
Kid-Friendly Craft · Ages 2–10 · About 20–30 Minutes · Zero Mess Excuses Needed
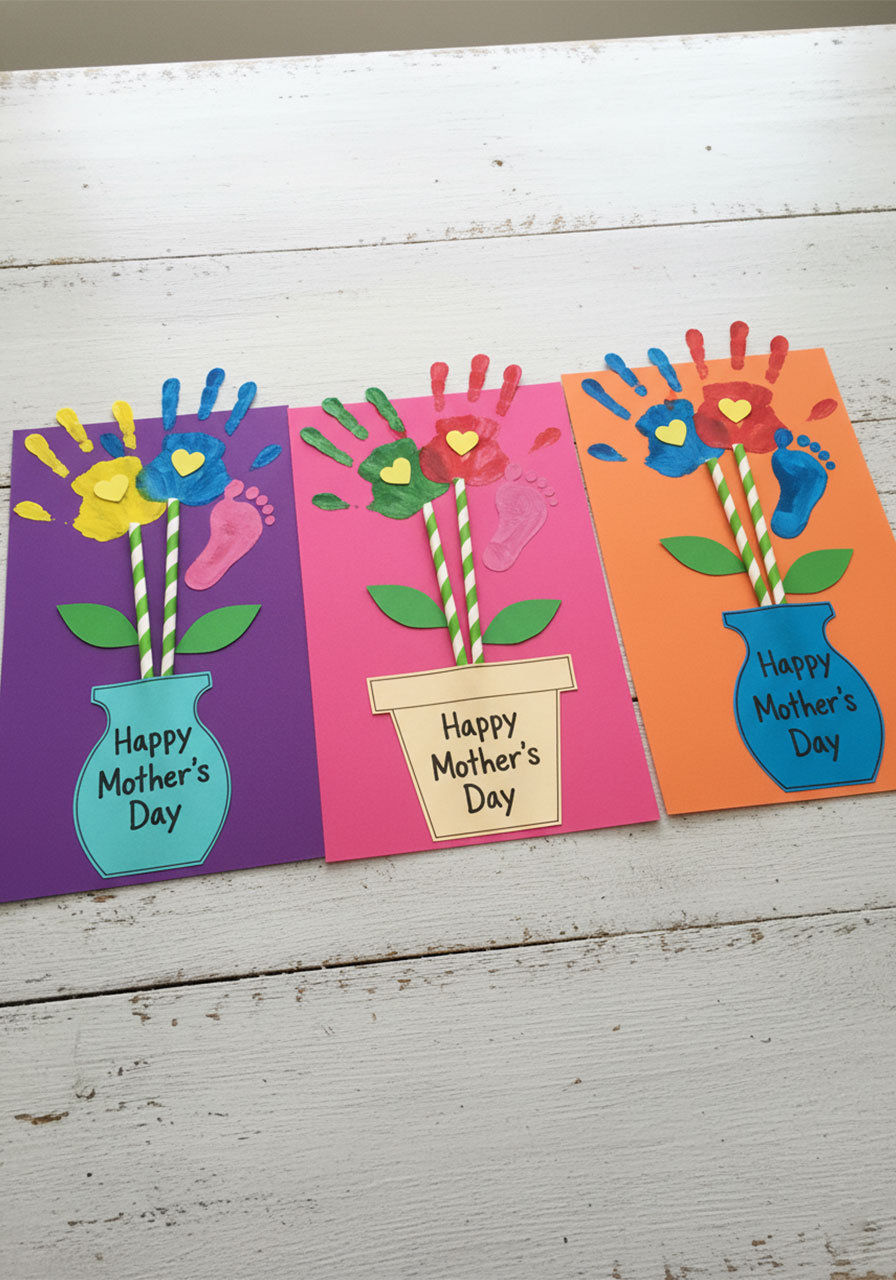
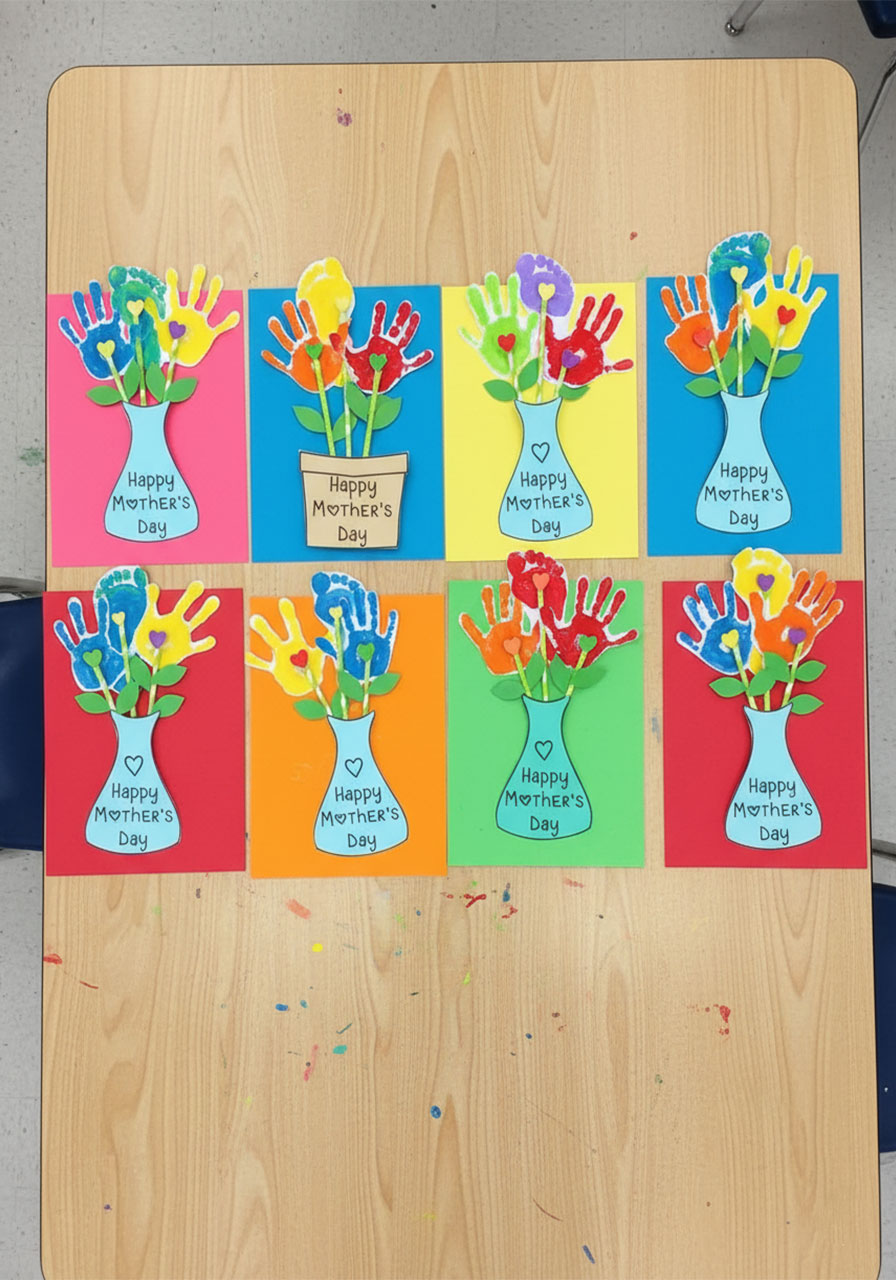
Fresh flowers are beautiful – but they wilt by Thursday. This handprint flower bouquet? Mom will keep it forever. It’s one of those crafts that gets tucked into a memory box, pulled out every few years, and cherished long after little hands aren’t so little anymore.
And here’s the best part: it’s genuinely easy. We’re talking paint, paper, a few straws, and one very excited kid. Whether you’re a parent squeezing this in on a Sunday morning or a teacher running it as a classroom activity, you’ve got this – and it’s going to turn out adorably.
⭐ Why This Craft Works So Well: It combines a keepsake handprint (always a winner) with a cheerful bouquet that actually looks impressive. The free-form colors mean every single one comes out unique – and somehow perfect.
What You’ll Need
Supplies List:
White cardstock or thick craft paper (for the handprints – regular printer paper gets soggy with paint)
Green craft paper (for leaves)
Yellow craft paper or foam stickers (for flower centers)
A sheet of colored background paper (one per bouquet – think pink, orange, purple)
3 paper straws per bouquet (green and white striped ones look especially cute)
Acrylic or washable craft paint in bright colors
A pencil
Scissors
Glue stick or craft glue
Tape (clear tape works great)
A paint brush or sponge for applying paint to hands/feet
🖌️ Teacher Tip: Running this with a full classroom? Set up a “paint station” with a few colors per table and have kids rotate. Lay out drying mats (just sheets of newspaper) so wet prints don’t smear. Baby wipes nearby = your best friend.

How to Make the Handprint Flower Bouquet
You’ll be making 3 flowers per bouquet – two handprint flowers and one footprint flower (the footprint makes a sweet, rounder bloom in the middle). Here’s how to put it all together, step by step.
Step 1: Make the Handprints and Footprint
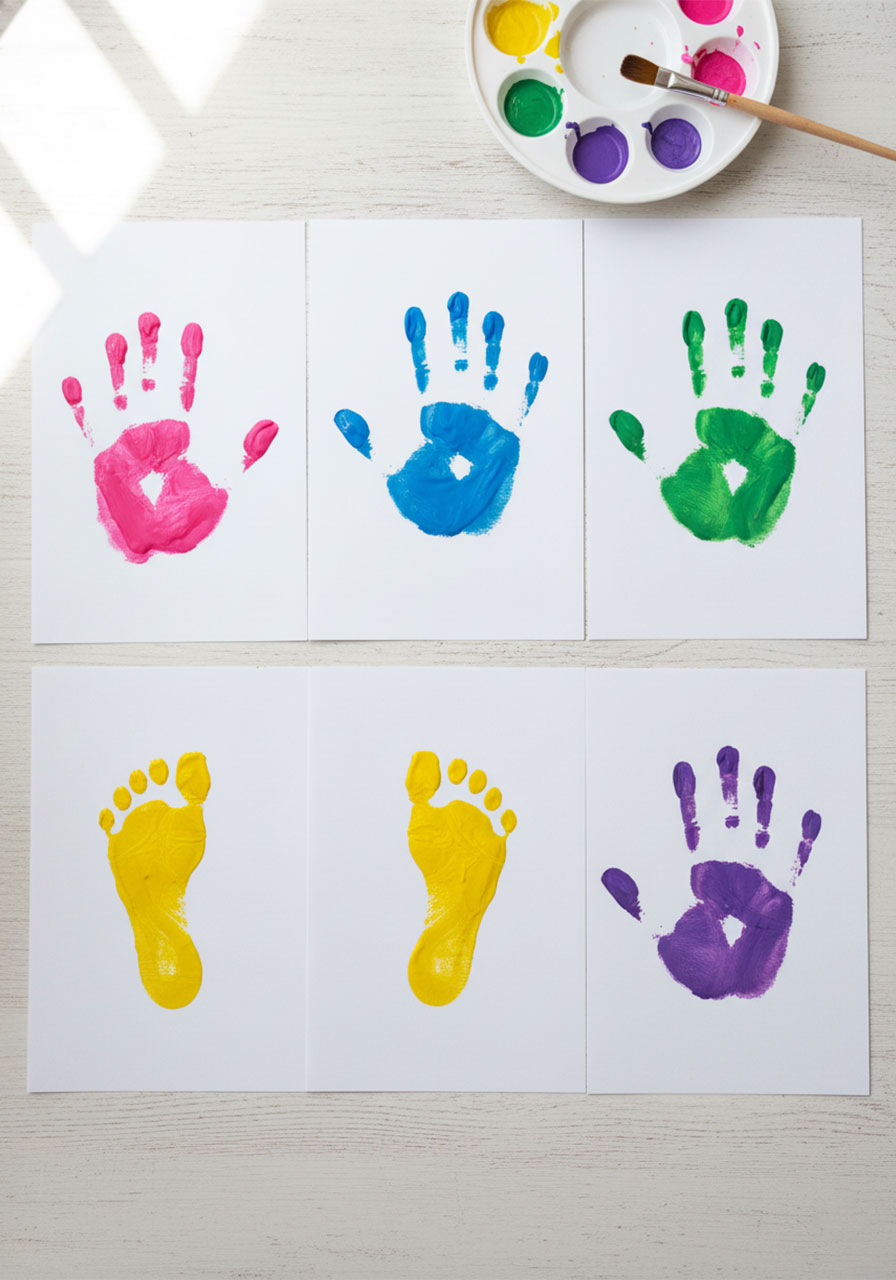
1. Brush a generous, even coat of acrylic paint onto your child’s hand. Choose any bright color – pink, blue, yellow, green, orange. Go wild.
2. Press their hand firmly onto the white cardstock, fingers spread. Hold your hand gently on top of theirs for 3–5 seconds to stop the wiggling and get a clean print.
3. Lift straight up – don’t drag.
4. Repeat to make a second handprint in a different color.
5. Now do one footprint: paint the bottom of their foot and press onto paper the same way. (Yes, this part gets giggly. Embrace it.)
6. Set all three prints aside and let them dry completely before cutting – usually 15–20 minutes with acrylic paint.
✂️ Pro Tip: Want crisp edges? Use cardstock over regular paper – it holds the paint better and cuts cleanly. If the print smudged a little, don’t stress. Imperfect handprints are still adorable handprints.
Step 2: Cut Out Your Flowers
1. Once the paint is fully dry, carefully cut around each handprint and footprint, leaving a small white border if you like – it helps them pop.
2. These are your three flowers. Set them aside.

Step 3: Make the Leaves
1. On green craft paper, draw 6 simple leaf shapes – imagine a small oval that comes to a point at each end, about 1.5–2 inches long.
2. Cut them out. You’ll use 2 leaves per flower stem.

Step 4: Cut Out the Flower Centers
1. Cut out 3 small hearts from yellow craft paper – about the size of a quarter. If you have a heart hole punch, now is its moment to shine.
2. These go in the center of each flower as a sweet little detail.
Step 5: Assemble Each Flower Stem
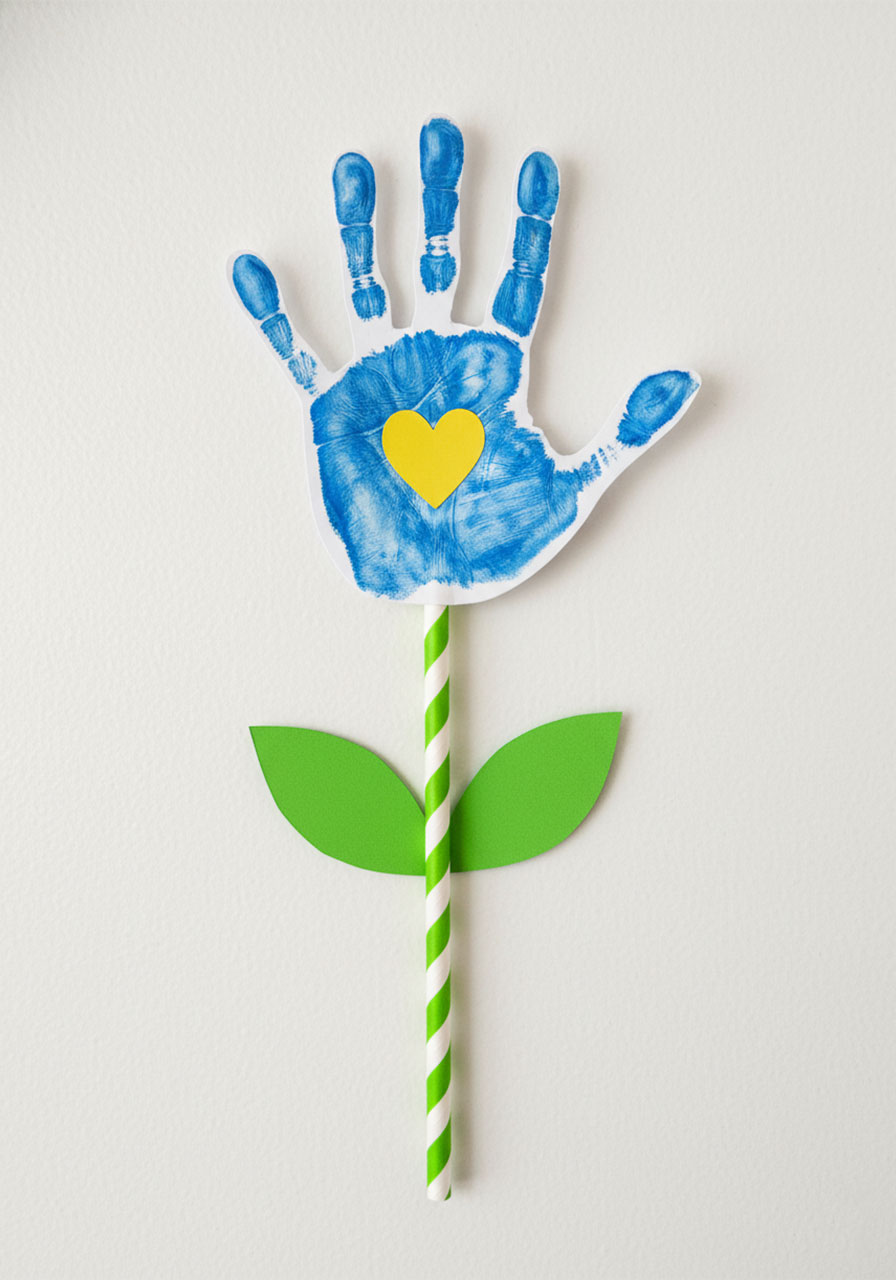
1. Take one paper straw and tape it to the back of a handprint or footprint near the base (the wrist or heel end). The straw is the stem.
2. Tape 2 green leaves onto the straw, one on each side, about halfway down.
3. Glue a small yellow heart in the center of the handprint/footprint on the front. This is the flower’s center – it pulls the whole look together.
4. Repeat for all three flowers.
💡 Heads up: Tape works better than glue for attaching the straws – glue tends to slide on the smooth straw surface. A small piece of clear tape wrapped around the back of the print and onto the straw holds it securely.
Step 6: Build the Bouquet
1. Gather your three flower stems together. Arrange them so the flowers fan out nicely at the top – the footprint in the middle looks especially cute as the center bloom.
2. Tape the bundle of straws together near the bottom to keep them in place.
3. Position the bouquet on your colored background paper. Hold it where you want it before taping.
4. Tape the stems securely to the background paper.
Step 7: Add the Vase or Flower Pot (Hand-Drawn Version)
Since we’re guiding you through this without a printed template, here’s how to make a simple hand-drawn vase or flower pot that looks totally charming:
For a flower vase:
1. On a separate piece of cardstock (blue or teal looks pretty), lightly draw a vase shape: a wide, gently curving bottom that narrows in the middle, then flares out again at the top – like a classic laboratory flask or a simple hourglass with a wider bottom.
2. Cut it out.
3. Write “Happy Mother’s Day” in the center – let your child write it if they can, or help younger kids trace your pencil letters in marker.
4. Glue or tape the vase onto the bottom of the background paper, overlapping the base of the straw stems so it looks like the flowers are sitting inside the vase.
For a flower pot:
1. Draw a simple trapezoid (wider at the top, narrower at the base) on brown or tan cardstock to look like a classic clay pot.
2. Add a small rectangular rim along the top edge.
3. Write “Happy Mother’s Day” inside and cut it out.
4. Attach it the same way – glue over the base of the stems.
🎨 Fun Variation: Let kids decorate the vase with their own drawings, stickers, or even tiny fingerprint dots before gluing it on. It makes the whole bouquet feel even more personal – and mom will notice every detail.

Tips to Make This Craft Go Smoothly
Dry time is not optional. Cutting into a wet handprint smears everything. Set a timer, walk away, come back.
For toddlers: Focus on just one handprint flower. One is plenty precious. Two or three can feel overwhelming for tiny ones (and their helpers).
For older kids (ages 6+): Let them draw their own leaves and cut them out. It gives them ownership and sharpens those fine motor skills.
For a classroom of 20+: Have parent volunteers help with the painting step. Everything else kids can do independently or in pairs.
Choosing background paper colors: Go bright – hot pink, orange, or purple backgrounds make the handprint flowers pop beautifully. White or light backgrounds tend to look washed out.
Why This Craft Is Worth Every Bit of the Mess
Here’s the thing about Mother’s Day gifts from kids: the store-bought stuff is fine, but it’s the handmade ones that actually get kept. This bouquet checks every box – it’s personal, it’s colorful, it captures exactly how small those hands and feet are right now, and it takes less than 30 minutes to make.
I’ve seen kids giggle uncontrollably the moment the paint touches their feet. I’ve seen moms tear up the moment they open it. That combination? That’s an unforgettable Mother’s Day moment – and you made it happen.
So gather the kids, cover the table (or don’t – paint washes off), and get ready for some serious fun. Mom is going to love every handprint of it.
🌸 Make It Even More Special: Have your child dictate (or write) a short message on the back – “I made this for you because you’re my favorite mom” – and date it. Future-you will be so glad you did.
More Mother’s Day Ideas to Keep the Fun Rolling:
30+ Mother’s Day Crafts for Kids of All Ages
How to Make an Adorable Mother’s Day Heart Card (That Folds Into a Surprise!)
The Sweetest Mother’s Day Card Idea: Baby Handprint with a Heart
100 DIY Mother’s Day Gift Ideas Mom Will Love (Handmade From the Heart)
Handprint Paper Lilies: The Sweetest Homemade Mother’s Day Gift Kids Can Actually Make
How to Make a Beautiful 3D Paper Tulip Mother’s Day Card (Step-by-Step)
DIY Pressed Flower Lanterns: The Sweetest Handmade Mother’s Day Gift (Takes Less Than an Hour!)
15 Easy Mother’s Day Brunch Ideas That Will Make Mom Feel Like a Queen
23 Easy DIY Mother’s Day Gift Ideas She’ll Actually Love (No Craft Skills Required!)
