Ten years. A whole decade of bedtime stories, scraped knees, belly laughs, and first-everything moments. If that doesn’t deserve the most epic party setup you’ve ever put together, I don’t know what does.
The good news? You don’t need to hire a professional event planner or max out your credit card to pull off something truly stunning. These 22 decoration ideas are packed with creative, budget-friendly ways to turn your living room, backyard, or party hall into a celebration that looks like it jumped straight off Pinterest.
Whether your kiddo is obsessed with rainbows, sparkles, or all things pink and gold, there’s something here that’ll make them feel like the absolute star of the show. Let’s get this party started!

1. Giant Gold Number Balloon Display With Streamer Backdrop
This is the decoration that makes every guest stop and say “Wow” the second they walk in. Giant gold foil “10” balloons are bold, bright, and impossible to miss – and when you hang them in front of a colorful streamer wall studded with fairy lights, the whole setup practically glows.
The best part? This doubles as both a decoration AND your dessert table backdrop. Two birds, one sparkly stone.
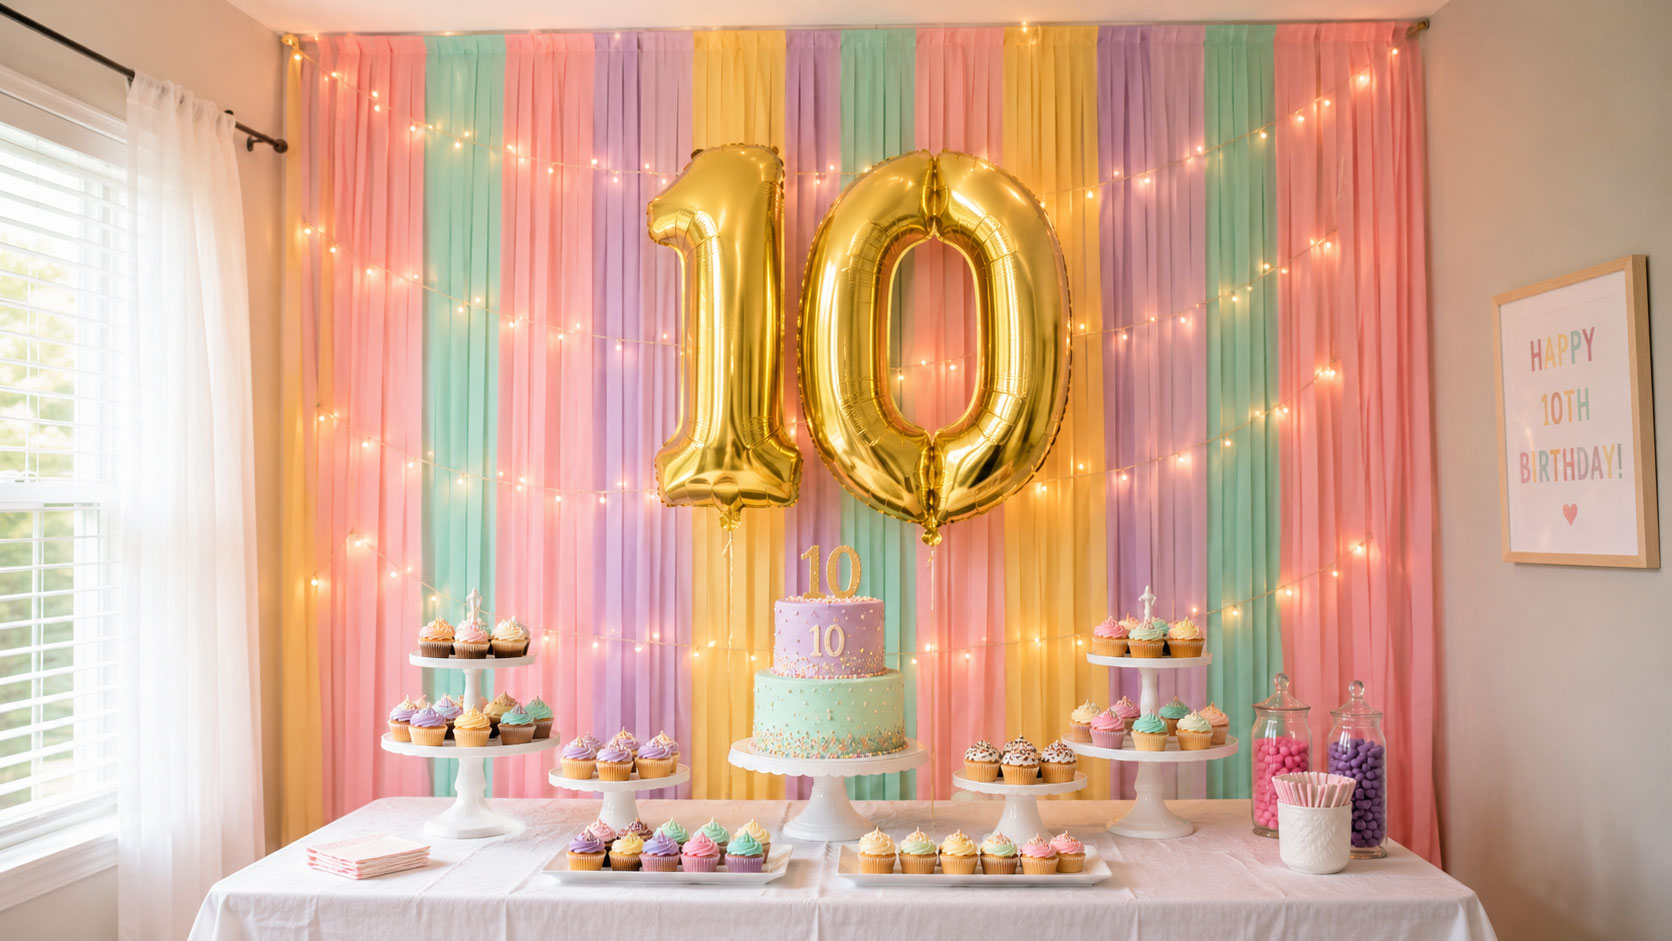
What You’ll Need:
- Giant gold foil number balloons (“1” and “0”)
- Rolls of pastel streamers in 3–4 colors (pink, mint, lavender, yellow work beautifully)
- Battery-operated string lights
- Command hooks or tape strips
- A white tablecloth for your dessert spread below
How to Set It Up:
1. Hang vertical streamer strips from the top of your wall down to the floor, alternating colors side by side.
2. Weave string lights through the streamers as you go.
3. Inflate your gold number balloons and anchor them slightly in front of the streamer wall at eye-catching height.
4. Set your dessert table right in front for the ultimate photo-worthy setup.
Pro Tip: Curl the ends of the streamers with scissors for a more polished, finished look. It takes 5 minutes and makes a huge difference!


2. Pink and Gold Balloon Arch Entrance
Want your guests to feel like they’re stepping into something magical the moment they arrive? A balloon arch entrance does exactly that. It frames the doorway or party entrance in a way that signals: this is a real celebration.
The pink, white, and chrome gold combo is a total crowd-pleaser – it’s glamorous without being over the top, and it photographs beautifully.
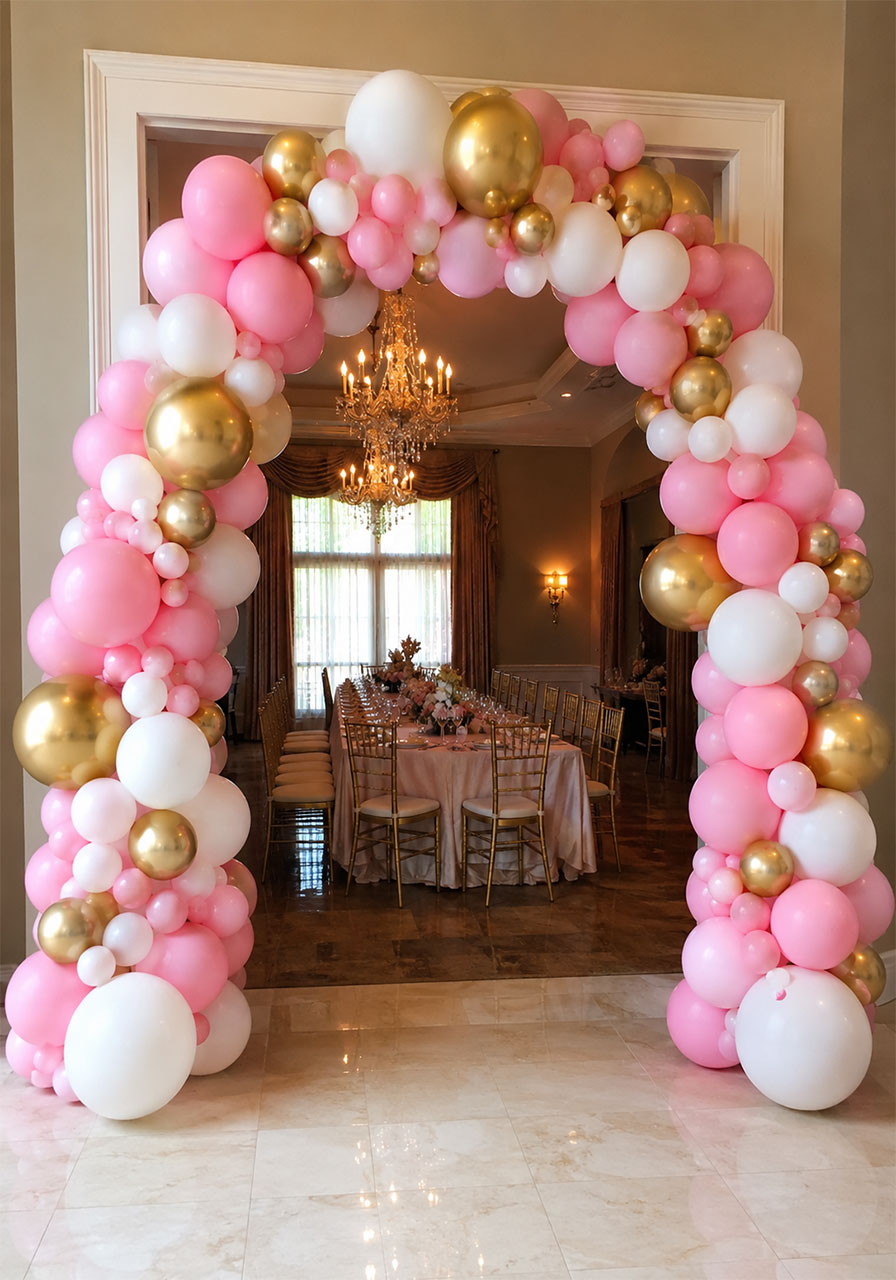
What You’ll Need:
- Pink latex balloons (various sizes: 5″, 11″, and 16″)
- White latex balloons
- Chrome gold latex balloons
- Balloon decorating strip or balloon tape
- Command hooks or a freestanding balloon arch stand
- Fishing line for securing
How to Set It Up:
1. Thread balloons of alternating colors and sizes onto your balloon decorating strip, packing them tightly together.
2. Shape the strip into an arch over your doorway or entrance area.
3. Secure both ends to the floor with weights or command hooks on the wall.
4. Fill in any gaps with extra small balloons for a lush, full look.
Pro Tip: Mix matte and chrome balloons together – the contrast in textures adds so much visual depth and makes the arch look professionally done.
3. Pink Balloon Arch With Fairy Light Curtain and “10” Balloons
This setup is pure dreamy magic. A soft pink balloon arch frames a sheer fabric curtain lit up from behind with warm fairy lights, with silver “10” number balloons floating right in the center. It’s simple, elegant, and looks incredible in photos.
This is especially perfect if you’re going for a soft, girly, or romantic birthday vibe. It also works as a beautiful photo booth backdrop.
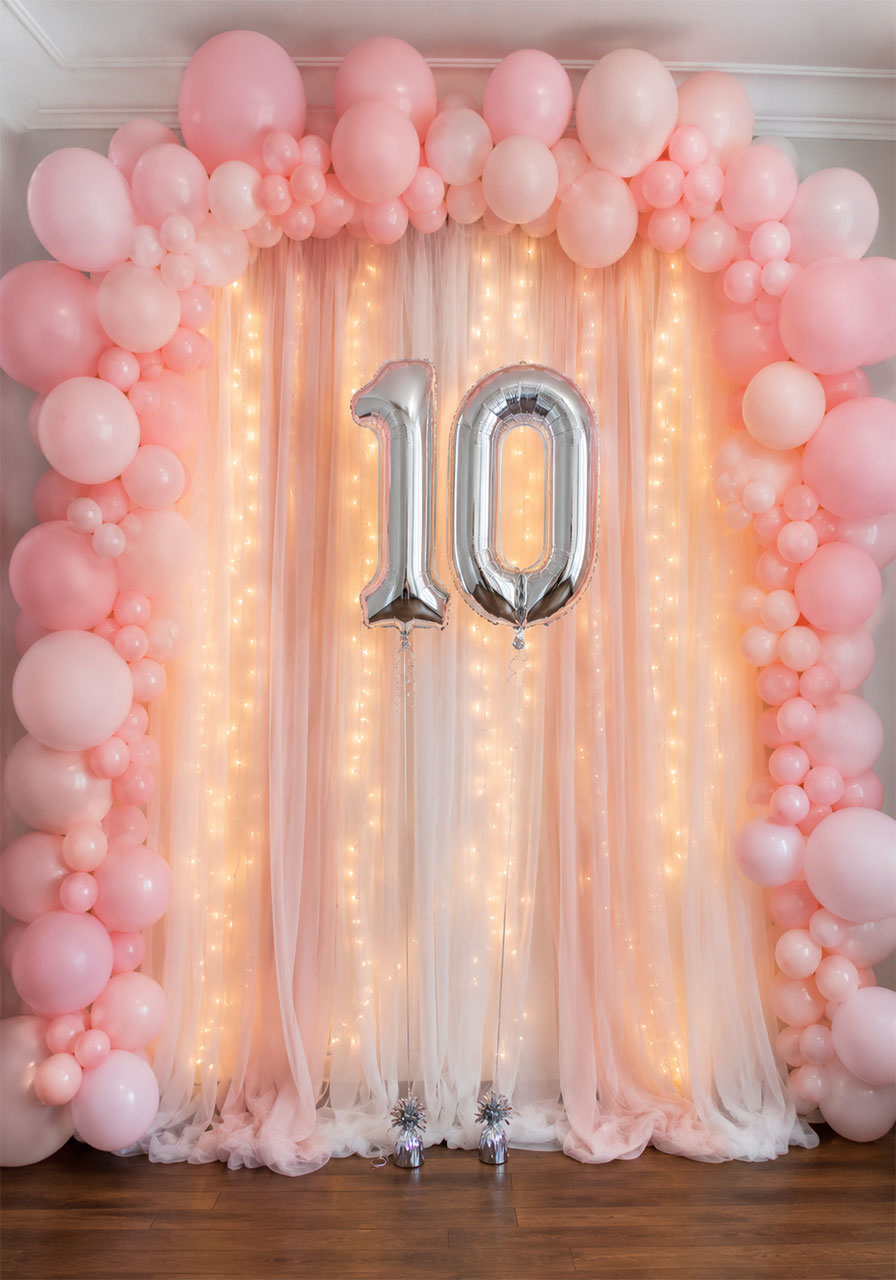
What You’ll Need:
- Pink and blush latex balloons (mixed sizes)
- Sheer white or blush fabric/curtain panels
- Silver foil “1” and “0” balloons
- Warm white fairy lights (plug-in or battery-operated)
- Balloon decorating strip
- Tension rod or curtain rod to hang fabric
How to Set It Up:
1. Hang your sheer fabric panels on a rod or tape them to the wall to create a soft curtain backdrop.
2. Weave or tape string lights along the back side of the fabric so the light glows through.
3. Build your balloon arch around the outside edge of the curtain using your decorating strip.
4. Float or anchor the silver “10” balloons in the center of the curtain.
Pro Tip: Warm white lights create a cozier, more flattering glow than cool white. Your photos will thank you!
4. Sequin Backdrop With Pink & Gold Balloon Garland and Dessert Table
If your birthday girl loves all things glamorous, this is THE setup. A rose gold or champagne sequin curtain backdrop catches every bit of light in the room and creates a stunning shimmer effect behind a dessert table. Pair it with a pink and gold organic balloon garland arching overhead, and you’ve got a scene that looks like it cost a fortune – but didn’t.
What You’ll Need:
- Rose gold or champagne sequin curtain panel(s)
- Pink, peach, and gold chrome latex balloons
- Balloon decorating strip
- Gold star foil balloons (accent pieces)
- Sequin or glittery tablecloth
- Gold “10” foil balloons for the centerpiece
How to Set It Up:
1. Hang your sequin curtain on the wall using command hooks. Make sure it’s smooth and wrinkle-free.
2. Build an organic balloon garland (clustering balloons in uneven groups for that lush, airy look) and attach it above the backdrop, draping down the sides.
3. Set up your dessert table directly in front with the sequin tablecloth.
4. Place the gold “10” balloons front and center on or above the table.
Pro Tip: For an organic garland look, vary your balloon sizes dramatically – use 5″, 11″, and 16″ balloons. The mix of sizes is what makes it look so professional and full.
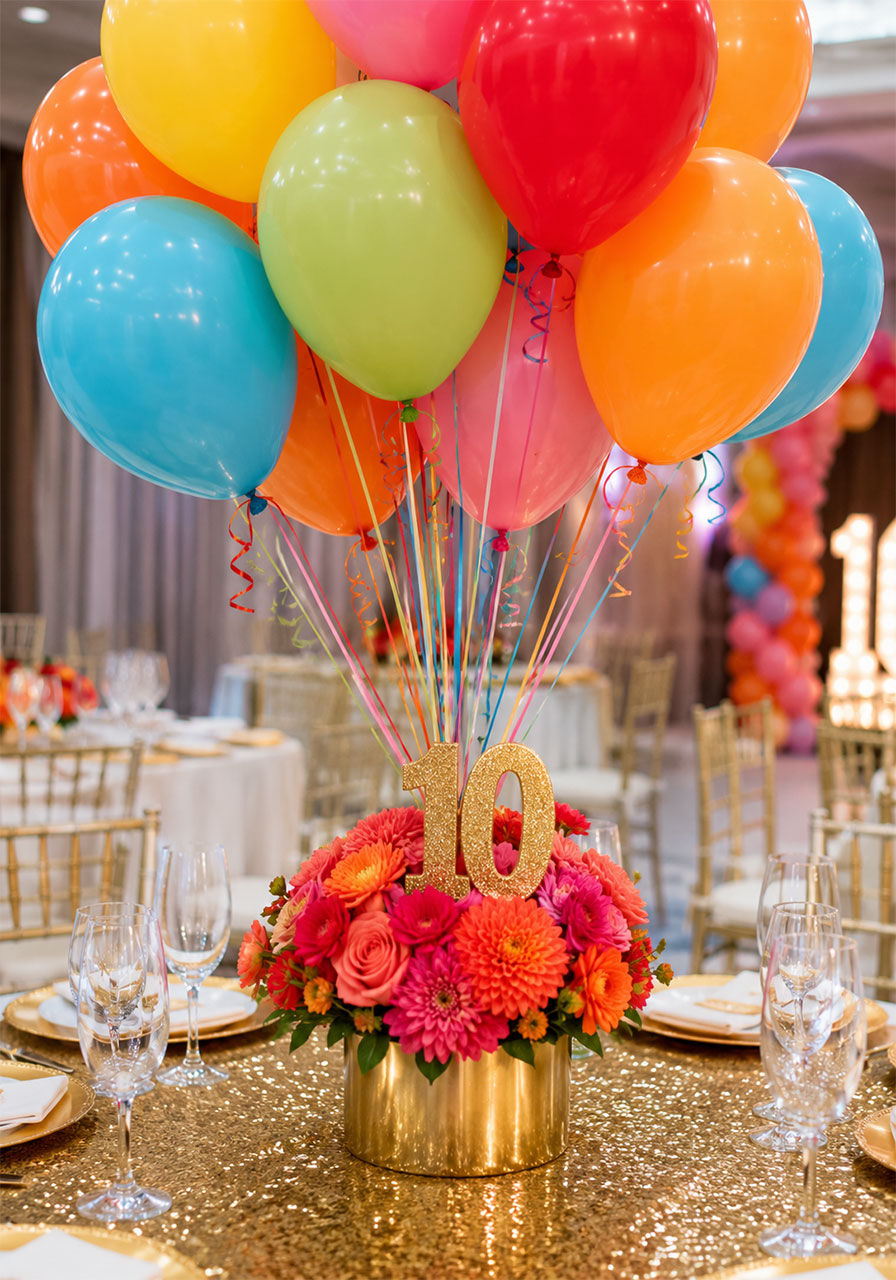
5. Colorful Balloon Centerpiece With Gold Glitter “10” and Flowers
For tables that need to make a statement, this centerpiece is an absolute showstopper. A bouquet of rainbow-colored helium balloons floats above a glittery gold “10” sign nestled in a cluster of fresh flowers – vibrant, festive, and totally Instagram-worthy.

What You’ll Need:
- Helium-filled latex balloons in red, orange, yellow, green, pink, and blue
- Curling ribbon to tie balloons
- Gold glitter number “10” (foam board or cardstock, available at craft stores)
- Fresh or faux flowers (roses, dahlias, or mums in bright colors)
- Small floral foam block or vase as a base
- Sequin tablecloth underneath
How to Set It Up:
1. Arrange your flowers in the foam block or vase to create a low, lush floral base.
2. Tuck the gold “10” sign into the floral arrangement at an angle so it’s clearly visible.
3. Tie all balloon ribbons together and anchor them into the floral foam so they float upward from the center of the flowers.
4. Curl ribbon ends for extra flair.
Pro Tip: Use a small decorative weight or even a rock wrapped in fabric hidden in the floral foam as your anchor – keeps everything stable even with a crowd bumping the tables.
6. Fairy Light Curtain Backdrop With Gold and White Balloon Ceiling Cluster
This one is pure sophistication. A floor-to-ceiling white sheer curtain covered in twinkling fairy lights creates an absolutely breathtaking backdrop, while gold and white balloon clusters float just above for that dramatic overhead effect. The warm glow makes the whole space feel cozy, magical, and special.
It works equally well for daytime or evening parties, and pairs beautifully with a simple table setting beneath it.
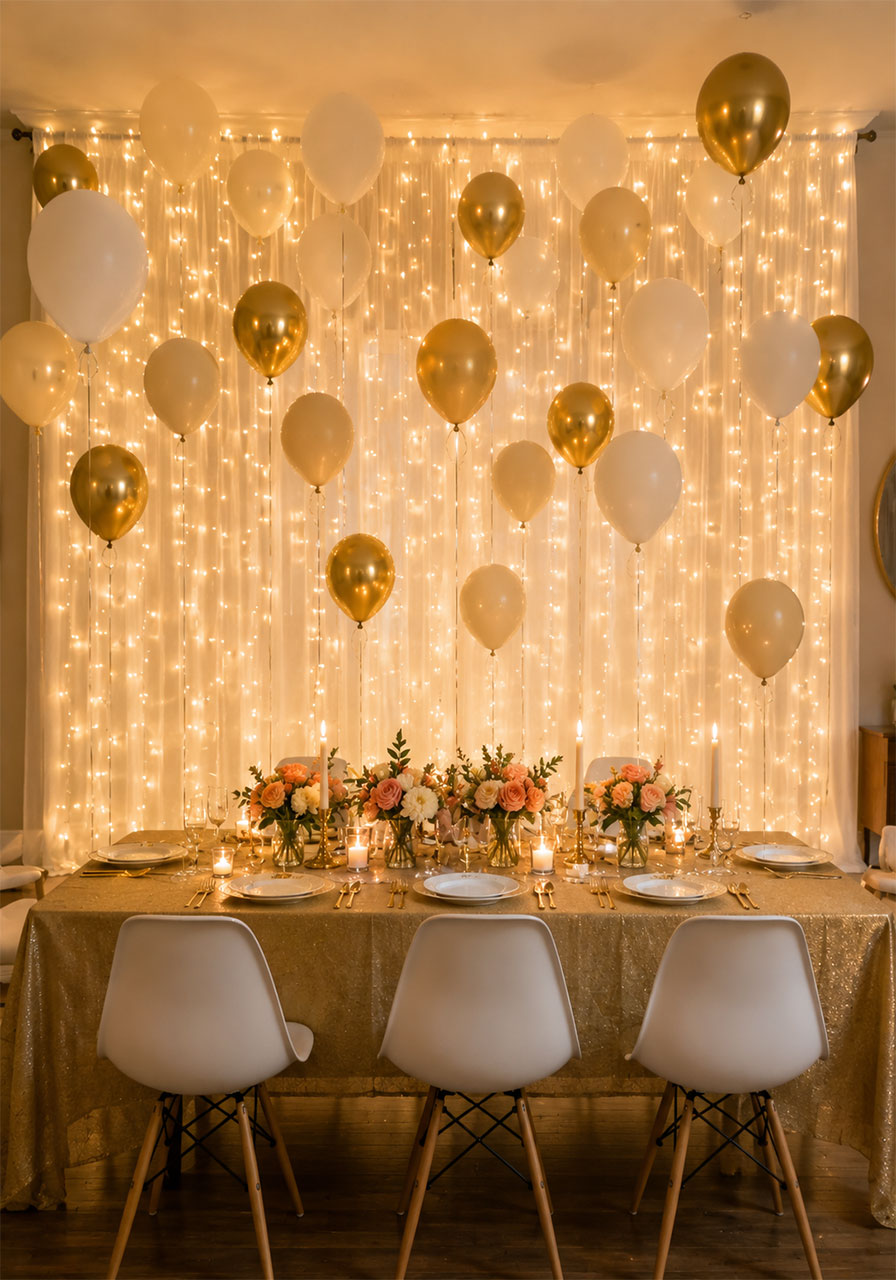
What You’ll Need:
- White sheer curtain panels (wide enough to fill your wall)
- Multiple strands of warm white fairy lights
- Gold, cream, and white latex balloons
- Chrome gold balloons for accent
- Ceiling hooks or balloon tape to secure overhead balloons
- Balloon glue dots
How to Set It Up:
1. Hang sheer curtain panels wall-to-wall using a curtain rod or command hooks.
2. Layer fairy light strands vertically along the curtain, fastening them with mini clips or tape so the lights are spread evenly.
3. Inflate your balloons in clusters of varying sizes and attach them to the ceiling just in front of the curtain using balloon tape.
4. Let a few balloons trail lower than others for a floating, cloud-like effect.
Pro Tip: Plug your fairy lights into a timer outlet – you can set them to turn on automatically as the party starts without having to fumble around behind furniture.
7. Dreamy Pastel Dessert Tower Display
Forget a plain ol’ birthday cake on a table. This dessert display is a work of art. Stacked macaron towers, cake pop pyramids, and tiered cupcake stands in the most gorgeous pastel shades create a dessert table that guests will be talking about long after the last bite.
The trick is variety in height – tall, medium, and short displays together create a visually stunning spread that looks like it belongs in a bakery window.
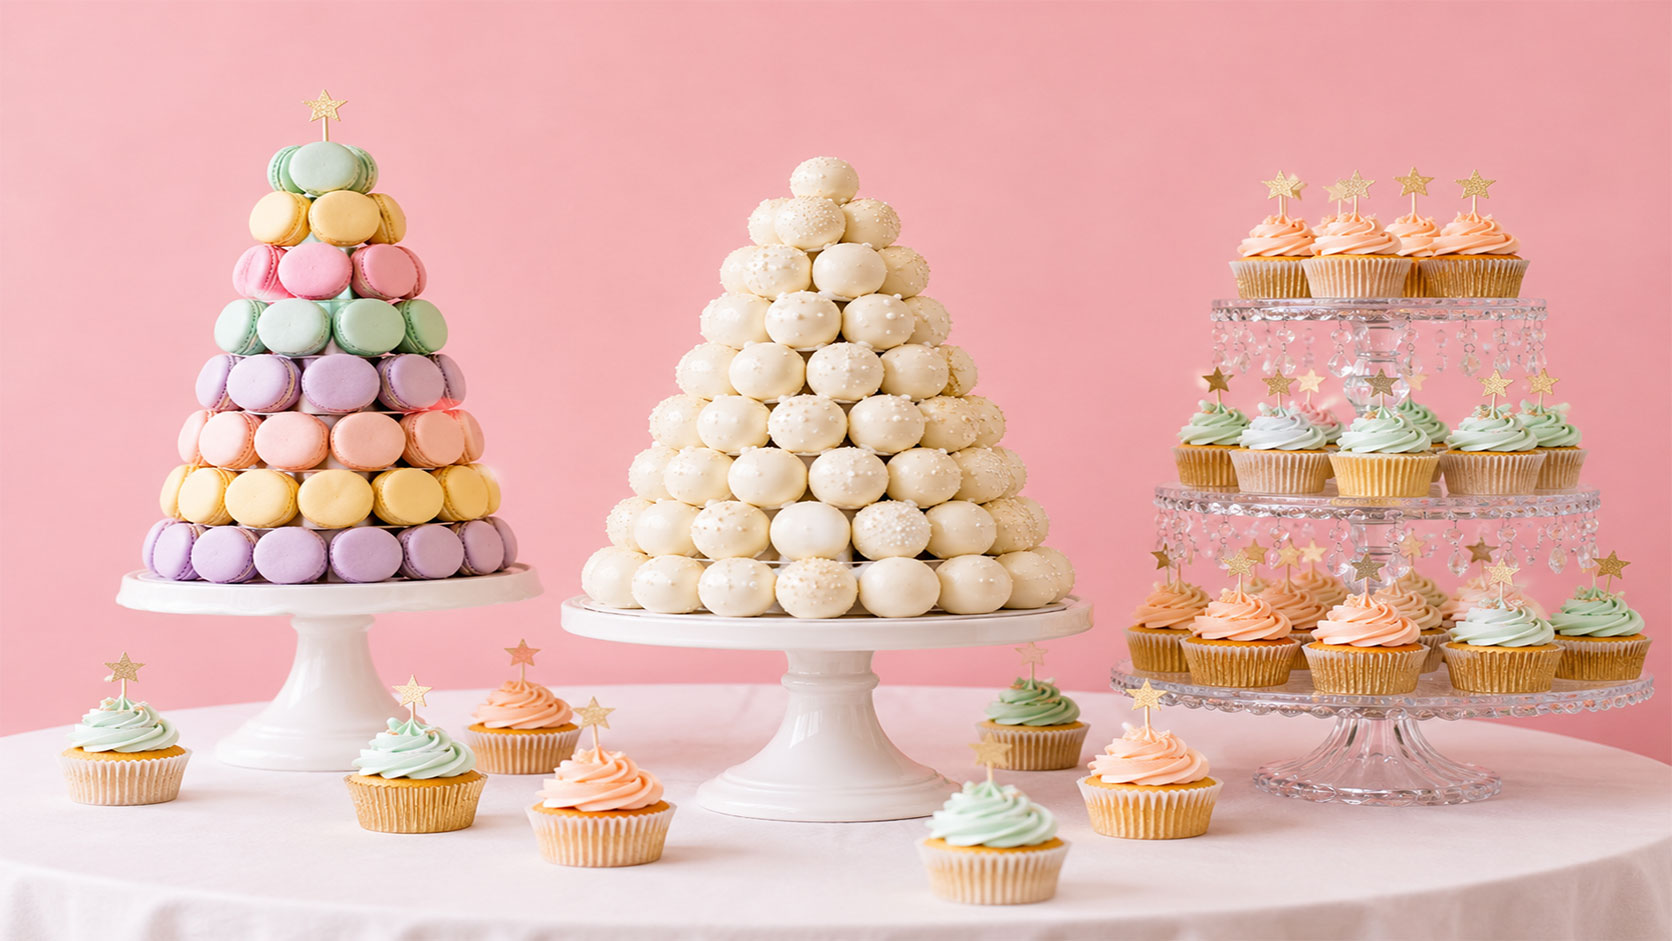
What You’ll Need:
- Tiered cupcake stand (crystal or acrylic looks gorgeous)
- Tall cake stand for macaron or cake pop tower
- Cupcakes with pastel frosting (mint, pink, peach, lavender)
- Macarons in mixed pastel colors
- Cake pops or round truffles for stacking
- White or pink tablecloth
- Small decorative toppers (stars, florals)
How to Set It Up:
1. Arrange your stands in a triangle formation – tallest in the back center, medium on the sides, short in front.
2. Fill the tallest stand with your macaron or cake pop tower (use a little royal icing to stack and secure them).
3. Load the tiered cupcake stand from bottom to top, alternating frosting colors.
4. Scatter a few loose cupcakes around the base of all the stands to fill gaps.
5. Add small decorative toppers to the tip of the macaron tower for a finishing touch.
Pro Tip: Order your treats in the same color palette as your party theme. When the desserts match the decorations, the whole party feels incredibly cohesive and intentional.
8. Pink, Silver, and Gold Glitter Balloon Arch With Tinsel Backdrop
Want maximum sparkle for minimum effort? This combo is it. Pink and silver metallic balloons frame a shimmery tinsel curtain backdrop, while a gold foil “10” balloon floats right in the center. Add some warm twinkle lights woven through it all, and the whole thing absolutely dazzles.
This is one of the easiest setups to DIY and it photographs like a dream – your birthday girl will want to stand in front of it for every single photo.
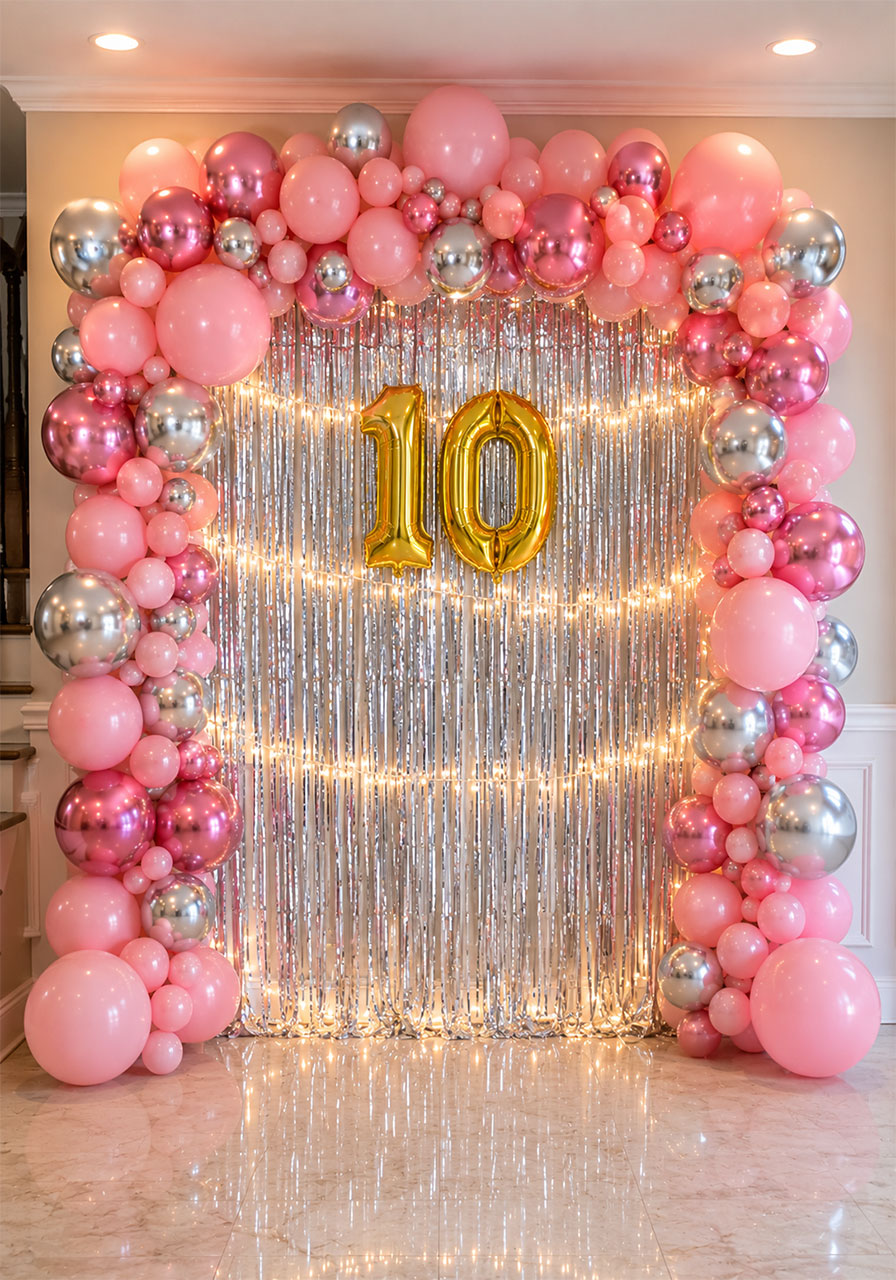
What You’ll Need:
- Pink latex balloons (matte and metallic mixed)
- Silver chrome latex balloons
- Silver tinsel fringe curtain panel(s)
- White sheer fabric panel (to layer behind tinsel)
- Gold foil “10” balloon
- Warm fairy lights
- Command hooks and balloon tape
How to Set It Up:
1. Layer your white sheer fabric first as a base backdrop, then hang the silver tinsel curtain over it.
2. Drape fairy lights over the tinsel, tucking them in so the lights peek through the metallic strands.
3. Build your balloon arch around the outer frame of the backdrop using balloon tape.
4. Anchor or float the gold “10” balloon in the center of the tinsel section.
Pro Tip: Slightly bunch the tinsel curtain rather than hanging it perfectly flat – the crinkled texture catches light even better and gives it a more luxurious, layered look.
9. Rainbow Paper Lantern Cluster Above the Dining Table
Paper lanterns are one of the most underrated party decorations out there. They’re affordable, easy to hang, and when you cluster a mix of bold colors together in different sizes, they create this stunning, festive overhead canopy that immediately transforms the vibe of any room.
They look especially magical above a dining or activity table where guests spend the most time.
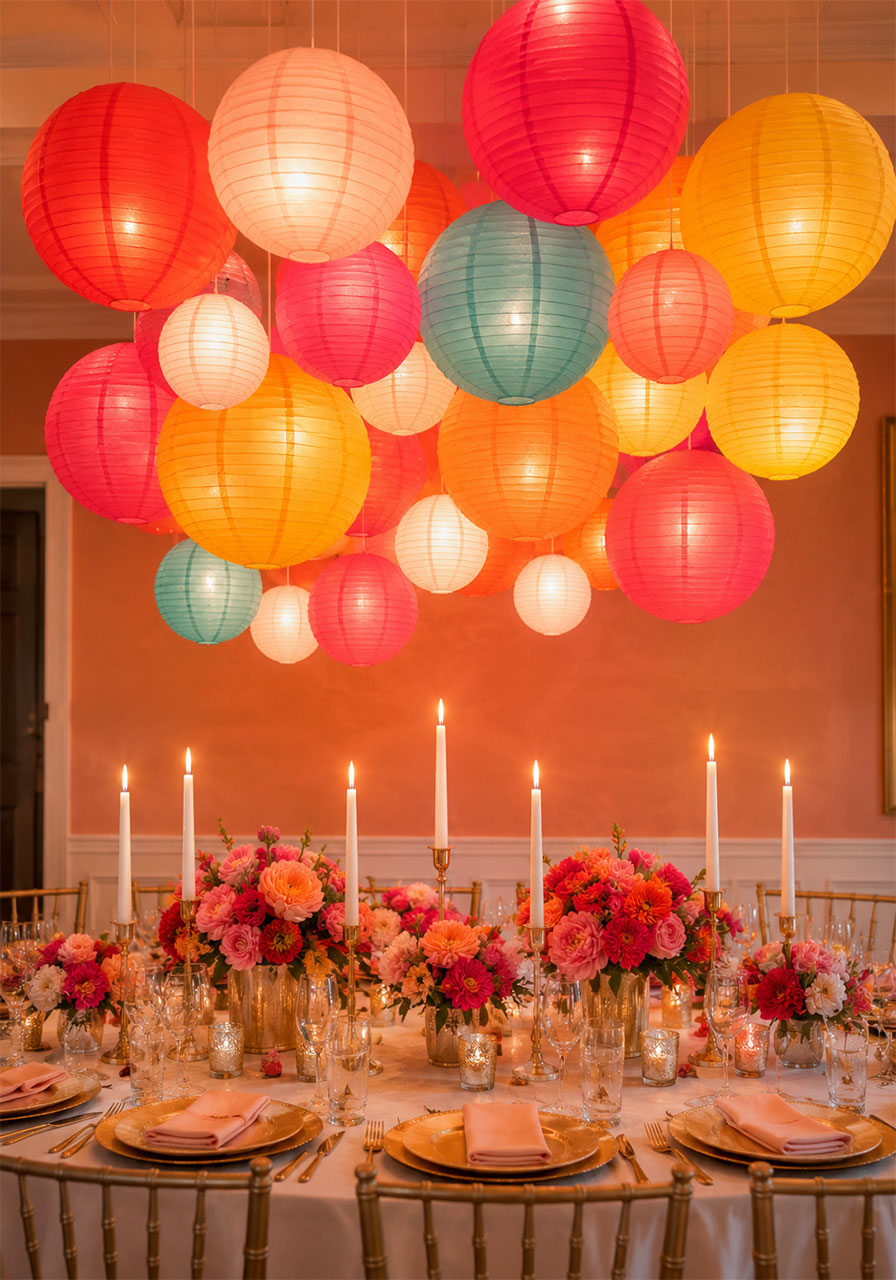
What You’ll Need:
- Paper lanterns in a rainbow of colors (red, orange, yellow, teal, pink, white) – mix sizes from 8″ to 16″
- Battery-operated LED lights (to tuck inside each lantern)
- Clear fishing line
- Ceiling hooks or removable adhesive strips
- Scissors
How to Set It Up:
1. Expand each lantern and tuck a small LED light inside before closing it up.
2. Tie clear fishing line to the top hook of each lantern at varying lengths (some short, some longer) to create depth.
3. Install ceiling hooks directly above your table, spacing them about 6–8 inches apart.
4. Hang lanterns in a staggered, clustered arrangement – big ones near the ceiling, smaller ones lower for layered effect.
Pro Tip: Use warm white LEDs for a cozier glow, or go with color-changing LEDs to make the lanterns shift and twinkle throughout the party. Kids absolutely love the color-changing option!
10. Ceiling Balloon and Ribbon Curtain Party Entrance
Turn your party entrance hallway or main room into something guests literally have to walk through. Ceiling-mounted balloons with long, flowing ribbon and tinsel streamers hanging down create a magical “curtain” effect that guests have to part as they enter – and everyone screams with delight when they do it.
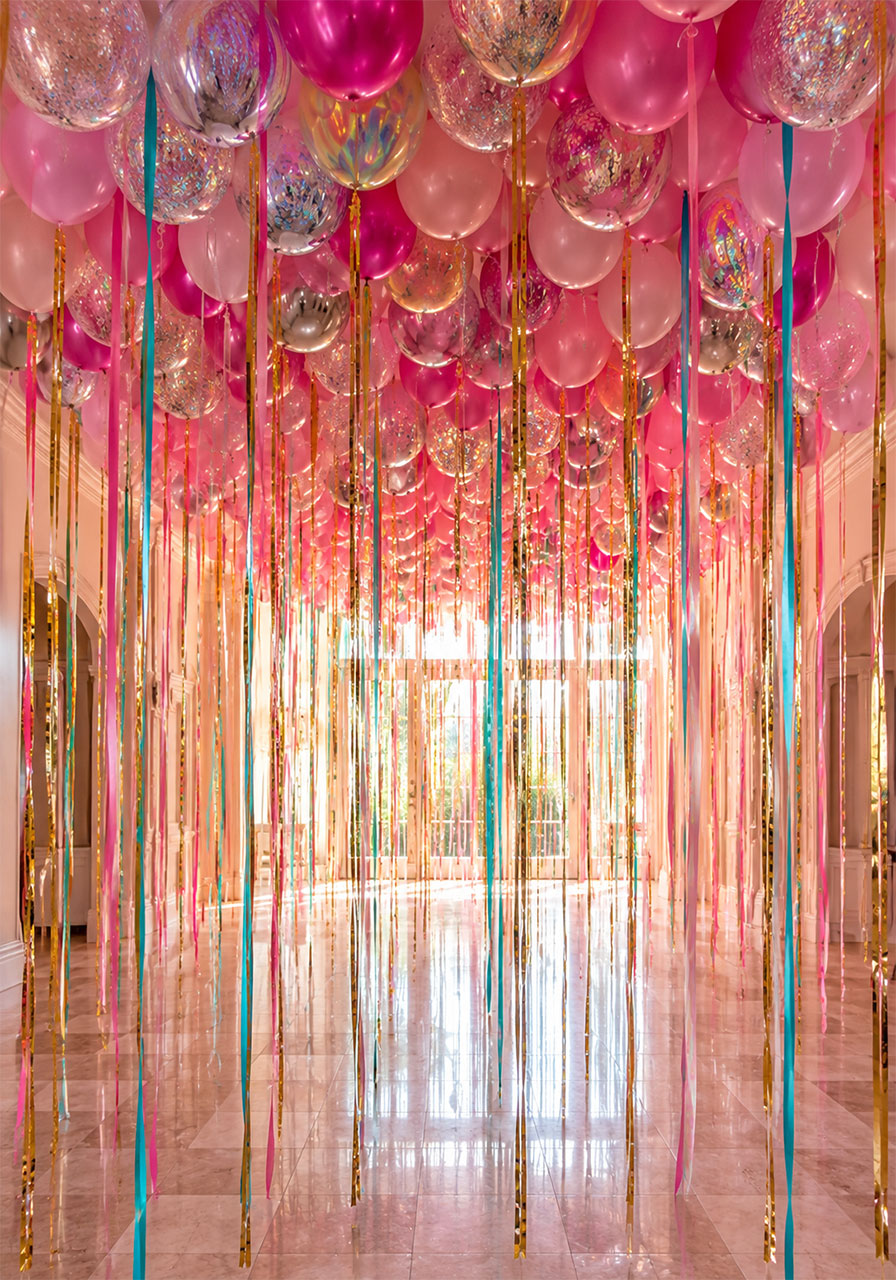
What You’ll Need:
- Pink, magenta, silver, and clear/confetti latex balloons (lots of them)
- Chrome and metallic balloons
- Pink and teal ribbon (cut into long strips, 4–5 feet)
- Gold tinsel fringe garland strips
- Removable ceiling hooks
- Balloon glue dots and fishing line
How to Set It Up:
1. Inflate all your balloons and glue-dot them directly to the ceiling in a dense cluster, covering as much ceiling space as you want the effect to span.
2. Tie long ribbon strips and tinsel pieces directly to balloon knots so they hang down to near-floor level.
3. Vary ribbon lengths so some hang at waist height and others nearly touch the floor, creating a full, flowing curtain.
4. Stand back, look at it from the entrance, and fill any gaps with extra balloons or ribbon.
Pro Tip: Use a mix of matte, metallic, and confetti balloons for incredible visual texture on the ceiling. When sunlight hits confetti balloons, the whole space sparkles.
11. Glow-in-the-Dark Neon Party Zone
Want to absolutely blow the 10-year-old crowd’s minds? Dim the lights, hit the blacklight, and watch their faces light up. A neon and glow-in-the-dark setup is hands-down the most EPIC thing you can do for a 10th birthday party – and kids will be talking about it for years.
This works especially well for an evening party or if you have a basement or room you can darken.

What You’ll Need:
- UV/blacklight LED strip lights or blacklight bulbs
- Neon balloons (white balloons glow brilliantly under blacklight)
- Neon streamers and tablecloths
- Neon face paint or finger paint for a “paint party” element
- Glow sticks and glow bracelets (one set per guest)
- White clothing suggestion to guests (it’ll glow!)
How to Set It Up:
1. Install your UV/blacklight strip lights around the perimeter of the ceiling, pointing downward.
2. Decorate with neon balloons, streamers, and tablecloths – the more white and neon the better.
3. Set up a neon paint station where kids can paint each other’s hands or draw on white paper that glows.
4. Hand each guest glow bracelets and sticks as they arrive. Let them go wild.
Pro Tip: White and neon yellow glow the brightest under blacklight. Stock up on those colors specifically for maximum wow factor.
12. DIY Glitter Party Hat Making Station
Here’s a decoration idea that doubles as an activity – and trust me, kids LOVE it. Set up a party hat craft station where guests make and customize their own glittery party hats. The finished hats become instant decorations AND a take-home keepsake all in one.
It’s perfect for filling that awkward early-arrival window when not all guests have shown up yet.

What You’ll Need:
- Pre-cut party hat cones (cardstock in pink, gold, and teal)
- Glitter in multiple colors
- Glue sticks and craft glue
- Pom-poms, sequins, and stickers
- Elastic string for chin straps
- Hole punch
- A few finished example hats for inspiration
How to Set It Up:
1. Pre-cut your hat cones and punch two small holes on opposite sides near the base for the elastic.
2. Lay out all craft supplies in small bowls or trays so everything is accessible and organized.
3. Display 2–3 finished example hats prominently so kids know what they’re creating.
4. Set out a designated drying area where completed hats can sit while guests enjoy other activities.
5. Once dry, kids put them on and join the party – instant parade of adorable walking decorations!
Pro Tip: Pre-apply a light layer of glue on each hat cone before guests arrive so they can immediately start adding glitter without waiting for glue to spread. Speeds things up and keeps the mess more contained!
13. Giant Light-Up “10” With Rainbow Balloon Arch
This is the ultimate statement piece. Giant marquee-style light-up “10” numbers standing about 4 feet tall, framed by a full rainbow balloon arch overhead – it stops everyone in their tracks. This is the decoration that becomes THE photo of the party.
Renting marquee numbers is surprisingly affordable (typically $50–$100), and the payoff in photos and excitement is absolutely worth it.
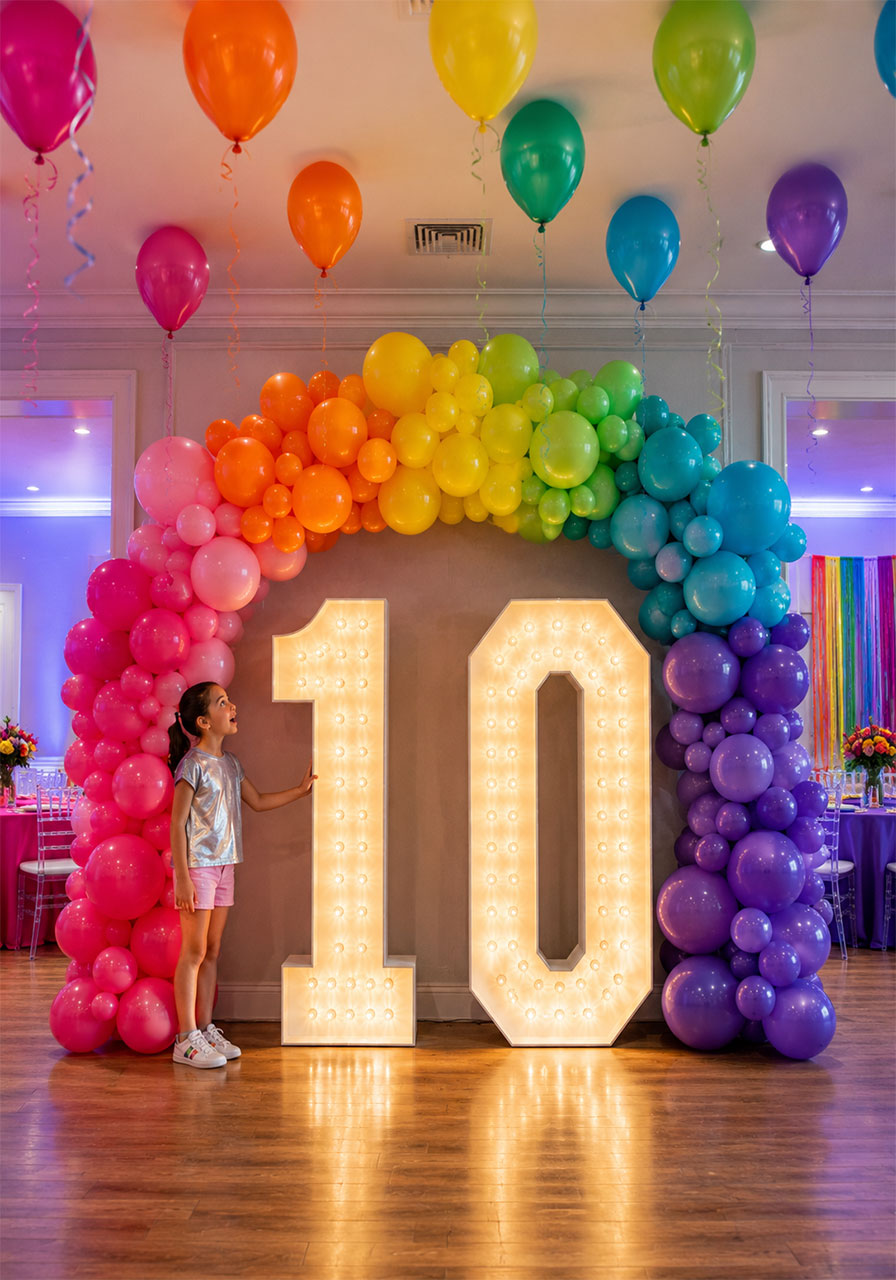
What You’ll Need:
- Marquee light-up number rentals or purchase (“1” and “0”) – check local party rental companies or Etsy
- Rainbow balloon garland kit (or individual balloons in red, orange, yellow, pink, purple, and teal)
- Balloon tape strip
- Extension cord (if needed for marquee numbers)
How to Set It Up:
1. Position your marquee numbers first – place them on the floor against a wall with an outlet nearby.
2. Build your rainbow balloon garland using the balloon tape, starting from one side and working across the top in a full arch shape.
3. Secure the ends of the arch to the wall or floor on either side of the numbers.
4. Fluff and adjust balloons until the arch looks full and even, plugging any gaps with extra balloons.
5. Plug in your marquee numbers and step back to admire.
Pro Tip: Place the light-up numbers where there’s a little distance between them and the nearest window. Natural light washes out the glow effect – positioning them toward an interior wall keeps that gorgeous sparkle visible all day long.
14. Rose Gold “10” Balloon Display With Mixed Balloon Backdrop
Rose gold is having a major moment, and for good reason – it’s warm, feminine, and absolutely stunning. Giant rose gold foil “10” balloons surrounded by a mix of blush, white, and rose gold latex balloons, set against a matching streamer or tinsel backdrop, create a cohesive and sophisticated look that feels very grown-up for a very special milestone birthday.
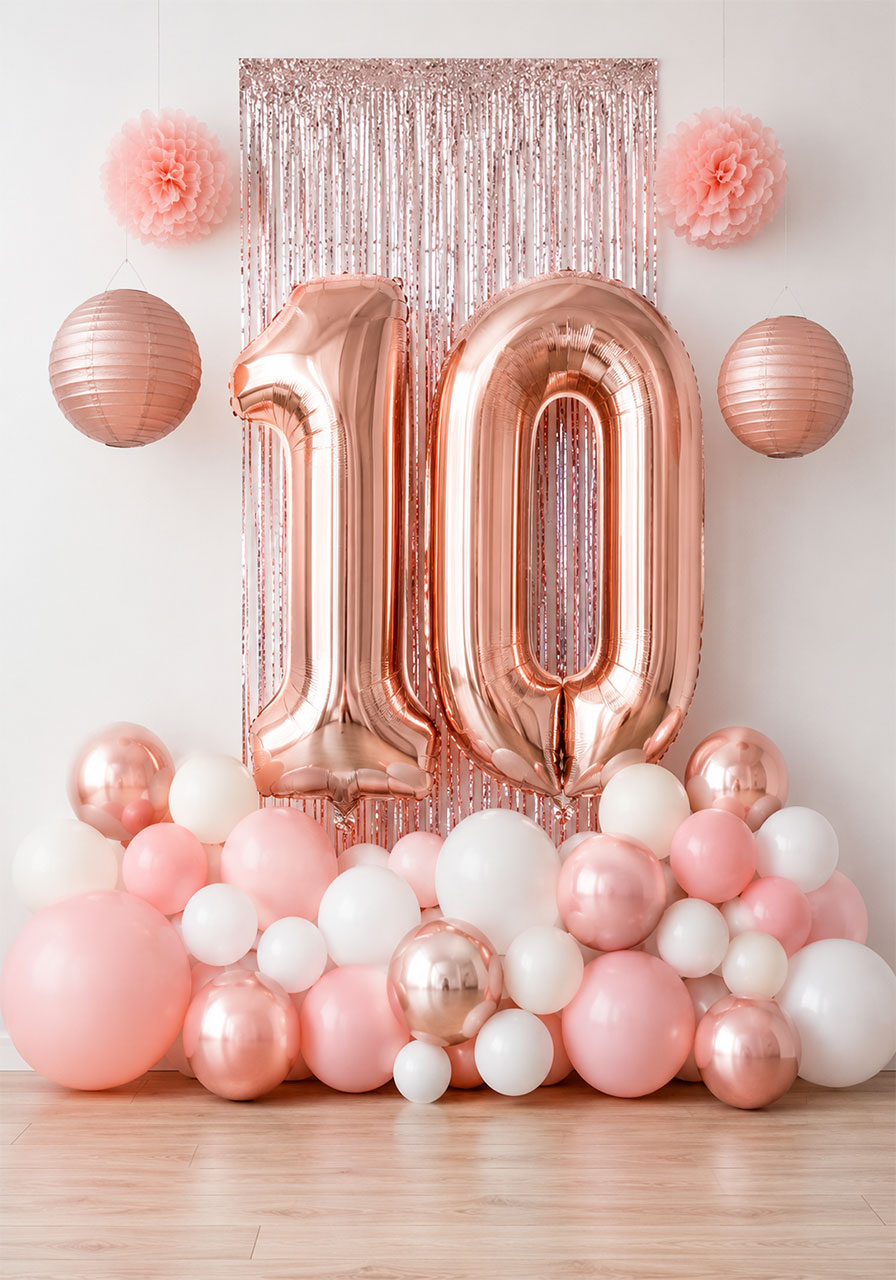
What You’ll Need:
- Giant rose gold foil “1” and “0” balloons
- Blush pink latex balloons (various sizes)
- White latex balloons
- Rose gold chrome balloons
- Rose gold paper lanterns (2–3 for accent)
- Rose gold or white tinsel fringe backdrop
- Tissue paper pom-poms in blush
How to Set It Up:
1. Hang your backdrop against the wall.
2. Arrange a loose balloon cluster on the floor in front of and around the base of the backdrop, mixing all your balloon types and sizes organically.
3. Hang a few rose gold paper lanterns and tissue pom-poms at varying heights above the backdrop.
4. Place the giant rose gold foil numbers standing upright in front of or slightly above the balloon cluster as the focal centerpiece.
Pro Tip: Don’t over-inflate your latex balloons to their maximum size – slightly under-inflated balloons have a more elegant, rounded shape that photographs better and looks more intentional than tightly stretched ones.
15. Pink Balloon Garland With Gold Confetti Photo Booth Wall
Every 10th birthday needs a photo booth moment, and this setup delivers. A crisp white wall adorned with scattered gold confetti, framed by a lush pink balloon garland along the top and down one side, creates a clean and gorgeous backdrop for photos. Simple, beautiful, and endlessly versatile for any party theme.
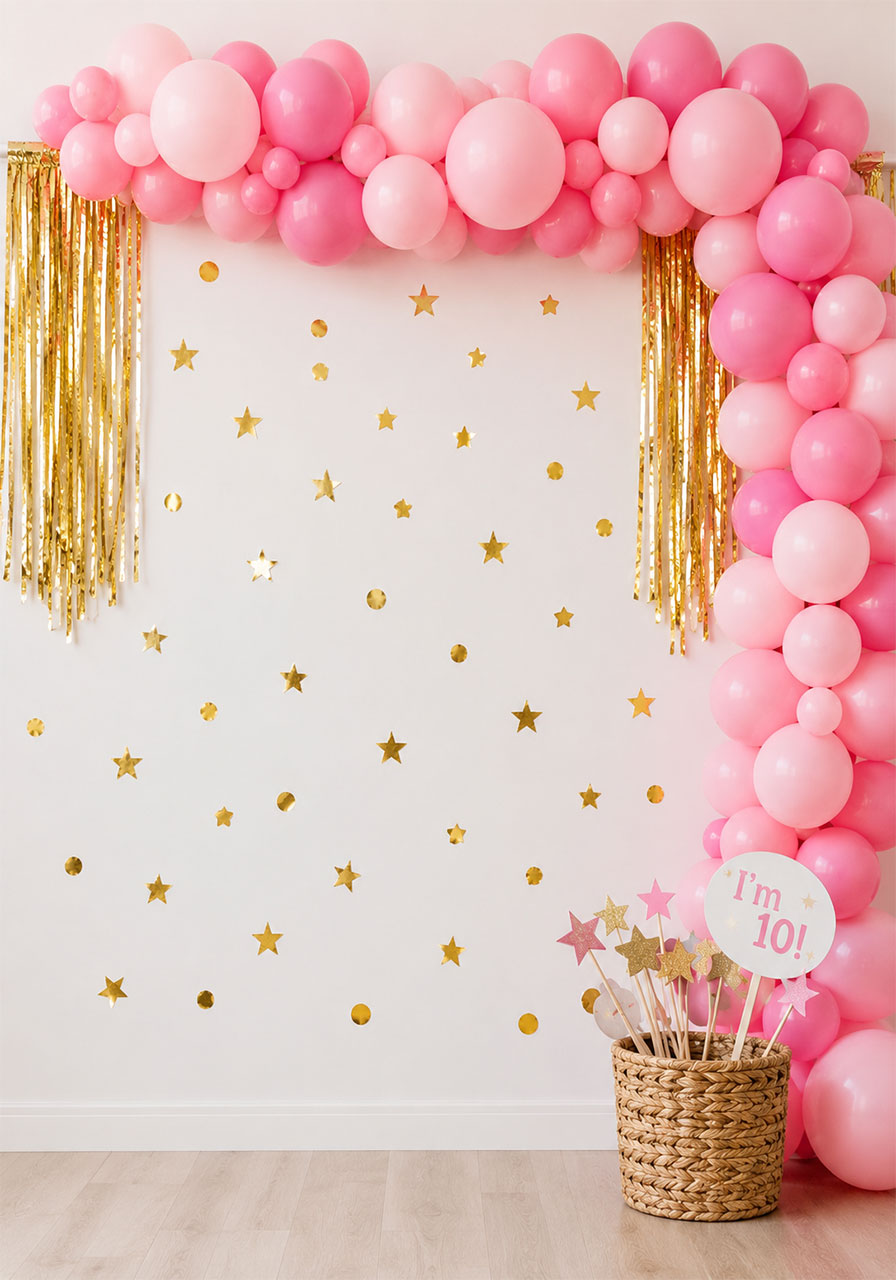
What You’ll Need:
- Pink latex balloons (various sizes)
- Gold foil confetti (star and circle shapes)
- Adhesive putty or double-sided tape (to stick confetti to wall)
- Gold tinsel fringe garland strips (hang on sides)
- Balloon decorating strip
- A clear or white wall to work with
How to Set It Up:
1. Scatter gold confetti pieces across the white wall section using small dots of adhesive putty – vary the spacing so it looks natural, not grid-like.
2. Build a balloon garland along the top of the wall and down one side using balloon tape.
3. Hang a few gold tinsel strips from the top to add a little shimmer movement on either side.
4. Set up a phone tripod or ask a designated “photo booth photographer” to capture all the memories.
Pro Tip: Print out a few fun props in advance – speech bubbles that say “I’m 10!”, birthday crowns, and star cutouts on sticks. Leave them in a basket near the photo wall for guests to grab.
16. 10-Year Photo Memory Wall With Fairy Lights
Cue the happy tears. This one is deeply personal and genuinely beautiful. Collect photos from all 10 years of your child’s life, clip them to hanging string lines against a warm, fairy-lit backdrop, and add gold “10” balloons front and center. Guests will spend the entire party gathered around it, pointing and reminiscing.
I’ve seen grown adults absolutely lose it over a display like this – in the best possible way.
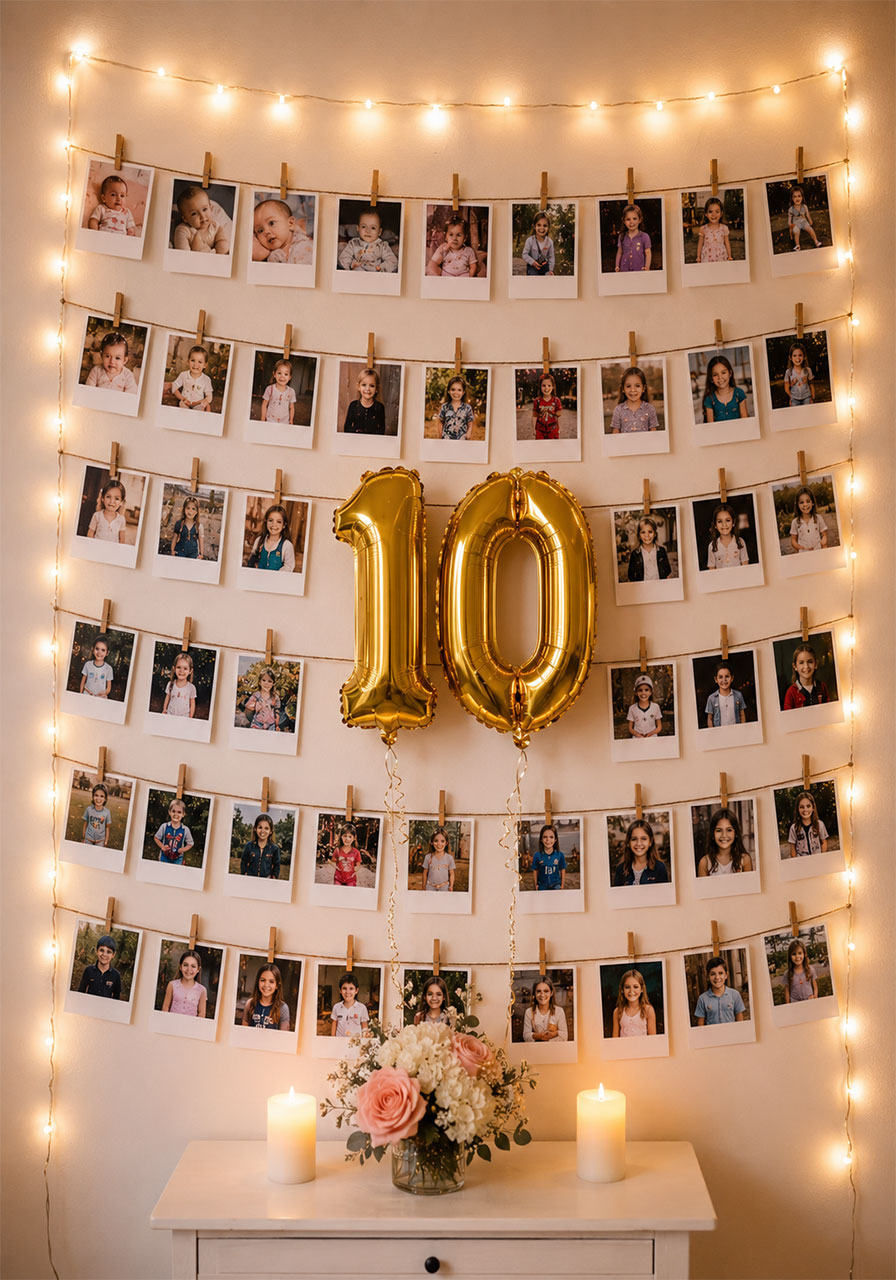
What You’ll Need:
- Printed photos from ages 0–10 (doesn’t need to be a lot – 40–60 photos is plenty)
- Twine or string (multiple horizontal lines)
- Small wooden clothespins or binder clips
- Warm white fairy light border (to frame the whole display)
- Gold foil “1” and “0” balloons
- Command strips or hooks to attach string lines to wall
How to Set It Up:
1. Run horizontal twine lines across a section of wall from left to right, spacing them about 8–10 inches apart vertically.
2. Clip your photos to the twine in roughly chronological order from top to bottom or left to right.
3. Frame the entire display with a border of warm white fairy lights using command hooks around the perimeter.
4. Float or anchor the gold “10” balloons in the center of the photo display.
5. Add a small table below with a candle and a sweet “A Decade of You” sign for the finishing touch.
Pro Tip: Add small handwritten date or caption tags below a few photos. It makes guests stop and look longer, and it becomes a beautiful keepsake you can save after the party.
17. Enchanting Paper Lantern Canopy Ceiling
If you really want to transform a space from ordinary to extraordinary, covering the entire ceiling in hanging paper lanterns is the move. The effect – especially at night with the lanterns lit from inside – looks absolutely breathtaking. It feels like you’ve walked into a fairy tale.
This works especially well in outdoor covered spaces, tents, or large indoor rooms.
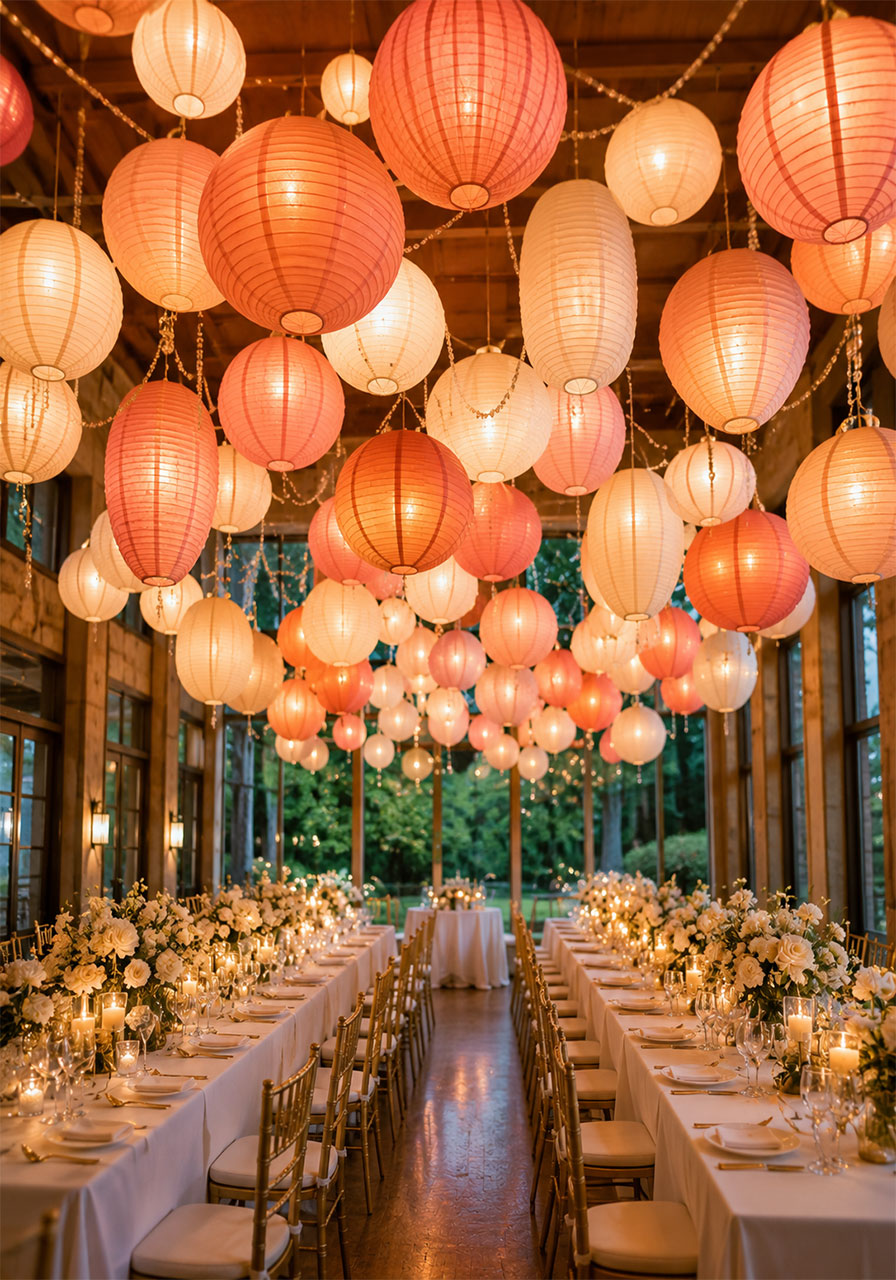
What You’ll Need:
- 20–30+ paper lanterns in blush, coral, white, and cream (mixed sizes)
- LED tea lights or battery-operated hanging lights to go inside each lantern
- Clear fishing line
- Ceiling hooks or a string grid system (run string across the ceiling first, then hang lanterns from it)
- Ladder
How to Set It Up:
1. First, run strings or fishing line back and forth across the ceiling in a loose grid pattern to give yourself hanging points throughout the space.
2. Insert a battery-operated light into each lantern before hanging.
3. Hang lanterns at varying heights – some close to the ceiling, others dangling much lower – for that gorgeous layered canopy effect.
4. Mix your lantern sizes throughout: big 16″ ones high up, smaller 8″ ones lower down.
5. Turn on all the lantern lights at party time and watch the room transform.
Pro Tip: Use a color ombre effect – start with deeper coral lanterns near the entrance and gradually transition to softer blush and white as you move further into the room. The effect is genuinely stunning.
18. Color-Coordinated Table Settings With Personalized Centerpieces
The table is where the party lives. When your table settings are thoughtfully color-coordinated – down to the plates, napkins, tablecloth, and centerpiece – the whole party feels elevated. It’s one of the details that separates “decorated” from “styled.”
Pick 2–3 colors that match your party theme and commit to them everywhere on the table.
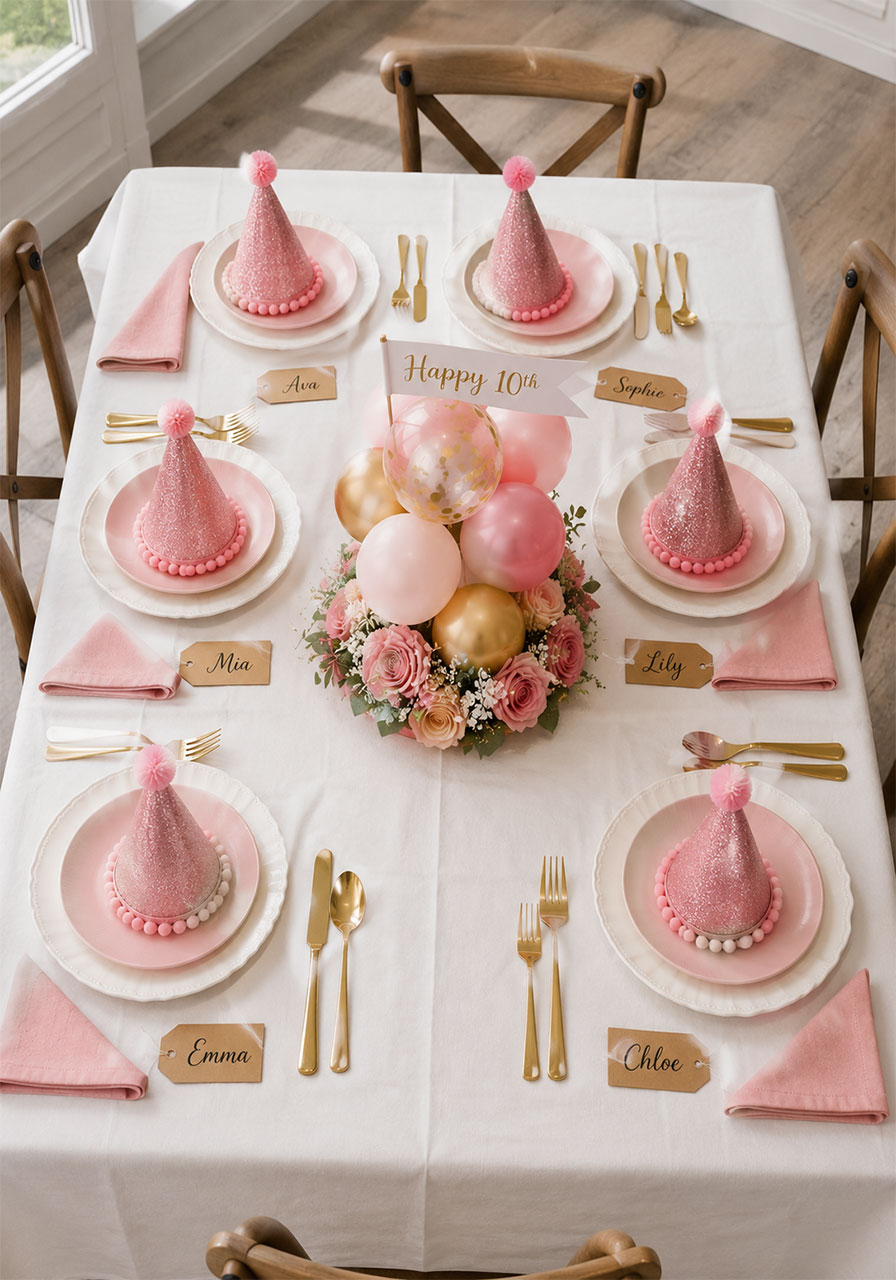
What You’ll Need:
- Tablecloth in your primary color
- Solid-color plates and napkins (matching or complementary)
- Metallic cutlery or simple plastic silverware
- A centerpiece (mini balloon cluster, small flower arrangement, or themed figurine)
- Personalized name tags or seat labels (optional but thoughtful)
- Matching party hats at each place setting
How to Set It Up:
1. Lay your tablecloth first, smoothed and centered.
2. Layer plates, then napkins folded on top or to the side.
3. Place cutlery symmetrically on either side of the plate.
4. Set your centerpiece in the middle of the table at a height that guests can see over comfortably.
5. Place a party hat, a small treat bag, or a personalized tag at each seat.
Pro Tip: Layer a smaller, contrasting-color plate on top of a larger plate for an effortlessly elegant look. It adds depth and makes even basic plates look intentionally styled.
19. Birthday Throne Chair With Balloon Garland and Glitter Backdrop
Your birthday girl should have ONE spot that’s entirely, exclusively, undeniably HERS. A birthday throne – a decorated chair set apart from everyone else – makes her feel like the royalty she is for the whole day. It’s also the most-photographed spot at the party, guaranteed.
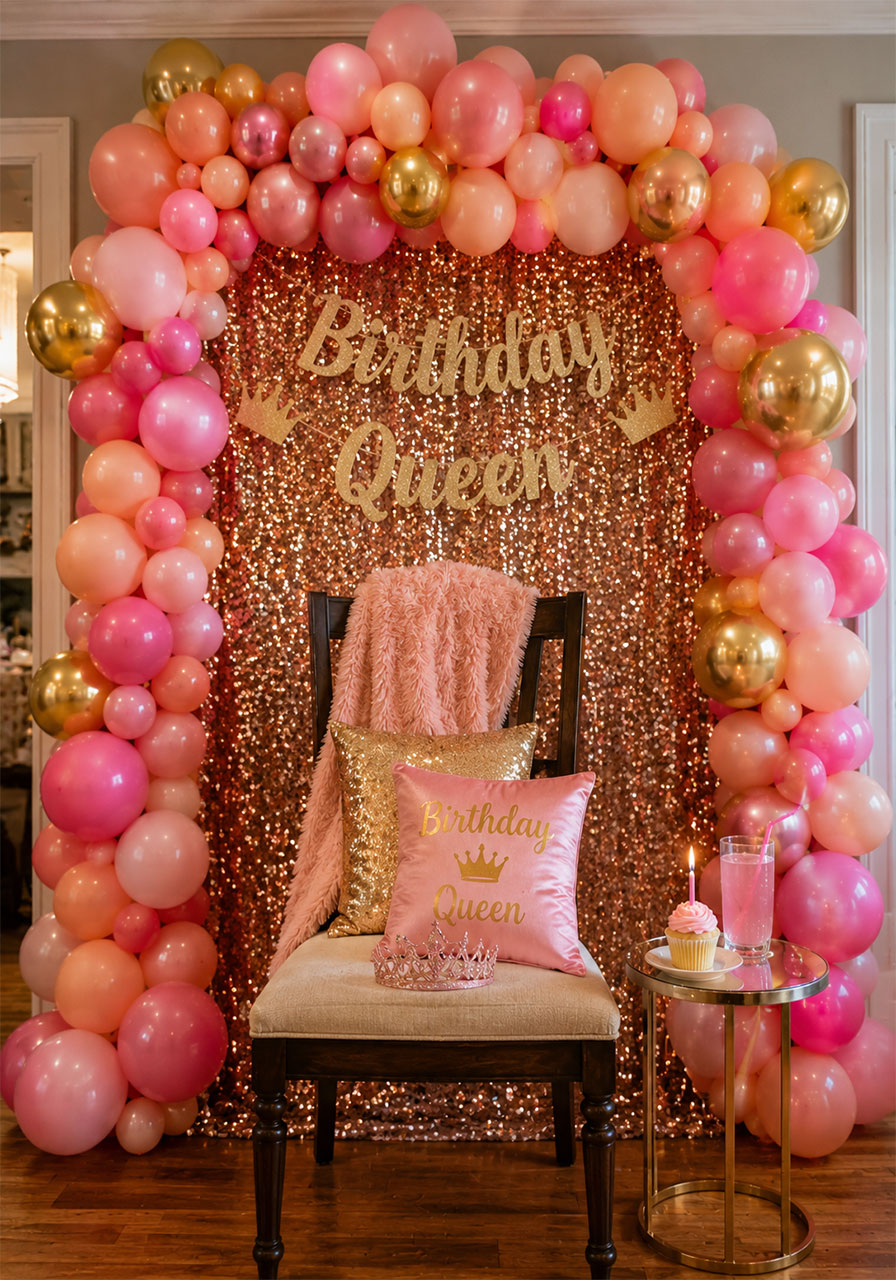
What You’ll Need:
- A chair with some height – a dining chair, folding chair, or rented throne chair all work
- Colorful cushions and a cozy throw blanket
- Balloon garland to drape behind and around the chair
- A “Birthday Queen” or “Birthday Star” banner hung above
- A glittery or sequined backdrop behind the chair
- A crown (because of course)
How to Set It Up:
1. Position the chair against a wall where you’ll hang your backdrop.
2. Hang the backdrop first, then build your balloon garland framing it on two sides and arching over the top.
3. Dress the chair itself with cushions and a blanket.
4. Hang the birthday banner above and position the crown on the seat for her to find when she arrives.
5. Add a small side table with her favorite snack or drink for the full royal treatment.
Pro Tip: Wrap the chair legs in ribbon or matching crepe paper streamers. It takes 5 minutes and makes the whole throne look completely cohesive and custom.
20. Light-Up Letter and Number Displays
Light-up letters and numbers are one of those decoration elements that look incredibly high-end but are actually totally accessible. Whether you spell out “HAPPY 10TH” or just display the big glowing “10,” these pieces create an unforgettable focal point that anchors the whole party aesthetic.
Place them near the cake, photo area, or entrance where they’ll get maximum visibility.
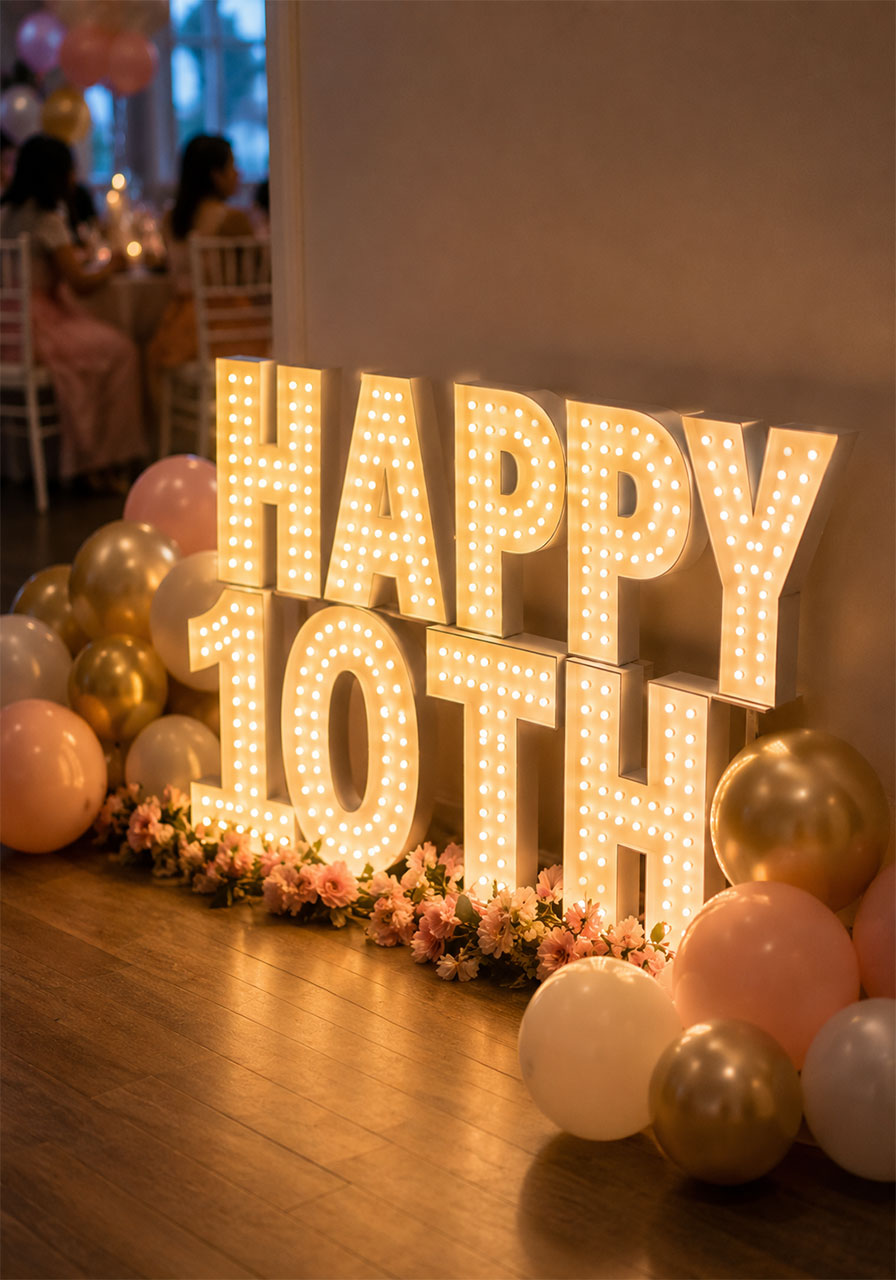
What You’ll Need:
- LED marquee letter/number props (rent locally or buy affordable versions online)
- Extension cord if needed
- Complementary balloons or florals to cluster around the base
- A flat, visible surface to place them on
How to Set It Up:
1. Position your light-up letters or numbers on a table, shelf, or directly on the floor.
2. Cluster balloons or a small floral arrangement around the base to frame them and fill the space below.
3. Run your power cord discreetly along the wall or behind decor.
4. Turn them on before guests arrive so the full effect is ready the moment the birthday girl walks in.
Pro Tip: Mix light-up letters with a plain backdrop like a white wall or simple curtain – this maximizes the visual impact of the glow and makes photos crisp and bright.
21. Confetti Balloon Cluster Arrangements
Confetti balloons are pure magic. When you fill clear latex balloons with a mix of metallic and holographic confetti, then cluster them together with coordinating solid balloons, you get an arrangement that shimmers and catches light from every angle. They’re easy to DIY, affordable, and they make any corner of a party feel festive and special.
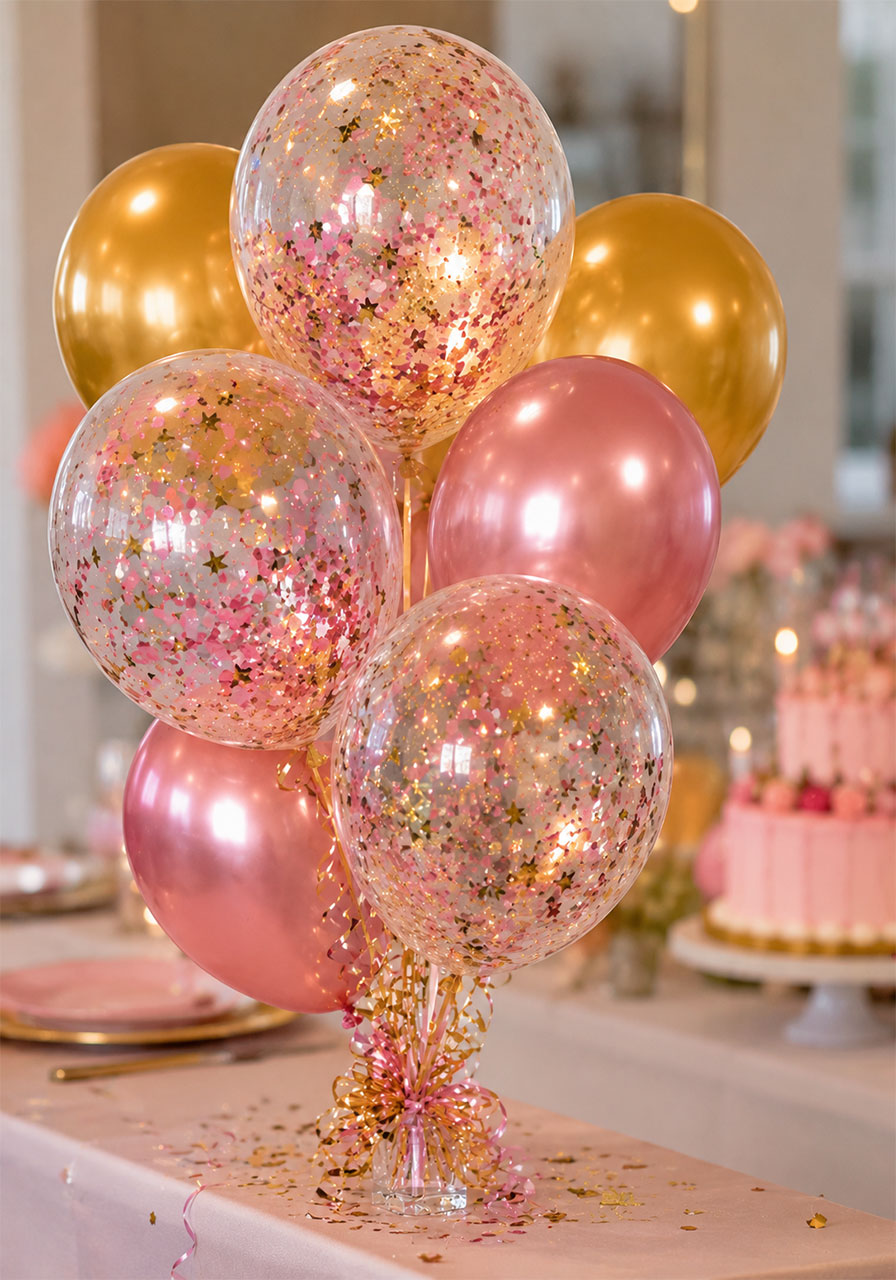
What You’ll Need:
- Clear latex balloons (11″ work best)
- Gold and pink metallic confetti
- Holographic or iridescent confetti (star and dot shapes)
- A funnel
- Complementary solid color balloons to mix in
- Balloon weights or ribbon to anchor clusters
- Battery-operated LED balloon lights (optional but spectacular)
How to Set It Up:
1. Using a funnel, pour a small handful of mixed confetti into each clear balloon before inflating.
2. Inflate balloons with helium and tie off.
3. After inflating, rub the balloon gently on your hair or a wool fabric to create static – this makes the confetti cling to the sides of the balloon rather than sitting in a clump at the bottom.
4. Cluster 5–7 confetti balloons together with matching solid balloons, tied to a central ribbon and weighted down.
5. Place clusters at tables, in corners, and along walls throughout the party space.
Pro Tip: Drop a small LED balloon light inside the clear balloon before adding confetti. When the light glows through the confetti, the effect is absolutely magical – especially in photos and in the evening.
22. DIY Ceiling Streamer and Lantern Canopy Display
This is your all-in-one ceiling transformation – and it’s one of the most impactful things you can do for a party on a budget. Colorful streamers cascading from a center point, mixed with hanging paper lanterns at varying heights, creates an overhead canopy that makes any room feel like a festival. Look up, and it’s pure joy.
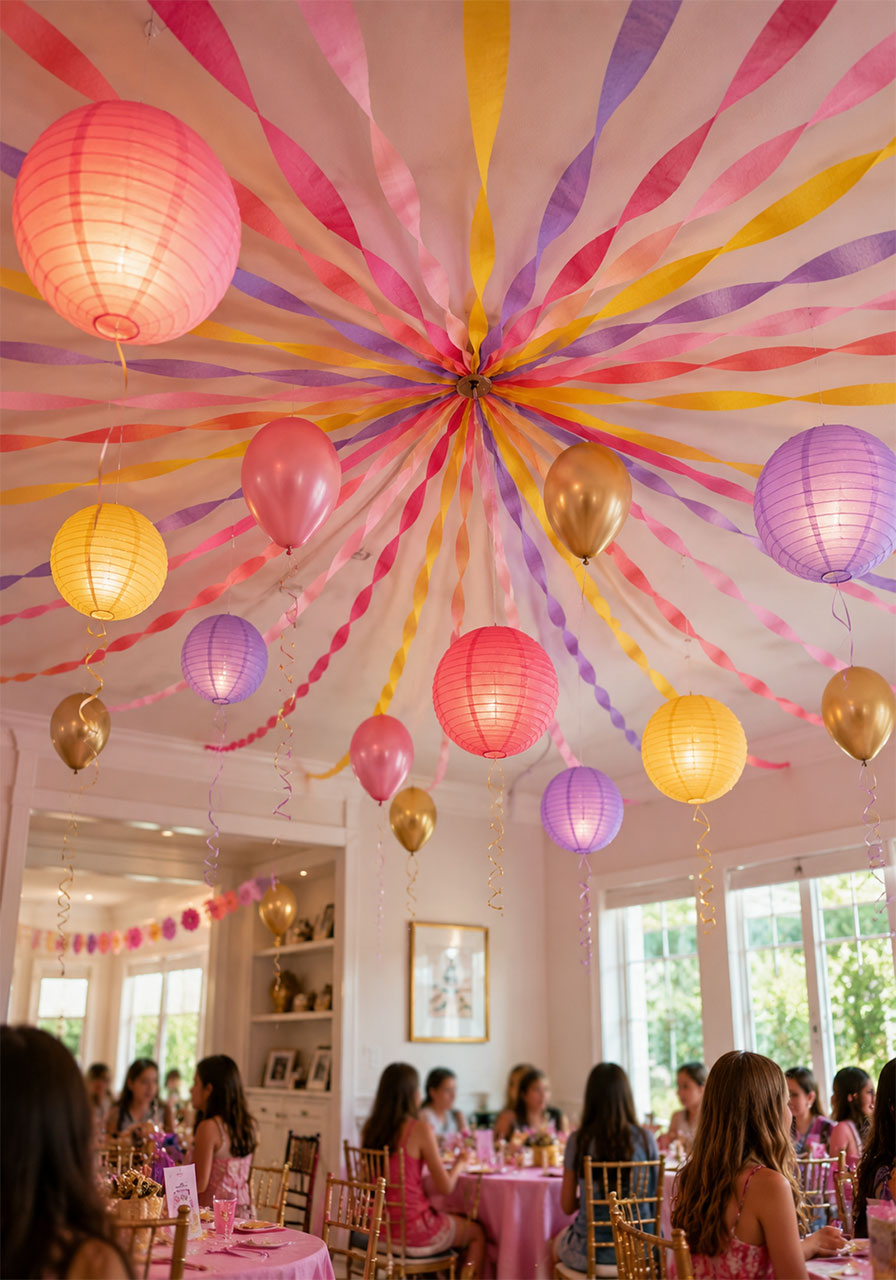
What You’ll Need:
- Crepe paper streamers in 3–4 coordinating colors
- Paper lanterns (mix of sizes, in matching party colors)
- LED lights for inside lanterns
- Clear fishing line
- Ceiling hooks (removable adhesive)
- Scissors and tape
- Balloons to float up and mix with the canopy
How to Set It Up:
1. Install your ceiling hooks in a pattern across the party space – create a center point and several outer hooks for the streamers to fan out from.
2. Attach streamer rolls to the center hook and pull them outward to the perimeter hooks, creating a fanned-out, tent-like canopy. Use alternating colors for a rainbow effect.
3. Twist streamers as you pull them for a more textured, spiral look.
4. Hang paper lanterns (lit from inside) from additional hooks, interspersed between the streamers at varying heights.
5. Add a few helium balloons anchored loosely to mix up into the canopy for extra dimension.
Pro Tip: Start this setup the night before the party – ceiling work takes longer than you think! Having it done the day before means you can focus on food, favors, and fun the morning of the party.
Putting It All Together: Your 10th Birthday Decoration Game Plan
You don’t need to do all 22 of these ideas – that would be a LOT of decorating! Instead, pick a focal theme (pink and gold? rainbow? glow-in-the-dark?) and choose 4–6 ideas that work together toward that theme.
A great formula that works every time:
- 1 big entrance moment (balloon arch or ribbon curtain)
- 1 show-stopping backdrop (sequin, fairy lights, or tinsel)
- 1 gorgeous dessert display (tiered dessert tower or candy-colored spread)
- 1 personal touch (memory wall or birthday throne)
- Scattered fillers throughout (confetti balloons, paper lanterns, table settings)
With that combination, you’ll have a space that looks thoughtfully designed, full of personality, and completely unforgettable.
Because the best birthday parties? They’re the ones where the birthday kid walks in and can’t even speak for a second. That jaw-drop moment is totally worth every streamer you hang.
Happy planning, and happy 10th birthday to your amazing kiddo!