Picture this: your guests walk through the door and their jaws drop. The room is glowing in every color of the rainbow. Fairy lights twinkle from every corner. Neon accents pulse under a disco ball. This is not just a birthday party. This is a light-up birthday party – and it is the kind of celebration that kids (and honestly, adults too) will be talking about for years.
If you have been searching for birthday party ideas that look absolutely magical but are still totally doable at home, you have landed in the right place. Light-up parties are one of the hottest birthday trends right now – and for very good reason.
They work for almost any age. They photograph beautifully. And the best part? You do not need a massive budget to pull off a seriously stunning setup.
Whether you are throwing a sleepover bash for your daughter’s 10th birthday, a glow-in-the-dark celebration for a group of teens, or a dreamy light-up event for a little one, this list has you covered with ideas that are creative, affordable, and guaranteed to wow.
Let’s get glowing. ✨

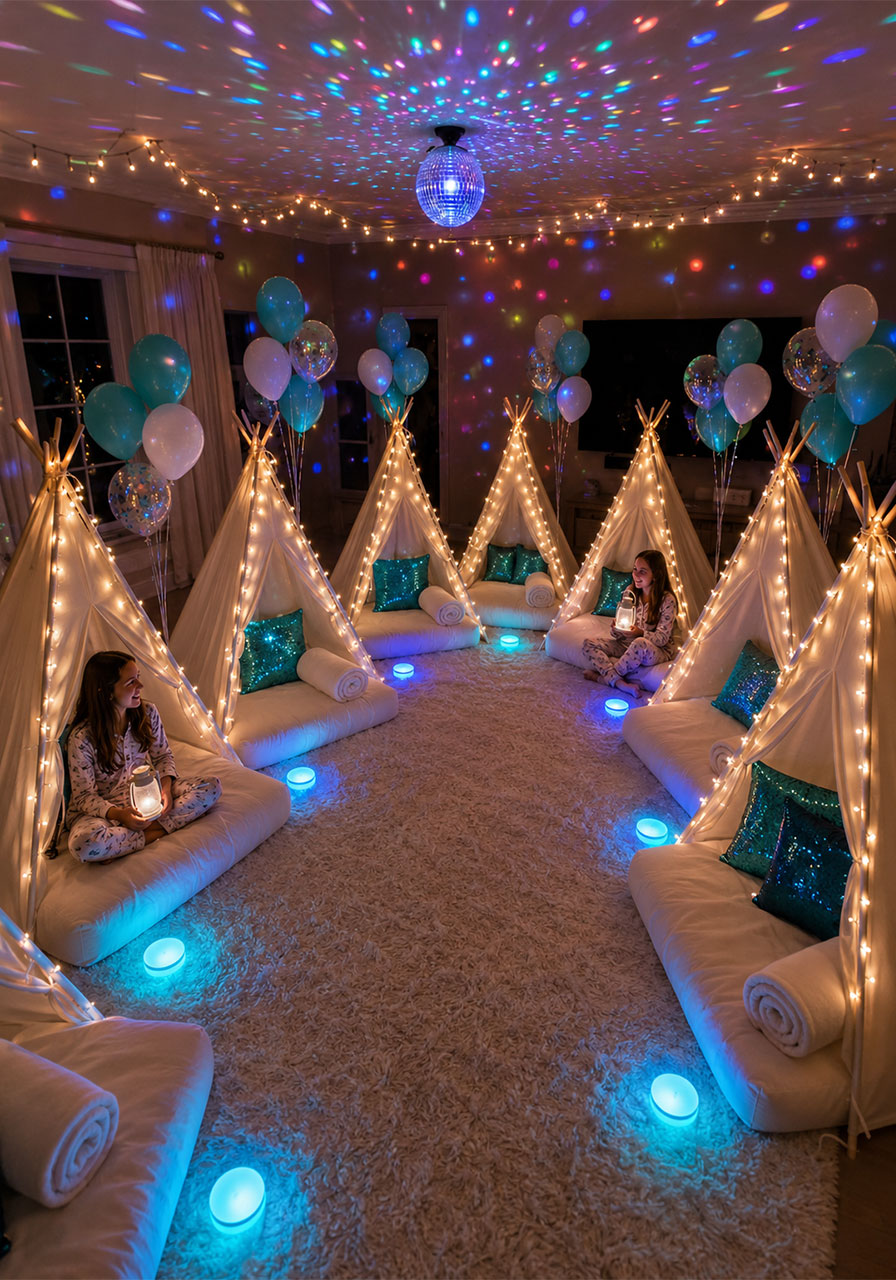
1. Light-Up Teepee Sleepover Party
If there is one light-up party idea that consistently stops people in their tracks on Pinterest and Instagram, it is the light-up teepee sleepover party. And once you see it in person, you will understand why.
The setup involves individual white teepee tents arranged in a circle or row on the floor, each one serving as a personal cozy “cabin” for each guest. The tents are draped with fairy lights, decorated with plush pillows in coordinating colors, and surrounded by glowing LED lights and balloon clusters on the floor. When you turn off the overhead lights and switch on the disco ball, the entire room transforms into something that looks like it belongs in a dream.
This idea works especially well for girls’ sleepovers, birthday parties for tweens, and kid birthday parties aged 7 to 13. It is cozy, exciting, and gives each guest her own special little space to feel like the VIP of the night.
Why guests absolutely love it: Every child gets her own decorated “mini bedroom” for the night. It feels exclusive and magical. The color-changing LED lights and disco ball projector make the room feel like a real party venue, not just someone’s living room.
Materials you will need:
- White teepee tents (one per guest – you can find affordable ones on Amazon or party rental sites)
- Fairy string lights (warm white or multicolor) – one set per tent plus extras for the room
- LED color-changing light pucks or small LED lanterns for the floor
- A disco ball projector or rotating LED star projector (this is the game-changer)
- Fluffy throw pillows and blankets in your color theme (blue and white, pink and gold, teal and white are all gorgeous)
- Small individual trays for each guest (for snacks and drinks)
- Balloons in your color theme
- Optional: faux floral garlands or greenery to drape between the tents
- Optional: personalized chalkboard name signs for each teepee
How to set it up:
- Clear out the furniture from your main living room or a large bedroom the night before the party.
- Arrange your teepee tents in a circle or U-shape, leaving enough space between each tent for guests to move comfortably.
- Inside each teepee, lay down a small mattress topper or thick blanket as the “bed.” Add a pillow, a small plush blanket, and a couple of decorative throw pillows in your color theme.
- Wrap each teepee frame with fairy lights, starting from the top pole and winding them loosely down the sides.
- Place LED color-changing pucks or small lanterns at the base of each tent and scattered around the floor between tents.
- String additional fairy lights along the walls and ceiling – the more, the better.
- Set up your disco ball projector or star projector in the center of the room pointed at the ceiling.
- Add balloon clusters near each tent or along the perimeter of the room.
- Place a small decorative tray in front of each tent with a personalized cup, a water bottle, and a small treat bag.
Pro tip: Set up the room completely the day before the party so all you have to do on the day is switch on the lights and welcome your guests. When they first walk in and see the full setup glowing, the reaction is absolutely priceless. Have someone ready with a camera at the door – you will want to capture that moment.
Color themes that look stunning with this setup: Aqua and white (ocean/mermaid vibe), pink and gold (glam princess), lavender and silver (galaxy), teal and turquoise (tropical), or all white with rainbow LED lights.


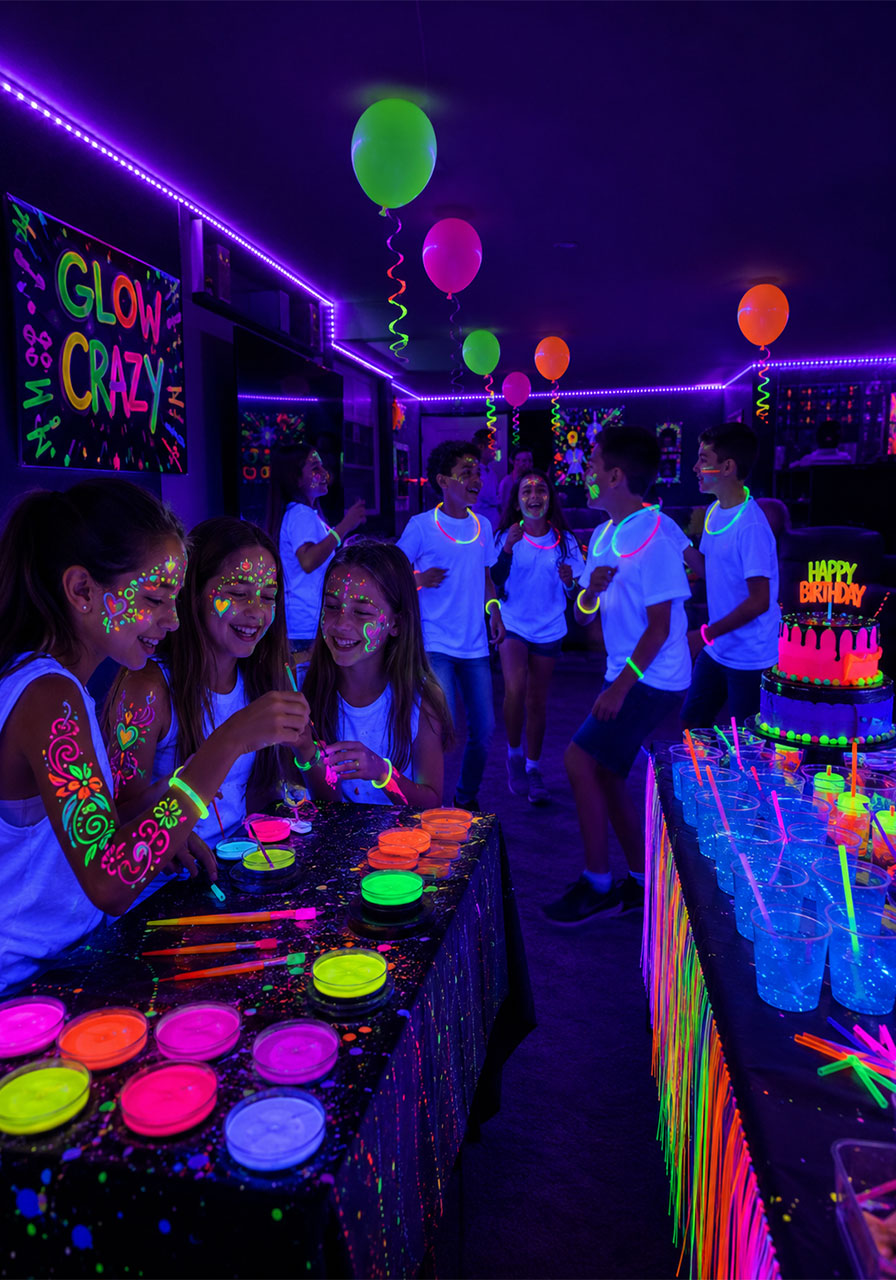
2. Glow-in-the-Dark Party
A glow-in-the-dark party is one of the most exciting, high-energy birthday setups you can create – and it requires surprisingly little effort to pull off. The secret is using UV blacklights, which make anything neon or fluorescent absolutely pop in the darkness.
Think neon-painted faces. Glowing cups. Bright white T-shirts that look like they’re lit from within. It is electric, it is wild, and kids of all ages go absolutely crazy for it.
This idea works wonderfully for birthday parties for kids aged 8 and up, tween parties, teen parties, and even adults. It is endlessly flexible – you can make it as chill or as high-energy as you like.
Why it works so well: The moment the overhead lights go off and the blacklights come on, the entire atmosphere shifts. Suddenly everything glows. Kids feel like they are inside a real club or a science experiment, and the energy level skyrockets instantly.
Materials you will need:
- UV blacklight bulbs or LED blacklight strips (get enough to light the whole party space)
- Neon face paint or UV-reactive body paint
- White or neon-colored T-shirts for each guest (to paint or wear)
- Neon-colored cups, plates, and straws
- Glow sticks, glow bracelets, and glow necklaces (bulk packs are very affordable)
- Neon balloons
- Neon streamers and table covers
- Optional: UV-reactive paint for an activity station where guests decorate their shirts
How to set it up:
- Install your blacklight bulbs or LED strips around the party area, aiming them at the walls, tables, and activity zones.
- Decorate with neon balloons, streamers, and table covers before guests arrive.
- Set up a face-painting or shirt-decorating station with UV paint as a party activity.
- Hand each guest a glow bracelet and glow necklace upon arrival as a party favor they can wear all night.
- When the party kicks into full gear, dim or turn off the overhead lights and switch on the blacklights.
- Cue the music and watch the room come alive.
Pro tip: Serve “glowing” drinks by adding a small glow stick to clear cups filled with lemonade or punch. Under the blacklight, the drinks will appear to glow and kids will absolutely love it. Make sure the glow sticks are in sealed plastic bags or test-tube style containers so they do not actually touch the drink.
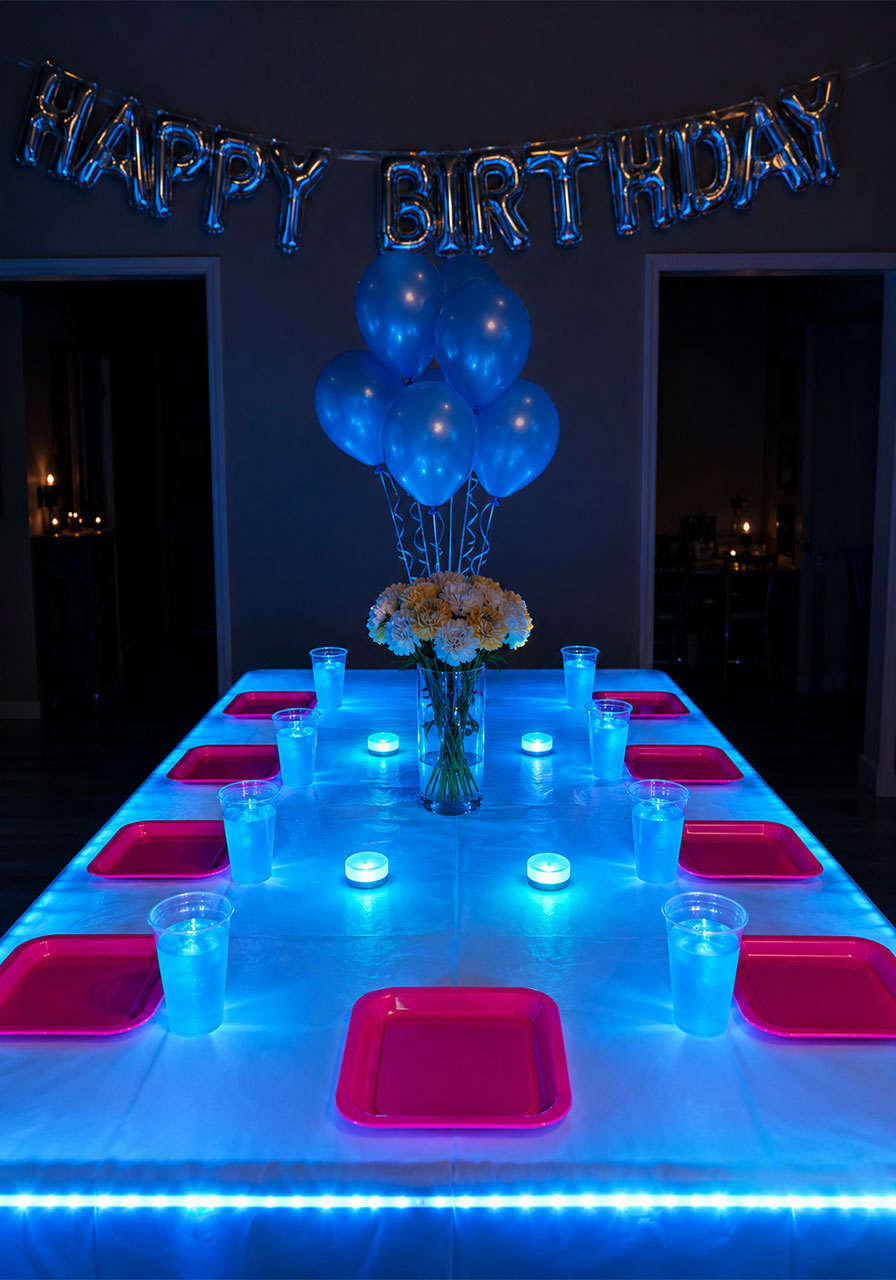
3. Light-Up Table Setup
You do not need to transform the entire room to create a jaw-dropping light-up party experience. Sometimes, all it takes is one show-stopping table.
A light-up party table uses LED strip lighting underneath a white or acrylic table surface to make the entire tabletop appear to glow from within. Pair this with neon-colored plates, glowing cups, and a dramatic floral centerpiece, and you have a setup that looks like it came straight from an event planning magazine.
This idea is perfect as the centerpiece of your party room, as the dessert or cake table, or as the main dining table for a more intimate celebration.
Materials you will need:
- A white plastic folding table or a clear acrylic table (the lighter the surface, the better the glow)
- LED color-changing strip lights or LED light panels placed under the table or along the edges
- Neon or brightly colored plates and square platters
- Colored cups or translucent cups filled with colored drinks
- A tall floral centerpiece with balloons
- Colored drinks (blue lemonade, pink punch) in clear cups so they catch the light beautifully
- Scattered LED tea lights or glow pucks on the tabletop
How to set it up:
- Place LED strip lights underneath the rim of the table or tape LED panels flat on the floor directly below the table surface.
- Set your table with neon plates, colored cups, and water bottles at each place setting.
- Build your centerpiece in the middle – a tall vase with flowers and balloons anchored to it works beautifully.
- Scatter a few LED glow pucks or LED tea lights across the table surface for extra dimension.
- Pour your colored drinks into clear cups before guests sit down so the table glows in full effect right away.
Pro tip: Use a remote-controlled LED strip so you can switch the table color to match each moment of the party – cool blue for dinner, warm pink for the cake, rainbow cycling for dancing. It is a tiny detail that makes a huge impression.
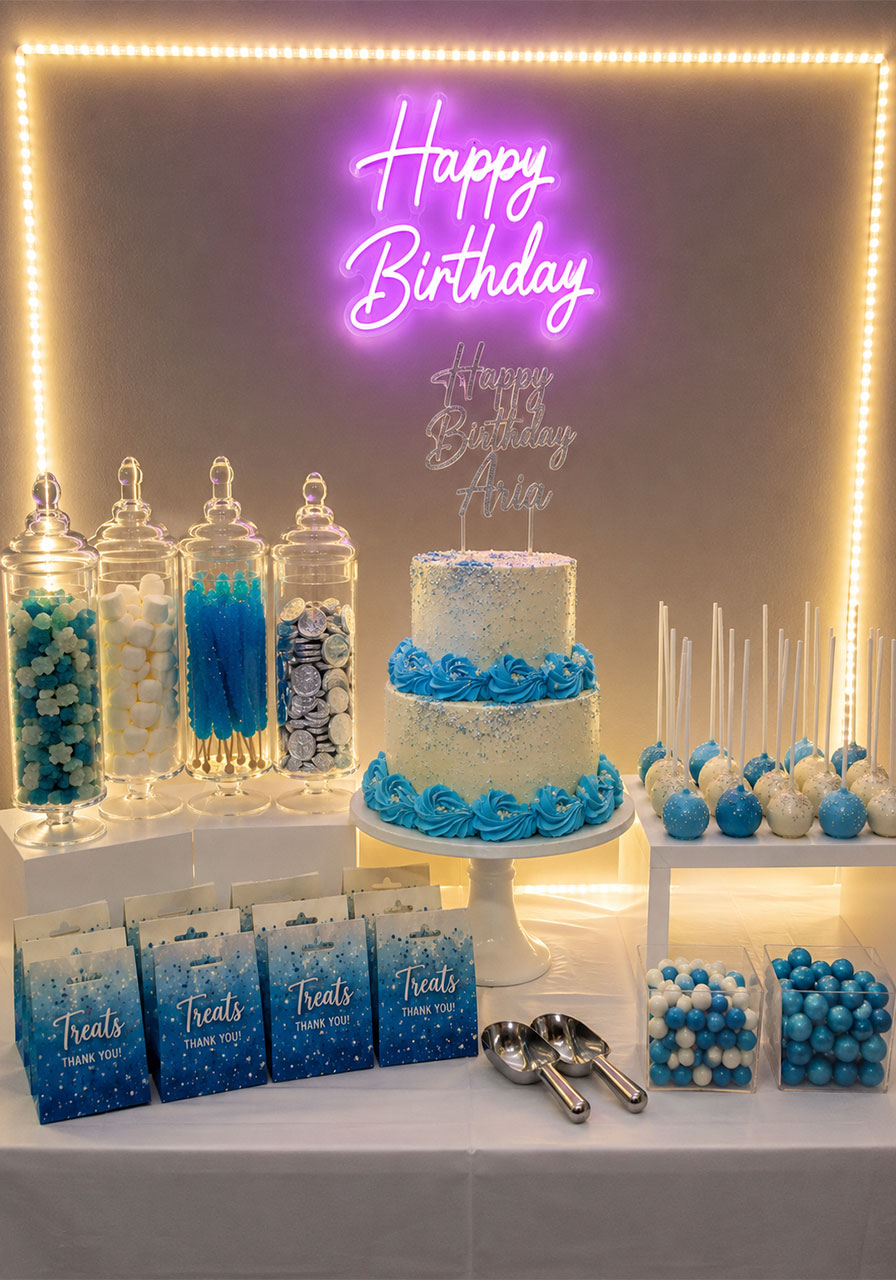
4. Light-Up Candy & Dessert Bar
A dessert bar is already a party win. Add lighting to it and it becomes completely unforgettable.
Set up a long table or shelving unit as your candy and dessert display, then layer it with LED strip lighting, backlit acrylic signs, and color-coordinated treats that glow beautifully under a blacklight or colored LED wash. Clear jars filled with neon gummies, white chocolate-dipped pretzels dusted with edible glitter, and brightly frosted cupcakes all look absolutely magical under the right lighting.
This doubles as a party activity – guests can build their own candy bags – and it makes for incredible photos.
Materials you will need:
- Tall clear glass or acrylic jars and bowls for candy display
- Neon or pastel-colored candies (gummy bears, M&Ms, jawbreakers, marshmallows)
- LED strip lights to line the shelves or the back wall
- Small treat bags or boxes for guests to fill
- Cupcakes or cake pops in your color theme
- An acrylic or chalkboard sign with the birthday child’s name
- Optional: a small battery-powered neon sign (“Happy Birthday,” a star, a heart, etc.)
How to set it up:
- Arrange your jars and bowls at varying heights using small risers, cake stands, or stacked books under a tablecloth.
- Fill each jar with a different candy in your color theme.
- Run LED strip lights along the back edge of the table or along the shelves behind the display.
- Place cupcakes and cake pops at the front of the display for easy grabbing.
- Add your personalized sign in the center or hang it on the wall behind the table.
- Set out small treat bags with scoops so guests can serve themselves.
Pro tip: Stick with two or three colors maximum for your candy selection. It looks far more intentional and stunning than a rainbow of mismatched colors. For example, an all-blue-and-white candy bar looks incredibly chic under cool LED lighting.
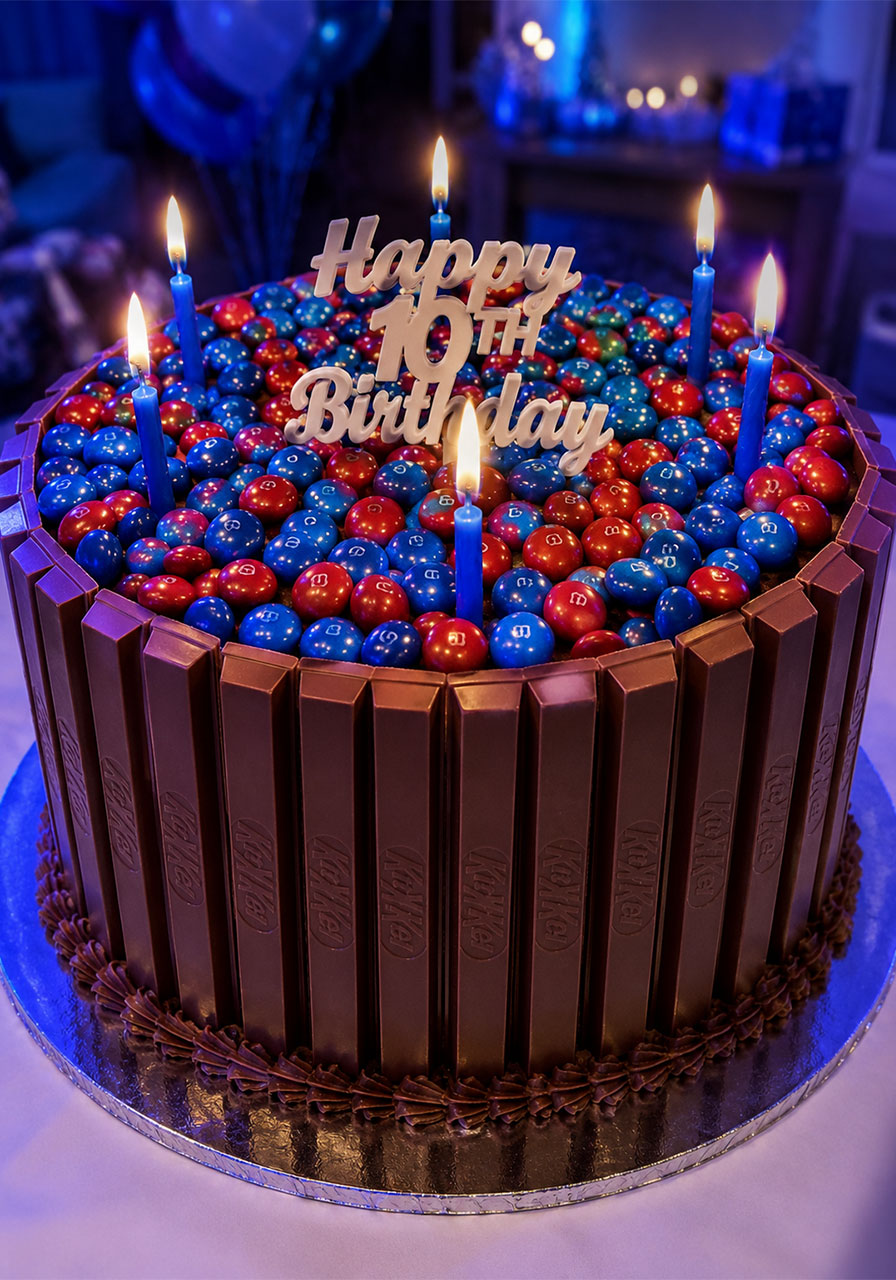
5. Kit Kat & M&M Light-Up Birthday Cake
You have probably seen the Kit Kat cake floating around on Pinterest and thought “that looks incredible but also really complicated.” Good news: it is way easier to make than it looks, and under colored party lighting, it is one of the most dramatic, beautiful cakes you will ever serve.
The concept is simple: a round layer cake wrapped on the outside with vertical Kit Kat bars, then filled on top with M&Ms, Skittles, or Reese’s Pieces in your party colors. The result is a tall, impressive candy-covered cake that looks like it belongs in a bakery window – and it costs a fraction of what a custom cake would run.
Why it is perfect for a light-up party: Under colored LED lighting, the bright M&Ms and the chocolate Kit Kats create this rich, jewel-like effect that photographs beautifully. It photographs even more dramatically under blue, pink, or purple party lights.
What you will need:
- A round layer cake (store-bought or homemade – two 8-inch layers work perfectly)
- Chocolate frosting or buttercream to use as the “glue”
- 4–5 packs of Kit Kat bars (full size, not fun size)
- 2–3 bags of M&Ms in your party colors
- A ribbon or twine to tie around the outside if the Kit Kats need a little help staying in place
- Birthday candles in your party colors
How to make it:
- Bake or purchase your layer cake and frost the outside generously with chocolate frosting.
- Separate the Kit Kat bars into individual sticks.
- Press the Kit Kat bars vertically around the entire outside edge of the cake, one by one. They will stick to the frosting. Work quickly before the frosting starts to dry.
- Tie a ribbon around the outside of the Kit Kat border if needed to keep everything in place while you work.
- Pour your M&Ms generously over the top of the cake until the surface is completely covered and overflowing slightly.
- Add birthday candles in the M&Ms and serve.
Pro tip: Sort your M&Ms before adding them to the cake and remove any colors that do not match your party theme. An all-blue and red M&M topping under blue LED party lights looks absolutely stunning. It takes five minutes but makes the whole presentation look completely intentional and professionally done.
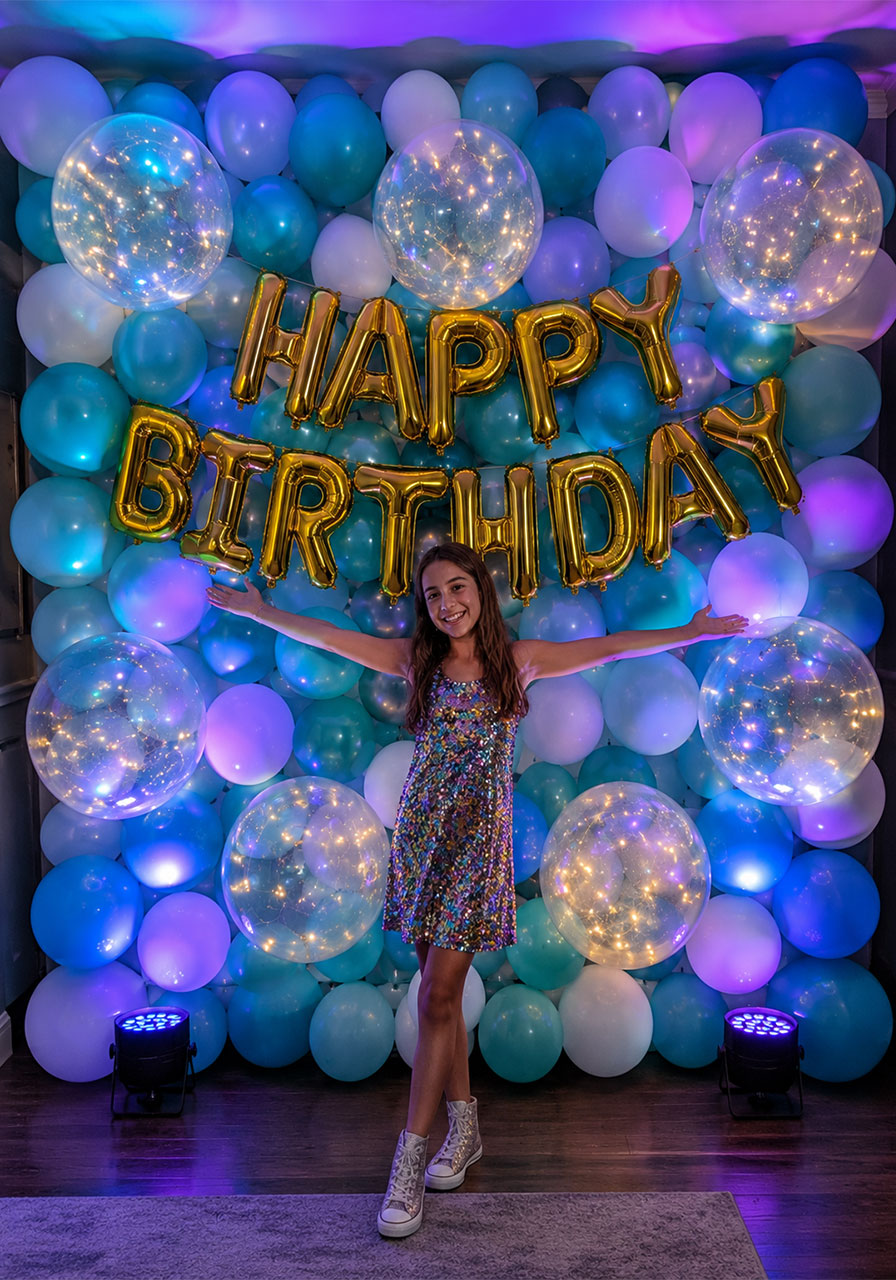
6. Neon Balloon Wall
A balloon wall is one of the most impactful photo moments you can create at a birthday party – and when you do it with neon or metallic balloons under LED lighting, the result is absolutely breathtaking.
This idea works as a photo backdrop, an entrance arch, or a wall decoration behind the dessert table. Guests will line up to take photos in front of it, and the birthday kid will feel like a total star.
Materials you will need:
- Balloons in your color theme – buy at least 50 to 100 for a full wall effect
- A balloon decorating strip (a long plastic strip with holes for anchoring balloons – these are inexpensive and make the job so much faster)
- Command hooks to hang the strip on the wall
- LED uplights or color-wash lights aimed at the balloon wall from below
- Optional: a few oversized 36-inch balloons in a coordinating color to add drama
- Optional: drape fairy lights over or through the balloon arrangement
How to set it up:
- Hang your balloon decorating strips on the wall using command hooks, creating the shape of your backdrop.
- Inflate balloons in a variety of sizes (11-inch and 5-inch balloons together look the most natural and full).
- Push the tied ends of the balloons into the holes on the decorating strip. Alternate colors and sizes as you go.
- Fill in any gaps by tucking smaller balloons between the larger ones.
- Place LED color-wash uplights on the floor aimed up at the wall to make the balloons glow dramatically.
- Add a “Happy Birthday” balloon letter banner in front of or above the wall.
Pro tip: Put a few clear “bobo” balloons stuffed with fairy lights into your balloon wall. They create this gorgeous glowing orb effect that looks unbelievably magical in photos under the party lights. This is one of those tiny additions that instantly elevates the whole setup from “pretty” to “absolutely stunning.”
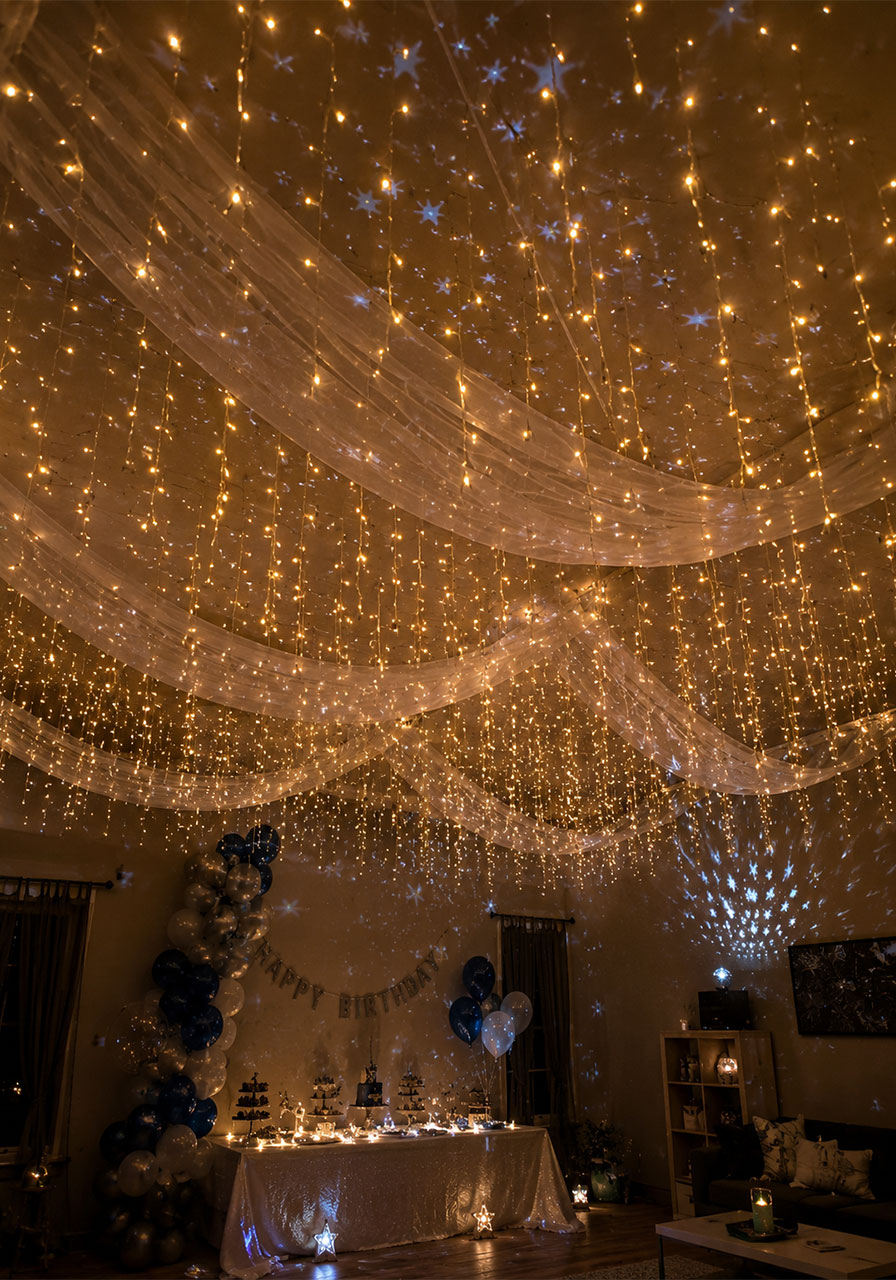
7. LED Fairy Light Ceiling Canopy
Want to transform an ordinary room into something that feels like an enchanted forest or a starlit sky? A fairy light ceiling canopy is one of the most dramatic and beautiful light-up party decorations you can create – and it is much simpler to install than it looks.
The effect is created by hanging dozens of fairy light strands from the ceiling so they cascade downward like a glowing curtain of light. When you dim the room and let the fairy lights do their work, guests feel like they have stepped into a completely different world.
Materials you will need:
- At least 6–10 strands of fairy lights (warm white or colored, depending on your theme)
- Command hooks rated for light weight – apply in a grid pattern across the ceiling
- Thin clear fishing line or extra string to help anchor the strands at different heights
- Optional: sheer fabric panels draped between strands for a canopy effect
- Optional: star projector to add moving light patterns to the ceiling
How to set it up:
- Plan your command hook placement first – a grid with hooks every 12–18 inches across the ceiling works well.
- Apply command hooks the day before the party and let them set properly overnight.
- Starting from one corner, drape fairy light strands across the ceiling, looping them over the hooks as you go and letting some strands hang lower than others for depth.
- Plug all strands into a single power strip for easy one-switch control.
- Optional: weave sheer fabric between the light strands for an even more dramatic canopy look.
- Take down command hooks carefully after the party to avoid wall damage.
Pro tip: Use battery-powered fairy lights for any strands that need to extend away from outlets. This gives you much more flexibility in placement and avoids dangerous extension cords running across the floor where kids are playing.
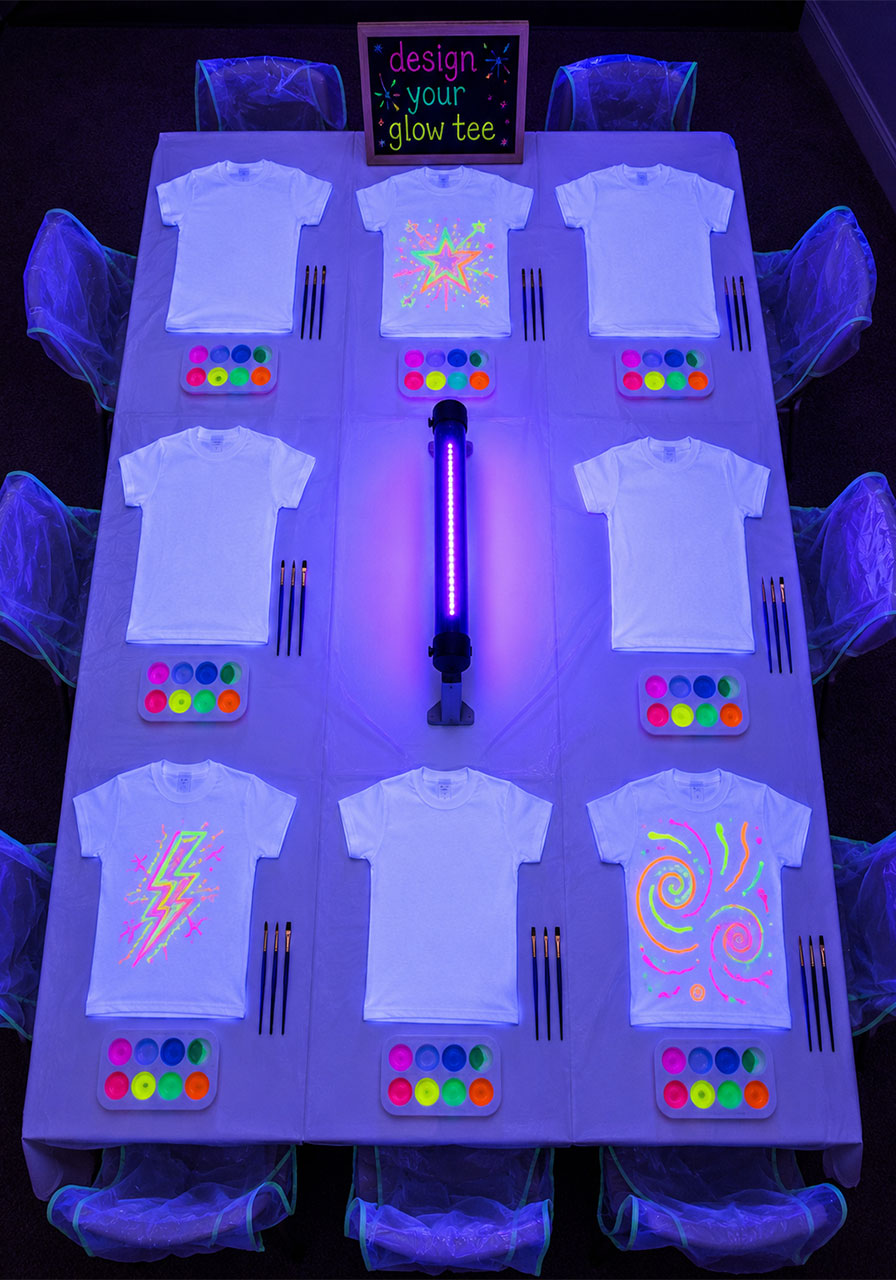
8. Glow-in-the-Dark Craft Station
Every great birthday party needs at least one activity that keeps the energy up between eating and dancing. A glow-in-the-dark craft station is the perfect solution – it is hands-on, creative, and the finished products double as party favors that kids take home.
Set up a table with UV-reactive paint, plain white T-shirts, canvas tote bags, or plain white sneakers. Guests decorate their items under normal light, and then when the party lights go on, they discover that their artwork absolutely glows. The “reveal” moment is genuinely exciting, especially for younger kids.
Materials you will need:
- UV-reactive fabric paint in multiple neon colors
- Plain white T-shirts, tote bags, or canvas sneakers (one per guest)
- Paintbrushes and foam applicators in various sizes
- A UV blacklight at the craft table for guests to test their work
- Table cover and smocks or aprons to protect clothing
- Plastic cups of water for rinsing brushes
How to run the activity:
- Set up the craft table with everything laid out before guests arrive.
- When it is craft time, have each guest put on an apron and find their item.
- Let guests freely paint their designs with the UV paint. Offer stencils for younger kids who want guidance.
- As guests finish each section, let them hold their item under the UV light at the table to see it glow – this is the moment everyone goes wild.
- Allow items to dry completely before guests pack them up as take-home favors.
Pro tip: Pre-write each guest’s name on their item in pencil before the party so nothing gets mixed up. You can also pre-paint a small design on each item as a “surprise reveal” – when guests hold their blank-looking item under the UV light for the first time before they start painting, they discover a hidden message or design already there. Kids absolutely love this moment.
9. Light-Up Photo Booth Corner
Every light-up party deserves a dedicated photo moment. A photo booth corner is one of the easiest additions you can make – and it creates memories that last long after the party ends.
The setup is simple: choose one corner of your party space, hang a backdrop of fairy lights or a neon balloon cluster, set up a ring light or LED strip light to illuminate your guests, and add a basket of fun props. Then let the kids go wild snapping photos on your phone or a Polaroid camera.
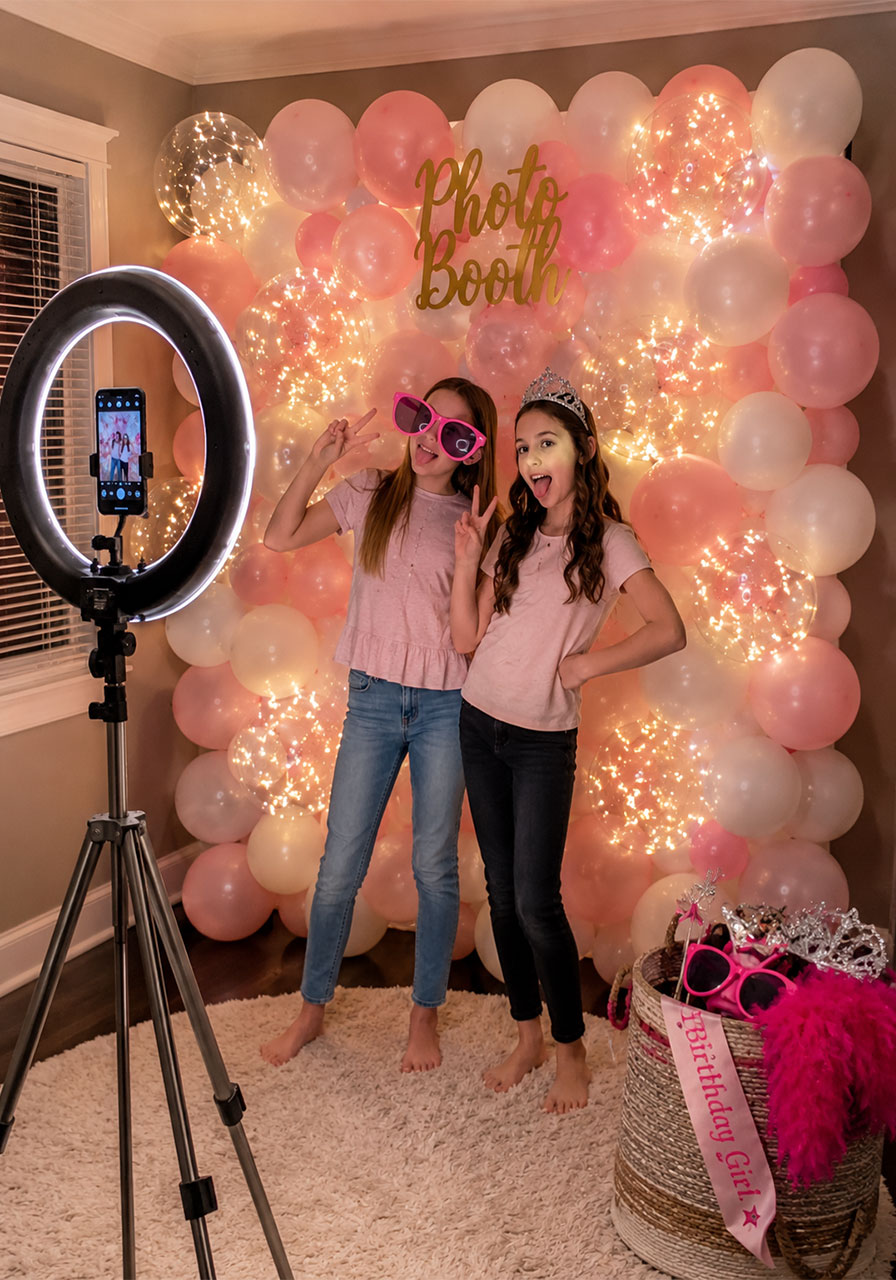
Materials you will need:
- A ring light on a stand (these are inexpensive and make every photo look professional)
- A fairy light backdrop or balloon wall as your background
- Fun props: oversized sunglasses, feather boas, birthday tiaras, star wands, silly signs
- A phone holder or small tripod for self-service photos
- Optional: a Polaroid or instax camera so guests get printed photos to take home immediately
- Optional: a printed custom sign with the party theme and birthday child’s name
Pro tip: Create a free QR code that links to a shared Google Photos album and tape it near the photo booth. Guests can scan it and instantly upload their photos to a shared album that the birthday child and all attendees can access after the party. It is the modern version of a photo guest book – and it costs nothing.
10. Personalized Glow Cup Station
This is one of those small but mighty details that guests always notice and remember. Set up a personalized glow cup station at the entrance or near the drink table where guests can customize their own light-up cup for the night.
Provide clear plastic cups, waterproof markers or vinyl letter stickers, and a supply of small LED glow sticks that slip inside the cup. Each guest writes or decorates their name on their cup, adds a glow stick, and carries a literally glowing personalized drink vessel all night. It eliminates the “whose cup is this?” confusion and adds a fun creative element to the party.

Materials you will need:
- Clear plastic cups (one per guest plus extras)
- Waterproof markers or permanent markers in multiple colors
- Vinyl letter stickers or alphabet sticker sets
- Thin glow sticks or small LED sticks that fit inside the cups
- A small sign explaining the activity
Pro tip: Activate this station as the very first thing guests do when they arrive. It gives early arrivals something fun to do while they wait for everyone to show up, and it means every guest walks into the party already feeling special and engaged.
11. Outdoor Light-Up Movie Night Birthday
Take the light-up party concept outside for a backyard movie night birthday that feels like the most magical sleepover in the world. Set up a projector screen against the back of the house or on a free-standing screen, surround it with fairy lights strung through the trees or along the fence, and create a cozy viewing area with blankets, pillows, and floor cushions for each guest.
The combo of twinkling fairy lights, a glowing movie screen, and warm outdoor string lights overhead creates an atmosphere that feels genuinely enchanted. Add some string lights wrapped around mason jars as individual lanterns and you have a setup that guests will absolutely never forget.
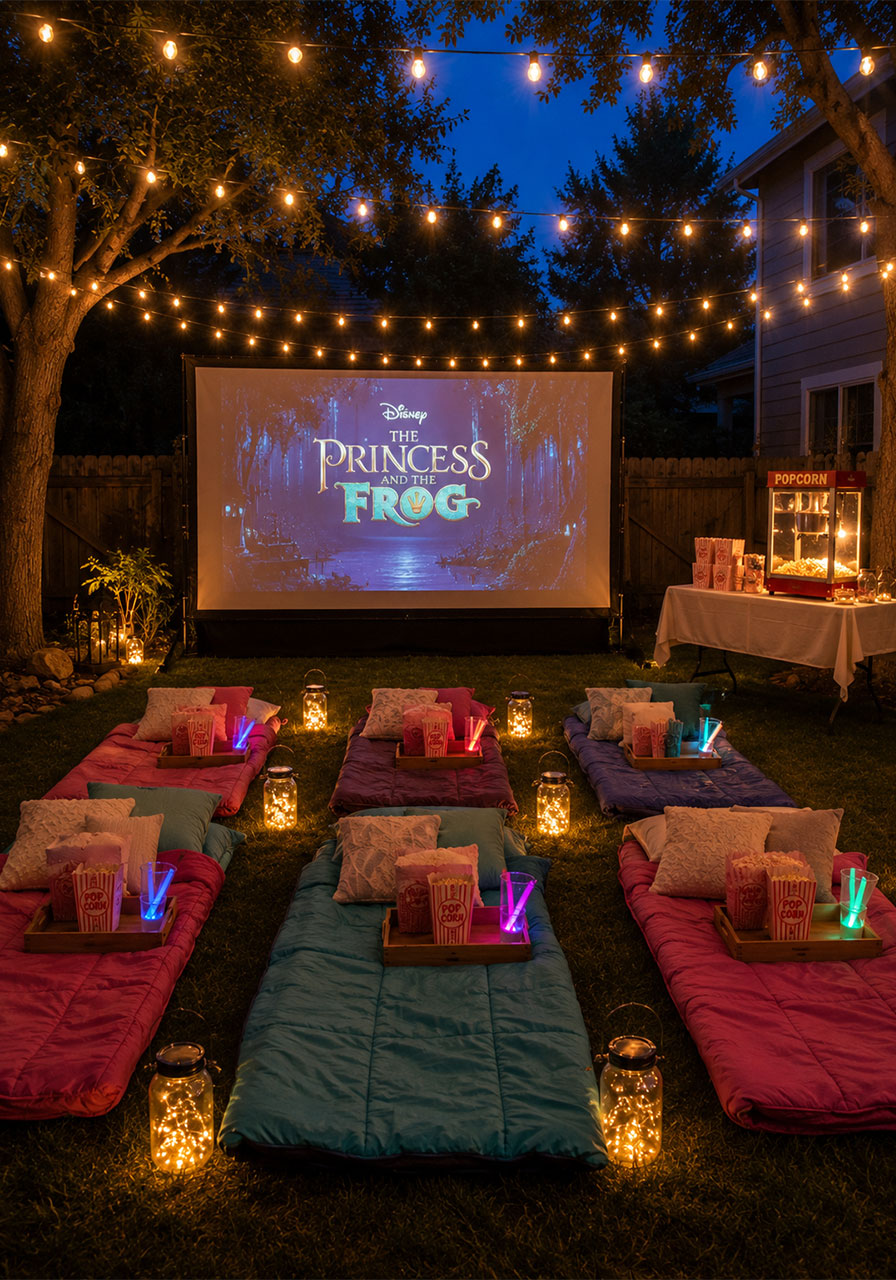
Materials you will need:
- An outdoor projector and screen (or a white bedsheet hung on a frame)
- Outdoor string lights to hang across the yard or through the trees
- Individual floor setups for each guest: a blanket, a pillow, and a small tray for snacks
- Mason jars with battery-powered fairy lights inside as lanterns
- Popcorn bags or boxes for each guest
- A chosen movie (birthday child’s favorite, or a poll sent to guests in advance)
- Cozy blankets – because even in summer, evenings can get cool
Pro tip: Start the evening before the movie with outdoor games while it is still light (limbo, balloon stomp, musical chairs). As it gets dark, transition into the movie setup. The shift from active party games to cozy movie time is a beautiful natural arc for a birthday evening that keeps energy high early and settles everyone down later – which parents of sleeping-over kids will deeply appreciate.
12. Glow-in-the-Dark Balloon Stomp Game
You need at least one high-energy party game in your light-up birthday lineup – and this one is an absolute crowd-pleaser for kids aged 5 and up.
Tie a glow-stick bracelet and a neon balloon to each player’s ankle. Under the blacklights, every balloon glows. The goal is to stomp and pop everyone else’s balloon while protecting your own. Last person with an intact balloon wins. It is chaotic, hilarious, and kids beg to play it again and again.
Best for: Ages 5–12, large groups, outdoor or indoor with enough space
Time to play: 5–10 minutes per round
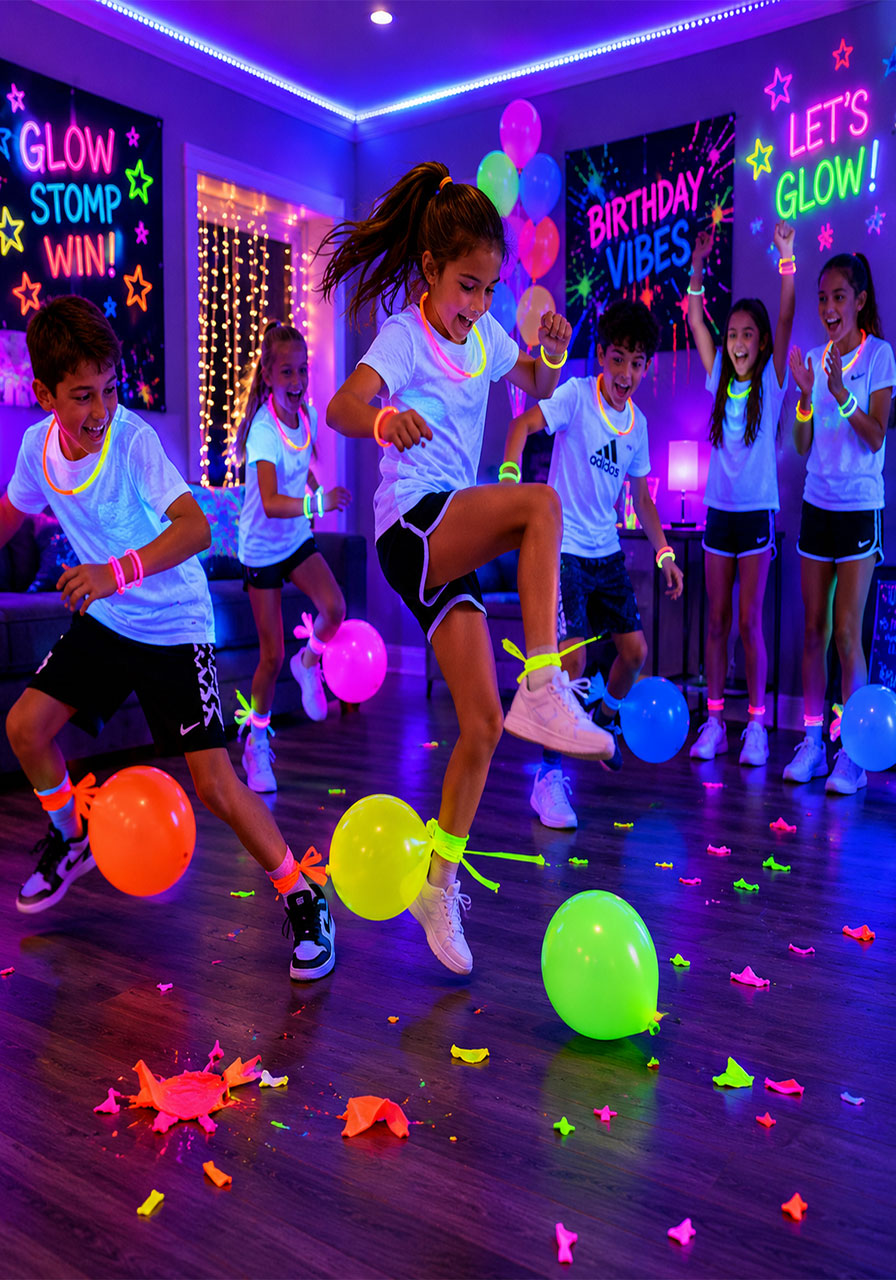
What you will need:
- One neon or white balloon per player (plus extras for re-runs)
- One glow-stick bracelet per player to tie to the balloon so it glows
- String or ribbon to tie the balloon loosely to each player’s ankle
- Blacklights to make everything glow (optional but makes it dramatically more fun)
How to play:
- Inflate one neon balloon per player and insert a glow stick bracelet inside before fully inflating, or attach it to the outside of the balloon with a small piece of tape.
- Tie the balloon to each player’s ankle with about 12 inches of ribbon, loose enough to drag slightly on the ground.
- Players spread out across the play area.
- On “go,” every player tries to stomp and pop other players’ balloons while protecting their own.
- When your balloon is popped, you step out. Last balloon standing wins.
Pro tip: Play this game outdoors or in a room with no sharp furniture edges. Clear the area completely before starting. For really young kids, shorten the string so the balloon is further off the ground and easier to stomp – it makes the game more successful and less frustrating for little ones.
13. Glow Bowling in the Living Room
Who needs to rent out a bowling alley when you can create your own glowing bowling lane right in the hallway or living room? This is one of the most creative light-up party activities you can set up with minimal materials, and kids absolutely love the novelty of it.
Use glow-stick bracelets stuffed inside clear plastic water bottles as your “pins,” and a neon or white ball as your bowling ball. Set up the bottles at the end of a hallway or along one side of the room. Turn on the blacklights, turn off the overhead lights, and let the games begin.
Best for: Ages 4–12, small to medium groups

What you will need:
- 10 clear plastic water bottles filled with a little water to add weight
- Glow-stick bracelets – one or two per bottle – to make them glow
- A white or neon ball (a soft rubber ball or even a rolled-up pair of white socks works)
- Tape to mark the bowling line on the floor
- Blacklights aimed at the lane
How to play:
- Fill each bottle with a small amount of water and drop in an activated glow bracelet. Cap the bottle tightly.
- Arrange the 10 bottles in a triangle formation at the far end of your hallway or room.
- Use tape on the floor to mark the throwing line.
- Turn on the blacklights and turn off overhead lights. Watch the bottles glow in the dark.
- Each player gets two rolls per turn. Keep score on a whiteboard or paper.
- Play as many rounds as the party allows. Award a small prize to the top scorer at the end.
Pro tip: Make a simple paper scorecard for each player and let an older sibling or parent be the “announcer” who reads out the scores with dramatic flair. The competitive element keeps older kids especially engaged, and the announcement moments add a fun game-show energy to the activity.
Final Tips for Pulling Off a Flawless Light-Up Birthday Party
Now that you have a full arsenal of light-up birthday ideas, here are a few things I have learned from watching these parties come together that will make the whole experience smoother, more beautiful, and way less stressful.
Test your lighting the night before.
This is the single most important thing you can do. Set up your lights, turn off the overheads, and walk through the space. Are there dark corners? Is the disco ball projector aimed correctly? Does the LED table glow as dramatically as you hoped? Adjusting all of this in advance means zero scrambling on the actual party day.
Have one central power strip per zone.
Group your lights by area and run each zone off a single power strip with an on/off switch. This lets you control the whole mood of the room with a few simple switches instead of hunting for individual plugs in the dark. Your future self will thank you enormously.
Brief your guests on the “big reveal.”
If you are doing a full light-up setup, consider keeping guests in another room while you get everything switched on. Then walk them in all at once. The collective gasp when they see the whole room glowing for the first time is absolutely magical – and it is one of those moments that gets remembered long after the cake is eaten.
Less is more with your color palette.
Pick two or three colors maximum and stick to them across every element: balloons, plates, cups, lights, candy. A cohesive color story looks ten times more intentional and beautiful than a rainbow of everything. When in doubt, white plus one accent color under LED lighting always looks stunning.
The best parties are the ones filled with laughter.
At the end of the day, no amount of perfect lighting or stunning decor matters more than the energy in the room. The games, the music, the people – that is what your child will remember. The light-up setup is just the gorgeous backdrop to the real party: the joy of being surrounded by the people they love most.
Now go make some magic. ✨
Which of these light-up birthday party ideas are you trying first? Drop your questions in the comments below – we would love to help you plan the most epic glowing celebration!