
Planning a Halloween party (or just want your house to look the part for trick-or-treaters) but short on time? You’ve landed in the right spot.
Turning your home into a haunted hangout doesn’t have to eat up your entire weekend or your entire budget. With the right game plan, you can spook up every room in a single afternoon.
We’ve pulled together the fastest, easiest, and most eye-catching Halloween decorating ideas for every corner of your home. Front door, living room, bedroom, kitchen, bathroom, backyard, and yes, even your roof.
Each idea below tells you exactly why it works, what to grab before you start, and how to pull it off step by step. No guesswork, no Pinterest-fail moments.
Let’s turn your house into the most talked-about haunt on the block.
Front Door and Porch: First Impressions That Scream “Halloween”
Your front door is the first thing guests see, so it deserves the biggest “wow” for the least effort. These ideas take 15 minutes to an hour and set the tone for everything else.
1. Frankenstein Door Face
This one turns your entire front door into a giant Frankenstein face using nothing but colored paper and a green (or any bright) door as the canvas. It’s silly, it’s bold, and it photographs incredibly well for your neighbors and trick-or-treaters.
Best for: Families with kids, front doors visible from the street.
Time to Decorate: 20-30 minutes.

What You’ll Need:
- Black craft paper for the hair and stitches
- White and black paper for the eyes
- A black rectangle and two small white triangles for the mouth and teeth
- Removable double-sided tape or painter’s tape
How to Make It:
1. Cut a jagged, zigzag “hairline” shape out of black paper sized to fit the top third of your door.
2. Cut two large circles for eyes (white background, smaller black circles on top for pupils) and tape them in the center of the door.
3. Add a black rectangle mouth with two white triangle “teeth” hanging below it.
4. Cut a small strip of black paper into a jagged line to look like a stitched scar near one eye.
5. Use painter’s tape so you don’t damage your door’s paint when you take it down.
Pro Tip: Add your house number below the mouth like a name tag. It’s a small touch that makes the whole look feel intentional instead of thrown together.
2. Silhouette Door Decals
Nothing beats a giant vinyl or paper silhouette for instant spook factor. Think a grinning skeleton face or a wide-eyed, sinister smile that fills the whole door. It’s dramatic, it’s fast, and it works on any door color.
Best for: Minimalist decorators who want maximum impact.
Time to Decorate: 15 minutes.

What You’ll Need:
- Pre-cut Halloween door decals (or black craft paper if making your own)
- Scissors and a pencil if cutting your own design
- Removable adhesive
How to Make It:
1. If using a store-bought decal set, simply peel and smooth it onto a clean, dry door.
2. If making your own, sketch a large simple face (think jagged eyes and a stitched smile) onto black paper.
3. Cut out the shapes carefully, keeping the design bold and simple so it reads well from a distance.
4. Press firmly into place, starting from the center and smoothing outward.
Pro Tip: Keep the design to two or three shapes max. A door face is way scarier when it’s simple and graphic, not busy.
3. DIY Spiderweb Door
A giant spiderweb stretched across your door is the classic Halloween decoration that never goes out of style, and it takes almost zero skill to pull off. Add a few oversized spiders for extra creep factor.
Best for: Any front door, especially dark-colored ones where white webbing pops.
Time to Decorate: 20 minutes.

What You’ll Need:
- Stretchable spiderweb material (from any Halloween aisle)
- 2-3 fake spiders of varying sizes
- Removable hooks or tape
How to Make It:
1. Gently stretch the web material until it’s thin and wispy, not clumpy.
2. Drape it across your door, securing the corners with removable hooks or tape.
3. Pull small sections outward to create depth and a more realistic, tangled look.
4. Tuck your fake spiders into the folds of the web, placing the biggest one dead center for shock value.
Pro Tip: Don’t stop at the door. Stretch a second web across a nearby window or porch railing to make it look like the spiders have taken over the whole entrance.
4. Creepy Doll Wreath
This one isn’t for the faint of heart, but it’s an absolute showstopper. A wreath made from broken doll parts, moss, and fake blood is the kind of decoration people stop and photograph. It’s genuinely unsettling in the best way.
Best for: Adults-only or teen Halloween parties, horror-theme houses.
Time to Decorate: 45-60 minutes.

What You’ll Need:
- A plain grapevine or twig wreath base
- 3-5 secondhand or dollar-store dolls (thrift stores are a goldmine here)
- Moss or dried floral filler
- Fake blood or dark red craft paint
- Hot glue gun
How to Make It:
1. If you want a “broken” look, carefully remove a few limbs or heads from your dolls (pliers work well for this).
2. Paint or dab fake blood around the joints and faces for a horror-movie finish.
3. Hot glue the moss around the wreath base first to create texture.
4. Attach the doll parts around the wreath, spacing them so the eye moves around the whole circle.
5. Let everything dry completely before hanging.
Pro Tip: Warn trick-or-treat parents before they knock. This wreath is genuinely creepy enough to startle little ones, so it works best for parties aimed at teens and adults.
5. Twig and Bat Wreath
Want something spooky but still elegant enough for a front door that also needs to look nice the rest of the year? A bare twig wreath dotted with paper bats hits that sweet spot between chic and creepy.
Best for: Hosts who want a more sophisticated, neutral-toned Halloween look.
Time to Decorate: 30 minutes.

What You’ll Need:
- A natural twig wreath
- 10-15 small paper or felt bats
- Hot glue gun or small wire
- Pumpkins in white, orange, and cream for the porch floor
How to Make It:
1. Lay the wreath flat and decide where you want your bats to “fly” across it.
2. Glue or wire each bat in place, angling a few as if they’re mid-flight for movement.
3. Hang the wreath and add a cluster of real or faux pumpkins in mixed sizes below it on the porch.
4. Add two bare branches in tall planters on either side of the door to frame the whole look.
Pro Tip: Stick to a neutral palette (white, cream, black, natural wood tones) if you want this look to transition smoothly from Halloween straight into Thanksgiving decor.
6. Skeleton Porch Squad
Nothing says “welcome to the haunted house” like a group of skeletons just hanging out on your steps. Pose them mid-conversation, sipping invisible drinks, or reaching for the candy bowl for an unexpectedly funny scene.
Best for: Large porches and steps, families who love a mix of spooky and silly.
Time to Decorate: 30-45 minutes.

What You’ll Need:
- 2-3 posable skeleton props (life-size or smaller)
- A mix of white and orange pumpkins
- Moss or greenery for filler
- Jack-o’-lantern buckets or lanterns
How to Make It:
1. Bend the skeleton’s joints into a natural, relaxed pose (sitting, leaning, or waving).
2. Place one skeleton at the top of the steps and stagger the others going down for visual flow.
3. Tuck pumpkins and moss around their “feet” so they look like they’re settled in, not just plopped down.
4. Add lanterns or glowing pumpkin buckets nearby for extra ambiance after dark.
Pro Tip: Give your skeleton crew a funny prop, like a tiny sign, a drink cup, or a deck of cards, and watch it become the most-photographed spot on your block.
7. Life-Size Witch Greeter
A standing witch prop clutching a poisoned apple by your door instantly sets a storybook-spooky tone. Pair her with a pile of pumpkins and gourds for a scene straight out of a fairy tale gone wrong.
Best for: Grand entryways, double doors, hosts who love a dramatic statement piece.
Time to Decorate: 20 minutes.

What You’ll Need:
- A life-size witch prop
- An assortment of pumpkins and gourds in different sizes and colors
- A bale of hay (optional, for texture)
- A pot of red or orange mums
How to Make It:
1. Position the witch prop just to the side of your door so she looks like she’s “greeting” guests, not blocking the entrance.
2. Stack the hay bale beside her as a base for your pumpkin display.
3. Arrange pumpkins and gourds around her feet, mixing sizes and colors for a natural, abundant look.
4. Finish with a pot of mums for a pop of seasonal color.
Pro Tip: Put a small solar spotlight at her feet so she’s just as striking after the sun goes down.

Living Room: Where the Party (and the Spookiness) Happens
Your living room is where guests will actually hang out, so it needs to feel Halloween-ready without being uncomfortable to sit in for hours. These ideas layer in the spook factor without a full room overhaul.
8. Halloween Throw Pillows
This is the single fastest way to transform a room. Swap your everyday pillow covers for Halloween prints, and suddenly your whole couch feels like it’s part of the celebration.
Best for: Anyone who wants a quick, no-mess refresh.
Time to Decorate: 5 minutes.

What You’ll Need:
- 2-4 Halloween-print pillow covers (spiders, “October 31,” bats, or pumpkins all work)
- A small accent pumpkin or two
How to Make It:
1. Slip the new covers over your existing pillow inserts.
2. Mix patterns and solids so the look feels curated instead of matchy-matchy.
3. Set a small velvet or ceramic pumpkin on the couch arm or coffee table to tie it together.
Pro Tip: Keep your everyday pillow covers in a bag nearby so you can swap back in five minutes once the season is over. Zero long-term commitment required.
9. Ghostly Furniture Draping
Drape your sofa and chairs in plain white sheets, and instantly your living room looks like it’s been abandoned for a century. It’s dramatic, it’s cheap, and it protects your furniture at the same time.
Best for: Full-room transformations, haunted house theme parties.
Time to Decorate: 15 minutes.

What You’ll Need:
- Plain white or cream bedsheets (one per furniture piece)
- Stretchable spiderweb material
- Fake spiders
How to Make It:
1. Drape each sheet loosely over your furniture, letting it fall unevenly rather than tucking it in neatly.
2. Scrunch and bunch the fabric in a few spots to create shadows and texture.
3. Stretch spiderweb material over a corner or between two pieces of furniture to connect the scene.
4. Add fake spiders crawling across the fabric for the finishing touch.
Pro Tip: This look works best in a room you’re not using for actual seating that night. Save your comfiest couch for guests and haunt a secondary sitting area instead.
10. Mantel Crow Display
A bare branch dotted with black crows perched above your fireplace looks like something straight out of a Gothic novel. Pair it with a hand-lettered banner and rows of flickering candles for major atmosphere.
Best for: Mantels, shelves, or any long horizontal surface.
Time to Decorate: 20 minutes.

What You’ll Need:
- A large bare branch
- 4-6 fake crows or ravens
- A “Happy Halloween” banner
- A row of pillar or LED candles
How to Make It:
1. Prop or wedge the branch upright against the wall or mirror above your mantel.
2. Perch the crows along the branch at different heights so they don’t look like a straight, robotic row.
3. String the banner along the mantel edge below the branch.
4. Line up your candles in front, staggering heights for a flickering, layered glow.
Pro Tip: Use battery-powered flameless candles if kids or pets will be nearby. You get the same glow with zero fire risk.
11. Bats-on-the-Wall Swarm
A “swarm” of paper bats flying across your wall is one of the most photographed Halloween looks for a reason. It’s bold, it’s dimensional, and it costs almost nothing to create.
Best for: Large blank walls, staircases, hallways.
Time to Decorate: 30-40 minutes.

What You’ll Need:
- 20-30 pre-cut paper or felt bats in mixed sizes
- Removable poster putty or double-sided tape
How to Make It:
1. Start with your largest bats near a focal point, like a mirror or piece of art, and work outward.
2. Vary the angle of each bat (some straight, some tilted) so the flock looks like it’s actually in motion.
3. Thin out the bats as you move away from the center so the swarm tapers naturally instead of stopping abruptly.
4. Step back every few bats to check the overall shape from across the room.
Pro Tip: Cluster more bats close together near the “source” (like they’re pouring out of the fireplace or a doorway) for a storytelling effect that’s way more impressive than an evenly spaced grid.
Bedroom: Spooky Enough to Dream, Cozy Enough to Sleep
Your bedroom doesn’t need to be terrifying, just festive enough to make you smile every time you walk in. These ideas balance cozy with creepy.
12. Cobweb Canopy Over the Bed
Draping black cheesecloth over your headboard like a torn, ghostly canopy is one of the easiest bedroom transformations out there. Add a few paper bats flying out from underneath, and you’ve got an entire scene.
Best for: Bedrooms with a headboard or wall space above the bed.
Time to Decorate: 20 minutes.

What You’ll Need:
- Black cheesecloth or gauze fabric
- Removable adhesive hooks
- 5-10 small paper bats
How to Make It:
1. Stick two or three hooks to the wall above your headboard, spaced a foot or so apart.
2. Drape the cheesecloth over the hooks, letting it sag and pool naturally instead of pulling it taut.
3. Tear a few small holes or fray the edges by hand for a more weathered, cobweb-like texture.
4. Scatter a few paper bats on the wall around the edges of the fabric.
Pro Tip: Tuck a string of warm white fairy lights underneath the cheesecloth before you drape it. The soft glow through the fabric looks incredible at night.
13. Halloween Bedding Swap
Swapping in a Halloween-print comforter or throw is the coziest way to get festive, and you’ll actually want to snuggle up in it every night through October. Layer in a skull-print accent pillow for extra flair.
Best for: Anyone who wants Halloween vibes without touching the walls.
Time to Decorate: 5 minutes.

What You’ll Need:
- A Halloween-print quilt, comforter, or throw blanket
- One or two novelty accent pillows (skulls, ghosts, or pumpkins)
- A small velvet pumpkin for the nightstand
How to Make It:
1. Swap your everyday bedding for the Halloween set.
2. Layer the accent pillows on top in a triangle or staggered arrangement for a styled, magazine-worthy look.
3. Set a small pumpkin on your nightstand to round out the theme.
Pro Tip: Choose a print with black, orange, and cream tones rather than neon colors. It’ll photograph better and feel cozier at bedtime.
14. Vintage Shelf Display with Fairy Lights
If you collect vintage or novelty Halloween pieces, a dedicated shelf display is the perfect way to show them off. String warm fairy lights along the ceiling edge for a soft, magical glow that makes the whole room feel festive at night.
Best for: Halloween collectors, kids’ or teens’ rooms, cozy vintage aesthetics.
Time to Decorate: 30-40 minutes.

What You’ll Need:
- Floating shelves or a small bookshelf
- Your collection of Halloween figurines, jack-o’-lantern decor, or vintage finds
- A string of warm white fairy lights
- A patterned throw or crocheted blanket in orange and black tones
How to Make It:
1. Arrange your collectibles on the shelf by height, tallest in back, shortest in front, so everything is visible.
2. Tuck a few small pumpkins or gourds between pieces for texture.
3. Run the fairy lights along the top of the wall or window frame, securing with clear removable hooks.
4. Finish the bed with a warm, patterned throw that pulls the same orange and black color palette from the shelf.
Pro Tip: Turn off the overhead light and let the fairy lights be your only light source in the evening. It instantly makes the whole room feel warmer and more atmospheric.
Kitchen: Serve Up Some Serious Spook
Your kitchen probably gets more daily traffic than any other room, so small, low-mess touches go a long way here.
15. Novelty Mug and Cutout Display
If you’ve got a mug collection gathering dust, Halloween is the perfect excuse to show it off. Add a few paper cutout characters dangling above, and your open shelving becomes a mini Halloween museum.
Best for: Open shelving, mug racks, coffee stations.
Time to Decorate: 20 minutes.

What You’ll Need:
- Your Halloween-themed mug collection
- Paper garland or hanging cutout characters
- A small Halloween sign or print
How to Make It:
1. Arrange your mugs on the shelf by color or character for a cohesive, gallery-like look.
2. Hang the paper garland along the top edge of the shelf so the characters dangle just above the mugs.
3. Lean a small printed sign against the shelf or wall nearby for a finishing detail.
Pro Tip: Rotate a few mugs to the front row each week so the display never looks static, even if you’re not using them all.
16. Bat Decal Backsplash
Small black bat decals scattered across your cabinets and backsplash add just enough spook without covering up your kitchen’s everyday look. It’s one of the lowest-effort, highest-impact ideas on this whole list.
Best for: White or light-colored kitchens, renters who can’t paint or wallpaper.
Time to Decorate: 15 minutes.

What You’ll Need:
- A pack of removable bat wall decals
- A small wreath or floral bundle (optional, for the island or cabinet front)
How to Make It:
1. Start near a range hood, cabinet corner, or window and place your first few bats close together.
2. Scatter the rest outward in a loose, uneven trail, like they’re flying away from that starting point.
3. Leave more space between bats as you move further from the center for a natural, dispersing effect.
4. Add a small wreath to your island or a cabinet front for extra texture.
Pro Tip: Test the decals on an inconspicuous spot first if you have painted cabinets, just to make sure the adhesive won’t pull off the finish.
17. Skeleton Kitchen Island Hangout
Posing a couple of skeletons on your kitchen barstools, like they’re mid-conversation over coffee, is the kind of unexpected detail that makes guests laugh out loud. Pair it with bat decals “flying” across the backsplash for a full scene.
Best for: Kitchens with an island and barstools, hosts who love a funny surprise.
Time to Decorate: 15 minutes.

What You’ll Need:
- 1-2 posable skeleton props
- Bat decals for the backsplash
- A small pumpkin or wine glass prop (optional, for the punchline)
How to Make It:
1. Seat your skeletons on the barstools and bend their arms into a natural, relaxed pose.
2. Add bat decals to the wall or backsplash behind them for atmosphere.
3. Place a small prop, like a mini pumpkin or an empty wine glass, in one skeleton’s hand for a funny finishing touch.
Pro Tip: Move the skeletons around throughout the week (leaning on the counter one day, “cooking” the next) to keep the joke fresh for anyone who sees your kitchen daily.
Bathroom: Small Room, Big Scares
The bathroom is easy to forget, but it’s actually one of the best rooms to go all-in on theme, since guests will be in there alone with nowhere to look but around.
18. Candlelit Vampire Bath
Turn bath time into a full Gothic experience with rows of black candles, a book with a skull on the cover, and a “blood-red” glass of wine on a bath caddy. It’s moody, it’s elegant, and it makes an incredible photo.
Best for: Guest bathrooms, self-care Halloween nights, romantic date nights.
Time to Decorate: 20 minutes.

What You’ll Need:
- A wooden bath caddy tray
- Black taper candles and candlesticks in varying heights
- A dark red drink (wine, juice, or a mocktail) in a wine glass
- A book with dark, Gothic cover art
How to Make It:
1. Cluster your candlesticks around the tub edge at different heights for a flickering, layered glow.
2. Set the bath caddy across the tub and place your book and drink on top.
3. Dim or turn off the overhead lights so the candles do all the work.
Pro Tip: Use battery-operated taper candles near the tub for safety. You still get the same warm flicker without any risk around water.
19. Crime Scene Shower Curtain
This is the ultimate jump-scare decoration: a shower curtain splattered with “bloody” handprints and a trail of bloody footprints leading across the floor. It’s dramatic, unforgettable, and shockingly easy to fake.
Best for: Guest bathrooms, horror-theme parties, teens and adults only.
Time to Decorate: 30 minutes.

What You’ll Need:
- A plain white shower curtain (thrifted or a spare)
- Red craft paint or fake blood
- A paper plate or palette for the paint
- Old towels or a floor covering (this gets messy)
How to Make It:
1. Lay the shower curtain flat and protect your work surface underneath.
2. Dip your hand or a handprint stamp into the paint and press it onto the curtain, dragging slightly downward for a “sliding” drip effect.
3. Repeat with a few more prints at varying heights, plus small splatter dots flicked from a paintbrush.
4. Once dry, hang the curtain and create a trail of painted footprints leading from the tub across the bathroom floor using a washable floor covering.
Pro Tip: Use washable paint or dedicated fake blood, not permanent dye, especially on flooring. You want screams, not a stain you’re scrubbing in November.
20. Apothecary Potion Shelf
Line up amber bottles filled with colored water, dried herbs, and handwritten “potion” labels along your bathroom counter for an instant witch’s apothecary. It’s a small footprint idea that still makes a big impression.
Best for: Powder rooms, guest bathroom counters, witch-theme parties.
Time to Decorate: 25 minutes.

What You’ll Need:
- 4-6 small glass bottles or jars (amber or dark glass works best)
- Food coloring and water
- Dried herbs, cloves, or small fake spiders
- Kraft paper or old-look labels and a pen
How to Make It:
1. Fill each bottle with water tinted a different color using food coloring.
2. Drop in a pinch of dried herbs, a clove or two, or a tiny fake spider into a few of the bottles for texture.
3. Write playful potion names on your labels (“Witch’s Brew,” “Spider Venom,” “Ghost Tears”) and wrap them around each bottle.
4. Line the bottles up on your counter or a small tray, tallest in back.
Pro Tip: Add a battery tea light behind the display at night. The colored water glows beautifully once the light hits it.
Backyard, Roof, and Beyond: Go Big Where You’ve Got the Space
If you’ve got a yard, patio, or roofline to work with, these are the ideas that turn heads from the sidewalk.
21. Backyard Ghost Garden
A cluster of glowing white sheet ghosts “floating” among your trees or bushes is one of the easiest large-scale outdoor decorations you can pull off in an afternoon, and it looks incredible lit up at night.
Best for: Yards with trees, bushes, or a fence line.
Time to Decorate: 45 minutes.
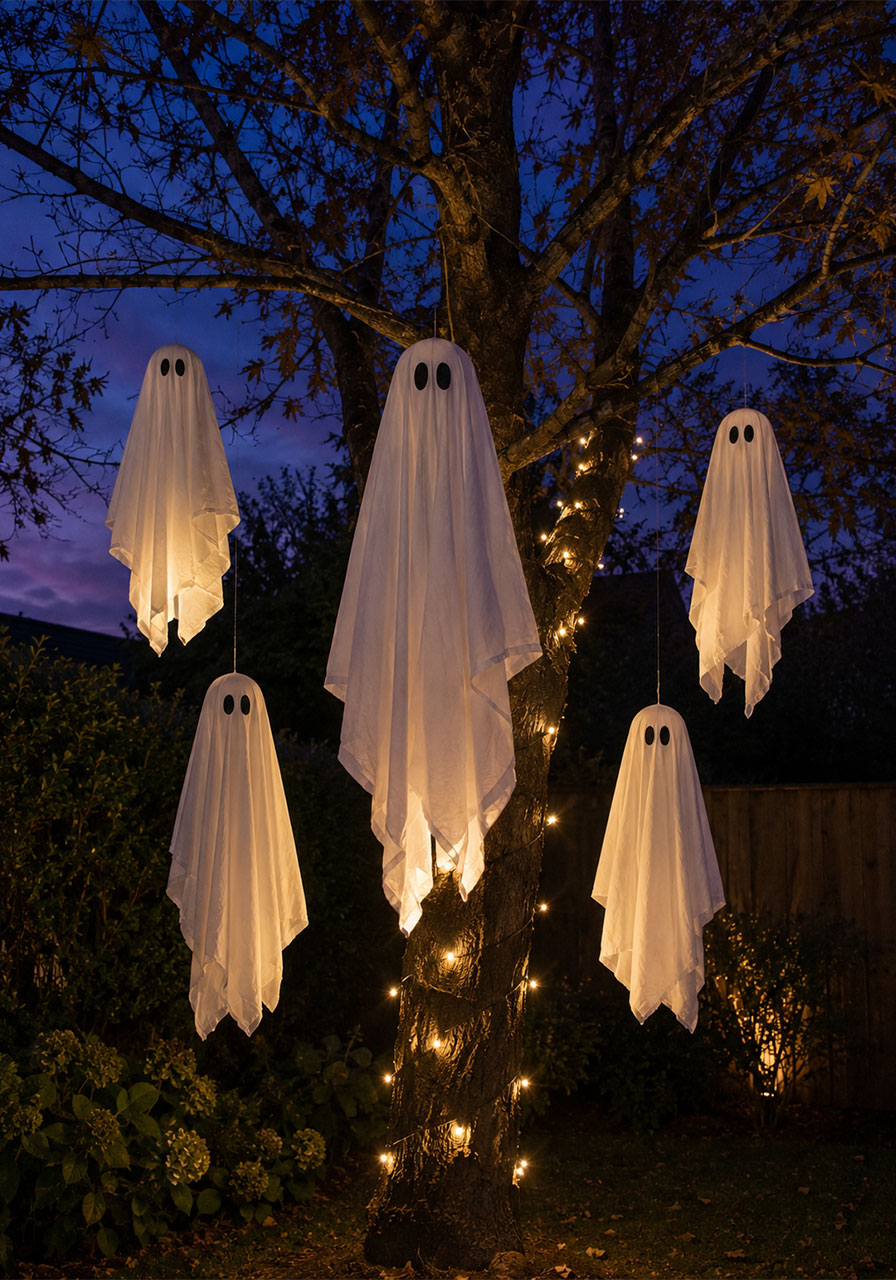
What You’ll Need:
- 4-6 white pillowcases or plain white fabric
- Foam balls or crumpled newspaper for the “heads”
- String or fishing line
- Black marker for eyes
- Warm white string lights or a spotlight
How to Make It:
1. Stuff a foam ball or crumpled newspaper into the top of each pillowcase to form a head shape, then tie it off with string.
2. Draw simple black oval eyes on each “face.”
3. Hang each ghost from a tree branch at a different height using fishing line so they appear to be floating.
4. Add string lights or a spotlight nearby so the ghosts glow once it gets dark.
Pro Tip: Space your ghosts unevenly, in twos and threes rather than a straight line, so the scene feels like a spontaneous haunting instead of a display.
22. DIY Graveyard Display
A cluster of homemade tombstones with funny, punny epitaphs is a backyard classic that never fails to get a laugh (and a scream) from visitors. Half-buried skeleton hands reaching up from the “graves” take it to the next level.
Best for: Front lawns, side yards, trick-or-treat routes.
Time to Decorate: 1 hour.

What You’ll Need:
- Foam board or plywood cut into tombstone shapes
- Gray craft paint
- A black permanent marker for epitaphs
- Wooden stakes to anchor each tombstone
- Fake skeleton hands or bones (optional)
How to Make It:
1. Cut your tombstone shapes and paint them gray, adding darker gray streaks for a weathered, aged texture.
2. Once dry, write a short, funny epitaph on each one (“I told you I was sick” always gets a laugh).
3. Attach a wooden stake to the back of each tombstone and push them into the ground at slightly different angles.
4. Partially bury skeleton hands near the base of a few tombstones so they look like they’re reaching up.
Pro Tip: Angle a few tombstones slightly sideways or leaning, like they’ve been there for decades. Perfectly straight tombstones read as “new,” not “haunted.”
23. Glowing Gutter Eyes
Line your roofline or gutters with a row of glowing monster eyes peeking over the edge, and your whole house looks like it’s watching the street. It’s a newer take on roof decor that’s quickly becoming a neighborhood favorite.
Best for: Homes with visible rooflines or gutters, dramatic curb appeal.
Time to Decorate: 30 minutes.

What You’ll Need:
- A set of glowing or reflective monster eye decorations (battery-powered LED eyes work great)
- Zip ties or gutter clips
- A sturdy ladder
How to Make It:
1. Clip or zip-tie each pair of eyes along the gutter edge, spacing them a few feet apart.
2. Vary the height slightly (some peeking just over the edge, some higher) so it looks like different creatures are hiding at different spots.
3. Test them at dusk to make sure they’re visible from the street, and adjust spacing as needed.
Pro Tip: Cluster more eyes near your porch light or entryway. That’s where trick-or-treaters will be looking up, and you want the scare to land right when they approach the door.
Because Halloween Is So Much More Fun When Your Whole House Is In On It
You don’t need weeks of prep or a professional decorator’s budget to pull off a Halloween look people remember. Pick two or three ideas from each room, work through them one weekend afternoon, and your whole house will be ready to haunt in no time.
With this guide in your back pocket, you’re all set to host the kind of Halloween that has your neighbors, guests, and trick-or-treaters talking well into November.
