
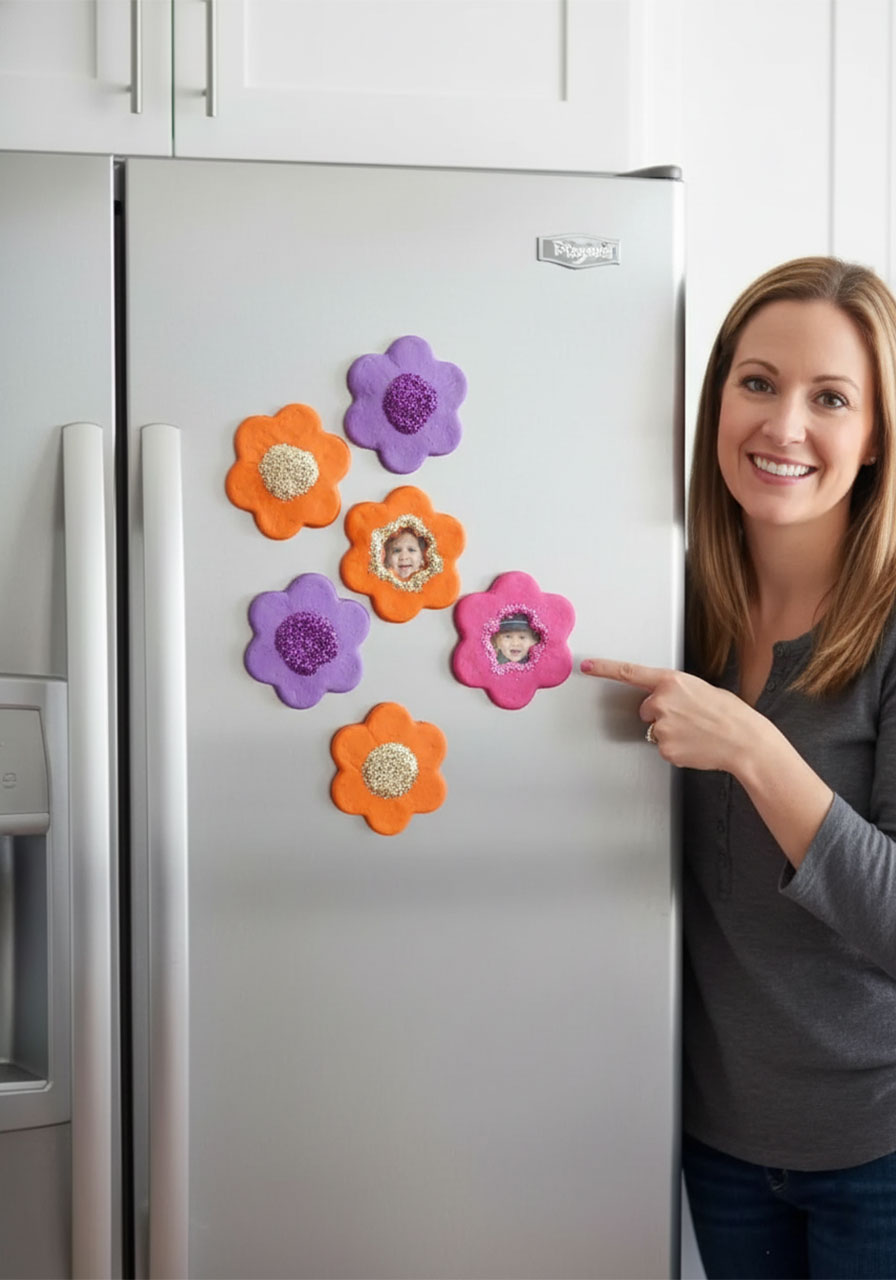
If you’re on the hunt for a Mother’s Day gift that’s heartfelt, budget-friendly, and genuinely fun to make with kids – stop right here. These salt dough flower magnets check every single box. They’re colorful, customizable, and so easy that even the youngest crafters can get in on the action. Moms (and grandmas!) will absolutely love displaying these on the fridge – especially the photo versions that put a tiny little face right in the center of each flower.
The best part? You only need 3 basic ingredients to make the dough, and the whole project costs just a few dollars. Whether you’re a parent crafting at home or a teacher running this as a classroom activity, this one is a guaranteed winner.
⚠️ Important reminder: Salt dough contains a high amount of salt and can be toxic to pets if eaten. Please keep the dough and finished magnets away from animals.

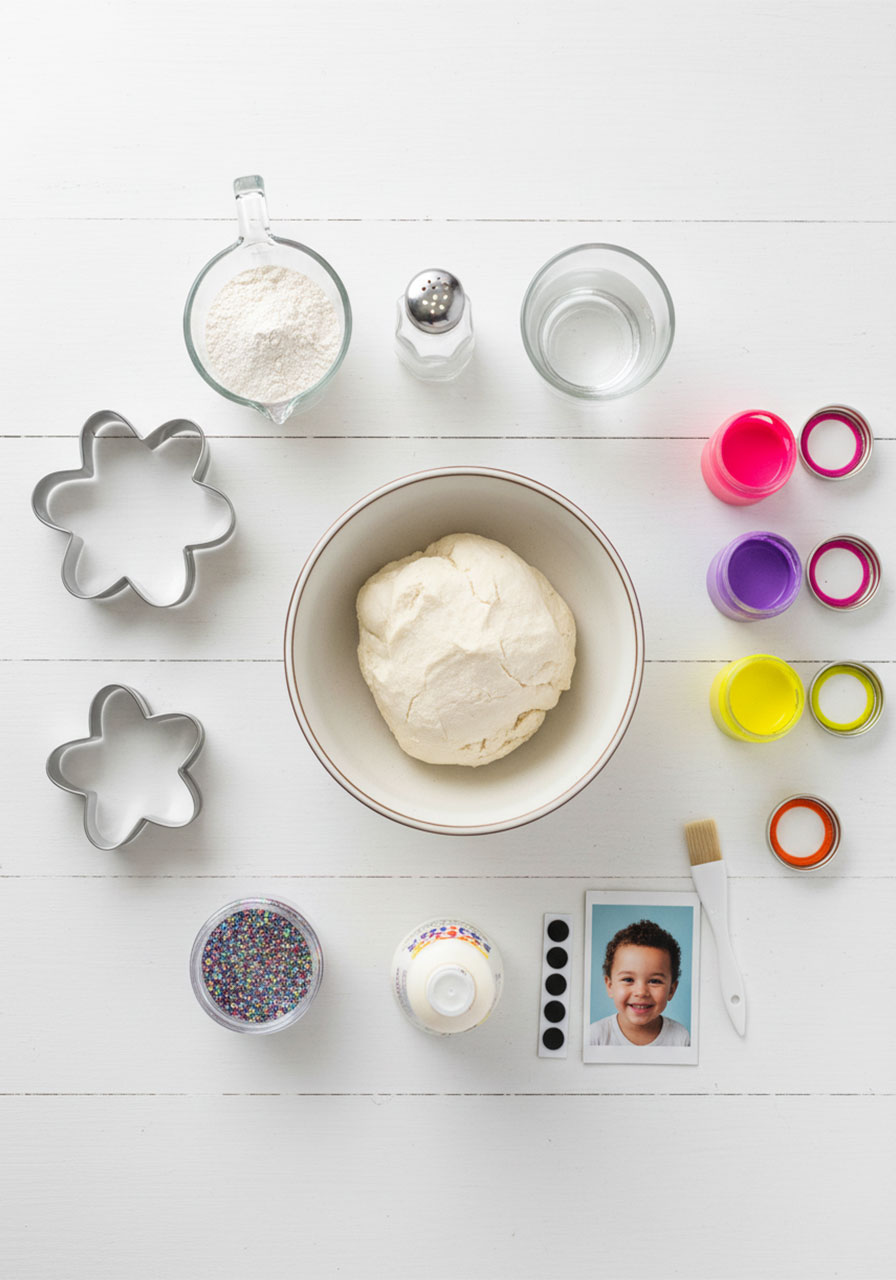
What You’ll Need
Here’s everything to gather before you get started:
Salt dough (see recipe below – just flour, salt, and water!)
Flower cookie cutters – you’ll need one large and one small size. A set that includes both is ideal.
Acrylic paint – neon colors like pink, purple, and orange look absolutely stunning on these
Mod Podge (glossy finish) or a clear glaze spray sealant
Glitter – chunky glitter works great for the center decoration
Craft magnets – either glue-on or peel-and-stick work perfectly
Strong craft glue (like Elmer’s or a hot glue gun for adults)
Printed photos – wallet-sized or small prints of your child’s face (for the photo version)
Non-stick baking sheet or silicone baking mat
Rolling pin


The Salt Dough Recipe
Making salt dough is one of those magical moments where kids realize that something amazing can come out of just three pantry staples. Here’s the classic recipe:
- 2 cups all-purpose flour
- 1 cup salt
- ¾ to 1 cup water (add gradually)
Mix the flour and salt together first, then slowly add water until the dough comes together into a smooth, non-sticky ball. Knead it for a few minutes until it’s nice and pliable – similar to the texture of play dough. If it’s too sticky, add a little more flour. Too dry? Add water one teaspoon at a time.
Pro Tip: Make a big batch! Salt dough goes a long way and costs almost nothing. If you’re doing this as a classroom activity, one large batch can easily yield 20–25 flowers.
Step-by-Step: How to Make Salt Dough Flower Magnets
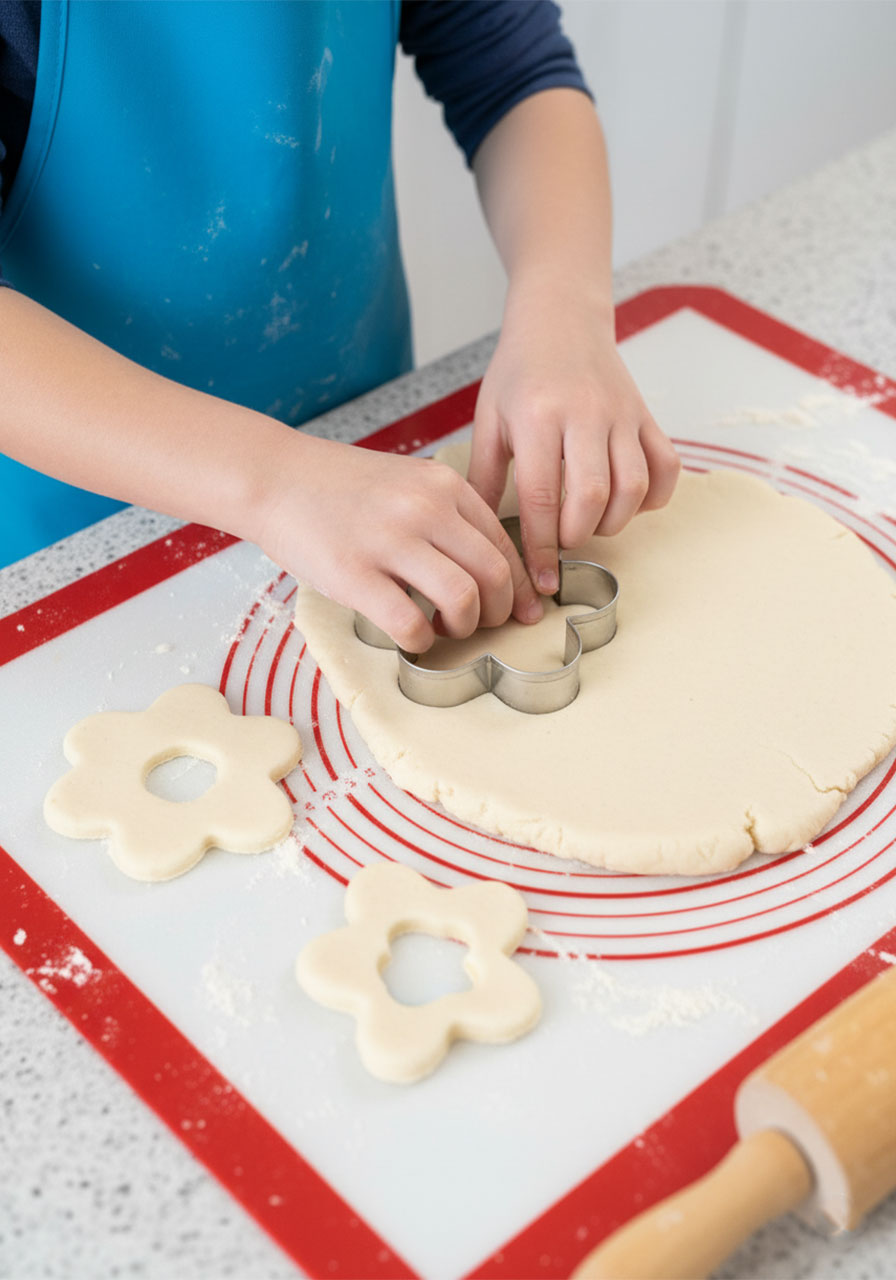
Step 1: Roll Out Your Dough
Once your dough is ready, roll it out on a lightly floured surface to about ½ cm (roughly ¼ inch) thick. Keep it on the thinner side – thinner flowers dry faster, weigh less, and stick to the fridge more reliably with the magnet. Thick flowers can also take much longer to bake or air dry all the way through.
Step 2: Cut Out Your Flowers
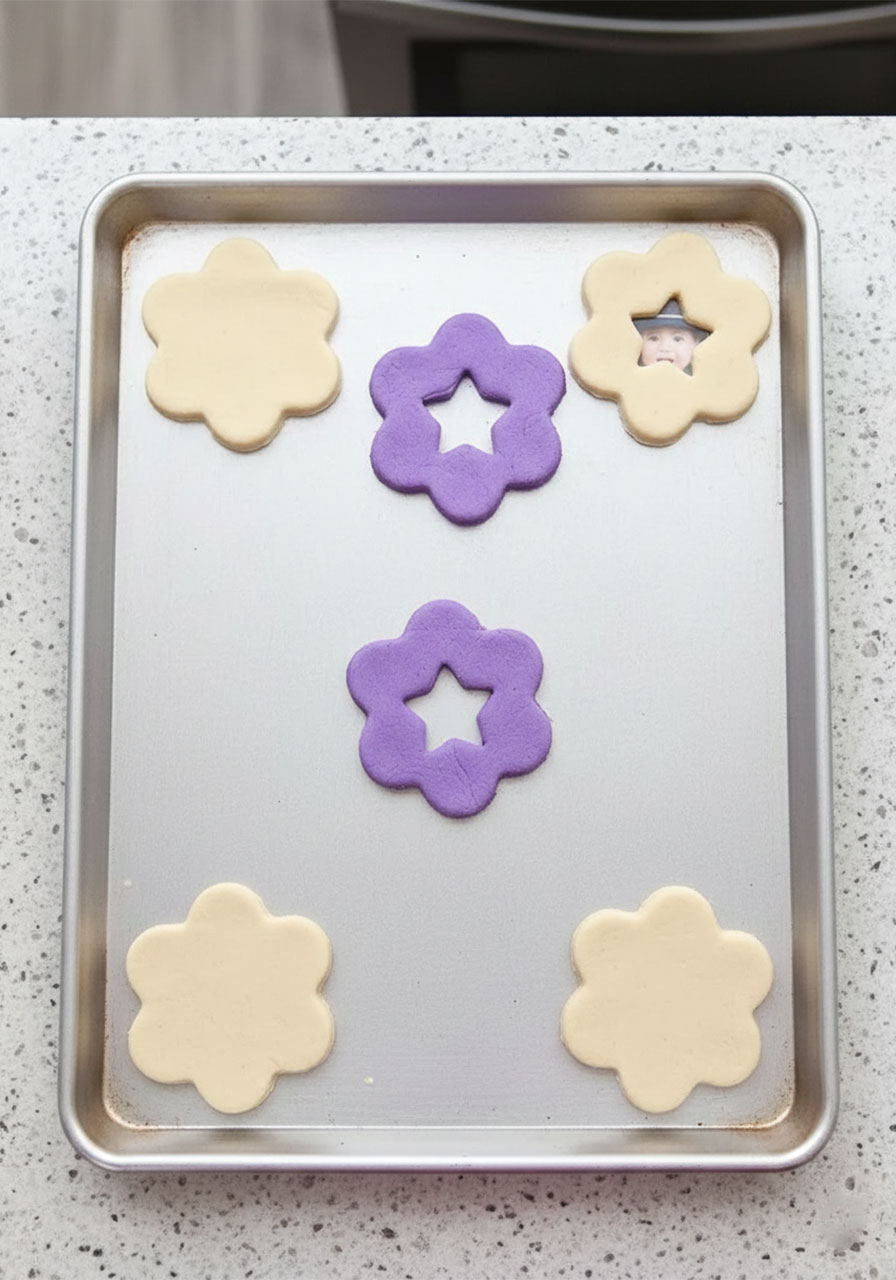
Use your large flower cookie cutter to press out the base flower shapes. Place them on your non-stick baking sheet as you go.
For the photo version, use your small flower cookie cutter (or any small round cutter) to cut a hole in the center of the large flower while the dough is still soft. This hole is where the photo will peek through from the back later – so cute!
For the plain version, just leave the flower solid with no cutout. You’ll add glitter decoration to the center of these instead.
Tip: A silicone baking mat on your tray is your best friend here – nothing sticks, and cleanup is a breeze. A light dusting of flour on the mat also helps.
Step 3: Bake (or Air Dry) Your Flowers
You have two options here:
Oven method: Bake at 200°F (93°C) for 2–3 hours until completely hard and dry. Check them every 30 minutes – you’re looking for a firm, dry texture all the way through with no soft spots.
Air dry method: Leave them out at room temperature for 2–3 days, flipping once halfway through. This method works well but requires patience!
Do not rush the drying step. Flowers that aren’t fully dry will crack or get soft over time.
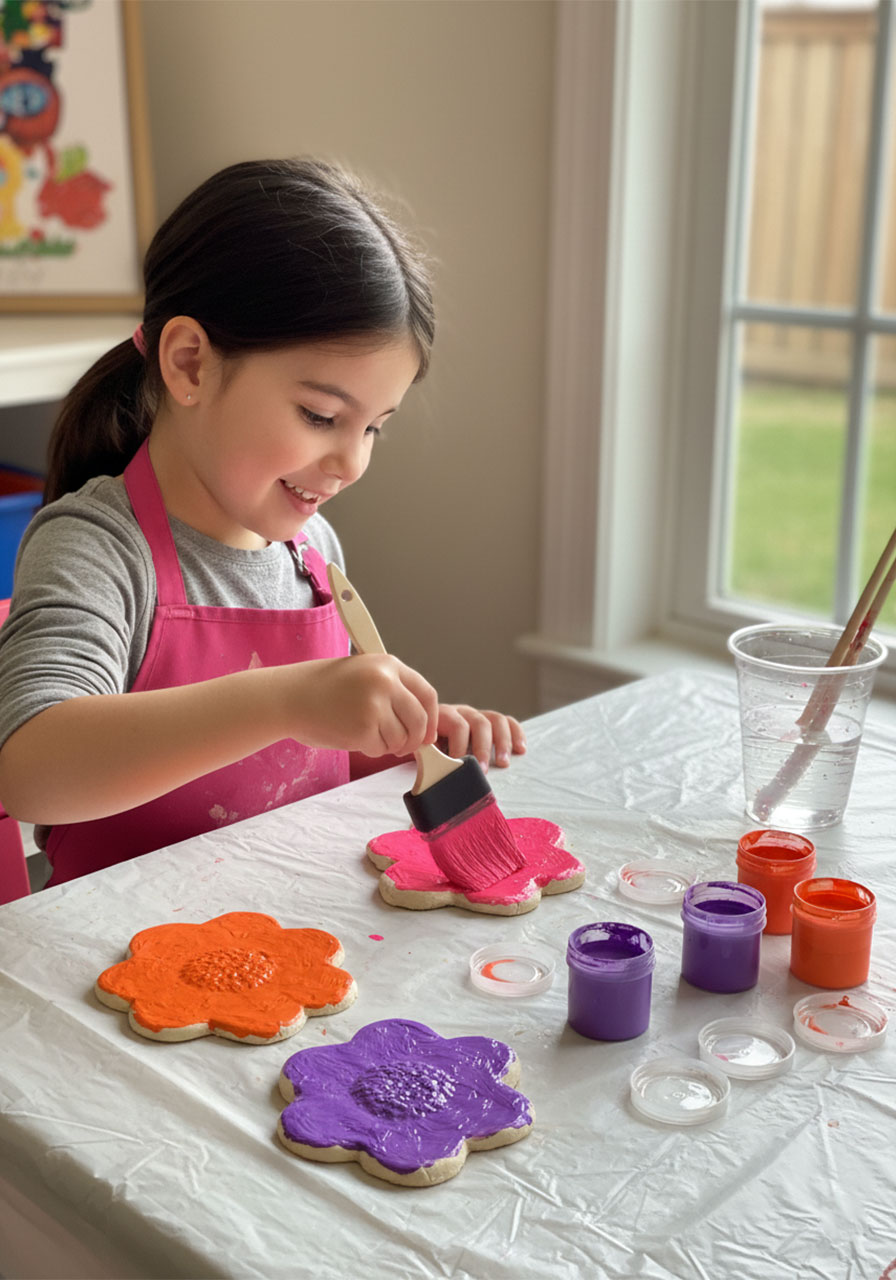
Step 4: Paint Your Flowers
Once the flowers are completely cool and dry, it’s time for the fun part – painting! Acrylic paints work best because they go on smooth and dry quickly.
Neon pink, bright orange, and bold purple are showstopper colors that really make these pop. Paint the entire top and sides of each flower. Let the first coat dry, then add a second coat if needed for full, vibrant coverage.
Classroom tip: Set up a painting station with small cups of paint and foam brushes – kids can each paint their own flower and sign the back!
Step 5: Seal Your Flowers
This step is what separates magnets that last for years from ones that crack after a few months. Once the paint is fully dry, seal every flower with a coat of glossy Mod Podge or a clear glaze spray.
If you’re using a spray sealant, adults should handle this step outdoors or in a well-ventilated area. The sealant locks out moisture (which prevents mold!) and keeps the paint from chipping. This is a must-do step, not an optional one.
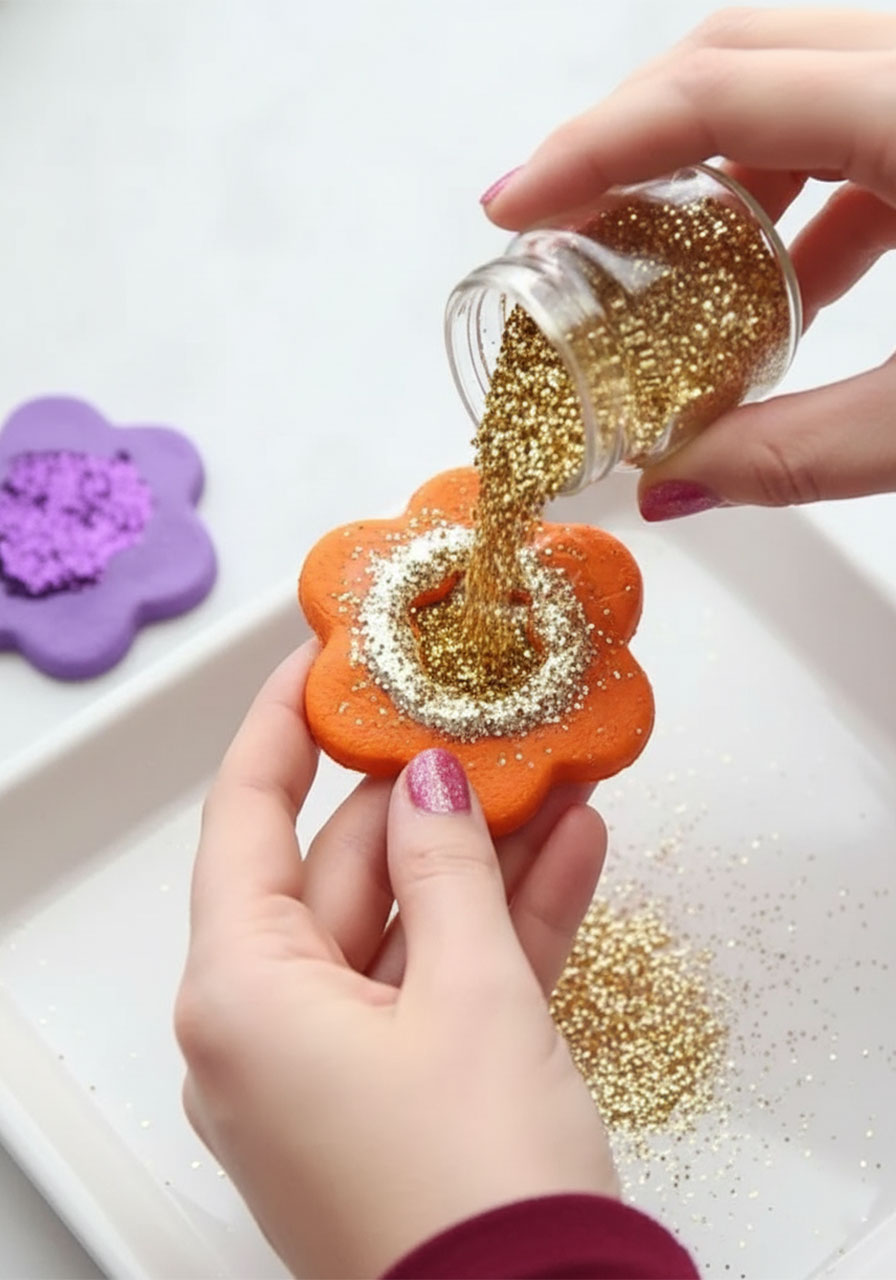
Step 6: Add the Glitter
Now for everyone’s favorite part – glitter time! 🌟
Apply a thin layer of craft glue to the center of each flower:
For solid (no-cutout) flowers: Add glue to the center and sprinkle glitter on top. Let it dry completely before shaking off the excess.
For photo-cutout flowers: Apply glue around the rim of the center hole and sprinkle glitter to create a sparkling frame effect around the photo opening.
Match your glitter color to your paint for a coordinated look, or go wild with contrasting glitter – gold glitter on orange flowers looks especially gorgeous!
Step 7: Add the Photo (Photo Version Only)
For the photo-frame magnets, print out small photos – your child’s face works beautifully. Trim each photo so it’s slightly larger than the center hole cutout.
Flip the flower over (painted side down) and center the photo over the hole so the face peeks through to the front. Glue the photo to the back of the flower and let it dry completely before moving on.
Pro Tip: Print a few copies of the photo so you have extras in case of misalignment. Wallet-sized prints from a pharmacy or home printer both work great.
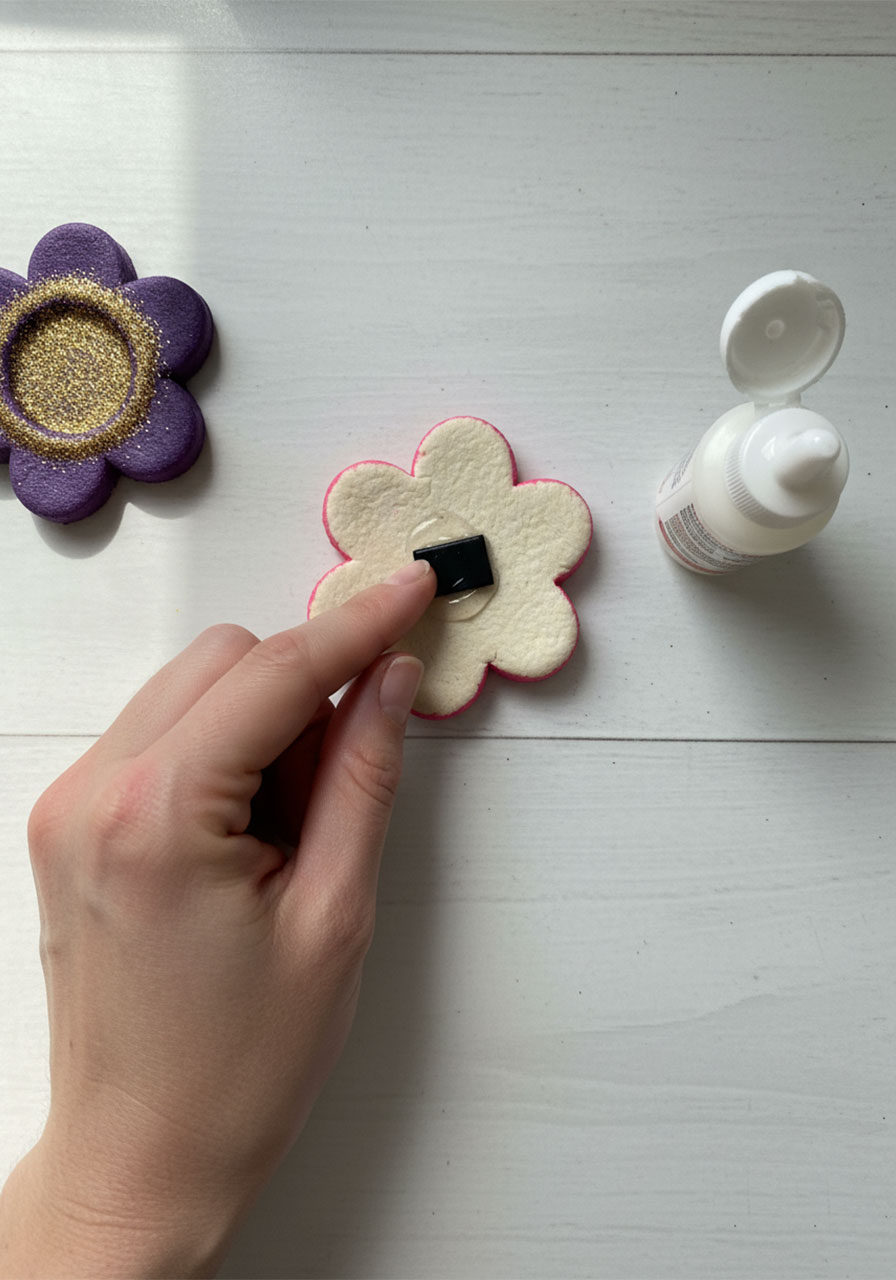
Step 8: Attach the Magnet
You’re almost done! Flip the flower over so the back is facing up. Apply a strong dab of craft glue (or use a peel-and-stick magnet) to the center of the back and press your craft magnet firmly in place.
Let the glue cure for at least an hour before sticking it on the fridge. For a stronger hold, a hot glue gun works wonders – just let an adult handle that part.
That’s it – your salt dough flower magnets are ready to gift! 🌸
Tips for Making These with a Classroom
This project is a total hit as a classroom Mother’s Day activity. A few things that make it run smoothly:
Make the dough in advance. Mix and portion the dough before class so kids can jump straight into cutting their flowers. This saves time and reduces mess.
Bake or dry the flowers the day before painting. Plan the project across two sessions – one day for making and drying, the next for decorating.
Have parents send in a small photo. Send a note home a week before asking parents to provide a small printed photo. Wallet-sized works perfectly.
Set up a glitter station with trays. Put glitter on a tray so kids can pour it over their flowers and the excess gets collected – your floor will thank you.
Teachers handle the sealing step. Spray sealant should always be applied by an adult, away from the children.
Fun Variations to Try
Handprint in the center: Instead of a photo, press your child’s thumb or small finger into the wet dough center before baking to leave a permanent keepsake print.
Mix in color: Add a few drops of food coloring or acrylic paint directly into the dough before rolling it out – skip the painting step entirely for a quicker project!
Write a name or message: Use a toothpick to carve “Mom,” “Nana,” or a short message into the wet dough before baking for an extra personal touch.
Make a set: Create 3–5 matching flowers in different colors for a gorgeous fridge display that Mom will love showing off.
Why Kids (and Moms!) Love This Craft
There’s something genuinely special about a gift that a child made with their own hands. These flower magnets aren’t just pretty – they’re meaningful. Every time Mom opens the fridge and sees a little face smiling back at her from a glittery pink flower, she’ll feel that warm, proud-parent glow all over again.
And for the kids? There’s real pride in making something from scratch – mixing the dough, cutting the shapes, choosing the colors. It’s the kind of craft they’ll remember making, and Mom will never throw away.
Whether you’re making one at home or twenty in a classroom, these salt dough flower magnets are one of those crafts that truly delivers every time. Happy Mother’s Day! 💐
More Mother’s Day Ideas to Keep the Fun Rolling:
30+ Mother’s Day Crafts for Kids of All Ages
5 Heartwarming Mother’s Day Craft Ideas Grandma Will Absolutely Treasure
How to Make a DIY Pop-Up Tulip Card for Mom
Easy Cotton Pad Tulip Craft for Kids
The Sweetest Mother’s Day Coffee Cup Craft
This Sweet Mother’s Day Handprint Flower Craft Will Make Mom Cry Happy Tears (The Best Kind)
How to Make an Adorable Mother’s Day Heart Card (That Folds Into a Surprise!)
The Sweetest Mother’s Day Card Idea: Baby Handprint with a Heart
100 DIY Mother’s Day Gift Ideas Mom Will Love (Handmade From the Heart)