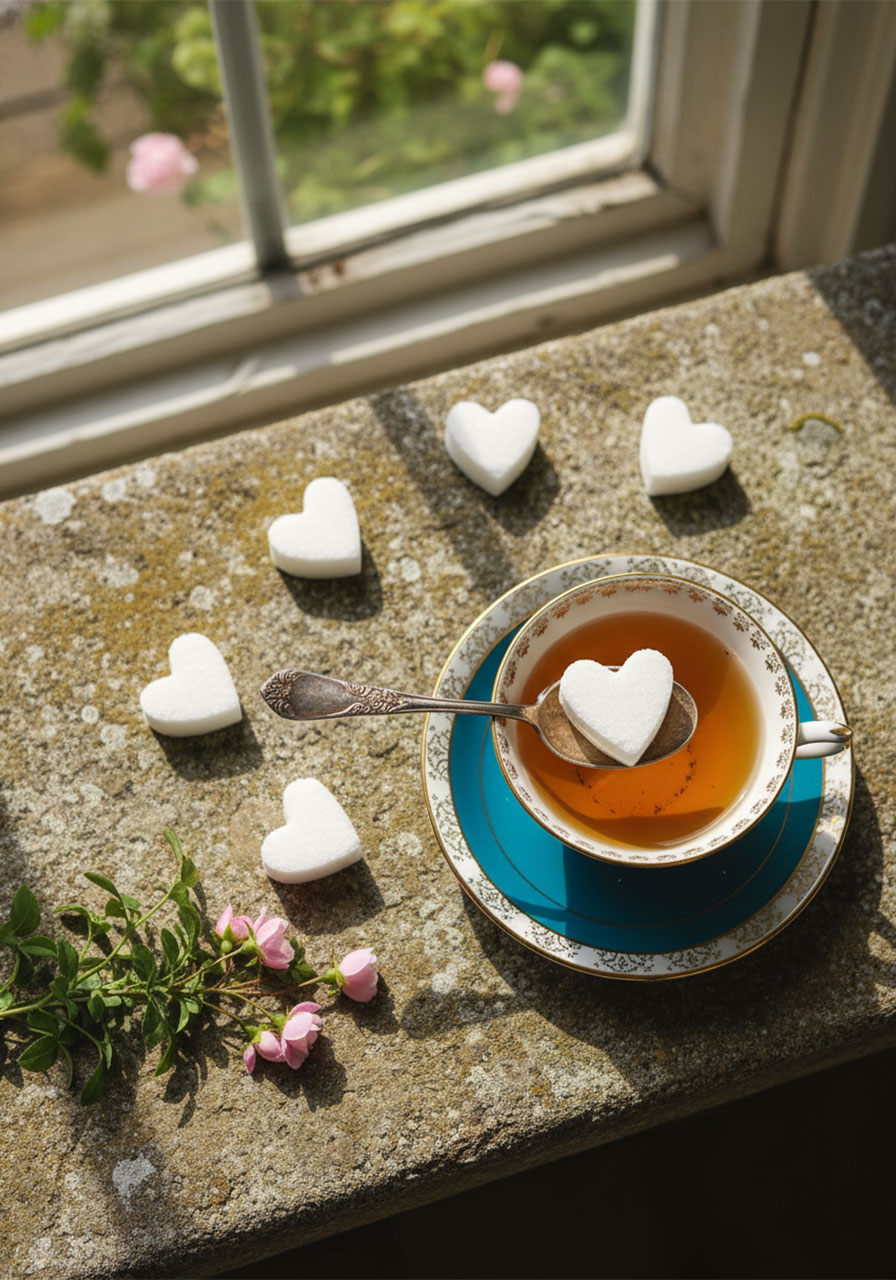
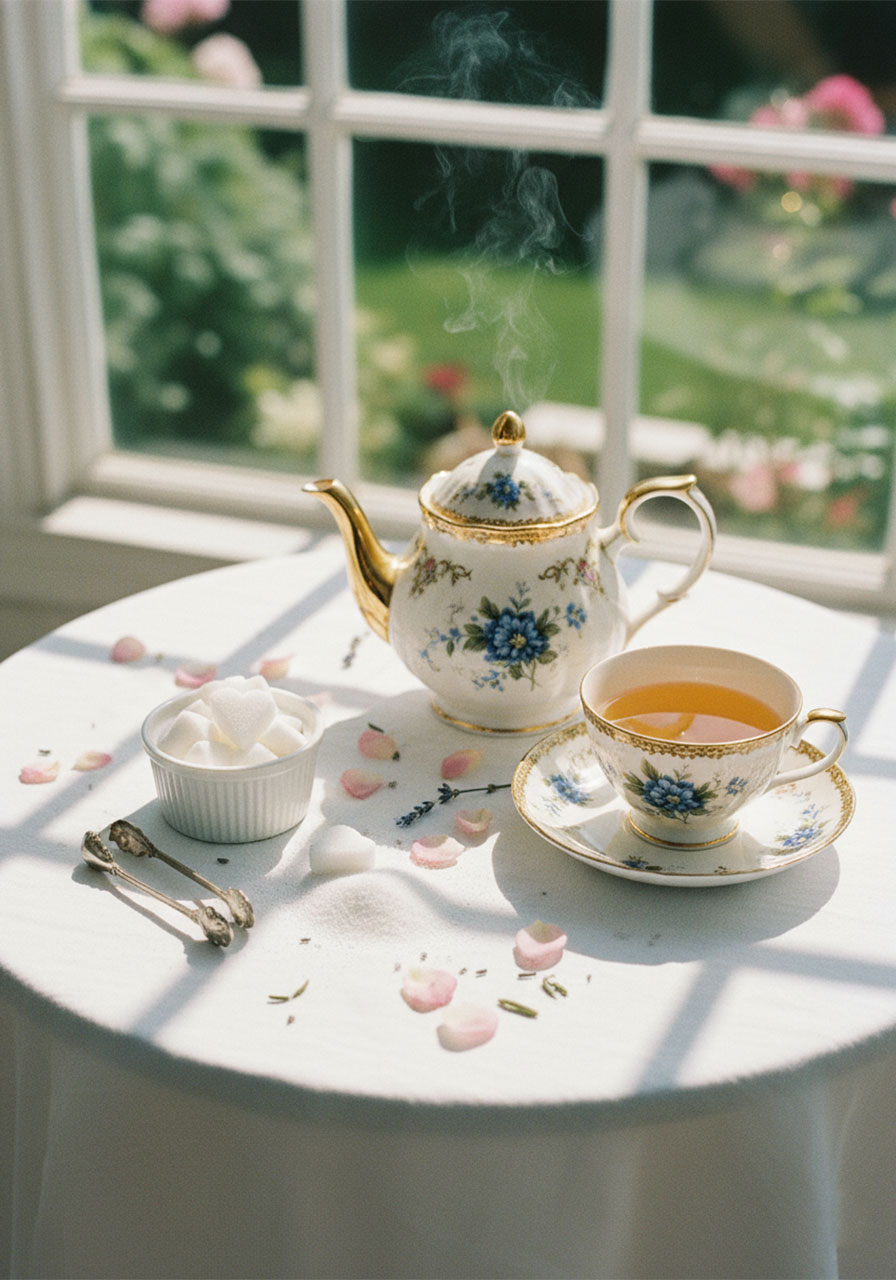
There’s something about a beautifully set tea table that just makes everything feel a little more intentional – a little more you. And if you’ve ever been to a high tea where tiny heart-shaped sugar cubes were sitting in a little dish beside the teapot, you already know the feeling. It’s that instant “ooh, how charming” moment that guests remember long after the last cup is poured.
Here’s the best-kept secret: those gorgeous artisan sugar cubes you’ve been eyeing at specialty stores? You can make them at home in about 5 minutes – with just 2 ingredients. Yes, really.
This DIY sugar cube tutorial is the kind of small, beautiful detail that takes your tea party, brunch, bridal shower, or self-care Sunday from “cute” to completely unforgettable. And once you see how easy it is, you’ll want to make a batch for yourself every single week.
Let’s get into it.
Why You’ll Love This DIY Sugar Cube Idea
If you’re the type of woman who loves making everyday moments feel special – this one’s for you.
These homemade sugar cubes are not just pretty. They’re the perfect hostess touch that shows your guests you put thought and care into every detail of your gathering. They also make an absolutely adorable homemade gift – pop them in a little jar tied with a ribbon and you have something genuinely lovely to give.
Plus, store-bought fancy sugar cubes can run surprisingly expensive. Making your own means you get all the charm at a fraction of the cost.
Here’s why this DIY is going straight into your party planning toolkit:
Only 2 ingredients (you already have both)
Takes about 5 minutes of hands-on time
Works in any shape – hearts, stars, flowers, snowflakes, you name it
Customizable with color, flavor, and different sugar types
Perfect for tea parties, bridal showers, Mother’s Day brunches, or everyday self-care rituals

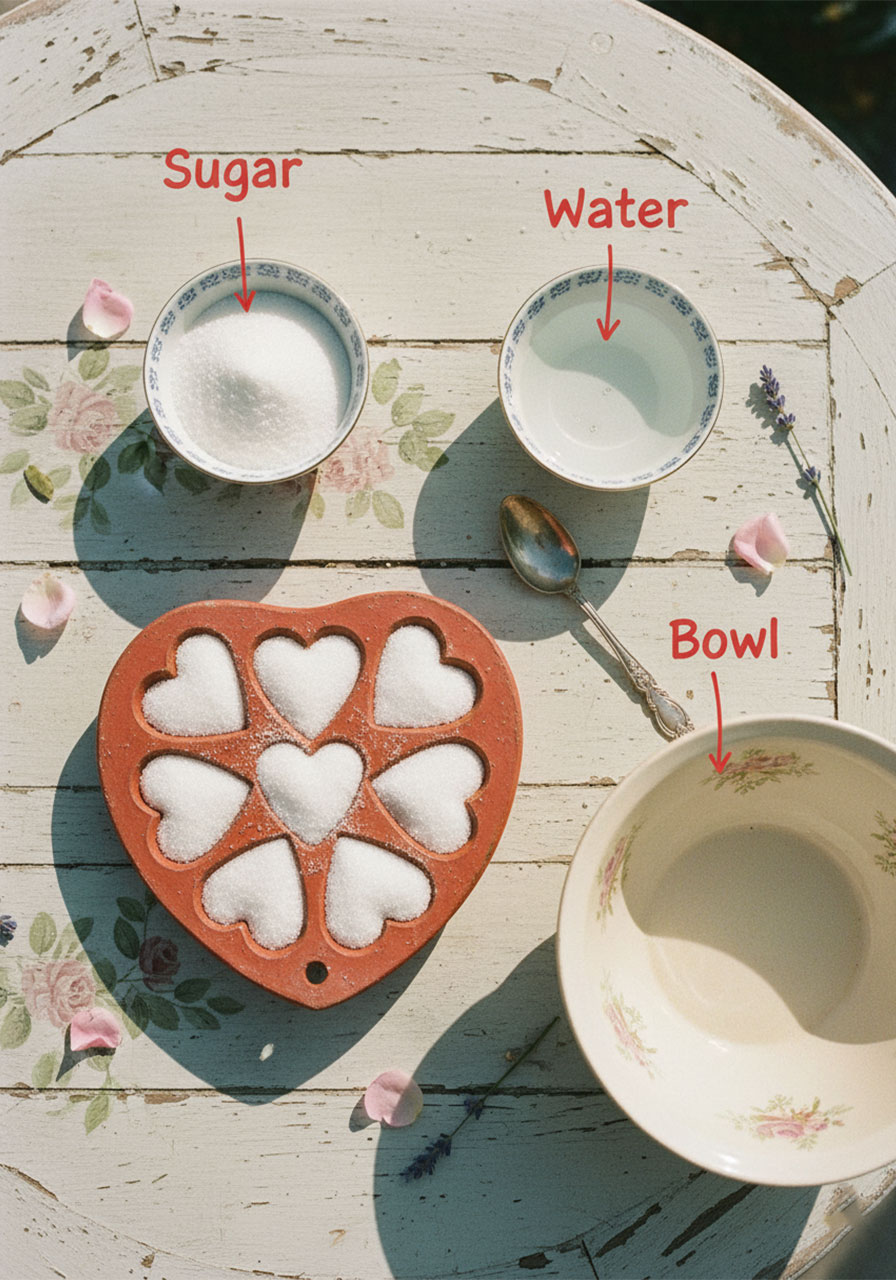
What You’ll Need
The supply list for these DIY sugar cubes is beautifully short:
¼ cup white granulated sugar (or brown sugar – both work!)
½ teaspoon water
A mixing bowl
A teaspoon
A silicone candy or chocolate mold in your favorite shape
That’s it. Seriously.
For the mold, a silicone mold is highly recommended – it’s flexible, so the sugar cubes pop out cleanly without breaking. You can find cute heart-shaped molds at dollar stores (especially around Valentine’s Day!) or easily online. But don’t feel locked into hearts – stars, flowers, and seasonal shapes all look stunning on a tea tray.
How to Make DIY Sugar Cubes Step by Step
Step 1: Mix Your Sugar and Water
In your bowl, combine the sugar and water and stir until just combined.
Here’s the key thing to get right: you do not want the sugar to dissolve. The mixture should look and feel like damp sand – slightly clumped, still granular, with a rough texture. Think of it like the sand at the beach right at the water’s edge.
If it looks too wet and the sugar is dissolving, just add a little more sugar and stir again until you hit that perfect damp-sand consistency. This step is everything – get it right and the rest is a breeze.

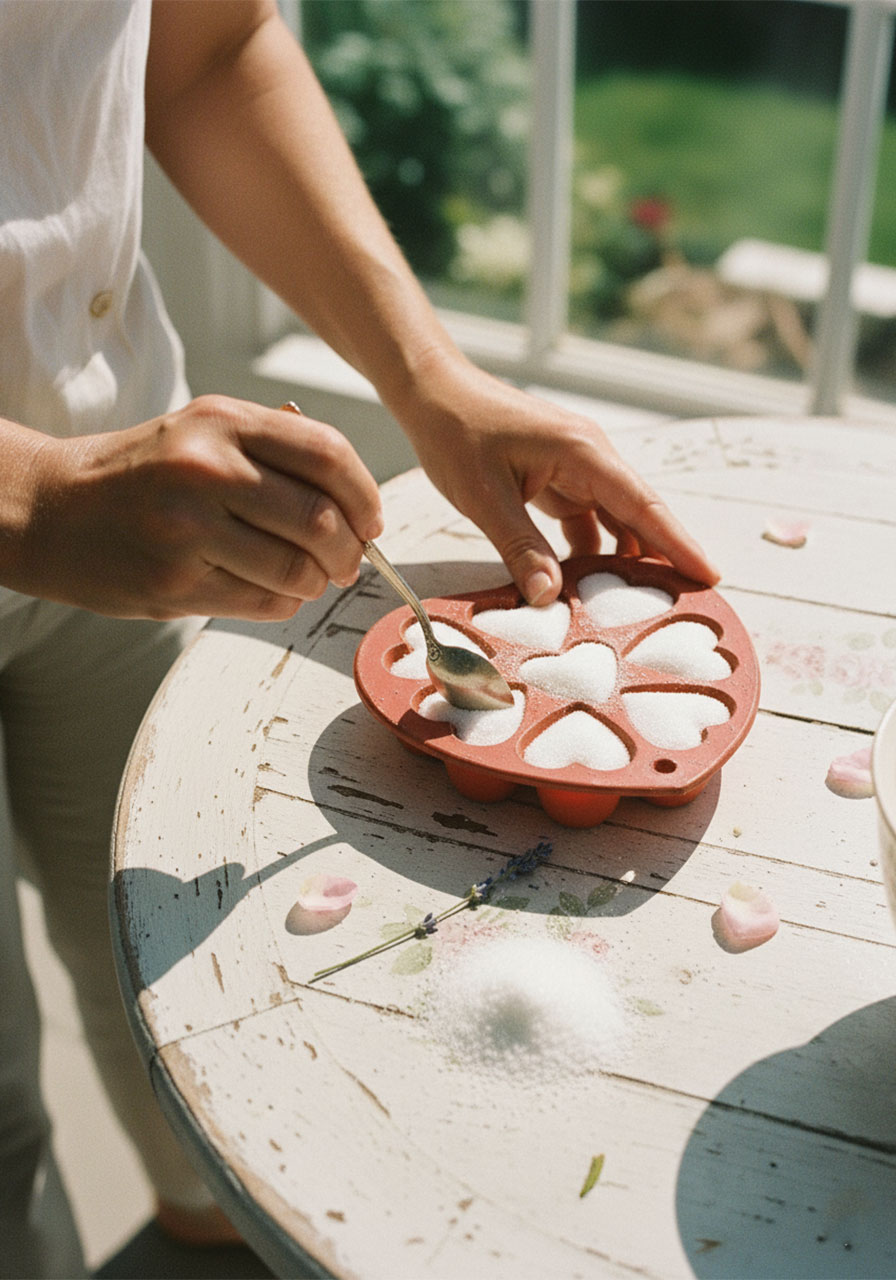
Step 2: Fill Your Molds
Using your teaspoon, scoop the damp sugar mixture into each cavity of your mold.
Press it down firmly and pack it in as tightly as you can. This compression is what helps the cube hold its shape once it dries. Don’t be shy here – really press it in.
One teaspoon of sugar = one sugar cube. If your mold is shallow, you may not need to fill it all the way to the top – about halfway is usually the right amount for a single serving in a cup of tea. You want your guests to be able to sweeten their tea, not turn it into dessert!
Step 3: Let Them Dry Overnight
Cover your mold loosely and leave it out at room temperature overnight – or for at least 8 hours.
Do not rush this step. The waiting is where the magic happens. As the water evaporates, the sugar crystallizes together and forms a solid, beautiful little shape. Trying to unmold them too early will just result in a crumbly mess.
Set them before you go to bed, wake up in the morning, and they’ll be ready to go. It’s honestly the most satisfying little morning reveal.
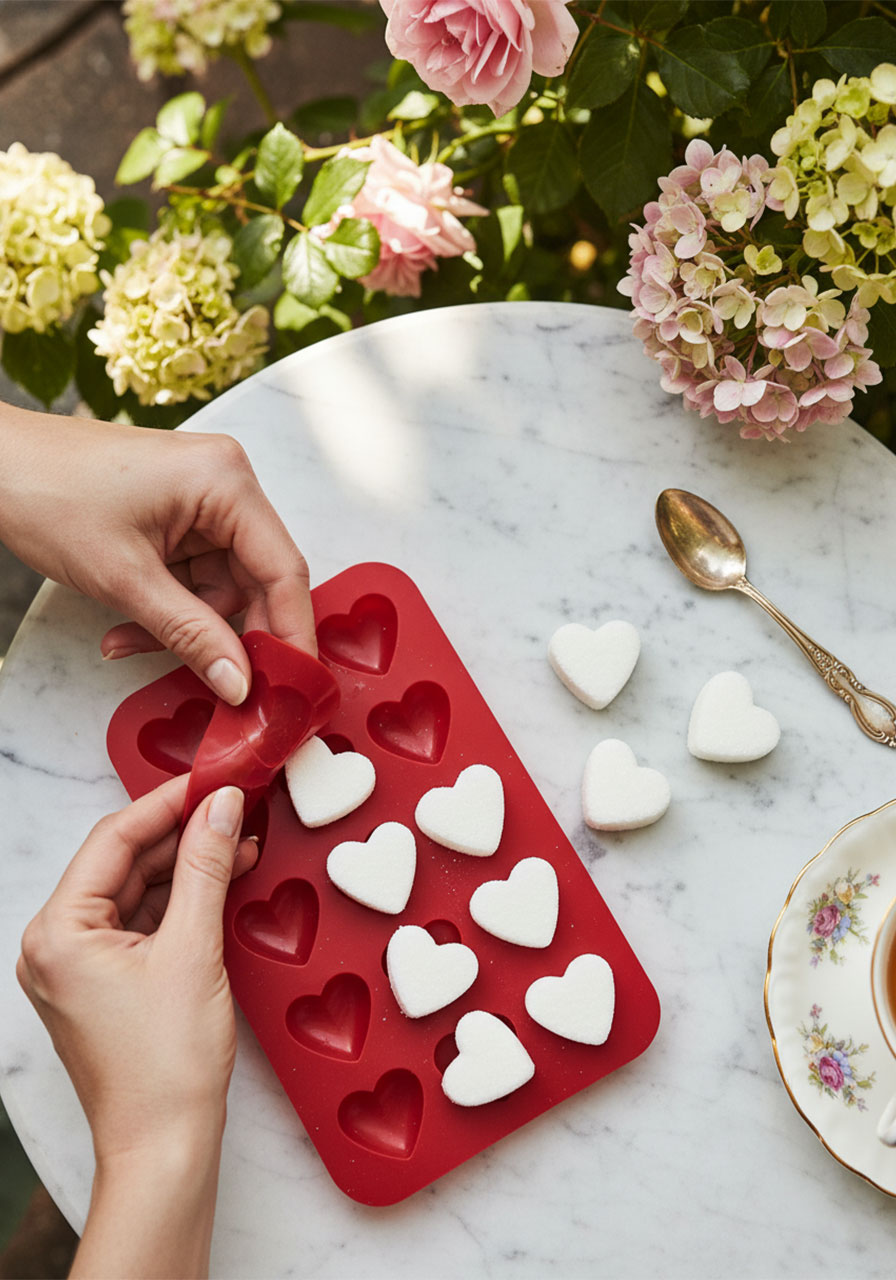
Step 4: Unmold and Store
Once fully dry, gently flex your silicone mold to release each sugar cube. They should pop out cleanly with a satisfying little “click.” If one breaks, no worries – it happens – just press more firmly next time.
Store your finished sugar cubes in an airtight container at room temperature. They’ll keep beautifully for weeks.
Step 5: Pull Them Out and Watch Your Guests React
Place them in a tiny dish, a ramekin, or even a vintage sugar bowl at your next tea party – and just watch people’s faces light up. Every single time, someone will say “Did you MAKE these?!” And you get to say yes.
Pro Tips for Perfect Sugar Cubes Every Time
A few insider tips that make all the difference:
Consistency is everything. The damp sand texture is non-negotiable. Too wet = won’t hold shape. Too dry = won’t stick together at all. If you’re unsure, err on the side of slightly less water – you can always add a tiny drop more.
Pack them tight. The more firmly you press the sugar into the mold, the more solid and defined your final cube will be. Use the back of the spoon to really compress it.
Be patient with unmolding. Silicone molds make this much easier, but be gentle. A slow, even flex of the mold releases the cubes cleanly. Rushing it is how they break.
Try brown sugar. Brown sugar cubes have a gorgeous warm caramel color and a subtle molasses depth that pairs beautifully with black teas and chai. They look stunning on a rustic or boho-style tea table.
Fun Variations: Get Creative With Your Sugar Cubes
Once you’ve mastered the basic recipe, there is so much fun to be had with flavor and color. Here are some ideas to inspire you:
Color Your Sugar Cubes Naturally
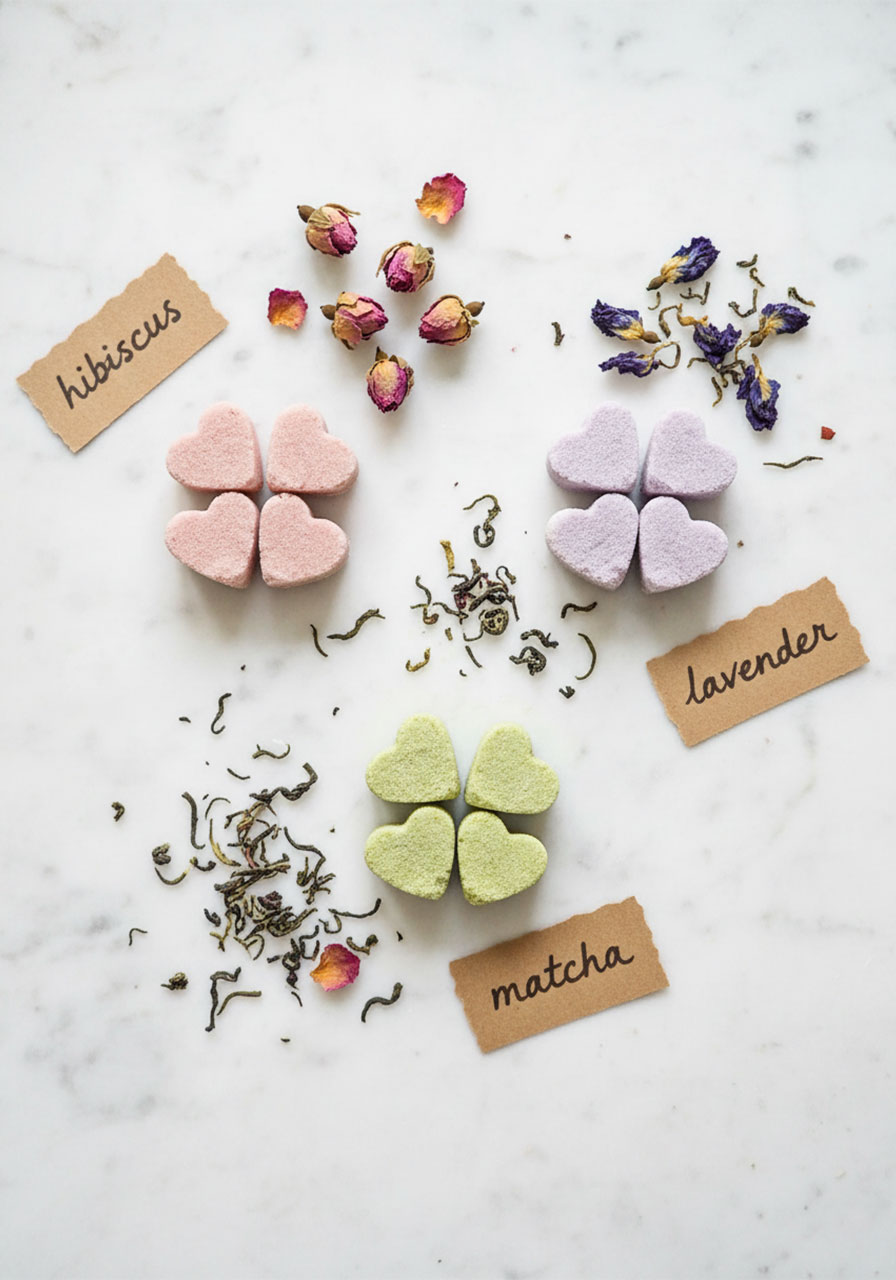
Instead of plain water, brew a strongly colored herbal tea – hibiscus creates a gorgeous deep pink, butterfly pea flower makes a stunning lavender-blue, and matcha steeped in a tiny bit of water makes a beautiful soft green. Mix that tea into your sugar just like you would plain water and you’ll get pastel-colored cubes with a subtle flavor twist.
Add a Flavor Twist
Swap plain water for rose water, orange blossom water, or lavender water for a delicate floral note. These are especially beautiful for bridal showers and spring tea parties.
Spice It Up
Grind a tiny bit of cinnamon, cardamom, or vanilla bean powder and mix it directly into your sugar before adding the water. These spiced sugar cubes are absolutely divine in chai or Earl Grey.
Just keep in mind – flavored cubes will add flavor to the tea they’re dropped into. That’s wonderful for most guests, but if you’re serving to a mixed crowd, it’s always a good idea to offer both plain and flavored options.
DIY Sugar Cubes as a Homemade Gift Idea
Looking for a thoughtful, low-cost gift that feels genuinely luxurious? This is it.
Fill a small glass jar with an assortment of sugar cubes in different shapes and flavors, tie a ribbon around it, and add a little tag. It makes a beautiful hostess gift, a Mother’s Day present, a teacher appreciation gift, or a sweet addition to a self-care gift basket.
You can make a batch in different colors and shapes for holidays – red and green cubes for Christmas, pastel hearts for Valentine’s Day, pumpkin-shaped cubes for fall. The possibilities are genuinely endless.

How to Style Your Sugar Cubes for a Tea Party
Presentation matters – and the good news is, this doesn’t have to be complicated at all.
A small white ramekin or vintage china sugar bowl filled with your homemade cubes is already stunning on its own. For an extra-special touch, arrange them in alternating colors or shapes. A little pair of sugar tongs beside the dish instantly elevates the whole setup.
Lay them out on a marble surface or a linen tablecloth alongside your teapot, and you have a tea table that looks effortlessly elegant. Your guests won’t believe you made those sugar cubes yourself – until you tell them, and then you’ll be the most impressive host in the room.
Frequently Asked Questions
Can I use any type of sugar?
Yes! White granulated sugar gives you classic clean white cubes. Brown sugar gives a warm, rustic look. Cane sugar and coconut sugar also work – just keep in mind they may have different textures and colors. Avoid powdered/confectioners sugar, as it doesn’t have the granular structure needed to form a cube.
How long do DIY sugar cubes last?
Stored in an airtight container at room temperature, homemade sugar cubes keep for several weeks to months – as long as moisture doesn’t get in. Keep them away from humidity and they’ll stay perfect.
My cubes crumbled when I unmolded them. What went wrong?
One of two things: either the sugar wasn’t packed firmly enough, or they weren’t fully dry yet. Make sure you’re pressing the sugar in tightly during step 2, and give them a full 8+ hours to dry before unmolding.
Can I add food coloring?
Yes! A tiny drop of gel food coloring mixed into the water before combining with sugar works beautifully. Gel coloring is more concentrated, so you’ll get vibrant color with just a drop and won’t add too much liquid.
Do I need a special mold?
Any silicone candy or chocolate mold works. Dollar stores, craft stores, and Amazon all carry them in a huge variety of shapes. Silicone is the best material because it flexes for easy release – rigid plastic molds can make removing the cubes much harder and more breakage-prone.
Make Every Cup of Tea a Little More Beautiful
There’s something deeply nourishing about creating little moments of beauty in your everyday life. A cup of tea is already a ritual – and a hand-pressed heart-shaped sugar cube makes it feel like a small, intentional act of care for yourself or the people you love.
That’s what this DIY is really about. It’s not just sugar. It’s showing up for the moment, putting thought into the details, and making an ordinary afternoon feel like something worth savoring.
So go pick up a silicone mold (or dig one out of the back of your cupboard), grab your sugar, and make a batch this weekend. Your future self – sipping tea on a Sunday morning with a perfect little heart dissolving into her cup – will absolutely thank you.
DIY Sugar Cubes
Equipment
- Small mixing bowl
- Teaspoon
- Silicone candy or chocolate mold (any shape)
- Airtight container for storage
Ingredients
- ¼ cup white granulated sugar (or brown sugar, cane sugar, or coconut sugar)
- ½ teaspoon water
Instructions
- In a small bowl, combine the sugar and water. Stir until the mixture reaches a damp sand consistency – slightly clumped and granular, but not dissolved or runny. If too wet, add a little more sugar.
- Using a teaspoon, fill each mold cavity with the sugar mixture. Press down very firmly to pack it in. One teaspoon of sugar = one cube. Fill molds about halfway if they are deep.
- Cover loosely and let dry at room temperature for at least 8 hours or overnight.
- Gently flex the silicone mold to release the sugar cubes. Store in an airtight container at room temperature.
Notes
- The damp sand consistency is the most critical step – the sugar should not dissolve in the water.
- For colored cubes, replace plain water with a brewed herbal tea (hibiscus = pink, butterfly pea = blue/purple) or add one drop of gel food coloring to the water before mixing.
- For flavored cubes, substitute water with rose water, orange blossom water, or lavender water.
- For spiced cubes, mix a pinch of ground cinnamon, cardamom, or vanilla bean powder directly into the sugar before adding water.
- Silicone molds are strongly recommended over rigid plastic for easy, clean release.
- Stored properly in an airtight container away from humidity, sugar cubes keep for several weeks.
More Tea Party Ideas to Keep the Fun Rolling:
Mini No-Bake Lemon Cheesecake Tarts (The Easiest Tea Party Dessert You’ll Ever Make!)
How to Make DIY Wood Wick Teacup Candles (The Cutest Vintage Party Favor Ever!)
15 Mini Sandwiches for Tea Parties That Are Almost Too Pretty to Eat
Iced Butterfly Pea Flower Tea Latte (Pretty Tea Party Drink Recipe!)
15 Best Savory Afternoon Tea Ideas (Finger Foods & Tea Party Appetizers)
12 Easy Make Ahead Tea Sandwiches (Perfect Finger Foods for Afternoon Tea)
Pink Vintage Tea Party Ideas That Will Make Every Guest Feel Like Royalty