
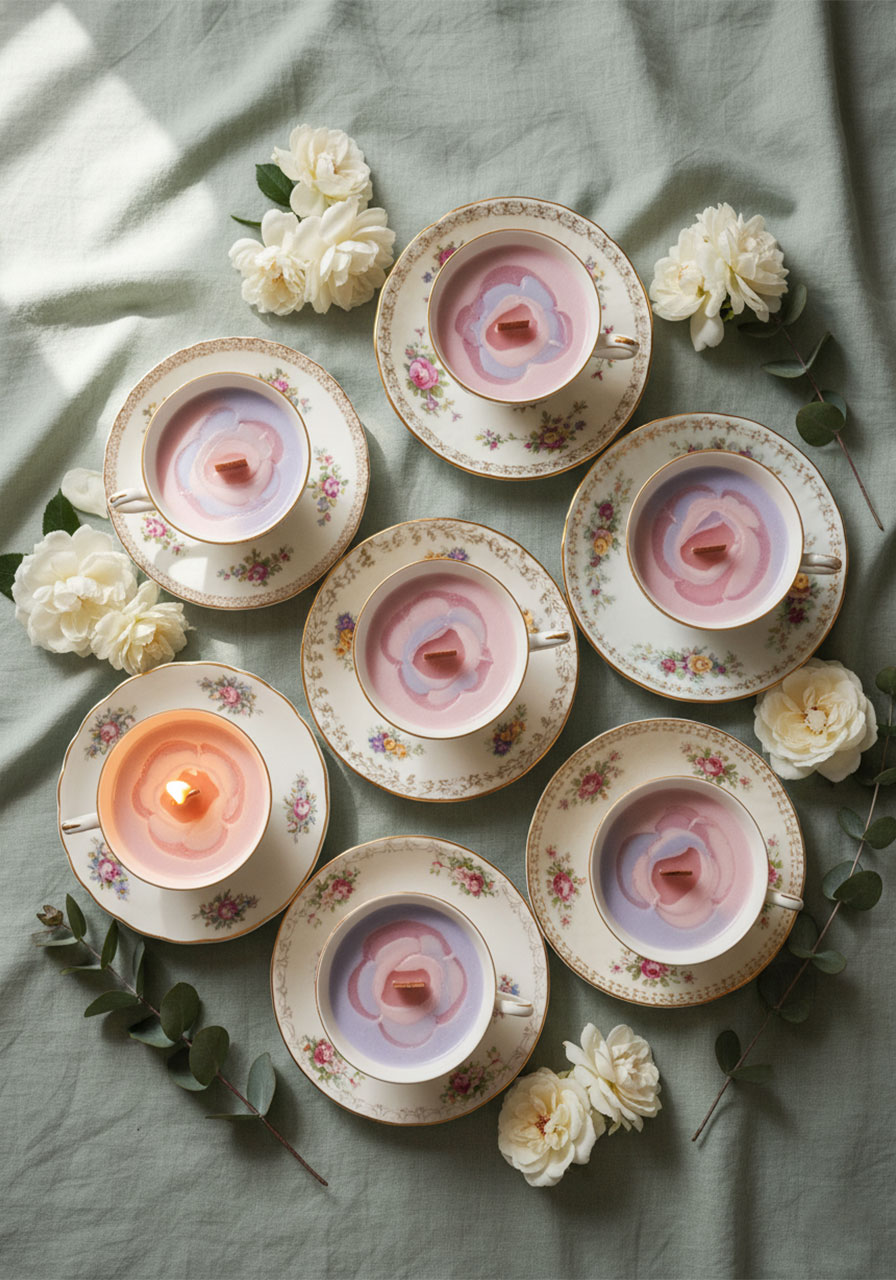
If you’re planning a tea party, bridal shower, or Mother’s Day brunch, these DIY teacup candles are about to become your new secret weapon.
They look like something straight out of a fancy boutique – but here’s the truth: they’re surprisingly easy to make, budget-friendly, and completely customizable to match any color palette or theme.
The wood wicks are what make these extra special. Instead of a boring cotton wick, a wood wick gives off a soft crackling sound when it burns – like a cozy fireplace in miniature form. It’s a detail your guests will absolutely love.
Whether you’re making these as party favors for a crowd or just a few pieces to use as prizes for shower games, you’re in for a seriously fun and rewarding craft project.
Let’s dive in!
Why These Teacup Candles Are a Total Winner
Before we get into the how-to, here’s why this DIY project is worth your time:
They’re completely unique. Each teacup has its own vintage pattern, which means no two candles look exactly the same. That’s a built-in charm that store-bought favors just can’t beat.
They work for SO many occasions. Tea parties, baby showers, bridal showers, Mother’s Day, Jane Austen-themed parties, holiday brunches – the list goes on and on.
They’re budget-friendly at scale. Once you source mismatched teacups affordably (more on this below!), the candle supplies themselves are very inexpensive per cup.
They double as keepsakes. Guests don’t just burn the candle and toss the container – the teacup itself is a lovely little keepsake they’ll actually display.

Where to Find Affordable Teacups
This is honestly the trickiest part of the whole project – but once you crack it, everything else is smooth sailing.
Estate sales and yard sales are the classic go-to, but they can be hit or miss. Cups are often priced at $10 or more each, and you might spend weeks hunting before you have enough for a full set of favors.
Here’s the insider tip: check Etsy.
You can often find Etsy shops that sell sets of mismatched vintage teacups labeled as “minor damage” – which sounds scary, but in practice usually just means they’ve been pre-inspected and priced lower because of tiny, barely-noticeable quirks. Many crafters report that these cups arrive in far better condition than expected, and at roughly half the price of estate sale finds.
Search Etsy for “mismatched vintage teacups lot” and you’ll find plenty of options. Sets of 8–12 cups are ideal for making a full batch of shower favors.
Pro Tip: If favors for every guest aren’t in your budget, just make 2–3 candles and use them as game prizes instead! They make incredibly popular prizes – guests go absolutely wild for them.
What You’ll Need
Here’s your complete supply list:
Mismatched vintage teacups and saucers
Wood candle wicks (with metal holder stands included)
Candle wax (fresh wax OR leftover candle stubs work great)
Candle pouring pot
Powdered candle dye (in your color of choice)
Essential oils for scent
Scissors
Tongs or a fork
Note on wax: If you use a fresh bag of candle wax, it will make approximately 20 candles in standard teacup sizes (around 8 oz each). If you have leftover candle stubs lying around the house, those work perfectly too – just remove the old wicks once melted.
Note on wicks: A 1.3 cm (13 mm) wide wood wick is the right size for a standard teacup. That’s the sweet spot – wide enough to stay lit easily, but not so wide that it overpowers the small vessel.

Step-by-Step Instructions
Step 1: Melt Your Wax
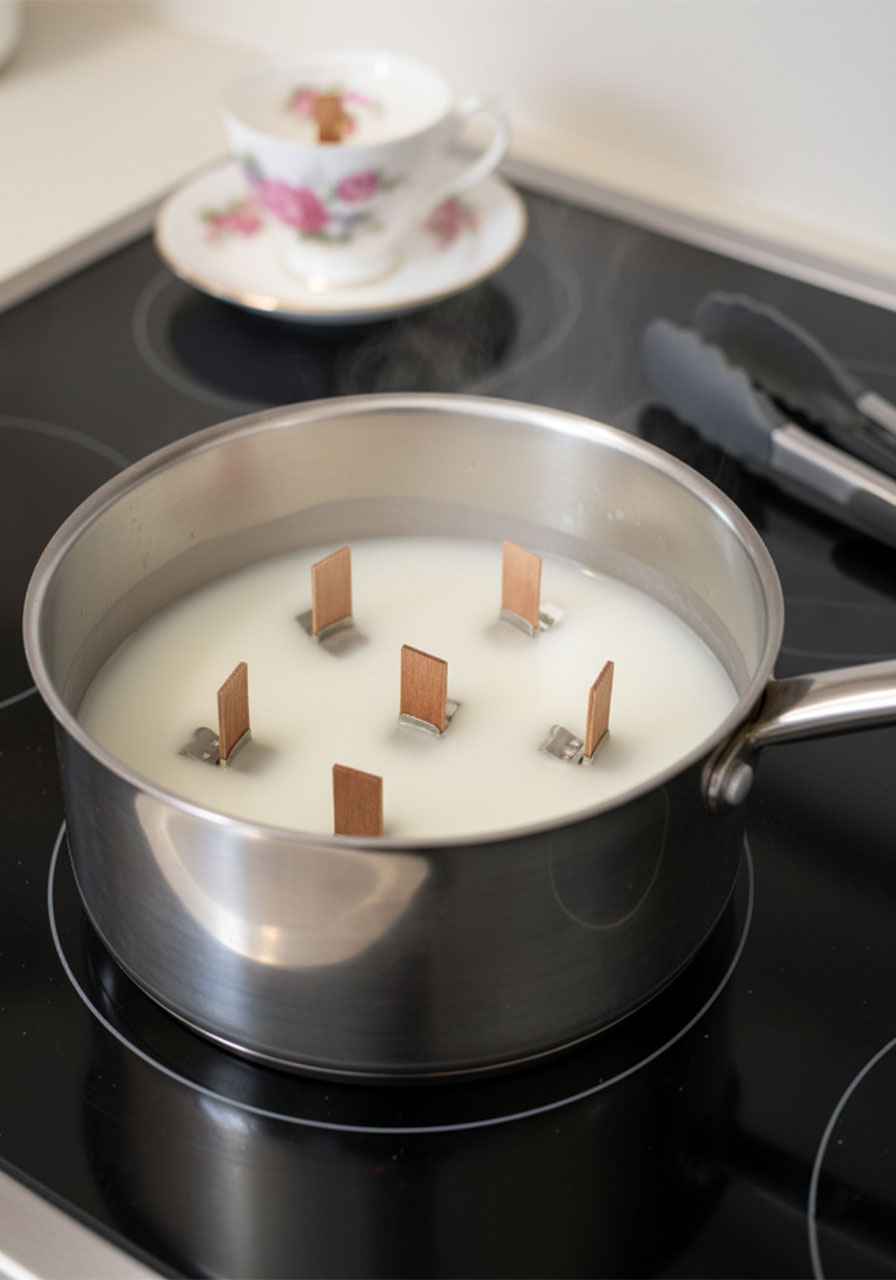
Add your wax to the candle pouring pot and melt it over low heat. Low and slow is key – you don’t want to rush this part.
If you’re using old candle stubs, let them melt completely before moving on. Then use tongs or a fork to fish out and discard the old wicks. Set the melted wax aside (keep it on the lowest heat setting to stay liquid).
Step 2: Prep and Soak Your Wood Wicks – Don’t Skip This!
This step is critical and the most commonly skipped. Please don’t skip it!
Wood wicks are NOT pre-coated in wax like standard cotton wicks. If you just plunk them in without soaking, your candles won’t stay lit. Here’s what to do:
1. Insert each wood wick into its metal holder stand.
2. Hold the wick up next to each teacup and trim it with scissors so it’s just about level with the top of the cup rim. You want it standing tall, not flopping over.
3. Once trimmed, submerge the wicks in the melted wax for 10 full minutes. Set a timer – don’t guess!
4. After soaking, remove the wicks with tongs and let them cool until you can safely handle them (this usually takes just a minute or two).
The wicks should now look slightly darker and feel stiff. That’s exactly what you want.
Step 3: Anchor the Wicks in the Teacups
Time to set up your teacups assembly-line style!
1. Dip the bottom of each metal wick holder into the melted wax.
2. Quickly press it firmly to the center bottom of a teacup.
3. Hold it in place for about 10–15 seconds while the wax sets like a little glue.
4. Repeat for all your teacups, then let everything sit for a few minutes until the anchors are solidly set.
Once all your wicks are standing upright on their own in every cup, you’re ready for the fun part.

Step 4: Add Color and Scent
Now that the wax has cooled slightly (but is still liquid and pourable), it’s time to customize!
Add a pinch of powdered candle dye and stir gently until fully dissolved. Start with a tiny amount – you can always add more to deepen the color, but you can’t take it out.
Then add a few drops of your chosen essential oil and stir again. Some beautiful combinations to try:
- Pink wax + peppermint and lemon essential oils
- Lavender wax + lavender and lemon essential oils
- Yellow wax + rosemary and lemon essential oils
- White wax + vanilla or rose essential oils
Pro Tip: The cooler the wax is when you pour (still liquid, but not piping hot), the smoother your finished surface will be and the less touch-up work you’ll need to do later.
Step 5: Pour the Wax
Carefully pour the colored, scented wax into each teacup, filling them close to the top.
Important: Reserve about 25% of your wax. Don’t pour it all at once. You’ll need it for touch-ups in the next step.
Pour slowly and steadily, keeping the wick centered as you go.
Now – walk away. Let the candles cool completely and fully solidify at room temperature. This usually takes 2–4 hours. Resist the urge to rush this in the fridge; slow cooling gives you a nicer surface.

Step 6: Fill in the Divots
Once your candles have fully cooled and hardened, take a look at the surface. You’ll likely notice a small dip or “divot” in the center where the wax contracted as it cooled. This is completely normal!
Reheat your reserved wax and carefully pour a thin second layer into any cups that have a noticeable divot. Let cool again completely.
Candles poured with cooler wax may need little to no touch-up at all. Ones poured when the wax was very hot will likely need a good fill-in to get that smooth, polished look.
And that’s it – you’re done! 🎉

How to Display These as Party Favors
The presentation is half the magic. Here are a few easy ways to display your teacup candles at your event:
Arrange them on a table with a simple framed sign that says something like “Don’t Forget Your Favor!” – guests will know exactly what to grab on their way out.
Mix and match the teacup patterns intentionally. The more eclectic and mismatched, the better the vintage vibe.
Pair each candle with its matching saucer so guests have a complete set to take home.
If you’re doing multiple scents, add tiny folded labels in front of each cup noting the scent. Guests will love picking their favorite!

Fun Variations to Try
For a bridal shower: Match the candle color to the wedding colors. Blush pink, dusty rose, or sage green all look stunning in vintage china.
For a baby shower: Go with soft pastels – mint, lavender, or buttery yellow – and use gentle scents like vanilla or chamomile.
For Mother’s Day: Use white or cream wax with a floral scent like rose or jasmine. Classic and elegant.
For a holiday party: Deep red or cranberry wax with cinnamon or clove essential oils feels festive and cozy.
For a classroom or school event: Skip the essential oils and just use dye for a fun, kid-friendly craft project that teachers can do with older students!

Common Questions Answered
What size wood wick should I use for a teacup?
A 1.3 cm (13 mm) wide wood wick is perfect for a standard-sized teacup. It’s wide enough to produce a good flame and burn evenly across the surface of the wax.
Can I use any type of wax?
Yes! Soy wax, paraffin, or a soy blend all work well. Soy wax tends to give a creamier, more opaque look when colored – which photographs beautifully. Leftover candle stubs work too, just make sure to remove all the old wicks before pouring.
Why won’t my wood wick stay lit?
This almost always comes down to one thing: the wick wasn’t soaked in wax before use. Wood wicks need that 10-minute wax soak to absorb enough fuel to sustain a flame. If your candle keeps going out, that’s your answer. Unfortunately, once poured and cooled, there’s not much you can do – so don’t skip the soak step on your next batch!
How long do these candles burn?
A teacup-sized candle (roughly 6–8 oz of wax) typically burns for 30–50 hours depending on the wax type and wick size. That’s a lot of cozy crackling-fire ambiance for your guests to enjoy!
Can kids help make these?
Older kids (10+) can help with the prep steps – trimming wicks, arranging teacups, and stirring in color. However, the actual melting and pouring of hot wax should always be handled by a responsible adult. Safety first!
Final Thoughts
These wood wick teacup candles are genuinely one of those projects that looks incredibly impressive – but once you make your first batch, you’ll realize just how approachable the whole process really is.
The crackling wood wick, the pastel colors, the mismatched vintage china – everything about these candles feels intentional, personal, and beautiful. Your guests are going to be talking about these favors for months.
And honestly? Once you start collecting vintage teacups, it’s hard to stop. Don’t say we didn’t warn you. 😄
Happy crafting – and happy hosting!
Caprese salad bites – Fresh mozzarella, cherry tomatoes, and basil on skewers with balsamic glaze. Easy and gorgeous.
Mini quiches – Great for a more filling tea party spread, especially if you’re serving brunch.
A cheese board – Pairs perfectly with the savory sliders and always looks impressive with minimal effort.
Whether you’re hosting a child’s birthday tea party, a bridal shower, or a simple at-home afternoon treat, these mini sandwiches have you covered.
Pick two or three of your favorites, make them the night before, and walk into your party feeling completely prepared – and just a little bit fancy. Because the best tea parties are the ones where the host is having just as much fun as the guests.
More Tea Party Ideas to Keep the Fun Rolling:
15 Mini Sandwiches for Tea Parties That Are Almost Too Pretty to Eat
Iced Butterfly Pea Flower Tea Latte (Pretty Tea Party Drink Recipe!)
15 Best Savory Afternoon Tea Ideas (Finger Foods & Tea Party Appetizers)
12 Easy Make Ahead Tea Sandwiches (Perfect Finger Foods for Afternoon Tea)
Pink Vintage Tea Party Ideas That Will Make Every Guest Feel Like Royalty
Magical Fairy Tea Party Food Ideas (Cute Snacks + Easy Tea Sandwiches)
Tea Party Decoration Ideas That Will Make Your Gathering Absolutely Unforgettable
