If you’ve been searching for that one showstopping treat that looks like it came from a fancy bakery but is secretly so easy to make – you just found it.
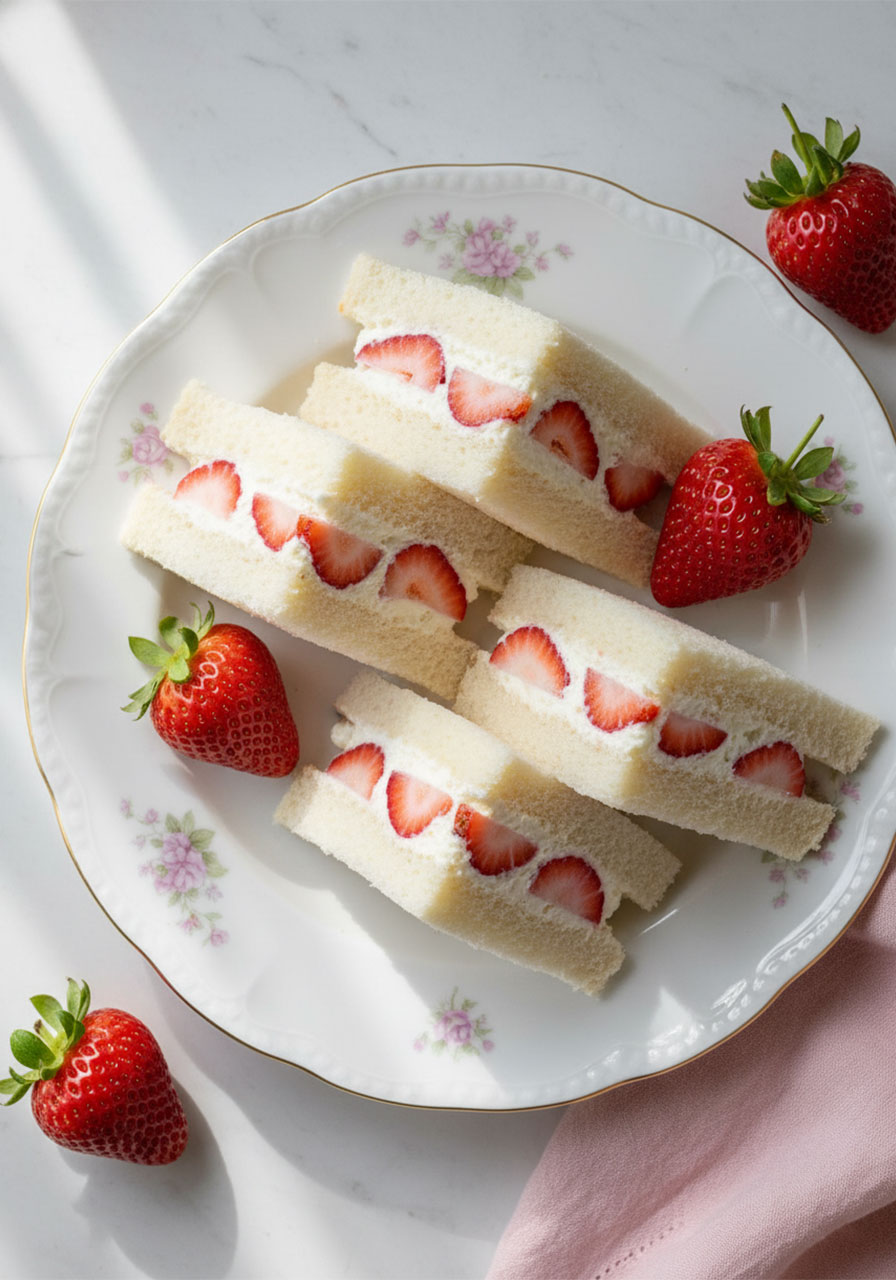
These Strawberry Cream Tea Sandwiches are sweet, elegant, and absolutely irresistible. We’re talking pillowy soft white bread, a thick lemon-kissed cream filling, and fresh juicy strawberries nestled inside every single bite.
And the best part? When you slice them open, the strawberries reveal themselves in the most beautiful, almost artistic way. Your guests will not stop talking about them.
Whether you’re hosting a spring tea party, a bridal shower, a Mother’s Day brunch, or a Galentine’s get-together – this is the recipe you need on your table.
So grab your mixer and let’s make something gorgeous.
Why You’re Going to Absolutely Love These
Let’s be real – you want food that looks as good as it tastes. These sandwiches deliver on both, without requiring any serious kitchen skills.
They look absolutely stunning. The cross-section of strawberries peeking through the creamy white filling is the kind of thing that stops a scroll and makes guests reach for their phones before they reach for the sandwich.
The flavor is dreamy. The cream filling is subtly sweet, tangy from the cream cheese, and brightened with a hint of fresh lemon zest. It’s rich but not heavy. Indulgent but not overwhelming.
They’re surprisingly easy. Seven ingredients. One bowl. No baking. Truly, anyone can make these – even if you’ve never made anything fancy in your life.
You can make them ahead of time. Prep them the night before your party, refrigerate, and slice right before serving. That’s the kind of stress-free hosting we love.
They’re endlessly versatile. Swap the strawberries for raspberries, kiwi, or blueberries depending on the season. The base recipe works beautifully with almost any firm, low-juice fruit.

The Sweet Story Behind This Recipe
These sandwiches are inspired by the Japanese fruit sandwich – called Sando – a beloved treat that’s been popular in Japan since the 1920s.
The traditional version uses milk bread (Shokupan) and simple whipped cream. It’s beautiful in its simplicity.
But this version takes things up a notch.
By adding cream cheese to the filling, you get a thicker, richer texture that holds its shape perfectly when sliced. The cream cheese also adds a subtle tanginess that balances the sweetness of the strawberries in the most satisfying way.
And that lemon zest? It’s a small touch that makes a big difference – a bright citrus note that makes the whole thing taste fresh and alive.
Once I made these for my first spring tea party, they became my most-requested recipe. Every single time.
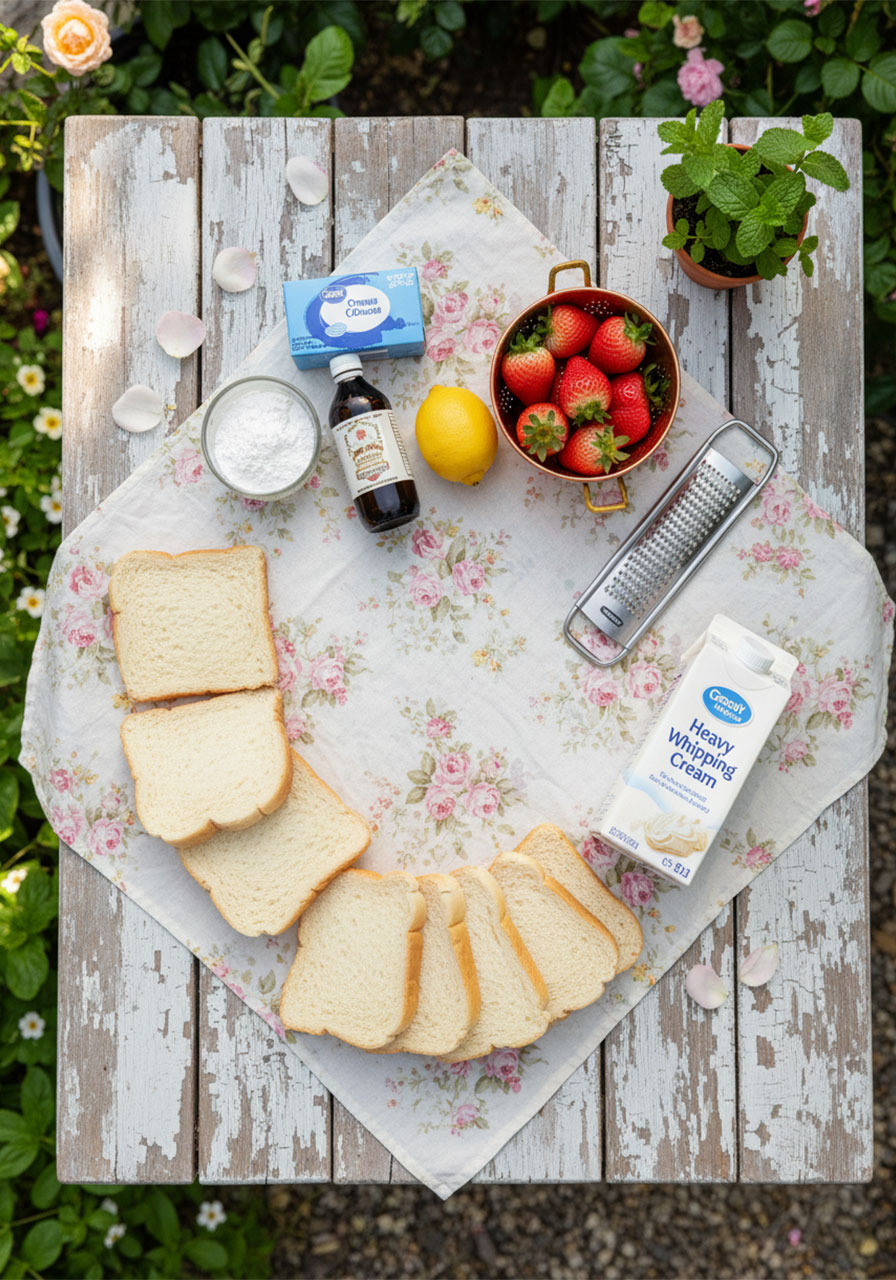
What You’ll Need
The ingredient list is short and sweet – just like the prep time.
Strawberries. Go organic if you can. Organic strawberries tend to be sweeter and more flavorful. Look for berries that are similar in size – this makes for a more uniform, beautiful cut when you slice the sandwich open.
Heavy Whipping Cream. This is what gives the filling its airy, fluffy texture. Don’t substitute with half-and-half – you need the fat content to whip properly.
Cream Cheese. Make sure it’s softened to room temperature before you start. Cold cream cheese won’t whip smoothly and can leave lumps in your filling. We definitely don’t want that.
Powdered Sugar. Just a small amount keeps the filling lightly sweet without going overboard. Feel free to adjust to your taste – this recipe is very forgiving.
Pure Vanilla Extract. Always use pure, not imitation. The flavor difference is real and noticeable, especially in a filling this simple.
Lemon Zest. Fresh is best here. One tablespoon of lemon zest adds a pop of brightness that elevates the entire sandwich from good to unforgettable.
White Bread. Soft, fresh white sandwich bread works perfectly. The original Japanese version uses milk bread (Shokupan), which has a slightly sweeter flavor. You can also use Hawaiian bread or brioche for a richer result. Whatever you choose, make sure it’s soft – this isn’t the moment for crusty artisan loaves.
Tools You’ll Want to Have Ready
Nothing fancy required here. Just make sure you have these basics on hand before you start:
A large mixing bowl (glass or ceramic works great)
A stand mixer or hand mixer
A spatula
Plastic wrap
A sharp serrated knife
A cutting board (or parchment paper – this makes cleanup so much easier)
The serrated knife is probably the most important tool on this list. A dull knife will drag and smash your beautiful sandwich. Sharp = clean, gorgeous cuts every time.
How to Make Strawberry Cream Tea Sandwiches
Ready to bring these beauties to life? Here’s exactly how to do it, step by step.
Step 1: Prep Your Strawberries
Wash, hull, and – this is critical – thoroughly dry your strawberries.
Excess moisture is the enemy of a good cream filling. If your berries are wet, the cream will become runny and your sandwiches won’t hold their shape when cut. Pat them dry with paper towels and let them air dry for a few minutes just to be safe.
If you want to get creative, you can cut the strawberries into tulip or heart shapes for an extra-cute touch. This is especially magical for Valentine’s Day or a bridal shower.
Step 2: Whip the Cream Cheese First
Add your softened cream cheese to a large bowl and whip it on high speed for 2 to 3 minutes until it’s light and fluffy.
Don’t skip this step! Whipping the cream cheese first is what gives your filling that silky, airy texture. It also ensures the cream cheese blends smoothly with the heavy cream later – no lumps, no streaks.
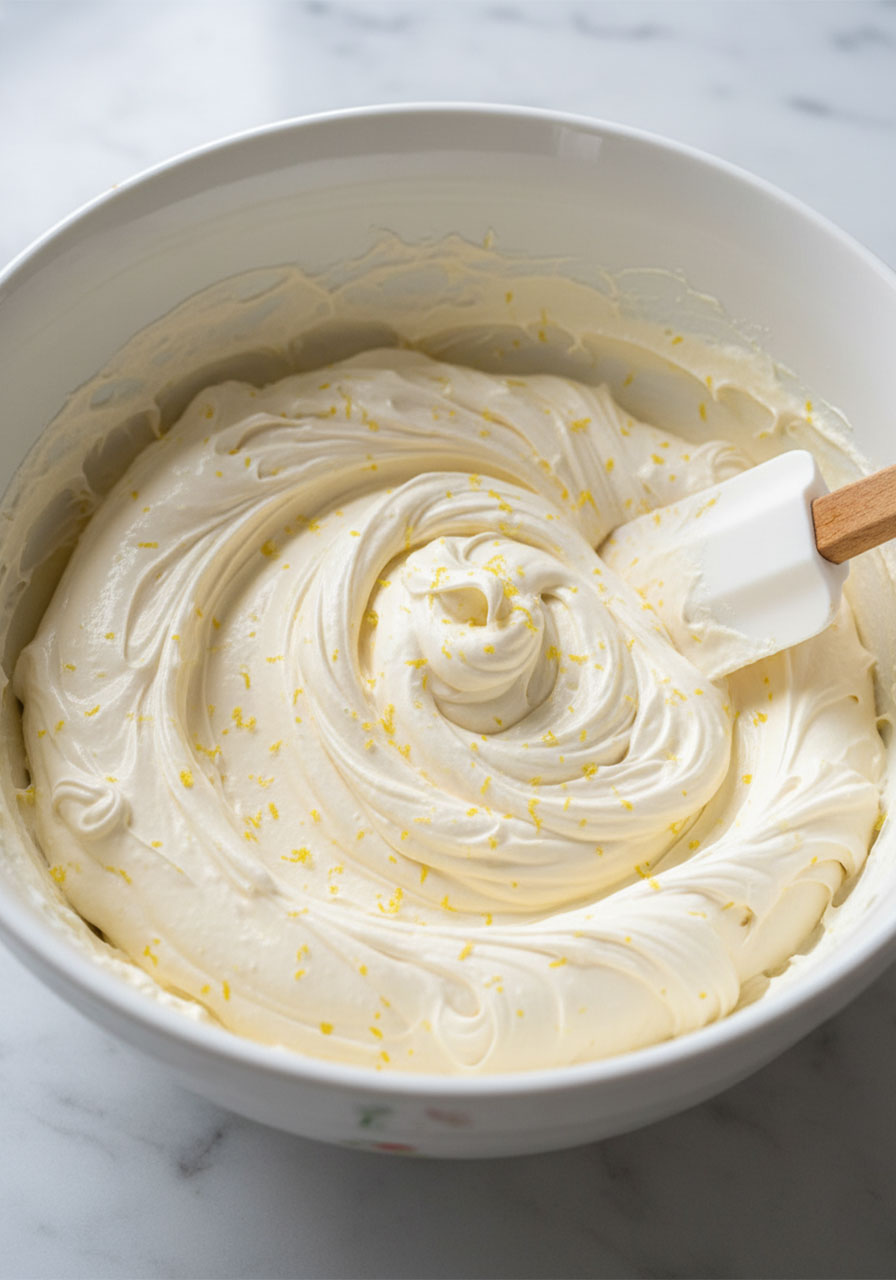
Step 3: Build the Filling
Add the heavy whipping cream, vanilla extract, and powdered sugar to the whipped cream cheese.
Continue whipping on high speed, scraping down the sides of the bowl as needed, until the mixture forms stiff peaks. You’ll know it’s ready when it holds its shape and looks thick and billowy – almost like a cloud.
Finally, fold in the lemon zest with a spatula. Just a gentle stir to combine – you don’t want to deflate all that beautiful fluffiness you just created.
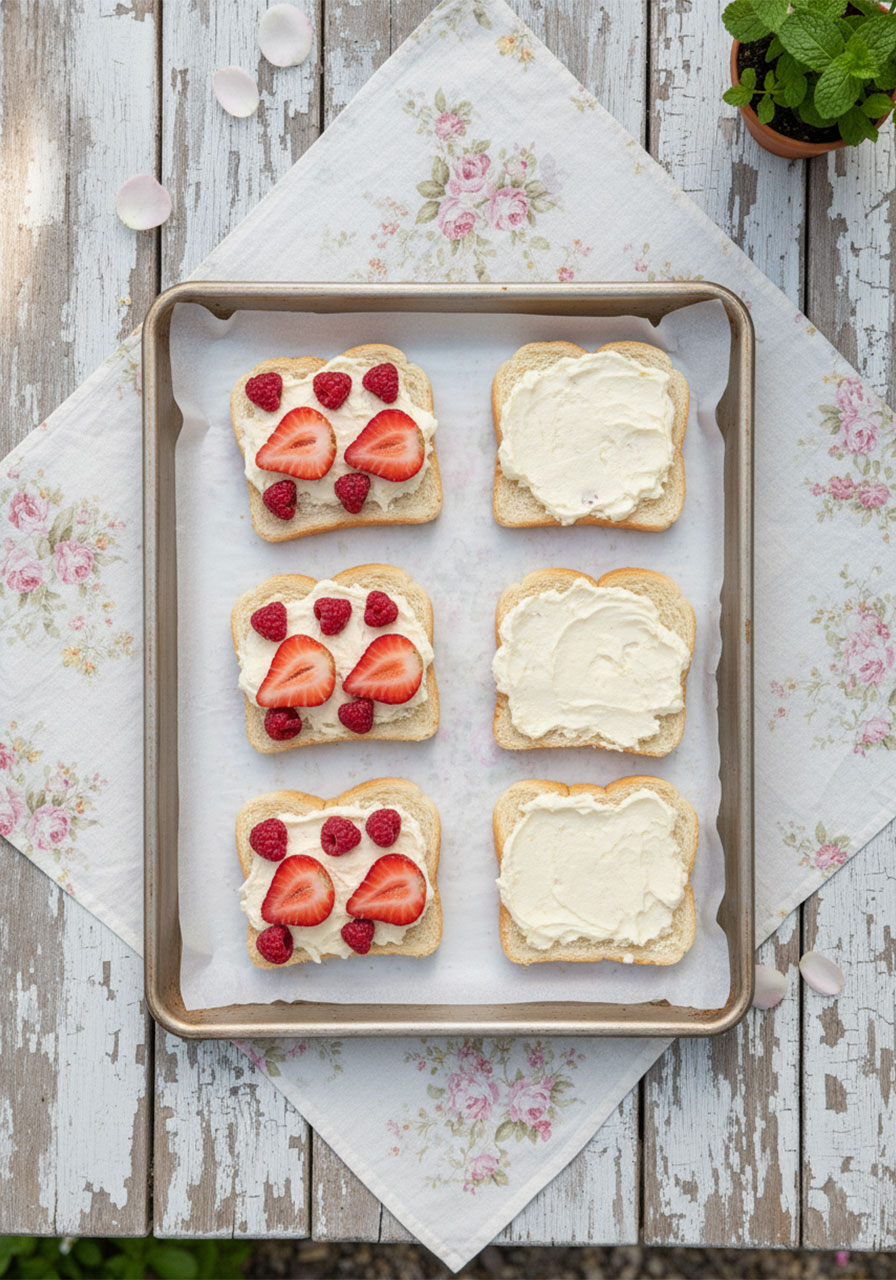
Step 4: Spread and Assemble
Lay out all your bread slices. Spread a generous, even layer of the cream mixture across every single slice – both the bottom and the top pieces.
Now comes the fun part: arranging the strawberries.
On half of the bread slices, place your strawberries cut-side down. Think about how the sandwich will look when you cut it diagonally – place your most beautiful berries in the center of the bread, facing the direction you plan to cut. Then fill in the sides with smaller pieces. Gaps are totally fine – the cream will fill in all the nooks and crannies.
Once your berries are in place, add another generous layer of cream on top of the strawberries. Be very generous here. You don’t want any air pockets.
Step 5: Close, Score, and Wrap
Gently press the cream-covered top slice of bread onto each strawberry-loaded bottom slice.
Here’s a pro move: use your knife to lightly score a line across the top of each sandwich in the direction you plan to cut. This is your guide for later – you’ll thank yourself when it’s time to slice.
Wrap each sandwich tightly in plastic wrap. Make sure everything is snug and secure – no gaps.
Step 6: Compress and Chill
Place your wrapped sandwiches on a tray or sheet pan. Then – and this is the secret step most people skip – place something slightly heavy on top of them.
A carton of eggs works perfectly. What this does is gently compress the sandwiches, pushing the cream filling into every little space around the strawberries. The result is a sandwich that holds together beautifully when sliced.
Refrigerate for at least 2 hours. Overnight is even better.
Step 7: The Big Reveal – Cutting the Sandwiches
This is the moment everyone’s been waiting for.
Remove the plastic wrap. Place each sandwich on your cutting board (or parchment paper).
First, trim off all four crusts. Here’s the trick: rotate your cutting board, not the sandwich. Picking up and turning the sandwich risks smushing it. Rotate the board and trim one side at a time. Clean your knife between every single cut – this keeps your edges pristine and prevents cream smears.
Then make your diagonal cut along the scored line.
Stand back and admire what you just made. Those ruby-red strawberries peeking through the creamy white filling? Pure magic.
Tips for the Most Beautiful Sandwiches Every Time
I’ve made these enough times to know exactly what makes the difference between a gorgeous sandwich and a messy one. Here’s everything I’ve learned:
Dry fruit is non-negotiable. Say it with me: dry fruit, dreamy filling. Any excess moisture will cause the cream to weep and thin out. Take your time here.
Always whip the cream cheese first. This one step is what gives the filling its luxurious, thick texture. Don’t combine everything at once – whip the cream cheese solo before adding anything else.
Be generous with the cream. This is not the time to be shy. More cream means fewer air pockets and a cleaner, more satisfying cross-section when you slice.
Clean knife, clean cuts. Wipe your blade with a damp cloth between every cut. Your presentation will look ten times more polished.
Think about the cut before you assemble. Visualize where you’ll make your diagonal cut, then arrange the berries accordingly – center berries pointing in the direction of the cut. This is what creates that stunning reveal.
Don’t skip the compression step. The weight on top makes a surprisingly big difference. It’s the difference between a messy sandwich and one that holds together like a dream.
Fun Fruit Variations to Try
Strawberries are the classic – but this recipe is incredibly versatile. Once you’ve made it once, you’ll start imagining all the possibilities.
Raspberries give you a more intense, tart flavor and a gorgeous deep pink color. Perfect for Valentine’s Day.
Kiwi adds a vibrant green color that’s stunning against the white cream. Great for a spring or garden party theme.
Blueberries are a great option for July 4th – pair them with strawberries for a red, white, and blue effect.
Plums are a more sophisticated, unexpected choice. The deep purple color is absolutely striking.
One important note: stick to relatively dry fruits. Juicy fruits like peaches, watermelon, or mango will release too much liquid and make the filling runny. Save those for a fruit salad instead.

How to Store Them
If your sandwiches are still wrapped in plastic and uncut, they’ll keep in the refrigerator for up to two days and still taste fresh and delicious.
If you’ve already sliced them, re-wrap each piece individually in plastic wrap or store them in an airtight container in the fridge. They’ll stay good for up to two days – though honestly, they rarely last that long.
Perfect Pairings for Your Tea Party Table
These sandwiches are the star of the show, but every star needs a great supporting cast.
Pair them with a pot of Earl Grey or chamomile tea for a classic, cozy vibe. Want something a little more festive? A light strawberry lemonade or a sparkling rosé makes a gorgeous match.
For food, think light and fresh – cucumber sandwiches, lemon scones with clotted cream, or a simple fruit platter round out the spread beautifully without competing with your sandwiches.
If you’re hosting an adults-only gathering, a strawberry bourbon cocktail alongside these sandwiches is the kind of combination that makes people stay a lot longer than they planned.

Make-Ahead Game Plan for Stress-Free Hosting
Here’s the hosting secret nobody talks about enough: make-ahead food is your best friend.
The night before your party, make the cream filling, assemble the sandwiches, wrap them tightly, compress, and refrigerate. That’s it. The next day, all you have to do is slice and serve.
No last-minute scrambling in the kitchen. No rushing. Just you, calm and collected, presenting a truly stunning spread while your guests wonder how you do it all.
You’re welcome.
Strawberry Cream Tea Sandwiches
Ingredients
- 12 fresh strawberries, washed, hulled, and thoroughly dried
- 1 pint (2 cups) heavy whipping cream
- 8 oz cream cheese, softened to room temperature
- ¼ cup powdered sugar (adjust to taste)
- ¼ tsp pure vanilla extract
- 1 tbsp fresh lemon zest
- 8–10 slices soft white bread (or milk bread, Hawaiian bread, or brioche)
Instructions
- Wash, hull, and thoroughly dry the strawberries. Pat dry with paper towels. If desired, cut into tulip or heart shapes for a decorative touch.
- Add softened cream cheese to a large mixing bowl. Using a stand mixer or hand mixer, whip on high speed for 2–3 minutes until light and fluffy.
- Add the heavy whipping cream, vanilla extract, and powdered sugar. Continue whipping on high speed, scraping down the sides as needed, until the mixture holds stiff peaks.
- Fold in the lemon zest gently with a spatula until just combined.
- Spread a generous, even layer of cream mixture onto every slice of bread.
- On half of the bread slices, arrange the strawberries cut-side down. Place the most visually appealing berries in the center, pointing in the direction of your planned diagonal cut. Fill in the sides with smaller berry pieces. Gaps are fine – the cream will fill them.
- Spread another generous layer of cream on top of the strawberries. Don't be shy – this prevents any empty pockets inside the sandwich.
- Press a cream-covered bread slice on top of each strawberry-loaded slice. Gently press together.
- Use a knife to lightly score a diagonal line across the top of each sandwich in the direction you plan to cut. This is your guide for slicing later.
- Wrap each sandwich tightly in plastic wrap.
- Place wrapped sandwiches on a tray. Set something slightly heavy on top (like a carton of eggs) to gently compress the cream into all the gaps.
- Refrigerate for at least 2 hours (or overnight).
- When ready to serve, remove the plastic wrap. Using a sharp serrated knife, trim off all four crusts – rotating the cutting board (not the sandwich) as you go. Clean the knife between every cut.
- Make the final diagonal cut along your scored line. Admire the beautiful strawberry reveal. Serve immediately.
Notes
- Dry fruit is essential. Any moisture from the strawberries will make the cream filling runny.
- Always whip the cream cheese first before adding the heavy cream – this creates a smoother, airier filling.
- Fruit variations: Try kiwi, raspberries, blueberries, or plums. Avoid overly juicy fruits like peaches or melon.
- Storage: Uncut sandwiches (wrapped in plastic) keep in the fridge for up to 2 days. Cut sandwiches store well in an airtight container for up to 2 days.
- Yield: 4–5 full sandwiches or 8–10 half servings.
More Tea Party Ideas to Keep the Fun Rolling:
DIY Sugar Cubes: The Cutest High Tea Party Idea That Takes 5 Minutes to Make
Mini No-Bake Lemon Cheesecake Tarts (The Easiest Tea Party Dessert You’ll Ever Make!)
How to Make DIY Wood Wick Teacup Candles (The Cutest Vintage Party Favor Ever!)
15 Mini Sandwiches for Tea Parties That Are Almost Too Pretty to Eat
Iced Butterfly Pea Flower Tea Latte (Pretty Tea Party Drink Recipe!)
15 Best Savory Afternoon Tea Ideas (Finger Foods & Tea Party Appetizers)
12 Easy Make Ahead Tea Sandwiches (Perfect Finger Foods for Afternoon Tea)