There is something almost magical about cooking over a fire. The smell of wood smoke, the sound of something sizzling, the warmth on your face as the sun goes down. If you have ever stood by a campfire wondering what to make beyond hot dogs on a stick, this list is your answer.
These 31 campfire recipes cover everything – hearty breakfasts that fuel a big day outside, satisfying dinners that feed a hungry crew, quick snacks that keep everyone happy between adventures, and indulgent desserts that make the whole trip feel like a celebration.
Every single recipe here is practical, delicious, and designed for real camp cooking – no commercial kitchen required.
Whether you are a solo traveler, a couple wanting a romantic night under the stars, or a mom feeding a whole family of hungry campers, there is something here for you. These are the recipes that nourish your body, slow down your mind, and remind you why you love being outdoors.
Let’s get cooking.
BREAKFASTS

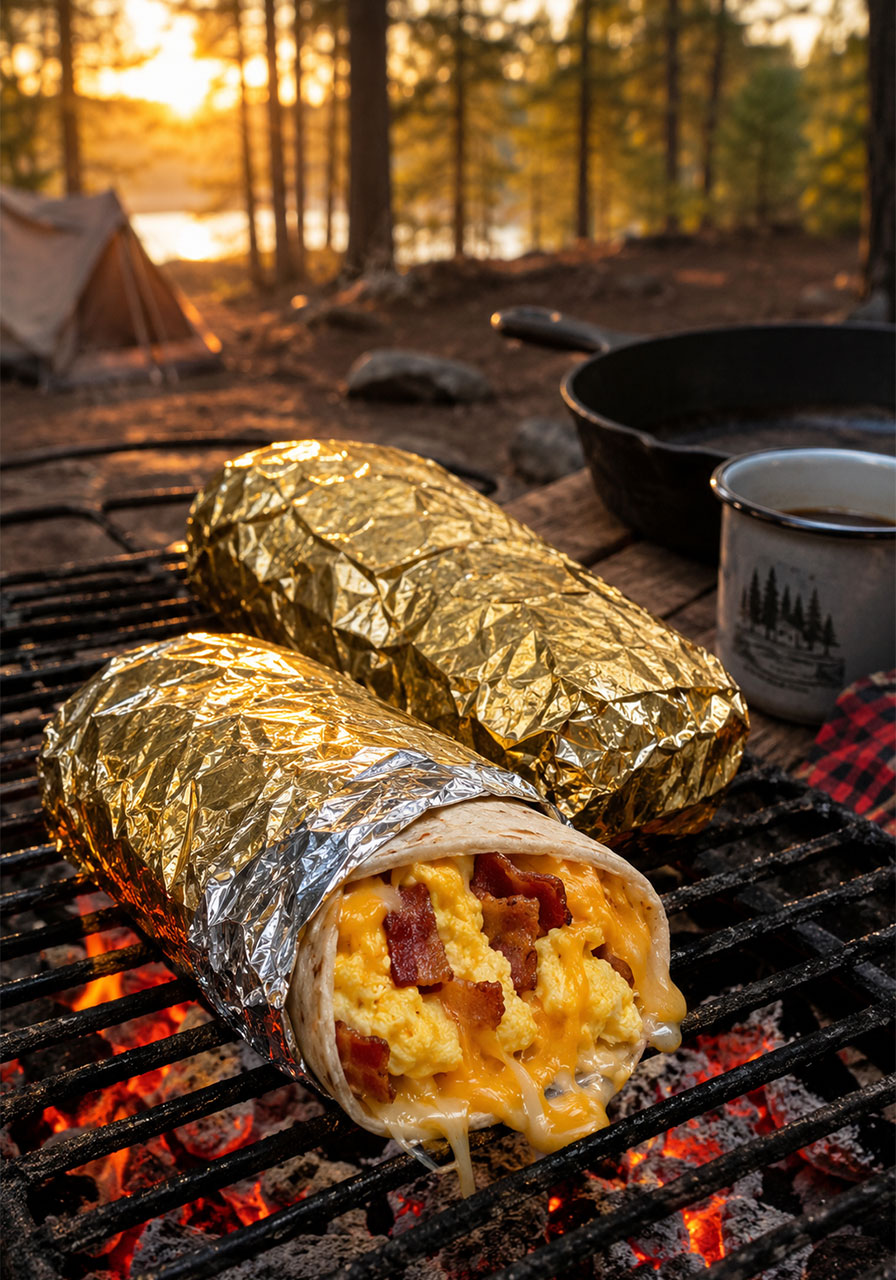
1. Campfire Breakfast Burritos
Some breakfast combos are just timeless – and bacon, egg, and cheese wrapped in a warm tortilla is the holy trinity of camp mornings. These foil-wrapped burritos are everything you need to start a big outdoor day: satisfying, portable, and ridiculously easy to make over the fire.
You can make them fresh at camp or prep them ahead at home, freeze them, and reheat straight on the grill. Either way, you will wake up excited to eat.
Best for: Camping breakfasts, meal prep, feeding a crew
Time to Play: 20 minutes
Serves: 4
What You’ll Need:
- 4 large flour tortillas
- 4 eggs
- 4 rashers of bacon
- ½ cup shredded cheese
- ¼ cup milk (optional, for fluffier eggs)
- Salt and pepper
- 1 tbsp oil or butter
- Foil
How to Make It:
1. Heat your skillet over the fire or gas stove. Cook the bacon until crispy, then set aside. Leave the pan as it is – that leftover bacon fat is pure flavor gold.
2. Crack the eggs into a bowl. Add a splash of milk if using, season with salt and pepper, and whisk well. Pour into the pan and stir gently until just cooked through. Pull them off a little early – they keep cooking from the heat.
3. Lay out your tortillas. Fill each with scrambled eggs, bacon, and a generous sprinkle of cheese.
4. Roll them up tightly into burritos and wrap each one securely in foil.
5. Place the wrapped burritos on your campfire grill or hotplate. Toast for 5–8 minutes, flipping once, until golden outside and melty inside.
6. Eat straight from the foil. Add hot sauce, relish, or salsa if you have it on hand.
Pro Tip: Make a big batch at home, cool them completely, then vacuum seal or zip-bag and freeze. At camp, just reheat in foil right on the grill – breakfast is done before the coffee finishes brewing.
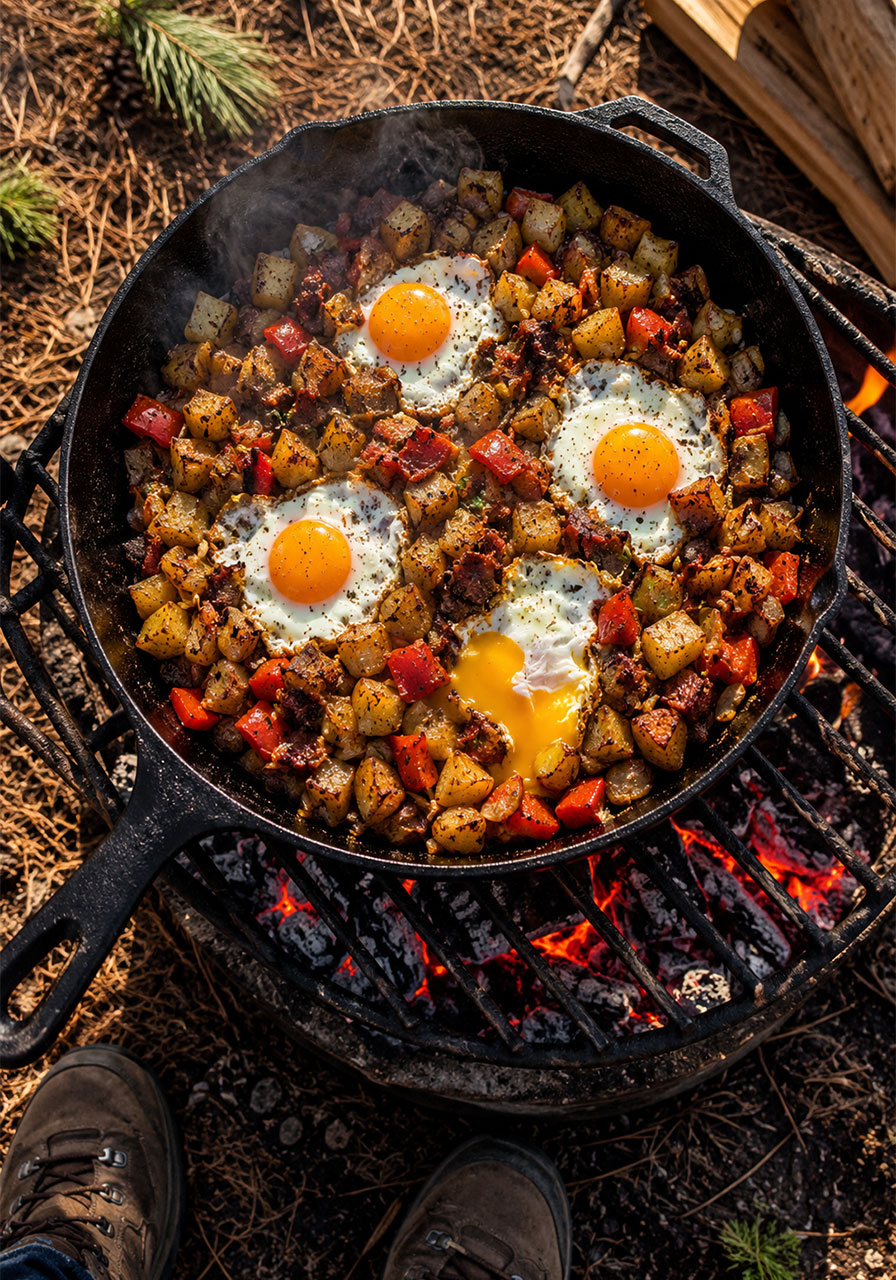
2. Campfire Breakfast Skillet Hash
This is the camp breakfast that earns you applause. Crispy potatoes, smoky bacon, sweet capsicum, and perfectly cooked eggs – all in one cast iron skillet over the coals. It is filling, flexible, and fast enough to get everyone fed before the day’s adventure kicks off.
The best part? You can customize it endlessly with whatever you have in the cooler. Add sausage, throw in some cheese, swap the capsicum for zucchini. It is one of those recipes that just works no matter what.
Best for: Group breakfasts, cold mornings, feeding hungry hikers
Time to Play: 35 minutes
Serves: 4
What You’ll Need:
- 4 rashers of bacon, chopped
- 4 medium potatoes, diced
- 1 onion, finely chopped
- 1 red capsicum, diced
- 4 eggs
- 2 tbsp olive oil
- Salt and pepper to taste
How to Make It:
1. Place your cast iron skillet over medium campfire heat. Add the olive oil and let it heat up.
2. Throw in the chopped bacon. Cook until golden and crispy. Scoop it out and set it aside, leaving a little bacon fat in the pan for flavor.
3. Add the diced potatoes, onion, and capsicum. Stir occasionally and cook for 10–15 minutes, until the potatoes are golden and cooked through. Do not overcrowd the pan – give them room to crisp.
4. Return the bacon to the skillet. Use a spoon to make four small wells in the hash. Crack an egg into each well.
5. Cover the skillet with foil or a lid. Cook another 5–7 minutes until the eggs are set to your liking.
6. Season with salt and pepper, scatter with fresh parsley if you have it, and serve straight from the pan.
Pro Tip: Pre-chop your potatoes and onion at home and store them in a zip bag. It cuts your camp prep down to almost nothing – and saves you from crying over onions at the campsite.
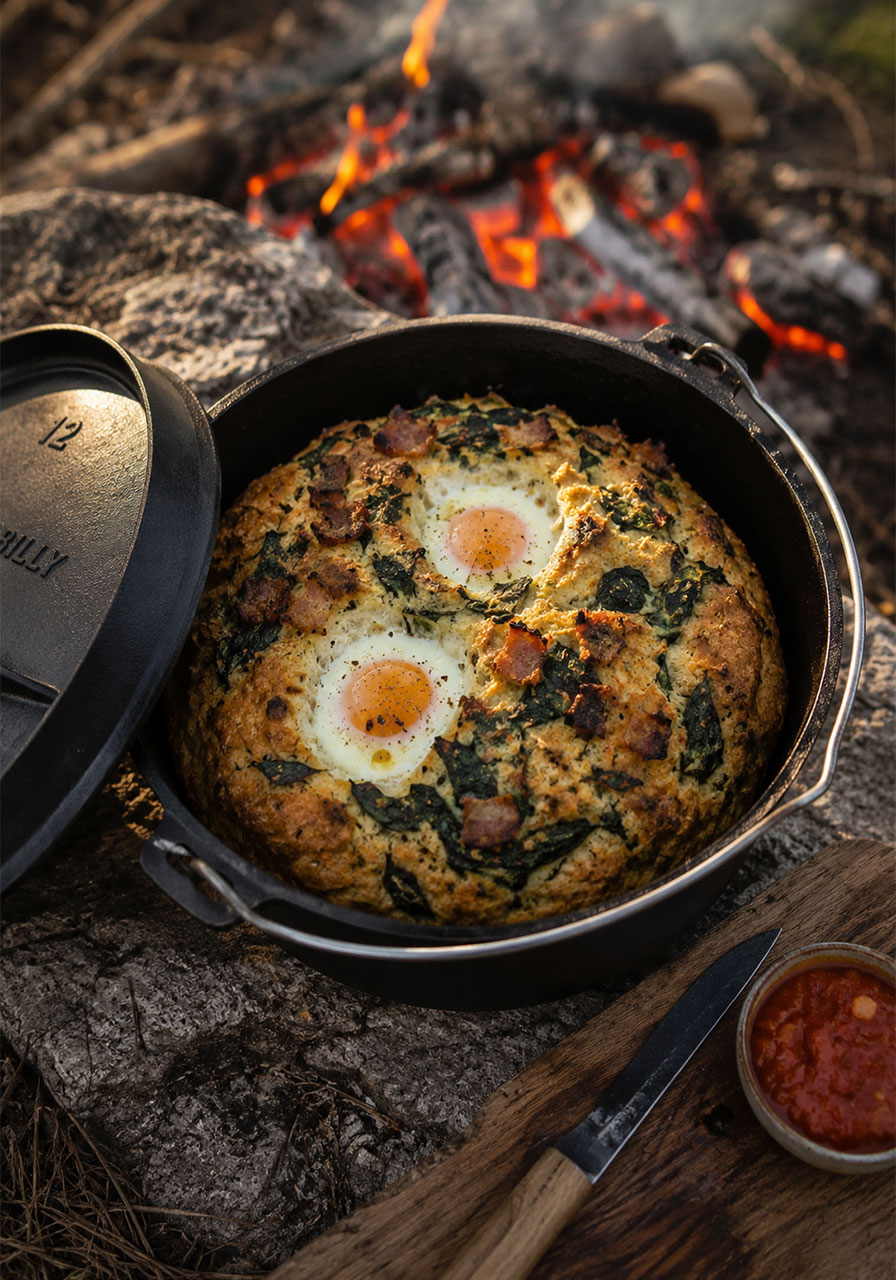
3. Bacon, Egg & Spinach Damper
Imagine pulling a golden, fluffy loaf out of a camp oven with eggs baked right into the top. That is exactly what this recipe delivers. Everything you love about a big bacon and egg breakfast is baked into one beautiful damper – and it serves six without any juggling of pans or plates.
It is a little bit rustic, a little bit impressive, and completely delicious. Slice it up warm with butter and tomato relish and watch it disappear.
Best for: Group camping breakfasts, make-ahead mornings, brunch by the fire
Time to Play: 40 minutes
Serves: 6
What You’ll Need:
- 3 cups self-raising flour
- 1 tsp salt
- ½ cup cooked bacon pieces
- 1 cup chopped fresh spinach
- 2 eggs, lightly beaten (for the dough)
- 2 whole eggs (for baking on top)
- 1 cup water
How to Make It:
1. In a large bowl, combine the self-raising flour, salt, bacon pieces, and chopped spinach. Stir well to distribute everything evenly.
2. Pour in the lightly beaten eggs and water. Mix until a soft dough forms. If it is sticky, add a little extra flour. You want soft but workable.
3. Lightly flour your hands. Shape the dough into a round loaf and place it into a greased camp oven.
4. Using a spoon or your fingers, make two small indents in the top of the dough. Carefully crack the whole eggs directly into these indents.
5. Place the lid on the camp oven and set it over hot coals. Add some extra coals on top. Bake for 25–30 minutes, rotating occasionally, until the crust is golden and the eggs are cooked through.
6. Let it cool slightly, then slice and serve warm with butter, tomato relish, or a drizzle of hollandaise.
Pro Tip: Want runny yolks? Pull it at 25 minutes. Want firm eggs all the way through? Go the full 30. Either way, this damper is a showstopper.
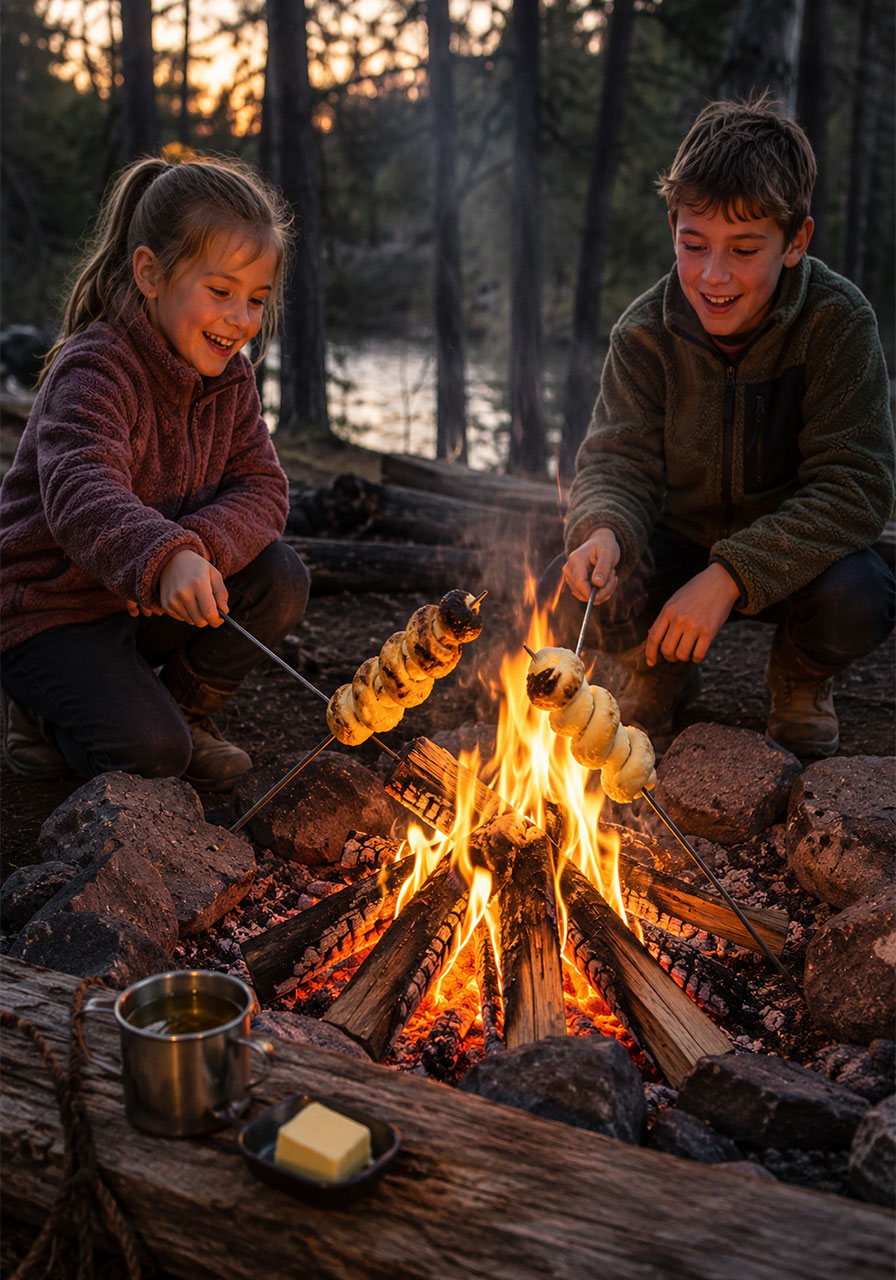
4. Campfire Damper on a Stick
This one is pure joy – especially if you have kids around. Twist soft dough around a skewer, hold it over the fire, and watch it puff up into a warm, lightly charred little bread roll. It is one of those campfire activities that doubles as a meal, and everyone loves it.
Dunk it in butter and honey while it is still warm and you have one of the simplest pleasures on earth.
Best for: Family camping, kids activities, snacks around the fire
Time to Play: 20 minutes
Serves: 2
What You’ll Need:
- 1 cup self-raising flour
- 1 tbsp chilled butter, chopped
- 1 tsp sugar
- ¼ cup milk
- Pinch of salt
- 2 long metal skewers or pre-soaked wooden skewers
How to Make It:
1. Place the flour in a bowl. Rub in the cold butter with your fingertips until the mixture looks crumbly, like rough breadcrumbs.
2. Stir in the salt and sugar. Gradually add the milk a little at a time, mixing until a soft dough forms. It should hold together without being sticky.
3. Divide the dough in half. Roll each portion into a long snake shape on a lightly floured surface.
4. Wind each dough snake around a skewer in a tight spiral, pressing gently so it sticks.
5. Hold over the campfire, rotating slowly, for about 7–10 minutes until golden, slightly charred in spots, and cooked through.
6. Slide off the skewer and eat warm – with butter, honey, jam, or just as is.
Pro Tip: Let the kids have a go at winding their own dough. The slightly wonky ones always taste the best.
MAINS
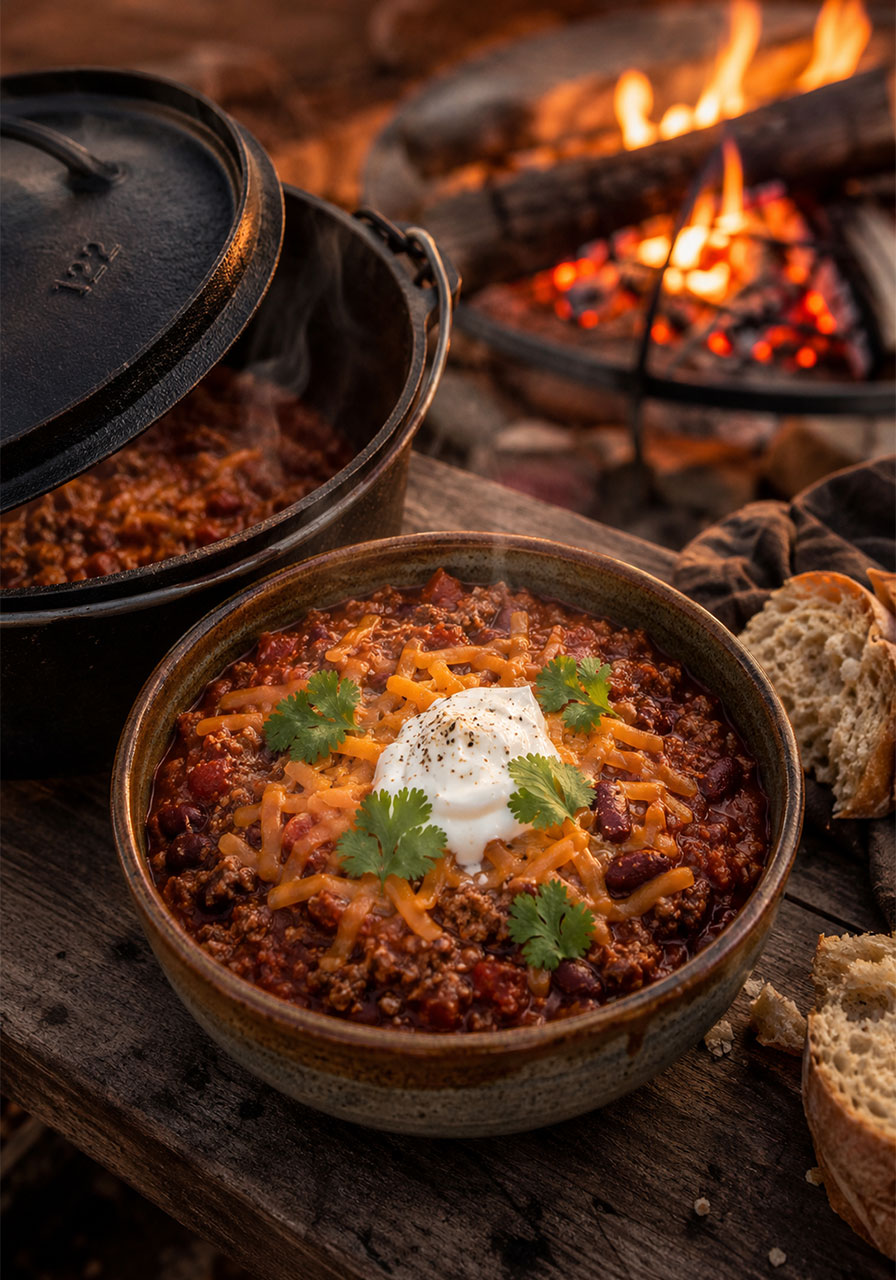
5. Camp-Oven Chilli Con Carne
Rich, smoky, and deeply satisfying – this camp oven chilli is the kind of meal people talk about for the rest of the trip. It feeds a crowd, fills everyone up, and somehow tastes even better reheated over the fire the next morning with some damper or rice.
The spice blend is everything here. Toast it well in the pan before adding the liquids and you will wonder why you ever made chilli any other way.
Best for: Group camping, cold nights, meals that stretch into leftovers
Time to Play: 1 hour 15 minutes
Serves: 8
What You’ll Need:
- 1–2 tbsp olive oil
- 1 large onion, diced
- 2 cloves garlic, crushed
- 1 red capsicum, diced
- 1 green capsicum, diced
- 1 kg beef mince
- 2 tbsp tomato paste
- 2 × 400g tins diced tomatoes
- 2 × 400g tins red kidney beans, drained and rinsed
- 1 cup beef stock
- 2 tsp ground cumin
- 2 tsp smoked paprika
- 1–2 tsp chilli powder (adjust to your heat preference)
- 1 tsp ground coriander
- 1 tsp dried oregano
- Salt and pepper to taste
- Grated cheese, sour cream, tortillas, rice, or damper to serve
How to Make It:
1. Place your camp oven over medium coals. Add the oil, then toss in the onion, garlic, and capsicum. Sauté until soft and fragrant – about 5 minutes.
2. Add the beef mince. Break it up with a wooden spoon and cook until browned all over.
3. Stir in the tomato paste, cumin, smoked paprika, chilli powder, coriander, and oregano. Let the spices toast for about 1 minute – this step wakes up all the flavors.
4. Pour in the diced tomatoes and beef stock. Stir well and bring to a gentle simmer.
5. Pop the lid on and simmer over low coals for 45–60 minutes, stirring occasionally. Add a few coals to the lid for even heat. If it is thickening too much, add a splash more stock.
6. Stir in the kidney beans for the last 10–15 minutes so they stay firm and hold their shape.
7. Dish into bowls. Load with cheese and sour cream and serve with tortillas, rice, or big chunks of damper.
Pro Tip: Pre-mix your spice blend at home in a small jar or zip bag before you leave. It saves so much faffing around at camp – and you will use every bit of it.
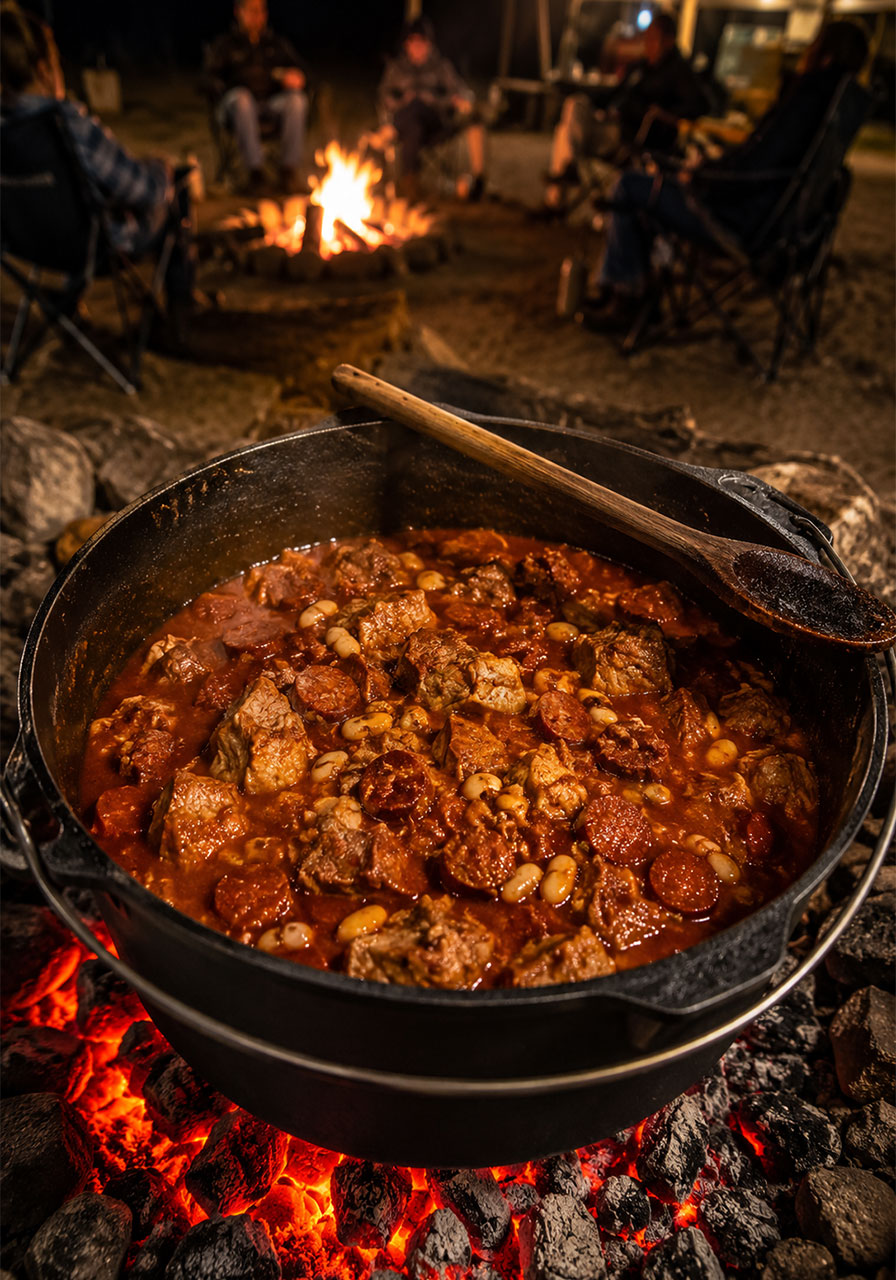
6. Campfire Pork & Chorizo Stew
Picture this: the fire is glowing low after a big day on the trails, everyone has pulled up a camp chair, and there is a pot of this bold, smoky stew bubbling away over the coals. Pork shoulder melts into tender bites, chorizo adds its signature spicy-smoky kick, and butter beans make the whole thing seriously hearty.
This is the stew that makes people ask for the recipe. And it gets even better the next day.
Best for: Group camp dinners, cold nights, slow campfire cooking
Time to Play: 2 hours 20 minutes
Serves: 12
What You’ll Need:
- 2 kg pork shoulder, cut into 3 cm chunks
- 500 g bacon, cut into large chunks
- 4 chorizo sausages, sliced
- 6 cans tinned tomatoes (preferably with paste and herbs)
- 2 tins butter beans, drained
- 2 chicken stock cubes
- 2 onions, sliced
- 3 tbsp smoked paprika
- Salt and pepper to taste
- Splash of oil for frying
How to Make It:
1. Heat your camp oven over the coals with a splash of oil. Sear the pork chunks until golden brown on all sides. Do not rush this step – that color means flavor. Set the pork aside.
2. Add the chorizo and bacon to the pot. Let them sizzle and release their beautiful, smoky fat. Add the pork back in.
3. Stir in the tomatoes, butter beans, stock cubes, onions, and smoked paprika. Season generously with salt and pepper. Mix well.
4. Put the lid on. Simmer gently over steady coals for about 2 hours, until the pork is fork-tender and the sauce has thickened and turned glossy. Stir it every now and then so nothing catches on the bottom.
5. Serve in big bowls with creamy mash, crusty bread, or damper to soak up every last drop of that incredible sauce.
Pro Tip: Nestle coals under and on top of the camp oven for even cooking, and swap them out every 30–40 minutes to keep the heat steady. This stew is all about low and slow.
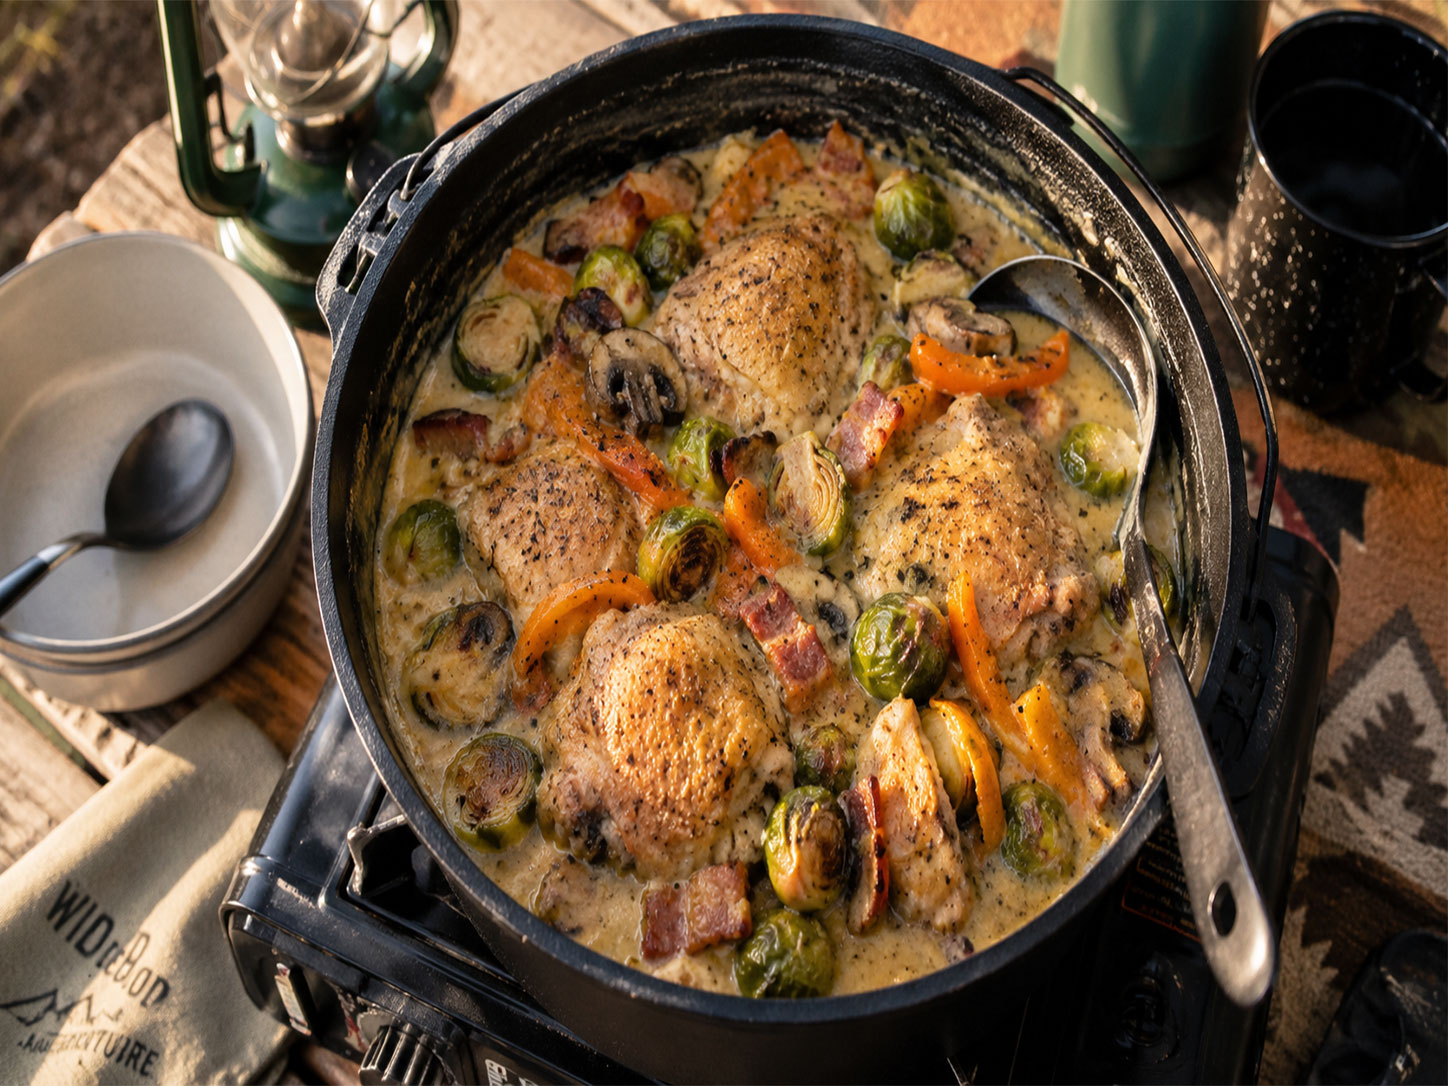
7. Creamy Campfire Chicken & Brussels Sprouts Stew
When the sun drops and the temperature follows, this is exactly what you want in your bowl. Juicy chicken thighs, chunky bacon, and Brussels sprouts that soak up a creamy, garlicky sauce – all coming together in one pot over the fire. Warming, nourishing, and deeply comforting.
The sprouts are the surprise star here. They caramelize beautifully and add a satisfying texture that makes this stew feel like more than the sum of its parts.
Best for: Cold-weather camping, one-pot dinners, comfort food at camp
Time to Play: 45 minutes
Serves: 4–6
What You’ll Need:
- 1 tbsp olive oil or butter
- 1 kg chicken thighs, cut into bite-sized pieces
- 500 g bacon, cut into chunky pieces
- Salt and cracked pepper
- 1 tsp garlic powder (or 2 fresh cloves, minced)
- 1 brown onion, sliced
- 200 g mushrooms, sliced (optional)
- 1 capsicum, sliced into chunky pieces
- 500 g Brussels sprouts, trimmed and halved
- 1½ cups chicken stock
- 300 ml long-life cooking cream
- 1 tbsp plain flour (to coat the chicken)
How to Make It:
1. Place the chicken pieces in a ziplock bag with the flour and shake well to coat. This helps with browning and will naturally thicken your stew later.
2. Heat oil in your camp oven over medium coals. Add the chicken and sear until golden all over. Remove and set aside.
3. Add the onion, mushrooms (if using), capsicum, and Brussels sprouts. Cook until softened and lightly golden at the edges.
4. Add the garlic powder and chicken stock. Stir and bring to a gentle simmer.
5. Return the chicken to the pot. Cover and cook for about 30 minutes, until the chicken is cooked through and the sprouts are tender.
6. Stir through the cooking cream until silky and combined. Taste and adjust the seasoning, then serve.
Pro Tip: Pre-chop your vegetables at home and store them in zip bags. At camp, you just tip them straight in – less mess, more time around the fire.
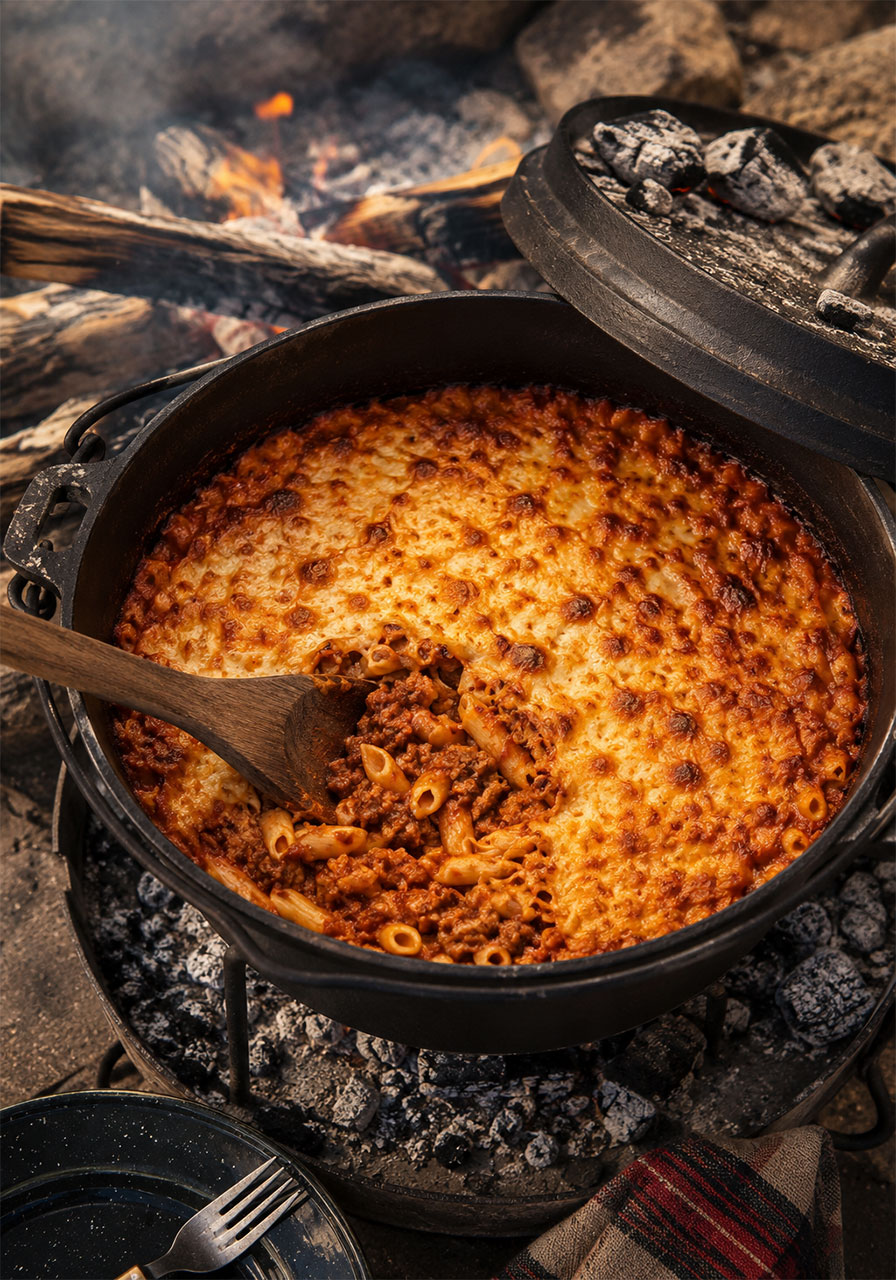
8. Gluten-Free Camp Oven Pasta Bolognese
Hearty, cheesy, loaded with hidden vegetables, and finished with a golden browned crust – this one-pot bolognese is the kind of camp dinner that makes everyone at the site wander over to see what you are cooking.
It is gluten-free, endlessly satisfying, and cooked entirely in one pot. The moment you pull the lid off and reveal that bubbly, golden cheese top, you will feel like an absolute legend.
Best for: Gluten-free campers, crowd feeding, lazy camp dinners
Time to Play: 1 hour
Serves: 7
What You’ll Need:
- 1 kg beef mince
- 2 celery sticks, diced
- 2 carrots, grated
- 2 onions, diced
- 1 zucchini, grated
- 4 tbsp tomato paste (or 2 sachets)
- 2 × 400g cans diced tomatoes with herbs
- 350 g gluten-free penne pasta
- 500 g grated cheese
- 3 stock cubes
- 3 cups water
- Olive oil
- Salt and pepper to taste
How to Make It:
1. Grate the zucchini and carrot, and dice the celery and onion at home or at camp. Have everything ready near the fire before you start.
2. Place the camp oven over hot coals. Add a splash of oil and sauté the vegetables until they start to soften and smell amazing.
3. Add the beef mince. Break it up with a spoon and cook until browned all over.
4. Stir in the tomato paste and let it fry off for a minute or two – this deepens the flavor significantly.
5. Tip in the tinned tomatoes and crumble in the stock cubes. Stir to combine. Simmer uncovered for 30 minutes until the sauce is thick, glossy, and rich. Season well.
6. Add the gluten-free penne and pour in 3 cups of water. Stir well to coat all the pasta.
7. Pop the lid on and simmer for about 15 minutes, stirring occasionally. Test the pasta early – GF penne goes from perfect to mushy fast. You want it just slightly underdone when you pull it off.
8. Sprinkle half the cheese through the pasta and poke it down. Dump the rest on top for that golden finish.
9. Return the lid and place a few hot coals on top. Cook for another 10 minutes for the iconic browned cheesy crust.
10. Scoop into bowls and serve hot with a bread roll or damper.
Pro Tip: That golden cheesy top only happens if you get hot coals on the camp oven lid. Do not skip it – it is the whole show.
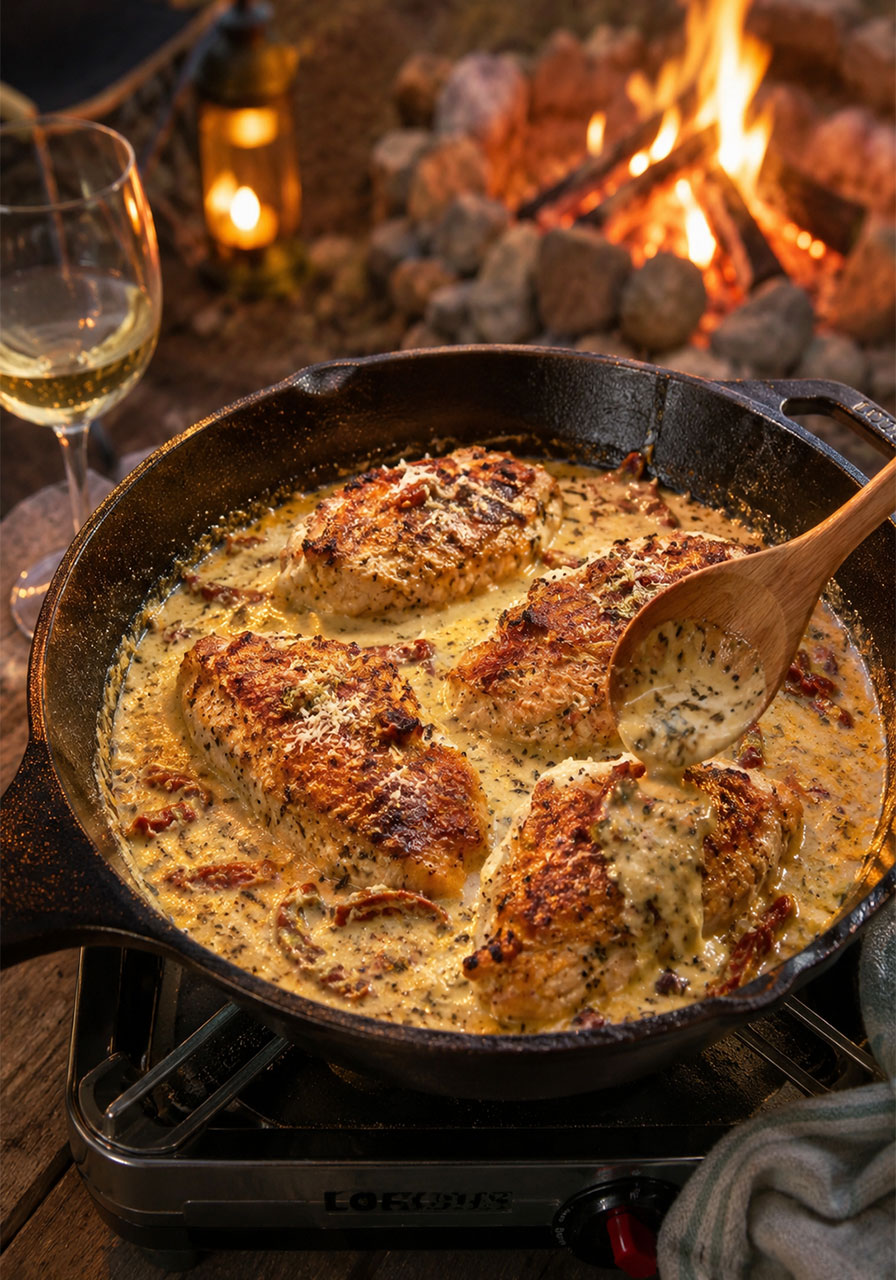
9. One-Skillet Marry Me Chicken
This is the recipe that earns proposals. Or at least second helpings. Crispy golden chicken breasts simmered in a dreamy garlic parmesan cream sauce with sun-dried tomatoes and herbs – straight from one skillet, with minimal cleanup and maximum wow factor.
It looks and tastes like a restaurant dinner. It takes about 35 minutes. Camp cooking has never looked this good.
Best for: Date nights under the stars, impressing your campmates, weeknight-level effort with weekend-level results
Time to Play: 35 minutes
Serves: 4
What You’ll Need:
- 4 whole chicken breasts, skin-on
- ½ cup sun-dried tomato strips
- ½ cup grated parmesan cheese
- 1 tsp garlic salt
- 1 tbsp mixed herbs
- 2 cups chicken stock
- 1 cup cooking cream
- 2 tbsp olive oil
- Salt and pepper
How to Make It:
1. Pat the chicken breasts dry with paper towel. Season generously with salt and pepper. Heat olive oil in your skillet over medium-high heat. Place the chicken skin-side down and sear until deeply golden and crispy – about 5–7 minutes. Flip and cook the other side for 4–5 minutes. Remove and set aside.
2. Pour the chicken stock into the hot skillet and use a wooden spoon to scrape up all those caramelized bits from the bottom. That is where all the flavor lives. Simmer for 3–4 minutes to reduce slightly.
3. Stir in the cream, sun-dried tomatoes, parmesan, garlic salt, and herbs. Mix well and bring to a gentle simmer until the cheese melts into the sauce.
4. Nestle the chicken back into the skillet, skin-side up so the skin stays crispy. Simmer on low-medium heat for 8–10 minutes, until the chicken is cooked through (internal temp 74°C/165°F).
5. Top with fresh parsley or basil if you have some. Serve straight from the skillet with crusty bread, rice, pasta, or whatever sides you have on hand.
Pro Tip: Pre-measure your dried herbs and garlic salt into a zip bag at home. It makes this feel like a dump-and-go recipe at the campsite, even though the result is anything but basic.
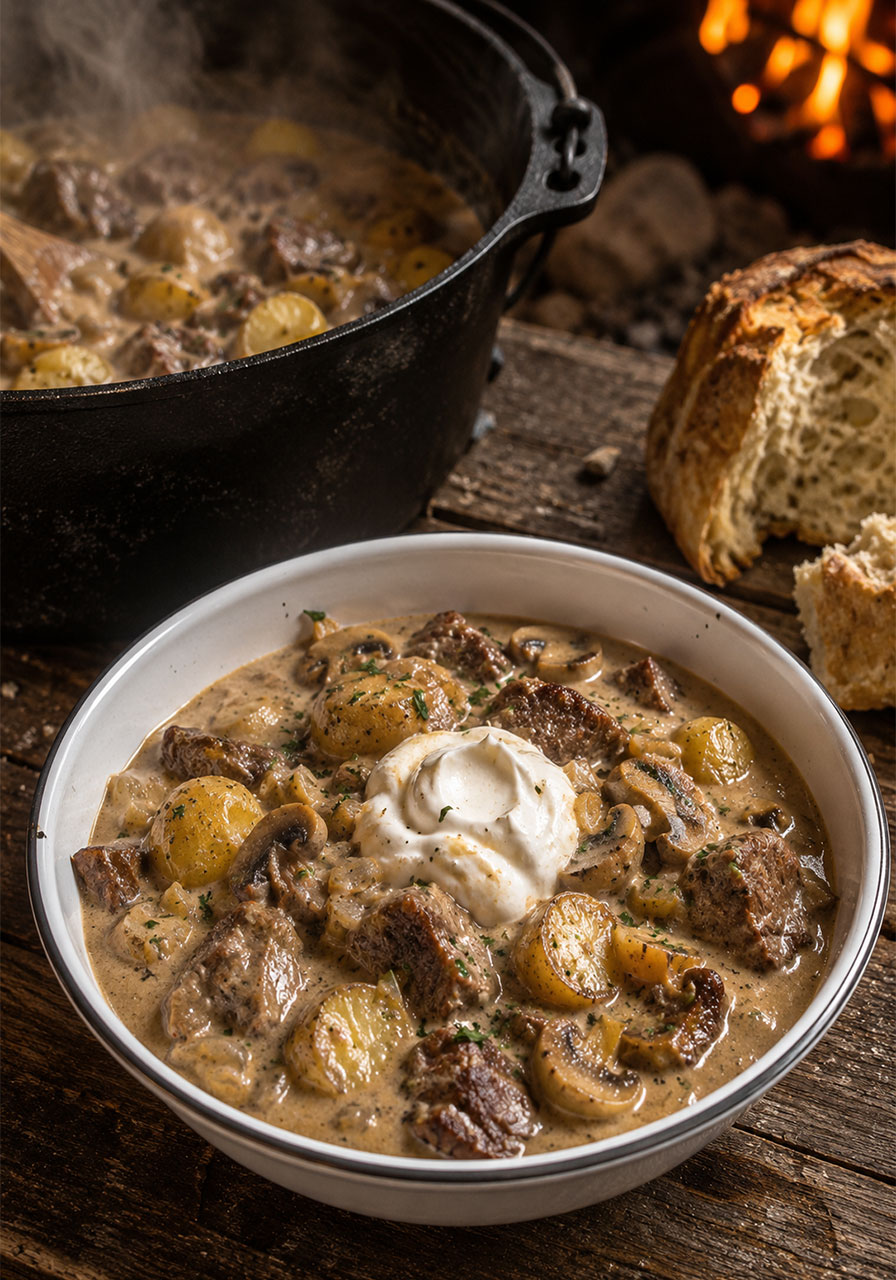
10. Creamy Camp Oven Beef Stroganoff
After a long day on the trails, there is nothing better than gathering around the fire and dishing up a big, creamy bowl of beef stroganoff. Rich sauce, meltingly tender beef, earthy mushrooms, and a hit of sour cream at the end – this is comfort food that earns its place on every camp meal plan.
The snaplock bag flour trick is the secret to zero-mess prep at camp. Do yourself a favor and sort it before you leave home.
Best for: Cool nights, feeding a hungry crew, slow campfire cooking
Time to Play: 2 hours 20 minutes
Serves: 8
What You’ll Need:
- 1.5 kg chuck steak, cut into chunks
- Plain flour (for coating the beef – pack it in a snaplock bag)
- 2 onions, sliced
- 500 g mushrooms, sliced
- 500 g chat potatoes, halved
- 2 sachets pizza paste (herbs and garlic flavor)
- 2 tbsp paprika
- 1 tbsp Dijon mustard
- 1 liter beef stock
- 300 ml sour cream
- Salt and pepper to taste
- Cooking oil
How to Make It:
1. At camp, pour the pre-packed flour into your snaplock bag. Add the beef chunks, seal, and shake until coated. No mess, no fuss.
2. Heat your camp oven over coals with a splash of oil. Brown the beef in batches until golden all over. Set aside.
3. Add the onions and mushrooms to the pot. Cook until softened and starting to turn golden.
4. Return the beef to the pot. Add the potatoes, pizza paste, paprika, Dijon mustard, and beef stock. Season well and stir everything together.
5. Pop the lid on and simmer gently over coals for about 2 hours, until the beef is fall-apart tender and the sauce is thick and glossy.
6. Remove from heat and stir through the sour cream. Taste and adjust seasoning.
7. Ladle into bowls and serve with crusty bread, rice, or pasta – whatever you have handy. Leftovers taste even better the next day.
Pro Tip: Place a few coals on the camp oven lid to keep the heat even and consistent. This is a low-and-slow recipe – patience is rewarded.
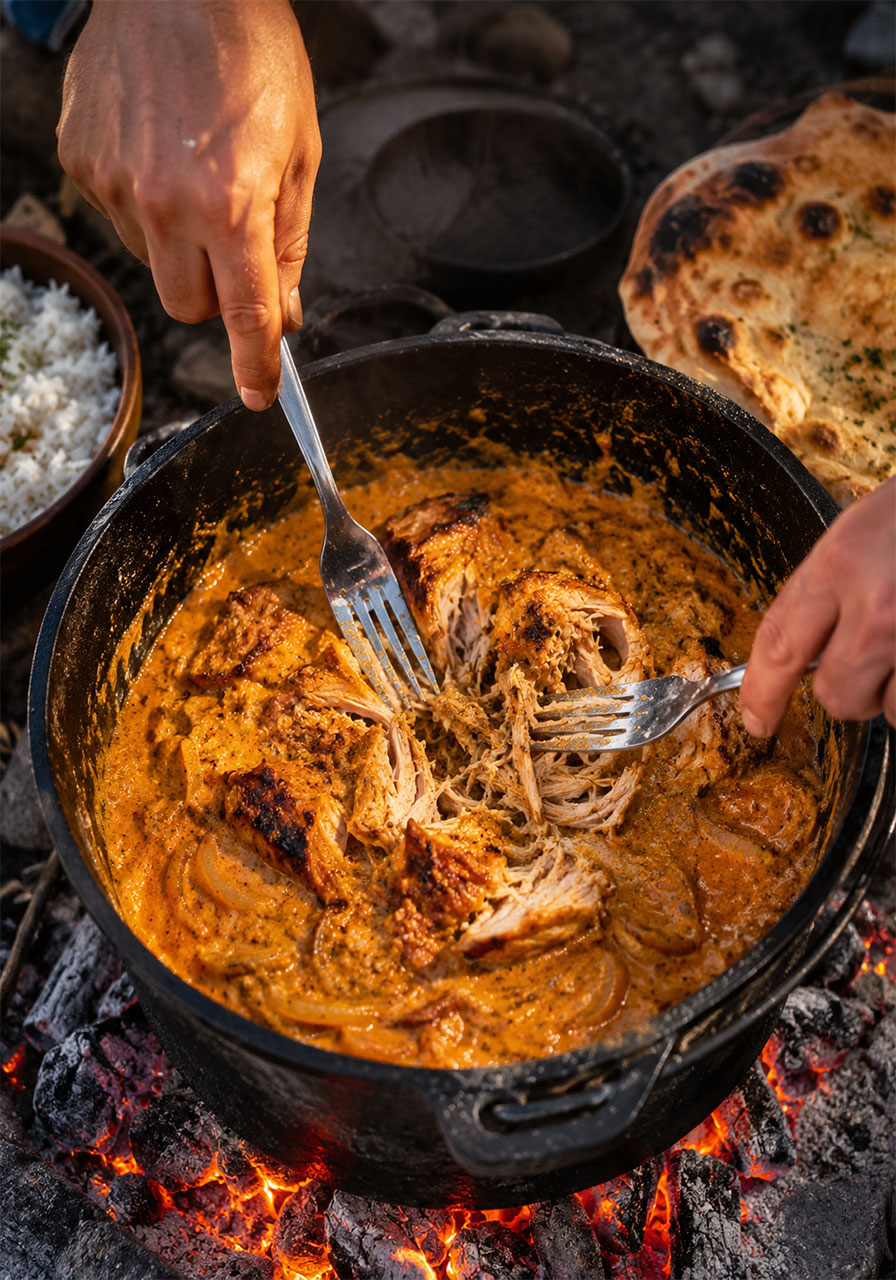
11. Camp Oven Butter Chicken
Four ingredients. One pot. One hour. One of the best camp dinners you will ever eat. This butter chicken earns a permanent spot on every camp meal plan – it is rich, creamy, deeply flavored, and so easy it almost feels like cheating.
The chicken thighs slow-cook in butter chicken paste and coconut cream until they practically shred themselves. Serve it with flatbread or rice and prepare for the compliments.
Best for: Simple camp dinners, feeding a crowd, no-fuss cooking
Time to Play: 1 hour 10 minutes
Serves: 6
What You’ll Need:
- 1.5 kg chicken thighs (boneless, skinless)
- 2 large onions (or 3 small), sliced
- 1 jar or sachet of butter chicken paste
- 1 can coconut cream
How to Make It:
1. Slice the onions and lay them across the base of your camp oven. They will soften and form a sweet, fragrant bed for the chicken.
2. Add the whole chicken thighs on top of the onions. No chopping required.
3. Pour over the butter chicken paste and the coconut cream. Give it a gentle swirl to distribute.
4. Put the lid on and set the camp oven over medium-hot coals. Simmer gently for about 1 hour, rotating the oven occasionally and adding coals to the lid for even heat.
5. Check for doneness – the chicken should pull apart easily with two forks. Once it is fall-apart tender, shred it right in the pot and stir everything together.
6. Dish it out with rice or campfire flatbread. Mop up every last drop of that sauce.
Pro Tip: Vacuum seal everything together at home – onions, chicken, paste, and coconut cream – in one bag. At camp, just cut the bag open and pour it straight into the pot. Easiest dinner prep ever.
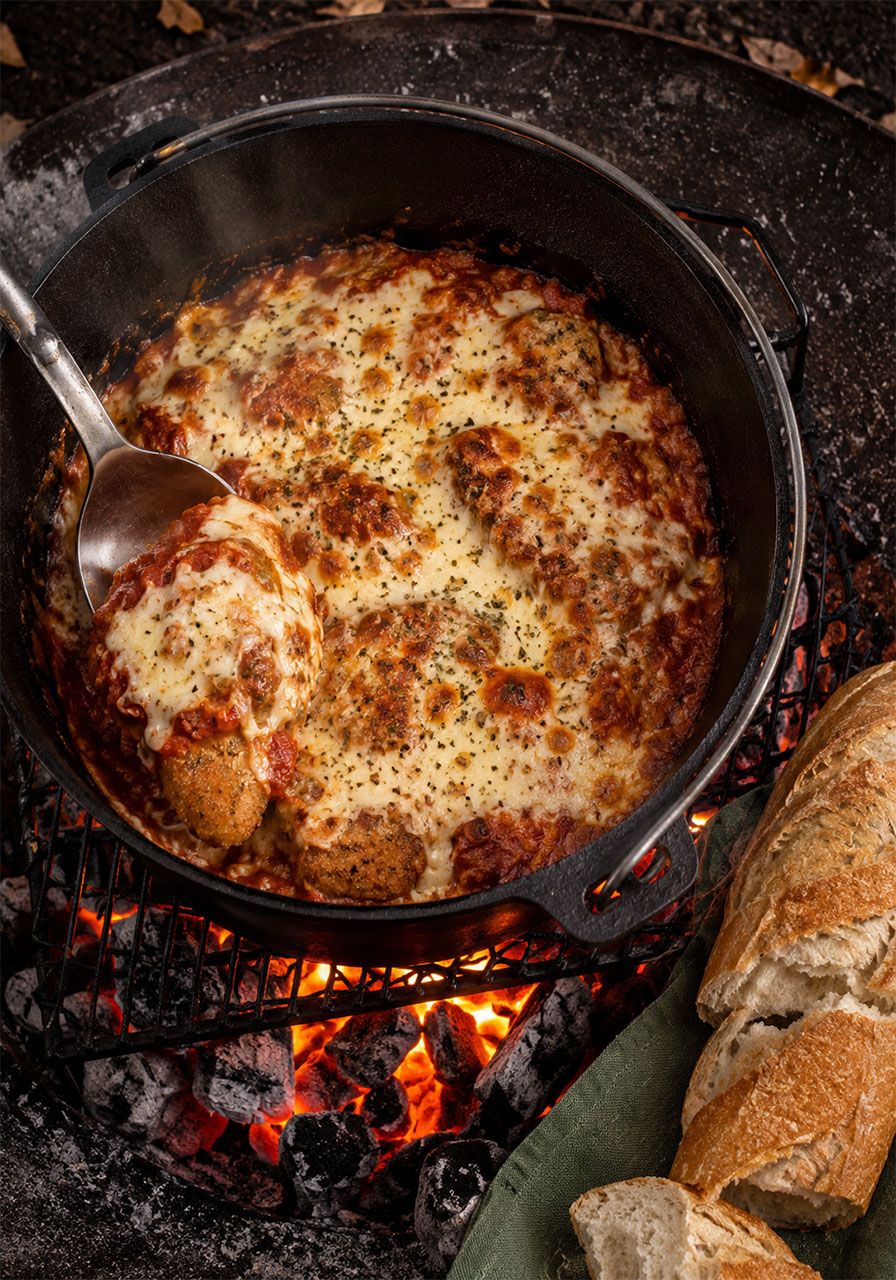
12. 3-Ingredient Chicken Parm Casserole
A pub chicken parmi – minus the deep fryer, minus the effort, minus the long ingredient list. This three-ingredient camp oven casserole layers crumbed chicken, rich tomato sauce, and a generous blanket of melted cheese into something that is bubbly, golden, and absolutely satisfying.
It is the recipe for those evenings when you want something that feels like a treat without actually doing much work.
Best for: Easy camp dinners, feeding a crowd, minimal prep
Time to Play: 35 minutes
Serves: 6
What You’ll Need:
- 1 kg cooked crumbed chicken tenders (or nuggets)
- 1 jar (around 680 g) passata or tomato pasta sauce
- 500 g grated cheese (mozzarella, tasty, or a pizza blend)
How to Make It:
1. Slice the chicken tenders into thirds – easier to layer and easier to serve.
2. In your camp oven or Dutch oven, lay down a base of chicken pieces. Spoon over some sauce, then scatter cheese on top. Repeat the layers until everything is used, finishing with a generous layer of cheese on top.
3. Place the lid on and set over hot coals on a grill plate. Add a few coals on top of the lid if you can. Cook for 25–30 minutes until the cheese is melted, golden, and bubbling at the edges.
4. Scoop straight from the pot. Serve with crusty bread or garlic toast. No sides necessary.
Pro Tip: Line the bottom of your camp oven with foil before layering. It saves serious scrubbing later, especially if the sauce gets enthusiastic near the base.
13. Creamy Chicken & Dumplings Casserole
This one always surprises people. It looks simple – and it is – but what comes out of the oven (or camp oven) is pure, pillowy, creamy comfort. The dumplings bake right on top of the chicken, absorbing all that savory broth goodness as they puff up golden.
Use a rotisserie chicken and it comes together in almost no time at all. It is the recipe that has everyone asking for seconds.
Best for: Cozy camp dinners, using rotisserie chicken, feeding families
Time to Play: 45 minutes
Serves: 6
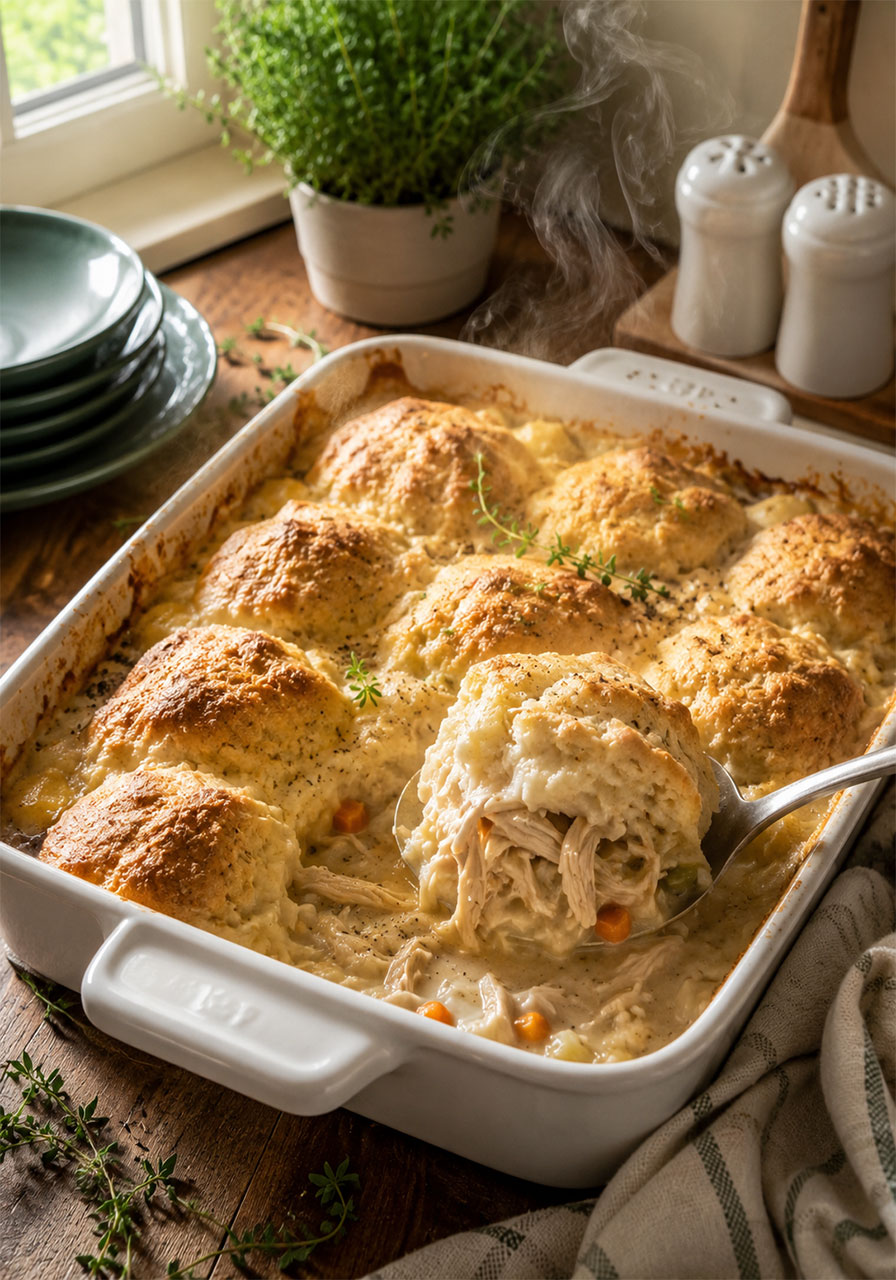
What You’ll Need:
- 3–4 cups chopped cooked chicken (rotisserie works perfectly)
- 2 cups chicken broth
- ¼ cup unsalted butter
- 1 cup all-purpose flour
- 1¼ tsp baking powder
- ¼ tsp salt
- 1 cup milk
- 1 can (10.5 oz) unsalted cream of chicken soup
How to Make It:
1. Preheat your camp oven or regular oven to 400°F (200°C).
2. Melt the butter and pour it into the bottom of your baking dish or camp oven. Spread the shredded chicken evenly on top of the butter.
3. In a bowl, whisk together the milk, flour, baking powder, and salt. Slowly pour this mixture over the chicken. Do not stir.
4. In another bowl, whisk together the chicken broth and cream of chicken soup until smooth. Pour this over the flour and milk layer. Do not stir.
5. Bake uncovered for 35–45 minutes, until the dumpling layer is golden brown on top and cooked through.
6. Scoop into bowls and serve warm. Watch the compliments roll in.
Pro Tip: Use unsalted cream of chicken soup so you can control the saltiness. Different brands vary a lot – taste before adding any extra salt.
14. Garlic Butter Prawn Skewers
Juicy, smoky, dripping in garlicky butter – these campfire prawn skewers are the kind of thing that makes a camping meal feel genuinely special. The key is marinating the prawns at home and vacuum sealing them so the flavor has time to really soak in.
At camp, all you do is thread them on skewers and grill for a few minutes. Dinner is done before the fire even settles.
Best for: BBQ nights, seafood lovers, impressive yet effortless camp meals
Time to Play: 20 minutes (plus marinating time)
Serves: 4
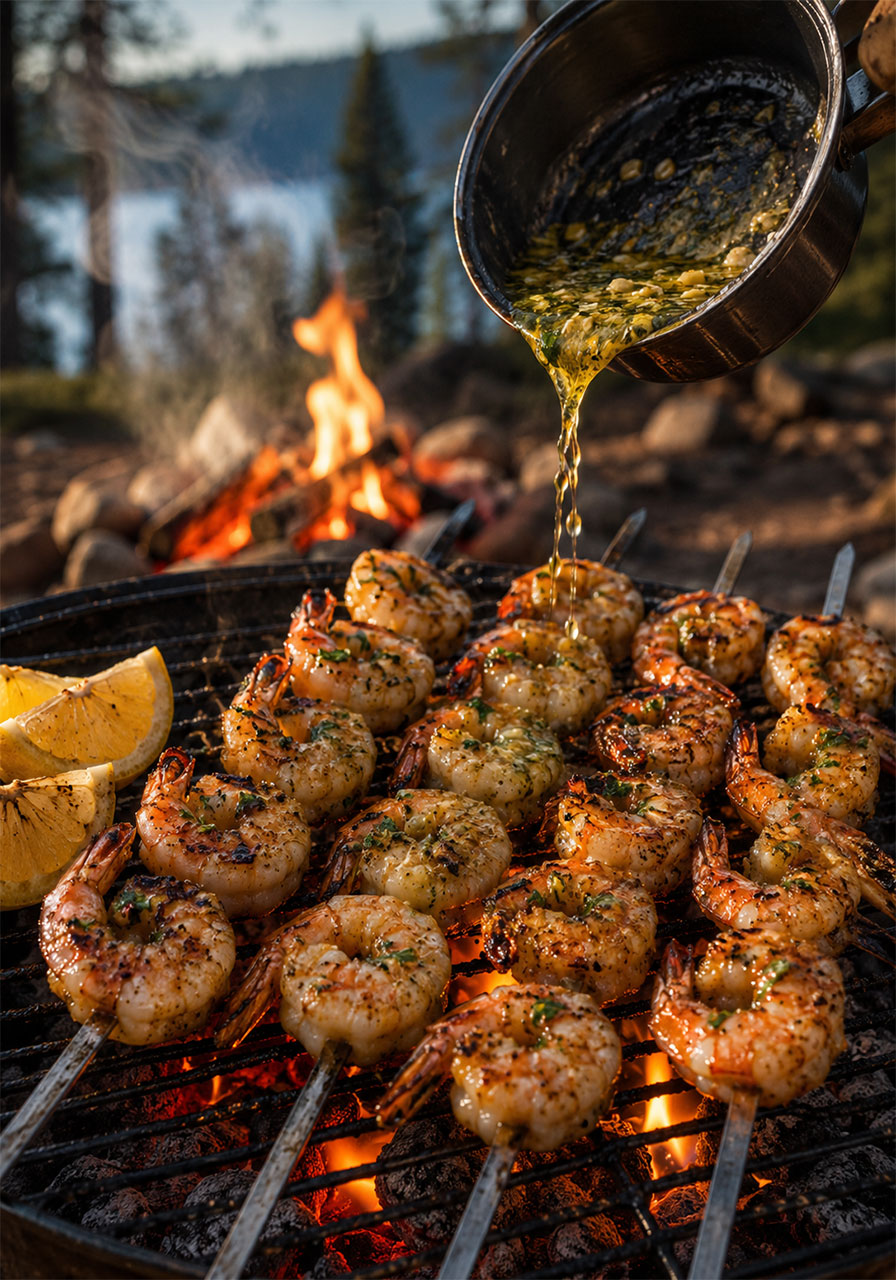
What You’ll Need:
- 500 g large prawns, peeled and deveined, tails on
- 2 tbsp unsalted butter, melted
- 2 cloves garlic, minced
- 1 tbsp olive oil
- Juice of ½ lemon
- ¼ tsp black pepper
- ¼ tsp salt
How to Make It:
1. At home: Whisk together the butter, garlic, olive oil, lemon juice, salt, and pepper in a bowl. Toss the prawns through until fully coated. Transfer prawns and marinade into a vacuum seal bag. Seal tightly and refrigerate until you head to camp. The flavors will only get better.
2. At camp: Soak wooden skewers in water for 30 minutes to prevent burning, or use metal skewers. Thread the marinated prawns onto skewers with even spacing for even cooking. Do not crowd them.
3. Heat your campfire grill or portable BBQ to medium heat. Melt a little extra butter on the grill to prevent sticking.
4. Lay the skewers down and cook for 2–3 minutes per side, basting with extra garlic butter as you go. The moment they turn pink and opaque, they are done. Pull them off immediately – overcooked prawns go rubbery fast.
5. Transfer to a plate. Drizzle with any remaining garlic butter. Squeeze over fresh lemon and scatter with parsley if you have it. Eat while hot.
Pro Tip: Use a BBQ grill mat to stop prawns falling through the grates. It is one of those small investments that makes camp cooking dramatically less stressful.
15. Campfire Foil Packet Meals
When you want dinner with zero dishes, foil packets are your absolute best friend. Load them with protein, vegetables, and seasoning, seal them up tight, and let the fire do all the work. What comes out is juicy, tender, and packed with flavor – and the only cleanup is a ball of foil.
This is the recipe format that works with whatever you have on hand, making it one of the most flexible options in your whole camp cooking repertoire.
Best for: Easy evenings, minimal dishes, customizable meals for groups
Time to Play: 30–40 minutes
Serves: As many as you like
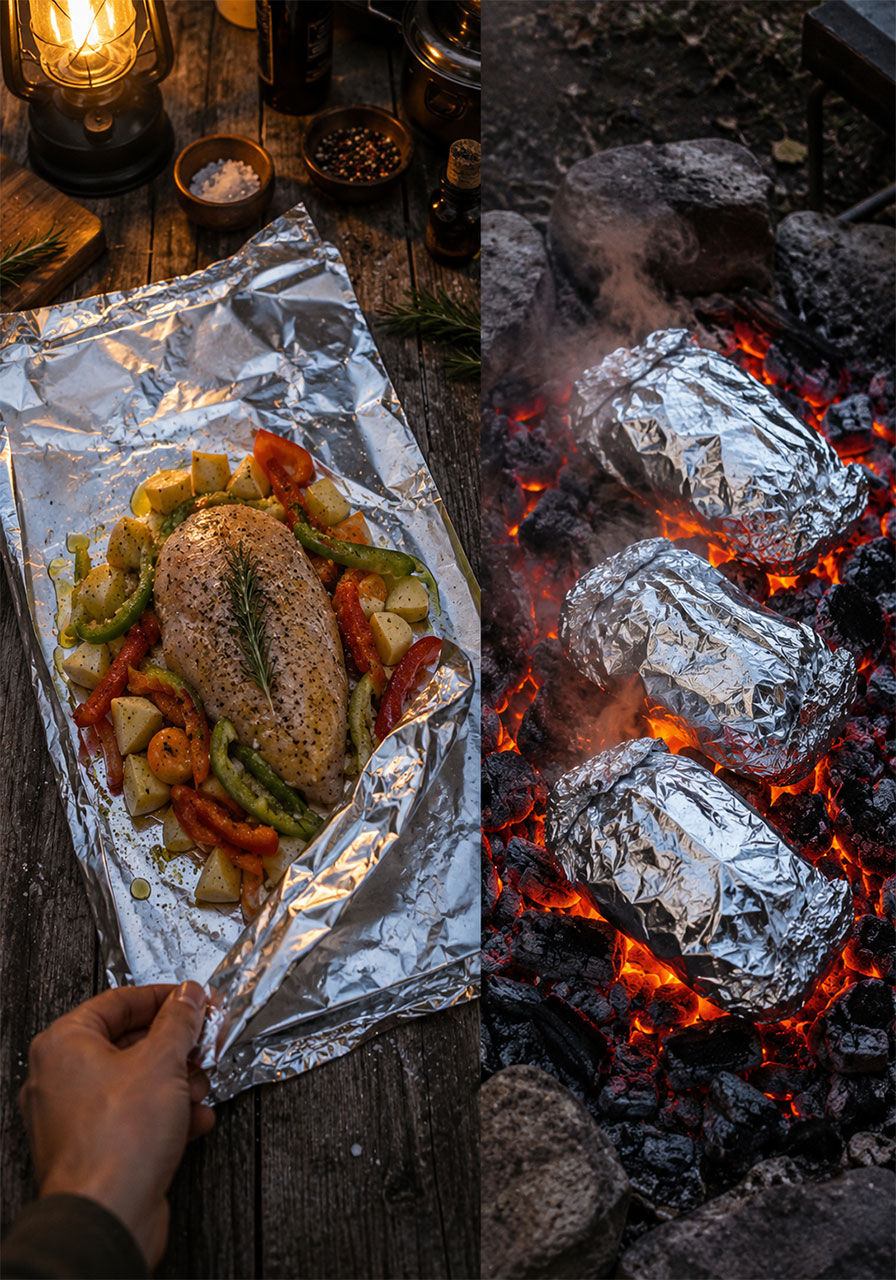
What You’ll Need (per packet):
- 1 portion of protein: chicken pieces, fish fillets, or beef strips
- A handful of vegetables: diced potatoes, carrot coins, capsicum strips, zucchini
- Olive oil or butter (a drizzle or a small pat)
- Your choice of seasoning: garlic, herbs, paprika, lemon pepper, or a spice blend
- Heavy-duty aluminum foil
How to Make It:
1. Tear off a large sheet of heavy-duty foil – about double what you think you need. You want plenty of overlap to seal it well.
2. Pile your protein and vegetables in the center of the foil. Drizzle with oil or add a pat of butter. Season generously – do not be shy here.
3. Fold the foil up and over the ingredients. Fold and crimp the edges tightly to create a sealed packet. You want steam to build up inside, not escape.
4. Place the packets on the campfire grill grate or nestle directly in the coals. Cook for 20–30 minutes, depending on what is inside. Chicken and root vegetables take longer than fish or soft vegetables.
5. Use tongs to carefully open a packet corner and check for doneness. When everything is cooked through and the vegetables are tender, they are ready.
6. Let packets cool slightly before opening fully – there will be a burst of hot steam. Eat straight from the foil.
Pro Tip: Add a splash of chicken stock or a tablespoon of salsa inside the packet before sealing. The liquid creates steam from the inside and keeps everything beautifully moist.
16. Campfire Quesadillas
Crispy on the outside, gooey on the inside, and ready in minutes – campfire quesadillas are the snack-meets-meal that works at any time of day. Stuff them with whatever you have: leftover chicken, canned beans, veggies, cheese. They are almost impossible to mess up.
Wrap them in foil for hands-off cooking over the grill, or go straight on the fire for extra-crispy edges.
Best for: Quick lunches, using up leftovers, hungry kids
Time to Play: 15 minutes
Serves: As needed
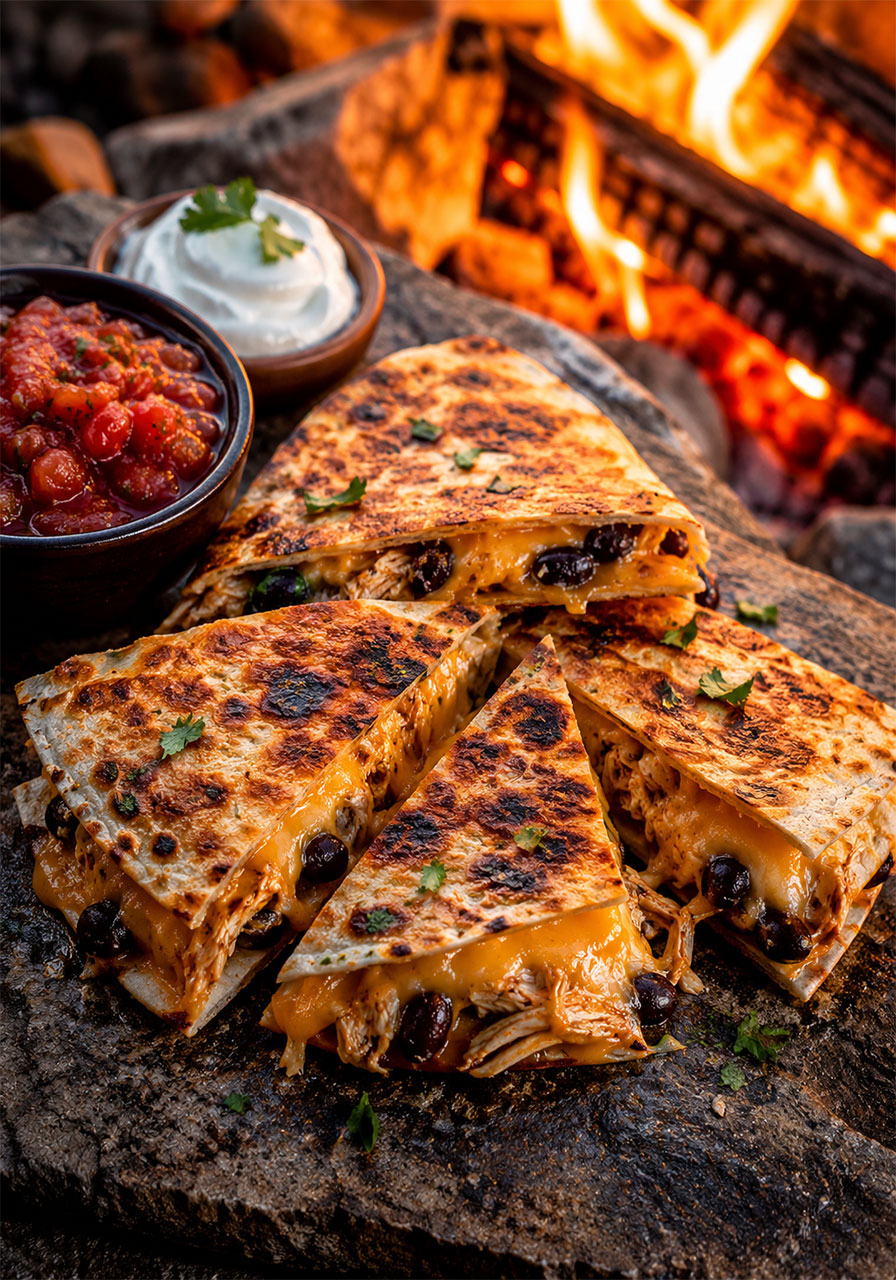
What You’ll Need:
- Large flour tortillas
- Shredded cheese (lots of it)
- Fillings of choice: cooked chicken, canned black beans, diced capsicum, corn, jalapeños, pulled pork
- Foil
How to Make It:
1. Lay one tortilla flat on a piece of foil. Scatter cheese across one half of the tortilla, add your fillings on top of the cheese, then fold the tortilla in half over the filling.
2. Wrap the folded quesadilla in foil, sealing the edges firmly.
3. Place on the campfire grill or hotplate over medium heat. Cook for 3–4 minutes per side until the tortilla is crispy and the cheese is fully melted.
4. Let it rest for a minute before cutting – the filling stays put better once slightly cooled.
5. Slice into wedges and serve with sour cream, salsa, or guacamole if you have it.
Pro Tip: Layer cheese on both sides of the filling, not just one. It acts as glue and makes sure every bite has that perfect melt-in-your-mouth pull.
17. Campfire Hot Dogs with a Twist
Forget plain snags on a stick. These campfire hot dogs get wrapped in a slice of cheese and golden puff pastry before hitting the fire – turning a simple classic into something crispy, flaky, and seriously addictive. They are quick to prep and even quicker to disappear.
Perfect for that moment between setting up camp and getting dinner properly started.
Best for: Snacks, quick dinners, kids who love food on sticks
Time to Play: 20 minutes
Serves: As many as you like
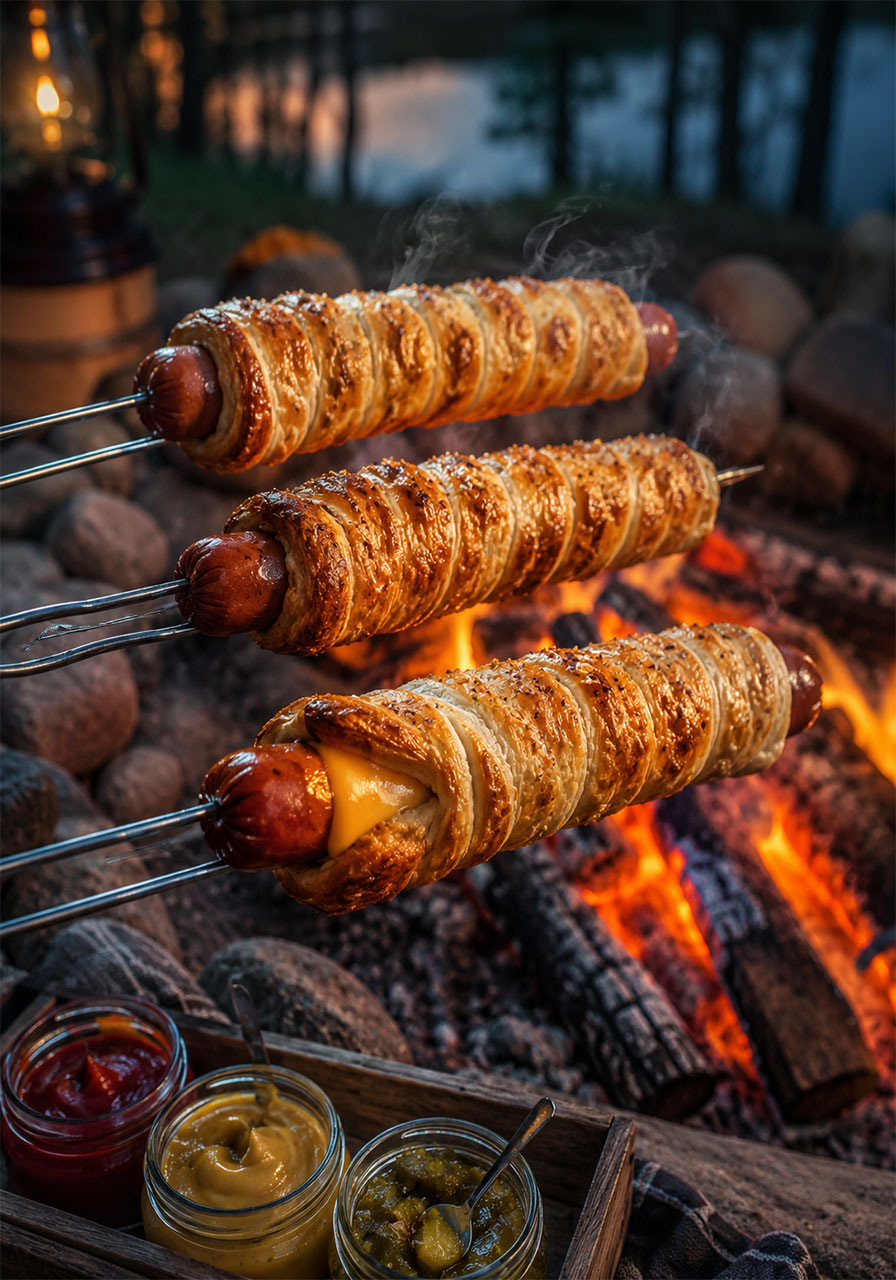
What You’ll Need:
- Hot dogs or sausages
- Puff pastry sheets, thawed
- Cheese slices
- Your favorite condiments: ketchup, mustard, relish
How to Make It:
1. Lay a slice of cheese flat. Place a hot dog at one end and roll it up so the cheese wraps around the sausage.
2. Cut the puff pastry into strips wide enough to wrap around the cheese-covered hot dog. Starting at one end, wind the pastry strip around in a spiral, overlapping slightly as you go.
3. Hold or place on a grill grate over a medium-heat campfire. Rotate slowly and consistently so the pastry cooks evenly on all sides – about 10–15 minutes until deep golden brown all over.
4. Serve immediately with your condiments of choice.
Pro Tip: Let your puff pastry thaw completely before using. Cold pastry will not wrap cleanly and may unravel over the heat. A few minutes at room temperature makes all the difference.
18. Campfire Nachos
A big, cheesy, bubbling pan of nachos around the campfire is one of life’s great pleasures. Load a cast iron skillet with corn chips, cheese, and beans, cover with foil, and let the fire turn it into golden, melty, impossible-to-stop-eating campfire magic.
Set it up in the middle of the group and watch everyone dive in at once.
Best for: Group snacking, casual dinners, happy hour by the fire
Time to Play: 15 minutes
Serves: 4–6
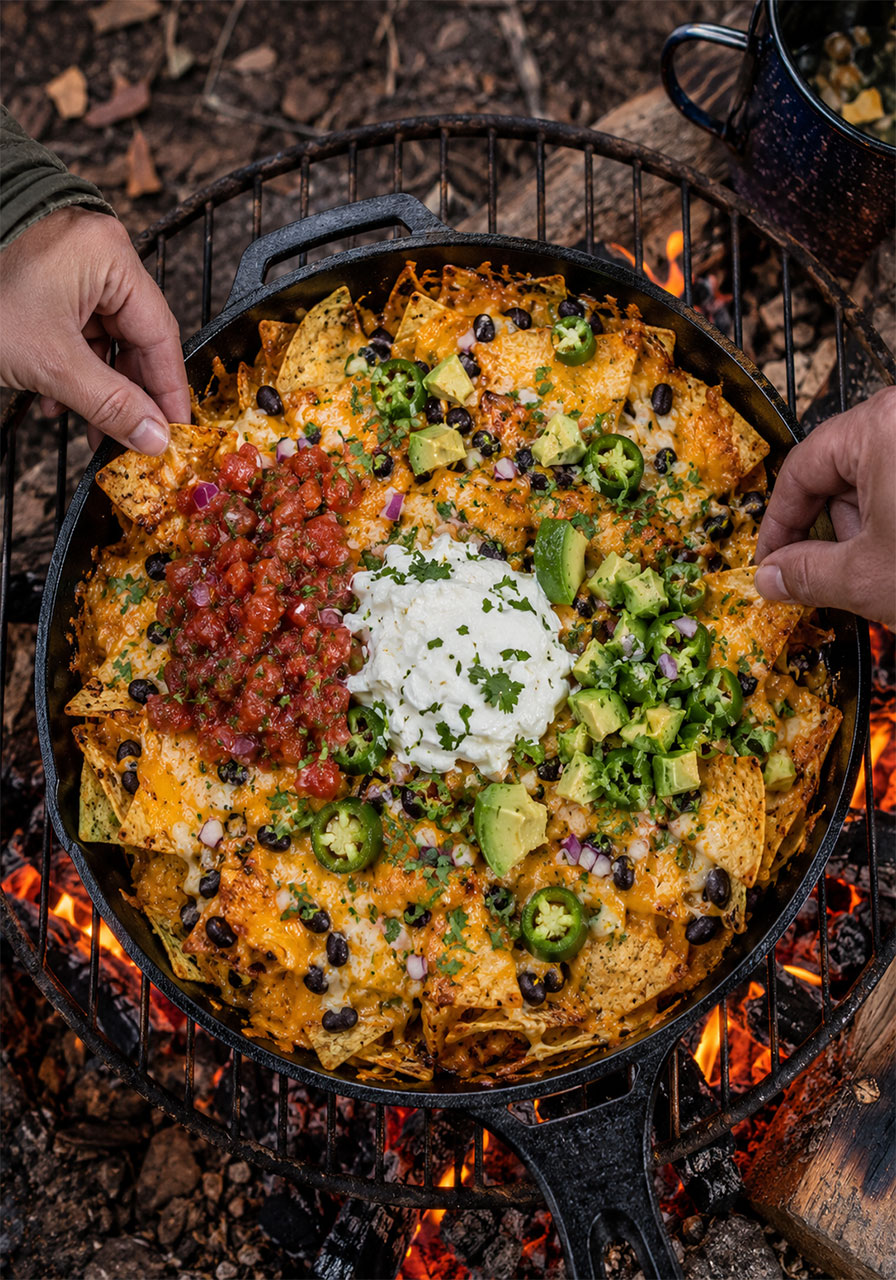
What You’ll Need:
- 1 large bag of tortilla chips
- 2 cups shredded cheese
- 1 can black beans or refried beans, drained
- Toppings: salsa, sour cream, sliced jalapeños, guacamole, pickled onions
- Foil
How to Make It:
1. In a cast iron skillet or a foil tray, spread a generous layer of corn chips across the bottom.
2. Scatter the beans evenly over the chips. Add a big handful of shredded cheese.
3. Repeat the layers – more chips, more beans, more cheese – finishing with a heavy layer of cheese on top.
4. Cover tightly with foil and place over the campfire grill on medium heat. Cook for 8–10 minutes until the cheese is completely melted and everything is hot through.
5. Remove the foil carefully (hot steam will escape). Pile on your cold toppings – sour cream, salsa, jalapeños, guacamole – and serve immediately, straight from the pan.
Pro Tip: Put the cold toppings on after the pan comes off the fire, not before. Cold sour cream and guacamole against hot, melty cheese is the whole point.
19. Campfire Pizza Cones
Pizza sauce, cheese, and your favorite toppings stuffed into a tortilla cone, wrapped in foil, and heated over the fire until everything is melted and delicious. These are fun to assemble, easy to eat, and customizable for every person in your group.
Set up a little topping station and let everyone build their own. It turns dinner into an activity.
Best for: Family camping, kids, fun group dinners
Time to Play: 15 minutes
Serves: As many as you like
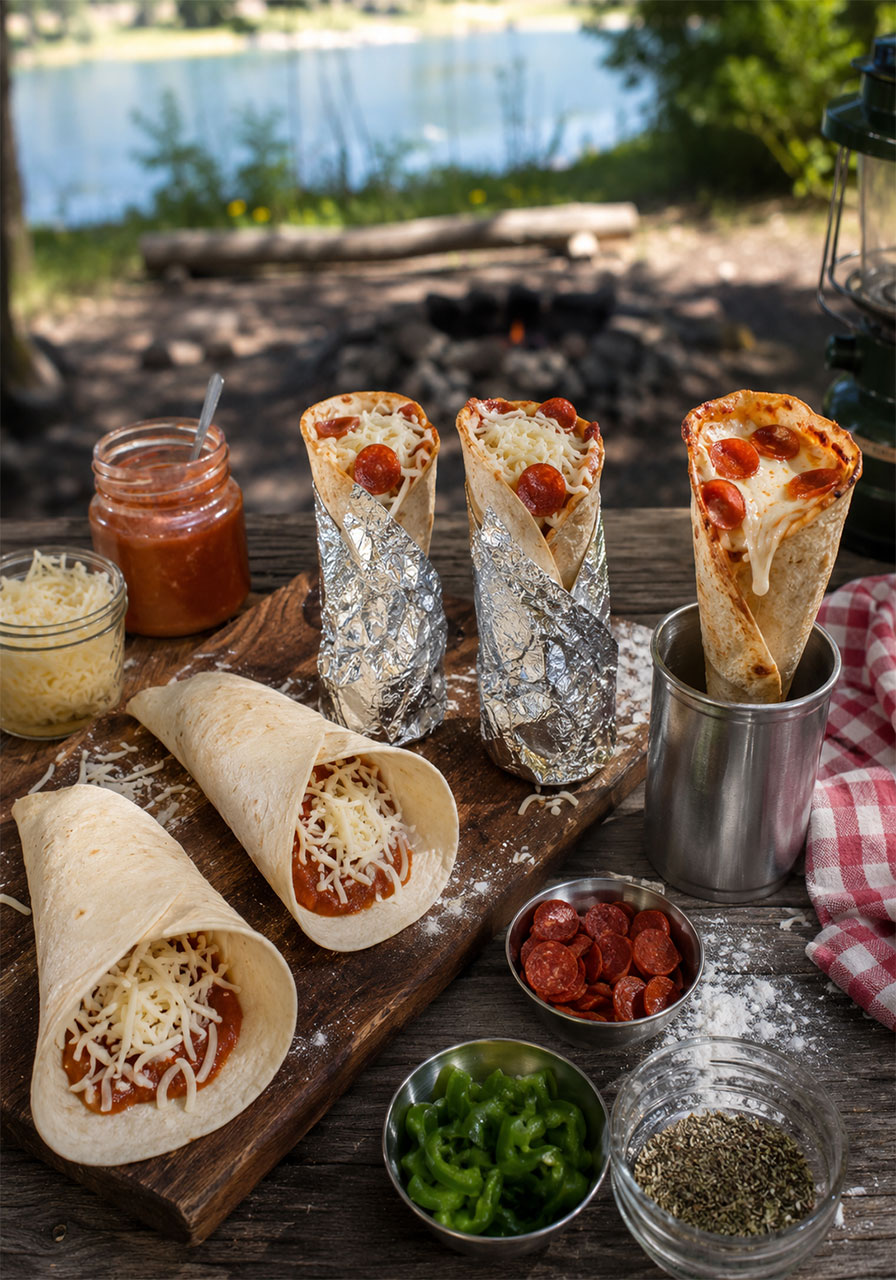
What You’ll Need:
- Large flour tortillas
- Pizza sauce or marinara
- Shredded mozzarella or pizza cheese blend
- Toppings of choice: pepperoni, mushrooms, olives, capsicum, cooked sausage, pineapple
- Foil
How to Make It:
1. Take a tortilla and fold it into a cone shape, forming a point at the bottom and a wide opening at the top. Hold it in place as you fill it.
2. Spoon a little pizza sauce down into the cone. Add a layer of cheese, then your toppings, then more cheese to seal it in. Pack it generously but leave a little room at the top so it does not overflow.
3. Wrap the filled cone securely in foil, twisting the bottom end closed and folding the top over.
4. Place on the campfire grill over medium heat and cook for 8–10 minutes, turning once or twice, until the cheese is melted and the tortilla has crisped up slightly.
5. Unwrap carefully – hot steam inside – and eat immediately.
Pro Tip: Prepare all the cones ahead of time, wrapped in foil, and cook them all together. It is the easiest way to feed a group without anyone waiting too long.
20. Campfire Pulled Pork Jaffles
Of all the things a campfire can do, this might be the most impressive: turning two slices of buttered bread, slow-cooked pulled pork, smoked cheese, and a tangy slaw into a perfectly sealed, golden-brown toasted sandwich that is crispy, melty, and completely addictive.
The jaffle iron is the most underrated piece of camp cooking gear there is. If you do not have one, this recipe is your reason to get one immediately.
Best for: Campfire lunches and dinners, touring trips, impressing yourself and everyone around you
Time to Play: 20 minutes (plus pulled pork prep)
Serves: 4
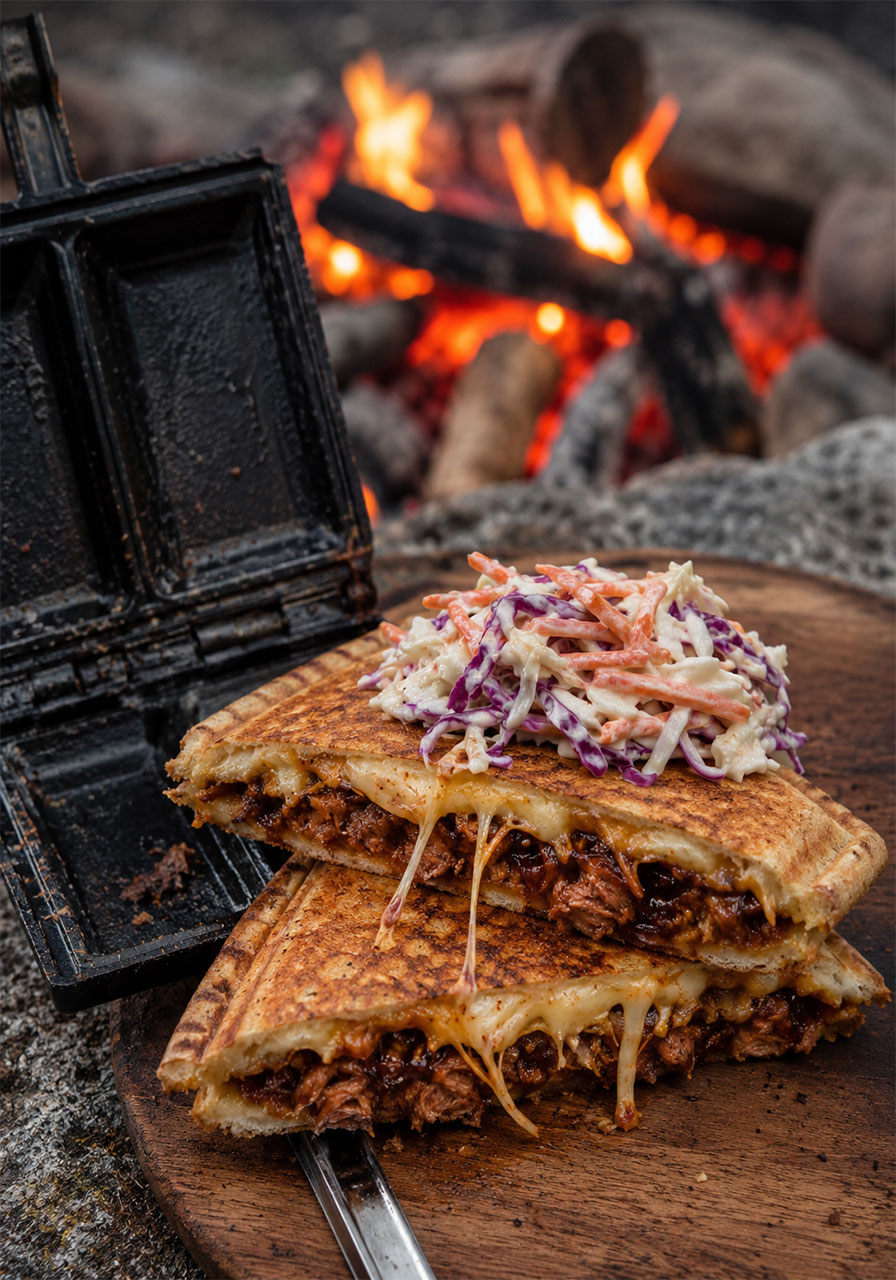
What You’ll Need:
- 8 slices of thick white or sourdough bread
- 300 g pulled pork (homemade or store-bought)
- 150 g smoked cheddar or smoked gouda, grated or sliced
- Butter (for the bread)
- Your favorite barbecue sauce
For the tangy slaw:
- 1 cup finely shredded cabbage
- 1 small carrot, grated
- 2 tbsp whole egg mayonnaise
- 1 tbsp apple cider vinegar
- ½ tsp sugar
- Pinch of salt
How to Make It:
1. Mix all the slaw ingredients together in a container. Make this at home or at camp – it only gets better as it sits.
2. Warm the pulled pork gently in a small pot over the fire or stove until it is no longer cold. It does not need to be piping hot, just take the chill off so it melts the cheese inside the jaffle properly.
3. Butter one side of each bread slice generously. This is the outside of the jaffle. Do not be stingy – butter is what gives you that golden, crispy shell.
4. Lay four slices butter-side down on your board. Add a layer of smoked cheese first (it acts as a moisture barrier), then a pile of pulled pork with a drizzle of barbecue sauce. Top with the second bread slice, butter-side up.
5. Preheat your jaffle iron over coals until hot. Lightly oil it if needed. Place the assembled jaffle in the iron and clamp shut firmly.
6. Hold or rest the iron over a good bed of coals – not open flame. Cook for 2–3 minutes per side until deeply golden brown, with cheese starting to ooze at the sealed edges.
7. Let the jaffle rest for 30 seconds before eating – the filling is molten and will burn you if you bite straight in. Pile slaw on top and eat immediately.
Pro Tip: Portion your pulled pork into flat zip bags and freeze them before the trip. They thaw fast, stack neatly in the cooler, and even help keep other food cold on day one. You will thank yourself every time.
SIDES & BREADS
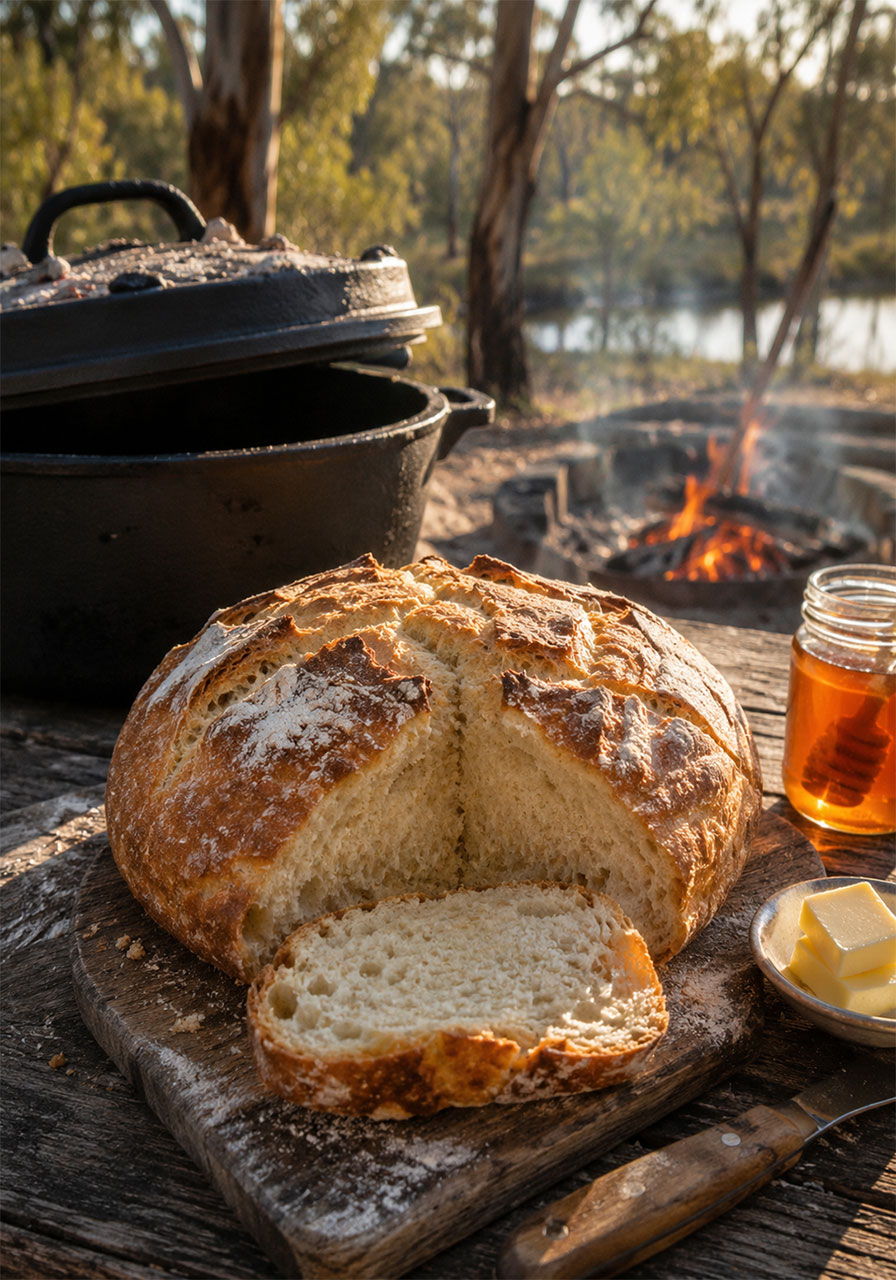
21. Camp-Oven Classic Damper
There is something deeply satisfying about pulling a perfect damper out of a camp oven – golden and crusty on the outside, soft and fluffy inside, with that slight smoky note from the fire. This is Australian bush cooking in its purest form, and it is easier to nail than most people think.
The key is not to overwork the dough. Mix it just enough to come together, shape gently, and let the coals do the rest.
Best for: Serving alongside stews and soups, sharing around the campfire
Time to Play: 30–35 minutes
Serves: 4
What You’ll Need:
- 2 cups self-raising flour
- A pinch of salt
- Water (enough to bring the dough together – start with about ½ cup)
Optional add-ins:
Sweet: lemonade instead of water, chocolate chips, dried fruit and nuts
Savory: beer instead of water, grated cheese and Italian herbs
How to Make It:
1. In a bowl, combine the self-raising flour and salt. Add optional mix-ins if using.
2. Slowly add water, a little at a time, mixing with your hands until a soft dough just comes together. This is the most important step: do not knead it, do not overwork it. Mix until combined and stop. Overworked dough pushes out all the air and gives you a dense brick, not a fluffy damper.
3. Gently cup the dough in your hands and shape it into a round loaf. If it sticks to your hands, add a little more flour. A slightly sticky dough is fine – just flour your hands lightly.
4. Sprinkle the base of your camp oven with flour (or place the damper on a foil-covered trivet inside). Set the damper in the middle, leaving at least 5 cm clearance from the walls all the way around.
5. Scatter about half a shovel of coals on the ground. Place the camp oven on top. Add a full shovel of coals on the lid. Check after 15 minutes, then every 10 minutes after that, replacing coals as needed.
6. Total cooking time is about 20–25 minutes depending on size. The damper is ready when the crust is golden and sounds hollow when tapped. Insert a long knife through the center – it should come out clean.
7. Serve with butter, honey, vegemite, jam – whatever you love best.
Pro Tip: To get a crispy crust, crack the camp oven lid slightly by propping it open with a small piece of wire. This lets steam escape instead of sitting inside, which is what makes crusts soft.
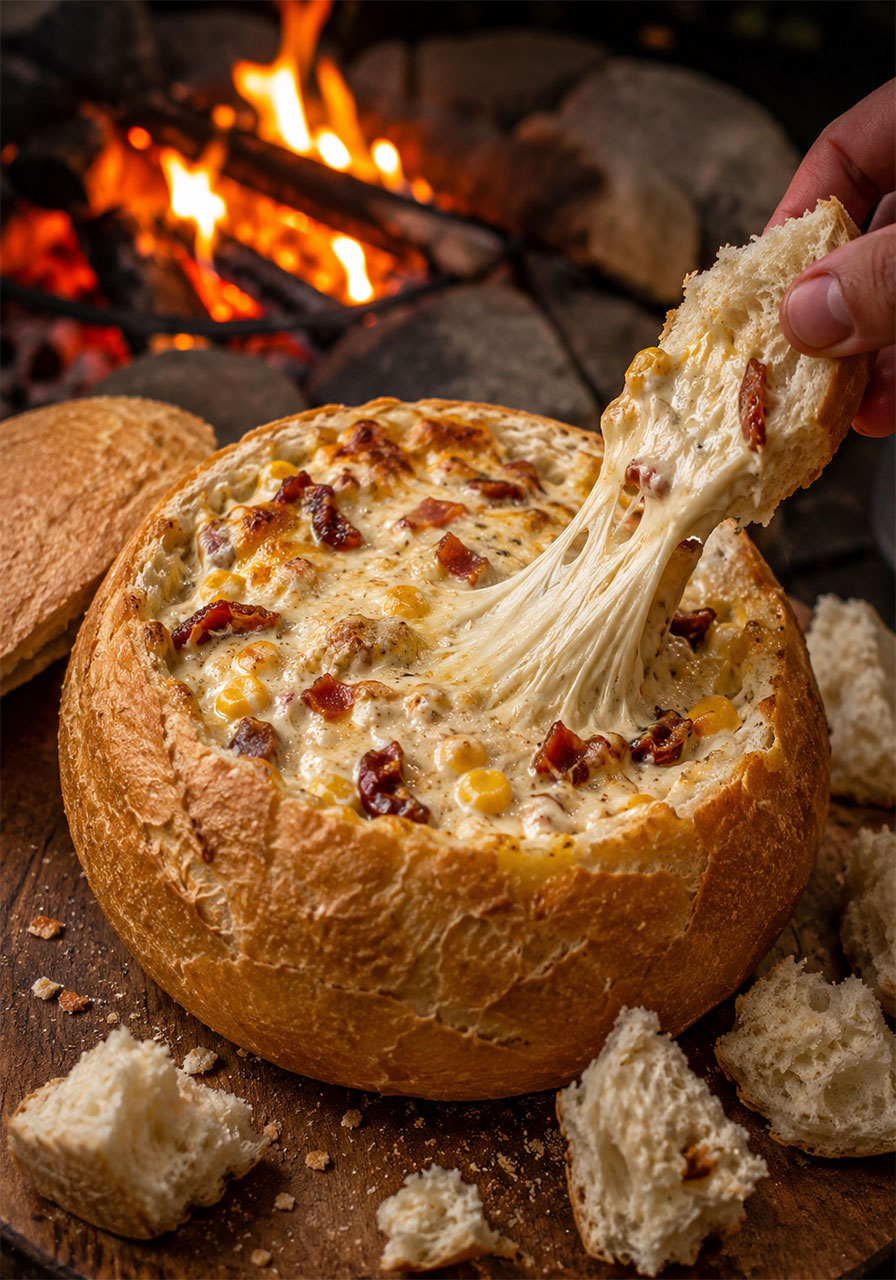
22. Campsite Cowboy Cob Loaf
This is the kind of shared dish that disappears within minutes of being set on the camp table. A crusty cob loaf hollowed out and filled with a warm, bubbling mixture of bacon, corn, sun-dried tomatoes, cream cheese, sour cream, mozzarella, and French onion soup mix. It is outrageous in the best possible way.
Tear off pieces of bread, swipe them through the filling, and do not expect leftovers.
Best for: Group snacking, appetizers before a big dinner, celebrating a good day outdoors
Time to Play: 35 minutes
Serves: 6
What You’ll Need:
- 1 large cob loaf
- 1 tbsp butter or olive oil
- 3 rashers streaky bacon, chopped
- 1 small tin corn kernels (about 125 g), drained
- 1 spring onion, sliced
- 3–4 sun-dried tomatoes, finely chopped
- 250 g cream cheese
- 200 g sour cream
- 1 cup grated mozzarella
- 1 packet French onion soup mix (dry)
How to Make It:
1. Slice the top off the cob loaf and carefully hollow out the inside. Tear the scooped-out bread into chunks for dipping later. Wrap the base of the cob in foil to protect it during baking.
2. In a skillet over medium heat, cook the chopped bacon in butter or oil until golden and crispy. Set aside.
3. In a large bowl, combine the bacon, corn, sun-dried tomatoes, spring onion, cream cheese, sour cream, mozzarella, and French onion soup mix. Stir well until everything is mixed and creamy.
4. Spoon the filling generously into the hollowed cob. Wrap the whole loaf loosely in foil, leaving the top slightly open if you want a golden, bubbly finish on top.
5. Place in a preheated camp oven, or nestle it near the coals at the campfire edge, turning occasionally. Cook for 20–25 minutes until the filling is hot and melty and the cob is toasted and fragrant.
6. Unwrap and serve surrounded by the bread chunks, extra crackers, or vegetable sticks. Everyone digs in together.
Pro Tip: Mix the entire filling at home and store it in a container in the cooler. At camp, just stuff the cob and bake. Prep takes 5 minutes. Impressiveness level: extremely high.
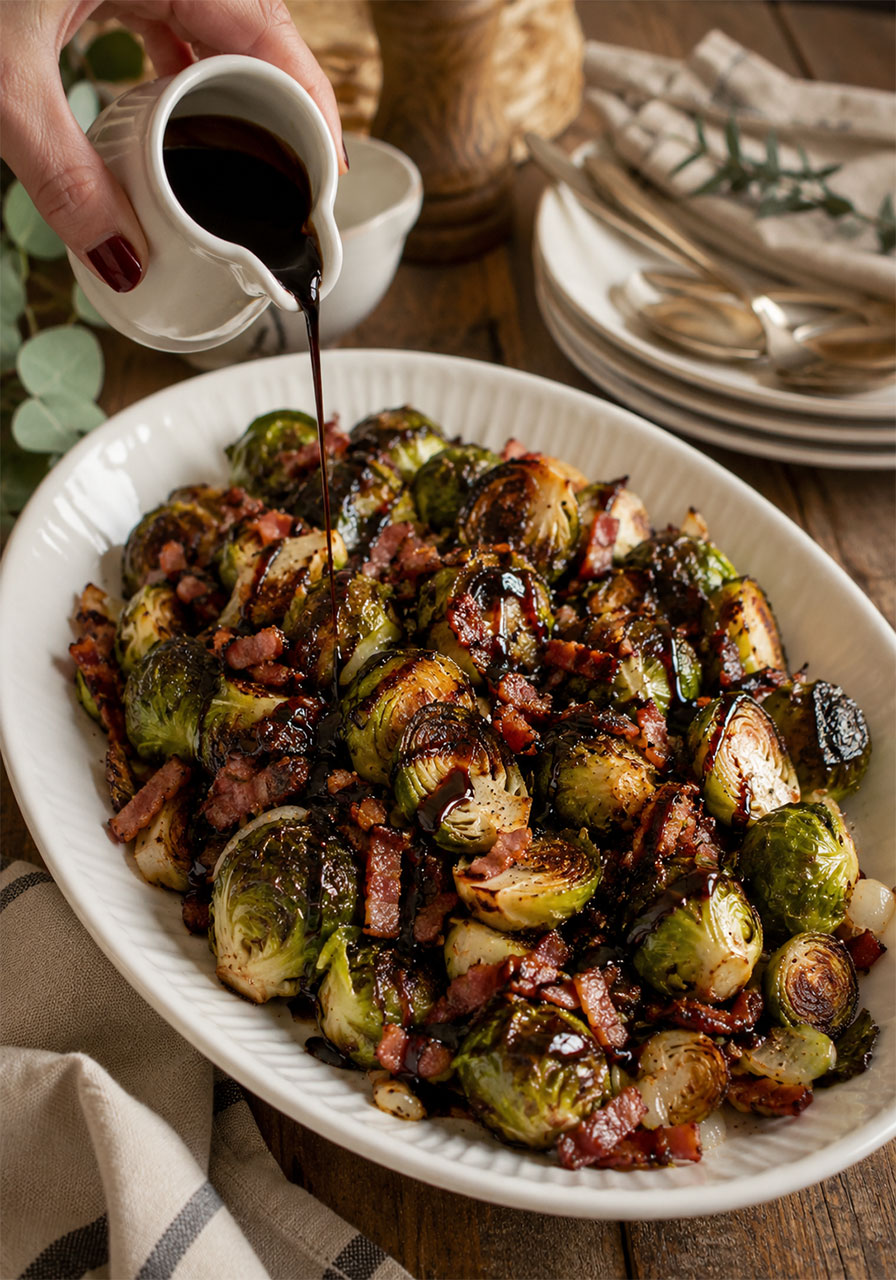
23. Brussels Sprouts & Bacon with Balsamic Glaze
These are not the Brussels sprouts you remember dreading as a kid. Roasted until caramelized and crispy, tossed with crunchy bacon and sweet golden onion, then finished with a sticky homemade balsamic glaze – they are genuinely one of the most craveable vegetable side dishes you can make anywhere, campsite or not.
They are also gorgeous on the holiday table if you happen to be making them at home.
Best for: Side dishes, holiday meals, converting Brussels sprouts skeptics
Time to Play: 40 minutes
Serves: 6
What You’ll Need:
- 1½ pounds Brussels sprouts
- 2 tbsp extra virgin olive oil
- Kosher salt and black pepper to taste
- 8 oz bacon
- ½ yellow onion, diced
- ⅓ cup balsamic vinegar
How to Make It:
1. Preheat oven to 425°F (220°C). Cut the ends off the Brussels sprouts and slice them into quarters. Some loose leaves will fall off – keep them for extra crispy bits when roasting.
2. Toss the sprouts and any loose leaves with olive oil, salt, and pepper. Spread onto a sheet pan in a single layer. Do not overcrowd – use two pans if needed. Roast for 25–30 minutes, stirring halfway through.
3. While the sprouts roast, slice the bacon into ½-inch pieces. Cook in a pan over medium heat until crispy. Remove with a slotted spoon to a paper towel-lined plate. Leave about 1 tbsp of bacon fat in the pan.
4. At the same time, add the balsamic vinegar to a small pot. Simmer over medium heat for 10–12 minutes until it has reduced by about a third to a half. You should have around 3 tbsp left. Turn off the heat.
5. Add the diced onion to the bacon pan. Cook for 2–3 minutes until translucent. Add the crispy bacon back in, stir, and turn off the heat.
6. When the sprouts are done, remove from the oven. Tip the bacon and onion mixture onto the sheet pan with the sprouts. Pour the balsamic reduction over everything. Stir together and serve immediately.
Pro Tip: You can make the balsamic glaze, cook the bacon and onion, and trim the sprouts up to a day ahead. Day-of, just roast and assemble. It saves significant stress when cooking for a group.
24. Spinach & Ricotta Cannelloni
This is the one to make when you want a camp dinner that genuinely impresses. Pasta tubes filled with a creamy spinach and ricotta mixture, baked in a rich, herby tomato sauce and finished under a melted blanket of parmesan and mozzarella. It takes a little more preparation than most camp meals, but every single bite is worth it.
This one works beautifully assembled ahead of time and baked at camp – or made entirely at home.
Best for: Special camp dinners, vegetarian meals, feeding people who appreciate real cooking
Time to Play: 1 hour 15 minutes
Serves: 5

What You’ll Need:
For the sauce:
- 2 tbsp olive oil
- 1 onion, finely chopped
- 4 garlic cloves, minced
- 1 bay leaf
- ½ tsp each dried thyme and oregano
- ⅓ cup tomato paste
- 800 g canned crushed tomatoes
- 4 cups low-sodium vegetable or chicken stock
- ⅓ cup dry white wine (or extra stock)
- ¾ tsp salt
- 1½ tsp sugar
- ⅓ tsp black pepper
- ⅔ cup basil leaves, roughly torn
For the filling:
- 250 g frozen chopped spinach, thawed
- 500 g full-fat ricotta
- ⅓ cup finely shredded parmesan
- 1 cup shredded mozzarella or cheddar
- 1 egg
- 1 large garlic clove, minced
- A light grating of fresh nutmeg (or ⅛ tsp nutmeg powder)
- ¾ tsp salt and ½ tsp black pepper
For assembly:
- 18–22 dried cannelloni tubes
- ⅓ cup parmesan
- 1¼ cups shredded mozzarella
How to Make It:
1. Make the sauce: Heat oil in a pot over medium-high heat. Add garlic, onion, bay leaf, thyme, and oregano. Cook for 3–4 minutes until onion is translucent. Add tomato paste and cook 1 minute. Add wine and simmer until nearly evaporated – about 2 minutes. Add tomatoes, stock, sugar, salt, and pepper. Simmer on medium-low for 20 minutes. Remove bay leaf and blend smooth with a stick blender. Simmer 1 more minute. Stir in basil.
2. Make the filling: Place thawed spinach in a colander and press out most of the liquid – do not squeeze completely dry. Place in a bowl with all remaining filling ingredients. Mix well. Taste and adjust seasoning.
3. Assemble: Preheat oven to 180°C/350°F. Spread 1 cup of sauce on the base of your baking dish. Transfer filling to a piping bag or strong ziplock bag with the corner snipped. Pipe filling into each cannelloni tube, then lay them in the dish. Pour remaining sauce over the top, covering all the tubes.
4. Bake: Cover tightly with foil and bake for 30 minutes. Remove foil, scatter parmesan then mozzarella over the top. Return to oven for 15 minutes until cheese is melted and golden.
5. Serve garnished with extra parmesan and basil if desired.
Pro Tip: Full-fat ricotta is essential here. Low-fat versions are drier and harder to pipe, and the finished dish will not be as moist and creamy. It is worth it.
DESSERTS
25. Campfire Banana Boats
A campfire dessert classic that never, ever gets old. Split a banana down the middle, stuff it with your favorite toppings, wrap in foil, and let the fire warm everything into melty, caramelized, spoonable perfection. Every combination is delicious, and the whole thing takes about 15 minutes from start to finish.
Set out a topping station and let everyone build their own. It is one of those campfire moments that sticks with people.
Best for: Campfire desserts, kids, groups with different preferences
Time to Play: 15 minutes
Serves: 1 per banana (scale to your group)
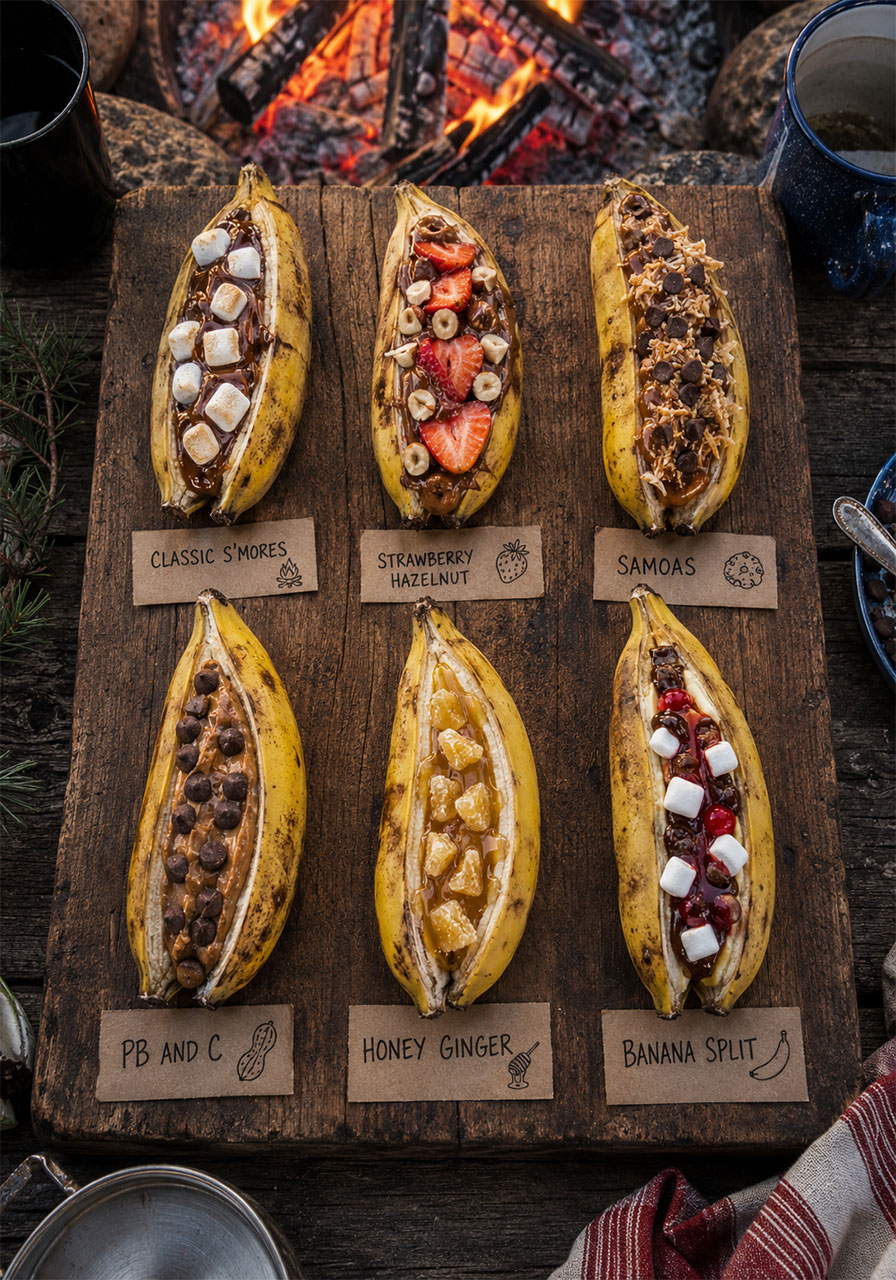
What You’ll Need (Classic S’mores Banana Boat):
- 1 banana (peel on)
- 2 tbsp milk chocolate chips or chopped chocolate
- 8 mini marshmallows
- 1 graham cracker square, crushed
- Foil (and parchment paper if you prefer not to cook directly in foil)
Other amazing combinations:
- Strawberry Hazelnut: Banana + strawberries + Nutella + chopped hazelnuts
- Samoas: Banana + chocolate chips + caramel sauce + toasted coconut
- PB & C: Banana + peanut butter + chocolate chips
- Honey Ginger: Banana + honey + candied ginger + dark or white chocolate
- Banana Split: Banana + milk chocolate + marshmallows + cherries
- Pecan Praline: Banana + pralines + dark chocolate
- Vegan: Banana + dark chocolate + vegan marshmallows
How to Make It:
1. Take a banana with the peel still on. Cut down the center along the concave (inner curved) side. Do not cut all the way through – stop when the tip of your knife just grazes the peel on the other side.
2. Gently pull the peel and banana apart to open up a channel for the filling. Stuff your toppings into the center. Mash the banana slightly to either side if you need more room.
3. Wrap the stuffed banana in foil (and parchment paper if using), sealing it well. Keep the banana topping-side up.
4. If your fire is active with flames, place on a grill grate raised slightly above the fire. If your fire has died to glowing embers, nestle the banana directly among the coals, topping-side up. Cook for about 10 minutes, until the banana is soft and the toppings are melted.
5. Remove with tongs. Give it a gentle squeeze – if it has a little give, it is ready. Let cool 1 minute before opening, as there will be steam. Grab a spoon and dig in.
Pro Tip: The banana is ready when it feels slightly squishy when squeezed gently with tongs. Still firm means it needs more time. Mushy means it is very soft inside – still delicious but aim for that middle point.
26. Campfire Cones
All the joy of s’mores – without roasting sticks flying dangerously around the fire. Fill waffle cones with your favorite toppings, wrap them in foil, and toss them in the coals until everything melts together into a warm, gooey, completely irresistible handheld dessert.
Set up a filling station and make it a whole activity. Kids go absolutely wild for these.
Best for: Kids and adults, group camping desserts, backyard fire pits
Time to Play: 15 minutes
Serves: As many as you like

What You’ll Need:
- Waffle cones
- Mini marshmallows
- Chocolate chips
- Graham cracker pieces
- Optional extras: M&Ms, Rolos, peanut butter cups, banana slices, strawberries, coconut flakes, butterscotch chips, chopped nuts
- Heavy-duty foil
How to Make It:
1. Hold or prop a waffle cone upright. Layer your fillings inside: start with a few chocolate chips at the base, then marshmallows, then graham cracker pieces, then more chocolate. Keep building layers until the cone is full but not overflowing.
2. Wrap the filled cone tightly in foil. If you are using campfire coals (rather than a grill), use heavy-duty foil or double-wrap – it protects against hot spots.
3. Toss the wrapped cones directly into campfire coals, or place on a grill grate over the fire. Cook for 5–7 minutes until everything inside is melted and warm. You can also bake in a 400°F oven for 5–7 minutes if camping in your backyard.
4. Remove carefully with tongs. Let cool for 1 minute before unwrapping – the filling is very hot. Eat immediately while everything is still warm and gooey.
Pro Tip: These can be assembled completely at home – filled, wrapped in foil, and kept in a container. At camp, just toss them in the coals when everyone is ready for dessert. Zero effort, maximum reward.
27. Cast Iron Skillet S’mores Dip
This is the communal dessert that brings everyone to the table. Golden puffed marshmallows melted over rich, gooey chocolate in a cast iron skillet – set in the center of the group with a pile of dippers and watch it disappear within minutes.
Prep everything before it hits the heat – this dip goes from perfect to set faster than you expect.
Best for: Group camping desserts, sharing around the fire, special evenings
Time to Play: 12 minutes
Serves: 8
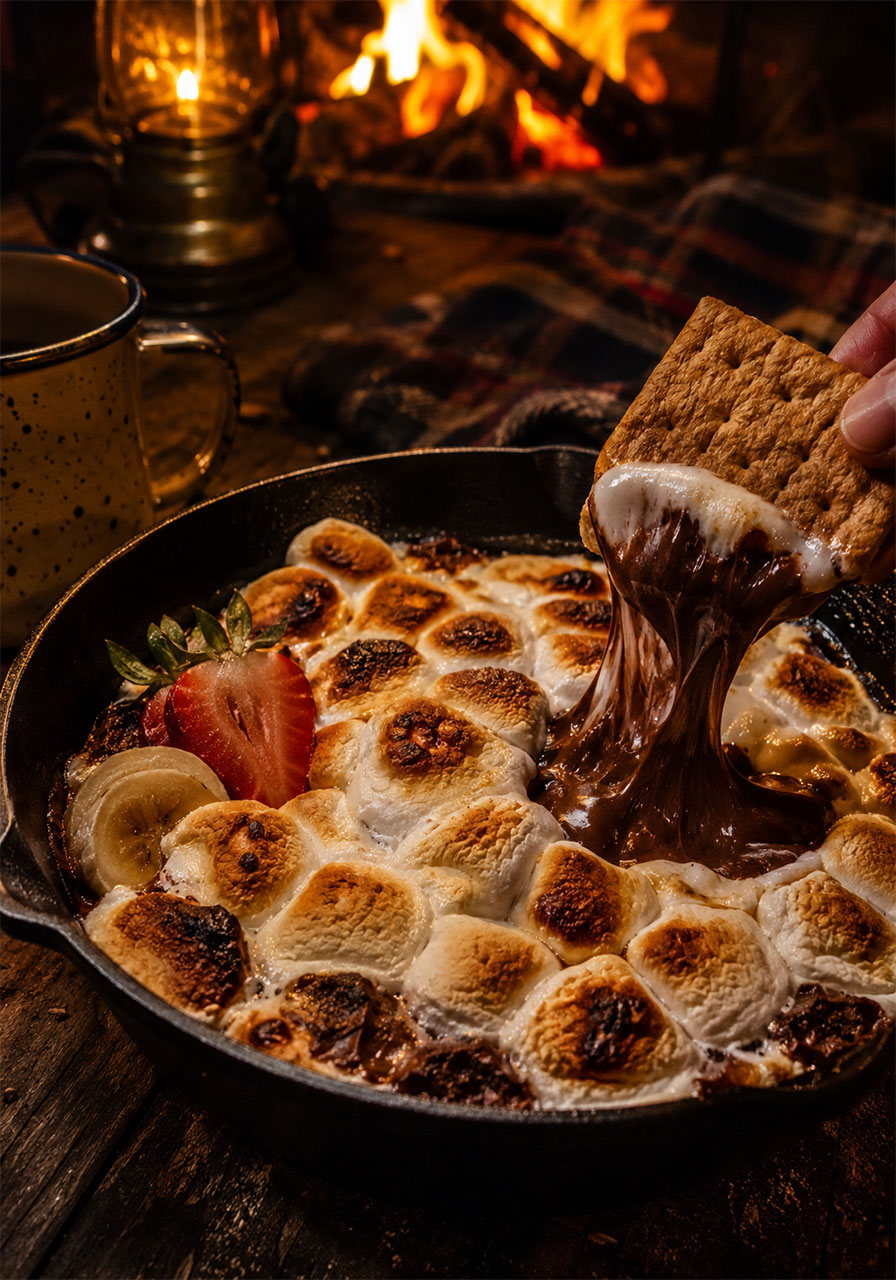
What You’ll Need:
- 4 cups mini marshmallows
- 2 cups cooking chocolate (chopped or chips)
- Dippers: graham crackers, biscuits, pretzels, strawberries, banana slices, apple slices, pineapple chunks, brownie bites, churros, mini donuts
- Foil
How to Make It:
1. Prepare all your dippers before you start cooking. Wash fruit, cut bananas and apples, arrange everything on a plate. Have it all ready to go – the dip sets quickly once it comes off the heat.
2. Place your cast iron skillet on a level surface. Spread the chocolate in an even layer on the base. Top with an even layer of marshmallows, covering the chocolate completely.
3. On a gas burner: Set the skillet over medium-low heat. Cover tightly with foil to trap the heat and help everything melt evenly. Cook for 5–7 minutes.
Over a campfire: Place the skillet on the grill grate over indirect heat (not directly in the flames). Cover with foil and rotate occasionally to prevent hot spots. Cook for 5–7 minutes.
4. Check at 5 minutes. When the chocolate is fully melted and the marshmallows are puffed, golden on top, and gooey – it is done.
5. Remove the foil carefully. Let the dip cool for 1–2 minutes, then surround it with dippers and let everyone dive in.
Pro Tip: Keep the heat on medium-low – not high. High heat scorches the chocolate on the bottom before the marshmallows melt on top. Low and gentle is the key to getting that even, beautiful melt.
28. Lemon Mug Cake
Fluffy, light, citrusy, and drizzled with a zingy lemon glaze – this single-serve mug cake is ready in about 6 minutes and satisfies that sweet craving without committing to baking an entire cake. It is the perfect little treat to end a day outside.
Made in the microwave, it is more of a basecamp and home recipe than a deep-fire-cooking situation – but it belongs on this list because it is just that good.
Best for: Solo sweet cravings, quick desserts at a camp with power
Time to Play: 6 minutes
Serves: 1

What You’ll Need:
- 1 tbsp butter, melted
- 2 tbsp sugar
- 3 tbsp milk
- 2 tbsp + ½ tsp fresh lemon juice, divided
- ¼ cup all-purpose flour
- ½ tsp baking soda
- ⅛ tsp salt
- 2 tsp lemon zest
- 2 tbsp confectioners sugar
How to Make It:
1. In a microwave-safe mug, combine the melted butter and sugar. Stir to combine.
2. Add the milk and 2 tbsp of lemon juice. Stir again.
3. Add the flour, baking soda, and salt. Stir until incorporated. Stir in the lemon zest. The batter will be smooth and pourable.
4. Microwave for 60 seconds. Check – the center should be set, no longer wet, and spring back lightly when touched. If it needs more time, microwave in 15-second increments up to 75 seconds total. Every microwave is different, so check early.
5. Make the glaze: whisk together the confectioners sugar and the remaining ½ tsp of lemon juice. Adjust the ratio until you reach a drizzle consistency. Pour over the warm cake.
6. Eat straight from the mug – with a cup of tea alongside if you really want to treat yourself.
Pro Tip: Serve with a scoop of whipped cream or vanilla ice cream instead of the glaze if you want something a little more indulgent. Both are wonderful.
29. Chocolate Cherry Mug Cake
Rich, dark chocolate cake with juicy pockets of cherry and pools of melting chocolate – this is basically a Black Forest cake in a mug, ready in under 10 minutes. It is dairy-free, eggless, and endlessly satisfying whether you eat it at midnight on a solo trip or share it with someone special by the fire.
Best for: Solo desserts, dairy-free treat lovers, quick sweet fixes
Time to Play: 7 minutes
Serves: 1
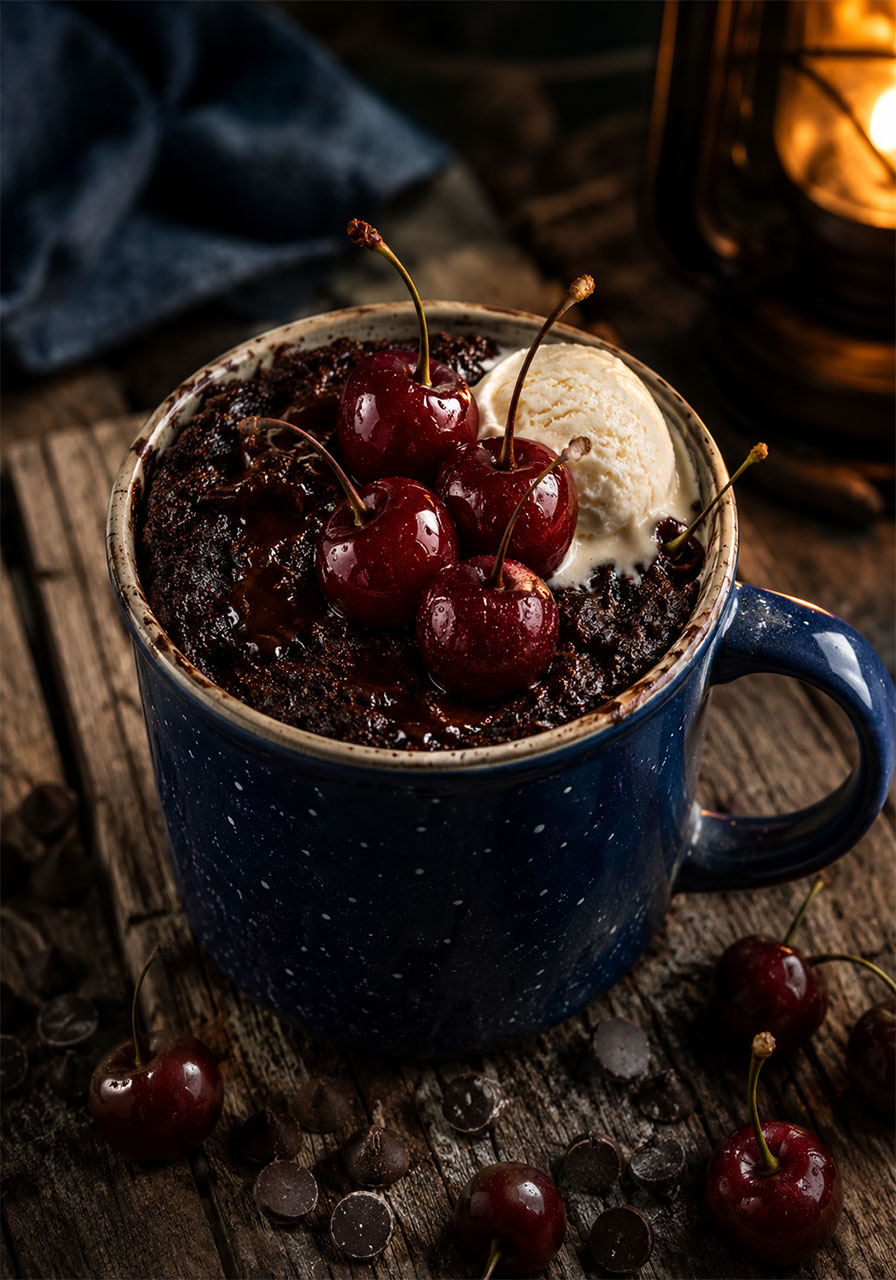
What You’ll Need:
- 4 tbsp all-purpose flour
- ¼ tsp baking powder
- ⅛ tsp baking soda
- ⅛ tsp salt
- 1½ tbsp sugar
- 1 tbsp cocoa powder
- 2 tbsp coconut oil
- 2 tbsp coconut milk (plus 1 extra tbsp if needed)
- 1 tsp vanilla extract
- 2 tbsp dark chocolate chips
- 8–10 fresh or frozen cherries, pitted and halved
How to Make It:
1. In a small bowl, combine all the dry ingredients – flour, baking powder, baking soda, sugar, salt, and cocoa powder. Use a fork to break up any lumps.
2. Stir in the coconut oil, coconut milk, and vanilla extract. Mix well until you have a thick, smooth batter. If it seems too dry, add an extra tablespoon of milk.
3. Fold in the chocolate chips and cherries.
4. Transfer the batter into a large microwave-safe mug or ramekin. Place a plate underneath to catch any overflow. Sprinkle a few extra chocolate chips on top if you like.
5. Microwave on high for 1 minute 15 seconds. Depending on your microwave, you may need an extra 30 seconds. The cake is ready when it has risen and the center is set.
6. Let it cool for a couple of minutes, then serve warm – with or without a scoop of ice cream. Ice cream is always the right choice.
Pro Tip: Use a big mug so the cake has room to rise. A mug that is too small means overflow, and overflow means unnecessary sadness. Go generously sized.
30. Grilled Pineapple with Cinnamon
Sweet, smoky, caramelized, and warm – grilled pineapple with brown sugar and cinnamon is one of those simple pleasures that feels far more special than the effort involved. The fire does the work of concentrating all those tropical sugars into something deeply fragrant and golden.
Eat it as is, serve it over vanilla ice cream, or lay it alongside grilled chicken for a sweet-savory contrast that is genuinely brilliant.
Best for: Light desserts, sides with grilled meats, impressive simplicity
Time to Play: 10 minutes
Serves: As many as you like
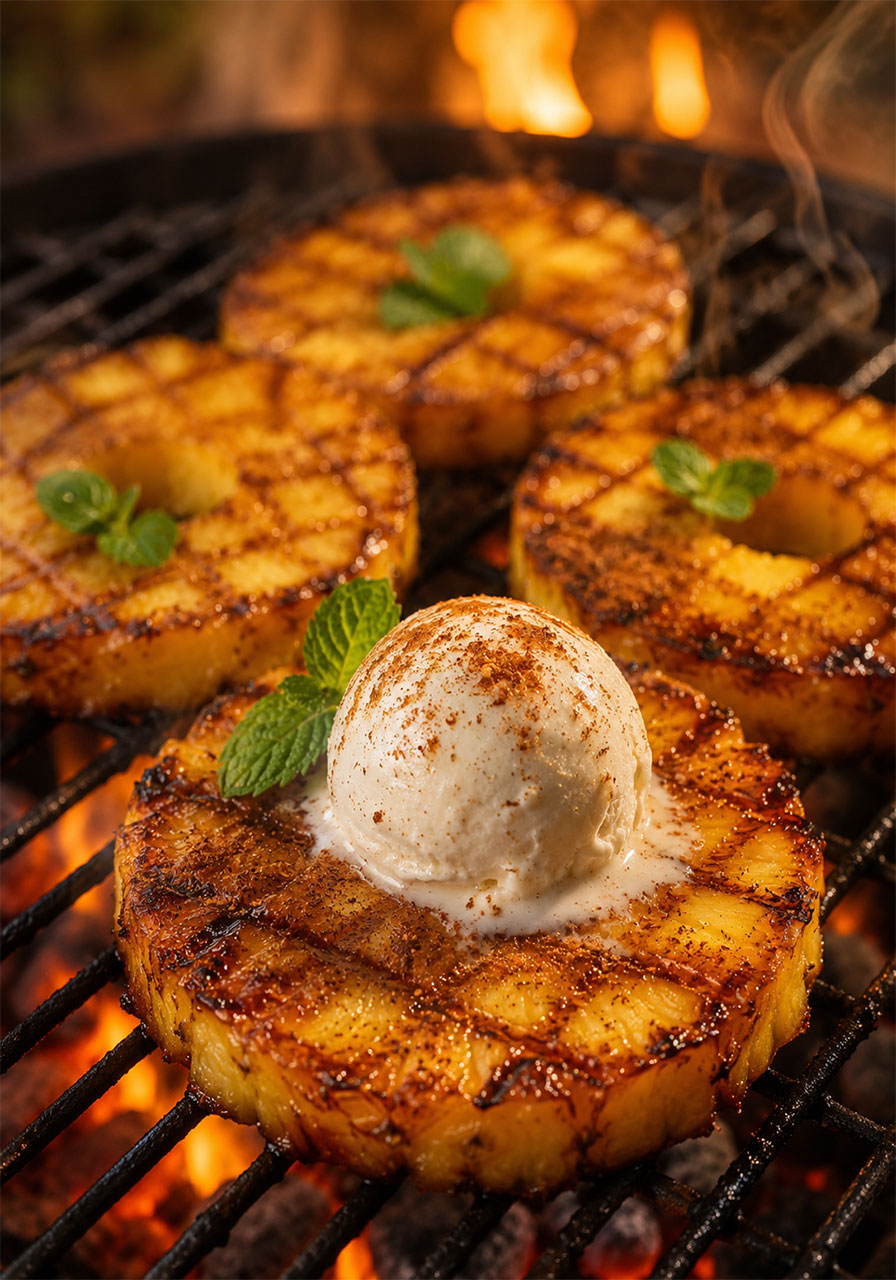
What You’ll Need:
- Fresh pineapple, cut into ½-inch thick rounds or spears
- Brown sugar
- Ground cinnamon
How to Make It:
1. Lay the pineapple slices out on a plate or cutting board.
2. Sprinkle each piece generously with brown sugar and a dusting of cinnamon. Pat it in gently so it sticks.
3. Place the slices directly on the campfire grill grate over medium-high heat. Let them cook undisturbed for 3–4 minutes until the sugar caramelizes and dark grill marks form underneath.
4. Flip carefully and cook the other side for another 2–3 minutes until golden and slightly charred at the edges.
5. Serve immediately while warm – on their own, with ice cream, with yogurt, or alongside a savory grilled dish.
Pro Tip: Use pineapple that is fully ripe – it caramelizes beautifully and tastes infinitely more vibrant than an underripe one. The sweeter the starting point, the more incredible the result.
31. 2-Ingredient Peach Dump Cake
You need a tin of peaches and a packet of cake mix. That is it. Stir them together, pour into a greased tin, and bake in your camp oven for 15 minutes. What comes out is a warm, golden cake with soft peaches and a tender crumb that tastes like you put in far more effort than you did.
This is the dessert that makes you the campsite hero with absolutely zero baking skills required.
Best for: No-fuss camp desserts, off-grid cooking, sweet tooth emergencies
Time to Play: 20 minutes
Serves: 6
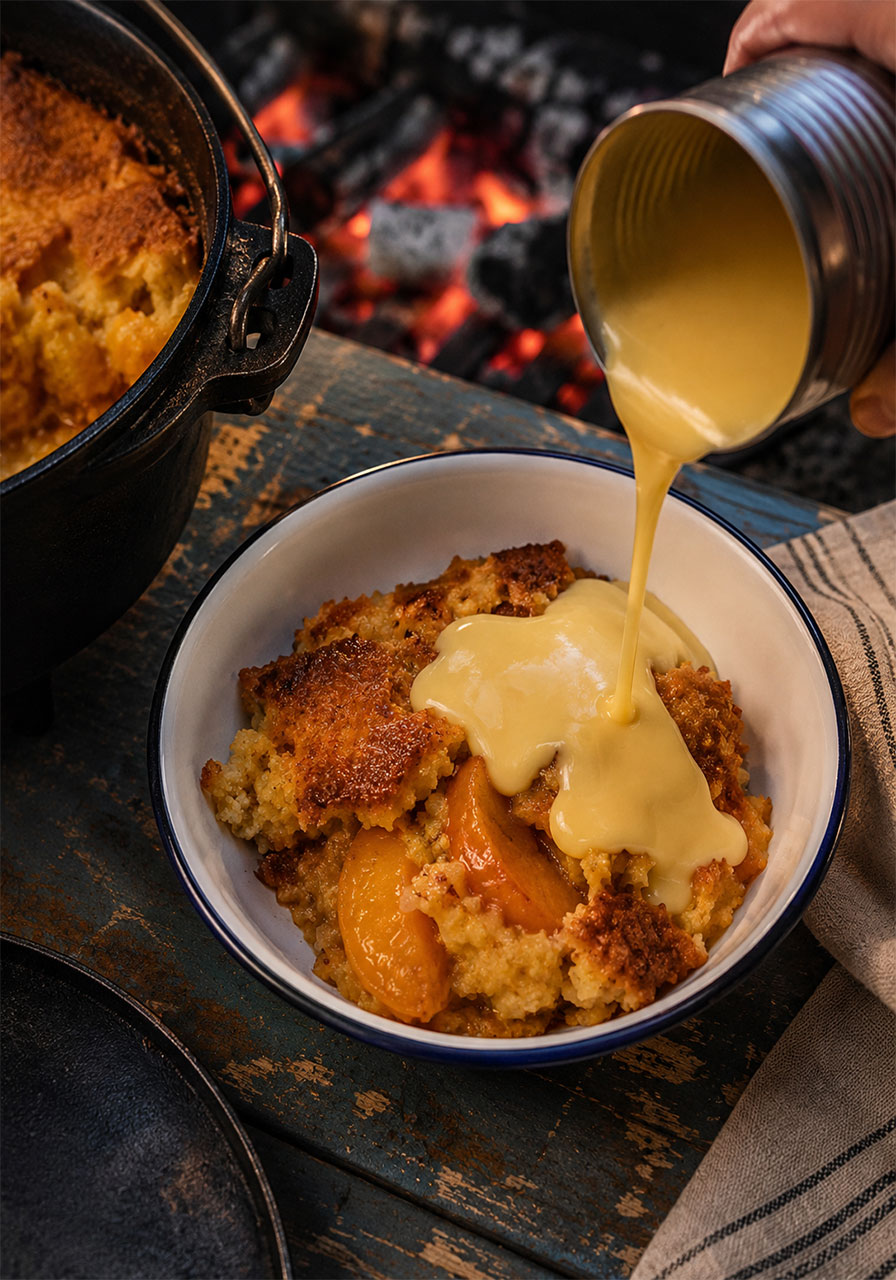
What You’ll Need:
- 1 tin peach slices in syrup (410 g) – use the syrup, do not drain it
- 1 packet vanilla cake mix (340 g)
- Long-life custard or cream to serve (optional but highly recommended)
How to Make It:
1. Tip the entire tin of peaches – syrup and all – into a large bowl. Do not drain it. The syrup is what makes the batter moist and helps the top go golden and sticky.
2. Add the dry cake mix directly to the bowl. Stir until just combined. Do not overmix – lumps in the batter are completely fine and actually good. A quick stir is all you need.
3. Grease a cake tin with oil or butter spray. Pour the mixture in.
4. Create a simple trivet inside your preheated camp oven by scrunching up a few balls of foil. Set the cake tin on top of the foil balls – this lifts it off the base and stops the bottom burning.
5. Add hot coals to the lid of the camp oven. Cook for 15–20 minutes.
6. Check at 15 minutes. The cake is ready when the top is golden and springs back lightly when touched in the center. Do not overbake – camp ovens can run hot.
7. Serve warm, topped generously with long-life custard or cream. You will be everyone’s favorite person at the campsite.
Pro Tip: Check at 15 minutes – not 20. Camp oven temperatures vary wildly depending on your coals, and this cake can go from perfect to overdone faster than you expect. Check early and pull it when the top just springs back.
Your Adventure Starts Here
Whether you are waking up to a crispy skillet hash by the fire, pulling a golden damper out of the coals, or passing around a skillet of melted s’mores dip under the stars – these campfire recipes are more than just food. They are the moments that make the whole trip.
Good food outdoors does something special to people. It slows everyone down. It gets conversations flowing. It turns a campsite into a place people want to linger instead of rush through.
You do not have to make all 31 recipes on one trip. Pick two or three that call to you, pack the ingredients, and let the fire do the rest. That is more than enough to make your next adventure unforgettable.
Which one are you trying first?