You worked hard to set up the perfect pool party. The floaties are inflated. The music is playing. The sunscreen is (mostly) applied. The last thing you need is to spend hours in the kitchen while everyone else is splashing around.
That’s exactly why this list exists.
These 27 pool party finger foods for kids are simple to make, easy to grab on the go, and – most importantly – genuinely delicious. We’re talking sweet treats, salty snacks, fresh bites, and everything in between.
Whether you’re feeding five kids or fifty, you’ll find something here that works for your crowd. And yes, the grown-ups will absolutely be sneaking these too.
Let’s dive in.
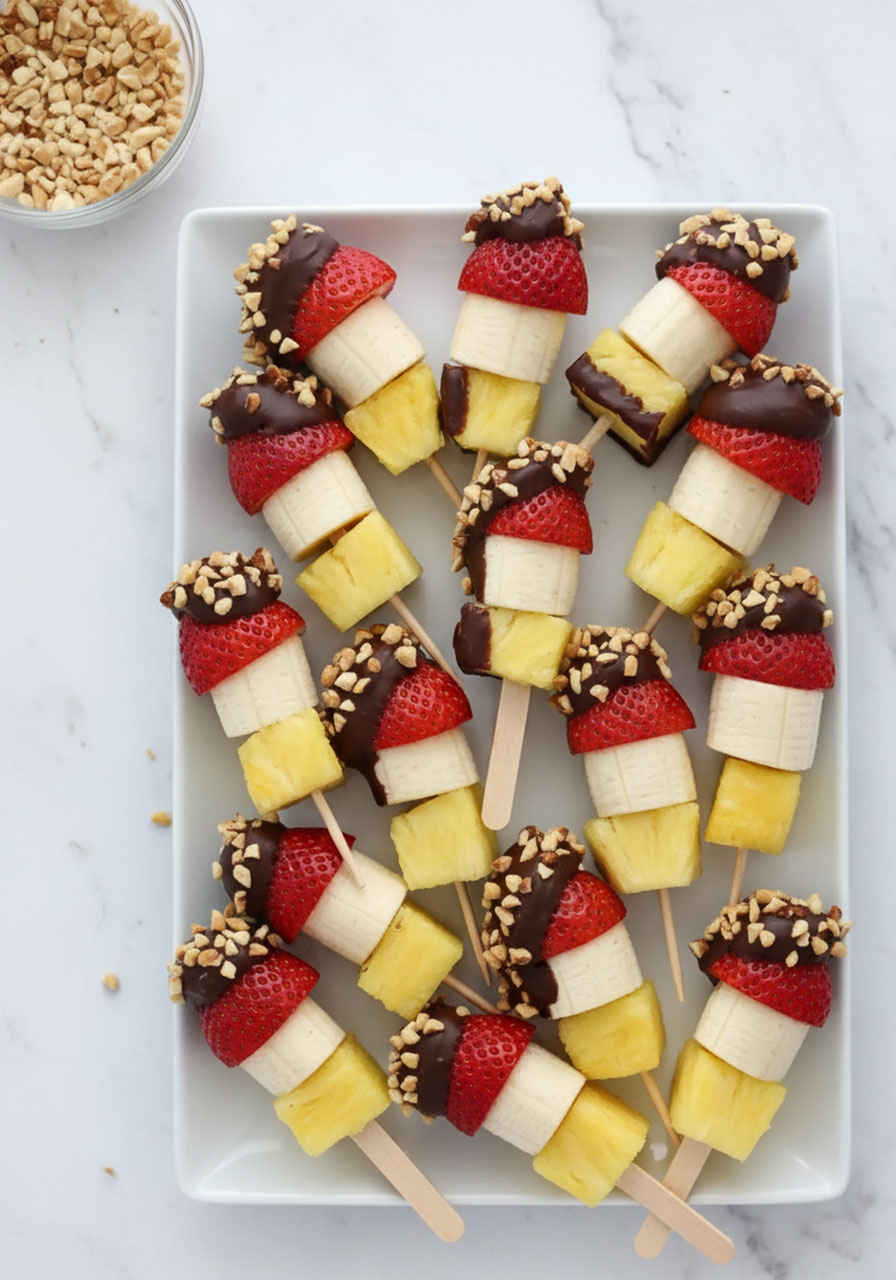
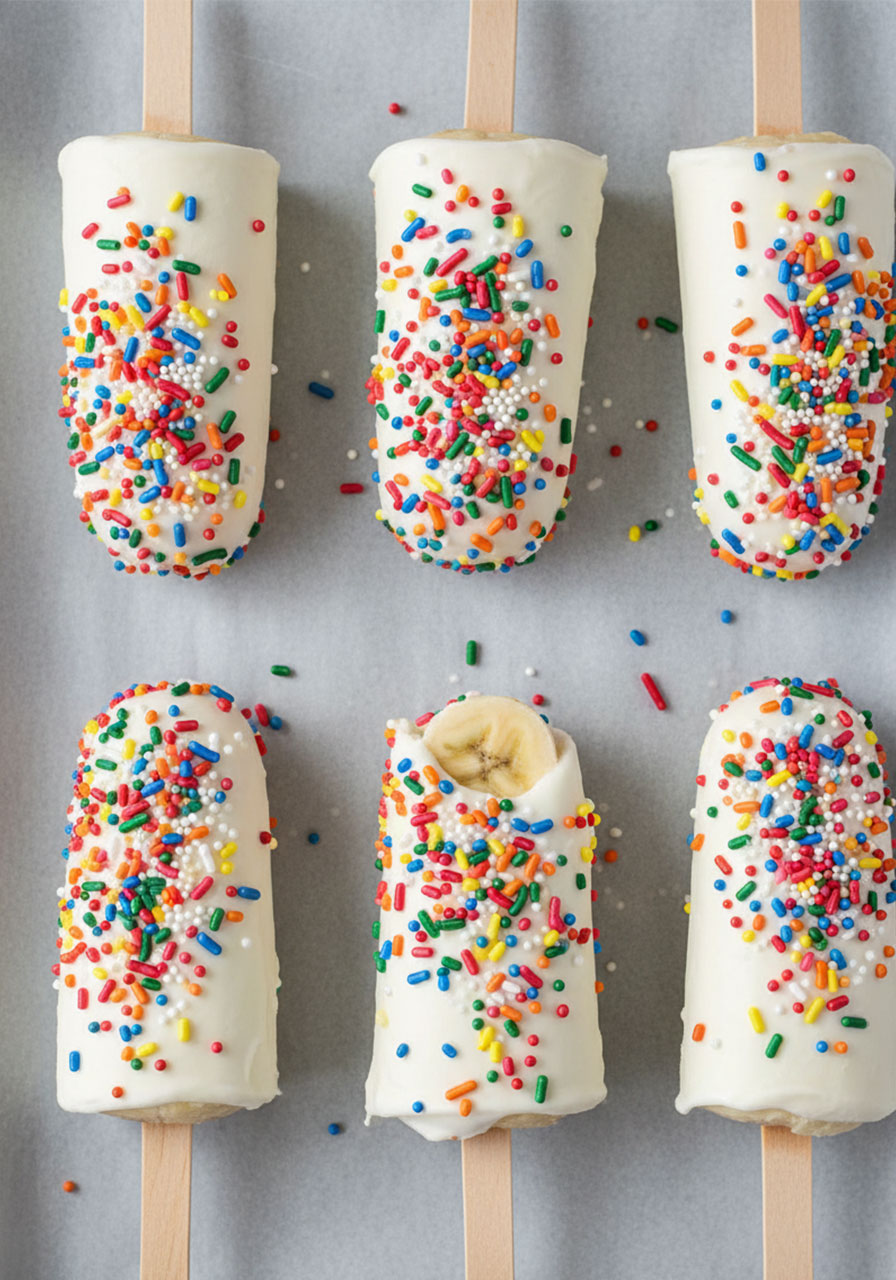
1. Banana Split Bites
All the flavors of a banana split – but on a stick, no ice cream required. These are the kind of summer snack that disappears within five minutes of hitting the table.
Best for: Summer parties, all ages, make-ahead snacks
Time to Make: 20 minutes + 10 minutes freeze time
Makes: 12 bites
What You’ll Need:
- 3 bananas
- 1/4 lb cored pineapple
- 6 strawberries
- 1 cup dipping chocolate
- 1/4 cup chopped peanuts
- 12 popsicle sticks or skewers
- Wax paper or parchment paper
How to Make It:
1. Cut the strawberries in half.
2. For each strawberry half, cut an equal-sized piece of banana and pineapple.
3. Thread onto each stick in this order: pineapple first, then banana, then strawberry.
4. Place the loaded sticks in the freezer for 10 minutes.
5. Line a tray with wax paper or parchment paper.
6. Put the chopped peanuts on a small plate for easy dipping.
7. Melt the chocolate in the microwave in 30-second intervals, stirring each time, until smooth.
8. Dip each cold fruit skewer in chocolate, then roll in chopped peanuts.
9. Set on the prepared tray. Chill until ready to serve.
Pro Tip: Make these the morning of the party and keep them in the freezer on the tray. They’re actually better when fully frozen – more refreshing on a hot day.

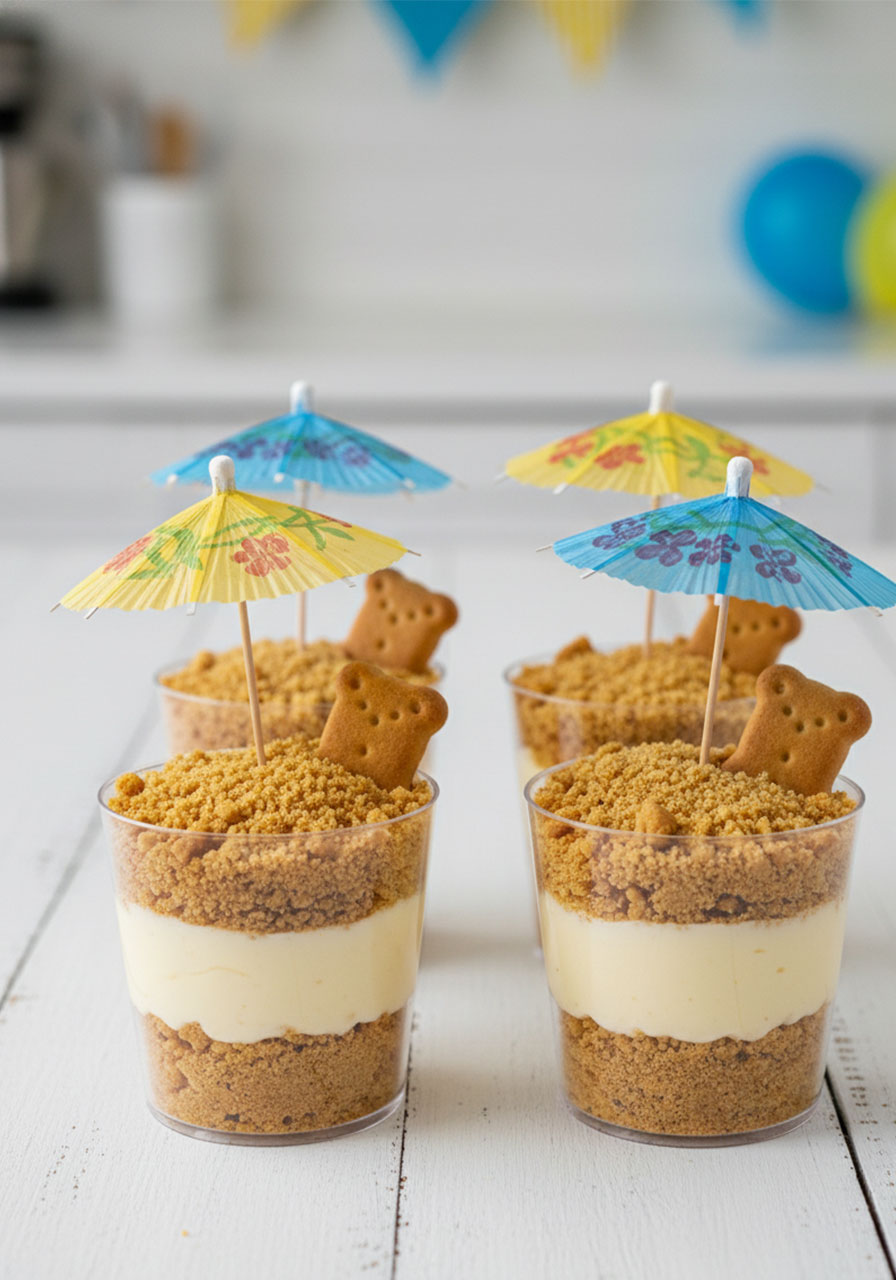
2. Sand Pudding Cups
Your kids are going to lose their minds over these. Crushed Golden Oreos look exactly like beach sand, and you can dress them up with little umbrella picks and Teddy Grahams for a full beach-in-a-cup moment.
Best for: Pool parties, beach-themed birthdays, all ages
Time to Make: 20 minutes
Makes: About 10 individual cups
What You’ll Need:
- 1 package Golden Oreo cookies
- 2 regular Oreo cookies
- 8 oz cream cheese, softened
- 2/3 cup powdered sugar
- 2 (3.5 oz) packages instant vanilla pudding mix
- 2 3/4 cups milk
- 12 oz Cool Whip
- Small clear plastic cups or mini sand buckets
How to Make It:
1. Remove the cream filling from the Golden Oreos (this makes the “sand” texture).
2. Crush all the Oreos – both Golden and regular – in a food processor until fine.
3. In a large bowl, beat together the softened cream cheese and powdered sugar until smooth.
4. In a separate bowl, whisk together the instant pudding mixes and milk until blended.
5. Add the pudding mixture to the cream cheese mixture and stir to combine.
6. Fold in the Cool Whip.
7. Layer into cups: sand on the bottom, then pudding, more sand, more pudding, and finish with a generous layer of sand on top.
Pro Tip: Stick a mini cocktail umbrella and a Teddy Graham into the top of each cup for a full beach scene. Kids go absolutely wild for it.
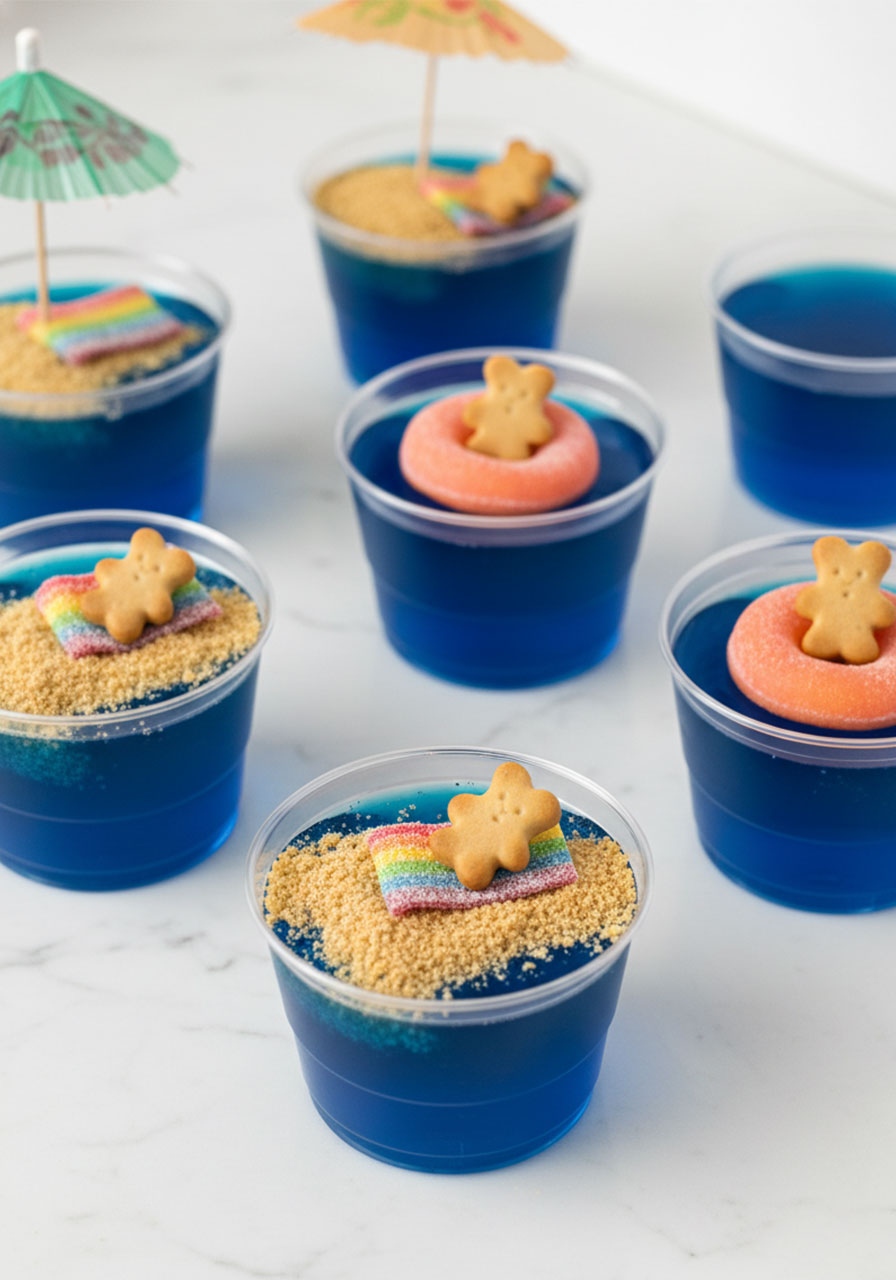
3. Pool Party Jello Cups
Blue gelatin as the “water,” graham cracker crumbs as the “sand,” and tiny Teddy Grahams lounging on candy beach towels. These cups are almost too cute to eat. Almost.
Best for: Pool parties, summer BBQs, beach-themed birthdays, kids ages 3+
Time to Make: 10 minutes prep + 2 hours chill time
Makes: About 10 cups
What You’ll Need:
- 6 oz blue gelatin (Berry Blue flavor works best)
- 2 cups water (per package directions)
- 3 graham cracker sheets, crushed
- 10 Teddy Graham crackers
- 10 peach ring candies
- 10 rainbow sour candy strips, cut into 1.5-inch rectangles
- 10 small clear plastic cups (5 oz size)
- Mini umbrellas (optional but adorable)
How to Make It:
1. Prepare the gelatin according to package directions.
2. Place the plastic cups on a baking sheet. Pour the liquid gelatin evenly into each cup.
3. Refrigerate for at least 2 hours, or overnight, until fully set.
4. To make the “sunbathing bear” scene: pour crushed graham cracker over half of the set gelatin. Lay a strip of sour candy on top as a beach towel. Place a Teddy Graham on top.
5. To make the “bear on a float” scene: sit a Teddy Graham inside a peach ring and press it into the top of the gelatin so it looks like it’s floating.
6. Add a mini umbrella if desired. Serve immediately.
Pro Tip: Prep the gelatin the day before and decorate right before serving. If you add the graham cracker too early, it gets soggy. Keep the sand and toppings separate and let guests add their own – it becomes a fun little activity.
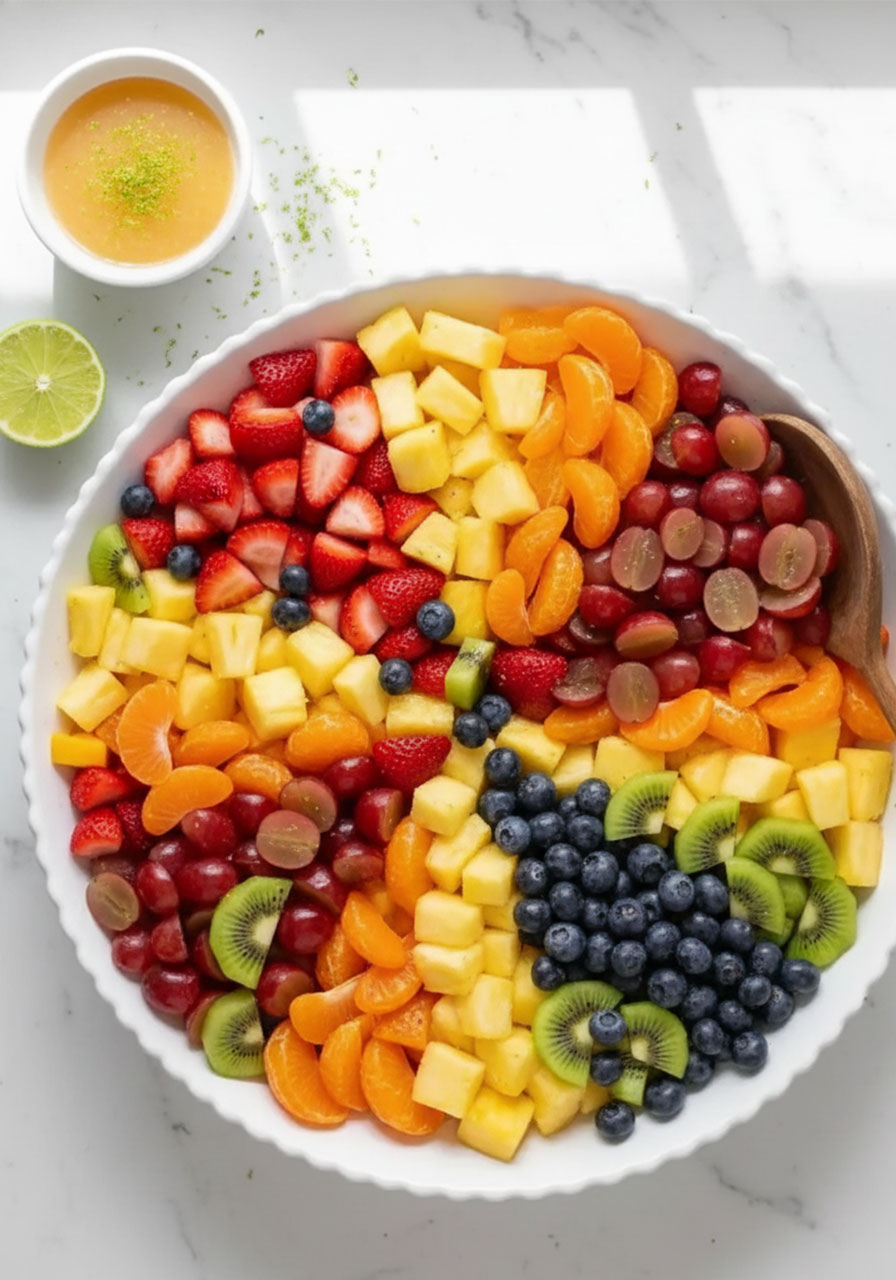
4. Rainbow Fruit Salad with Honey Lime Dressing
This one is the crowd-pleaser that makes you look like you have it all together. A big, gorgeous bowl of colorful fresh fruit tossed in a simple honey lime dressing. It pairs with everything, it feeds a crowd, and it takes about 30 minutes to pull together.
Best for: Side dish, potlucks, large groups, all ages
Time to Make: 30 minutes
Serves: 12
What You’ll Need:
- 1 lb fresh pineapple, chopped
- 12 oz fresh strawberries, chopped
- 12 oz fresh blueberries
- 12 oz red grapes, halved
- 5 clementines, peeled
- 4 kiwis, peeled and chopped
- 1/4 cup honey
- 2 teaspoons lime zest
- 1.5 tablespoons fresh lime juice
How to Make It:
1. Wash, dry thoroughly, and chop all the fruit. Add everything to a large mixing bowl.
2. In a small bowl, whisk together the honey, lime zest, and lime juice.
3. Pour the dressing over the fruit and toss to coat evenly.
4. Transfer to a serving bowl and sprinkle with a little extra lime zest if you like. Serve and enjoy!
Pro Tip: Dry your fruit really well after washing. Fruit naturally releases liquid as it sits, and excess moisture will make the salad watery faster. The dressing clings better to dry fruit too.
5. Banana Yogurt Popsicles
Three ingredients. Ten minutes of prep. One hour in the freezer. That’s literally all that stands between you and a batch of these creamy, refreshing, kid-approved banana pops.
These are also a fantastic activity for little ones – even a 4-year-old can dip bananas and add sprinkles.
Best for: Kids, hot days, easy make-ahead treats
Time to Make: 10 minutes prep + 1 hour freeze
Makes: 6 popsicles
What You’ll Need:
- 3 bananas
- 1.5 cups vanilla yogurt
- Rainbow sprinkles
- Popsicle sticks
- Parchment paper
- Baking sheet
How to Make It:
1. Line your baking sheet with parchment paper.
2. Peel the bananas and cut each one in half.
3. Insert a popsicle stick into the bottom of each banana half.
4. Dip each banana into the yogurt, turning to coat all sides.
5. Place on the parchment-lined baking sheet.
6. Add sprinkles to your liking while the yogurt is still wet.
7. Freeze for at least 1 hour, until the yogurt has hardened.
Pro Tip: Use ripe bananas for naturally sweeter popsicles. Not a fan of sprinkles? Try mini chocolate chips, crushed nuts, or a drizzle of melted chocolate instead.
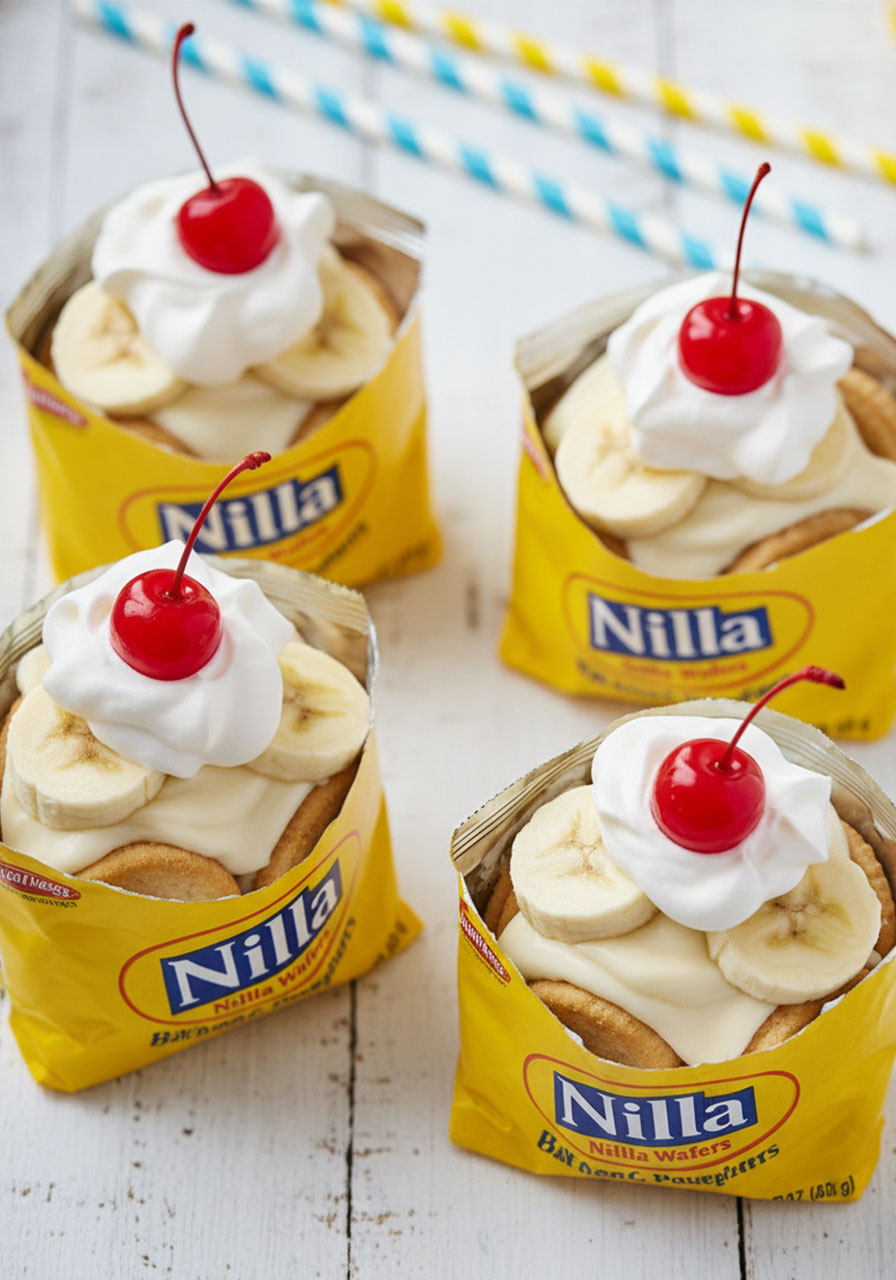
6. Walking Banana Pudding Bags
No bowls. No spoons. No mess. These banana pudding bags are the most genius party dessert you’ll make all summer. Just layer everything right into a mini bag of Nilla Wafers and hand them out. Done in three minutes flat.
Best for: Pool parties, picnics, outdoor gatherings, kids and adults
Time to Make: 3 minutes
Makes: 6 servings
What You’ll Need:
- 6 mini bags of Nilla Wafer cookies
- 1 banana
- 3 vanilla pudding cups (pre-made, snack size)
- 1 cup whipped cream
- 6 maraschino cherries
How to Make It:
1. Open each mini bag of Nilla Wafers and push the cookies aside to create room.
2. Spoon vanilla pudding into each bag.
3. Slice the banana and add a few slices on top of the pudding.
4. Gently mix in some of the Nilla Wafers for crunch.
5. Top with a dollop of whipped cream and a cherry.
6. Hand them out and watch the smiles happen.
Pro Tip: Set these up assembly-line style at the party and let the kids build their own. It becomes a whole activity, and cleanup is literally just throwing away a bag.
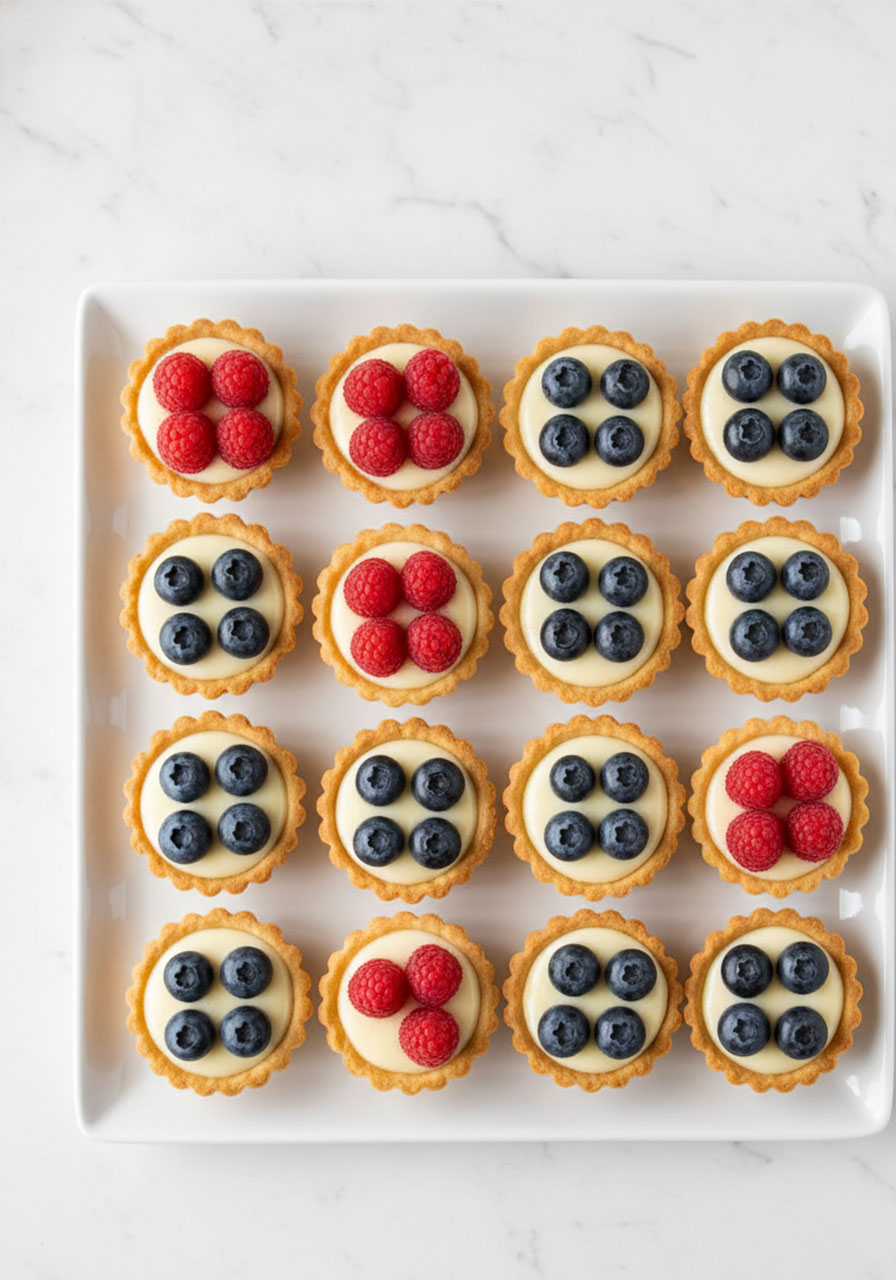
7. Mini Fruit Tarts
These look like they came from a fancy bakery. They taste even better. Buttery shortbread shells filled with real homemade vanilla custard and topped with fresh berries – they’re the kind of bite-sized dessert that makes guests say “wait, did you make these yourself?”
Best for: Spring and summer parties, showers, brunches
Time to Make: 1 hour (can prep components ahead)
Makes: 24 mini tarts
What You’ll Need:
- 1 1/4 cups all-purpose flour
- 1/3 cup powdered sugar
- 1/4 teaspoon kosher salt
- 1/2 cup cold unsalted butter, cubed
- 1 tablespoon cold water
- 1 cup whole milk
- 3/4 tablespoon vanilla bean paste or pure vanilla extract
- 3 egg yolks
- 1/3 cup granulated sugar
- 2 tablespoons cornstarch
- 1/2 tablespoon unsalted butter
- 1 pint fresh blueberries
- 1 pint fresh raspberries
- Nonstick spray + mini muffin pan
How to Make It:
1. Preheat the oven to 375°F and spray a mini muffin pan well with nonstick spray.
2. In a food processor, pulse together the flour, powdered sugar, and salt. Add the cold cubed butter and pulse until the mixture resembles coarse meal. Add cold water and pulse just until the dough comes together.
3. Scoop about 1 tablespoon of dough into each muffin cup. Press into the bottom and partway up the sides.
4. Bake for 15 minutes, until the edges are golden. Cool in the pan for 5 minutes, then pop out gently with a butter knife. Cool completely on a wire rack.
5. For the custard: bring the milk and vanilla to a boil in a medium saucepan. In a separate bowl, whisk the egg yolks and sugar until pale, then whisk in the cornstarch until smooth.
6. Slowly stream about 1/4 cup of the hot milk into the egg mixture while whisking constantly. Then whisk in the rest of the milk. Pour everything back into the saucepan.
7. Cook over medium-high heat, whisking continuously, until the custard thickens and begins to slowly boil. The moment you see that boil, pull it off the heat immediately and stir in the butter.
8. Spoon cooled custard into the cooled tart shells. Let sit for 20 minutes to firm up, then top with fresh berries. Refrigerate until ready to serve.
Pro Tip: Bake the shells and make the custard up to a day ahead. Store shells at room temperature and custard in the fridge. Assemble about an hour before the party.
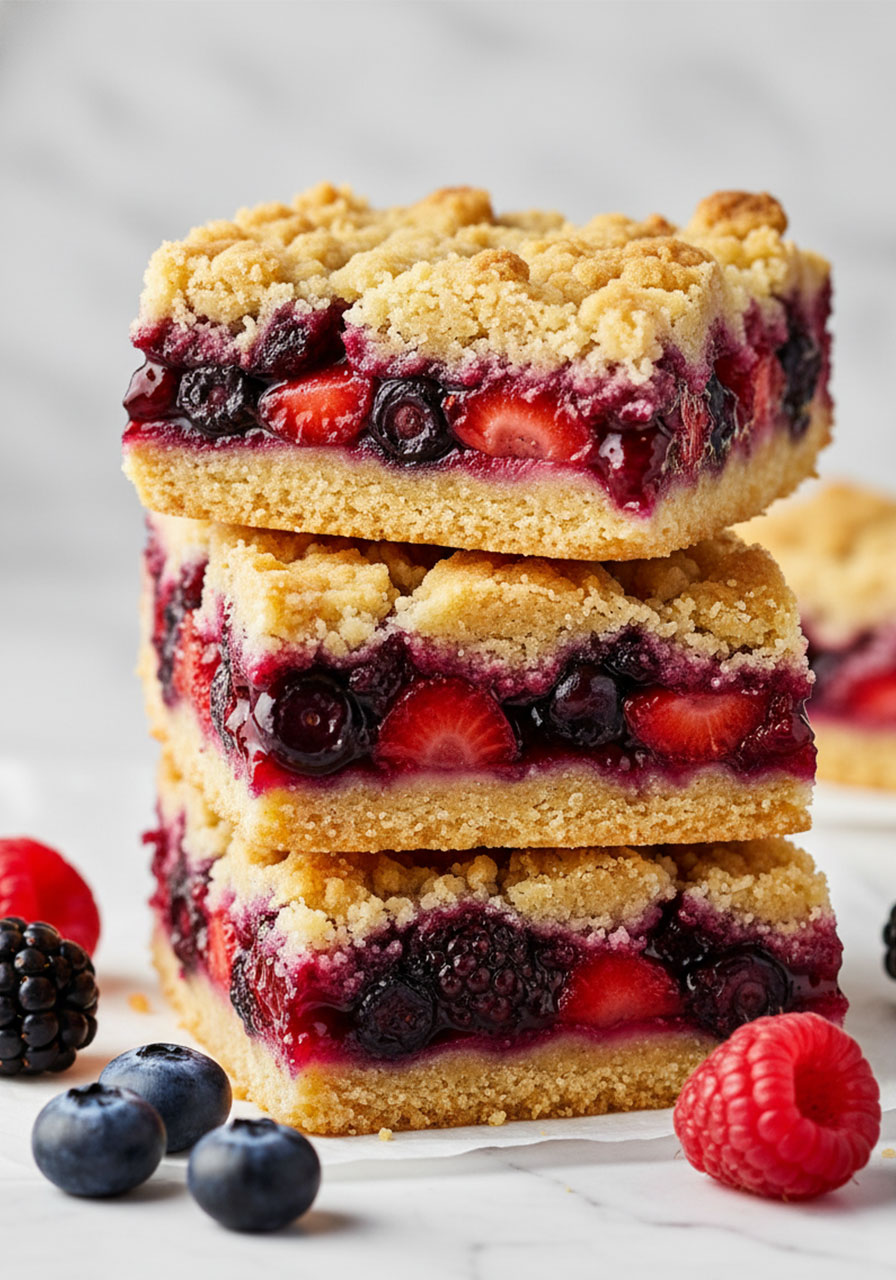
8. Mixed Berry Crumble Bars
Fresh summer berries tucked between two layers of buttery shortbread, baked until golden and jammy. These bars are easy to cut into handheld pieces, travel well to a party, and taste just as good cold from the fridge as they do warm.
Best for: Summer parties, BBQs, potlucks, make-ahead desserts
Time to Make: 15 minutes prep + 45 minutes bake + 2 hours cooling
Makes: 9 large bars or 16 small bars
What You’ll Need:
- 1.5 to 2 cups mixed fresh berries (strawberries, blueberries, blackberries, raspberries)
- 1/3 cup sugar (for berry filling)
- 1 tablespoon cornstarch
- 1.5 cups all-purpose flour
- 1/2 cup granulated sugar (for dough)
- 1/2 teaspoon baking powder
- 1/4 teaspoon salt
- 1/2 cup cold salted butter, cut into small cubes
- 1 egg
- 1 teaspoon vanilla extract
- 8×8 inch baking pan + parchment paper
How to Make It:
1. Preheat the oven to 375°F. Line an 8×8 inch pan with parchment paper, letting the edges hang over the sides for easy removal.
2. In a medium bowl, toss the berries with the 1/3 cup sugar and cornstarch. Set aside.
3. In a large bowl, stir together the flour, 1/2 cup sugar, baking powder, and salt. Use a fork or pastry cutter to work the cold butter into the flour until the mixture looks like coarse crumbs. Work quickly – you want the butter to stay cold.
4. In a small bowl, beat together the egg and vanilla, then add to the flour mixture. Mix lightly until you have a crumbly, clumping dough.
5. Press half of the dough evenly into the bottom of the prepared pan.
6. Spoon the berry mixture over the crust in an even layer.
7. Crumble the remaining dough over the berry filling to create the top layer.
8. Bake for 45 minutes or until the top is light golden brown. Cool completely in the pan, about 2 hours, before cutting into squares.
Pro Tip: Don’t rush the cooling time – the bars need the full two hours to set properly before they can be sliced cleanly. Serve with a scoop of vanilla ice cream or a dollop of whipped cream for an extra special treat.
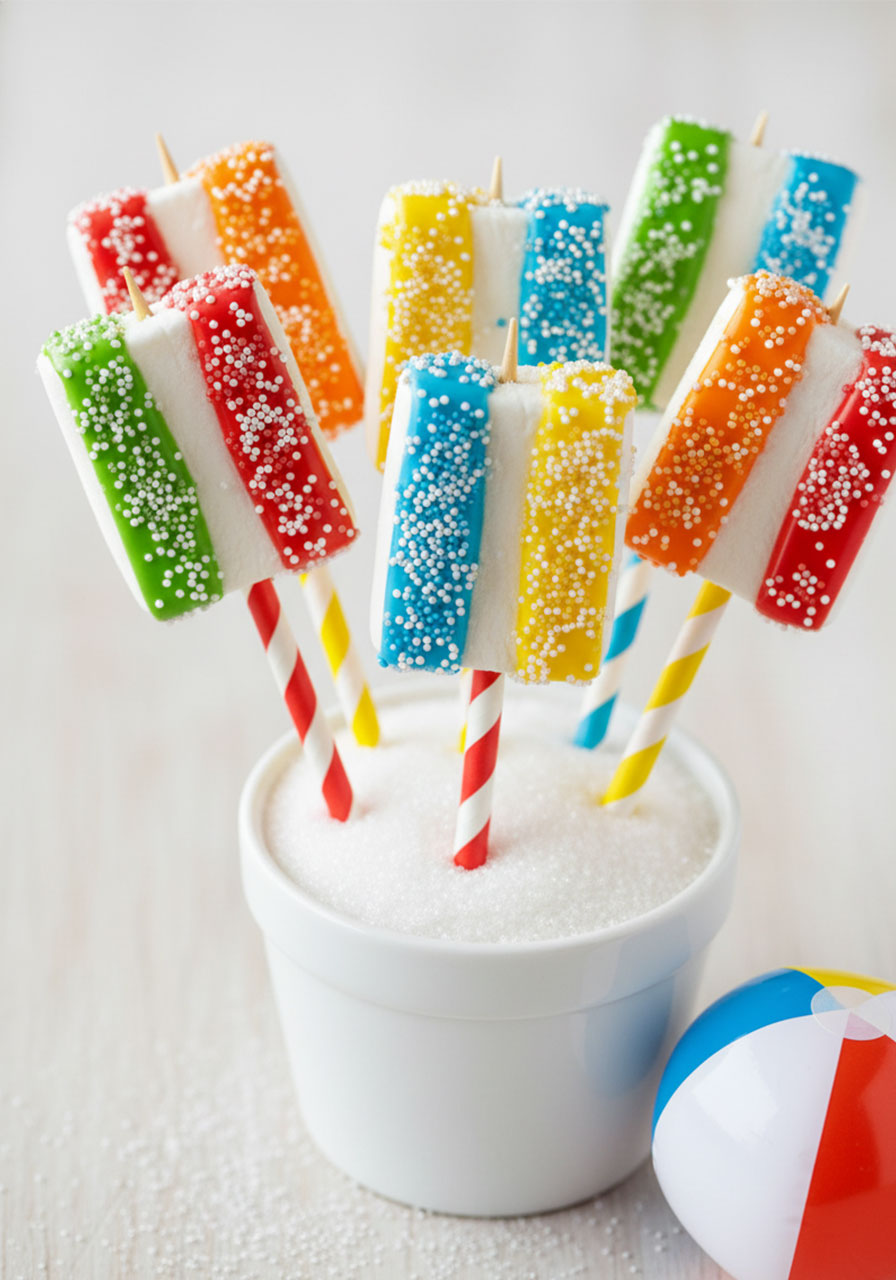
9. Marshmallow Beach Balls
These are pure pool party magic. Giant marshmallows decorated with colorful, Kool-Aid-flavored chocolate in beach ball stripes. The kool-aid actually flavors the chocolate – which means they taste as amazing as they look.
Best for: Pool parties, summer birthdays, kids and adults
Time to Make: 20-30 minutes
What You’ll Need:
- Large marshmallows (like Campfire Giant Roasters)
- Wilton Bright White Candy Melts
- Bamboo skewers
- Assorted Kool-Aid packets (for coloring and flavoring)
- Sprinkles or non-pareils in coordinating colors
- Small offset spatula or butter knife
How to Make It:
1. Place each marshmallow on a bamboo skewer.
2. Melt a small amount of white candy melts in the microwave in 20-second intervals, stirring between each round. Stop when just melted. About 6-7 melts will coat 3 marshmallows with some leftover.
3. Sprinkle a small amount of one Kool-Aid packet color into the melted chocolate. Add a few drops of water and stir to activate the color and smooth the texture. Add water gradually – just a few drops at a time – until the chocolate is silky and smooth.
4. Using the offset spatula, spread a stripe of colored chocolate down one section of the marshmallow to look like a beach ball panel. Use a clean spatula or fingernail to push the edges into a clean stripe shape.
5. Immediately shake sprinkles over the wet chocolate, then gently press them in with your finger. Stand the skewer in a tall glass to dry while you work on the next color.
6. Repeat with each color, doing all marshmallows in one color before moving to the next.
Pro Tip: Display them by slipping the bamboo skewers into striped paper straws, then standing them up in a small beach bucket filled with sand-colored sugar. It becomes a full-on centerpiece.
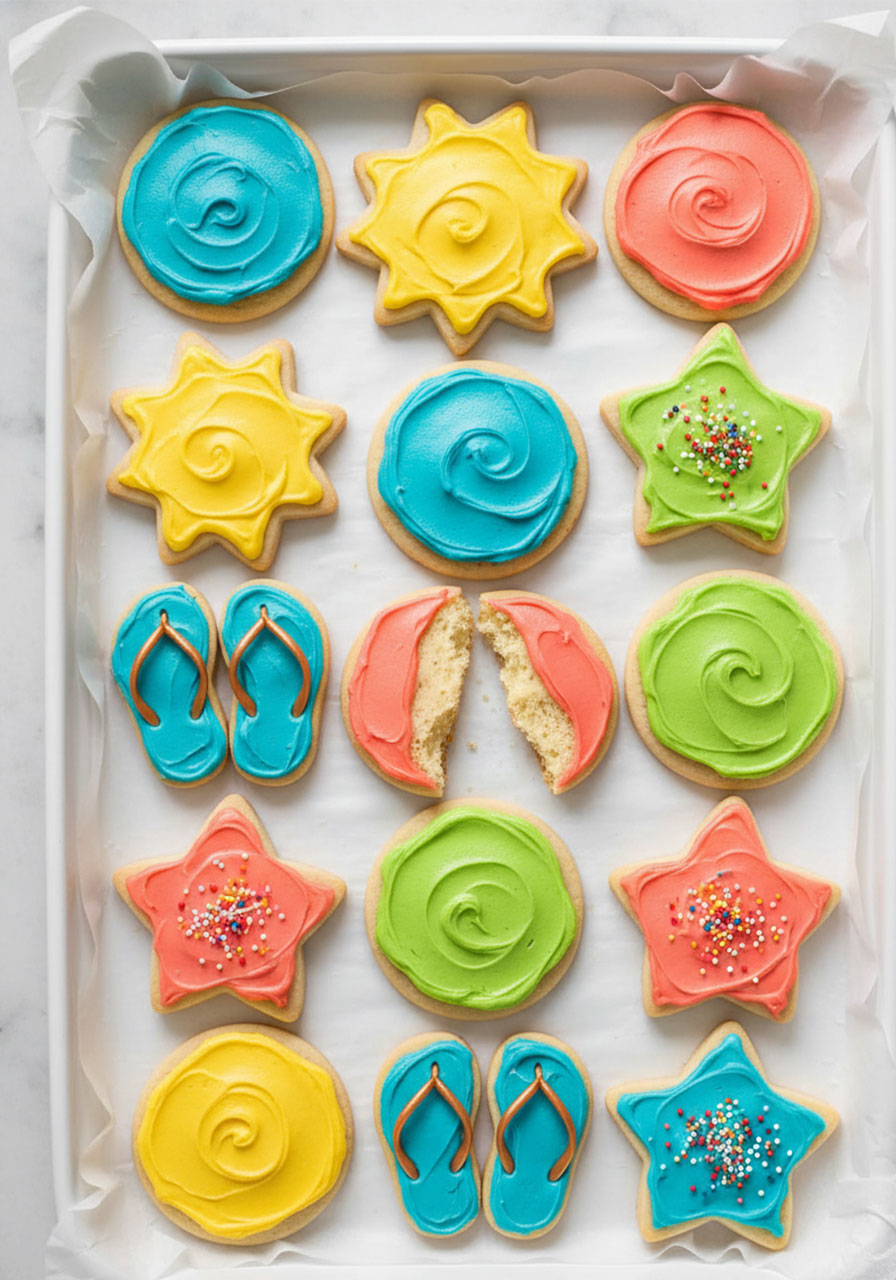
10. Summer Sour Cream Sugar Cookies
These are not your average sugar cookies. The sour cream makes them unbelievably soft and moist with a slightly tangy flavor that keeps you going back for more. Topped with cream cheese frosting in summery colors, they’re the cookie people ask you for the recipe for every single time.
Best for: Summer parties, baking with kids, any gathering
Time to Make: About 45 minutes
Makes: About 2 dozen cookies
What You’ll Need:
- 2 cups sugar
- 1 cup butter (2 sticks), softened
- 2 eggs
- 1 cup sour cream
- 2 teaspoons vanilla extract
- 5 cups all-purpose flour
- 3/4 teaspoon salt
- 2 teaspoons baking soda
For the Cream Cheese Frosting:
- 1/2 cup butter (1 stick), softened
- 8 oz cream cheese, softened
- 1 teaspoon vanilla extract
- 5 cups powdered sugar
- 1/4 cup milk (add gradually)
- Food coloring (optional, for summer colors)
How to Make It:
1. Cream together the sugar, butter, and eggs until light and fluffy.
2. Add the sour cream and 1 teaspoon of vanilla. Mix to combine.
3. In a separate bowl, whisk together the flour, salt, and baking soda. Gradually stir the dry ingredients into the wet ingredients. Do not overmix.
4. Roll the dough out on a floured surface to about 1/4 inch thickness.
5. Cut into circles or use fun summer cookie cutters – suns, stars, flip-flops, anything goes.
6. Bake at 425°F for 5 minutes. The centers should look slightly soft – that’s perfect. They firm up as they cool.
7. Cool completely on wire racks before frosting.
8. For the frosting: beat together the softened butter and cream cheese. Add 1 teaspoon vanilla. Alternately add powdered sugar and milk while beating until smooth. Tint with food coloring if desired.
9. Frost and decorate the cooled cookies.
Pro Tip: These cookies freeze beautifully, both frosted and unfrosted. Make a big batch the week before the party and just pull them out the night before.
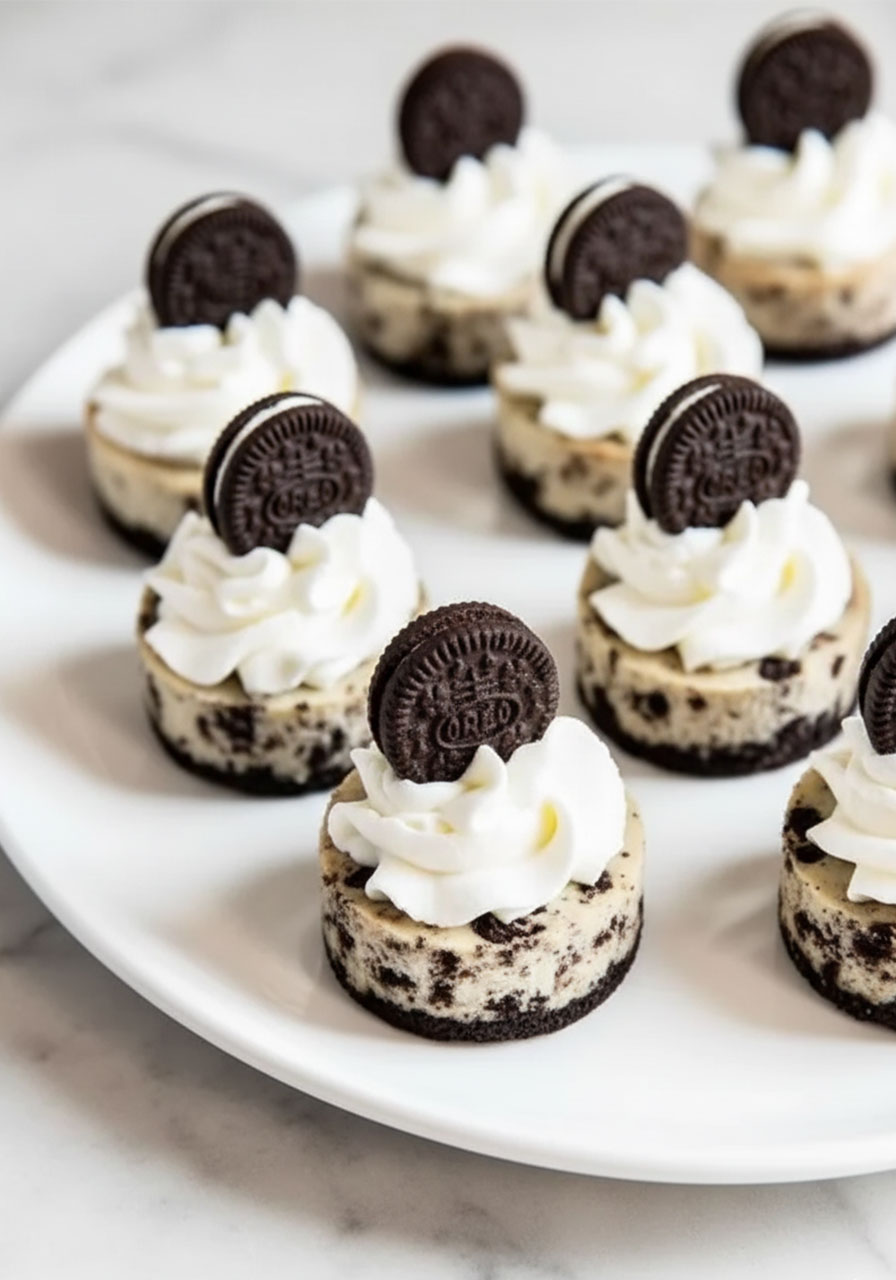
11. Mini Cookies and Cream Cheesecake Bites
An Oreo crust, a creamy cheesecake filling studded with crushed Oreos, a swirl of whipped cream, and a tiny Oreo on top. These are individual, party-ready, and absolutely impossible to resist.
Best for: Parties, birthdays, any occasion worth celebrating
Time to Make: 40 minutes + chilling time
Makes: 12 mini cheesecakes
What You’ll Need:
- 10 Oreo cookies (for crust)
- 1 tablespoon butter, melted
- 12 oz cream cheese, softened
- 1/2 cup granulated sugar
- 2 teaspoons vanilla extract
- 1 egg
- Pinch of salt
- 1/2 cup chopped Oreo cookies, filling removed
- 1 cup heavy cream
- 1/4 cup powdered sugar
- 12 mini Oreo cookies for topping
- Mini cheesecake pan (or regular muffin tin with paper liners)
How to Make It:
1. Preheat the oven to 350°F. Spray the mini cheesecake pan with nonstick spray.
2. Crush the 10 Oreos until fine. Mix with the melted butter. Spoon about 1.5 teaspoons of the mixture into each well and press firmly down with your fingers. Bake for 5 minutes, then let cool slightly.
3. Beat together the cream cheese, sugar, vanilla, egg, and salt until smooth. Fold in the chopped Oreos (with filling removed). Spoon into the pan, filling each well nearly full. Tap the pan on the counter a few times to release air bubbles.
4. Bake for 15-18 minutes, until the cheesecakes have puffed and only jiggle slightly. Remove and let cool on the counter, then chill in the fridge.
5. Once chilled, whip the heavy cream until light and fluffy. Beat in the powdered sugar. Pipe onto the top of each cheesecake.
6. Top each one with a mini Oreo cookie and serve.
Pro Tip: Make these up to 3 days in advance – just hold off on adding the whipped cream until right before serving. They actually taste better after a full day in the fridge.
12. Blueberry Hand Pies
Imagine a homemade pop tart – but better. These flaky, golden, blueberry-filled hand pies are made with refrigerated pie crust and a jammy berry filling. They work in the oven or the air fryer, and kids love the fact that they’re a perfectly handheld size.
Best for: Summer parties, bake sales, picnics
Time to Make: 1 hour 10 minutes
Makes: 6 hand pies

What You’ll Need:
- 2 sheets refrigerated pie crust
- 2 cups wild blueberries, fresh or frozen
- 2 tablespoons cornstarch (2.5 tablespoons if using frozen berries)
- 1/3 cup sugar
- 1/8 teaspoon salt
- 1 teaspoon lemon juice
- 1 large egg + 1 teaspoon water (egg wash)
- 1 cup powdered sugar + 1-2 tablespoons heavy cream (for optional icing)
How to Make It:
1. Make the filling: In a saucepan, combine the blueberries, cornstarch, sugar, salt, and lemon juice. Stir to combine. Cook over medium-high heat until the liquid simmers. Reduce heat and stir frequently until the mixture thickens, about 5 minutes. Transfer to a bowl and cool completely.
2. Preheat the oven to 425°F. Line a baking sheet with parchment paper.
3. Roll each pie crust sheet into a 10″ x 15″ rectangle. Cut each into 6 equal rectangles (3.25″ x 5″ each).
4. Whisk together the egg and water for the egg wash. Brush the inner 1-inch edge of 6 of the rectangles.
5. Place a heaping tablespoon of filling in the center of those 6 pieces. Place them on the prepared baking sheet.
6. Use a fork to poke vent holes in the other 6 rectangles. Place each one over a filled piece and press the edges together with a fork to seal.
7. If the dough has gotten soft, refrigerate for 20 minutes. Brush the tops with the remaining egg wash.
8. Bake for 18-20 minutes until light golden brown. Cool for 20 minutes before adding icing (if using).
9. For icing: stir together the powdered sugar and heavy cream until smooth. Drizzle or spread over the cooled pies.
Pro Tip: Keep the dough cold right up until baking – cold fat hitting hot air is what creates that beautiful flaky texture. If your dough gets warm during assembly, pop it in the fridge for 20 minutes before baking.
Savory Snacks
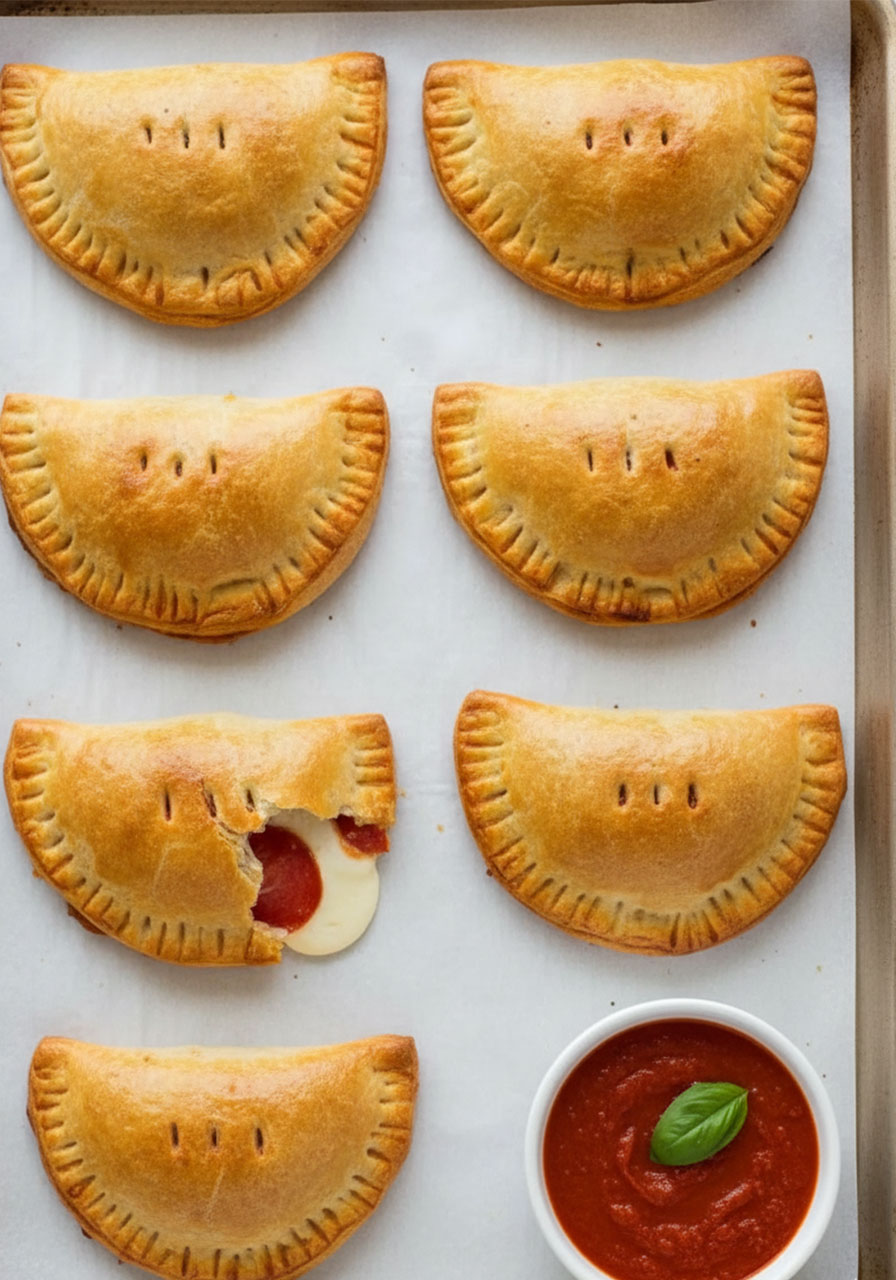
13. Mini Pepperoni Calzones
Pizza pockets, but homemade and way better than anything you’d get from a box. These little calzones are stuffed with pepperoni, melty mozzarella, and marinara, sealed up tight, and baked until golden. Kids go crazy for them, and they’re great for dipping.
Best for: Snacks, kids parties, game day, lunch
Time to Make: 50 minutes (includes dough rest time)
Makes: 8 mini calzones
What You’ll Need:
- 1 pound frozen bread dough, thawed
- 24 slices pepperoni
- 3 oz string cheese (3 sticks), each cut into thirds
- 1/4 cup marinara sauce (plus more for dipping)
- 1 egg + 1 tablespoon water (egg wash)
- Flour for dusting
How to Make It:
1. Preheat the oven to 425°F. Line a baking sheet with parchment paper.
2. On a floured surface, cut the thawed dough into 8 equal pieces. Roll each into a small ball. Let rest at room temperature for 30 minutes – this makes the dough much easier to work with.
3. While the dough rests, cut each string cheese into 3 equal pieces and separate the pepperoni into groups of 3. Whisk together the egg and water for the egg wash.
4. Using a floured rolling pin, roll each dough ball into a circle about 5 inches wide.
5. On one side of each circle, place 3 pepperoni slices, 1 piece of cheese, and 1 tablespoon of marinara, leaving a clean 1/2-inch edge. Brush the edge with egg wash.
6. Fold the dough over the filling and press the seam with your fingers. Crimp all around with a fork to seal. Use the fork to poke 3 vent holes on top.
7. Place on the baking sheet 2 inches apart. Brush the tops with egg wash.
8. Bake for 15 minutes until cooked through and golden brown. Serve with warm marinara for dipping.
Pro Tip: The best way to thaw frozen bread dough is overnight in the fridge. Pull it out the morning of the party, and it’ll be perfectly ready to work with by party time.
14. Pepperoni Crescent Rolls
Seven ingredients. Ten minutes of prep. These golden, flaky crescent rolls are stuffed with mozzarella and pepperoni, seasoned with garlic and herbs, and ready to dip in warm marinara. If there’s one snack that kids and adults fight over equally, this is it.
Best for: Quick snacks, parties, busy weeknights
Time to Make: 25 minutes
Makes: 16 rolls
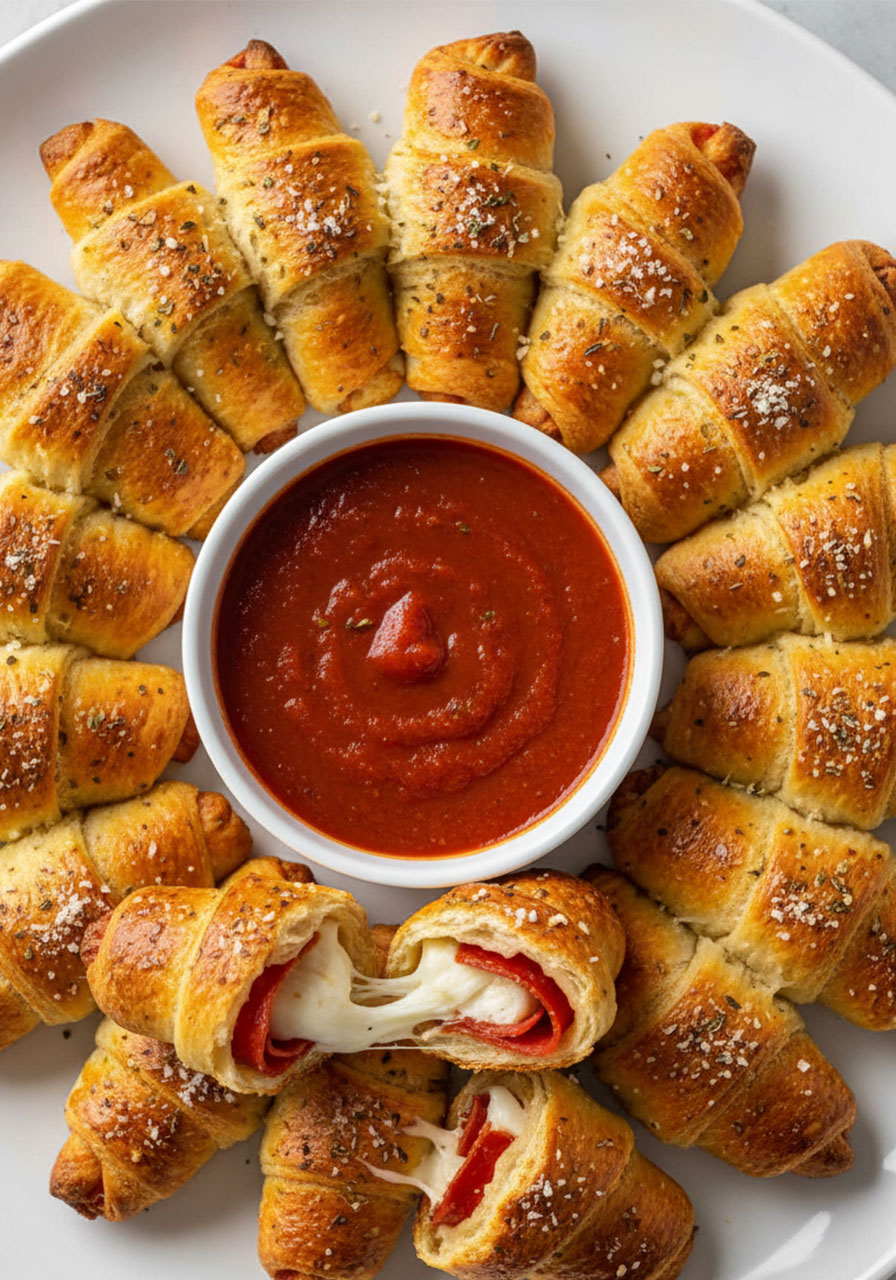
What You’ll Need:
- 2 packages Pillsbury crescent rolls
- 8 mozzarella cheese sticks, cut in half (16 pieces)
- 1 package pepperoni slices
- 1 teaspoon garlic powder
- 1 teaspoon dried oregano
- 1 teaspoon dried basil
- 1 egg, beaten
- 2 tablespoons freshly grated Parmesan cheese
- Pizza or marinara sauce for dipping
How to Make It:
1. Preheat the oven to 375°F. Mix the garlic powder, oregano, and basil in a small bowl and set aside.
2. Beat the egg in a small bowl.
3. Unroll the crescent dough and separate into individual triangles. Starting at the wide end, place half a mozzarella stick at the edge.
4. Lay pepperoni slices along the surface of the crescent, slightly overlapping. Roll up from the wide end toward the narrow point.
5. Place on an ungreased baking sheet, seam-side down. Brush with beaten egg, then sprinkle with the herb seasoning mix.
6. Bake for 15 minutes until golden brown.
7. Sprinkle with Parmesan immediately after pulling from the oven. Serve with warm pizza or marinara sauce.
Pro Tip: Don’t skip the egg wash – it gives the rolls that gorgeous, bakery-quality golden color. Overlap the pepperoni when you place it on the dough for better flavor and a prettier look when rolled.
15. Sheet Pan Nachos
When you need to feed a hungry group fast and have everyone happy, nachos are never the wrong answer. This sheet pan version is loaded with seasoned beef, salsa, beans, corn, cheese, and all the toppings. It’s in the oven in 10 minutes and on the table in 15.
Best for: Large groups, game day snacks, quick party food
Time to Make: 15 minutes
Serves: 10
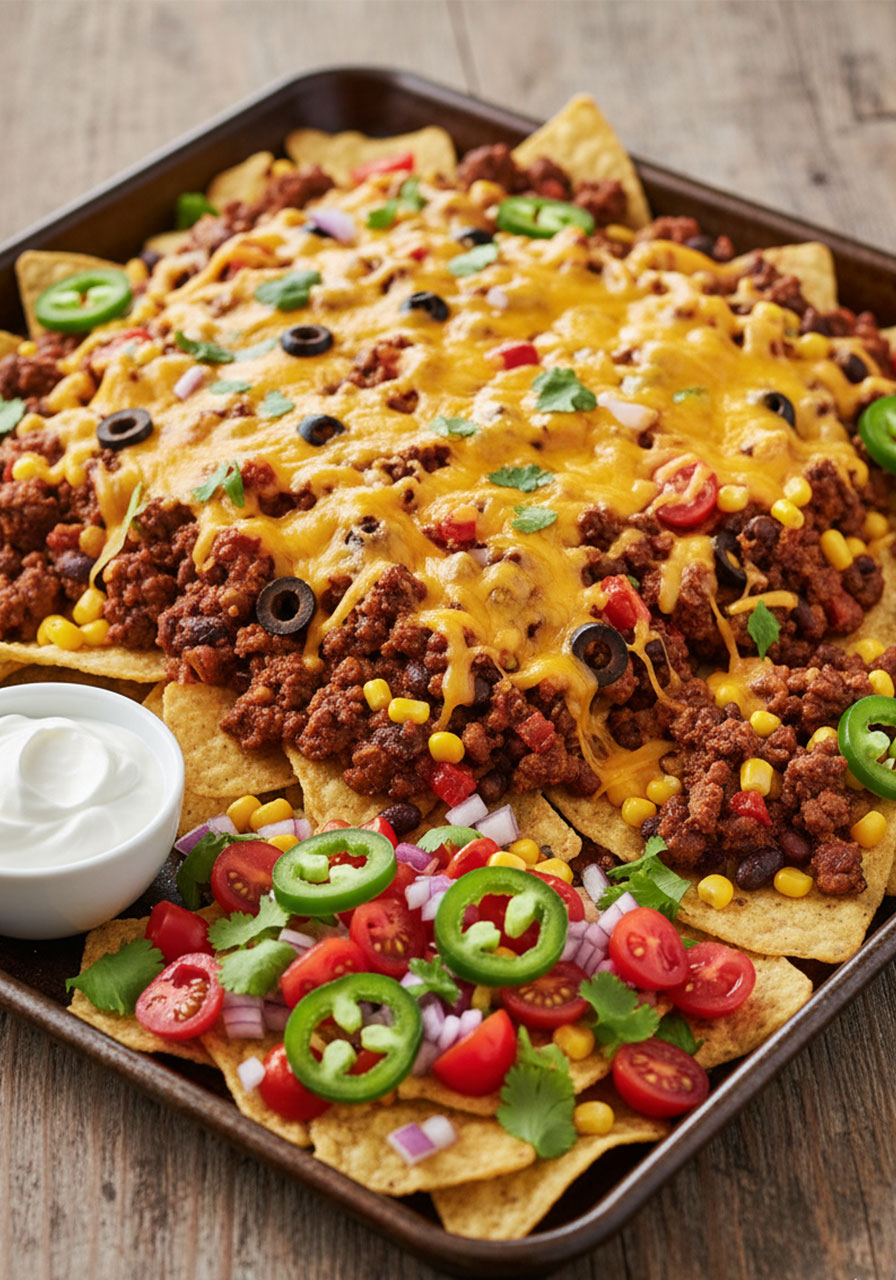
What You’ll Need:
- 1 tablespoon olive oil
- 1 lb ground beef
- 1 (1.25 oz) packet taco seasoning
- 1 (16 oz) jar salsa (mild works great for kids)
- 1 (12 oz) bag corn chips/tortilla chips
- 1 (15 oz) can black beans, drained and rinsed
- 1 (8.5 oz) can corn, drained
- 1 small can sliced black olives, drained
- 1.5 cups shredded Mexican cheese blend
- Toppings: diced tomato, diced red onion, sliced jalapeño, fresh cilantro, sour cream
How to Make It:
1. Preheat the oven to 400°F. Line a baking sheet with aluminum foil and spray with nonstick cooking spray.
2. Heat the olive oil in a large skillet over medium-high heat. Brown the ground beef. Drain if desired, then stir in the taco seasoning and salsa.
3. Spread the tortilla chips in a single layer on the prepared baking sheet. Top evenly with the beef mixture, black beans, corn, olives, and shredded cheese.
4. Bake for 5-6 minutes, just until the cheese is melted and bubbly. Do not overbake or the edges will burn.
5. Pull from the oven and immediately top with tomato, red onion, jalapeño, and cilantro. Serve with sour cream on the side.
Pro Tip: Keep the toppings like cilantro, tomato, and sour cream separate so guests can customize their own plates. And nachos don’t keep well – if you’re not going to finish the whole tray, make a half batch in a 9×13 casserole dish instead.
16. Mini Corn Dogs
Fair-worthy corn dogs, made right in your own kitchen. These bite-sized, golden-battered little dogs are the kind of food kids will absolutely flip over. Ready in about 20 minutes, and way more delicious than the frozen version.
Best for: Kids parties, casual gatherings, summer snacking
Time to Make: 25 minutes
Makes: 10 servings
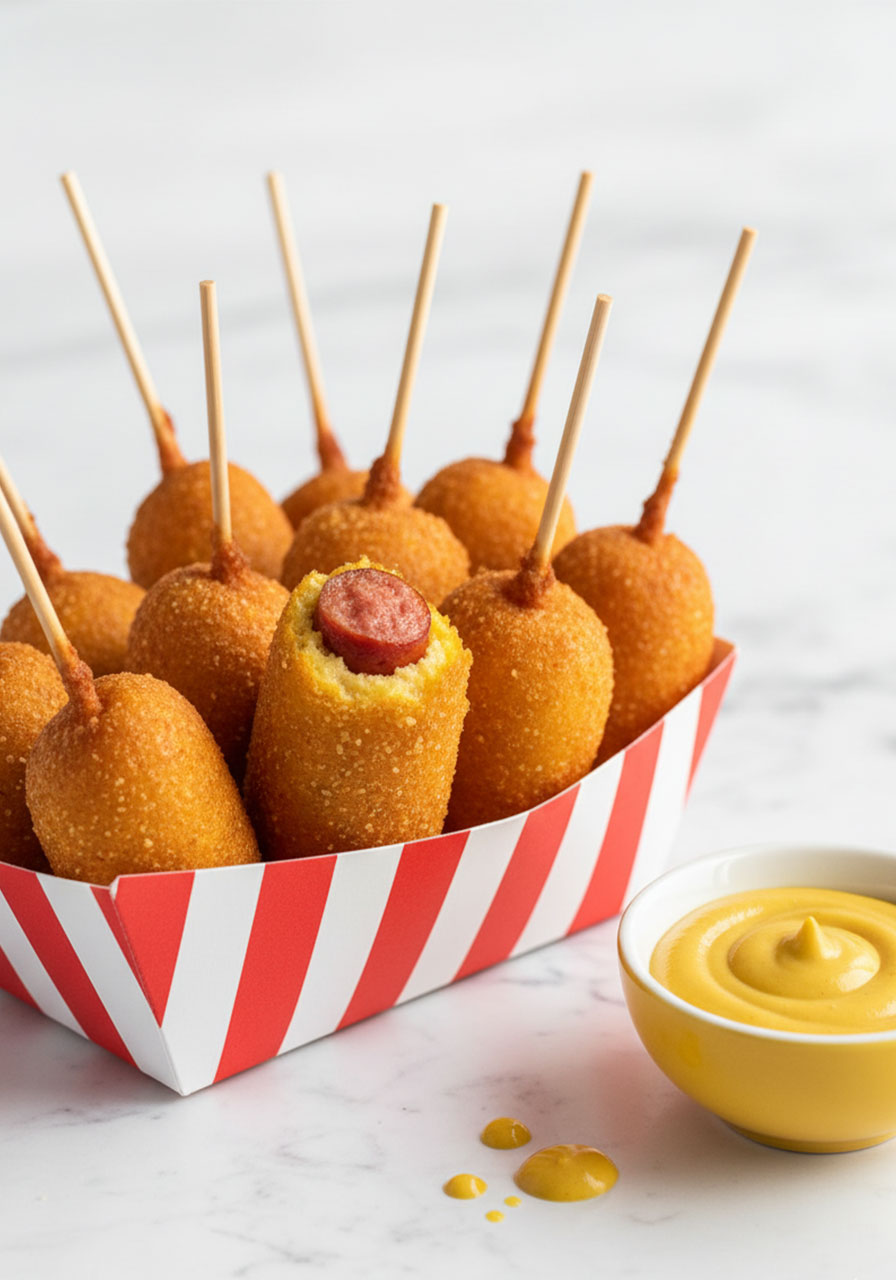
What You’ll Need:
- 1 lb hot dogs
- 1/2 cup yellow cornmeal
- 1/2 cup all-purpose flour
- 2 tablespoons granulated sugar
- 2 teaspoons baking powder
- 1/4 teaspoon sea salt
- 1 egg
- 1/2 cup buttermilk
- Vegetable oil or canola oil for frying
- Food-grade popsicle sticks or lollipop sticks
How to Make It:
1. Cut each hot dog in half. Dry them thoroughly with paper towels. Thread each half onto a popsicle stick.
2. In a bowl, whisk together the cornmeal, flour, sugar, baking powder, and salt. Add the egg and buttermilk and stir to combine.
3. Pour the batter into a tall glass or measuring cup for easy dipping. Let the batter rest for 15-20 minutes.
4. Heat 2.5 to 3 inches of oil in a Dutch oven or heavy skillet to 375°F. Use a candy thermometer to monitor the temperature.
5. Dip each hot dog into the batter, turning to coat fully. Carefully lower into the hot oil.
6. Fry in small batches for 2-3 minutes until golden brown. Work in batches to maintain the oil temperature.
7. Drain on paper towels and serve promptly with mustard, ketchup, or your favorite dipping sauce.
Pro Tip: If you’re having trouble getting the batter to stick, roll the hot dogs in a light dusting of flour before dipping them. The flour gives the batter something to grab onto. Use only food-grade popsicle sticks – craft sticks are not intended for food use.
Healthy-ish Options
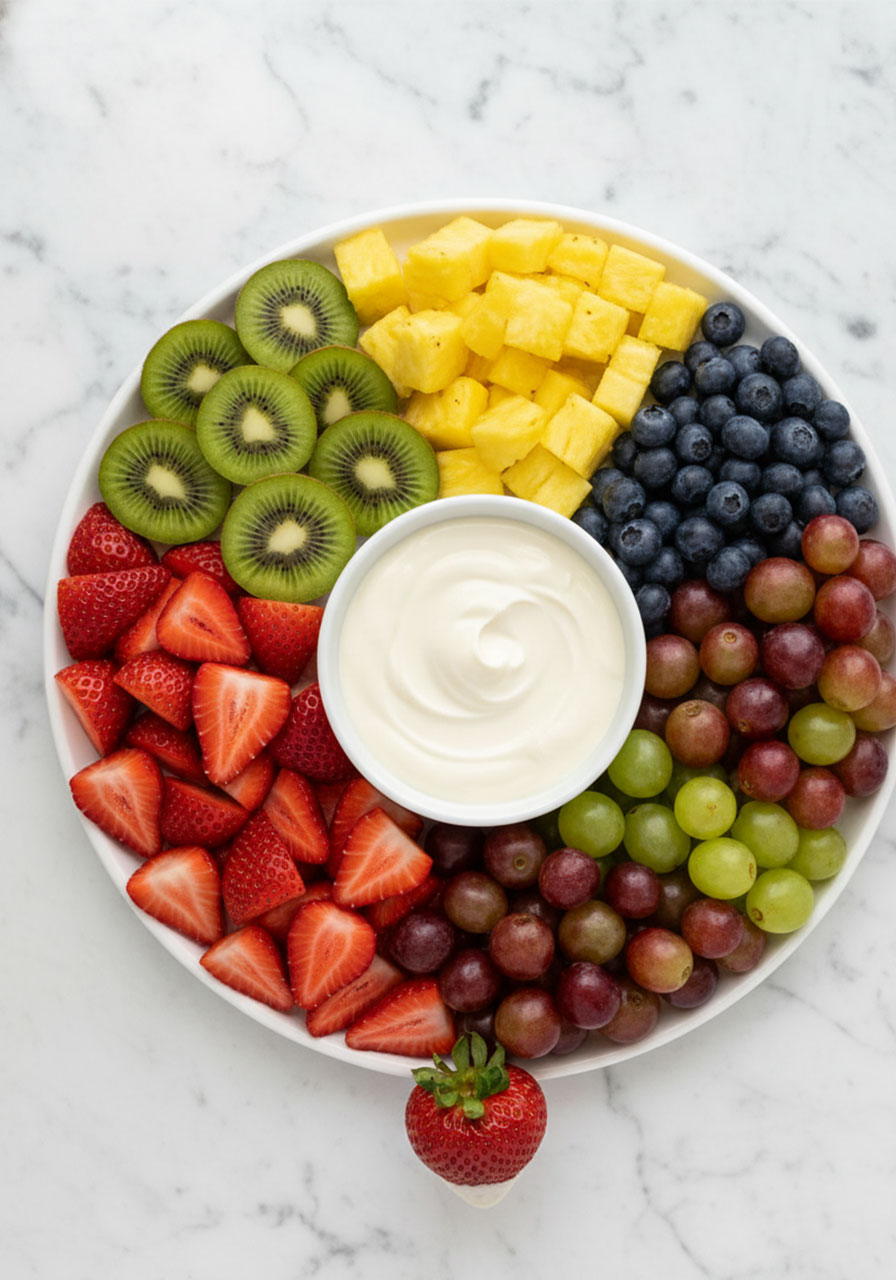
17. Rainbow Fruit Skewers with Cheesecake Dip
These are always the first thing to disappear at any party – kids love the colors, adults love the presentation, and everyone loves that there’s a dip. Thread the fruit in rainbow order (red, orange, yellow, green, blue, purple) for a result that looks absolutely stunning on a platter.
Best for: All ages, parties, potlucks, healthy snack option
Time to Make: 20 minutes
Makes: 21 skewers
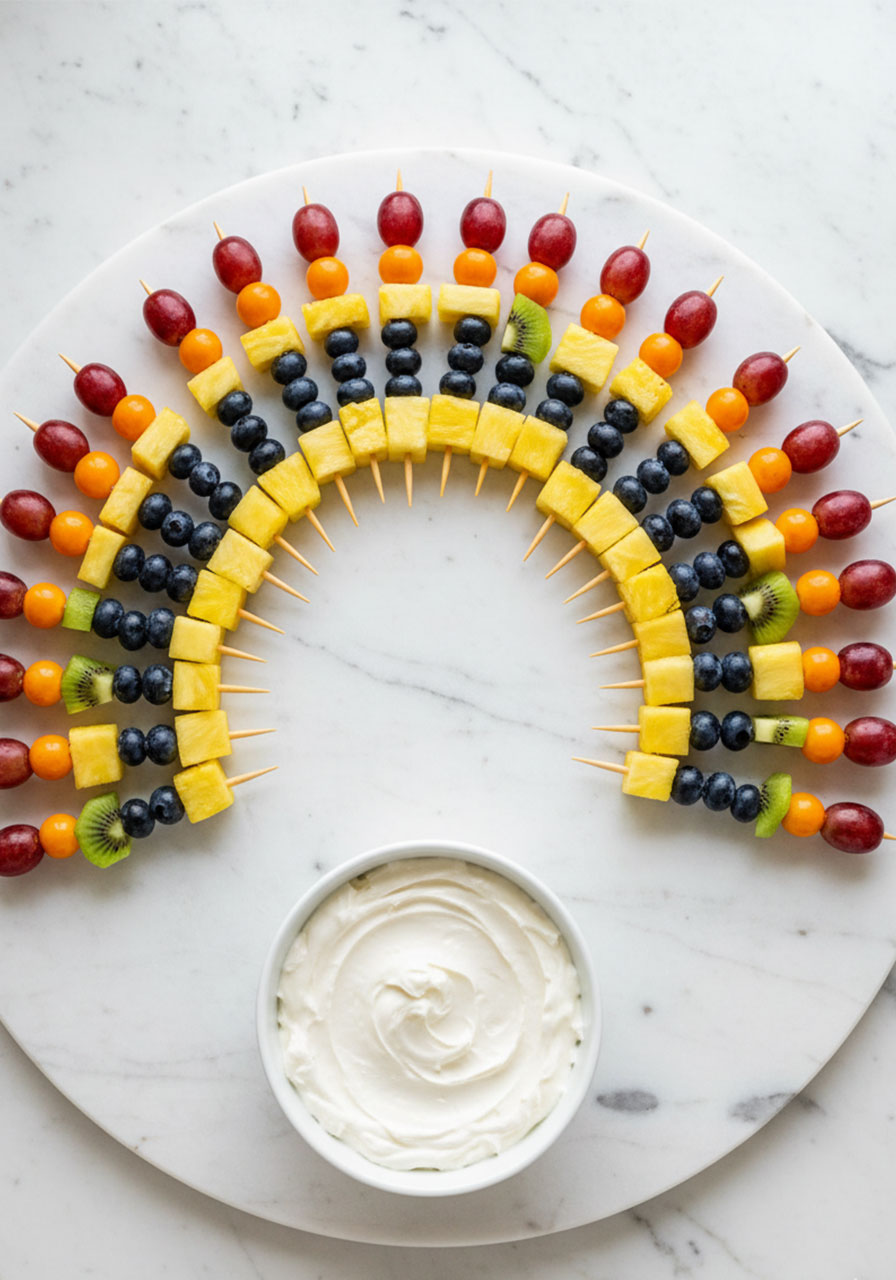
What You’ll Need:
- 2 cups strawberries, halved or quartered
- 21 goldenberries or clementine segments
- 1 small pineapple, cut into bite-sized cubes
- 21 kiwi chunks (about 2 kiwis)
- 42 blueberries
- 21 purple grapes
- 21 wooden skewers
For the Cheesecake Dip:
- 4 oz cream cheese, room temperature
- 6 tablespoons powdered sugar (or 3 tablespoons maple syrup)
- 1/2 teaspoon vanilla extract
- 1/16 teaspoon salt
- 1/2 cup cold heavy cream
How to Make It:
1. Wash, dry, and prep all the fruit. Cut everything into similar-sized pieces so the skewers look even and beautiful.
2. Thread each skewer in rainbow order: red (strawberry), orange (goldenberry or clementine), yellow (pineapple), green (kiwi), blue (2 blueberries), purple (grape).
3. Arrange on a platter in a fan shape to create a rainbow effect. Refrigerate until ready to serve.
4. For the dip: Beat the cream cheese, sweetener, vanilla, and salt with a hand mixer until smooth. With the mixer on low, gradually add the cold heavy cream. Once incorporated, turn to high speed and beat until stiff peaks form, about 3-5 minutes. Refrigerate until serving.
Pro Tip: Can’t find goldenberries? Mandarin orange segments, mango chunks, or cantaloupe all work beautifully as the orange layer. Make the dip up to 2 days ahead – it keeps perfectly in the fridge.
18. Watermelon Caprese Skewers
Sweet juicy watermelon, creamy mozzarella, fresh basil, and a balsamic drizzle. This is the appetizer that makes everyone think you’re a fancy food person – but it takes about 10 minutes to put together. Refreshing, beautiful, and totally unexpected at a pool party.
Best for: Summer parties, adults and older kids, elegant-but-easy appetizer
Time to Make: 10 minutes
Serves: 10
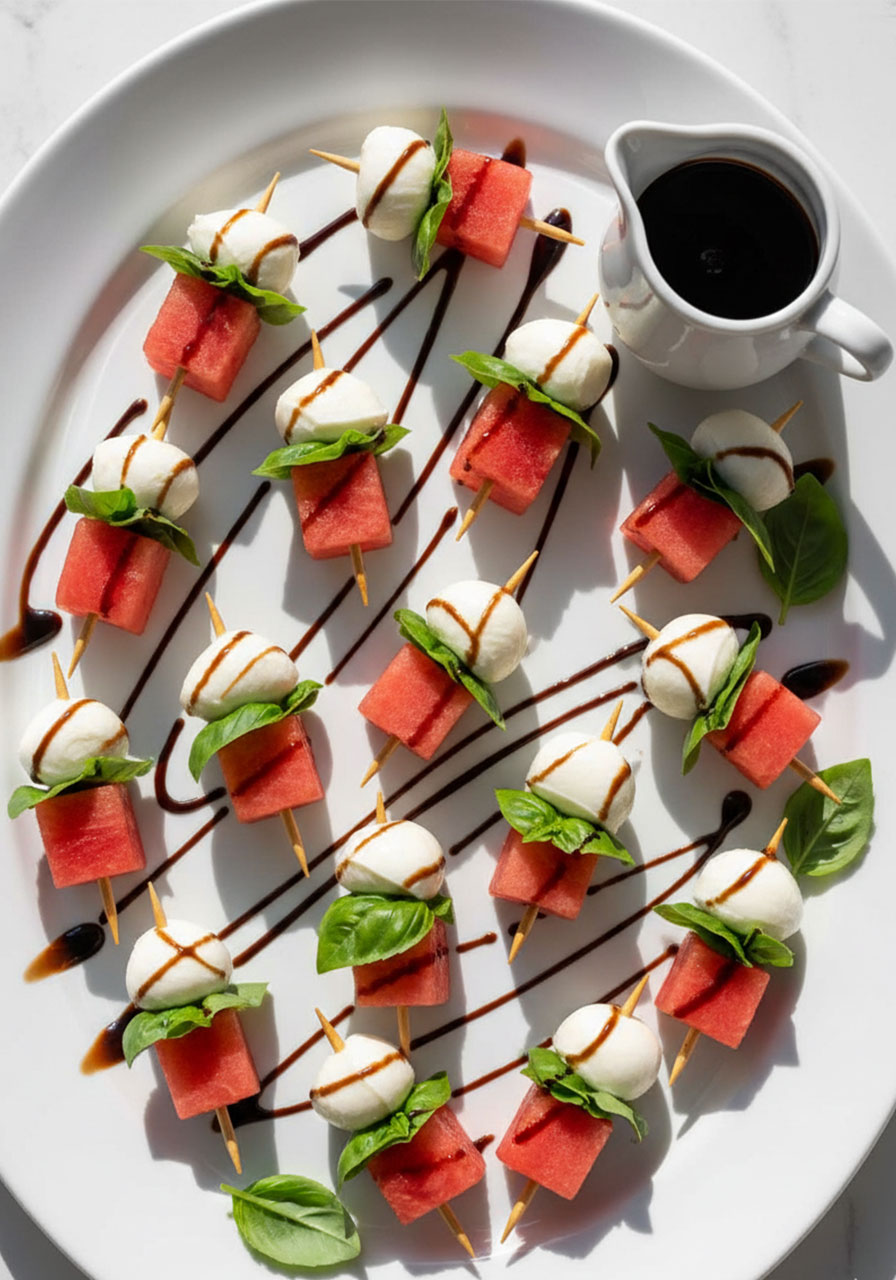
What You’ll Need:
- 1/2 medium watermelon
- 12 mozzarella snacking cheese balls or pieces
- 12 fresh basil leaves
- 3 tablespoons balsamic glaze
- Toothpicks or small skewers
How to Make It:
1. Cut the watermelon into 1/2 to 1-inch chunks.
2. On each skewer or toothpick, stack: one piece of watermelon, one basil leaf folded, then one piece of mozzarella.
3. Drizzle with balsamic glaze and serve chilled.
Pro Tip: Serve the balsamic glaze on the side rather than drizzling ahead of time. If the skewers sit for a while, the glaze soaks into the watermelon – it tastes great but looks less pretty. Letting guests drizzle their own keeps things looking fresh all party long.
19. No-Bake Energy Bites
Healthy enough to feel good about serving, delicious enough that the kids actually eat them. These no-bake energy bites come together in about 20 minutes with pantry staples, and they come in 10 different flavors – so you can mix and match to suit your crowd.
Best for: Healthy snacking, all ages, make-ahead snacks
Time to Make: 20 minutes
Makes: 18-22 bites
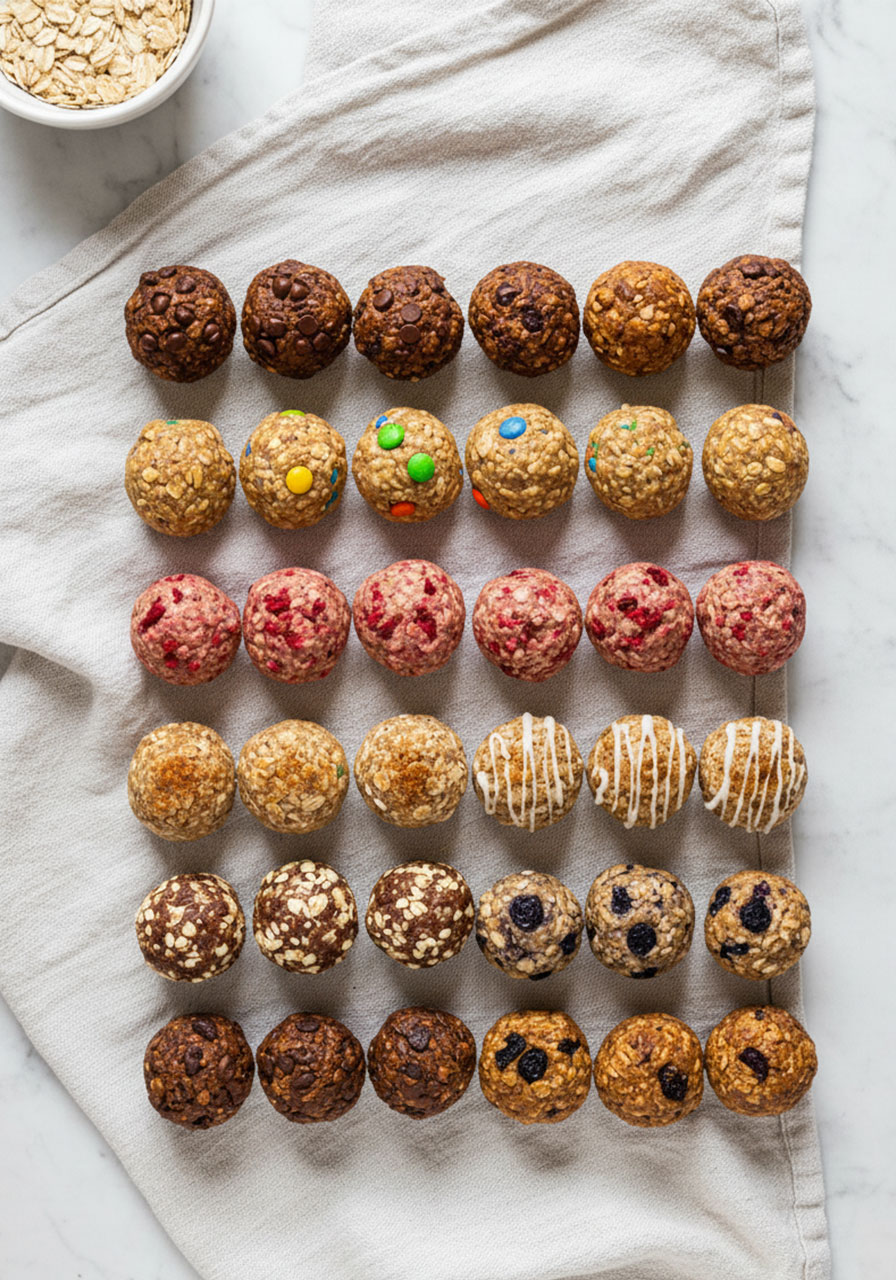
Base Recipe (What You’ll Need for All Flavors):
- 1 cup rolled oats
- 1/4 cup ground flax or chia seeds
- 1/2 cup peanut butter or nut/seed butter of choice
- 1/3 cup maple syrup or honey
- 1 teaspoon vanilla (optional)
- Pinch of salt
Popular Mix-In Options:
- Chocolate Chip Cookie: add 1/2 cup mini chocolate chips
- Monster Cookie: add 1/2 cup M&Ms
- No-Bake Cookie: add 3 tablespoons cocoa powder + 1/4 cup mini chocolate chips
- Strawberry: add 3/4 cup lightly crushed freeze-dried strawberries + 1 teaspoon cinnamon
- Blueberry Muffin: add 1/2 cup dried blueberries + 1 teaspoon cinnamon + 1 teaspoon lemon zest
How to Make It:
1. Add the oats, ground flax or chia seeds, and any spices to a medium mixing bowl.
2. Add the nut butter, maple syrup, vanilla, and salt. Stir until thoroughly combined. If the mixture is too dry, add water one teaspoon at a time.
3. Add your chosen mix-ins and stir until incorporated.
4. Use a cookie scoop to portion out the bites. Roll between your hands to shape into smooth balls.
5. Store in an airtight container in the fridge for up to 1 week, or freeze for up to 1 month.
Pro Tip: If the mixture seems too loose right after mixing, give it 5 minutes. The chia or flax seeds absorb moisture as they sit and the mixture will firm up. You can also add an extra 1/4 cup of oats to tighten things up.
20. Red Pepper Hummus with Veggies
Roasting the bell peppers first makes all the difference – it gives this hummus a deep, slightly smoky, naturally sweet flavor that store-bought can never match. Set it out with cut veggies and crackers as a gorgeous, healthy addition to any pool party spread.
Best for: Healthy appetizer, all ages, make-ahead party food
Time to Make: 1 hour 20 minutes (most of it is hands-off roasting time)
Serves: 6
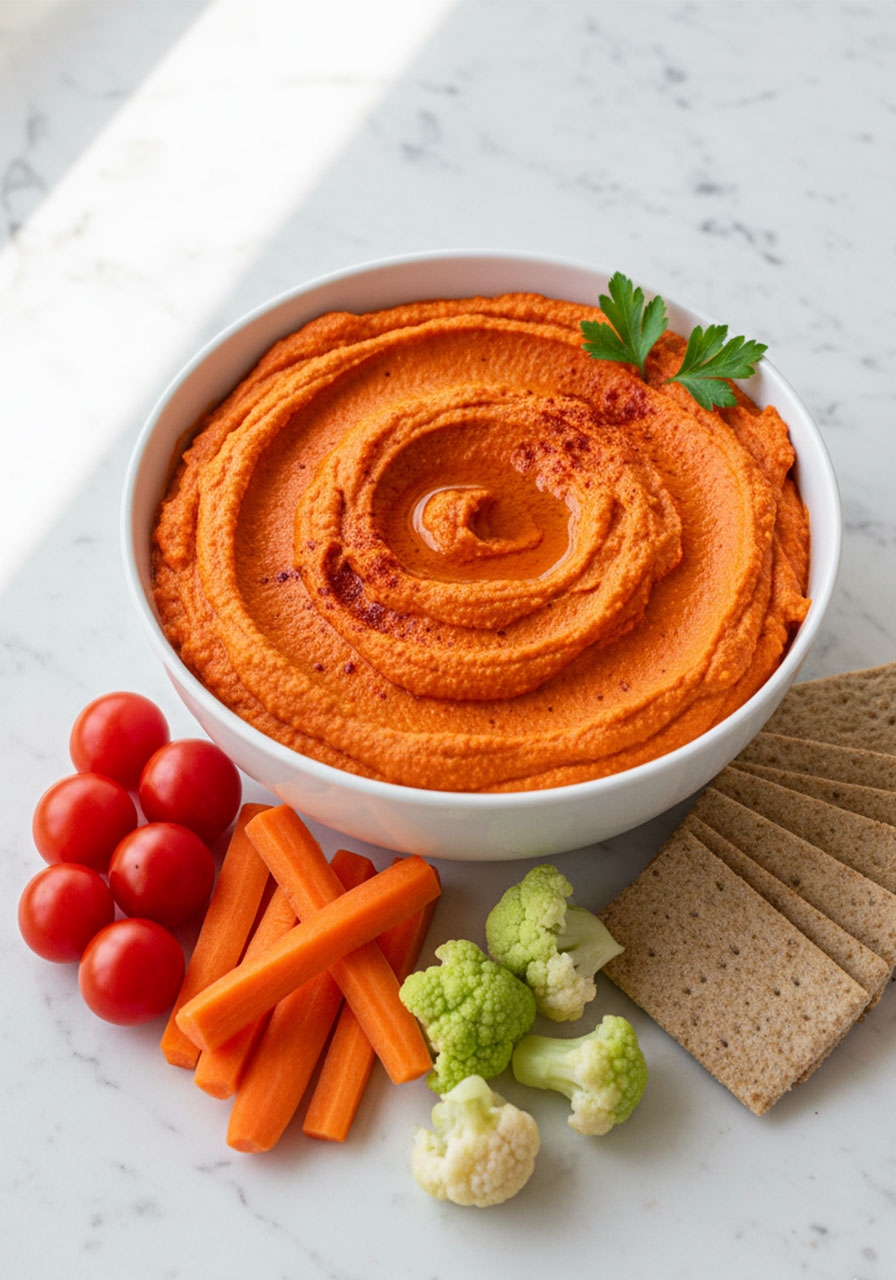
What You’ll Need:
- 2 medium red bell peppers
- 1 can chickpeas, drained and rinsed (reserve the liquid – that’s aquafaba)
- 2 tablespoons aquafaba (the reserved liquid from the can)
- 3 tablespoons lemon juice
- 1/4 cup tahini
- 4 cloves garlic
- 1/2 teaspoon cumin
- 1/2 teaspoon smoked paprika
- 1/4 teaspoon salt
How to Make It:
1. Preheat the oven to 400°F. Line a baking sheet with parchment paper and place the whole bell peppers on it. Roast for 20 minutes. Flip the peppers and roast for another 20 minutes until blackened and blistered all over.
2. Remove from oven and carefully place the peppers in a bowl. Cover the bowl with a towel and let them steam for 20 minutes.
3. Once cool enough to handle, peel off the charred skin (it should come off easily), remove the stems and seeds, and discard. Slice the peppers into strips.
4. Add the roasted peppers and all other ingredients to a high-powered blender. Blend until completely smooth. Taste and add more salt if needed.
5. Transfer to a serving bowl. Sprinkle with extra paprika and a few sprigs of parsley for a gorgeous presentation. Serve with cut veggies and crackers.
Pro Tip: Use high-quality, smooth tahini for best results – dry or chunky tahini won’t blend as well. This hummus keeps in the fridge for up to a week, so you can absolutely make it a day or two before the party.
21. Aquarium Trail Mix
Gummy worms as eels. Swedish fish swimming through the mix. Vanilla yogurt raisins pretending to be turtle eggs. This trail mix is as fun to explain as it is to eat, and kids can mix it up entirely on their own. It takes five minutes and feeds a crowd.
Best for: Kids, pool parties, no-cook snacks
Time to Make: 5 minutes
Makes: 7 cups (about 14 half-cup servings)
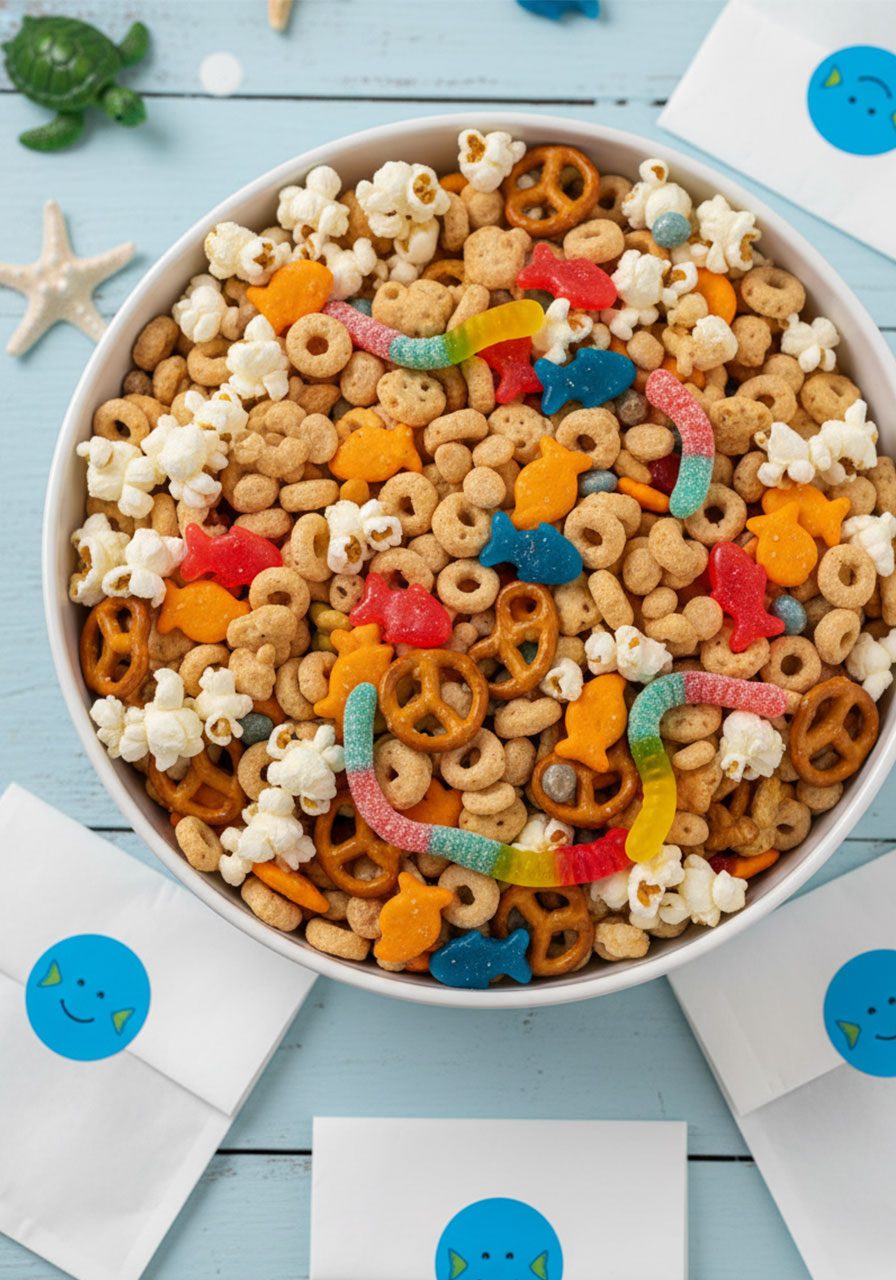
What You’ll Need:
- 2 heaping cups popped popcorn
- 1 cup mini pretzel twists
- 1 cup Kix cereal
- 1 cup Goldfish crackers
- 1 cup gummy worms
- 1/2 cup vanilla yogurt raisins
- 1/2 cup Swedish Fish (about one 3.1 oz box)
How to Make It:
1. Add all the ingredients to a large bowl.
2. Mix everything together and enjoy!
3. Store leftovers in an airtight container.
Pro Tip: Tell the kids the gummy worms are “eels” and the yogurt raisins are “sea creature eggs.” It makes the whole snack feel like a game. For easy serving, portion it into individual snack bags ahead of time – perfect for a pool party where everyone’s reaching with wet hands.
22. Roasted Trail Mix
Homemade trail mix is a game-changer once you’ve tried it. This version toasts the nuts and seeds in maple syrup and savory seasonings first, which takes the flavor to a completely different level. Add dried cranberries, raisins, and optional chocolate chips, and you’ve got a snack everyone will reach for again and again.
Best for: All ages, outdoor activities, healthy snacking
Time to Make: 40 minutes (including cooling time)
Makes: About 3 cups
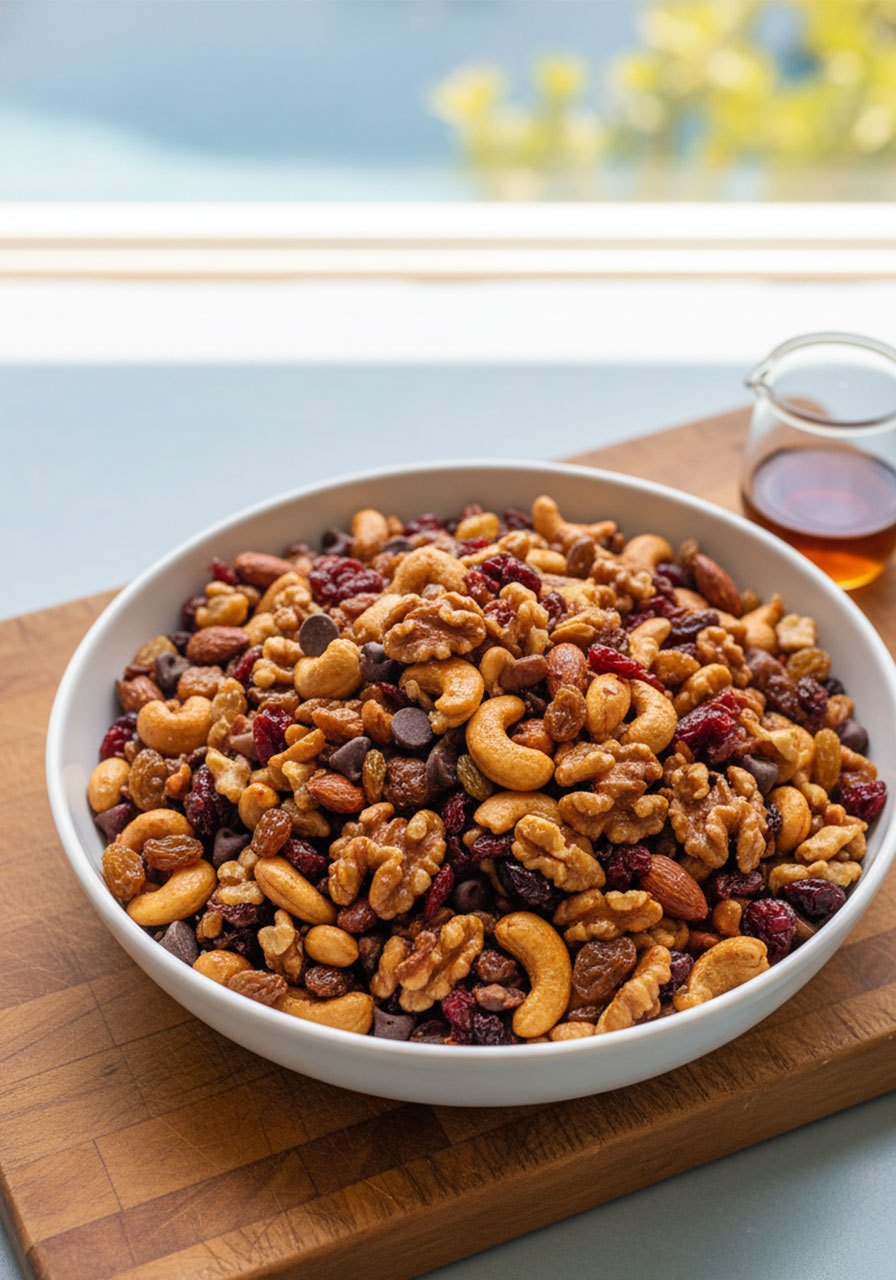
What You’ll Need:
- 1/3 cup peanuts
- 1/3 cup walnuts, roughly chopped
- 1 cup cashews
- 3/4 cup almonds
- 1/4 cup pumpkin seeds
- 1 tablespoon pure maple syrup
- 1/4 teaspoon smoked paprika
- 1/2 teaspoon garlic powder
- Pinch of salt
- 1/4 cup raisins
- 1/4 cup dried cranberries
- Optional: 1 handful chocolate chips
How to Make It:
1. Preheat the oven to 350°F.
2. Add all the nuts and pumpkin seeds to a bowl. Drizzle with maple syrup and stir until everything is coated. Add the smoked paprika, garlic powder, and salt. Mix to combine.
3. Spread the nut mixture on a baking tray lined with a silicone mat or foil. Bake for 8 minutes, then remove and stir. Return to the oven and bake for another 8-10 minutes until lightly golden brown and no longer sticky. Watch closely – nuts go from toasted to burned quickly.
4. Remove from the oven and let cool completely. Once cooled, mix in the raisins, dried cranberries, and optional chocolate chips.
5. Store in an airtight container. Enjoys within a week or two.
Pro Tip: Do not add the chocolate chips until the nut mixture is fully cooled – totally cooled. If you add them early, they melt and clump. It still tastes good, but the texture isn’t as satisfying.
23. Yogurt Fruit Dip
This 4-ingredient dip comes together in two minutes flat and tastes like a light, creamy honey cheesecake. Set it in the middle of a gorgeous fruit platter and watch people dip everything into it – even the kids who “don’t like fruit.”
Best for: All ages, healthy party addition, pairs with everything
Time to Make: 2 minutes
What You’ll Need:
- 1 cup plain full-fat yogurt
- 1 tablespoon honey
- 1/4 teaspoon ground cinnamon
- 1/2 teaspoon vanilla extract
How to Make It:
1. Add all the ingredients to a mixing bowl.
2. Stir until well combined.
3. Cover and refrigerate until ready to serve.
4. Serve with your favorite cut fruits for dipping.
Pro Tip: This dip keeps for 6-7 days in the fridge. It may separate slightly – just give it a quick stir before serving. Adjust the honey to taste, and if you want it thicker, swap in Greek yogurt.
24. PB&J Banana “Sushi” Wraps
The classic PB&J – reinvented as roll-up “sushi” that kids absolutely love. You spread peanut butter and jelly on a tortilla, roll a whole banana inside, slice it into rounds, and serve cut-side up. It’s adorable, it’s easy, and it tastes amazing.
Best for: Kids lunches, easy snacks, parties
Time to Make: 10 minutes
Makes: 1 wrap (4-6 pieces)
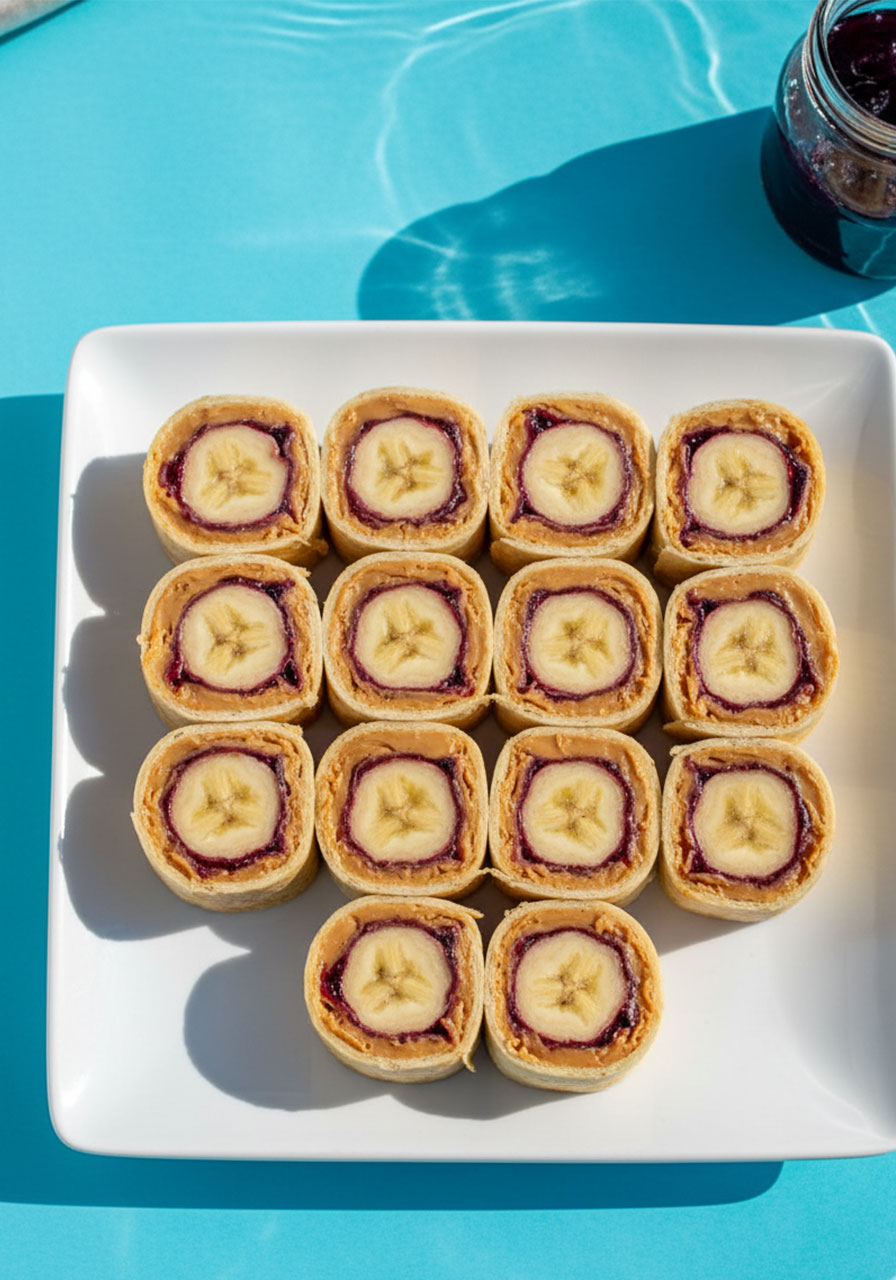
What You’ll Need:
- 1 medium flour tortilla
- 2-3 tablespoons peanut butter
- 1-2 tablespoons jelly (any flavor)
- 1 medium banana
How to Make It:
1. Spread the peanut butter across the entire surface of the tortilla, going close to the edges.
2. Spread the jelly on top of the peanut butter layer.
3. Place the banana near one edge of the tortilla.
4. Tightly roll the tortilla around the banana into a log shape.
5. Slice the roll into 4-6 pieces, each about 1 inch thick.
6. Serve cut-side up so the beautiful spiral shows.
Pro Tip: If you’re making a big batch for a party, brush the cut ends lightly with lemon juice to keep the banana from browning. These can be prepped 1-2 hours ahead and stored in an airtight container in the fridge.
25. Fresh Fruit Cream Cheese Sandwiches
Soft bread, a generous spread of cream cheese, and beautiful layers of fresh fruit cut into fun shapes. These are a fantastic activity to do with kids – let them choose their fruit, arrange the layers, and cut the sandwiches into stars and hearts with cookie cutters.
Best for: Kids, fun food activity, light snack
Time to Make: 10 minutes
Makes: 2 sandwiches
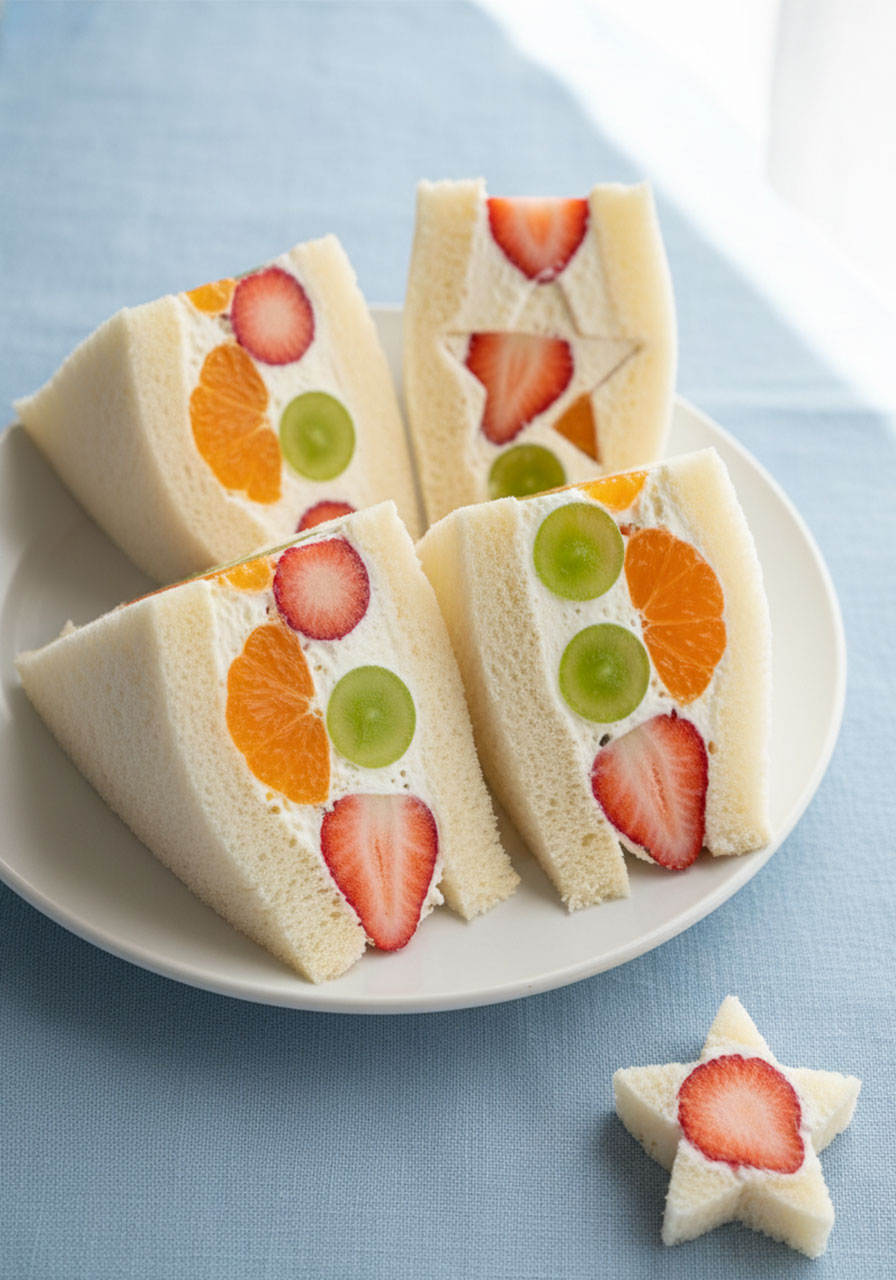
What You’ll Need:
- 4 slices soft white bread
- 2 tablespoons cream cheese
- 6 fresh strawberries, washed and sliced in half lengthwise
- 8 green grapes, washed and sliced in half
- 8 brown or red grapes, washed and sliced in half
- 1 clementine, peeled and segmented
How to Make It:
1. Wash and dry all the fruit. Slice the strawberries and grapes, and separate the clementine segments.
2. Trim the crusts from the bread slices.
3. Spread 1 tablespoon of cream cheese on one side of each bread slice.
4. Arrange the fruit on the cream cheese layer. Encourage kids to get creative with the arrangement.
5. Place a second slice of bread on top and press gently to secure the layers.
6. Cut into halves, quarters, or fun shapes with cookie cutters. Serve immediately.
Pro Tip: Pat the fruit dry before adding it to the sandwich – excess moisture makes the bread soggy fast. These are best eaten within 1-2 hours of assembly, so make them close to serving time.
26. Shark Jello Cups
Blue gelatin “ocean water,” crushed graham cracker “sand,” a gummy shark fin poking up from the surface, and a sprinkle of blue sugar crystals. These cups are a total pool party showstopper for kids, and they could not be easier to make.
Best for: Kids, pool parties, shark-themed fun, summer gatherings
Time to Make: 10 minutes prep + 2 hours chill
Makes: 4 cups
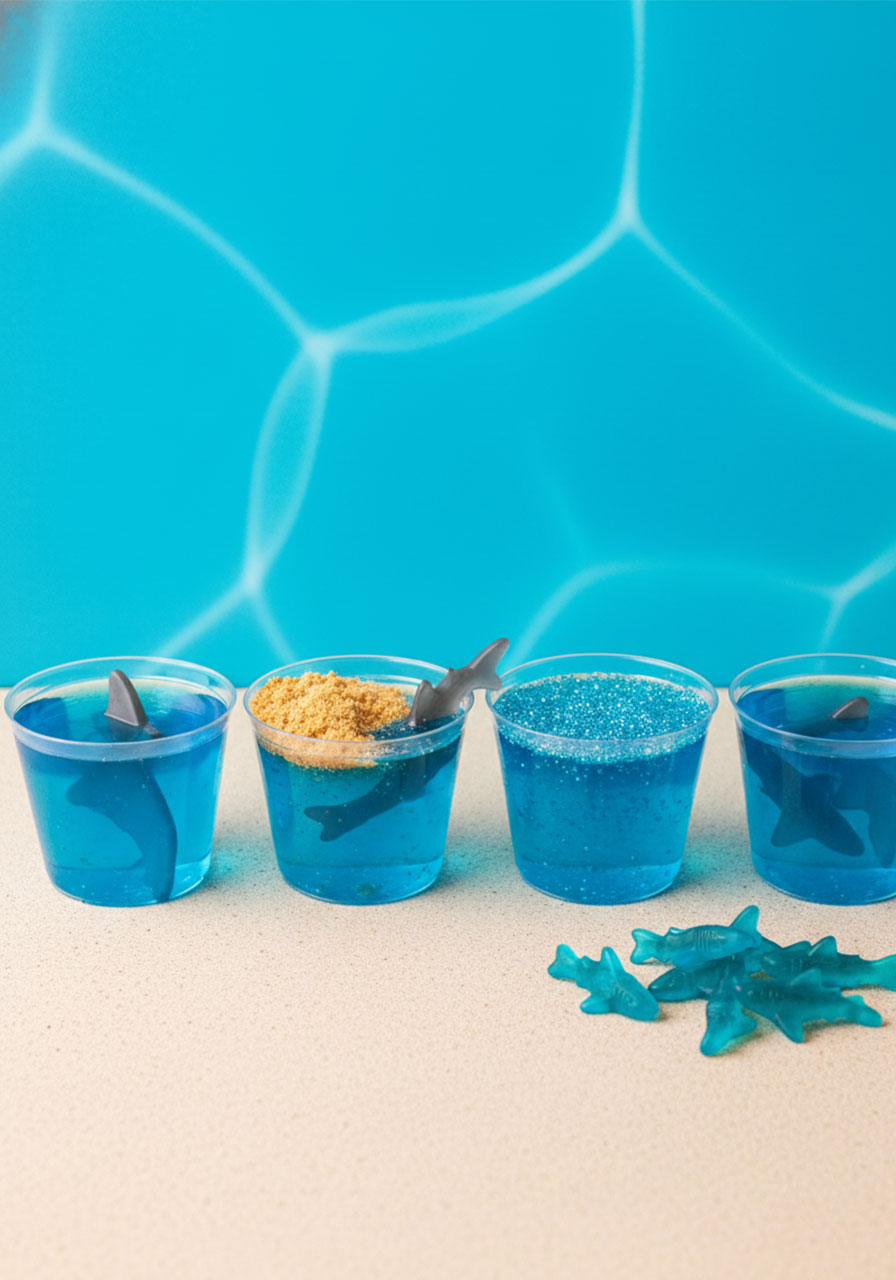
What You’ll Need:
- 4 blue raspberry Jello cups (pre-made snack size, or make your own with blue gelatin mix)
- 1 sheet graham cracker
- Gummy shark candies
- Blue sprinkles (optional)
- 1 zip-lock bag
How to Make It:
1. If using pre-made Jello cups, refrigerate them until you’re ready to decorate.
2. Add the graham cracker sheet to the zip-lock bag. Seal and crush with your hands or a rolling pin until you have fine “sand” crumbs.
3. Take the Jello cups out of the fridge. Spoon a small pile of graham cracker crumbs onto one side of each cup.
4. On the opposite side, add a pinch of blue sprinkles.
5. Press a gummy shark into the gelatin so it looks like it’s swimming (or attack-diving) through the water.
6. Serve immediately and enjoy the reactions.
Pro Tip: Can’t find pre-made blue Jello cups? Make your own using Berry Blue Jello mix per package directions, poured into clear plastic cups and chilled for 2 hours. Clear cups are key – they give it that beautiful glassy “ocean water” look.
27. Mini Waffle Skewers
Breakfast for lunch, on a stick. Mini cinnamon toast waffles threaded with crispy turkey bacon and fresh strawberries – served with maple syrup for dipping. These are the kind of fun, unexpected skewer that kids will talk about for the rest of the summer.
Best for: Kids, fun lunch, brunch-style party food
Time to Make: 10 minutes
Makes: 2 skewers
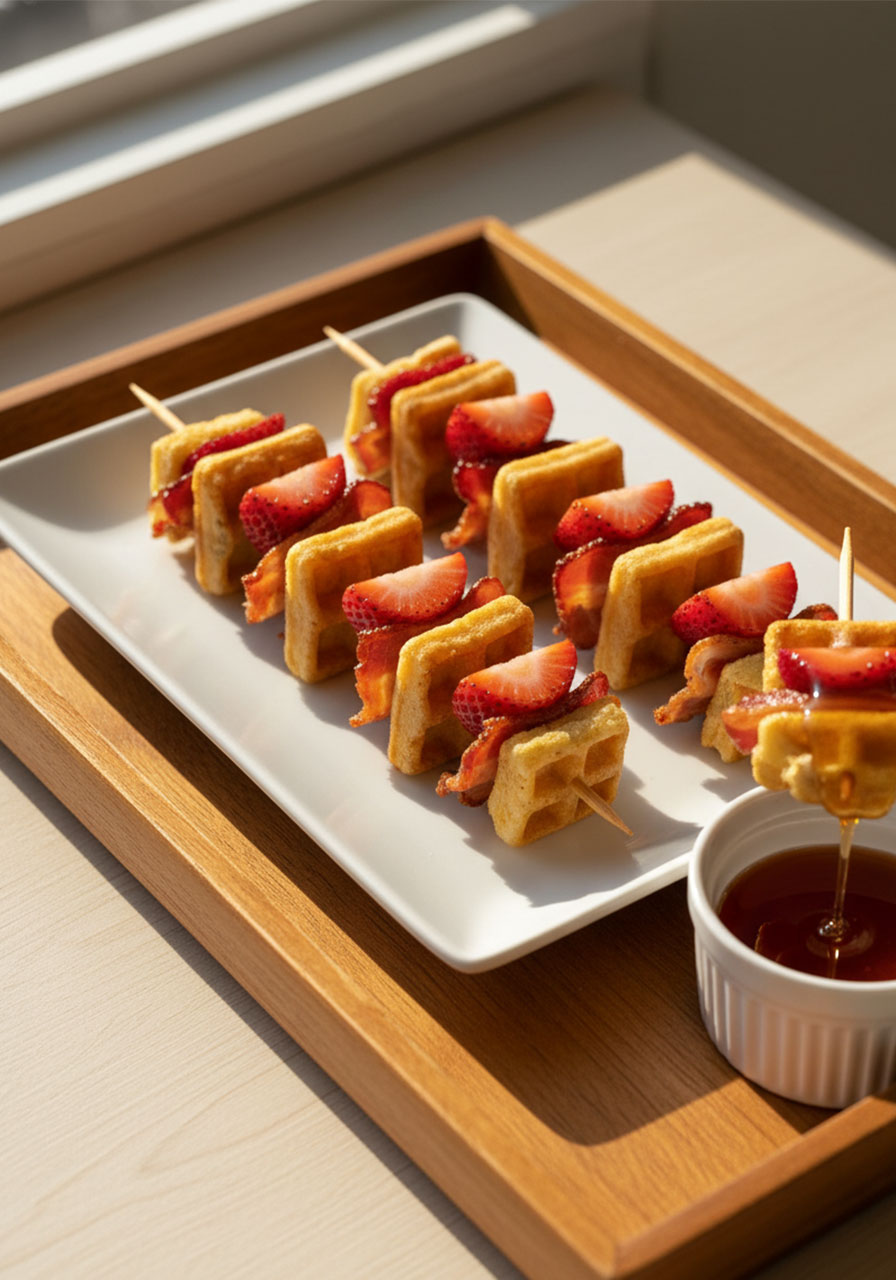
What You’ll Need:
- 8 Eggo Mini Cinnamon Toast Waffles (one package)
- 4 fresh strawberries, tops removed
- 2 slices turkey bacon, cooked
- 2 (6-inch) skewers
- Maple syrup for dipping
How to Make It:
1. Toast the Eggo Mini Waffles according to package directions and separate them – you’ll have 8 mini waffles total.
2. Cut the tops off the strawberries.
3. Cut each slice of cooked turkey bacon into 4 pieces.
4. Assemble each skewer in this order: mini waffle, 2 pieces of bacon, 1 strawberry, mini waffle, 2 pieces of bacon, 1 strawberry.
5. Serve with maple syrup on the side for dipping.
Pro Tip: These are so versatile. Swap strawberries for blueberries, raspberries, or kiwi chunks. Don’t have turkey bacon? Regular bacon, cooked and cut, works just as well. Feeling extra? Add a drizzle of honey over the assembled skewer before serving.
Tips for a Stress-Free Pool Party Food Setup
You’ve got the food. Now let’s make sure the day of the party actually feels fun for you too.
Make a plan for wet hands. Kids at pool parties have wet, slippery hands constantly. Finger foods that can be eaten in 1-2 bites – like the banana split bites, crescent rolls, waffle skewers, and mini corn dogs – are your best friends. Skip anything that requires a fork or careful handling.
Prep as much as possible the day before. The Jello cups, energy bites, banana popsicles, berry bars, and mini cheesecakes all get better after a night in the fridge. Make them ahead and wake up on party day with half your food already done.
Set up a dedicated food station away from the pool. A shaded table with all the food in one spot keeps things organized and keeps pool water out of the dips and snacks. Label each item so guests know what they’re grabbing – especially helpful if anyone has allergies.
Keep cold food cold. Gelatin cups, yogurt dips, fruit skewers, and popsicles all need to stay chilled. Set them in trays of ice if they’ll be out for more than 30-45 minutes. On a hot day, things melt fast.
Portion out grab-and-go snacks ahead of time. The trail mixes, wafer bags, and snack-sized items are way more practical in individual servings. Fill little cups or snack bags before the party, and let kids grab one when they’re hungry. It cuts down on the “can I have more?” conversations too.
With 27 ideas in your back pocket, you are absolutely ready to throw the most legendary pool party your neighborhood has ever seen. Pick four or five favorites that work for your crowd and time, prep what you can the night before, and spend the day actually enjoying the party.
Because the best gatherings aren’t about perfect food – they’re about the memories you make while eating it.
Now go crank up that music and jump in. You’ve got this.