
Planning a Halloween party that guests will still be talking about come Thanksgiving? Gothic decor is your answer.
Think moody candlelight, dramatic black florals, skeletons lounging around like they own the place, and just enough velvet and cobwebs to make everyone feel like they’ve stepped into a haunted mansion.
The best part? You don’t need a big budget or a professional stylist to pull this off. You just need the right ideas and a little bit of dark, delicious creativity.
Below, we’re breaking down 25 gothic Halloween decor ideas, complete with what you’ll need and exactly how to bring each one to life. Whether you’re hosting an intimate dinner or a full backyard bash, there’s an idea here for you.
Let’s dive into the dark side.
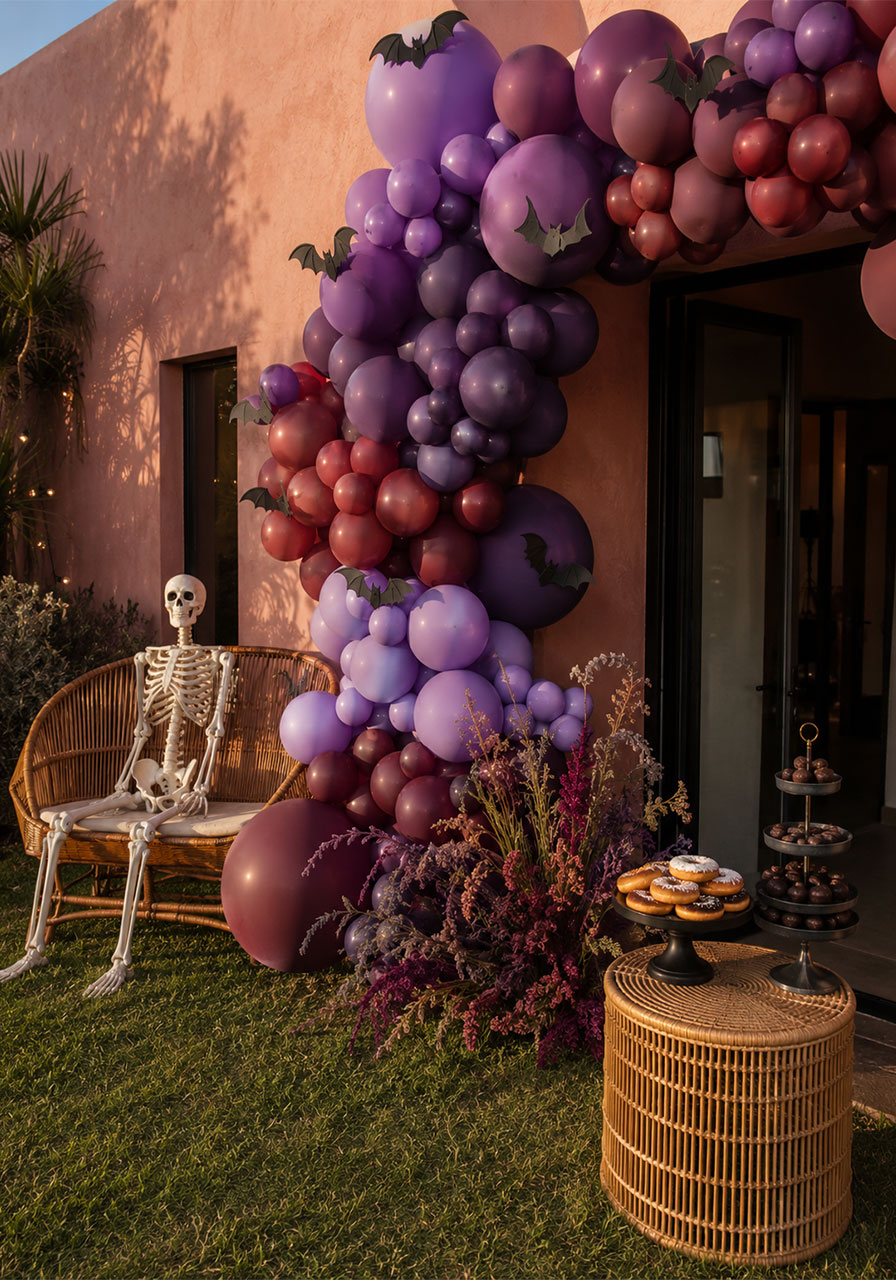
1. Purple Balloon Arch with a Skeleton Greeter
A cascading purple and burgundy balloon arch is one of the easiest ways to make a huge visual statement at your party entrance or dessert table.
Add a life-size skeleton propped nearby, some paper bats flying across the balloons, and a scattering of dark florals underneath, and you’ve got a photo-worthy focal point that guests will want to pose in front of the second they arrive.
Why We Love It: It’s dramatic from across the yard but only takes an afternoon to build.
What You’ll Need:
- Balloon garland kit in purple, plum, and burgundy shades
- Black paper bat cutouts
- A life-size skeleton prop
- A small side table or bar cart for your dessert display
- Fresh or faux dark florals (deep reds, purples, black)
How to Make It:
1. Inflate your balloons using a hand pump and arrange them by size, largest at the base and smaller ones toward the top.
2. Attach balloons to a balloon strip or fishing line, clustering colors so the ombré effect reads clearly.
3. Secure the garland to a wall, fence, or freestanding frame.
4. Tape paper bats directly onto balloons at varying heights for a “flying” effect.
5. Position your skeleton prop beside the arch, seated or leaning, and style the table below with treats and florals.
Pro Tip: Balloons can deflate slightly in cooler outdoor temps, so build this one the same day as your party for the fullest look.

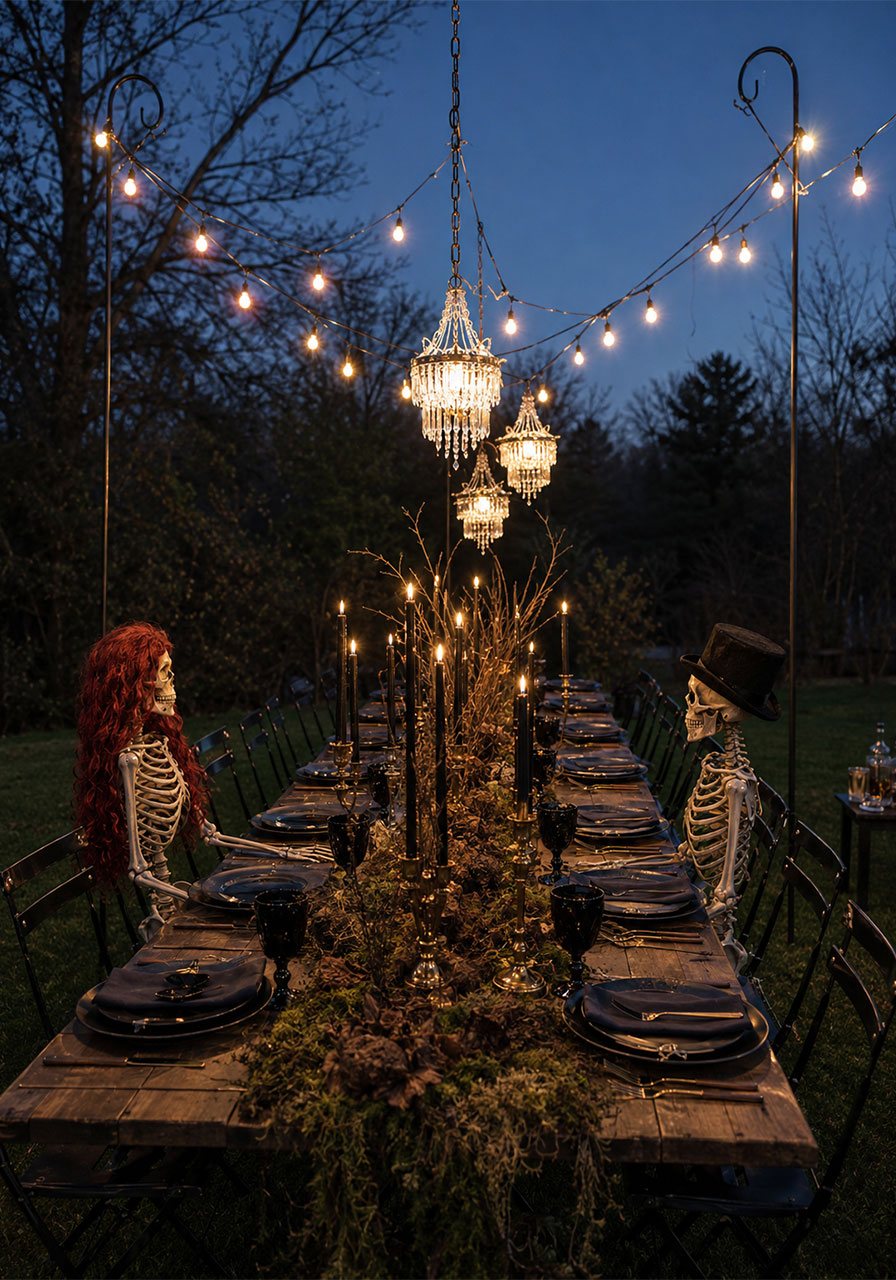
2. Long-Table Outdoor Gothic Dinner Party
If you have a backyard, this is the idea that turns a normal dinner into an event. A long banquet table draped with string lights, mini chandeliers, and seated skeleton “guests” creates an eerie, elegant dining scene under the stars.
Layer in bone-adorned centerpieces and candlelight down the table’s length, and your guests will feel like they’ve crashed a very stylish, very dead dinner party.
Why We Love It: It transforms an ordinary backyard into a full-blown haunted estate.
What You’ll Need:
- A long farmhouse-style table or several tables pushed together
- Black folding or bistro chairs
- String lights and 2-3 small hanging chandeliers
- Life-size skeleton props (2-3 works well)
- Candlesticks, taper candles, and dried florals for the table runner
How to Make It:
1. Set up your table outdoors and string lights above it using shepherd’s hooks or nearby trees.
2. Hang small chandeliers at varying heights above the table using the same hooks.
3. Seat your skeletons at the table like honored guests, dressed in wigs, hats, or costume pieces for extra personality.
4. Run a garland of dried branches, moss, and small bones down the table’s center.
5. Cluster taper candles between the place settings and light them right before guests arrive.
Pro Tip: Use battery-operated string lights and flameless candles if you’re worried about wind or little ones running around.
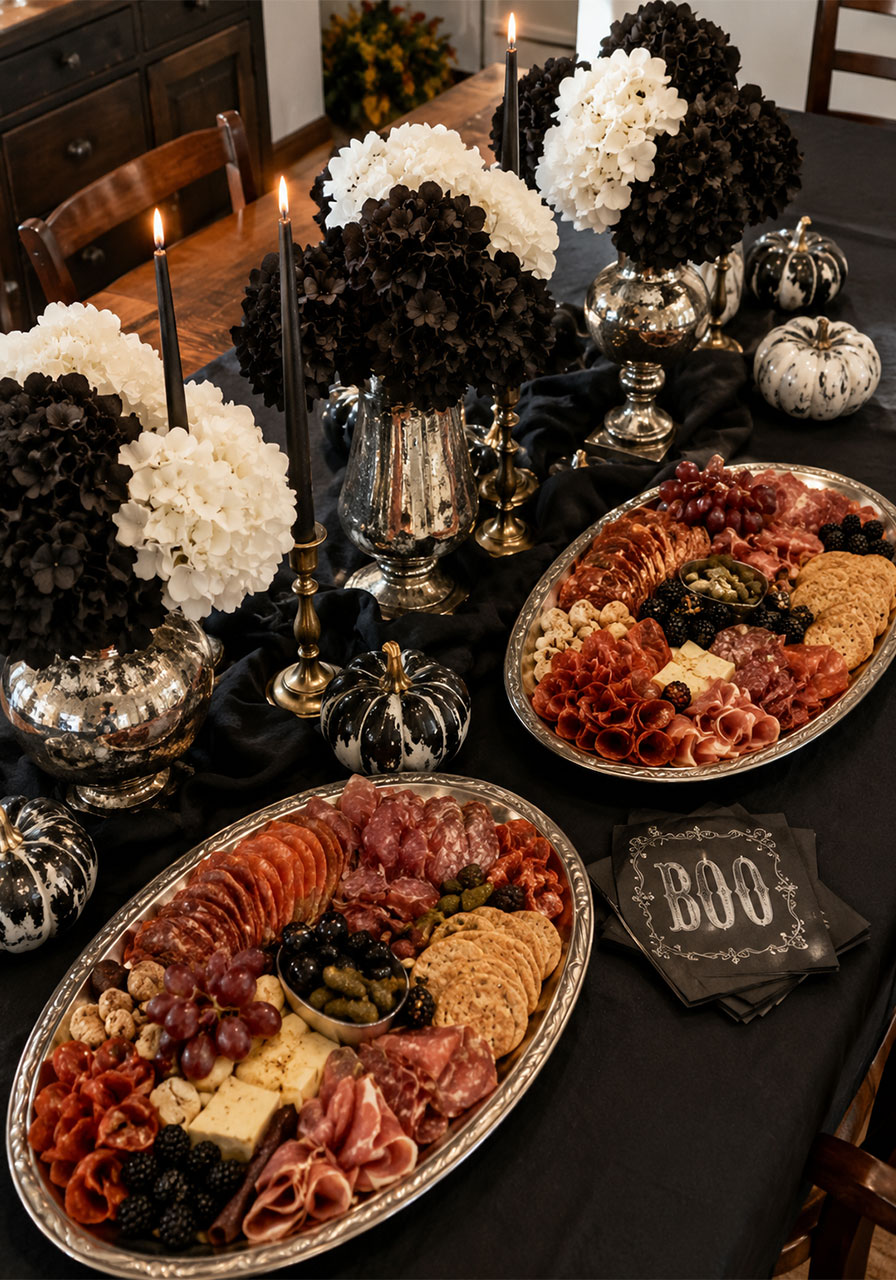
3. Dark & Dramatic Floral Charcuterie Table
A grazing table is already a party favorite. Give yours a gothic makeover with black and white florals, mercury glass vases, and a moody black tablecloth as the backdrop for your meats, cheeses, and crackers.
The contrast of rich, dark blooms against a beautifully arranged spread makes this table look expensive without actually being expensive.
Why We Love It: It doubles as your food display and your centerpiece, saving you setup time and table space.
What You’ll Need:
- A black tablecloth or fabric runner
- Mercury glass or silver vases
- Black and white florals (hydrangeas and roses work beautifully)
- Wooden or marble charcuterie boards
- Black taper candles and candle holders
- Small pumpkins in white, black, or gold
How to Make It:
1. Lay your black tablecloth or runner across the length of the table.
2. Arrange your florals in vases at varying heights, spacing them evenly down the table.
3. Place your charcuterie boards between the floral arrangements, leaving room to fill them right before the party.
4. Tuck small pumpkins and candles into any empty gaps.
5. Fill your boards with meats, cheeses, crackers, and fruit just before guests arrive to keep everything fresh.
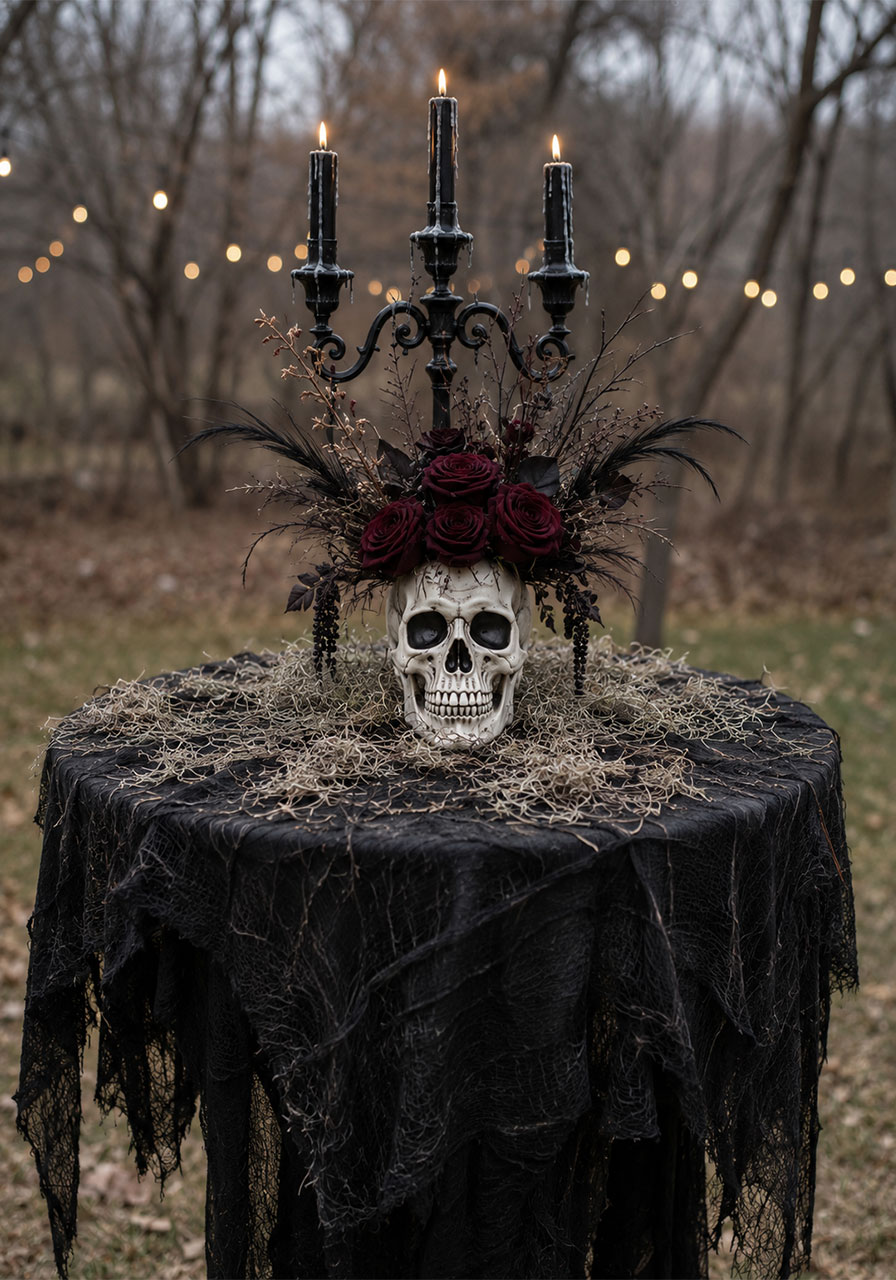
4. Draped Cheesecloth Cocktail Table
This one is pure drama in a small footprint. A round cocktail table gets wrapped in black cheesecloth or gauze, then topped with a skull vase, dark florals, and a dripping candelabra.
It’s perfect for outdoor cocktail hour or as a standalone accent table near your entrance.
Why We Love It: One small table creates a huge gothic mood, and it works indoors or out.
What You’ll Need:
- A round cocktail or high-top table
- Black cheesecloth or gauze fabric
- A faux or resin skull (with a hollow center for florals)
- A black candelabra with taper candles
- Dark florals like burgundy roses and dried grasses
- Spanish moss or dried moss for texture
How to Make It:
1. Drape the cheesecloth loosely over the table, letting it fall unevenly at the edges for a tattered look.
2. Scatter a layer of Spanish moss across the tabletop.
3. Place your skull vase in the center and arrange your florals inside it.
4. Set the candelabra just behind the skull and light the candles.
5. Let the wax drip naturally over the course of the party for extra eerie texture.
5. Skulls & Candlelight Centerpiece
Sometimes the simplest ideas are the most striking. A cluster of faux skulls, scattered bones, and dozens of candles at varying heights turns any tabletop into a hauntingly beautiful centerpiece.
This one is all about layering, more candles, more textures, more shadows.
Why We Love It: It looks incredibly elaborate but is really just skulls, bones, and candles arranged with intention.
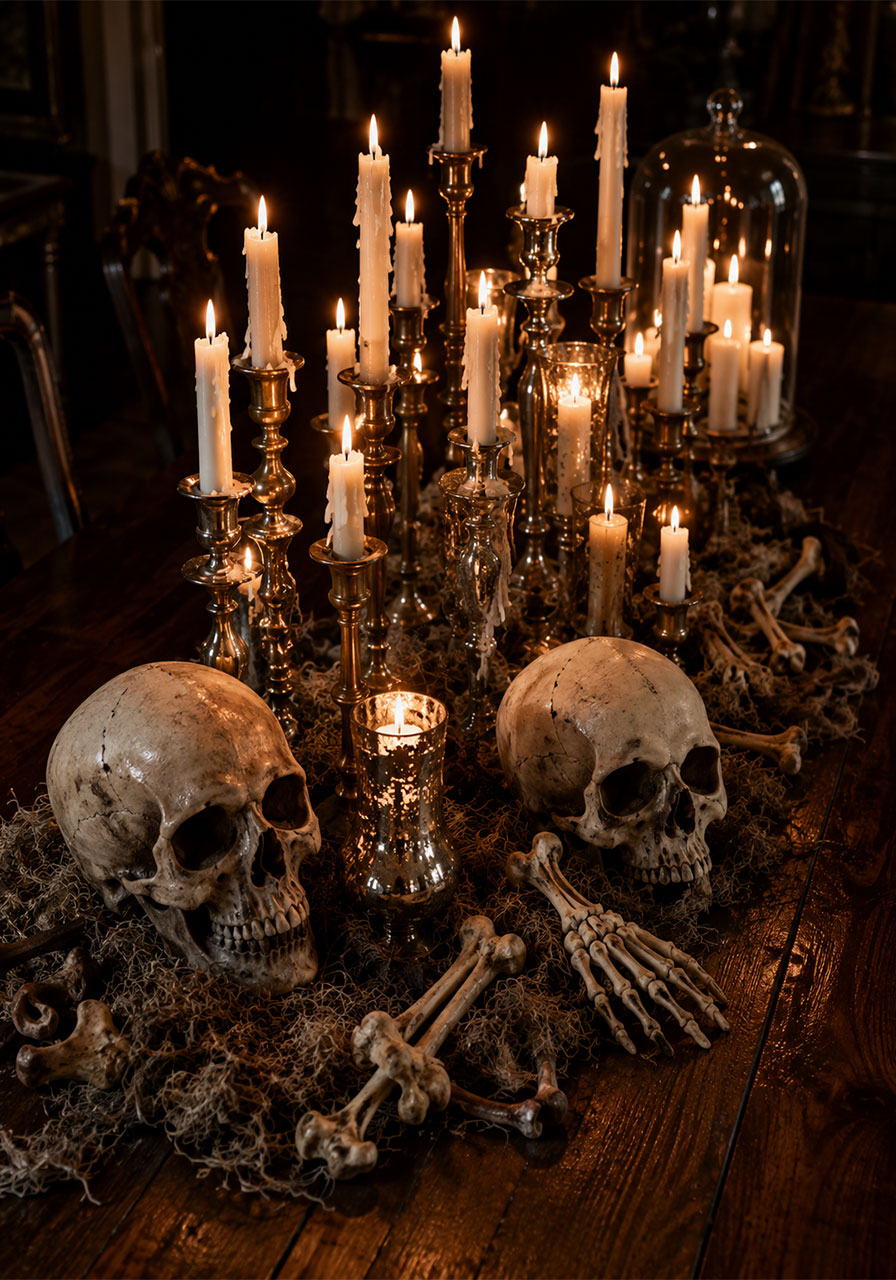
What You’ll Need:
- 2-3 faux skulls
- A bag of faux bones (found at most Halloween or craft stores)
- Mercury glass and brass candle holders in varying heights
- White or ivory taper candles (at least 15-20)
- Dried Spanish moss
How to Make It:
1. Lay your skulls and bones directly on the table or a wooden tray as your base layer.
2. Tuck moss around the bones to soften the look.
3. Cluster your candle holders behind and around the skulls, mixing heights so the eye moves up and down the display.
4. Add candles to every holder and light them right as the sun starts to set for maximum drama.
Pro Tip: Let a few candles burn down and drip before the party for that “this has been here for centuries” effect.
6. Dripping Wax Candle Bottles
This idea is a DIY dream because it does the work for you over time. Take vintage glass bottles, insert taper candles, and let the wax drip down the sides night after night until you have a gorgeously eerie, one-of-a-kind display.
Why We Love It: The more you use it, the better it looks. Old wax drips become part of the charm.
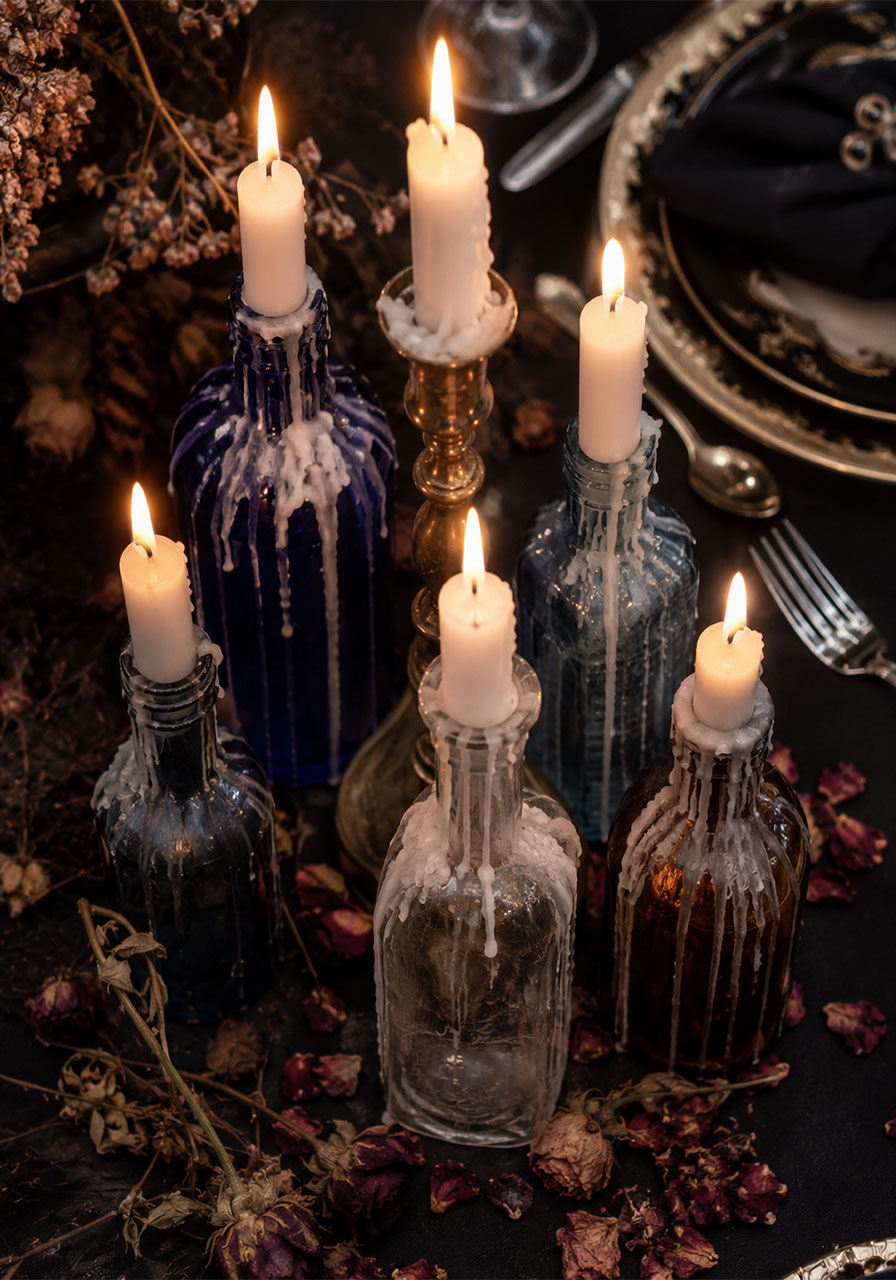
What You’ll Need:
- Assorted vintage or thrifted glass bottles
- White or ivory taper candles
- A brass or vintage candlestick or two for height variation
- Dried flowers or petals to scatter around the base
How to Make It:
1. Insert one taper candle into the neck of each bottle.
2. Cluster the bottles together on your tabletop, mixing heights and shapes.
3. Light the candles and let them burn for an hour or two, then blow them out.
4. Relight the same candles at your next gathering and let the wax build up over multiple uses.
5. Scatter dried petals around the base of the bottles right before your party.
Pro Tip: Start this one weeks before Halloween. The wax drips look far more dramatic after several rounds of burning.
7. Blood-Red Balloon Garland
Swap your usual black and orange for a bold, blood-red balloon installation. Paired with black florals, spiderwebs, and a skull tucked into the base, this garland makes an unforgettable backdrop for a photo area or dessert table.
Why We Love It: Red balloons feel unexpected and instantly elevate the gothic vibe past the basics.
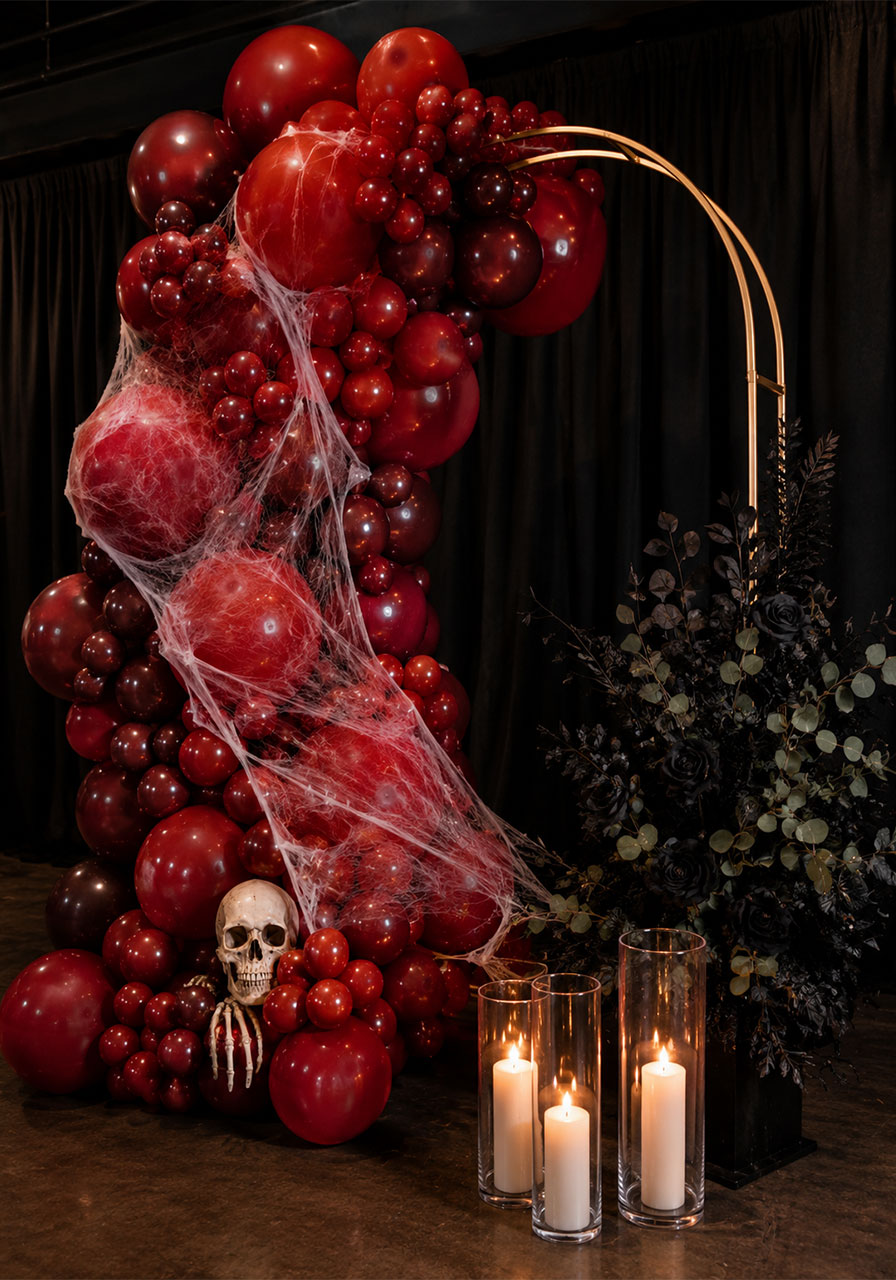
What You’ll Need:
- Red and burgundy balloons in varying sizes
- Stretch spiderweb decor
- A gold or black metal frame or arch
- A faux skull
- Black florals and eucalyptus greenery
- Tall glass cylinder vases with pillar candles
How to Make It:
1. Build your balloon garland the same way as idea #1, clustering reds and burgundies together.
2. Drape stretch spiderweb across sections of the balloons and frame.
3. Tuck the skull into the base of the garland where the balloons are largest.
4. Add black floral arrangements to one side for contrast.
5. Line the floor beneath the display with glass cylinder vases and pillar candles.
8. Cobweb Chandelier Dining Room
If you have a chandelier in your dining room, you already have your centerpiece. Drape it in stretchy cobweb material, hang a skeleton from it, and surround the table below with clusters of pillar candles for an instantly haunted dining room.
Why We Love It: It uses a fixture you already have, which means big impact without buying a single new piece of furniture.
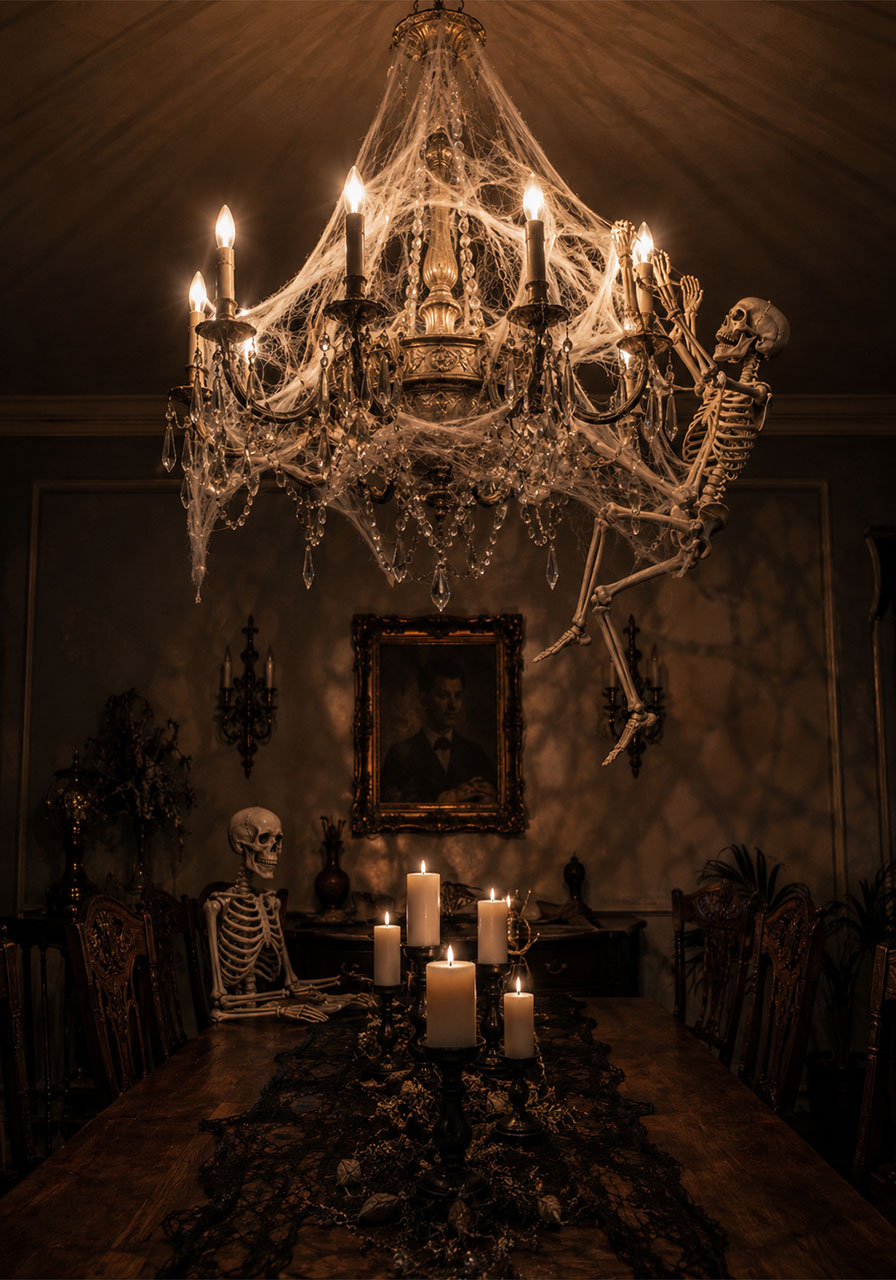
What You’ll Need:
- Stretch cobweb material
- A skeleton prop (a smaller, lightweight one works best for hanging)
- Black lace fabric for a table runner
- An assortment of pillar candles and candle holders
- Small glass jars and vintage bottles for accent candles
How to Make It:
1. Stretch the cobweb material across and around your chandelier, pulling it thin for a realistic web texture.
2. Secure your skeleton prop to the chandelier frame with wire or twine so it appears to be climbing or dangling.
3. Drape black lace fabric down the center of your table.
4. Cluster candle holders of varying heights along the table and light them together for a warm, flickering glow.
9. Gothic Macaron Tower
Every party needs a showstopping dessert, and a tiered macaron tower in black, ivory, and deep purple hits the mark every time. It’s elegant, it’s colorful without being cartoonish, and it photographs beautifully.
Why We Love It: Store-bought macarons in the right colors instantly look custom-made when styled on a tiered stand.
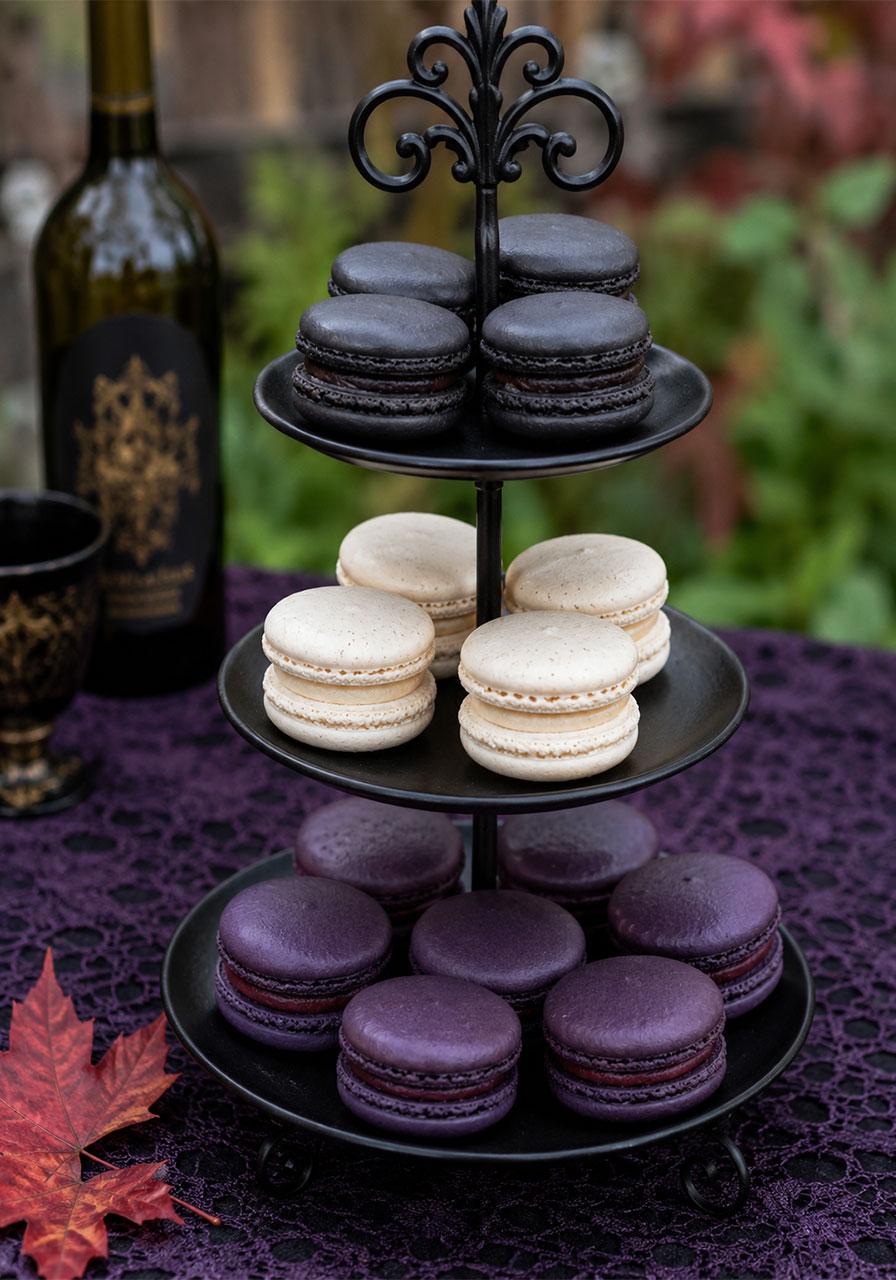
What You’ll Need:
- A 3-tier dessert stand
- Macarons in black, purple, and ivory (bakery-bought or homemade)
- A dark purple or black table runner
- A few dried leaves or small florals for garnish
How to Make It:
1. Lay your table runner down first as the base for your display.
2. Set your tiered stand on top, positioned as a focal point on your dessert table.
3. Arrange macarons by color on each tier, keeping like colors together for the cleanest look.
4. Tuck a few dried leaves or small flowers between the macarons on the top tier for a finishing touch.
Pro Tip: Order macarons in bulk from a local bakery a few days ahead. They hold up well in the fridge until party time.
10. Skeleton Charcuterie “Remains” Board
This is the idea guests will be talking about long after the party ends. A full skeleton prop lies on your table, “holding” a charcuterie spread across its ribcage, with meats, cheeses, and crackers nestled right into the bones.
It’s a little morbid, a lot hilarious, and completely unforgettable.
Why We Love It: It’s the ultimate conversation starter, and it’s genuinely delicious once guests get over the initial shock.
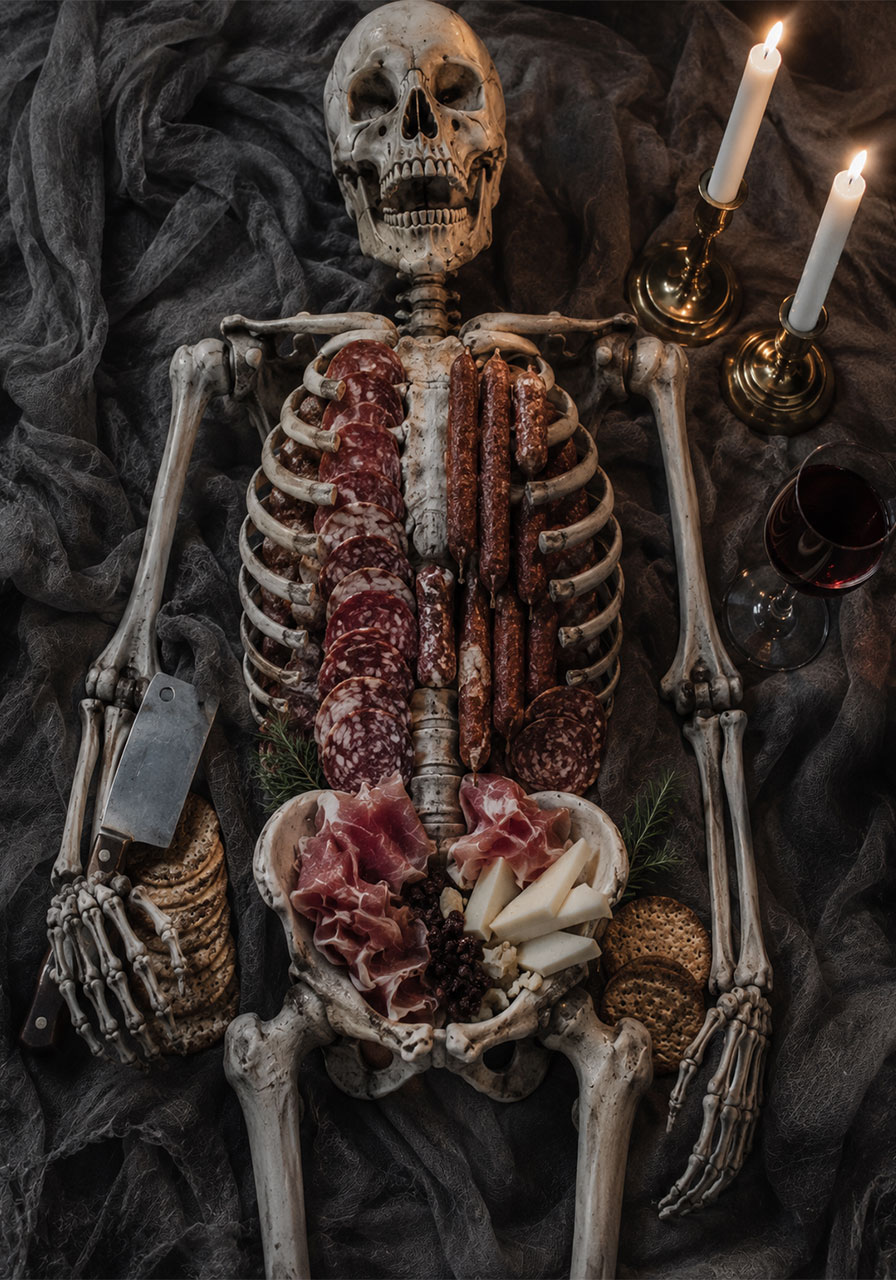
What You’ll Need:
- A full life-size skeleton prop
- A neutral or gray fabric backdrop to lay the skeleton on
- Cured meats, salami, and charcuterie cuts
- Crackers, bread, and a cheese knife
- Taper candles for ambiance
How to Make It:
1. Lay your fabric backdrop across your table or serving surface.
2. Position the skeleton on its back with arms slightly bent to “cradle” the food.
3. Arrange meats and crackers directly across the ribcage and pelvis area, building outward from the center.
4. Tuck a cheese knife or small serving tool into one of the skeleton’s hands.
5. Add candles on either side and dim the lights for full effect when guests approach the table.
Pro Tip: Use food-safe parchment or wax paper directly under the meat so nothing touches the prop itself.
11. Witch’s Dinner Table Setting
Think old apothecary meets candlelit dinner party. This table setting layers in glass apothecary jars, mercury glass candle holders, moss garlands, and a personalized “spell” scroll at each place setting for guests to take home.
Why We Love It: The personalized spell scrolls make every guest feel like part of the story, not just a spectator.
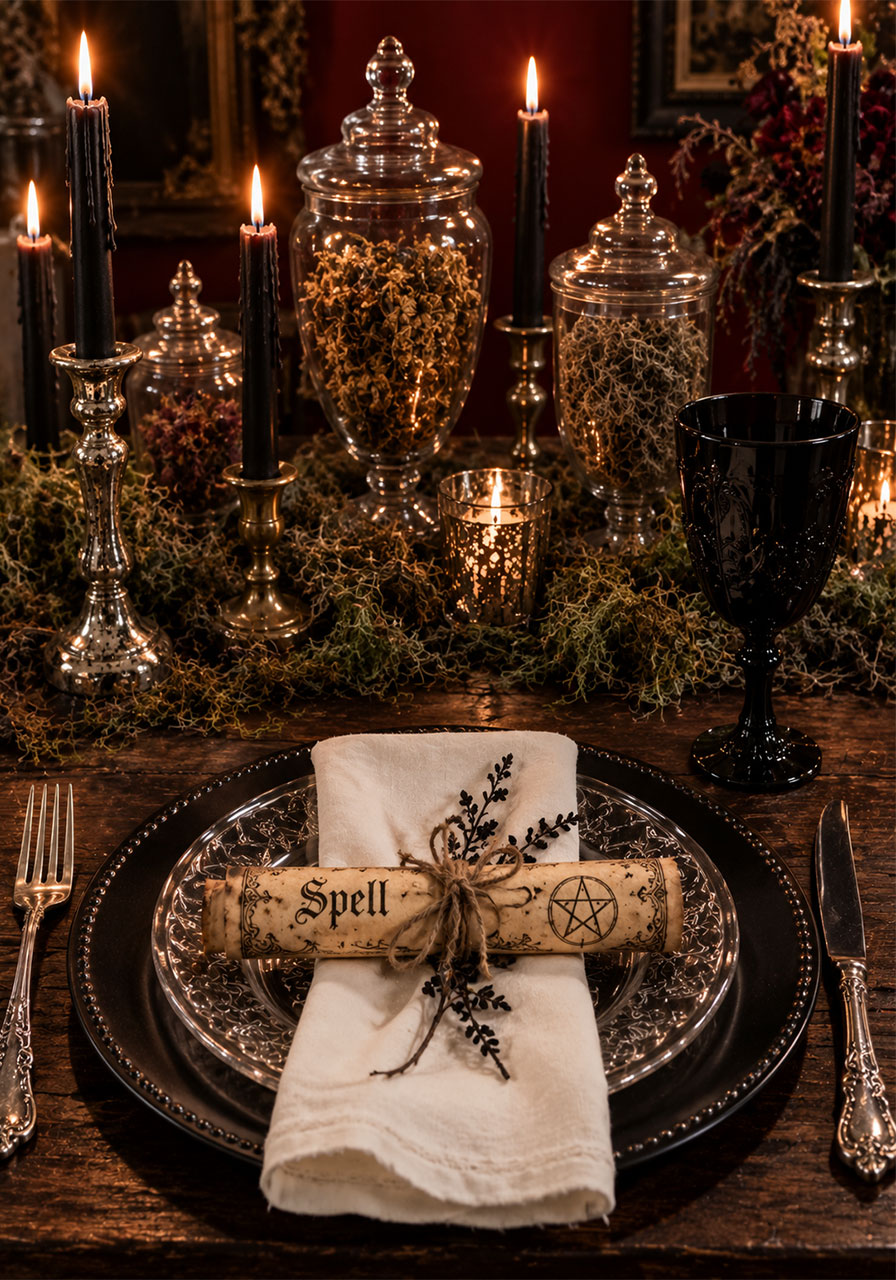
What You’ll Need:
- Black chargers and plates
- Mercury glass and silver candle holders
- Apothecary jars filled with dried herbs or florals
- Black taper candles
- Moss garland for the table runner
- Printed “spell” scrolls tied with twine (one per guest)
How to Make It:
1. Lay a moss garland down the center of your table as the base runner.
2. Set out black chargers and plates at each place setting.
3. Cluster candle holders and apothecary jars along the runner, mixing heights for visual interest.
4. Print small “spell” scrolls with a fun message or your guest’s name, roll them, and tie with twine.
5. Place one scroll on top of each plate as a personal touch.
12. Black Branch Centerpiece
Minimal but striking, this centerpiece uses spray-painted black branches in a small planter as the star of an otherwise simple table. Pair it with dried roses scattered across the linen and black glassware for a chic, moody dinner table.
Why We Love It: It’s one of the easiest ideas on this list to pull off, and it still looks incredibly polished.
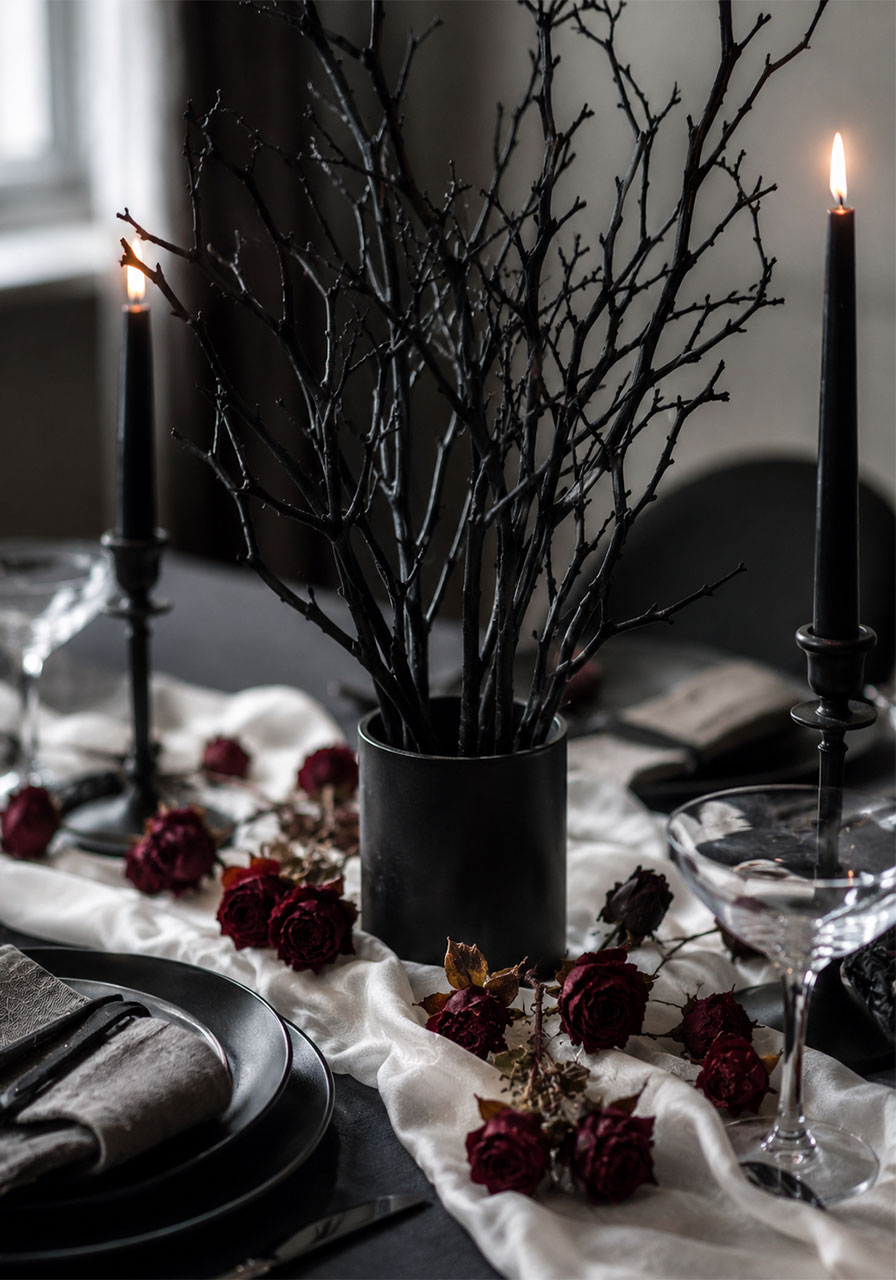
What You’ll Need:
- Bare branches from your yard (or craft store branches)
- Black spray paint
- A small black planter or pot
- Dried roses
- A soft gray or white table runner
- Black dinnerware and glassware
How to Make It:
1. Spray paint your branches black and let them dry completely.
2. Arrange the branches upright in your planter, using floral foam or gravel to hold them in place.
3. Lay your table runner and scatter a few dried roses along its length.
4. Set the branch centerpiece at the middle of the table.
5. Finish with black plates, glassware, and simple flatware at each setting.
13. Bone Wall Photo Backdrop
This is the showstopper for anyone who wants a true wow moment. Hundreds of faux bones and skulls are arranged on a large board to create a dramatic photo backdrop guests will line up for.
Why We Love It: It guarantees every guest gets an incredible photo, and it works as a standalone piece long after the party ends.

What You’ll Need:
- A large flat board or foam core panel (4×6 feet or larger)
- Bulk bags of faux bones and skulls
- A hot glue gun or strong adhesive
- A small bench or stool to place in front for seating
How to Make It:
1. Lay your board flat and start gluing bones from the outer edges inward.
2. Layer bones and skulls closely together so no board shows through.
3. Mix bone sizes and orientations for texture and realism.
4. Let the glue fully cure before standing the board upright.
5. Prop the board against a wall or frame and place a small bench in front for photos.
Pro Tip: This piece takes the most prep time on the list, so start at least two weeks before your party.
14. Black & White Dessert Table
A high-contrast black and white dessert spread feels sophisticated rather than spooky-cliché. Layer in a skull-topped chocolate cake, gold-flecked macarons, and a candy apple or two on varying cake stand heights.
Why We Love It: The black and white palette makes every dessert pop, and it photographs beautifully in any lighting.
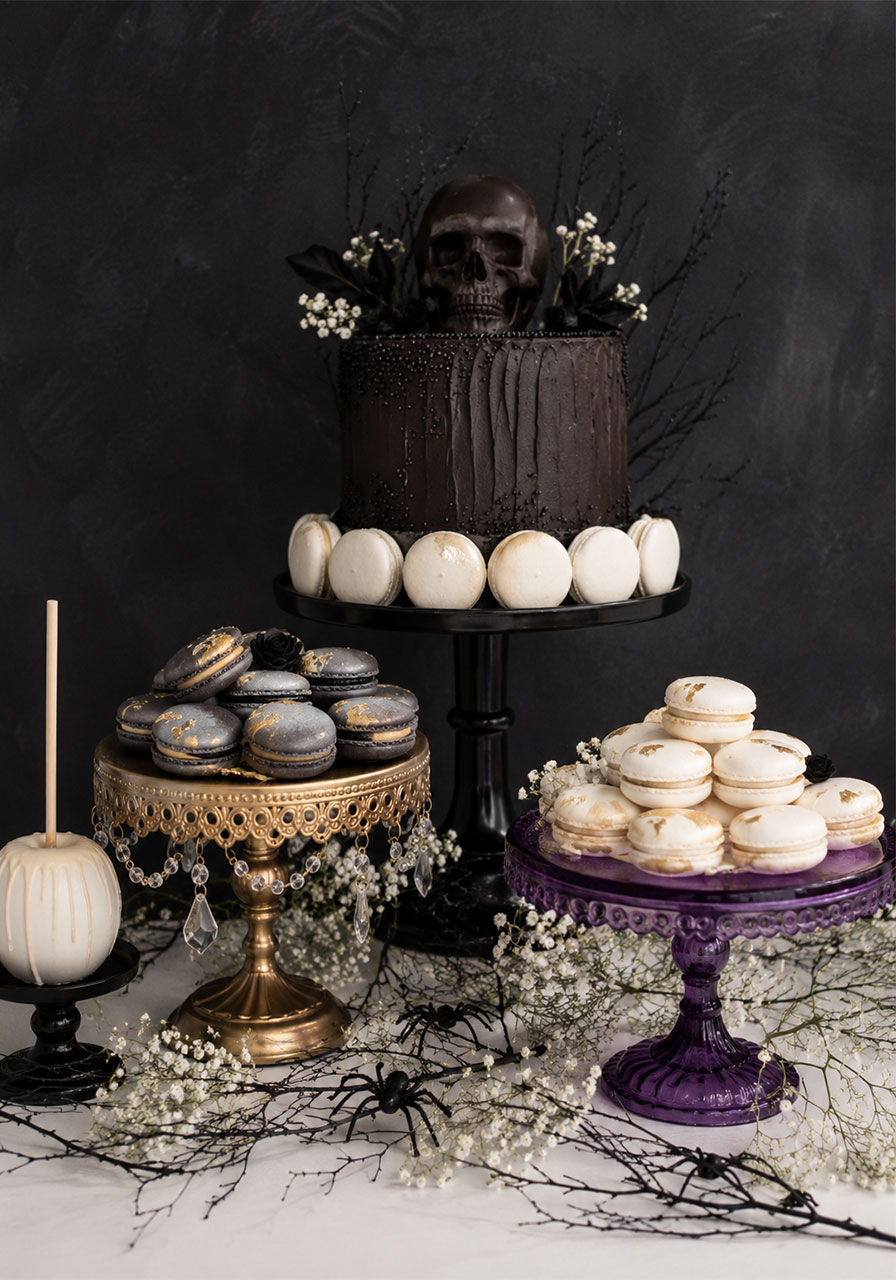
What You’ll Need:
- Cake stands in gold, black, and purple, at varying heights
- A dark chocolate cake with a faux or edible skull topper
- Macarons in black, white, and gold
- Candy apples
- Baby’s breath or small white florals for garnish
How to Make It:
1. Arrange your cake stands across the table at staggered heights.
2. Place the skull-topped cake on your tallest or most central stand.
3. Fill the remaining stands with macarons, sorted loosely by color.
4. Add candy apples to a lower stand or directly on the table.
5. Tuck small florals between the desserts for softness against the dark palette.
15. Eyeball Centerpiece Table
This table setting leans fully into the eerie with a giant eyeball nestled directly into a lush, jewel-toned floral arrangement. Pair it with tarot card placemats and gold goblets for a fortune-teller-meets-dinner-party mood.
Why We Love It: It’s unapologetically weird in the best way, and guests will absolutely stop to look twice.
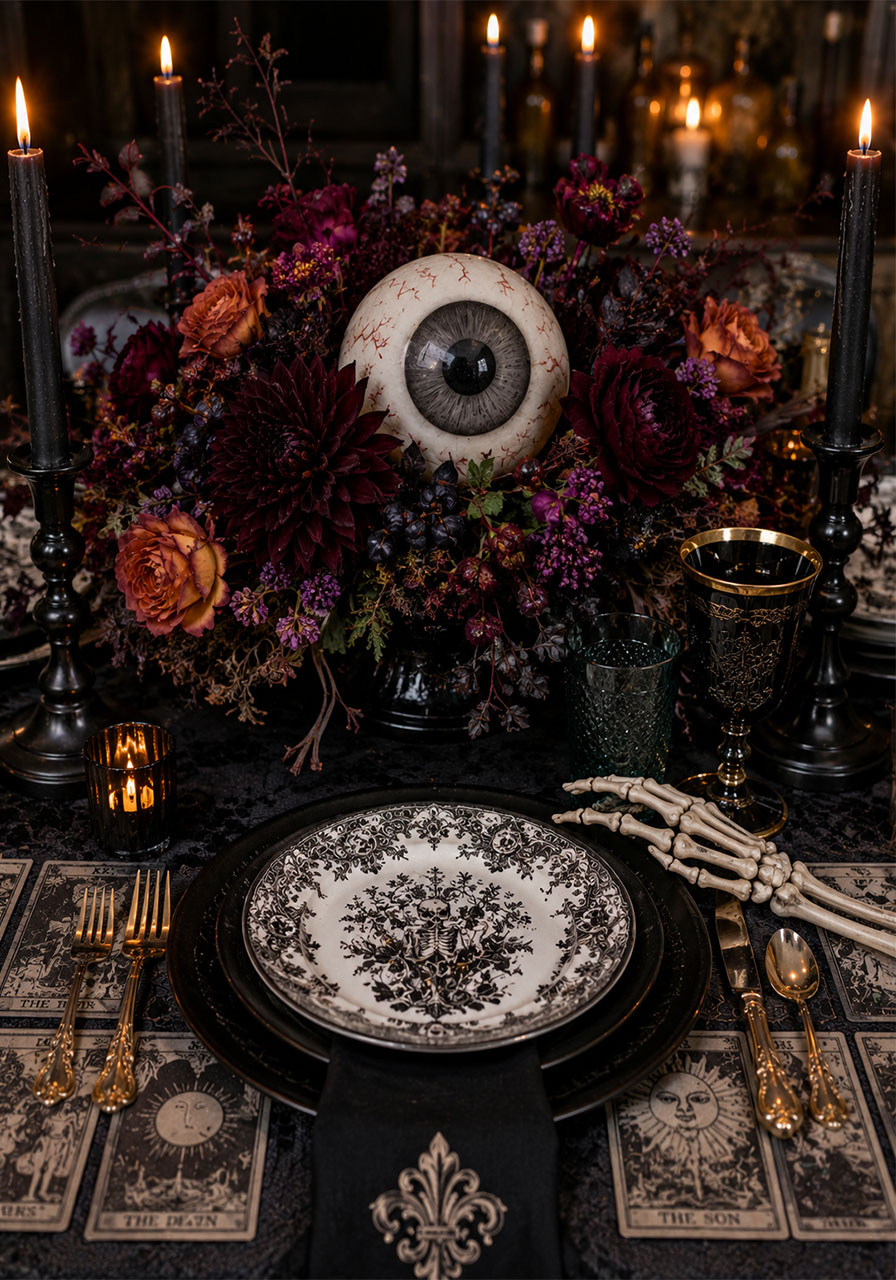
What You’ll Need:
- A large faux eyeball prop
- Jewel-toned faux florals (burgundy, purple, deep orange)
- Black taper candles and candle holders
- Tarot card printed placemats
- Gold goblets or metallic drinkware
- A black tablecloth
How to Make It:
1. Lay your black tablecloth and place tarot placemats at each setting.
2. Build your floral arrangement in a low bowl or vase at the table’s center.
3. Nestle the eyeball prop directly into the florals so it peeks out.
4. Add candle holders around the arrangement and light them.
5. Set gold goblets and black plates at each place setting to complete the look.
16. Skeleton Place Setting Dinner
A more approachable, family-friendly take on gothic decor, this idea seats a costumed skeleton right at the head of the table, surrounded by black and white pumpkins, spiderweb-patterned plates, and flickering candles.
Why We Love It: It’s spooky enough to feel festive but still totally kid-friendly and easy to recreate.
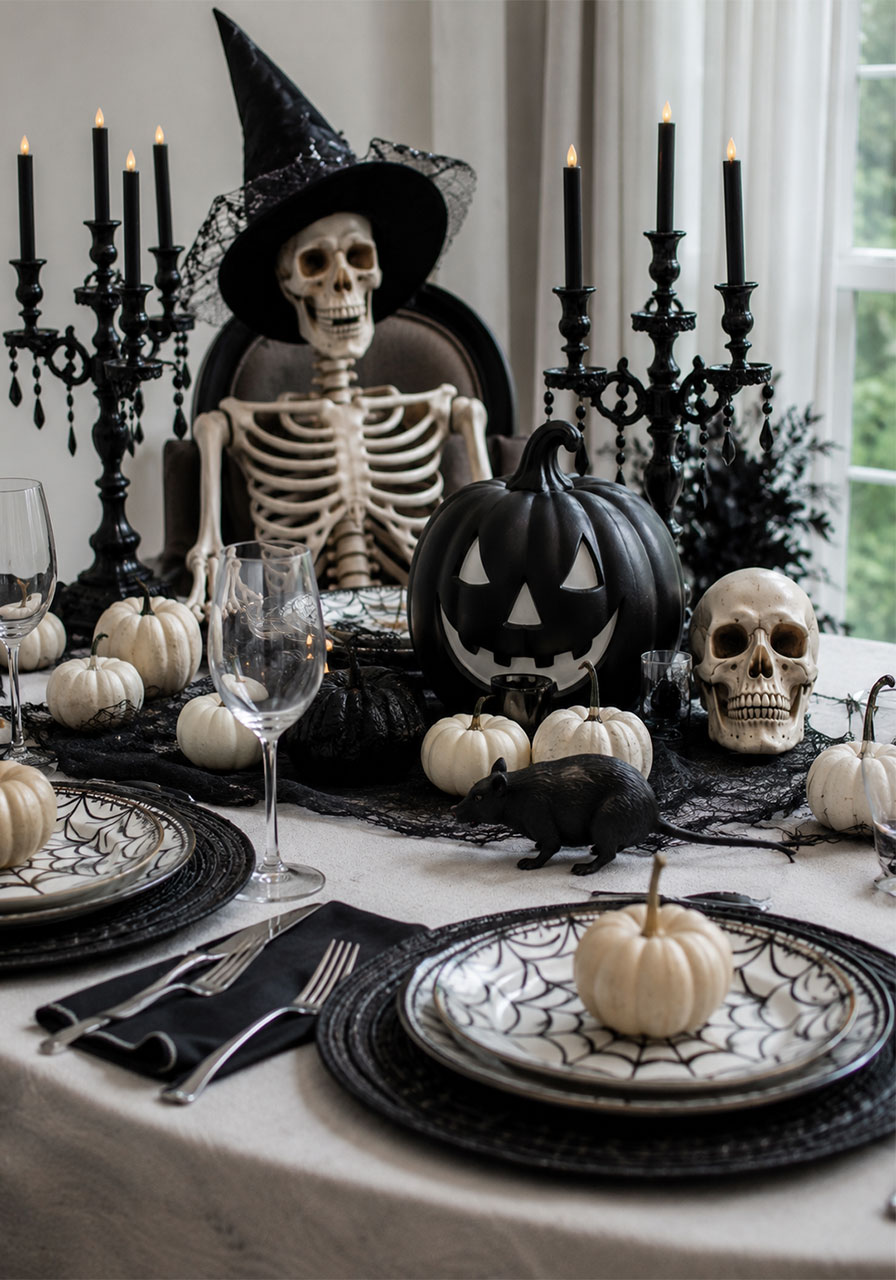
What You’ll Need:
- A seated skeleton prop with a hat or costume accessory
- Black and white mini pumpkins
- Spiderweb-print plates and napkins
- Black chargers
- Battery-operated taper candles
- Small black plastic rats or spiders for accents
How to Make It:
1. Seat your skeleton at the head of the table or in a nearby chair.
2. Arrange mini pumpkins and a larger black pumpkin around the skeleton’s place setting.
3. Set out spiderweb plates and black chargers at each guest seat.
4. Add battery-operated candles down the table for a flicker without the fire risk.
5. Scatter small rats and spiders across the table for a playful finishing touch.
17. Crow & Bottle Candle Table
Vintage glass bottles in amber and clear tones become candle holders down the length of your table, while faux crows perch among bare branches rising up from the centerpiece. Add antlers and dried moss for a wild, woodland-gothic feel.
Why We Love It: It looks like it was collected over years of antiquing, even though it comes together in one afternoon.
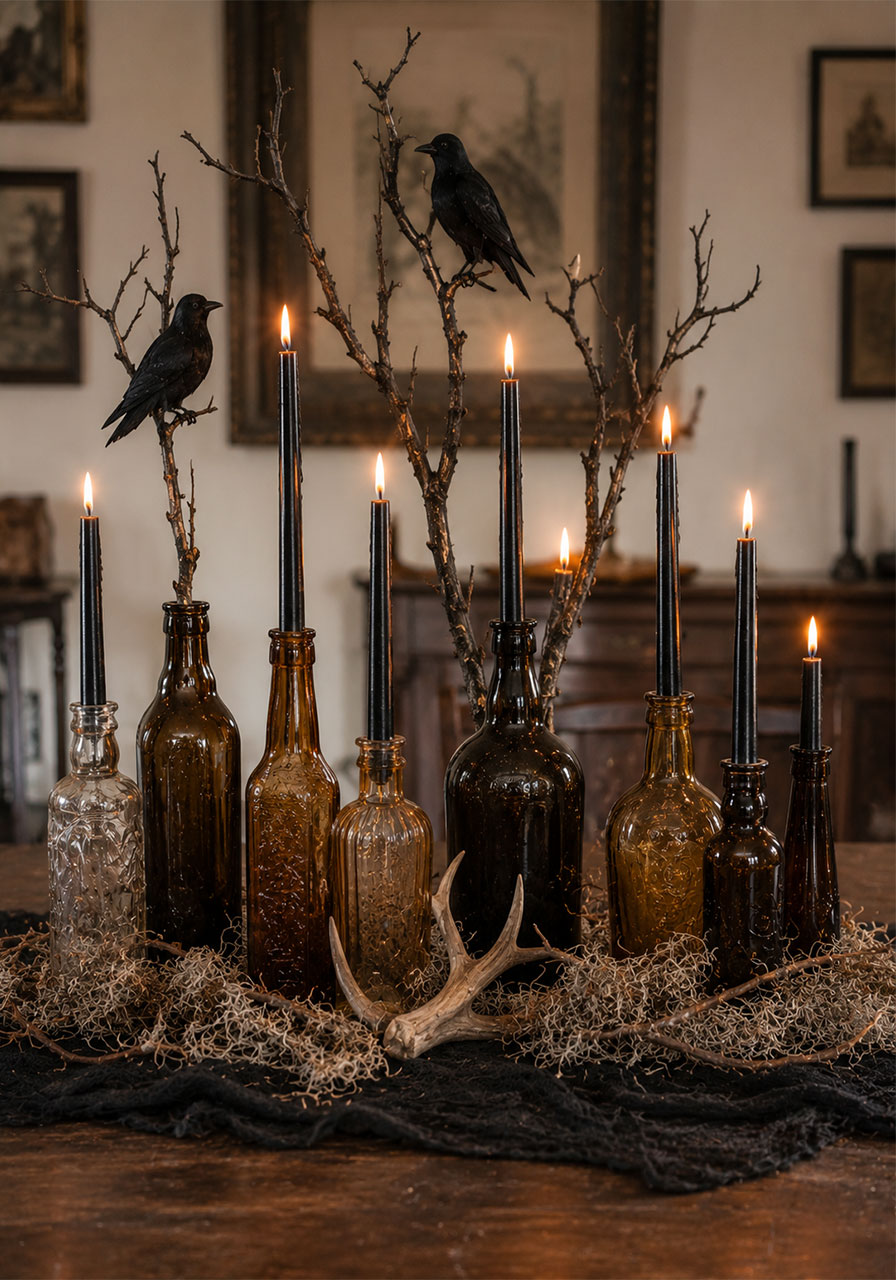
What You’ll Need:
- Assorted vintage glass bottles
- Black taper candles
- Bare branches
- 2-3 faux crow props
- Faux or real antlers (optional)
- Dried Spanish moss
- A black lace or gauze table runner
How to Make It:
1. Lay your black lace runner down the center of the table.
2. Cluster your bottles along the runner and insert a taper candle into each.
3. Stand your branches upright in a bottle or small vase at the center for height.
4. Perch the crows on the branches using wire if needed to keep them secure.
5. Tuck moss and antlers around the base of the display to fill any gaps.
18. Smoking Punch Bowl Bar
No gothic party is complete without a bubbling, smoking punch bowl. Using dry ice in a black cauldron-style bowl, this drink station creates real fog effects that make your signature cocktail look like an actual potion.
Why We Love It: The smoke effect is genuinely magical to watch, and it makes for the best party photos and videos of the night.
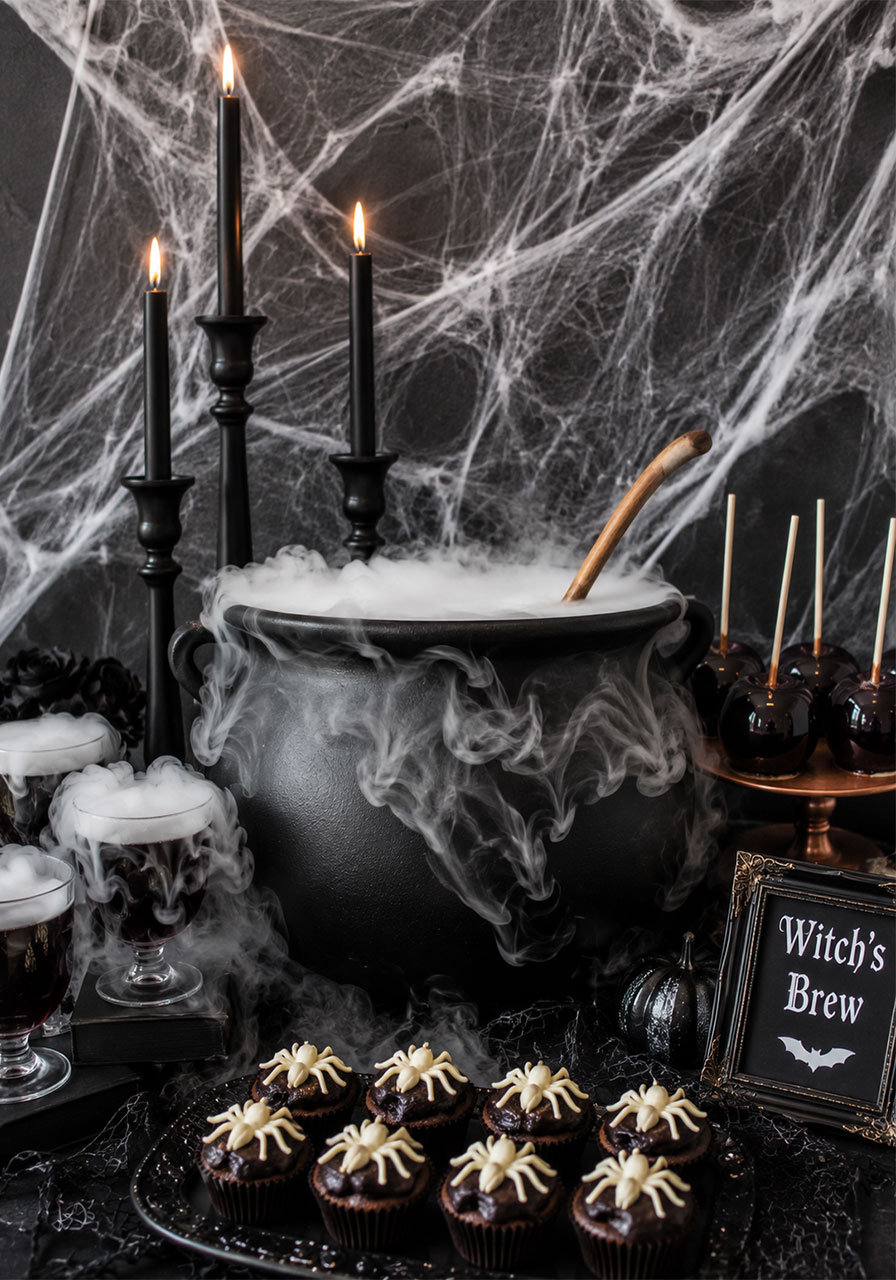
What You’ll Need:
- A large black bowl or cauldron
- Dry ice (handled with gloves, never bare hands)
- Your punch or cocktail of choice
- Black taper candles for the surrounding display
- Halloween-themed cupcakes and candy apples for serving alongside
How to Make It:
1. Fill your bowl with punch a couple hours before guests arrive.
2. Right before your party starts, add a small chunk of dry ice using tongs or gloves, never your bare hands.
3. Top off with a bit of warm water periodically throughout the night to keep the fog effect going.
4. Arrange candles and desserts around the bowl to complete your drink station.
5. Keep the dry ice bag out of reach of children and pets for safety.
Pro Tip: Dry ice should never go directly into a drink guests will consume. Keep it in the surrounding water only.
19. Fortune Teller Dessert Station
Turn your dessert table into a full fortune-teller’s den with a glowing crystal ball, tarot cards, gold coins, and a rustic chocolate cake topped with a skull. A lit sign reading “Fortune Teller” ties the whole scene together.
Why We Love It: It transforms a simple dessert table into an interactive experience guests will want to explore.
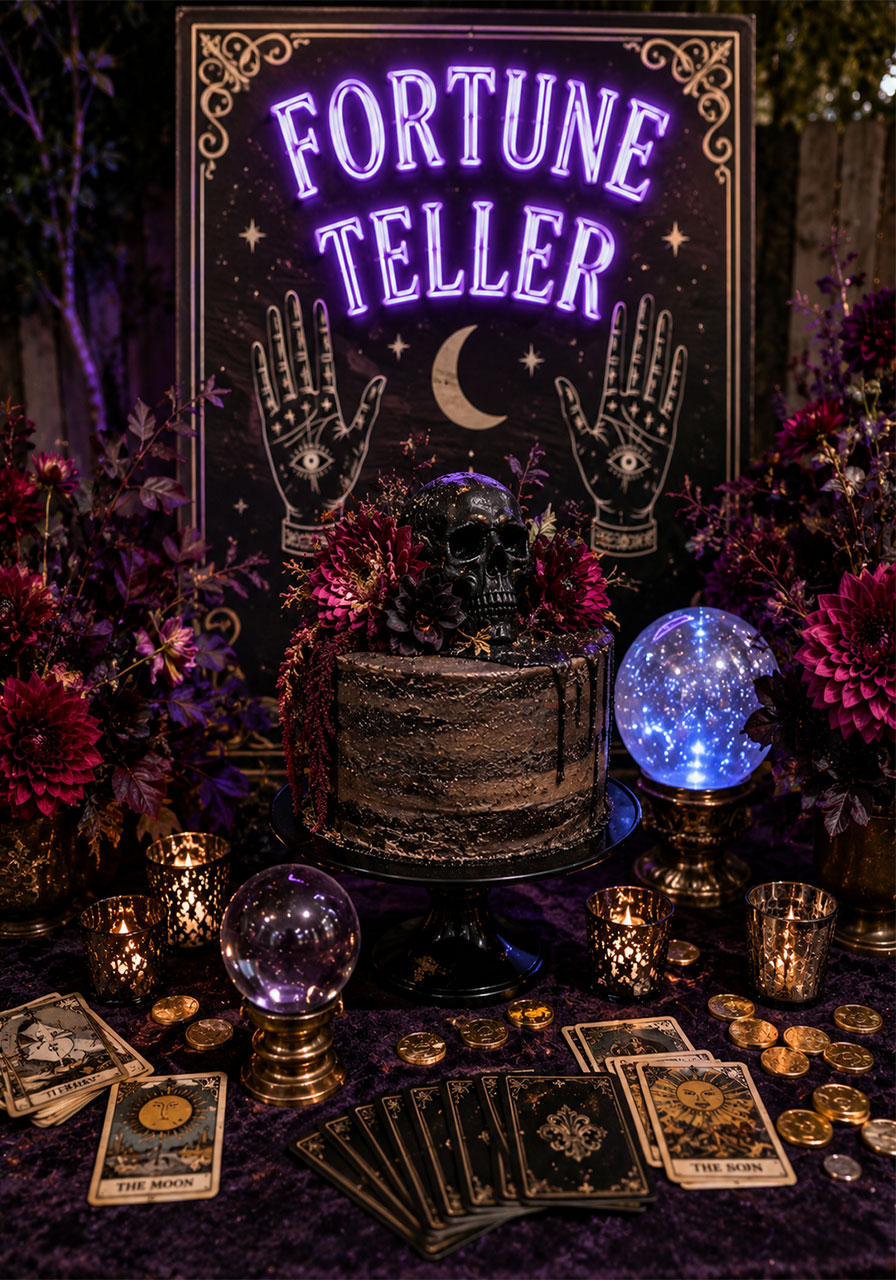
What You’ll Need:
- A light-up “Fortune Teller” sign or printed backdrop
- A light-up or glass crystal ball prop
- Tarot cards for styling
- Gold coin props
- A rustic chocolate cake with a faux skull topper
- Deep purple and magenta faux florals
How to Make It:
1. Set up your sign or backdrop as the tallest element at the back of your table.
2. Place your cake on a stand toward the front, topped with the skull.
3. Position the crystal ball prop just beside the cake and turn on its light.
4. Scatter tarot cards and gold coins across the table surface.
5. Tuck florals throughout to soften the display and add rich color.
20. Spiderweb Wrapped Balloons
Simple, moody, and endlessly Instagrammable, this idea wraps black balloons in stretchy spiderweb material along with tiny plastic spiders. Hung against a plain wall or backdrop, they look like they’ve been hanging in an attic for a hundred years.
Why We Love It: It takes about ten minutes and works anywhere in your space, from the entryway to the dessert table.
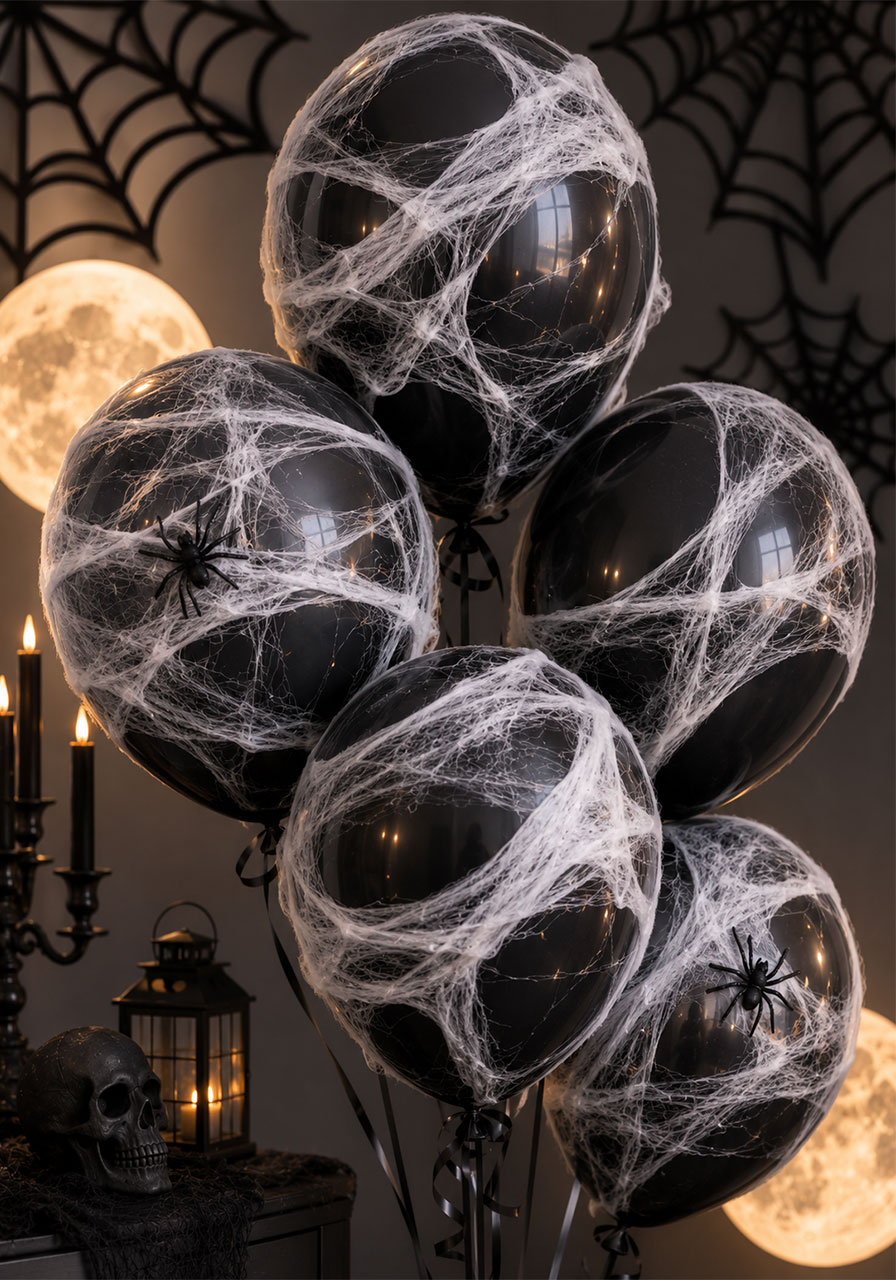
What You’ll Need:
- Black balloons
- Stretch cobweb material
- Small plastic spiders
- Fishing line or ribbon for hanging
How to Make It:
1. Inflate your black balloons and tie them off.
2. Stretch small sections of cobweb material and wrap them around each balloon, leaving parts of the balloon exposed for contrast.
3. Tuck a plastic spider or two into the webbing on each balloon.
4. Cluster 4-5 balloons together and hang them from a doorway, wall hook, or backdrop stand.
21. Black Rose Wall Photo Backdrop
Instead of the usual balloon backdrop, cover an entire wall panel in faux black and deep red roses for a lush, dramatic photo moment. Add a neon or marquee sign with your party name across the center for the ultimate Instagram spot.
Why We Love It: It feels luxe and editorial, more high-fashion event than typical Halloween party.
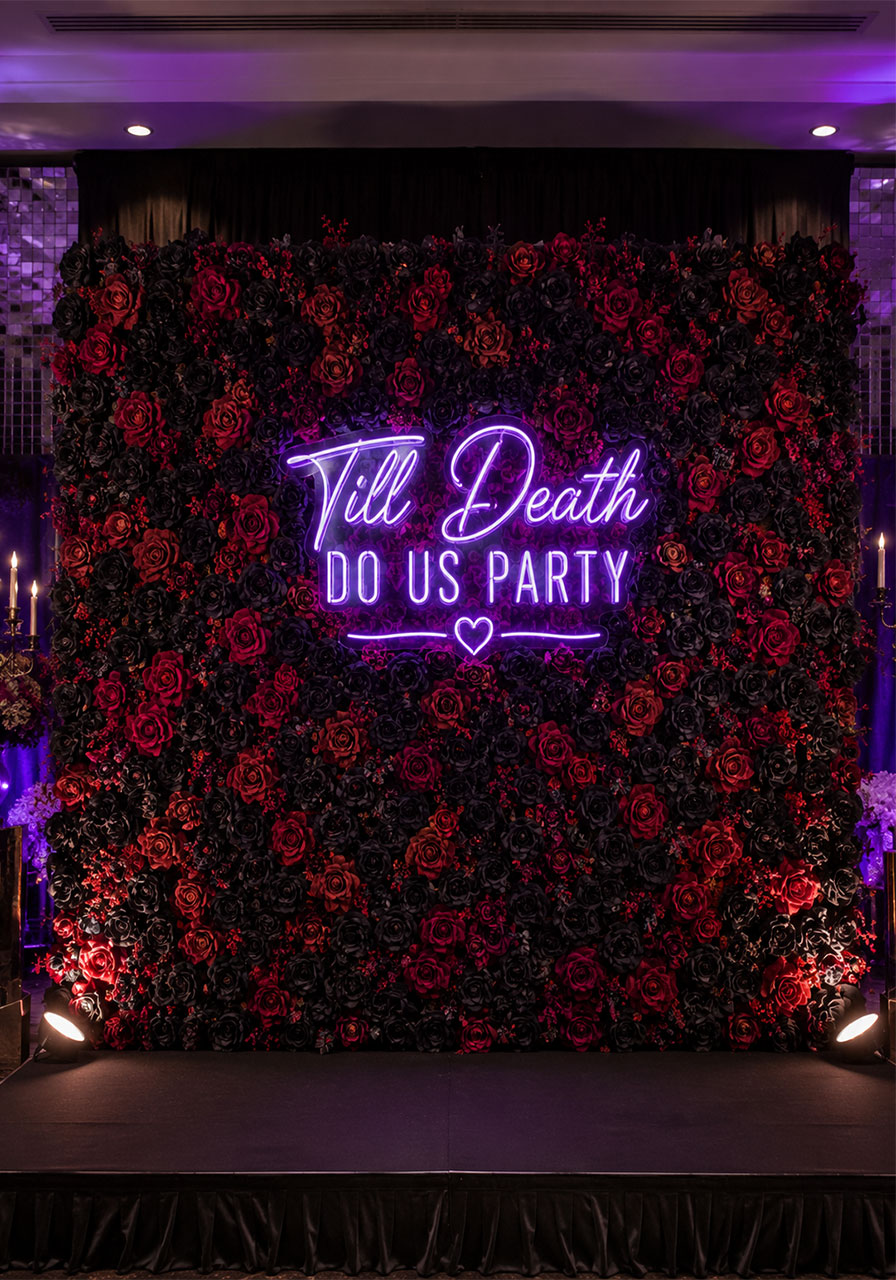
What You’ll Need:
- A flower wall panel or grid backdrop
- Faux black and deep red roses in bulk
- Zip ties or floral wire
- A neon sign or printed marquee letters
How to Make It:
1. Attach your flower wall panel to a stand or existing wall.
2. Insert roses one at a time into the grid, working from the outside in.
3. Pack the flowers tightly so no backing shows through.
4. Hang your sign at the center once the wall is fully filled.
22. Gothic Cocktail Bar with Glowing Ice Cubes
Give your bar cart a magical upgrade with LED ice cubes that glow purple or blue in every drink. Paired with black bar tools, dark liquor bottles, and a chalkboard cocktail menu, it turns any bar cart into the party’s centerpiece.
Why We Love It: Guests will be fascinated watching their drinks glow, and it’s an easy way to make cocktail hour feel like an event.
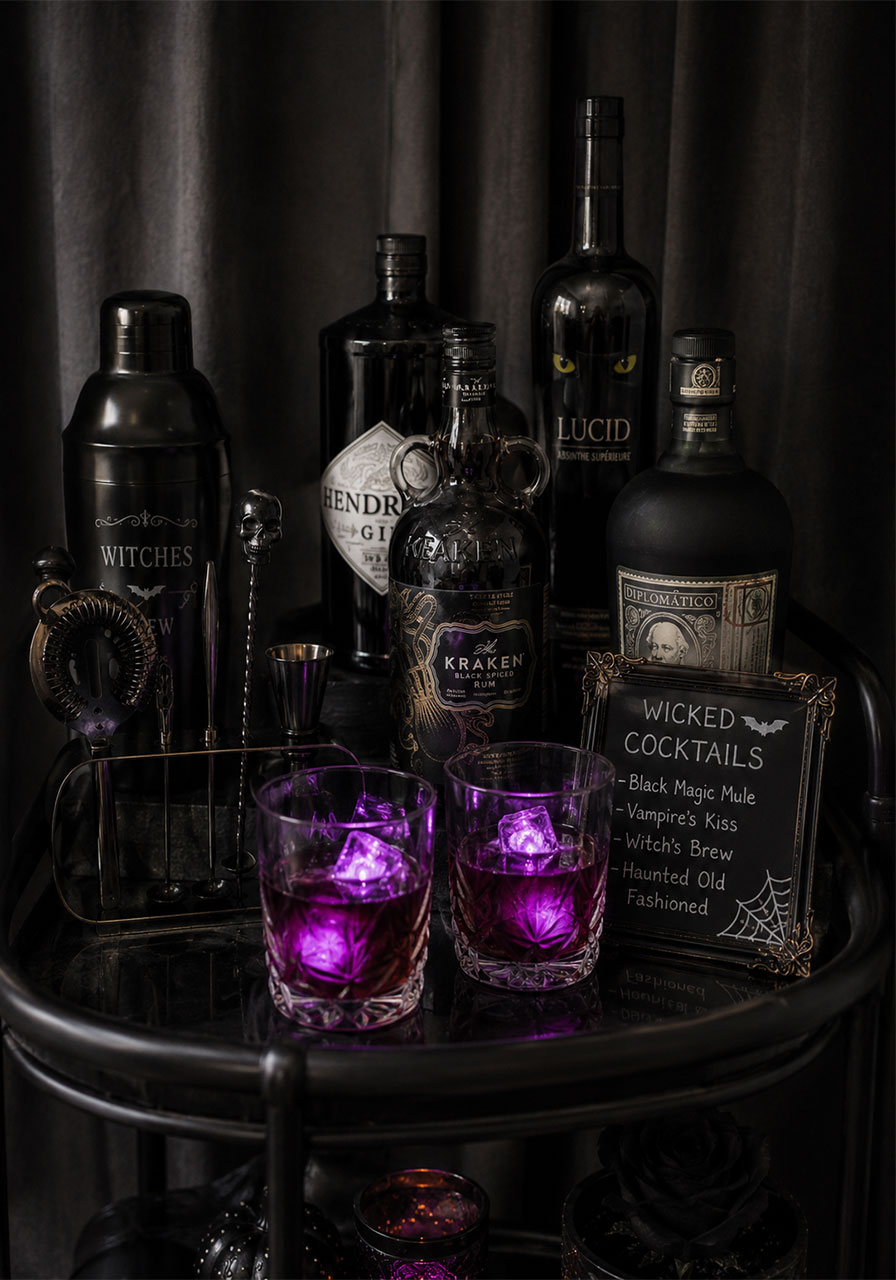
What You’ll Need:
- LED light-up ice cubes (reusable, battery-powered)
- Black bar tools and a cocktail shaker
- A small chalkboard sign for your menu
- Dark spirits and mixers for a signature cocktail
- Black or smoked glassware
How to Make It:
1. Set up your bar cart or table with bottles and glassware arranged by height.
2. Write your signature cocktail name and ingredients on the chalkboard sign.
3. Turn on your LED ice cubes and drop them into each drink as you serve.
4. Dim nearby lighting so the glow really pops.
23. Antique Mirror “Séance” Table
Lean into the spooky-elegant with a small side table styled as a séance station, an antique or vintage-style mirror propped upright, surrounded by candles, a spirit board, and a scattering of dried roses.
Why We Love It: It adds a genuinely chilling, story-driven moment to your party that guests will want to photograph.
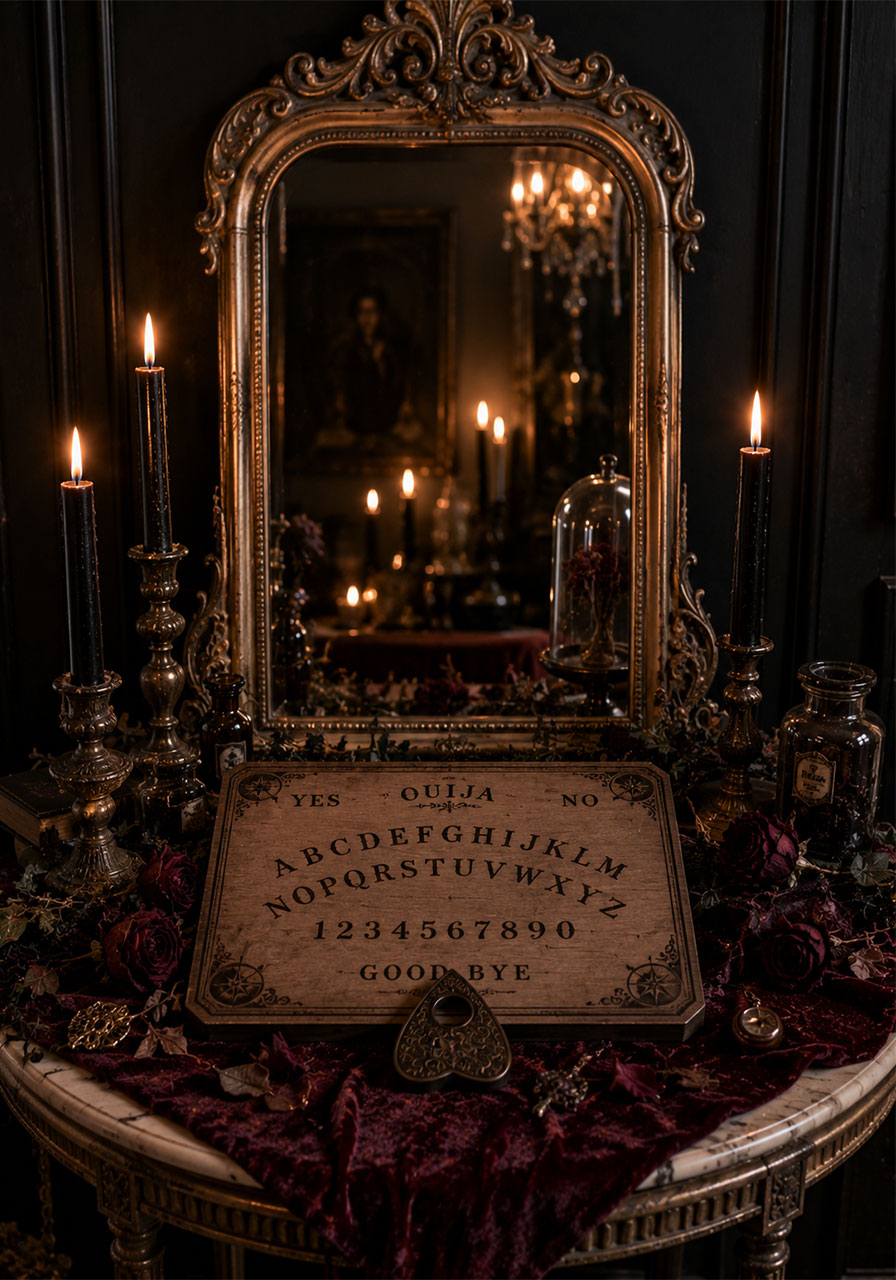
What You’ll Need:
- A vintage or vintage-style framed mirror
- A spirit board or planchette prop
- Black taper candles
- Dried roses and dark greenery
- A black or deep burgundy table runner
How to Make It:
1. Prop your mirror upright against a wall or stand behind your table.
2. Lay your runner across the table surface.
3. Place the spirit board flat at the center of the table.
4. Surround it with candles and scatter dried roses across the runner.
24. Raven Cage Centerpieces
Small decorative birdcages, painted black and filled with faux ravens, candles, and dried florals, make elegant, portable centerpieces you can cluster down a table or use individually at each place setting.
Why We Love It: They’re reusable year after year and work beautifully at both large and small gatherings.
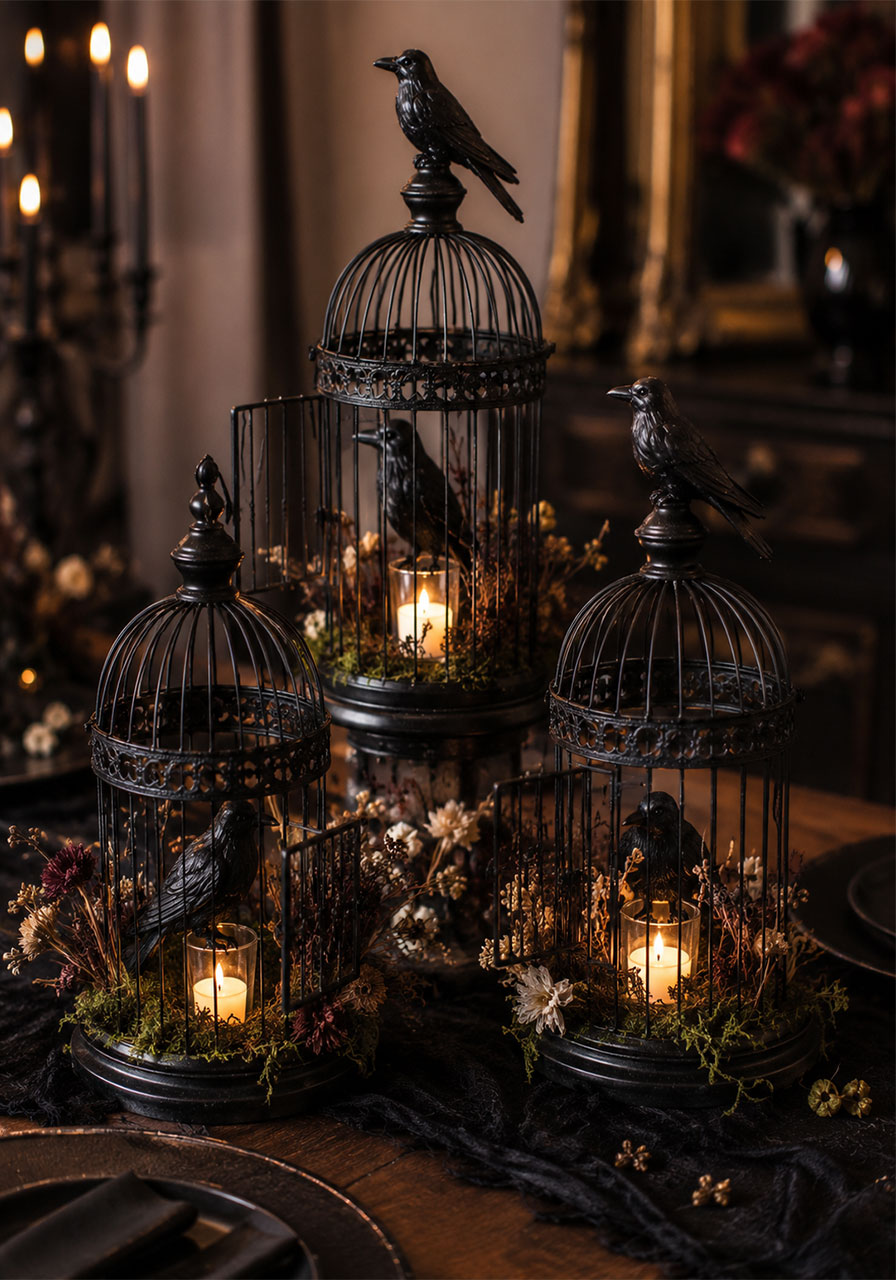
What You’ll Need:
- Small decorative birdcages
- Black spray paint (if cages aren’t already black)
- Faux raven or crow figures
- Small votive candles
- Dried florals and moss
How to Make It:
1. Spray paint your cages black if needed and let them dry fully.
2. Open each cage and place a votive candle and small floral cluster inside.
3. Perch a raven on top of or beside each cage.
4. Cluster 2-3 cages together as a centerpiece, or space them individually down the table.
25. Gothic Cake Stand Tower with Dripping “Blood” Ganache
A tiered cake stand filled with dark red velvet cupcakes, each topped with a dripping dark chocolate ganache “blood” effect, makes an easy but showstopping dessert centerpiece with zero cake decorating skills required.
Why We Love It: It looks bakery-level impressive, but the ganache drip technique is genuinely foolproof.
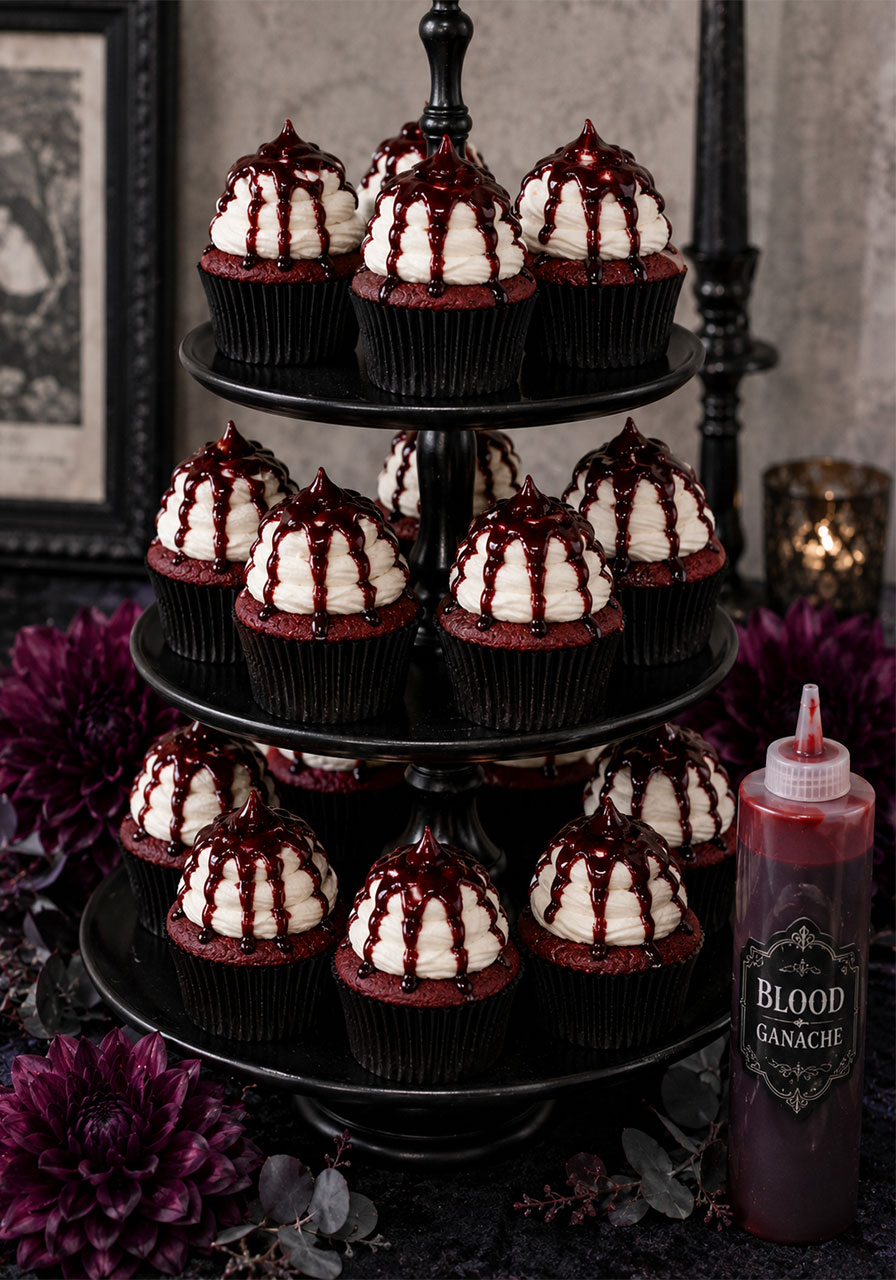
What You’ll Need:
- A tiered cake or cupcake stand
- Red velvet or chocolate cupcakes (store-bought or homemade)
- Dark chocolate ganache or red-tinted white chocolate ganache
- A squeeze bottle for the drip effect
- Black cupcake liners
How to Make It:
1. Frost each cupcake with a simple swirl of buttercream and let it set.
2. Warm your ganache until pourable but not hot, then transfer it to a squeeze bottle.
3. Gently squeeze the ganache around the edge of each cupcake so it drips down the sides.
4. Let the drips set for a few minutes before arranging cupcakes on your tiered stand.
Ready to Set the Mood?
Gothic Halloween decor is all about layering, dark colors, flickering candlelight, dramatic florals, and just enough eerie detail to make your space feel transformed.
You don’t need to use all 25 of these ideas at once. Even picking three or four, a balloon garland, a candlelit centerpiece, and a dessert table upgrade, will completely change the feel of your party.
Start with the ideas that match your space and your budget, then build from there. Your guests won’t just remember your party. They’ll be asking you for the how-to next year.
Happy haunting, and happy hosting!
