If you’ve ever stared into the fridge at 5 p.m. wondering what on earth you’re going to feed everyone tonight – this recipe is your answer.
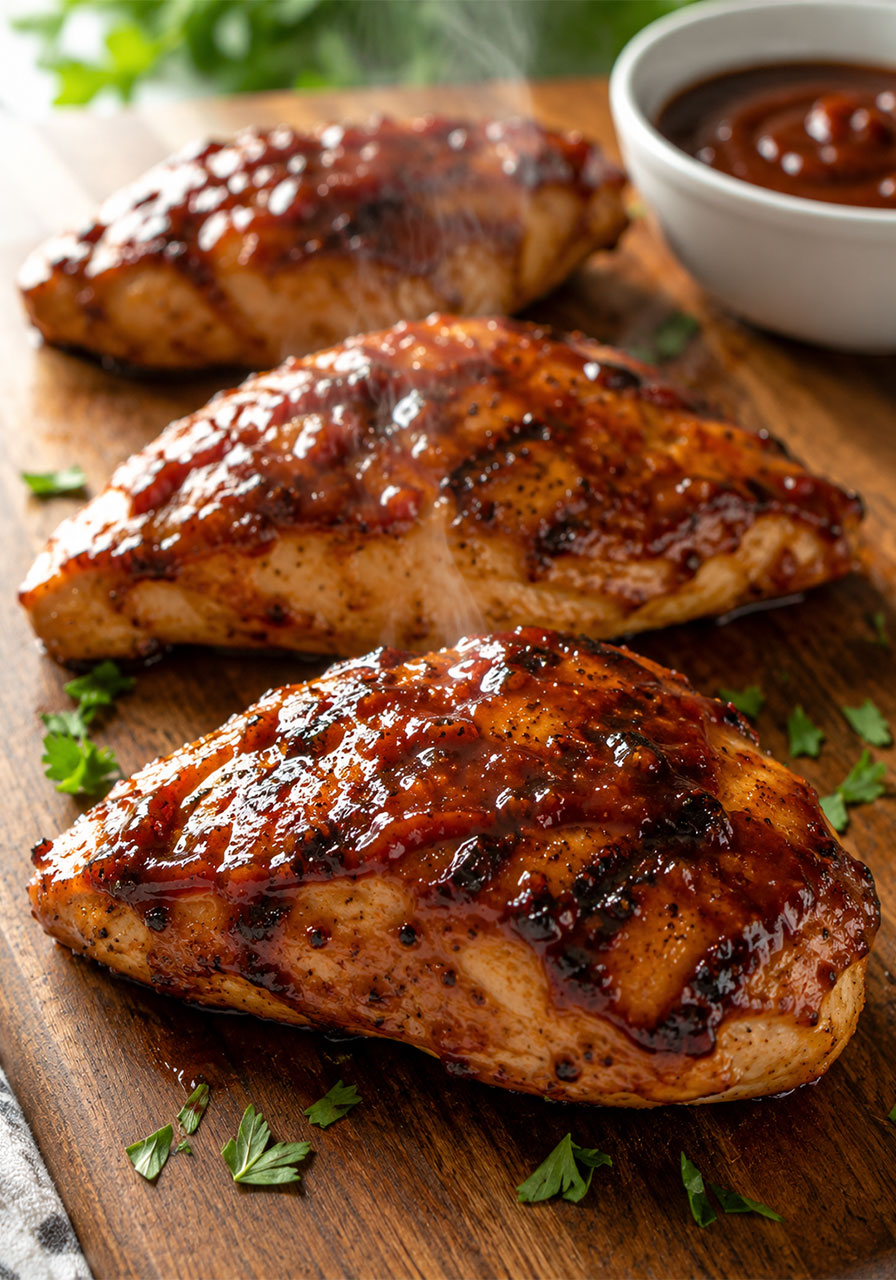
This Air Fryer BBQ Chicken Breast is juicy, smoky, saucy, and on the table in under 20 minutes. No grill. No oven preheating. No stress.
Whether you’re throwing together a casual weeknight dinner, feeding a crowd at a backyard party, or meal prepping for the week ahead – this recipe delivers every single time.
The secret? A simple 5-ingredient dry rub that packs a serious flavor punch, plus a quick brush of BBQ sauce right at the end that caramelizes into something truly magical.
Trust me – once you try this, you’ll be making it on repeat.
Why You’ll Absolutely Love This Recipe
Let’s be real: we all want dinner to be easy AND delicious. This recipe checks both boxes without compromise.
Here’s why this air fryer BBQ chicken breast deserves a permanent spot in your weekly rotation:
It’s genuinely fast. From fridge to table in about 20 minutes. That’s faster than most drive-throughs.
The flavor is next level. The dry rub alone – paprika, garlic powder, brown sugar, salt, and pepper – creates a beautifully seasoned crust. Then the BBQ sauce goes on at the very end and caramelizes slightly, adding a sticky, smoky sweetness that tastes like you spent hours making it.
It’s incredibly versatile. Slice it and serve it as a main dish, toss it on a salad, stuff it in a sandwich, or slice it up for a party platter. So many options!
Meal prep dream. Make a batch on Sunday and you’ve got high-protein lunches and dinners ready to go all week long. It keeps well in the fridge for up to 4 days.
Minimal cleanup. One air fryer basket. That’s it. Your future self will thank you.


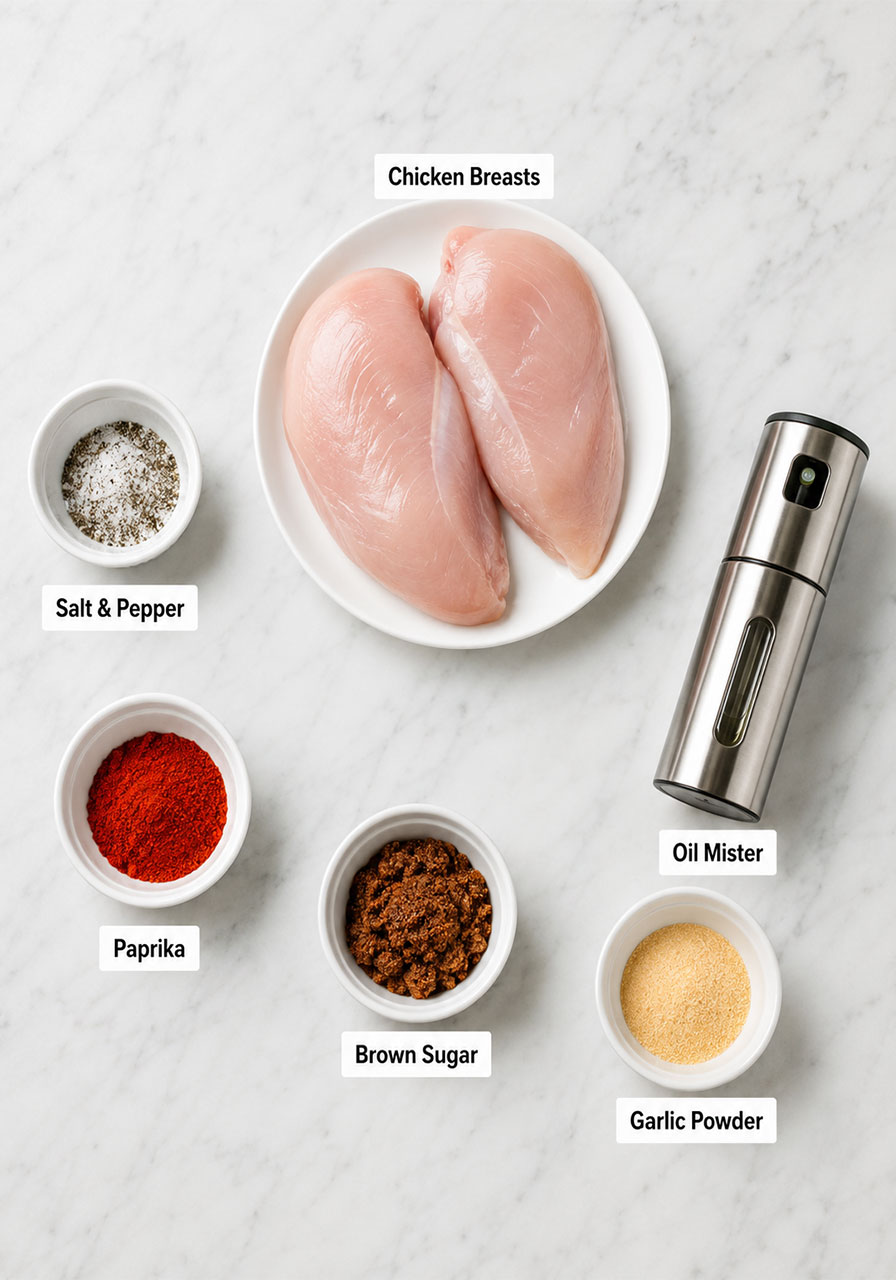
What You’ll Need
The ingredient list is short, simple, and probably already sitting in your pantry. Here’s the lineup:
Chicken breasts – Boneless, skinless chicken breasts are the star of the show. Chicken cutlets work great too since they’re thinner and cook even faster. If your breasts are on the thicker side, pound them down a bit for more even cooking.
Paprika – This is where that gorgeous deep red color comes from. It adds a gently smoky, slightly sweet flavor that makes the dry rub absolutely irresistible.
Garlic powder – Just a touch, but it adds that warm savory depth that makes everything taste better.
Brown sugar – Don’t skip this! It balances out the salt perfectly and helps the rub get a tiny bit caramelized as it cooks. So good.
Salt and pepper – The essential duo. Simple, classic, and always necessary.
BBQ sauce – Use your favorite! Any store-bought sauce works perfectly here. Sweet Baby Ray’s is a go-to in this kitchen. Or use a homemade BBQ sauce if you’re feeling fancy.
Olive oil – Just a light spray to coat the air fryer basket and prevent sticking. Use an oil mister for the best results – and skip the aerosol sprays like Pam, which can damage your basket over time.
How to Make Air Fryer BBQ Chicken Breast
This is truly one of the easiest recipes you’ll ever make. No marinating required, no complicated techniques – just simple steps that lead to seriously delicious results.
Step 1: Mix Your Dry Rub
In a small bowl, stir together the paprika, garlic powder, brown sugar, salt, and pepper until well combined. This simple blend is going to do a lot of heavy lifting in the flavor department!
Step 2: Season the Chicken
Sprinkle the dry rub generously over all sides of your chicken breasts, then rub it in with your hands so the seasoning really coats every inch of the meat. Don’t be shy here – the more coverage, the more flavor.
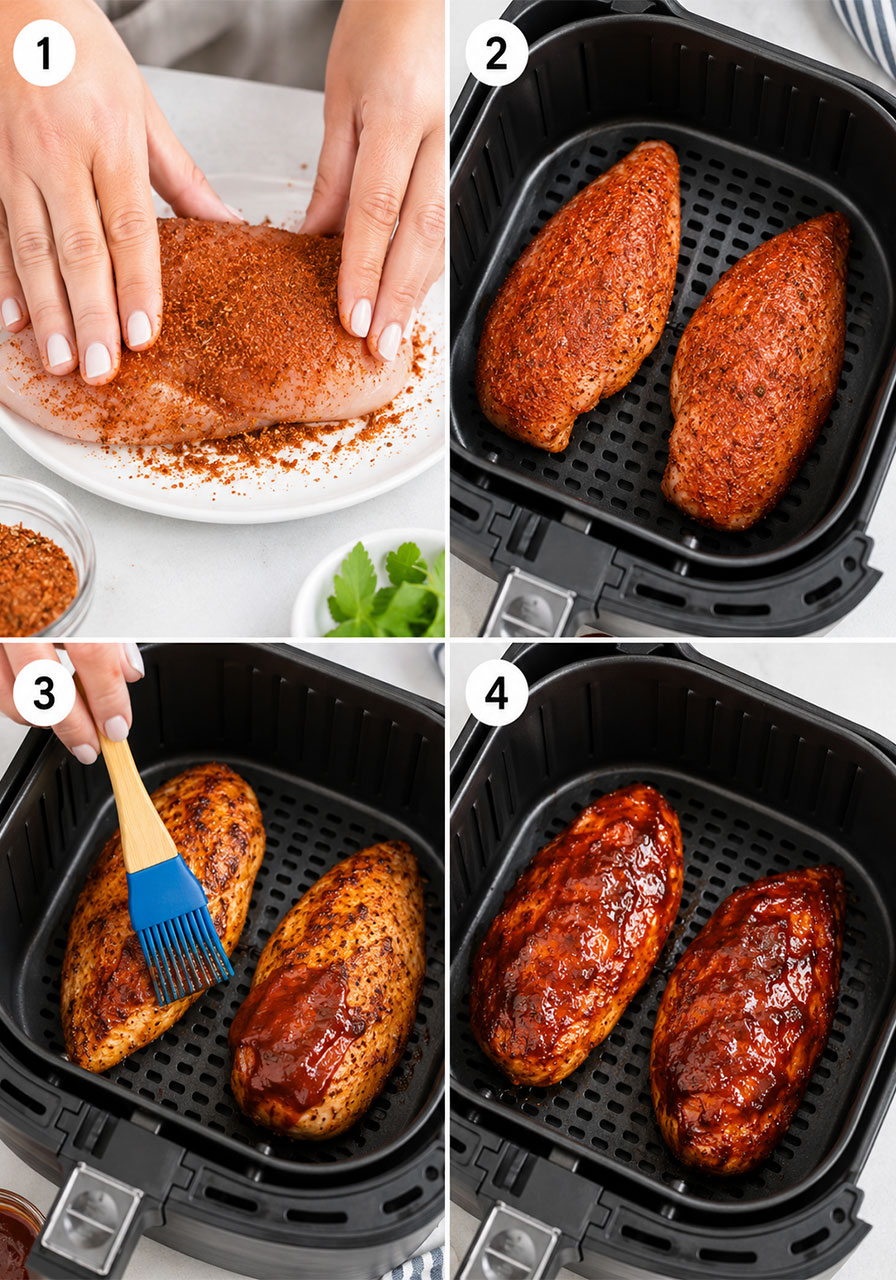
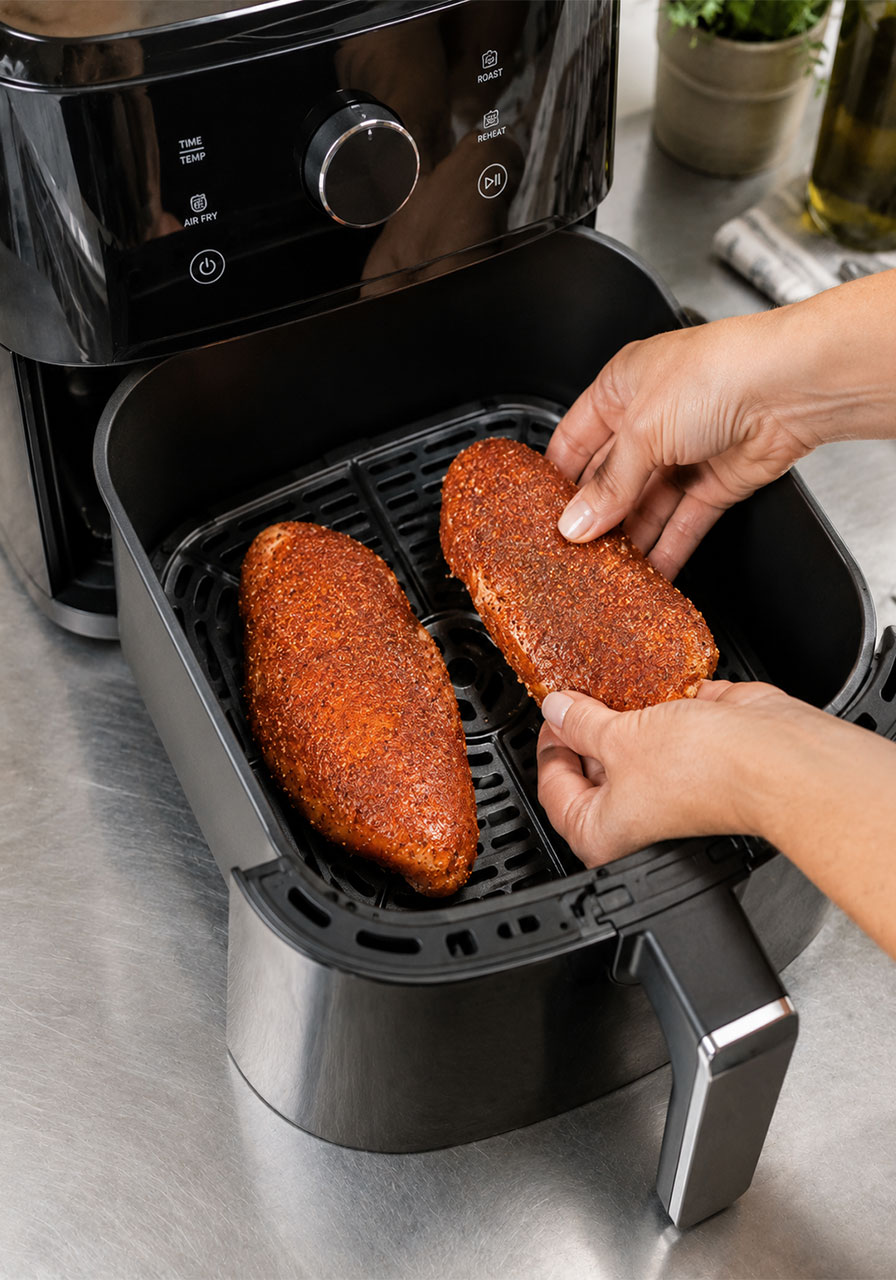
Step 3: Prep Your Air Fryer
Lightly spray your air fryer basket with olive oil using an oil mister. This small step makes a big difference – it prevents the chicken from sticking and makes cleanup so much easier.
A quick reminder: do NOT use aerosol cooking sprays like Pam in your air fryer basket. They contain additives that can break down the non-stick coating over time. A simple oil mister filled with olive oil is the way to go.
Step 4: Air Fry the Chicken
Place the seasoned chicken breasts in the basket in a single layer. Do not overlap or stack them – the hot air needs to circulate freely around each piece to cook it evenly and get that gorgeous golden exterior.
Cook at 380°F for 7 minutes. Then flip each breast over and cook for another 7–8 minutes, or until the internal temperature reaches 165°F.
Since chicken breasts vary quite a bit in size, the cook time can vary too. Always use a meat thermometer to check – that 165°F internal temp is the magic number for safe, perfectly cooked chicken.
Step 5: Add the BBQ Sauce
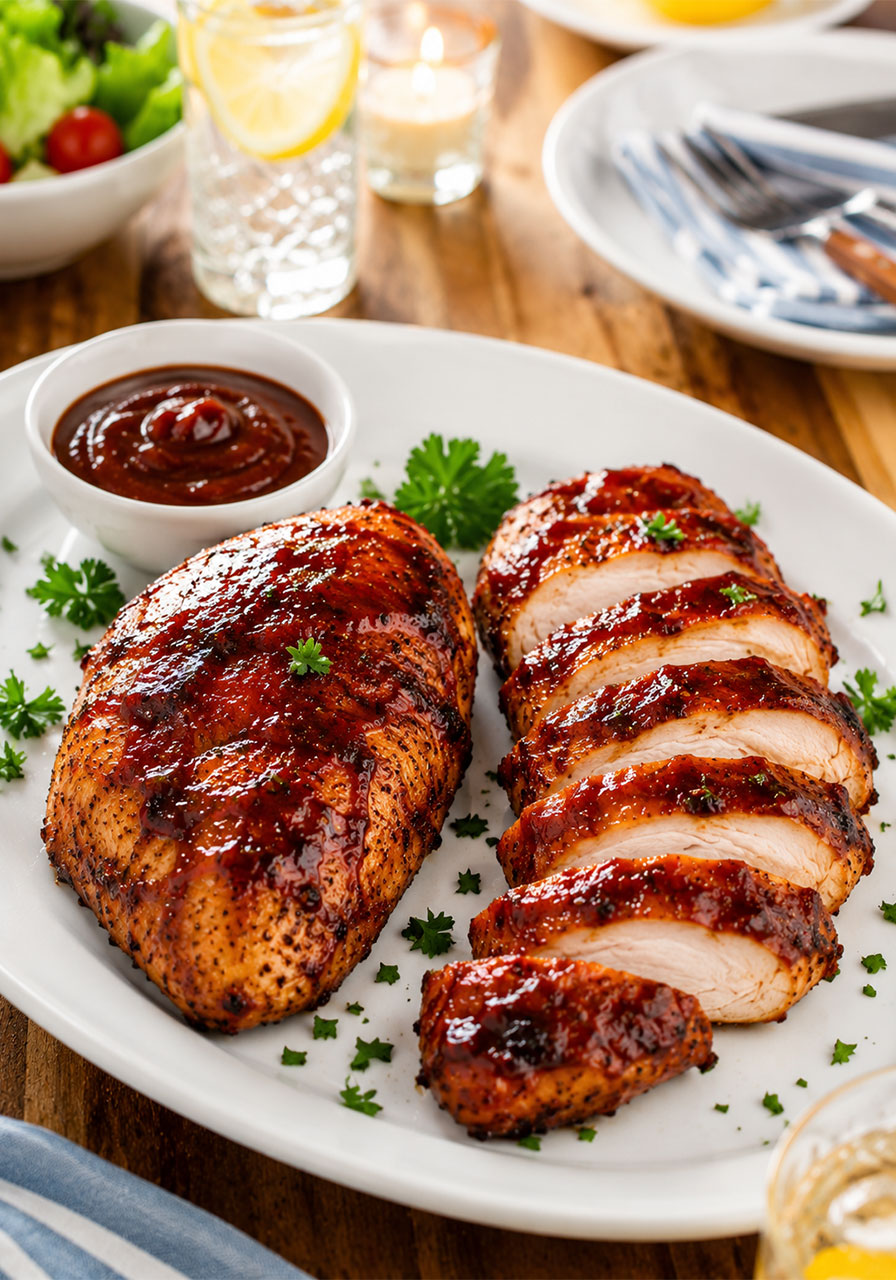
Here’s where the magic happens. Once the chicken is cooked through, brush your favorite BBQ sauce generously over the top of each breast.
Pop it back in the air fryer for just 1–2 more minutes. This quick blast of heat warms the sauce and lets it caramelize slightly against the seasoned crust – creating that sticky, glossy, finger-licking finish that makes this recipe so addictive.
Step 6: Rest Before Slicing
This step is non-negotiable! Let the chicken rest for 4–5 minutes before cutting into it. Resting allows the juices to redistribute throughout the meat, which is the difference between dry, disappointing chicken and the kind of juicy, tender result that makes everyone ask for seconds.
Pro Tips for the Best Results Every Time
A few insider tricks to make sure your air fryer BBQ chicken turns out perfect:
Pound thick chicken breasts before cooking. If your chicken breasts are very thick or uneven in shape, take a minute to pound them to a more uniform thickness (about 3/4 to 1 inch). This helps them cook through evenly without the thinner parts drying out before the thick center is done.
Always check the internal temperature. Don’t guess – get a meat thermometer! The chicken is safe to eat and perfectly cooked when it hits 165°F. This is especially important since chicken breast sizes vary so much.
Don’t overlap the chicken in the basket. Air fryers work by circulating hot air rapidly around the food. If you stack or overlap the chicken pieces, the air can’t do its job and you’ll end up with uneven cooking. Cook in batches if needed.
Add the BBQ sauce LAST. Because BBQ sauce contains sugar, it will burn if it’s in the air fryer for too long. Always wait until the last 1–2 minutes of cooking to brush it on. This is the key to getting that beautiful caramelized glaze without any burnt bitterness.
Don’t use aerosol sprays. Stick to an oil mister filled with olive oil to protect your basket’s non-stick coating.
How Long Does BBQ Chicken Take in the Air Fryer?
For a standard boneless, skinless chicken breast, plan for about 14–16 minutes total at 380°F, plus 1–2 minutes after adding the BBQ sauce.
Smaller or thinner cutlets may be done closer to the 12–14 minute mark. Larger, thicker breasts might need a couple of extra minutes.
The most reliable way to know? Use a meat thermometer and look for that 165°F internal temperature. It takes the guesswork out completely and guarantees juicy, perfectly cooked chicken every single time.
How to Serve Air Fryer BBQ Chicken
One of the best things about this recipe is how incredibly versatile it is. Here are some delicious ways to serve it up:
As a main dish – Serve it whole alongside your favorite sides for a complete, satisfying dinner.
On a salad – Slice it thin and lay it over a crisp green salad. The smoky, saucy flavor pairs beautifully with a cool, fresh base.
In a sandwich or wrap – Pile it onto a toasted bun or wrap it in a flour tortilla with some coleslaw and extra BBQ sauce. Absolute perfection.
On a party platter – Slice it into strips and arrange it on a board with dipping sauces. It’s always a crowd-pleaser at gatherings.
For meal prep bowls – Dice it up and portion it into meal prep containers with rice, roasted veggies, or your favorite grains for easy grab-and-go lunches all week.
Some great side dishes to serve alongside it:
Corn on the cob, corn salad, red cabbage slaw, roasted potatoes, pea salad, or sweet potato fries all pair beautifully with the smoky-sweet flavors of this BBQ chicken.
How to Store Leftover BBQ Chicken
Got leftovers? Lucky you – this chicken stores really well and tastes just as great the next day.
Let the chicken cool completely before storing. Then transfer to an airtight container and refrigerate. It will keep well for 3–4 days.
To reheat, pop it back in the air fryer at 350°F for 3–4 minutes until warmed through. You can also microwave it, but the air fryer keeps the texture much better.
This makes it a fantastic option for weekly meal prep – cook a big batch over the weekend and enjoy easy, high-protein meals all week long without any extra effort.
Air Fryer BBQ Chicken FAQs
Can you put raw chicken directly in the air fryer?
Absolutely! Raw chicken goes straight into the air fryer basket – no pre-cooking necessary. The air fryer cooks it through beautifully from raw to perfectly done. Just make sure it reaches that 165°F internal temperature before eating.
Can I put BBQ sauce in an air fryer?
Yes, but timing matters! Because BBQ sauce contains sugar, it can burn if it’s exposed to the high heat for too long. The trick is to wait until the last 1–2 minutes of cooking to brush it on. That short time is enough to warm it through and let it caramelize slightly without any burning.
Can you layer chicken in the air fryer?
It’s best not to. Air fryers rely on hot air circulation to cook the food, and stacking or overlapping chicken prevents the air from flowing evenly around each piece. The result? Unevenly cooked chicken – some parts overdone, others still underdone. Always cook in a single layer, and do batches if you have more chicken than space.
What if my chicken breasts are different sizes?
This happens all the time! The easiest fix is to pound your chicken breasts to a more even thickness before seasoning. If you have one very large breast and a couple of smaller ones, consider pulling the smaller ones out a few minutes early to avoid overcooking them. Again – use that meat thermometer!
Can I use chicken thighs instead?
Yes! Boneless, skinless chicken thighs work great with this exact same method and seasoning. They’re naturally a bit fattier, which means they tend to stay even juicier. Just note that thighs may need a couple of extra minutes – always check for 165°F internal temp.
Make it a Party!
This recipe isn’t just a weeknight dinner winner – it’s also an absolute star at parties and gatherings. Double or triple the batch, slice the chicken into strips, and lay it out on a big wooden board with little bowls of extra BBQ sauce and your favorite dipping sauces on the side.
It’s the kind of easy, crowd-pleasing party food that disappears in minutes – and has everyone asking you for the recipe.
Because the best gatherings are the ones where everyone leaves happy, well-fed, and already looking forward to the next invite.
Air Fryer BBQ Chicken Breast
Equipment
- Air Fryer, meat thermometer, pastry brush or silicone brush, oil mister
Ingredients
- 4 boneless, skinless chicken breasts
- 1/2 teaspoon paprika
- 1/2 teaspoon garlic powder
- 2 tablespoons brown sugar
- 1/4 teaspoon salt
- 1/4 teaspoon ground black pepper
- 1 tablespoon olive oil (for spraying basket)
- 1/2 cup BBQ sauce
Instructions
- In a small bowl, stir together the paprika, garlic powder, brown sugar, salt, and black pepper until well combined.
- Sprinkle the seasoning blend over all sides of the chicken breasts. Rub it in with your hands so the entire surface is well coated.
- Lightly spray the air fryer basket with olive oil using an oil mister. Do not use aerosol sprays like Pam as they can damage the basket coating.
- Place the chicken breasts in the basket in a single layer. Do not overlap.
- Cook at 380°F for 7 minutes. Flip each breast over and cook for another 7–8 minutes, or until the internal temperature reaches 165°F. Note: cooking time may vary depending on the thickness of your chicken.
- Once cooked through, brush BBQ sauce generously over the top of each chicken breast. Return to the air fryer and cook for an additional 1–2 minutes to warm and slightly caramelize the sauce.
- Remove from the air fryer and let the chicken rest for 4–5 minutes before slicing. Serve and enjoy!