Get ready to transform your space into party paradise without breaking the bank or your sanity! We know you want your celebration to look like a million bucks, but here’s the secret: the most impressive decorations are often the easiest to make. Whether you’re planning a milestone birthday bash, a kids’ party extravaganza, or an adults-only celebration, these DIY decoration ideas will have your guests asking, “Wait, you made this yourself?”
We’ve curated 40 foolproof projects that deliver maximum impact with minimal stress. From show-stopping balloon installations to elegant paper flowers, each idea comes with a straightforward approach that even craft newbies can master. The best part? Most of these use supplies you can grab at your local craft store or even have lying around at home. Let’s dive into these party decorating gems that’ll make you the host with the most!

Garlands & Banners That Steal the Show
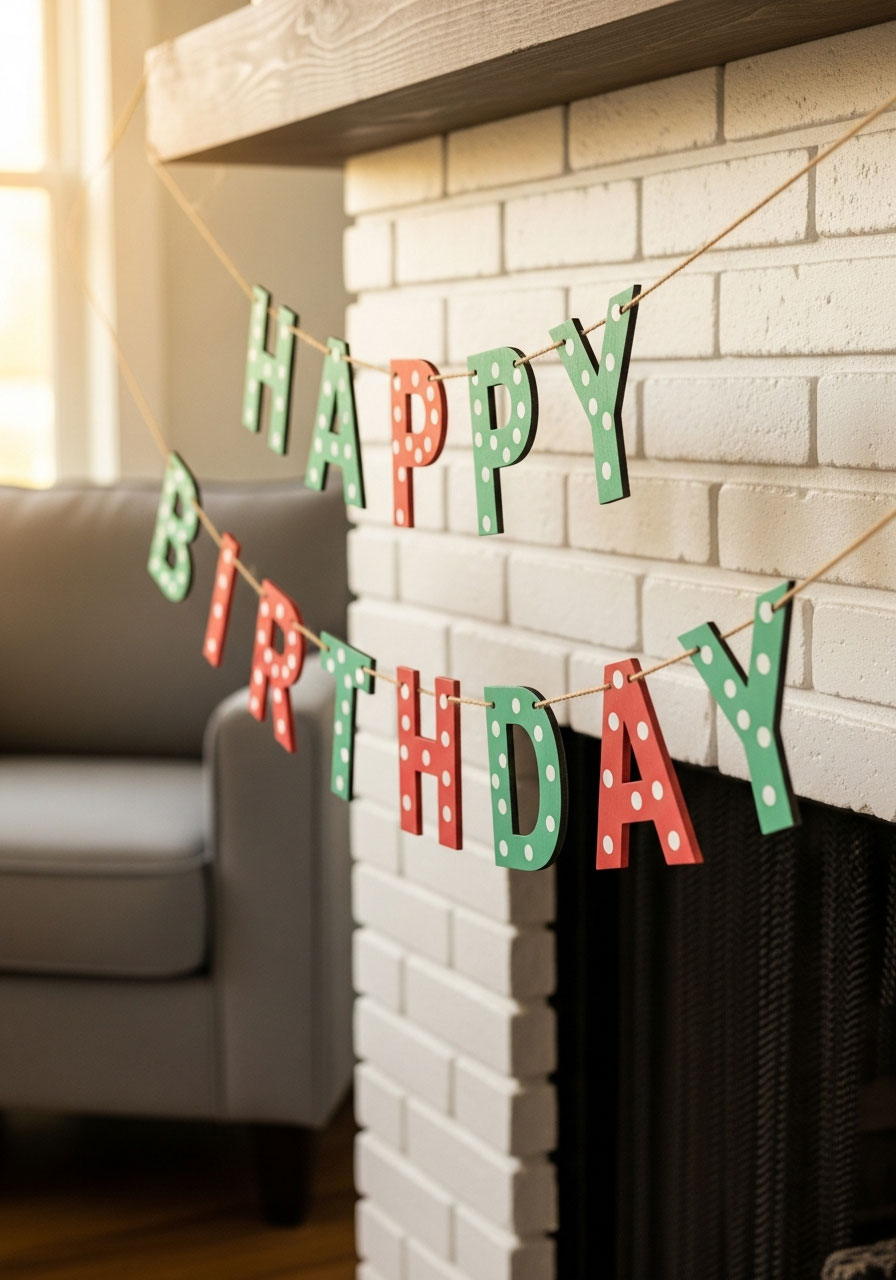
1. Wood Birthday Banner
Best for: Rustic-themed parties, milestone birthdays, reusable decor
Time to Make: 1-2 hours
Difficulty: Easy
This charming wooden banner adds a personal, handcrafted touch that screams “I put thought into this!” The beauty? You can customize it with any message and reuse it year after year.
What You’ll Need:
- Wooden letter cutouts or small wooden shapes
- Acrylic paint in your party colors
- Twine or ribbon
- Small drill or hot glue gun
- Paintbrushes
How to Make It:
1. Paint your wooden letters in your chosen colors and let them dry completely (this usually takes 30-45 minutes).
2. Add decorative details like polka dots, stripes, or glitter while the base coat is still slightly tacky for better adhesion.
3. Create holes at the top corners of each letter using a small drill, or skip this if you’re using hot glue.
4. String your letters onto twine or ribbon, spacing them evenly.
5. Hang it up across a mantel, doorway, or above your dessert table for instant charm.
Pro Tip: Make the banner extra special by sanding the edges of each letter lightly before painting – it gives them that trendy, distressed look that’s all over Pinterest right now!
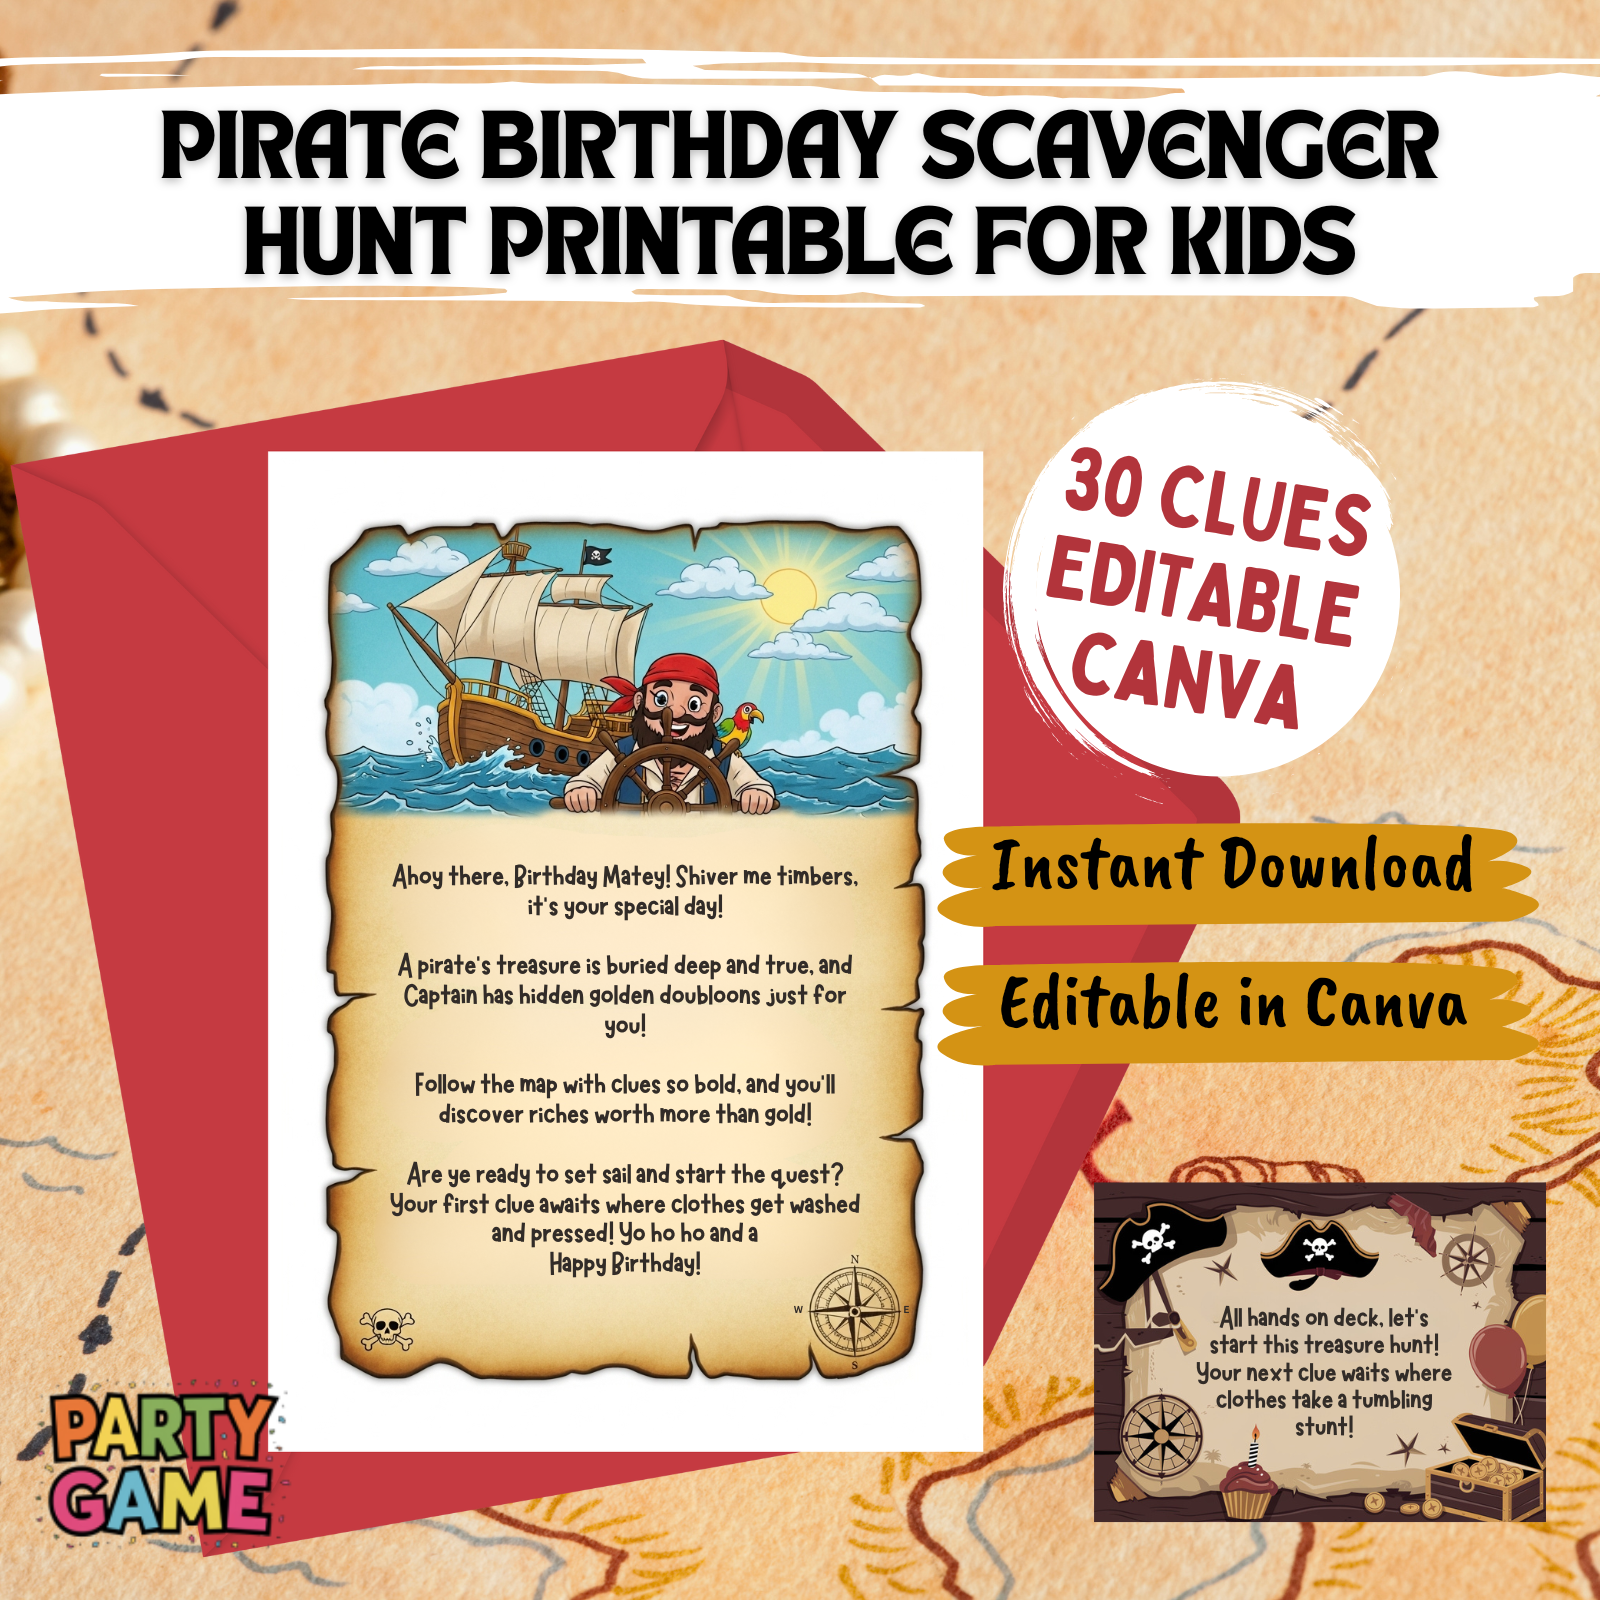
Pirate Birthday Scavenger Hunt for Kids Printable
Instant Pirate Adventure: Download, print, and play in 15 minutes! No stress – just instant, unforgettable fun for kids ages 4-12
Indoor Party Lifesaver: Perfect for apartments & houses. Keep 1-10 kids wildly entertained for 45 minutes with clever rhyming clues
A Treasured Memory: Watch your birthday child become the hero of an epic story. Includes a thrilling intro and congratulatory treasure letter
Fun That Secretly Teaches: Kids race to solve riddles while building reading, problem-solving, and teamwork skills. Fun with a hidden purpose!

Indoor Birthday Scavenger Hunt Printable for Kids – 12 challenges
Your 15-Minute Party Hero: Instantly download, print, and hide. Get 1-2 hours of immersive, screen-free fun with 12 unique puzzles. Stress-free entertainment, guaranteed
More Than a Hunt – It’s a “”Cake Bandit”” Adventure! Kids don’t just find clues; they solve the mystery of the stolen cake! This engaging storyline creates a memorable birthday mission
Ultimate Indoor Party Lifesaver: Perfect for bad weather or small spaces. Keeps kids ages 4-10+ happily challenged with picture matching, mazes, and secret codes
Fun That Secretly Builds Genius: Laughter meets learning! These 12 clever challenges boost problem-solving, teamwork, and critical thinking skills without the kids even noticing

Difficult Birthday Scavenger Hunt Printable for Adults – The Oracle’s Birthday Prophecy
Forget Boring Parties. Unleash the Oracle: Transform a birthday into an epic mystery with 30 brain-teasing riddles, ciphers, and challenges. Customize the perfect adventure for your guests
Be the Host of the Most Memorable Party: Provide the clever, shared activity that gets everyone laughing and collaborating. It’s the highlight that guests will talk about for years
Sophisticated Fun, Zero Effort: Just download, pick your 10 favorite clues from 30 options, and hide them. Get a complete, themed adventure without the stress of planning from scratch
Challenge Adult Minds with “The Prophecy”: Move beyond simple games. This hunt features logic puzzles, cryptic ciphers, and hilarious dares designed specifically to engage and thrill adults

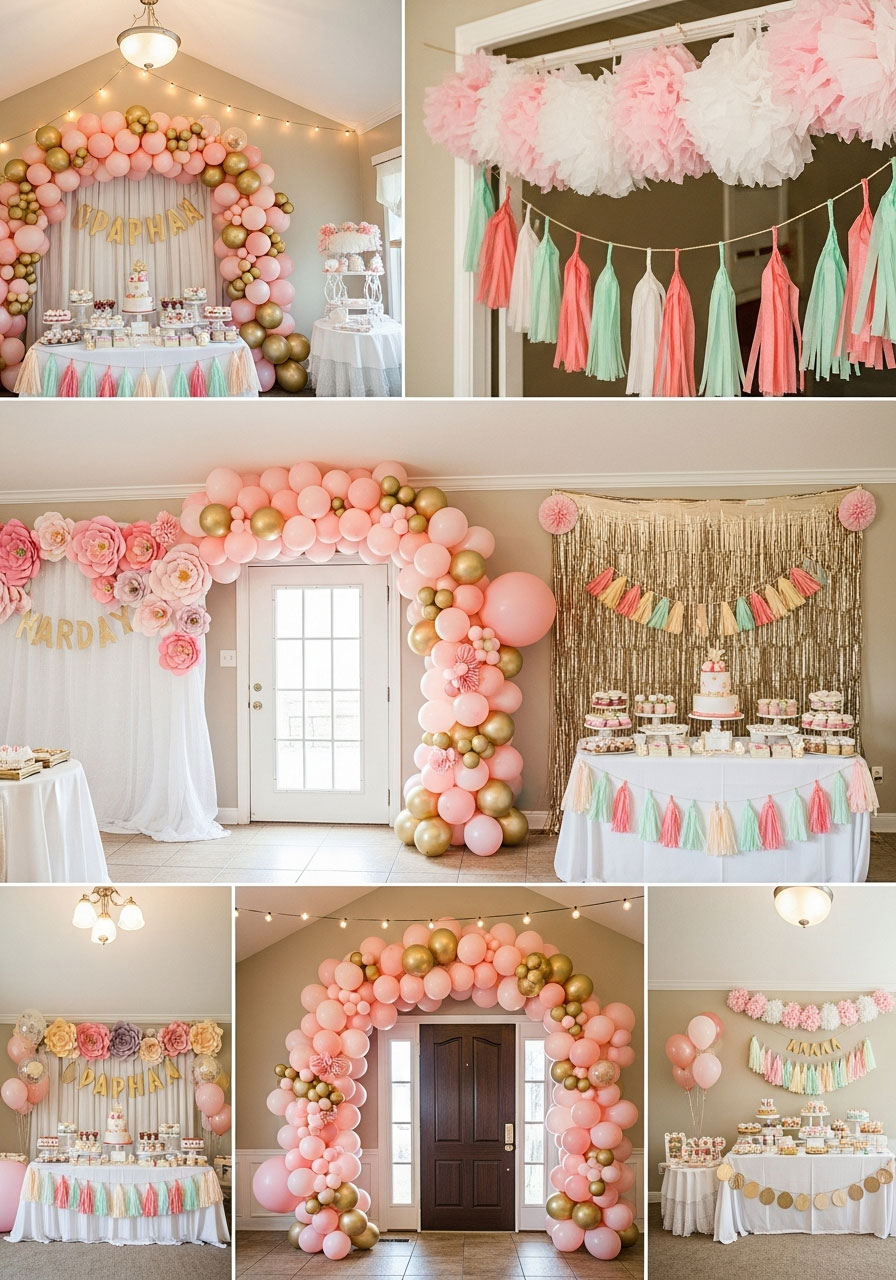
Happy Birthday Decorations
Everything in one box = party stress solved – Banner, honeycomb balls, swirls, and garland all coordinated. No last-minute runs to three different stores at 9 PM the night before.
Photo-ready in 15 minutes – Easy assembly means you spend less time wrestling with decorations and more time enjoying the birthday person’s reaction. Looks expensive, sets up fast.
Reusable = smart money – Quality materials hold up through the party AND pack away for next year. Stop buying flimsy decorations that rip before cake time.
Saves you $50+ vs. party store prices – Get the complete coordinated look without the markup. Guests think you hired a decorator; you paid a fraction of the cost.
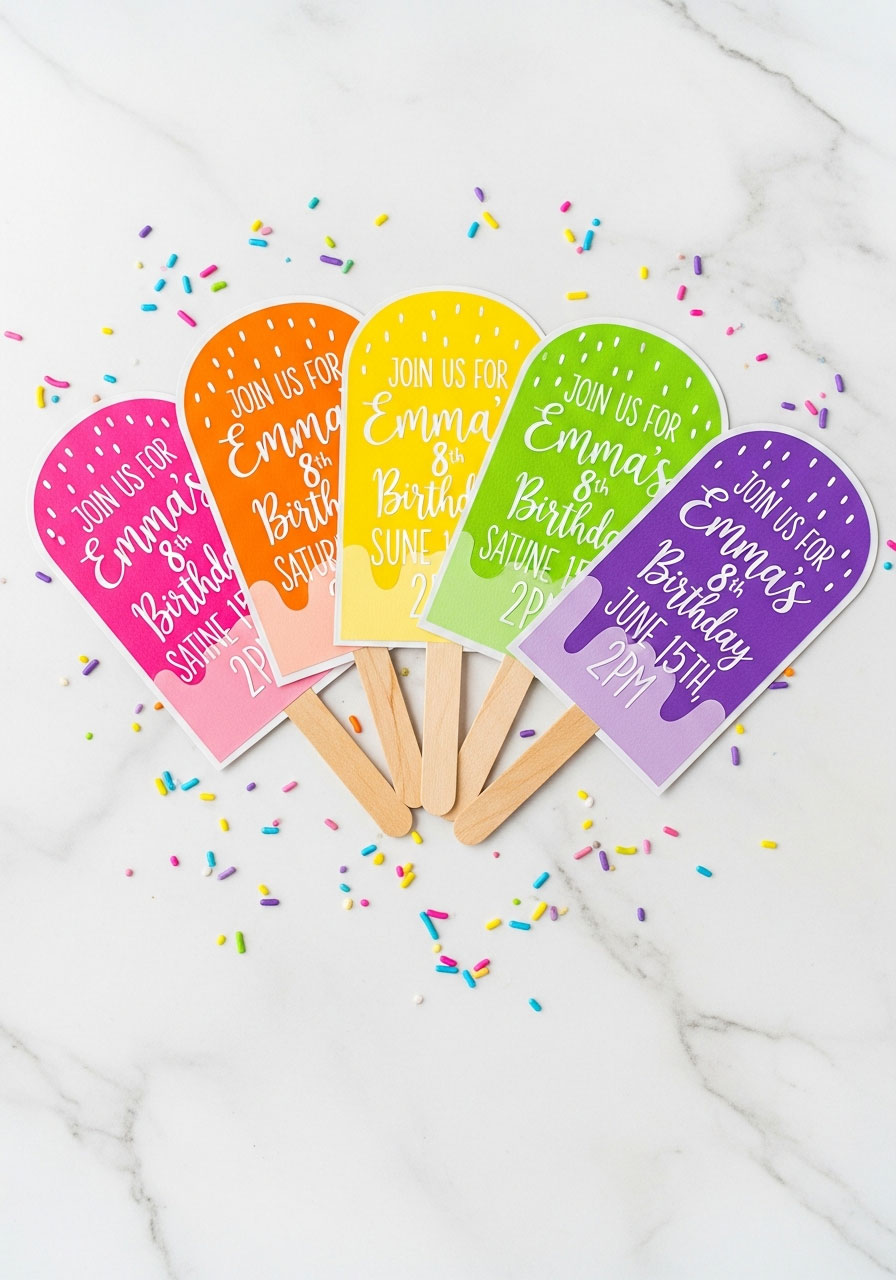
2. DIY Popsicle Party Invitations
Best for: Summer birthdays, pool parties, kid-friendly celebrations
Time to Make: 30 minutes for 10 invitations
Difficulty: Super easy
These adorable invitations set the fun tone before guests even arrive! They’re so cute that people will actually keep them instead of tossing them in the recycling bin.
What You’ll Need:
- Colored cardstock
- Popsicle stick template (easily found online)
- Scissors
- Markers or printed labels
- Wooden craft sticks (optional, for 3D effect)
How to Make It:
1. Cut out popsicle shapes from your cardstock – aim for about 3 inches wide by 5 inches tall.
2. Add party details using colorful markers or print labels with all the important info.
3. Decorate the “popsicle” with fun patterns, stripes, or polka dots.
4. Attach a wooden craft stick to the bottom using glue for that authentic popsicle look.
5. Seal them in colorful envelopes and watch the excitement build!
Pro Tip: Use different colors for each invitation to make a rainbow effect when they’re all together – perfect for social media photos!
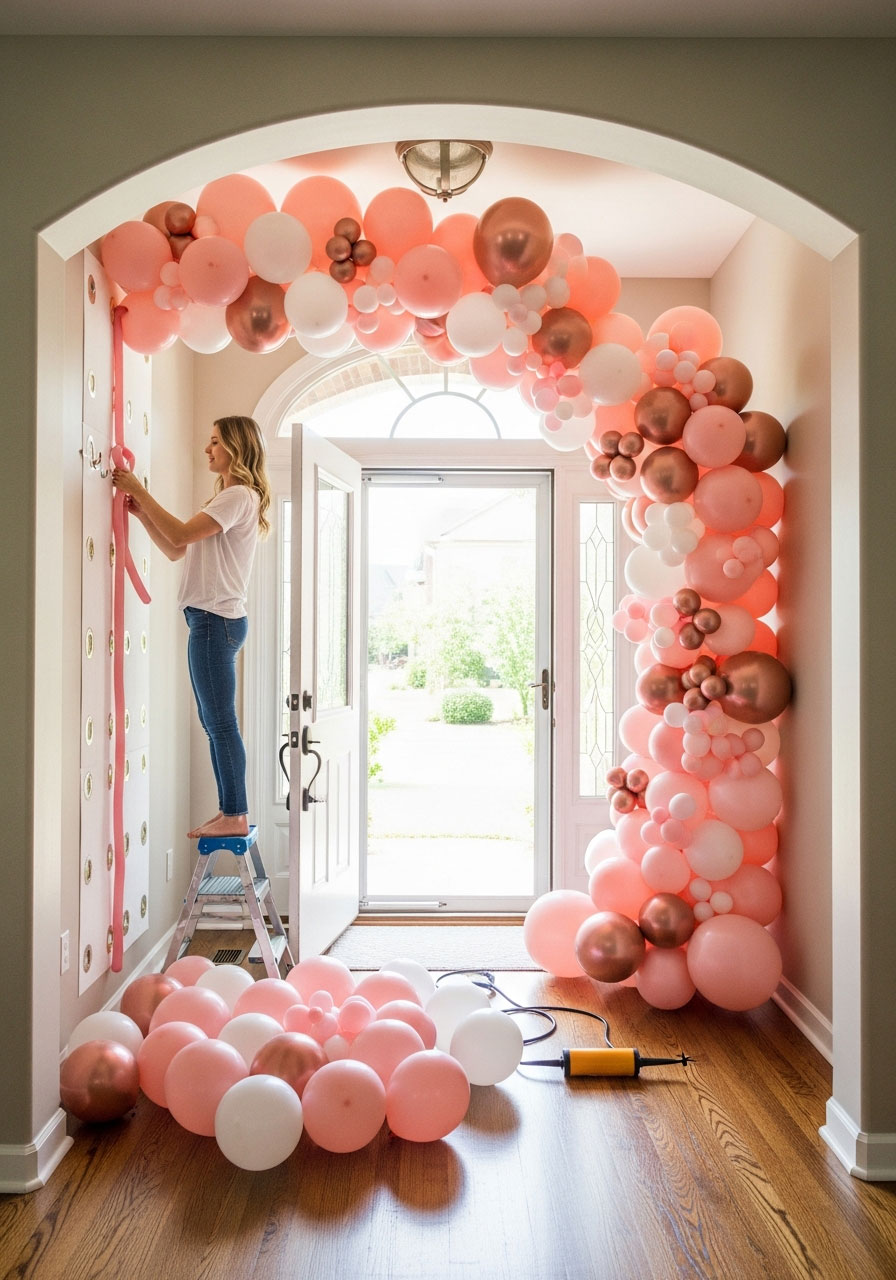
3. Balloon Arch
Best for: Entrance decor, photo backdrops, statement pieces
Time to Make: 1-2 hours
Difficulty: Moderate
This is THE decoration that makes people go “Wow!” the second they walk in. And guess what? It’s way easier than it looks – no helium required!
What You’ll Need:
- Balloon strip tape or chicken wire
- 50-100 balloons in coordinating colors
- Balloon pump (save your lungs!)
- Command hooks or fishing line for hanging
- Greenery or flowers for filling gaps (optional)
How to Make It:
1. Inflate all your balloons to varying sizes for a more organic, professional look.
2. Attach the balloon strip tape to your desired location using Command hooks.
3. Insert balloon knots into the holes of the strip tape, alternating colors and sizes.
4. Fill in any gaps with smaller balloons, tucking them between the larger ones.
5. Add greenery or florals by tucking stems between balloons for an upscale touch.
Pro Tip: Inflate your balloons the day before and store them in a large garbage bag – they’ll hold up perfectly and save you time on party day!
4. Mini Honeycomb Ice Cream Garland
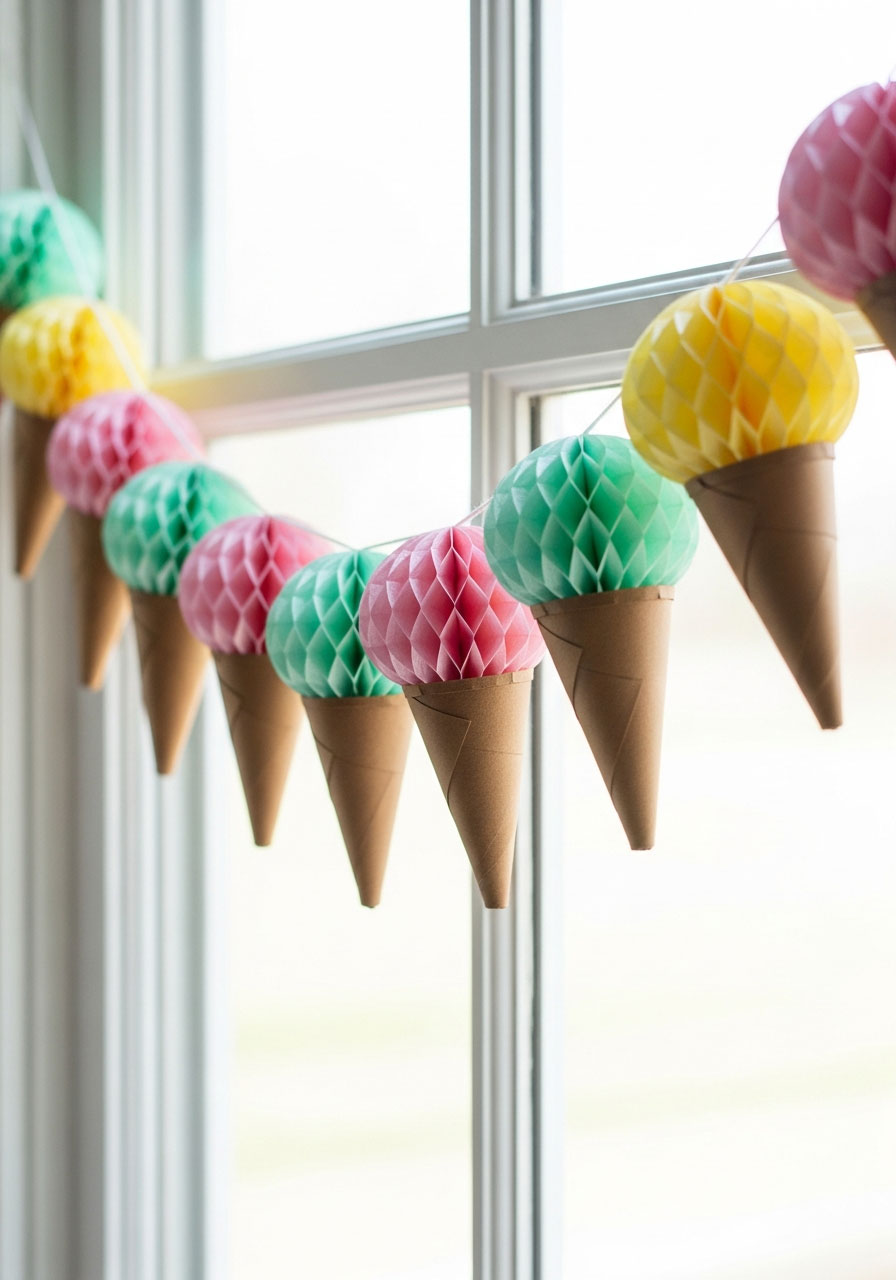
Best for: Ice cream socials, summer parties, dessert table decor
Time to Make: 45 minutes
Difficulty: Easy
This sweet garland is almost too cute to handle! It adds a playful, dimensional element that flat decorations just can’t match.
What You’ll Need:
- Mini honeycomb balls in pastel colors
- Brown cardstock for cones
- Hot glue gun
- String or fishing line
- Scissors
How to Make It:
1. Cut cone shapes from brown cardstock – about 3 inches tall works perfectly.
2. Roll and glue each cone shape to form ice cream cones.
3. Attach honeycomb balls to the top of each cone using hot glue.
4. String them together by threading fishing line through the top of each honeycomb.
5. Hang your garland above the dessert table or along a wall for instant whimsy!
Pro Tip: Mix in some metallic gold or silver honeycomb balls to give your garland an unexpected pop of glam!
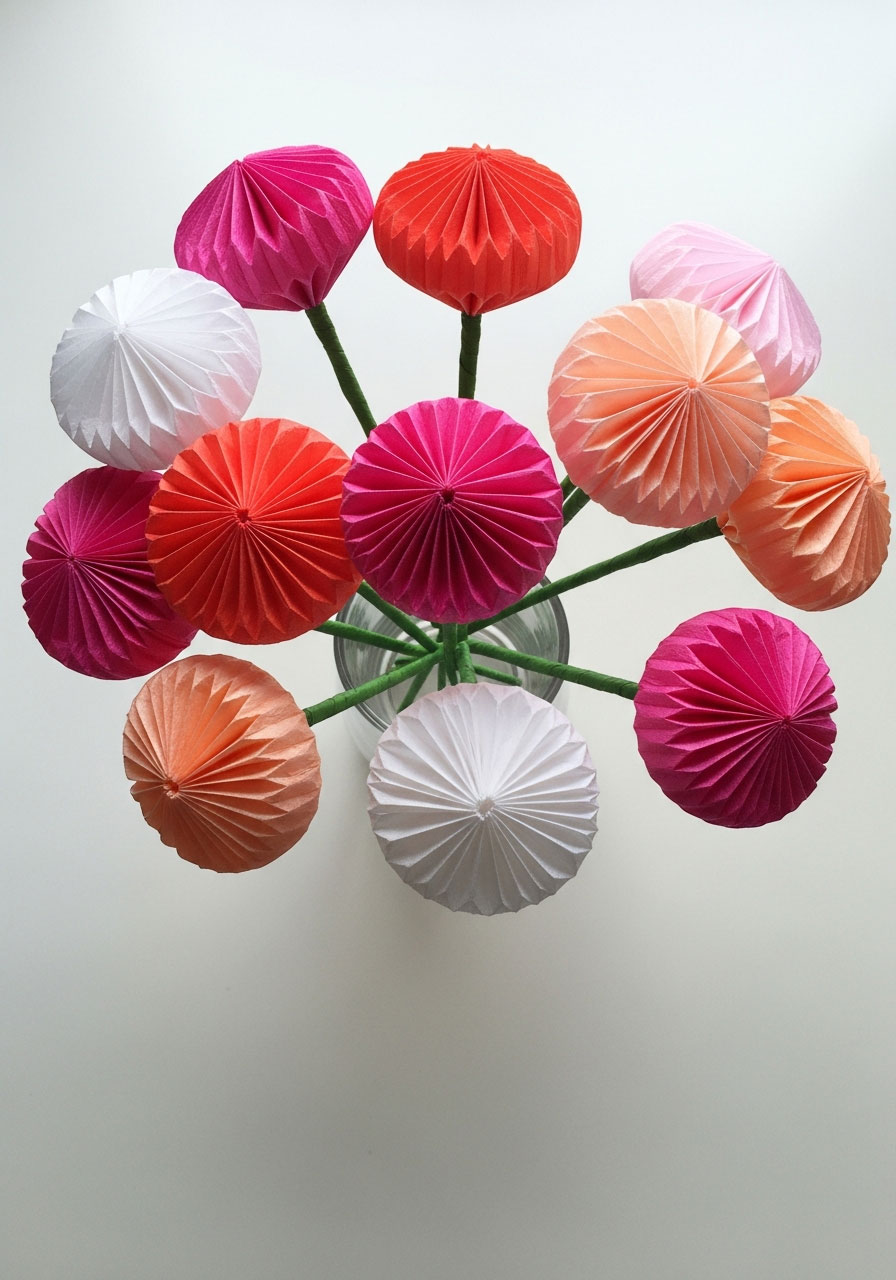
5. Paper Fan Garland
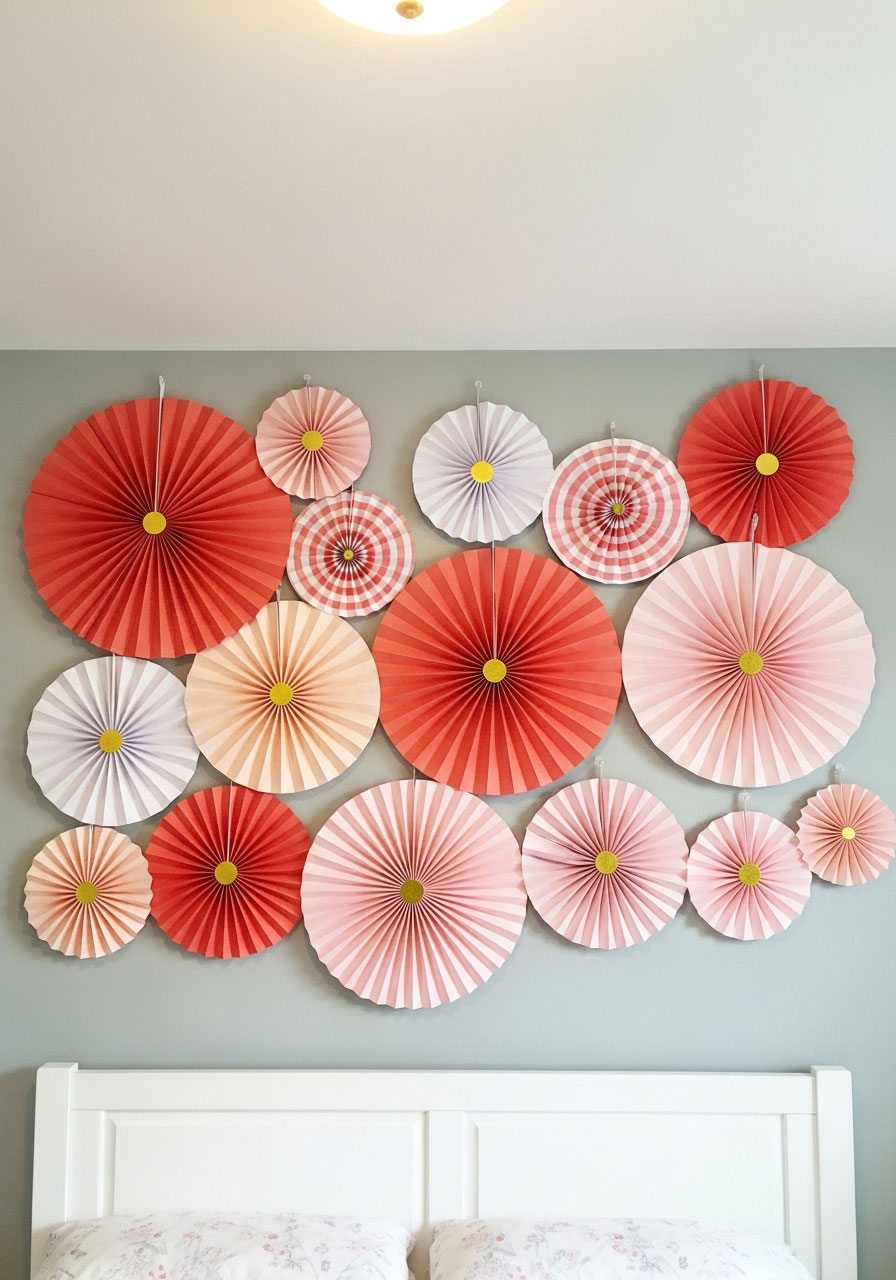
Best for: Backdrop decoration, wall coverage, budget-friendly impact
Time to Make: 30-45 minutes
Difficulty: Easy
Want to cover a large wall space without spending a fortune? These paper fans (also called rosettes) are your new best friend! They create incredible visual impact with minimal effort.
What You’ll Need:
- Colorful cardstock or scrapbook paper
- Scissors
- Hot glue gun or double-sided tape
- Paper fasteners or buttons
How to Make It:
1. Accordion-fold your paper lengthwise, making each fold about half an inch wide.
2. Fold the accordion in half to find the center point.
3. Secure the center with a paper fastener or glue a button over it.
4. Fan out both sides and glue the ends together to form a complete circle.
5. Attach to the wall using double-sided tape or Command strips in a clustered arrangement.
Pro Tip: Create depth by making fans in three different sizes (small, medium, large) and layering them in groups of three for a dimensional effect!
6. Strawberry Roses
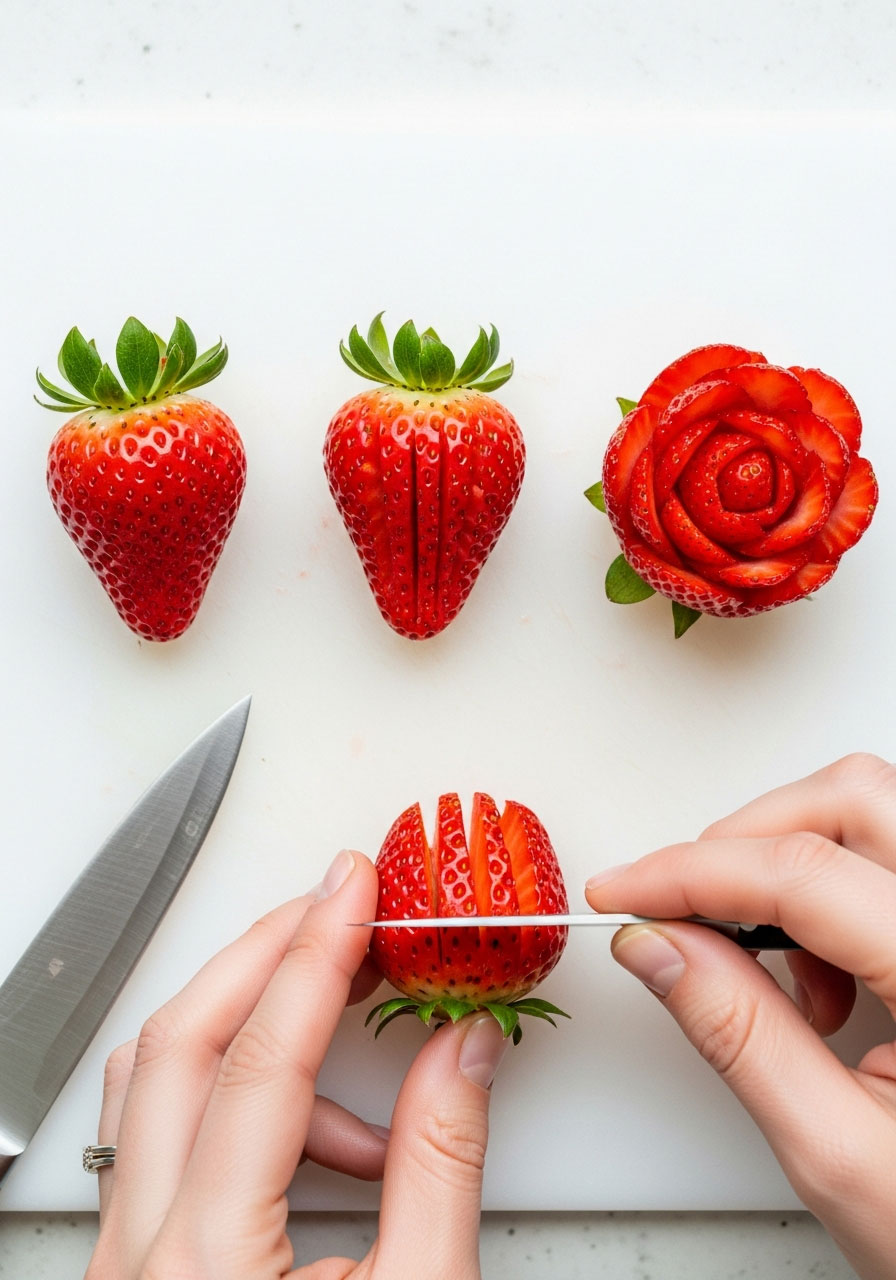
Best for: Elegant dessert displays, brunch parties, romantic themes
Time to Make: 20 minutes
Difficulty: Easy (but impressive!)
These edible “roses” are decoration and dessert rolled into one gorgeous package. Your guests will be seriously impressed by your culinary artistry!
What You’ll Need:
- Fresh strawberries
- Sharp paring knife
- Serving platter
- Mint leaves (optional)
How to Make It:
1. Select firm strawberries with nice green tops still attached.
2. Make thin vertical cuts around the strawberry, starting from the tip and cutting toward (but not through) the base.
3. Create additional layers by making cuts in between your first cuts, going slightly deeper.
4. Gently fan out the “petals” by pressing lightly on the strawberry.
5. Arrange on a platter with mint leaves for a stunning edible centerpiece!
Pro Tip: Chill your strawberries before carving – they’ll hold their shape better and the petals will fan out more beautifully!


Balloon Magic (Because Balloons Never Go Out of Style!)
7. Mini Ice Cream Cone Balloon Sticks
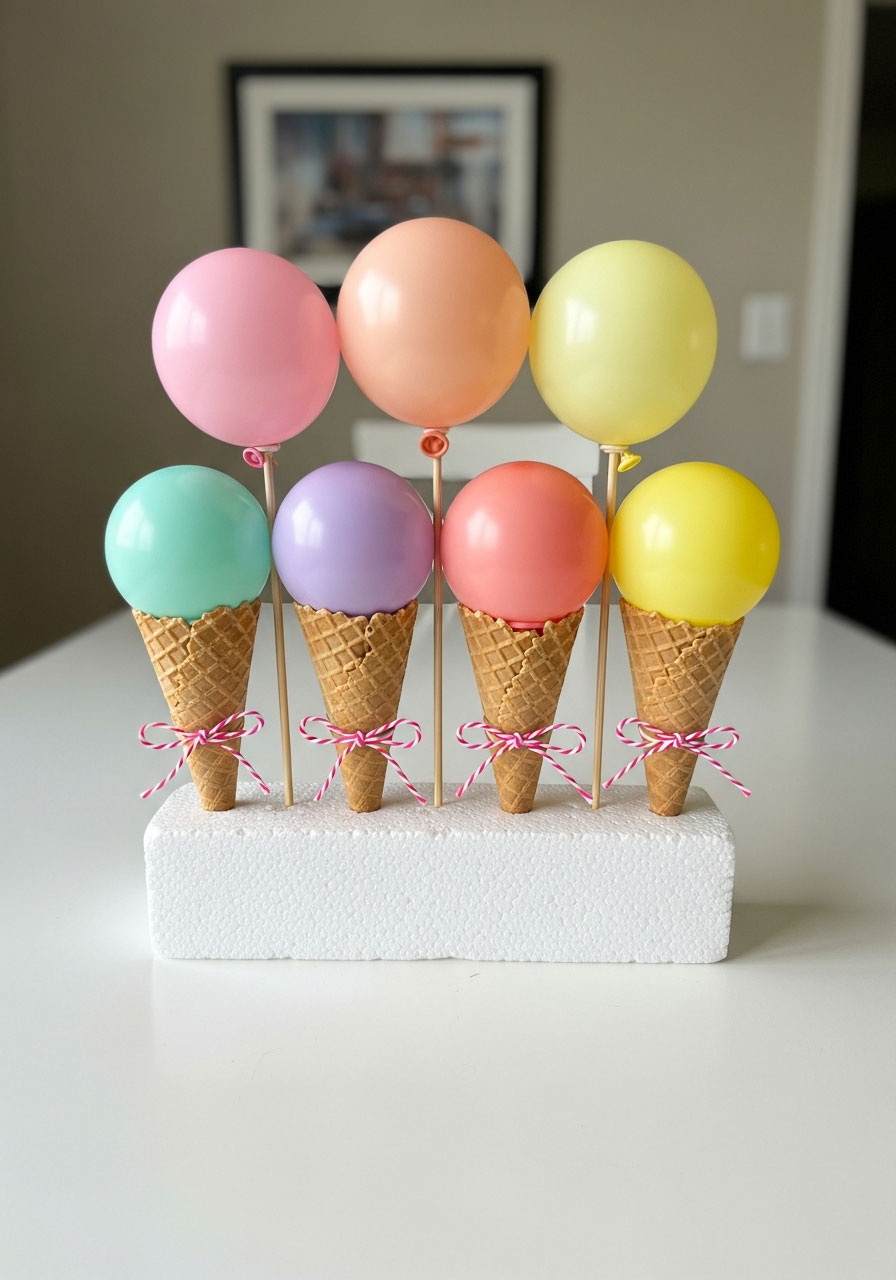
Best for: Table decorations, party favors, individual place settings
Time to Make: 15 minutes per cone
Difficulty: Easy
These adorable mini decorations double as party favors that guests can take home. They’re basically the cutest thing ever!
What You’ll Need:
- Small balloons in pastel colors
- Mini waffle cones
- Wooden dowels or sturdy straws
- Hot glue gun
- Ribbon (optional)
How to Make It:
1. Inflate small balloons to about 4-5 inches in diameter.
2. Tie off balloons and trim the excess tying material.
3. Insert a dowel into the cone and secure with hot glue at the base.
4. Attach the balloon to the top of the dowel using hot glue.
5. Position the cone over the balloon knot and secure with glue for that ice cream effect!
Pro Tip: Add a small tuft of cotton candy or tissue paper “fluff” between the balloon and cone for an extra realistic melting ice cream look!
8. DIY Fruity Balloon Straws
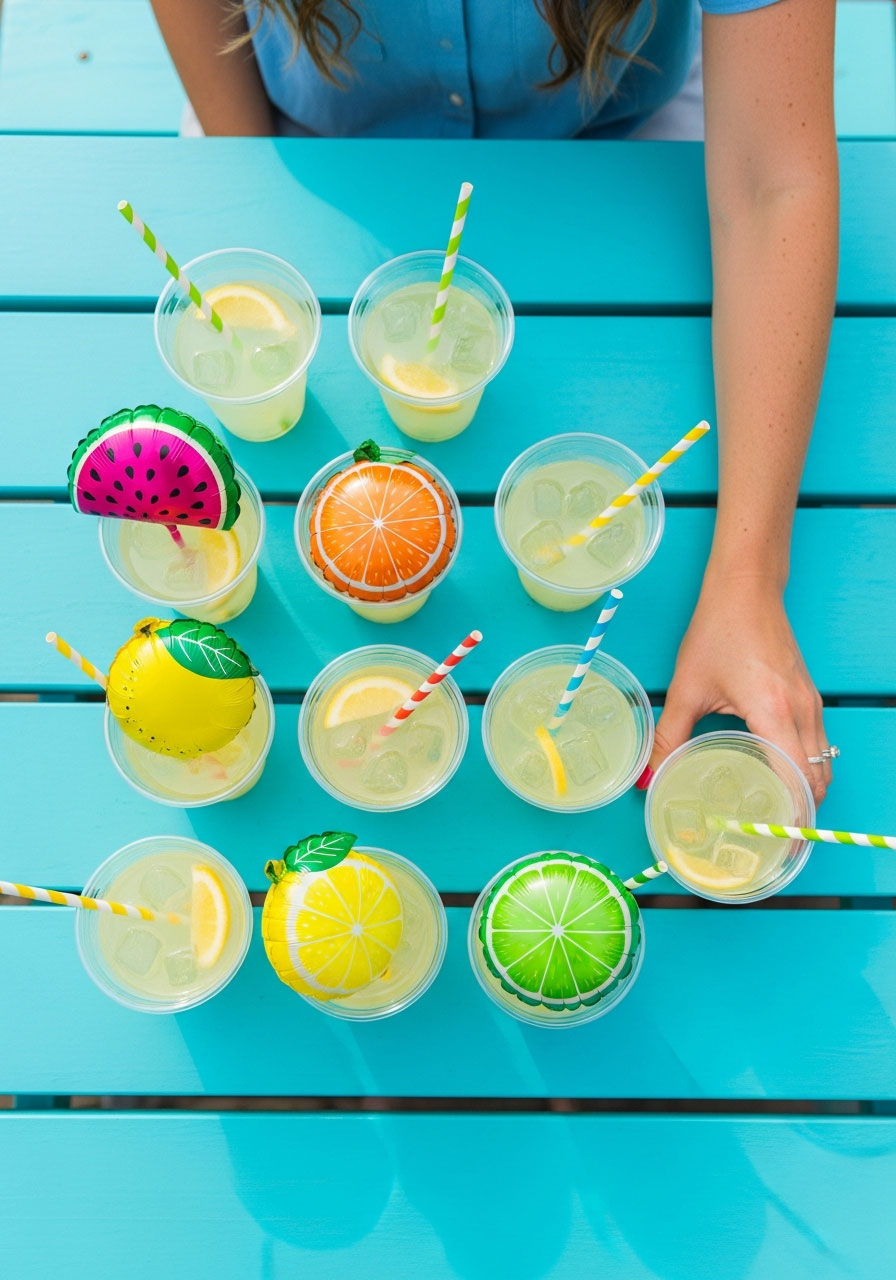
Best for: Kids’ parties, tropical themes, beverage stations
Time to Make: 5 minutes each
Difficulty: Super easy
Turn ordinary straws into extraordinary party accessories! These fruity toppers make even plain water look like a party.
What You’ll Need:
- Small 5-inch balloons in fruit colors (red, orange, yellow, green)
- Striped paper straws
- Permanent markers (black and green)
- Tape or glue dots
How to Make It:
1. Inflate small balloons to about 3-4 inches.
2. Draw fruit details using permanent markers (seeds for strawberries and watermelon, segments for oranges).
3. Tie off balloons securely.
4. Attach balloon knots to straws using clear tape or glue dots.
5. Place in drinks right before serving for maximum wow factor!
Pro Tip: Make these the night before and store them in a box with tissue paper – they’ll survive just fine and save you precious party-day time!
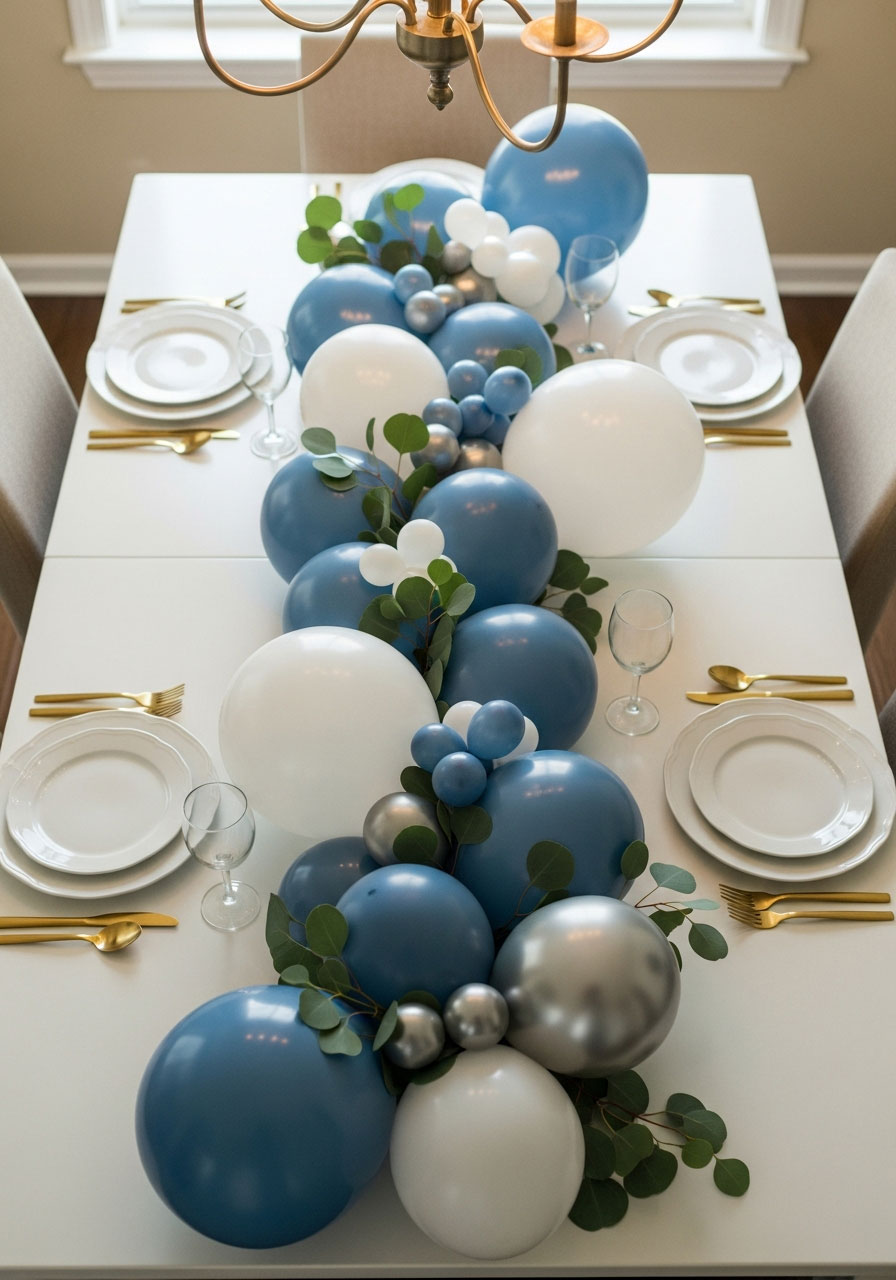
9. DIY Balloon Fronds Party Table Centerpiece Garland
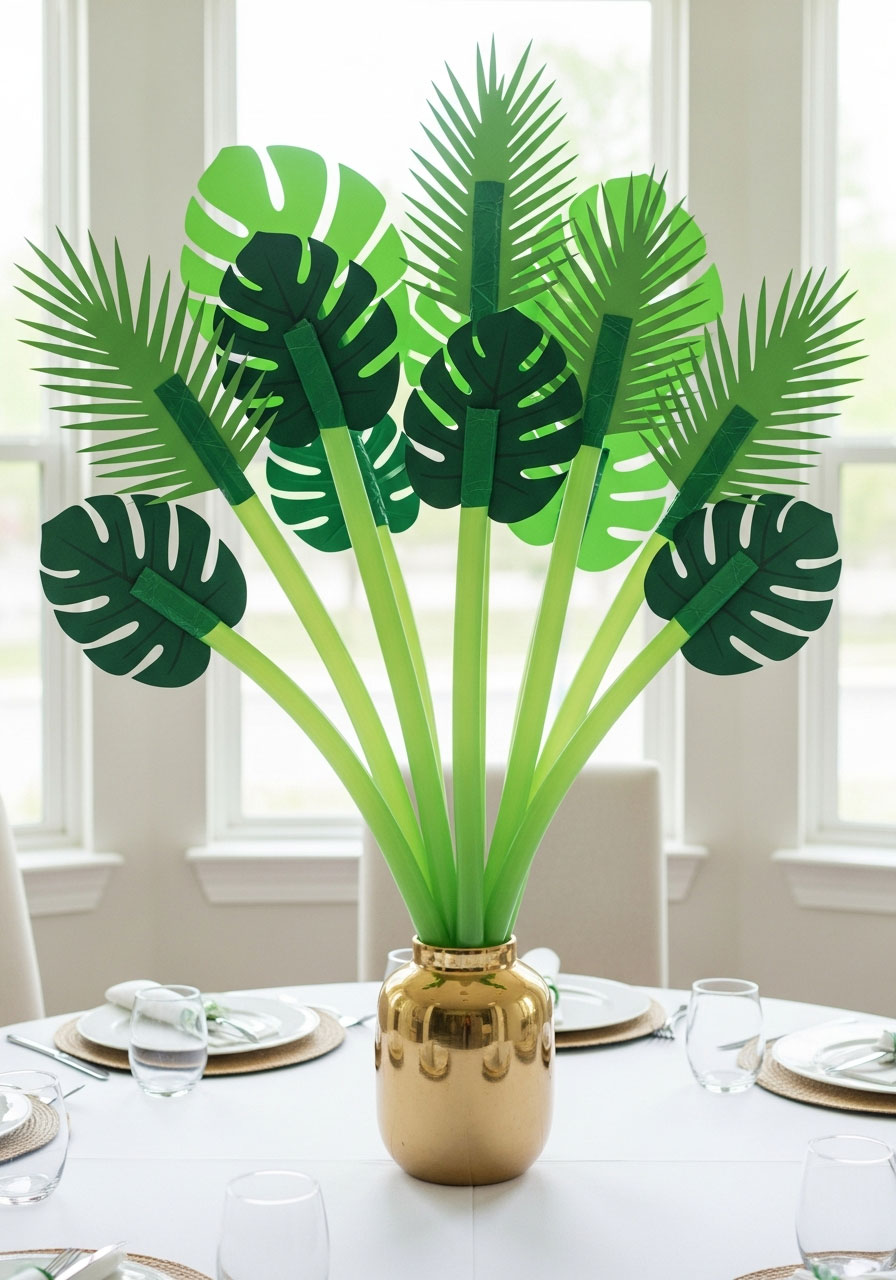
Best for: Tropical parties, modern celebrations, minimalist themes
Time to Make: 30 minutes
Difficulty: Easy
This trendy decoration brings serious style with its modern, botanical vibe. It’s like bringing the tropics indoors without the humidity!
What You’ll Need:
- Long balloons (260Q modeling balloons)
- Balloon pump
- Green cardstock or felt
- Wire or floral tape
- Scissors
How to Make It:
1. Cut leaf shapes from green cardstock – think palm fronds or monstera leaves.
2. Inflate long balloons partially to create stem-like shapes.
3. Attach leaves to balloons using floral tape or by threading wire through the leaf base.
4. Arrange multiple fronds in a vase or attach to a base for table centerpieces.
5. Group 3-5 together for maximum impact!
Pro Tip: Spray your paper leaves with a light coat of cooking spray and buff with a paper towel – it gives them a subtle sheen that looks incredibly realistic!
10. DIY Tiny Fruit Garland
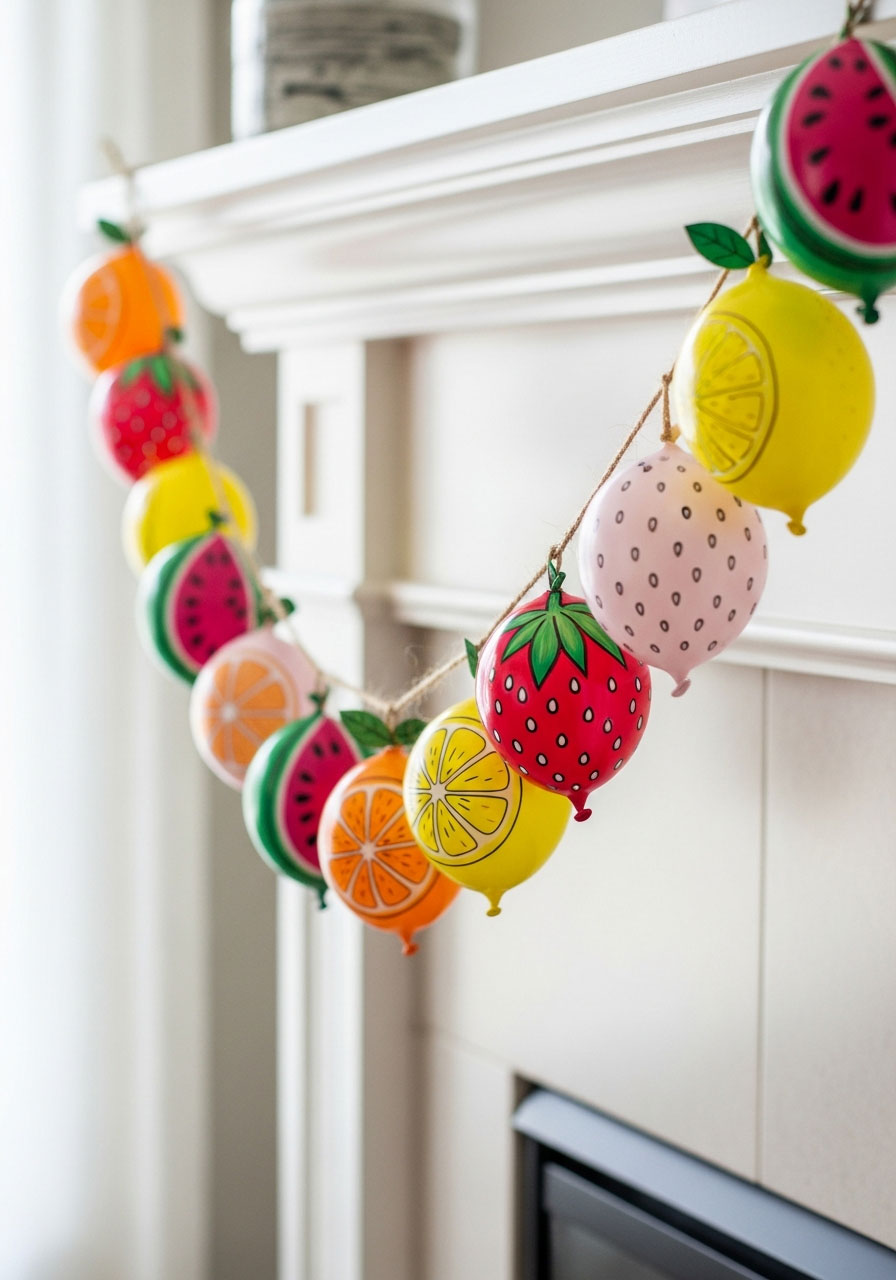
Best for: Summer parties, farmers market themes, kids’ celebrations
Time to Make: 1 hour
Difficulty: Easy
This miniature garland packs major cute factor! It’s perfect for adding charm without overwhelming your space.
What You’ll Need:
- Small balloons in fruit colors
- Permanent markers
- Green cardstock or felt for leaves
- Twine or string
- Hot glue gun
How to Make It:
1. Inflate small balloons to golf-ball size.
2. Draw fruit patterns with permanent markers (watermelon slices, citrus segments, strawberry seeds).
3. Cut tiny leaf shapes from green paper.
4. Glue leaves to the balloon knots.
5. String them together by tying the knots to twine, spacing them 4-6 inches apart.
Pro Tip: Use a combination of matte and metallic balloons to add unexpected texture and visual interest to your garland!
11. Spiral Mobiles DIY
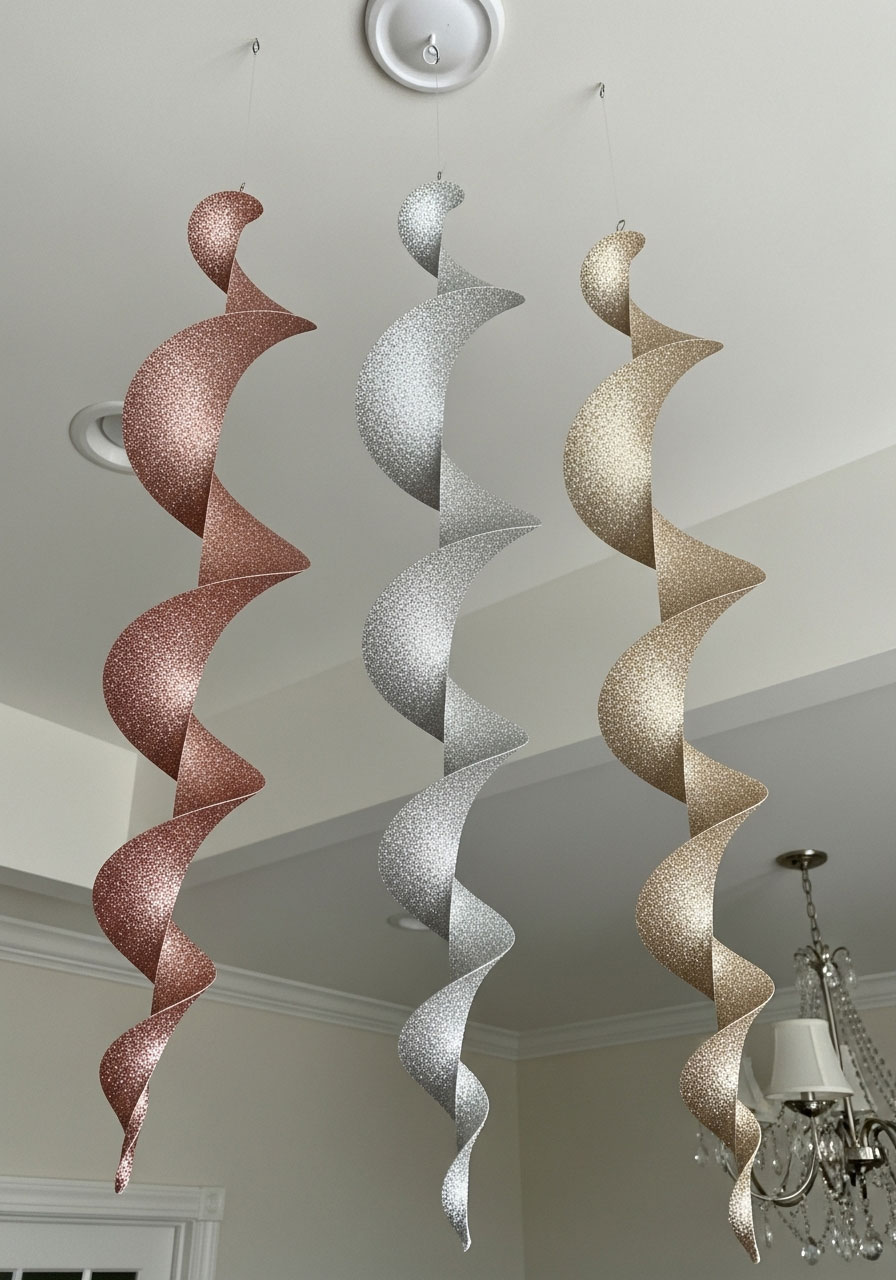
Best for: Overhead decor, filling vertical space, adding movement
Time to Make: 45 minutes
Difficulty: Easy
These mesmerizing spirals add a magical, floating quality to your party space. They catch the light beautifully and create gorgeous shadows!
What You’ll Need:
- Colorful cardstock or glitter paper
- Scissors
- Needle and thread or fishing line
- Circle template or compass
- Pencil
How to Make It:
1. Draw circles on cardstock – anywhere from 6-12 inches in diameter.
2. Cut a spiral starting from the outside edge and working toward the center in a continuous line.
3. Poke a hole at the center point.
4. Thread fishing line through the center and knot it.
5. Hang at varying heights from the ceiling for a floating, whimsical effect!
Pro Tip: Make spirals in an ombré color scheme, hanging from lightest to darkest, for an incredibly sophisticated look that photographs beautifully!
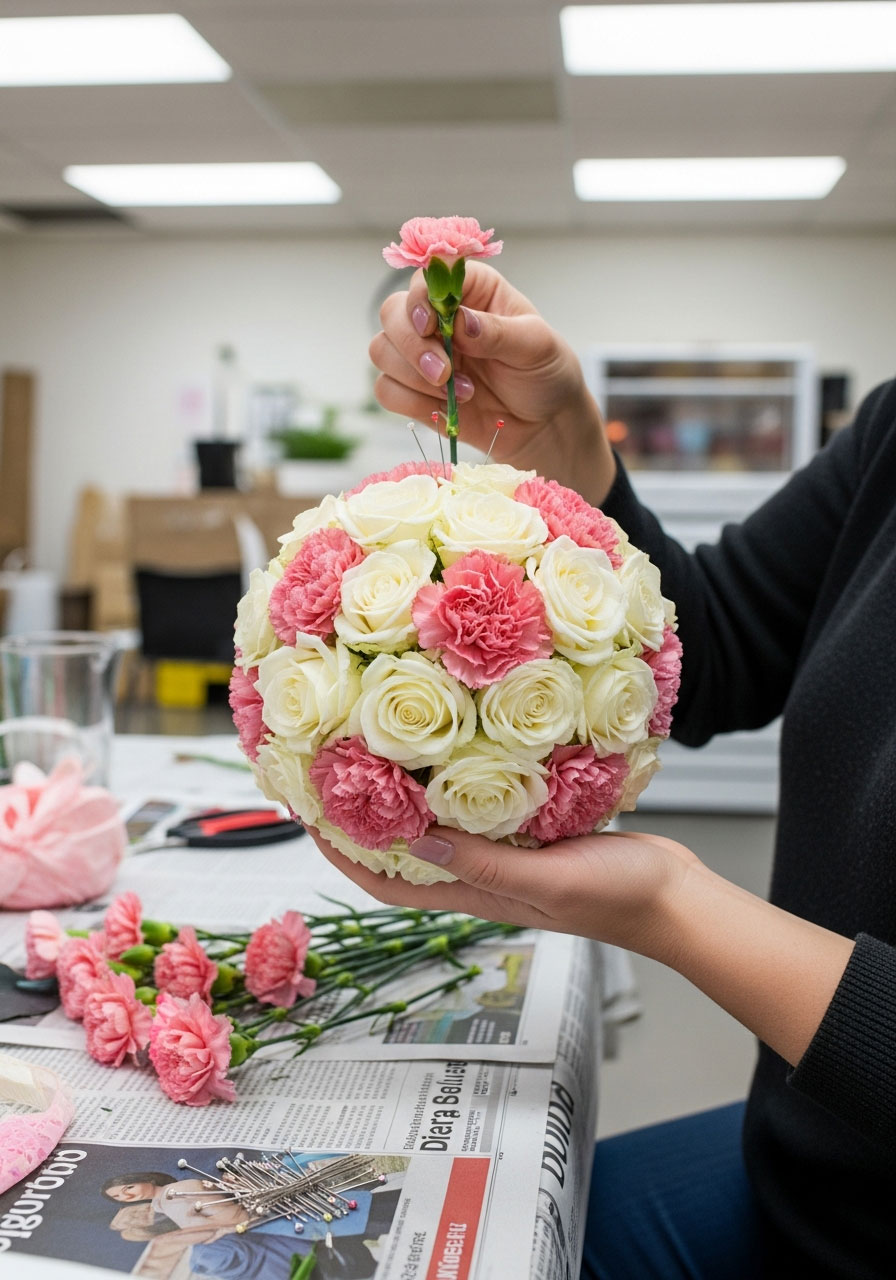
12. DIY Kissing Ball
Best for: Elegant parties, weddings, photo backdrops
Time to Make: 2 hours
Difficulty: Moderate
This showstopper looks like it came straight from a high-end event designer! Your guests will never believe you made it yourself.
What You’ll Need:
- Foam ball (8-12 inches)
- Fresh or faux flowers with short stems
- Floral pins or hot glue
- Ribbon for hanging
- Scissors or wire cutters
How to Make It:
1. Attach a ribbon loop to the top of the foam ball for hanging.
2. Trim flower stems to about 1-2 inches long.
3. Insert flowers into the foam ball using floral pins or hot glue, starting at the top.
4. Work in a circular pattern, covering the entire ball while leaving no gaps.
5. Hang from the ceiling or use as a stunning table centerpiece!
Pro Tip: Mix in some greenery or eucalyptus between flowers – it adds texture, saves money, and helps cover the ball more quickly!
Statement Pieces That Command Attention
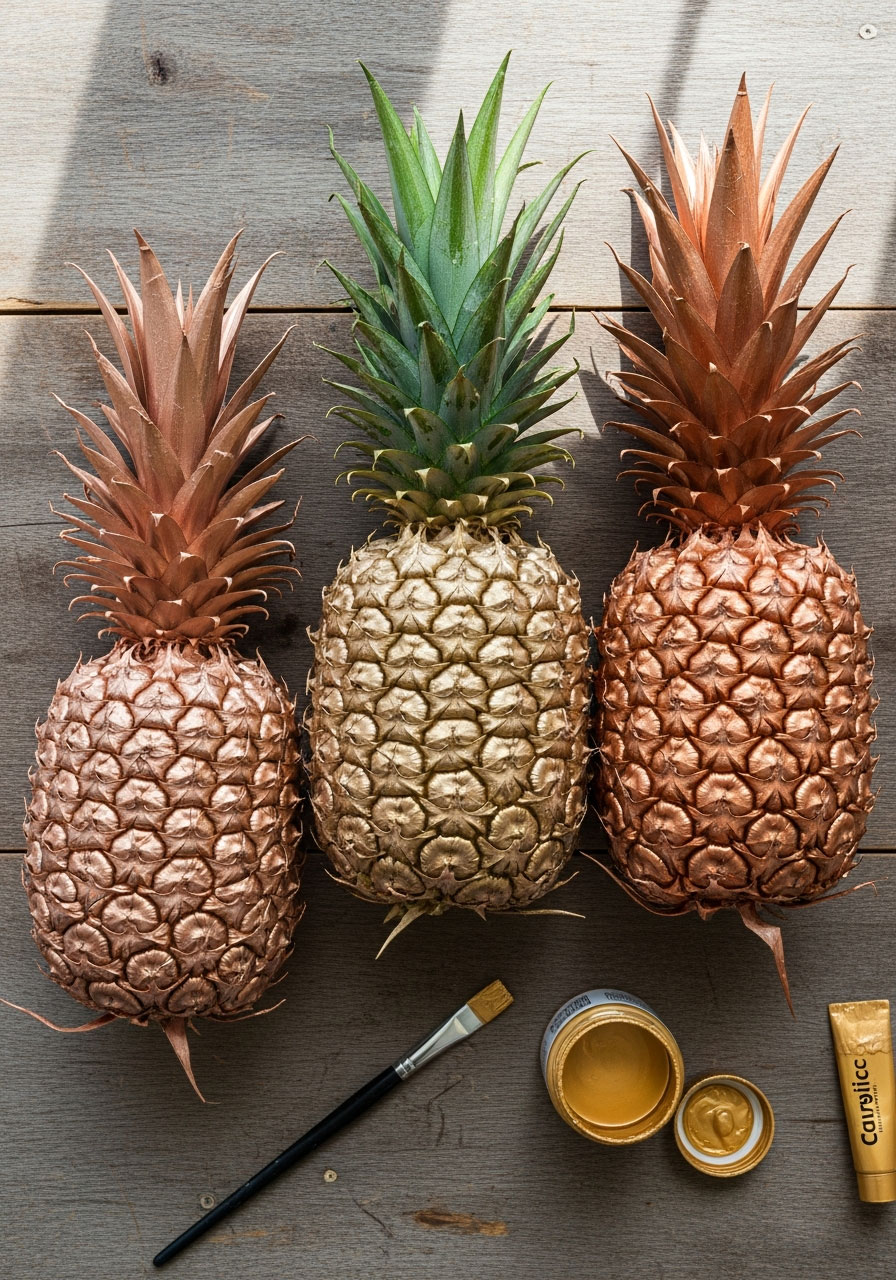
13. Painted Pineapples DIY Party Decor
Best for: Tropical themes, summer parties, budget-friendly centerpieces
Time to Make: 30 minutes (plus drying time)
Difficulty: Easy
Fresh pineapples are already gorgeous, but painted ones? Next-level fabulous! This is how you make fruit fancy.
What You’ll Need:
- Fresh pineapples with green tops
- Acrylic paint (metallic gold is stunning!)
- Paintbrushes
- Newspaper or drop cloth
- Clear acrylic sealer (optional)
How to Make It:
1. Clean and dry pineapples thoroughly – paint won’t stick to moisture.
2. Lay down newspaper to protect your surface.
3. Paint the pineapple body with your chosen color, avoiding the green top.
4. Apply 2-3 coats for full coverage, letting each coat dry completely.
5. Add a sealer coat if you want them to last beyond the party.
Pro Tip: Create a stunning ombré effect by using three shades of the same color and painting each pineapple a different shade – arrange them from lightest to darkest on your table!
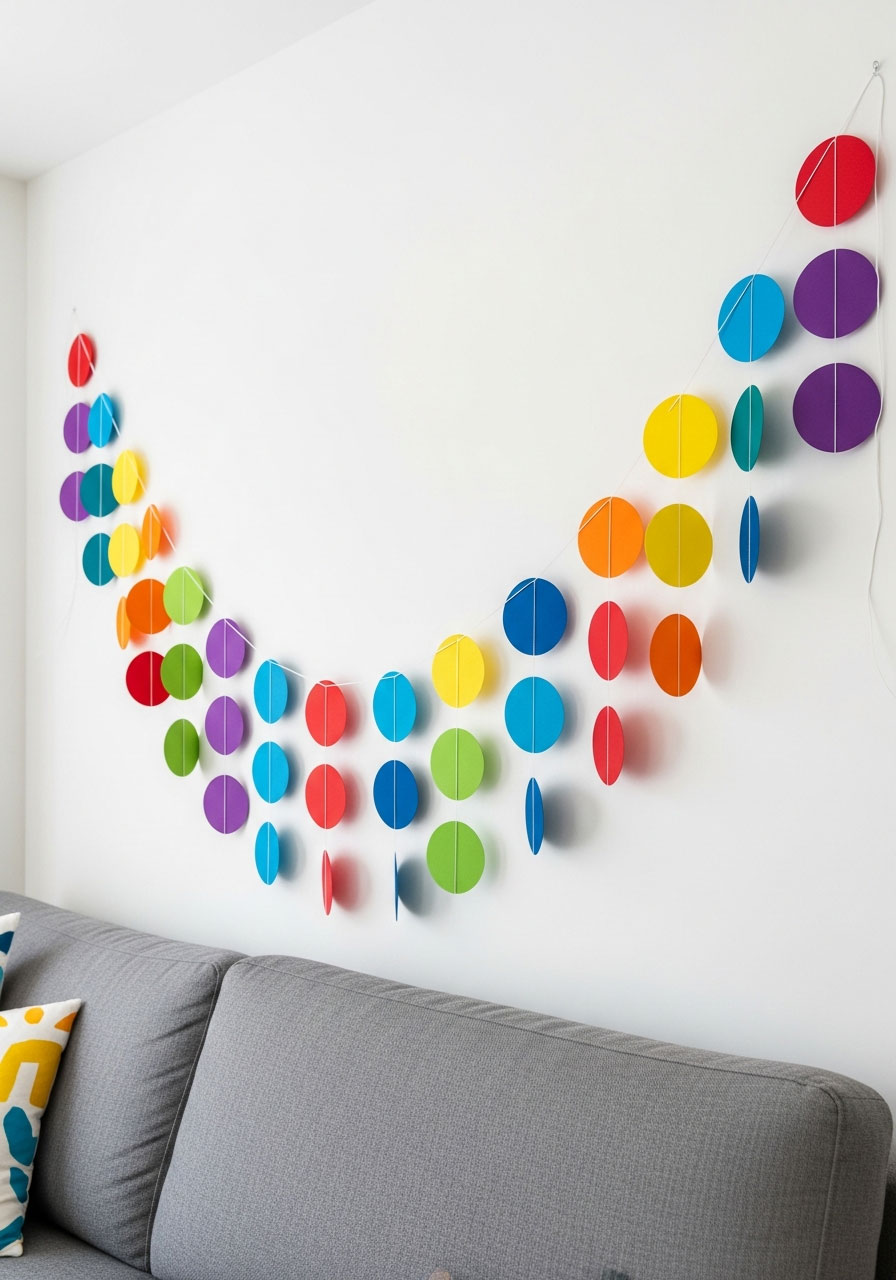
14. DIY Festive Paper Garland
Best for: All occasions, quick decor, filling empty walls
Time to Make: 30 minutes
Difficulty: Easy
This classic never goes out of style! It’s the MVP of party decorations – simple, cheerful, and endlessly customizable.
What You’ll Need:
- Cardstock in multiple colors
- Circle punch or template (3-4 inches)
- Sewing machine or needle and thread
- Scissors
- Ruler
How to Make It:
1. Cut out circles from cardstock in your party colors – you’ll need about 50 for a 10-foot garland.
2. Arrange circles in your desired color pattern.
3. Sew through the center of each circle using a sewing machine or hand-stitching.
4. Leave thread tails at each end for hanging.
5. Hang in swags across walls, doorways, or above tables!
Pro Tip: Alternate solid colors with patterned scrapbook paper for added visual interest, and vary your circle sizes for a more organic, whimsical look!
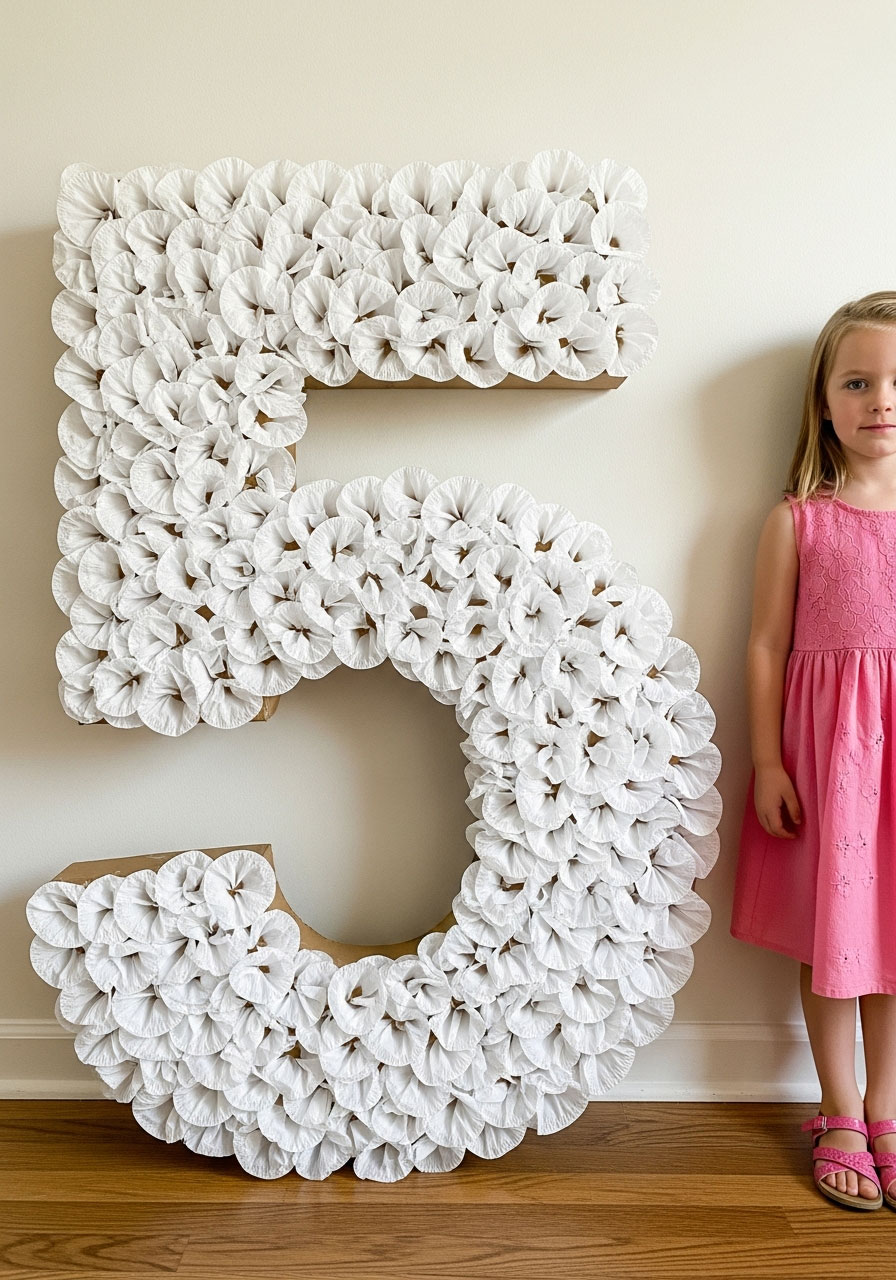
15. DIY Coffee Filter Number
Best for: Milestone birthdays, anniversaries, age displays
Time to Make: 2-3 hours
Difficulty: Moderate (but SO worth it!)
This dimensional number display creates an incredible textured effect that looks professionally made. People will be shocked when you tell them it’s made from coffee filters!
What You’ll Need:
- Large cardboard number cutout (buy pre-made or cut yourself)
- 200-300 coffee filters
- Hot glue gun with extra glue sticks
- Scissors
- Paint or dye (optional)
How to Make It:
1. Dye coffee filters if desired by dipping in diluted food coloring and letting dry.
2. Fold each filter in half, then in half again to create a cone shape.
3. Apply hot glue to the base of the folded filter.
4. Attach to the cardboard, starting at the bottom edge and working in rows.
5. Overlap each row slightly to create fullness and cover all cardboard completely.
Pro Tip: Create an ombré effect by using three shades of dyed filters, transitioning from dark at the bottom to light at the top – it adds incredible depth and sophistication!
16. Tissue Paper Tassel Garland
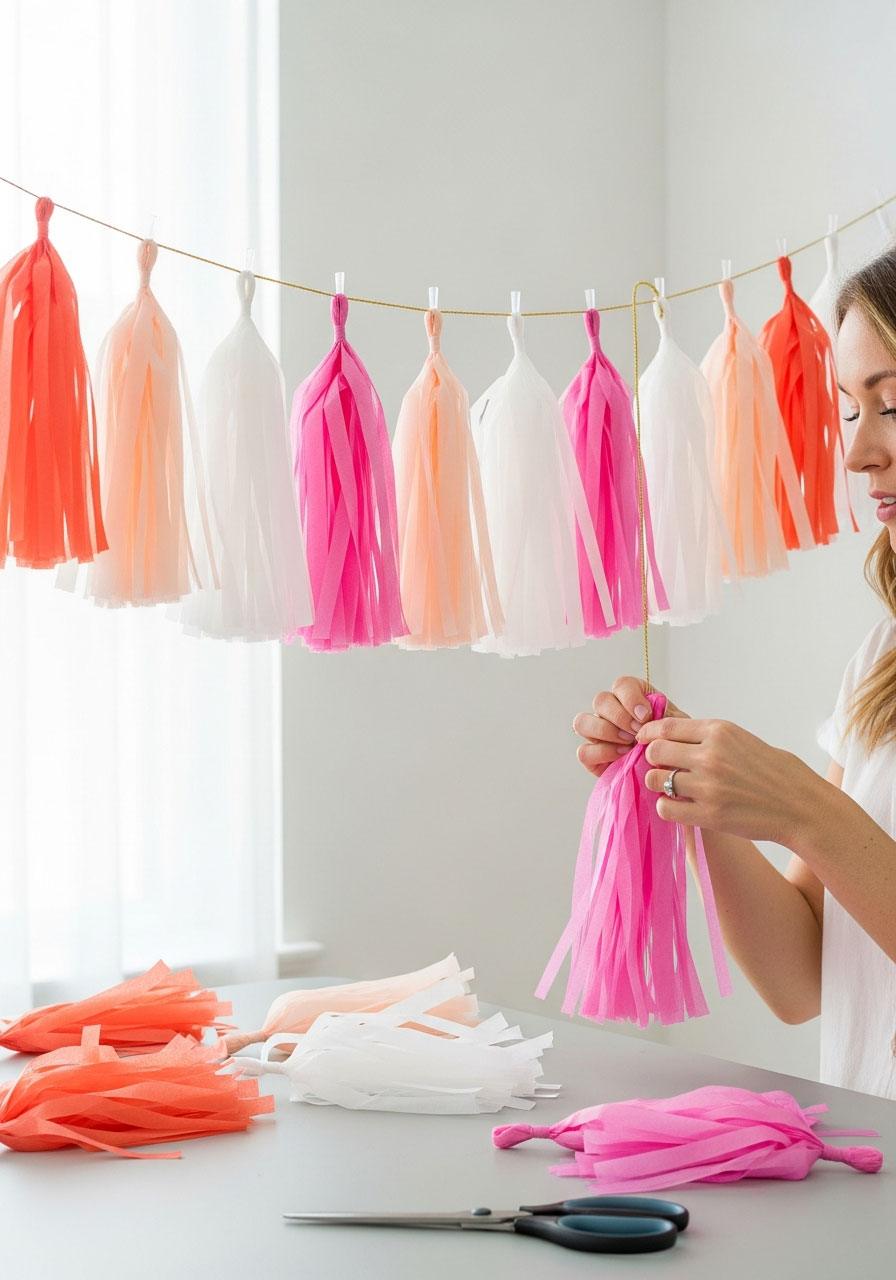
Best for: Photo backdrops, hanging decor, filling vertical space
Time to Make: 1 hour
Difficulty: Easy
This garland brings movement and texture to your party space. Every time someone walks by, those tassels flutter and catch the light – it’s pure magic!
What You’ll Need:
- Tissue paper in multiple colors
- Scissors
- Twine or ribbon
- Ruler
- Tape
How to Make It:
1. Cut tissue paper into rectangles about 12×16 inches.
2. Fold each rectangle in half lengthwise.
3. Cut fringe along the open edge, stopping about 2 inches from the fold.
4. Unfold and roll tightly from one short end, then fold in half.
5. Twist the top to secure and tie onto your twine, spacing tassels 4-6 inches apart.
Pro Tip: Make your tassels in two different lengths and alternate them on your garland – it creates gorgeous visual rhythm and makes your garland look more expensive!
17. DIY Paper Rosettes
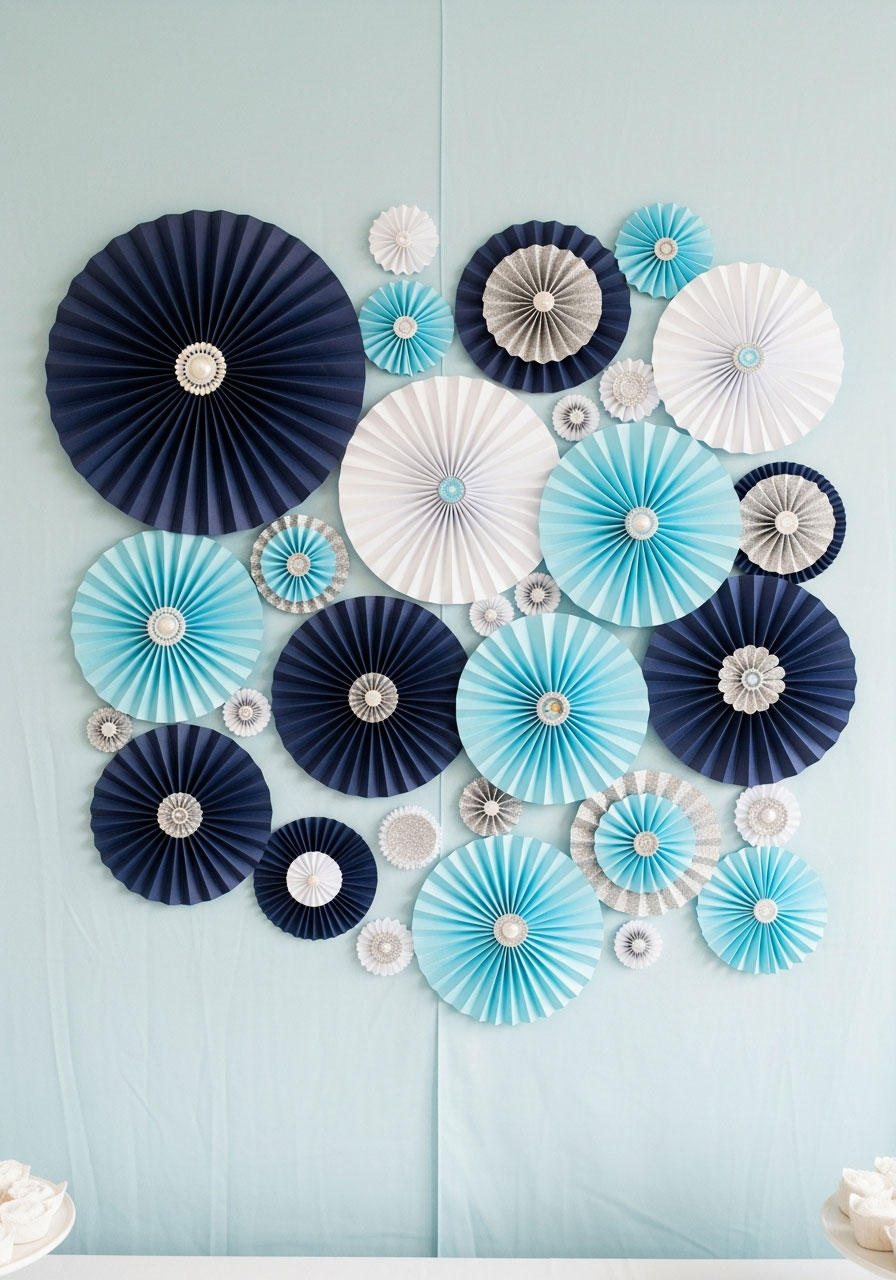
Best for: Wall displays, backdrop decorations, filling large spaces
Time to Make: 20 minutes each
Difficulty: Easy
These gorgeous medallions are the ultimate high-impact, low-effort decoration. They’re like paper fans’ more sophisticated cousin!
What You’ll Need:
- Decorative scrapbook paper or cardstock
- Hot glue gun
- Circle cutouts for centers
- Stapler
- Ruler
How to Make It:
1. Cut paper into strips about 12 inches long and 2 inches wide (you’ll need 10-12 strips per rosette).
2. Accordion-fold each strip with half-inch folds.
3. Arrange strips in a circle, overlapping ends slightly, and staple together at the center.
4. Glue a circle cutout over the center to hide the staples.
5. Mount on wall using double-sided tape or Command strips.
Pro Tip: Layer two rosettes of different sizes on top of each other (large one behind, smaller one in front) for incredible dimension – use complementary colors or patterns for maximum impact!
18. DIY Birthday Party Banner
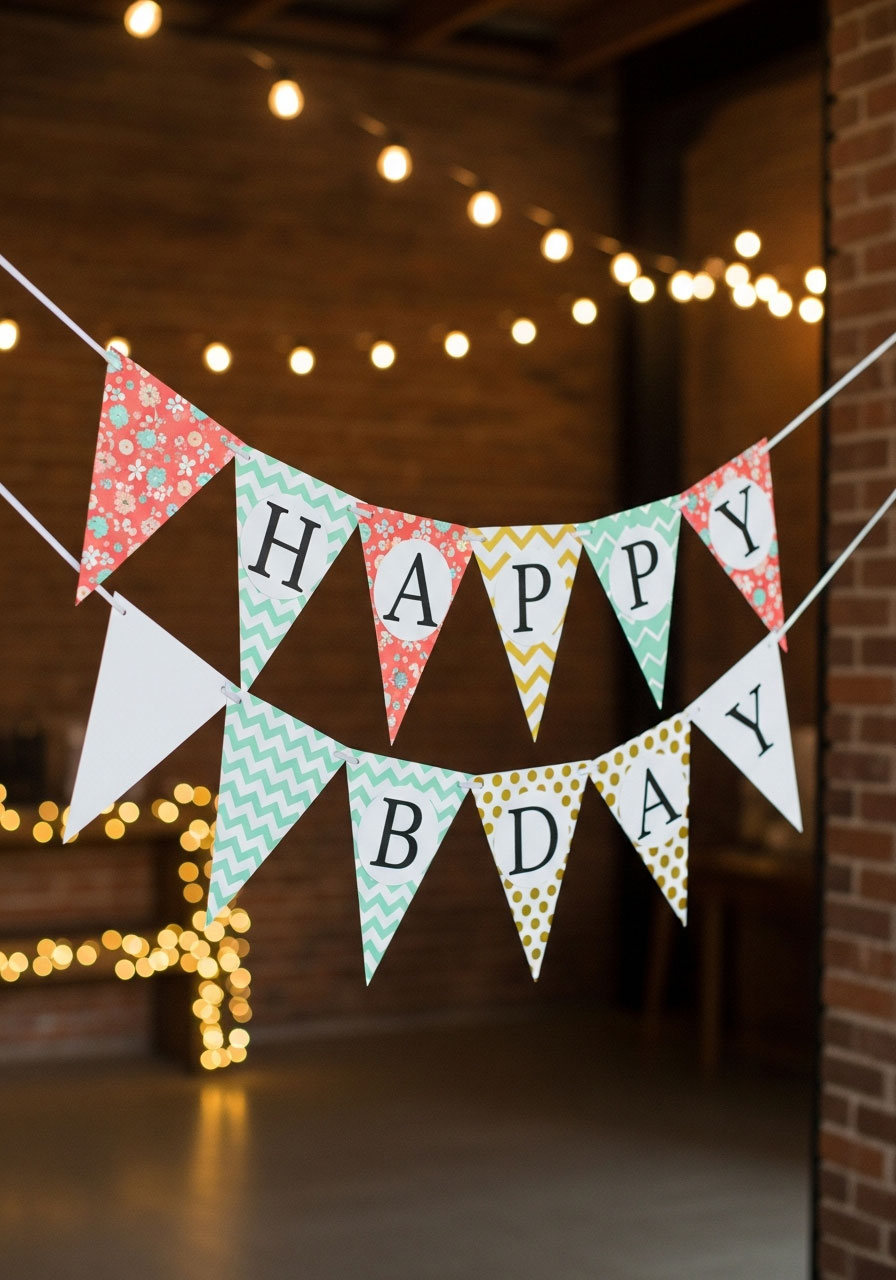
Best for: All birthday parties, customizable messaging, photo backdrops
Time to Make: 45 minutes
Difficulty: Easy
This is your chance to get creative with messaging! Whether it’s “Happy Birthday”, the guest of honor’s name, or a fun phrase, this banner makes it official.
What You’ll Need:
- Cardstock or scrapbook paper
- Letter templates or stencils
- Scissors
- Ribbon or twine
- Hole punch
- Markers or paint (optional)
How to Make It:
1. Cut out pennant shapes from cardstock – about 5×7 inches each works great.
2. Trace or print letters onto each pennant (one letter per pennant).
3. Decorate each pennant with patterns, borders, or embellishments.
4. Punch holes in the top corners of each pennant.
5. String onto ribbon, spelling out your message, and hang proudly!
Pro Tip: Mix solid colors with patterned papers and add some metallic gold or silver pennants between letters for a designer look that photographs beautifully!
Balloon Art That Looks Professional
19. DIY Donut Balloons
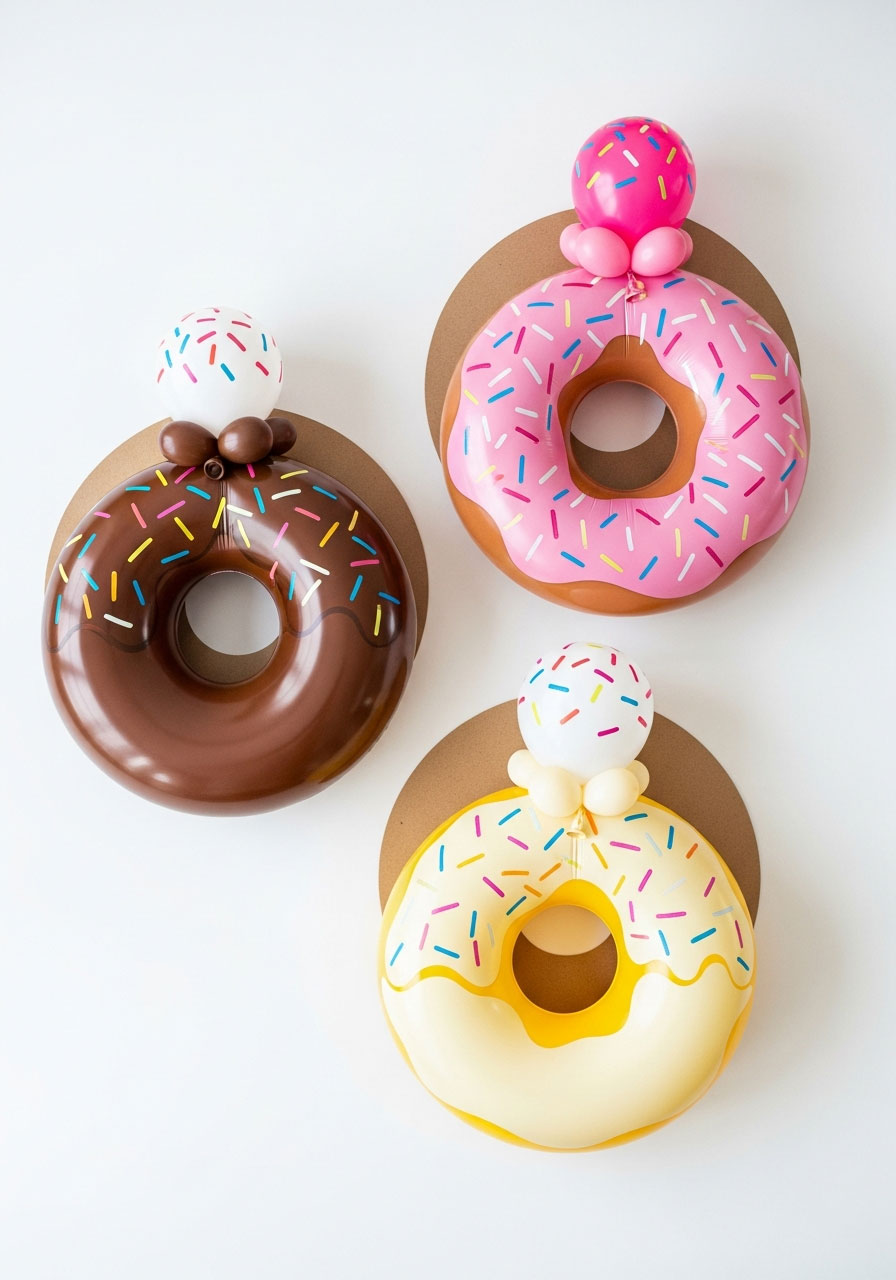
Best for: Donut parties, breakfast celebrations, Instagram-worthy photos
Time to Make: 15 minutes per donut
Difficulty: Easy
These adorable donut balloons are almost too cute to pop! They’re perfect for the dessert-lover in your life.
What You’ll Need:
- Large round balloons in donut colors (pink, chocolate brown, vanilla yellow)
- Small balloons for “frosting”
- Cardstock in white and brown
- Permanent markers
- Hot glue gun
How to Make It:
1. Inflate a large balloon fully for the donut base.
2. Cut a circle from cardstock and draw a hole in the center to create the donut shape.
3. Inflate a smaller balloon partially and attach to the top of the large balloon as “frosting”.
4. Draw sprinkles on the smaller balloon using permanent markers.
5. Glue the cardstock ring to the large balloon if needed for structure.
Pro Tip: Make a whole dozen in different “flavors” and arrange them in a box or on the wall – your guests will do a double-take wondering if they’re real!
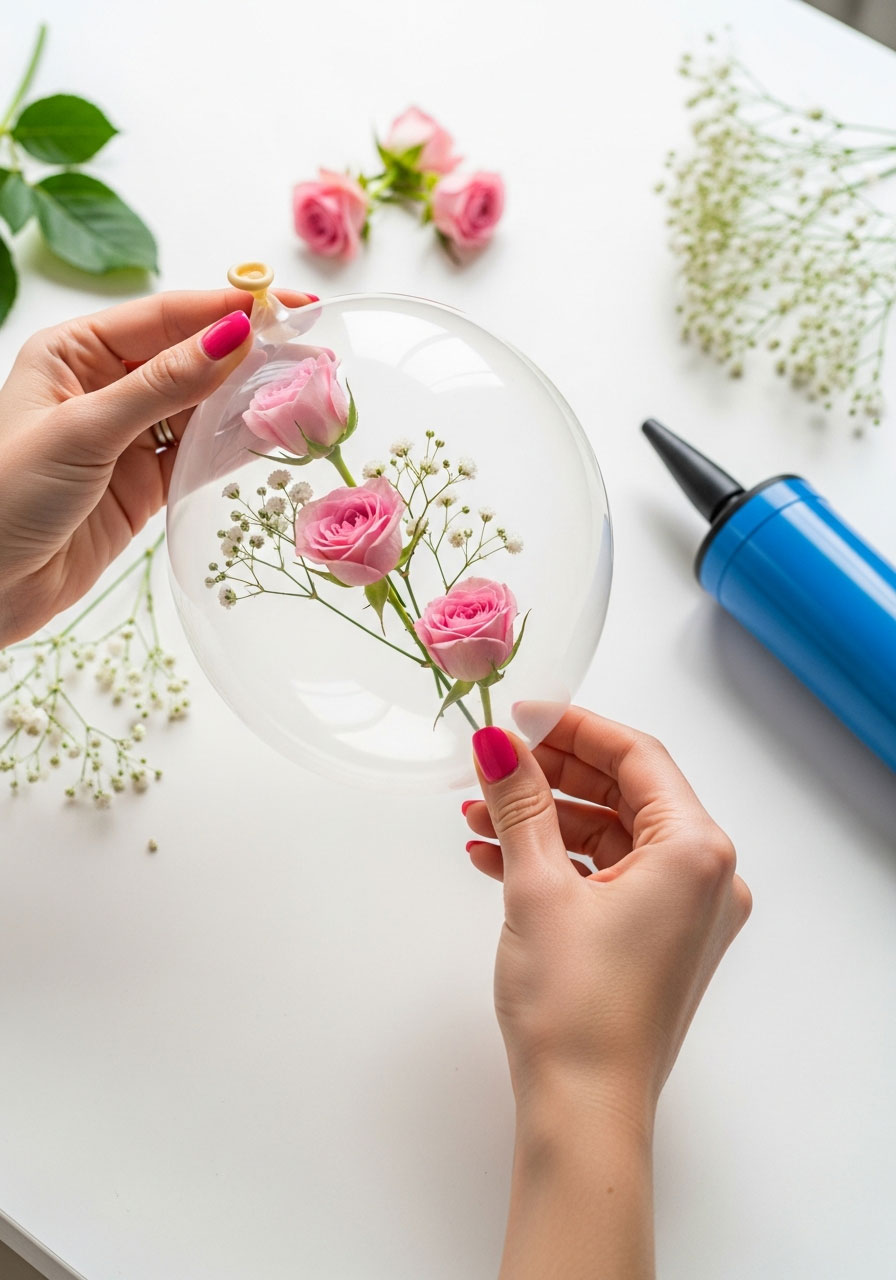
20. DIY Floral Balloon
Best for: Garden parties, bridal showers, elegant celebrations
Time to Make: 30 minutes
Difficulty: Easy
This elegant decoration brings together the fun of balloons with the sophistication of florals. It’s the perfect compromise between playful and pretty!
What You’ll Need:
- Clear or pastel balloons
- Fresh or faux flowers with stems
- Scissors
- Ribbon
- Balloon pump
How to Make It:
1. Trim flower stems to about 6-8 inches long.
2. Carefully insert flowers into the balloon opening before inflating.
3. Inflate the balloon around the flowers.
4. Tie off securely and trim excess stem if needed.
5. Add ribbon and hang or use as table centerpieces!
Pro Tip: Use baby’s breath or small dried flowers inside clear balloons for the most stunning effect – they’re lightweight and won’t weigh down the balloon, plus they photograph like a dream!
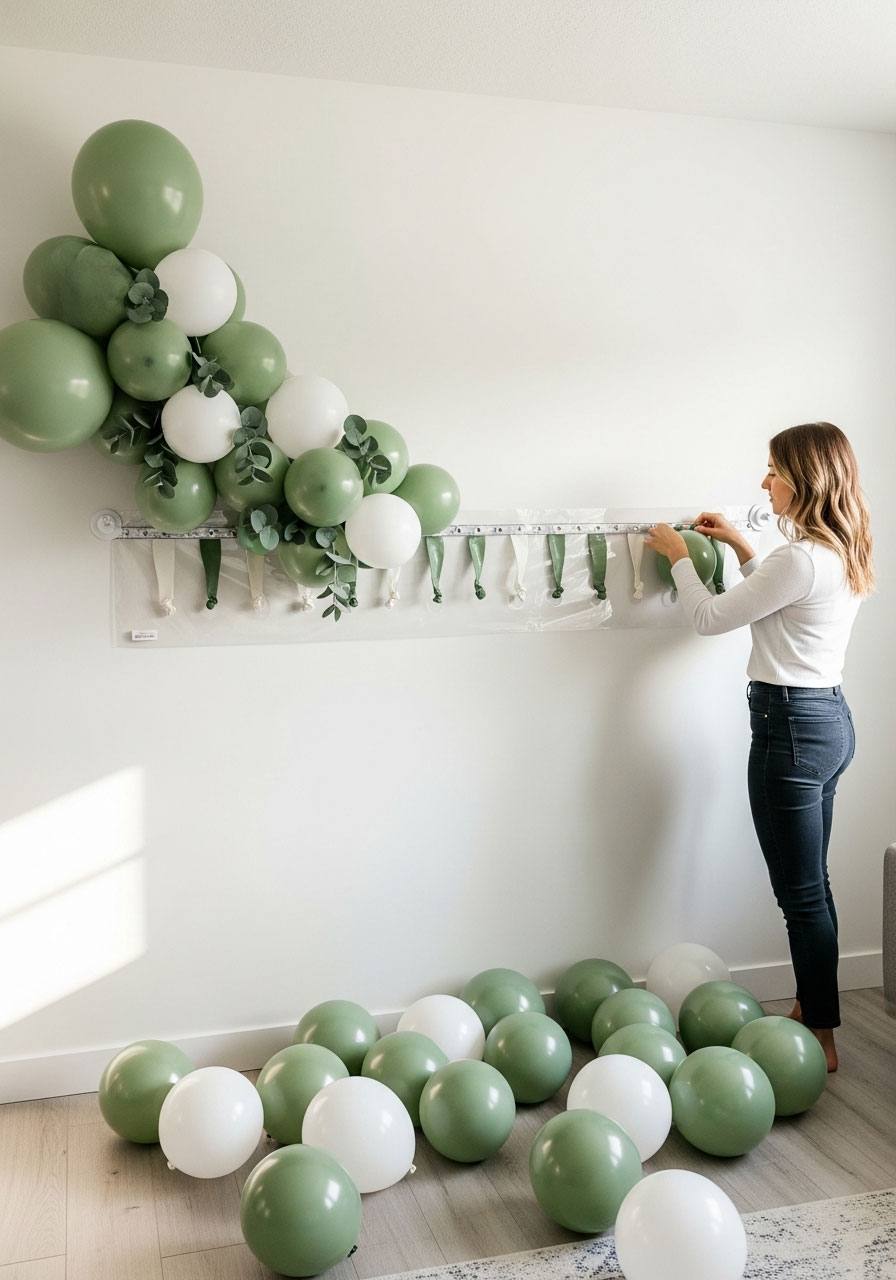
21. Easiest Ever Balloon Garland
Best for: First-time DIYers, quick decor, statement pieces
Time to Make: 1 hour
Difficulty: Easy
If you’ve been intimidated by balloon garlands, this foolproof method will make you a convert! It truly is the easiest version out there.
What You’ll Need:
- Balloons in 3-4 coordinating colors (40-60 balloons)
- Balloon decorating strip (found at craft stores)
- Balloon pump
- Command hooks
- Greenery or flowers (optional)
How to Make It:
1. Inflate balloons in various sizes (small, medium, large) for organic fullness.
2. Insert balloon knots into the holes of the decorating strip.
3. Alternate colors and sizes randomly for the most professional look.
4. Hang the strip using Command hooks on your wall or doorway.
5. Fill gaps with smaller balloons tucked between larger ones.
Pro Tip: Save yourself SO much time by inflating balloons with a dual-action pump that inflates on both push and pull – you’ll cut your inflation time in half!
22. DIY Fruit Slice Balloons

Best for: Summer parties, tropical themes, refreshing vibes
Time to Make: 10 minutes per balloon
Difficulty: Easy
These playful balloons instantly transport your party to a tropical paradise. They’re fun, fruity, and totally Instagram-worthy!
What You’ll Need:
- Large round balloons in fruit colors (yellow, orange, pink, green)
- White and black permanent markers
- Scissors
- Balloon pump
How to Make It:
1. Inflate balloons to full size and tie off.
2. Draw fruit segments radiating from the center using a white marker.
3. Add seeds or details with a black marker.
4. Draw the rind around the edge for citrus fruits.
5. Hang or cluster together for a fresh fruit stand effect!
Pro Tip: Make one of each fruit type and hang them at varying heights in a corner – it creates an incredible focal point that guests will flock to for photos!
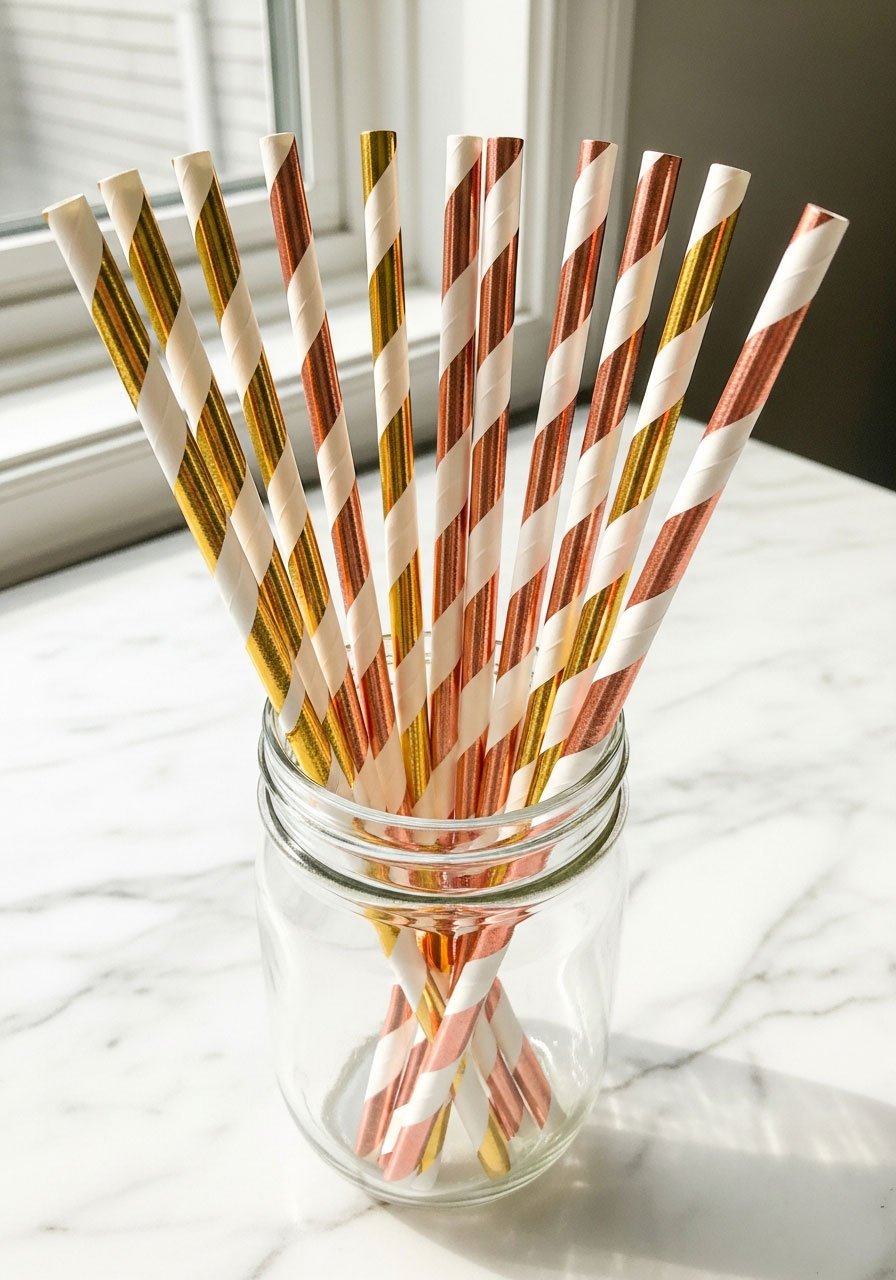
23. Metallic Straws
Best for: Elevating drinks, adding shine, modern parties
Time to Make: 10 minutes total
Difficulty: Super easy
Sometimes the smallest details make the biggest impact! These glamorous straws turn ordinary beverages into party-worthy drinks.
What You’ll Need:
- Plain paper straws
- Metallic washi tape
- Scissors
- Decorative tags or flags (optional)
How to Make It:
1. Wrap metallic washi tape diagonally around each straw in a barber pole pattern.
2. Trim excess tape at both ends.
3. Add decorative flags cut from cardstock to the top if desired.
4. Place in drinks or bundle in a jar for a drink station.
5. Mix and match metallic colors for variety!
Pro Tip: Buy washi tape in multiple metallic shades (gold, silver, rose gold, copper) and wrap each straw in a different combination for a coordinated but varied look!
24. DIY Cotton Candy Balloons

Best for: Carnival themes, kids’ parties, whimsical celebrations
Time to Make: 20 minutes each
Difficulty: Easy
These fluffy, dreamy balloons capture the magic of carnival treats! They’re guaranteed to make everyone smile.
What You’ll Need:
- Pink and blue balloons
- Polyester fiberfill or tulle
- Clear balloons (larger than colored ones)
- Balloon pump
- Ribbon
How to Make It:
1. Inflate a colored balloon halfway and tie off.
2. Stuff fiberfill around the colored balloon.
3. Insert into a clear balloon along with more fiberfill.
4. Inflate the clear balloon around everything.
5. Tie with ribbon and admire your cotton candy creation!
Pro Tip: Add a touch of edible glitter inside the clear balloon before inflating for sparkle that catches the light every time the balloon moves – pure magic!
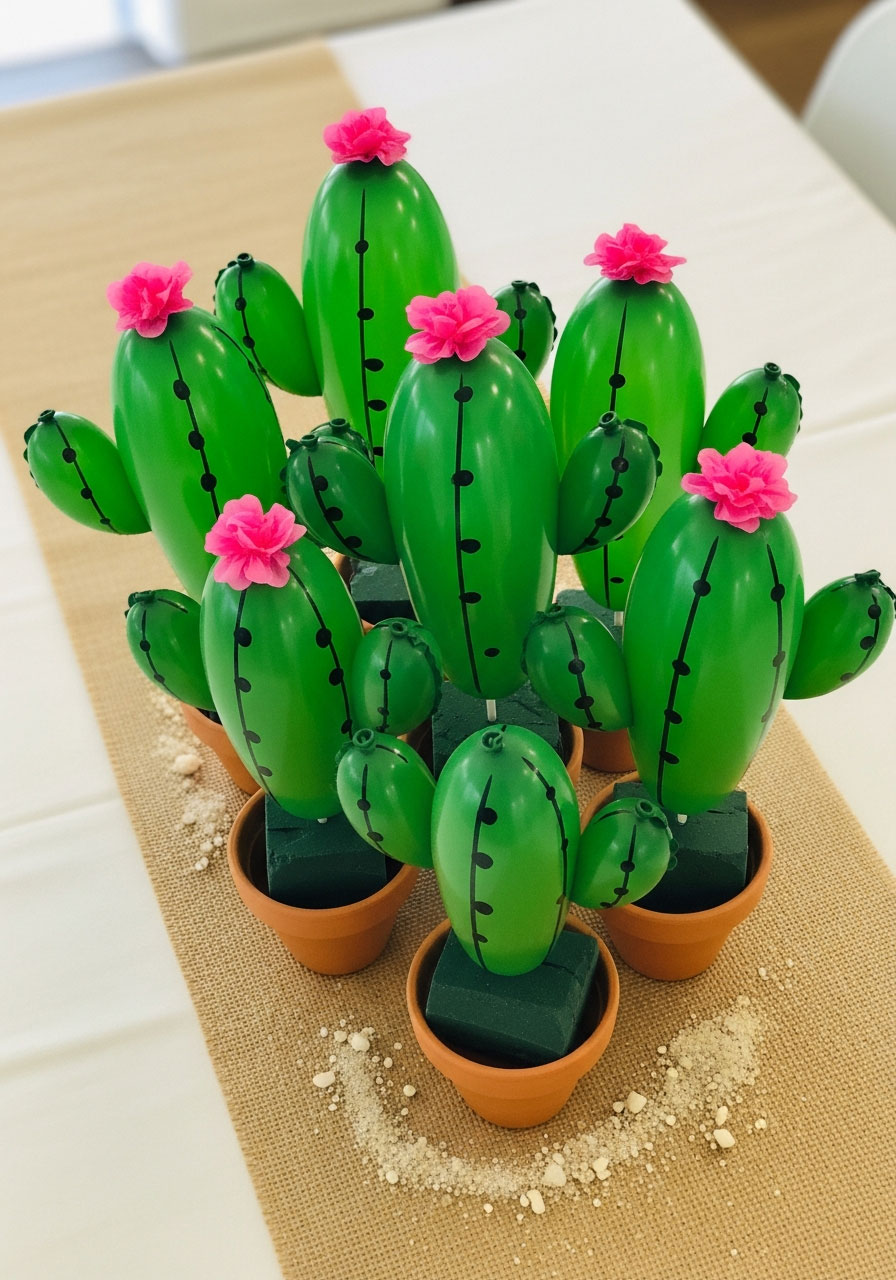
25. Cactus Balloons
Best for: Fiesta themes, desert parties, southwestern celebrations
Time to Make: 15 minutes each
Difficulty: Easy
These adorable cacti are prickly cute (but not actually prickly)! They bring desert vibes without the need for a green thumb.
What You’ll Need:
- Green oval balloons
- Small terracotta pots
- Floral foam or styrofoam
- Pink cardstock or felt
- Black permanent marker
- Hot glue gun
How to Make It:
1. Inflate green balloons to an oval shape.
2. Cut flower shapes from pink cardstock.
3. Draw cactus spines on the balloons using a black marker.
4. Secure floral foam in the bottom of pots.
5. Insert balloon knot into the foam and glue the pink flowers to the balloon.
Pro Tip: Make a whole cactus garden with varying heights and pot sizes – group them together on a table with some sand or small rocks for an incredibly authentic desert display!
26. DIY Anthropologie Inspired Scroll Garland
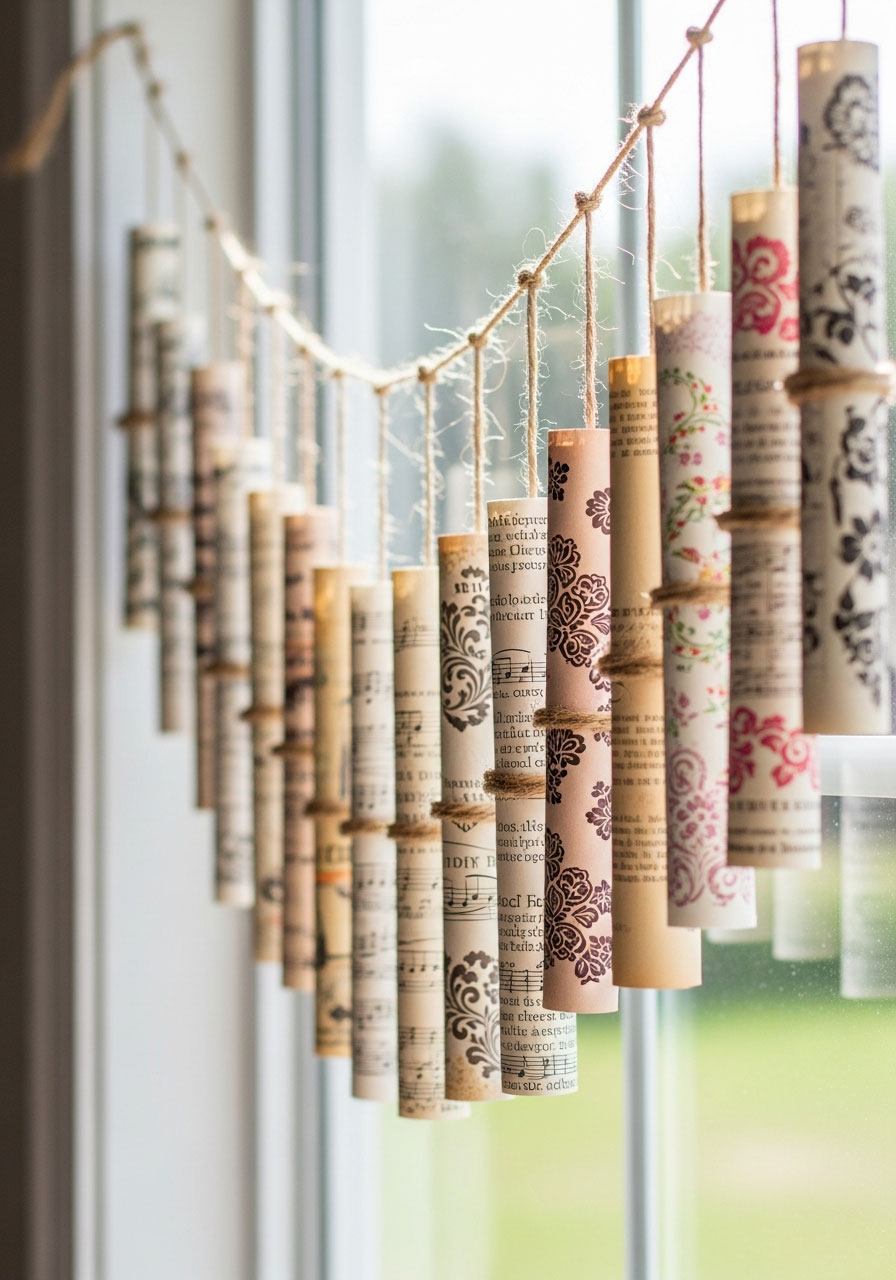
Best for: Bohemian parties, sophisticated celebrations, unique backdrops
Time to Make: 1-2 hours
Difficulty: Moderate
This artistic garland brings high-end boutique style to your party without the boutique price tag! It’s elegant, unexpected, and completely unique.
What You’ll Need:
- Decorative scrapbook paper or sheet music
- Wooden dowels or pencils
- Hot glue gun
- Twine or ribbon
- Scissors
How to Make It:
1. Cut paper into rectangles about 8×10 inches.
2. Roll each rectangle loosely around a dowel to create a scroll shape.
3. Remove the dowel and secure the scroll with a dot of hot glue.
4. String scrolls together by threading twine through the center of each scroll.
5. Hang with scrolls at varying heights for that effortless, artistic look.
Pro Tip: Mix in vintage book pages, music sheets, and decorative papers with your party colors for incredible texture and visual interest – it looks like it came straight from an expensive boutique!
Creative Centerpieces & Table Decorations
27. DIY Summer Inspired Piñata
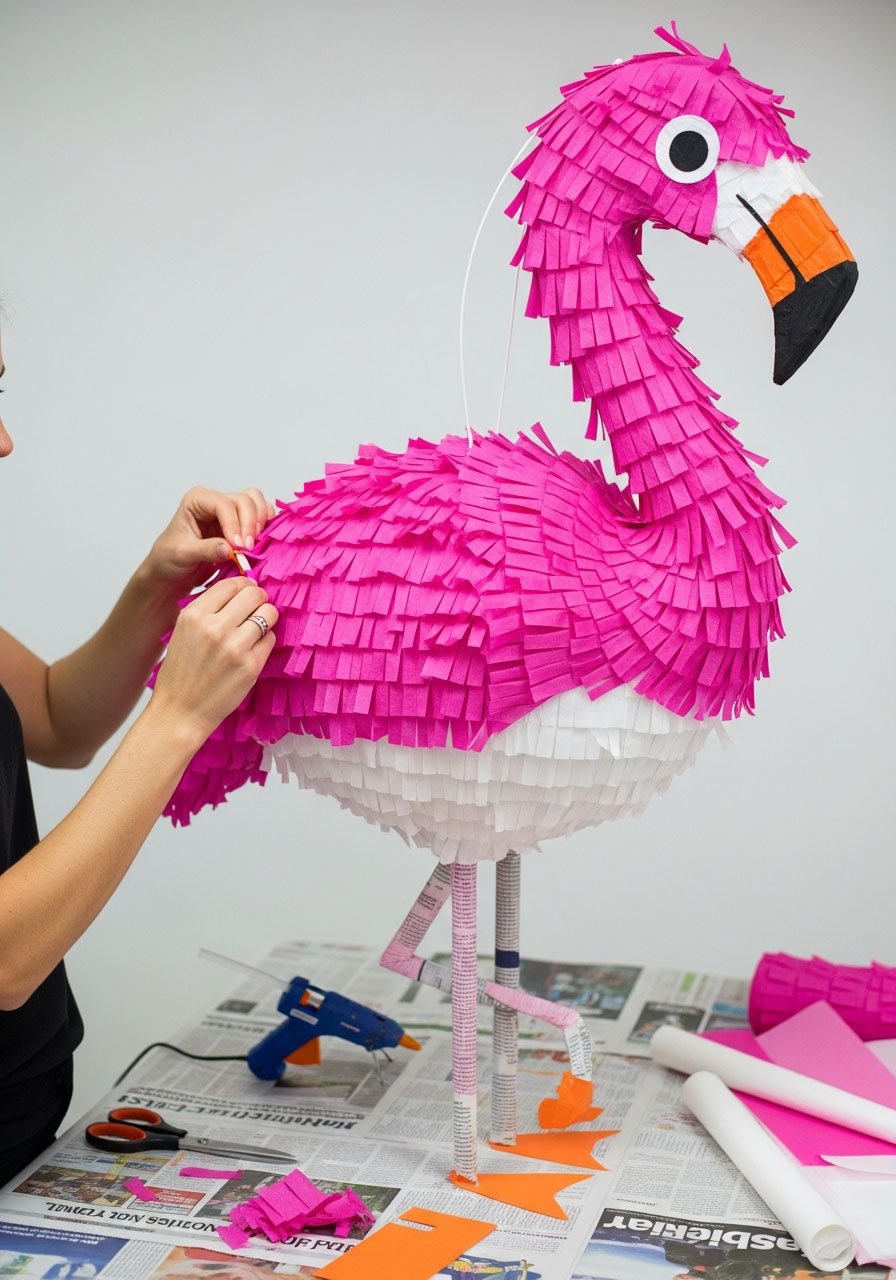
Best for: Kids’ parties, outdoor celebrations, interactive fun
Time to Make: 3-4 hours (mostly drying time)
Difficulty: Moderate
A piñata is both decoration AND entertainment! This DIY version lets you customize the shape and colors to match your party perfectly.
What You’ll Need:
- Large balloon or cardboard box
- Newspaper strips
- Flour and water for paste
- Tissue paper in bright colors
- Scissors
- Candy and small toys
- Strong rope
How to Make It:
1. Inflate balloon or prepare your cardboard base shape.
2. Create papier-mâché paste by mixing 1 part flour with 2 parts water.
3. Dip newspaper strips in paste and layer over balloon, leaving an opening at the top.
4. Let dry completely (24 hours minimum).
5. Cut fringe strips from tissue paper and glue in overlapping layers to cover.
6. Fill with treats and seal the opening before hanging.
Pro Tip: Create a custom shape by building your base from multiple balloons taped together – make a flamingo, pineapple, or unicorn that matches your theme perfectly!
28. Big Fringe Garlands
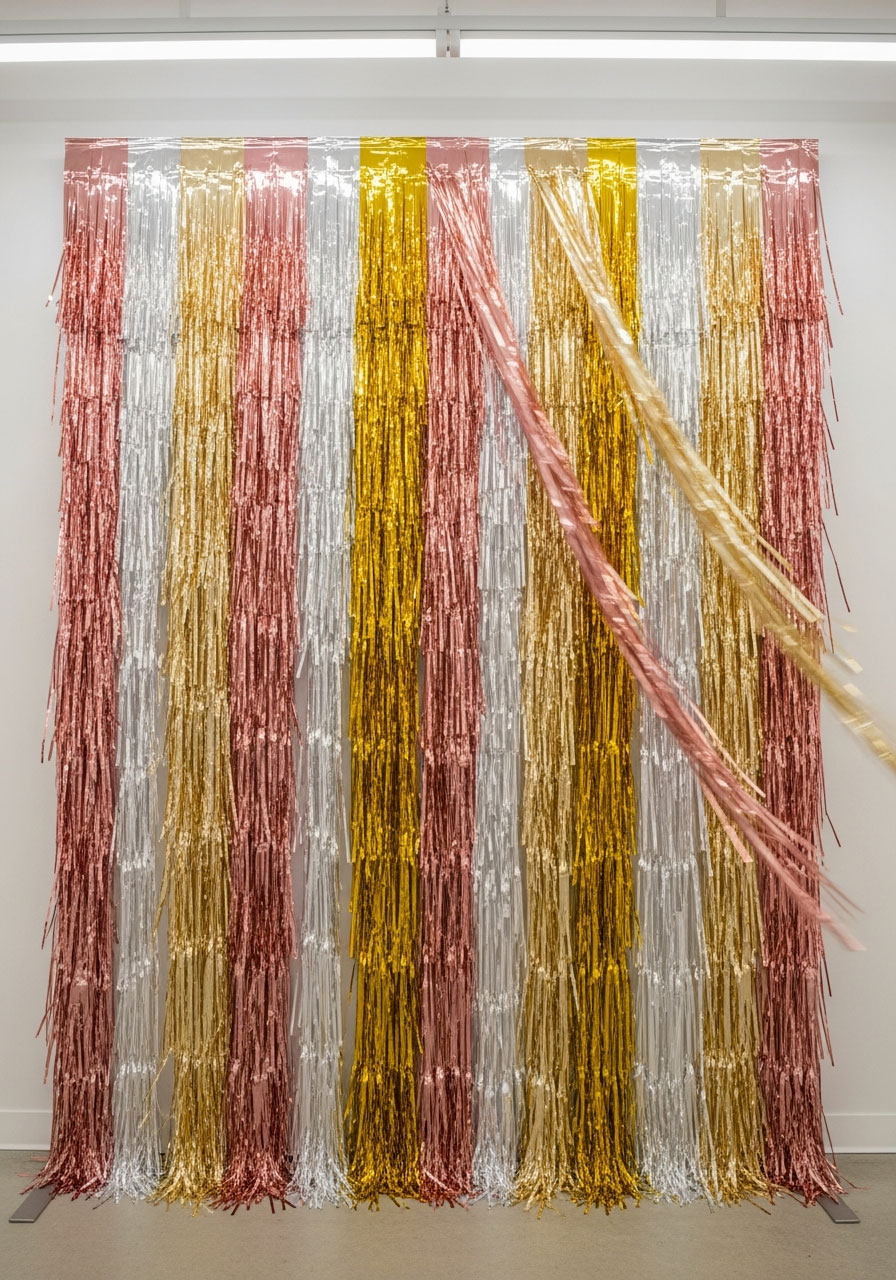
Best for: Photo backdrops, large wall coverage, high-impact decor
Time to Make: 1 hour
Difficulty: Easy
These dramatic garlands create major wow factor! They photograph beautifully and add movement and texture to any space.
What You’ll Need:
- Plastic tablecloths or streamers in multiple colors
- Scissors
- Tape or Command strips
- Ruler
How to Make It:
1. Unfold tablecloth and cut into sections about 3 feet long.
2. Fold each section in half lengthwise.
3. Cut fringe along the open edge, stopping 2-3 inches from the fold.
4. Unfold and twist the uncut portion to create a hanging loop.
5. Hang multiple strips side by side for a full backdrop effect.
Pro Tip: Create an ombré effect by hanging garlands in gradient colors from light to dark – it creates stunning depth and makes your backdrop look professionally designed!
29. Colorful DIY Photo Booth Props
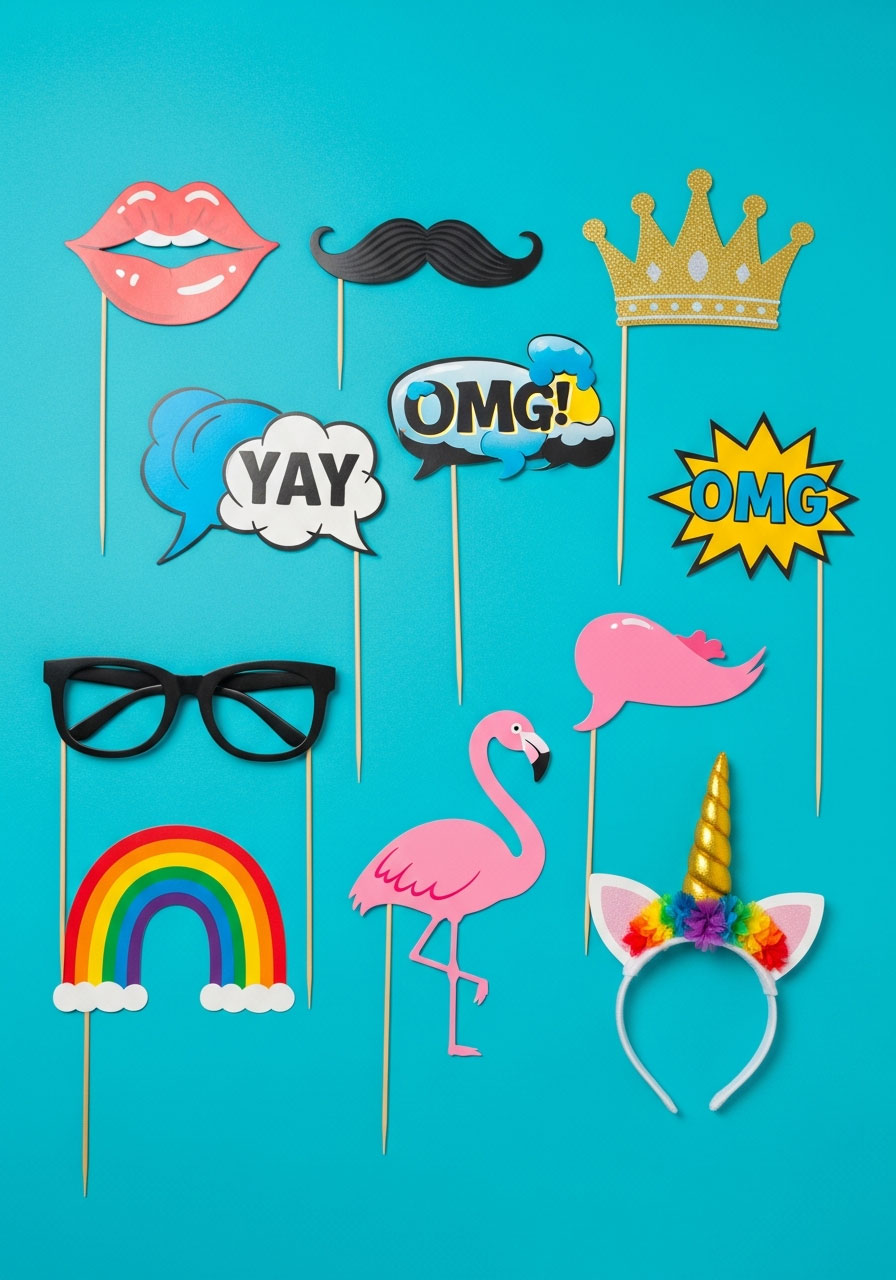
Best for: Interactive fun, memorable photos, guest entertainment
Time to Make: 1-2 hours
Difficulty: Easy
Give your guests something fun to play with! These props encourage silly photos and create memories that last long after the party ends.
What You’ll Need:
- Cardstock in bright colors
- Wooden dowels or straws
- Hot glue gun
- Scissors
- Templates or stencils
- Markers and embellishments
How to Make It:
1. Print or draw prop templates (mustaches, lips, glasses, speech bubbles, hats).
2. Cut out shapes from colorful cardstock.
3. Decorate props with markers, glitter, or additional paper details.
4. Attach dowels to the back using hot glue.
5. Display in a basket near your photo backdrop for easy access!
Pro Tip: Create props that are specific to your guest of honor – inside jokes, their favorite quotes, or references to shared memories make the photo booth way more personal and fun!
30. Tulle Pom Poms
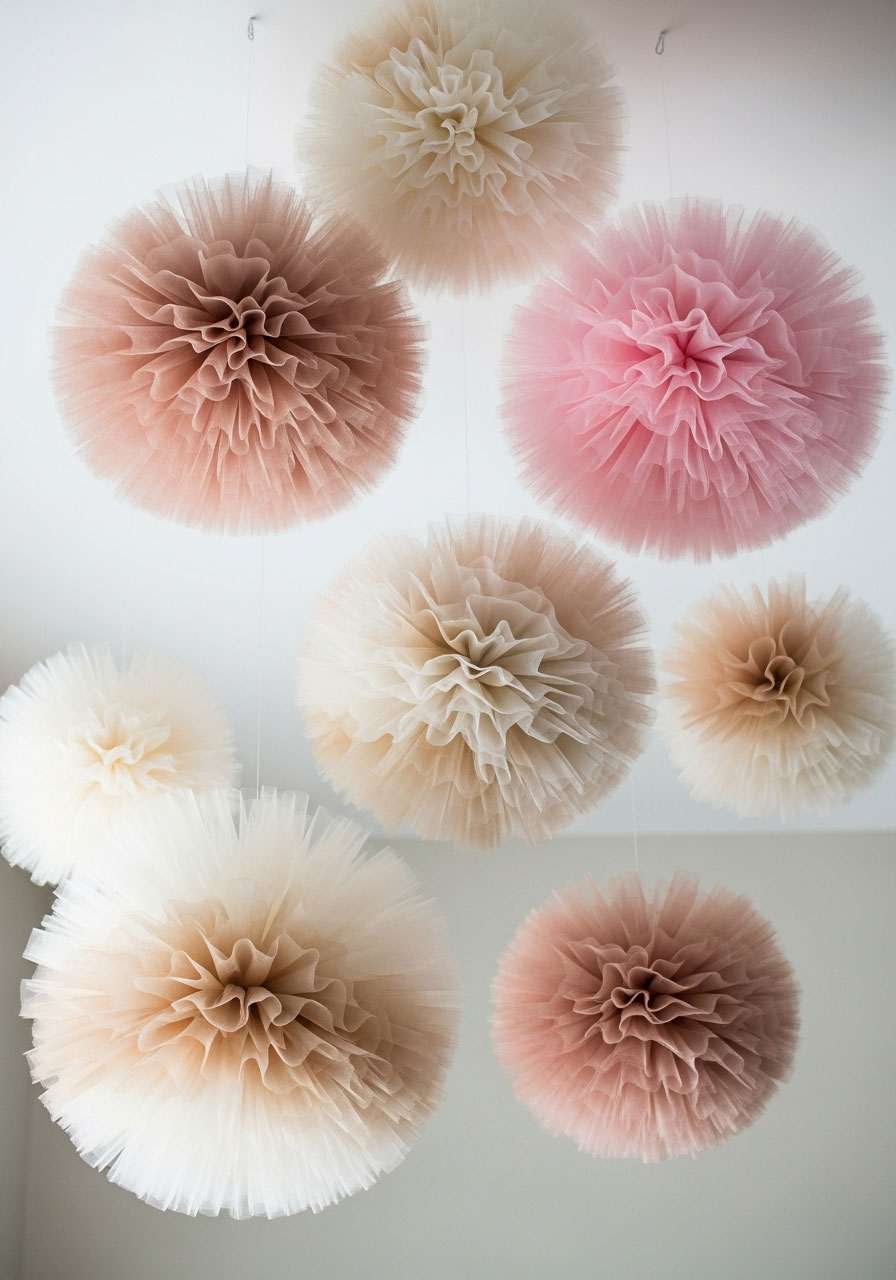
Best for: Princess parties, soft decor, elegant celebrations
Time to Make: 20 minutes each
Difficulty: Easy
These soft, cloud-like pom poms add a dreamy, romantic quality to your space. They’re like tissue paper pom poms’ fancier sister!
What You’ll Need:
- Tulle in your party colors (6-inch wide rolls work great)
- Scissors
- Fishing line or ribbon
- Ruler
How to Make It:
1. Cut tulle into strips about 2 feet long (you’ll need 20-30 strips per pom).
2. Layer all strips together in a stack.
3. Accordion-fold the stack with 1-inch folds.
4. Tie fishing line tightly around the center.
5. Separate and fluff each layer, pulling toward the center to create a round pom pom.
Pro Tip: Mix tulle in two different shades of the same color (like light pink and hot pink) in the same pom pom for gorgeous dimension and a more expensive, layered look!
31. Paper Flower Backdrop
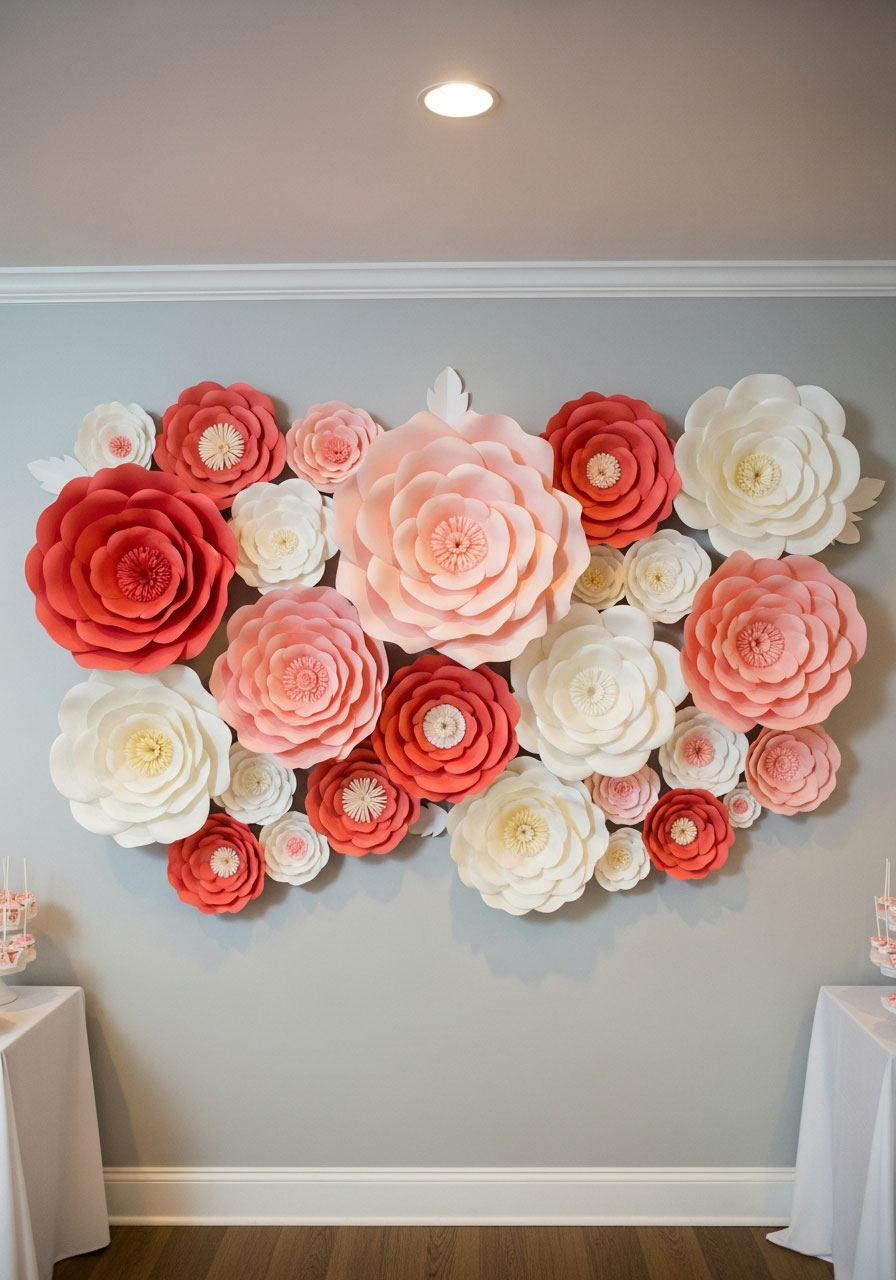
Best for: Photo backdrops, statement walls, elegant parties
Time to Make: 3-4 hours
Difficulty: Moderate (but stunning results!)
This showstopping backdrop will have everyone asking where you got it done professionally. The secret? It’s all you, baby!
What You’ll Need:
- Cardstock in multiple sizes and colors
- Scissors
- Hot glue gun (lots of glue sticks!)
- Large backdrop board or wall space
- Flower templates
- Tape or Command strips
How to Make It:
1. Cut out petals in various sizes using templates (small, medium, large).
2. Shape each petal by curling edges with scissors or over a pencil.
3. Layer and glue petals to create dimensional flowers (5-7 petals per flower).
4. Make 20-30 flowers in varying sizes and colors.
5. Arrange on backdrop starting from the center and working outward, securing with hot glue or tape.
Pro Tip: Create depth by mounting some flowers flat and others on small foam squares – this makes certain flowers “pop” forward and creates incredible dimension in photos!
32. Giant Lollipop Decorations
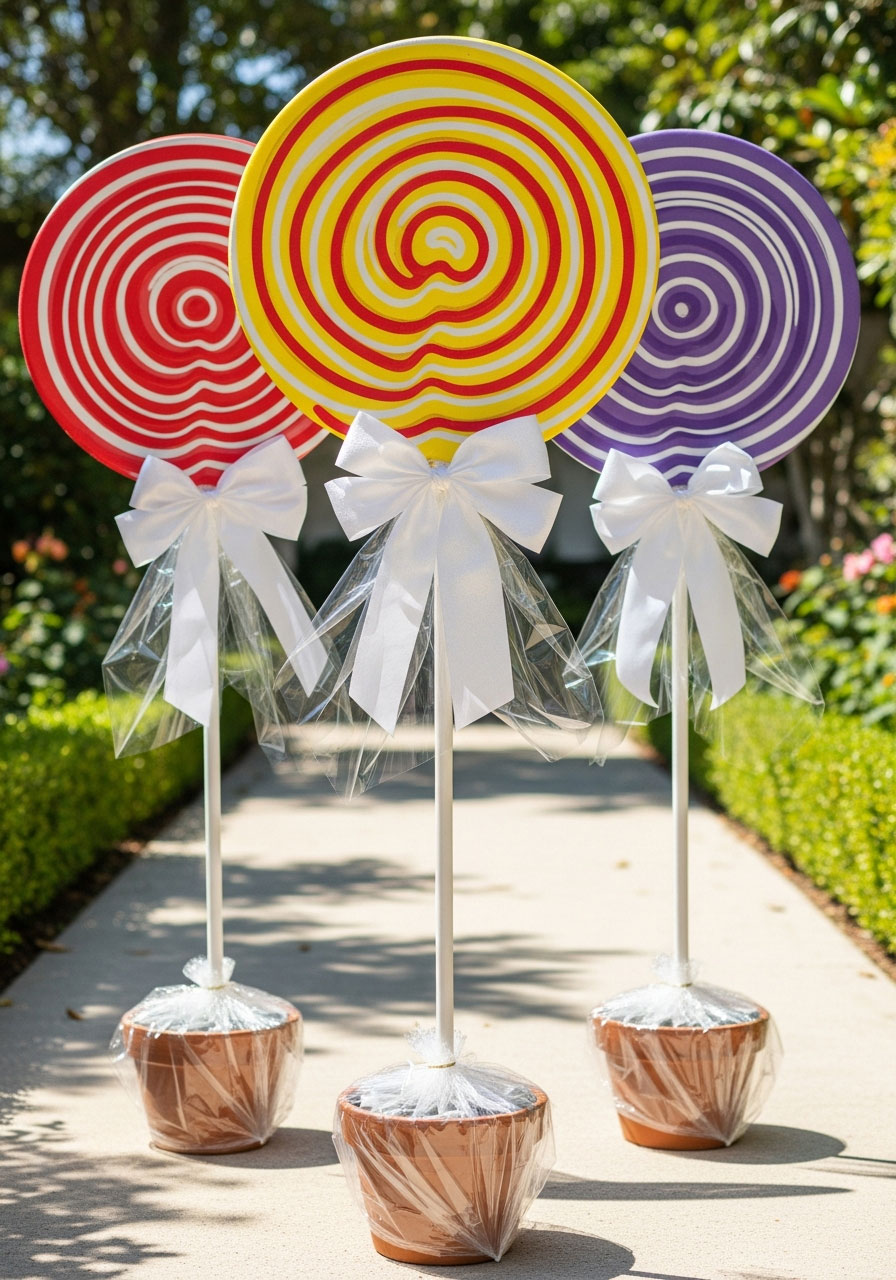
Best for: Candy-themed parties, kids’ celebrations, colorful displays
Time to Make: 30 minutes each
Difficulty: Easy
These oversized lollipops bring instant joy and whimsy to your party space! They’re like stepping into a real-life candy land.
What You’ll Need:
- Large circles cut from foam board or cardboard (12-18 inches)
- Wrapping paper or contact paper in bright colors
- PVC pipe or large dowels
- Hot glue gun
- Cellophane and ribbon
How to Make It:
1. Cover foam circles with bright wrapping paper or contact paper on both sides.
2. Add swirl patterns using contrasting paper for the classic lollipop look.
3. Attach PVC pipe to the back using hot glue and reinforcing tape.
4. Wrap in clear cellophane gathered at the base of the circle.
5. Tie with ribbon at the gathering point for an authentic wrapped candy look!
Pro Tip: Stand these in large planters filled with foam or sand along your party pathway – they create an incredible “entrance to Candyland” effect that makes everyone smile!
33. DIY Color Wrapped Wheat
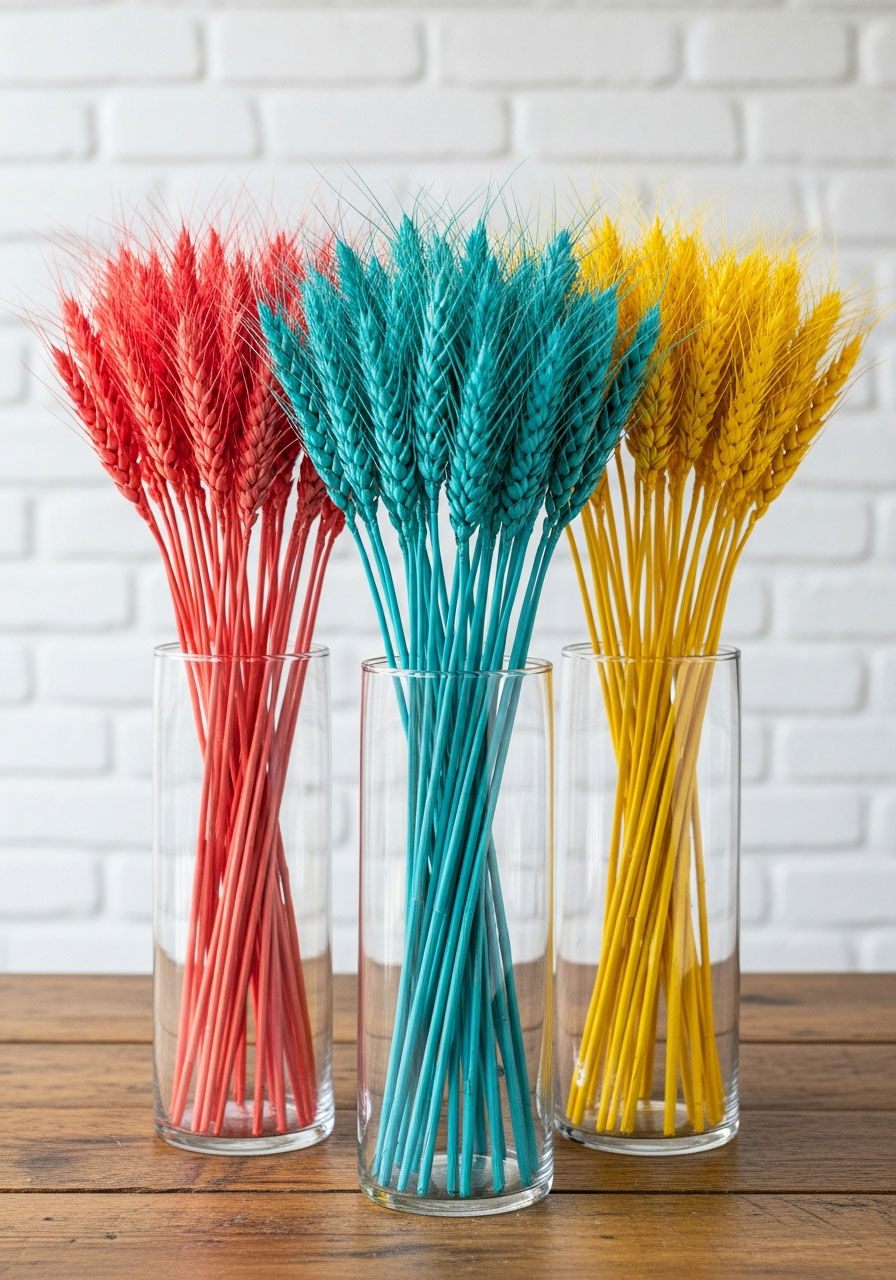
Best for: Rustic parties, fall celebrations, natural decor
Time to Make: 45 minutes
Difficulty: Easy
This trendy decoration brings natural elements with a colorful twist! It’s the perfect blend of rustic and modern.
What You’ll Need:
- Dried wheat stalks or pampas grass
- Acrylic paint in bright colors
- Paintbrushes
- Vases or jars
- Rubber bands
How to Make It:
1. Bundle wheat stalks in groups of 5-7 and secure with rubber bands.
2. Paint the bottom third of each bundle in your chosen color.
3. Let dry completely propped upright (about 30 minutes).
4. Remove rubber bands and arrange in vases.
5. Mix painted and unpainted bundles for visual variety!
Pro Tip: Use metallic paints (gold, silver, or copper) for an elevated look that catches the light beautifully – it turns simple wheat into seriously chic decor!
34. Easy DIY Balloon Garland (Alternative Method)
Best for: Organic balloon looks, professional style, Instagram photos
Time to Make: 1-2 hours
Difficulty: Moderate
This alternative method creates that trendy, organic balloon installation you see all over Pinterest – without hiring a professional!
What You’ll Need:
- 60-80 balloons in coordinating colors
- Balloon pump
- Clear fishing line
- Low-temp hot glue gun
- Command hooks
- Greenery or flowers
How to Make It:
1. Inflate balloons in dramatically varied sizes (from 5 inches to 16 inches).
2. Create a base by tying large balloons together in groups of 4.
3. Connect groups using fishing line to create your desired length.
4. Fill gaps by hot-gluing smaller balloons to larger ones.
5. Tuck in greenery between balloons for that upscale, organic look.
Pro Tip: Create “clusters” by grouping 3-4 balloons of the same color together, then spacing them throughout your garland – it creates intentional color blocking that looks incredibly sophisticated!
Paper Flowers & Dimensional Decor
35. DIY Giant Paper Flowers
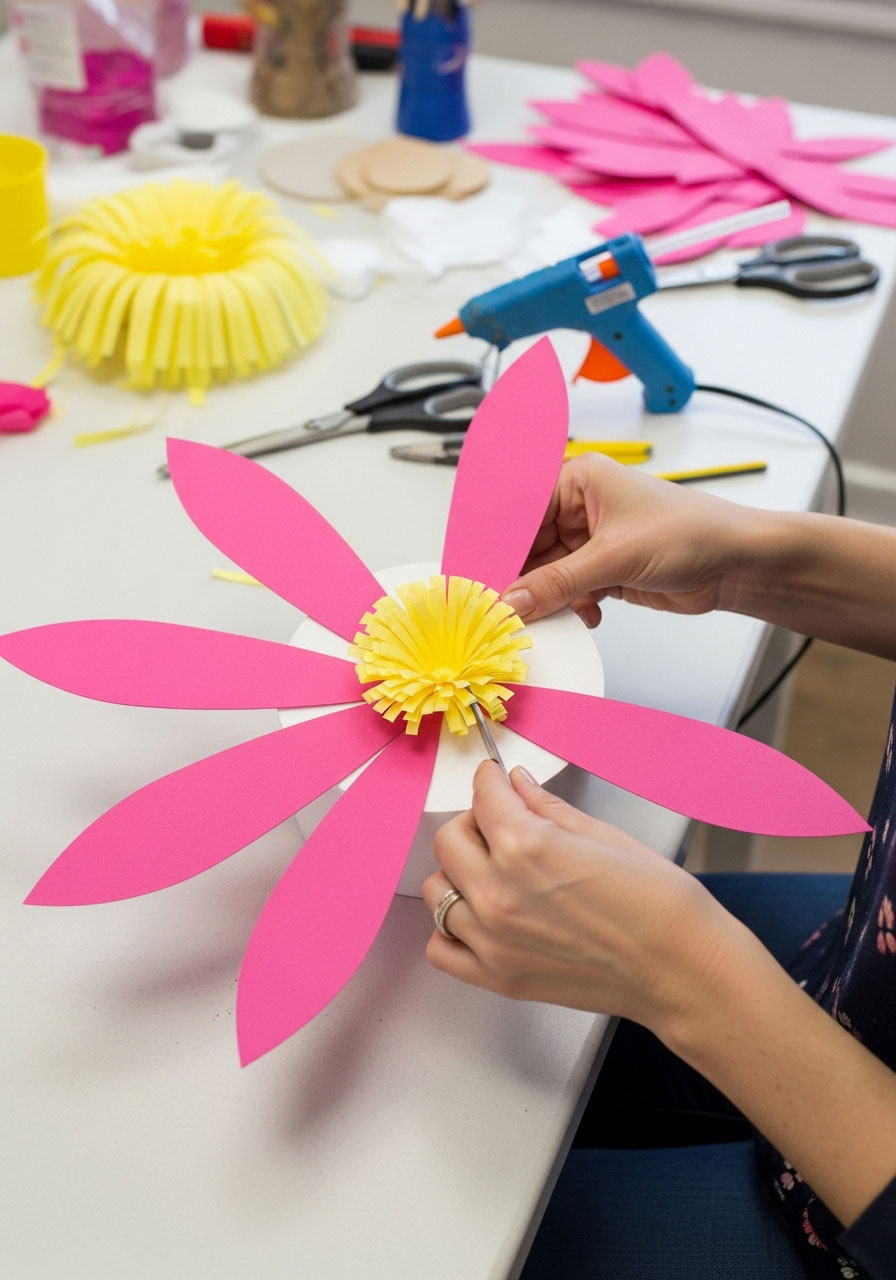
Best for: Statement pieces, photo backdrops, eye-catching centerpieces
Time to Make: 45 minutes each
Difficulty: Moderate
These larger-than-life blooms create serious drama! One or two of these can transform an entire space.
What You’ll Need:
- Large cardstock sheets (12×12 or bigger)
- Scissors
- Hot glue gun
- Flower petal templates
- Paper for flower centers
- Foam board for backing (optional)
How to Make It:
1. Cut out 8-10 large petals per flower using your template.
2. Shape each petal by curling the edges and creating a center crease.
3. Glue petals in a circular pattern, overlapping slightly.
4. Add a second layer of slightly smaller petals on top.
5. Create the center by cutting fringe strips and rolling them into a tight spiral.
Pro Tip: Make your flowers in graduating sizes (small, medium, large, and extra-large) and layer them together for a single, incredibly dramatic statement flower that becomes an instant focal point!
36. Tissue Paper Pom Poms
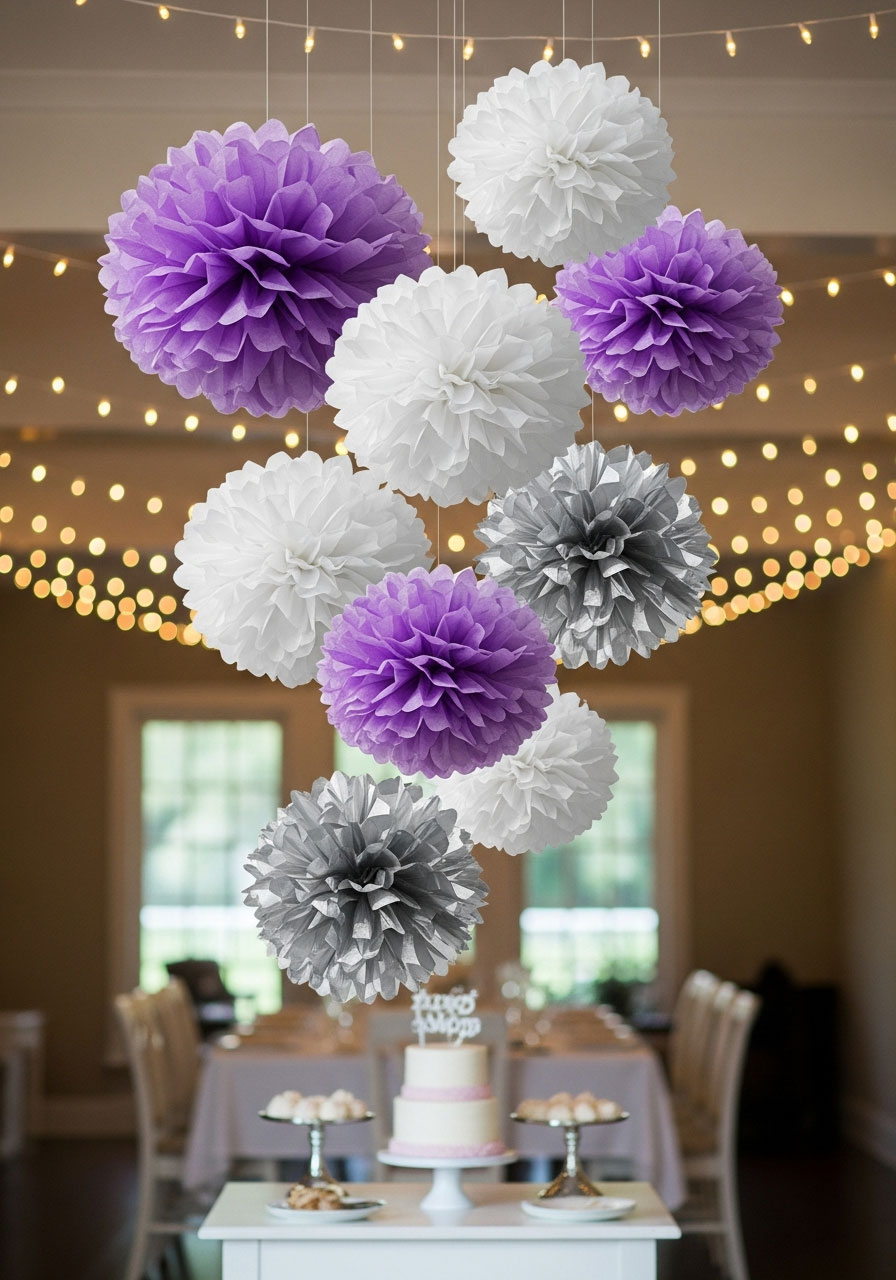
Best for: Classic party decor, filling ceiling space, budget-friendly impact
Time to Make: 15 minutes each
Difficulty: Easy
These party classics never go out of style! They’re the workhorse of party decorations – reliable, affordable, and always beautiful.
What You’ll Need:
- 8-10 sheets of tissue paper per pom pom
- Scissors
- Floral wire or pipe cleaners
- Fishing line or ribbon for hanging
How to Make It:
1. Stack 8-10 sheets of tissue paper together.
2. Accordion-fold the stack lengthwise with 1-inch folds.
3. Secure the center tightly with floral wire.
4. Trim the ends into rounded or pointed shapes.
5. Separate each layer carefully, pulling toward the center to create fullness.
Pro Tip: Make pom poms in three different sizes and hang them in clusters of three at varying heights – this creates gorgeous visual rhythm and makes even simple pom poms look professionally styled!
37. Tissue Paper Flowers
Best for: Delicate decor, garden parties, budget-friendly florals
Time to Make: 20 minutes each
Difficulty: Easy
These beauties look incredibly realistic from a distance! They’re perfect when you want the look of fresh flowers without the expense or wilting.
What You’ll Need:
- Tissue paper in flower colors
- Green floral wire
- Green floral tape
- Scissors
- Ruler
How to Make It:
1. Cut tissue paper into 4×6 inch rectangles (you’ll need 5-8 per flower).
2. Stack rectangles and fold accordion-style.
3. Secure the center with floral wire, leaving a long tail for the stem.
4. Round the edges by cutting curved shapes on both ends.
5. Separate and fluff each layer, then wrap the wire stem with floral tape.
Pro Tip: Add a drop of essential oil (rose or lavender) to each flower – it makes them smell amazing and creates a subtle sensory experience your guests will love!
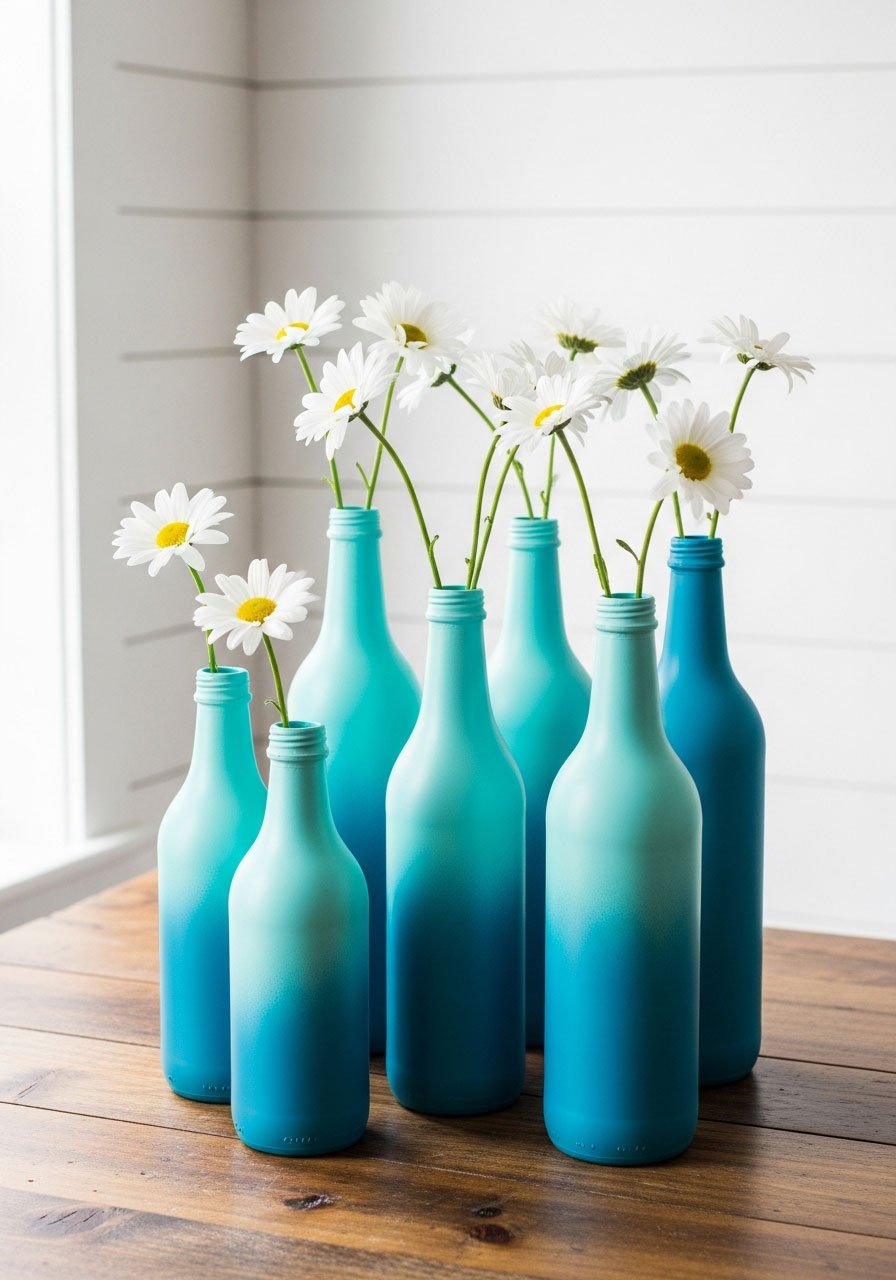
38. DIY Painted Bottles
Best for: Vintage vibes, eclectic decor, centerpiece collections
Time to Make: 30 minutes (plus drying)
Difficulty: Easy
Turn your recycling into party gold! These painted bottles add instant charm and work beautifully as bud vases or grouped decorations.
What You’ll Need:
- Clean glass bottles in various shapes
- Acrylic paint or spray paint
- Paintbrushes
- Painter’s tape (for patterns)
- Clear acrylic sealer
How to Make It:
1. Clean and dry bottles thoroughly, removing all labels.
2. Apply painter’s tape if creating striped or geometric patterns.
3. Paint bottles with 2-3 thin coats, letting each coat dry completely.
4. Remove tape carefully while the final coat is slightly tacky.
5. Seal with acrylic spray for durability and shine.
Pro Tip: Paint bottles in an ombré color scheme (all different shades of blue, for example) and arrange them in gradation on your table – it creates a stunning, cohesive look that photographs beautifully!
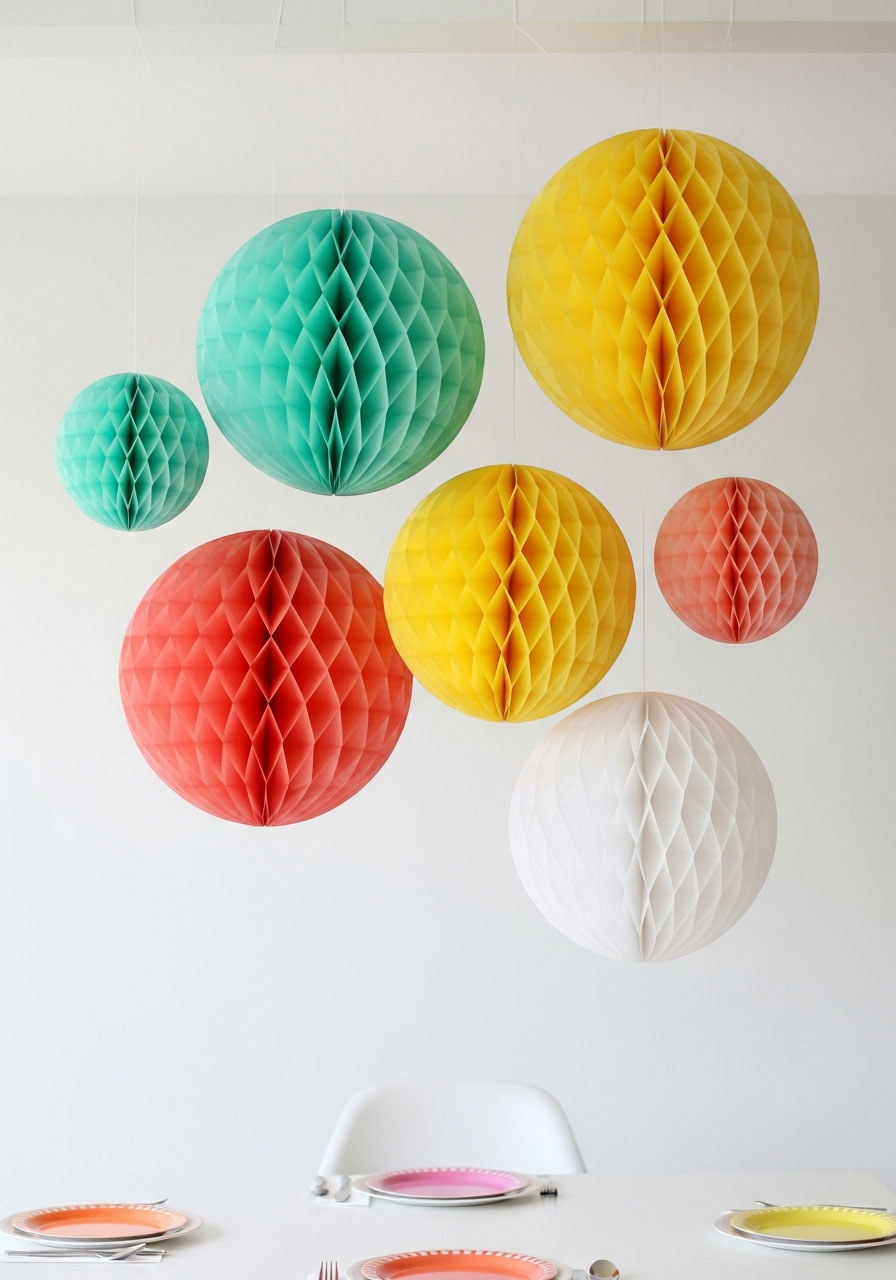
39. Honeycomb Pom Poms
Best for: Dimensional decor, modern parties, textured displays
Time to Make: 5 minutes each (they come pre-made!)
Difficulty: Super easy
Okay, these aren’t technically “DIY” since you buy them pre-made, but the styling is where you shine! These dimensional balls create incredible impact with zero effort.
What You’ll Need:
- Honeycomb pom poms in various sizes
- Fishing line
- Command hooks
- Scissors
How to Make It:
1. Unfold honeycomb balls according to package instructions.
2. Secure the adhesive tabs to hold the ball shape.
3. Attach fishing line through the top loop.
4. Hang at varying heights from the ceiling.
5. Group in odd numbers (3, 5, or 7) for the most pleasing visual arrangement.
Pro Tip: Mix honeycomb balls with regular tissue paper pom poms in coordinating colors and hang them at different heights – the combination of textures creates incredible visual interest and depth!
40. Confetti-Filled Balloons
Best for: New Year’s parties, celebrations, interactive decor
Time to Make: 5 minutes per balloon
Difficulty: Easy
These festive balloons bring the party surprise inside the decoration! They’re fun to look at and even more fun to pop at midnight or during the big moment.
What You’ll Need:
- Clear balloons
- Confetti (paper or metallic)
- Balloon pump
- Funnel (or rolled paper cone)
- Static cloth or balloon (to create static)
How to Make It:
1. Stretch balloon opening to make it easier to work with.
2. Use a funnel to pour confetti into the balloon (about 2 tablespoons).
3. Inflate the balloon to your desired size.
4. Tie off securely and give it a shake to distribute confetti.
5. Rub with a static cloth to make confetti stick to the sides (super cool effect!).
Pro Tip: Use tissue paper confetti in your party colors instead of store-bought – simply hole-punch sheets of tissue paper for custom confetti that perfectly matches your theme! Plus, mix in some metallic confetti for sparkle that catches every light.
Bringing It All Together
There you have it – 40 DIY decoration ideas that’ll transform your party space from “meh” to “magnificent!”. The best part? You can mix and match these ideas based on your theme, budget, and time constraints. Start with 2-3 statement pieces (like a balloon garland or giant paper flowers), add some simple accents (painted bottles or metallic straws), and finish with personal touches (like a custom banner with the birthday person’s name).
Remember, the goal isn’t perfection – it’s creating a space that feels special and sets the tone for an amazing celebration. Your guests will be so impressed by your creativity and effort that they won’t notice if a balloon is slightly crooked or a paper flower petal isn’t quite perfect.
Pro Planning Tip: Tackle projects over several days leading up to the party. Make anything paper-based a week ahead, work on painted items 2-3 days before (for drying time), and save balloon projects for the day before or morning of the party for maximum float time and freshness.
Now get out there and create some party magic! Your celebration is going to be absolutely unforgettable.
More Birthday Party Ideas to Keep the Fun Rolling:
40+ Magical Harry Potter Birthday Games That’ll Cast a Spell on Your Party
How to Make a Birthday Balloon Column (No Helium Needed!)
22 Creative DIY Craft Activity Ideas That’ll Make Your Kids’ Birthday Party Legendary
36 Dinosaur Birthday Party Ideas (Roaring Fun & Easy!)
The Birthday Fishbowl Game (+ Free Word List)
40 Brilliant Ideas to Throw the Ultimate LEGO Birthday Party
30+ Sparkling Fun Unicorn Birthday Party Ideas That’ll Make Your Party Absolutely Magical
10 Adorable Hello Kitty Birthday Party Decor Ideas
7 Fun & Easy Party Craft Ideas for an Unforgettable Teen Girl Birthday
22 Creative DIY Craft Activity Ideas That’ll Make Your Kids’ Birthday Party Legendary
18 Creative Arts and Crafts Birthday Party Ideas That’ll Have Everyone Creating Masterpieces
As an Amazon Associate, we may earn a commission from qualifying purchases at no additional cost to you.