
If you’ve ever scrolled through bridal shower inspiration and felt a little overwhelmed, you’re not alone. There are a million directions you could go, and “pretty” can start to feel impossibly vague.
That’s exactly why the pink and orange color combo works so well. It’s soft enough to feel romantic, warm enough to feel inviting, and flexible enough to work for a backyard brunch or a full-on venue celebration.
We pulled together real ideas from an actual pink and orange bridal shower (balloon arch, dessert table, flower bar, and all) and broke each one down into something you can actually plan this week. No vague inspiration boards, no guessing what you’ll need.
Because the best bridal showers aren’t the most expensive ones. They’re the ones where every detail feels intentional and the bride walks in and immediately tears up.
1. A Pink & Orange Balloon Arch With a “Bride to Be” Sign
This is the single biggest “wow” moment you can create for a bridal shower, and it’s the first thing every guest will photograph the second they walk in.
A balloon arch in soft pink, peach, and white instantly turns a plain wall into a backdrop, and adding a gold “Bride to Be” sign in the center makes it clear this party has one very important guest of honor.
Best for: The main photo backdrop and welcome area.
Time to Prepare: 2-3 hours (or hire a balloon artist for a stress-free option).

What You’ll Need:
- Latex balloons in pink, peach/orange, and white, in 3 different sizes
- A balloon arch kit or balloon decorating strip
- An air pump (hand-held or electric, your wrists will thank you)
- Hot glue gun or balloon glue dots
- Faux or fresh flower stems
- A “Bride to Be” sign (wood, acrylic, or printed)
How to Make It:
- Inflate balloons in your three sizes, mixing colors as you go so no two same-color balloons sit right next to each other.
- Attach the decorating strip to your wall or a freestanding frame in the shape of an arch.
- Glue balloons onto the strip, alternating sizes and colors to fill in gaps and avoid a flat, uniform look.
- Tuck flower stems into the gaps between balloons for a softer, more elevated finish.
- Hang or place your “Bride to Be” sign in the open center of the arch at eye level.
Pro Tip: Build your arch the morning of the party, not the night before. Latex balloons can lose their shape overnight, and you want this looking full and fresh for every photo.

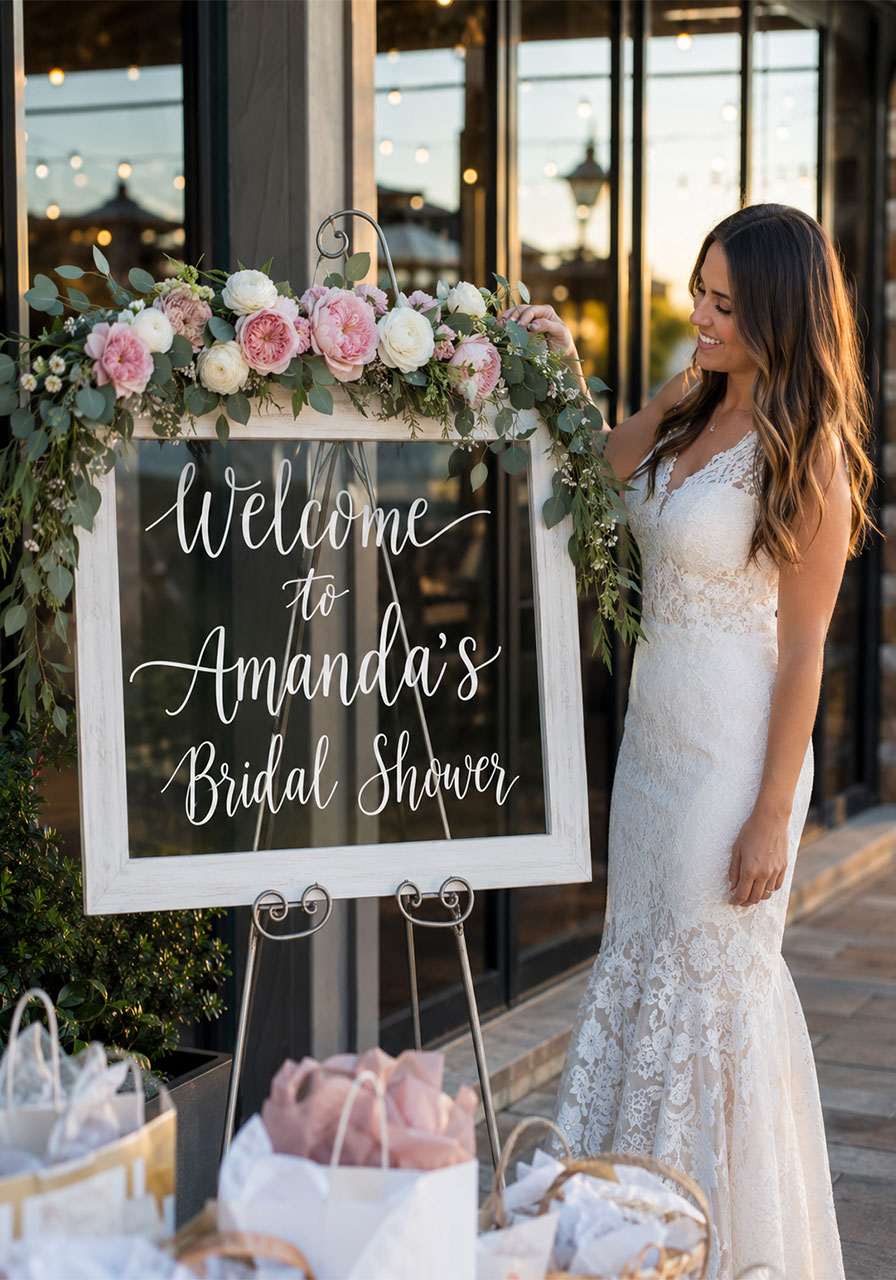
2. A Welcome Sign With Fresh Florals
A welcome sign does double duty: it tells guests they’re in the right place, and it sets the tone for the entire party before anyone even sits down.
A simple mirror or glass sign with the bride’s name and the date, dressed up with a swag of fresh roses and greenery, looks elegant without requiring any design skills on your part.
Best for: The entrance or check-in table.
Time to Prepare: 30-45 minutes.
What You’ll Need:
- A mirror, glass, or acrylic sign with an easel stand
- White vinyl or chalk marker for lettering (or order one pre-printed)
- Fresh roses, eucalyptus, and greenery
- Floral wire or clear tape
How to Make It:
- Write or apply the lettering: “Welcome to [Bride’s Name]’s Bridal Shower” plus the date.
- Lay the sign flat and arrange a row of greenery and roses along the top edge.
- Secure the stems with floral wire or tape so they stay put when the sign is upright.
- Set the sign on its easel at the entrance, angled slightly toward foot traffic.
Pro Tip: Keep the floral swag along just the top edge. A heavy arrangement across the whole sign makes the words harder to read from a distance.
3. A Blush Pearl-Beaded Table Setting
You don’t need a huge budget to make your tables look like they belong at a five-star brunch. A blush table runner, pearl-beaded chargers, and folded blush napkins do almost all the work.
This setup photographs beautifully and gives every table a cohesive, polished look even if your centerpieces are simple.
Best for: Seated brunches, lunches, or any sit-down portion of the shower.
Time to Prepare: 45-60 minutes for a table of 8-10.

What You’ll Need:
- White tablecloths
- Blush pink table runners
- Clear pearl-beaded charger plates
- Blush pink cloth or paper napkins
- White or silver flatware and glassware
How to Make It:
- Lay the white tablecloth first, then center the blush runner down the length of the table.
- Place a pearl charger at each seat, lining the bead edge up evenly with the table edge.
- Fold each napkin into a simple cone or rectangle and set it directly on the charger.
- Add flatware on either side and a water glass at the top right of each setting.
Pro Tip: If you’re renting chargers, count out one extra per table. They’re easy to chip when stacking and unstacking quickly during setup.
4. Bride-to-Be Chair Decor
The bride should never have to wonder which seat is hers, and this detail makes sure of it while doubling as one of the prettiest photo opportunities of the day.
A garland of greenery and roses draped over the chair back, finished with a wooden “Bride to Be” tag and flowing ribbon, instantly marks her spot as the guest of honor.
Best for: The bride’s designated seat at the head table.
Time to Prepare: 20-30 minutes.

What You’ll Need:
- Fresh eucalyptus and a few rose stems
- Floral wire
- A wooden or acrylic “Bride to Be” hanging sign
- Wide ribbon in blush or champagne
How to Make It:
- Wire the eucalyptus and roses together into a loose, draping garland.
- Drape the garland over the top back rail of the chair so it hangs naturally on one side.
- Tie the ribbon into a bow at the top of the chair back, letting the tails hang long.
- Attach the “Bride to Be” sign to the ribbon so it hangs at the center of the chair back, easy to read in photos.
Pro Tip: Use real or high-quality faux flowers here. This chair gets photographed constantly throughout the party, so it’s worth the small upgrade.
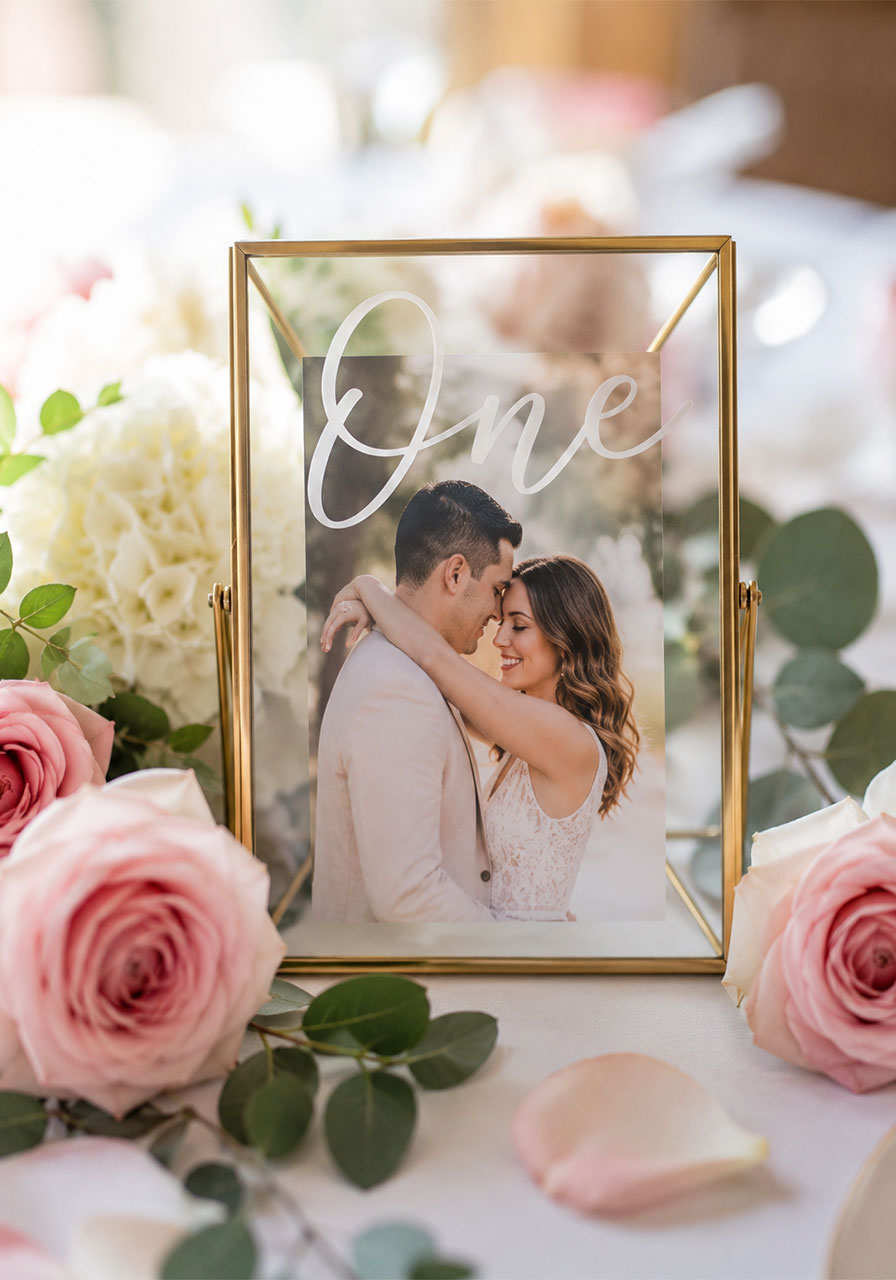
5. Engagement Photo Table Numbers
Instead of plain printed numbers, this idea turns table numbers into a sweet, personal touch by pairing them with a real photo of the couple.
It’s a small detail, but it adds warmth to every table and gives guests something to smile at while they’re seated.
Best for: Multi-table seated events.
Time to Prepare: 1 hour for a full set.
What You’ll Need:
- Small gold or silver picture frames (one per table)
- Printed engagement or couple photos sized to fit the frames
- Printed or hand-lettered table numbers on cardstock
How to Make It:
- Print the table number on cardstock sized to slide into the back of each frame.
- Layer the couple’s photo in front of the number, or print the number directly onto clear acrylic so the photo shows through behind it.
- Slide both into the frame and stand it upright among the centerpiece flowers.
Pro Tip: Ask the bride for her favorite photo a few weeks ahead of time. This is one detail you don’t want to be scrambling for the night before.
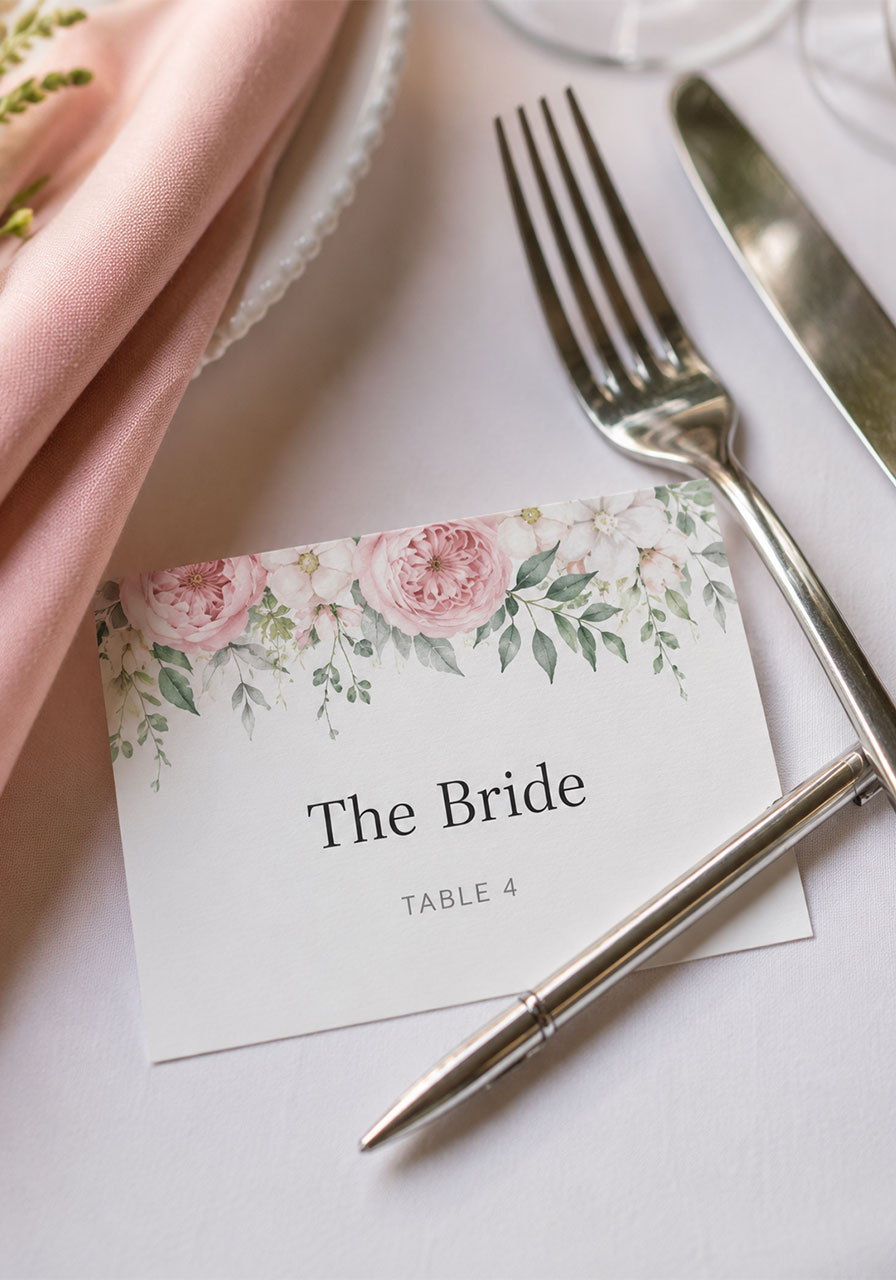
6. Personalized Place Cards
Place cards keep your seating organized without anyone having to ask “wait, where am I sitting?” five separate times.
A simple floral-bordered card with the guest’s name and table number looks elegant and keeps things running smoothly, especially for larger groups.
Best for: Showers with assigned seating or multiple tables.
Time to Prepare: 30 minutes to print and cut, plus setup time.
What You’ll Need:
- Printable place card template (floral border works well with this color scheme)
- Cardstock
- Scissors or a paper cutter
- Your final guest and seating list
How to Make It:
- Finalize your seating chart at least three days before the party.
- Print each guest’s name and table number onto the place card template.
- Cut the cards apart and fold if your template is a tent-style card.
- Set each card at its assigned spot, either flat on the charger or standing at the top of the place setting.
Pro Tip: Print two or three blank extras. Last-minute guest additions happen more often than you’d think.
7. Printable “He Said, She Said” and “Would She Rather” Game Cards
These two games are bridal shower classics for a reason. They get the whole table laughing, they require zero setup beyond printing, and they work whether you have 10 guests or 50.
“He Said, She Said” has guests guessing whether the bride or groom said certain things, while “Would She Rather” tests how well everyone knows the bride’s preferences. Both are easy enough that even guests who just met can jump right in.
Best for: Seated portions of the party, especially while guests are eating.
Time to Prepare: 15 minutes to print, zero setup beyond placing cards on tables.

What You’ll Need:
- Printable “He Said, She Said” game cards
- Printable “Would She Rather” game cards
- Pens, one per guest
How to Make It:
- Print one of each game card per guest, or one per table if you’d rather have groups work together.
- Set a card and a pen at each place setting before guests arrive.
- Once everyone is seated, announce the games and give guests 5-10 minutes to fill them out.
- Go around the table afterward so guests can share their funniest or most surprising answers out loud.
Pro Tip: Ask the bride (and groom, if possible) to confirm the real answers ahead of time. The reveal is twice as fun when you know exactly who got it right.
8. The Shoe Game
If you only add one interactive game to your bridal shower, make it this one. The Shoe Game is a long-time bridal shower favorite because it’s hilarious, low-prep, and works for literally any crowd.
The premise: the bride and groom sit back to back, each holding one of their own shoes and one of their partner’s. The bride answers questions about their relationship by holding up whichever shoe she thinks fits the answer, and guests roar every time the answers don’t match.
Best for: A mid-party energy boost, especially good after dessert.
Time to Prepare: 10 minutes.

What You’ll Need:
- One shoe from the bride and one from the groom (ask the groom to send a shoe ahead of time, or pre-record his answers on video)
- Two chairs
- A list of 10-15 fun relationship questions
How to Make It:
- Set two chairs back to back and have the bride sit in one (the groom joins if he’s there, otherwise play his recorded answers).
- Hand each person one of their own shoes and one of their partner’s.
- Read each question aloud, such as “Who said ‘I love you’ first?”
- Both the bride and groom hold up the shoe of whoever they think the answer applies to.
- Reveal the answers together and let the group react to every match (or hilarious mismatch).
Pro Tip: If the groom can’t attend, record his shoe answers on video a few days before. It keeps the surprise factor intact and still gets huge laughs.
9. A Pink & White Macaron Tower
A tiered macaron tower is one of the easiest ways to add height, color, and elegance to your dessert table without any baking required on your part.
The soft pink and white shells fit the color scheme perfectly, and the tower itself becomes a centerpiece even before anyone takes a bite.
Best for: The centerpiece of your dessert table.
Time to Prepare: 20 minutes to assemble (order the macarons ahead of time).

What You’ll Need:
- A tiered acrylic or clear macaron display stand
- 4-6 dozen pink and white macarons (order from a local bakery 1-2 weeks ahead)
How to Make It:
- Assemble the tiered stand according to its instructions, usually a center pole with stacking plates.
- Starting from the bottom tier, arrange macarons in alternating colors, leaning them slightly outward for a fuller look.
- Work your way up each tier the same way, finishing with a smaller cluster on top.
- Place the finished tower in the center of your dessert table as the focal point.
Pro Tip: Order your macarons no more than a day or two before the party. They’re best fresh and can get chalky if they sit too long.
10. Custom Iced Bridal Cookies
Custom sugar cookies in shapes like wedding dresses, rings, and “Mrs.” script lettering bring a personal, made-just-for-this-bride touch that store-bought desserts can’t match.
They look beautiful stacked on a tiered stand, and they’re an easy way to tie your color palette and theme into something edible.
Best for: A take-home treat or dessert table addition.
Time to Prepare: Order 1-2 weeks ahead, or 2-3 hours if baking and decorating yourself.

What You’ll Need:
- Cookie cutters in dress, ring, and lettering shapes
- Sugar cookie dough and royal icing (or order finished cookies from a local baker)
- A tiered stand for display
How to Make It:
- If ordering, place your request at least two weeks ahead so the baker has time for custom designs.
- If making your own, bake and cool the cookies completely before icing to avoid melting or smearing.
- Outline each cookie with royal icing first, then fill in the center once the outline has set.
- Let the icing fully harden for several hours before stacking on the display stand.
Pro Tip: Mention any allergies to your baker ahead of time, especially nuts, since cookies are often a take-home item guests grab on the way out.
11. A Donut Wall
A donut wall is a guaranteed crowd-pleaser because it turns a simple snack into an interactive, grab-and-go display that looks far more impressive than it actually is to put together.
Pink and white glazed donuts hung in neat rows on a pegboard create instant visual impact, and guests genuinely love picking their own.
Best for: A self-serve dessert or snack station.
Time to Prepare: 20 minutes.

What You’ll Need:
- A pegboard or pre-made donut wall stand
- Wooden dowels or pegs
- 2-3 dozen pink and white glazed donuts
How to Make It:
- Set up your pegboard or stand against a flat surface or easel.
- Insert the dowels or pegs into the pre-drilled holes, spacing them evenly.
- Slide one donut onto each peg, alternating pink and white glazes for visual contrast.
- Place the finished wall near your dessert table so guests can grab one as they pass.
Pro Tip: Order your donuts the morning of the party. Glazed donuts taste best within a few hours of being made.
12. Pink Chocolate-Covered Strawberries
These are simple, elegant, and always one of the first things to disappear from the dessert table. Drizzled in soft pink and white chocolate, they fit the palette perfectly and feel a little more special than a plain strawberry.
Best for: Dessert table or favor display.
Time to Prepare: 45 minutes, plus 30 minutes to set.

What You’ll Need:
- 2-3 pints of fresh strawberries
- Pink and white melting chocolate (candy melts work well)
- Parchment paper
- A piping bag or zip-top bag with the corner snipped
How to Make It:
- Wash and thoroughly dry the strawberries, leaving the green tops on.
- Melt the pink chocolate according to package instructions and dip each strawberry about three-quarters of the way up.
- Set dipped strawberries on parchment paper to firm up for a few minutes.
- Melt the white chocolate and drizzle it in thin lines across each strawberry using your piping bag.
- Let the strawberries set fully at room temperature before arranging on a serving tray.
Pro Tip: Make these no more than a few hours before the party. Strawberries release moisture over time, which can make the chocolate coating slide off.
13. A Build-Your-Own Dessert Table
Instead of one big dessert, give guests a full spread to graze on throughout the party. A mix of brownies, cake pops, candy jars, and bite-size treats keeps people coming back to the table all afternoon.
Variety also means there’s something for every guest, whether they’re craving chocolate, fruit, or something light and sweet.
Best for: An all-afternoon grazing setup.
Time to Prepare: 1-2 hours for full setup.

What You’ll Need:
- A mix of desserts: brownies, cake pops, mini cakes, candy in jars, chocolate-covered treats
- Cake stands and tiered trays in varying heights
- Glass candy jars with small scoops
- Fresh flowers and greenery for filler
How to Make It:
- Cover your table with a tablecloth and place taller items (cake stands, flower arrangements) toward the back.
- Layer shorter items like trays and candy jars toward the front so nothing is hidden.
- Tuck small flower arrangements or greenery into open gaps between dessert platters.
- Add small printed labels near anything guests might not recognize, especially if there are allergens involved.
Pro Tip: Vary the heights of your serving pieces. A table where everything sits at the same level looks flat in photos, even when the food itself is beautiful.
14. A DIY Flower Bar Favor Station
This is one of those ideas that doubles as both decor and a take-home favor, which makes it feel like a much bigger gesture than it actually is to set up.
Guests build their own small bouquet from buckets of fresh carnations and greenery, then take it home as a sweet reminder of the day.
Best for: An activity station guests can visit any time during the party.
Time to Prepare: 30-45 minutes.

What You’ll Need:
- Buckets of fresh carnations in pink, white, and peach
- Eucalyptus or greenery for filler
- Small kraft paper or cellophane wraps
- Ribbon to tie off finished bouquets
- A “Flower Bar” sign
How to Make It:
- Arrange the flower buckets in a row, grouped by color, on a table or stand.
- Set out wraps, ribbon, and scissors at one end of the table.
- Place the “Flower Bar” sign at the front so guests know to help themselves.
- Show one finished sample bouquet nearby so guests have an idea of how full to make theirs.
Pro Tip: Carnations are a smart choice here because they hold up well out of water for hours, unlike roses, which can wilt fast once cut.
15. Mini “Let Love Bloom” Champagne Favors
Small bottles of pink champagne or sparkling wine, dressed up with a simple “let love bloom” tag, make a favor that guests actually want to take home, instead of one that ends up in a junk drawer.
Best for: A take-home gift as guests leave.
Time to Prepare: 30 minutes.

What You’ll Need:
- Mini bottles of pink champagne or sparkling wine (one per guest)
- Printed favor tags
- Thin ribbon
- A hole punch
How to Make It:
- Print and cut out your favor tags, including a short thank-you message and the bride’s name.
- Punch a hole in the corner of each tag.
- Thread ribbon through the hole and tie it around the neck of each bottle.
- Arrange the bottles together on the favor table near the exit so guests grab one on their way out.
Pro Tip: Check your state’s regulations on gifting alcohol if you’re not 100% sure all your guests are over 21. A non-alcoholic sparkling option works as a backup for any guests who need it.
16. A Mimosa & Champagne Welcome Bar
This one isn’t from the original shower, but it’s a natural fit for this color palette and it makes guests feel taken care of from the moment they walk in.
A self-serve mimosa bar with a few juice options lets guests build their own drink and gives the party an easy, celebratory feel right from arrival.
Best for: Brunch-style or daytime showers.
Time to Prepare: 20-30 minutes.

What You’ll Need:
- Champagne or sparkling wine
- 2-3 juice options: orange, peach nectar, cranberry
- Fresh fruit garnish: strawberries, orange slices
- Champagne flutes or stemless glasses
- A small “Mimosa Bar” sign
How to Make It:
- Line up the champagne and juice options on a table, each in its own pitcher or bottle.
- Set out the glasses in a stacked row at one end.
- Add a small bowl of fruit garnish with a spoon for scooping.
- Place the sign at the front with simple ratios suggested, such as “half champagne, half juice.”
Pro Tip: Always have a non-alcoholic juice or sparkling cider option clearly labeled for guests who aren’t drinking.
17. A Recipe Card Box for the Bride
This is a sentimental favor for the bride that doubles as a guest activity, and it’s been showing up at more and more bridal showers lately for good reason.
Each guest fills out a blank recipe card with one of their favorite dishes, and the bride leaves the party with a personal recipe box she’ll actually use in her new home.
Best for: A quiet activity guests can complete while seated.
Time to Prepare: 15 minutes to set up.

What You’ll Need:
- Blank recipe cards (printed to match your color scheme)
- Pens
- A decorative box or card file to collect them in
- A small sign explaining the activity
How to Make It:
- Set a recipe card and pen at each place setting, or place a stack at a central table.
- Add a sign asking guests to write down one favorite recipe to share with the bride.
- Collect the finished cards in the decorative box throughout the party.
- Present the full box to the bride at the end of the shower as one of her keepsake gifts.
Pro Tip: Add a line on the card for “who this recipe is from” so the bride remembers the story behind each one later.
18. An “Advice for the Bride” Card Station
This is a low-cost, high-sentiment idea that gives the bride something to keep long after the party ends. Guests write a short piece of marriage or relationship advice on a card, and the bride collects them into a keepsake she can read whenever she needs it.
Best for: A guest activity that doubles as a heartfelt gift.
Time to Prepare: 10-15 minutes to set up.

What You’ll Need:
- Printed advice cards
- Pens
- A jar, box, or small album to collect the cards
- A small sign with instructions
How to Make It:
- Set a stack of advice cards and pens near the entrance or at each table.
- Place the sign nearby asking guests to leave one piece of advice for the bride.
- Collect filled-out cards in the jar or album throughout the party.
- Give the full collection to the bride at the end as a keepsake she can read on tough days or anniversaries.
Pro Tip: Read a few of the funniest or sweetest cards out loud near the end of the party. It’s a guaranteed laugh-and-cry moment for the whole room.
Bringing It All Together
You don’t need every single idea on this list to throw a beautiful bridal shower. Pick the handful that fit your space, your budget, and the bride’s personality, and build out from there.
Start with one anchor moment, like the balloon arch or the dessert table, and let the smaller details (place cards, favors, a game or two) fill in around it.
The goal is simple: a party that feels personal, looks beautiful in every photo, and leaves the bride feeling celebrated. With this list in hand, you’re already most of the way there.
