
Okay, party planners – let’s talk Halloween crafts.
Not the boring kind. Not the “print a coloring page and call it a day” kind.
We’re talking crafts that turn a random Tuesday afternoon into a full-blown Halloween memory. The kind where the kids get glue on their hands, someone paints a rock instead of their nails, and you end up with a porch, mantel, or party table that genuinely stops the neighbors in their tracks.
This is your complete Halloween crafting headquarters. Every idea below comes with exactly what you need, exactly how to make it, and a pro tip to make it even better. No guesswork. No “wait, what did they mean by that.” Just clear, foolproof instructions you can hand to a 7-year-old or a Halloween-obsessed adult and get great results either way.
Whether you’re planning a Halloween party, a family craft night, a school event, or you just want your front door to be the spookiest one on the block, grab your hot glue gun. Let’s get into it.
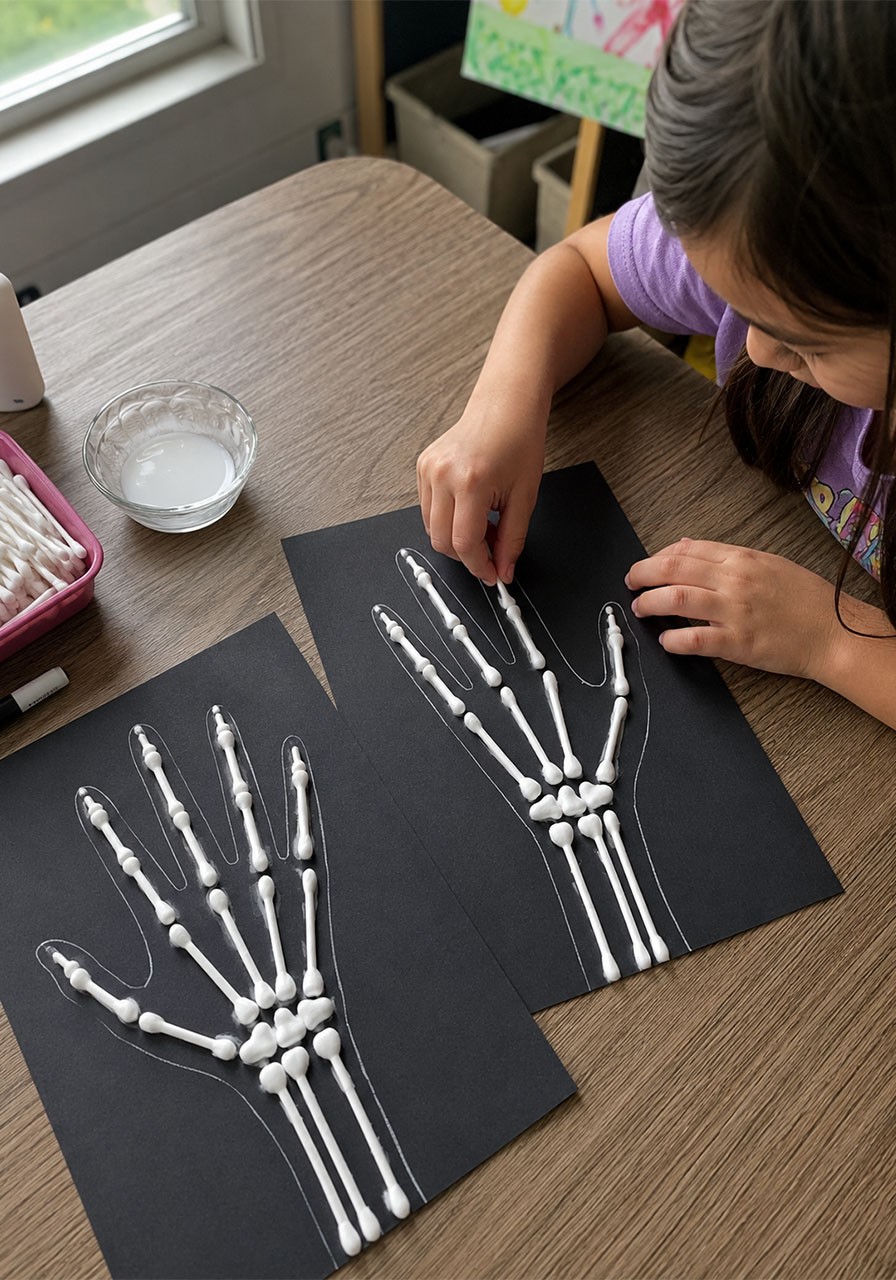
1. Skeleton Hand Q-Tip Art
Who knew Q-tips could look this creepy? This is one of those crafts that looks way more impressive than the actual effort required – which, honestly, is the best kind.
Best for: Kids, family craft night, ages 4 and up
Time to Make: 20-30 minutes
Difficulty: Easy
What You’ll Need:
- Black cardstock
- A white marker or paint pen
- A box of Q-tips
- School glue
- A small dish for glue dipping
How to Make It:
1. Have your child spread their hand out and trace it onto the black cardstock with the white marker.
2. Lightly mark where each “bone” should go inside the outline – the marker lines will be covered by Q-tips, so don’t stress about perfection here.
3. Pour some glue into your dish. Dip the ends of your Q-tips and press them into place along the finger and hand outline.
4. Let it dry flat for at least an hour before hanging or displaying.
Pro Tip: Cut the Q-tips down to size for the shorter bones instead of forcing a full-length one to fit. It makes the whole hand look way more anatomically convincing (and honestly, kind of impressive for a craft this simple).

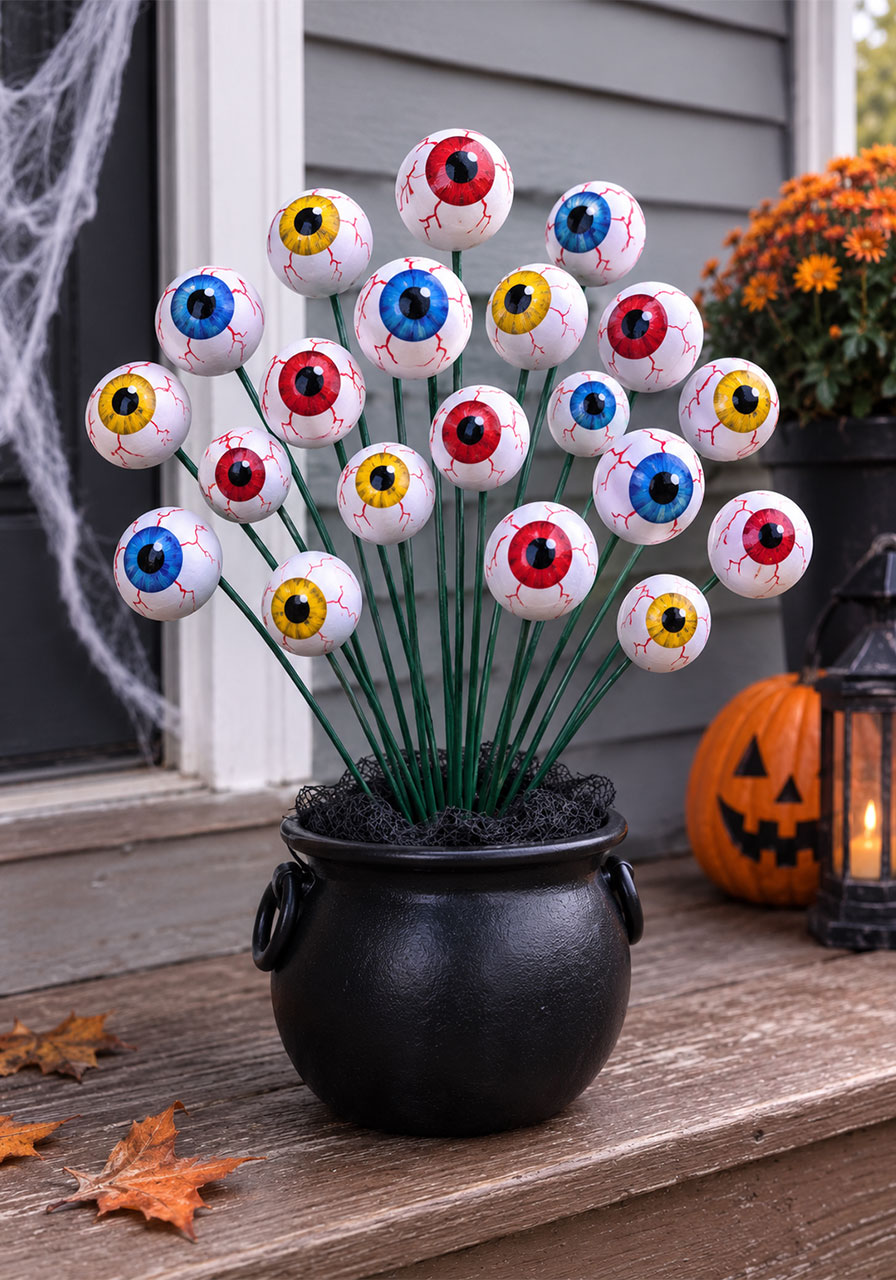
2. Eyeball Bouquet in a Witch’s Cauldron
This one is pure creepy-cute. A bouquet of “eyeballs” sprouting out of a mini cauldron makes an unforgettable centerpiece for any Halloween table.
Best for: Party centerpieces, porch decor
Time to Make: 30 minutes
Difficulty: Easy
What You’ll Need:
- Green mesh tubing or floral wire wrapped in green ribbon (for stems)
- Ping pong balls
- Acrylic paint (white, and colors for the iris)
- A fine-tip black marker for veins and pupils
- Hot glue gun
- A mini plastic cauldron
How to Make It:
1. Paint each ping pong ball white, then add a colored iris and black pupil once dry.
2. Use the black marker to draw thin, squiggly “veins” across the white part of each eyeball.
3. Hot glue each painted eyeball onto the end of a green stem.
4. Arrange all the stems in your cauldron so they fan out like a bouquet.
Pro Tip: Vary the height of your stems slightly. A totally uniform bouquet looks store-bought – a few taller and shorter stems makes it look wild and organic (in the best, creepiest way).
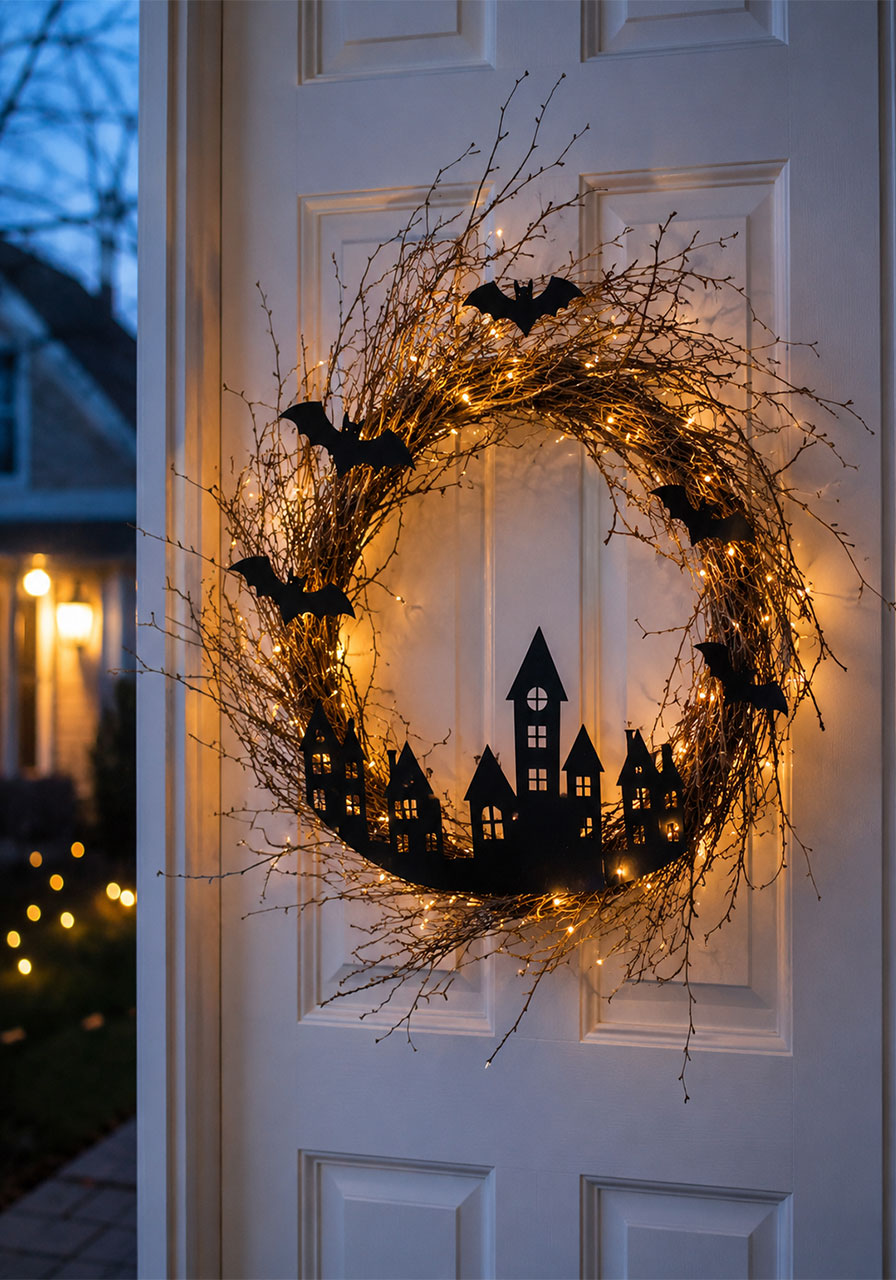
3. Spooky Village Wreath
A twig wreath with a tiny haunted village tucked inside, plus fairy lights glowing through it at night – this is the kind of door decor that makes trick-or-treaters slow down.
Best for: Front door decor, nighttime trick-or-treating
Time to Make: 45 minutes
Difficulty: Medium
What You’ll Need:
- A twig or grapevine wreath base
- Black cardstock
- Scissors
- Thin floral wire or hot glue
- A battery-operated fairy light string
How to Make It:
1. Cut simple house silhouettes and bat shapes out of black cardstock.
2. Attach the houses and bats to the wreath using wire or hot glue, arranging them so the “village” sits along the bottom curve.
3. Weave your fairy lights through the twigs behind the cutouts.
4. Hang your wreath and turn the lights on once the sun goes down for the full eerie glow effect.
Pro Tip: Use warm white lights instead of cool white – it gives the village that flickering, candlelit haunted-house look instead of a harsh glow.
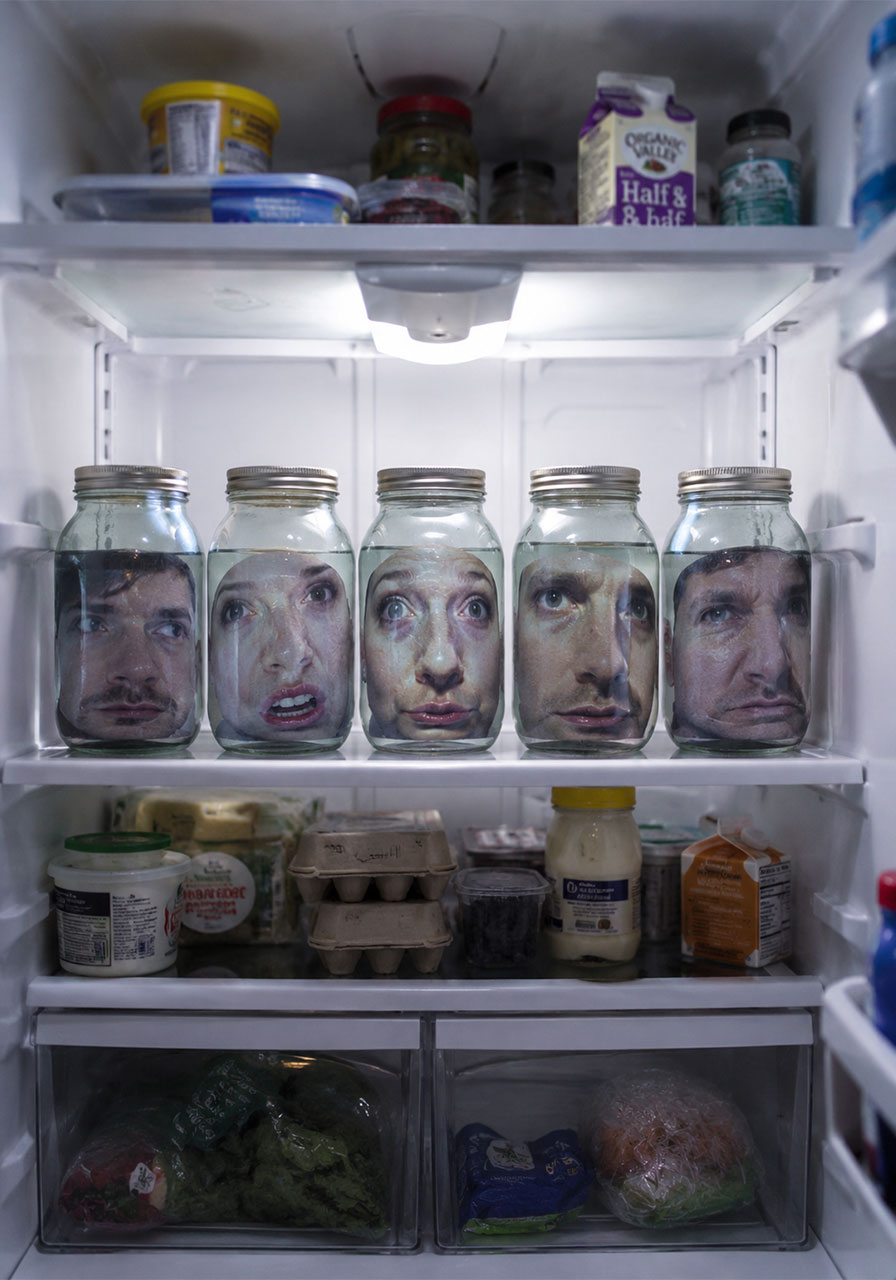
4. Creepy Fridge Faces
This one is a genuine prank-slash-decoration combo. Open the fridge, get scared. Repeat every time someone grabs a snack.
Best for: Party pranks, Halloween house takeovers
Time to Make: 15 minutes
Difficulty: Easy
What You’ll Need:
- Printed photos of distorted or spooky faces
- Clear glass jars with lids
- Water
How to Make It:
1. Print out your spooky face images sized to fit inside your jars.
2. Roll each printed face and slide it into a jar, pressing it against the glass so it’s visible from outside.
3. Fill the jars with water, seal the lids tight, and pop them into the fridge.
Pro Tip: The water distorts the image just enough to look unsettling without needing anything fancy – a slightly warped, wide-angle face photo works best.
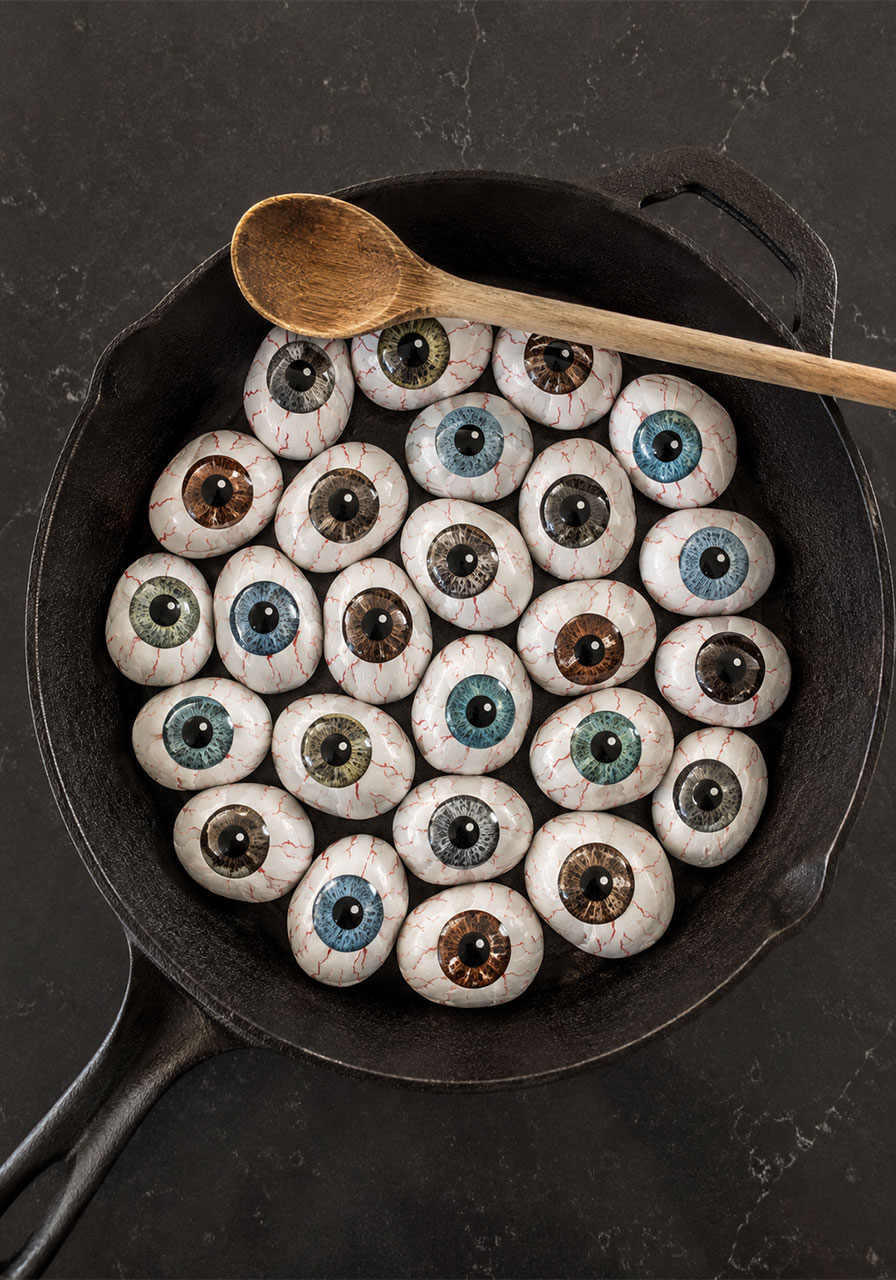
5. Pan of Petrifying Eyeballs
A skillet full of painted rock eyeballs is the kind of “wait, what is that” centerpiece that gets every guest to lean in for a closer look – right before they realize what they’re looking at.
Best for: Party centerpiece, buffet table decor
Time to Make: 40 minutes (plus drying time)
Difficulty: Easy
What You’ll Need:
- Smooth, rounded rocks
- White, colored, and black acrylic paint
- Fine-tip paintbrush
- Clear sealant spray
- A cast iron skillet or bowl for display
How to Make It:
1. Paint each rock white as a base and let it fully dry.
2. Add a colored iris and black pupil to each rock.
3. Use a fine brush to add thin red “vein” lines radiating out from the iris.
4. Seal with a clear coat once dry, then pile the eyeballs into your skillet for display.
Pro Tip: Mix in a few rocks with different iris colors and sizes. A skillet of identical eyeballs looks like a craft kit – a mismatched pile looks like actual creepy chaos, which is exactly the vibe you want.
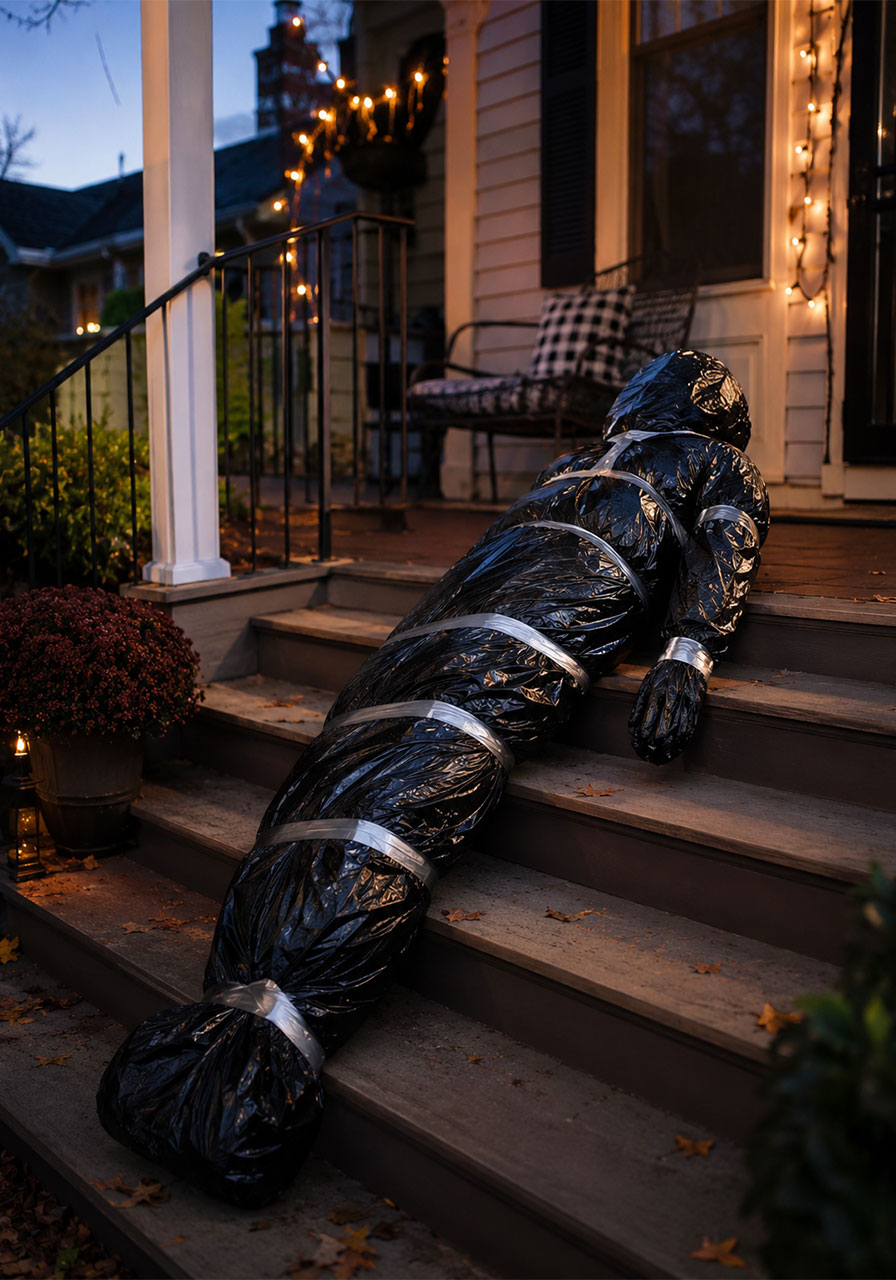
6. DIY Mummified Corpse Prop
Turn a stack of recycling into a life-sized “body” that’ll have your neighbors doing a double-take from the sidewalk. This is one of the most dramatic props on this list, and it costs almost nothing.
Best for: Yard displays, spooky front-porch scenes
Time to Make: 1 hour
Difficulty: Medium
What You’ll Need:
- 10-15 empty plastic bottles
- Duct tape
- Black trash bags
How to Make It:
1. Arrange your bottles into a rough human shape – a head, torso, and legs – laid flat on the ground.
2. Tape the bottles together securely so the shape holds when lifted.
3. Wrap the entire bottle “body” in black trash bags, taping as you go to keep everything tight and seamless.
4. Position your finished corpse somewhere it’ll get noticed – half out of a bush, draped over porch steps, or laid across the front walkway.
Pro Tip: Add a hand or foot shape poking out from the wrapping using a stuffed glove or sock. That one small detail sells the whole illusion.
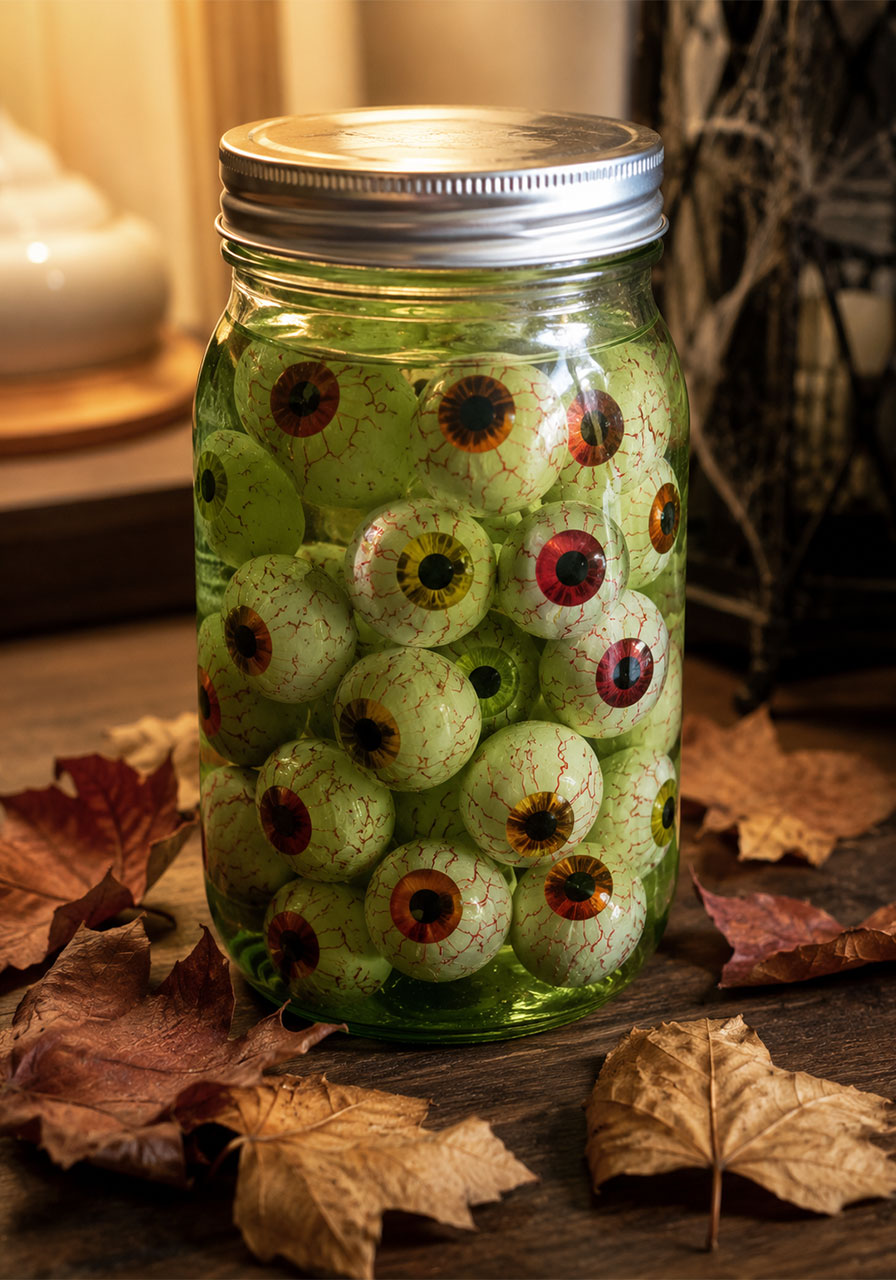
7. Jar of Pickled Eyeballs
Simple, cheap, and unbelievably effective – this jar looks like something straight out of a mad scientist’s lab.
Best for: Party decor, table centerpiece
Time to Make: 10 minutes
Difficulty: Easy
What You’ll Need:
- A large glass jar with lid
- Plastic toy eyeballs or painted ping pong balls
- Water
- Green food coloring
How to Make It:
1. Fill your jar about three-quarters full with the toy eyeballs.
2. Add water until the eyeballs are fully covered.
3. Add a few drops of green food coloring and gently swirl until the water reaches your desired “creepy” shade.
4. Seal the jar tight and set it out on display.
Pro Tip: Use small green tomatoes or peeled green grapes instead of toy eyeballs, and stick tiny printed iris stickers on them – it reads as far more realistic (and gross) up close.
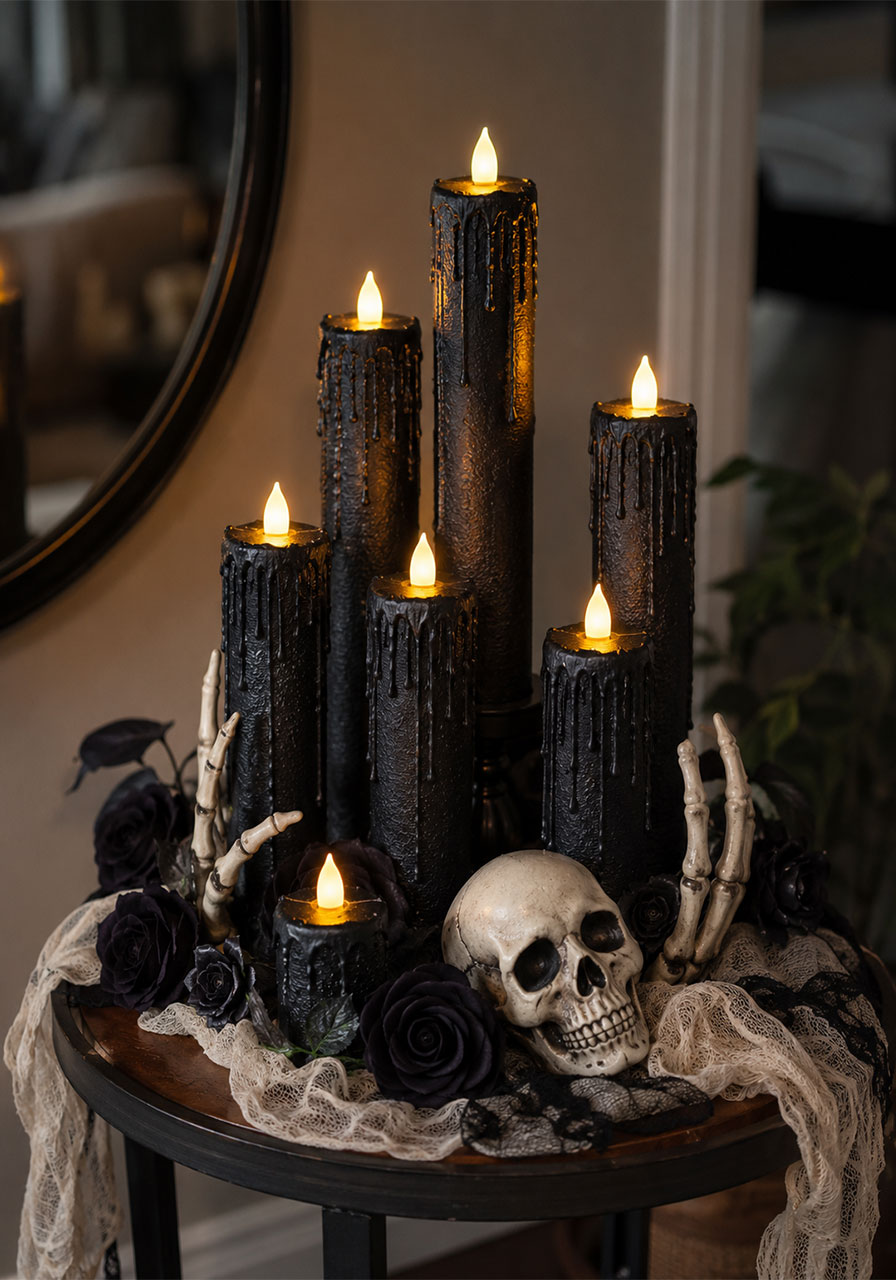
8. Skeleton Candle Shrine Centerpiece
Candles, skeleton pieces, and dark roses combine into a haunted-mansion-worthy centerpiece. This is the showstopper piece for anyone who wants their table to look genuinely designed, not just decorated.
Best for: Adult Halloween parties, dinner table centerpiece
Time to Make: 1 hour
Difficulty: Medium
What You’ll Need:
- Pool noodles (various lengths)
- Black acrylic paint
- Battery-operated tea lights
- Hot glue gun
- Plastic skeleton hands and skulls
- Artificial dark roses and black cheesecloth or gauze
How to Make It:
1. Cut pool noodles into varying heights to mimic melted candle pillars.
2. Paint each one black and let dry fully.
3. Hot glue drips of white or gray paint (or hot glue itself) down the sides for a melted wax effect.
4. Cut a hole in the top of each “candle” to nestle a tea light inside.
5. Arrange your candles on a tray or platter, then tuck in skeleton hands, skulls, roses, and gauze around the base.
Pro Tip: Stagger the candle heights dramatically – tall, medium, short – instead of keeping them even. It creates way more visual drama once the lights are glowing.
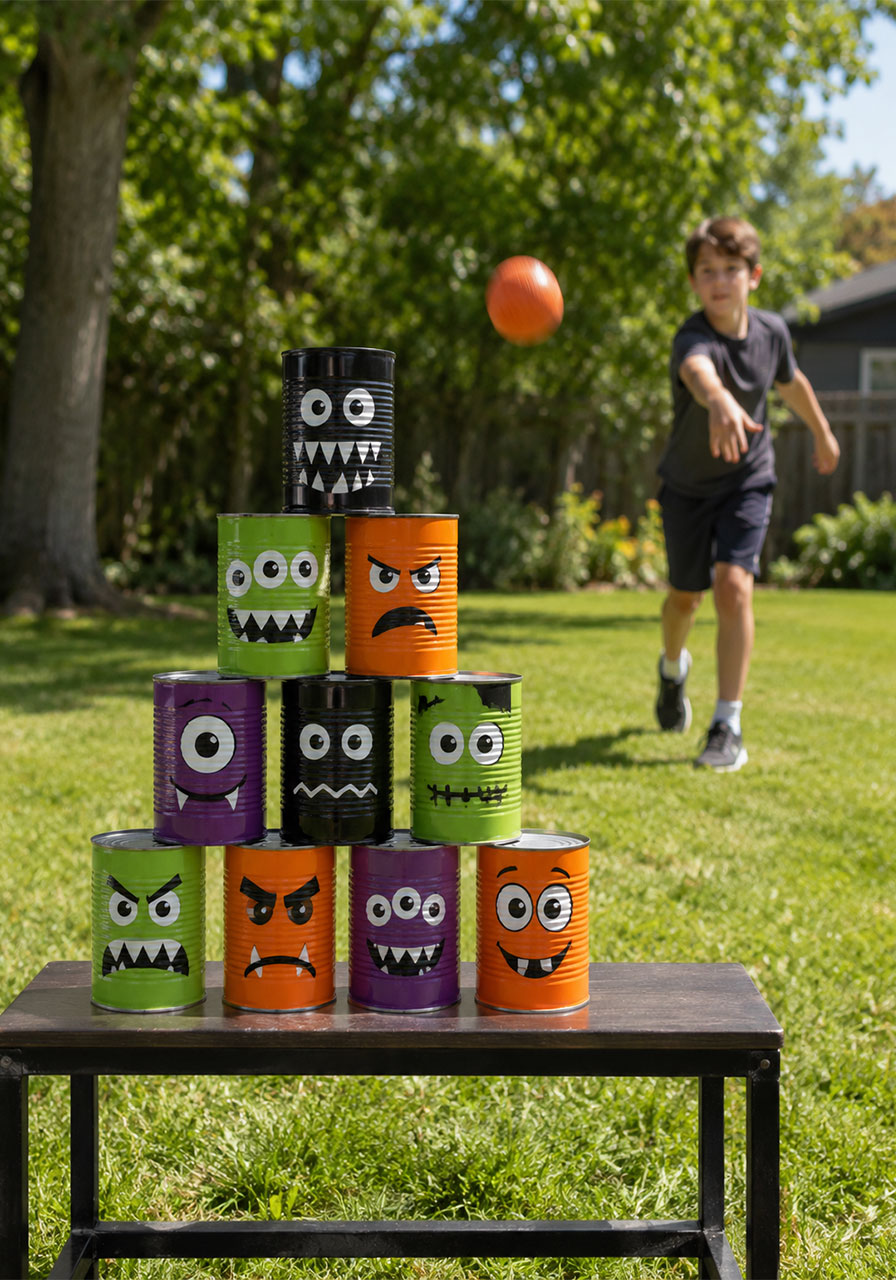
9. Monster Can Toss Party Game
This is where craft night meets game night. A stack of monster-painted cans becomes an instant carnival-style game the whole family can play together.
Best for: Family parties, kids’ Halloween games, ages 4+
Time to Make: 45 minutes
Time to Play: Ongoing
Difficulty: Easy
What You’ll Need:
- 8-10 empty cans (labels removed)
- Acrylic paint in Halloween colors
- Googly eyes
- Hot glue gun
- A soft ball for tossing
How to Make It:
1. Paint each can a solid base color and let it dry completely.
2. Add monster faces using paint pens or a fine brush – fangs, stitches, one giant eye, whatever feels fun.
3. Glue on googly eyes for extra personality.
4. Once dry, stack your cans into a pyramid and set up a toss line a few feet away.
Pro Tip: Weight the bottom row of cans slightly with a bit of sand or rice before sealing them. It keeps the pyramid from getting knocked over by a stray breeze before the game even starts.
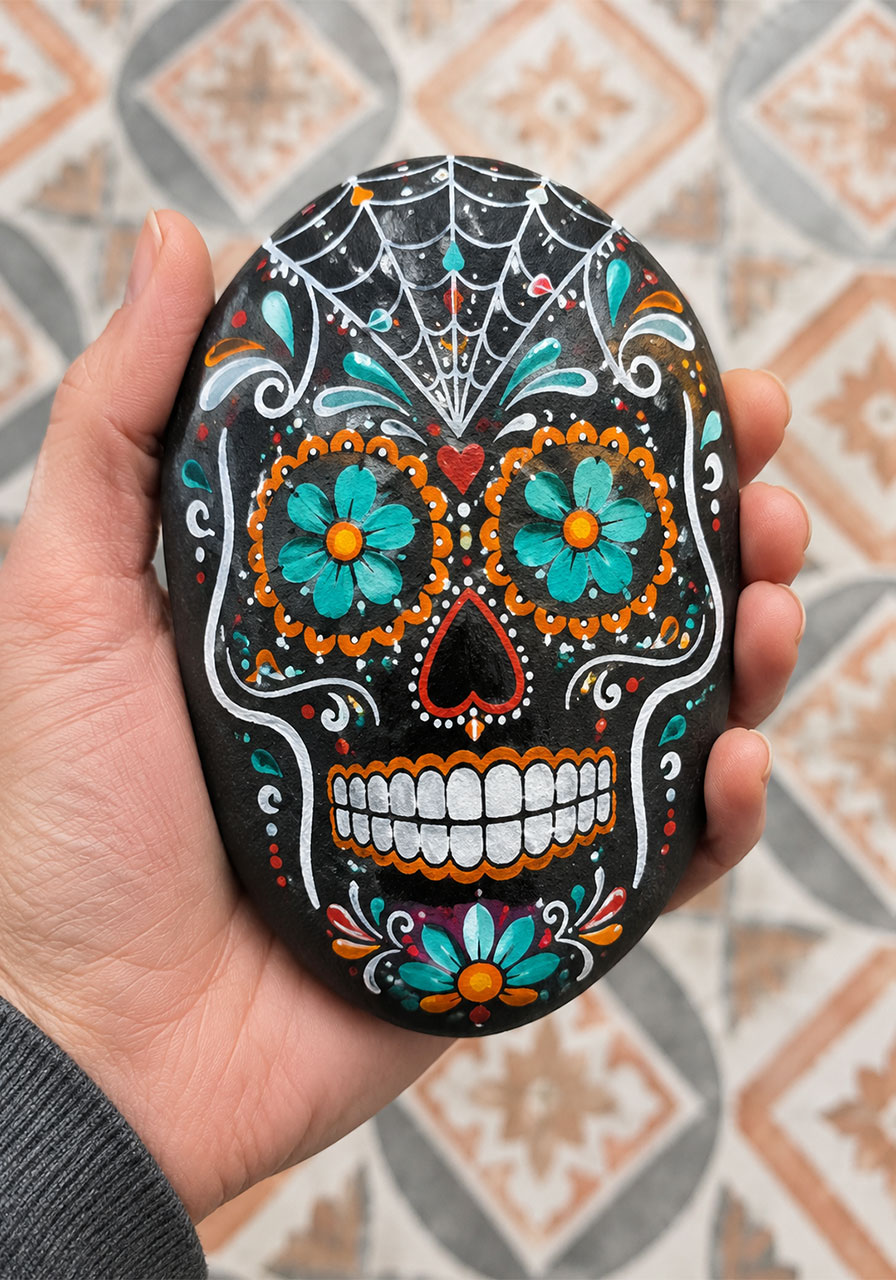
10. Day of the Dead Painted Rocks
A hand-painted sugar skull rock is equal parts art project and keepsake. This one’s especially meaningful if your gathering includes a Día de los Muertos celebration alongside Halloween festivities.
Best for: Family craft night, Día de los Muertos celebrations
Time to Make: 30-45 minutes
Difficulty: Medium
What You’ll Need:
- Smooth, flat rocks
- White acrylic paint (base coat)
- Colorful acrylic paints
- Fine-tip paintbrush
- Clear sealant spray
How to Make It:
1. Paint your rock white and let it dry completely – this is your blank “skull” canvas.
2. Lightly sketch out where the eyes, nose, and mouth will go.
3. Fill in bold floral patterns, teeth details, and colorful designs using your fine brush.
4. Seal with a clear coat once fully dry to protect your design.
Pro Tip: Work in layers – base shapes first, then outlines, then tiny details last. Trying to do it all at once is where designs get muddy.
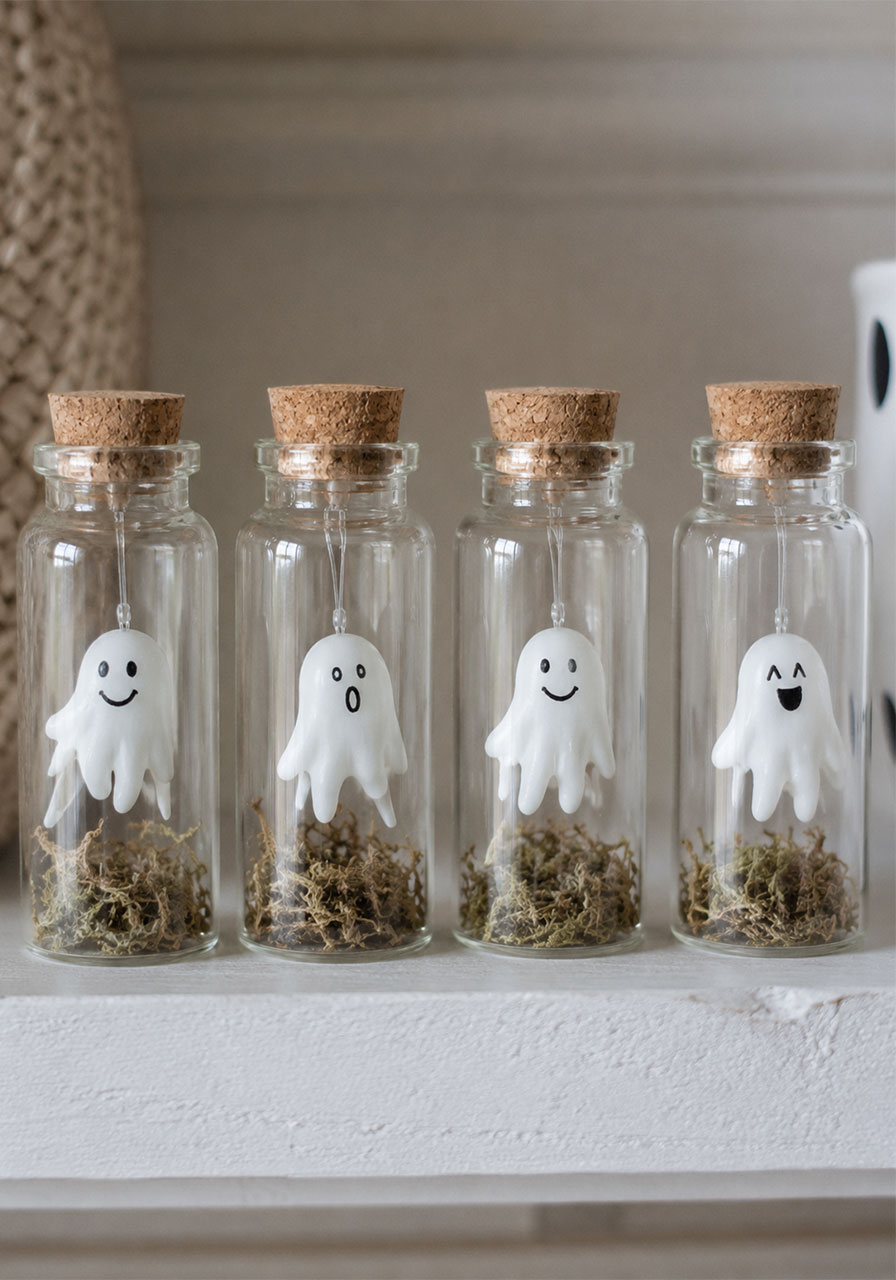
11. Pet Ghost Jars
Tiny, adorable, and genuinely one of the easiest crafts on this entire list. These make an unforgettable party favor that guests will actually want to take home.
Best for: Party favors, trick-or-treat add-ons
Time to Make: 5 minutes each
Difficulty: Easy
What You’ll Need:
- A nonstick craft mat
- Hot glue gun
- A fine-tip black marker
- Fishing line
- Small corked glass bottles
- A pinch of dried moss (optional)
How to Make It:
1. Draw a small ghost outline directly onto the nonstick mat with hot glue, then let it cool and harden.
2. Peel the hardened glue ghost off the mat and draw on a simple face with your marker.
3. Attach a small piece of fishing line to the back of the ghost.
4. Secure the other end of the fishing line into the cork, then push the cork into the bottle so the ghost “floats” inside.
Pro Tip: Add a tiny pinch of moss or shredded paper inside the bottle before sealing – it gives the ghost something to “float” above and makes the whole jar look intentional.
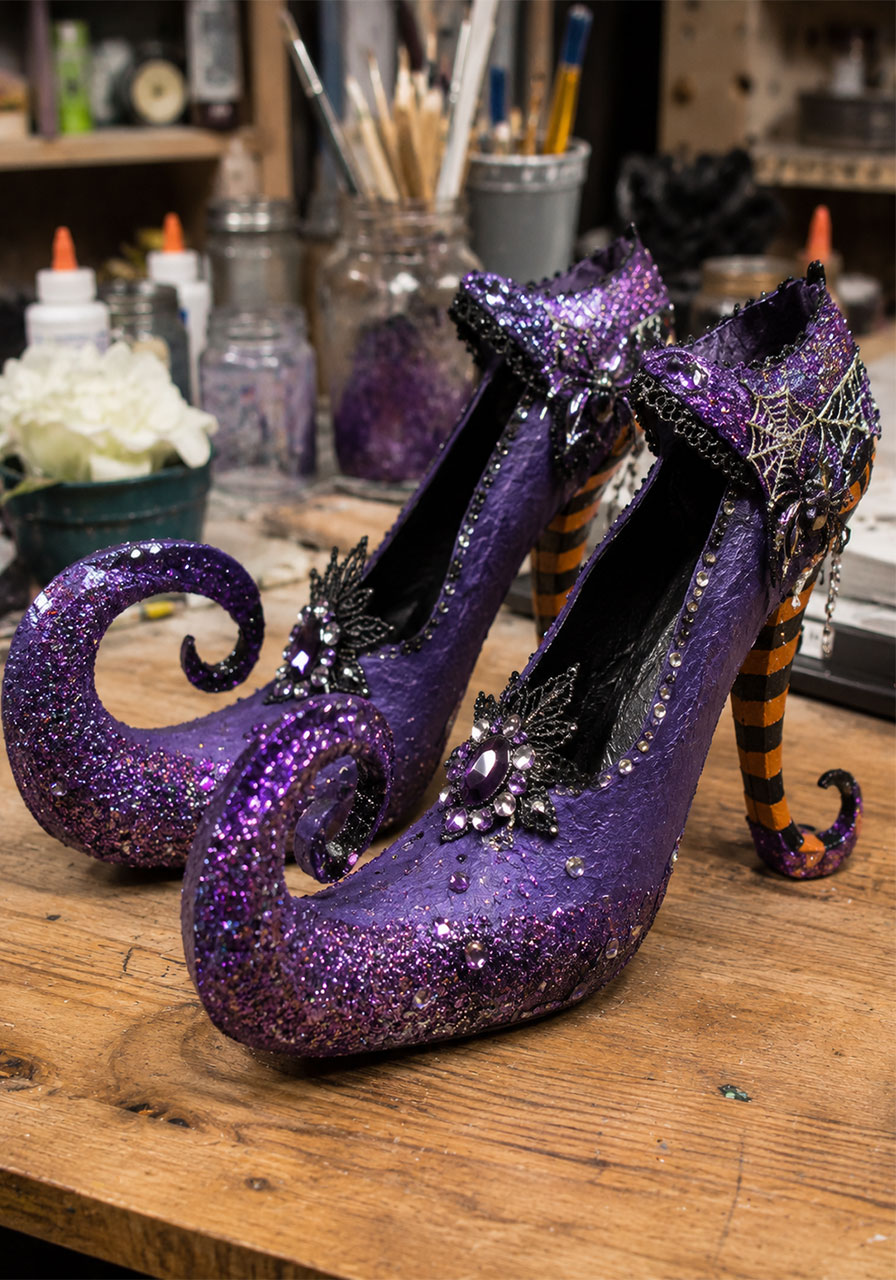
12. Witch’s Curled Heels
An old pair of heels transforms into full-on witch shoes. This is a showstopping craft for anyone building out a complete witch costume or display.
Best for: Costume accessories, witch-themed decor
Time to Make: 2-3 hours (plus drying time)
Difficulty: Advanced
What You’ll Need:
- An old pair of heels
- Paper mache paste and strips
- Acrylic paint
- Glitter, rhinestones, and small decorative spiders
How to Make It:
1. Build up a curled toe shape at the front of each shoe using paper mache strips, layering until you get a solid, sculpted curl.
2. Let the paper mache dry completely – this can take 24 hours depending on thickness.
3. Paint the entire shoe in your chosen witch color palette.
4. Once dry, add glitter, rhinestones, and small spiders for the final witchy flourish.
Pro Tip: Stuff the curled toe with plastic bags before wrapping in paper mache. It holds the curled shape while drying so it doesn’t sag flat.
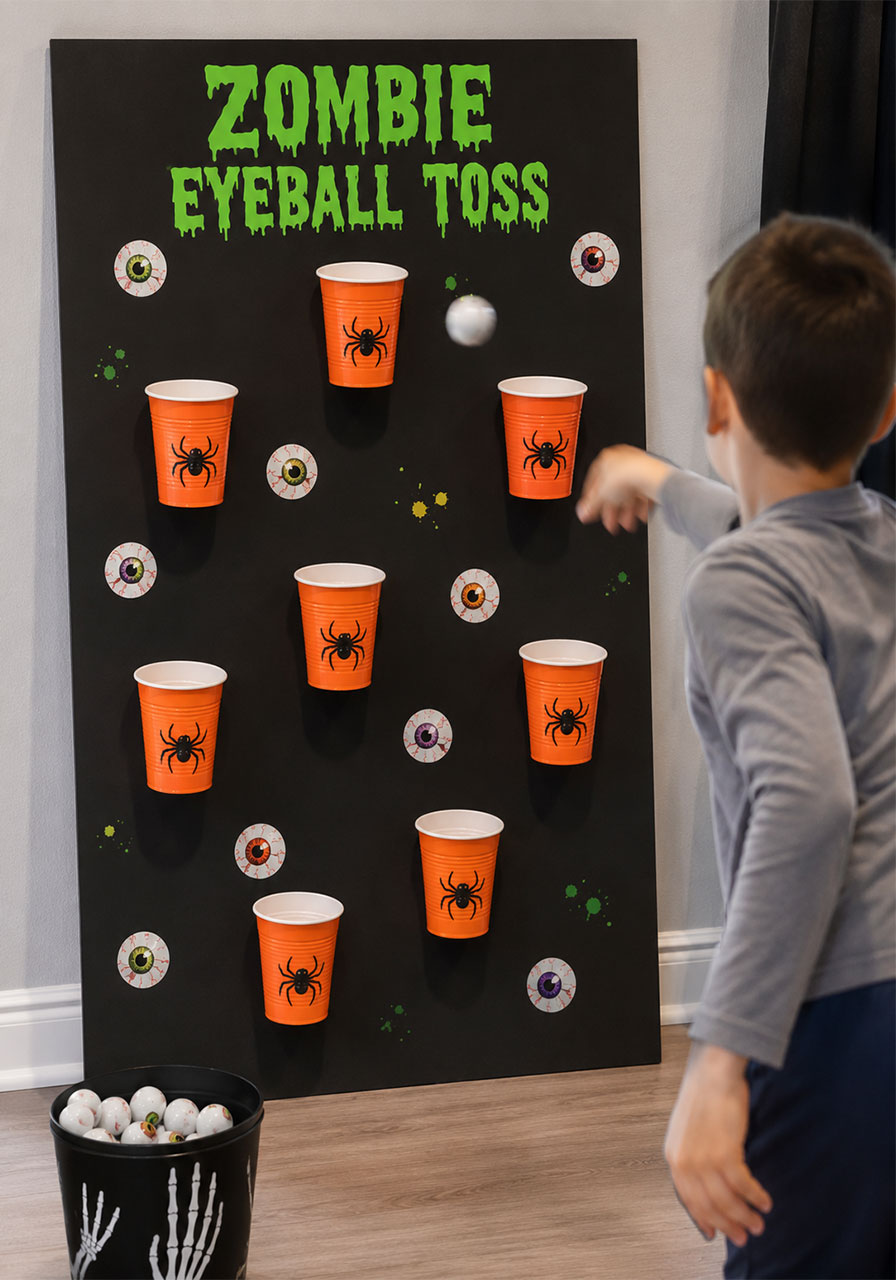
13. Zombie Eyeball Toss Game
An easy DIY carnival game that’s a guaranteed hit at any Halloween party. Simple to build, and endlessly replayable.
Best for: Halloween parties, family game time, ages 4+
Time to Make: 30 minutes
Time to Play: Ongoing
Difficulty: Easy
What You’ll Need:
- A large piece of poster board or foam board
- Plastic cups
- Hot glue gun
- Halloween stickers
- Lightweight balls or plastic eyeballs
How to Make It:
1. Decorate your board with Halloween stickers and a bold game title.
2. Hot glue plastic cups onto the board in a scattered pattern, leaning them at slight angles to catch tosses.
3. Prop the board upright, leaning against a wall or chair.
4. Toss your plastic eyeballs or lightweight balls, trying to land them in the cups.
Pro Tip: Give each cup a point value written next to it and keep score – it turns a casual toss game into a full-on competition, which is always a party win.
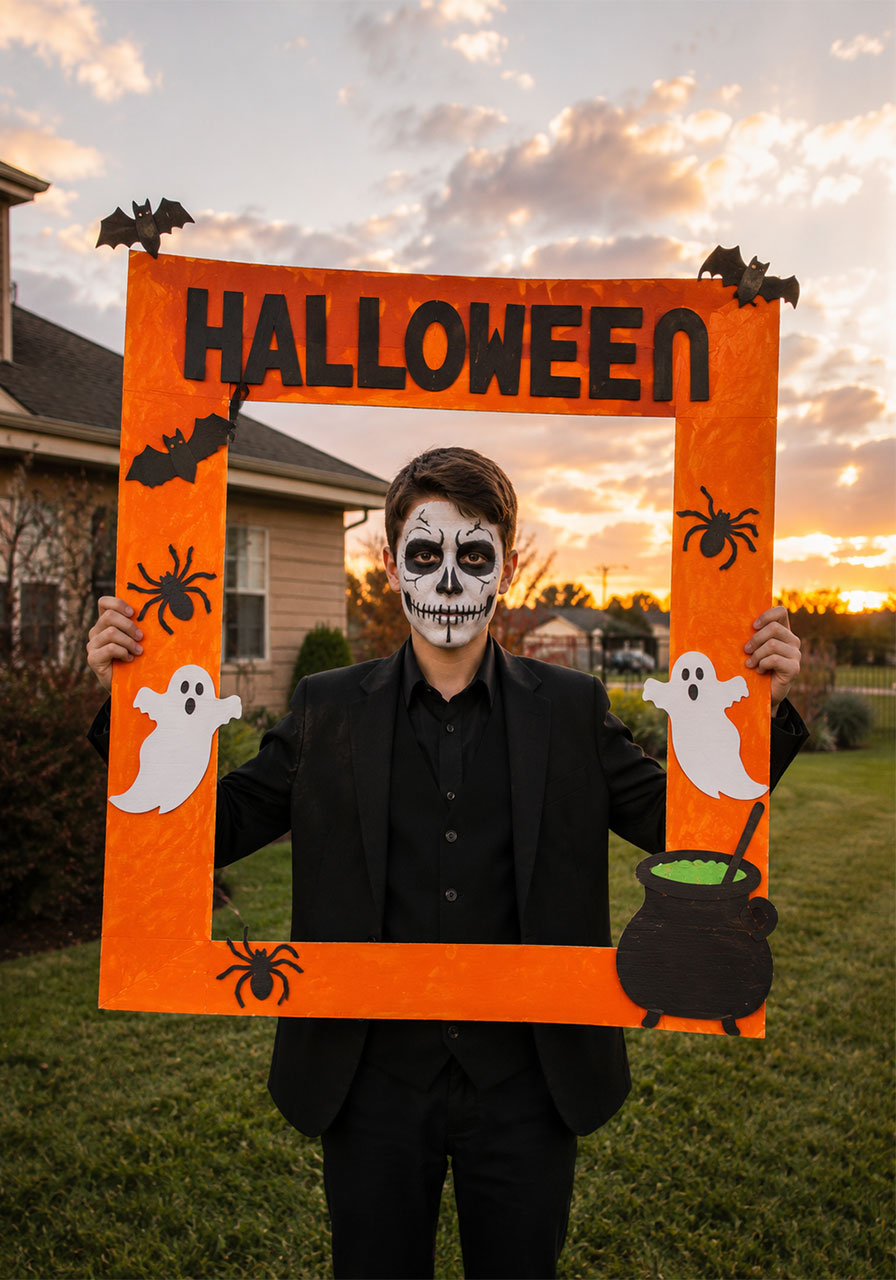
14. Halloween Photo Booth Frame
Every party needs a photo moment, and this DIY frame turns any corner of your house into an instant photo op guests will actually use.
Best for: Party photo ops, all ages
Time to Make: 1 hour
Difficulty: Medium
What You’ll Need:
- Large cardboard sheet
- Craft knife or scissors
- Acrylic paint
- Halloween-themed cutouts (bats, ghosts, pumpkins)
- Hot glue gun
How to Make It:
1. Cut a large rectangle out of your cardboard, then cut out a smaller rectangle inside it to create the frame shape.
2. Paint the frame your chosen base color and let it dry.
3. Glue on Halloween cutouts around the border.
4. Cut two hand-holds into the back so guests can hold it up comfortably for photos.
Pro Tip: Add a small strip of hot glue “dripping” from the top edge, painted black or orange, for a spooky slime-drip effect guests will notice in every photo.
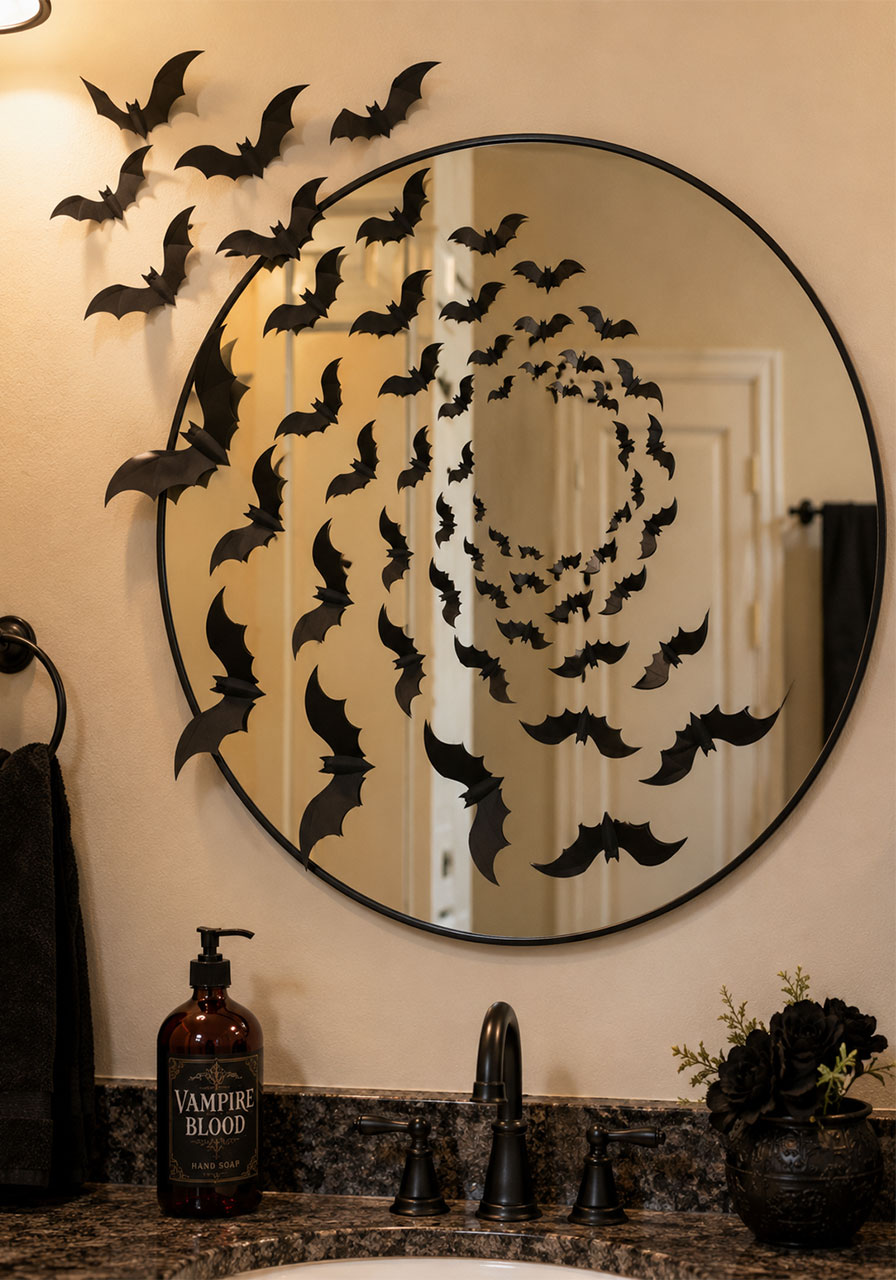
15. Mirror of Bats
This one takes minutes to make but delivers maximum drama. A swarm of paper bats flying off a mirror is one of the most Instagrammed Halloween decor ideas out there – and it’s basically free.
Best for: Bathroom or entryway decor
Time to Make: 30 minutes
Difficulty: Easy
What You’ll Need:
- Black cardstock
- A bat stencil (or freehand template)
- Scissors
- Double-sided tape or removable adhesive dots
How to Make It:
1. Trace and cut out 20-30 bats in a few different sizes.
2. Gently bend the wings of each bat upward for a 3D, mid-flight look.
3. Starting at one edge of the mirror, attach bats in a spiral pattern flowing outward.
4. Vary the density – clustered near the mirror, more scattered as they trail away.
Pro Tip: Use smaller bats near the “trail end” and larger ones near the mirror. This size gradient tricks the eye into thinking the bats are flying toward you.
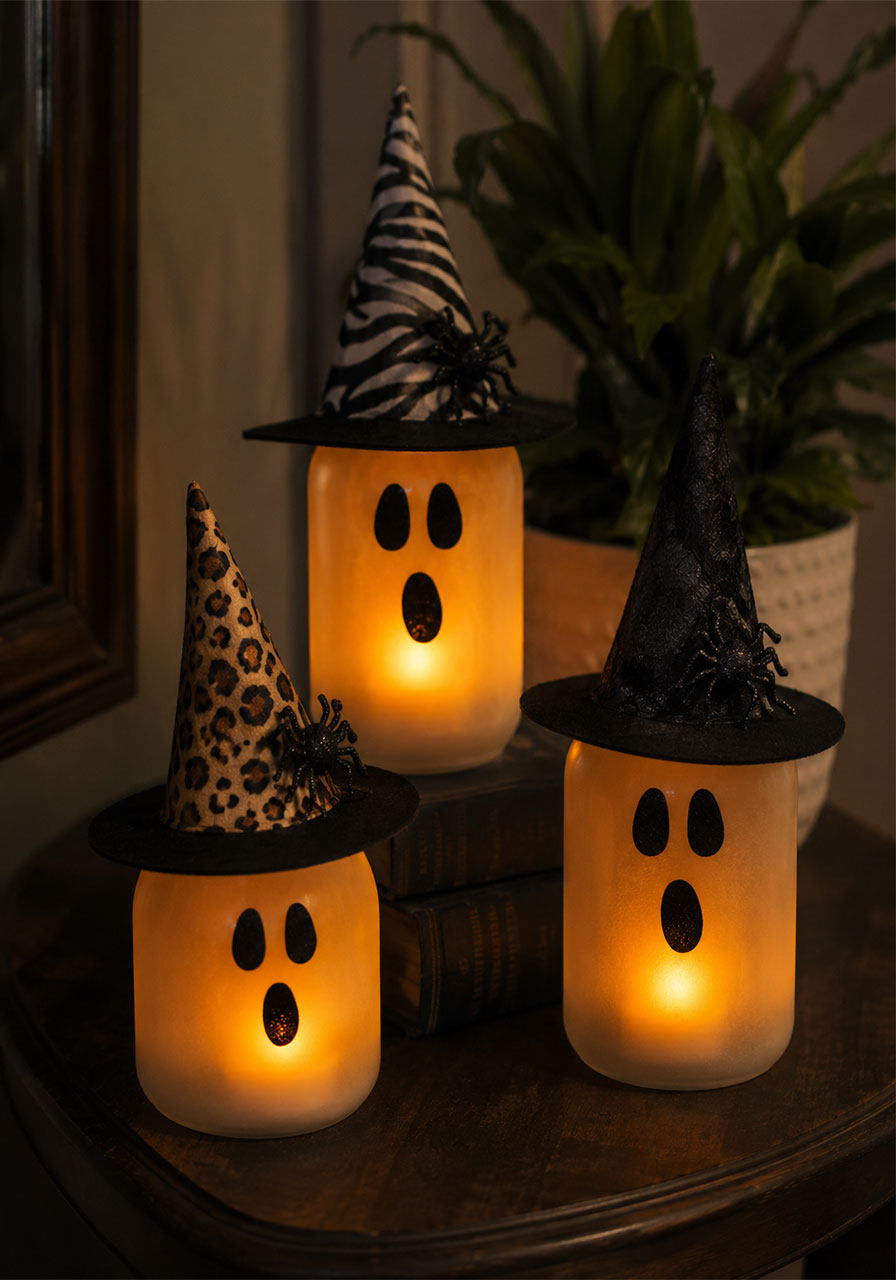
16. Glowing Witchy Ghost Votives
These adorable glowing ghosts wearing tiny witch hats are proof that Halloween decor doesn’t have to be all gore – sometimes cute and spooky is exactly the right combo.
Best for: Mantel decor, tablescapes
Time to Make: 45 minutes
Difficulty: Medium
What You’ll Need:
- Glass votive holders (ceiling fan glass shades work perfectly)
- Battery-operated tea lights
- Small fabric witch hats
- Black felt or foam for faces
- Hot glue gun
How to Make It:
1. Place a battery-operated tea light inside each glass votive.
2. Cut simple ghost eyes and a mouth out of black felt and glue them onto the front of the votive.
3. Glue a small fabric witch hat onto the top of each votive.
4. Group your finished ghosts together for the full glowing effect at night.
Pro Tip: Use different patterned fabrics for each hat (leopard, stripes, plain black) – a matched trio with mismatched hats looks intentional and a lot more charming.
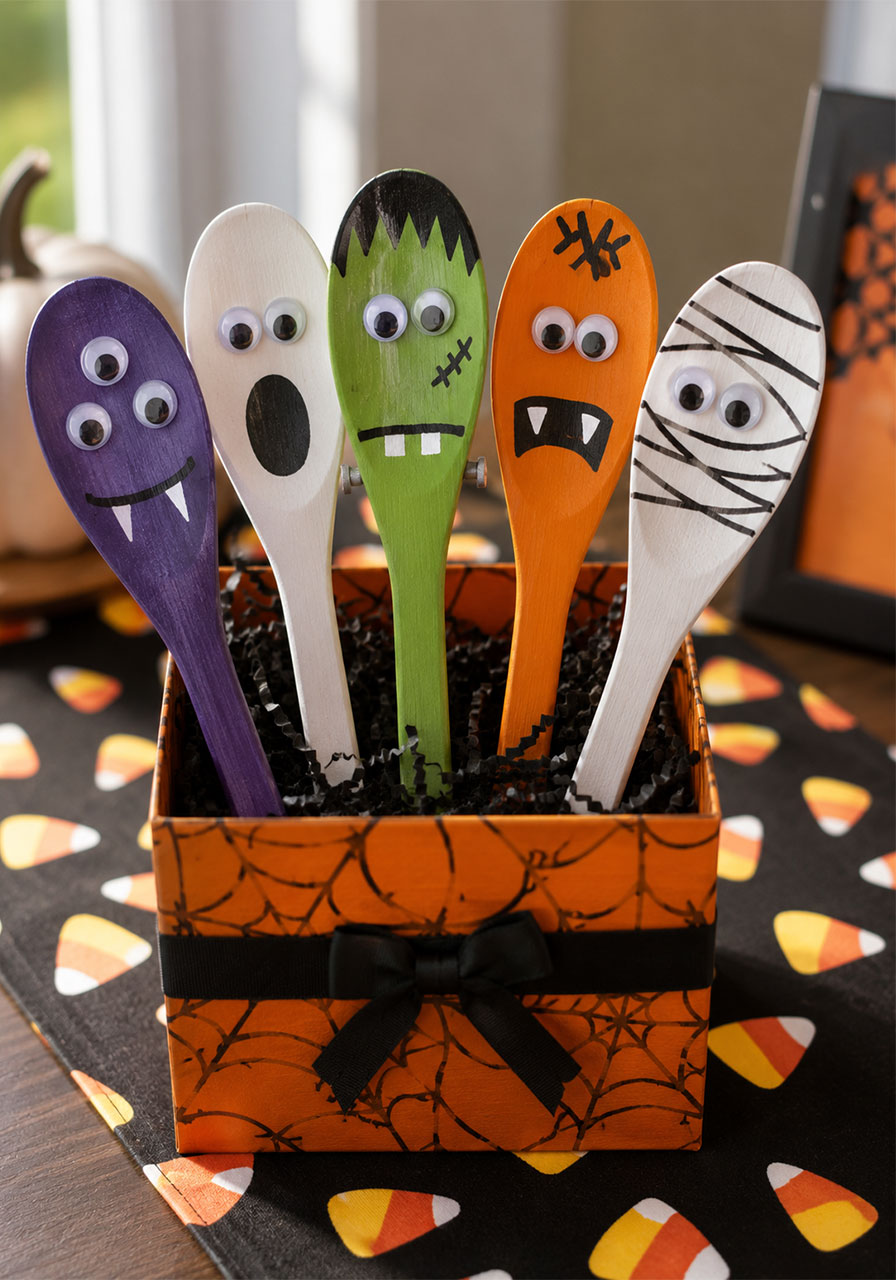
17. Colorful Halloween Spoon Monsters
Wooden spoons become an entire crew of tiny painted monsters. This craft is genuinely fun for kids of every age, and the finished spoons make a great decoration or even a fun stir-stick for a Halloween party drink station.
Best for: Kids, family craft night, ages 5+
Time to Make: 30 minutes
Difficulty: Easy
What You’ll Need:
- Wooden spoons
- Acrylic paint in bright Halloween colors
- Fine-tip paintbrush
- Googly eyes
- Craft glue
How to Make It:
1. Paint each spoon a solid base color and let it dry fully.
2. Paint on a monster face – mouth, teeth, and features – using your fine brush.
3. Glue on googly eyes once the paint is dry.
4. Let everything set completely before displaying in a jar or vase.
Pro Tip: Give each spoon a distinct personality – one grumpy, one goofy, one surprised. A full set with different expressions is way more fun to display than identical faces.
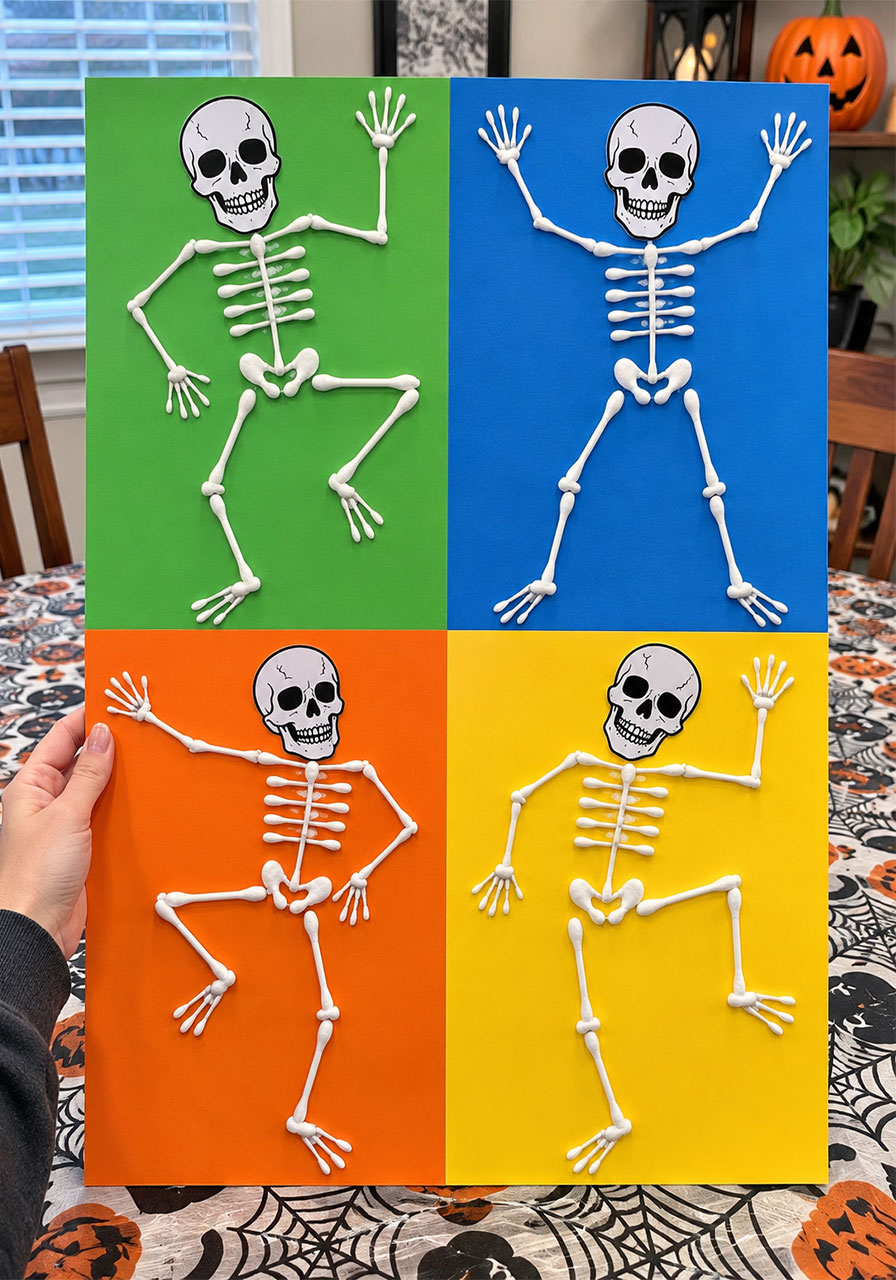
18. Quirky Q-Tip Skeleton Art (Full Body)
The full-body version of the skeleton hand craft – great for a group project where every family member makes their own dancing skeleton.
Best for: Kids, classroom or group activities, ages 4+
Time to Make: 30 minutes each
Difficulty: Easy
What You’ll Need:
- Colored cardstock
- Q-tips
- Craft glue
- Printed or drawn skull heads
- A large poster board (for group display)
How to Make It:
1. Cut Q-tips to size to represent arms, legs, ribs, and a spine.
2. Glue the pieces onto the cardstock in a skeleton pose – arms up, legs bent, whatever feels fun.
3. Add a printed or hand-drawn skull at the top.
4. Once everyone’s skeleton is dry, glue all the finished pieces onto one large poster board to display the whole “spooky crew” together.
Pro Tip: Have each person pose their skeleton differently – dancing, waving, jumping. A whole board of matching stiff skeletons is way less fun than a crew that looks like they’re mid-party.
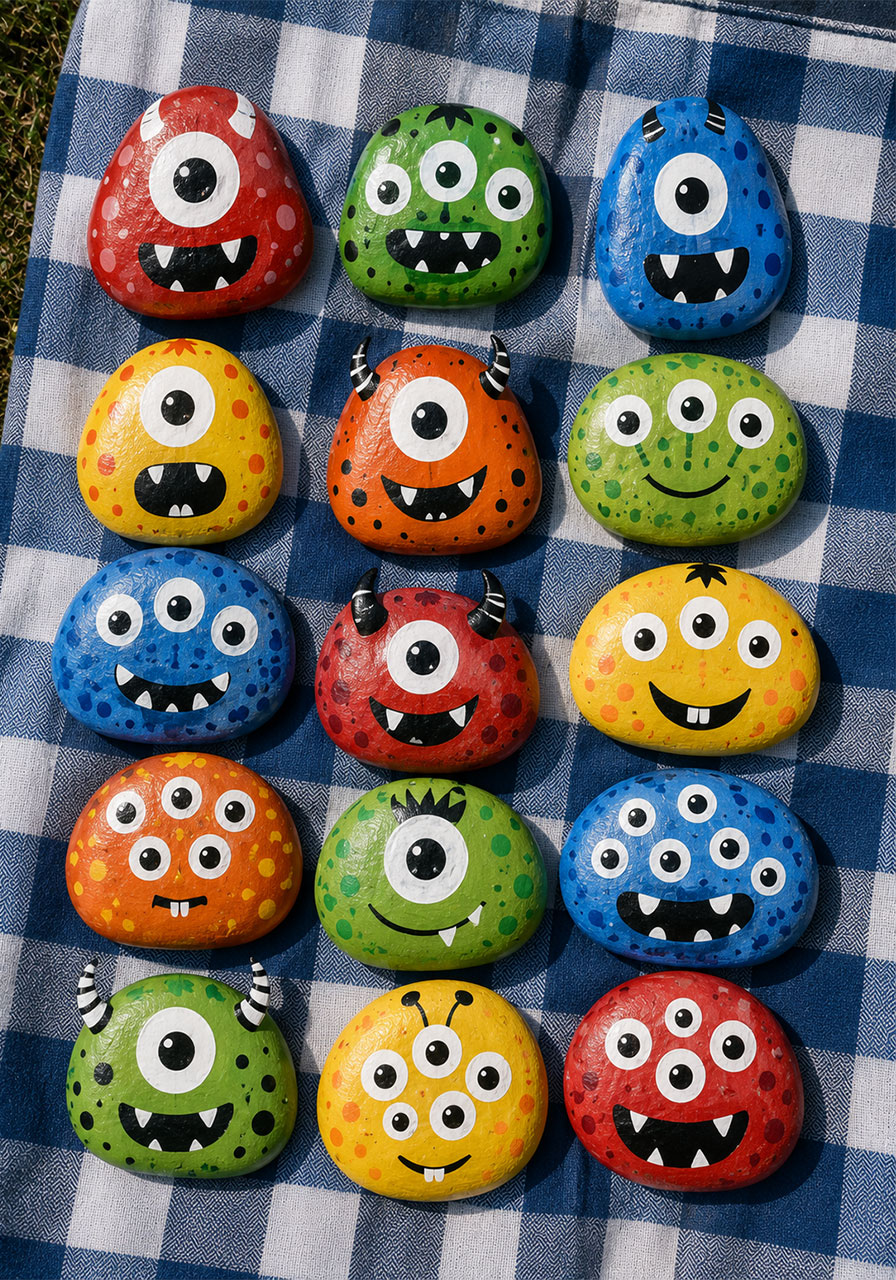
19. Monster Rock Painting
Plain rocks become an army of goofy, colorful monsters. This is an endlessly repeatable craft – perfect for keeping kids busy on a rainy pre-Halloween afternoon.
Best for: Kids, outdoor craft table, ages 4+
Time to Make: 30 minutes
Difficulty: Easy
What You’ll Need:
- Smooth rocks
- Acrylic paint in bright colors
- Fine-tip paintbrush
- Clear sealant spray
How to Make It:
1. Paint each rock a bright base color and let it dry.
2. Add polka dots, stripes, or other fun patterns using a contrasting color.
3. Paint on monster faces – big eyes, goofy teeth, wild expressions.
4. Seal with a clear coat once fully dry so the rocks hold up outdoors.
Pro Tip: Let kids paint the faces themselves rather than following a template. The more asymmetrical and lopsided, the funnier the monster turns out.
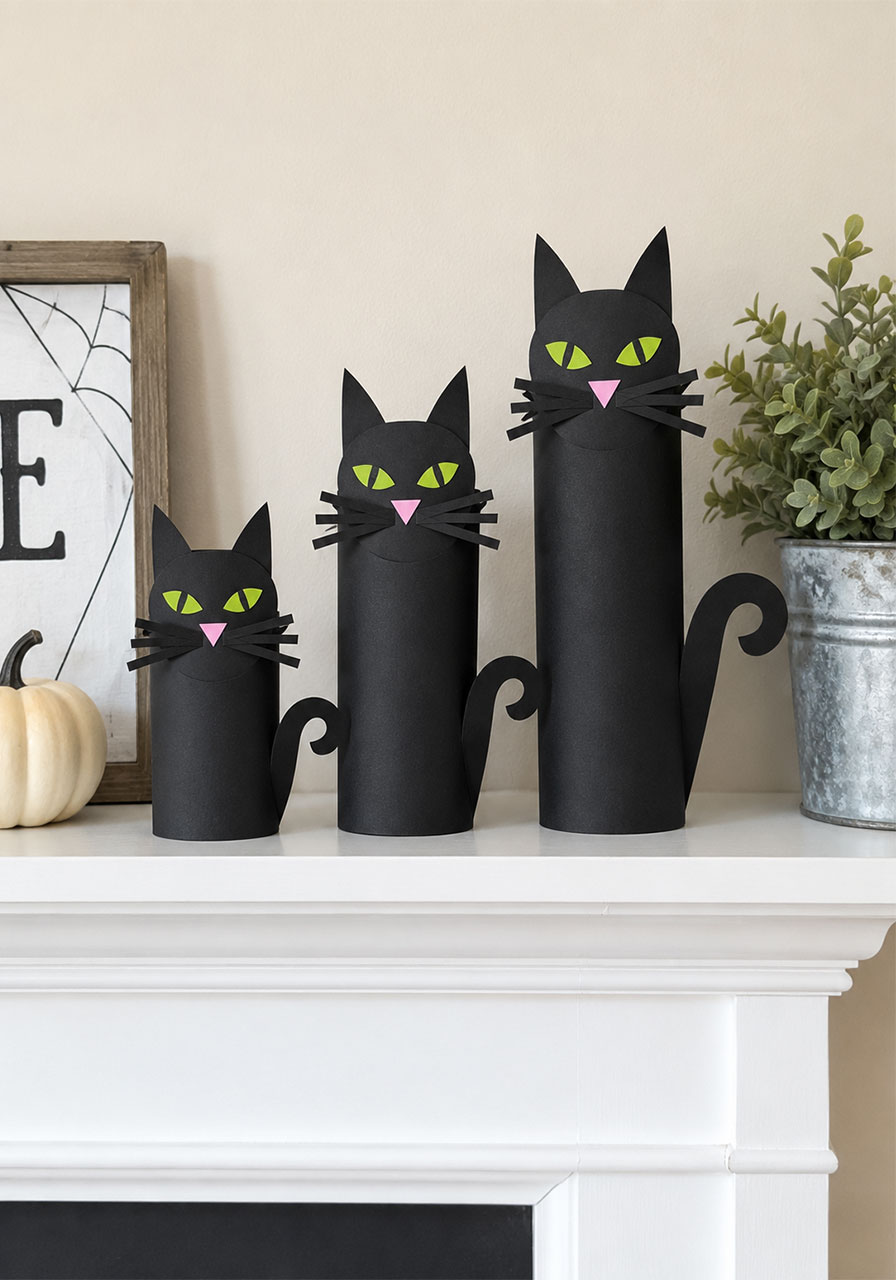
20. Spooky Black Cat Cones
A whole family of black cats made from rolled construction paper – simple, cute, and instantly recognizable as Halloween decor.
Best for: Kids, mantel or shelf decor, ages 5+
Time to Make: 25 minutes each
Difficulty: Easy
What You’ll Need:
- Black construction paper
- Green construction paper (for eyes)
- Scissors
- Craft glue
How to Make It:
1. Roll a sheet of black paper into a cone shape and glue the seam closed.
2. Cut out a cat face with pointed ears from black paper, plus small green eyes.
3. Glue the face onto the top of the cone.
4. Cut and glue on a tail and whiskers to finish.
Pro Tip: Make three cones in slightly different heights and line them up together, just like the classic “family of cats” display – it reads as a set instead of a single random craft.
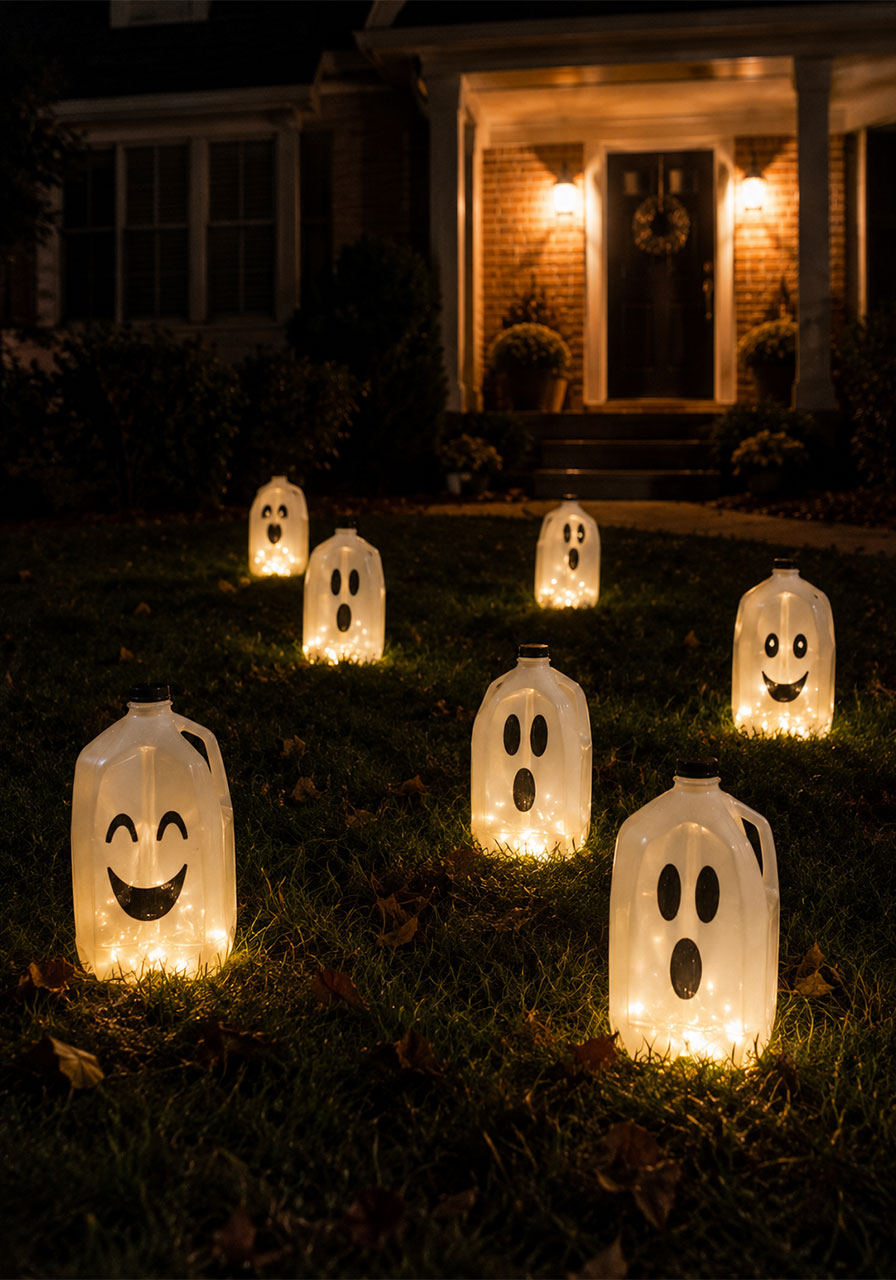
21. Glowing Milk Jug Ghosts
One of the most beloved yard-decor hacks out there, and for good reason – it’s nearly free, takes minutes, and looks incredible lit up at night.
Best for: Yard and porch decor, nighttime display
Time to Make: 20 minutes
Difficulty: Easy
What You’ll Need:
- Empty, clean milk jugs (labels removed)
- Black permanent marker
- Craft knife
- Battery-operated fairy lights or tea lights
How to Make It:
1. Make sure your jugs are completely clean and dry inside.
2. Draw a simple ghost face on the front of each jug with your marker.
3. Cut a small hole in the back of each jug, sized to fit your light source.
4. Pop a strand of fairy lights or a tea light inside each jug and set them out on your lawn once it gets dark.
Pro Tip: Group your jugs in clusters of three or five at varying distances from the house instead of one straight line – it creates a much more dramatic glow pattern across the yard.
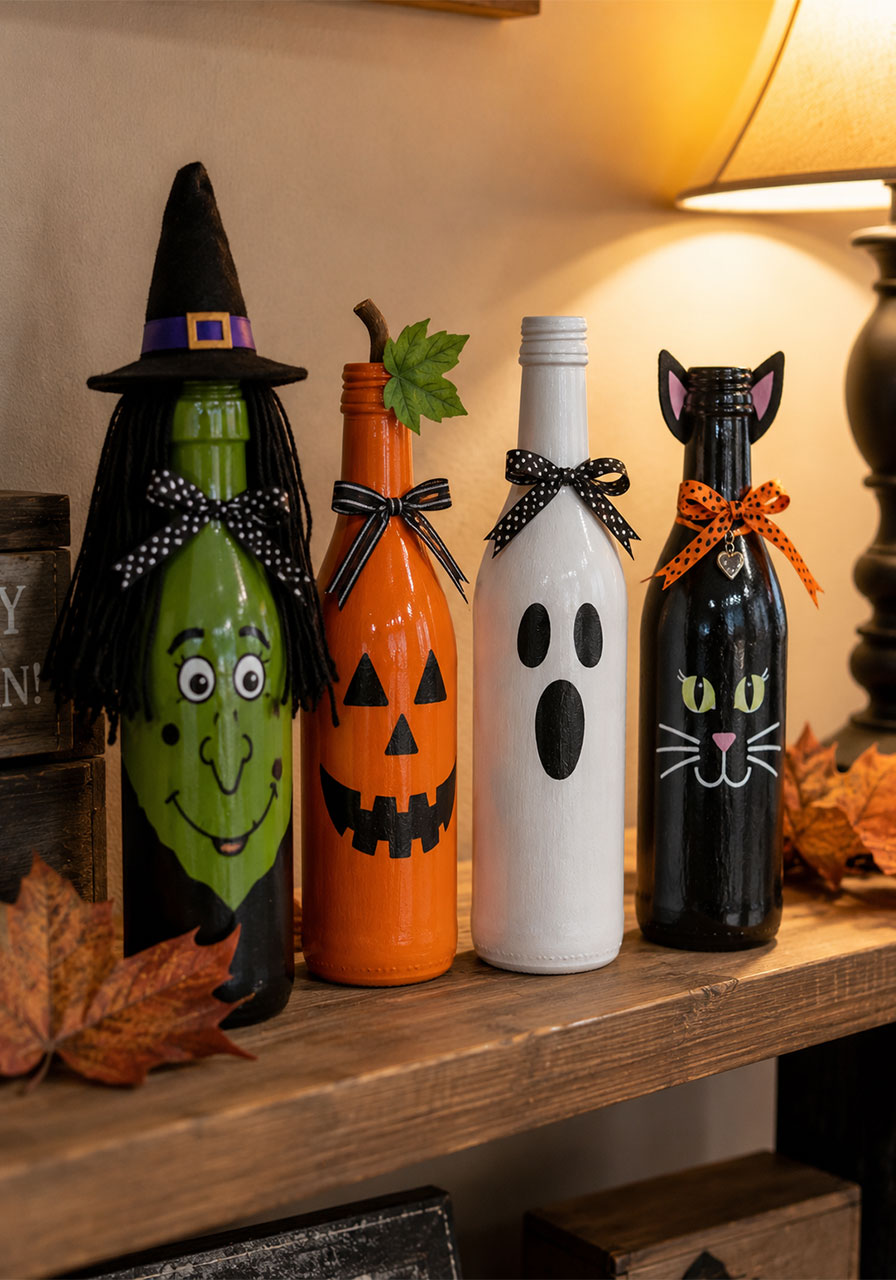
22. Halloween Bottle Characters
Empty bottles become an entire cast of Halloween characters. A great way to repurpose glass bottles into decor you’ll actually want to display year after year.
Best for: Shelf and mantel decor, all ages
Time to Make: 40 minutes each
Difficulty: Medium
What You’ll Need:
- Empty glass bottles, cleaned and dried
- Acrylic paint
- Fine-tip paintbrush
- Ribbon or raffia
How to Make It:
1. Paint each bottle a base color matching your character and let it dry fully.
2. Add facial features, patterns, and details with your fine brush.
3. Tie ribbon or raffia around the neck of each bottle for a finished look.
4. Arrange your finished characters together for a full Halloween display.
Pro Tip: Pick a lineup of characters that go together – a witch, a pumpkin, a ghost, a mummy – so the group tells a little Halloween “story” as a set.
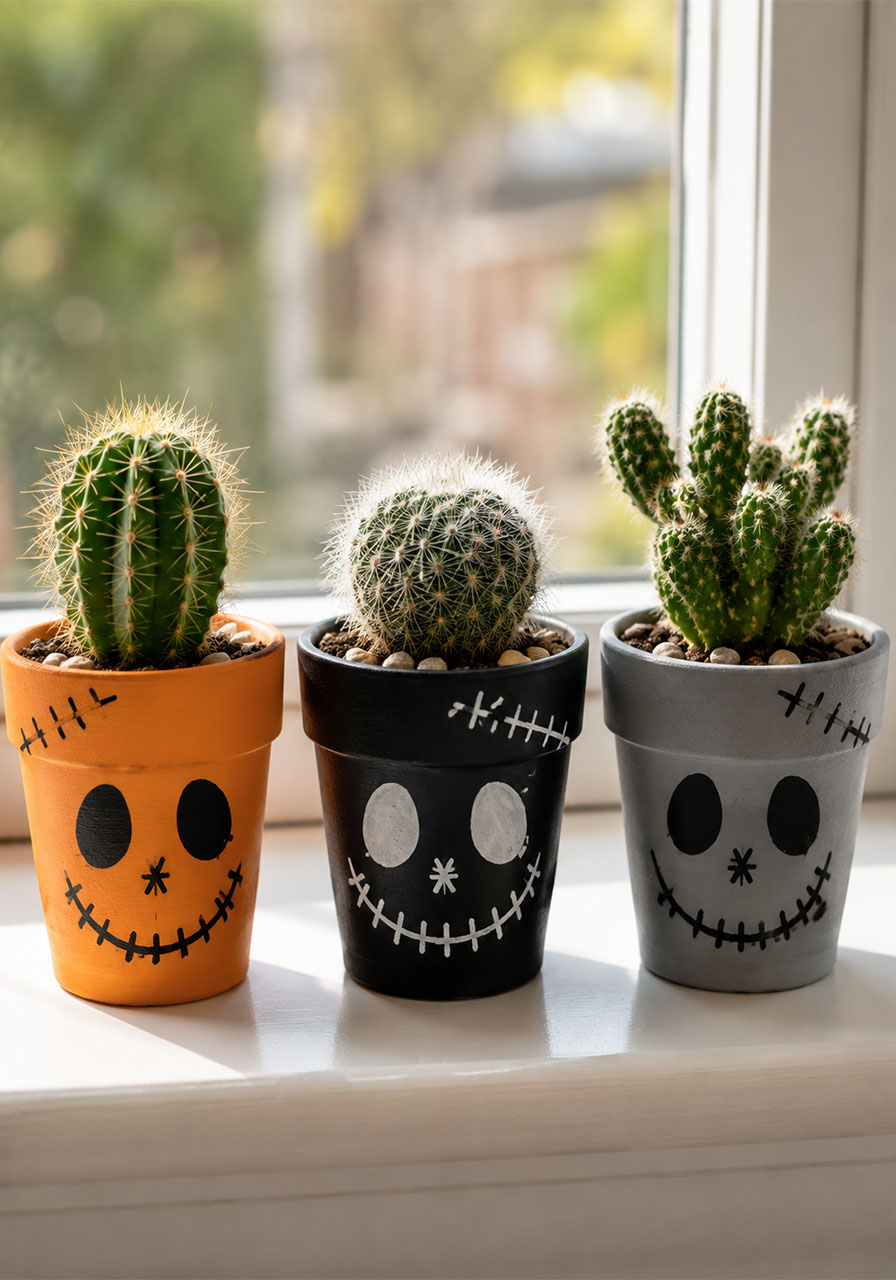
23. Creepy Cactus Planters
Give your houseplants a Halloween makeover. This craft is an easy way to bring the spooky season into rooms that don’t usually get decorated.
Best for: Home decor, plant lovers
Time to Make: 25 minutes
Difficulty: Easy
What You’ll Need:
- Terra cotta pots
- Acrylic paint
- Fine-tip paintbrush
- Small cacti or succulents
How to Make It:
1. Paint your pot a base color and let it dry completely.
2. Add a spooky face – stitches, swirls, hollow eyes, whatever fits your vibe – using the fine brush.
3. Once dry, plant your cactus or succulent inside.
4. Group several together for a mini Halloween plant family.
Pro Tip: Skip the sealant on this one since it holds a live plant – a light coat of clear matte spray on just the outside works if you want extra durability without affecting the soil.
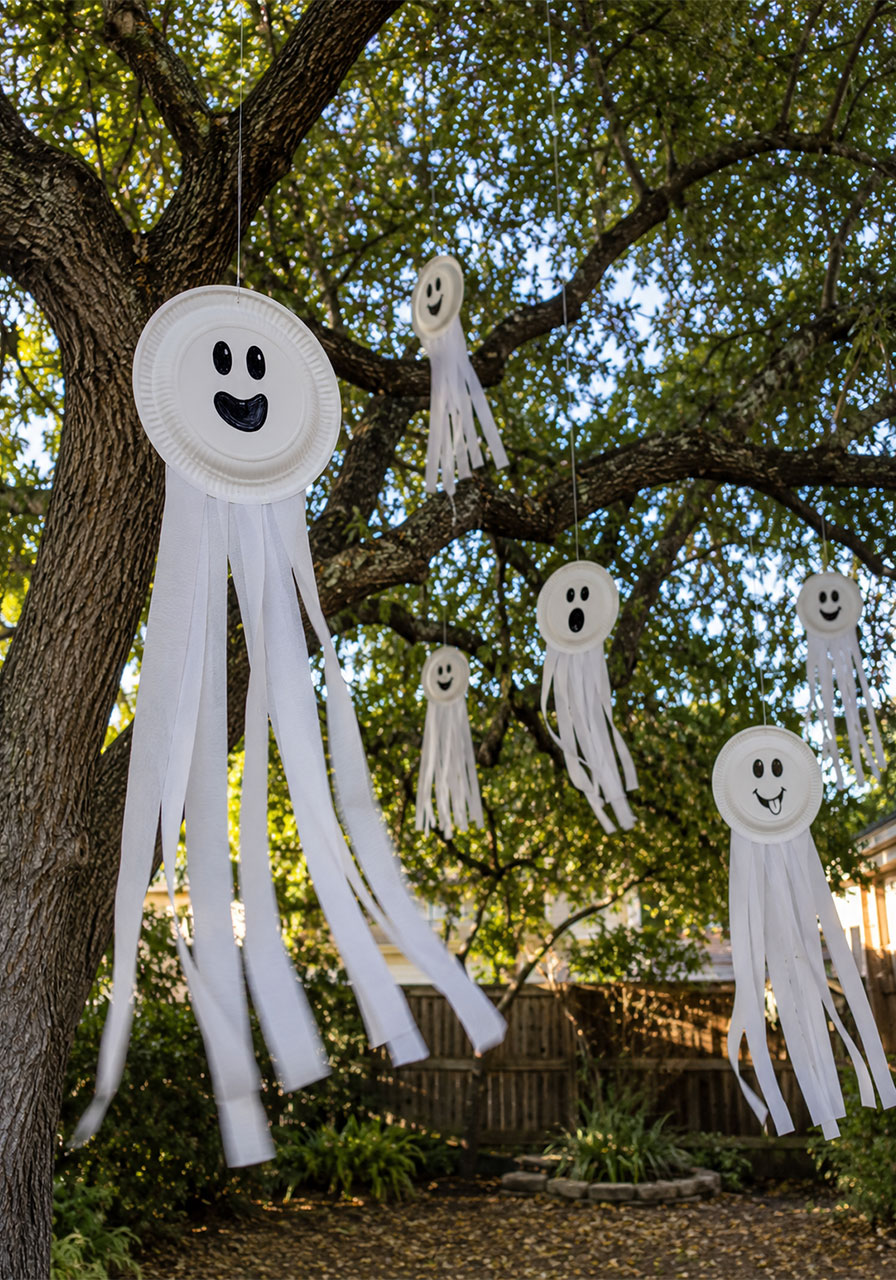
24. Floating Ghost Decorations
Paper plate ghosts that “float” from tree branches are a Halloween classic for a reason – they’re simple, cheap, and genuinely eerie swaying in the wind.
Best for: Yard decor, kids’ craft projects
Time to Make: 20 minutes each
Difficulty: Easy
What You’ll Need:
- White paper plates
- Black marker
- White crepe paper or streamers
- Craft glue
- String or fishing line
How to Make It:
1. Draw a simple ghost face on each paper plate.
2. Glue long strips of white crepe paper or streamers to the bottom edge of the plate.
3. Attach a string or fishing line to the top of the plate for hanging.
4. Hang your ghosts from tree branches so the streamers move freely in the wind.
Pro Tip: Hang them at different heights across a tree instead of all at one level – it creates a much more convincing “floating ghost swarm” effect.
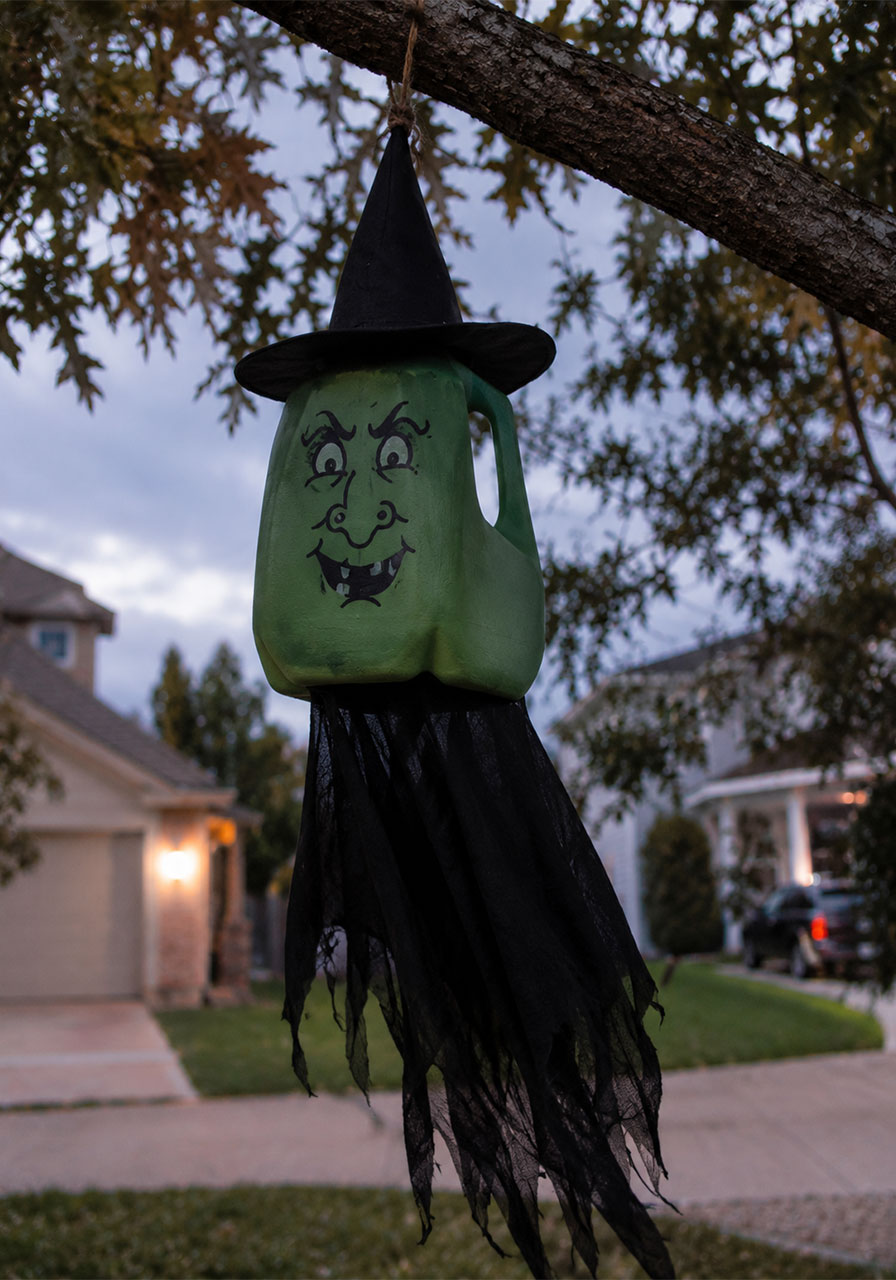
25. Flying Milk Jug Witch
Another clever milk jug transformation – this time into a witch that looks like she’s mid-flight across your yard.
Best for: Yard decor, tree display
Time to Make: 30 minutes
Difficulty: Easy
What You’ll Need:
- An empty milk jug, cleaned and dried
- Dark green acrylic paint
- Black permanent marker
- A small witch hat
- Black fabric
How to Make It:
1. Paint the milk jug a dark green shade and let it dry.
2. Draw a witchy face on the front using your marker.
3. Attach a witch hat to the top of the jug.
4. Drape black fabric around the jug to form a flowing witch body, then hang from a tree branch.
Pro Tip: Add a few strands of gray or black yarn as hair peeking out from under the hat – it’s a tiny detail that makes the whole character read much more clearly from a distance.
26. Crashed Witch Wall Decoration
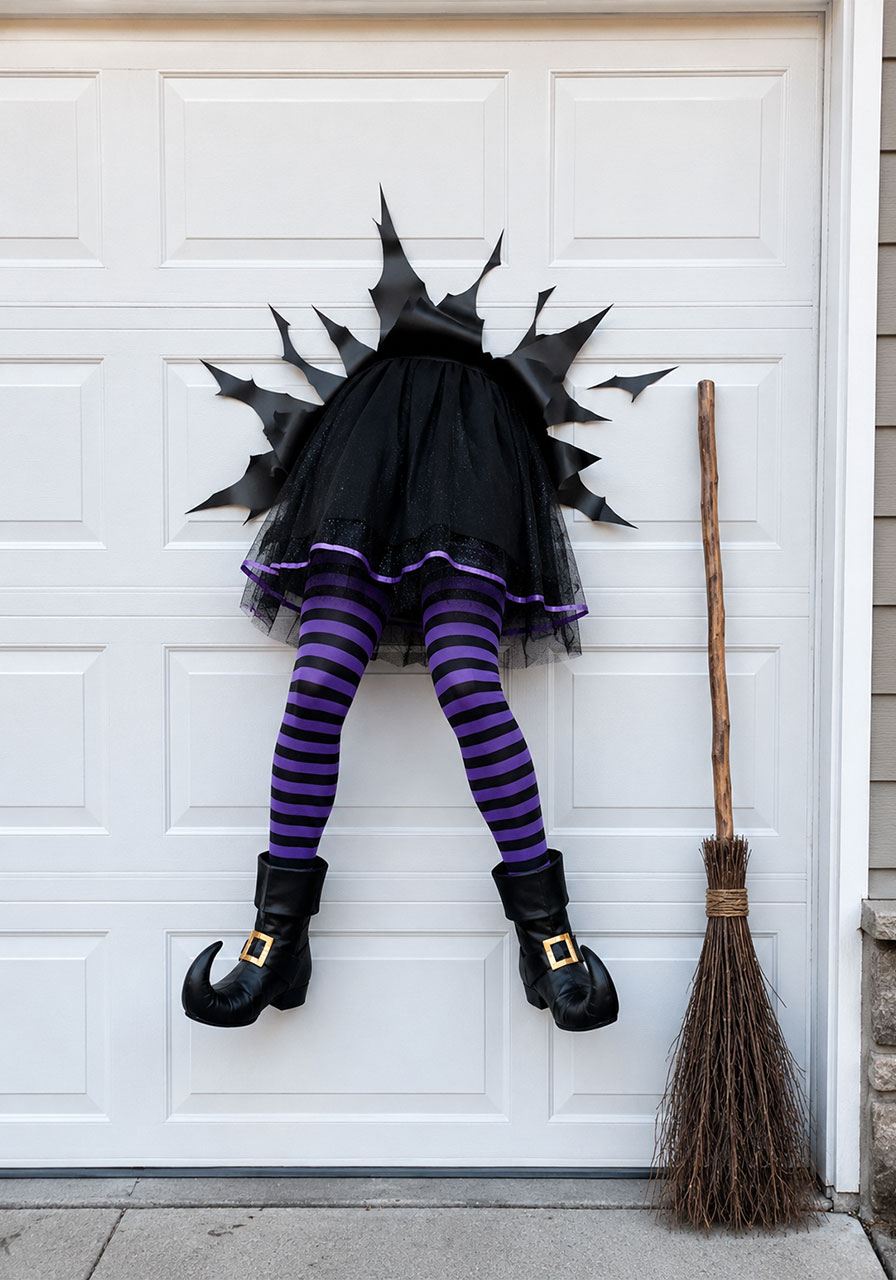
Make it look like a witch flew straight into your wall or garage door. This is one of the most talked-about yard gags every Halloween season – genuinely funny and surprisingly easy to build.
Best for: Yard and garage decor, comedic display
Time to Make: 1 hour
Difficulty: Medium
What You’ll Need:
- A pair of striped stockings
- Stuffing (fabric scraps or newspaper)
- Black shoes
- A mannequin torso or large doll
- A witch costume
- A broom
How to Make It:
1. Stuff the striped stockings firmly to create witch legs.
2. Attach black shoes to the bottom of each stuffed leg.
3. Dress your mannequin torso or doll in the witch costume.
4. Attach the torso and legs to your wall or garage door so it looks like she crashed headfirst into it, then lean a broom nearby for the final touch.
Pro Tip: Position the legs at a slight bent angle instead of straight down – it sells the “impact” moment much more convincingly than perfectly straight legs.
27. Scary Movie Location Signs
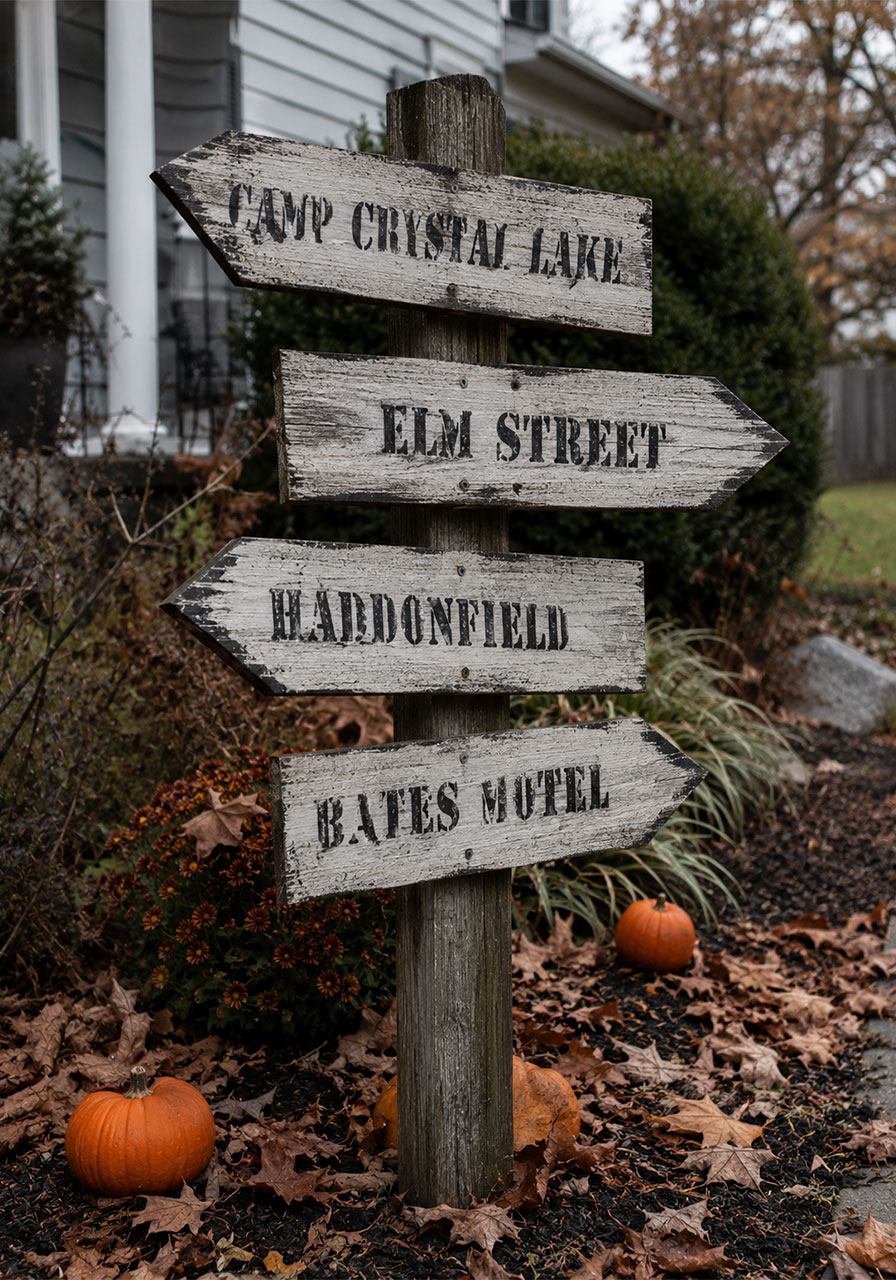
Wooden signposts naming iconic horror movie locations make for a genuinely clever yard display that horror fans will absolutely recognize and appreciate.
Best for: Yard decor, horror movie fans
Time to Make: 45 minutes
Difficulty: Medium
What You’ll Need:
- Wooden planks
- Acrylic paint
- Letter stencils (optional)
- A wooden post or tree
How to Make It:
1. Cut your wooden planks to your desired sign size.
2. Paint each plank a base color and let it dry.
3. Stencil or freehand your chosen horror location names onto each sign.
4. Attach the signs to a post or tree, angling them slightly like a real signpost.
Pro Tip: Distress the wood slightly with sandpaper before painting – a weathered look sells the “old spooky signpost” feel way better than a clean, fresh board.
28. Spooky Pool Noodle Candle Tower
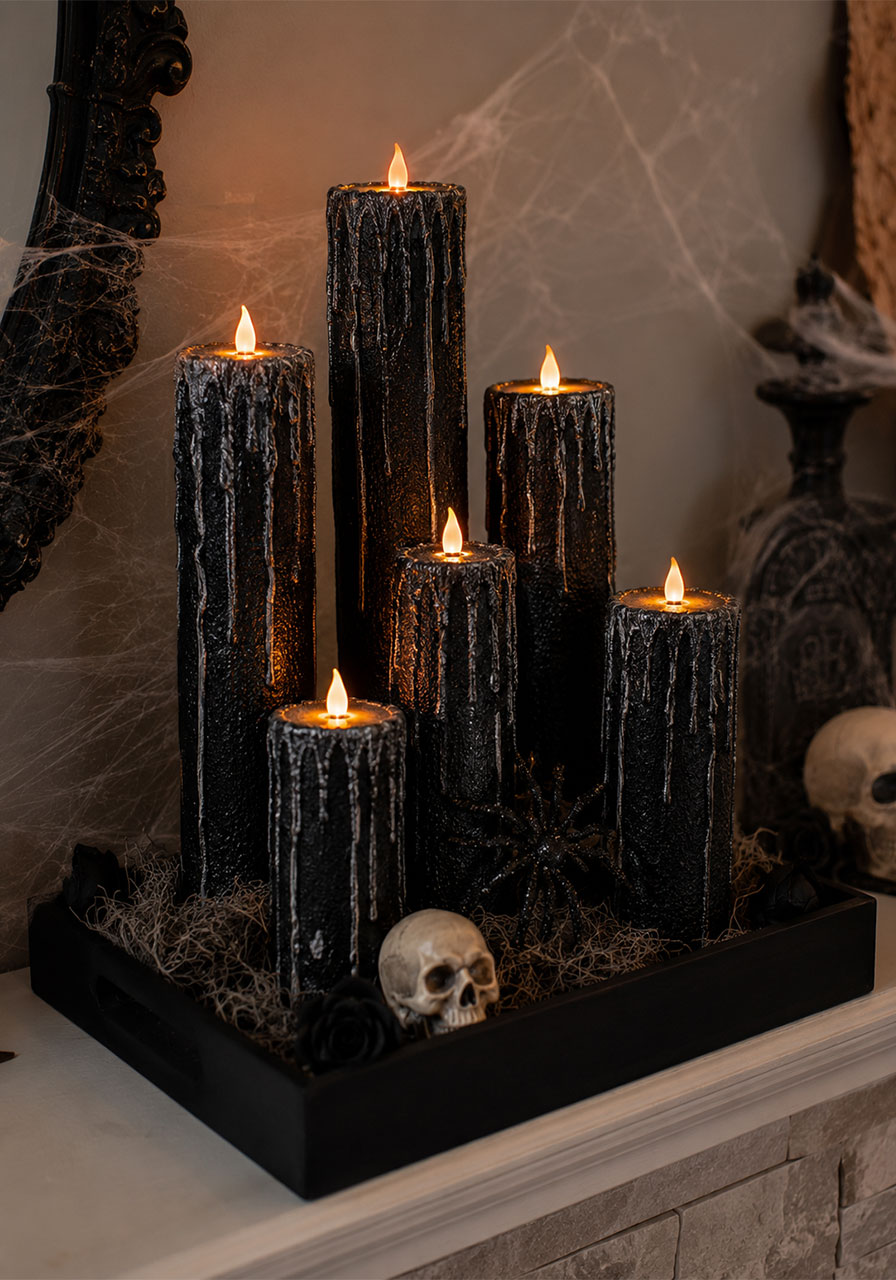
A dramatic, tiered candle tower built entirely from pool noodles. It looks like an antique candelabra straight out of a haunted mansion – for a fraction of the cost.
Best for: Party centerpiece, mantel display
Time to Make: 1 hour
Difficulty: Medium
What You’ll Need:
- Pool noodles
- Black acrylic paint
- Hot glue gun
- Battery-operated LED tea lights
- A flat base or tray
How to Make It:
1. Cut pool noodles into a range of heights, with your tallest piece around 22 inches.
2. Cut a hole in the top of each piece to hold an LED tea light.
3. Paint every piece black and let dry completely.
4. Use hot glue to create drip marks running down the sides for a melted wax effect.
5. Arrange your finished “candles” on a base, add the LED lights, and decorate around them with spooky accents.
Pro Tip: Let the hot glue drips cool at an angle by tilting the noodle slightly while it sets – straight-down drips look flat, angled drips look like they’re actually melting.
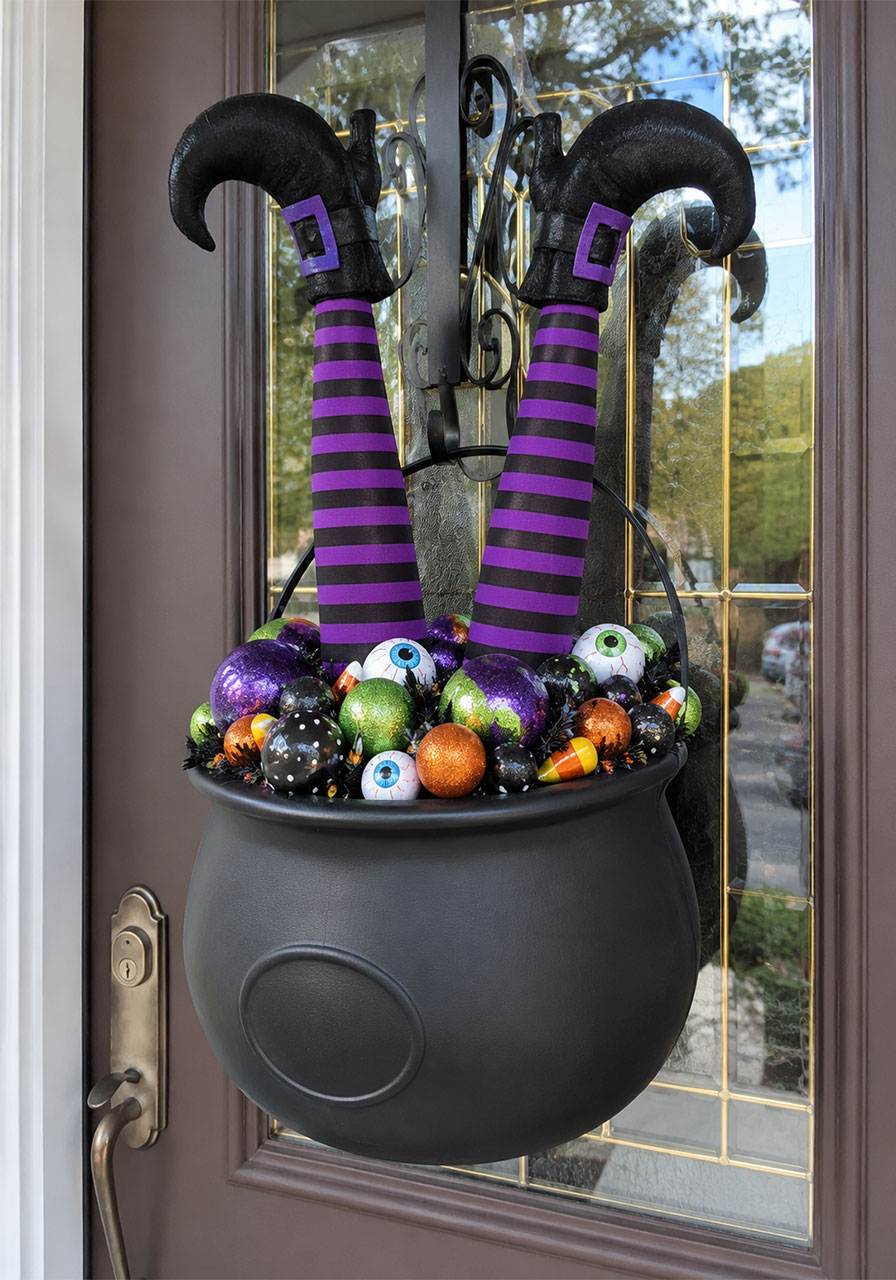
29. Bubbly Witch Cauldron Door Decor
A cauldron overflowing with Halloween ornaments and “witch legs” sticking out the top is a fun, festive twist on classic door decor.
Best for: Front door decor
Time to Make: 30 minutes
Difficulty: Easy
What You’ll Need:
- A large plastic cauldron
- Colorful ornaments and plastic eyeballs
- Striped fabric or stockings
- Stuffing material
- A door hanger bracket
How to Make It:
1. Fill your cauldron with a colorful mix of ornaments and eyeball decorations.
2. Stuff your striped fabric to create witch legs, then attach a pair of small shoes to the bottom.
3. Position the stuffed legs so they appear to stick straight up out of the cauldron.
4. Hang the whole cauldron on your door using a door hanger bracket.
Pro Tip: Bend the legs slightly at the knee before securing them – perfectly straight legs look stiff, while a slight bend makes it look like she toppled in headfirst.
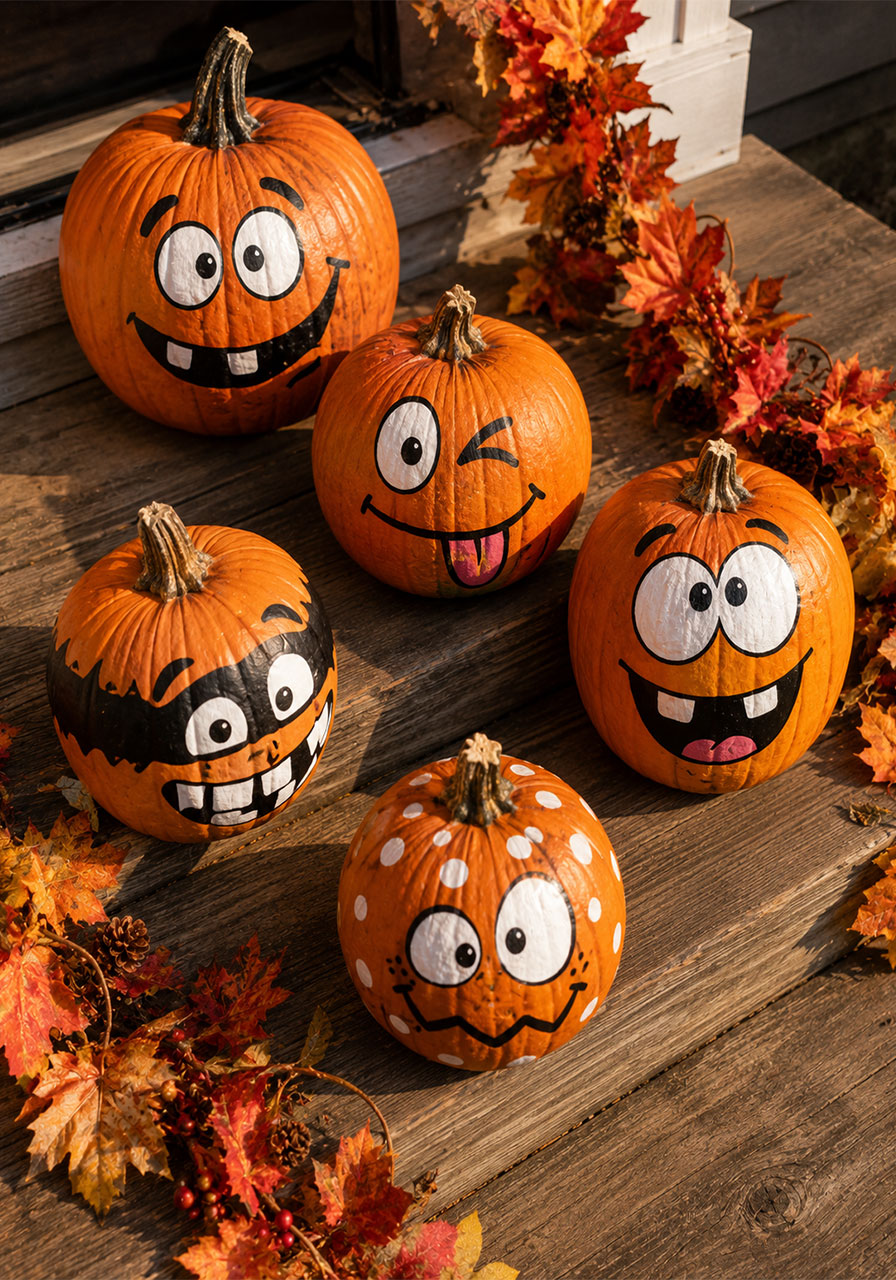
30. Painted Pumpkin Faces
Skip the mess of carving altogether. Painting pumpkin faces is faster, safer for younger kids, and honestly opens up way more creative possibilities.
Best for: Kids, family craft afternoon, all ages
Time to Make: 30-45 minutes
Difficulty: Easy
What You’ll Need:
- Real or foam pumpkins
- Acrylic paint
- Pencil (for sketching)
- Paintbrushes of various sizes
How to Make It:
1. Clean your pumpkins and let them dry fully.
2. Lightly sketch out your face design with a pencil first.
3. Paint your design, letting each layer dry before adding more detail on top.
4. Group your finished pumpkins together for a cheerful Halloween display.
Pro Tip: Use foam pumpkins if you want a display that lasts well beyond Halloween – real pumpkins are great for a one-day party but won’t hold up as home decor for weeks.
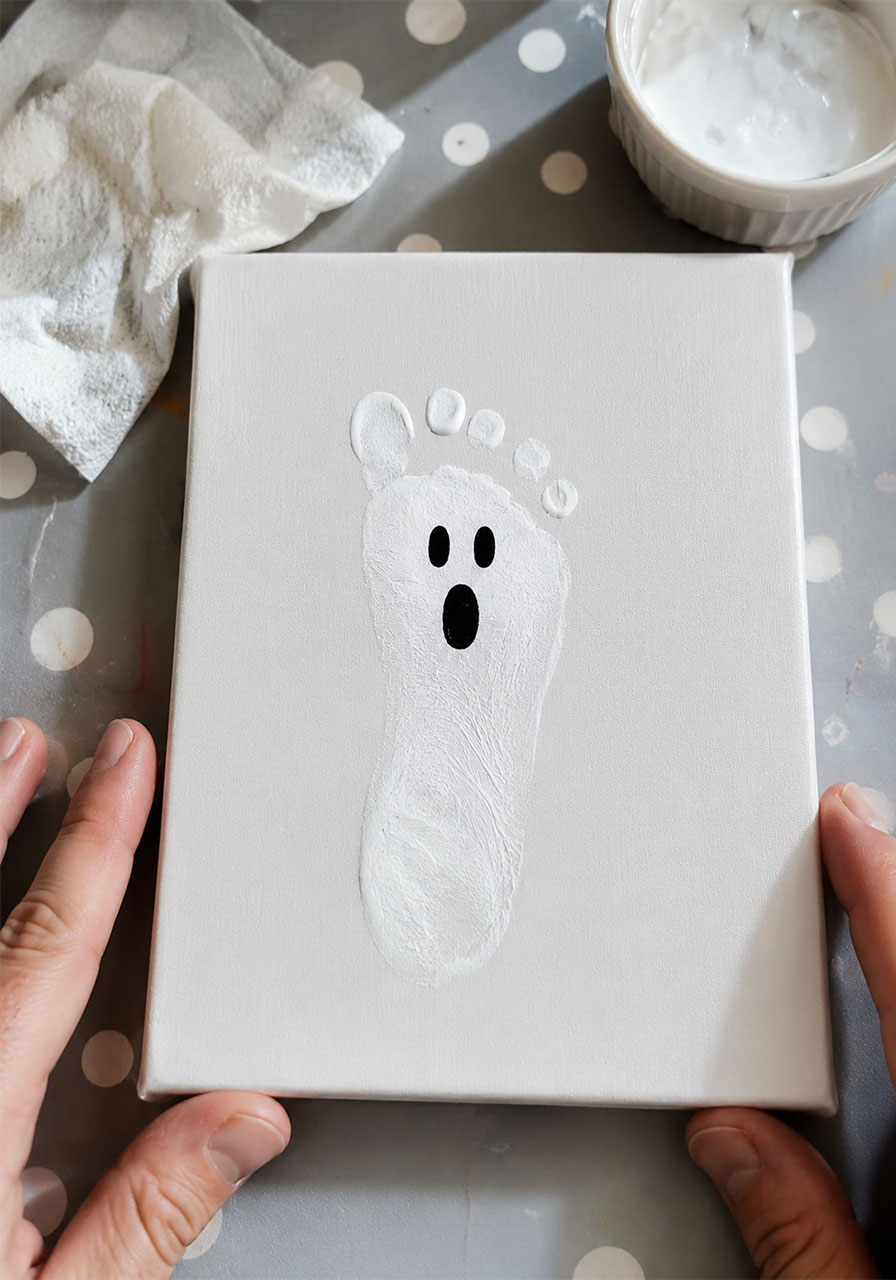
31. Spooky Footprint Art
A sweet, sentimental keepsake craft disguised as a Halloween activity. This one turns tiny feet into ghosts, monsters, or whatever spooky character your imagination lands on.
Best for: Toddlers and young kids, keepsake craft
Time to Make: 20 minutes
Difficulty: Easy
What You’ll Need:
- Non-toxic washable paint
- A canvas or thick paper
- Fine-tip markers for detail
- Wet wipes for quick cleanup
How to Make It:
1. Paint the bottom of your child’s foot with washable paint.
2. Press their foot firmly onto the canvas, then lift straight up to avoid smudging.
3. Once dry, add details with a marker to turn the footprint into a ghost, monster, or pumpkin character.
4. Let it dry fully before hanging or framing.
Pro Tip: Have a helper hold the canvas steady while another person presses the foot down – a wobbly canvas is the number one cause of smeared prints.
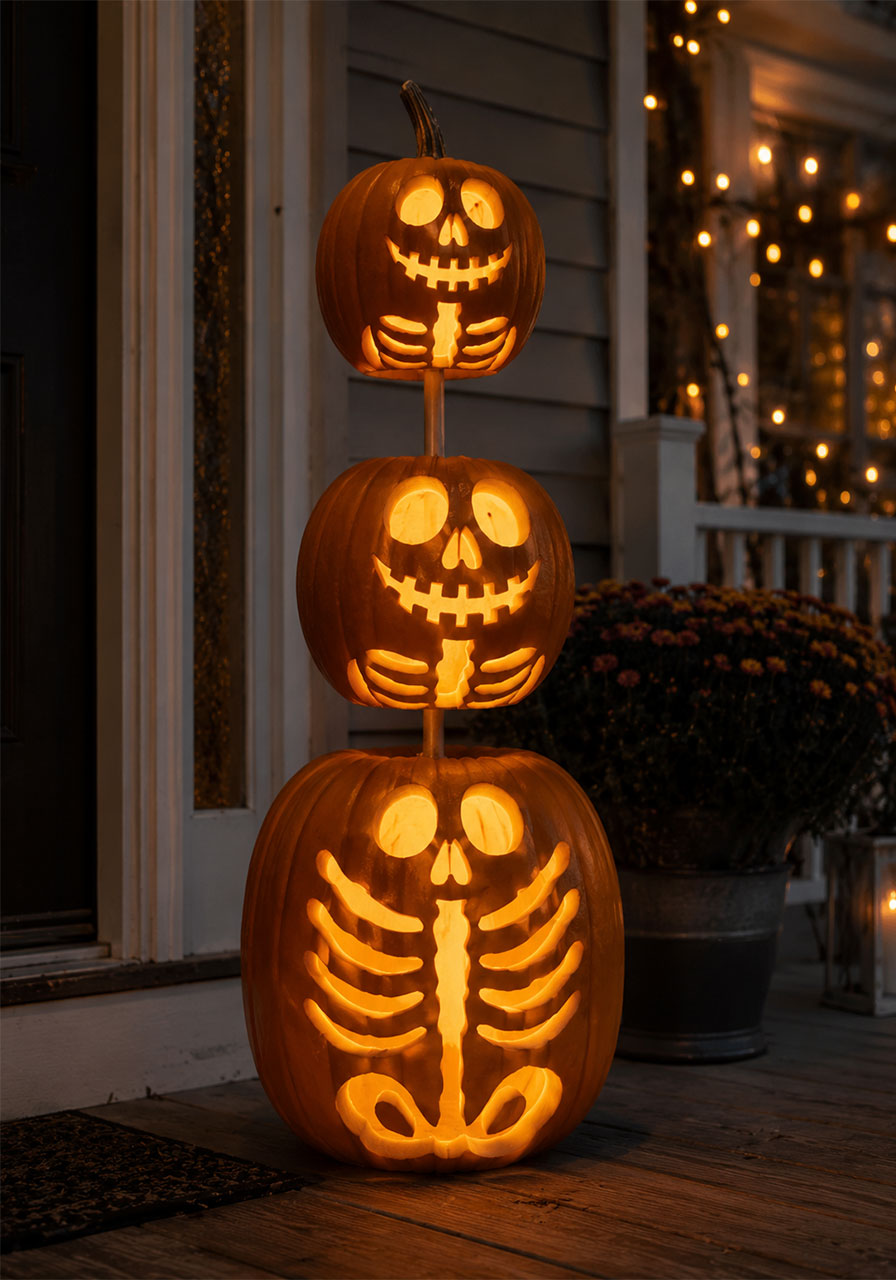
32. Stacked Skeleton Jack-O’-Lanterns
Three carved pumpkins stacked into one dramatic skeleton tower makes for one of the most eye-catching porch displays on this entire list.
Best for: Porch decor, Halloween night display
Time to Make: 1.5 hours
Difficulty: Advanced
What You’ll Need:
- 3 pumpkins in graduating sizes
- Carving tools
- Wooden dowels or thick sticks
- LED tea lights
How to Make It:
1. Carve a skeleton or bone-themed face into each pumpkin.
2. Insert a dowel down through the center of your bottom pumpkin, leaving enough sticking up to anchor the next one.
3. Stack the middle pumpkin onto the dowel, then repeat for the top pumpkin.
4. Place an LED tea light inside each pumpkin cavity.
5. Set your tower on the porch where it’ll get maximum visibility from the street.
Pro Tip: Carve your pumpkins the same day you plan to display them – carved pumpkins start to sag and lose their shape within 24-48 hours, especially when stacked.
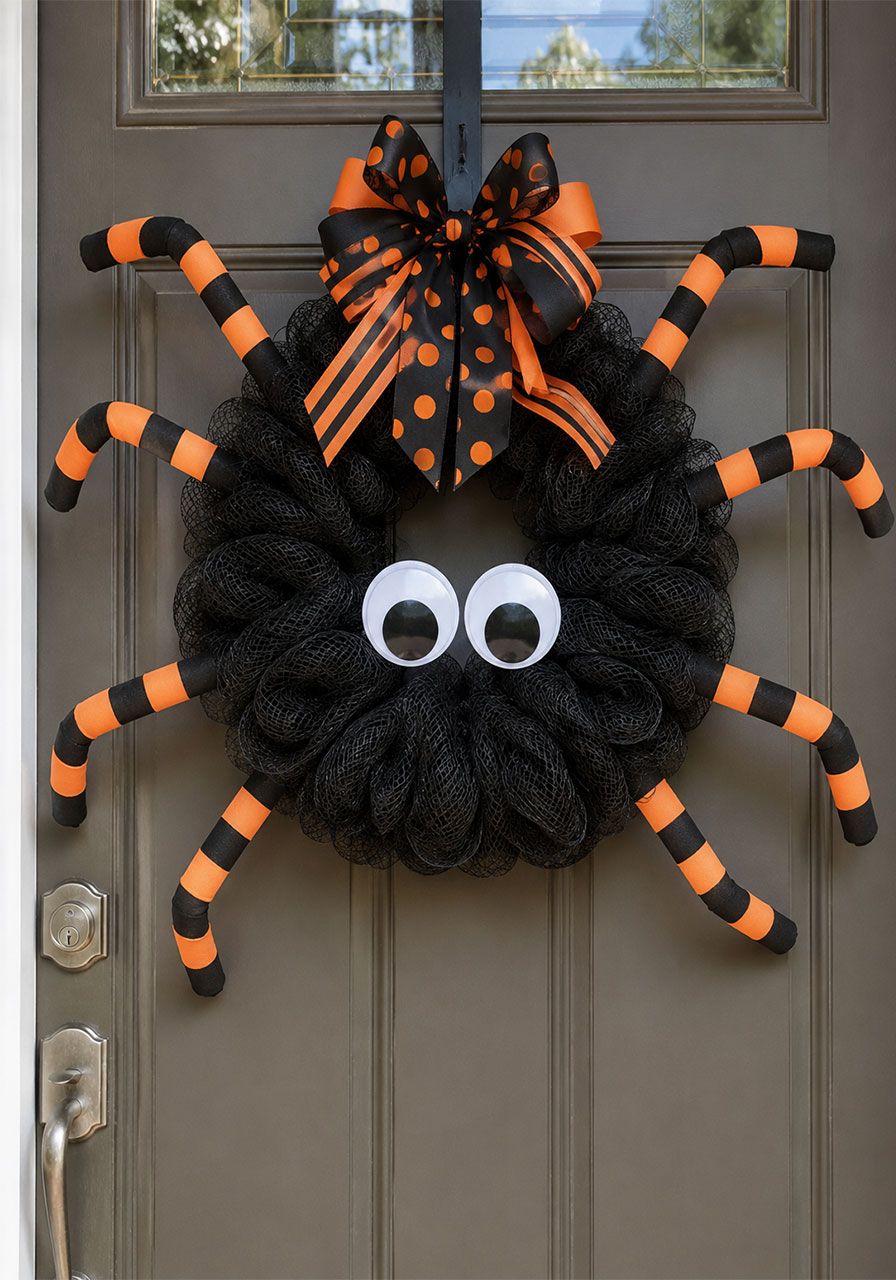
33. Spider Mesh Wreath
A wreath that doubles as a giant spider – dramatic, easy, and guaranteed to unsettle anyone who isn’t a fan of eight-legged creatures.
Best for: Front door decor
Time to Make: 45 minutes
Difficulty: Medium
What You’ll Need:
- Black mesh netting
- Floral wire
- Two large googly eyes
- Striped fabric or foam tubing (for legs)
- A bow and ribbon
How to Make It:
1. Bunch and shape black mesh into a wreath ring, securing it with floral wire as you go.
2. Attach the two large googly eyes to the center front of the wreath.
3. Create spider legs from striped fabric or foam tubing and attach them radiating outward around the wreath.
4. Finish with a bow and additional ribbon accents.
Pro Tip: Bend the “legs” at slight angles rather than keeping them straight – it makes the spider look like it’s actively crawling rather than just decorated on.
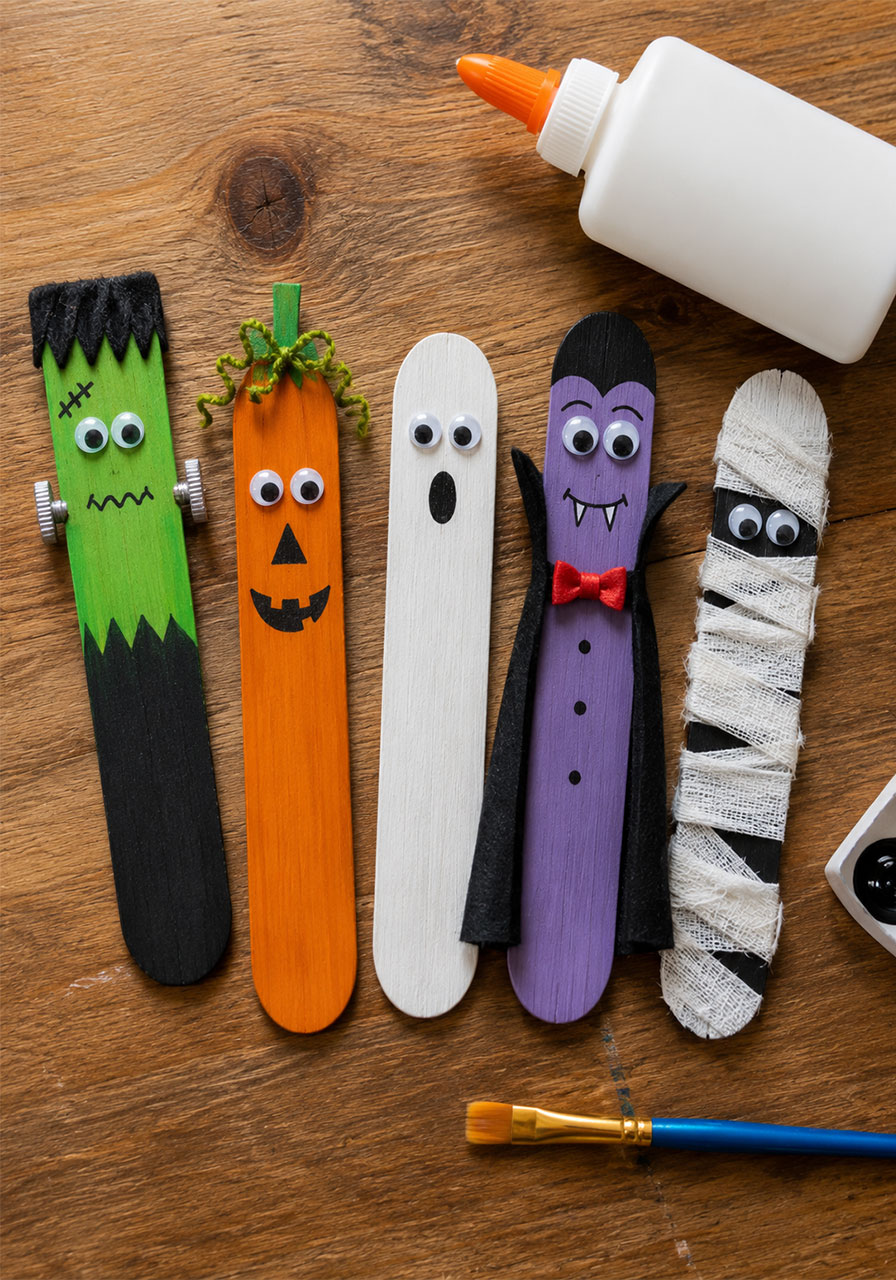
34. Popsicle Stick Halloween Characters
Popsicle sticks glued together into a flat base become the perfect canvas for a whole cast of Halloween characters. Simple enough for little hands, cute enough for grown-up displays.
Best for: Kids, classroom crafts, ages 4+
Time to Make: 25 minutes each
Difficulty: Easy
What You’ll Need:
- Popsicle sticks
- Craft glue
- Acrylic paint
- Googly eyes, yarn, and small felt accents
How to Make It:
1. Glue several popsicle sticks side by side to form a flat rectangular base.
2. Paint the base to match your character – green for Frankenstein, orange for a pumpkin, and so on.
3. Add googly eyes, yarn hair, and other small details to bring the character to life.
4. Let everything dry fully before displaying.
Pro Tip: Add a small loop of ribbon to the back before the glue fully sets so each character can double as a mini hanging ornament.
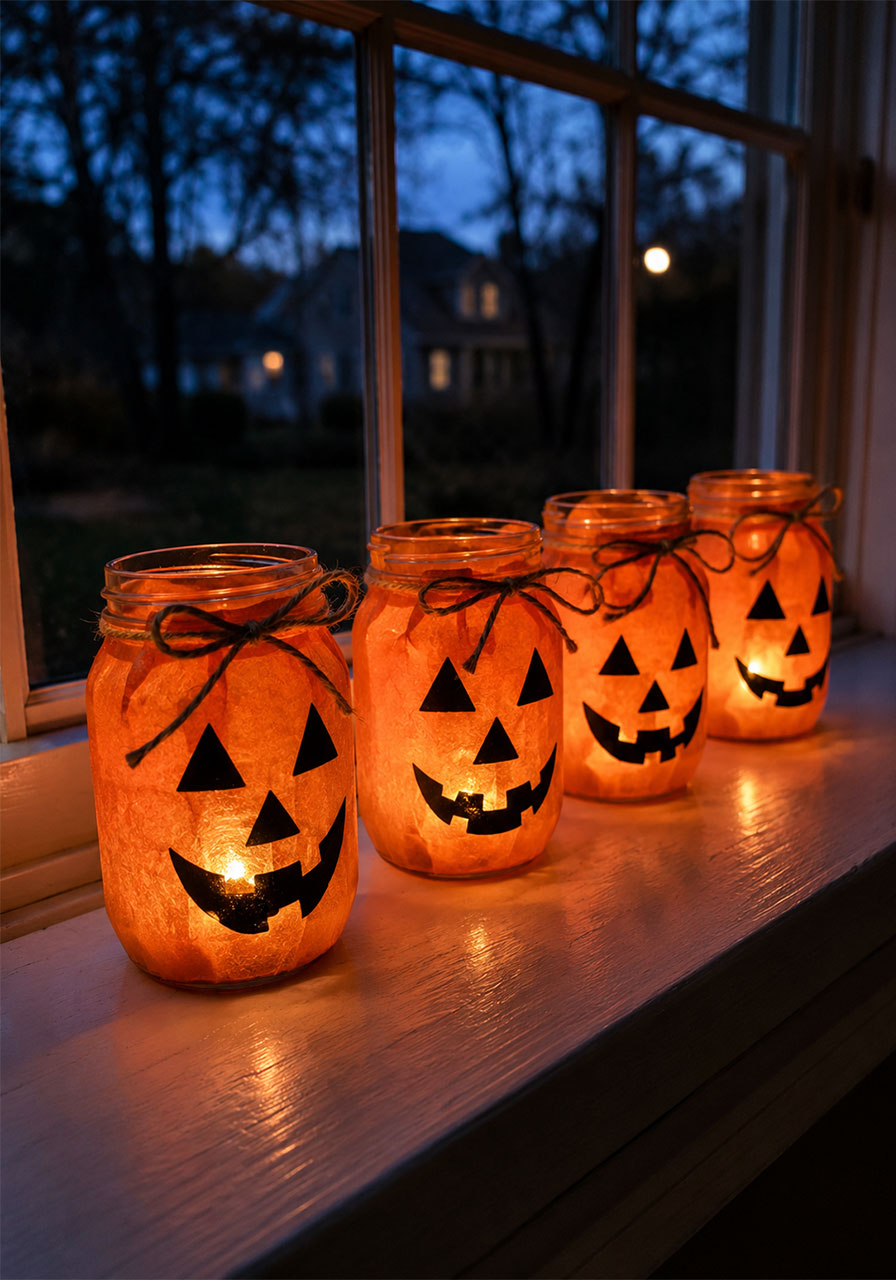
35. Pumpkin Mason Jar Lanterns
Mason jars get a jack-o’-lantern makeover using nothing but tissue paper and a little glow. Simple, effective, and genuinely charming lined up along a windowsill or porch step.
Best for: Porch and window decor
Time to Make: 30 minutes
Difficulty: Easy
What You’ll Need:
- Mason jars
- Orange tissue paper
- Mod Podge
- Black cardstock (for faces)
- Ribbon
- LED tea lights
How to Make It:
1. Brush a layer of Mod Podge onto the jar, then wrap orange tissue paper around it, smoothing out the wrinkles.
2. Add another light layer of Mod Podge over the top to seal the tissue in place, then let it dry.
3. Cut a simple pumpkin face out of black cardstock and glue it onto the jar.
4. Tie a ribbon around the neck of the jar and place an LED tea light inside.
Pro Tip: Use two thin layers of tissue paper instead of one thick layer – it gives a more even, glowing color once the tea light is lit.
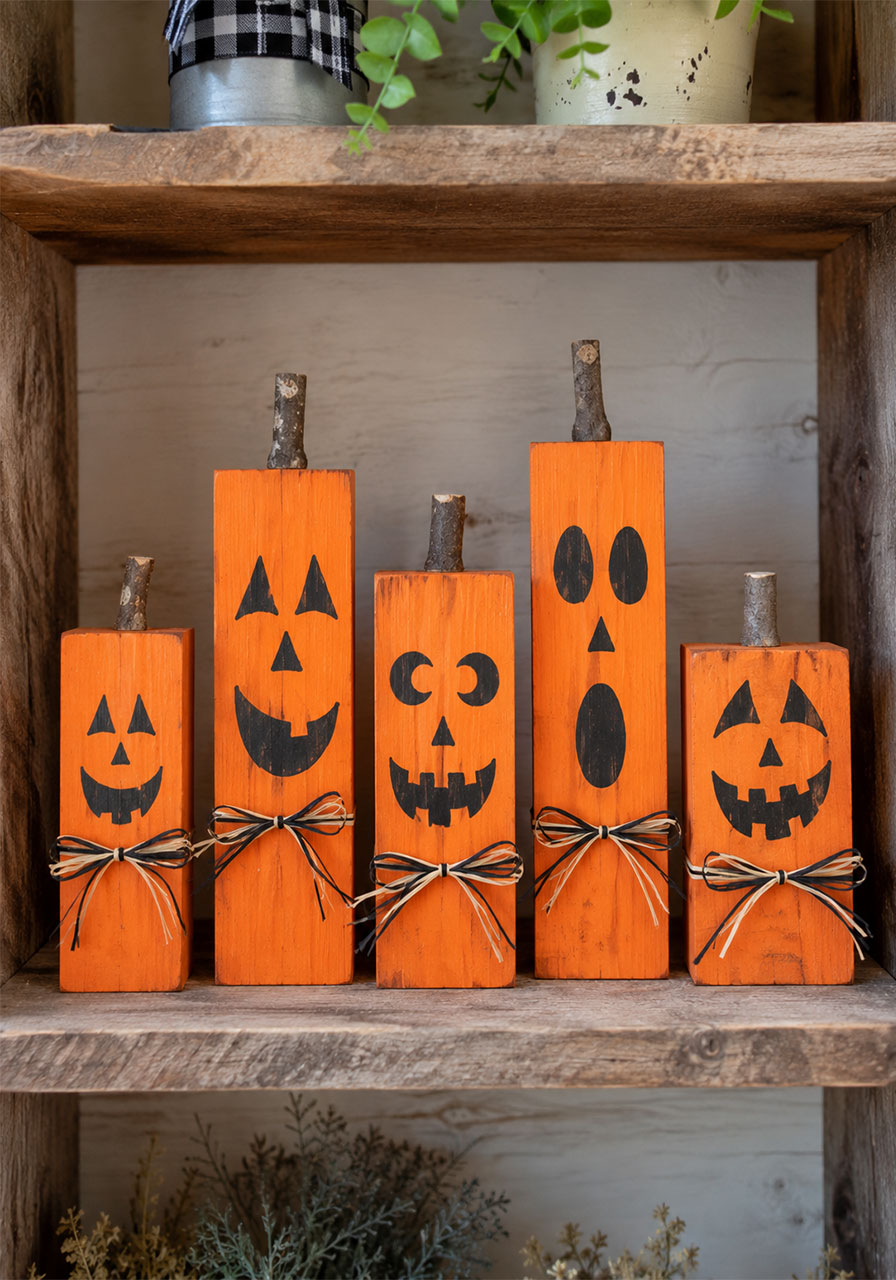
36. Wooden Block Pumpkins
Reusable, sturdy, and completely rot-proof – wooden block pumpkins are a smart alternative if you want your porch decor to last for years, not just one season.
Best for: Long-term porch decor
Time to Make: 1 hour
Difficulty: Medium
What You’ll Need:
- Wooden blocks in varying heights
- Orange acrylic paint
- Fine-tip paintbrush
- Small sticks (for stems)
- Ribbon
How to Make It:
1. Cut wooden blocks into a mix of heights for variety.
2. Paint each block orange and let it dry completely.
3. Add a fun painted face to each pumpkin using your fine brush.
4. Attach a small stick to the top of each block as a stem, then tie on a ribbon for a finishing touch.
Pro Tip: Sand the blocks lightly before painting so the acrylic adheres evenly – raw, unsanded wood can soak up paint unevenly and leave patchy spots.
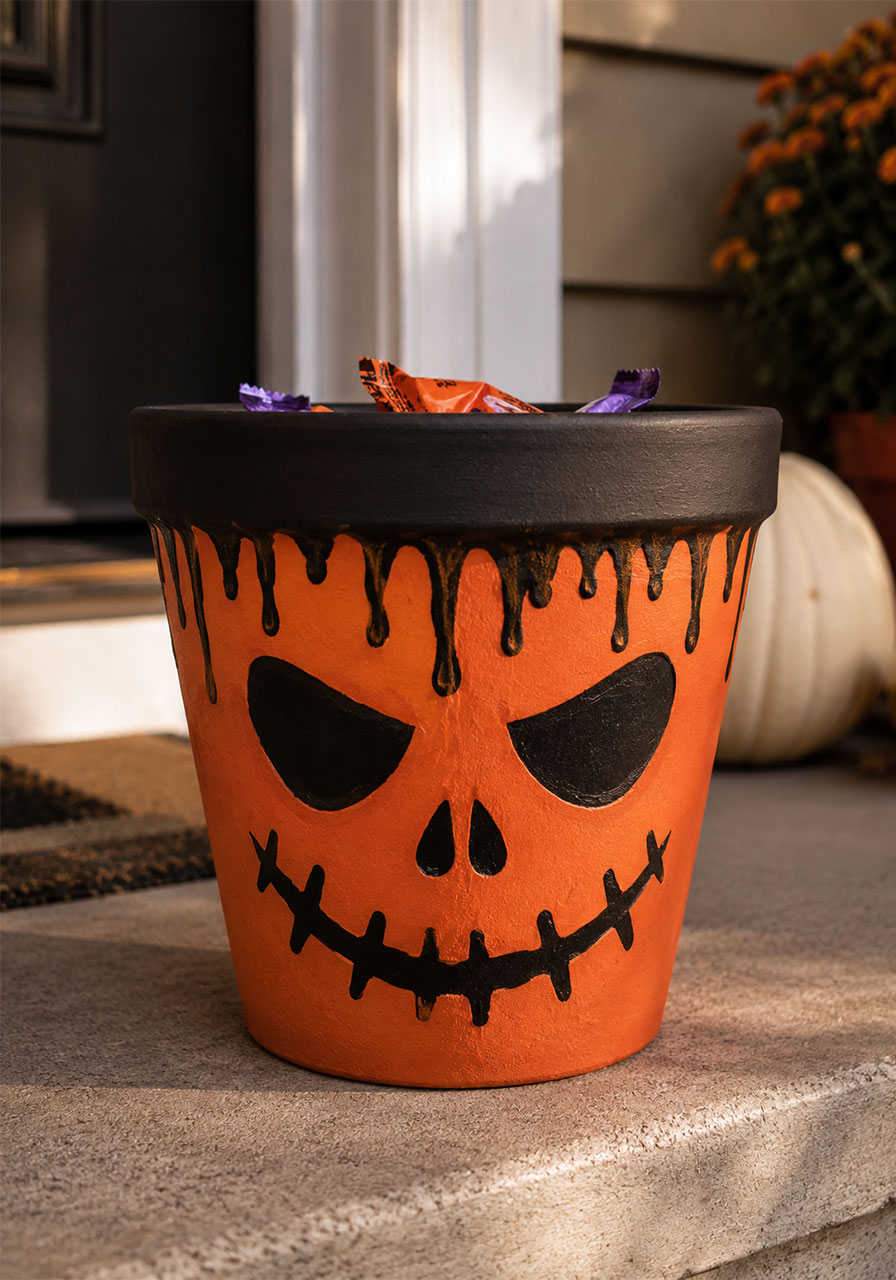
37. Spooky Painted Planter
A pumpkin-colored pot with a spooky painted face doubles as a planter or a candy bowl – genuinely useful decor that works both inside and out.
Best for: Indoor and outdoor decor
Time to Make: 30 minutes
Difficulty: Easy
What You’ll Need:
- A terra cotta pot
- Orange and black acrylic paint
- Fine-tip paintbrush
- Clear sealant spray
How to Make It:
1. Paint the pot orange and let it dry completely.
2. Add a spooky face in black paint.
3. Paint the rim black, adding a few drip marks for extra creepy detail.
4. Seal the whole pot with a clear coat once fully dry.
Pro Tip: Use it as a candy bowl on Halloween night, then repurpose it as an actual planter once the season’s over – you get double the value out of one craft.
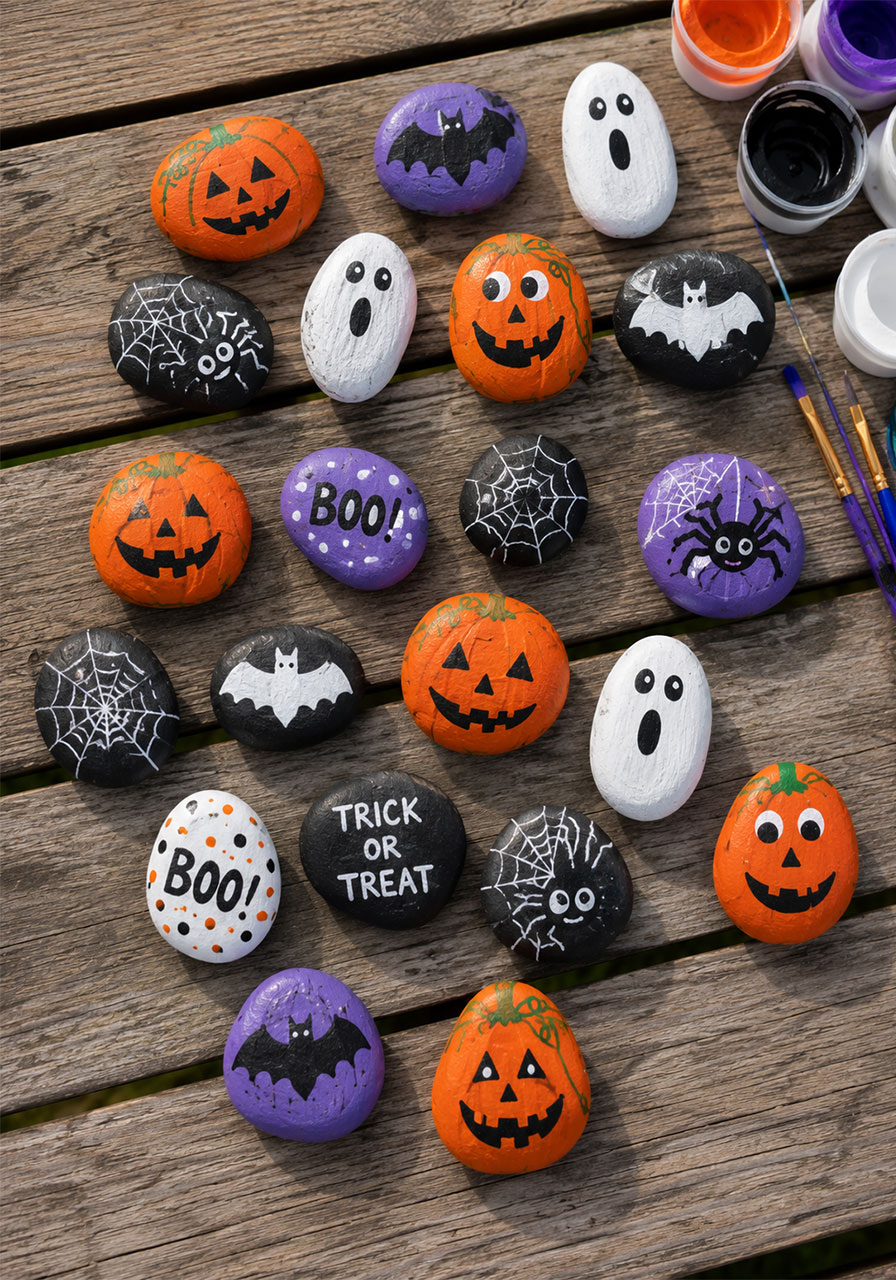
38. Halloween Painted Rocks (Mixed Designs)
Free, easy to find, and endlessly customizable – painted rocks are the perfect low-cost craft for a big group of kids at a Halloween party.
Best for: Kids, group parties, ages 4+
Time to Make: 20 minutes each
Difficulty: Easy
What You’ll Need:
- Smooth rocks
- Acrylic paint in Halloween colors
- Markers
- Clear sealant spray
How to Make It:
1. Clean your rocks so they’re ready for paint.
2. Paint a bright base color and let it dry fully.
3. Add Halloween designs – pumpkins, ghosts, bats, spiders – using paint or markers.
4. Seal with a clear coat so your rocks hold up outdoors all season.
Pro Tip: Set up a “rock painting station” at your party with a few simple templates traced onto index cards – it gives younger kids an easy starting point without limiting the more artistic ones.
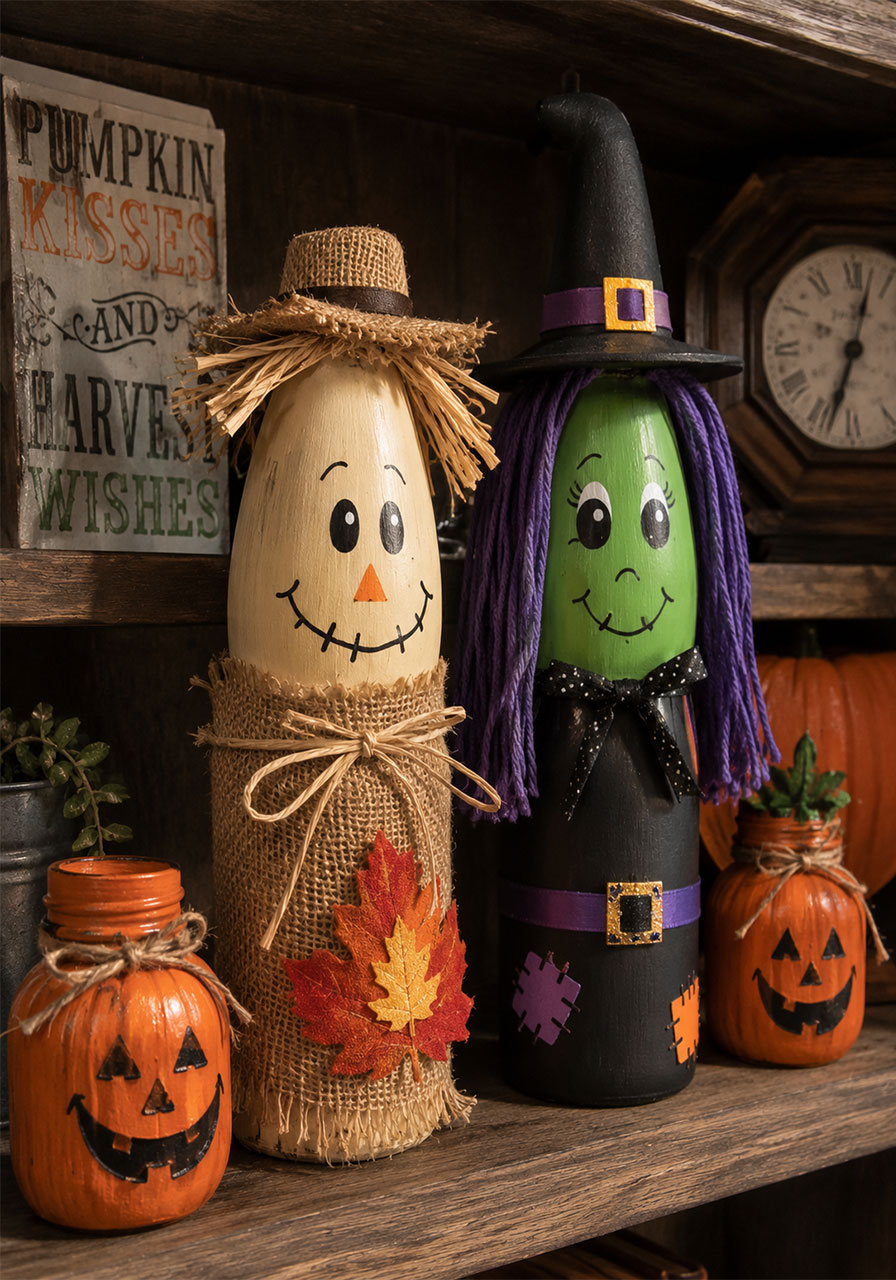
39. Bottle Scarecrow and Witch
A final bottle transformation to round out your Halloween bottle collection – a cheerful scarecrow paired with a classic green-faced witch.
Best for: Shelf decor, fall and Halloween crossover display
Time to Make: 45 minutes each
Difficulty: Medium
What You’ll Need:
- Empty bottles, cleaned and dried
- Acrylic paint (including green for the witch)
- Burlap and raffia
- Yarn (for witch hair)
- Small hats
How to Make It:
1. Paint your bottles with a base color and let them dry.
2. For the scarecrow, paint on a cheerful face and wrap burlap and raffia around the bottle, topping it with a small hat.
3. For the witch, paint the face green, glue on yarn hair, and finish with a witch hat.
4. Add any extra details like buttons, ribbons, or small flowers.
Pro Tip: Display the scarecrow and witch side by side with a couple of your painted pumpkin bottles – together they make a full mini fall-to-Halloween scene without needing anything else.
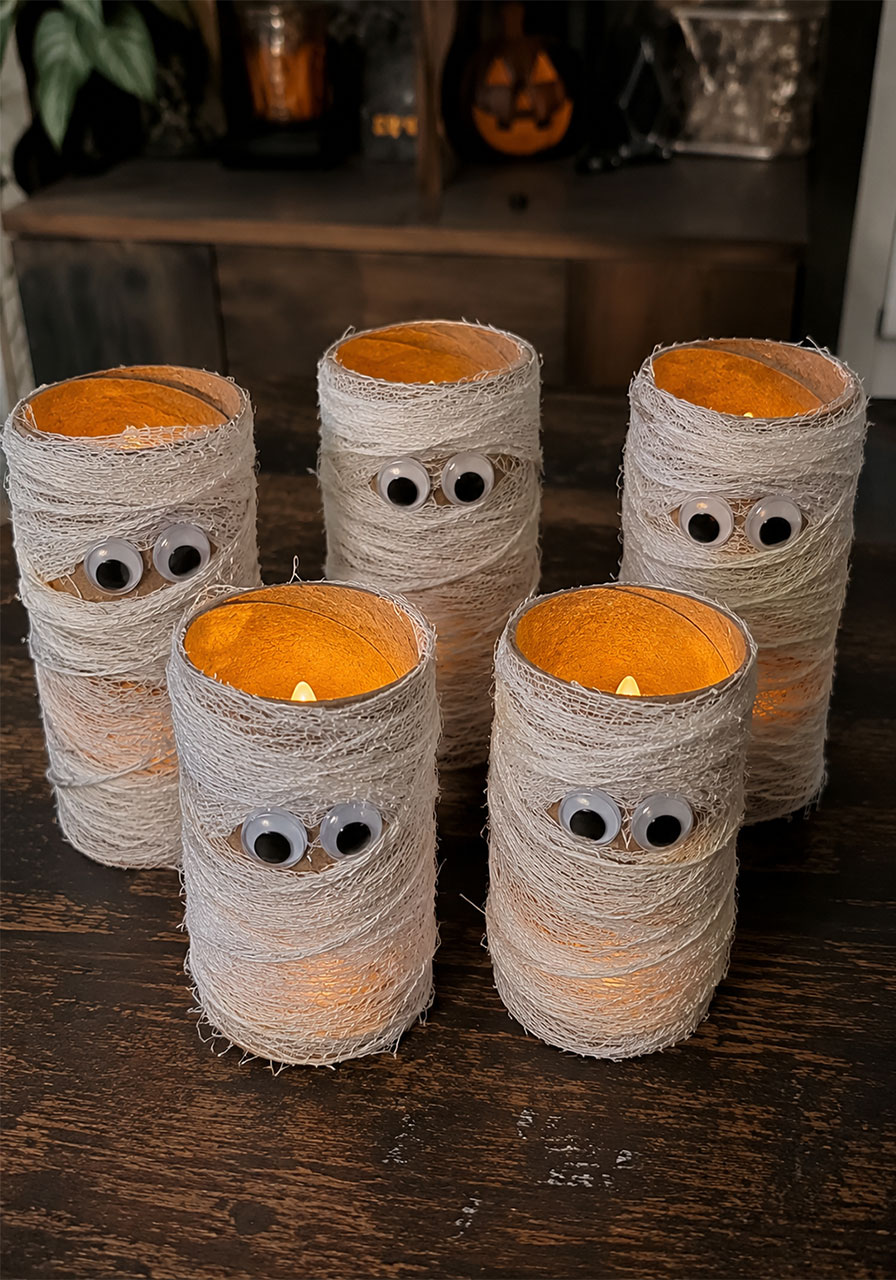
40. Toilet Paper Roll Mummy Candle Holders
An easy upcycling craft that turns cardboard tubes you already have on hand into an army of tiny mummy candle holders.
Best for: Kids, budget-friendly party decor
Time to Make: 25 minutes
Difficulty: Easy
What You’ll Need:
- Empty toilet paper rolls
- White paint or gauze strips
- Googly eyes
- Craft glue
- Battery tea lights
How to Make It:
1. Wrap each toilet paper roll in strips of gauze or paint it white and let dry.
2. Glue on googly eyes so they peek out from between the “bandages.”
3. Stand the rolls upright and place a battery tea light inside each one.
Pro Tip: Leave the gauze strips slightly loose and uneven rather than wrapping them tightly – a messier wrap actually looks more authentically mummy-like.
41. Candy Corn Wind Chime
A cheerful, colorful DIY that brings a little Halloween movement and sound to your porch, without leaning into anything scary – great for families with younger kids.
Best for: Porch decor, family-friendly
Time to Make: 40 minutes
Difficulty: Medium
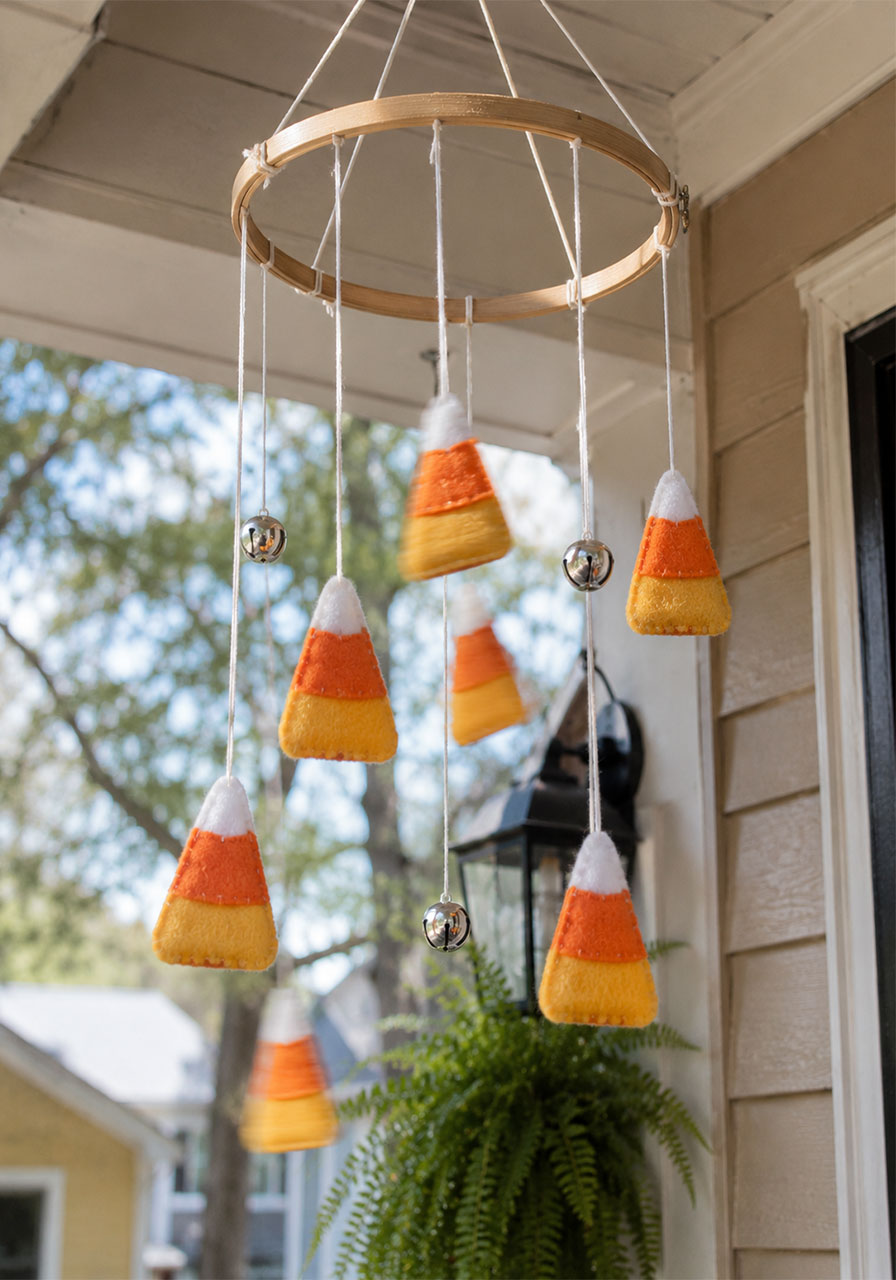
What You’ll Need:
- A wooden embroidery hoop or small hoop
- Foam or felt cut into candy corn shapes
- String or fishing line
- Small bells (optional)
How to Make It:
1. Cut several candy corn shapes from foam or felt, painting them yellow, orange, and white if using plain foam.
2. Tie a length of string to each shape, adding a small bell to a few strands if you want sound.
3. Tie the loose ends of each string around your hoop at varying lengths.
4. Attach a longer string to the top of the hoop for hanging.
Pro Tip: Vary the length of each hanging string noticeably – even lengths look stiff, while a mix of long and short creates natural movement in the breeze.
42. Spooky Message-in-a-Bottle Party Favors
A clever party favor that doubles as a mini activity – guests unroll a spooky “prophecy” or Halloween joke tucked inside a tiny corked bottle.
Best for: Party favors, adult and family parties
Time to Make: 5 minutes each
Difficulty: Easy
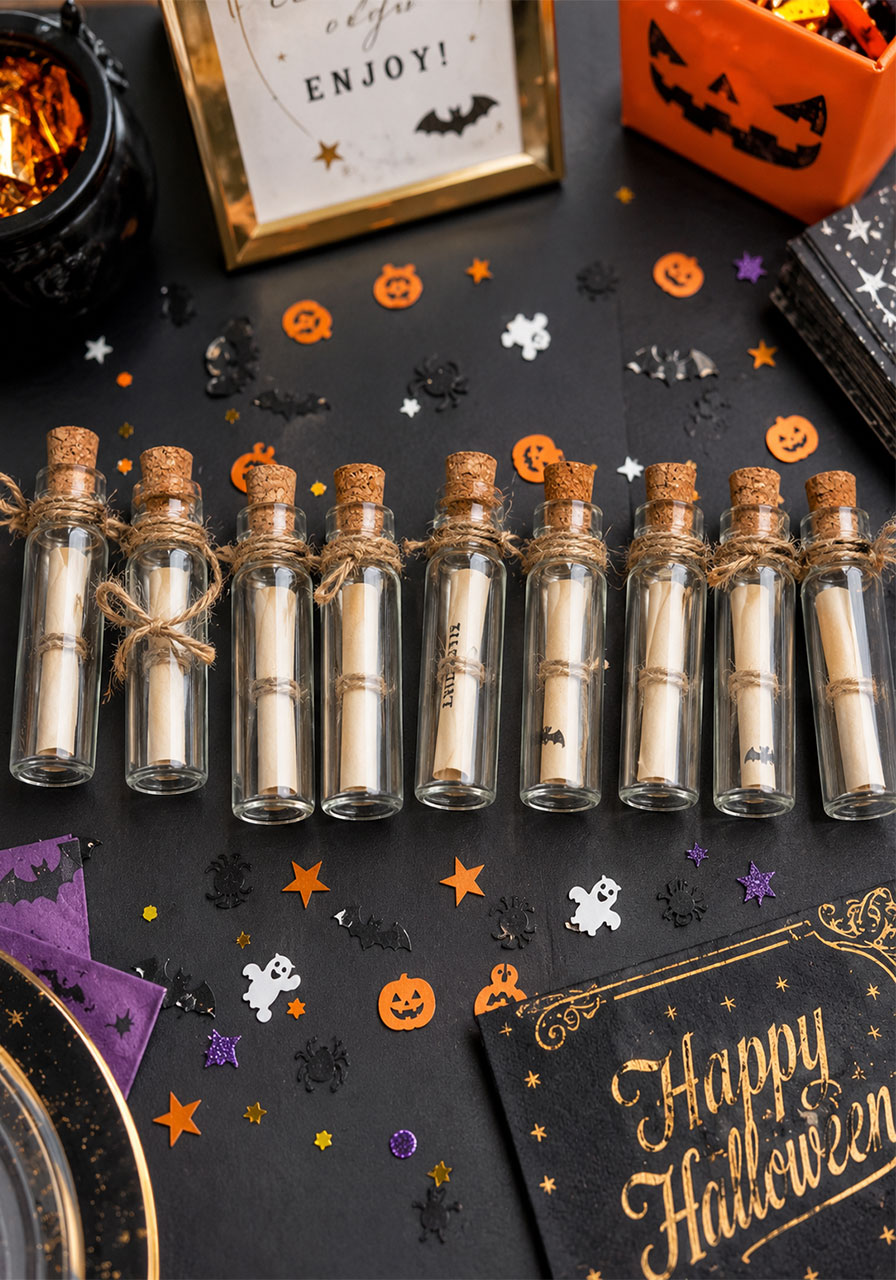
What You’ll Need:
- Small corked glass bottles
- Thin paper strips
- Pen
- Twine (optional)
How to Make It:
1. Write a short spooky fortune, joke, or Halloween trivia fact on each paper strip.
2. Roll the paper tightly and slide it into a bottle.
3. Cork the bottle and tie a small piece of twine around the neck if you want extra styling.
4. Hand these out as favors or scatter them around your party table for guests to discover.
Pro Tip: Write a mix of funny and genuinely spooky messages – an all-serious set feels like a fortune-telling game, a full mixed set feels like an actual party.
43. Frankenstein Mason Jar Candy Jars
A fun cousin to the pumpkin mason jar lantern, this version turns your jars into a whole crew of Frankenstein’s monster candy dishes for the party table.
Best for: Candy display, party table decor
Time to Make: 25 minutes each
Difficulty: Easy
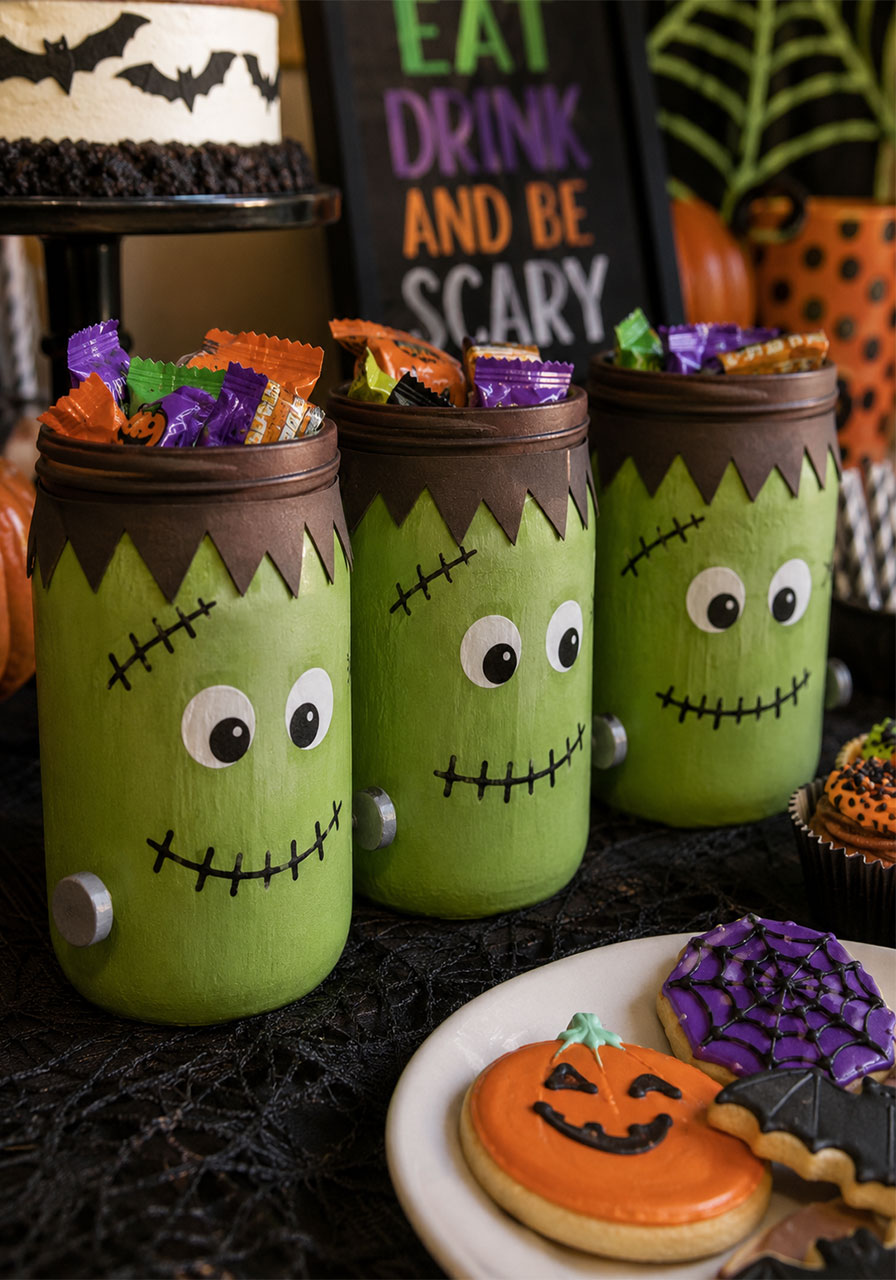
What You’ll Need:
- Mason jars
- Green acrylic paint
- Black paint marker
- Brown craft foam (for hair)
- Craft glue
How to Make It:
1. Paint the jar green and let it dry fully.
2. Use a black paint marker to add Frankenstein’s monster’s iconic stitches, eyes, and mouth.
3. Cut a strip of brown or black foam into a jagged hairline and glue it around the lid.
4. Fill with candy and set out on your table.
Pro Tip: Add two small metal brads on either side of the jar to mimic Frankenstein’s neck bolts – a tiny detail, but it instantly makes the character recognizable from across the room.
44. DIY Spider Web Doorway Curtain
A dramatic entryway effect made from stretched cotton or yarn webbing, perfect for framing your front door or a party entrance.
Best for: Front door and entryway decor
Time to Make: 30 minutes
Difficulty: Easy
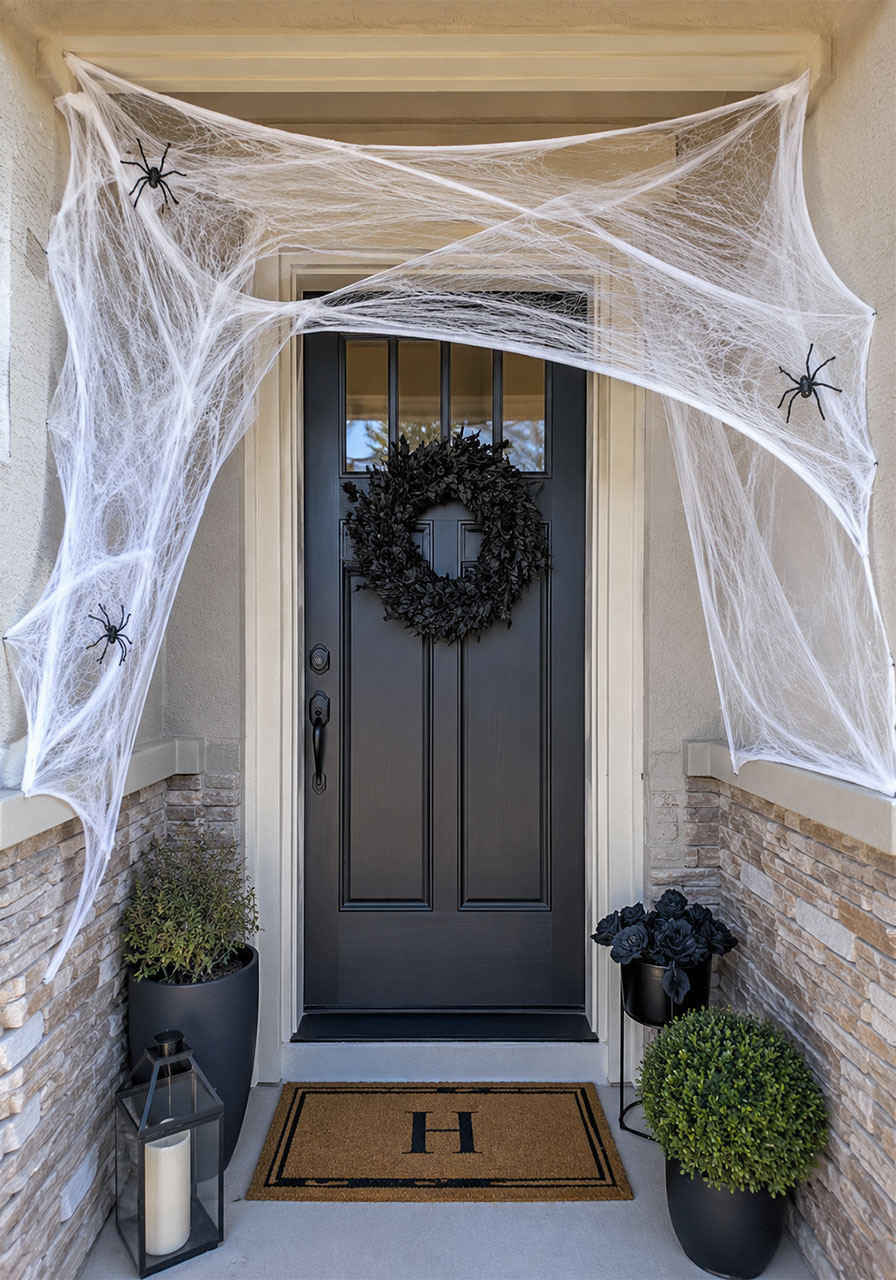
What You’ll Need:
- Stretchable cotton spider web material (widely available at craft and Halloween stores)
- Plastic spiders
- Removable adhesive hooks
How to Make It:
1. Attach adhesive hooks around your doorway frame.
2. Stretch the cotton webbing across the doorway, pulling gently to create wispy, layered strands.
3. Tuck plastic spiders into the webbing at different spots for extra detail.
4. Adjust the thickness so the webbing looks natural rather than clumped in one spot.
Pro Tip: Pull the webbing apart in small sections before stretching it across your doorway. Straight out of the bag it looks like cotton balls – stretched thin, it looks like a genuine spider web.
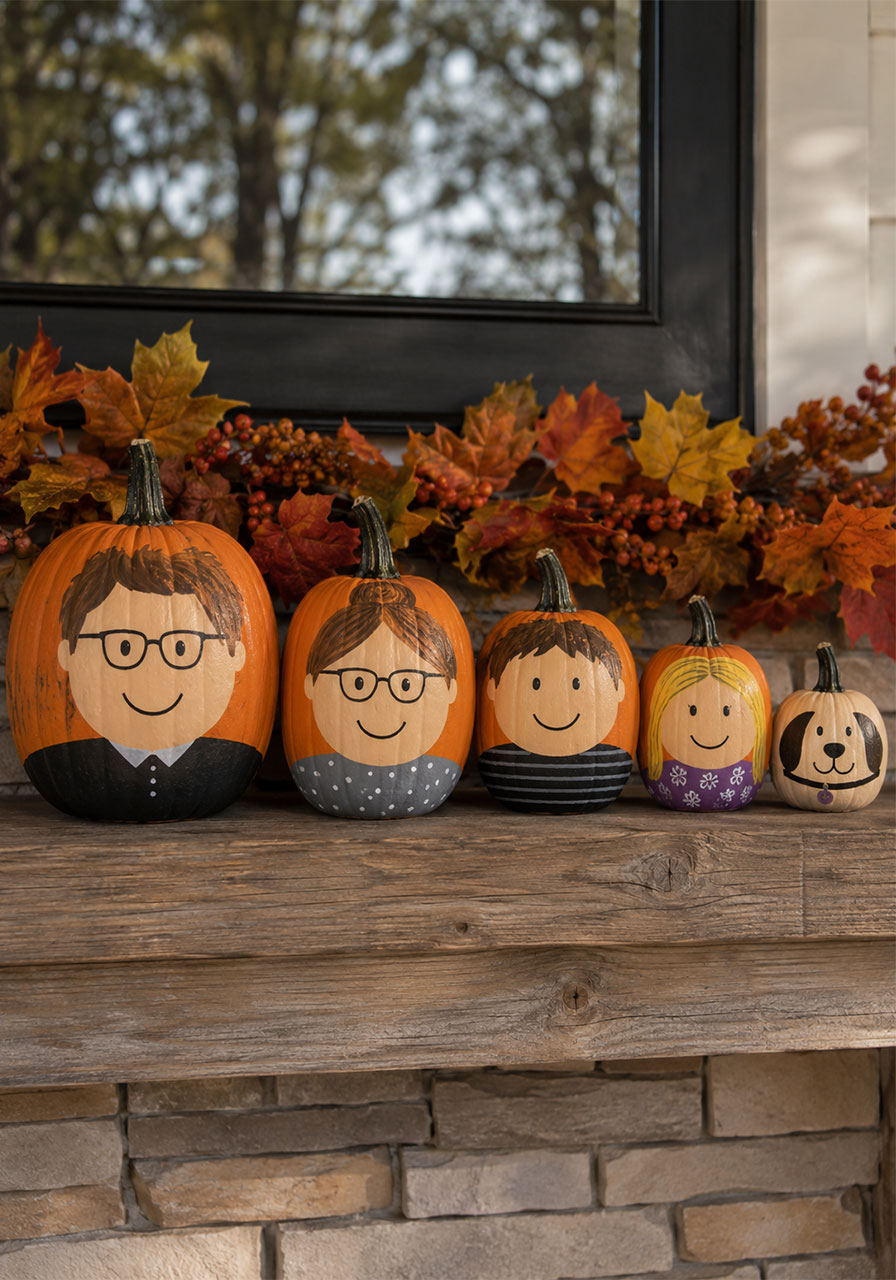
45. Painted Pumpkin Family Portrait Wall
A sweet twist on painted pumpkins – turn a row of small pumpkins into portraits of your own family members, pets included.
Best for: Family craft night, keepsake decor
Time to Make: 1 hour
Difficulty: Medium
What You’ll Need:
- Small pumpkins (one per family member)
- Acrylic paint
- Fine-tip paintbrush
- A photo reference of each family member (optional)
How to Make It:
1. Clean each pumpkin and let it dry fully.
2. Lightly sketch a simplified portrait of each family member – hair color, glasses, favorite hat, whatever makes them recognizable.
3. Paint in the details, letting each layer dry before adding more.
4. Line up your finished “family” on the porch or mantel in order from oldest to youngest, including the family pet.
Pro Tip: Keep the style simple and cartoonish rather than trying for a realistic likeness – exaggerated, simplified features are much easier to paint and honestly look more charming displayed together.
With this lineup in your back pocket, your Halloween crafting calendar is officially full – enough ideas here to fill an entire month of family activities, party prep, and porch upgrades. Pick a few, grab your supplies, and get ready for a Halloween that guests, trick-or-treaters, and your own kids will be talking about long after the candy’s gone.
