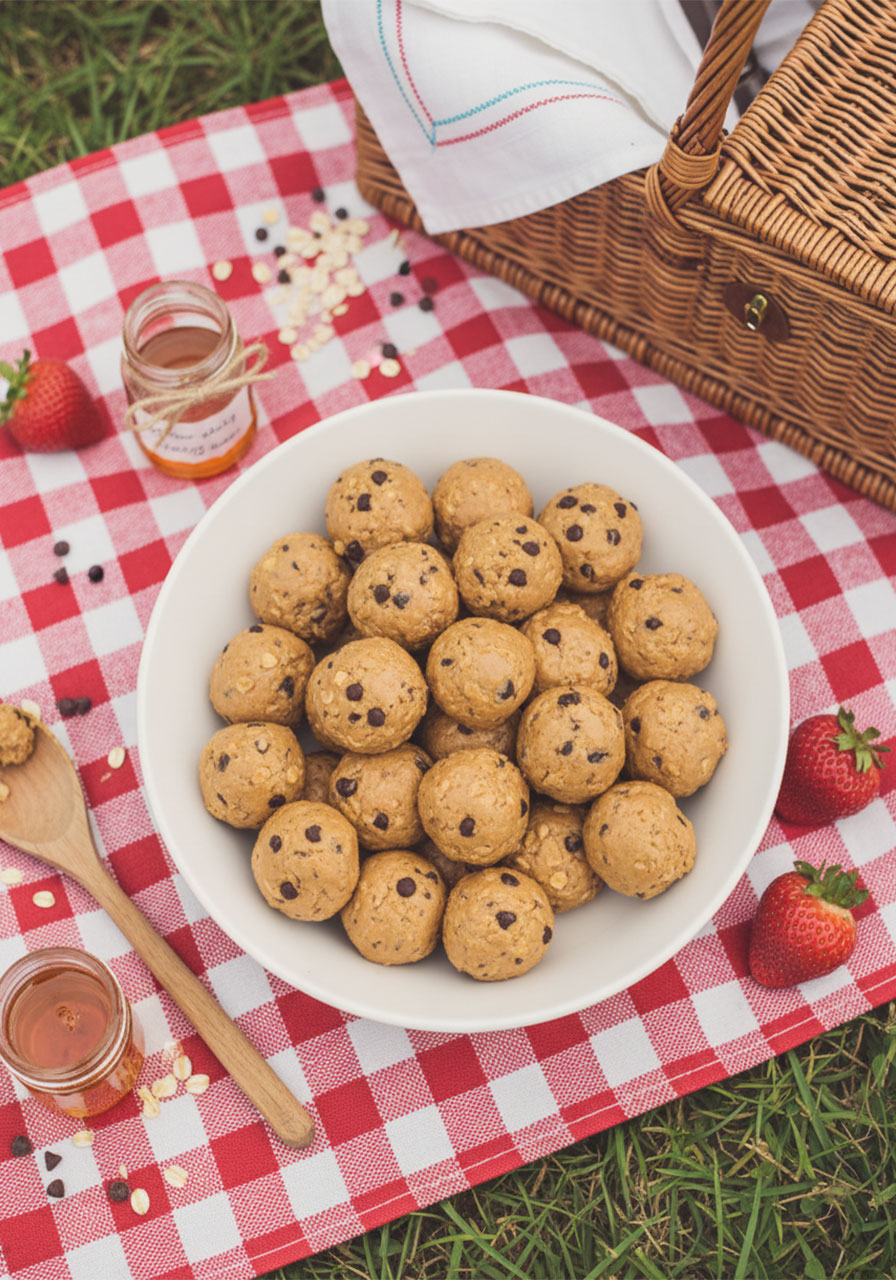
If you’re a parent or teacher constantly on the lookout for a snack that’s healthy, quick to make, and actually gets eaten without complaint – these No Bake Protein Balls are about to become your new best friend.
No oven. No mess. No fuss.
Just six simple pantry ingredients, one bowl, and about 10 minutes of hands-on time. That’s it!
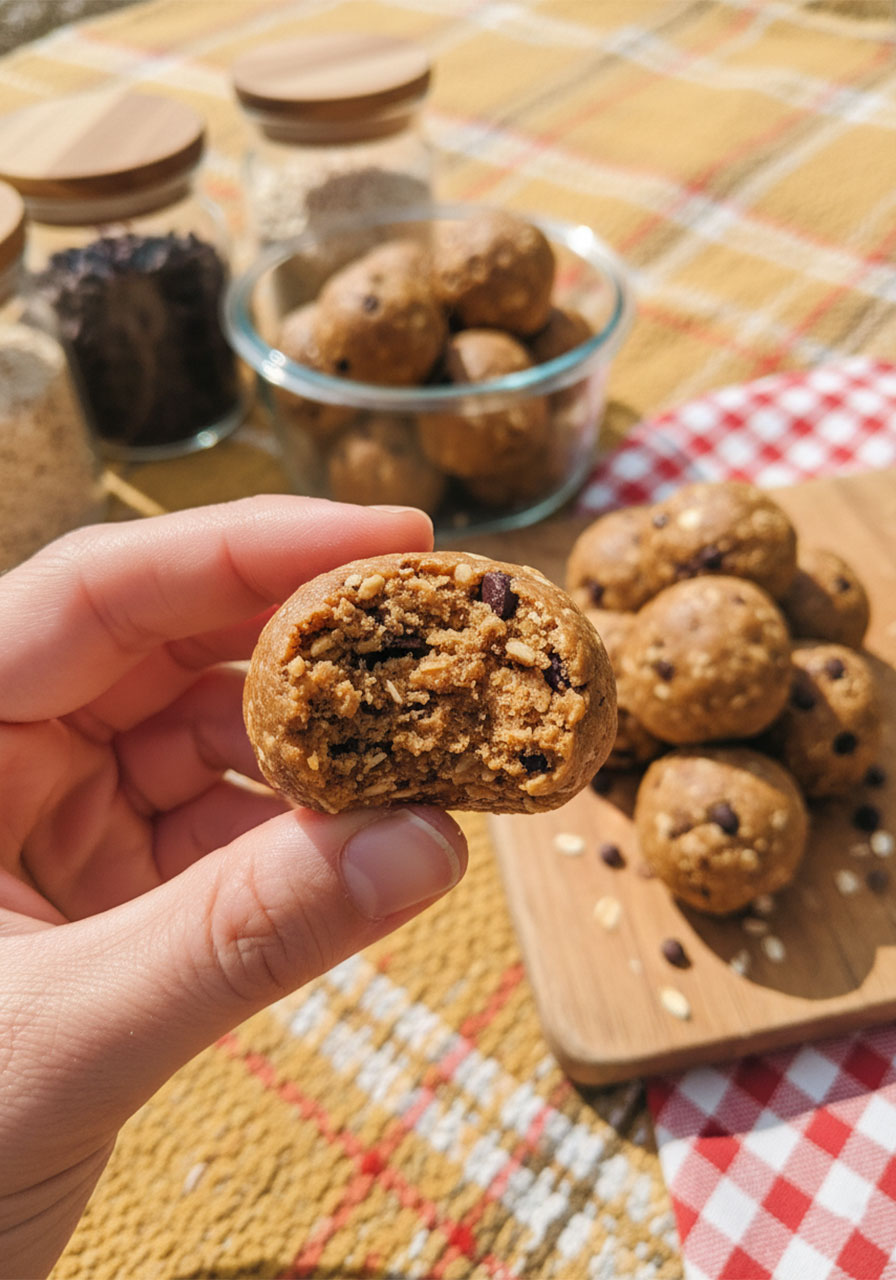
The best part? These little energy bites taste exactly like cookie dough. Kids absolutely love them, and you’ll feel great about handing them over.
I’ve been making a double batch of these every week for months now, and they disappear from the freezer so fast I can barely keep up. Whether it’s a quick after-school snack, a grab-and-go breakfast, or something to fuel a long day in the classroom, these protein balls truly do it all.
Ready to make the easiest, most delicious snack of your life? Let’s dive in!
What You’ll Find in This Post
Why parents and teachers love these protein balls
The 6 ingredients you need
Step-by-step instructions (foolproof!)
Tips for the perfect texture every time
Fun variations and customizations
Storage and make-ahead tips
Frequently asked questions


Why Parents and Teachers Are Obsessed With These Energy Balls
Let’s be real – feeding kids healthy snacks that they’ll actually eat is a challenge. You’ve got picky eaters, allergy concerns, after-school hunger meltdowns, and approximately zero spare time to make anything complicated.
These protein balls check every single box.
They’re made with real, wholesome ingredients you likely already have at home. Each ball packs 5 grams of protein, which means they actually satisfy hunger rather than causing a sugar crash 20 minutes later.
They’re also portable, no-mess, and freeze beautifully – which means you can prep a big batch on Sunday and have snacks ready for the entire week.
Teachers especially love keeping a container of these in the break room for a midday energy boost. Trust me, once your coworkers find out you made these, they’ll be asking for the recipe!
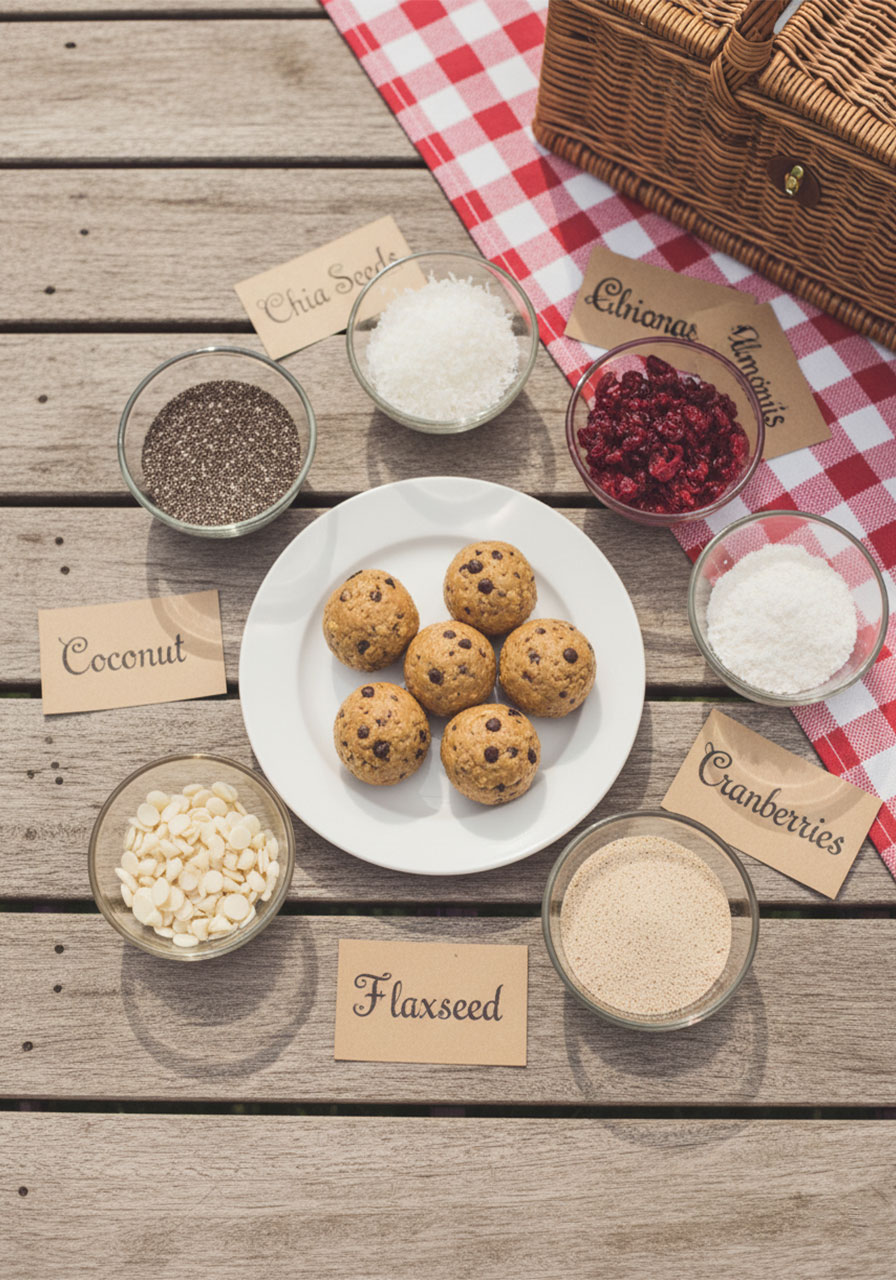
The 6 Simple Ingredients You Need
What makes this recipe so brilliant is how simple the ingredient list is. No weird specialty items. No expensive superfoods you’ll only use once. Just everyday pantry staples.
Here’s what you’ll need:
1. Peanut Butter
Use no-stir creamy peanut butter for this recipe – this is the most important tip! The kind you find at most grocery stores (think Jif or Skippy) works perfectly. It has a smooth, thick consistency that holds the balls together beautifully.
Natural peanut butter that separates tends to be too oily and runny, which can make the dough too wet and sticky. Stick with no-stir for best results.
2. Honey
Honey acts as the sticky sweetener that binds everything together. It also adds a lovely natural sweetness without going overboard.
Want to make these vegan? Simply swap the honey for maple syrup – it works just as well!
3. Old Fashioned Rolled Oats
This is what gives the protein balls their satisfying cookie dough texture. Rolled oats (also called old fashioned oats) add bulk, fiber, and a slight chewiness that makes every bite so satisfying.
Don’t use quick oats – they’re too fine and will change the texture.
4. Vanilla Protein Powder
The protein powder is what takes these from a regular snack to a genuinely filling, nutritious energy bite. Use your favorite brand – vanilla works beautifully here, but chocolate protein powder makes these taste like a brownie bite!
No protein powder on hand? No problem. You can substitute with more rolled oats or oat flour to get the right consistency.
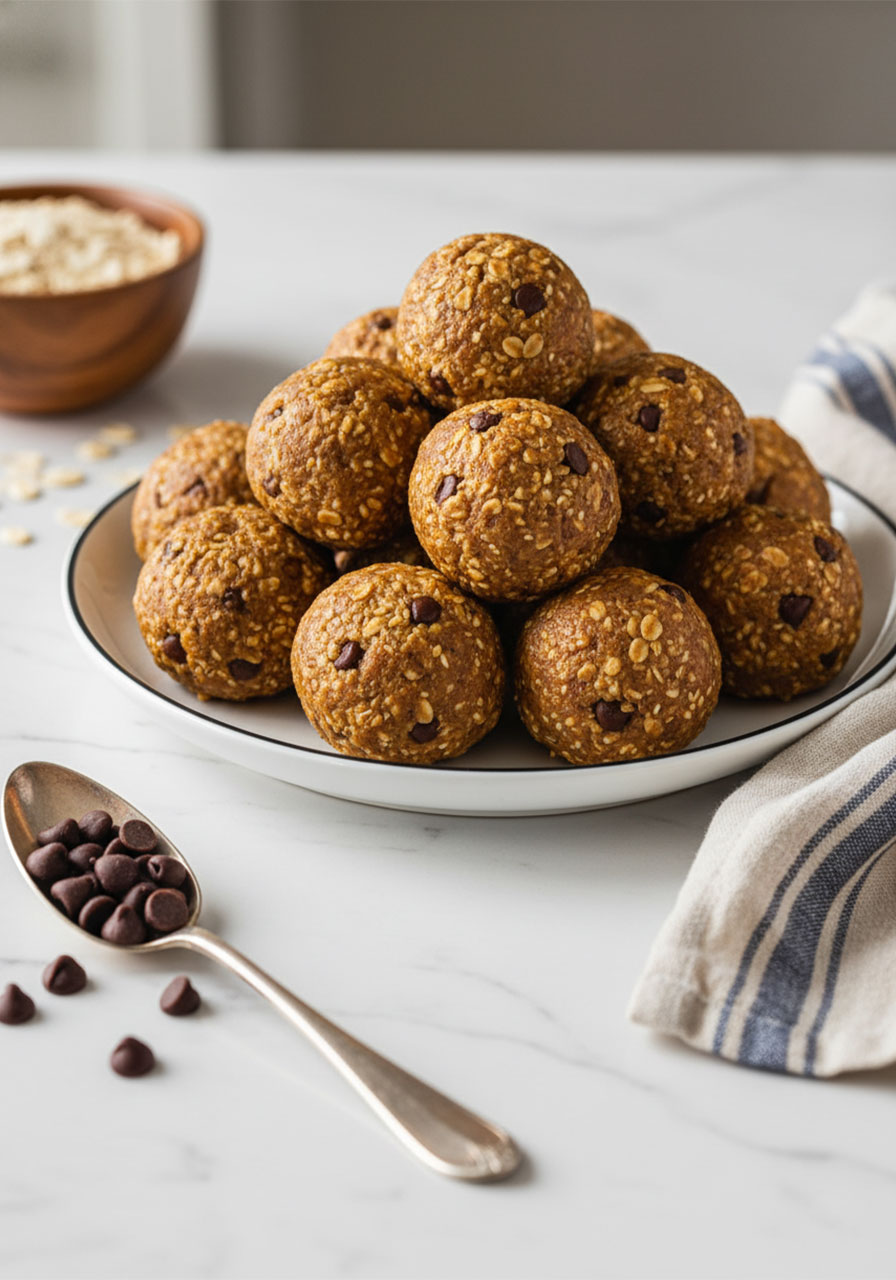
5. Mini Chocolate Chips
Mini chocolate chips are key here. Because they’re smaller, you get a little pocket of chocolate in almost every single bite. So good.
Regular-sized chocolate chips also work, but you won’t get that same chocolate-in-every-bite magic.
6. Salt
Just a tiny pinch. But don’t skip it! That little bit of salt makes the sweet and salty flavors absolutely pop.

How to Make No Bake Protein Balls (Step-by-Step)
Here’s the thing – you really cannot mess this up. It’s one bowl, no baking, and comes together in minutes. Here’s exactly how to do it:
What You’ll Need:
1 large mixing bowl
A rubber spatula (this is important – see the tip below!)
A mini cookie scoop or two spoons
A baking sheet lined with parchment or wax paper
Ingredients:
1 ½ cups no-stir creamy peanut butter
½ cup honey
1 ⅓ cups old fashioned rolled oats
½ cup vanilla protein powder
⅛ teaspoon salt
½ cup mini chocolate chips
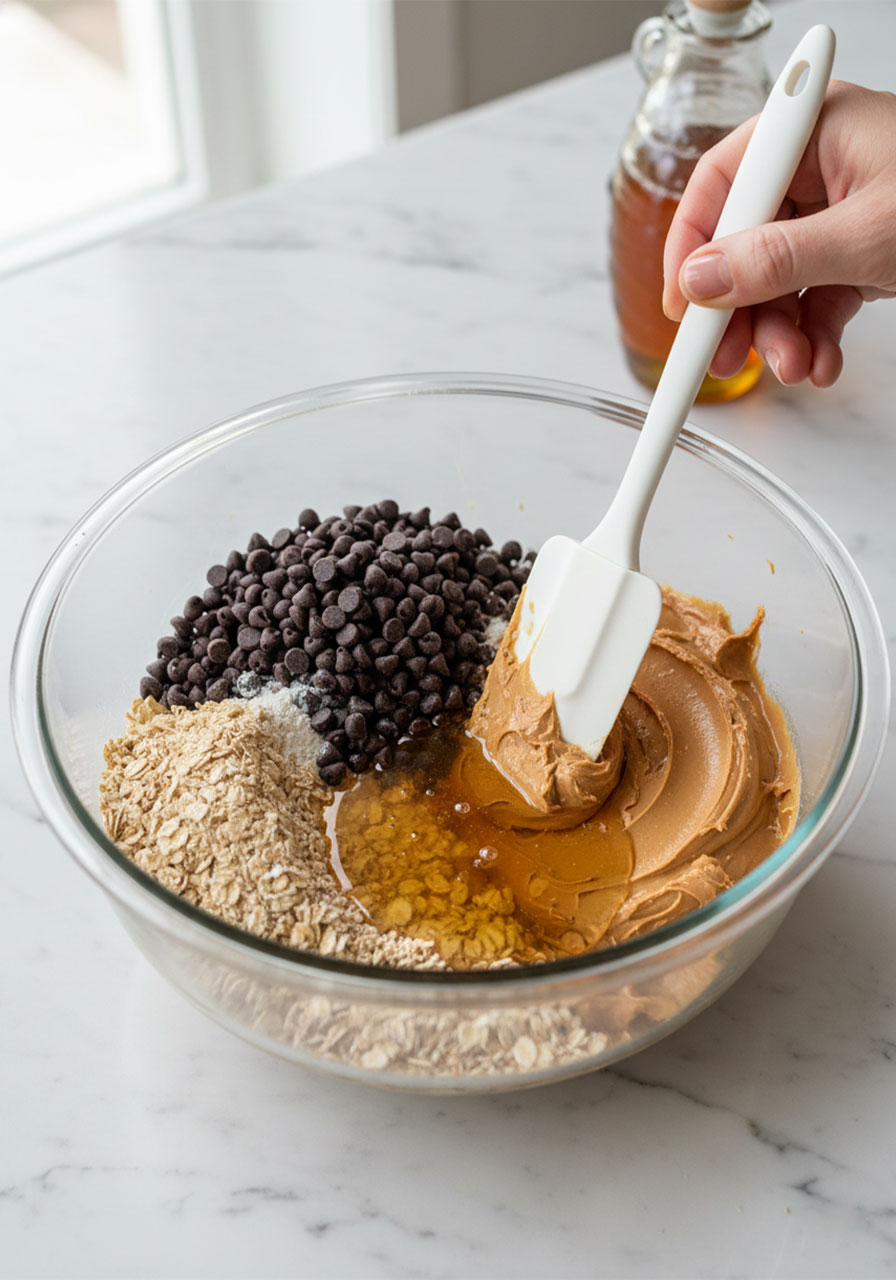
Step 1: Combine All Ingredients in One Bowl
Add the peanut butter, honey, rolled oats, vanilla protein powder, salt, and mini chocolate chips all into your large mixing bowl at once.
No need to mix wet and dry ingredients separately. Just dump it all in!
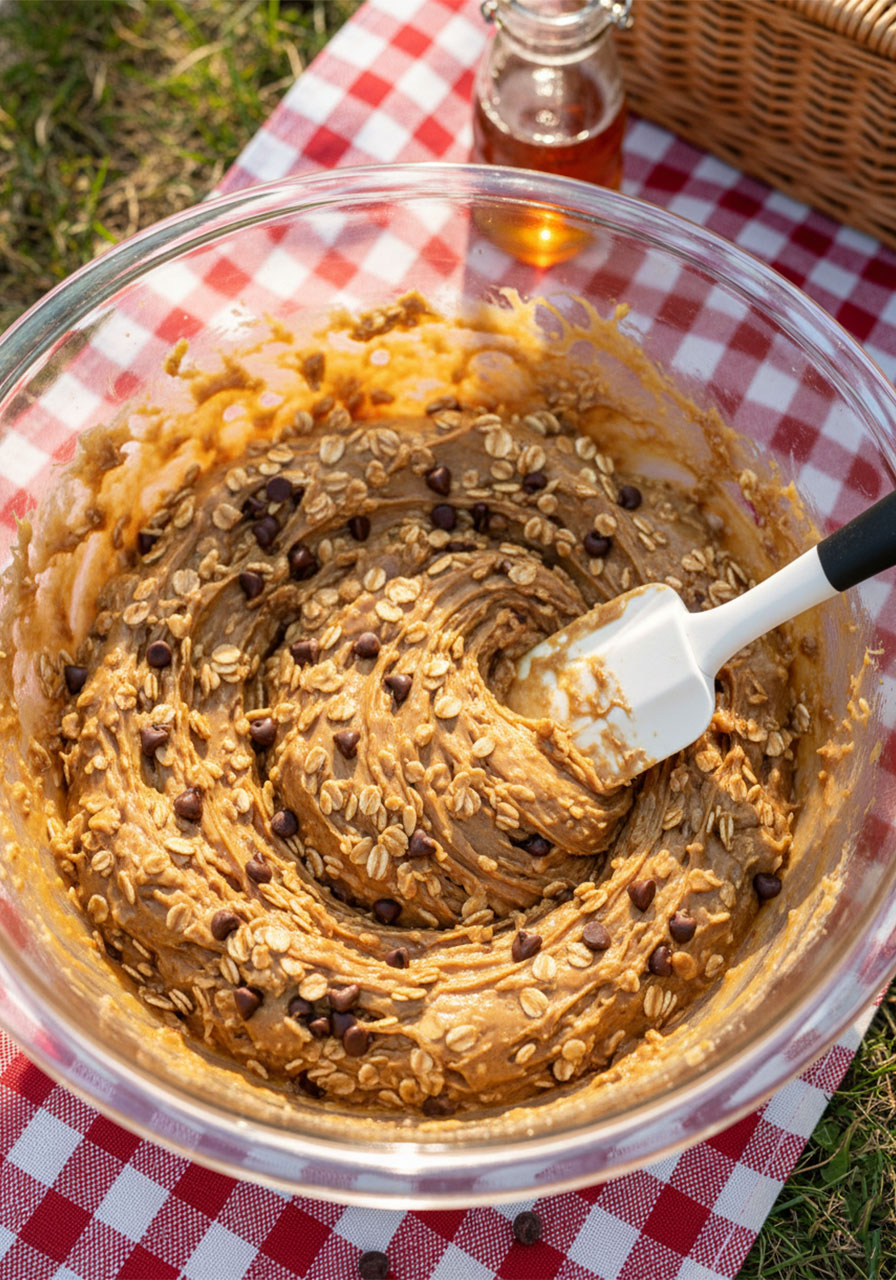
Step 2: Mix It Together (Use a Rubber Spatula!)
Use a rubber spatula to mix everything together. This batter is thick and sticky, so a regular spoon won’t cut it and you’ll end up frustrated.
Keep mixing until everything is fully combined with no dry streaks. It’ll take a couple of minutes, but you’ll get there!
Step 3: Scoop Onto Parchment Paper
Line a baking sheet with parchment paper or wax paper.
Use a 1.5-tablespoon mini cookie scoop to portion out the batter onto the sheet. If you don’t have a cookie scoop, just use a couple of spoons and aim for balls about 1 inch in size.
A cookie scoop genuinely makes this process faster and gives you perfectly uniform-sized bites every time.
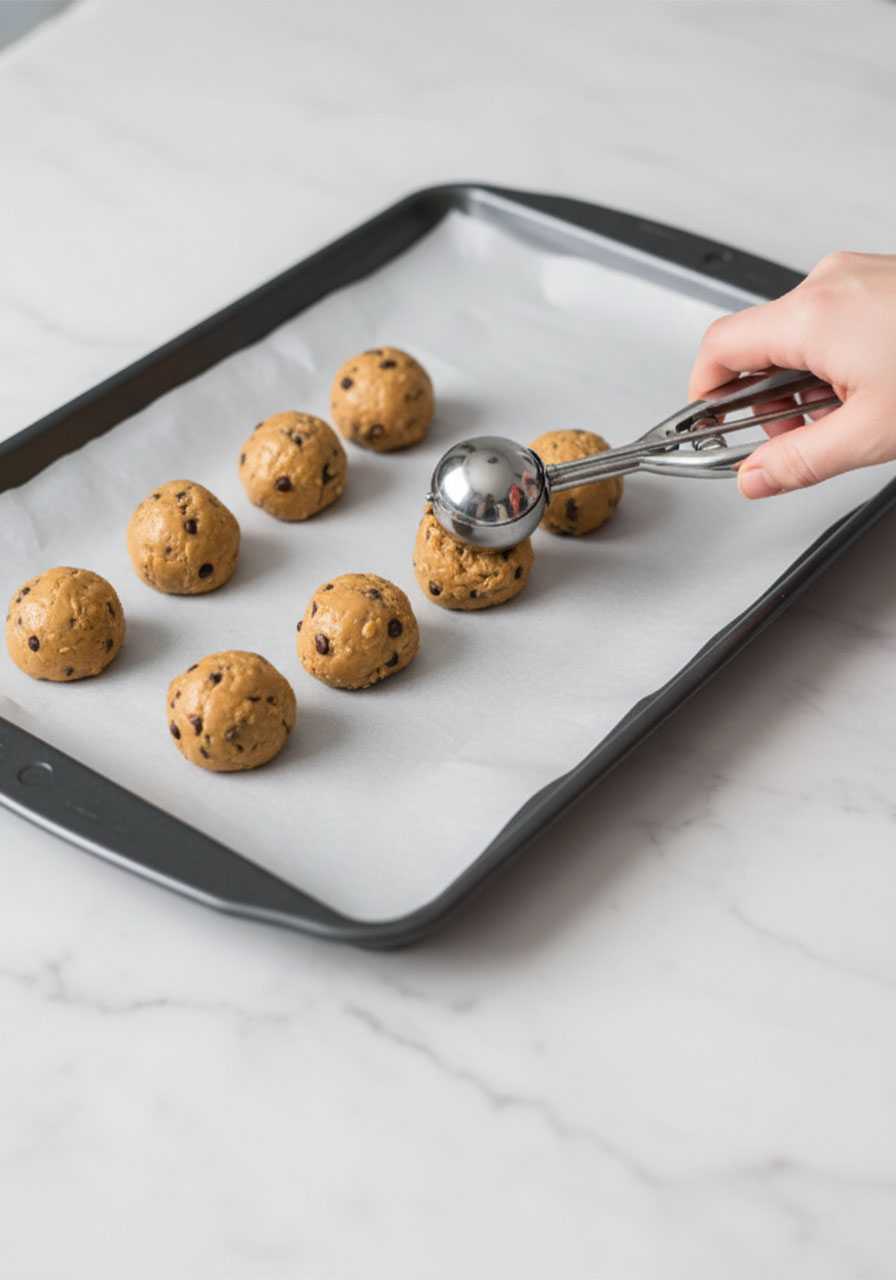
Step 4: Roll Into Balls
After scooping, use clean hands to gently roll each portion into a smooth ball shape.
Pro tip: If the batter is sticking to your hands, a very light coat of cooking spray on your palms will help!
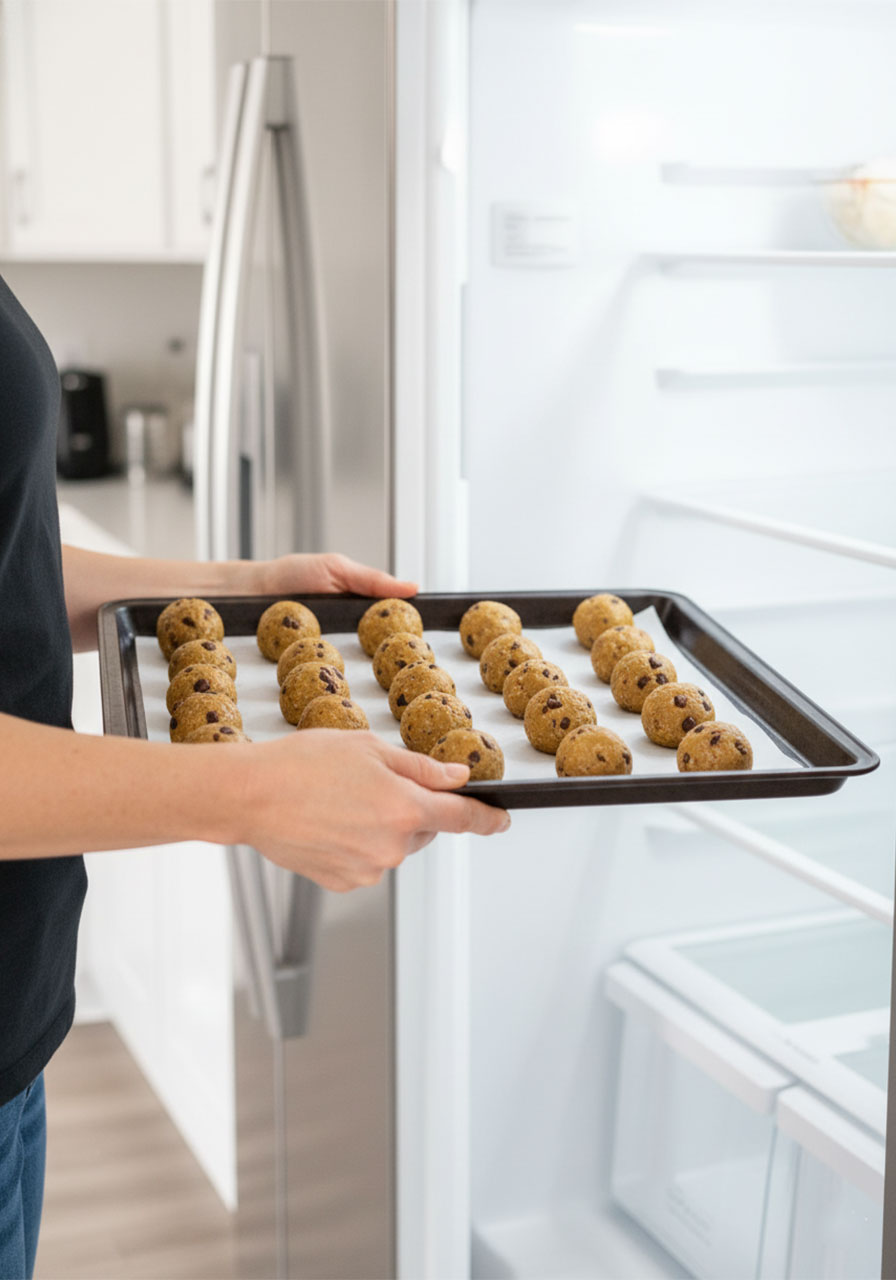
Step 5: Chill in the Fridge
Place the baking sheet in the fridge for at least 1 hour, or until the balls are firm to the touch.
This step is what takes them from a soft sticky blob to that perfect, holdable, bite-sized snack with a satisfying texture.
Step 6: Store and Enjoy!
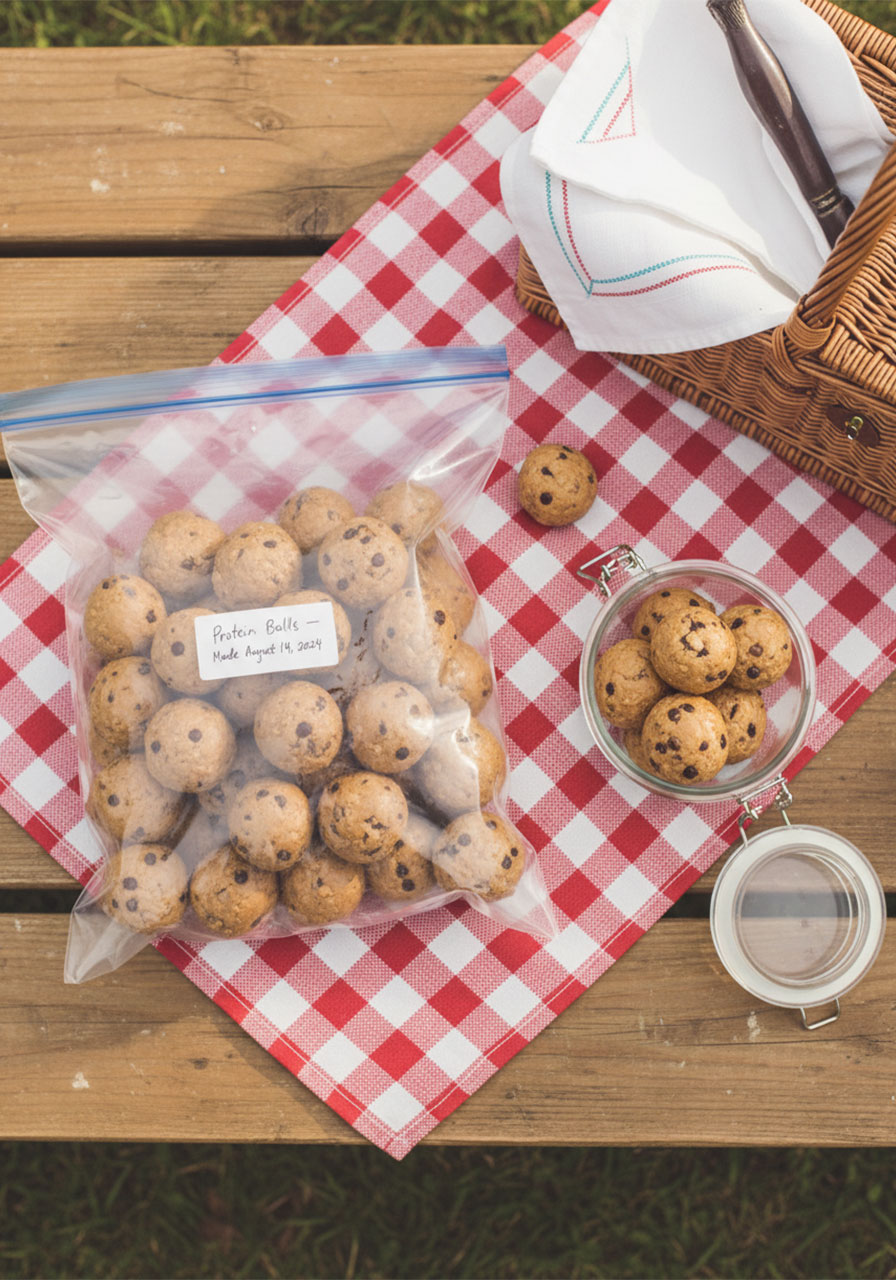
Once they’ve firmed up, transfer your protein balls to an airtight container or zip-lock bag. They’re ready to eat!
Keep them in the fridge for up to a week, or pop them in the freezer for up to 3 months.
The Secret to Getting the Perfect Texture Every Time
The most common question I hear about this recipe is: “Why is my dough too sticky / too dry / not rolling properly?”
Here are the top tips to nail the texture every single time:
Tip 1: Use the Right Peanut Butter
I can’t stress this enough – use no-stir, creamy peanut butter. It’s thicker and more stable than natural peanut butter, which tends to separate and add too much oil to the batter.
If your dough is too wet or greasy, the peanut butter is almost always the culprit.
Tip 2: Mix Thoroughly
The batter needs a good mix for everything to come together properly. Don’t rush it. Spend a solid 2-3 minutes stirring until there are no streaks of dry protein powder or oats.
Tip 3: Don’t Skip the Chilling Step
Popping the baking sheet in the fridge for an hour is non-negotiable. The chilling is what firms up the peanut butter and honey, giving the protein balls their structure.
If you skip the chill time, they’ll be too soft to hold their shape.
Tip 4: Scoop First, Then Roll
Scoop all of the batter onto the baking sheet first, then go back and roll each one into a smooth ball. This is much more efficient than scooping and rolling one at a time, and keeps your hands from getting overly sticky.
Fun Ways to Customize Your Protein Balls
Once you’ve nailed the base recipe, the fun really begins. These protein balls are incredibly easy to customize based on what your family loves or what you have in your pantry.
Here are some of our favorite mix-in ideas:
Add-Ins for Extra Nutrition:
Chia seeds – boost fiber and omega-3s
Ground flaxseed – great for digestion
Shredded coconut – adds a tropical chew
Chopped dried fruit – raisins, cranberries, or apricots work great
Chopped nuts – almonds, walnuts, or pecans for crunch
Swap the Peanut Butter:
Have a peanut allergy in the house? No problem! Try almond butter, cashew butter, or sunflower seed butter (SunButter) as a 1:1 substitute. SunButter makes these completely nut-free, which is a lifesaver for school snacks!
Switch Up the Chocolate Chips:
Try white chocolate chips, peanut butter chips, or butterscotch chips for a totally different flavor profile.
Change the Protein Powder Flavor:
Chocolate protein powder turns these into what tastes like a brownie bite. You can also do half vanilla and half chocolate for a cookies-and-cream vibe that kids go absolutely wild for.
Are These Protein Balls Kid-Friendly?
Short answer: absolutely yes.
These taste like a treat. Kids don’t know they’re eating oats and protein powder – all they know is that they taste like cookie dough with chocolate chips, and they love them.
They’re also the perfect size for little hands and lunchboxes.
For school lunches, keep in mind that many schools are nut-free. In that case, just swap the peanut butter for sunflower seed butter and you’re good to go! The flavor is slightly different but still absolutely delicious.
I’ve also found that kids love helping make these. Let them pour in the ingredients, mix the batter (with a rubber spatula – it’s very satisfying for kids!), and roll the balls. It’s a fun kitchen activity that also sneaks in some life skills.

These Are Perfect for Meal Prep
If you’re a busy parent or a teacher with a packed schedule, meal prepping these protein balls is a game-changer.
Here’s why they’re the ultimate meal prep snack:
They take only 10 minutes of active prep time. Mix, scoop, roll, refrigerate. Done.
One batch makes around 26-27 protein balls. That’s nearly a month of daily snacks if you eat one a day, or about a week’s worth if the whole family is grabbing them.
They freeze beautifully for up to 3 months. Make a double or triple batch, store them in freezer bags, and just pull out a few the night before. They thaw quickly in the fridge or at room temperature.
They travel well. Pack them in a small container in a lunchbox, a work bag, or a teacher’s tote. No refrigeration needed for a few hours.
How to Store No Bake Protein Balls
Storage is simple and flexible – here’s what you need to know:
In the Refrigerator:
Store in an airtight container or zip-lock bag for up to 1 week. They’ll stay firm and fresh, and you can grab one anytime.
In the Freezer:
Transfer them to a freezer-safe zip-lock bag (squeeze out the air!) and freeze for up to 3 months. To enjoy, just let them thaw on the counter for 10-15 minutes, or overnight in the fridge.
I always keep a big freezer stash on hand. The moment they run out, I make another batch immediately – that’s how good they are.
Nutrition Information (Per Ball)
Here’s a quick look at what’s inside each protein ball:
Calories: 144
Protein: 5g
Carbohydrates: 14g
Fat: 8g
Fiber: 1g
Sugar: 9g
Each ball is a balanced little package of protein, healthy fats, and complex carbs that gives you lasting energy rather than a quick spike and crash.
For a snack, that’s pretty incredible – especially when it tastes like dessert!
Frequently Asked Questions
Do I have to use protein powder?
Nope! If you don’t have protein powder or prefer not to use it, you can substitute it with additional rolled oats or oat flour. Just add enough to get the dough to a non-sticky, rollable consistency.
The balls will have slightly less protein per serving, but they’ll still be delicious and satisfying.
Can I use natural peanut butter?
We really recommend using no-stir creamy peanut butter for this recipe. Natural peanut butter that separates tends to make the dough too oily and sticky, which makes it hard to roll the balls properly.
If natural peanut butter is all you have, make sure it’s fully stirred before measuring, and you may need to add a bit more oats to compensate for the extra moisture.
My dough is too sticky – what do I do?
Add more rolled oats, a tablespoon at a time, until the dough is manageable. Too much peanut butter or using natural peanut butter are usually the cause.
Can I make these nut-free?
Yes! Sunflower seed butter (SunButter) is the best nut-free swap for peanut butter. It’s school-safe and works perfectly in this recipe.
Can I make these vegan?
Absolutely. Replace the honey with maple syrup and use a plant-based protein powder. Everything else in the recipe is already vegan!
How many protein balls does this recipe make?
This recipe makes approximately 26-27 energy balls, depending on how large you roll them. Using a 1.5-tablespoon cookie scoop gives you the most consistent results.
Can kids help make these?
Yes, and they love it! Kids can pour and mix the ingredients, and rolling the balls is especially fun for little hands. Just make sure they’re supervised during the mixing, as the batter is quite thick.
Are these good for school lunches?
These are perfect for lunchboxes! If your child’s school is nut-free, swap the peanut butter for SunButter and you’re all set. They don’t need to be refrigerated for a few hours, so they stay fresh in a lunchbox all morning.
Ready to Make the Best Snack of Your Week?
These No Bake Protein Balls are the kind of recipe you’ll make once and then just never stop making.
They’re quick, they’re healthy, they taste amazing, and they make your life so much easier. What more could a busy parent or teacher ask for?
Make a big batch this weekend, stash them in the freezer, and you’ll have a ready-to-grab snack waiting for you every single day.
And when your kids ask for “that cookie dough ball thing again” – you can feel good knowing exactly what’s in every single bite.
Happy snacking!
No Bake Protein Balls (Easy Energy Balls)
Ingredients
- 1.5 cups no-stir creamy peanut butter
- 0.5 cups honey
- 1.3 cups old fashioned rolled oats
- 0.5 cups vanilla protein powder
- 0.5 cups mini chocolate chips
- 0.1 teaspoons salt
Instructions
- Combine all ingredients: Add 1.5 cups no-stir creamy peanut butter, 0.5 cups honey, 1.3 cups old fashioned rolled oats, 0.5 cups vanilla protein powder, 0.5 cups mini chocolate chips, and 0.1 teaspoons salt into a large mixing bowl all at once.
- Mix the batter: Use a rubber spatula (not a spoon!) to mix everything together. The batter is thick and sticky – keep stirring for 2–3 minutes until fully combined with no dry streaks of protein powder or oats.
- Scoop onto parchment: Line a baking sheet with parchment paper or wax paper. Use a 1.5-tablespoon mini cookie scoop to drop portions of batter onto the sheet. No cookie scoop? Use two spoons and aim for 1-inch balls.
- Roll into balls: Once all the batter is scooped, go back and roll each portion between your palms into a smooth ball shape. Tip: a very light coating of cooking spray on your hands prevents sticking.
- Chill until firm: Place the baking sheet in the refrigerator for 60 minutes, or until the balls are firm to the touch. Do not skip this step – chilling is what gives them their perfect holdable texture!
- Store and serve: Transfer the firm protein balls to an airtight container or zip-lock bag. Store in the fridge for up to 1 week, or in the freezer for up to 3 months. Grab one anytime and enjoy!