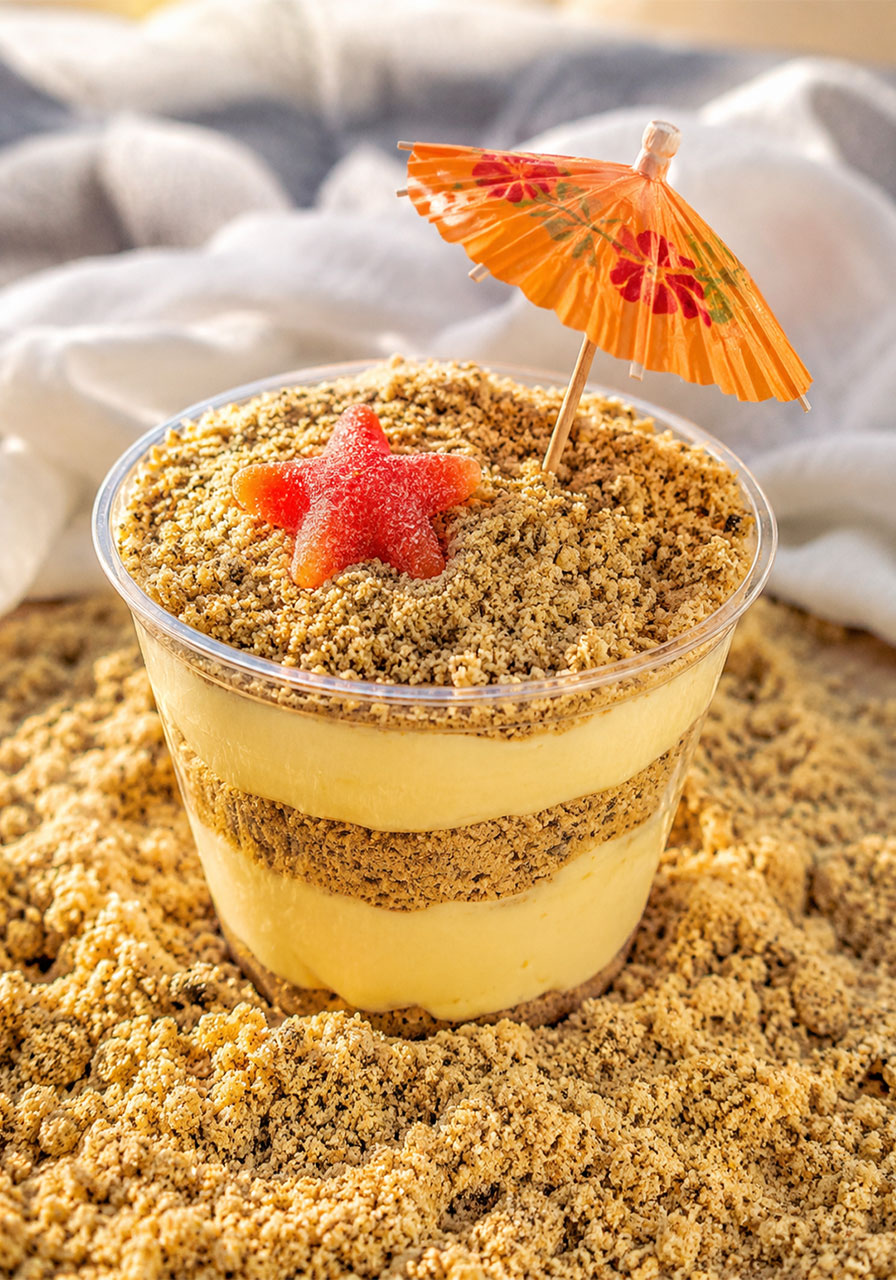
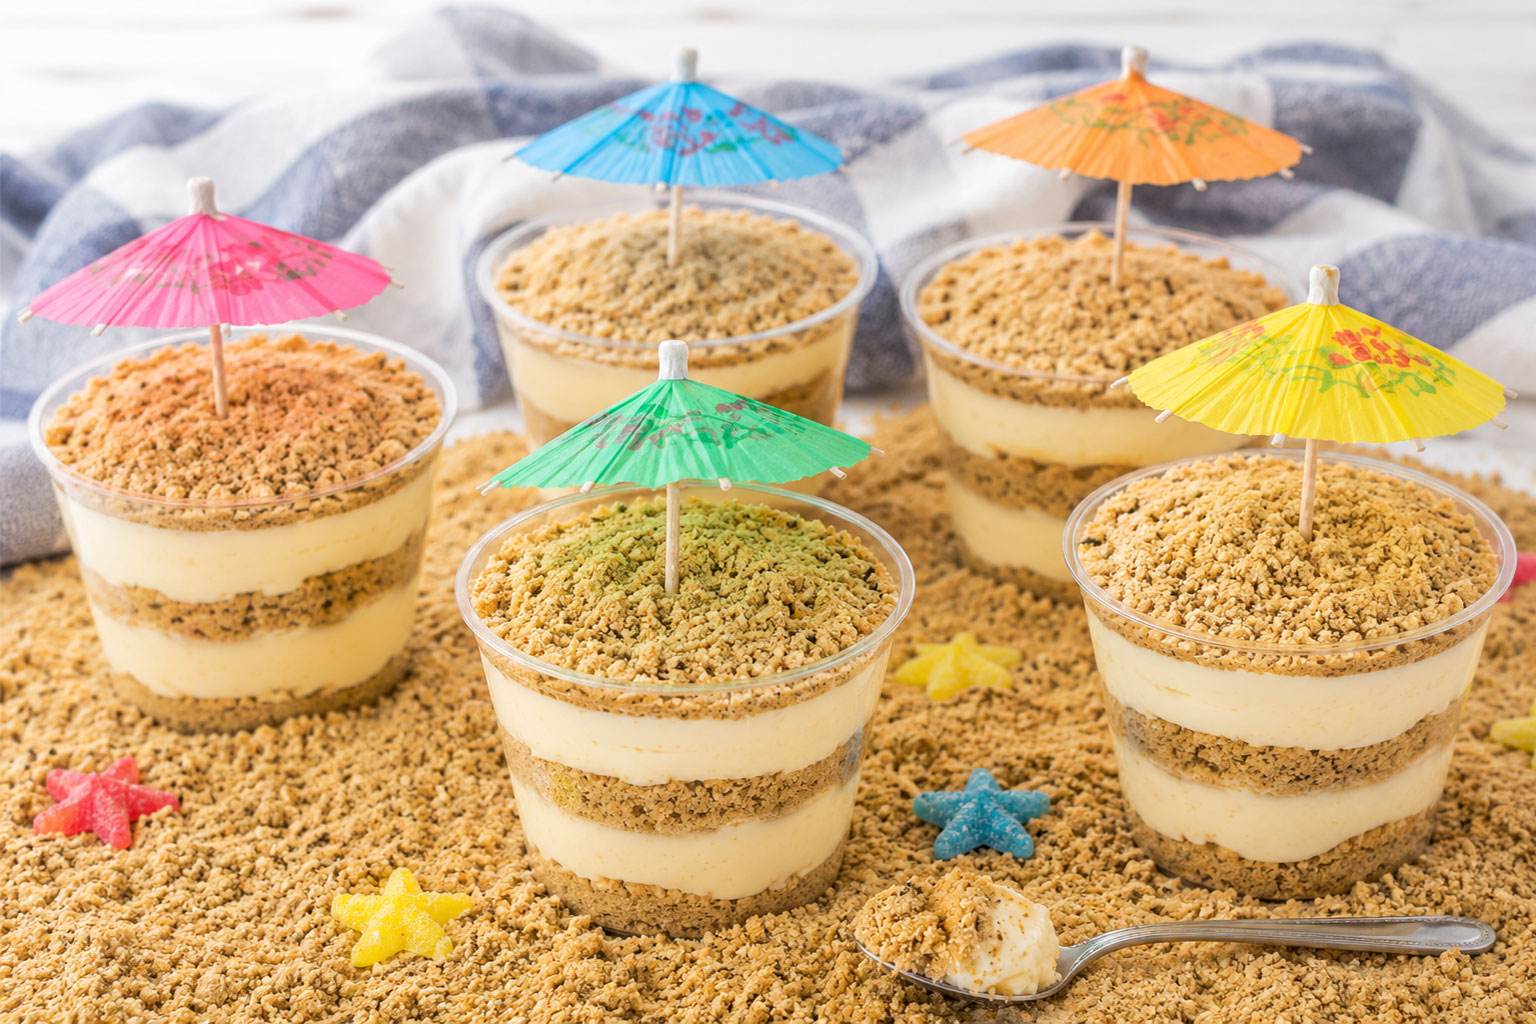
Picture this: a little cup of “sand,” layered with creamy pudding, topped off with a tiny paper umbrella. It looks exactly like a mini beach in a cup. Your guests will do a double-take before they even take a bite.
That’s the magic of Golden Oreo Sand Pudding. It’s a no-bake dessert that’s part trifle, part edible art project, and 100% guaranteed to get a reaction.
Best of all, it’s ridiculously easy to make. No oven, no fancy skills, no stress. Just crushed cookies, pudding, and a little bit of layering magic.
If you’re planning a beach-themed birthday, a summer pool party, or really any get-together where you want to impress without exhausting yourself, this is the dessert you’ve been looking for.
What Exactly Is Sand Pudding?
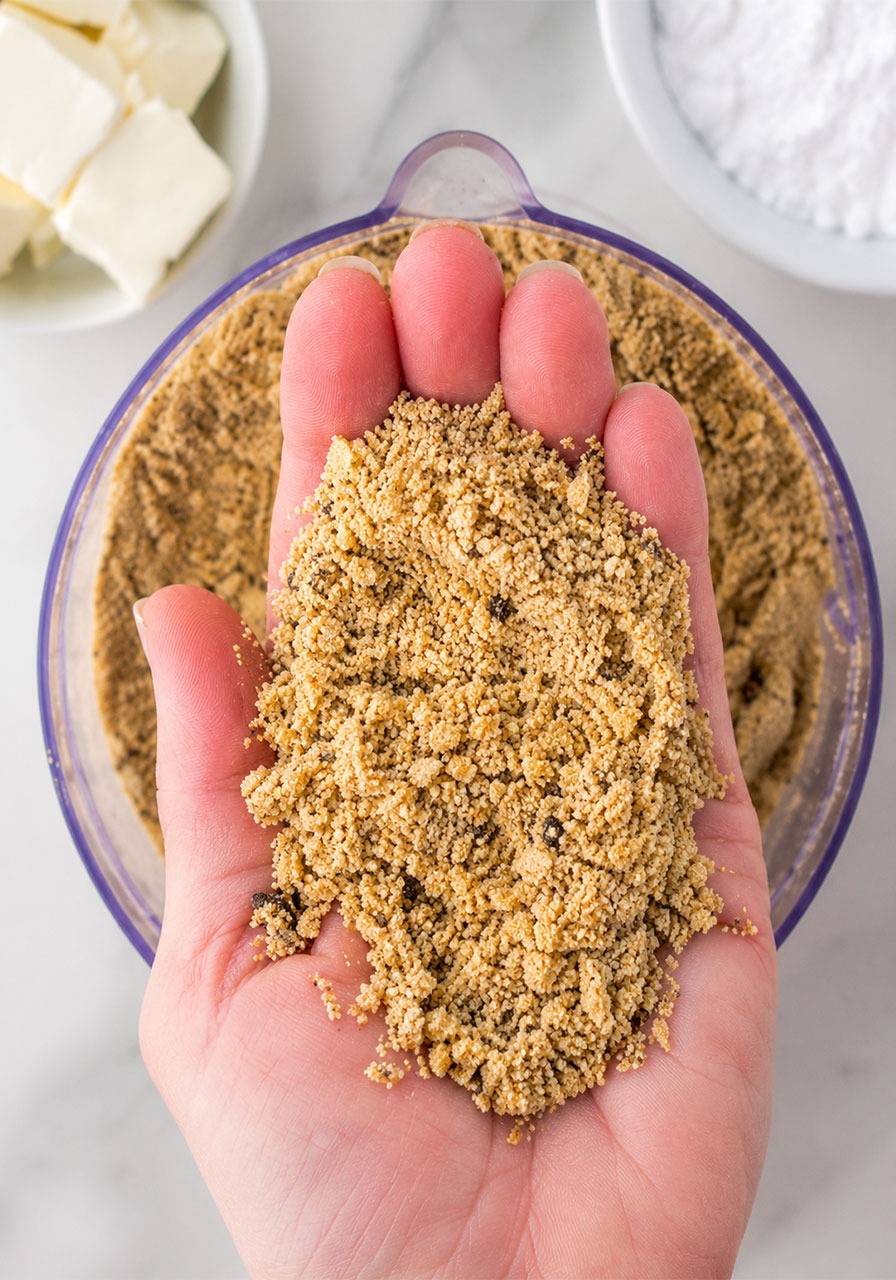
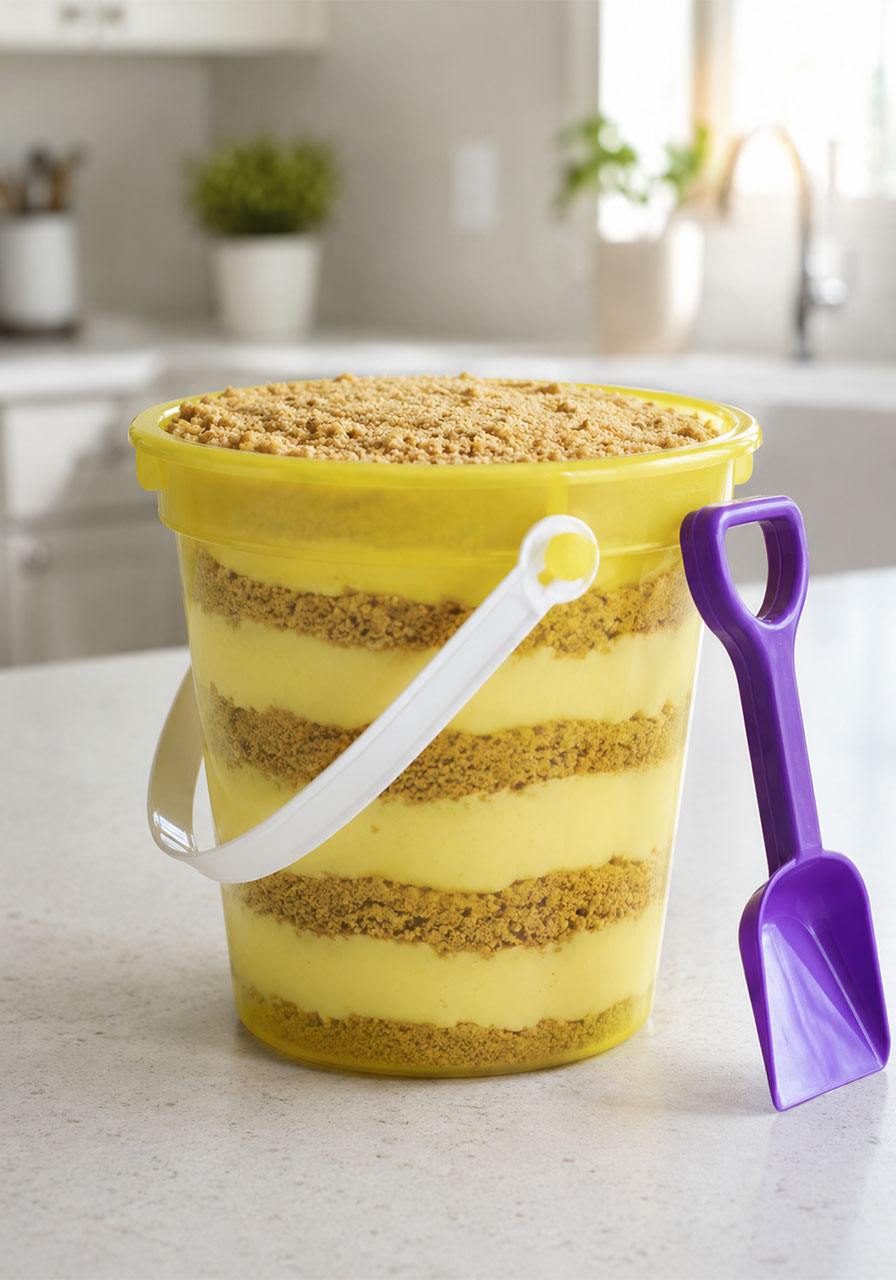
Sand pudding is a layered dessert, kind of like a trifle or a parfait. Except instead of cake crumbs or cookie pieces, you’re using crushed Oreo cookies to mimic real sand.
And it really, truly looks like sand. That’s the whole fun of it.
You simply layer the “sand” with a sweet, creamy pudding mixture in a cup or bucket. The result looks like a tiny beach scene that just so happens to be edible.
It’s similar in spirit to a banana split dessert or a chocolate lush, but this version is made specifically for summer and beach-themed parties.


Why You’re Going to Love This Recipe
This isn’t just a cute idea. It’s also genuinely practical for a busy party host. Here’s why it earns a permanent spot in your recipe rotation.
- It’s completely no-bake. No oven, no waiting around for something to cool.
- It comes together fast. You’re looking at about 30 minutes from start to finish.
- It’s a guaranteed conversation starter. Kids and adults are equally impressed by how realistic the “sand” looks.
- It’s budget-friendly. Most of the fun extras, like sand buckets and drink umbrellas, can be found at the dollar store.
- It can be made ahead. Perfect for anyone juggling a long party prep list.
Perfect for These Parties and Occasions
This dessert was basically made for summer, but don’t let that stop you from bringing it out any time you want a fun, beachy vibe.
It works beautifully for:
- Beach-themed birthday parties
- Pool parties and backyard summer bashes
- Graduation parties
- Bridal showers with a tropical or beach theme
- Baby showers with an “under the sea” or beach baby theme
- Fourth of July cookouts
- Luau-themed get-togethers
- Or honestly, any summer get-together where you want a fun dessert that doesn’t require turning on the oven
Because the supplies and rules are flexible, you can easily dress this dessert up or keep it simple depending on the occasion.
A Little Backstory
This recipe has been a family favorite for years. It was first made for a graduation party, and it disappeared within minutes.
Since then, it’s made an appearance at a beach-themed bridal shower, where it got rave reviews from guests who couldn’t believe how real the “sand” looked.
That’s the kind of dessert this is. The kind people remember and ask you about months later.
Tools You’ll Need
You probably already have most of these in your kitchen. Here’s what to grab before you get started.
Food processor – for crushing the cookies into sand-like crumbs. No food processor? A ziptop bag and a rolling pin work just as well.
Hand mixer – makes blending the cream cheese mixture much easier, though a whisk will work in a pinch.
Mixing bowls – you’ll need a few for prepping the different layers.
Sand buckets and shovels – usually easy to find at the dollar store. If it’s off-season, online ordering works too.
Clear plastic cups – 9-ounce cups work great if you’re making individual servings.
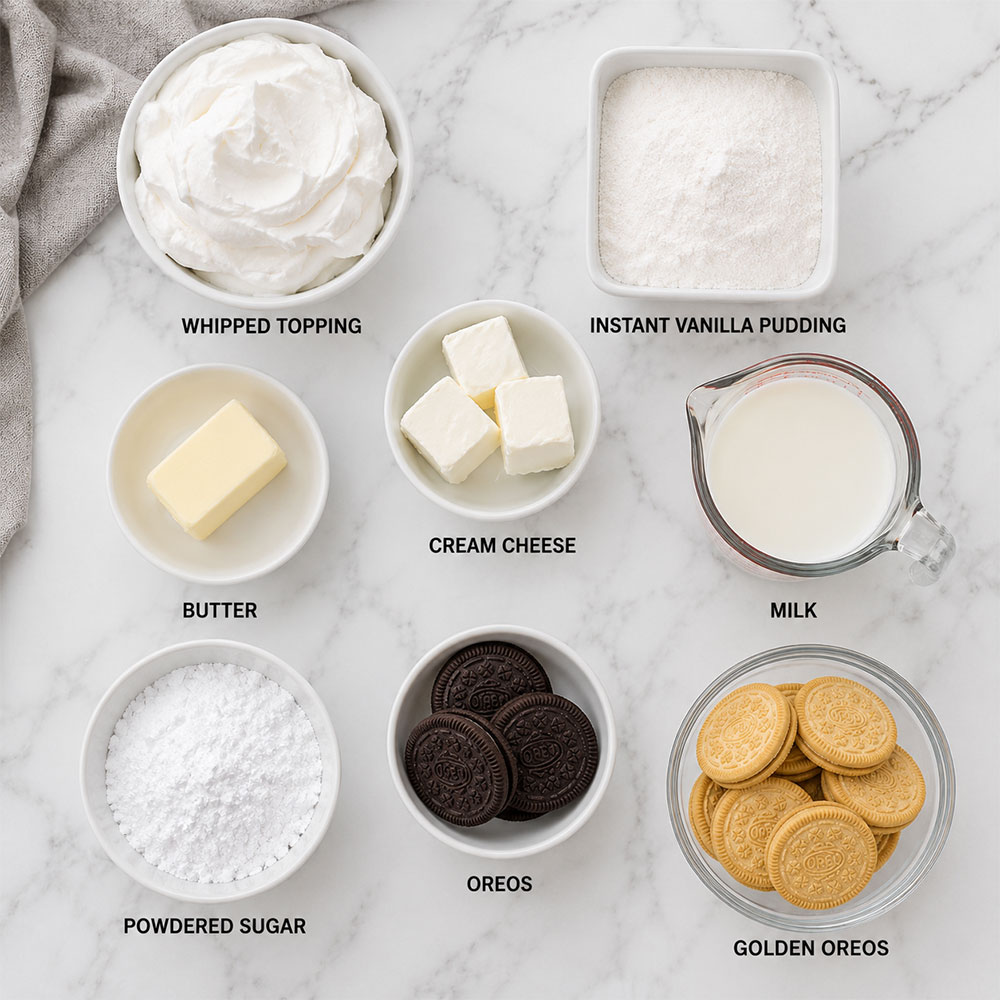
What You’ll Need (Ingredients)
Here’s everything that goes into this dessert, plus a few notes on substitutions.
Golden Oreos – the base of your “sand.” You’ll need the whole package, with the centers scraped out. Vanilla wafers can work in a pinch too.
Classic Oreos – just a few. Mixing in some regular Oreos makes the sand look even more realistic, with that speckled texture.
Cream cheese – full-fat is recommended, though reduced-fat should work fine. Make sure it’s softened to room temperature so it blends smoothly.
Unsalted butter – also softened to room temperature.
Powdered sugar – sometimes labeled as confectioners’ sugar or icing sugar. All the same thing.
Instant vanilla pudding mix – you’ll need two 3.4-ounce boxes. Banana pudding also works well here.
Milk – 2% works great, but use whatever you typically have on hand.
Whipped topping – store-bought is easiest. Just make sure it’s fully thawed before you start.
How to Make Golden Oreo Sand Pudding
This dessert comes together in just a few simple stages. Follow these steps and you really can’t go wrong.
1. Scrape out the Oreo filling.
Take the 4 classic Oreo cookies and scrape the cream filling out of the center. This step is optional, but it helps cut down on extra sweetness.
2. Crush the cookies.
Add the scraped classic Oreos along with the full package of Golden Oreos into a food processor. Pulse until the mixture looks just like sand.
3. Make the cream cheese base.
In a large bowl, beat together the softened cream cheese, butter, and powdered sugar until smooth and creamy.
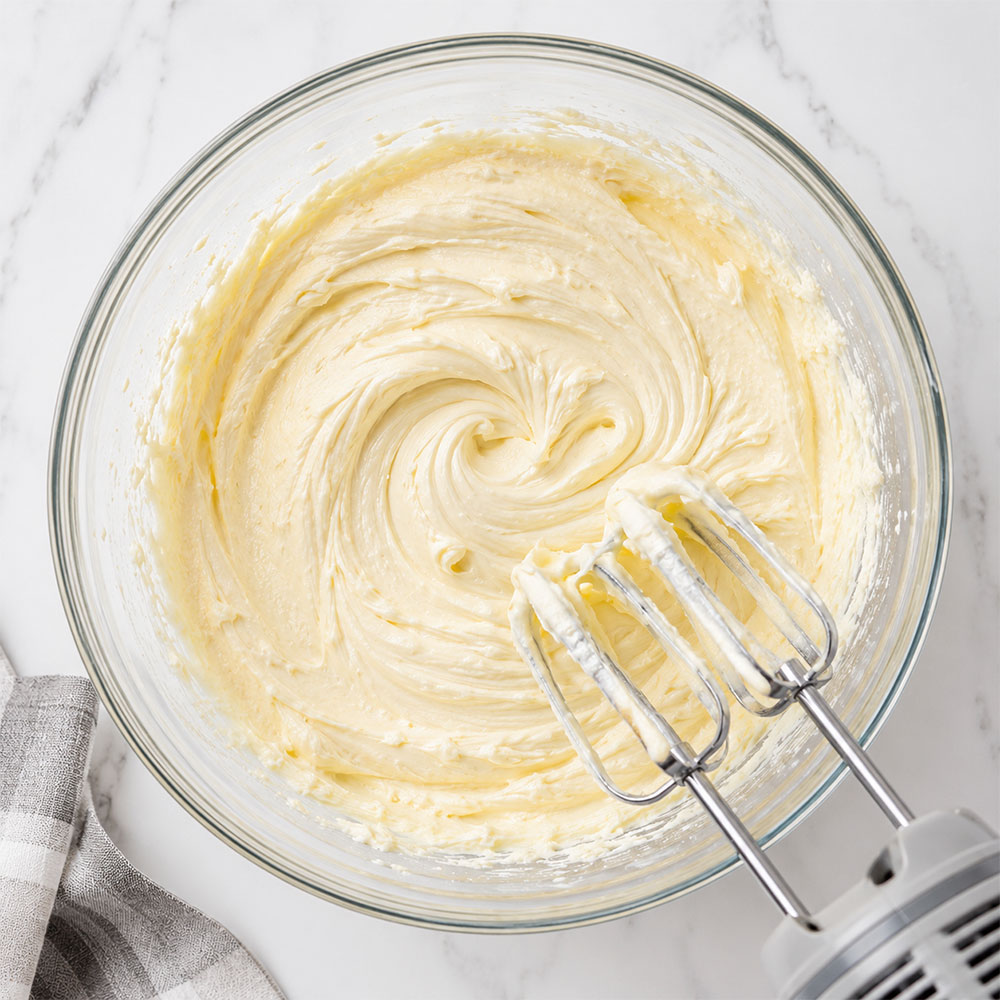
4. Mix the pudding.
In a separate bowl, whisk the instant pudding mix with the milk until it starts to thicken. Add this mixture into the cream cheese base and stir until fully combined.
5. Fold in the whipped topping.
Gently fold the whipped topping into the pudding mixture until everything is light and fluffy.
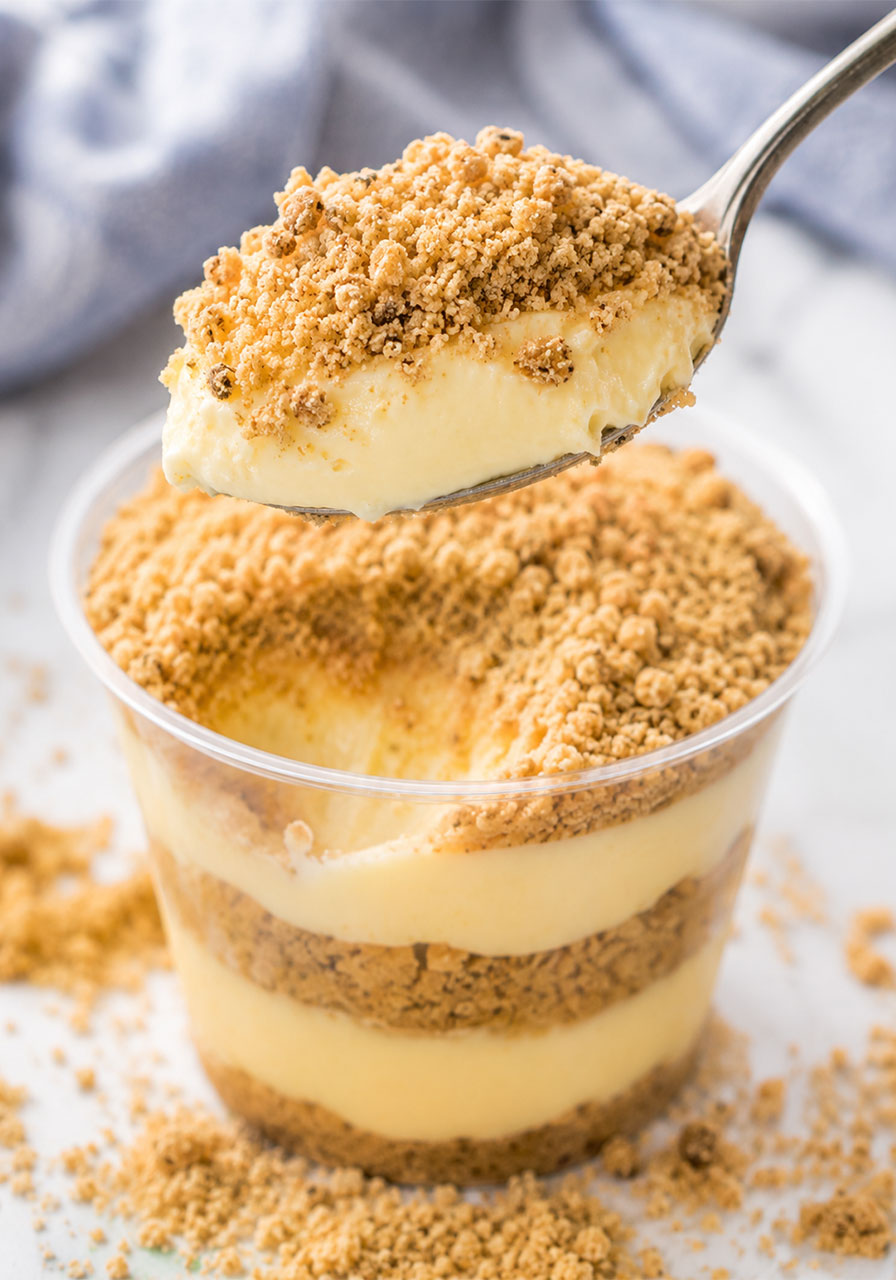
6. Start layering.
Add a layer of cookie “sand” to the bottom of your cup or bucket, followed by a layer of pudding. Repeat the layers, always finishing with a layer of sand on top.
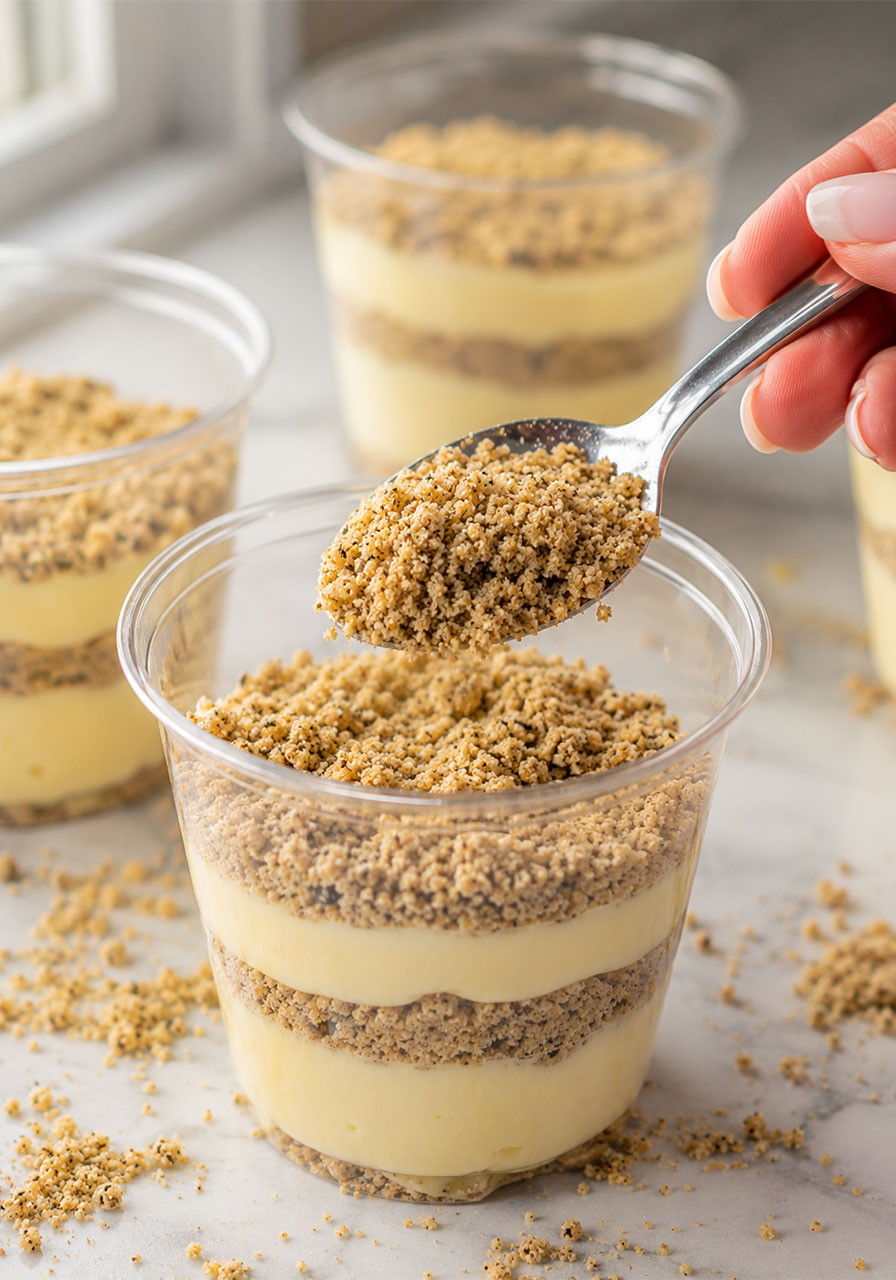
7. Add your toppings and serve.
Stick in a drink umbrella, scatter a few gummy starfish on top, and dig in.
That’s genuinely all there is to it. No baking, no complicated techniques, just layering and chilling.
Pro Tip for the Most Realistic Sand
Don’t skip the classic Oreos. Mixing a few regular Oreos in with the Golden Oreos creates those little dark speckles that make the “sand” look incredibly realistic.
It’s a small step that makes a huge visual difference, and it’s exactly the kind of detail that gets people asking how you made it.
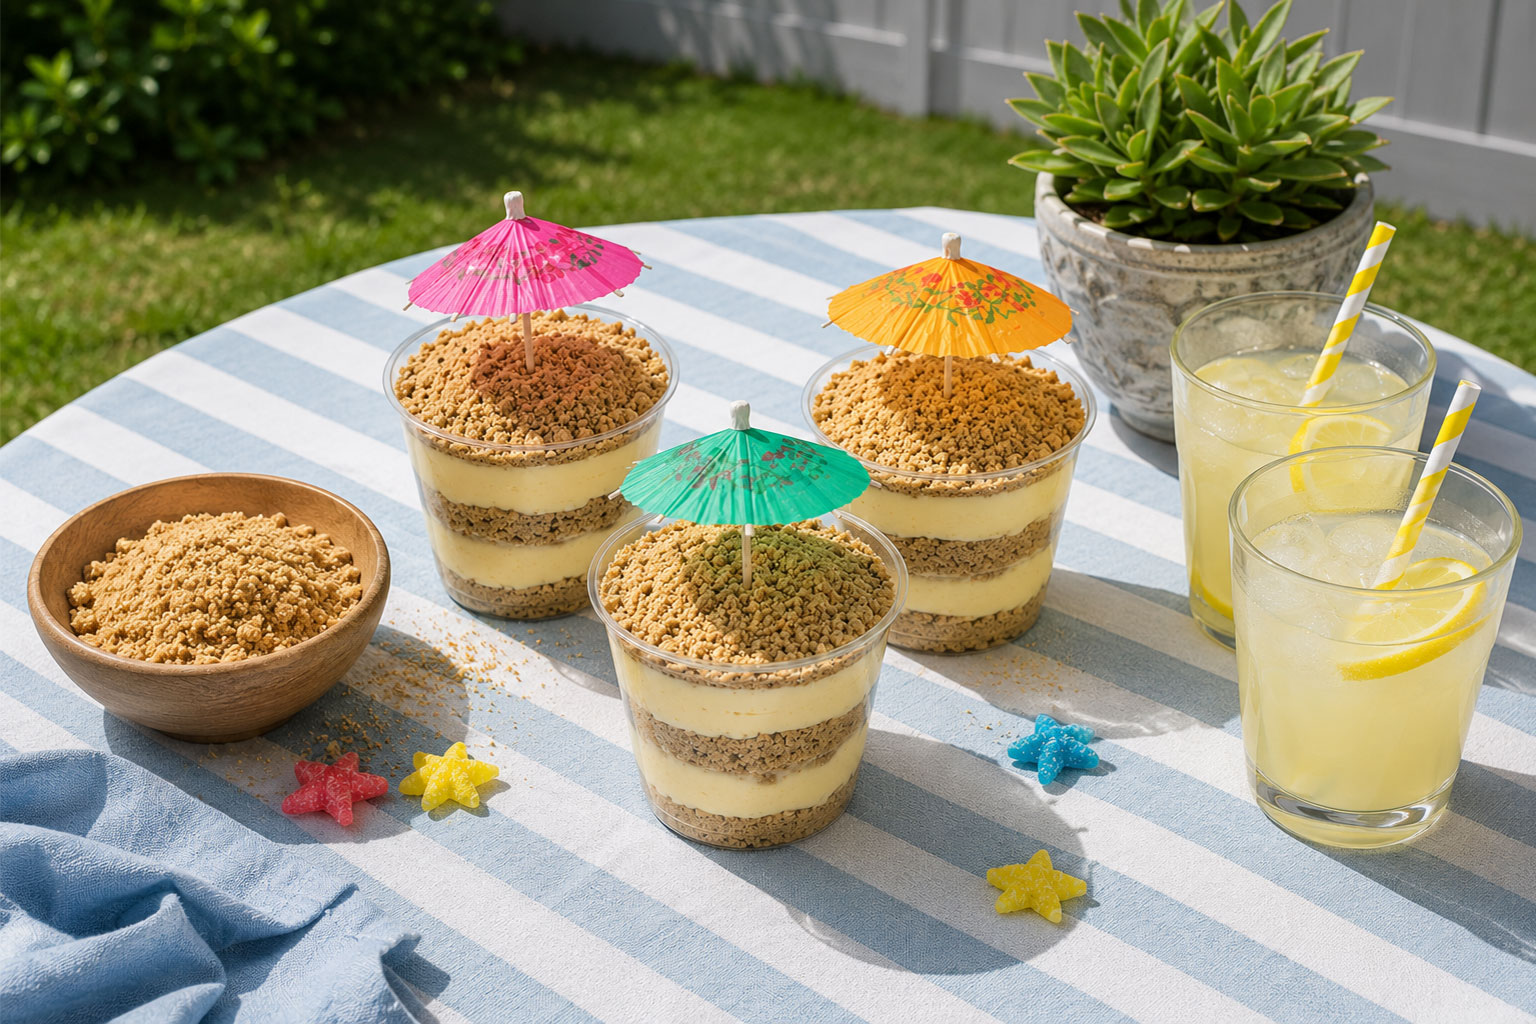
Fun Toppings and Variations
This is where you really get to have fun and make this dessert your own. A few crowd-pleasing ideas:
- Mini paper drink umbrellas, stuck right into the top layer of sand
- Teddy Grahams, positioned like they’re relaxing under the umbrella
- Gummy starfish or gummy worms, peeking out of the sand
- Swedish fish, for an extra beachy touch
You can also switch up the pudding flavor. Lemon and banana cream both work beautifully if you want to mix things up from classic vanilla. Cheesecake pudding is another tasty option if you want something a little richer.
Individual Cups or One Big Bucket? How to Serve a Crowd
This recipe is flexible depending on how you want to serve it, and both options are equally fun.
For individual servings: Use 9-ounce clear plastic cups. Layer the sand and pudding, making the pudding layer about 1/4 cup thick each time. This recipe makes roughly 6 individual cups.
For a crowd: Layer everything into a 7.5-inch sand bucket instead. Hand out shovels for scooping, and let guests dig in together. This option is especially fun for kids’ parties.
Make-Ahead Tips and How to Store It
This dessert is great for party prep because you can get most of the work done in advance.
If you’re making it ahead of time, prep the cookie “sand” and the pudding mixture separately, then store them in the fridge. Wait to actually assemble the layers until closer to serving time.
Once it’s fully assembled, keep it covered in the refrigerator. It will stay fresh for up to 5 days.
Freezing is not recommended. The pudding and whipped topping change texture once thawed, so this one is best enjoyed fresh.
Frequently Asked Questions
Do I have to scrape out the cream filling from the Oreos?
Not at all. It’s optional. Scraping it out just helps cut down on the overall sweetness, since this dessert already has plenty of sugar built in.
What if I only have cook-and-serve pudding instead of instant?
That’s fine. Just prepare the pudding according to the package instructions, let it cool completely, and then proceed with the recipe as written.
How many servings does this recipe make?
Using 9-ounce plastic cups, this recipe makes about 6 individual servings. You can also stretch it into one large 7.5-inch bucket for a crowd.
Can I use a different cookie flavor?
Yes. Golden Oreos or Lemon Oreos both work well as the base. Oreo also releases limited edition flavors throughout the year that can work in this recipe too.
Can I freeze sand pudding?
It’s not recommended. The texture of the pudding and whipped topping changes once it thaws, so this dessert is best made and enjoyed fresh.
Your Next Beach Party Just Got a Whole Lot Easier
With this recipe in your back pocket, you’ve got a dessert that’s easy to make, fun to look at, and impossible for guests to forget.
Whether you’re hosting a backyard pool party or a full-on beach-themed bash, Golden Oreo Sand Pudding is the kind of dessert that does a lot of the heavy lifting for you. All you have to do is layer, chill, and watch everyone’s reaction when you bring it out.
Because the best summer parties are the ones where the food is just as fun as the company.

Golden Oreo Sand Pudding
Equipment
- Food processor (or a ziptop bag and rolling pin)
- Hand mixer
- Mixing bowls
- Six 9-ounce clear plastic cups, or a sand bucket and shovel
Ingredients
- 13.29 ounces Golden Oreos, centers scraped out
- 4 classic Oreo cookies, centers scraped out
- 8 ounces cream cheese, room temperature
- 1/4 cup unsalted butter, room temperature
- 2/3 cup powdered sugar
- 6.8 ounces vanilla instant pudding mix (two 3.4 ounce boxes)
- 2 3/4 cups milk
- 12 ounces whipped topping, thawed
Instructions
- Scrape the cream filling out of the 4 classic Oreo cookies.
- Add the scraped classic Oreos and the full package of Golden Oreos to a food processor. Crush until the mixture looks like sand.
- In a large bowl, beat the cream cheese, butter, and powdered sugar with a hand mixer until smooth and creamy.
- In a separate bowl, whisk the instant pudding mix with the milk until it starts to thicken. Add this to the cream cheese mixture and mix until fully combined.
- Fold in the whipped topping until fully incorporated.
- For individual cups: layer cookie crumbs and pudding into each cup, using about 1/4 cup of pudding between layers, and repeat until you run out, ending with a layer of crumbs on top.
- For a crowd: layer the crumbs and pudding into a sand bucket the same way, alternating sand, pudding, sand, pudding, and finishing with sand on top.
- Add toppings such as drink umbrellas, Teddy Grahams, or gummy starfish.
- Cover and refrigerate until ready to serve, or serve immediately.