
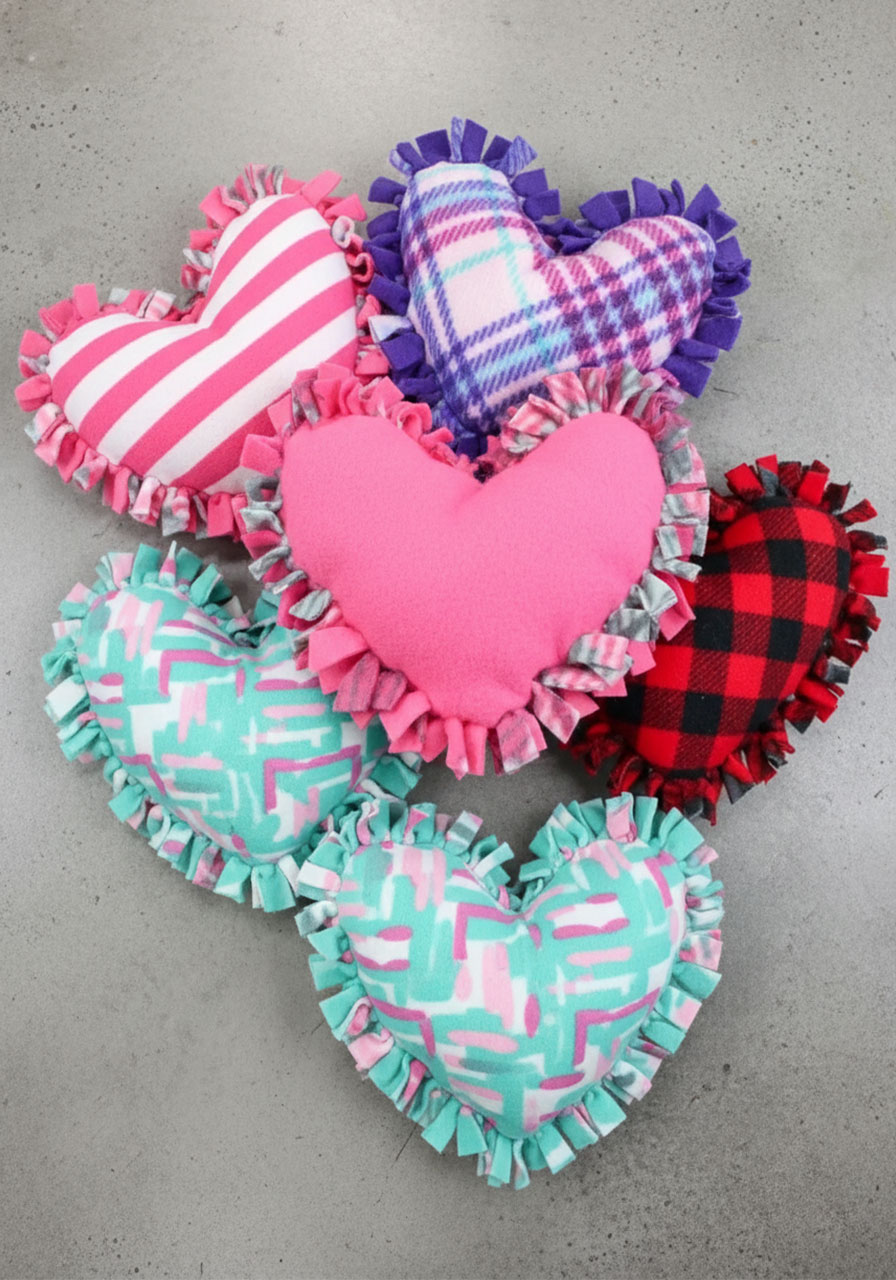
Looking for a craft that keeps kids entertained and teaches them a useful skill? These no-sew heart pillows are about to become your go-to activity for sleepovers, Valentine’s Day parties, or any rainy afternoon when the kids need something fun to do.
The best part? Zero needles, zero pins, and zero half-finished projects for you to complete after the kids lose interest. This is a craft they can actually finish on their own – and they’ll be so proud of what they’ve made, they’ll want to display it in their room for weeks.
Best for: Kids ages 6+, birthday parties, Valentine’s Day activities, sleepovers
Time to Make: 20-30 minutes per pillow
Skill Level: Beginner-friendly (if they can tie their shoes, they can make this!)
Why This Craft Is a Total Winner
Let’s be honest: craft time with kids can either be magical or chaotic. This no-sew pillow craft falls firmly in the “magical” category because it hits all the right notes:
No sharp objects to worry about (okay, you’ll need scissors for the prep, but the kids won’t be handling pins or needles)
Keeps them engaged for the perfect amount of time – long enough to feel accomplished, but not so long they get bored
They get something they’ll actually use instead of another random craft that sits in a drawer
Sneaky fine motor skill practice disguised as pure fun
I love using this activity when my daughter has friends over because it gives them something productive to do together, and each kid gets to take home their own unique creation. Plus, there’s something oddly satisfying about tying all those little knots – even the adults want to join in.

What You’ll Need

For Each Pillow:
2 pieces of fleece fabric (9″ x 9″ squares work great – or go bigger if you want chunkier pillows!)
Pillow stuffing or polyester fiberfill
Fabric scissors (invest in a good pair – they make all the difference)
A pen or fabric marker
White paper or cardstock for your heart template
Pro Tip: If you’re doing this as a party activity, cut out all the hearts and fringe strips ahead of time. This prevents fabric waste, keeps the chaos manageable, and means you only need one pair of good scissors instead of five.

Cute Valentine Day Treasure Hunt Printable for Kids and Preschoolers
Instant download = Valentine’s Day saved at the last minute – Forgot to plan something special? Buy now, print in 5 minutes, become the hero parent.
30-60 minutes of pure entertainment – Kids stay happily busy solving clues while you finish dinner, wrap up work, or just enjoy your coffee hot.
No craft store runs, no supplies needed – Everything’s done for you. Just print on regular paper and hide around spots you already have (fridge, couch, bed).
Cupid storyline they’ll talk about for months – Way more memorable than another box of chocolates. Grandparents: this is the visit they’ll never forget.
Under $10 beats a babysitter – Keeps multiple kids engaged together with zero screen time. Siblings actually cooperate for once.

Romantic Valentine Scavenger Hunt Printable for Couples and Adults – Cupid’s Mischievous Adventure
Way better than dinner reservations – Skip the overpriced restaurant crowds. Create an intimate, playful experience at home that actually feels personal and memorable.
24 flirty clues = built-in foreplay – Romantic riddles leading around your home build anticipation and laughter. Way more fun than another box of chocolates gathering dust.
No awkward “”what do we do now?”” moments – Everything’s scripted but feels spontaneous. Perfect for couples who want romance without the pressure of planning it themselves.
Under $15 beats flowers that die in 3 days – Create a memory you’ll both laugh about for years. Add your own surprise at the end (jewelry, getaway reveal, or just champagne and you).

Conversation Heart Bulletin Board Classroom Decoration Set
130+ pieces = complete Valentine’s display in ONE box – No extra shopping trips or piecing together mismatched decorations.
Reusable for years – Sturdy cardboard that teachers confirm holds up, unlike flimsy paper that tears after one use.
Instant student engagement – Familiar conversation heart design captures attention and creates classroom buzz.
5-minute setup – Adhesive included. Transform your space faster than your morning coffee break.
Blank hearts = bonus teaching tool – Use for student names, vocabulary, or kind messages beyond just decoration.

Valentines Day Gifts for Kids – 24 Pack
24 pre-packaged valentines = ZERO prep work – Already assembled with cards attached. Just sign names and you’re done in minutes.
Candy-free option parents actually thank you for – No sugar rush, no red dye, no allergy worries. Kids still get excited, classrooms stay calm.
Keychains kids actually USE after February – Clip to backpacks and they’ll play tic-tac-toe for months. Way better than crushed candy hearts in the trash.
Under $1 per student – 24 complete valentines for less than a box of store-bought cards, but looks like you spent way more effort.
Four designs included – No awkward “”why did they get that one?”” moments. Every kid gets a fun variation with matching pun cards.

Valentines Day Gifts for Your Loved One
Custom photo + personalized text = looks way more expensive than it is – Recipients think you spent hours designing something unique. You just uploaded a photo and typed their name.
Doubles as functional night light – Not just décor gathering dust. Customers rave it’s the perfect bedroom glow without being too bright.
Clear, vibrant photo quality that lasts – Shatterproof acrylic with UV printing means colors stay vivid for years, unlike cheap frames that fade by next Valentine’s.
USB-powered, zero hassle setup – Plug in, flip switch, done. No batteries to replace, no complicated assembly that sits in the box for months.
Perfect last-minute gift that feels thoughtful – Arrives ready to give. Looks like you planned ahead even if you’re ordering the week before Valentine’s Day.
How to Make Your No-Sew Heart Pillow
Step 1: Create Your Heart Template
Grab a piece of white paper and draw a heart shape – keep it under 9″ x 9″ (or whatever size your fabric squares are). Cut it out. This template will help you make consistently shaped hearts, which is especially helpful if multiple kids are crafting together.
Quick Hack: If you’re not confident in your freehand heart-drawing skills, fold the paper in half and cut a half-heart shape. When you unfold it, you’ll have a perfectly symmetrical heart.
Step 2: Cut Out Your Fleece Hearts
Place your paper template on top of one piece of fleece and trace around it with your pen or fabric marker. Cut it out, then use this first heart as a template to cut your second piece of fleece. Now you’ve got two identical fleece hearts ready to go.
Why fleece? It’s forgiving, soft, doesn’t fray like other fabrics, and comes in every color and pattern imaginable. Plus, it’s usually pretty affordable!

Step 3: Mark Your Cutting Guide (Optional but Helpful)
Stack your two fleece hearts on top of each other. On the top heart, draw a smaller heart about 1½ inches inside the edge. This inner line is your “stop cutting here” guide – it’ll keep your fringe strips uniform and prevent you from accidentally cutting all the way through.

Step 4: Cut the Fringe Strips
Starting from any edge, cut strips about ½ inch wide from the outer edge toward your inner guide line. Stop cutting when you reach that inner heart you drew. Continue cutting strips all the way around the heart.
You’ll end up with what looks like a fringed heart border – think of it as giving your heart a little grass skirt all the way around.
For Younger Kids: You might want to do this step yourself or help them. The key is making sure they cut through both layers of fleece at once.


Step 5: Tie It All Together (Almost!)
Here’s where the magic happens. Take two matching strips (one from the top layer, one from the bottom) and tie them together in a tight knot. Move to the next pair of strips and repeat. Keep going around the entire heart.
Important: Stop when you have about a 2-inch opening left! You need that gap to stuff your pillow.
This is the part kids find most satisfying – there’s something really rewarding about seeing the pillow take shape with each knot.
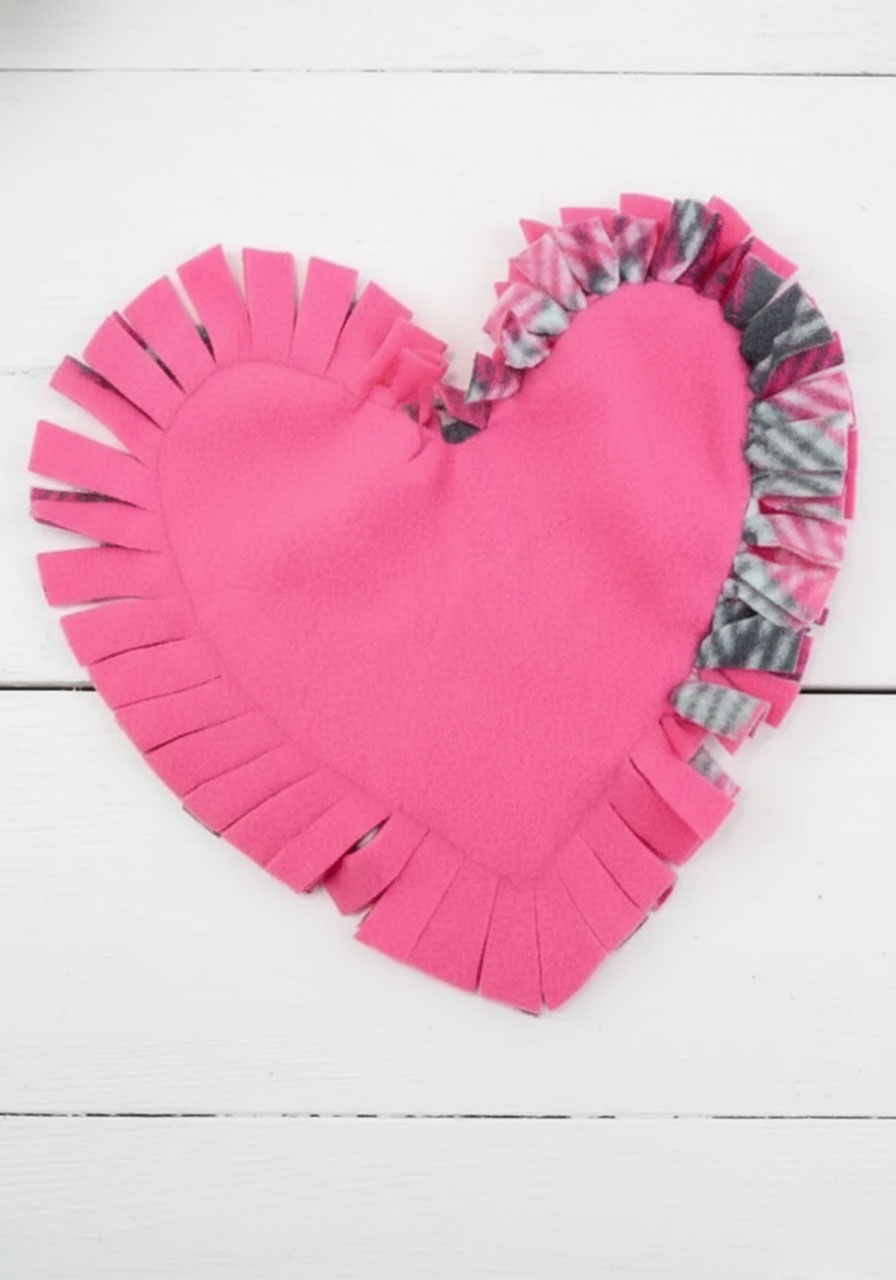

Step 6: Stuff It Good
Time to fluff! Grab your pillow stuffing and push it through that opening you left. Keep adding stuffing until your pillow feels nice and full – not so much that it’s bursting at the seams, but enough that it’s soft and squishy.
Pro Tip: Let each kid decide how firm or soft they want their pillow. Some like them super stuffed, others prefer them a bit flatter. It’s their pillow, their call!
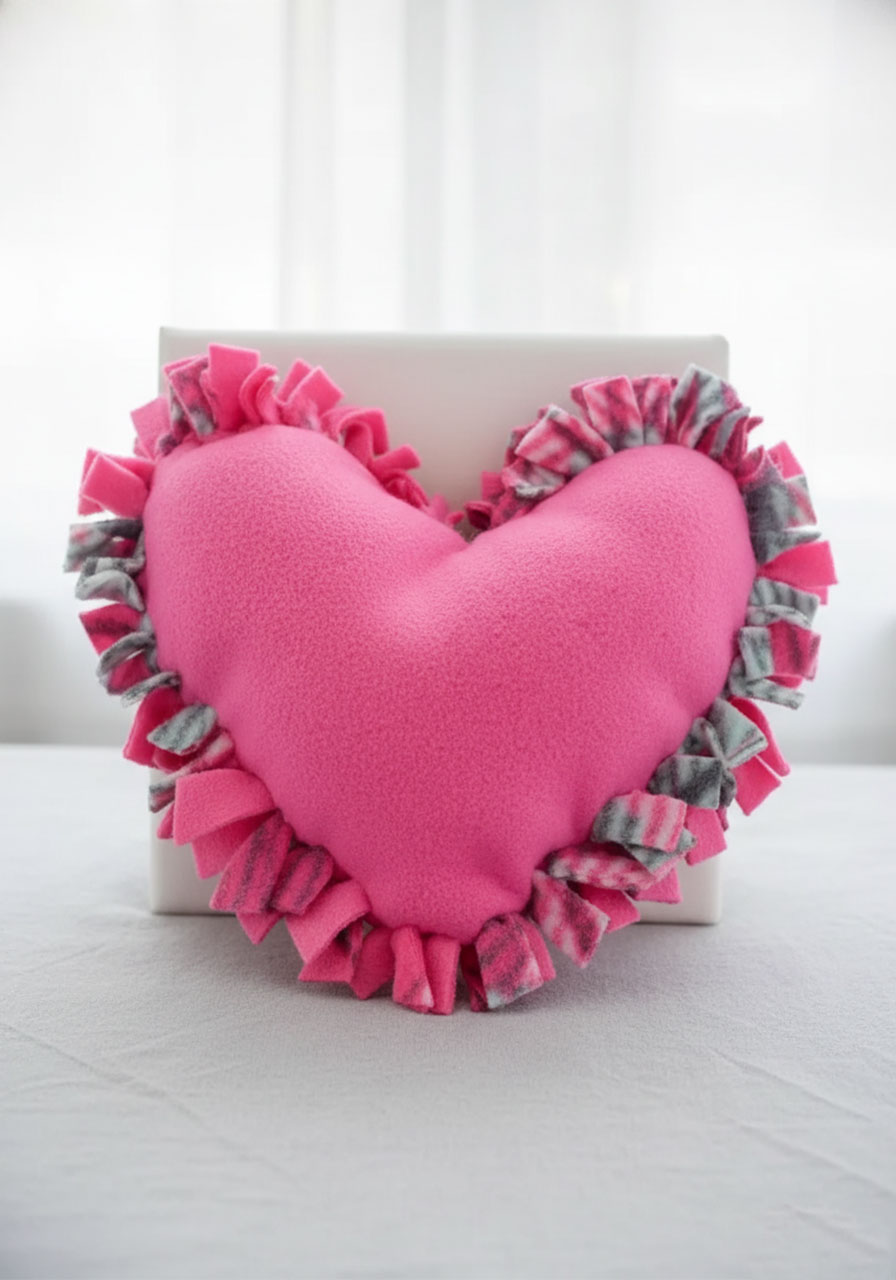

Step 7: Finish Tying
Once you’re happy with how fluffy your pillow is, tie those last few strips closed. Give all the knots a quick check to make sure they’re tight. And that’s it – you’re done!

Creative Variations to Try
Once you’ve mastered the basic heart pillow, here are some fun ways to mix it up:
Go Rainbow: Use two different colored fleece pieces for a fun two-toned effect. The contrast looks amazing, especially when you tie the knots.

Add Personality: Before you tie everything together, let kids decorate the top layer with fabric markers, fabric paint, or iron-on patches. Just make sure everything is dry before you start knotting!

Try Different Shapes: This no-sew method works for any shape – stars, circles, squares, even animal shapes if you’re feeling ambitious.

Size It Up: Use larger fabric squares (12″ x 12″ or even bigger) to make full-size throw pillows for their beds or reading nooks.

Photo Transfer: Use photo transfer paper to add a picture right in the center of the heart before you start cutting strips. Imagine a pillow with a photo of their pet or best friend!
Holiday Themes: Make these for different holidays – red and green for Christmas, orange and black for Halloween, pastels for Easter.

Party Planning Tips

Planning to make these at a birthday party or Valentine’s Day celebration? Here’s how to set yourself up for success:
Prep Work (Do This Before the Party):
Cut all fabric squares to size
Cut out all the heart shapes
Cut the fringe strips on each heart
Set up individual stations with pre-cut hearts and stuffing
During the Party:
Give each kid their pre-cut hearts (let them choose their colors!)
Demonstrate tying the first few knots
Let them work at their own pace
Have extra stuffing ready – kids always want more than they need
Time Management: Plan for about 30 minutes of craft time. It’s the perfect length for keeping a group engaged without losing their attention.
Why Kids (and Parents) Love This Craft

For Kids:
They can actually complete it without adult help
The knotting is fun and almost therapeutic
They get to make choices about colors and how fluffy to make it
It’s something they’ll actually use, not just another craft that gets tossed in a drawer
For Parents:
No tiny sewing needles to keep track of
No expensive supplies needed
Minimal mess and cleanup
Builds fine motor skills and teaches basic knotting
Keeps kids entertained for a solid chunk of time
Troubleshooting Common Issues
Knots Keep Coming Undone:
Make sure kids are pulling the knots tight – really tight. Double knots work great if they’re having trouble.
Strips Are Different Lengths:
Totally fine! The beauty of this craft is that it doesn’t need to be perfect. Uneven strips actually add to the handmade charm.
Stuffing Is Poking Through:
This usually means the strips were cut too close together or the knots aren’t tight enough. Just tie them tighter or add an extra knot.
It’s Taking Forever:
If kids are getting frustrated, remind them they don’t have to knot every single strip – skipping a few here and there is totally acceptable and still looks great.
Storage and Care
These pillows are surprisingly durable! Toss them in the washing machine on gentle cycle (inside a pillowcase or laundry bag to protect those knots) and tumble dry on low. The fleece holds up really well to washing.
Store them on beds, couches, reading nooks, or in toy bins. They make great “special pillows” for movie nights or long car rides.
Ready to unleash some creativity? Grab your fleece, round up the kids, and get knotting. Whether you’re planning a party activity or just looking for something fun to do on a lazy weekend, these no-sew heart pillows deliver on the fun factor every single time. Plus, that moment when they finish their pillow and their face lights up with pride? Totally worth the tiny bits of fleece fuzz you’ll be finding in your carpet for the next week.
More Valentine’s Day Party Ideas to Keep the Fun Rolling:
The Great Valentine Candy Pass: The Sweetest Icebreaker for Your Valentine’s Party
Turn Classic Jenga Into the Ultimate Date Night Game (Valentine’s Day Edition!)
Valentine Floam Slime: The Crunchiest, Squishiest Valentine’s Day Activity Ever
The Adorable Love Bug Craft That’ll Make Valentine’s Day Unforgettable
DIY Valentine Pop Tart Pouches: The Sweetest Way to Say “I Love You”
DIY Valentine’s Friendship Necklaces: The Sweetest Non-Candy Valentine for Your Class
3 DIY Valentine’s Day Sensory Bottles That’ll Mesmerize Your Little Ones
Heart-Shaped Valentine Rice Krispie Treats That’ll Steal the Show
As an Amazon Associate, we may earn a commission from qualifying purchases at no additional cost to you.
