Ready to transform boring $1.25 cutting boards into show-stopping Christmas decor? Grab your hot glue gun and let’s dive into these ridiculously fun (and budget-friendly) projects that’ll have everyone asking, “You made that?!”
Whether you’re creating personalized gifts for your entire list, decking out your kitchen in festive style, or crafting items to sell at your holiday market, these cutting board crafts are about to become your new obsession. The best part? Each one costs less than a fancy coffee, but looks like you spent a fortune.
What Makes These Crafts Perfect:
- Budget-friendly (we’re talking $3-5 per project!)
- Beginner-friendly with foolproof instructions
- Perfect for gift-giving, selling, or keeping for yourself
- Customizable to match any Christmas style (farmhouse, traditional, modern, whimsical)
Pro Tip: Order your cutting boards in bulk from DollarTree.com and have them shipped to your local store to save time. Your local Dollar Tree can also order items for you if they’re out of stock!
1. Classic Red Truck Cutting Board
This farmhouse favorite is the perfect starting point for beginners – and it looks absolutely stunning on any kitchen counter.
Best for: Gift-giving, kitchen decor, craft fair sales
Time to Make: 30-40 minutes
Skill Level: Beginner
What You’ll Need:
- 1 Dollar Tree cutting board
- Christmas-themed napkins or scrapbook paper (look for vintage red trucks)
- Mod Podge (matte or glossy finish)
- Foam brush
- Faux berries and greenery
- Red or buffalo plaid ribbon
- Hot glue gun and glue sticks
How to Make It:
- Prep your surface: Wipe down your cutting board with a damp cloth and let it dry completely.
- Cut your design: If using napkins, separate the top printed layer. For scrapbook paper, cut your truck design to fit the center of the board.
- Apply Mod Podge: Brush a thin, even layer onto the cutting board where you want your design.
- Place your design: Carefully lay your napkin or paper onto the Mod Podge, smoothing from the center outward to eliminate bubbles.
- Seal it: Once dry (about 15 minutes), apply 2-3 thin coats of Mod Podge over the entire design, letting each coat dry.
- Add embellishments: Hot glue berries, greenery, and a ribbon bow to the top corner or handle.
Pro Tip: For a distressed farmhouse look, lightly sand the edges of your cutting board before you start. This gives it that perfectly imperfect vintage vibe!

Indoor Christmas Scavenger Hunt Printable for Kids
25 ready-made clues = zero stress for you – Just print, hide, and watch kids stay engaged for hours while you actually enjoy your coffee
Instant download, works today – Get it in minutes, print on regular paper, create Christmas magic in under 15 minutes of setup
Saves Christmas on bad weather days – Perfect indoor activity when kids are bouncing off walls and you need them happily occupied
One purchase, use it every year – Blank templates let you customize for different ages or create new versions as kids grow

Outdoor Christmas Scavenger Hunt Printable for Kids
Gets kids outside and active – Burns energy while solving 25 riddles and challenges around the yard (lifesaver when they’re hyped on holiday sugar)
Instant download, 15-minute setup – Print, hide clues, done. Perfect last-minute activity that looks like you planned for weeks
Works with your yard decorations – Turns your Christmas lights and lawn decor into part of the adventure kids will beg to do again
Reusable every year – Blank templates let you customize for different ages or add new challenges as kids grow
Difficult Christmas Scavenger Hunt Printable for Adults – Twelve Days of Christmas
Actually challenging puzzles for adults – 30 clever clues including ciphers, logic puzzles, and cryptic riddles that will genuinely stump your smartest friends
Print and play in minutes – Download, print, hide. Setup takes less time than wrapping gifts, but creates hours of laughter and memories
Flexible for any group – Pick 12 clues for a quick adventure or all 30 for an epic night. Customize with blank cards for personal inside jokes


2. Chalkboard Paint “Let It Snow” Board
Transform your cutting board into a reusable chalkboard that you can customize all season long – talk about versatile!
Best for: Kitchen decor, countdown calendars, ever-changing messages
Time to Make: 20 minutes (plus drying time)
Skill Level: Super easy
What You’ll Need:
- 1 Dollar Tree cutting board
- Black chalkboard paint
- Foam brush or small paint roller
- Chalk or chalk markers
- Ribbon for hanging
- Hot glue gun (optional, for embellishments)
How to Make It:
- Paint your board: Apply 2-3 thin coats of chalkboard paint to the front of your cutting board, letting each coat dry completely (about 1 hour between coats).
- Cure the surface: Once fully dry, rub the side of a piece of chalk all over the board, then wipe clean with a dry cloth. This “seasons” your chalkboard.
- Write your message: Use chalk markers for bold, bright lettering that won’t smudge. Try “Let It Snow”, “Merry & Bright”, or “Days Until Christmas: __”
- Add festive touches: Hot glue a ribbon bow to the handle or wrap ribbon around the top for hanging.
Fun Variation: Create a “Christmas Countdown” by writing the number of days until Christmas and changing it daily. Kids absolutely love this interactive decor!
3. Buffalo Plaid “EAT” Organizer Board
This genius creation gives you festive decor AND a functional spot to corral your salt, pepper, and napkins. Win-win!
Best for: Kitchen counter organization, housewarming gifts
Time to Make: 45 minutes
Skill Level: Beginner
What You’ll Need:
- 1 Dollar Tree cutting board
- Buffalo plaid scrapbook paper or fabric
- Small wooden crate (Dollar Tree has these!)
- White acrylic paint
- Mod Podge
- Wood letters spelling “EAT” or vinyl decals
- Hot glue gun
How to Make It:
- Cover the board: Cut buffalo plaid paper to fit your cutting board, then use Mod Podge to adhere it smoothly. Seal with 2 coats of Mod Podge.
- Paint the crate: Give your small wooden crate 2 coats of white paint. Let dry completely.
- Attach the letters: Hot glue your “EAT” letters at the top of the board or use vinyl decals for a cleaner look.
- Secure the crate: Use strong hot glue (or wood glue for extra durability) to attach the crate to the bottom half of your cutting board.
- Fill and display: Load up your crate with salt and pepper shakers, napkins, or small kitchen essentials.
Pro Tip: Distress the white crate edges with sandpaper for an authentic farmhouse feel. It takes 30 seconds and elevates the entire look!
4. Cricut Farmhouse Christmas Collection
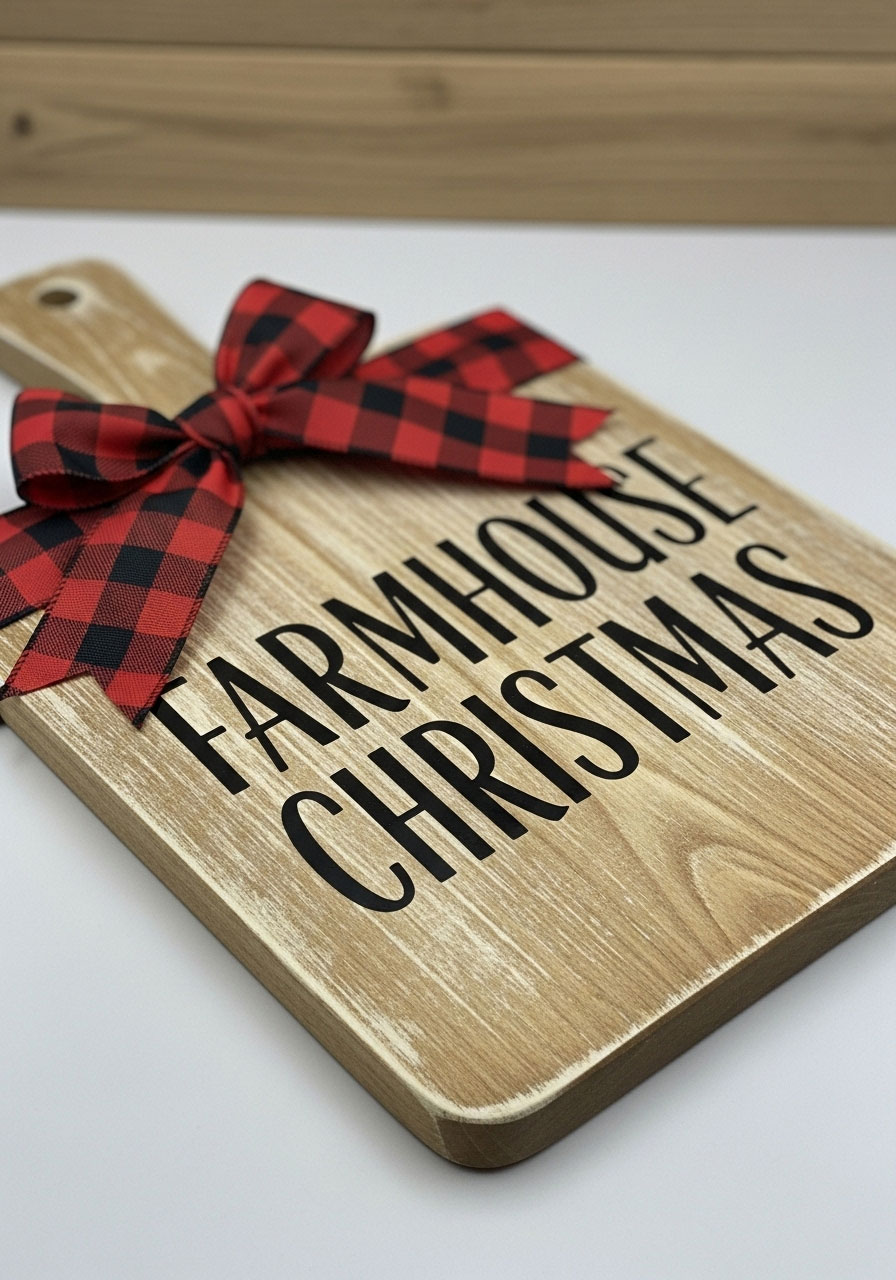
Got a Cricut machine? Get ready to create professional-looking cutting boards that people will beg you to make for them!
Best for: Personalized gifts, craft sales, matching kitchen sets
Time to Make: 25-35 minutes per board
Skill Level: Intermediate (Cricut required)
What You’ll Need:
- Dollar Tree cutting boards (buy in bulk!)
- Cricut machine and cutting mat
- Adhesive vinyl in festive colors (black, white, red, green)
- Transfer tape
- Weeding tool
- Buffalo plaid ribbon
- Hot glue gun
How to Make It:
- Design your vinyl: Choose or create designs like “Farmhouse Christmas”, “Gather”, “Blessed”, or “Joy”. Keep text and images sized to fit your cutting board.
- Cut and weed: Load vinyl into your Cricut, cut your design, then carefully weed away excess vinyl.
- Apply transfer tape: Cover your design with transfer tape and burnish well.
- Transfer to board: Peel off the backing, position carefully on your cutting board, and burnish again. Slowly peel away transfer tape.
- Add ribbon accent: Hot glue buffalo plaid ribbon to the handle or top of the board for that signature farmhouse touch.
Design Ideas to Try:
- “Farm Fresh Christmas Trees” with small tree graphics
- “Merry & Bright” in elegant script
- “Home for the Holidays” with snowflake accents
- Custom family names with “EST. [year]”
Pro Tip: Make multiples of the same design to create matching gift sets for teachers, coworkers, or neighbors. Batch crafting saves tons of time!
5. Countdown to Christmas Chalkboard
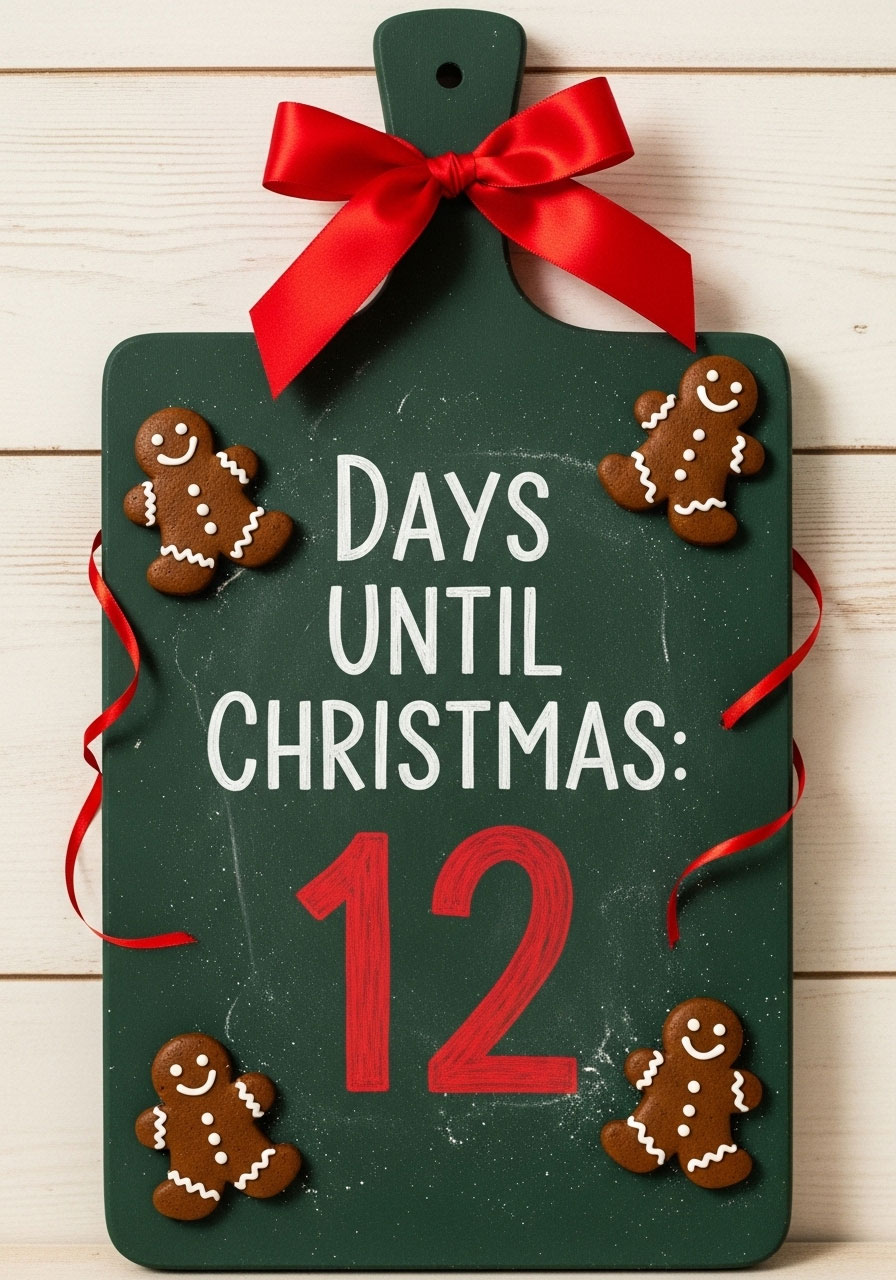
Make counting down to the big day an adorable part of your daily routine with this interactive cutting board!
Best for: Families with kids, classroom decor, festive tradition-building
Time to Make: 30 minutes
Skill Level: Easy
What You’ll Need:
- 1 Dollar Tree cutting board
- Chalkboard paint
- Chalk markers (white and red)
- Gingerbread man cutouts or stickers
- Red ribbon
- Hot glue gun
How to Make It:
- Create your chalkboard base: Paint the cutting board with 2-3 coats of chalkboard paint. Let dry overnight for best results.
- Season the board: Rub chalk across the entire surface, then wipe clean.
- Design your layout: Use chalk markers to create a box or frame in the center. Write “Days Until Christmas” at the top.
- Add the number: Write the current countdown number in the center box (you’ll change this daily).
- Embellish: Hot glue gingerbread men decorations and a red ribbon bow to the top.
Fun Variation: Create spaces for “Days”, “Hours”, and “Minutes” until Christmas for the truly enthusiastic counters in your family!
6. “Simply Blessed” Farmhouse Display
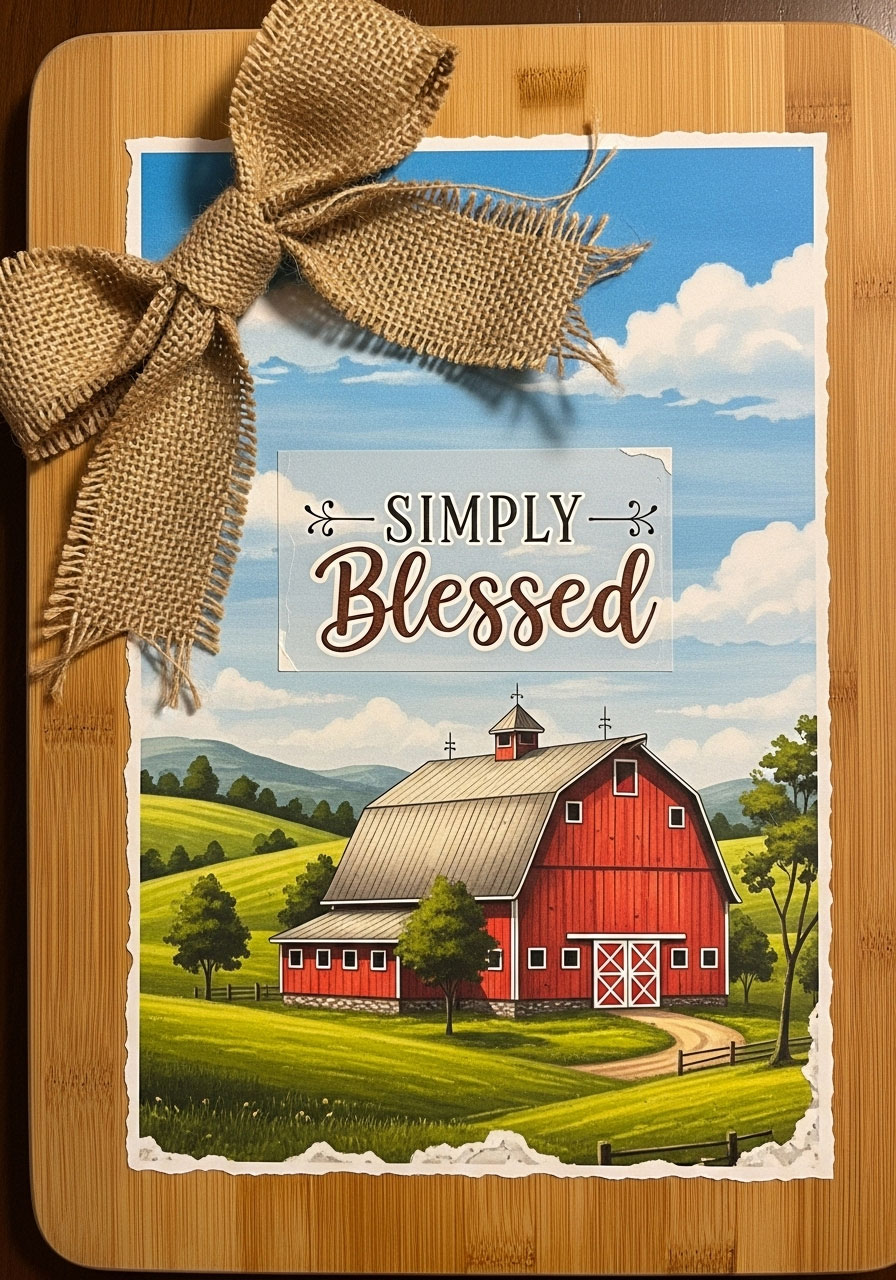
This gorgeous design combines rustic charm with heartfelt messaging – perfect for gift-giving or your own kitchen.
Best for: Farmhouse lovers, gratitude-themed decor, Thanksgiving through Christmas
Time to Make: 45 minutes
Skill Level: Intermediate
What You’ll Need:
- 1 Dollar Tree cutting board
- Scrapbook paper with red barn or farmhouse scene
- Mod Podge
- Vinyl lettering (“Simply Blessed”) or paint markers
- Burlap or buffalo plaid ribbon
- Hot glue gun
How to Make It:
- Select your image: Choose a beautiful barn or farmhouse scene from scrapbook paper. Cut to fit the center of your board.
- Mod Podge it down: Apply a smooth layer of Mod Podge, place your image, then seal with 2-3 additional coats.
- Add your message: Apply “Simply Blessed” vinyl lettering or hand-paint the words with a steady hand.
- Finish with ribbon: Hot glue burlap or buffalo plaid ribbon across the top or around the handle.
Pro Tip: This design transitions beautifully from Thanksgiving to Christmas – just change out the ribbon color!
7. Vintage “Merry Christmas” Collage Board
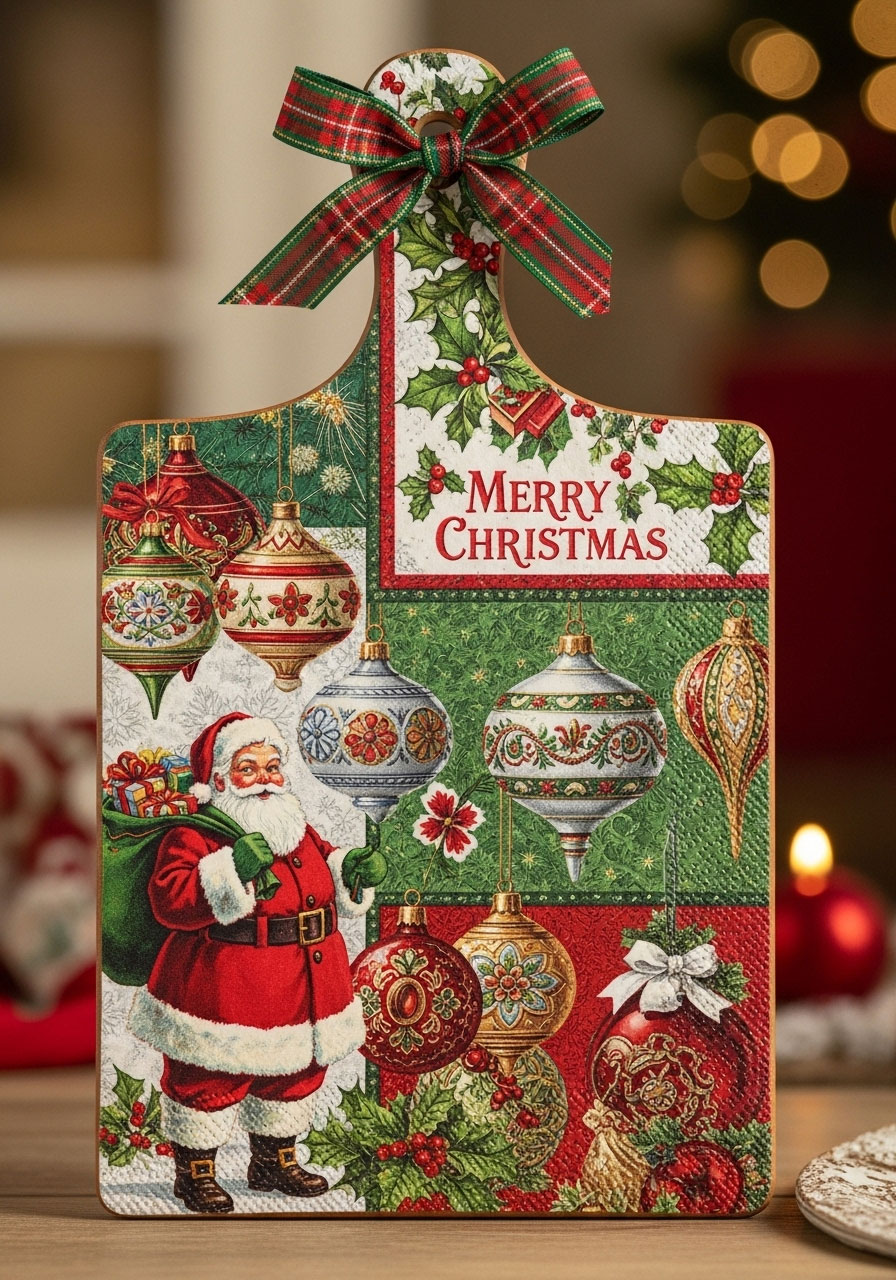
Channel your inner artist with this beautiful collage-style cutting board that looks like it came from a boutique!
Best for: Traditional Christmas lovers, statement decor pieces
Time to Make: 40-50 minutes
Skill Level: Beginner-Intermediate
What You’ll Need:
- 1 Dollar Tree cutting board
- Christmas-themed napkins or multiple scrapbook papers
- Mod Podge
- Clear sealer spray (optional but recommended)
- Paint pen or vinyl letters for “Merry Christmas”
- Decorative ribbon
How to Make It:
- Create your collage: Cut various Christmas images from napkins or papers – think vintage Santas, holly, ornaments, snowflakes.
- Layer your design: Start with larger images as your background, then layer smaller elements on top using Mod Podge.
- Seal everything: Once dry, apply 2-3 coats of Mod Podge over the entire collage.
- Add lettering: Paint or apply vinyl letters spelling “Merry Christmas” across the design.
- Final seal: For extra durability, spray with clear sealer.
- Add ribbon: Hot glue festive ribbon to complete the look.
Pro Tip: Slightly overlap your images for a professional, layered look rather than placing them side by side with gaps.
8. Frosty’s Candy Cane Cutting Board
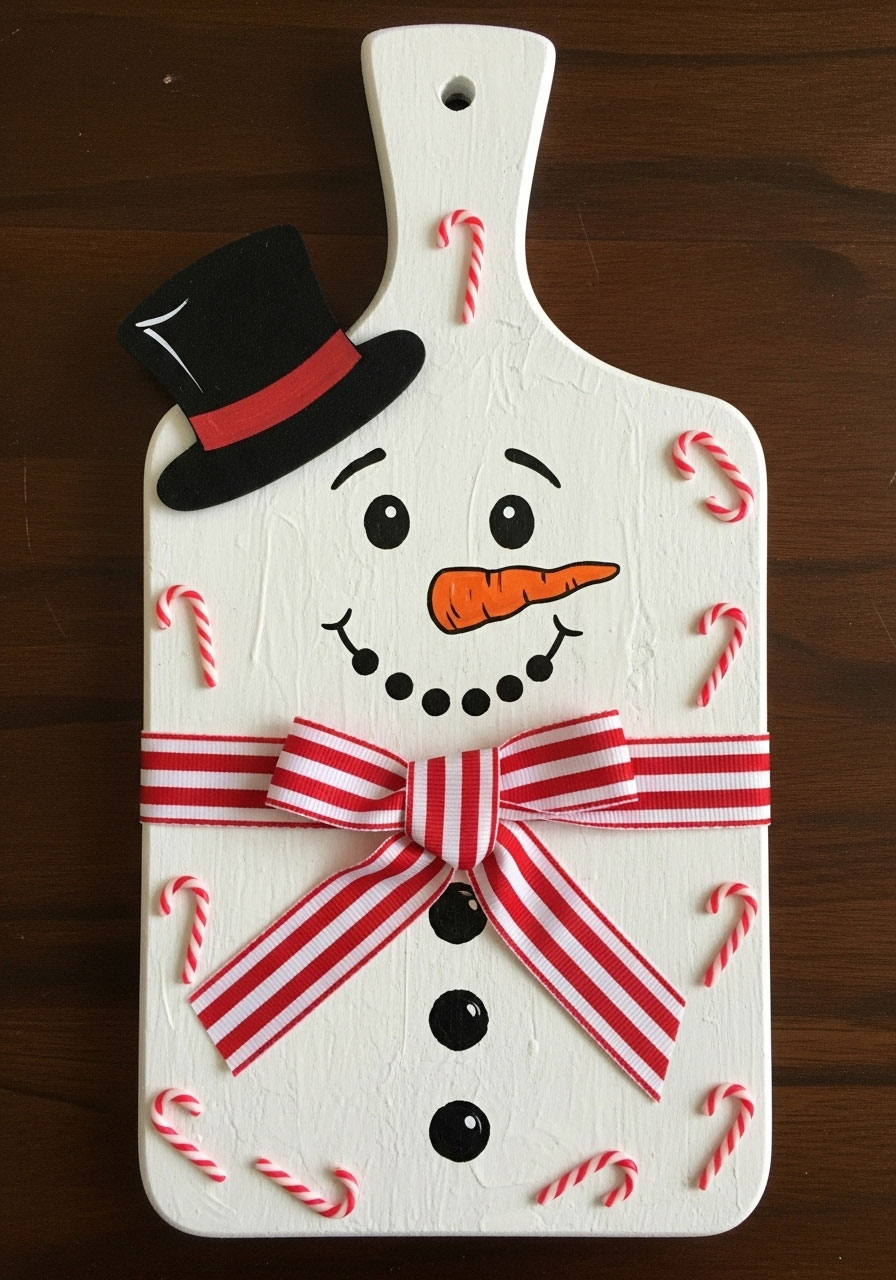
This cheerful snowman design is a guaranteed smile-maker every time you walk into your kitchen!
Best for: Kid-friendly decor, gift exchanges, playful Christmas style
Time to Make: 35 minutes
Skill Level: Easy (great for beginners!)
What You’ll Need:
- 1 Dollar Tree cutting board
- White acrylic paint
- Black paint or permanent marker
- Orange paint or marker (for nose)
- Mini candy canes
- Holiday ribbon
- Hot glue gun
- Optional: small twigs for arms
How to Make It:
- Paint the base: Apply 1-2 coats of white paint to the entire cutting board if you want a snowy white snowman. Or leave natural for a rustic look.
- Draw the face: Use black paint or marker to create coal eyes and a dotted smile. Add an orange carrot nose.
- Create the hat: Paint or use black cardstock to create a top hat at the handle area of the board.
- Add candy cane accents: Hot glue mini candy canes around the edges or in a decorative pattern.
- Finish with a scarf: Wrap and glue ribbon around the “neck” area (middle of the board) to create a cozy scarf.
Fun Variation: Make the board double-sided – snowman on one side, gingerbread man on the other!
9. Christmas Town Village Display
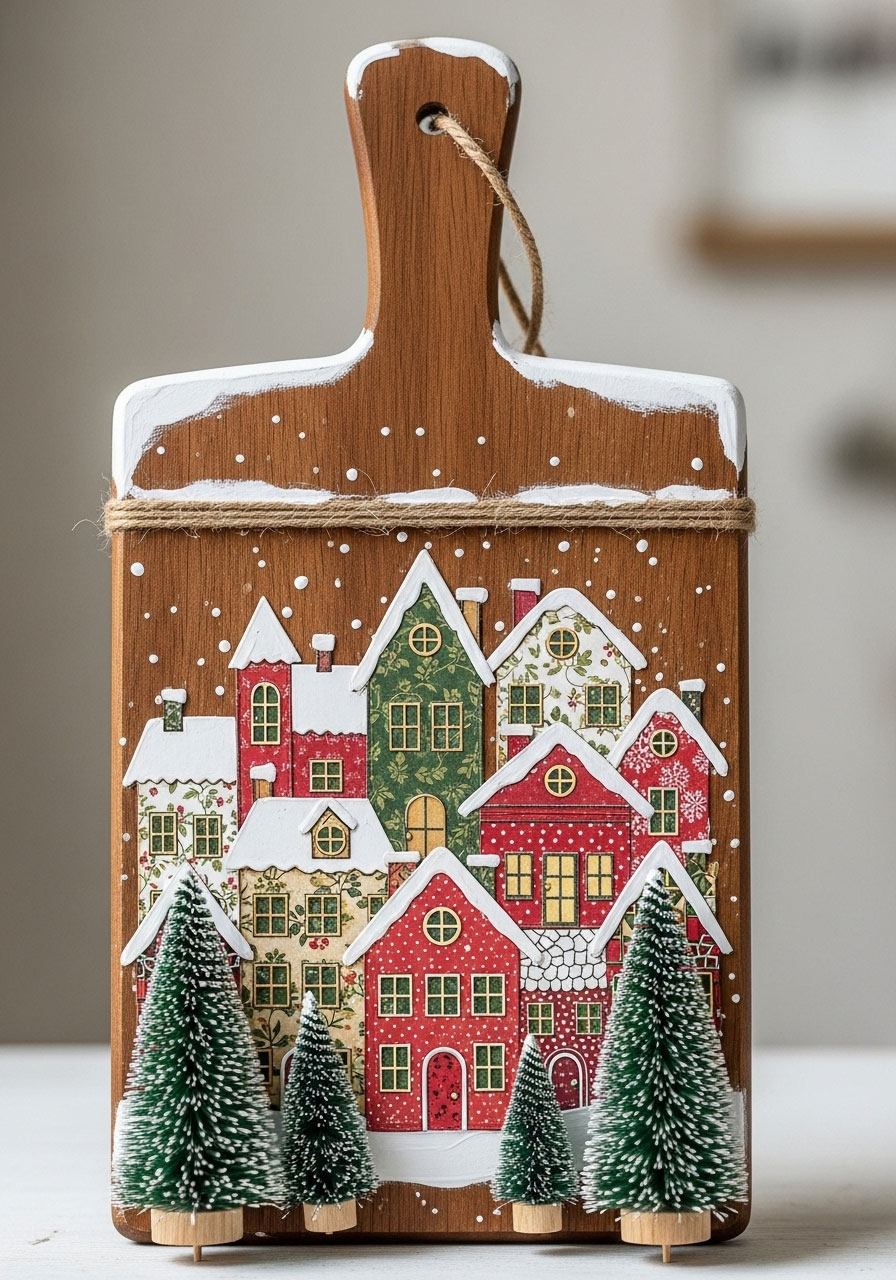
Bring a charming Christmas village to life on your cutting board with this whimsical layered design!
Best for: Storytelling decor, mantels, gift-giving to home decor lovers
Time to Make: 50-60 minutes
Skill Level: Intermediate
What You’ll Need:
- 1 Dollar Tree cutting board
- Scrapbook paper with Christmas houses/village scene
- Mod Podge
- White paint or paint pen for snow details
- Mini bottle brush trees (Dollar Tree!)
- Hot glue gun
- Twine or ribbon
How to Make It:
- Create your village base: Cut out Christmas houses from scrapbook paper and arrange on the cutting board to create a village scene.
- Mod Podge everything: Adhere each house with Mod Podge, then seal with 2-3 coats.
- Add dimension: Hot glue mini bottle brush trees at the bottom or sides to create a 3D effect.
- Paint snow accents: Use white paint or a paint pen to add snow on rooftops and ground.
- Add finishing touches: Glue twine across the top to create a “hanging lights” effect, or add a ribbon bow.
Pro Tip: Write “All roads lead home for Christmas” at the bottom for an extra heartfelt touch!
10. Gingerbread Recipe Holder
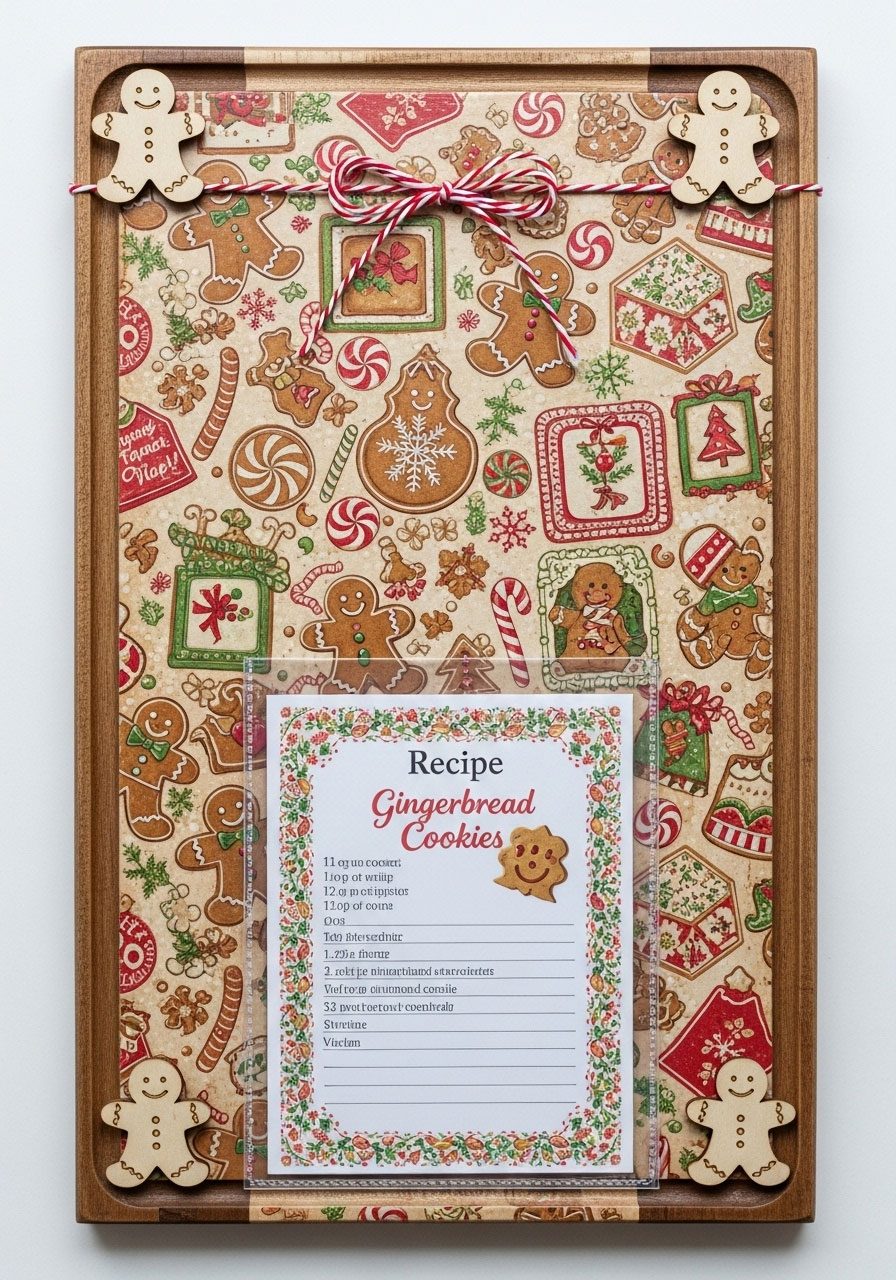
Combine function and festivity with this adorable cutting board that holds your favorite holiday cookie recipe!
Best for: Bakers, recipe card displays, themed gift baskets
Time to Make: 30 minutes
Skill Level: Easy
What You’ll Need:
- 1 Dollar Tree cutting board
- Scrapbook paper or cardstock with gingerbread print
- Mod Podge
- Gingerbread man decorations
- Clear page protector or laminated recipe card
- Hot glue gun
- Ribbon
How to Make It:
- Cover the board: Use Mod Podge to adhere gingerbread-themed paper to your cutting board.
- Add decorations: Hot glue gingerbread man cutouts or stickers to the corners or top.
- Create a recipe slot: Hot glue a clear page protector pocket at the bottom of the board to hold a recipe card.
- Insert your recipe: Print or write your favorite gingerbread cookie recipe and slide it into the protector.
- Add ribbon: Hot glue a festive bow at the top.
Gift Idea: Pair this with a bag of cookie ingredients or already-baked gingerbread cookies for the ultimate holiday gift!
11. “Farm Fresh Christmas Trees” Sign
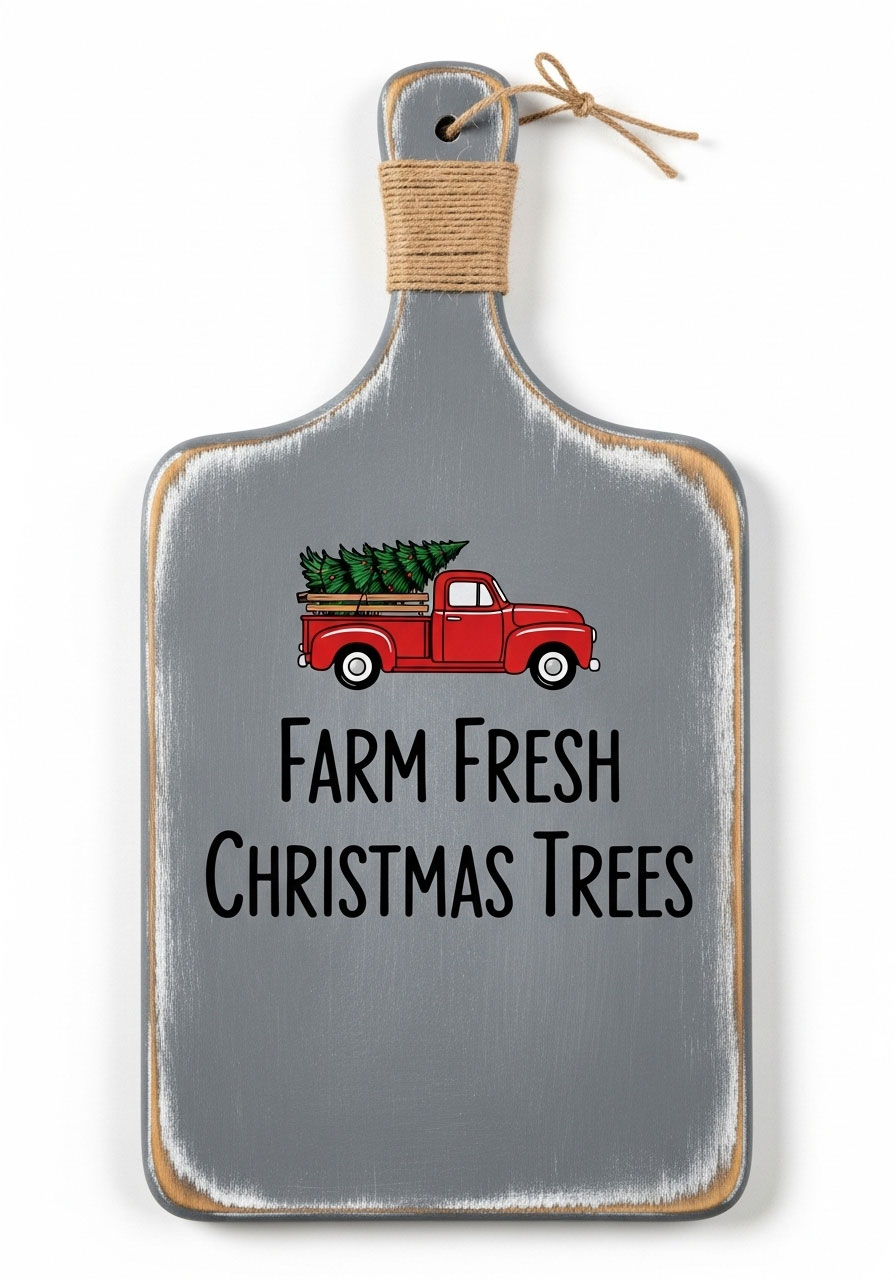
This trendy design screams modern farmhouse and looks incredible on any kitchen wall or counter!
Best for: Farmhouse decor enthusiasts, tree lot nostalgia lovers
Time to Make: 35-40 minutes
Skill Level: Beginner-Intermediate
What You’ll Need:
- 1 Dollar Tree cutting board
- Red and white paint OR gray paint for background
- Vinyl lettering or stencil for “Farm Fresh Christmas Trees”
- Small red truck image (vinyl decal or printable)
- Green ribbon or twine
- Hot glue gun
How to Make It:
- Paint your background: Choose either a distressed white/red combo or a neutral gray. Apply 2 coats and let dry.
- Add the truck: Position a small red truck decal or Mod Podge a printed image at the top of the board.
- Apply lettering: Place “Farm Fresh Christmas Trees” vinyl at the bottom or use a stencil to paint the words.
- Embellish: Hot glue a small piece of greenery or a tiny bottle brush tree to the truck bed.
- Add hanging option: Attach twine or ribbon to the handle for easy display.
Pro Tip: Age the board by lightly sanding edges and corners after painting for that perfectly worn vintage look!
12. “Farm Fresh Eggs” Country Cutting Board
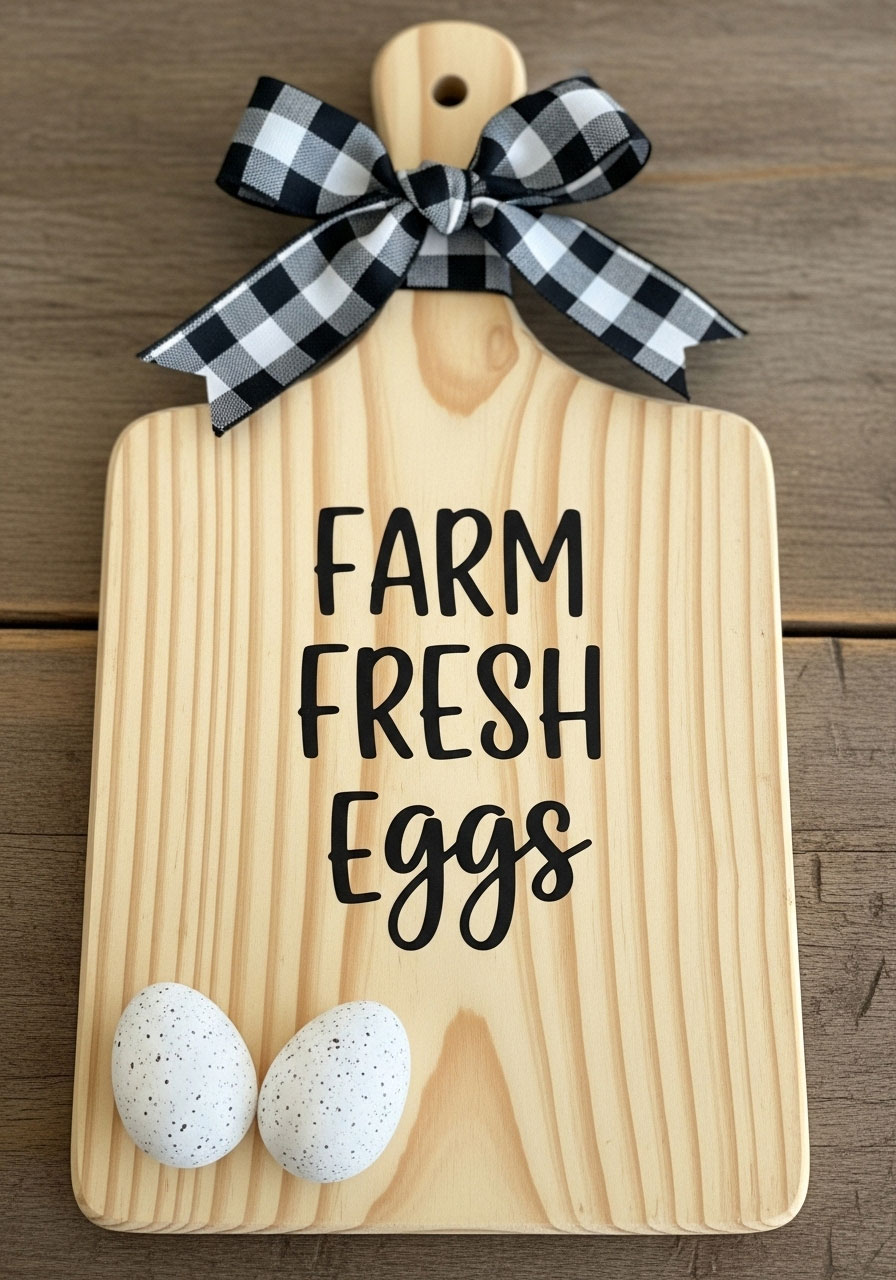
This charming design is perfect for country kitchen lovers and makes an adorable year-round gift!
Best for: Country decor fans, chicken coop owners, unique gift-giving
Time to Make: 30 minutes
Skill Level: Easy
What You’ll Need:
- 1 Dollar Tree cutting board
- Vinyl lettering for “Farm Fresh Eggs” (or stencil and paint)
- 2 faux speckled eggs (Dollar Tree seasonal aisle)
- Buffalo plaid ribbon (black and white)
- Hot glue gun
- Optional: small nest decoration
How to Make It:
- Apply your lettering: Use a Cricut to cut and apply “Farm Fresh Eggs” vinyl in a farmhouse-style font. Center it on the board.
- Create an egg display: Hot glue a small nest or simply position two faux speckled eggs at the bottom of the board.
- Add the ribbon: Wrap buffalo plaid ribbon around the handle and tie a bow, or hot glue a bow at the top.
- Optional distressing: Lightly sand the edges for a rustic, well-loved look.
Fun Variation: Change the message to “Fresh Eggs Daily” or add a rooster graphic for extra country charm!
13. “Family” Kitchen Caddy
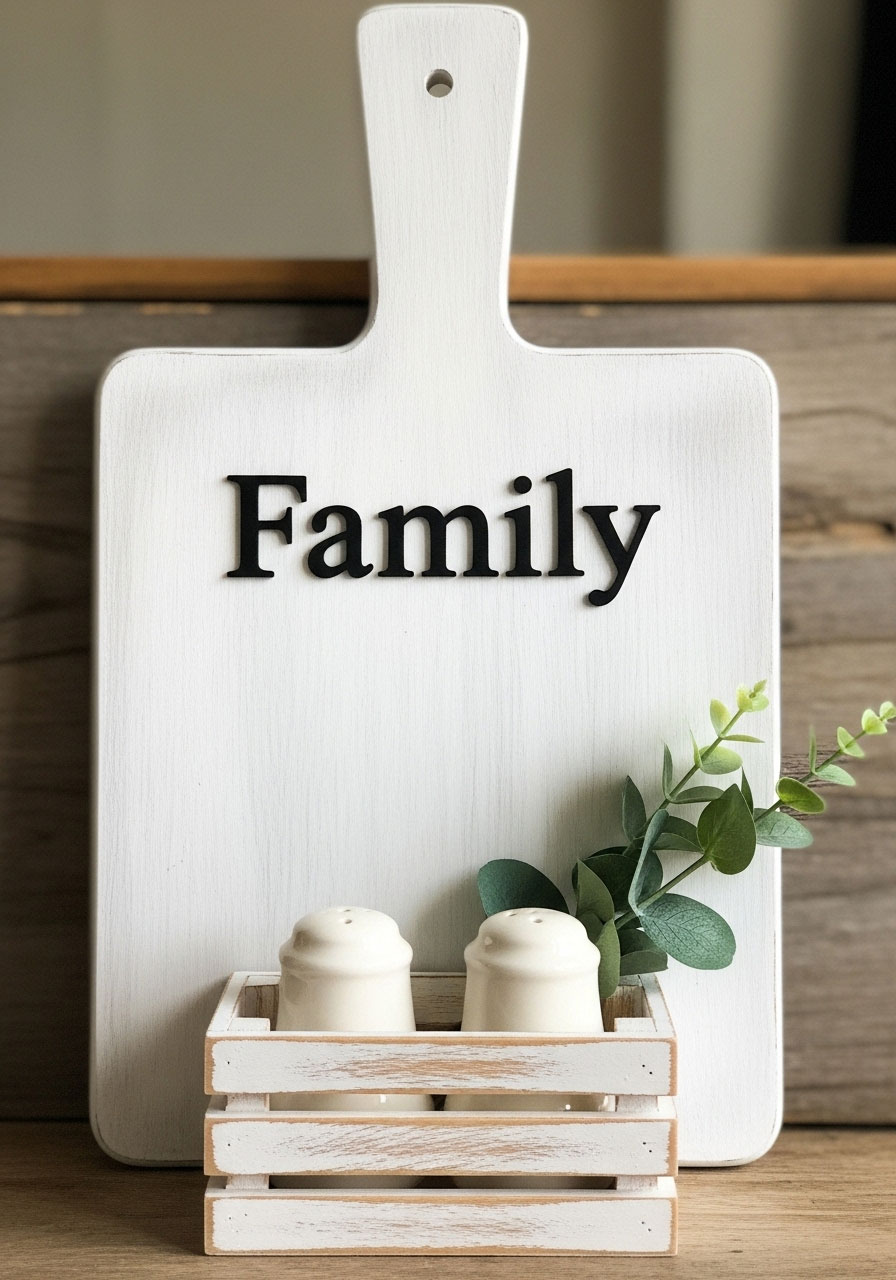
This genius design gives you a beautiful word display AND a functional storage solution in one!
Best for: Organizing kitchen essentials, family-focused decor
Time to Make: 40 minutes
Skill Level: Beginner-Intermediate
What You’ll Need:
- 1 Dollar Tree cutting board
- Small wooden crate (Dollar Tree)
- Paint in your choice of color (white, gray, or wood stain)
- Vinyl lettering for “Family” or “Gather”
- Salt and pepper shakers (optional, for display)
- Faux greenery
- Hot glue gun or wood glue
How to Make It:
- Paint both pieces: Give your cutting board and crate a coordinating paint job. 2 coats work best.
- Add your word: Apply vinyl lettering to the top portion of the cutting board.
- Attach the crate: Use hot glue or wood glue to securely attach the crate to the lower half of the board.
- Style it up: Fill the crate with salt and pepper shakers, small plants, or kitchen utensils.
- Add greenery: Tuck faux eucalyptus or pine sprigs around the items in the crate.
Pro Tip: Use wood glue instead of hot glue for the crate attachment – it’s much more durable for functional pieces!
14. “Home Sweet Home” Chalkboard Display
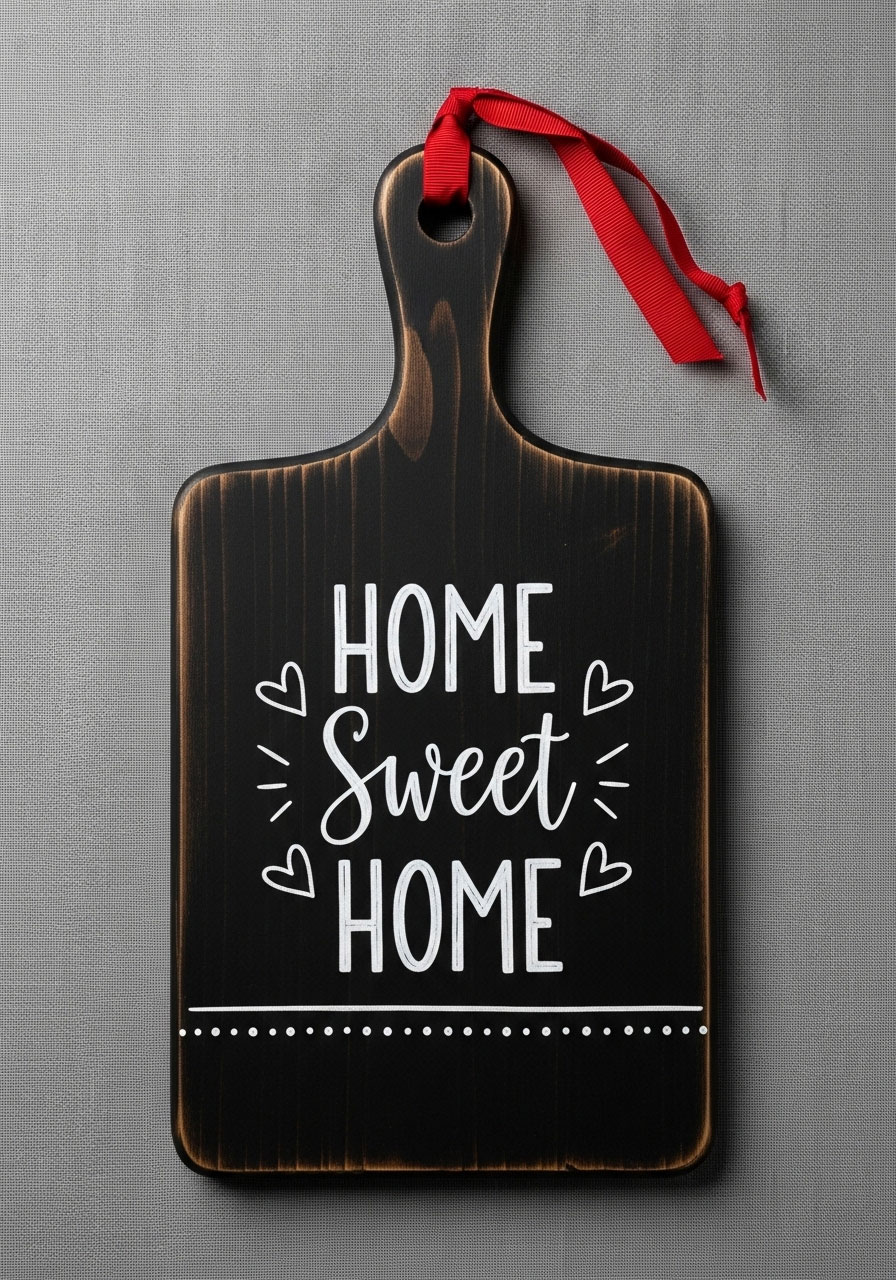
This timeless message looks stunning on a chalkboard-style cutting board and works for any season!
Best for: Year-round decor, housewarming gifts, entryway displays
Time to Make: 25 minutes (plus drying time)
Skill Level: Super easy
What You’ll Need:
- 1 Dollar Tree cutting board
- Black chalkboard paint
- Chalk markers (white and one accent color)
- Decorative frame design (optional)
- Ribbon for hanging
- Hot glue gun
How to Make It:
- Paint the board: Apply 2-3 coats of chalkboard paint. Let dry completely overnight.
- Season your chalkboard: Rub regular chalk over the entire surface, then wipe clean.
- Create your design: Use chalk markers to draw a decorative border or frame around the edges.
- Write your message: Letter “Home Sweet Home” in the center using your best handwriting or printed guides underneath.
- Add flourishes: Draw small hearts, stars, or swirls to fill empty spaces.
- Attach hanging ribbon: Hot glue ribbon to the back or thread through the handle hole.
Fun Variation: Change the message seasonally – “Thankful”, “Merry & Bright”, “Spring has Sprung”, etc.
15. Wine Bottle Holder Display

Transform your cutting board into a stylish wine holder that’s perfect for date nights or dinner parties!
Best for: Wine lovers, kitchen bar areas, unique hostess gifts
Time to Make: 45 minutes
Skill Level: Intermediate
What You’ll Need:
- 1 Dollar Tree cutting board
- Small wooden crate (tall enough to hold wine bottles)
- Gray or white paint
- Sandpaper for distressing
- Vinyl wine quote (“Wine a Little, Laugh a Lot” or “Sip Happens”)
- Hot glue gun or wood glue
How to Make It:
- Paint everything: Apply 2 coats of distressed gray or white paint to both the board and crate.
- Distress the finish: Once dry, sand edges and random spots for a weathered look.
- Add your quote: Apply vinyl lettering with a wine-themed saying at the top of the board.
- Attach the crate: Securely glue the crate to the lower portion of the cutting board.
- Display wine: Place 2-3 mini wine bottles in the crate along with wine charms or a corkscrew.
Pro Tip: This makes an AMAZING gift when filled with a couple of nice wine bottles and paired with wine glasses!
16. “Blessed & Grateful” Inspirational Board
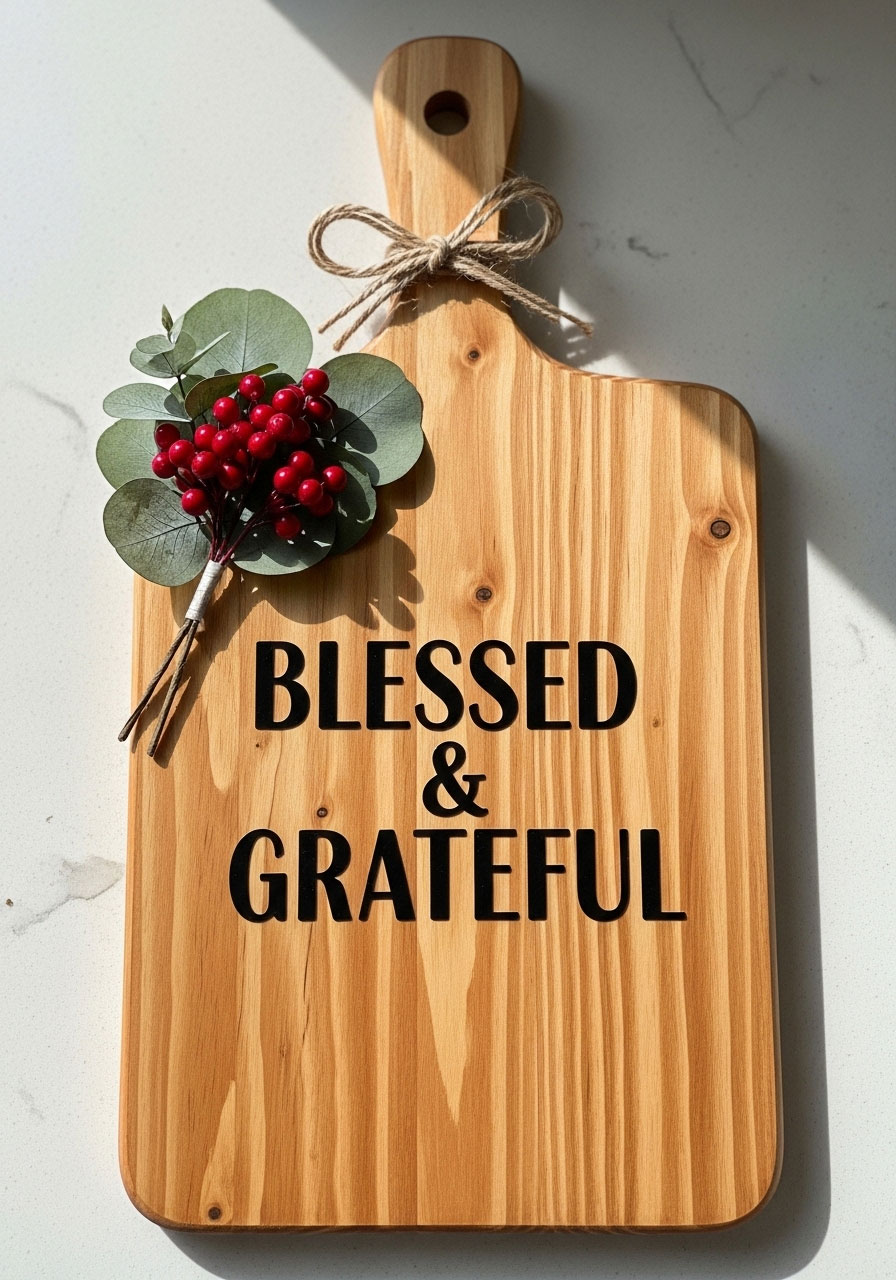
Start each day with a reminder of gratitude with this beautiful, uplifting cutting board design!
Best for: Gift-giving, daily inspiration, Thanksgiving to Christmas decor
Time to Make: 30 minutes
Skill Level: Easy
What You’ll Need:
- 1 Dollar Tree cutting board
- Background paint or stain (optional)
- Vinyl lettering for “Blessed & Grateful”
- Decorative flourishes (leaves, berries, or simple lines)
- Ribbon or twine
- Hot glue gun
How to Make It:
- Prep your board: Either leave natural wood or apply a light stain/paint wash.
- Apply main lettering: Center “Blessed & Grateful” vinyl on the board.
- Add decorative elements: Place small vinyl flourishes, leaves, or draw simple decorative lines around the words.
- Create dimension: Hot glue small faux berries or leaves at the corners if desired.
- Add hanging option: Attach ribbon or twine for displaying on a wall.
Pro Tip: Make several of these with different gratitude messages (“Thankful”, “Grateful Heart”, “Count Your Blessings”) to give as a set!
17. Hot Cocoa Bar Station
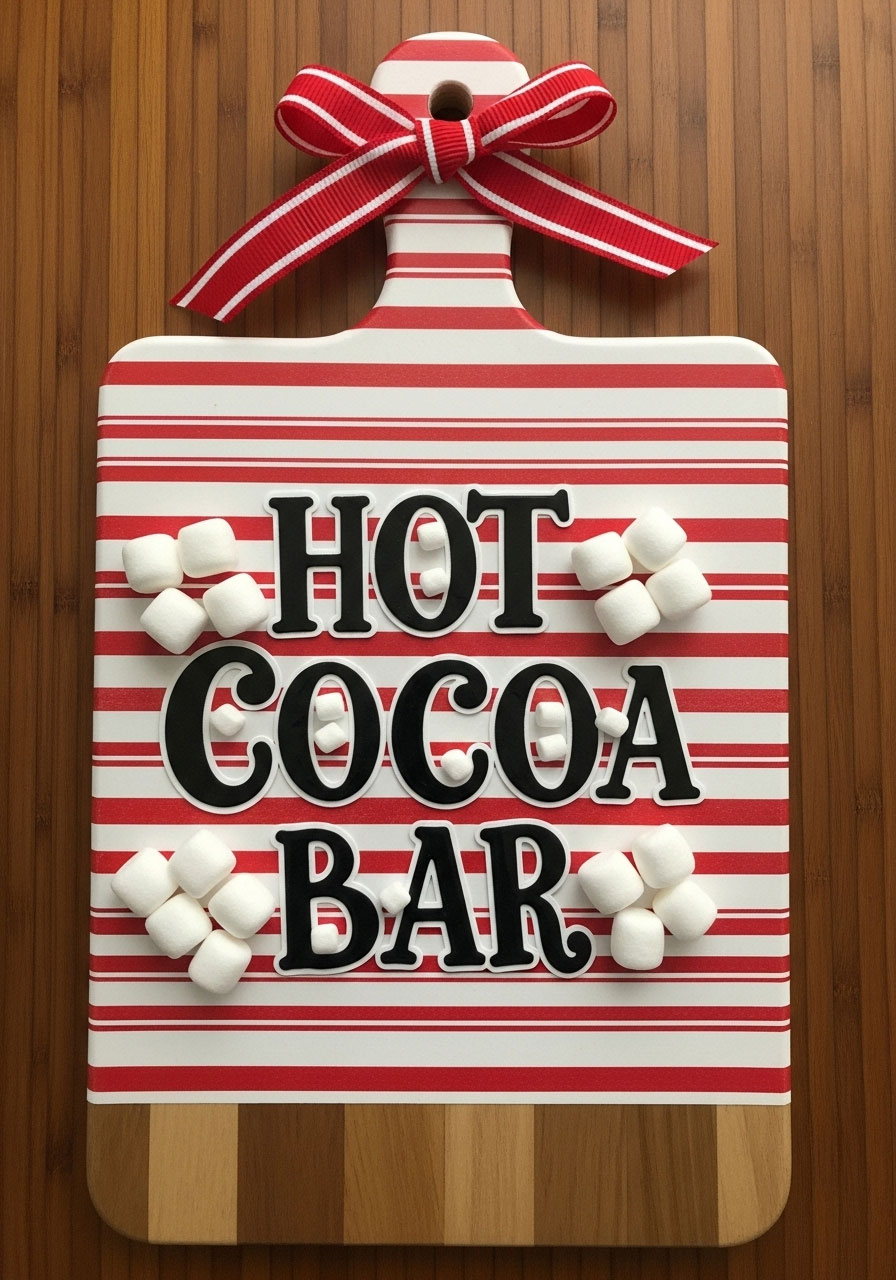
Turn your cutting board into an adorable hot cocoa station sign that’ll make your winter beverage setup irresistible!
Best for: Hot cocoa bars, kitchen counter displays, winter party decor
Time to Make: 35 minutes
Skill Level: Easy
What You’ll Need:
- 1 Dollar Tree cutting board
- Red and white paint for candy cane stripes (or peppermint napkins)
- Vinyl lettering: “Hot Cocoa Bar” or “Peppermint Cocoa”
- Miniature marshmallows or felt marshmallow shapes
- Ribbon
- Hot glue gun
How to Make It:
- Create your background: Either paint red and white stripes for a candy cane effect, or Mod Podge peppermint-patterned napkins.
- Add your sign lettering: Apply “Hot Cocoa Bar” vinyl in a fun, festive font.
- Embellish with cocoa elements: Hot glue mini marshmallows, candy cane decorations, or felt cocoa mug shapes.
- Add ribbon accent: Hot glue a red and white striped or plaid ribbon bow at the top.
- Display: Prop up behind your hot cocoa station with mugs, cocoa mix, and toppings!
Fun Variation: Create matching smaller boards with labels for “Marshmallows”, “Whipped Cream”, and “Candy Canes” for a complete bar display!
18. Santa Face Cutting Board
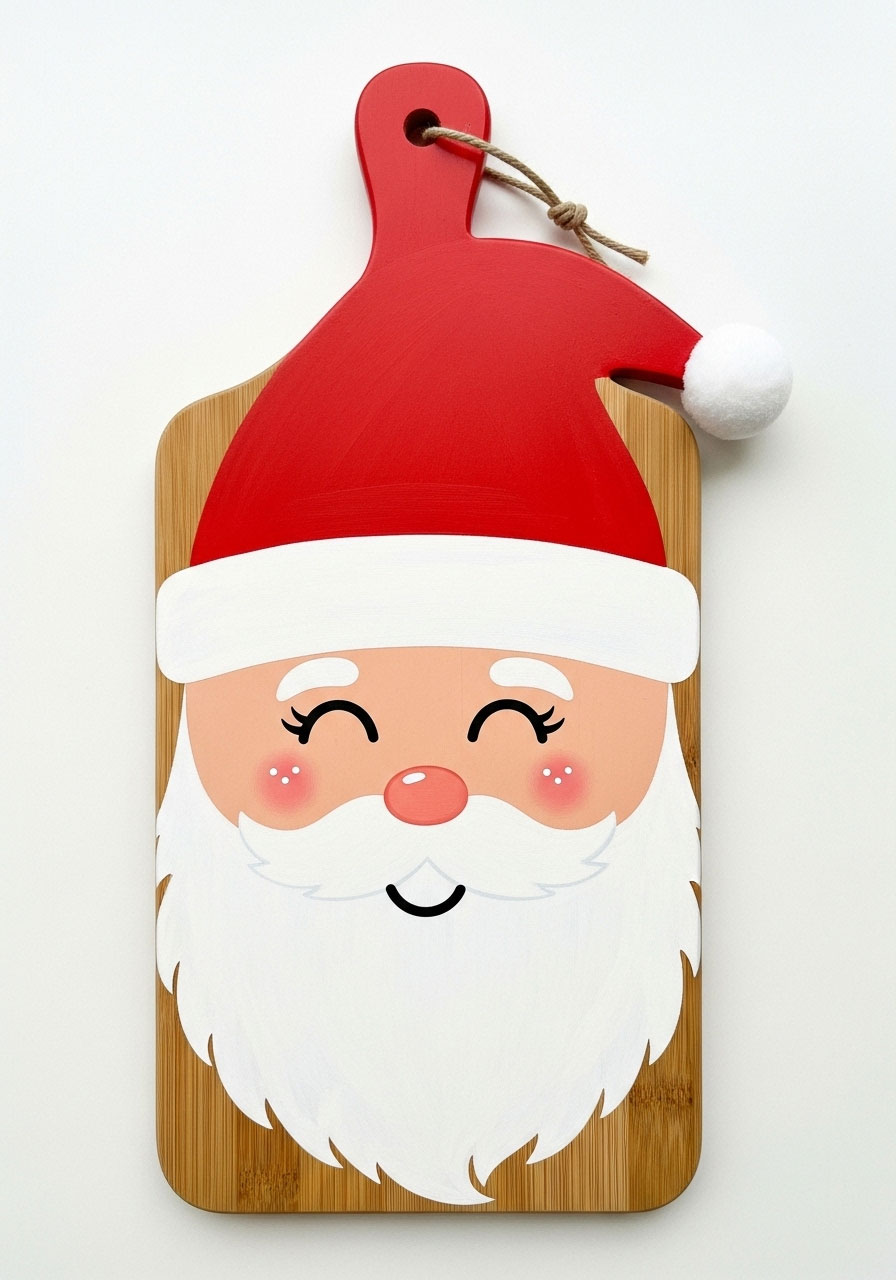
This jolly Santa face will bring smiles to everyone who sees it – and it’s surprisingly easy to create!
Best for: Kid-friendly decor, classroom gifts, playful Christmas displays
Time to Make: 40 minutes
Skill Level: Beginner
What You’ll Need:
- 1 Dollar Tree cutting board
- Red paint (for hat)
- White paint (for beard and hat trim)
- Black and white paint or markers (for eyes)
- Peach or beige paint (for face)
- Pink paint or blush (for rosy cheeks)
- Cotton balls or white pom-pom (for hat)
- Hot glue gun
How to Make It:
- Paint the hat: Paint the handle area and top third of the board red for Santa’s hat.
- Add white trim: Paint a white band at the bottom of the hat (where it meets the face).
- Paint the face: Use peach or beige for the middle section of the board.
- Create the beard: Paint white puffy shapes at the bottom third for Santa’s beard.
- Add facial features: Paint black eyes, add rosy pink cheeks, and a smile.
- Top it off: Hot glue a white pom-pom to the tip of the hat (the handle hole works perfectly!).
Pro Tip: Use a pencil to sketch your design lightly before painting so you get the proportions just right!
19. Dual Santa & Snowman Set
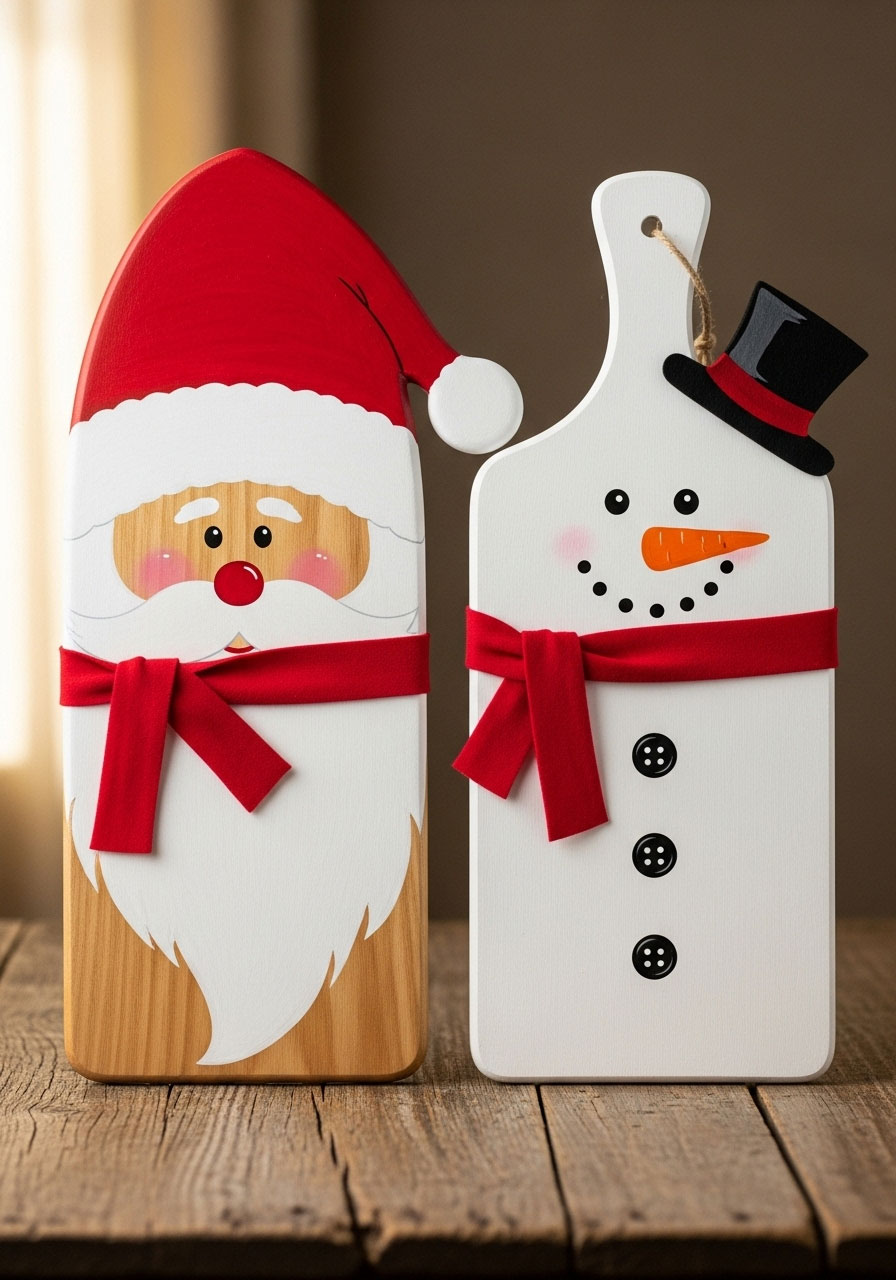
Why make one when you can create a matching set? This pair looks incredible displayed together!
Best for: Matching decor sets, gift pairs, craft fair sellers
Time to Make: 1 hour for both
Skill Level: Beginner-Intermediate
What You’ll Need (for both):
- 2 Dollar Tree cutting boards
- Paint: red, white, black, orange, peach
- Ribbon for Santa’s beard tie and snowman’s scarf
- Buttons for snowman
- Googly eyes or painted eyes
- Hot glue gun
- Pom-poms for hats
Santa Instructions: Follow the Santa face instructions from #18 above, but add a ribbon “beard tie” for extra detail.
Snowman Instructions:
- Paint the entire board white
- Draw the traditional snowman face with coal eyes and carrot nose
- Paint or glue black buttons down the middle
- Wrap a scarf ribbon around the middle
- Add a painted or paper top hat at the handle
Display Tip: Lean these together at an angle on your mantel or kitchen counter for maximum cuteness!
20. Modern Geometric Christmas Trees
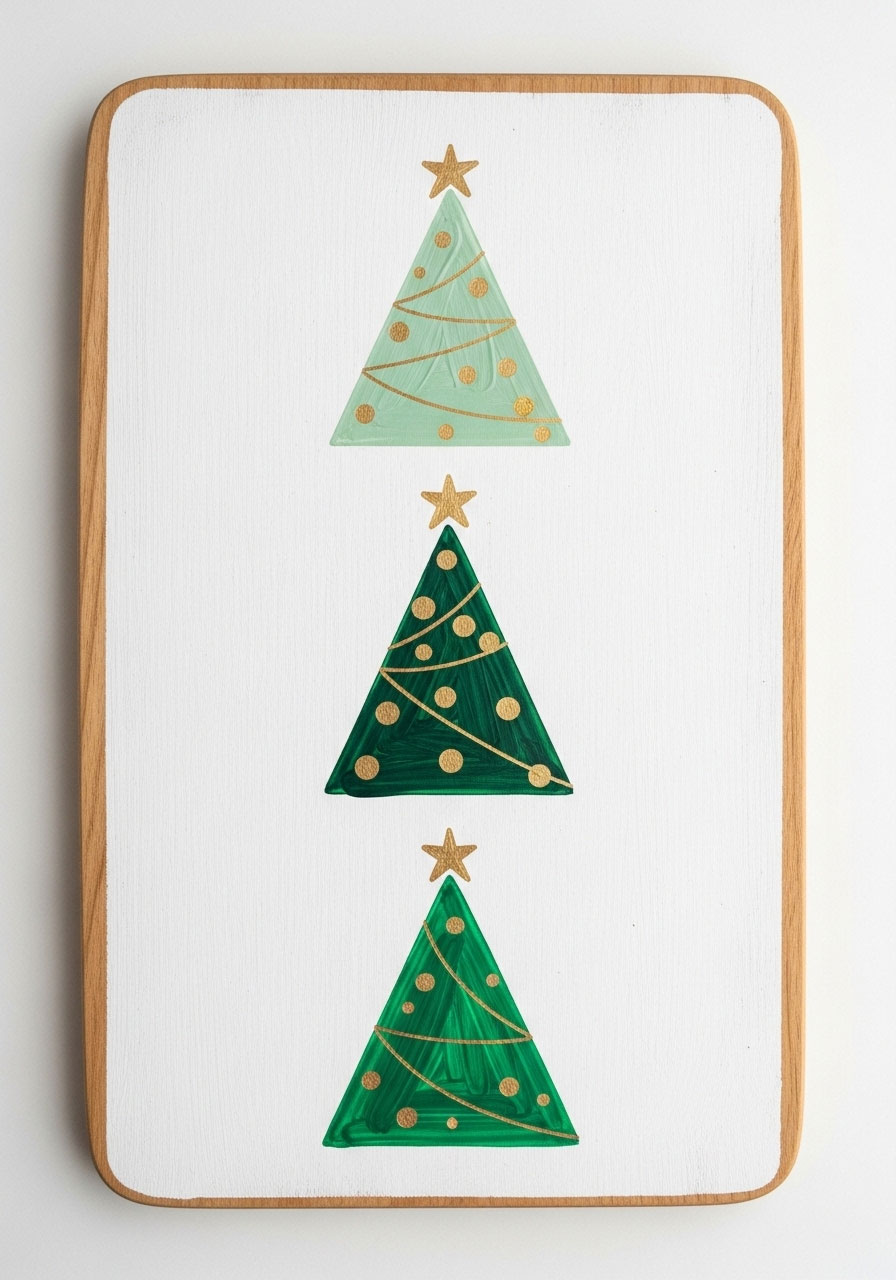
This contemporary design is perfect for those who love a clean, modern aesthetic with a Christmas twist!
Best for: Modern decor lovers, minimalist style, younger homeowners
Time to Make: 45 minutes
Skill Level: Intermediate
What You’ll Need:
- 1 Dollar Tree cutting board
- Painter’s tape
- Green paint in 2-3 different shades
- Gold or silver metallic paint pen
- Optional: small star stickers
- Clear sealer
How to Make It:
- Create tree shapes: Use painter’s tape to create geometric triangle tree shapes on the board – try different sizes and overlapping designs.
- Paint your trees: Fill in each tree with different shades of green, removing tape while paint is still slightly wet.
- Add details: Use a gold or silver paint pen to add dots, lines, or stars as ornaments.
- Add tree toppers: Place small metallic star stickers at the top of each tree.
- Seal it: Spray with clear sealer for a professional, glossy finish.
Pro Tip: This design is a hit with the “millennial modern farmhouse” crowd – make extras because people WILL ask where you bought it!
21. Simple Snowman with Wood Grain
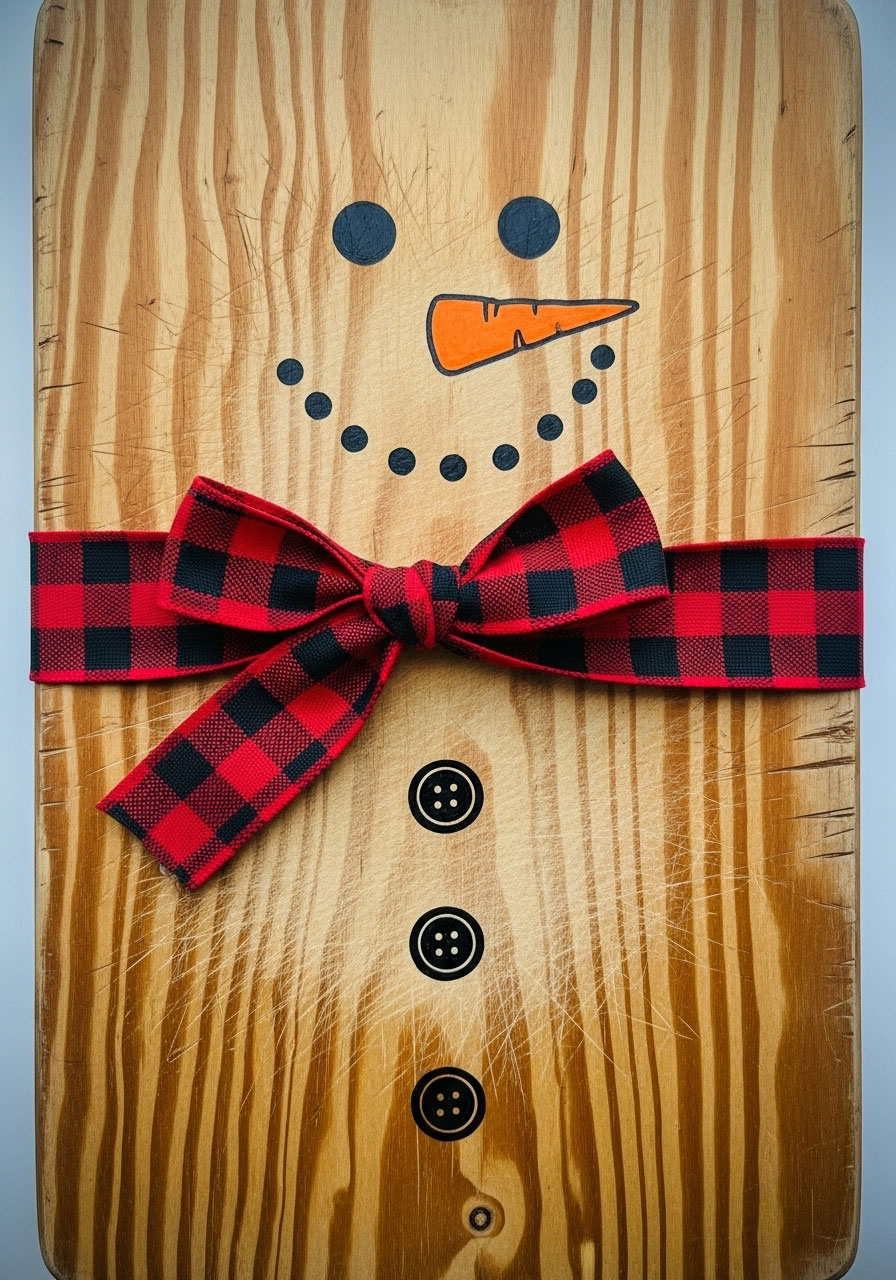
Let the natural wood shine through with this minimalist snowman design that’s rustic and refined!
Best for: Quick crafts, kids’ projects, budget-conscious gifting
Time to Make: 20 minutes
Skill Level: Super easy (perfect for beginners!)
What You’ll Need:
- 1 Dollar Tree cutting board
- Black permanent marker or paint pen
- Orange marker or paint (for nose)
- Red or plaid ribbon
- Optional: buttons, mini twigs
- Hot glue gun
How to Make It:
- Draw the face: Use a black marker to draw simple coal eyes and a dotted smile on the upper portion of the board.
- Add the carrot nose: Draw or paint an orange triangle nose.
- Create buttons: Either draw black button circles down the middle or hot glue actual buttons.
- Tie a scarf: Wrap ribbon around the middle of the board and tie a bow.
- Add twig arms (optional): Hot glue small twigs to the sides for snowman arms.
Why This Works: The natural wood grain gives this snowman a rustic, organic feel that’s very on-trend right now!
22. Napkin Transfer Christmas Collage
This technique lets you use those gorgeous Christmas napkins you’ve been hoarding – and it looks amazing!
Best for: Using up craft supplies, creating unique one-of-a-kind pieces
Time to Make: 40-50 minutes
Skill Level: Intermediate
What You’ll Need:
- 1 Dollar Tree cutting board
- 2-3 Christmas napkins with different patterns
- Mod Podge
- Foam brush
- Scissors
- Red ribbon
- Hot glue gun
How to Make It:
- Prep your napkins: Separate the printed top layer from the white layers beneath.
- Cut your designs: Cut out individual elements like ornaments, snowflakes, holly, poinsettias.
- Plan your layout: Arrange cutouts on the board WITHOUT glue first to perfect your design.
- Apply with Mod Podge: Working one piece at a time, brush Mod Podge on the board, place the napkin piece, then gently brush more Mod Podge over the top.
- Layer and overlap: Create depth by slightly overlapping images.
- Seal everything: Apply 2-3 coats of Mod Podge over the entire collage once everything is dry.
- Add ribbon: Hot glue a festive bow at the top.
Pro Tip: Napkins can tear easily when wet – use a VERY light touch with your brush and dab rather than stroke!
23. “Merry Christmas” Red, Black & White Bold Design
This striking color combination creates a modern, eye-catching piece that works with any decor style!
Best for: Bold statement pieces, modern Christmas decor, craft sales
Time to Make: 30-35 minutes
Skill Level: Easy
What You’ll Need:
- 1 Dollar Tree cutting board
- Red and white acrylic paint OR buffalo plaid paper
- Black vinyl lettering for “Merry Christmas”
- Optional: snowflake or ornament cutouts
- Hot glue gun
- Red ribbon
How to Make It:
- Create your background: Either paint the board in red and white sections/stripes, or Mod Podge buffalo plaid paper.
- Apply black lettering: Center “Merry Christmas” in bold black vinyl for maximum contrast.
- Add subtle embellishments: Hot glue small white or silver snowflakes at the corners if desired.
- Add ribbon: Hot glue or tie red ribbon at the handle.
Why This Works: The high contrast between red, black, and white makes this design pop from across the room!
24. Christmas Recipe Chalkboard Holder
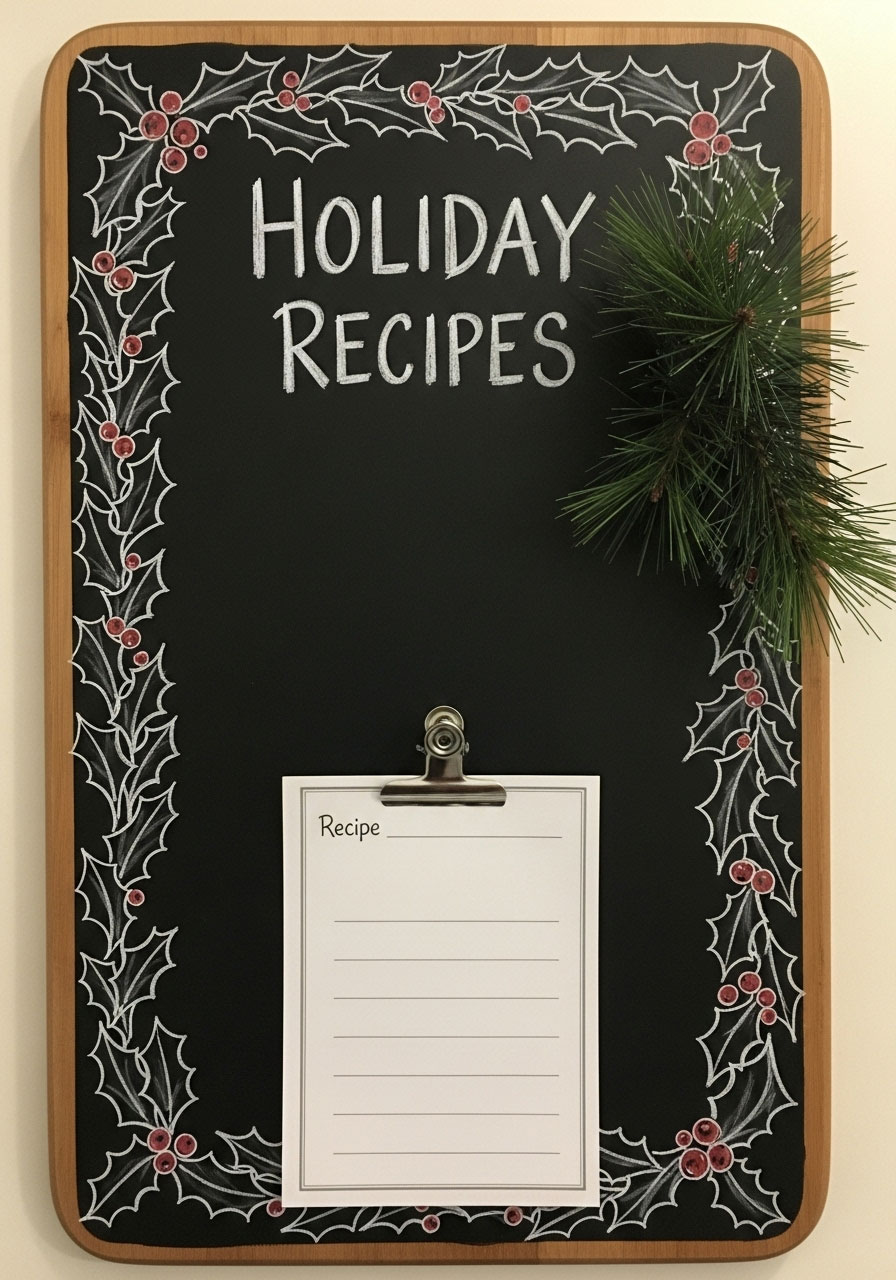
Combine form and function with this chalkboard cutting board that holds your favorite holiday recipes!
Best for: Bakers, recipe collectors, kitchen organization
Time to Make: 35 minutes (plus drying time)
Skill Level: Easy
What You’ll Need:
- 1 Dollar Tree cutting board
- Chalkboard paint
- Small binder clip or clothespin
- Chalk markers
- Hot glue gun
- Decorative ribbon or greenery
How to Make It:
- Paint your chalkboard: Apply 2-3 coats of chalkboard paint to the cutting board. Let dry overnight.
- Season the surface: Rub chalk all over, then wipe clean.
- Add a holder: Hot glue a decorative binder clip or painted clothespin at the bottom to hold recipe cards.
- Decorate the border: Use chalk markers to create a festive border with holly, snowflakes, or candy canes.
- Label it: Write “Holiday Recipes” or “Family Favorites” at the top.
- Embellish: Hot glue greenery or a ribbon bow at the top corner.
Fun Variation: Make one for each holiday – Thanksgiving recipes, Christmas cookies, New Year’s appetizers!
25. Layered Wood Sign with Bottle Brush Trees
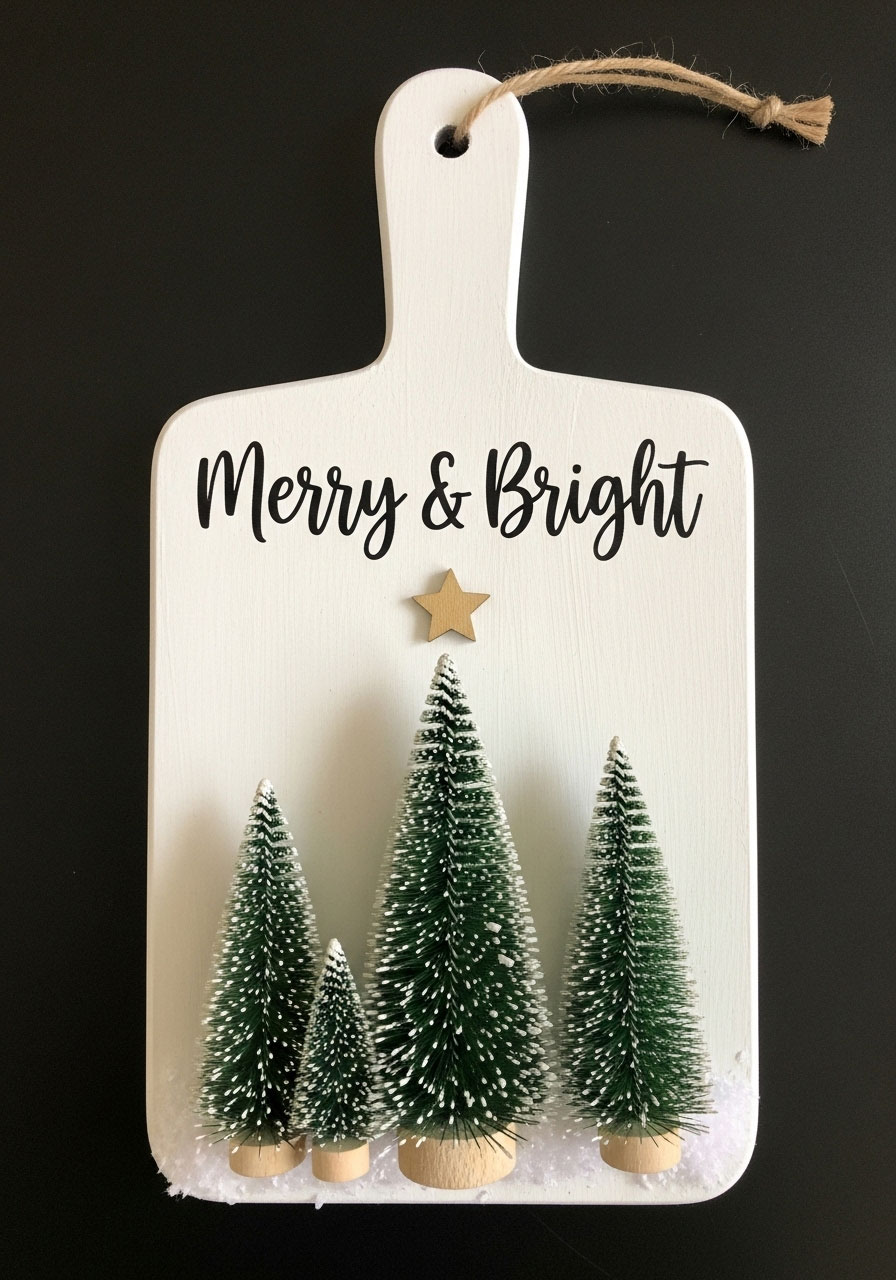
Add dimension to your cutting board with adorable mini bottle brush trees for a truly unique piece!
Best for: 3D decor lovers, mantel displays, statement pieces
Time to Make: 45 minutes
Skill Level: Intermediate
What You’ll Need:
- 1 Dollar Tree cutting board
- White or light gray paint
- Mini bottle brush trees (Dollar Tree seasonal section)
- Vinyl lettering: “Merry & Bright” or “Let It Snow”
- Fake snow or white glitter
- Hot glue gun
- Optional: wooden stars or snowflakes
How to Make It:
- Paint the background: Apply 2 coats of white or light gray paint for a snowy backdrop.
- Add your message: Apply vinyl lettering at the top of the board.
- Create a tree scene: Hot glue 3-5 bottle brush trees in varying heights at the bottom of the board, creating a mini forest.
- Add snow: Dab hot glue around the tree bases and sprinkle with fake snow or white glitter while still wet.
- Add dimension: Hot glue small wooden stars or snowflakes above the trees.
Pro Tip: Arrange trees at slight angles and varying distances from the board for a more natural, dimensional look!
26. “Joy” with Wreath Accent
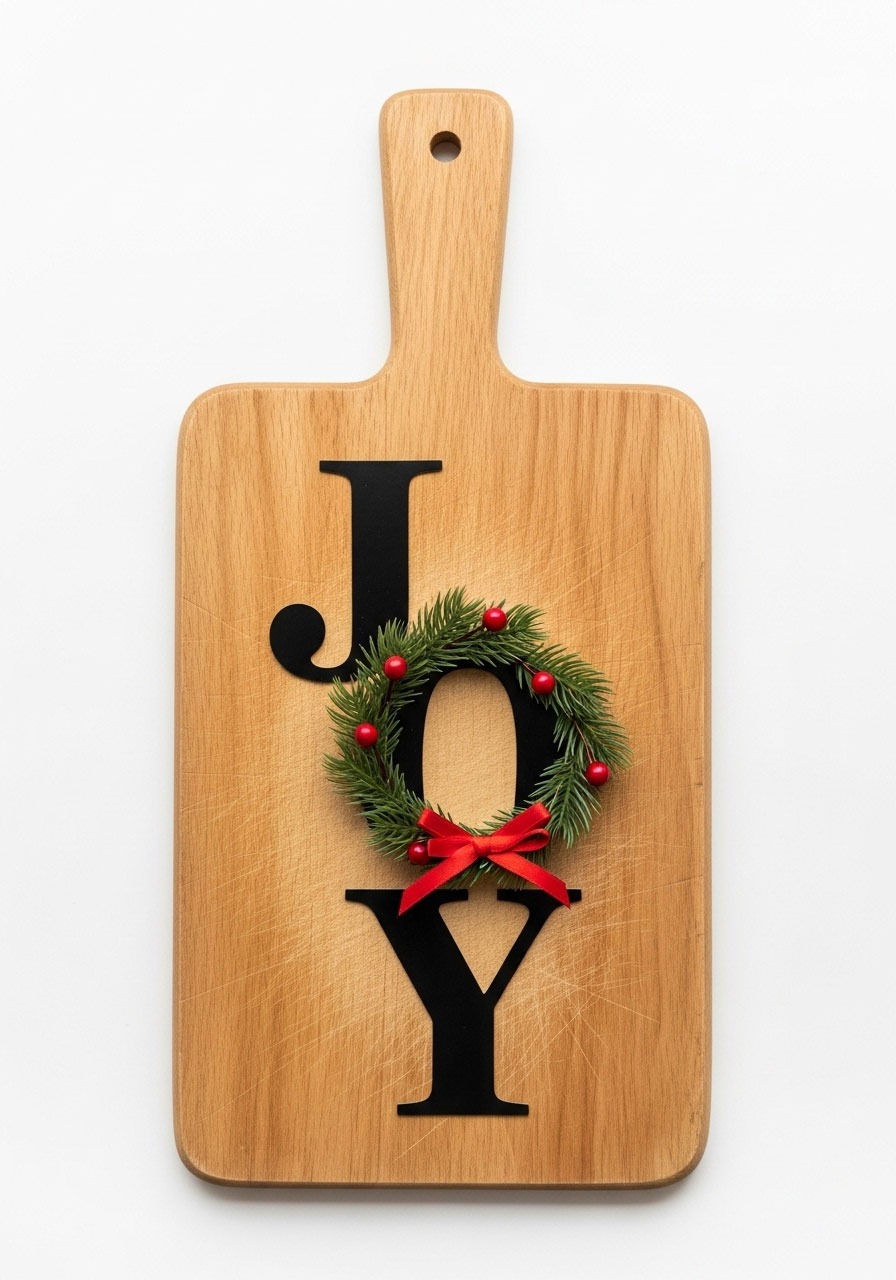
This simple but elegant design packs a powerful visual punch and takes almost no time to create!
Best for: Minimalist decor, quick gifts, elegant Christmas style
Time to Make: 25 minutes
Skill Level: Super easy
What You’ll Need:
- 1 Dollar Tree cutting board
- Large vinyl letters spelling “JOY”
- Small faux wreath (or greenery to make one)
- Red berries or small ornaments
- Red ribbon
- Hot glue gun
How to Make It:
- Apply your letters: Center large “JOY” letters on the cutting board using vinyl or painted letters.
- Create the “O” wreath: Hot glue a small wreath over the “O” or arrange greenery in a circle around it.
- Add color: Tuck red berries or tiny ornaments into the wreath.
- Tie it together: Hot glue a small bow at the top or bottom of the wreath.
- Hang or display: Add ribbon for hanging or use an easel to display on a shelf.
Why This Works: The wreath integrated into the word creates visual interest and draws the eye!
27. Christmas Tree Countdown Calendar
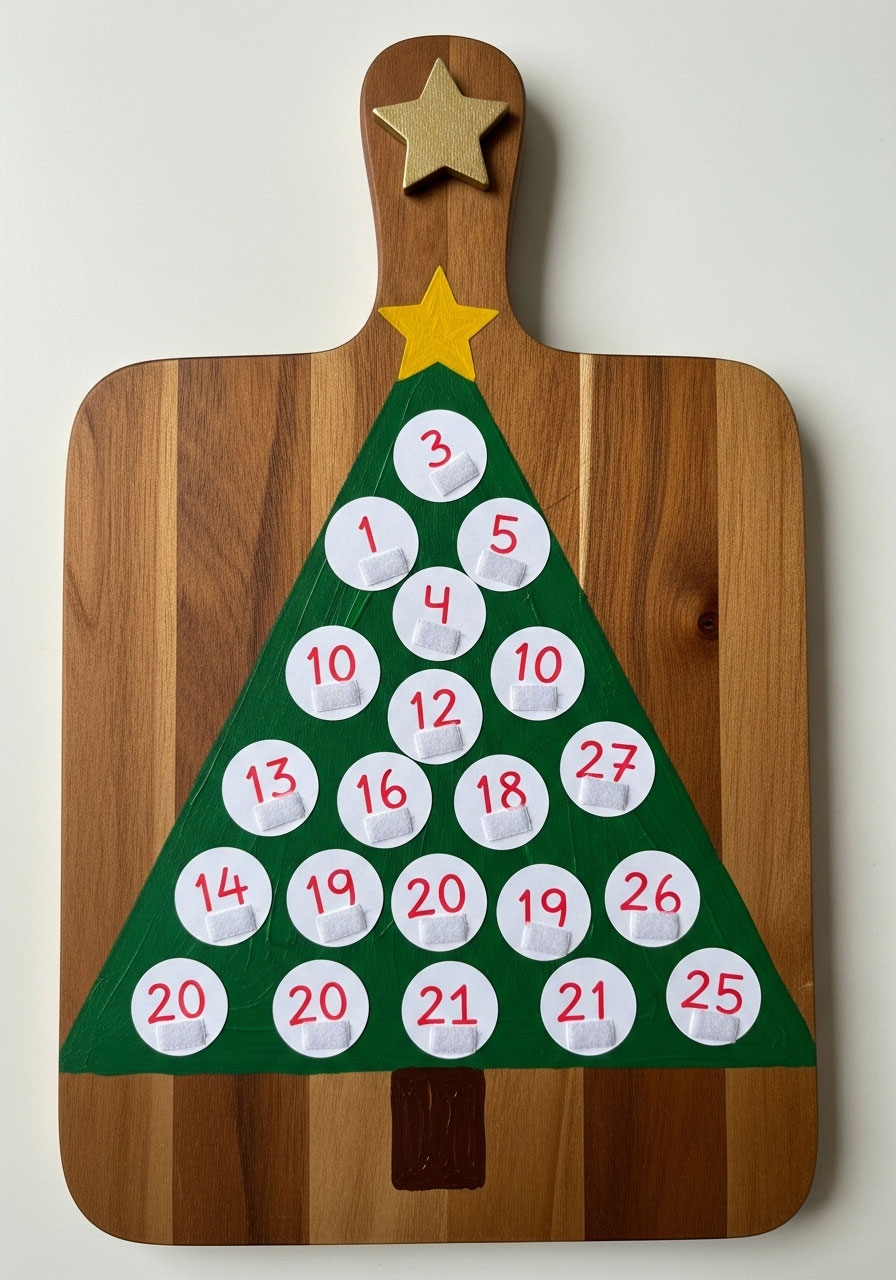
Make your cutting board interactive with this clever countdown design that changes throughout December!
Best for: Families with kids, Advent calendar alternative, interactive decor
Time to Make: 50 minutes
Skill Level: Intermediate
What You’ll Need:
- 1 Dollar Tree cutting board
- Green paint
- 25 small circles (cut from cardstock or use round stickers)
- Numbers 1-25 (printed or vinyl)
- Red and gold pens
- Mod Podge
- Velcro dots
- Star for tree topper
How to Make It:
- Paint a tree shape: Use green paint to create a triangle Christmas tree shape on the board.
- Number your circles: Add numbers 1-25 to small circles (these will be ornaments).
- Attach Velcro: Put one side of Velcro dots all over the tree, the other side on the back of each numbered circle.
- Create the trunk: Paint a brown trunk at the bottom.
- Add the star: Hot glue or paint a gold star at the top.
- Start the countdown: Each day, remove the ornament matching the date!
Pro Tip: Store removed ornaments in a small basket next to the board so kids can see how many days they’ve counted down!
28. “North Pole” Directional Sign
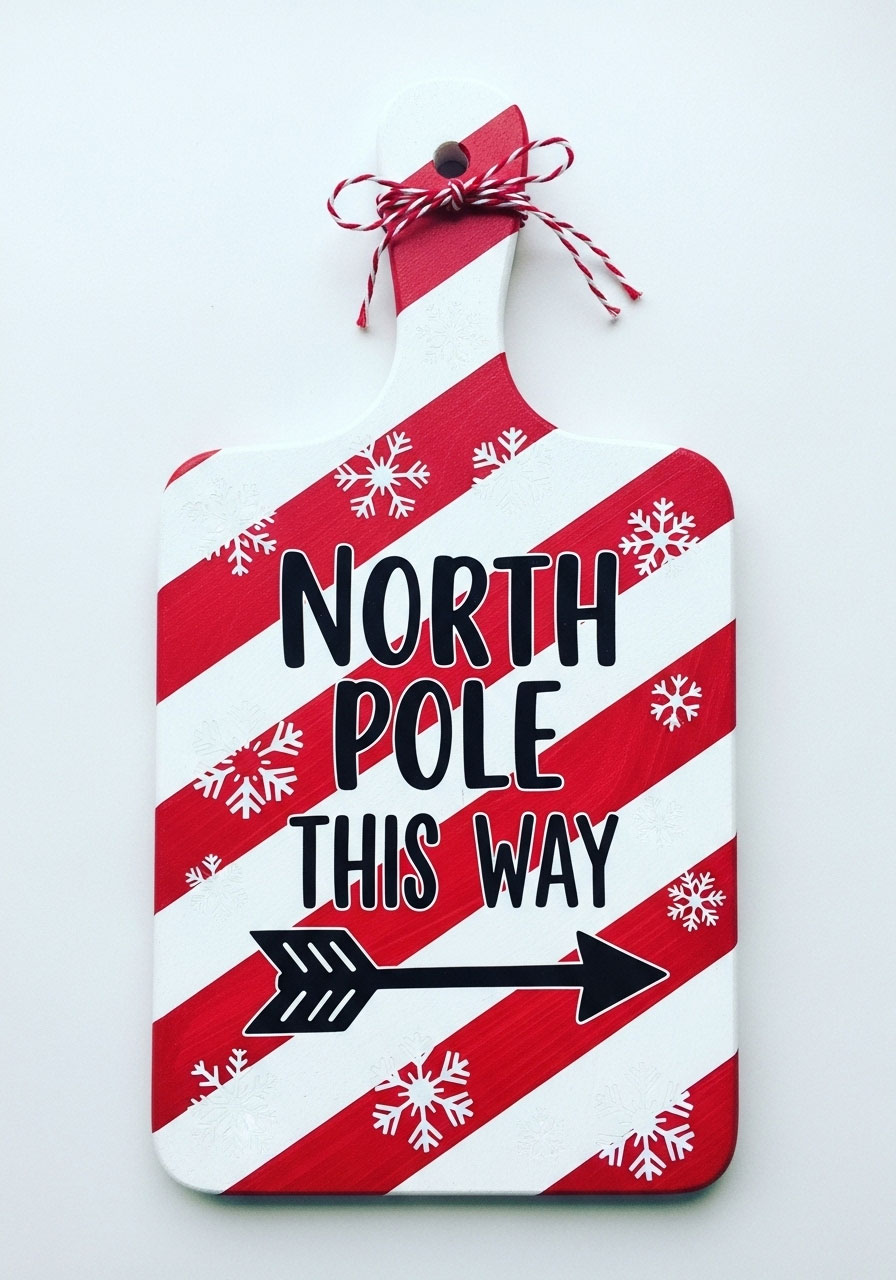
Bring the magic of Christmas vacation vibes into your home with this charming directional sign!
Best for: Whimsical decor, kids’ rooms, playful Christmas style
Time to Make: 40 minutes
Skill Level: Beginner-Intermediate
What You’ll Need:
- 1 Dollar Tree cutting board
- Paint: red, white, green
- Vinyl lettering or paint pen: “North Pole”, “Santa’s Workshop”, “Reindeer Crossing”
- Snowflake stickers or stencils
- White paint for snow effects
- Hot glue gun
How to Make It:
- Create striped sections: Paint diagonal stripes in red and white (like a candy cane pole).
- Add directional labels: Apply vinyl words or hand-paint phrases like “North Pole – This Way!” with an arrow.
- Layer multiple signs: Create the look of stacked directional signs by painting different sections.
- Add snow: Dab white paint along the top edges for a snowy effect.
- Finish with snowflakes: Add snowflake stickers or stencil them around the signs.
Fun Variation: Personalize it with your family name: “The Johnsons – Santa Stop Here!” with an arrow pointing down!
29. “Believe” with Bell Embellishments
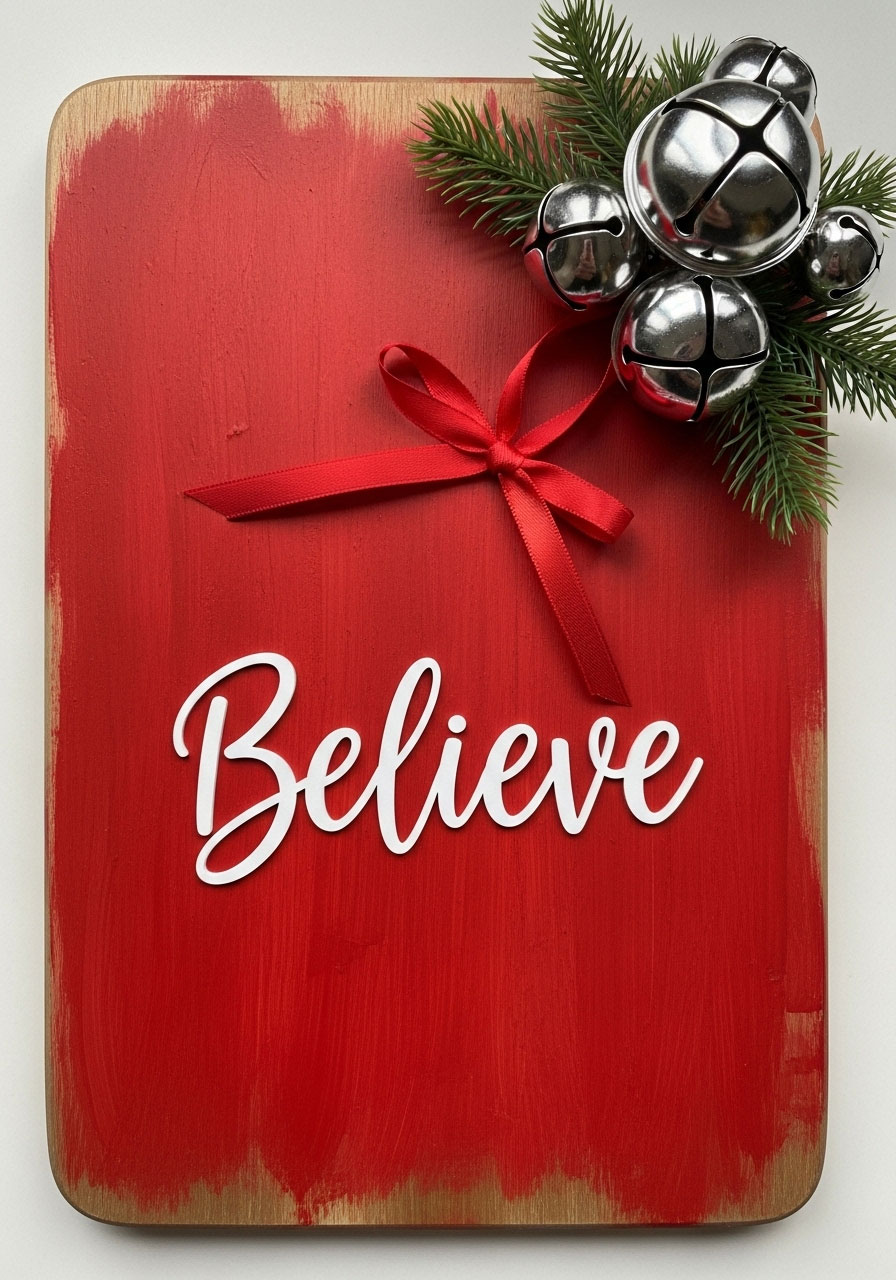
This magical design reminds everyone of the true spirit of Christmas with beautiful simplicity!
Best for: Traditional Christmas lovers, meaningful gifts, mantel decor
Time to Make: 30 minutes
Skill Level: Easy
What You’ll Need:
- 1 Dollar Tree cutting board
- Red or green background paint (optional)
- Large vinyl letters or stencil: “Believe”
- Small jingle bells (silver or gold)
- Greenery sprigs
- Red ribbon
- Hot glue gun
How to Make It:
- Prep the background: Either leave natural wood or paint a soft red or green background.
- Apply the word: Center “Believe” in elegant script using vinyl or carefully stenciled letters.
- Add bell cluster: Hot glue 3-5 small jingle bells in one corner or at the top.
- Tuck in greenery: Add small sprigs of faux pine or holly near the bells.
- Tie with ribbon: Hot glue a ribbon bow connecting the greenery and bells.
Pro Tip: Use real jingle bells that actually ring for an interactive element that kids (and adults!) will love!
30. Mixed Media “Noel” Statement Board

Pull out all your craft supplies for this show-stopping mixed media piece that combines multiple techniques!
Best for: Experienced crafters, statement pieces, craft show sellers
Time to Make: 60-75 minutes
Skill Level: Advanced
What You’ll Need:
- 1 Dollar Tree cutting board
- Background: paint, scrapbook paper, or stained wood
- Large “NOEL” letters (wood, vinyl, or painted)
- Decorative elements: lace, burlap, ribbon, buttons, bells, berries, greenery
- Mod Podge
- Hot glue gun
- Optional: metallic gold or silver leaf
How to Make It:
- Create your background: Layer painted sections, scrapbook paper, or use wood stain. Mix textures!
- Add the main word: Position “NOEL” prominently using dimensional wood letters or thick vinyl.
- Layer embellishments: Hot glue lace trim along one edge, add burlap corners, wrap ribbon around the handle.
- Add dimensional elements: Attach bells, buttons, small ornaments, berries, and greenery in a visually pleasing arrangement.
- Create focal points: Group smaller items together rather than spacing them evenly.
- Add metallic accents: Use gold or silver leaf or paint to highlight edges and add shimmer.
- Seal if needed: If using paper elements, seal with Mod Podge.
Pro Tip: Take a photo after each embellishment addition – sometimes less is more, and you can reference the photo to see when you’ve hit that perfect “finished” point!
Bonus Tips for Dollar Tree Cutting Board Success
Buying in Bulk: Order cutting boards by the case on DollarTree.com to save trips and ensure you have plenty for all your projects!
Sealing for Longevity: After completing any project, spray with a clear acrylic sealer to protect from moisture and wear – especially important for kitchen pieces!
Making Them Gift-Ready: Wrap finished boards in clear cellophane bags tied with ribbon, or display multiple designs together in a gift basket with hot cocoa mix or cookie ingredients!
Selling Your Creations: These cutting boards sell like crazy at craft fairs! Price them at $8-15 depending on complexity, and watch them fly off your table. Pro sellers make 20-30 at a time with the same design for efficiency.
Storage Hack: Store completed cutting boards upright in a magazine holder or dish rack to prevent scratching and keep them organized!
Final Thoughts: Your Holiday Crafting Awaits!
Ready to dive into your Dollar Tree cutting board crafting adventure? With 30 unique designs to choose from, you’ve got endless possibilities for creating personalized gifts, stunning Christmas decor, or inventory for your craft business – all on the ultimate budget!
The beauty of these projects is that each one can be customized to match your style, skill level, and the recipient’s taste. Whether you’re going full farmhouse, keeping it modern and minimal, or embracing traditional Christmas vibes, there’s a cutting board design here with your name on it.
Your Crafting Game Plan:
- Choose 3-5 designs that excite you most
- Make a Dollar Tree shopping list (don’t forget extra supplies!)
- Set aside a crafting afternoon with your favorite holiday music
- Take before and after photos to share your creations
- Watch everyone’s faces light up when they see what you made!
Remember, imperfections add character – embrace the handmade charm and have fun with the process. After all, the best gifts are the ones made with love (and a glue gun)!
What’s your next move? Grab that shopping list and head to Dollar Tree – your cutting boards are waiting to be transformed into something magical!
More Christmas Party Ideas to Keep the Fun Rolling:
The Candy Cane Game: Easy Winter Party Fun That Gets Everyone Laughing
10 German Christmas Traditions That’ll Make Your Holiday Unforgettable
20 Epic Dice Games for Christmas Parties That’ll Make Everyone Say “Roll Again!”
49 Genius Ideas to Create Your Own Hot Cocoa Bar – From Toppings to Décor
100+ Best Outdoor DIY Christmas Decorations to Make Your Home the Talk of the Neighborhood
30 Cheap DIY Christmas Gifts That Look Expensive
100+ Best Christmas Games for Large Family Gatherings That Create Unforgettable Memories
100+ DIY Christmas Gifts Your Friends and Family Will Actually Love
75+ Frugal Christmas Gift Basket Ideas That’ll Make You Look Like a Holiday Hero
50 Budget-Friendly Gifts for Coworkers (or Neighbors) This Christmas
100 Epic Christmas Eve Box Ideas to Make December 24th Unforgettable
40 Gift Basket Ideas for Women That’ll Make You Look Like a Gift-Giving Genius