Ready to turn your home into the most festive spot on the block? We’ve rounded up over 100 creative, budget-friendly DIY outdoor Christmas decorations that’ll have your neighbors doing double-takes. From giant candy canes to glowing gift boxes, these projects are easier than you think – and way more fun than fighting the holiday shopping crowds.
Whether you’redecking out your front porch, transforming your yard into a winter wonderland, or just adding a few festive touches, we’ve got you covered. Most of these projects use materials you can grab at the dollar store, repurpose from around your house, or snag for free. Let’s dive in!
1. Evergreen Christmas Gnome

These adorable little guys are having a major moment, and for good reason – they’re quirky, charming, and surprisingly easy to make.
Best for: Front porch or yard display
Time to Make: 2-3 hours
What You’ll Need:
Large terra cotta pot (turned upside down for the body)
Faux fur or white fleece (for the beard)
Red felt or fabric (for the hat)
Hot glue gun
Evergreen branches or garland
Wooden bead or foam ball (for the nose)
How to Make It:
1. Turn your terra cotta pot upside down to create the gnome’s body.
2. Cut a triangle from red felt to make the iconic gnome hat, then glue or sew it into a cone shape.
3. Attach the hat to the top of the pot.
4. Create a fluffy beard using faux fur or white fleece, and glue it just below the hat.
5. Glue on a wooden bead or small foam ball for the nose, peeking out from the beard.
6. Wrap evergreen branches or garland around the base for extra festive flair.
Pro Tip: Make a whole gnome family in different sizes using various pot sizes. Place them in a cluster for maximum cuteness!

Indoor Christmas Scavenger Hunt Printable for Kids
25 ready-made clues = zero stress for you – Just print, hide, and watch kids stay engaged for hours while you actually enjoy your coffee
Instant download, works today – Get it in minutes, print on regular paper, create Christmas magic in under 15 minutes of setup
Saves Christmas on bad weather days – Perfect indoor activity when kids are bouncing off walls and you need them happily occupied
One purchase, use it every year – Blank templates let you customize for different ages or create new versions as kids grow

Outdoor Christmas Scavenger Hunt Printable for Kids
Gets kids outside and active – Burns energy while solving 25 riddles and challenges around the yard (lifesaver when they’re hyped on holiday sugar)
Instant download, 15-minute setup – Print, hide clues, done. Perfect last-minute activity that looks like you planned for weeks
Works with your yard decorations – Turns your Christmas lights and lawn decor into part of the adventure kids will beg to do again
Reusable every year – Blank templates let you customize for different ages or add new challenges as kids grow
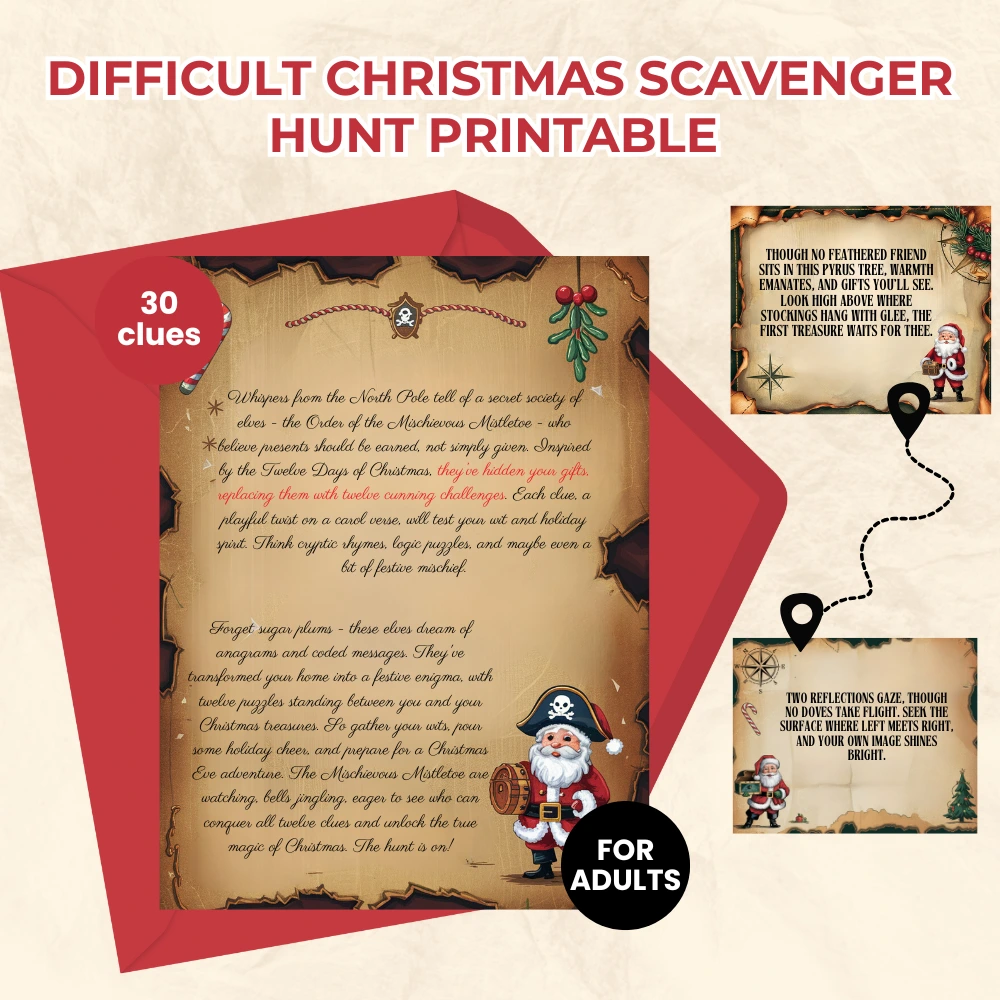
Difficult Christmas Scavenger Hunt Printable for Adults – Twelve Days of Christmas
Actually challenging puzzles for adults – 30 clever clues including ciphers, logic puzzles, and cryptic riddles that will genuinely stump your smartest friends
Print and play in minutes – Download, print, hide. Setup takes less time than wrapping gifts, but creates hours of laughter and memories
Flexible for any group – Pick 12 clues for a quick adventure or all 30 for an epic night. Customize with blank cards for personal inside jokes


2. Giant Christmas Ornament Topiary
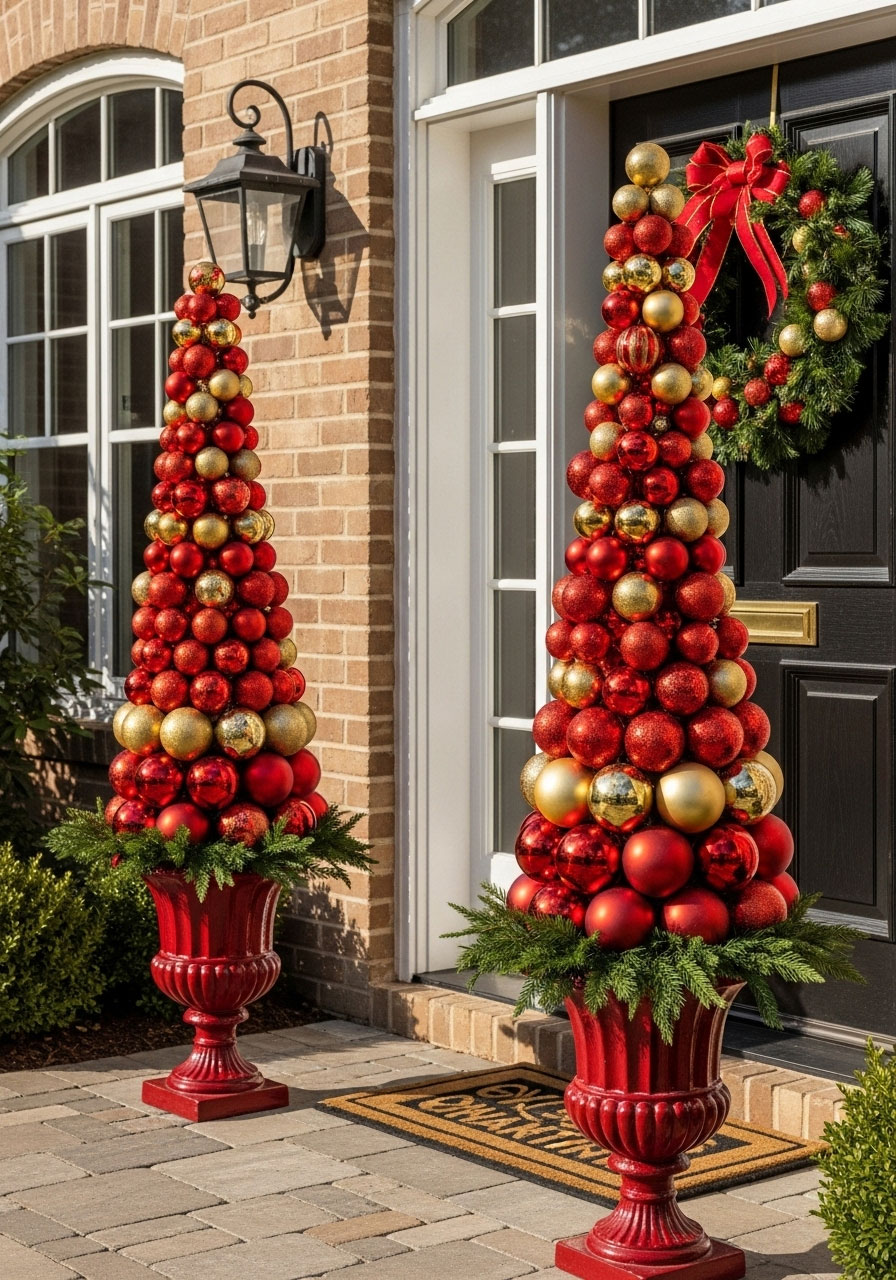
Nothing says “I’ve got my holiday decorating game on point” like a stunning ornament topiary flanking your front door.
Best for: Entryway or porch corners
Time to Make: 1-2 hours
What You’ll Need:
Large decorative urn or pot
Foam cone (craft store find)
Assorted shatterproof ornaments in coordinating colors
Hot glue gun
Ribbon or garland for finishing touches
How to Make It:
1. Place your foam cone securely in the urn or pot.
2. Starting at the bottom, hot glue ornaments around the cone in rows, working your way up.
3. Mix different sizes and finishes (matte, shiny, glittery) for visual interest.
4. Top with a statement ornament or bow.
5. Wrap ribbon or garland around the base to hide any gaps.
Pro Tip: Spray paint mismatched ornaments in a cohesive color scheme for a designer look on a dollar-store budget!
3. Christmas Crate Train

All aboard the holiday express! This charming decoration is perfect if you’ve got kids – they’ll lose their minds over it.
Best for: Front porch or yard
Time to Make: 2 hours
What You’ll Need:
3-4 wooden crates
Red and green paint
Wagon wheels or round wood slices (for wheels)
Garland, bows, and battery-operated lights
Hot glue or wood screws
How to Make It:
1. Paint your crates in festive red and green colors. Let dry completely.
2. Attach wheels to the bottom of each crate using hot glue or screws.
3. Line up the crates to form a train, securing them together if needed.
4. Fill the “train cars” with wrapped gift boxes, garland, or oversized ornaments.
5. String battery-operated lights around the train for nighttime magic.
Fun Variation: Add a small Christmas tree in the front crate as the “engine” and create a sign that says “North Pole Express”!
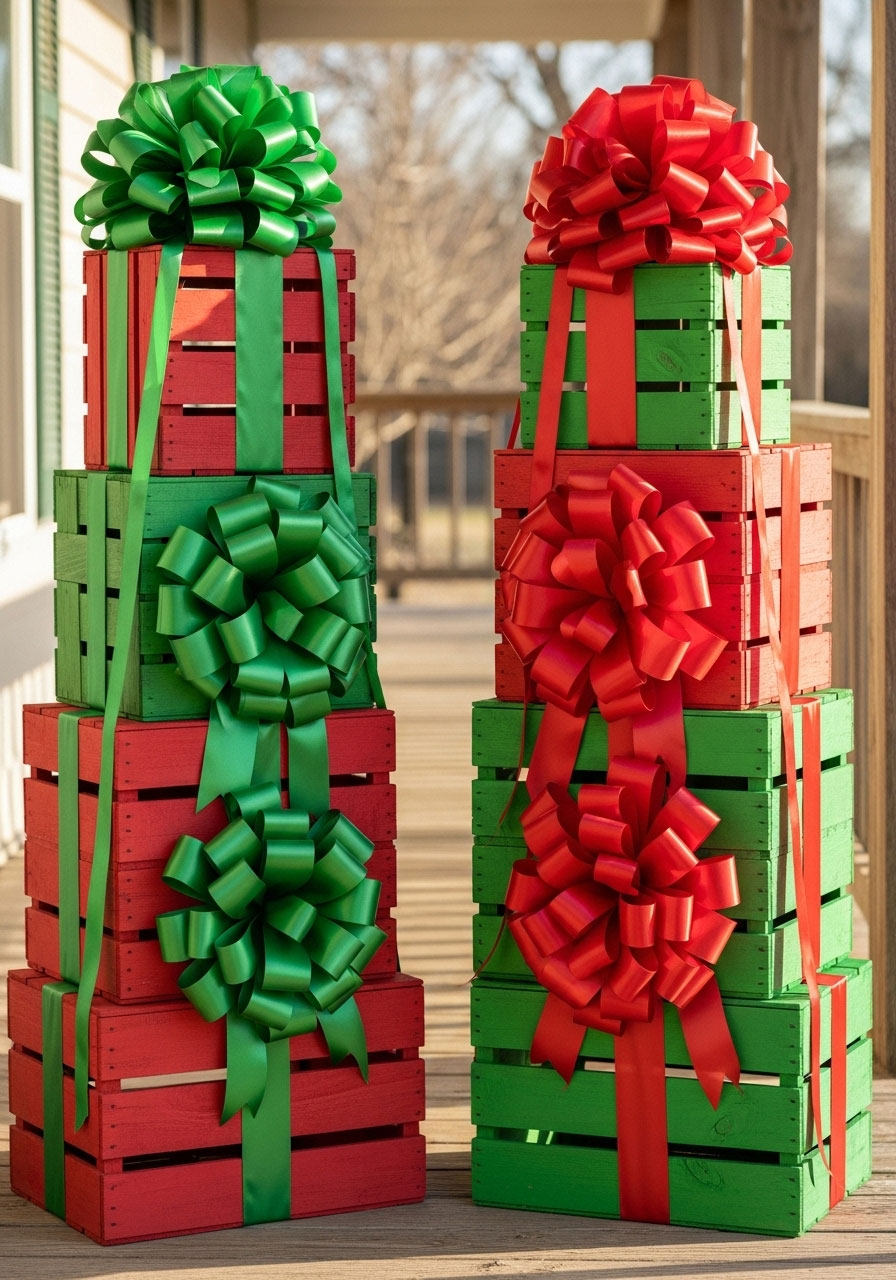
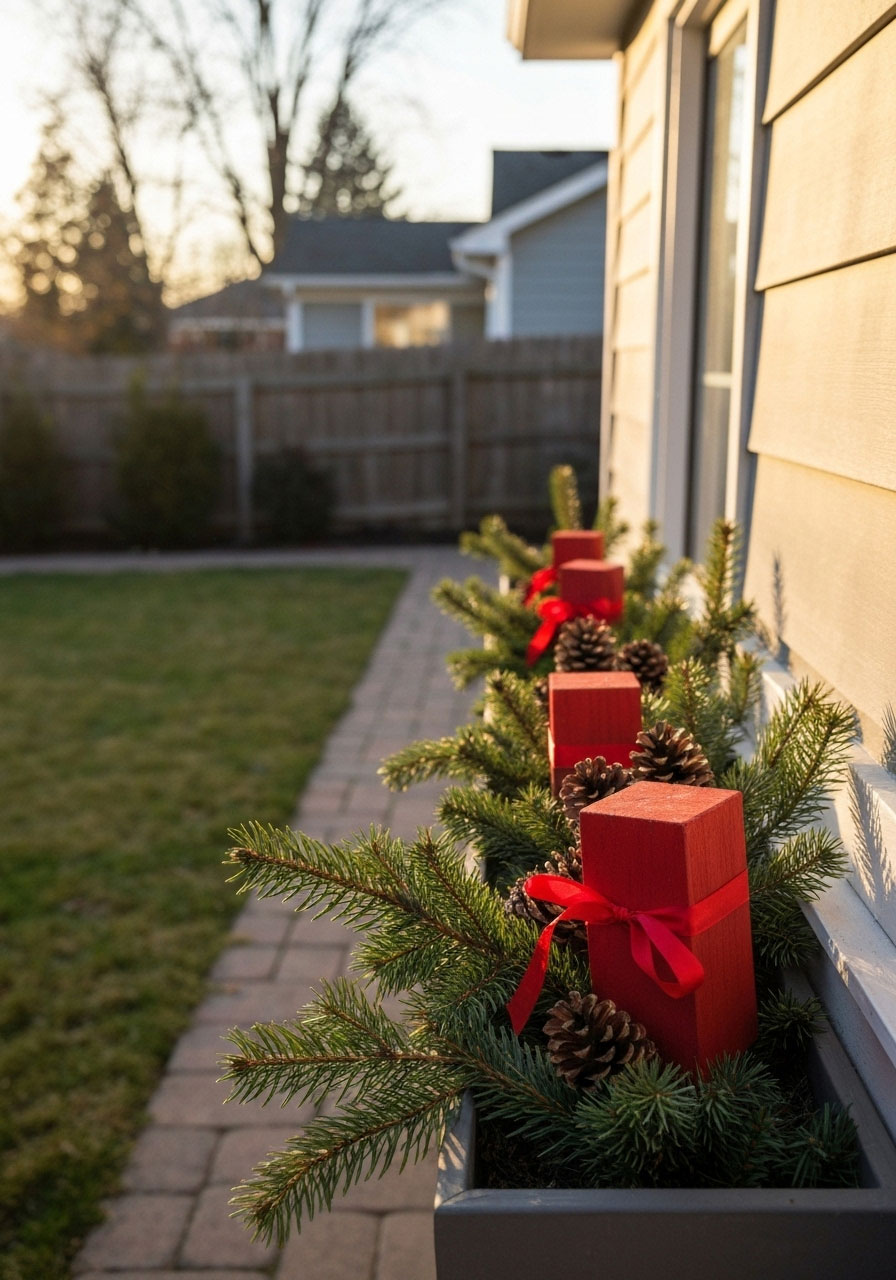
4. Holiday Gift Box Concrete Blocks

Transform boring concrete blocks into festive stacked presents. It’s genius because they’re weatherproof AND heavy enough to withstand winter winds.
Best for: Porch decoration or yard display
Time to Make: 1 hour (plus drying time)
What You’ll Need:
Concrete blocks (various sizes)
Outdoor spray paint in festive colors
Wide waterproof ribbon
Large bows
Clear exterior sealer (optional)
How to Make It:
1. Clean your concrete blocks and let them dry.
2. Spray paint each block in bright Christmas colors – red, green, silver, gold, or white.
3. Once dry, wrap each block with waterproof ribbon, crisscrossing it to look like wrapped presents.
4. Top each “present” with a large bow.
5. Stack them in varying heights for a gift pile effect.
Pro Tip: Place battery-operated fairy lights inside the hollow centers of the blocks for a subtle glow!
5. Giant Pool Noodle Lollipops

These oversized candies are ridiculously fun, dirt cheap, and surprisingly sturdy. Your inner child is going to love this project.
Best for: Lining walkways or creating a candy wonderland
Time to Make: 30 minutes per lollipop
What You’ll Need:
Large pool noodles in red, white, or green
Wooden dowels or PVC pipes (4-5 feet long)
Clear cellophane wrap
Ribbon
Hot glue or strong tape
How to Make It:
1. Coil your pool noodle into a spiral shape (it’ll want to spring back, so work with it).
2. Use hot glue or strong tape to secure the spiral as you go.
3. Insert a wooden dowel or PVC pipe into the center bottom of the spiral.
4. Wrap the entire lollipop in clear cellophane.
5. Tie it off at the base with festive ribbon.
6. Stake the dowel into your yard.
Fun Variation: Alternate red and white pool noodles for a candy cane swirl effect!
6. Giant Standing Lollipops

Similar to the pool noodle version, but these use foam discs for a cleaner, more polished look.
Best for: Yard borders or walkway decorations
Time to Make: 45 minutes per lollipop
What You’ll Need:
Large foam discs (available at craft stores)
Wooden dowels (4-5 feet)
Red and white paint
Glitter (optional, but highly recommended)
Clear exterior sealer
How to Make It:
1. Paint your foam discs with red and white swirl patterns.
2. Add glitter while the paint is still wet for extra sparkle.
3. Seal with an exterior sealer to protect from weather.
4. Attach the disc to a wooden dowel using hot glue or wood screws.
5. Plant the dowel firmly in your yard.
Pro Tip: Make lollipops in different sizes and group them together for a whimsical candy forest!
7. DIY Candy Lights Border
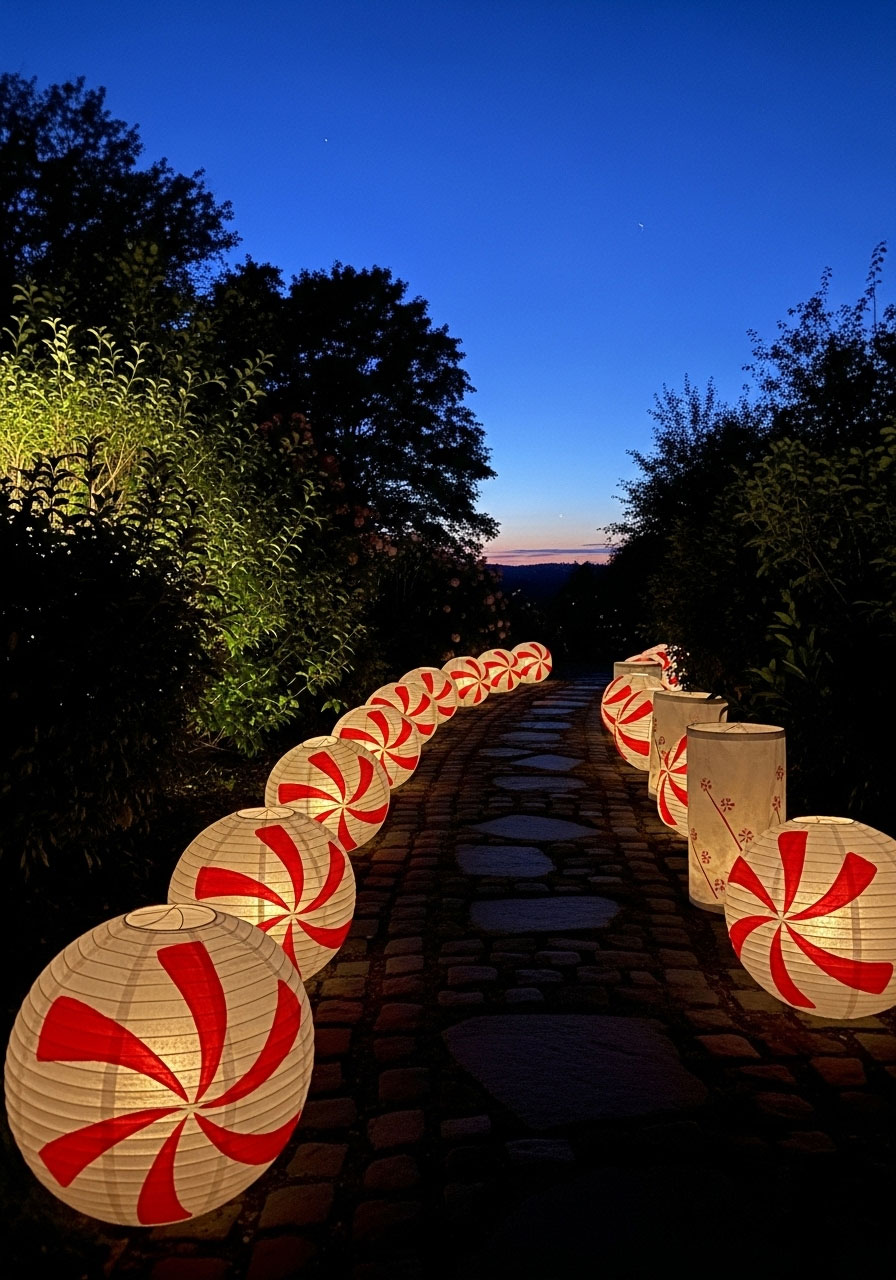
Line your walkway or driveway with these adorable candy-inspired lights that look like they came straight from Santa’s workshop.
Best for: Pathway lighting
Time to Make: 2 hours
What You’ll Need:
White paper lanterns or lampshades
Red and white paint or tape
Battery-operated LED lights
Stakes or shepherd hooks
Clear weather sealant spray
How to Make It:
1. Paint stripes on white paper lanterns to create a peppermint candy look.
2. Spray with weather sealant to protect from moisture.
3. Insert battery-operated LED lights into each lantern.
4. Hang from shepherd hooks or attach to stakes along your pathway.
Pro Tip: Synchronize them with timer settings so they automatically light up at dusk!
8. Christmas Front Porch Sign

A bold, welcoming sign sets the tone before guests even ring the doorbell.
Best for: Porch or entryway
Time to Make: 1-2 hours
What You’ll Need:
Large wooden board or pallet wood
Paint in festive colors
Stencils or vinyl lettering
Outdoor sealer
Decorative elements (greenery, bows, etc.)
How to Make It:
1. Sand and paint your wooden board in your chosen background color.
2. Use stencils or vinyl lettering to add your message: “Merry Christmas”, “Let it Snow”, or “Welcome”.
3. Add decorative touches like painted snowflakes or holly.
4. Seal with outdoor sealer.
5. Prop against your porch or hang on the door.
Fun Variation: Make it double-sided with different messages for day and night viewing!
9. Giant Hanging Ornaments

These show-stopping spheres look expensive but cost almost nothing to make. Prepare for compliments.
Best for: Hanging from porch ceiling or tree branches
Time to Make: 1 hour
What You’ll Need:
Large clear plastic or foam balls
Glitter, paint, or decorative paper
Ribbon (wide and sturdy)
Hot glue gun
Fishing line or strong string
How to Make It:
1. Decorate your large balls with glitter, paint, or by filling clear ones with tinsel or fake snow.
2. Create an ornament “cap” using ribbon formed into a loop and bow.
3. Hot glue the ribbon cap to the top of the ball.
4. Thread fishing line through the ribbon to hang.
5. Suspend from porch beams, tree branches, or shepherd hooks.
Pro Tip: Hang them at varying heights for a dynamic, professional display!
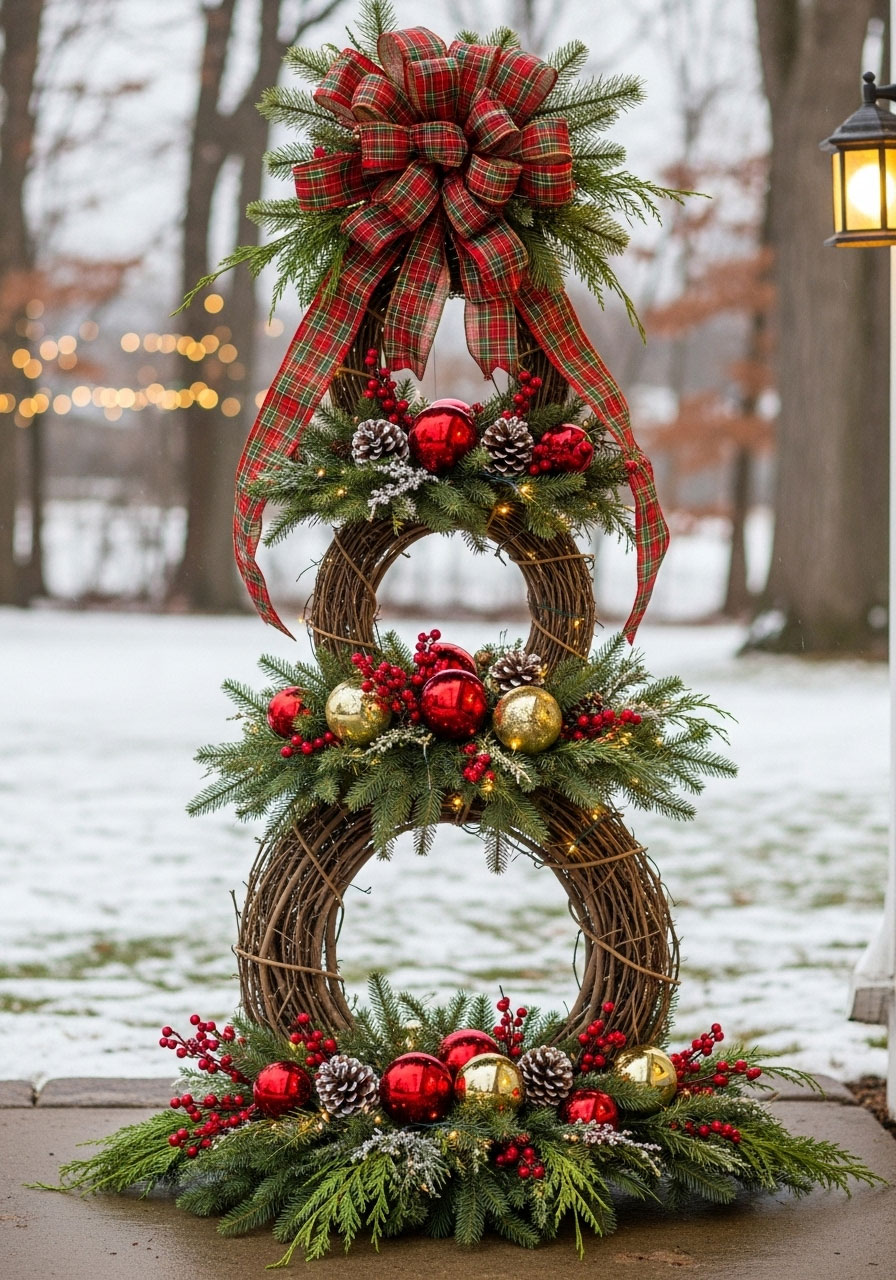
10. Giant Christmas Wreath

Go big or go home! A massive wreath makes a statement and works beautifully on large walls, garage doors, or fences.
Best for: Garage door, fence, or large exterior wall
Time to Make: 2-3 hours
What You’ll Need:
Hula hoop or large wire wreath frame
Evergreen garland (real or faux)
Floral wire
Oversized ornaments and bow
Pinecones, berries, or other decorative elements
How to Make It:
1. Wrap your hula hoop or wreath frame completely with evergreen garland, securing with floral wire.
2. Attach oversized ornaments using wire or hot glue.
3. Add pinecones, berries, or other natural elements.
4. Create or attach a massive bow at the bottom or top.
5. Hang securely using heavy-duty hooks or wire.
Pro Tip: Add battery-operated lights woven through the garland for nighttime wow factor!
11. Candy Cane Lollipop Stakes

These classic red-and-white treats never go out of style and they’re shockingly easy to DIY.
Best for: Garden beds, walkways, or yard accents
Time to Make: 30 minutes per stake
What You’ll Need:
- Foam discs or circular craft foam
- Wooden dowels
- Red and white acrylic paint
- Glitter (optional)
- Outdoor sealer
How to Make It:
- Paint swirl patterns on foam discs using red and white paint.
- Add glitter for sparkle if desired.
- Seal with outdoor sealer once dry.
- Attach to wooden dowels with hot glue or screws.
- Push dowels into the ground throughout your yard.
Fun Variation: Create a “lollipop garden” by mixing in different colors like green, pink, and silver!
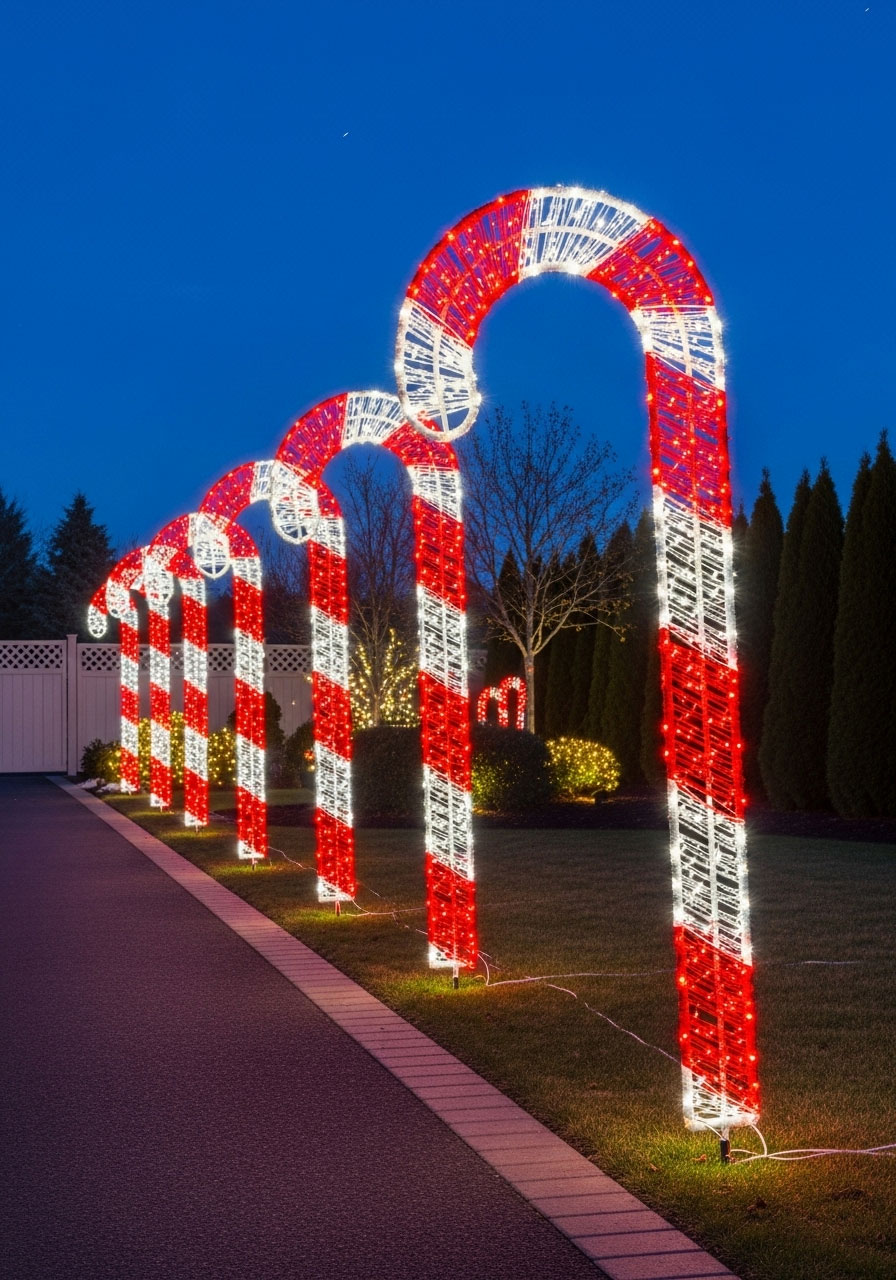
12. PVC Lighted Candy Canes
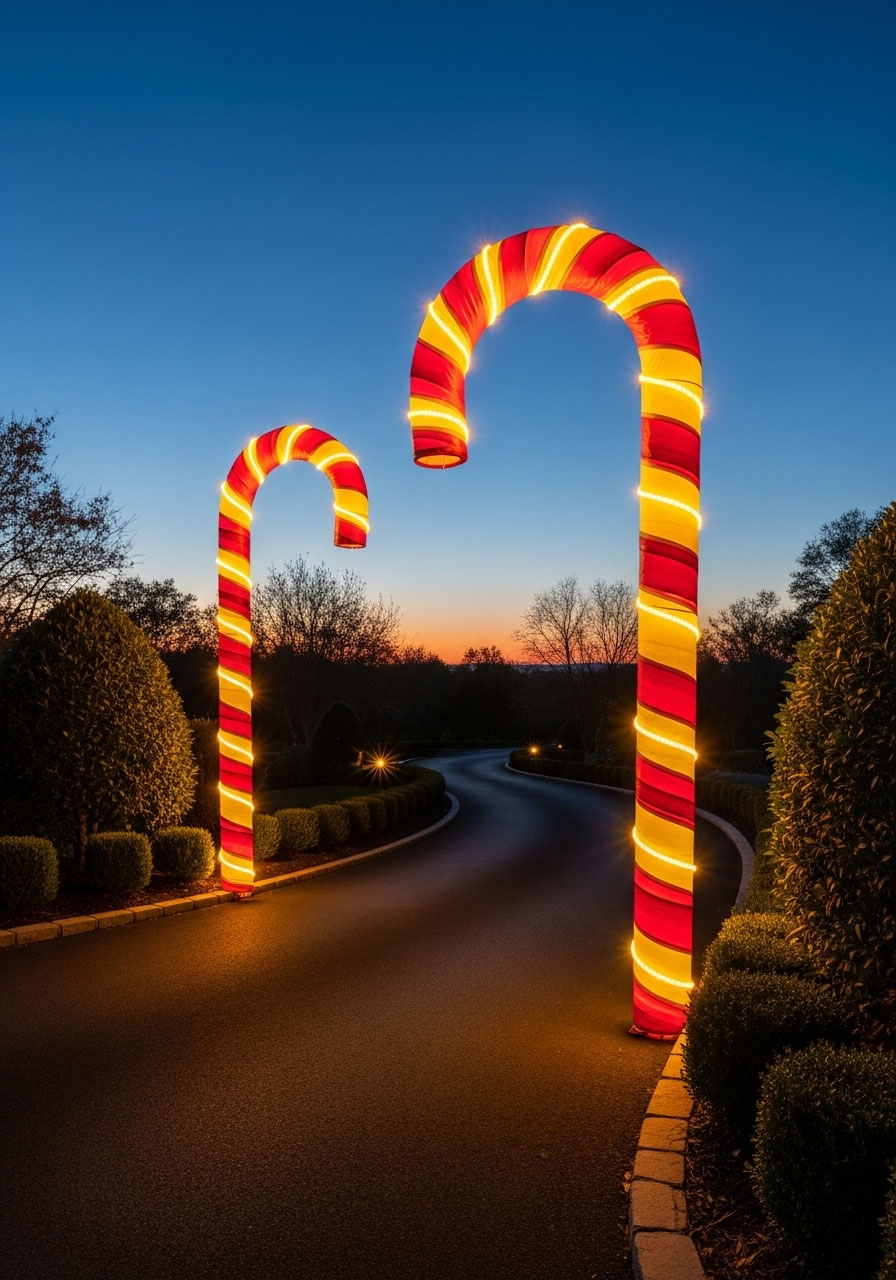
These glowing beauties look professional but cost a fraction of store-bought versions.
Best for: Lining driveways or walkways
Time to Make: 1 hour per candy cane
What You’ll Need:
- PVC pipe (1-2 inches diameter)
- Pipe bender or gentle heat source
- Red and white duct tape or electrical tape
- Rope lights (red or white)
- Zip ties or electrical tape
How to Make It:
- Carefully bend your PVC pipe into a candy cane shape (use a pipe bender or gently heat and bend).
- Wrap the pipe with alternating red and white tape to create stripes.
- Secure rope lights along the candy cane using zip ties.
- Stake the straight end into the ground.
- Plug in and watch them glow!
Pro Tip: Use solar-powered rope lights to save on your electric bill!
13. Christmas Sparkleballs

These glittery orbs catch the light beautifully during the day and glow magically at night.
Best for: Hanging from trees or porch ceiling
Time to Make: 2 hours (plus drying time)
What You’ll Need:
- Wire or grapevine balls
- String lights or battery-operated fairy lights
- Spray adhesive
- Glitter in various colors
- Clear sealer spray
How to Make It:
- Weave battery-operated lights through your wire or grapevine ball.
- Spray the ball with adhesive.
- Roll or sprinkle with glitter until fully covered.
- Seal with clear spray to prevent glitter fallout.
- Hang using fishing line or ribbon.
Pro Tip: Make them in different sizes and colors for a cohesive but interesting display!
14. Plastic Cup Snowman
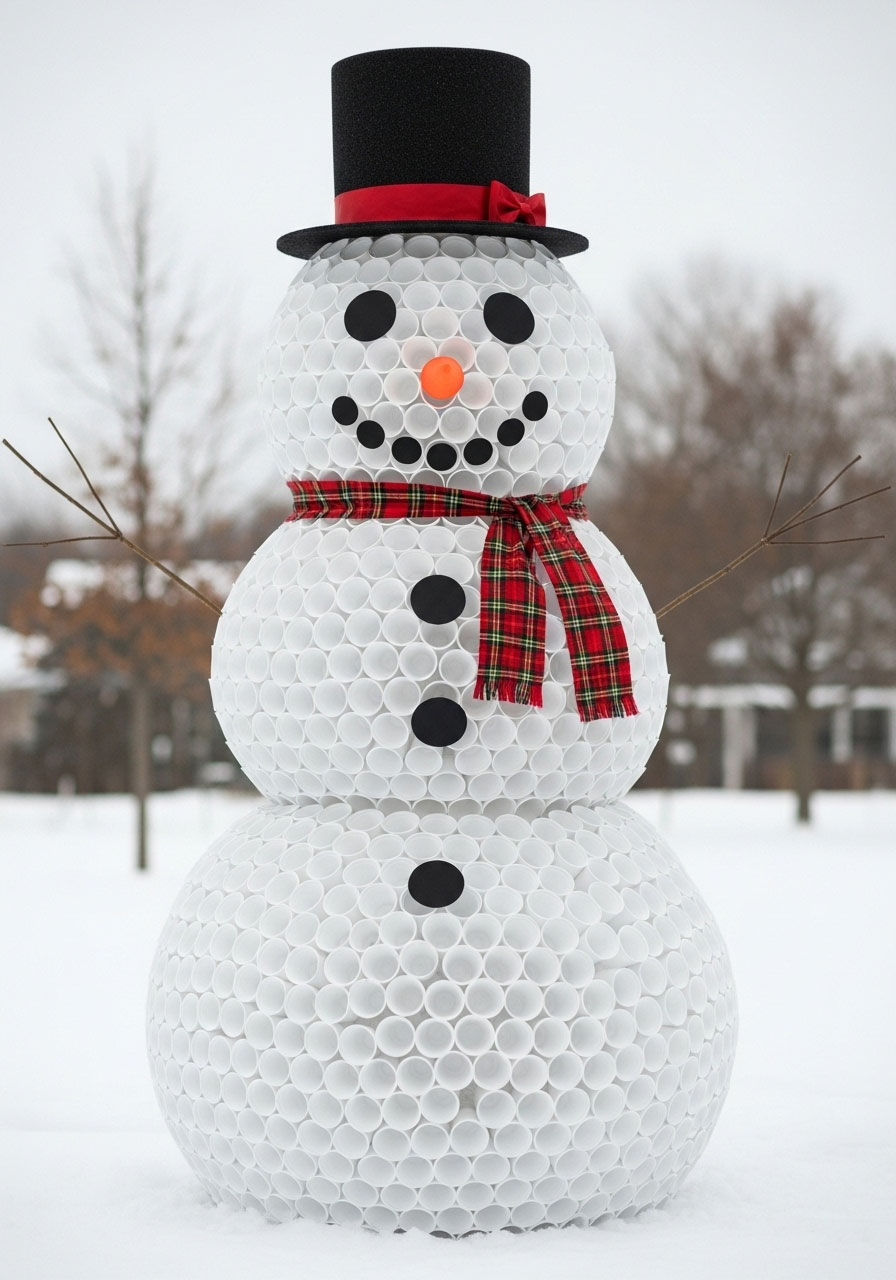
This is one of those projects that looks way more complicated than it actually is. Plus, kids can help!
Best for: Yard centerpiece
Time to Make: 3-4 hours
What You’ll Need:
- 300-500 white plastic cups
- Stapler
- Black paper or felt (for eyes and buttons)
- Orange paper or foam (for nose)
- Hat and scarf
- Battery-operated lights (optional)
How to Make It:
- Form the bottom ball by arranging cups in a circle (about 25 cups), stapling each cup to the next.
- Continue building upward in circles, slightly offsetting each row, until you form a sphere.
- Repeat for the middle and head sections (smaller sizes).
- Stack the three spheres to form your snowman.
- Add facial features, hat, and scarf.
- Optional: Place lights inside for a glowing effect.
Fun Variation: Make a family of snowmen in different sizes!
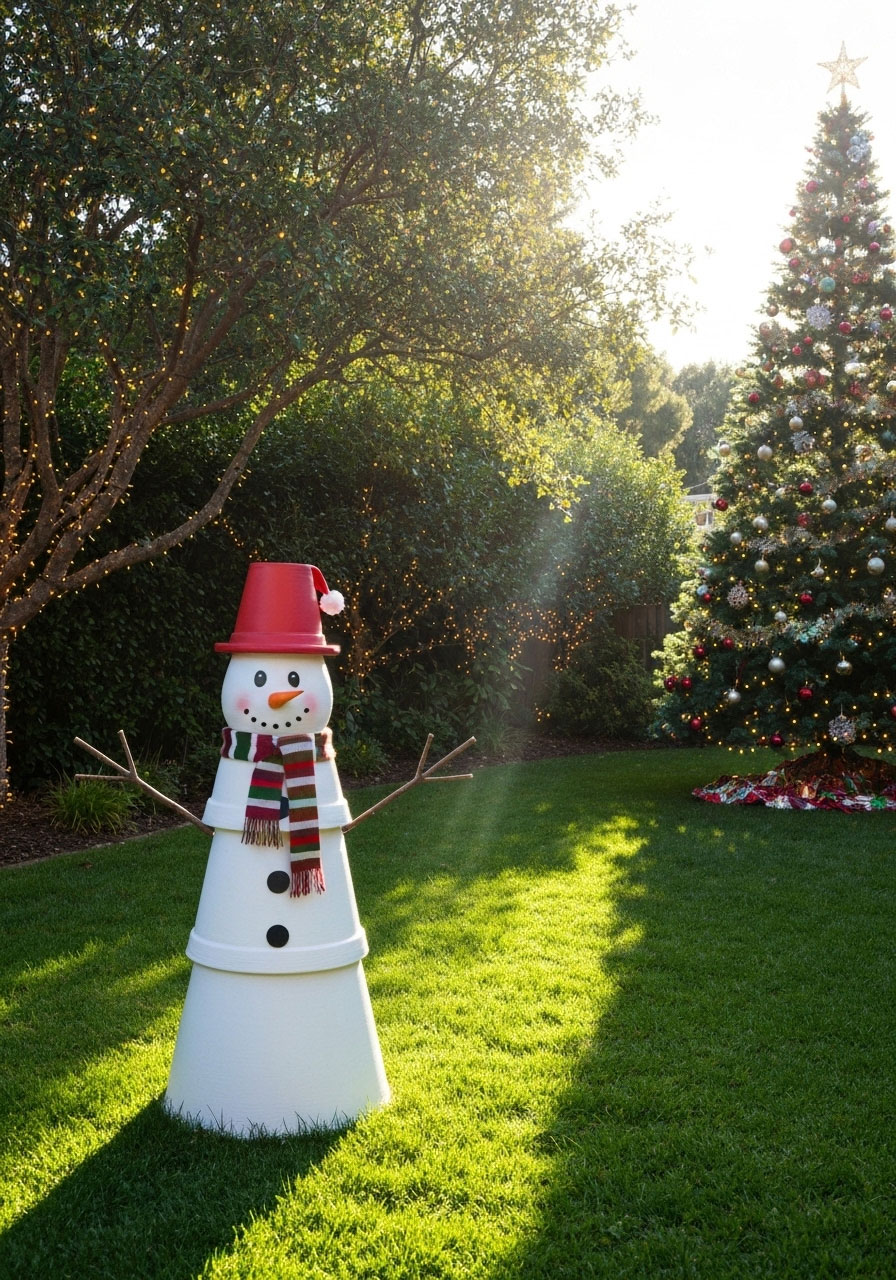
15. Plastic Pumpkin Snowman
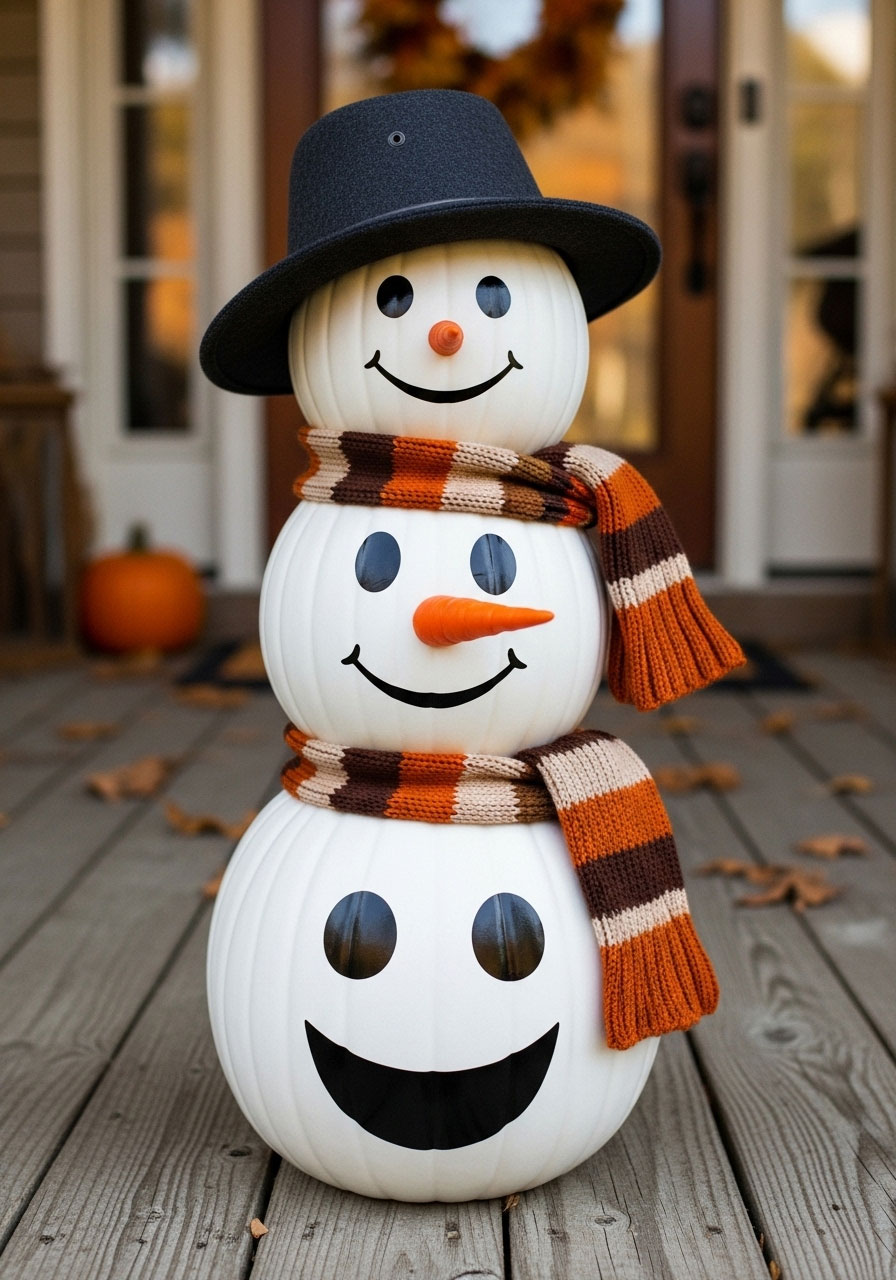
Got leftover plastic pumpkins from Halloween? Flip them white and transform them into the easiest snowman you’ll ever make.
Best for: Quick porch decoration
Time to Make: 30 minutes
What You’ll Need:
- 2-3 plastic pumpkins (different sizes)
- White spray paint
- Black felt or paper (for eyes and buttons)
- Orange felt or foam (for nose)
- Hat and scarf
- Hot glue
How to Make It:
- Spray paint your pumpkins white and let dry.
- Stack them from largest to smallest.
- Cut and glue on eyes, buttons, and a carrot nose.
- Add a hat and scarf.
- Done! Seriously, it’s that easy.
Pro Tip: This is perfect for those of us who procrastinate decorating until the last minute!
16. DIY North Pole Sign

Point the way to Santa’s headquarters with this charming directional sign.
Best for: Yard or garden
Time to Make: 1-2 hours
What You’ll Need:
- Wooden post or stake (4-6 feet)
- Wooden boards for signs
- White, red, and green paint
- Black paint or markers for lettering
- Outdoor sealer
- Post hole digger or hammer
How to Make It:
- Paint your wooden sign boards in festive colors.
- Add directional text like “North Pole”, “Santa’s Workshop”, “Reindeer Parking”, etc.
- Attach signs to your post at various heights and angles.
- Seal with outdoor sealer.
- Plant firmly in your yard.
Fun Variation: Add distances like “North Pole – 2,847 miles” for extra charm!
17. North Pole Decoration Set

Create a whole North Pole scene complete with signage, candy canes, and mailbox for Santa letters.
Best for: Full yard display
Time to Make: Half day project
What You’ll Need:
- Wooden signs and posts
- White, red, and candy cane striped paint
- Mailbox (painted or decorated)
- Faux snow or white fabric
- Outdoor lights
How to Make It:
- Create multiple North Pole-themed signs (workshop, reindeer stable, mailroom, etc.).
- Paint a mailbox red and label it “Letters to Santa”.
- Add candy cane striped posts throughout the display.
- Spread faux snow or white fabric around the base.
- String lights to connect all elements.
Pro Tip: Encourage neighborhood kids to drop letters in your Santa mailbox – it builds community magic!
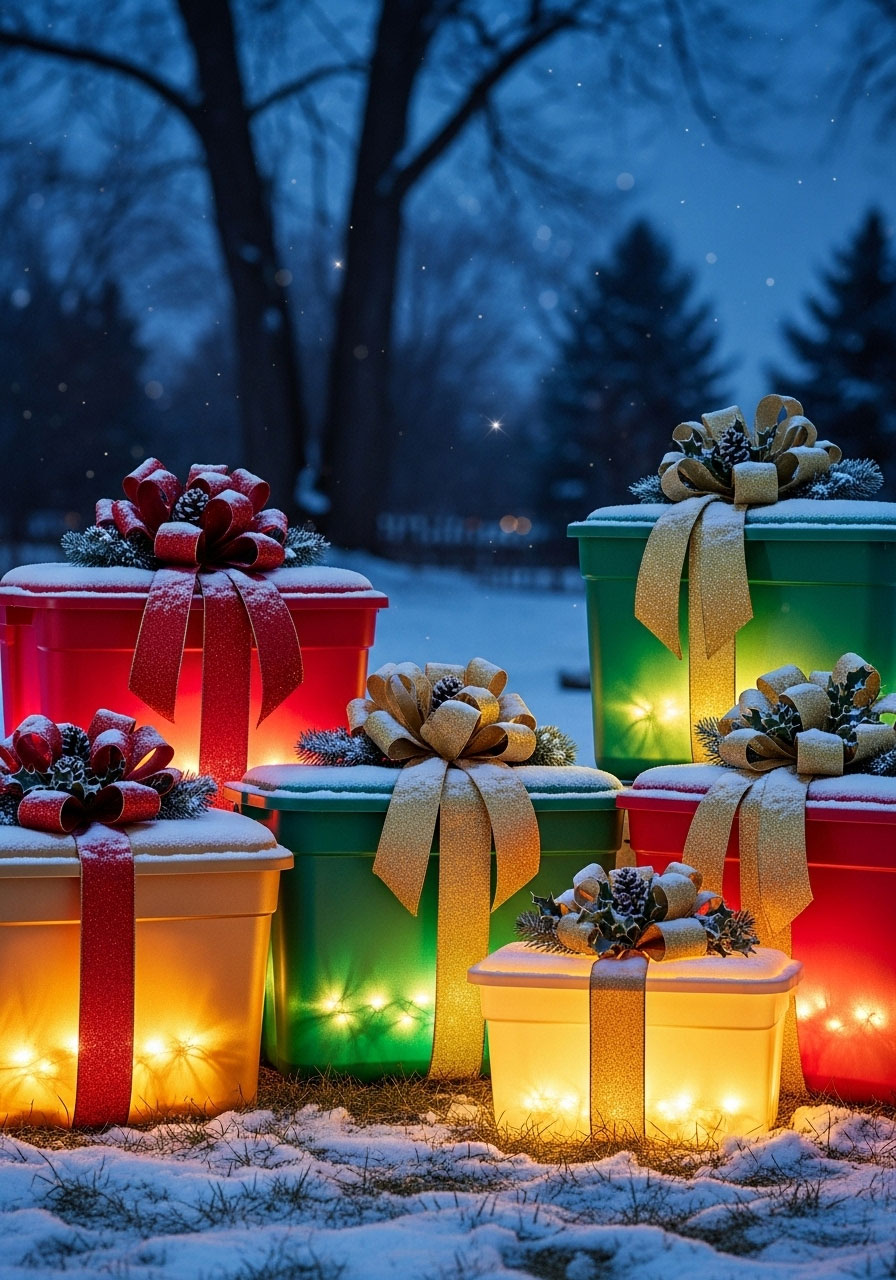
18. Glowing Gift Boxes (The Martha Stewart Way)
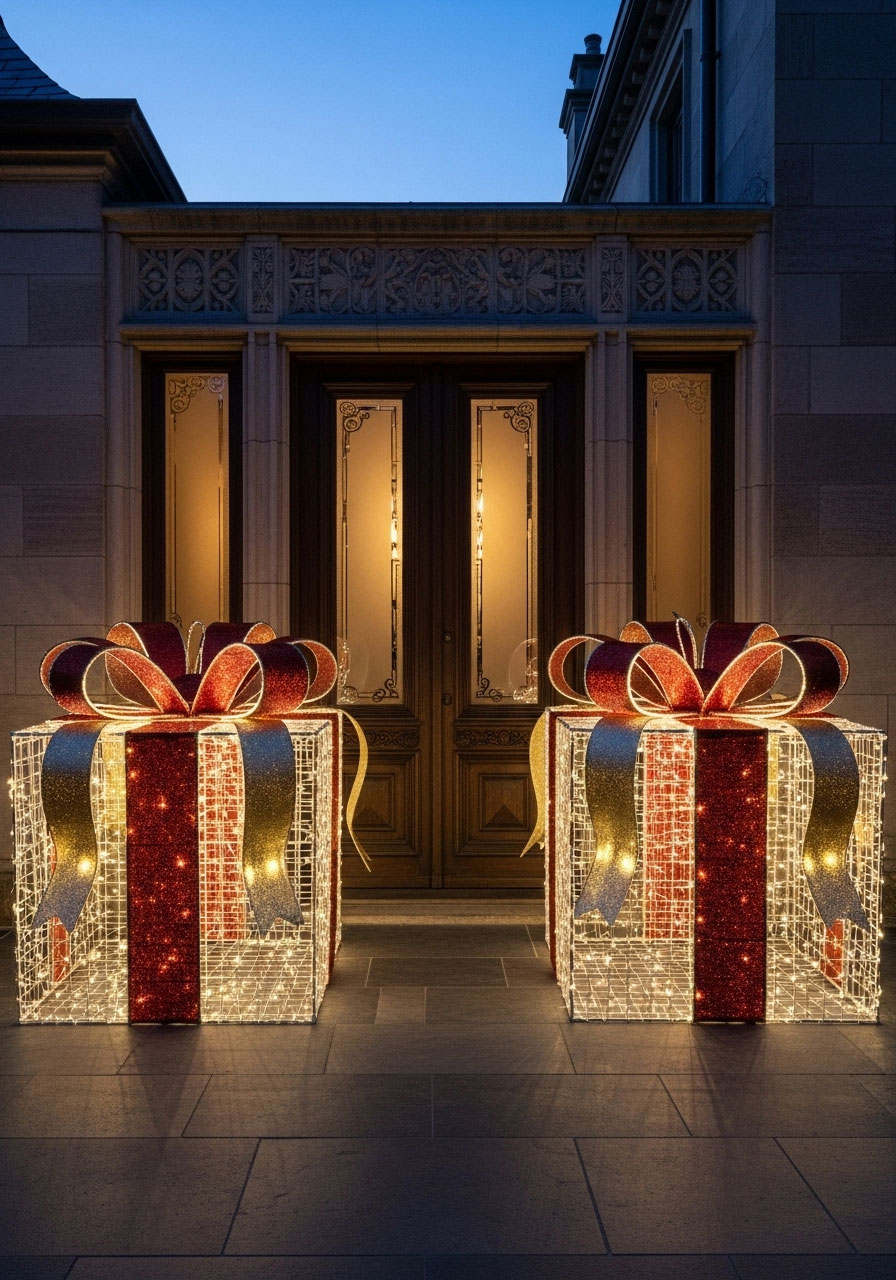
These elegant illuminated presents look like they belong in a high-end holiday catalog.
Best for: Flanking your front door or lining a walkway
Time to Make: 1 hour per box
What You’ll Need:
- Wire gift box frames or chicken wire formed into boxes
- String lights
- Weatherproof ribbon
- Large bow
How to Make It:
- Form chicken wire into cube shapes or use pre-made wire frames.
- Weave string lights throughout the frame.
- Wrap with weatherproof ribbon, creating a gift-wrap appearance.
- Top with a large, weather-resistant bow.
- Plug in or use battery packs for cordless display.
Pro Tip: Make them in various sizes and group them together for a “Santa dropped off early” vibe!
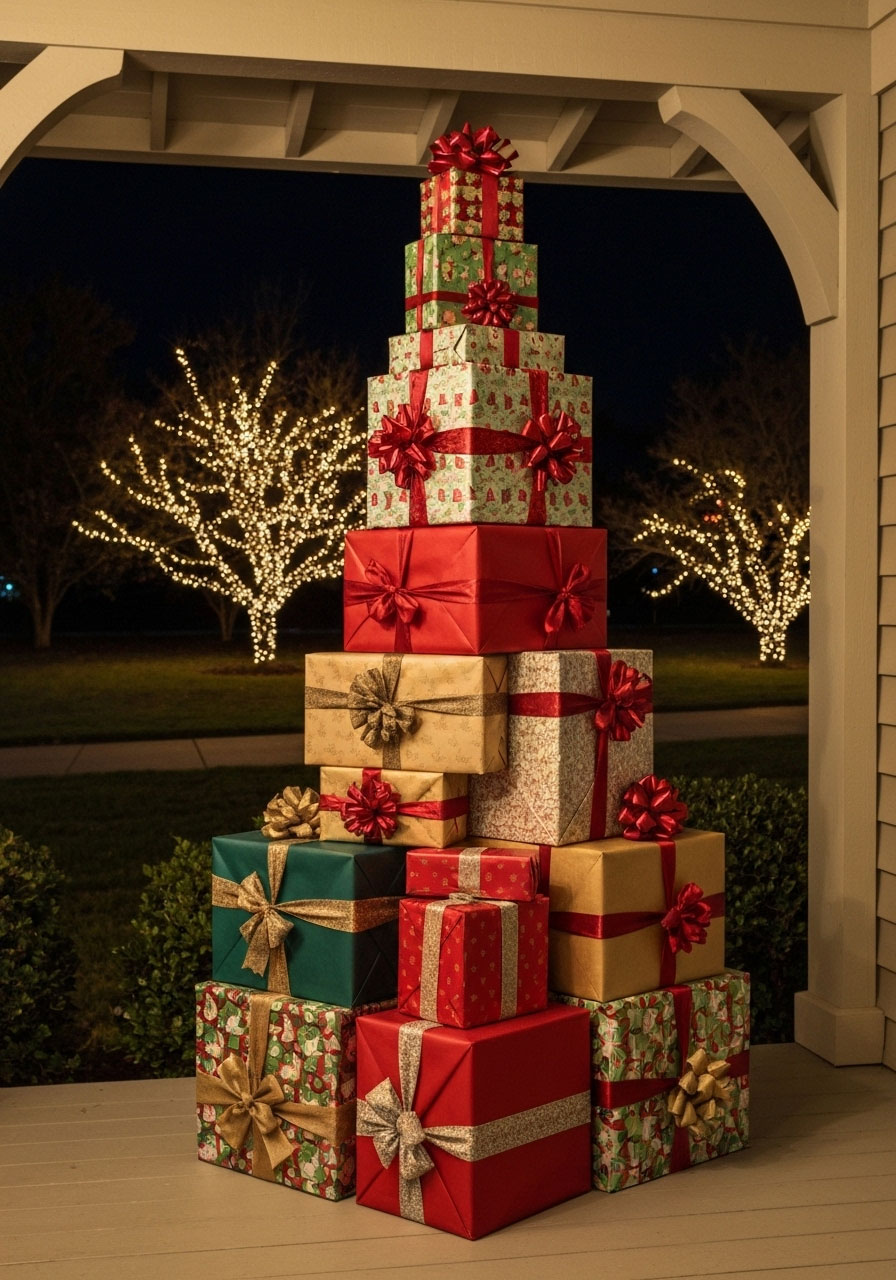
19. Lighted Christmas Present Boxes
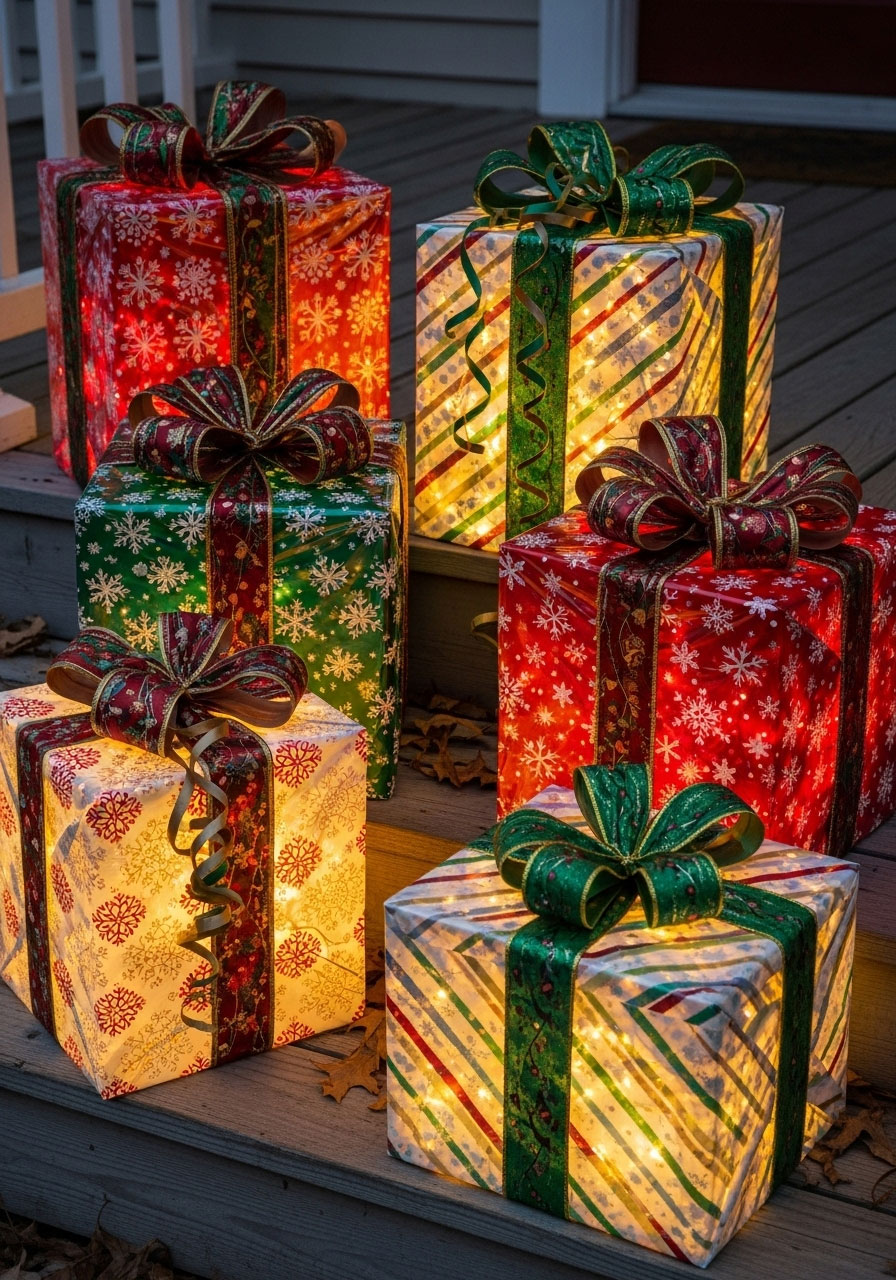
Similar to the glowing boxes, but using actual boxes for a more solid look.
Best for: Porch or yard
Time to Make: 45 minutes per box
What You’ll Need:
- Cardboard or wooden boxes (various sizes)
- Wrapping paper or paint
- Clear plastic wrap (for weather protection)
- Ribbon and bows
- Rope lights or string lights
How to Make It:
- Wrap boxes in festive paper or paint them solid colors.
- Cover with clear plastic wrap to weatherproof.
- Wrap with real ribbon secured with hot glue or staples.
- Add oversized bows on top.
- Place rope lights around or behind the boxes for a glow.
Fun Variation: Stack them to create a present pyramid!
20. Wooden Gift Box Towers
These are more permanent than cardboard versions and can be used year after year.
Best for: Porch corners or yard display
Time to Make: 2-3 hours
What You’ll Need:
- Wooden crates or boxes (various sizes)
- Outdoor paint in festive colors
- Wide ribbon
- Large bows
- Drill and rope lights
How to Make It:
- Paint wooden boxes in coordinating Christmas colors.
- Drill small holes for rope lights if you want them illuminated from within.
- Wrap each box with wide ribbon, securing with staples or hot glue.
- Top with large, weatherproof bows.
- Stack in a staggered arrangement.
Pro Tip: Seal with outdoor polyurethane so they’ll last for many Christmases!
21. Giant Silver Bells
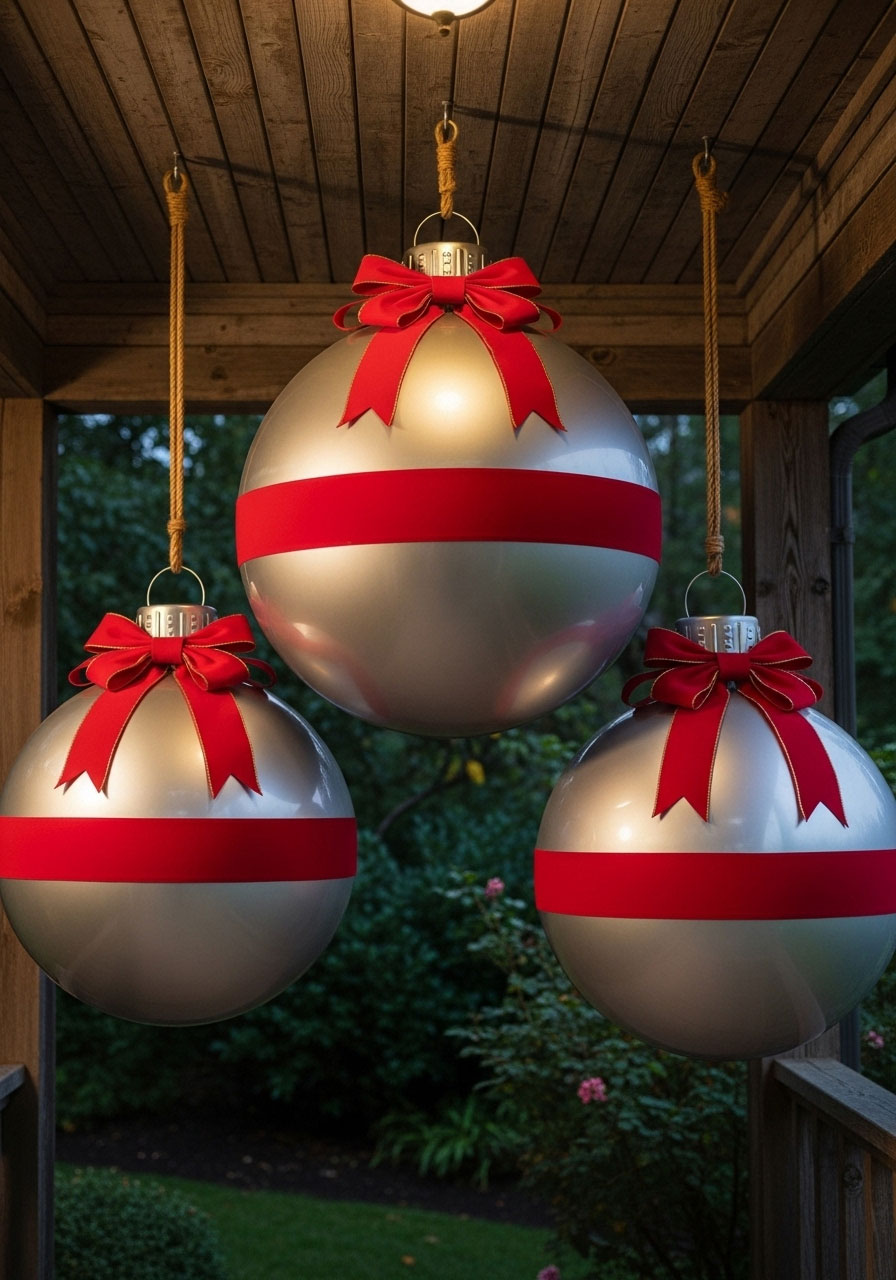
These shimmering beauties make a stunning statement and they’re easier than you think!
Best for: Hanging from porch or tree branches
Time to Make: 30 minutes per bell
What You’ll Need:
- Large plastic or foam balls
- Silver spray paint
- Red ribbon (wide)
- Large bow
- Fishing line or sturdy string
How to Make It:
- Spray paint your balls silver (may need 2-3 coats).
- Once dry, attach a large red ribbon around the “middle” of each bell.
- Create a ribbon loop at the top for hanging.
- Add a large bow where the ribbon meets.
- Hang using fishing line from porch beams or branches.
Fun Variation: Cluster three bells together at different heights for a classic bell arrangement!
22. $2 Large Silver Ball Ornaments

These budget-friendly beauties prove you don’t need to spend a fortune for high impact.
Best for: Hanging displays or ground arrangements
Time to Make: 20 minutes per ornament
What You’ll Need:
- Large plastic balls (dollar store finds)
- Silver spray paint
- Red ribbon
- Large bows
- Optional: glitter, rhinestones
How to Make It:
- Spray paint plastic balls silver.
- While tacky, add glitter or rhinestones if desired.
- Create ribbon hangers with bows.
- Hang or arrange in planters and urns.
Pro Tip: Group several together in different sizes for a designer look that cost you less than $10!
23. Christmas Present Topiary
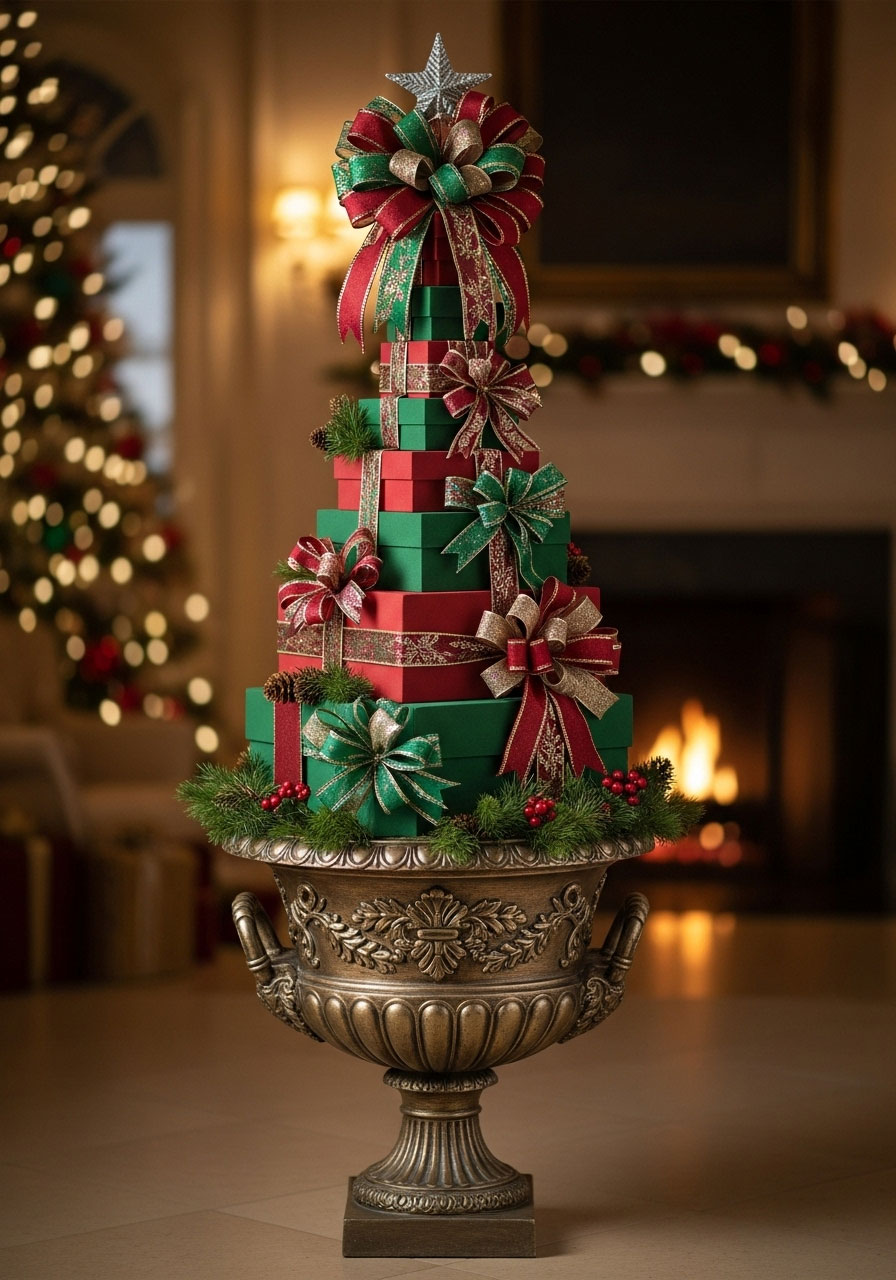
These geometric beauties add height and elegance to your porch display.
Best for: Flanking doorways
Time to Make: 1-2 hours
What You’ll Need:
- Foam blocks or boxes in graduated sizes
- Decorative wrapping or paint
- Ribbon
- Wooden dowel
- Urn or pot
- Foam or sand for stability
How to Make It:
- Stack foam blocks from largest to smallest, threading them onto a dowel.
- Wrap or paint each section in coordinating festive colors.
- Add ribbon and bows to each tier.
- Insert dowel into urn filled with foam or sand for stability.
- Top with a star or large bow.
Fun Variation: Go monochromatic for a super sophisticated look!
24. Giant Ornaments from Old Tires

Repurposing at its finest! Turn old tires into stunning, weatherproof ornaments.
Best for: Yard focal points
Time to Make: 2 hours per ornament
What You’ll Need:
- Old tires (various sizes)
- Spray paint in bright colors
- Plywood circles (to cover tire holes)
- Ribbon
- Large bow
- Outdoor sealer
How to Make It:
- Clean tires thoroughly.
- Cut plywood circles to fit inside tire openings and paint them.
- Spray paint the entire tire in festive colors.
- Insert painted plywood circles.
- Wrap ribbon around and add a large bow at top.
- Seal with outdoor sealer.
Pro Tip: Get free tires from auto shops – they’ll be happy you’re taking them!
25. Giant Ornaments Using Dollar Tree Cake Pans

This genius hack uses cheap cake pans to create perfect ornament shapes!
Best for: Hanging from trees or displaying in yard
Time to Make: 45 minutes per ornament
What You’ll Need:
- Two round cake pans (same size)
- Spray paint
- Hot glue or rivets
- Ribbon
- Decorative elements (glitter, vinyl designs)
How to Make It:
- Spray paint both cake pans in the same festive color.
- Decorate with glitter, vinyl cutouts, or paint designs.
- Glue or rivet the two pans together (open sides facing in) to form a ball.
- Attach ribbon and bow at top for hanging.
- Hang from trees or shepherd hooks.
Fun Variation: Create an entire “ornament tree” using multiple colors and sizes!
26. Hanging Santa Suit

This hilarious decoration looks like Santa got stuck in the chimney! Guaranteed to make people smile.
Best for: Roof edge or porch
Time to Make: 30 minutes
What You’ll Need:
- Santa suit (jacket and pants)
- Black boots
- Stuffing or rolled newspaper
- Christmas lights
- Rope or wire for securing
How to Make It:
- Stuff the Santa suit to give it shape.
- Position it as if Santa’s upper body is down the chimney (legs and boots dangling).
- Secure carefully to roof edge or porch overhang.
- Wrap Christmas lights around the legs for extra visibility.
- Optional: Add a bag of gifts nearby.
Pro Tip: Make sure it’s VERY secure – you don’t want Santa “falling” in a windstorm!
27. Melted Snowman

This comedic decoration captures that “uh oh” moment when the weather gets too warm.
Best for: Lawn or garden bed
Time to Make: 1 hour
What You’ll Need:
- White fabric or felt
- Hat, scarf, and buttons
- Carrot (for nose)
- Coal or black buttons (for eyes and mouth)
- Small pile of “snow” (white fabric or cotton batting)
How to Make It:
- Spread white fabric flat on the ground in a puddle shape.
- Place hat, scarf, and buttons on the fabric as if the snowman melted beneath them.
- Position carrot and coal for facial features.
- Add small mound of “snow” to suggest he’s still melting.
Fun Variation: Add a sign saying “I’m okay!” or “Send ice!” for extra laughs!
28. Lighted Spire Ornament

These tall, elegant ornaments add dramatic vertical interest to your display.
Best for: Flanking doorways or lining pathways
Time to Make: 1 hour per spire
What You’ll Need:
- Tomato cage or wire cone frame
- String lights
- Garland or tinsel
- Ornaments
- Tree topper or finial
How to Make It:
- Shape tomato cage into a spire/tree form.
- Wrap with string lights from bottom to top.
- Weave garland or tinsel through the frame.
- Hang ornaments at various points.
- Top with a star or finial.
Pro Tip: These look amazing in pairs flanking your front door or at the end of your driveway!
29. Christmas Reindeer Logs

These rustic woodland creatures bring natural charm to your holiday display.
Best for: Yard or porch
Time to Make: 1-2 hours per reindeer
What You’ll Need:
- Logs (various sizes for body and head)
- Thin branches (for legs and antlers)
- Drill with large bit
- Wood glue or screws
- Ribbon, jingle bells
- Optional: googly eyes or paint
How to Make It:
- Use a large log for the body and a smaller one for the head.
- Drill holes for legs and antlers.
- Insert and secure thin branches for legs and antlers.
- Attach head to body with screws or strong glue.
- Add details like eyes, nose, and a ribbon with bells.
Fun Variation: Create a whole reindeer herd, including Rudolph with a red nose!
30. Pallet Candles
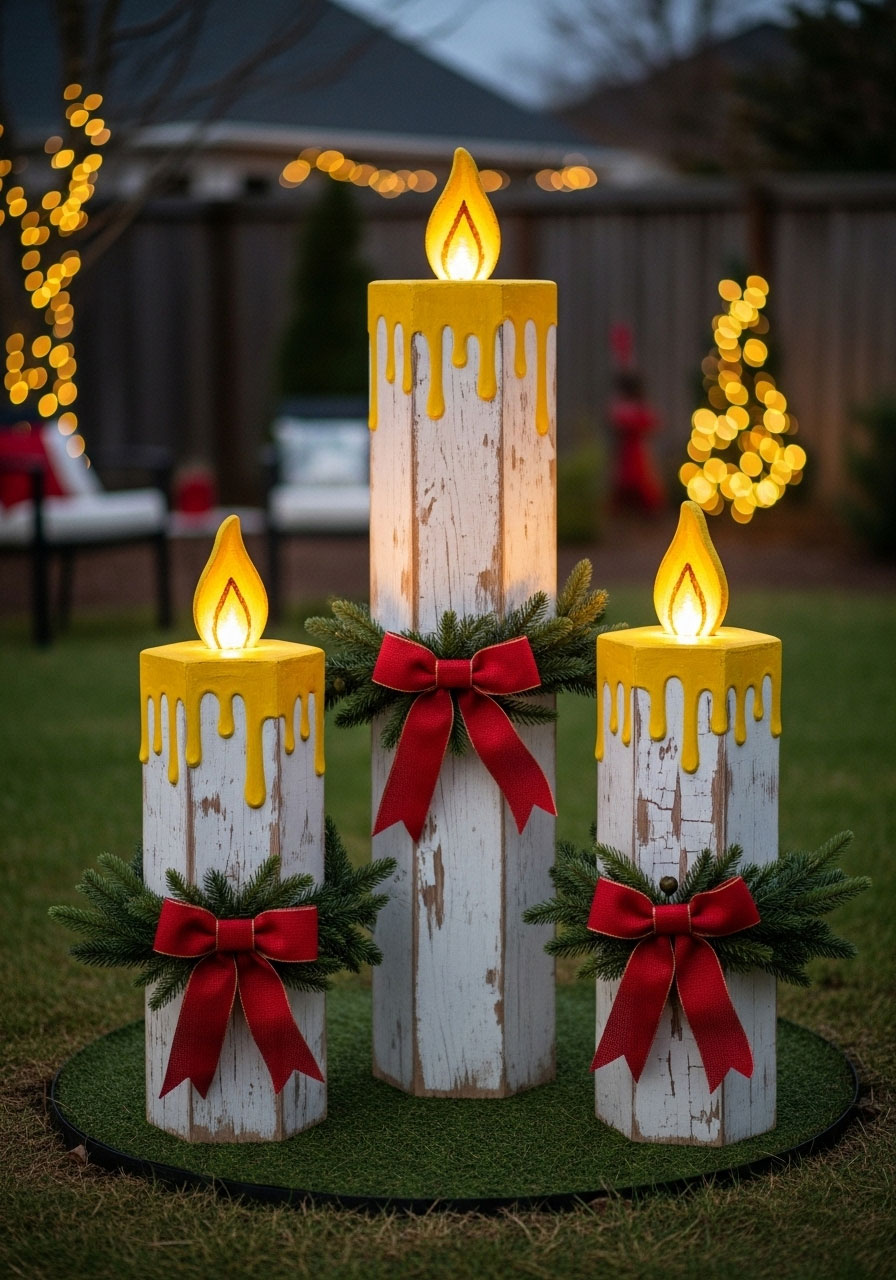
These oversized “candles” add a warm, cozy vibe without any fire risk.
Best for: Porch or walkway
Time to Make: 1 hour per candle
What You’ll Need:
- Pallet wood or 4×4 posts (various heights)
- White, red, or cream paint
- Yellow or orange paint (for flame)
- Black marker or paint
- Battery-operated LED candle or flameless tea light
- Drill with large bit
- Greenery or ribbon for base
How to Make It:
- Cut wood to desired candle heights (vary them for interest).
- Paint white, red, or cream.
- Drill a shallow hole at the top for the LED light.
- Paint yellow “drips” down the sides for melted wax effect.
- Insert battery-operated LED candle in top hole.
- Wrap base with greenery and ribbon.
Pro Tip: Group three or five together at different heights for maximum impact!
31. Wood Log Snowmen

These adorable rustic snowmen are perfect for a farmhouse or woodland Christmas theme.
Best for: Porch or yard
Time to Make: 1-2 hours
What You’ll Need:
- 3 logs or wood rounds (graduated sizes)
- White paint
- Black paint or buttons (for eyes and mouth)
- Orange paint (for nose)
- Twigs (for arms)
- Hat and scarf
- Wood glue or screws
How to Make It:
- Stack three wood rounds from largest to smallest.
- Secure them together with wood glue or screws.
- Paint the front faces white.
- Paint or attach eyes, button mouth, and carrot nose.
- Drill small holes on sides and insert twigs for arms.
- Add hat and scarf.
Fun Variation: Leave the backs unpainted for a rustic, woodsy look!
32. DIY Log Snowman (Single Piece Version)
A simpler take using one thick log stood upright.
Best for: Quick porch accent
Time to Make: 30-45 minutes
What You’ll Need:
- One thick log (2-3 feet tall)
- White, black, and orange paint
- Paintbrushes
- Scarf and small hat
- Optional: clear sealer
How to Make It:
- Stand log upright.
- Paint the front face white, leaving wood showing on back and sides.
- Paint snowman face with black eyes/mouth and orange nose.
- Add painted buttons down the front.
- Wrap scarf and add small hat on top.
- Seal if desired.
Pro Tip: These work great grouped with other log decorations for a cohesive natural theme!
33. Wood Block Candles (Striped Version)

Add a candy cane twist to your wooden candles for extra festive flair.
Best for: Porch steps or walkway
Time to Make: 1 hour per set
What You’ll Need:
- 4×4 wood posts (various heights)
- Red and white paint
- Painter’s tape
- Drill with large bit
- Battery-operated LED candles
- Twine
- Christmas picks or greenery
How to Make It:
- Use painter’s tape to create stripe patterns on wood.
- Paint alternating red and white sections.
- Remove tape once dry.
- Drill hole at top for LED candle.
- Wrap twine around the “candle”.
- Insert greenery or Christmas picks at the base of the flame.
Fun Variation: Make some solid colors and some striped for variety!
34. Wood Block Snowmen

These chunky little guys are insanely cute and super stable (no tipping over in the wind!).
Best for: Lining walkways or porch steps
Time to Make: 45 minutes per snowman
What You’ll Need:
- 4×4 or 6×6 wood blocks (3 per snowman)
- White paint
- Black paint or buttons
- Orange paint
- Small hat and scarf
- Wood glue
- Twigs
How to Make It:
- Paint three wood blocks white.
- Stack and glue them together.
- Paint face on top block (eyes, mouth, carrot nose).
- Paint buttons on middle block.
- Drill small holes and insert twig arms.
- Add hat and scarf.
Pro Tip: Make several and line them up like a snowman family photo!
35. Pallet Christmas Tree (Rustic Horizontal Version)

This trendy tree is all over Pinterest for good reason – it’s beautiful and uses free materials!
Best for: Porch wall or fence
Time to Make: 2-3 hours
What You’ll Need:
- Wooden pallet (free from Craigslist or businesses)
- Green paint or stain
- Sandpaper
- Star tree topper
- String lights
- Ornaments
- Hooks or screws for hanging
How to Make It:
- Sand your pallet to remove rough spots.
- Paint or stain green (or leave natural).
- Cut pallet into graduated triangle shape.
- Reassemble pieces to form tree shape.
- Attach star to top.
- String lights and hang ornaments.
- Mount on porch wall or fence.
Pro Tip: Pre-drill holes for hanging ornaments so you’re not scrambling with a drill ladder on decorating day!
36. Pallet Christmas Tree (Vertical Stacked Version)

This version stands freely and makes a stunning focal point.
Best for: Corner of porch or yard centerpiece
Time to Make: 3-4 hours
What You’ll Need:
- Wooden pallet boards
- Green paint
- Wood glue and screws
- Base board for stability
- Star topper
- Decorations
How to Make It:
- Cut pallet boards into graduated lengths (longest at bottom, shortest at top).
- Paint all pieces green.
- Stack and attach boards to a center pole, creating a tree shape.
- Secure to a sturdy base.
- Add star topper and decorations.
Fun Variation: Leave it natural wood for a Scandinavian minimalist vibe!
37. Rustic Nail-Head Christmas Trees
These simple yet striking trees have a modern farmhouse aesthetic that’s pure perfection.
Best for: Porch or indoor/outdoor display
Time to Make: 2 hours per tree
What You’ll Need:
- Wooden boards (pine works great)
- Nails with large heads
- Hammer
- Stain or paint
- Star stencil or template
- String lights (optional)
How to Make It:
- Cut wood into tree shape or use rectangular board.
- Stain or paint your board.
- Draw or trace a tree outline.
- Hammer nails along the outline, spacing them 1-2 inches apart.
- Optionally weave string lights between the nail heads.
Pro Tip: Make a set of three in different sizes for a forest effect!
38. Pallet Christmas Tree Sign

A flat, sign-style tree that’s perfect for small spaces.
Best for: Apartments, condos, or small porches
Time to Make: 2 hours
What You’ll Need:
- Pallet wood arranged in tree shape
- Green paint or stain
- Decorative elements
- Hanging hardware
How to Make It:
- Arrange pallet wood in triangular tree shape.
- Secure boards together on the back.
- Paint or stain green.
- Add painted ornaments, a star, and “Merry Christmas” message.
- Hang on exterior wall or fence.
Fun Variation: Paint it white with colorful ornaments for a fresh, modern look!
39. Santa Log Family

These adorable log Santas bring whimsy and warmth to your holiday display.
Best for: Porch or yard
Time to Make: 1 hour per Santa
What You’ll Need:
- Log rounds or thick logs
- Red and white paint
- Pink paint (for face)
- Black paint (for eyes and belt)
- Cotton balls or white fur (for beard)
- Red felt (for hat)
- Hot glue
How to Make It:
- Paint the top portion of the log red (for Santa’s body).
- Paint a pink oval for the face.
- Paint black eyes and belt with gold buckle.
- Glue cotton balls for fluffy beard.
- Create a cone hat from red felt and attach.
Pro Tip: Make Mrs. Claus and elf versions to create a whole North Pole family!
40. “HO HO HO” Pallet Sign

This classic greeting never gets old and looks amazing in rustic style.
Best for: Fence, porch wall, or leaning against house
Time to Make: 2-3 hours
What You’ll Need:
- Pallet wood
- Red spray paint or stain
- Large wooden letters (H-O-H-O-H-O)
- White acrylic paint
- Black felt
- Gold glitter
- Mod Podge
- Cardboard (for Santa belts)
How to Make It:
- Arrange and secure pallet boards.
- Paint or stain the background red.
- Paint wooden letters white.
- Add black felt strips as “belts” across each O.
- Create gold buckles with glitter and cardboard.
- Attach letters to pallet board.
Fun Variation: Alternate the O’s with ornament shapes for extra festivity!
41. Shutter Door Snowmen
Got old shutters lying around? Transform them into charming snowman decorations!
Best for: Porch or propped against house
Time to Make: 1 hour per snowman
What You’ll Need:
- Old shutters or slatted closet doors
- White spray paint
- Black paint (for eyes and buttons)
- Orange paint (for nose)
- Burlap ribbon
- Christmas picks
- Wood chip or felt (for nose)
How to Make It:
- Spray paint shutters white.
- Once dry, paint snowman face at the top.
- Paint button details down the center.
- Wrap burlap ribbon as a scarf.
- Add Christmas picks for decoration.
- Prop against porch wall or fence.
Pro Tip: Habitat for Humanity ReStores have doors for under $10!
42. “JOY” Pallet Sign

Simple, powerful, and perfectly festive.
Best for: Porch, fence, or entry wall
Time to Make: 2 hours
What You’ll Need:
- Pallet boards
- Paint in your chosen colors
- Large letters (J-O-Y)
- Decorative elements
- Hanging hardware
How to Make It:
- Arrange pallet boards and secure.
- Paint background color.
- Attach or paint large “JOY” letters.
- Add decorative elements like greenery, ribbons, or snowflakes.
- Seal with outdoor sealer.
Fun Variation: Make it reversible with “HOPE” on the other side!
43. Candy Cane Fence
Transform a boring fence section into a peppermint paradise!
Best for: Front yard fence
Time to Make: Half-day project
What You’ll Need:
- Fence boards or wooden slats
- Red and white paint
- Painter’s tape
- Brushes or rollers
- Outdoor sealer
How to Make It:
- Tape off diagonal stripe patterns on fence boards.
- Paint alternating sections red and white.
- Remove tape once dry.
- Seal with outdoor sealer.
- Install or attach to existing fence.
Pro Tip: Do every other board for a candy cane effect, or paint the whole fence section!
44. Snowman Pallet
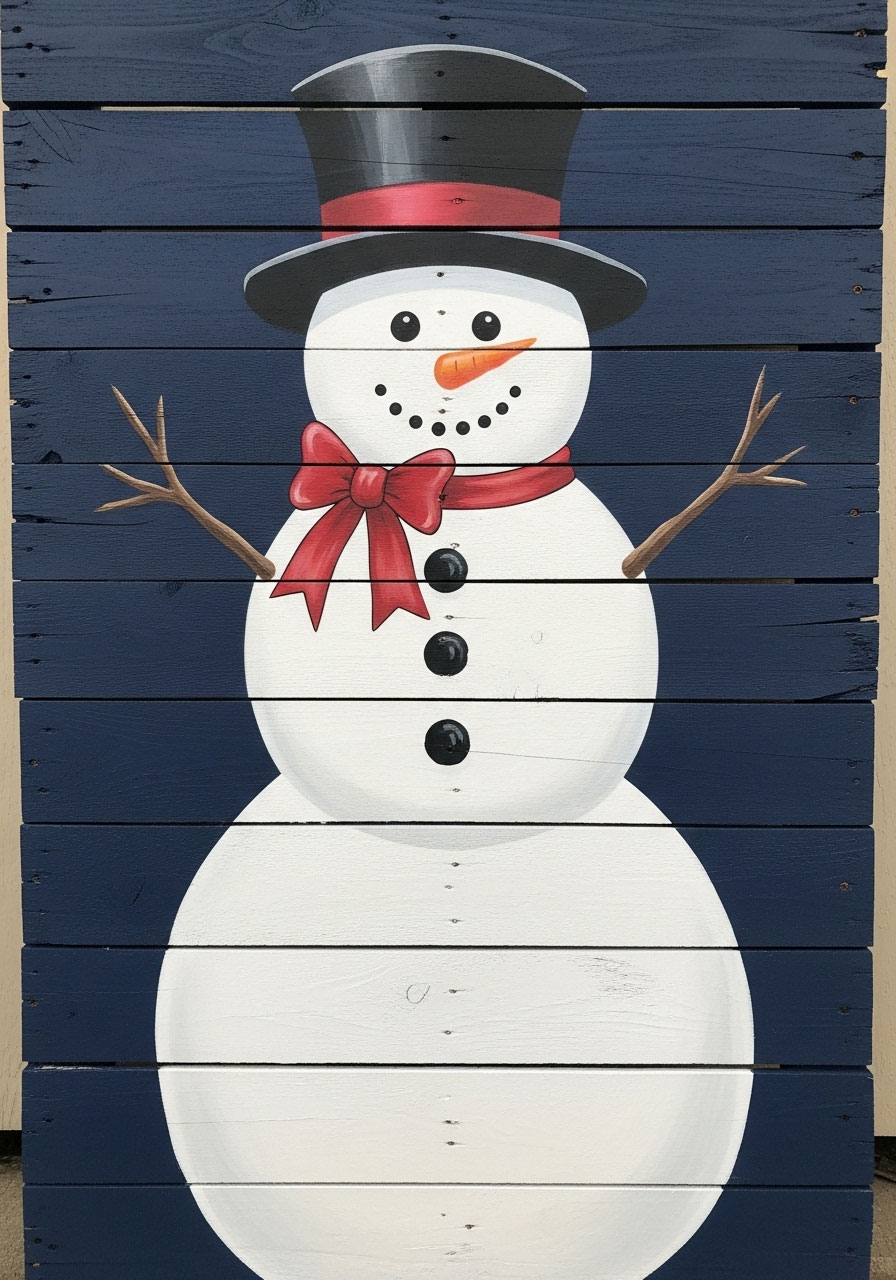
A full-body snowman made from reclaimed pallet wood – rustic charm at its finest!
Best for: Porch or yard
Time to Make: 2-3 hours
What You’ll Need:
- Full pallet or pallet boards
- Navy or dark blue paint (for background)
- White and black acrylic paint
- Red bow
- Cardboard (for hat)
- Pencil for initial sketch
How to Make It:
- Paint pallet background dark blue or navy.
- Sketch snowman outline in pencil.
- Paint snowman body white.
- Add black hat, eyes, mouth, and buttons.
- Attach red bow at neck.
- Seal for outdoor use.
Fun Variation: Add “Let it Snow” text at the top or bottom!
45. Happy Lighted Snowman

This cheerful fellow lights up the night and warms hearts.
Best for: Front yard centerpiece
Time to Make: 2 hours
What You’ll Need:
- Wire tomato cages (3 sizes)
- White string lights
- Black felt or fabric
- Orange foam (for nose)
- Hat and scarf
- Extension cord
How to Make It:
- Stack three tomato cages to form snowman shape.
- Wrap entirely with white string lights.
- Cut and attach black felt for eyes, mouth, and buttons.
- Add orange foam cone for carrot nose.
- Top with hat and add scarf.
- Plug in and admire!
Pro Tip: Use zip ties to secure the cages together so he doesn’t topple in wind!
46. Christmas Spindle Decorations

These elegant candles add classic charm with an upscale look.
Best for: Porch steps or flanking doorway
Time to Make: 1 hour per candle
What You’ll Need:
- White painted spindles (from old railings or Habitat for Humanity)
- Battery-operated LED candles
- Red ribbon
- Evergreen clippings
- Berry branches
- Pinecones
- Square wood base
How to Make It:
- Paint spindles white if needed.
- Attach spindle to square wood base.
- Place LED candle on top.
- Wrap red ribbon around middle.
- Hot glue evergreen clippings, berries, and pinecones around the base.
Fun Variation: Paint some gold or silver for variety!
47. Wood Snowflakes with Lights

These geometric beauties bring modern elegance to your winter wonderland.
Best for: Hanging on exterior walls or fence
Time to Make: 2 hours per snowflake
What You’ll Need:
- Wooden craft sticks or paint stirrers
- White paint
- Hot glue gun
- String lights (white or blue)
- Glitter (optional)
- Fishing line for hanging
How to Make It:
- Arrange sticks in snowflake pattern (six points radiating from center).
- Hot glue all pieces together.
- Paint white and add glitter if desired.
- Weave string lights through the design.
- Hang with fishing line.
Pro Tip: Make several in different sizes for a snowflake cascade!
48. Reclaimed Wood Reindeer

This rustic beauty brings woodland magic to your display.
Best for: Yard focal point
Time to Make: 3-4 hours
What You’ll Need:
- Reclaimed wood planks
- Saw
- Wood stain or paint
- Screws or wood glue
- Red bow or bandana
How to Make It:
- Cut wood pieces for body, head, legs, and antlers.
- Stain or paint as desired.
- Assemble pieces using screws or strong wood glue.
- Add details like eyes and nose.
- Tie red bow around neck.
Fun Variation: Make the nose red for Rudolph!
49. Wooden Moose Decoration

For something a little different, a majestic moose brings northern charm.
Best for: Large yards or corner displays
Time to Make: 3-4 hours
What You’ll Need:
- Plywood or reclaimed wood
- Moose template or pattern
- Saw
- Brown stain or paint
- Weatherproof sealer
How to Make It:
- Trace moose pattern onto plywood.
- Cut out shape carefully.
- Stain or paint brown.
- Add antler details.
- Seal for weather protection.
- Secure with stakes in yard.
Pro Tip: Add a scarf or string lights around the neck for festive flair!
50. Paper Bag Christmas Luminaries

These timeless classics line pathways with old-fashioned charm.
Best for: Driveway or walkway
Time to Make: 30 minutes for a dozen
What You’ll Need:
- Brown paper lunch bags
- Sand or small rocks
- Battery-operated tea lights
- Hole punch
- Christmas templates (optional)
How to Make It:
- Fold down tops of paper bags for stability.
- Optional: Use hole punch to create snowflake or Christmas designs.
- Fill bottom of each bag with 2-3 inches of sand.
- Place battery-operated tea light in center.
- Line your pathway or driveway.
Pro Tip: Use white bags for snow luminaries or red/green for color!
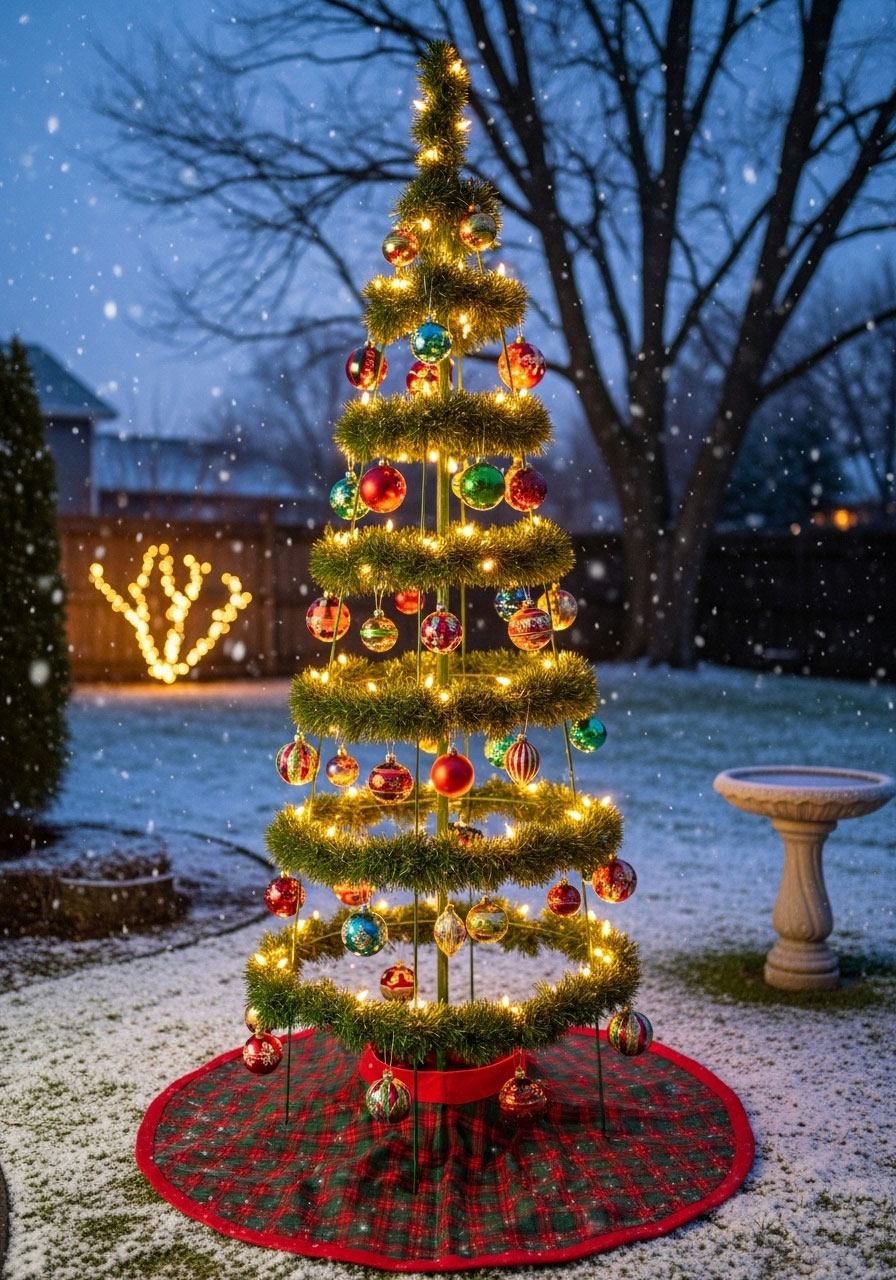
51. Tomato Cage Christmas Tree with Lights

The ultimate budget-friendly lighted tree that looks way more expensive than it is!
Best for: Yard, porch, or even indoors
Time to Make: 1 hour
What You’ll Need:
- Tomato cage
- String lights (at least 100)
- Garland (optional)
- Ornaments
- Tree topper
How to Make It:
- Flip tomato cage upside down (wider end becomes base).
- Wrap string lights around cage from bottom to top.
- Optionally wrap garland through the lights.
- Hang lightweight ornaments.
- Add tree topper.
Fun Variation: Make a whole forest of different-sized trees!
52. Snow Lanterns (Ice Luminaries)
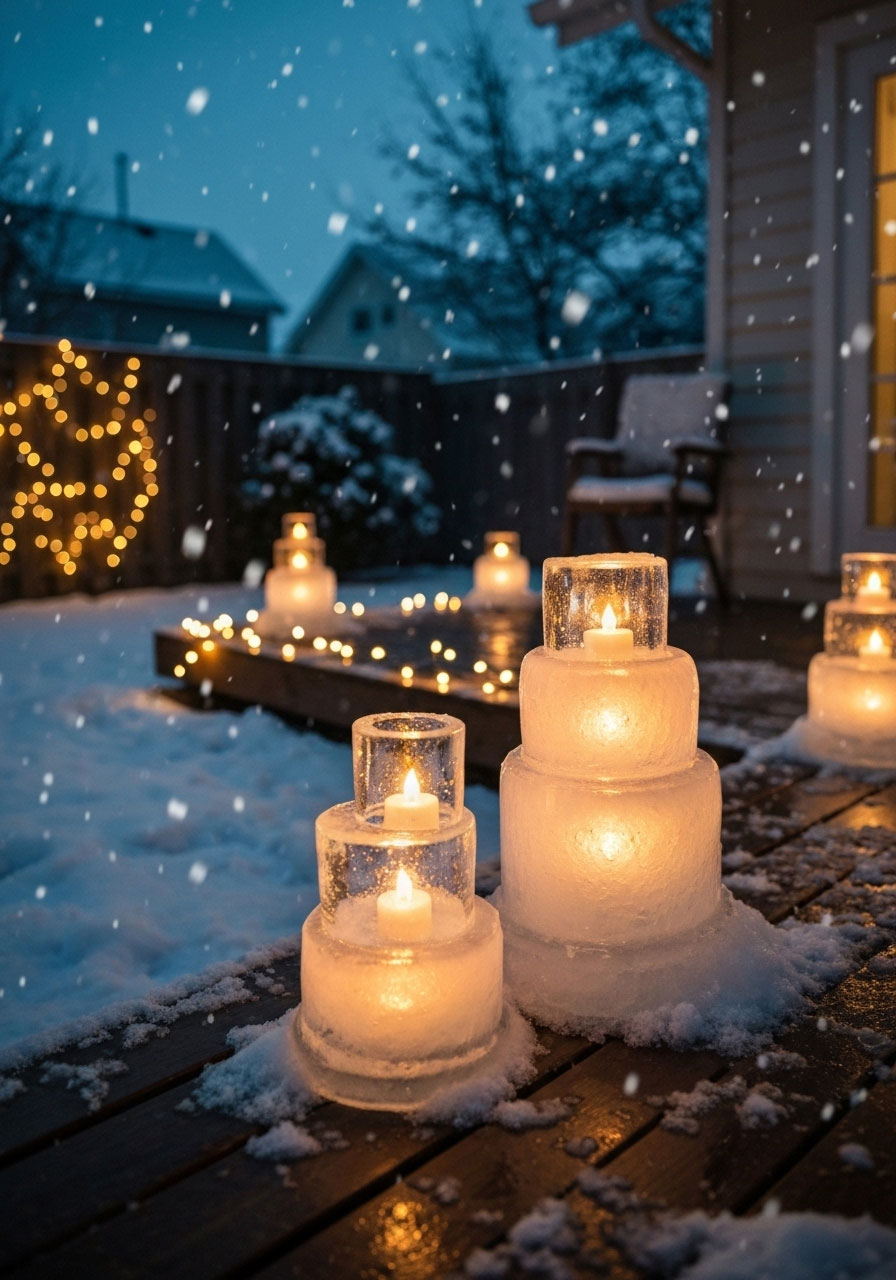
These magical ice creations are perfect if you live in cold climates.
Best for: Walkways in freezing temperatures
Time to Make: Overnight freezing required
What You’ll Need:
- Large buckets or containers
- Smaller containers (to nest inside)
- Water
- Tea light candles
- Optional: cranberries, greenery, or food coloring
How to Make It:
- Fill large container with 2 inches of water. Freeze solid.
- Place smaller container inside, weighed down.
- Fill space between containers with water (add berries/greenery if desired).
- Freeze overnight.
- Remove containers by running warm water over them.
- Place tea light inside the ice lantern.
Pro Tip: These only work in consistently freezing temps, but they’re absolutely magical!
53. DIY Glitter Snow Mason Jar Candles

These sparkling beauties create ambient lighting with minimal effort.
Best for: Porch steps or window ledges
Time to Make: 30 minutes (plus drying)
What You’ll Need:
- Mason jars
- Mod Podge or white glue
- Epsom salt or white glitter
- Battery-operated tea lights
- Optional: ribbon, greenery
How to Make It:
- Brush Mod Podge around outside of mason jar.
- Roll jar in Epsom salt or glitter.
- Let dry completely.
- Add battery-operated tea light inside.
- Optional: tie ribbon around rim and add sprig of evergreen.
Fun Variation: Use colored glitter for jewel-tone luminaries!
54. Christmas Tree Ball Ornaments

These oversized spheres covered in small ornaments are show-stopping!
Best for: Yard or hanging from porch
Time to Make: 2-3 hours per ball
What You’ll Need:
- Large foam or plastic ball
- Small shatterproof ornaments (dozens)
- Hot glue gun
- Ribbon for hanging
How to Make It:
- Start at bottom of ball, hot gluing ornaments in rows.
- Work your way around and up, covering entire surface.
- Use ornaments of varying sizes to fill gaps.
- Attach ribbon at top for hanging.
Pro Tip: Stick to a color scheme (all silver, all red and gold, etc.) for a cohesive look!
55. Mason Jar Fairy Lights

Simple, magical, and endlessly customizable!
Best for: Porch railings, steps, or hanging from trees
Time to Make: 15 minutes per jar
What You’ll Need:
- Mason jars
- Battery-operated fairy lights
- Wire for hanging (optional)
- Ribbon or twine
- Optional: fake snow, cranberries, greenery inside
How to Make It:
- Add decorative elements inside jar if desired.
- Coil fairy lights inside jar.
- Close lid or leave open.
- Wrap ribbon or twine around jar neck.
- Hang or place on surfaces.
Fun Variation: Use colored lights or tinted jars for different effects!
56. Hanging Christmas Planter
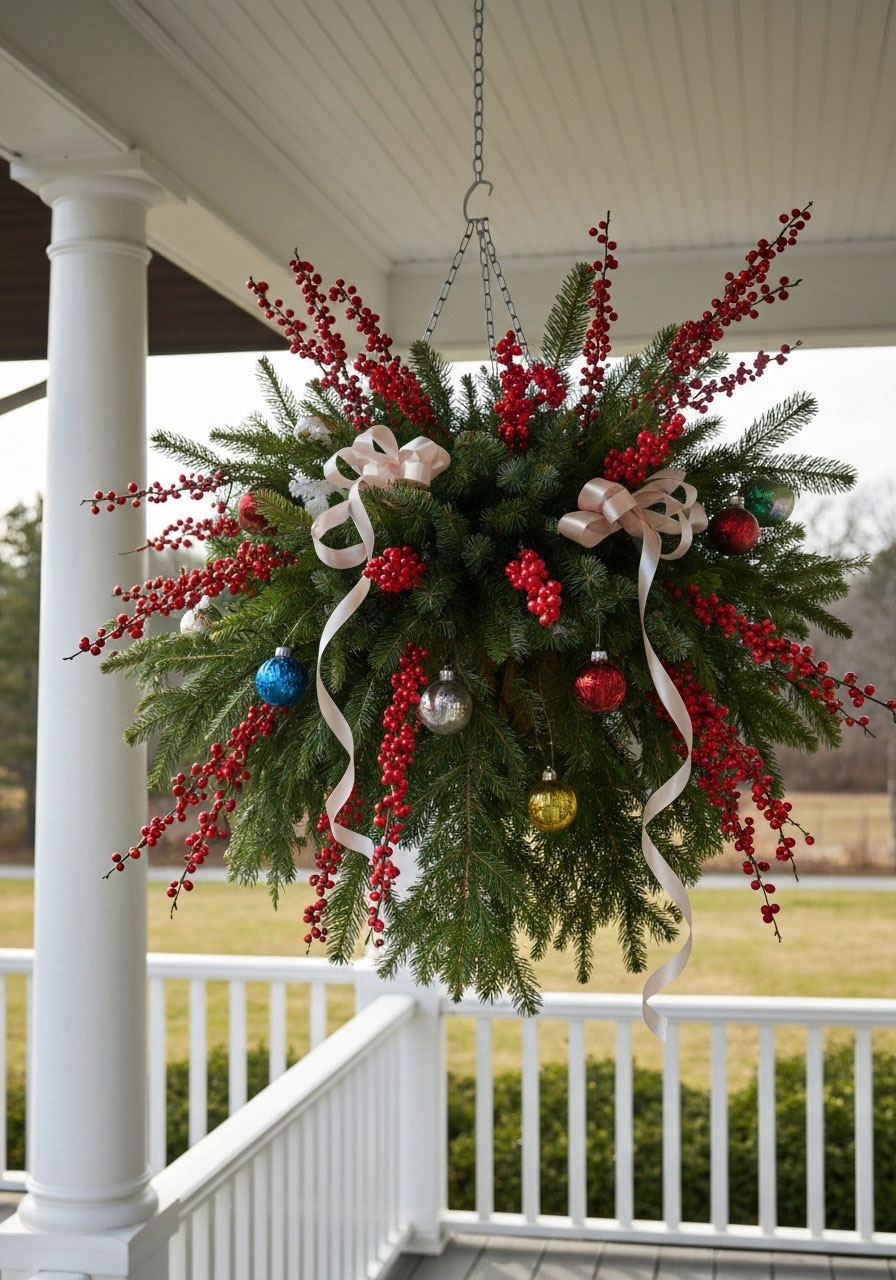
These overflowing planters bring life and color to your porch ceiling.
Best for: Hanging from porch or pergola
Time to Make: 30 minutes per planter
What You’ll Need:
- Wire hanging basket or planter
- Evergreen branches
- Berries, pinecones, ornaments
- Ribbon
- Floral wire
- Optional: lights
How to Make It:
- Fill basket with evergreen branches as base.
- Wire in berries, pinecones, and ornaments.
- Add cascading ribbon.
- Optional: weave in battery-operated lights.
- Hang securely from hooks.
Pro Tip: Make them extra full – skimpy planters look sad!
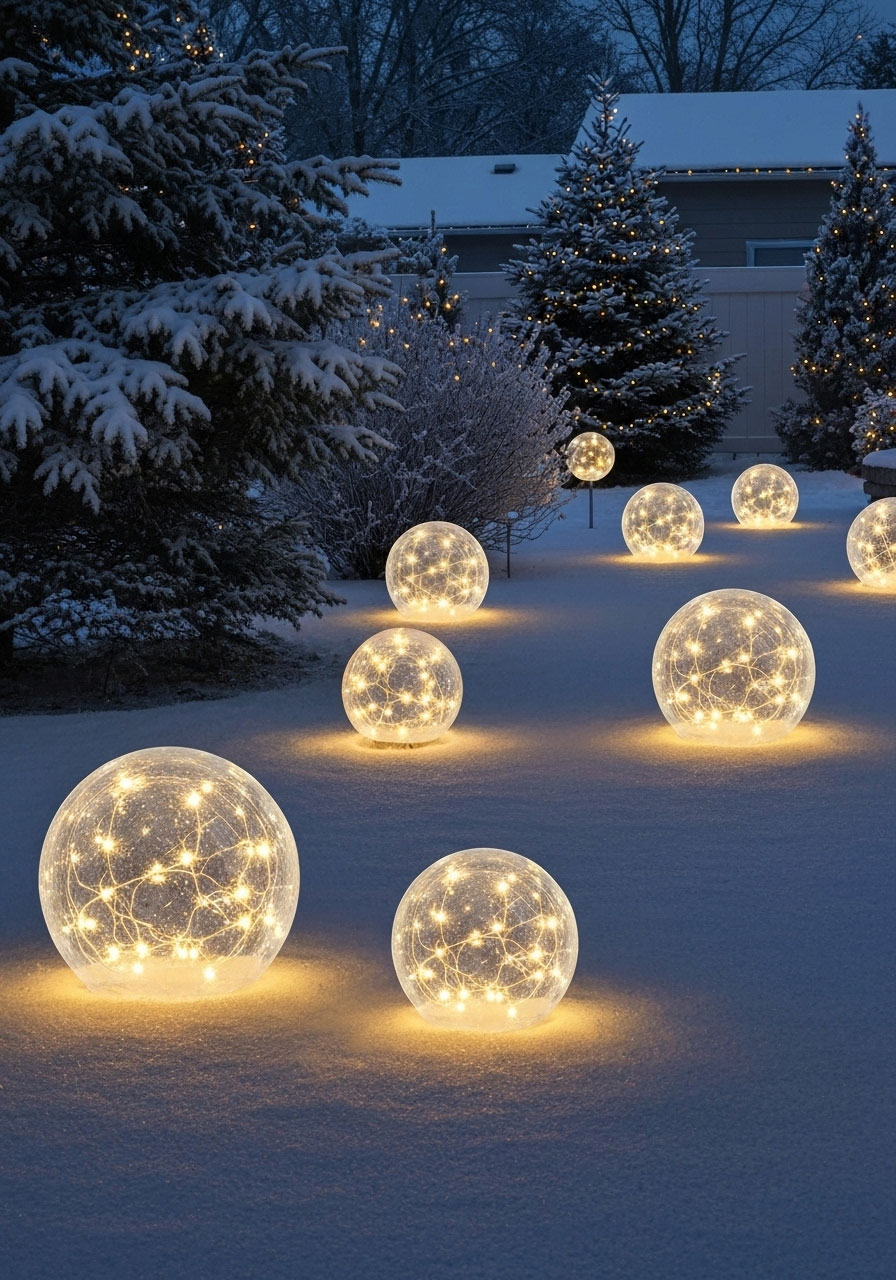
57. Fairy Light Globe

These glowing orbs look like captured stars!
Best for: Hanging from trees or shepherd hooks
Time to Make: 1 hour
What You’ll Need:
- Clear glass or plastic globe/bowl
- String or fairy lights
- Fishing line for hanging
- Optional: fake snow, ornaments inside
How to Make It:
- Coil lights inside globe.
- Add fake snow or small ornaments if desired.
- Attach fishing line to hang.
- Suspend from tree branches or hooks.
Fun Variation: Use colored globes or different colored lights!
58. Giant Yardstick Star

This oversized star makes a bold statement and costs almost nothing!
Best for: Exterior wall, fence, or hanging
Time to Make: 1 hour
What You’ll Need:
- Wooden yardsticks or rulers (at least 10)
- Gold or white spray paint
- Hot glue or wood screws
- String lights (optional)
- Hanging hardware
How to Make It:
- Arrange yardsticks in star pattern (5-pointed star).
- Layer and glue/screw each point.
- Spray paint gold or white.
- Optional: weave lights through the design.
- Hang on wall or fence.
Pro Tip: Make a cluster of three stars in different sizes!
59. Garage Door Christmas Tree

Transform your garage door into a massive Christmas tree – it’s easier than you think!
Best for: Garage door (obviously!)
Time to Make: 1-2 hours
What You’ll Need:
- Green ribbon or garland
- Command hooks or tape
- String lights
- Large ornaments
- Tree topper or star
How to Make It:
- Use Command hooks to outline a tree shape on garage door.
- Drape green ribbon or garland following the outline.
- Secure with additional hooks or tape.
- Add string lights following the same pattern.
- Hang ornaments using more hooks.
- Place large star or topper at the peak.
Fun Variation: Add a “trunk” at the bottom with brown ribbon!
60. Christmas Light Balls

These glowing spheres are mesmerizing and surprisingly simple!
Best for: Hanging from trees or shepherd hooks
Time to Make: 45 minutes per ball
What You’ll Need:
- Wire hanging basket frames (remove the basket liner)
- String lights (100-150 per ball)
- Zip ties
- Ribbon for hanging
How to Make It:
- Remove liner from wire basket frame to leave just the wire ball.
- Weave string lights throughout the frame.
- Secure starting and ending points with zip ties.
- Add ribbon at top for hanging.
- Plug in and hang from branches.
Pro Tip: Use different colored lights for a rainbow of hanging orbs!
61. DIY Oversized Ornaments (Large-Scale Version)

These statement pieces turn heads and photograph beautifully!
Best for: Yard focal points
Time to Make: 2 hours per ornament
What You’ll Need:
- Exercise balls or large beach balls
- Papier-mâché materials or fabric
- Paint
- Large ribbon and bow
- PVC pipe for ornament “cap”
- Glitter, glue (optional)
How to Make It:
- Cover ball with papier-mâché or stretch fabric over it.
- Paint in festive colors once dry.
- Add glitter or designs.
- Create ornament cap from painted PVC pipe sections.
- Add large bow on top.
- Display on ground or hang if possible.
Fun Variation: Make a whole set in coordinating colors!
62. Ice Lanterns (Simple Version)
These crystal-clear beauties are nature’s own decoration!
Best for: Cold climate displays
Time to Make: Overnight freeze
What You’ll Need:
- Balloons
- Water
- Food coloring (optional)
- Tea light candles
How to Make It:
- Fill balloons with water (add food coloring if desired).
- Freeze overnight outside or in freezer.
- Remove balloon once frozen.
- Use warm water to create a hollow space in center.
- Place tea light inside.
Pro Tip: These look magical lining a pathway on a snowy evening!
63. Window Christmas Tree Using Lights
Perfect for those with big windows and not much yard space!
Best for: Large windows visible from outside
Time to Make: 30 minutes
What You’ll Need:
- Clear Christmas lights
- Command Light Clips
- Tree topper or star
- Optional: garland
How to Make It:
- Use Command clips to outline tree shape on window.
- String lights following the outline from bottom to top.
- Secure each strand with clips.
- Add star or topper at peak (attach inside window).
- Optional: add garland draping inside following the tree shape.
Fun Variation: Use different colored lights for each row, rainbow style!
64. Terra Cotta Pot Snowman
These chunky little snow buddies are incredibly stable and adorable!
Best for: Porch or walkway
Time to Make: 1 hour
What You’ll Need:
- 3 terra cotta pots (graduated sizes)
- White spray paint
- Black paint or buttons
- Orange paint
- Small hat and scarf
- Twigs
How to Make It:
- Stack terra cotta pots upside down (largest on bottom).
- Spray paint white.
- Paint face on top pot.
- Paint buttons on middle pot.
- Insert twigs for arms.
- Add hat and scarf.
Pro Tip: Fill the bottom pot with sand for extra stability!
65. Window Box with Ornaments and Garland

Transform your window box into a festive focal point!
Best for: Front windows
Time to Make: 30-45 minutes
What You’ll Need:
- Window box or planter
- Evergreen garland
- Ornaments (various sizes)
- Floral picks
- Battery-operated lights
- Ribbon
How to Make It:
- Fill window box with evergreen garland as base.
- Insert ornaments throughout on wire picks.
- Add berries, pinecones, or floral picks.
- Weave in battery lights.
- Add flowing ribbon.
Fun Variation: Theme it! Go all-silver, all-red, or traditional red and green!
66. Simple Christmas Window Box
A quick version using just greenery and simple accents.
Best for: Multiple windows
Time to Make: 20 minutes per box
What You’ll Need:
- Pine garland or evergreen clippings
- Wood blocks (painted red)
- Christmas ribbon
- Pinecones
How to Make It:
- Fill window box with evergreen clippings or garland.
- Place painted red wood blocks throughout.
- Tuck in pinecones.
- Add ribbon bows here and there.
Pro Tip: This is the perfect project to knock out multiple windows quickly!
67. Chalk Pen Galvanized Buckets

These farmhouse-chic planters are trendy and totally customizable!
Best for: Porch steps or flanking doorway
Time to Make: 30 minutes (plus filling time)
What You’ll Need:
- Galvanized metal buckets
- Chalk pens
- Evergreen branches
- Berries, pinecones
- Optional: lights
How to Make It:
- Use chalk pen to write festive messages on buckets (“Joy”, “Noel”, “Merry”, etc.).
- Fill with evergreen branches.
- Add berries, pinecones, and decorative picks.
- Optional: add battery lights.
Fun Variation: Draw snowflakes or Christmas designs instead of words!
68. Candy Cane Urn Decoration

Classic candy canes get an elegant upgrade!
Best for: Flanking front door
Time to Make: 15 minutes per urn
What You’ll Need:
- Large plastic candy canes
- Urn or decorative pot
- Red ribbon
- Evergreen branches or picks
How to Make It:
- Arrange candy canes in urn, fanning them out.
- Tie red ribbon around the bundle at the rim.
- Fill any gaps with evergreen branches.
- Add a large bow.
Pro Tip: Use odd numbers of candy canes (3, 5, or 7) for visual appeal!
69. Candy Cane Pails with Snow
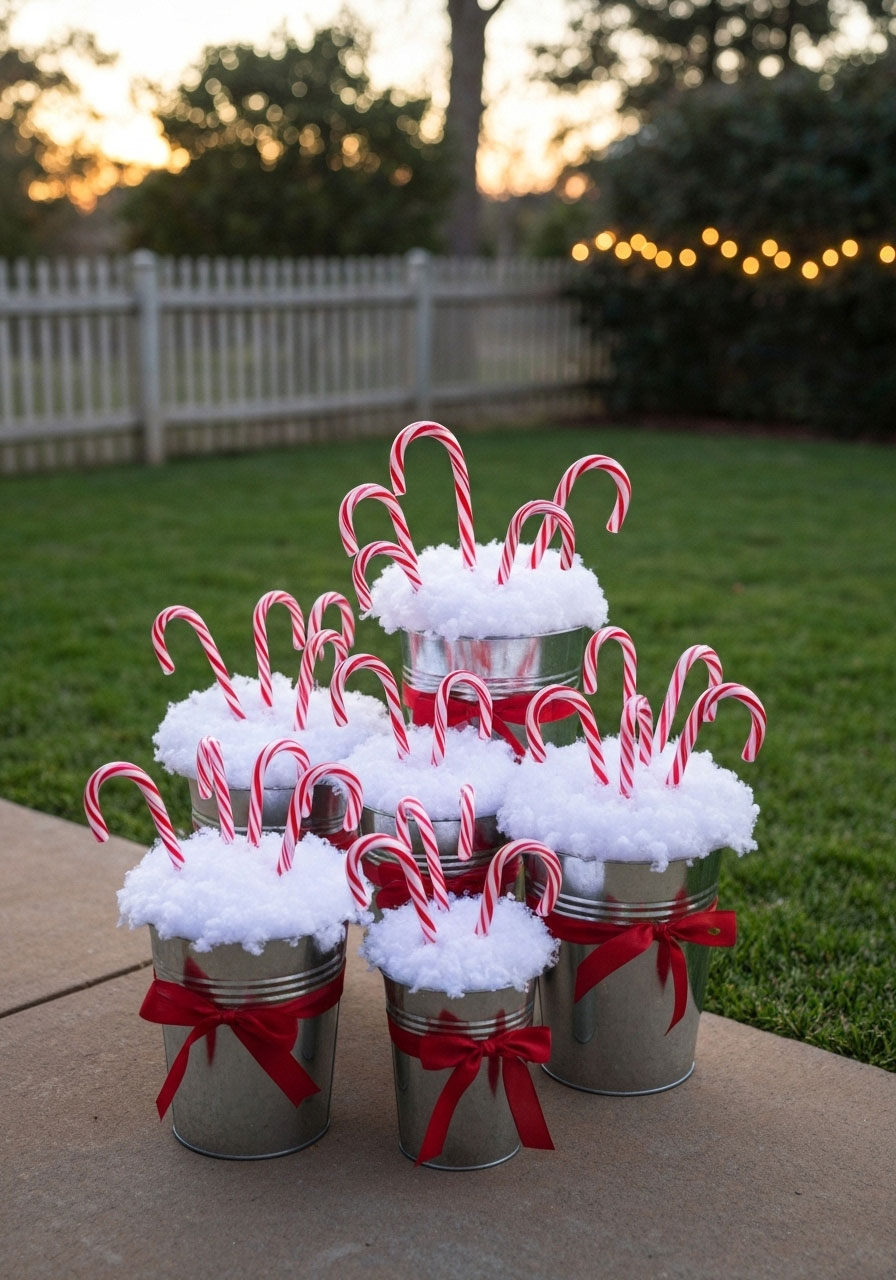
These sweet little decorations are perfect for porch steps!
Best for: Steps or clustered display
Time to Make: 10 minutes per pail
What You’ll Need:
- Tin pails or buckets
- Plastic candy canes
- Fake snow or white batting
- Red ribbon
How to Make It:
- Fill pail with fake snow or white batting.
- Insert candy canes standing upright.
- Tie red ribbon around pail.
- Add a bow.
Fun Variation: Use different sized pails and group them together!
70. Christmas Porch Complete Display

Create a cohesive, magazine-worthy porch setup!
Best for: Full porch transformation
Time to Make: Half day
What You’ll Need:
- Multiple coordinating elements (wreaths, garland, planters)
- String lights
- Ribbon in matching colors
- Seating area decorations
How to Make It:
- Start with a wreath on the door as focal point.
- Drape garland along railings.
- Place matching planters on either side of door.
- Add lights throughout.
- Include coordinating pillows on porch furniture.
- Add finishing touches like lanterns or signs.
Pro Tip: Pick 2-3 colors max and stick with them throughout for a cohesive designer look!
71. Christmas Lanterns with Greenery

These elegant lanterns bring warm ambiance to any space!
Best for: Porch steps, flanking door, or hanging
Time to Make: 20 minutes per lantern
What You’ll Need:
- Metal or wood lanterns
- Evergreen clippings
- Berry sprigs
- Floral wire
- Battery-operated candles
- Pinecones
How to Make It:
- Place battery candle inside lantern.
- Arrange evergreen clippings around base of candle.
- Add berry sprigs and small pinecones.
- Secure with floral wire if needed.
- Close lantern and add ribbon to handle if desired.
Fun Variation: Hang them at different heights from shepherd hooks!
72. Christmas Front Door Display

A complete door makeover that welcomes guests with style!
Best for: Front door and immediate surroundings
Time to Make: 1-2 hours
What You’ll Need:
- Wreath for door
- Garland for around door frame
- Welcome mat
- Flanking decorations (urns, lanterns, or signs)
How to Make It:
- Hang statement wreath on door.
- Drape garland around door frame, securing with small nails or hooks.
- Place festive welcome mat.
- Position matching decorations on both sides of door.
- Add string lights if desired.
Pro Tip: Measure your door frame before buying garland – too little looks skimpy!
73. Snowman Wreath

This cheerful wreath brings smiles to everyone who sees it!
Best for: Front door or exterior wall
Time to Make: 2 hours
What You’ll Need:
- White wreath form or spray-painted grapevine wreath
- Black felt (for hat and buttons)
- Orange foam (for nose)
- Twigs (for arms)
- Scarf
- Hot glue
How to Make It:
- Start with white wreath form.
- Cut and attach black felt top hat.
- Glue on eyes and button mouth.
- Add orange foam carrot nose.
- Attach twig arms on sides.
- Tie scarf at bottom.
Fun Variation: Make different expressions for multiple snowman wreaths!
74. Christmas Porch Present Stack
These wrapped boxes create instant curb appeal!
Best for: Porch corners
Time to Make: 1 hour
What You’ll Need:
- Cardboard or wooden boxes (various sizes)
- Wrapping paper or paint
- Weather-resistant ribbon
- Large bows
- Clear plastic wrap (for weatherproofing)
How to Make It:
- Wrap boxes or paint them festive colors.
- Cover with clear plastic for weather protection.
- Stack in pyramid formation.
- Wrap with real ribbon.
- Top each with a large bow.
Pro Tip: Weigh down the boxes with rocks so they don’t blow away!
75. Outdoor Christmas Lights with Greenery

The classic combination that never fails!
Best for: Porch railings, columns, or wrapped around trees
Time to Make: Varies by area
What You’ll Need:
- Evergreen garland
- String lights
- Berry sprigs
- Floral wire
- Command hooks or zip ties
How to Make It:
- Drape garland along railings or wrap around columns.
- Secure with zip ties or wire.
- Weave string lights through the garland.
- Add berry sprigs throughout.
- Secure any loose ends.
Fun Variation: Add pinecones or ornaments wired into the garland!
76. Festive Porch Light with Burlap

Transform your porch light fixture with rustic charm!
Best for: Porch ceiling light
Time to Make: 15 minutes
What You’ll Need:
- Burlap ribbon
- Evergreen sprigs
- Berry picks
- Pinecones
- Bow
- Floral wire
How to Make It:
- Wrap burlap ribbon around light fixture base.
- Wire on evergreen sprigs.
- Add berry picks and pinecones.
- Finish with a bow.
Pro Tip: Make sure nothing touches the bulb itself – fire safety first!
77. Rustic Christmas Lamp with Burlap

Dollar store materials create an expensive look!
Best for: Outdoor lamp posts or shepherd hooks
Time to Make: 20 minutes
What You’ll Need:
- Burlap ribbon (Dollar Tree)
- Pinecones
- Hot glue
- Optional: battery lights
How to Make It:
- Wrap burlap ribbon around lamp post or hook.
- Hot glue pinecones onto the burlap.
- Add a bow at top.
- Optional: weave battery lights through.
Fun Variation: Add jingle bells for sound when the wind blows!
78. Wrapped Front Door Gift
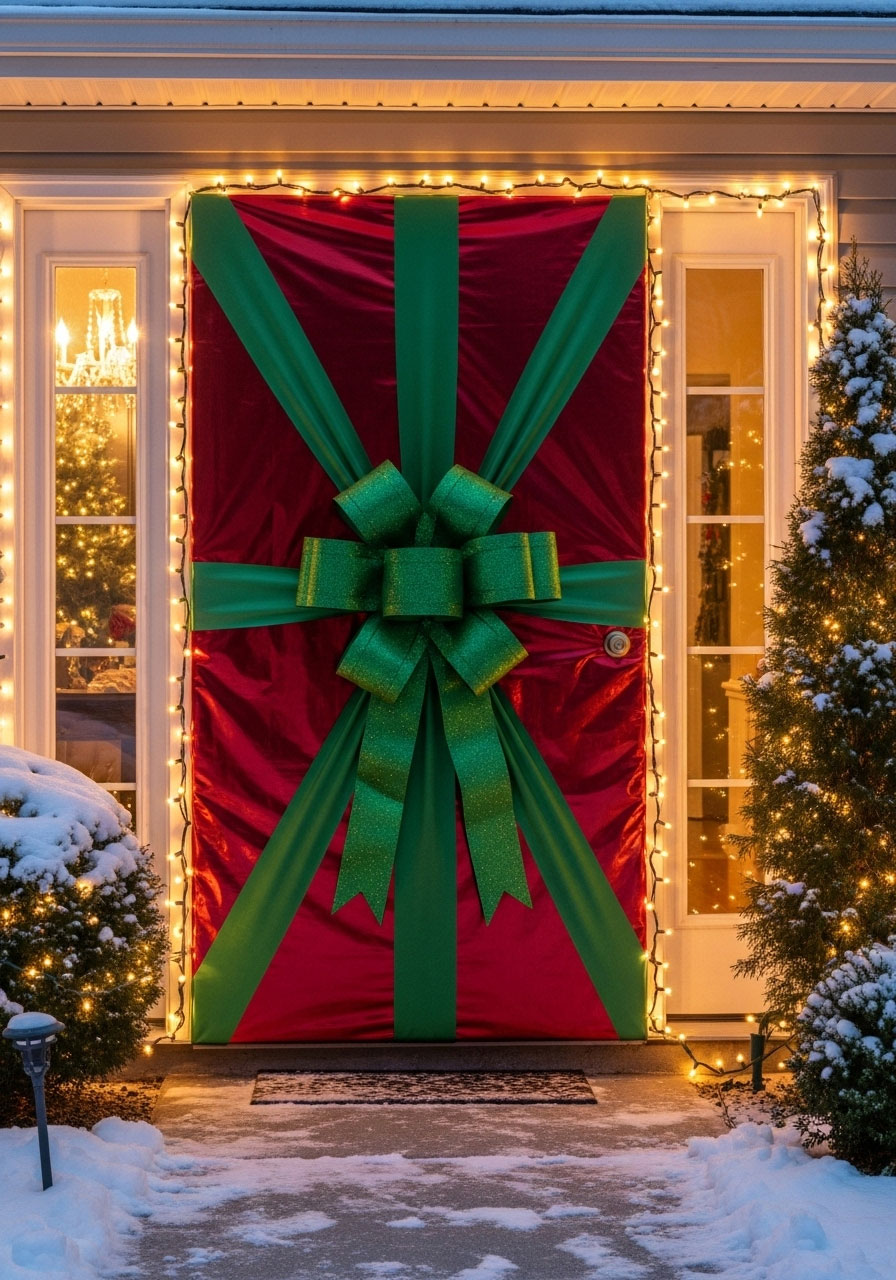
Turn your entire door into a giant present!
Best for: Front door
Time to Make: 30 minutes
What You’ll Need:
- Wide ribbon (or wrapping paper if covered entry)
- Large bow
- Command strips or tape
How to Make It:
- Run two strips of ribbon vertically down the door.
- Run two strips horizontally across.
- Secure intersections and edges with Command strips.
- Place giant bow where ribbons cross at center.
Pro Tip: Use weather-resistant ribbon to prevent fading and damage!
79. Pinecone Cluster Wreath
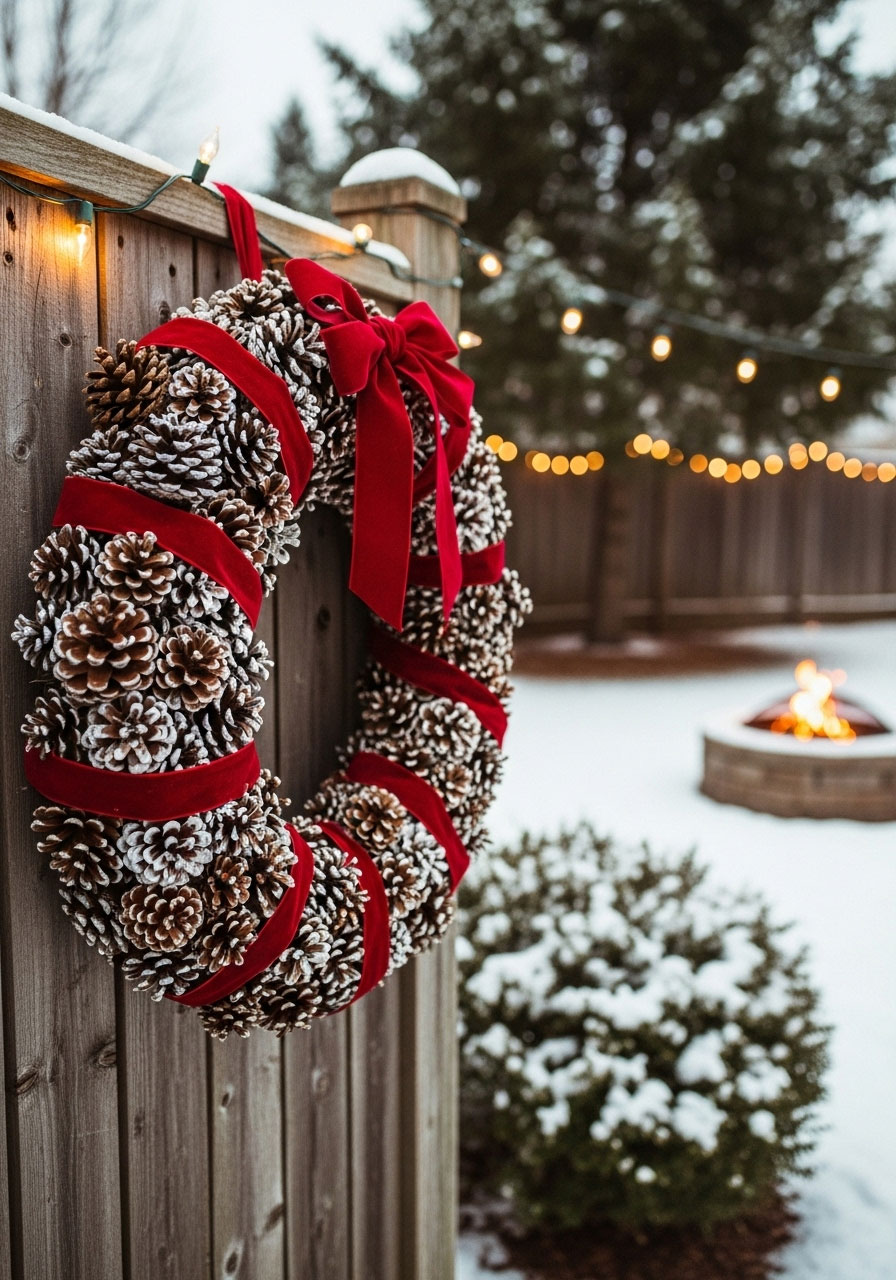
Nature provides the materials for this stunning wreath!
Best for: Front door or fence
Time to Make: 2 hours
What You’ll Need:
- Wire wreath frame
- Dozens of pinecones (various sizes)
- Hot glue gun
- Ribbon
- Optional: spray paint (white, gold, or silver)
How to Make It:
- Optional: Spray paint pinecones and let dry.
- Starting with largest pinecones, hot glue them to the wreath frame.
- Fill gaps with medium and small pinecones.
- Continue until frame is completely covered.
- Add ribbon hanger and bow.
Pro Tip: Collect pinecones for free on nature walks, then bake at 200°F for 30 minutes to kill any bugs!
80. Bow-Wrapped Garage Door

This dramatic decoration makes your garage the star of the show!
Best for: Garage door
Time to Make: 45 minutes
What You’ll Need:
- Giant bow (store-bought or DIY)
- Wide ribbon (20+ feet)
- Command hooks or strong tape
- Optional: additional smaller bows
How to Make It:
- Center giant bow on garage door.
- Secure with Command hooks behind it.
- Run ribbon from bow to corners of garage door.
- Run another ribbon piece vertically down center.
- Secure all ends with hooks or tape.
Fun Variation: Use multiple colors of ribbon for a candy stripe effect!
81. DIY Starburst Ornaments

These geometric beauties add modern flair to traditional displays!
Best for: Hanging from trees or porch ceiling
Time to Make: 1 hour per ornament
What You’ll Need:
- Wooden skewers or dowels
- Foam ball (center)
- Gold or silver spray paint
- Hot glue gun
- Fishing line for hanging
- Optional: beads on each skewer end
How to Make It:
- Cut skewers to equal lengths.
- Spray paint skewers and foam ball.
- Insert skewers into foam ball at even intervals, creating a starburst pattern.
- Add beads to ends if desired.
- Attach fishing line for hanging.
Pro Tip: Make a whole cluster in different sizes for maximum impact!
82. Tomato Cage Christmas Tree (Decorated Version)
Level up the basic tomato cage tree with full decorations!
Best for: Porch or yard
Time to Make: 1-2 hours
What You’ll Need:
- Tomato cage
- Green garland or tinsel
- String lights
- Ornaments
- Tree topper
- Tree skirt or wrapped base
How to Make It:
- Flip tomato cage upside down.
- Wrap entirely with green garland.
- Weave string lights throughout.
- Hang ornaments on the garland.
- Add tree topper at peak.
- Wrap base with tree skirt or burlap.
Fun Variation: Theme it! All blue and silver for a winter wonderland tree!
83. Vintage Sled with Evergreen Display

Bring nostalgic charm with this classic holiday vignette!
Best for: Leaning against porch or house
Time to Make: 30 minutes
What You’ll Need:
- Old wooden sled
- Evergreen branches
- Pinecones
- Red bow
- Optional: wrapped gift boxes, lantern
How to Make It:
- Position sled at an angle against wall.
- Pile evergreen branches on sled.
- Add pinecones throughout.
- Tie large red bow to sled.
- Optional: Add wrapped gifts or lantern on sled.
Pro Tip: Hit up thrift stores for cheap vintage sleds!
84. “Merry Christmas” Front Yard Sign

Make your greeting impossible to miss with this large-scale sign!
Best for: Front yard
Time to Make: 2-3 hours
What You’ll Need:
- Large wooden board or plywood
- Red and white paint
- Stencils or vinyl lettering
- Two wooden posts
- Outdoor sealer
- Post hole digger
How to Make It:
- Paint board with background color.
- Add “Merry Christmas” message using stencils or vinyl.
- Decorate with holly, snowflakes, or other designs.
- Seal with outdoor sealer.
- Attach to two posts.
- Plant posts firmly in yard.
Fun Variation: Make it reversible with “Happy New Year” on the back!
85. Christmas Grapevine Wreath Stack
This vertical arrangement is unexpected and eye-catching!
Best for: Door or exterior wall
Time to Make: 1-2 hours
What You’ll Need:
- 3 grapevine wreaths (small, medium, large)
- Ornaments (various sizes)
- Evergreen clippings
- Ribbon
- Wire for connecting
- Christmas bow
How to Make It:
- Stack three wreaths vertically, securing with wire.
- Fill each wreath with ornaments, graduating sizes.
- Add evergreen clippings throughout.
- Weave ribbon through all three wreaths.
- Top with large Christmas bow.
Pro Tip: This creates a “snowman” silhouette that’s totally unique!
86. Tire Snowman

Repurpose old tires into this sturdy, weatherproof snow buddy!
Best for: Yard display
Time to Make: 2-3 hours
What You’ll Need:
- 3 old tires (different sizes if possible)
- White paint
- Plywood (for backing)
- Orange and black acrylic paint
- Scarf and hat
- Paintbrush
How to Make It:
- Clean tires thoroughly.
- Paint tires white (multiple coats needed).
- Cut plywood circles to fit inside tire openings.
- Paint snowman face on top tire’s plywood.
- Paint buttons on middle tire.
- Stack and secure tires.
- Add scarf and hat.
Pro Tip: Fill tires with sand for stability and to prevent tipping!
87. Wooden Reindeer Silhouette

This simple cutout makes a big statement!
Best for: Yard or roofline
Time to Make: 2 hours
What You’ll Need:
- Plywood sheet
- Reindeer template
- Jigsaw
- Brown stain or paint
- Red paint (for nose if making Rudolph)
- Stakes or mounting hardware
How to Make It:
- Trace reindeer template onto plywood.
- Cut out carefully with jigsaw.
- Sand edges smooth.
- Stain or paint brown.
- Add red nose if desired.
- Attach to stakes for yard display or mount on house.
Fun Variation: Make a whole herd of reindeer pulling a sleigh!
88. Lighted Present Pathway
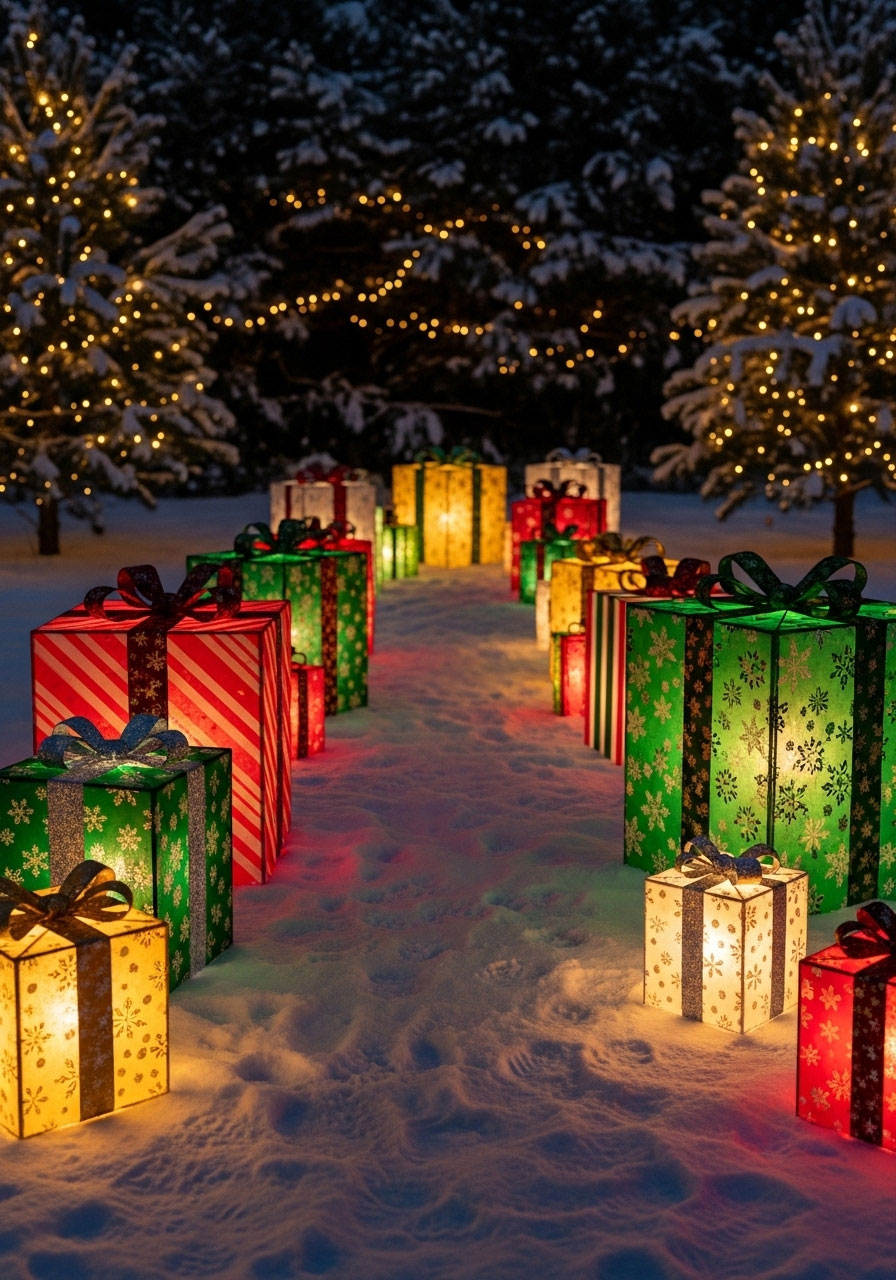
Guide guests to your door with a glowing gift trail!
Best for: Walkway or driveway
Time to Make: 2-3 hours
What You’ll Need:
- Multiple cardboard boxes (various sizes)
- Wrapping paper
- Clear plastic wrap
- Ribbon and bows
- Rope lights or string lights
How to Make It:
- Wrap boxes in festive paper.
- Cover with clear plastic wrap for weather protection.
- Add ribbon and bows.
- Place rope lights around each box or inside if using translucent wrapping.
- Line your pathway alternating sizes.
Pro Tip: Use solar-powered lights to save on electricity!
89. Wooden Christmas Tree Cutout

A flat, minimalist tree that’s perfect for small spaces!
Best for: Porch wall or fence
Time to Make: 2 hours
What You’ll Need:
- Large plywood sheet
- Green paint
- Tree template
- Jigsaw
- Star for top
- Command hooks for hanging ornaments
- Small ornaments
How to Make It:
- Trace tree shape onto plywood.
- Cut out with jigsaw.
- Paint green.
- Seal for outdoor use.
- Add small Command hooks throughout.
- Hang lightweight ornaments.
- Attach star to top.
Fun Variation: Paint it white with colorful ornaments for a modern look!
90. Rope Light Candy Canes
These flexible light-up canes are perfect for lining anything!
Best for: Driveway, walkway, or garden borders
Time to Make: 30 minutes per cane
What You’ll Need:
- Red and white rope lights
- PVC pipe or thick wire for support
- Zip ties
- Stakes
How to Make It:
- Bend PVC pipe or wire into candy cane shape.
- Alternate wrapping red and white rope lights around the form.
- Secure with zip ties.
- Attach stake to bottom.
- Push into ground along pathway.
Pro Tip: These are virtually indestructible and can be used year after year!
91. Christmas Mailbox Cover

Give your mailbox a festive makeover!
Best for: Mailbox (obviously!)
Time to Make: 20 minutes
What You’ll Need:
- Fabric mailbox cover or DIY fabric
- Evergreen garland
- Ribbon
- Battery-operated lights (optional)
How to Make It:
- If DIYing, wrap festive fabric around mailbox and secure.
- Drape garland over top.
- Wrap ribbon around post.
- Optional: Add battery lights woven through garland.
Fun Variation: Paint mailbox to look like a wrapped present!
92. Hanging Ornament Clusters
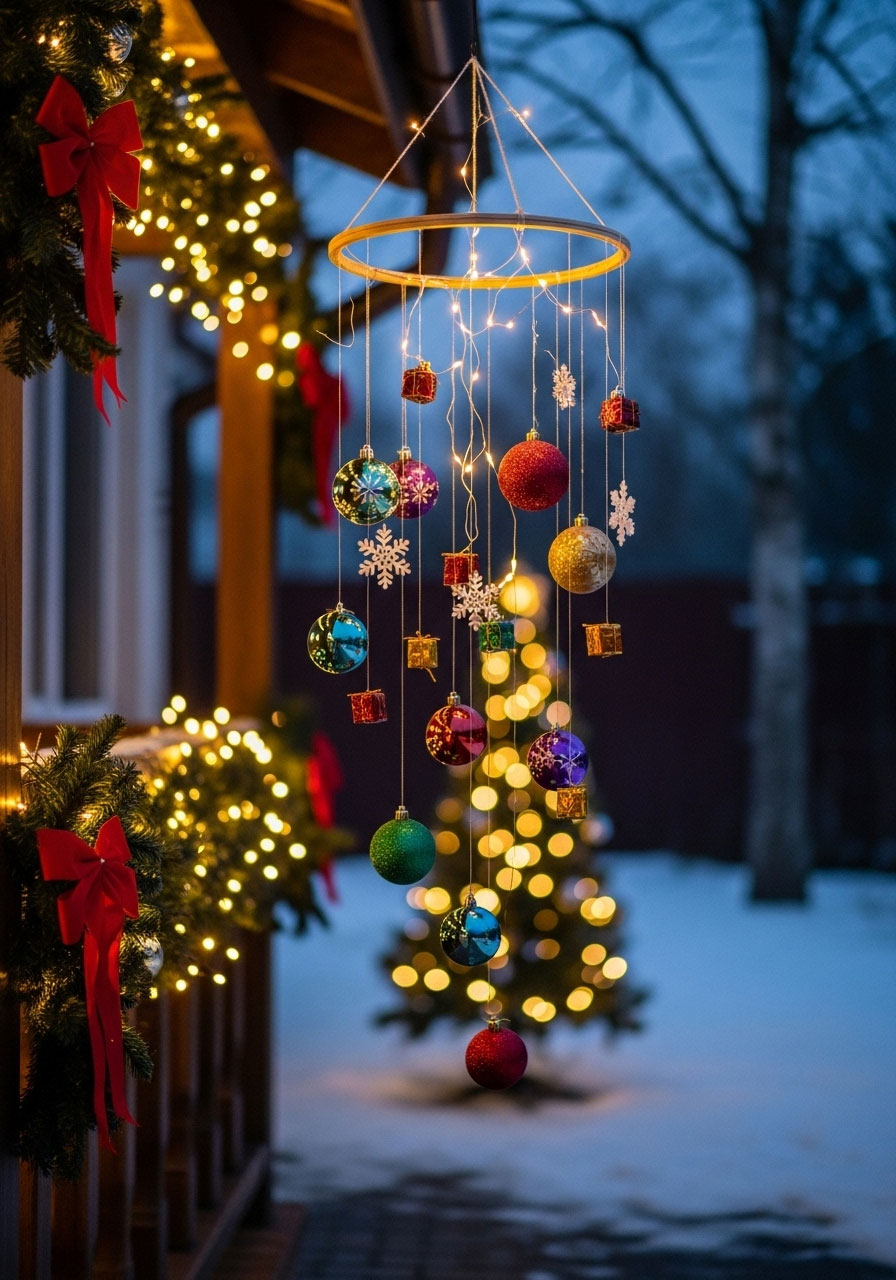
Group ornaments for dramatic overhead displays!
Best for: Porch ceiling or tree branches
Time to Make: 45 minutes per cluster
What You’ll Need:
- Fishing line or clear thread
- Ornaments (various sizes)
- Embroidery hoop or branch for hanging base
- Ribbon
How to Make It:
- Tie ornaments to fishing line at varying lengths.
- Attach all lines to embroidery hoop or branch.
- Create a chandelier effect with different heights.
- Hang from ceiling hook or tree branch.
- Add ribbon to hoop for finishing touch.
Pro Tip: Use all one color family for elegance or mix it up for whimsy!
93. DIY Light-Up Gift Boxes (Budget Version)
Get the glowing gift look for less!
Best for: Porch or yard
Time to Make: 1 hour
What You’ll Need:
- Plastic storage bins with lids (dollar store)
- Spray paint
- Ribbon
- Battery-operated lights
- Bows
How to Make It:
- Spray paint bins in festive colors.
- Place battery light strands inside bins.
- Put lids on (light will glow through plastic).
- Wrap with ribbon.
- Top with large bows.
Fun Variation: Drill small holes for extra light sparkle!
94. Evergreen Swag with Bells

These vertical arrangements add elegance to doors and walls!
Best for: Front door or exterior walls
Time to Make: 30 minutes
What You’ll Need:
- Fresh or faux evergreen branches
- Floral wire
- Large jingle bells
- Red ribbon
- Pinecones
- Berry sprigs
How to Make It:
- Bundle evergreen branches together, longest at top.
- Secure tightly with floral wire.
- Wire jingle bells to bottom of swag.
- Add pinecones and berries throughout.
- Tie large ribbon bow at top.
- Hang from door hook or nail.
Pro Tip: Spray fresh greens with anti-desiccant to help them last longer!
95. Window Cling Christmas Scenes
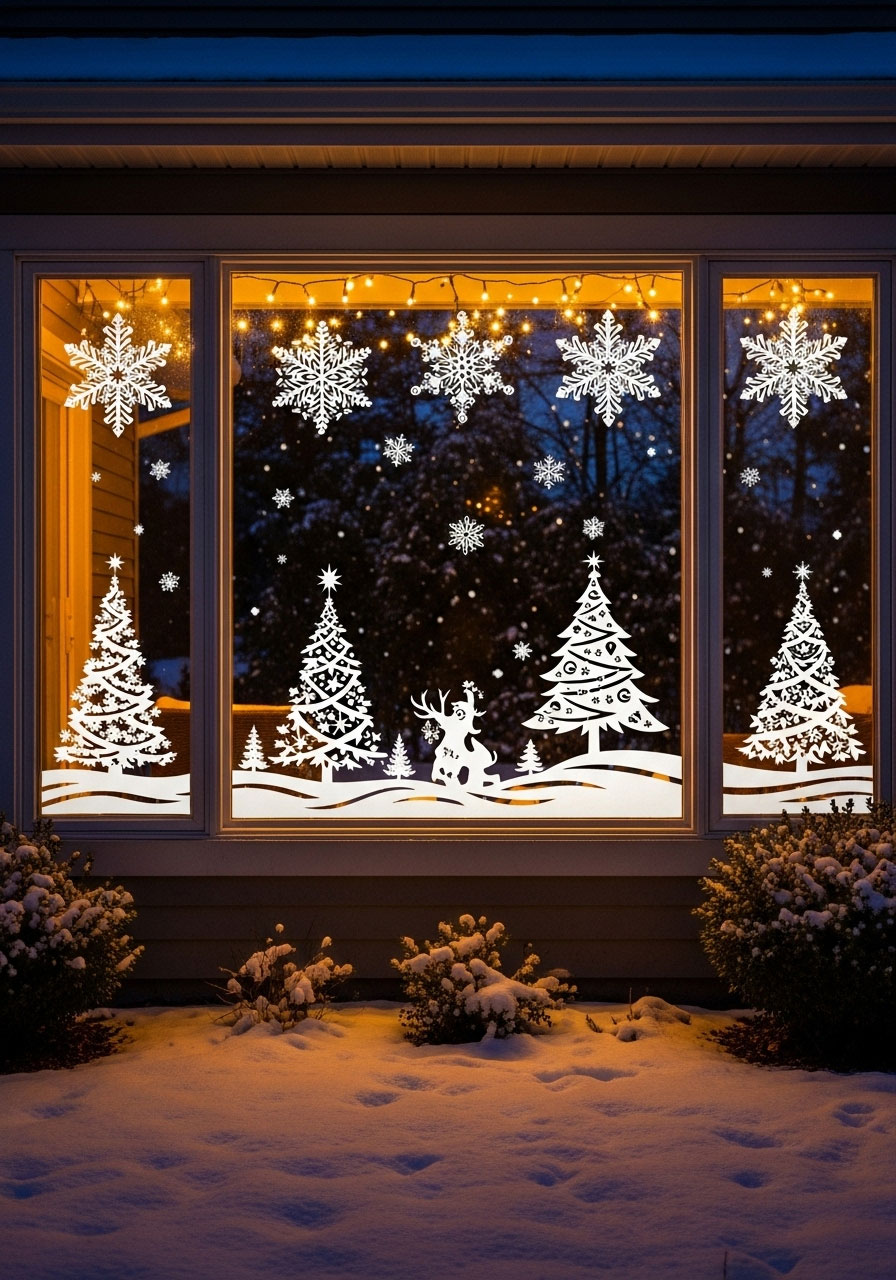
Perfect for renters or those who want temporary decor!
Best for: Windows
Time to Make: 15 minutes
What You’ll Need:
- White window clings or static clings
- Christmas templates
- Scissors
How to Make It:
- Cut out snowflakes, trees, or other Christmas shapes from clings.
- Apply to windows.
- Arrange in scenes or patterns.
- Add fairy lights inside windows for backlighting.
Fun Variation: Use colored clings for stained glass effect!
96. Lighted Birch Log Bundle
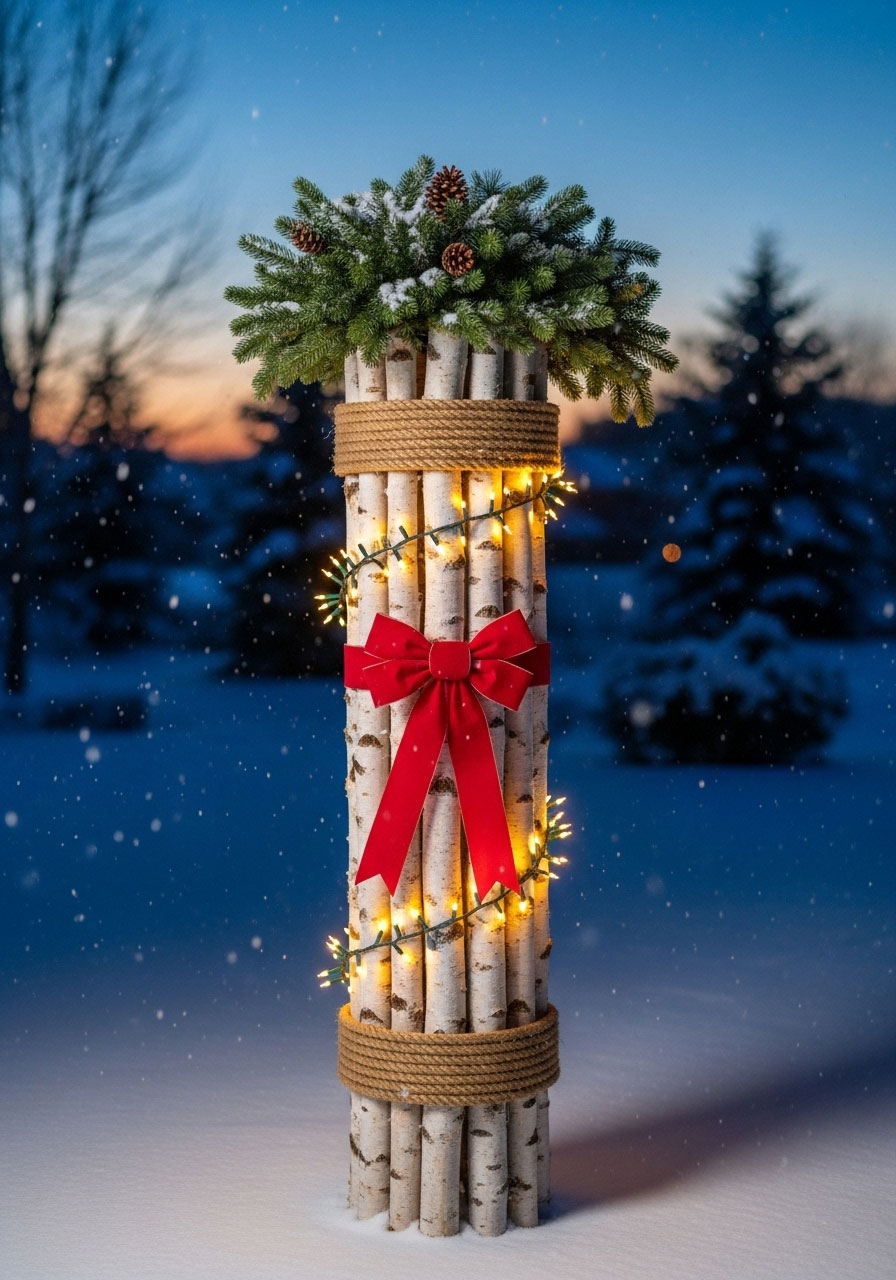
These rustic columns bring woodland elegance!
Best for: Flanking doorway or on porch
Time to Make: 30 minutes per bundle
What You’ll Need:
- Birch logs or branches (various lengths)
- Rope or twine
- String lights
- Red ribbon
- Evergreen sprigs
How to Make It:
- Bundle birch logs together with rope.
- Weave string lights between the logs.
- Tie with red ribbon.
- Tuck evergreen sprigs at the top.
- Stand upright against wall or in planter.
Pro Tip: Birch logs are stunning left natural or spray painted white!
97. Christmas Topiary Balls

These elegant spheres elevate your entrance!
Best for: Flanking doorway in urns
Time to Make: 1-2 hours per topiary
What You’ll Need:
- Foam balls (various sizes)
- Dowel or branch
- Urn or pot
- Fresh or faux greenery clippings
- Floral pins
- Foam or sand for stability
- Ribbon
How to Make It:
- Insert dowel into foam ball.
- Cover ball completely with greenery using floral pins.
- Fill urn with foam or sand.
- Insert dowel into urn.
- Cover urn top with more greenery.
- Wrap ribbon around dowel.
Fun Variation: Add small ornaments or berries pinned throughout!
98. Wooden Advent Calendar Display

Countdown to Christmas with this outdoor version!
Best for: Porch wall
Time to Make: 3-4 hours
What You’ll Need:
- 25 small wooden boxes or buckets (numbered 1-25)
- Wall-mounted shelf or board
- Paint
- Small treats or ornaments for each day
- Hooks
How to Make It:
- Paint and number boxes 1-25.
- Attach boxes to wall board or shelving unit.
- Fill each with a small weather-safe treat or ornament.
- Mount on porch wall.
- Remove one item each day of December.
Pro Tip: Use this to countdown with your whole neighborhood!
99. Christmas Village Display

Create a miniature winter wonderland!
Best for: Porch shelf or protected display area
Time to Make: 1-2 hours (setup)
What You’ll Need:
- Small houses (ceramic, wood, or cardboard)
- White fabric or batting (for snow)
- Small LED lights
- Miniature trees
- Fake snow
How to Make It:
- Cover display surface with white fabric.
- Arrange houses in village formation.
- Add LED lights inside houses or strung around.
- Place miniature trees throughout.
- Sprinkle fake snow over everything.
Fun Variation: Add a small train or skating pond for extra charm!
100. Spiral Lollipop Trees

These whimsical treats double as outdoor decor!
Best for: Garden beds or lining walkways
Time to Make: 30 minutes per tree
What You’ll Need:
- Tomato cage or wire cone
- Pool noodles or foam (red, white, green)
- Hot glue
- Cellophane wrap
- Ribbon
- Wooden stake
How to Make It:
- Wrap pool noodle in spiral around cone frame.
- Secure with hot glue.
- Wrap entire creation in cellophane.
- Tie with ribbon at base.
- Attach to stake and plant in yard.
Pro Tip: These hold up surprisingly well in weather!
101. Monogrammed Christmas Flag
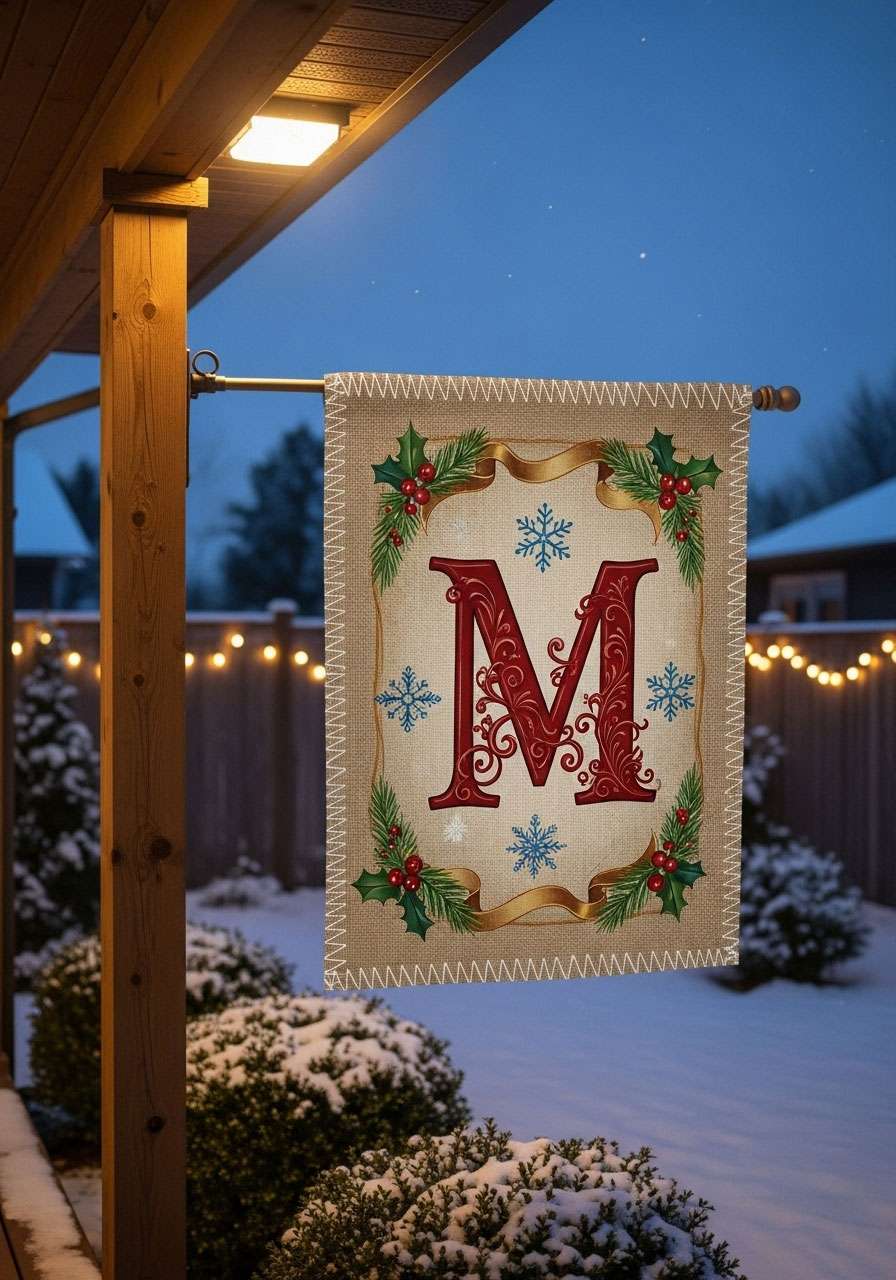
Personalize your holiday display with your family initial!
Best for: Hanging on porch or flag pole
Time to Make: 1 hour
What You’ll Need:
- Burlap or canvas fabric
- Fabric paint
- Large letter stencil or template
- Ribbon or grommets for hanging
- Christmas embellishments
How to Make It:
- Cut fabric to flag size.
- Stencil large family initial in center.
- Paint Christmas designs around edges.
- Add ribbon or grommet hangers.
- Hang from porch or flag holder.
Fun Variation: Make it double-sided with different designs!
102. Outdoor Christmas Garland with Photos

Share holiday memories right on your porch!
Best for: Porch railing or strung across porch
Time to Make: 1 hour
What You’ll Need:
- Evergreen garland
- Mini clothespins
- Laminated family photos
- String lights
- Ribbon
How to Make It:
- Drape garland across porch railing or between posts.
- Weave string lights through garland.
- Clip laminated photos to garland with clothespins.
- Add ribbon bows throughout.
Pro Tip: Laminate photos to protect them from weather!
103. Christmas Light Net Display

Cover bushes and hedges instantly!
Best for: Shrubs and bushes
Time to Make: 15 minutes per bush
What You’ll Need:
- Net lights (sized for your bushes)
- Extension cords
- Stakes to hold nets in place
How to Make It:
- Drape net lights over bush, starting at top.
- Pull down and around bush sides.
- Secure bottom edges with small stakes.
- Connect to power source.
- Adjust to ensure even coverage.
Fun Variation: Layer different colored nets for a rainbow effect!
104. Glowing Snowball Path
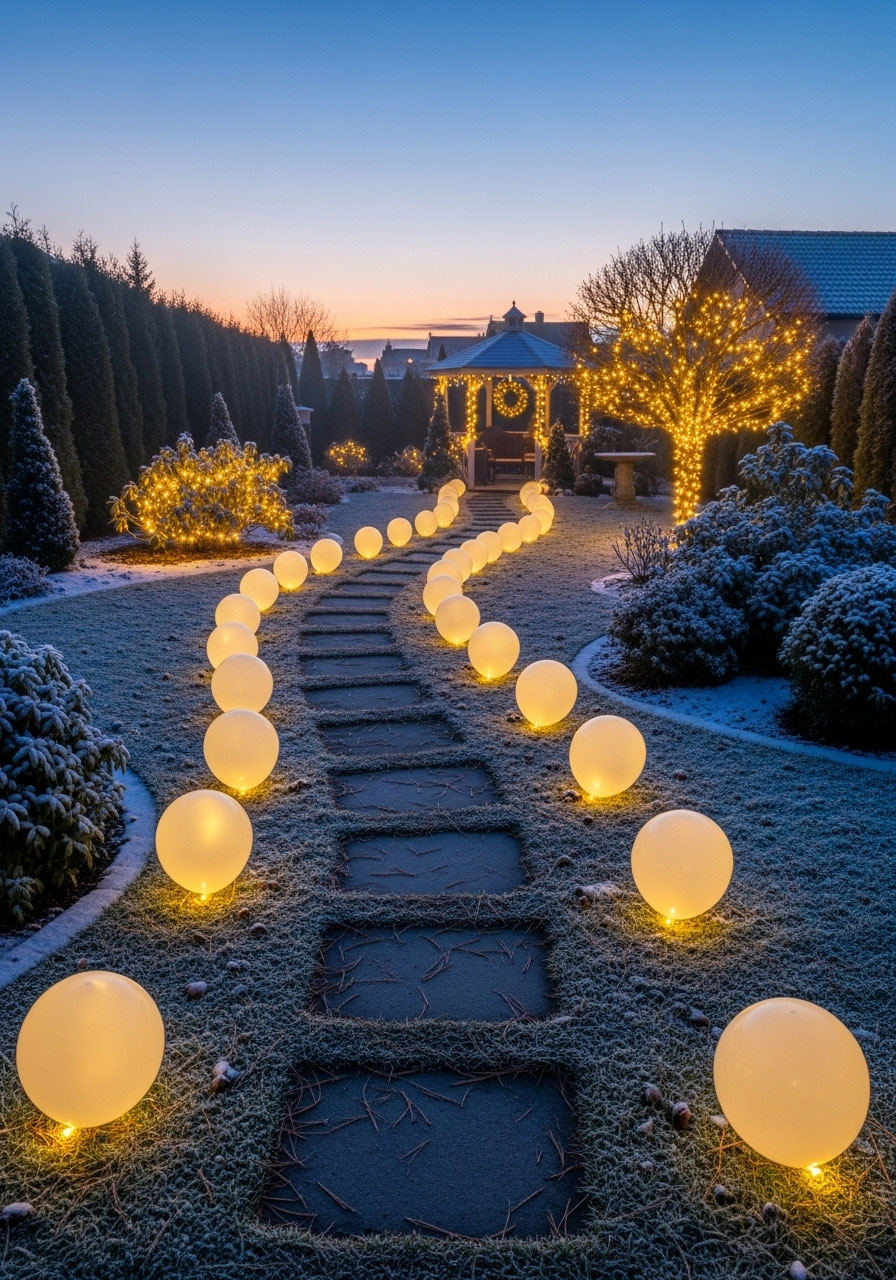
These illuminated orbs look like magical snowballs!
Best for: Lining walkways
Time to Make: 1 hour for dozen
What You’ll Need:
- White balloons
- LED tea lights (battery-operated)
- Optional: fake snow spray
How to Make It:
- Insert LED tea light into balloon before inflating.
- Inflate balloon to softball size.
- Tie off.
- Optional: spray with fake snow for texture.
- Line walkway with glowing “snowballs”.
Pro Tip: These are perfect for one-night events but won’t last in harsh weather!
105. Vintage Ladder Christmas Display

Repurpose an old ladder into a stunning decoration holder!
Best for: Porch corner or lean against house
Time to Make: 1 hour (decorating)
What You’ll Need:
- Old wooden ladder
- Garland
- String lights
- Hanging ornaments
- Small signs or decor items
- Ribbon
How to Make It:
- Position ladder at angle against wall.
- Drape garland on each rung.
- Weave string lights throughout.
- Hang ornaments from rungs at varying heights.
- Place small signs or lanterns on steps.
- Add ribbon bows throughout.
Fun Variation: Paint the ladder white or red for extra pop!
Final Tips for Outdoor Christmas Decorating Success
Weather-Proof Everything:
- Use outdoor-rated lights and extension cords
- Seal painted wood projects with exterior polyurethane
- Cover fabric elements with clear plastic wrap
- Anchor everything securely to withstand wind
Stay Safe:
- Never leave candles unattended outdoors
- Check all electrical connections regularly
- Use timers to avoid overloading circuits
- Secure ladders properly when hanging decorations
Budget-Friendly Shopping:
- Hit dollar stores for basic supplies
- Check Habitat for Humanity ReStores for wood and doors
- Collect free pallets from Craigslist
- Shop after-Christmas sales for next year
- Repurpose Halloween decorations (pumpkins → snowmen!)
Storage Solutions:
- Label everything clearly for next year
- Store delicate items in plastic bins
- Take photos before taking down decorations (so you remember what went where!)
- Keep batteries separate from decorations
Make It a Tradition:
- Involve the whole family in decorating day
- Take annual photos in front of your display
- Add one new decoration each year
- Host a decorating party with friends and neighbors
Wrapping It Up!
There you have it – 105 amazing outdoor DIY Christmas decorations that’ll transform your home into the most festive spot on the block! Whether you’re going for rustic charm, classic elegance, or whimsical fun, these projects prove you don’t need a huge budget to create holiday magic.
The best part? Most of these decorations can be made in an afternoon, use materials you already have or can get for cheap, and will last for many Christmases to come. So grab your hot glue gun, round up the family, and get decorating. Your neighbors are going to be seriously impressed!
More Christmas Party Ideas to Keep the Fun Rolling:
30 Cheap DIY Christmas Gifts That Look Expensive
100+ Best Christmas Games for Large Family Gatherings That Create Unforgettable Memories
100+ DIY Christmas Gifts Your Friends and Family Will Actually Love
75+ Frugal Christmas Gift Basket Ideas That’ll Make You Look Like a Holiday Hero
50 Budget-Friendly Gifts for Coworkers (or Neighbors) This Christmas
109 Best DIY Christmas Centerpiece Ideas to Make Your Holiday Table Unforgettable
100 Epic Christmas Eve Box Ideas to Make December 24th Unforgettable
40 Gift Basket Ideas for Women That’ll Make You Look Like a Gift-Giving Genius
23 Best Adult Christmas Craft Ideas for the Holidays
The Ultimate White Elephant Gift Auction: Turn Your Gift Exchange Into a Hilarious Bidding War
33 Epic Christmas Activities for Adults That’ll Make This Your Best Holiday Season Yet