Planning a tween birthday party and need activities that won’t get eye-rolls?
You’ve come to the right place! Crafting is the secret weapon for tween parties because it keeps everyone engaged, gives them something awesome to take home, and works for all skill levels.
Whether you’re hosting a birthday bash, bat mitzvah, or just a casual hangout, these birthday party crafts for tweens are guaranteed crowd-pleasers.
Why crafts are perfect for tween parties: They give your guests something cool they created themselves (instant party favor!), they work for different skill levels, and they keep everyone entertained without needing to organize complicated games. Plus, tweens love having control over their creations – customization is everything at this age.
We’ve rounded up 22 birthday party crafts for tweens that hit all the right notes: quick enough that restless kids can finish in 10 minutes, but engaging enough that creative souls can really dive in.
They’re affordable, require minimal prep, and most importantly? They’re actually cool.

Birthday Party Crafts Perfect for Girls
Let’s start with some crafts that are especially popular with the girls (though some boys might dig them too!). These are feminine, fun, and totally Instagram-worthy.
1. DIY Watercolor Earrings
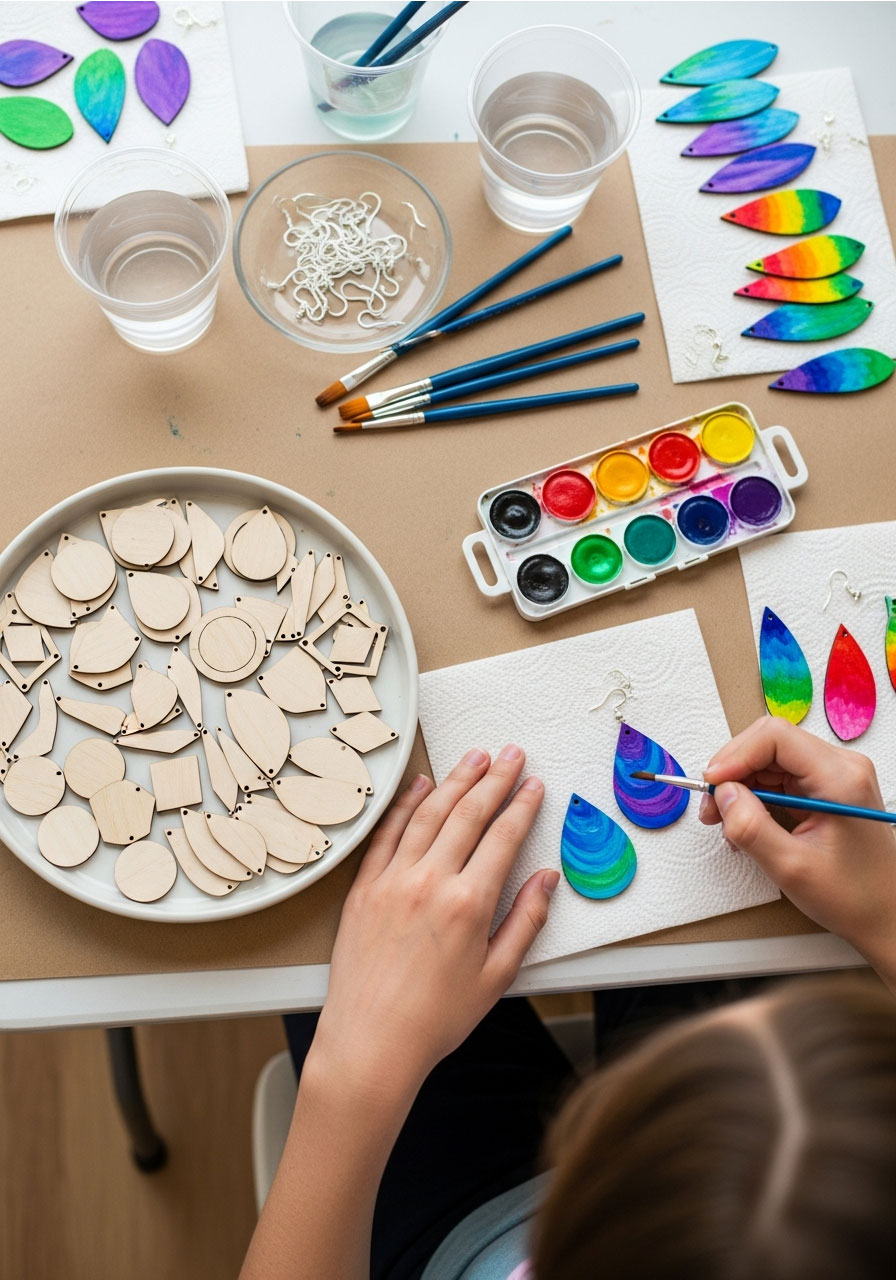
Get ready for the compliments – these earrings look way more expensive than they are!
Your guests will love painting their own unique designs on lightweight wood pieces, then turning them into wearable art. The best part? Endless color combinations mean no two pairs will look the same.
Perfect for: Creative tweens who love fashion accessories
Time to Complete: 10-15 minutes
Skill Level: Beginner-friendly
What You’ll Need:
Wooden earring blanks (with pre-drilled holes)
Watercolor paints and brushes
Earring hooks
Small pliers
Clear sealant spray (optional, for durability)
How to Make:
1. Set up your craft station with paints, water cups, and wood pieces spread out for easy browsing.
2. Have each guest choose their wooden shapes and paint them with watercolor designs – abstract swirls, ombre effects, or tiny patterns all work great.
3. Let the pieces dry completely (use a hair dryer on cool to speed this up if needed).
4. Once dry, help attach the earring hooks using pliers.
5. Guests can take them home in small jewelry boxes for extra flair!
Pro Tip: Pre-drill all the holes before the party to save time, and set up a “drying station” so finished pieces don’t get smudged while guests move on to the next activity.
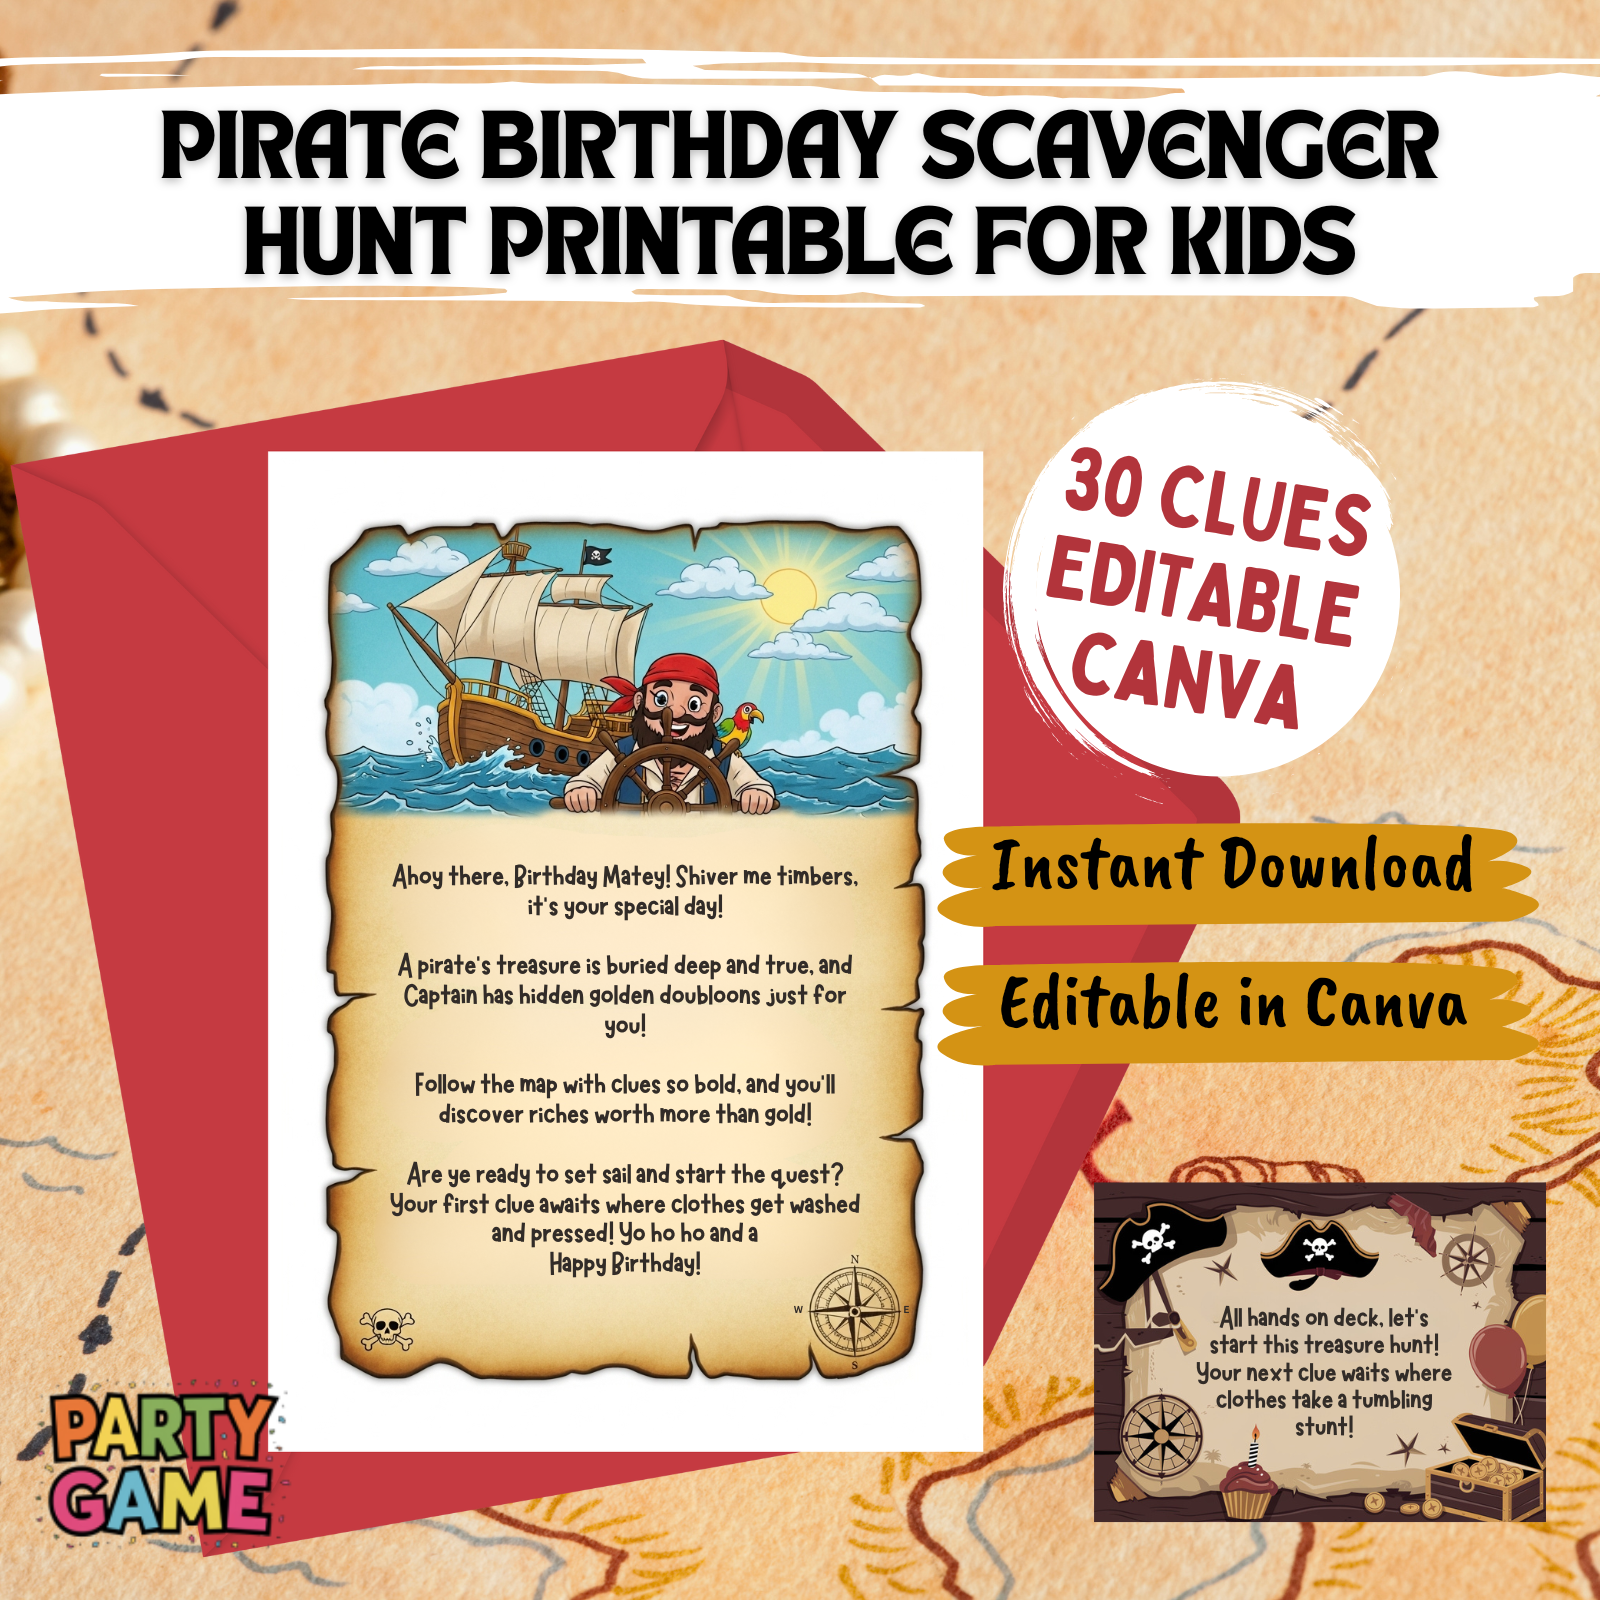
Pirate Birthday Scavenger Hunt for Kids Printable
Instant Pirate Adventure: Download, print, and play in 15 minutes! No stress – just instant, unforgettable fun for kids ages 4-12
Indoor Party Lifesaver: Perfect for apartments & houses. Keep 1-10 kids wildly entertained for 45 minutes with clever rhyming clues
A Treasured Memory: Watch your birthday child become the hero of an epic story. Includes a thrilling intro and congratulatory treasure letter
Fun That Secretly Teaches: Kids race to solve riddles while building reading, problem-solving, and teamwork skills. Fun with a hidden purpose!

Indoor Birthday Scavenger Hunt Printable for Kids – 12 challenges
Your 15-Minute Party Hero: Instantly download, print, and hide. Get 1-2 hours of immersive, screen-free fun with 12 unique puzzles. Stress-free entertainment, guaranteed
More Than a Hunt – It’s a “”Cake Bandit”” Adventure! Kids don’t just find clues; they solve the mystery of the stolen cake! This engaging storyline creates a memorable birthday mission
Ultimate Indoor Party Lifesaver: Perfect for bad weather or small spaces. Keeps kids ages 4-10+ happily challenged with picture matching, mazes, and secret codes
Fun That Secretly Builds Genius: Laughter meets learning! These 12 clever challenges boost problem-solving, teamwork, and critical thinking skills without the kids even noticing

Difficult Birthday Scavenger Hunt Printable for Adults – The Oracle’s Birthday Prophecy
Forget Boring Parties. Unleash the Oracle: Transform a birthday into an epic mystery with 30 brain-teasing riddles, ciphers, and challenges. Customize the perfect adventure for your guests
Be the Host of the Most Memorable Party: Provide the clever, shared activity that gets everyone laughing and collaborating. It’s the highlight that guests will talk about for years
Sophisticated Fun, Zero Effort: Just download, pick your 10 favorite clues from 30 options, and hide them. Get a complete, themed adventure without the stress of planning from scratch
Challenge Adult Minds with “The Prophecy”: Move beyond simple games. This hunt features logic puzzles, cryptic ciphers, and hilarious dares designed specifically to engage and thrill adults

Happy Birthday Decorations
Everything in one box = party stress solved – Banner, honeycomb balls, swirls, and garland all coordinated. No last-minute runs to three different stores at 9 PM the night before.
Photo-ready in 15 minutes – Easy assembly means you spend less time wrestling with decorations and more time enjoying the birthday person’s reaction. Looks expensive, sets up fast.
Reusable = smart money – Quality materials hold up through the party AND pack away for next year. Stop buying flimsy decorations that rip before cake time.
Saves you $50+ vs. party store prices – Get the complete coordinated look without the markup. Guests think you hired a decorator; you paid a fraction of the cost.
2. No-Slip Elastic Hair Ties
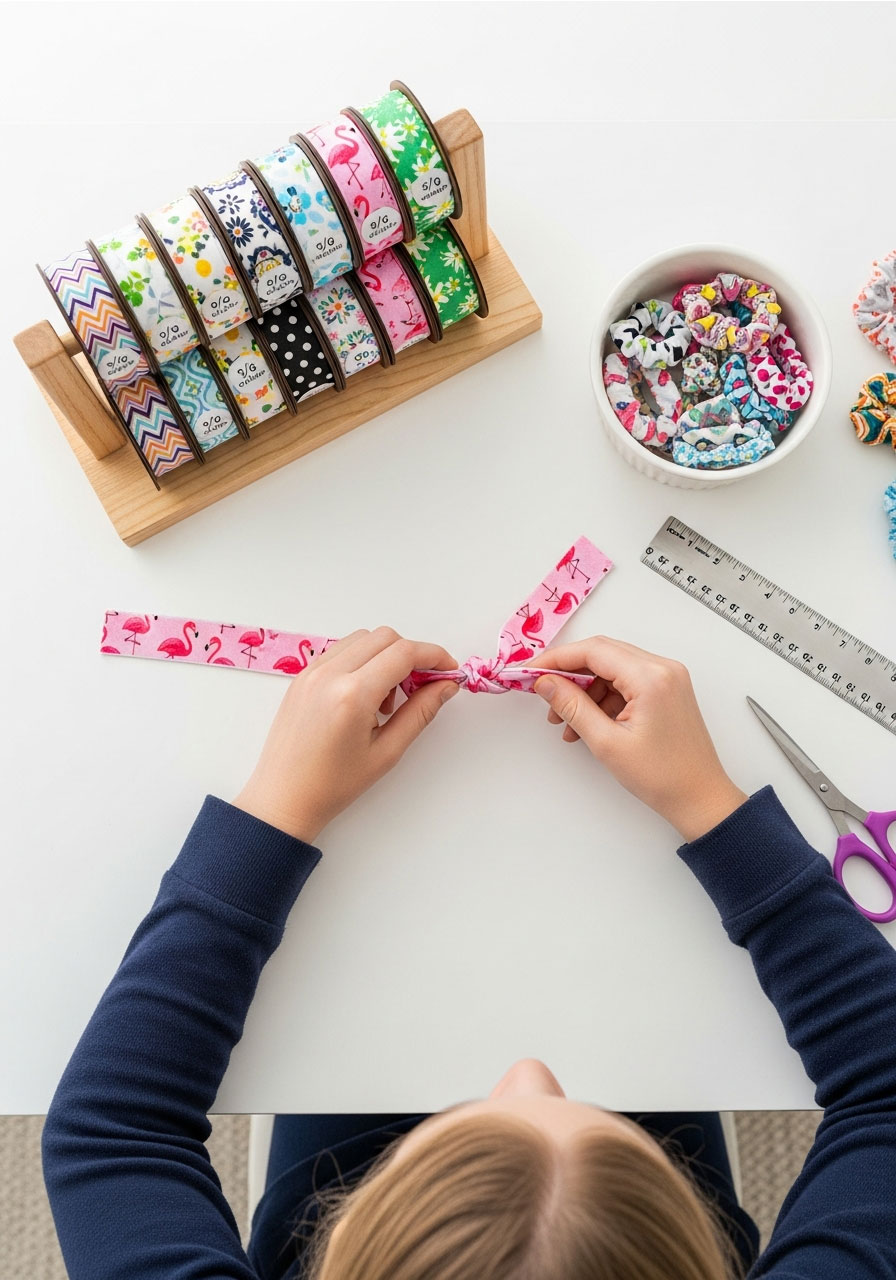
These trendy hair ties take literally 5 minutes to make – and your guests will want to create a whole collection!
Fold-over elastic (FOE) hair ties are all over stores right now, and tweens will flip when they realize how easy they are to DIY. Stock up on fun patterns and watch them make multiples.
Perfect for: Quick crafters and anyone who loves hair accessories
Time to Complete: 5 minutes per tie
Skill Level: Super easy
What You’ll Need:
Fold-over elastic in various patterns and colors
Scissors
Ruler
How to Make:
1. Cut the elastic into 8-inch strips (one strip = one hair tie).
2. Have guests choose their favorite patterns and colors.
3. Tie the ends together with a simple knot – that’s it!
4. Trim any excess elastic for a clean finish.
Fun Variation: Create custom display cards with the birthday kid’s name and party date, turning these into personalized party favors that guests can gift to friends later.
3. Decorated Dollar Store Sunglasses
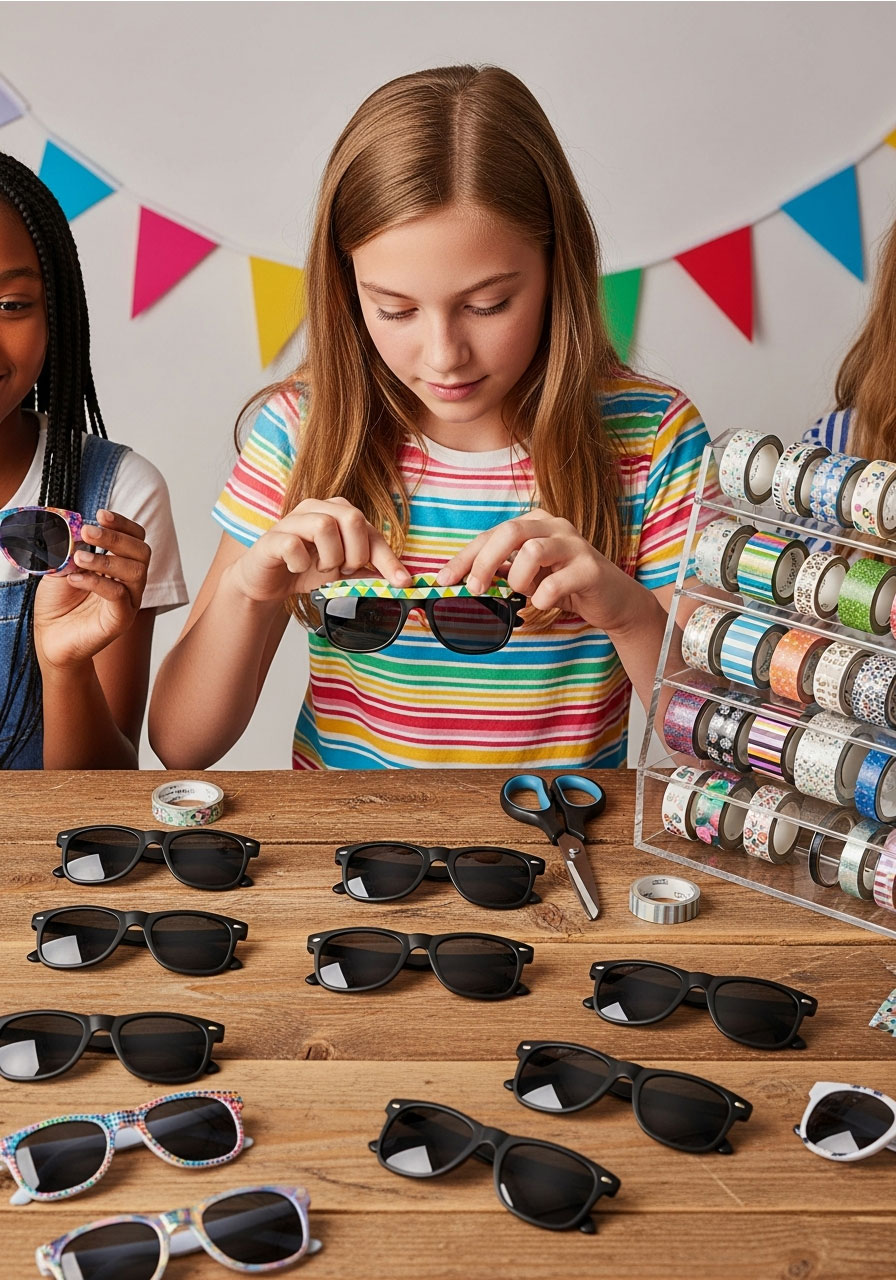
Transform basic shades into festival-ready statement pieces with one simple supply: washi tape!
This craft is foolproof, fast, and gives everyone a functional party favor they can actually use. Plus, they make for amazing group photos when everyone’s wearing their custom sunnies.
Perfect for: Summer birthdays, pool parties, or tweens who love accessories
Time to Complete: 10 minutes
Skill Level: No experience needed
What You’ll Need:
Cheap sunglasses from the dollar store (one pair per guest)
Assorted washi tape in fun patterns
Scissors
How to Make:
1. Spread out your washi tape collection so guests can see all the patterns.
2. Let each person choose their sunglasses and tape designs.
3. Wrap the washi tape around the frames, overlapping patterns or creating stripes – whatever strikes their fancy.
4. Trim any excess tape and smooth down the edges.
Pro Tip: Buy sunglasses in the party’s color theme, or let guests pick their favorite frame shapes for extra customization.
4. Stamped Canvas Clutches
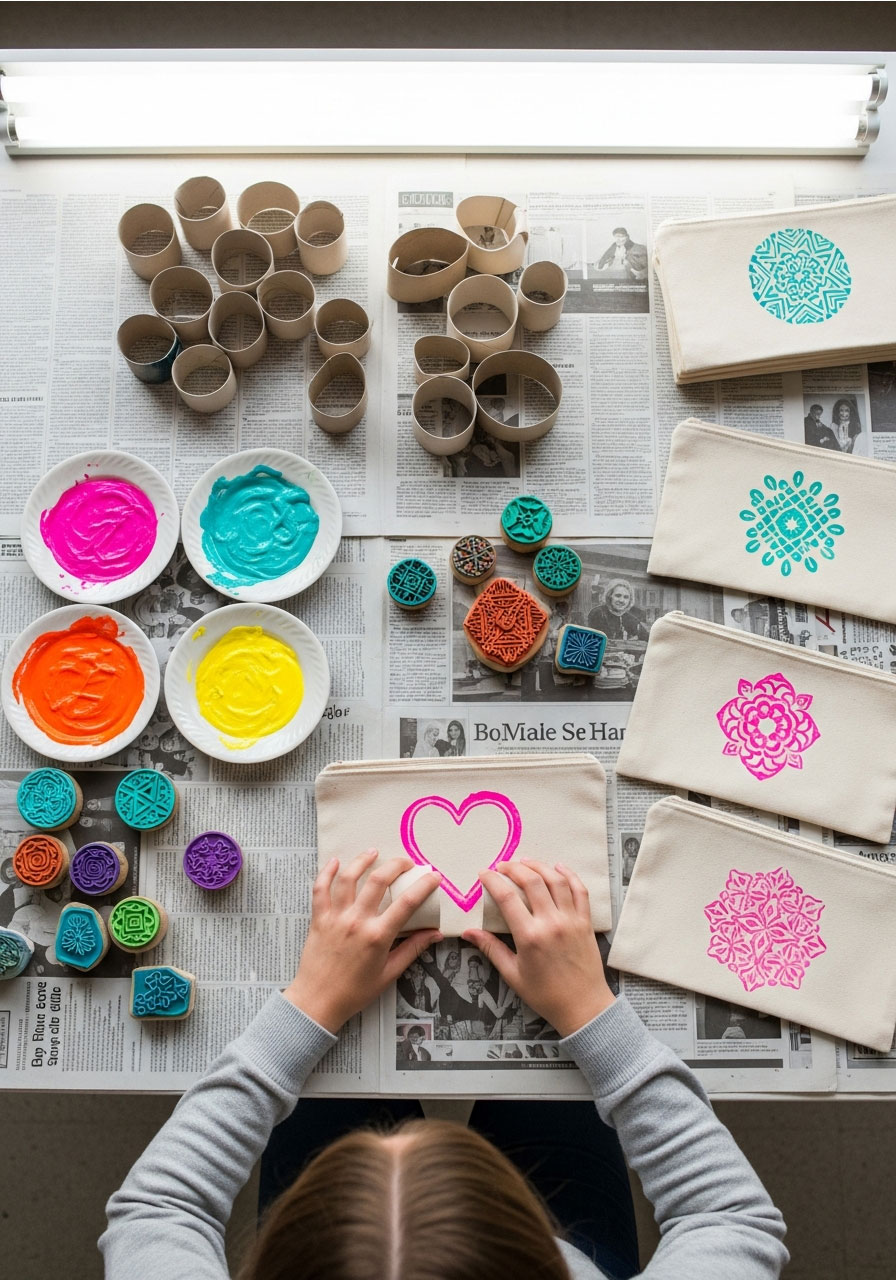
Toilet paper tubes become trendy stamps? Yes! This craft is surprisingly chic and totally unique.
These mini clutches are perfect for tweens who want something more sophisticated than typical kid crafts. They’ll love that they made something they can actually use for sleepovers or storing their phone and lip gloss.
Perfect for: Artsy tweens who love fashion
Time to Complete: 15-20 minutes
Skill Level: Beginner
What You’ll Need:
Plain canvas clutch bags (available at craft stores)
Fabric paint or fabric markers
Toilet paper tubes (for stamping circles)
Optional: rubber stamps, sponges, or foam shapes
How to Make:
1. Set up a stamping station with paints in shallow dishes.
2. Show guests how to bend the TP tubes into different shapes (hearts, flowers, or keep them round).
3. Dip the tube edges in paint and stamp designs onto the clutch.
4. Add details with markers or other stamps to complete the look.
5. Let dry completely before guests take them home.
Fun Variation: Use metallic or neon fabric paints for clutches that really pop!
5. DIY Dipped Clay Earrings
These lightweight, trendy earrings look like they came from a boutique – but your guests made them!
Air-dry clay is having a major moment, and tweens love the sculptural, modern look of geometric shapes dipped in metallic or bright colors.
Perfect for: Fashion-forward tweens ready for a slightly more advanced craft
Time to Complete: 20 minutes plus drying time
Skill Level: Intermediate
What You’ll Need:
Air-dry clay (Sculpey Air-Dry works great)
Rolling pin or smooth bottle
Cookie cutters or knife for cutting shapes
Acrylic paint (metallics are especially cool)
Small paintbrushes
Earring posts with glue, or jump rings and hooks
Small tins or boxes for guests to take them home
How to Make:
1. Roll out the clay to about 1/4-inch thickness.
2. Have guests cut out shapes – circles, triangles, teardrops, or abstract forms.
3. Use a toothpick to make holes at the top if using hooks (do this before the clay dries).
4. Paint the bottom half or edges with a dipped effect, leaving the top natural or using a contrasting color.
5. Let dry completely (send home in tins to finish drying if needed).
6. Attach earring hardware once fully dry.
Pro Tip: Make these the first activity of the party so they have maximum drying time, or prep clay shapes in advance and just let guests paint them.
6. Mermaid Shell Necklaces
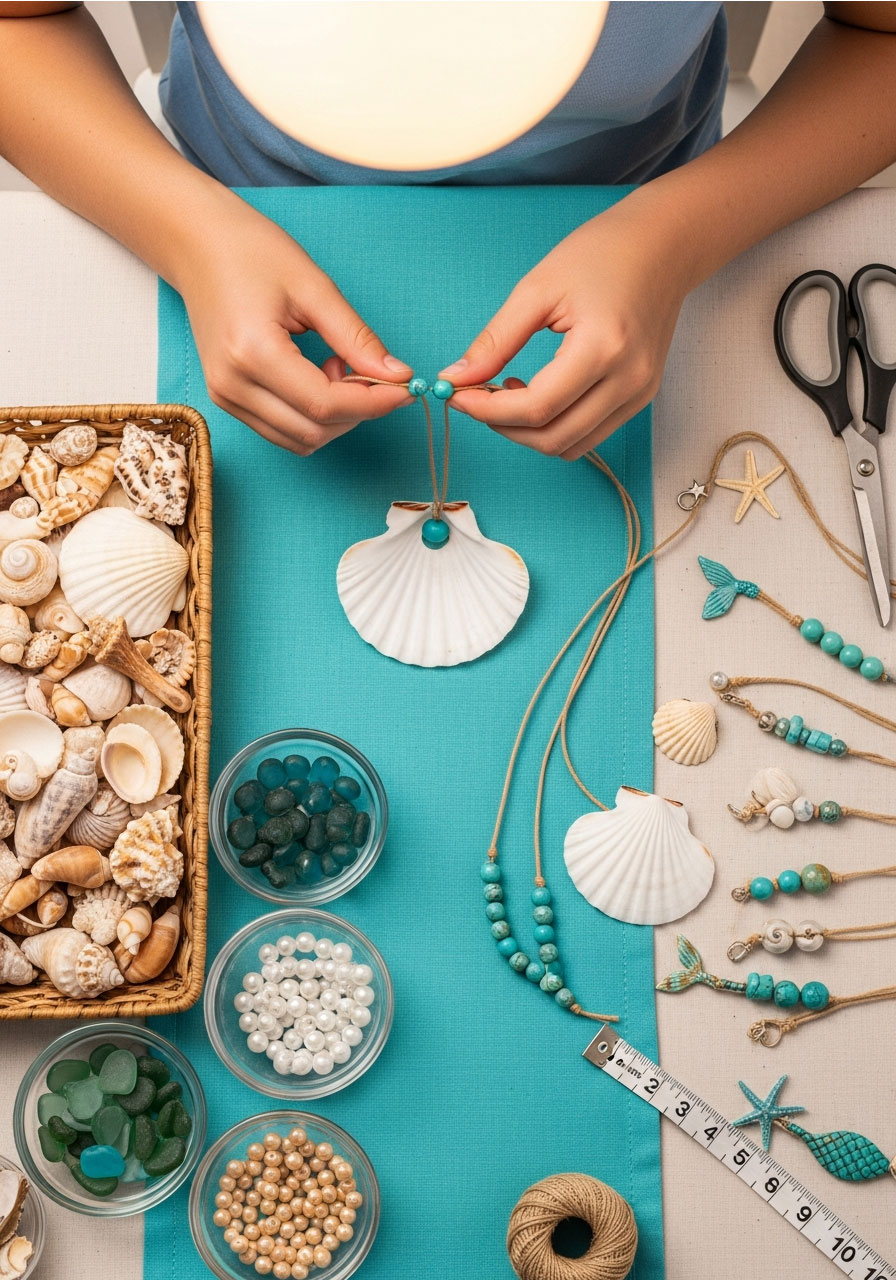
Bring beach vibes to any party with these gorgeous ocean-inspired necklaces!
Using real shells and simple supplies, guests create boho-chic jewelry that’s perfect for summer or any mermaid-themed celebration. The natural materials make each piece truly one-of-a-kind.
Perfect for: Beach parties, mermaid themes, or nature-loving tweens
Time to Complete: 15 minutes
Skill Level: Easy
What You’ll Need:
Small to medium shells (with natural holes, or drill holes beforehand)
Hemp cord or thin leather string
Beads (turquoise, pearl, or sea glass colors work beautifully)
Scissors
Optional: small charms (starfish, anchors, etc.)
How to Make:
1. Pre-cut cord into 24-inch lengths (one per guest).
2. Let guests choose their favorite shell as the centerpiece.
3. Thread the cord through the shell’s hole, then add beads on either side.
4. Tie the ends together to create an adjustable sliding knot, or use clasps if you prefer.
5. Add optional charms for extra personality.
Fun Variation: Set up a “shell decorating station” where guests can paint or add glitter to their shells before stringing them.


Birthday Party Crafts for All Tweens (Boys and Girls!)
These crafts have universal appeal – they’re creative, cool, and work for any tween regardless of style preferences.
7. DIY Infinity Cubes
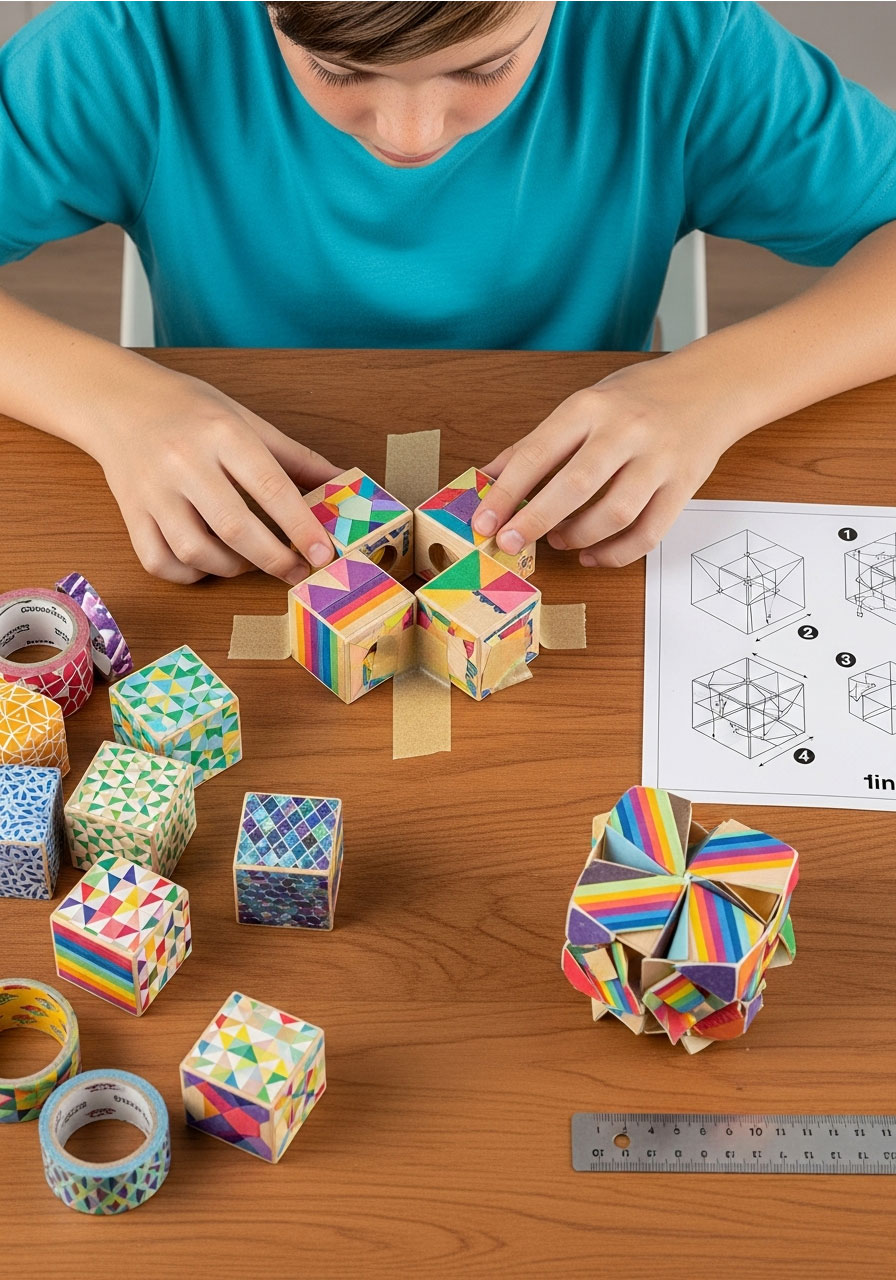
This fidget toy will be the hit of the party – guaranteed!
Infinity cubes are the coolest desk toy/stress reliever combo, and making them is way easier than it looks. Tweens can customize the colors and patterns, then fold and flip them endlessly. Best part? They fit in a pocket for sneaky classroom fidgeting.
Perfect for: Tweens who love puzzles and fidget toys
Time to Complete: 20-25 minutes
Skill Level: Intermediate (but totally doable with clear instructions)
What You’ll Need:
Small wooden cubes (8 per infinity cube)
Washi tape or acrylic paint for decorating
Strong tape (like packaging tape)
Ruler
How to Make:
1. Have guests decorate all 8 cubes with washi tape or paint – this is where personality shines.
2. Let paint dry if using it (or do this step in advance).
3. Arrange the cubes in a 2x2x2 configuration and tape them together in a specific folding pattern (provide a demonstration or printed guide).
4. Show guests how to fold and flip their finished cube – the “infinity” motion is so satisfying!
Pro Tip: Make a sample ahead of time and have the folding pattern printed out with clear diagrams. This is one where a video tutorial playing on loop can be super helpful!
8. Glitter-Dipped Tumblers
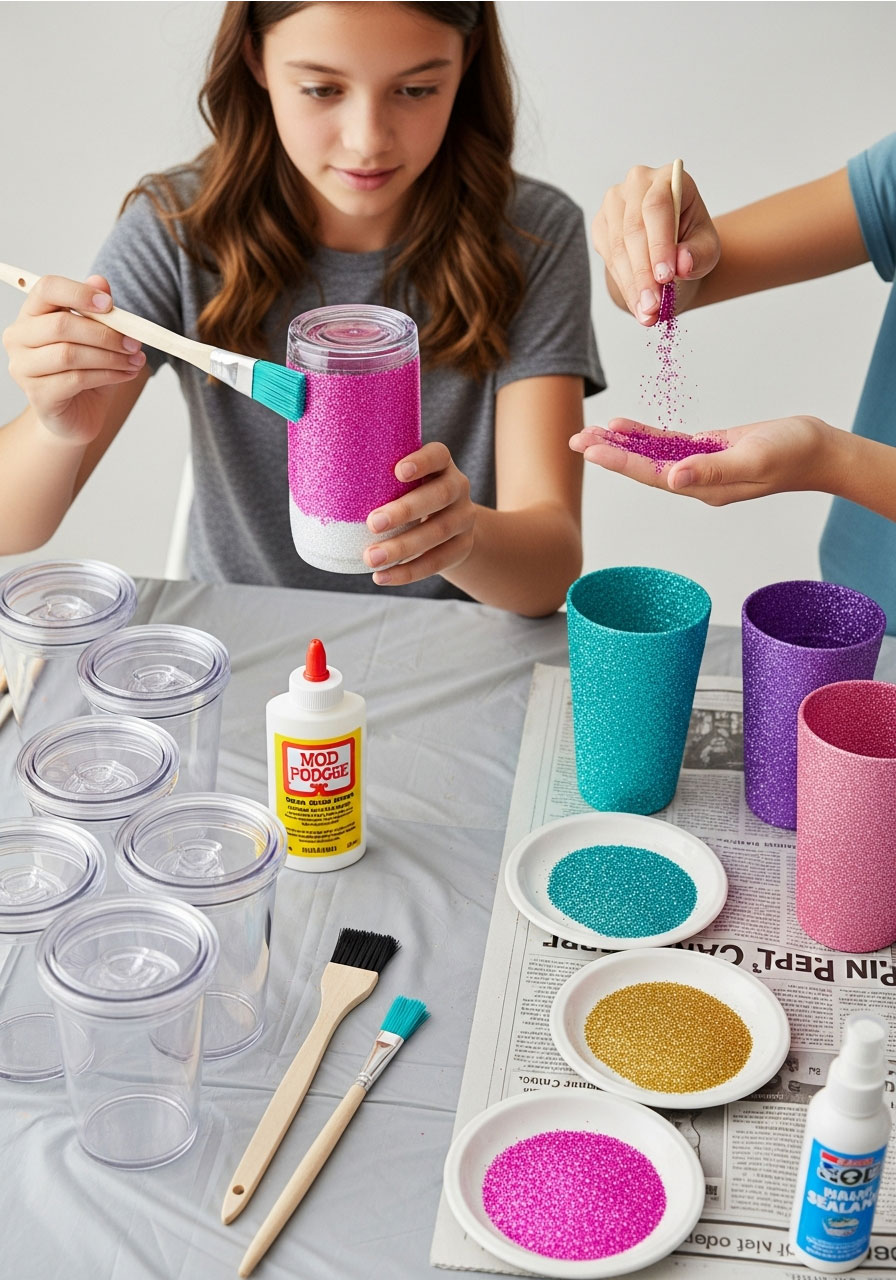
Sparkle, sip, repeat! These custom tumblers are party décor AND a craft activity.
Tweens go wild for glitter, and these tumblers are actually functional enough to use every day. They’re perfect for the party itself (hello, drink station!) and then guests take them home as a keepsake.
Perfect for: Any celebration, especially if you’re serving fun drinks
Time to Complete: 15 minutes plus drying time
Skill Level: Easy
What You’ll Need:
Clear plastic tumblers with lids
Mod Podge or clear-drying glue
Fine glitter in various colors
Foam brushes
Newspaper or disposable tablecloth
Clear sealant spray
How to Make:
1. Cover your craft area thoroughly – glitter gets EVERYWHERE.
2. Have guests brush Mod Podge on the bottom third of their tumbler.
3. Sprinkle glitter generously over the glue, rotating to coat evenly.
4. Tap off excess glitter and let dry completely.
5. Seal with a clear spray to keep glitter from shedding.
6. Add straws and use at the party, or wrap up to take home!
Fun Variation: Use biodegradable glitter or confetti for an eco-friendly version, or try ombre effects with multiple glitter colors.
9. Decoupage Monogram Letters
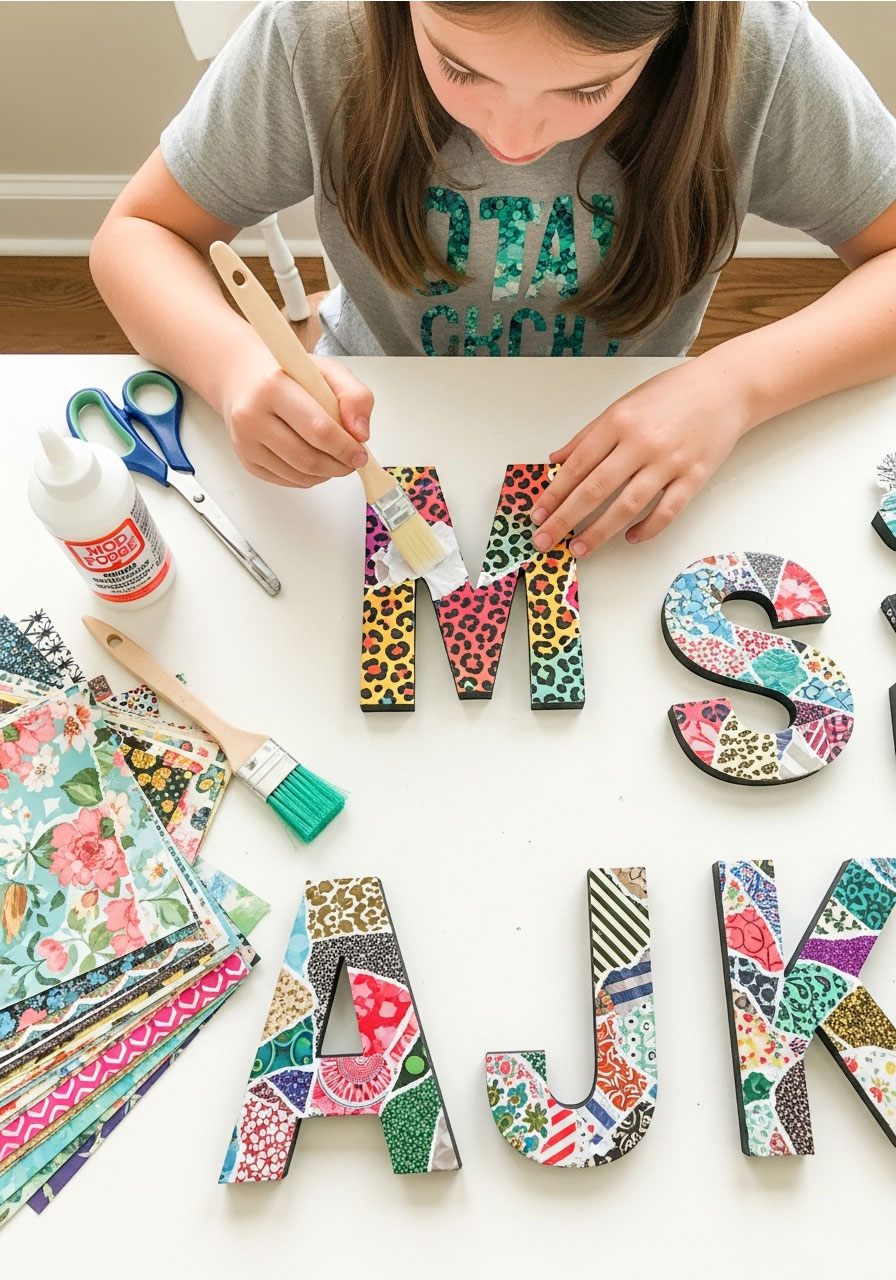
Everyone loves seeing their initial in lights – or in this case, covered in cool scrapbook paper!
These personalized letters are bedroom décor that tweens will actually want to display. The best part? You can prep the letters based on your guest list so everyone gets their own initial.
Perfect for: Tweens who love room décor
Time to Complete: 15-20 minutes
Skill Level: Easy
What You’ll Need:
Wooden letters (one per guest – get their initials ahead of time!)
Scrapbook paper in various patterns
Mod Podge
Foam brushes
Scissors
How to Make:
1. Pre-assign letters or let guests find theirs from your collection.
2. Have guests tear or cut scrapbook paper into small pieces (no need to be perfect – mixed patterns look great!).
3. Brush Mod Podge onto a section of the letter.
4. Apply paper pieces, overlapping slightly, then brush more Mod Podge over the top.
5. Continue until the entire letter is covered, including the sides.
6. Let dry and apply a final coat of Mod Podge for a glossy finish.
Pro Tip: Go with smaller letters (4-6 inches) for a quicker craft that’s easier to take home. You can also do mini versions that work as locker decorations!
10. Printable Cat Masks
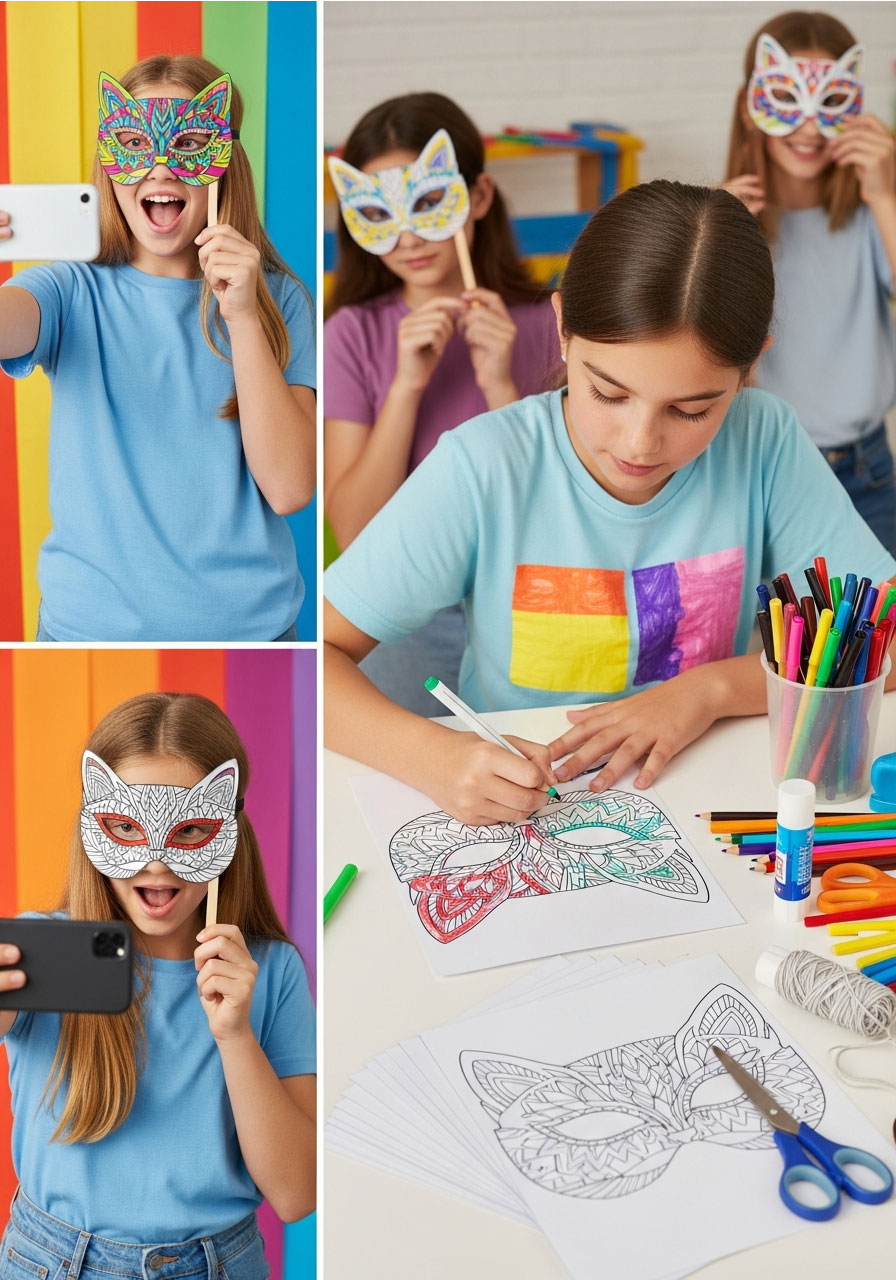
Color, cut, create – then strike a pose! These masks double as a craft AND a photo booth prop.
Tweens are all about the selfies, and these customizable cat masks give them something fun to do AND amazing photo ops afterward. It’s a two-for-one activity that keeps the party energy high.
Perfect for: Parties with a photo booth or tweens who love art
Time to Complete: 15 minutes
Skill Level: Super easy
What You’ll Need:
Printable cat mask templates (search online for free versions)
Cardstock or heavy paper
Colored pencils, markers, or crayons
Scissors
Popsicle sticks or elastic string
Glue or tape
How to Make:
1. Print out mask templates on cardstock before the party.
2. Let guests color and decorate their masks however they want – realistic cats, rainbow cats, galaxy cats, anything goes!
3. Cut out the masks and eye holes carefully.
4. Attach a popsicle stick to one side to hold it, or punch holes and add elastic to wear it hands-free.
5. Create a photo backdrop and let the selfie session begin!
Fun Variation: Try different animal masks (foxes, unicorns, superheroes) based on your party theme, or let guests design entirely original creatures.
11. Custom Dry Erase Boards
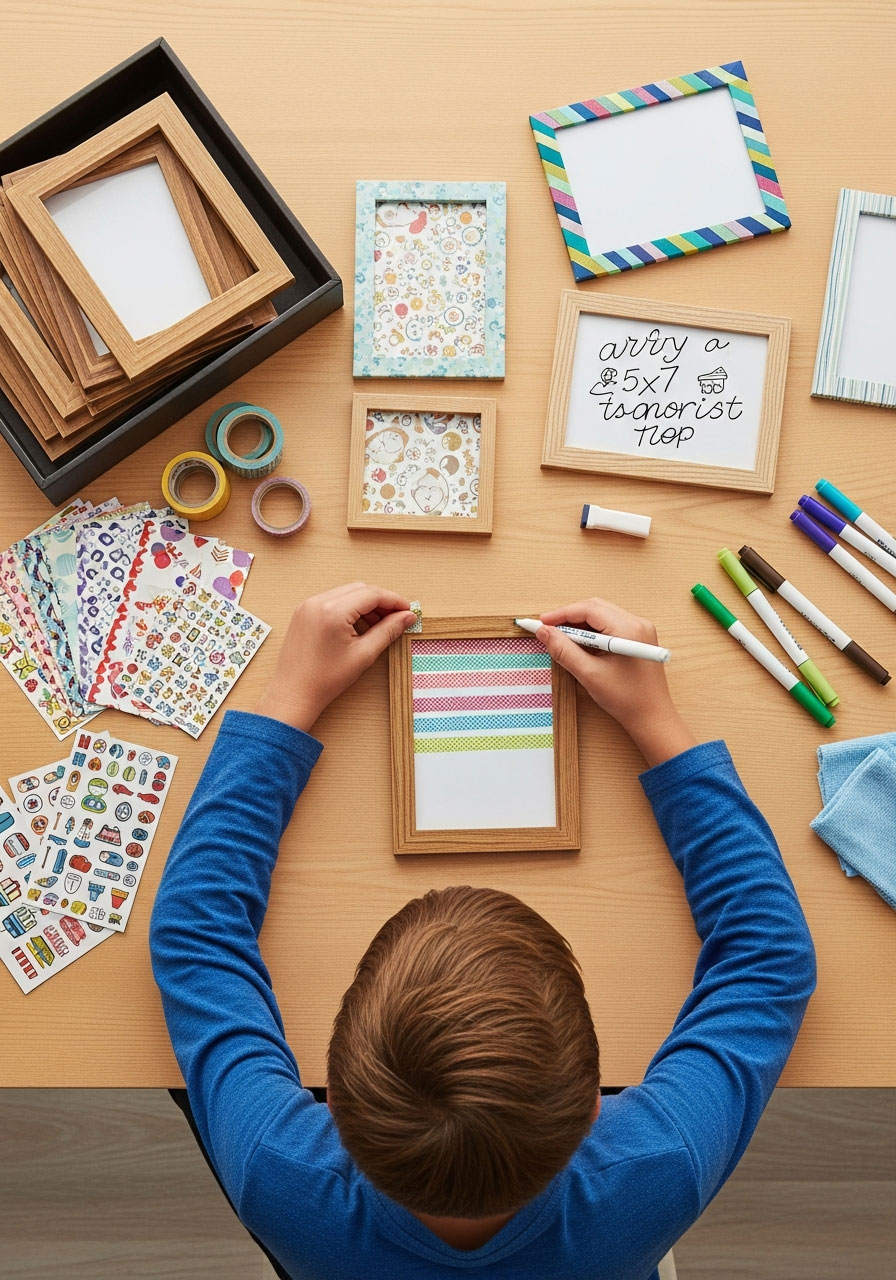
These mini message boards are cute, useful, and totally customizable – tween heaven!
Perfect for jotting down homework assignments, leaving notes for family, or just doodling when bored, these dry erase boards are a practical party favor that will actually get used.
Perfect for: Tweens who love organizing and decorating their space
Time to Complete: 15 minutes
Skill Level: Easy
What You’ll Need:
Small picture frames with glass (remove the backing and photo)
Decorative paper or fabric for the background
Washi tape or paint for decorating the frame
Scissors
Dry erase markers (one per guest to take home)
How to Make:
1. Have guests choose their background paper – patterns, solid colors, or even magazine cutouts work.
2. Cut the paper to fit the frame.
3. Decorate the frame itself with washi tape, paint, or stickers.
4. Reassemble the frame with the decorative paper as the backing.
5. Test it out with dry erase markers – the glass surface is your writing area!
Pro Tip: Write a fun message on each board as guests finish, like “Happy Birthday [Guest Name]!” so they have something cute to photograph before erasing.
12. DIY Tetris Magnets
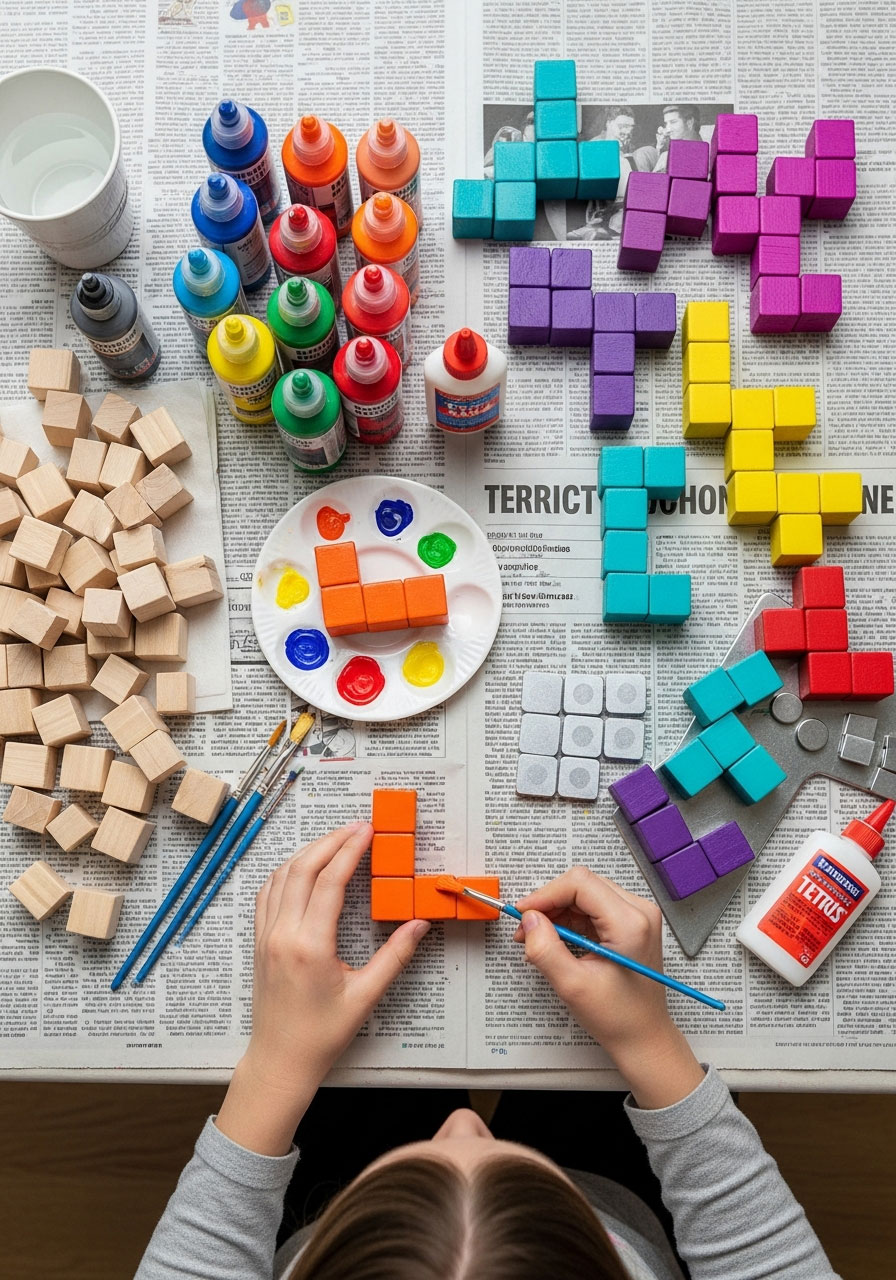
Level up your locker game with these retro-cool gaming magnets!
If you’re throwing a video game-themed party, these are perfect – but honestly, tweens love them regardless. They’re colorful, fun to arrange, and give major ’80s nostalgia (even if the kids don’t quite get why).
Perfect for: Gaming-themed parties or tweens who love retro vibes
Time to Complete: 20 minutes
Skill Level: Easy
What You’ll Need:
Wooden craft cubes (available at craft stores)
Acrylic paint in classic Tetris colors (blue, orange, red, yellow, green, purple, teal)
Small paintbrushes
Strong adhesive magnets
Craft glue
How to Make:
1. Pre-arrange cubes into classic Tetris shapes (the L, T, square, line, etc.) or let guests create their own.
2. Have guests paint each cube in their chosen colors – they can do full Tetris pieces or random color combos.
3. Let the paint dry completely.
4. Glue magnets to the back of each cube.
5. Once dry, guests can arrange them on any magnetic surface!
Fun Variation: Use glow-in-the-dark paint for cubes that shine at night, or try other pixel art patterns like Space Invaders or Minecraft blocks.
13. Painted Rock Photo Holders
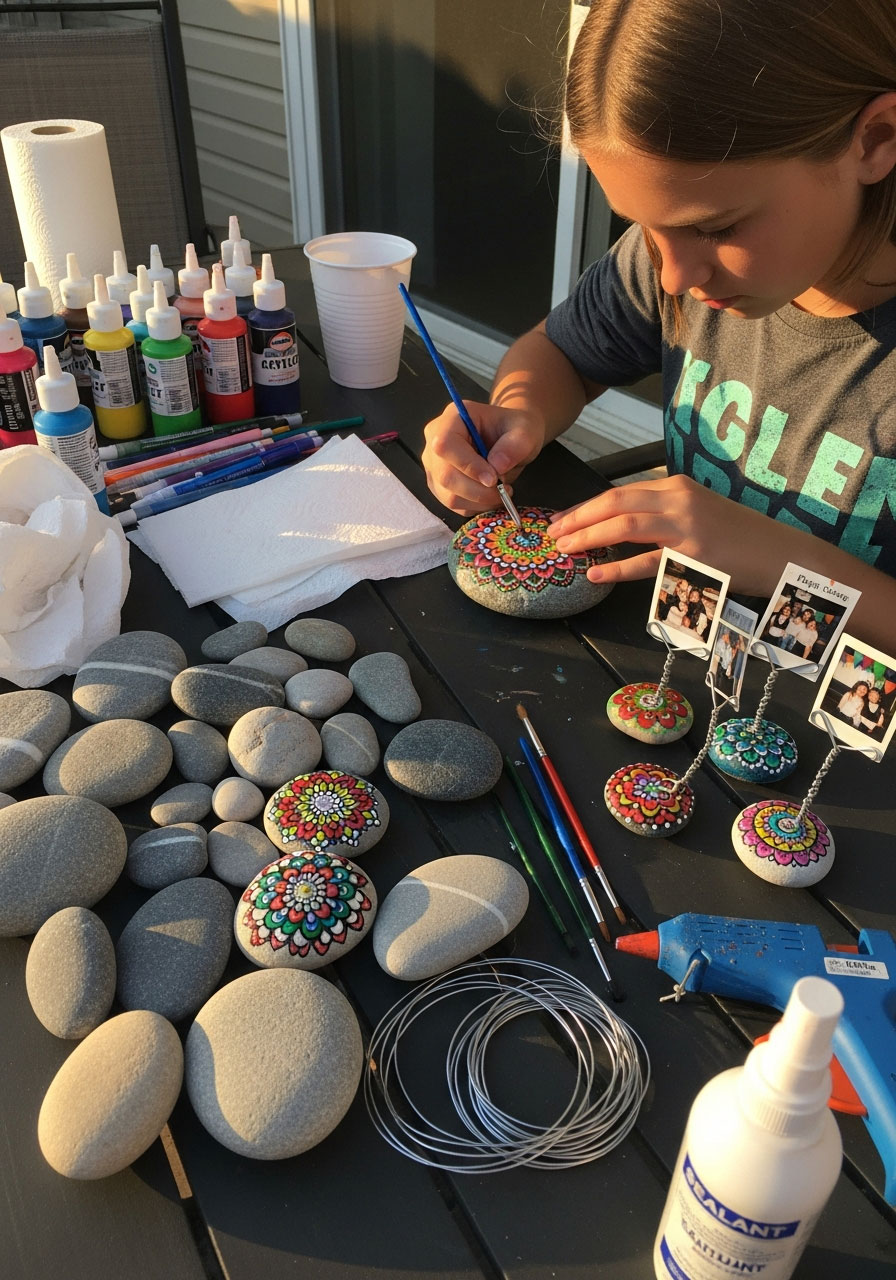
Turn simple stones into functional art pieces that hold memories!
Rock painting is huge with tweens right now, and these photo holders add a practical twist. Guests can display their favorite pics from the party (or any other photos) on their dresser or desk.
Perfect for: Tweens who love rock painting and photography
Time to Complete: 20 minutes plus drying time
Skill Level: Easy
What You’ll Need:
Smooth, flat-bottomed rocks (one per guest)
Acrylic paint and brushes
Paint pens for details
Craft wire (thick enough to be sturdy)
Wire cutters
Strong craft glue or hot glue gun
Optional: sealant spray
How to Make:
1. Have guests paint their rocks in any design – mandalas, animals, abstract patterns, quotes, or solid colors with details.
2. While paint dries, cut wire pieces about 6-8 inches long.
3. Bend the wire into a spiral or loop at the top to hold a photo.
4. Once rocks are dry, glue the wire piece to the flat bottom, making sure it stands upright.
5. Let glue dry completely, then test with a photo!
Pro Tip: Take instant photos at the party so guests can immediately display a party memory in their new holders!
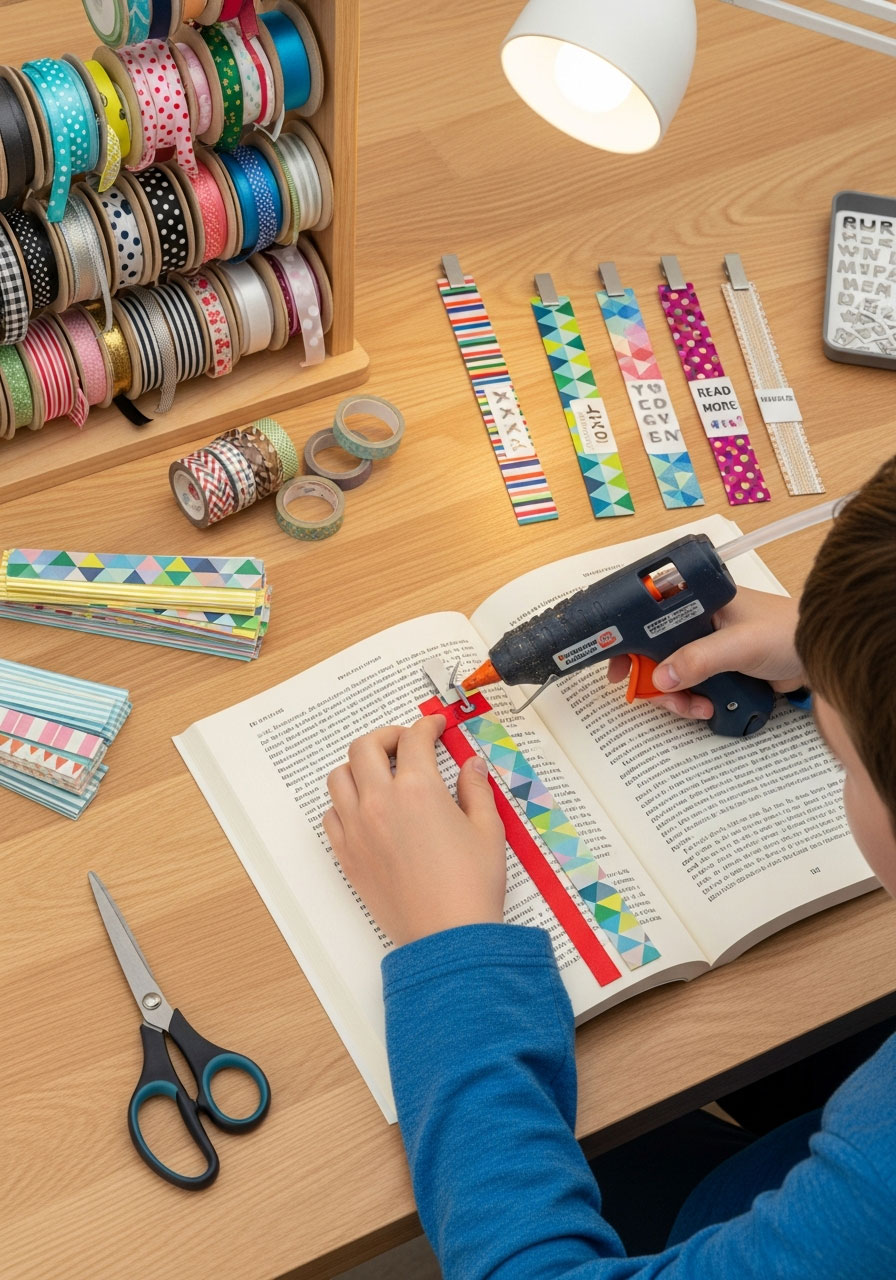
14. Washi Tape Bookmarks
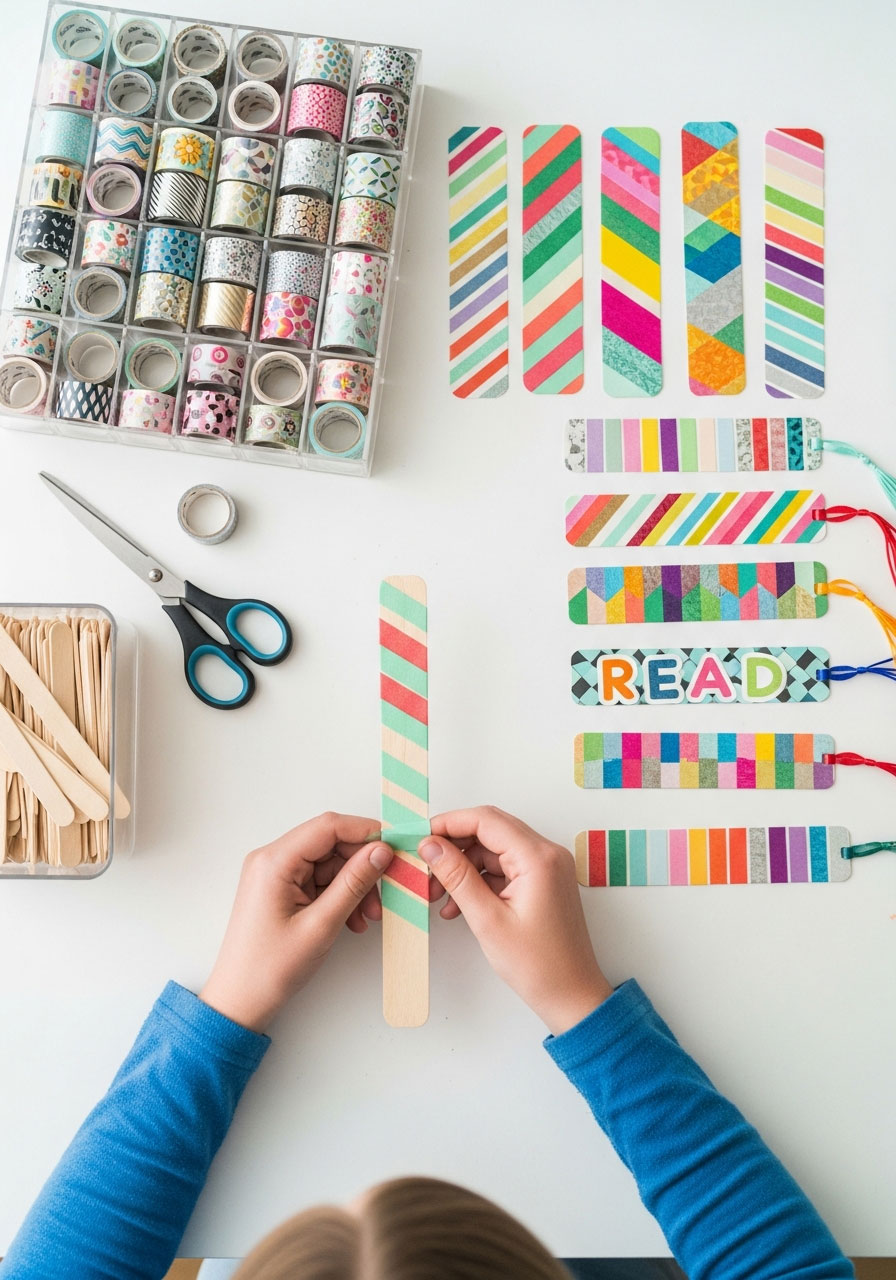
Reading just got way cuter with these personalized craft stick bookmarks!
This is one of the fastest, easiest crafts on the list – but tweens love the customization possibilities. With dozens of washi tape patterns available, everyone creates something unique without any mess.
Perfect for: Book lovers and quick crafters
Time to Complete: 5-10 minutes
Skill Level: Beginner
What You’ll Need:
Jumbo craft sticks or wooden bookmarks
Washi tape in tons of patterns and colors
Scissors
Optional: letter stickers, small charms, ribbon
How to Make:
1. Spread out your washi tape collection so guests can browse all the options.
2. Have guests wrap their craft sticks in washi tape patterns – stripes, diagonal wraps, patchwork, whatever looks cool.
3. Trim any excess tape from the edges.
4. Add optional letter stickers for initials or words like “READ”.
5. Attach a ribbon tassel to the top with glue for extra flair.
Fun Variation: Use wide craft sticks and let guests make multiple bookmarks to gift to friends later, or create corner bookmarks by folding washi tape into triangular pockets.
15. Confetti-Dipped Party Cups
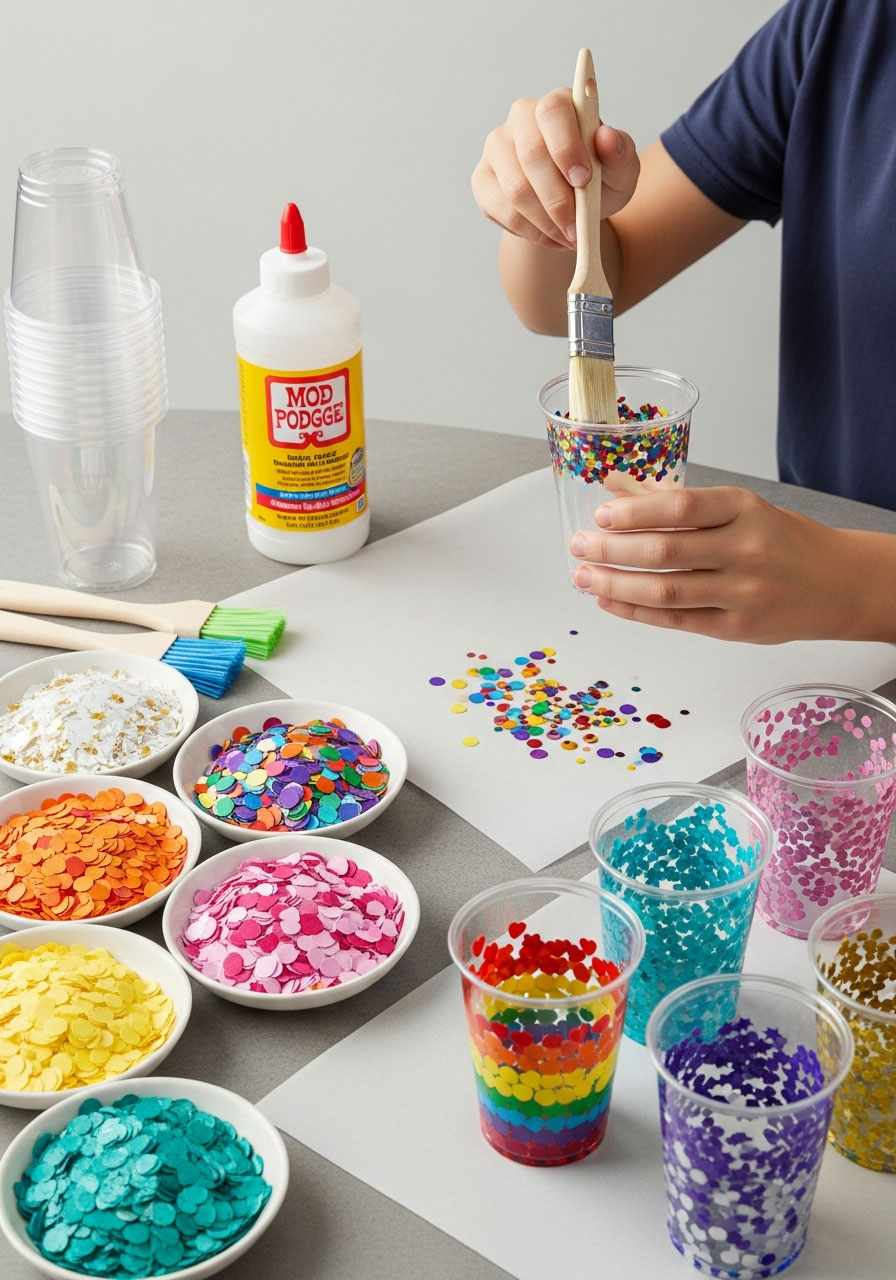
These festive cups bring the party vibes while being functional party supplies!
Guests can use these decorated cups during the party, then take them home. It’s a win-win that adds to your party décor while keeping everyone entertained with a creative activity.
Perfect for: Any celebration where you’re serving drinks
Time to Complete: 15 minutes plus drying time
Skill Level: Easy
What You’ll Need:
Clear plastic or sturdy paper cups
Mod Podge
Biodegradable confetti (eco-friendly and just as fun!)
Foam brushes
Wax paper or newspaper for drying
How to Make:
1. Brush Mod Podge around the bottom third of each cup.
2. Have guests sprinkle confetti over the glue, pressing gently to make sure it sticks.
3. Apply another layer of Mod Podge over the confetti to seal it.
4. Let dry completely on wax paper.
5. Use at the party with fun drinks, then send home as favors!
Pro Tip: Match your confetti colors to the party theme, or use metallic confetti for extra glam. Set up a drink station with these cups as the centerpiece!
16. Hashtag Magnets
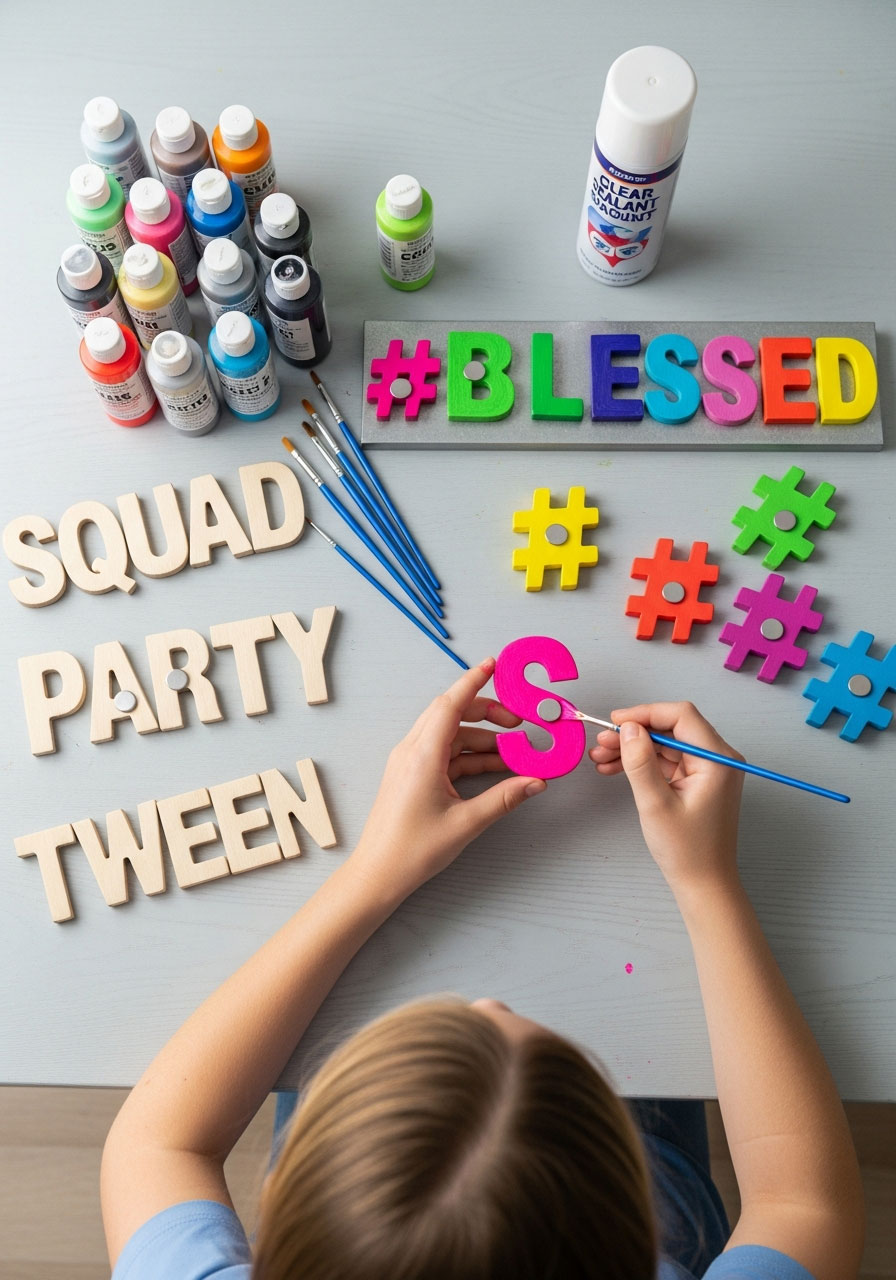
#PartyFavors #DIY #TweenLife – these trendy magnets speak their language!
Similar to the Tetris magnets but with a modern twist, these hashtag magnets are perfect for the social-media-savvy generation. They can spell out their favorite phrases or create funny messages on any magnetic surface.
Perfect for: Social media-loving tweens
Time to Complete: 20 minutes
Skill Level: Easy
What You’ll Need:
Wooden craft letters
Acrylic paint or paint markers
Small adhesive magnets
Clear sealant spray (optional)
How to Make:
1. Let guests choose letters to spell out their favorite hashtags or words (#TWEEN, #PARTY, #SQUAD, etc.).
2. Paint each letter in bright, bold colors – metallics and neons are especially popular.
3. Let paint dry completely.
4. Attach adhesive magnets to the back of each letter.
5. Spell out their hashtag to make sure everything fits together.
Fun Variation: Pre-cut hashtag symbols (#) from craft foam so everyone’s phrases are properly hashtagged, or let guests create emoji magnets instead!
17. DIY Stone Pendants
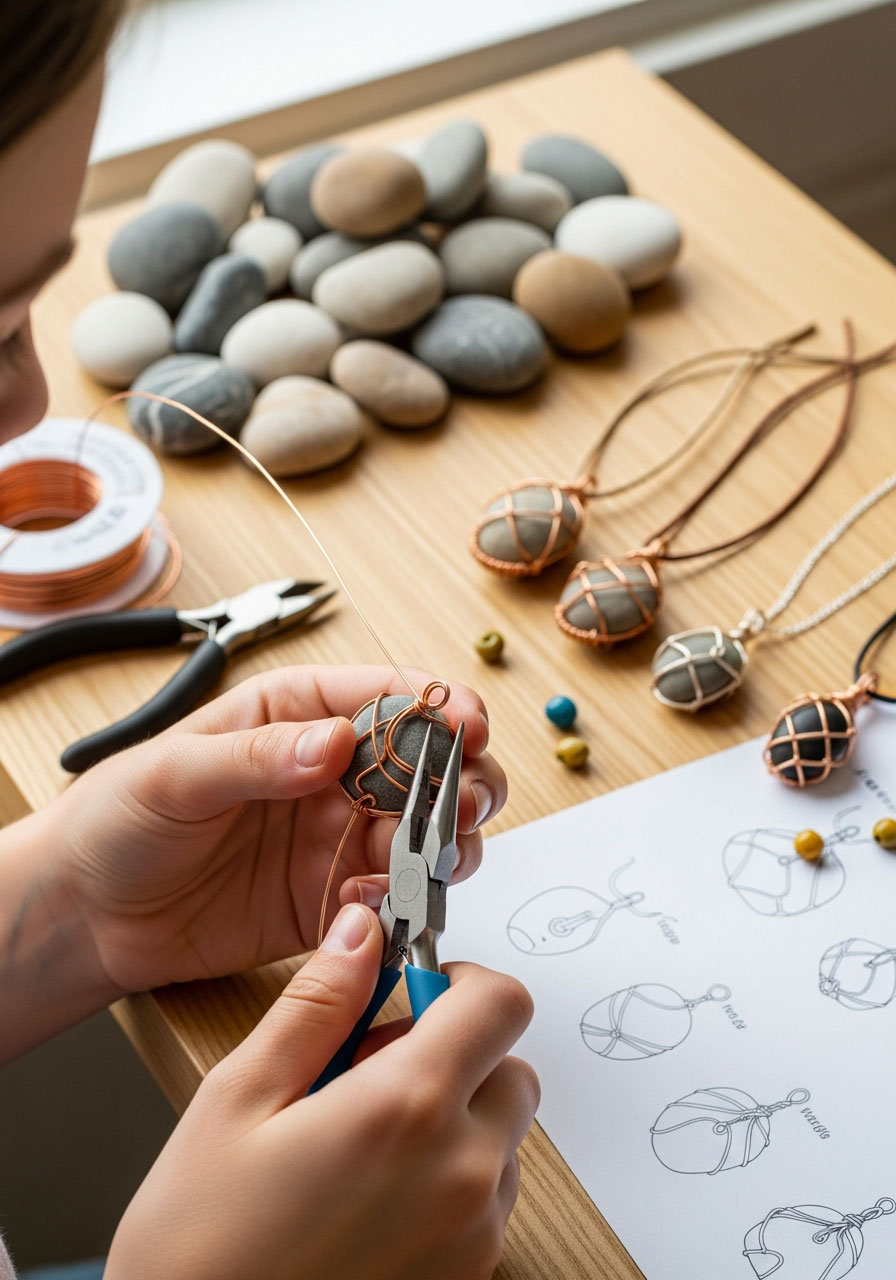
These nature-inspired necklaces look way more complicated than they actually are!
Using smooth stones and simple wire-wrapping techniques, tweens create bohemian jewelry that looks professionally made. It’s impressive enough that they’ll wear it constantly.
Perfect for: Tweens who love jewelry and natural materials
Time to Complete: 15-20 minutes
Skill Level: Intermediate (but manageable with guidance)
What You’ll Need:
Smooth, flat stones (beach stones work perfectly)
Thin craft wire (20-24 gauge)
Wire cutters
Needle-nose pliers
Necklace cord or chain
Optional: beads for accents
How to Make:
1. Show guests how to wrap wire around their stone, creating a cage or simple wrap design that holds it securely.
2. Leave a loop at the top for threading the necklace cord.
3. Use pliers to tighten and secure the wire ends.
4. Thread the wrapped stone onto cord or chain.
5. Add optional beads and tie or clasp the ends.
Pro Tip: Provide a demonstration and have a sample for guests to reference. Consider offering pre-wrapped stones for guests who find wire-wrapping challenging, then let them customize with beads and cord choices.
18. Sunset-Painted Seashells
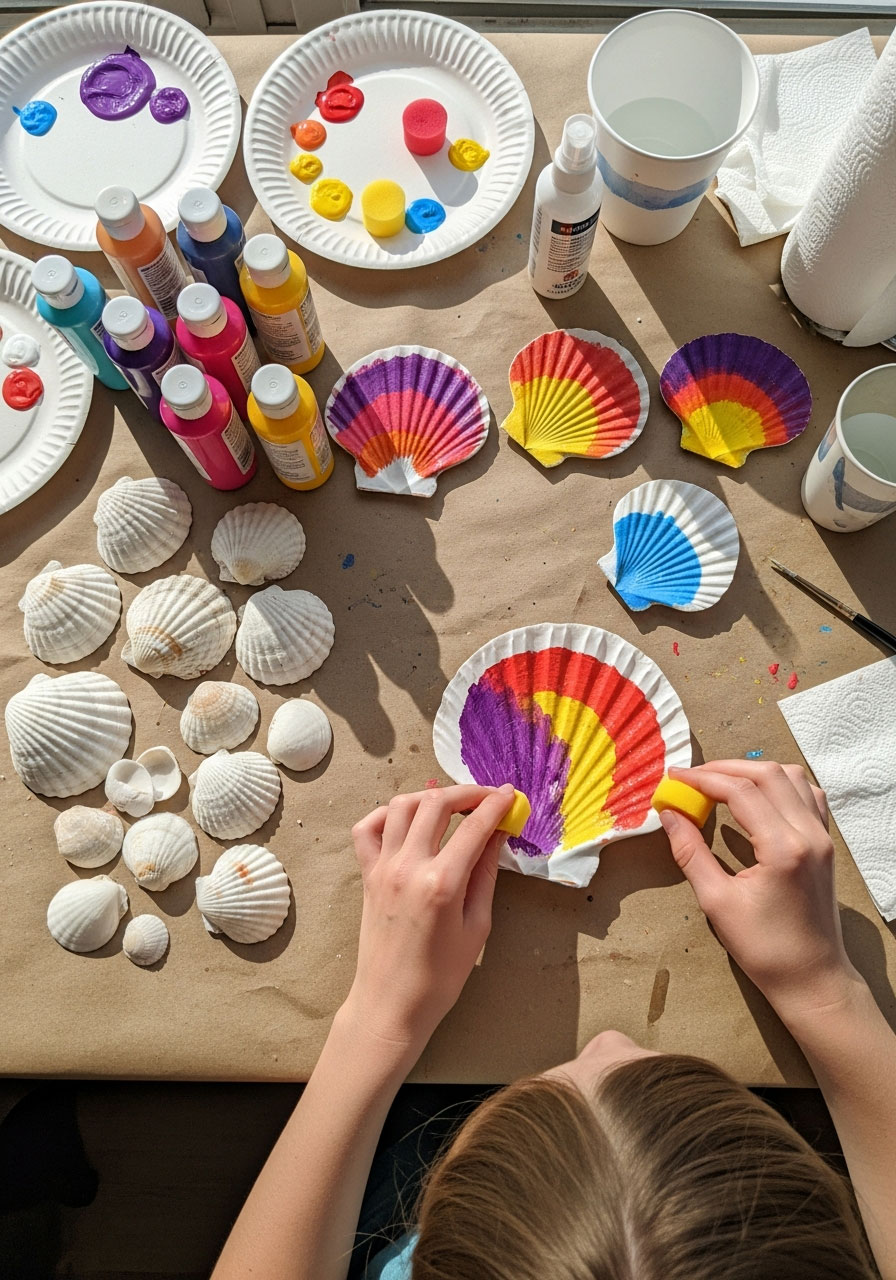
Bring beach-sunset vibes home with these stunning painted shells!
This craft combines the popularity of rock painting with the beauty of natural shells. The gradient sunset effect is surprisingly easy to achieve and looks absolutely gorgeous when finished.
Perfect for: Artsy tweens and beach/summer-themed parties
Time to Complete: 20 minutes plus drying time
Skill Level: Intermediate
What You’ll Need:
Large, smooth seashells
Acrylic paint in sunset colors (pink, orange, yellow, purple, blue)
Small sponges or foam brushes
Water cups
Paper plates for palettes
Sealant spray
How to Make:
1. Have guests choose their shell and decide on their sunset color scheme.
2. Start with the darkest color (usually purple or deep pink) at one edge of the shell.
3. Blend into the next color, dabbing where colors meet to create a gradient.
4. Continue with progressively lighter colors (orange, yellow, light blue).
5. Let dry completely and seal with spray for lasting color.
Fun Variation: Try galaxy designs with dark blue/purple and white splatter stars, or ocean waves with blues and white foam effects.
19. Upcycled Puzzle Piece Pins
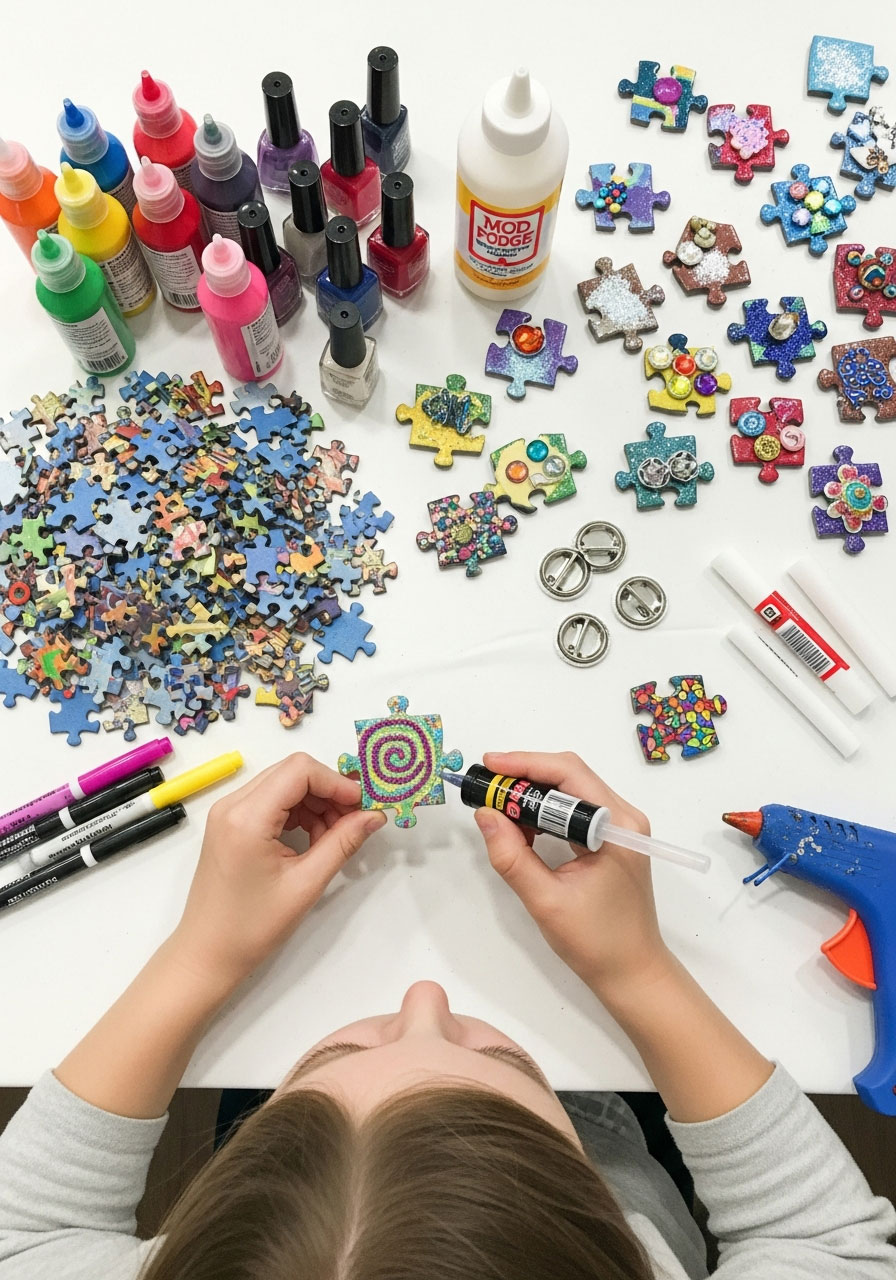
Old puzzles get a glamorous second life as wearable art!
This craft is perfect for tweens who love quirky, unique accessories. The puzzle piece shape is instantly recognizable but totally transforms with a little creativity – and it’s a great way to upcycle old games.
Perfect for: Eco-conscious tweens who love unique accessories
Time to Complete: 15 minutes
Skill Level: Easy
What You’ll Need:
Puzzle pieces from incomplete puzzles
Acrylic paint, nail polish, or paint pens
Glitter, gems, or stickers for decorating
Mod Podge
Pin backs
Hot glue gun
How to Make:
1. Have guests choose their puzzle piece (or two for earrings!).
2. Paint the base color and let dry.
3. Add designs – stripes, polka dots, glitter, gemstones, whatever speaks to them.
4. Seal everything with a coat of Mod Podge.
5. Hot glue a pin back to the reverse side once completely dry.
Fun Variation: Create matching sets by painting multiple pieces in coordinating designs, or make earrings by adding earring posts instead of pin backs.
20. Zentangle Rock Art

Meditative doodling meets rock painting – the ultimate creative combo!
Zentangle patterns are those satisfying, repetitive designs that are somehow both relaxing to create and impressive to look at. On rocks, they become permanent mini art pieces that tweens can display anywhere.
Perfect for: Artistic tweens who love detailed work
Time to Complete: 20-30 minutes
Skill Level: Intermediate
What You’ll Need:
Smooth, light-colored rocks
Fine-tip permanent markers in black and colors
Pencils for sketching (optional)
Example zentangle pattern sheets
Sealant spray
How to Make:
1. Provide printed examples of zentangle patterns for inspiration (think spirals, scales, flowers, geometric shapes).
2. Have guests sketch light pencil guidelines on their rock if they want structure.
3. Fill sections with different zentangle patterns using fine-tip markers.
4. Build up the design by adding different patterns in each section.
5. Seal with spray when finished for durability.
Pro Tip: Show examples where different patterns are combined in one piece – this helps guests understand they don’t need to stick to just one design. Playing calming music during this craft creates a zen atmosphere!
21. Fringed Magnetic Bookmarks
These ribbon-trimmed bookmarks are practical, pretty, and ready for locker duty!
Magnetic bookmarks are genius because they actually stay in place (unlike regular bookmarks that fall out constantly). Add colorful ribbon fringe and you’ve got a craft that’s both functional and fabulous.
Perfect for: Readers and tweens who want practical locker decorations
Time to Complete: 10-15 minutes
Skill Level: Easy
What You’ll Need:
Thin magnetic sheets (cut into 2×5 inch rectangles)
Decorative ribbon in various colors and patterns
Scissors
Strong craft glue or hot glue gun
Optional: washi tape for decorating the magnetic pieces
How to Make:
1. Pre-cut magnetic sheets into bookmark-sized rectangles (or have guests do this if you trust them with scissors!).
2. Optionally, wrap magnetic pieces with washi tape for color and pattern.
3. Cut multiple 3-4 inch pieces of ribbon for the fringe.
4. Glue ribbon pieces along one short edge of the magnetic strip, slightly overlapping them.
5. Let glue dry, then demonstrate how to clip the bookmark onto book pages.
Fun Variation: Create corner magnetic bookmarks by bending the magnetic sheet into an L-shape, or add inspirational quotes with letter stickers on the front.
22. Personalized Name Keychains
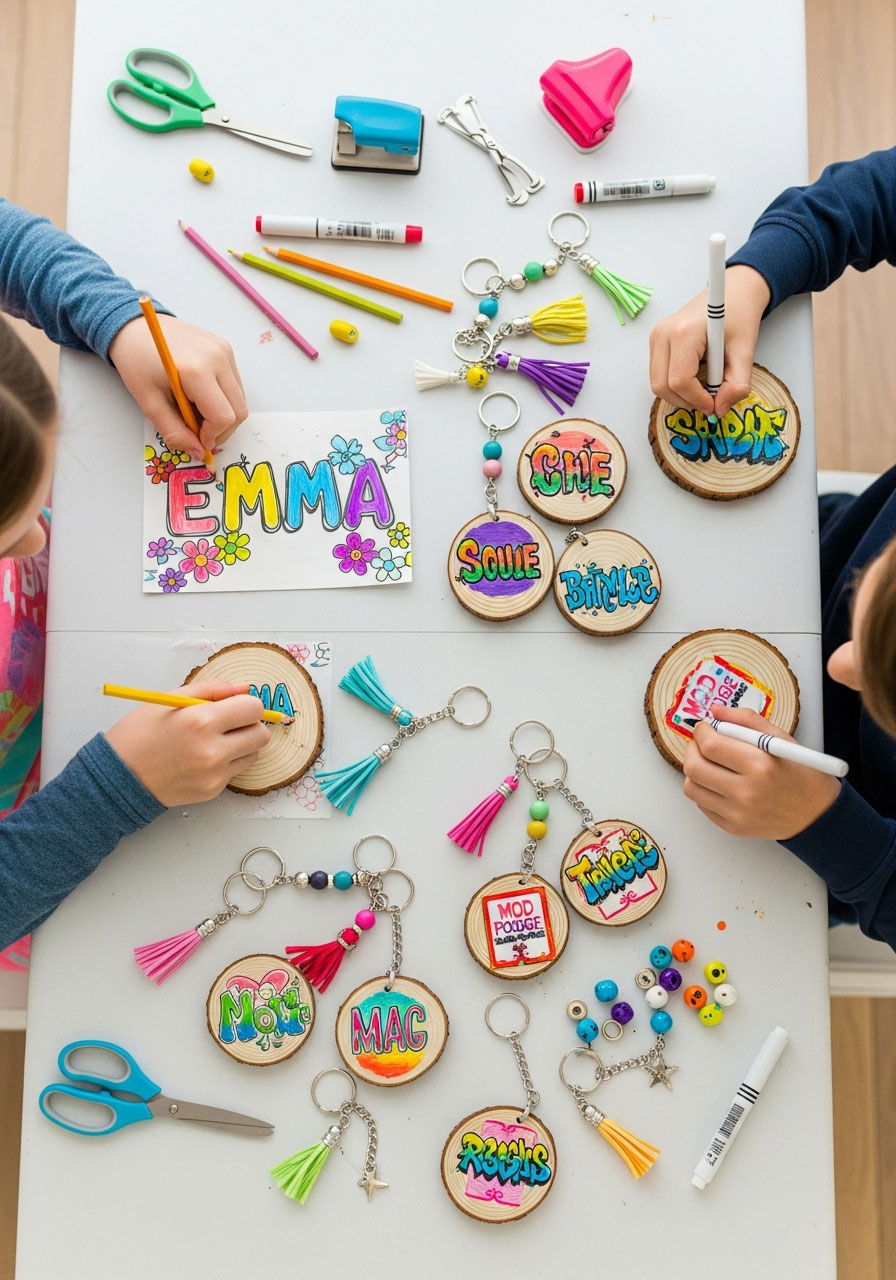
Everyone needs a cool keychain – for their locker, backpack, or eventually their first set of keys!
This final craft is all about personalization. Using shrink plastic or wood discs, tweens create custom keychains with their names, initials, or favorite designs that they’ll actually use.
Perfect for: Tweens who love personalized accessories
Time to Complete: 15-20 minutes plus baking time if using shrink plastic
Skill Level: Easy to intermediate
What You’ll Need:
Shrink plastic sheets OR wooden disc blanks
Colored pencils (for shrink plastic) or paint markers (for wood)
Scissors
Hole punch
Keychain rings
Baking sheet and oven (if using shrink plastic)
Optional: beads, charms, tassels
How to Make (Shrink Plastic Version):
1. Have guests draw their design and write their name on the rough side of the shrink plastic.
2. Cut out the shape, leaving a border around the design.
3. Punch a hole at the top for the keychain ring.
4. Bake according to package directions (usually 2-3 minutes at 325°F) – watch them shrink through the oven window!
5. Let cool, then add keychain ring and optional charms.
How to Make (Wood Version):
1. Guests paint or draw designs on wooden discs using markers or paint pens.
2. Add their name or initials in their best lettering.
3. Let dry completely.
4. Seal with Mod Podge or clear spray.
5. Attach keychain ring and add beads or tassels.
Pro Tip: If using shrink plastic, have an adult manage the oven to speed things along. Make extras so guests can create keychains for friends! You can also set up a “charm bar” with extra beads and dangles so everyone can fully customize.
Pro Tips for Hosting a Craft Party
Set up stations: Arrange supplies at different tables so guests aren’t crowding one area. Have clear labels so everyone knows where to find what they need.
Prep ahead: Pre-cut materials, pre-drill holes, and set out supplies before guests arrive. The less setup time during the party, the more fun time!
Have extras: Always have more supplies than you think you need. Some guests will want to make multiples, and it’s better to have leftovers than run out mid-party.
Create a drying station: Dedicate a table or counter for wet projects so nothing gets smudged or ruined before guests take them home.
Provide inspiration: Display finished examples of each craft so guests can see what they’re making. Pinterest boards on a tablet can also spark ideas!
Have backup activities: Not every guest will love every craft, so having 2-3 options running simultaneously keeps everyone happy.
Package them up: Provide small bags, boxes, or tissue paper so guests can safely transport their creations home. This also makes them feel more like special party favors!
There you have it – 22 birthday party crafts for tweens that actually deliver on fun! These ideas work whether you’re hosting 5 guests or 25, and they all check the important boxes: engaging enough to hold tween attention, easy enough for various skill levels, and cool enough that your guests will genuinely be excited to show off what they made.
The secret to a successful craft party? Pick 2-3 crafts that complement each other (maybe one quick option, one medium-length project, and one for the overachievers), set up your stations with plenty of supplies, and let the creativity flow. Before you know it, you’ll have a group of happy tweens and a collection of custom party favors heading out the door.
Ready to host the ultimate tween birthday bash? These crafts have got you covered!
More Birthday Party Ideas to Keep the Fun Rolling:
40+ Magical Harry Potter Birthday Games That’ll Cast a Spell on Your Party
15 Creative Birthday Morning Surprises for Daughter That’ll Make Her Day Unforgettable
40 Easy DIY Birthday Party Decorations That’ll Make You Look Like a Pro
How to Make a Birthday Balloon Column (No Helium Needed!)
22 Creative DIY Craft Activity Ideas That’ll Make Your Kids’ Birthday Party Legendary
36 Dinosaur Birthday Party Ideas (Roaring Fun & Easy!)
40 Brilliant Ideas to Throw the Ultimate LEGO Birthday Party
30+ Sparkling Fun Unicorn Birthday Party Ideas That’ll Make Your Party Absolutely Magical
10 Adorable Hello Kitty Birthday Party Decor Ideas
7 Fun & Easy Party Craft Ideas for an Unforgettable Teen Girl Birthday
22 Creative DIY Craft Activity Ideas That’ll Make Your Kids’ Birthday Party Legendary
As an Amazon Associate, we may earn a commission from qualifying purchases at no additional cost to you.