Got a mini Picasso on your hands? If your kiddo lights up at the sight of paintbrushes and gets lost in their own creative world, then buckle up – because we’re about to show you 8 genius Art Birthday Party ideas that are equal parts fun, memorable, and surprisingly doable at home.
Forget the stuffy art studios charging an arm and a leg. With a little prep work and the right game plan, you can create a colorful celebration that’s bigger, better, and way more personal than anything you’d book elsewhere. And the best part? Your young artists will walk away with custom keepsakes they actually made themselves.
Ready to unleash your inner party-planning artist? Let’s dive into 8 creative ideas that’ll turn your home into the ultimate art studio!

Why an Art Party is Pure Genius
Here’s the thing: Art parties are interactive, creative, and surprisingly low-stress once you’ve got your stations set up. Kids stay engaged because they’re actually making things (not just running around screaming – though there might be some of that, too). Plus, every project doubles as both an activity and a party favor. Talk about a win-win!
Our biggest tip? Keep your guest list manageable. We’re talking 8-10 kids, tops. This gives you enough hands to help with projects without turning your home into a chaotic paint-splattered war zone.


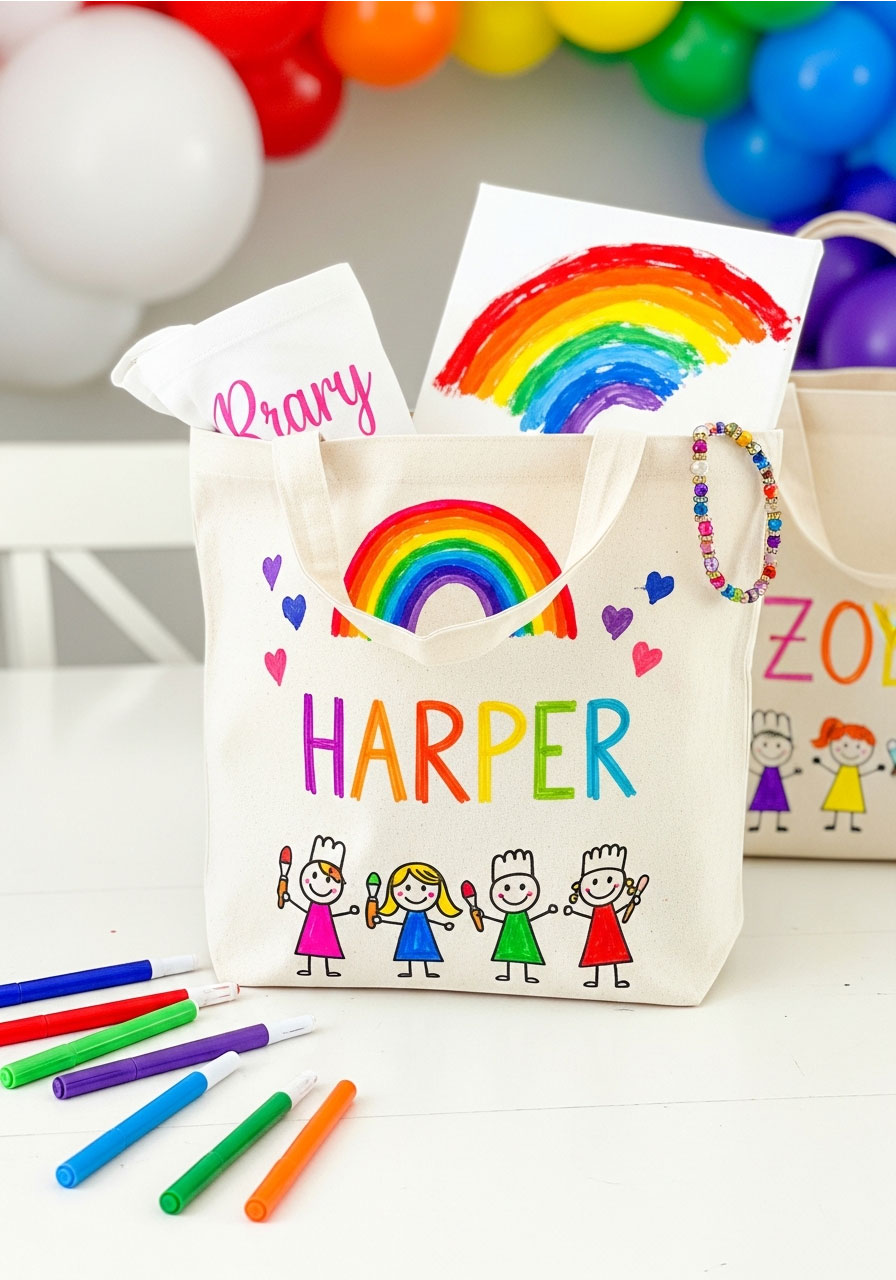
1. Personalized Artist Aprons (The Ultimate Party Favor)
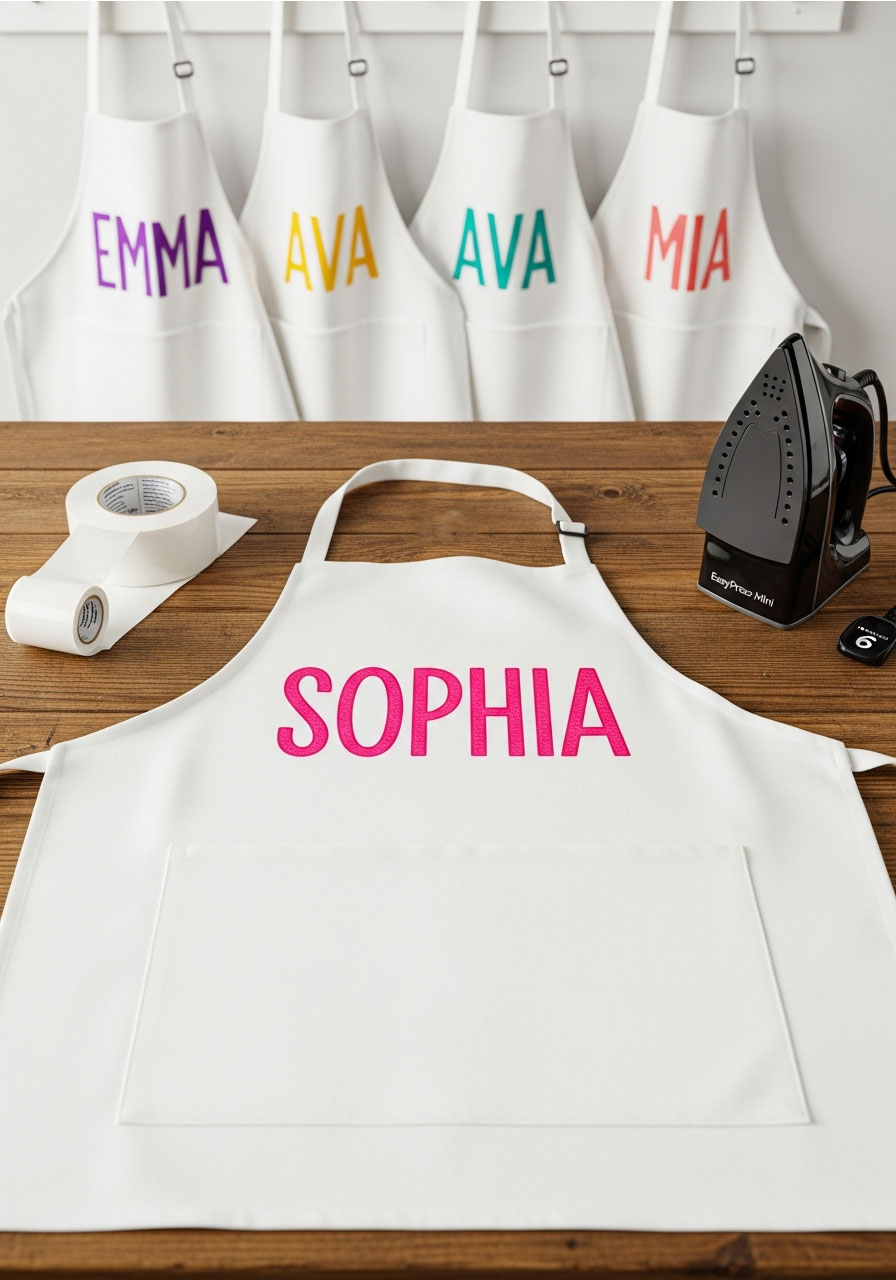
Let’s kick things off with what might be the coolest part of this whole shindig: custom aprons that each guest gets to keep. Not only do these protect clothes during all the messy activities, but they also make kids feel like real artists from the moment they arrive.
Best for: All ages, doubles as party favor and activity protection
Time to Prep: 15-20 minutes per apron
Guests: Works for any party size
What You’ll Need:
- Plain canvas aprons (one per guest)
- Iron-on vinyl in fun colors
- A Cricut or cutting machine (or order pre-cut letters online)
- An EasyPress Mini or household iron
- Transfer tape
How to Make Them:
1. Cut each guest’s name from iron-on vinyl using your cutting machine a week before the party.
2. Weed out the negative space around the letters – this part is oddly satisfying, trust us!
3. Position the name on the center or chest area of each apron.
4. Press firmly with your iron or EasyPress, applying even pressure for 30-40 seconds.
5. Let it cool completely before peeling away the transfer sheet – this is the secret to making it stick!
6. Hang each apron on a hook or chair with the guest’s name visible as they arrive.
Pro Tip: Use the EasyPress Mini instead of a regular iron so you can see exactly what’s happening underneath. Canvas can scorch easily, and this gives you way more control. The cool peel method is critical – if you try to peel the transfer tape while it’s still warm, the vinyl won’t stick properly!
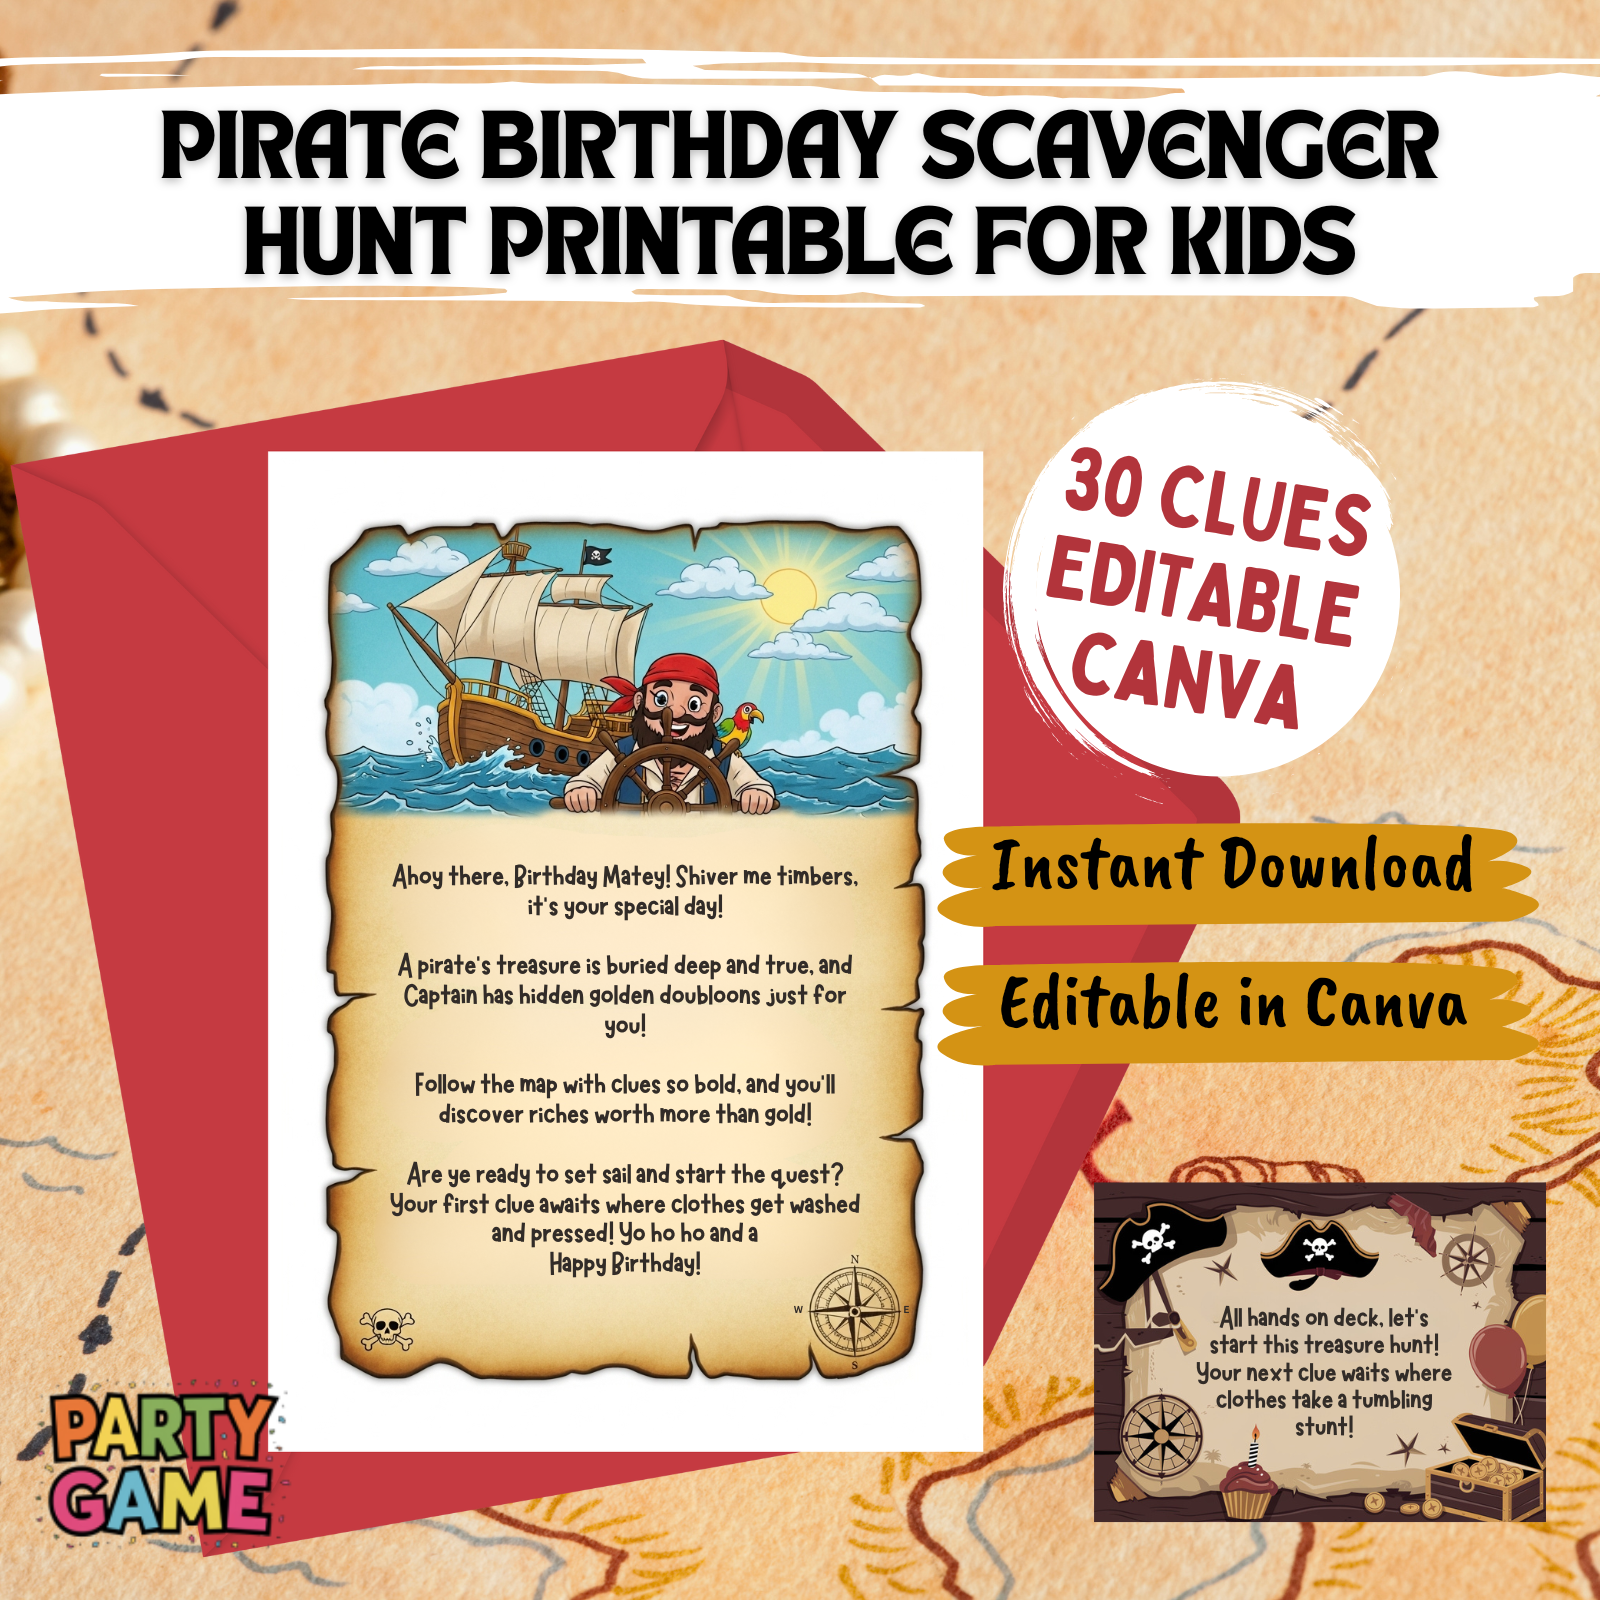
Pirate Birthday Scavenger Hunt for Kids Printable
Instant Pirate Adventure: Download, print, and play in 15 minutes! No stress – just instant, unforgettable fun for kids ages 4-12
Indoor Party Lifesaver: Perfect for apartments & houses. Keep 1-10 kids wildly entertained for 45 minutes with clever rhyming clues
A Treasured Memory: Watch your birthday child become the hero of an epic story. Includes a thrilling intro and congratulatory treasure letter
Fun That Secretly Teaches: Kids race to solve riddles while building reading, problem-solving, and teamwork skills. Fun with a hidden purpose!

Indoor Birthday Scavenger Hunt Printable for Kids – 12 challenges
Your 15-Minute Party Hero: Instantly download, print, and hide. Get 1-2 hours of immersive, screen-free fun with 12 unique puzzles. Stress-free entertainment, guaranteed
More Than a Hunt – It’s a “”Cake Bandit”” Adventure! Kids don’t just find clues; they solve the mystery of the stolen cake! This engaging storyline creates a memorable birthday mission
Ultimate Indoor Party Lifesaver: Perfect for bad weather or small spaces. Keeps kids ages 4-10+ happily challenged with picture matching, mazes, and secret codes
Fun That Secretly Builds Genius: Laughter meets learning! These 12 clever challenges boost problem-solving, teamwork, and critical thinking skills without the kids even noticing

Difficult Birthday Scavenger Hunt Printable for Adults – The Oracle’s Birthday Prophecy
Forget Boring Parties. Unleash the Oracle: Transform a birthday into an epic mystery with 30 brain-teasing riddles, ciphers, and challenges. Customize the perfect adventure for your guests
Be the Host of the Most Memorable Party: Provide the clever, shared activity that gets everyone laughing and collaborating. It’s the highlight that guests will talk about for years
Sophisticated Fun, Zero Effort: Just download, pick your 10 favorite clues from 30 options, and hide them. Get a complete, themed adventure without the stress of planning from scratch
Challenge Adult Minds with “The Prophecy”: Move beyond simple games. This hunt features logic puzzles, cryptic ciphers, and hilarious dares designed specifically to engage and thrill adults

Happy Birthday Decorations
Everything in one box = party stress solved – Banner, honeycomb balls, swirls, and garland all coordinated. No last-minute runs to three different stores at 9 PM the night before.
Photo-ready in 15 minutes – Easy assembly means you spend less time wrestling with decorations and more time enjoying the birthday person’s reaction. Looks expensive, sets up fast.
Reusable = smart money – Quality materials hold up through the party AND pack away for next year. Stop buying flimsy decorations that rip before cake time.
Saves you $50+ vs. party store prices – Get the complete coordinated look without the markup. Guests think you hired a decorator; you paid a fraction of the cost.
2. DIY Coloring Placemats (The Perfect Icebreaker)
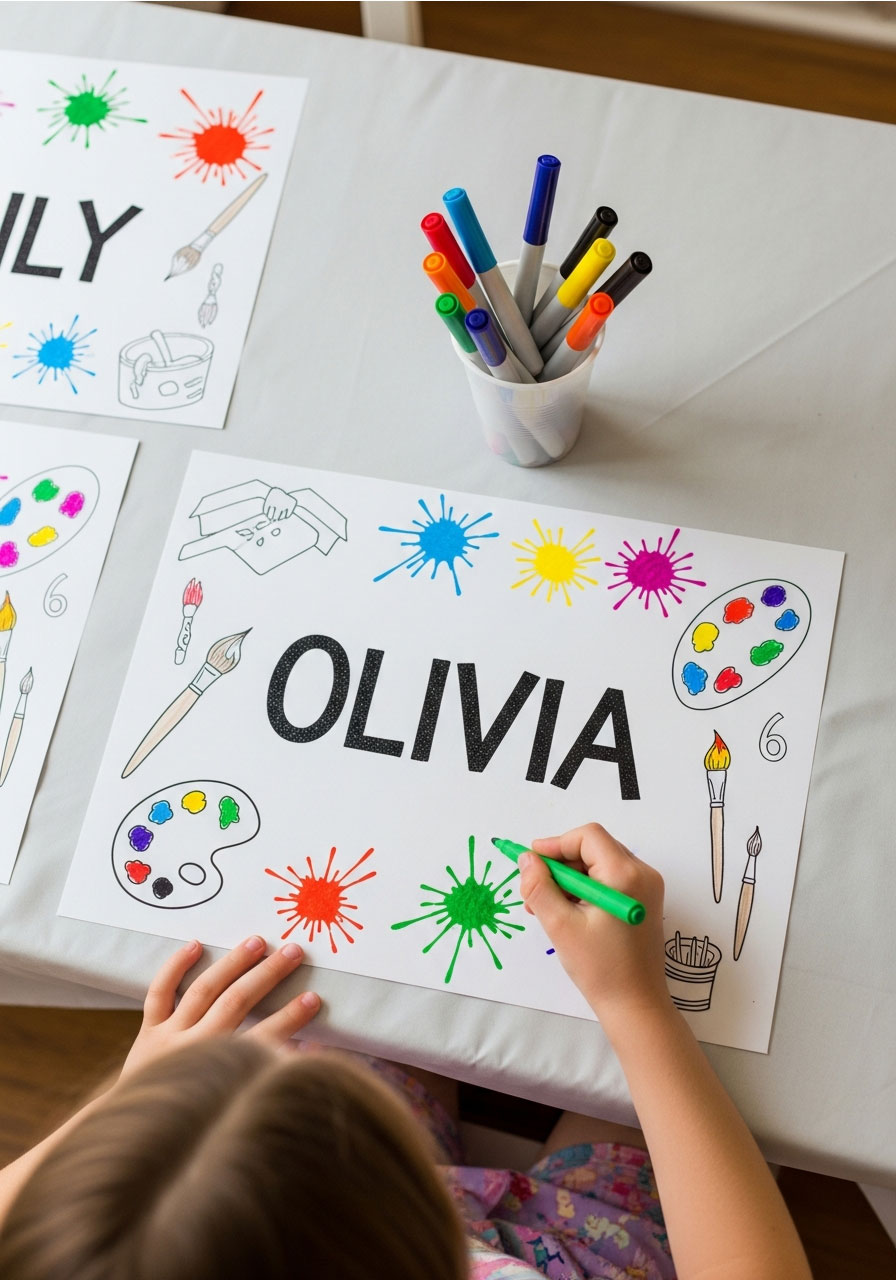
As guests trickle in, you need something to keep early birds busy while you wait for everyone to arrive. Enter: custom coloring placemats with each child’s name. This is the ultimate no-pressure warm-up activity that gets kids in the creative zone immediately.
Best for: Kids ages 4-10, keeping early arrivals entertained
Time to Play: 10-15 minutes as guests arrive
Guests: One placemat per child
What You’ll Need:
- 12×24 paper (one sheet per guest)
- A Cricut or drawing machine with pen holder
- Black glitter gel pens – and grab extras! (You’ll burn through about one pen per 8 placemats)
- Markers, crayons, or colored pencils for guests to use
How to Create Them:
1. Design each placemat in Cricut Design Space (or similar software) with the child’s name plus fun art-themed doodles like paint splatters, brushes, and palettes.
2. Load your glitter gel pen into the machine and let it draw the complete design – this takes about 10-12 minutes per mat.
3. Switch to the cutting blade and have the machine cut around the edges to create the finished placemat shape.
4. Set one at each place setting before guests arrive, with a small cup of markers or crayons nearby.
5. Let kids color their custom mats while they wait for everyone to show up!
Pro Tip: Budget your time wisely – each placemat takes roughly 15 minutes to draw and cut. Start making these a few days before the party so you’re not scrambling at the last minute. And seriously, stock up on those pens! One brand-new glitter pen gave us exactly 8 placemats before running completely dry.
3. Paint-Your-Name Canvas Art (The Show-Stopping Main Event!)
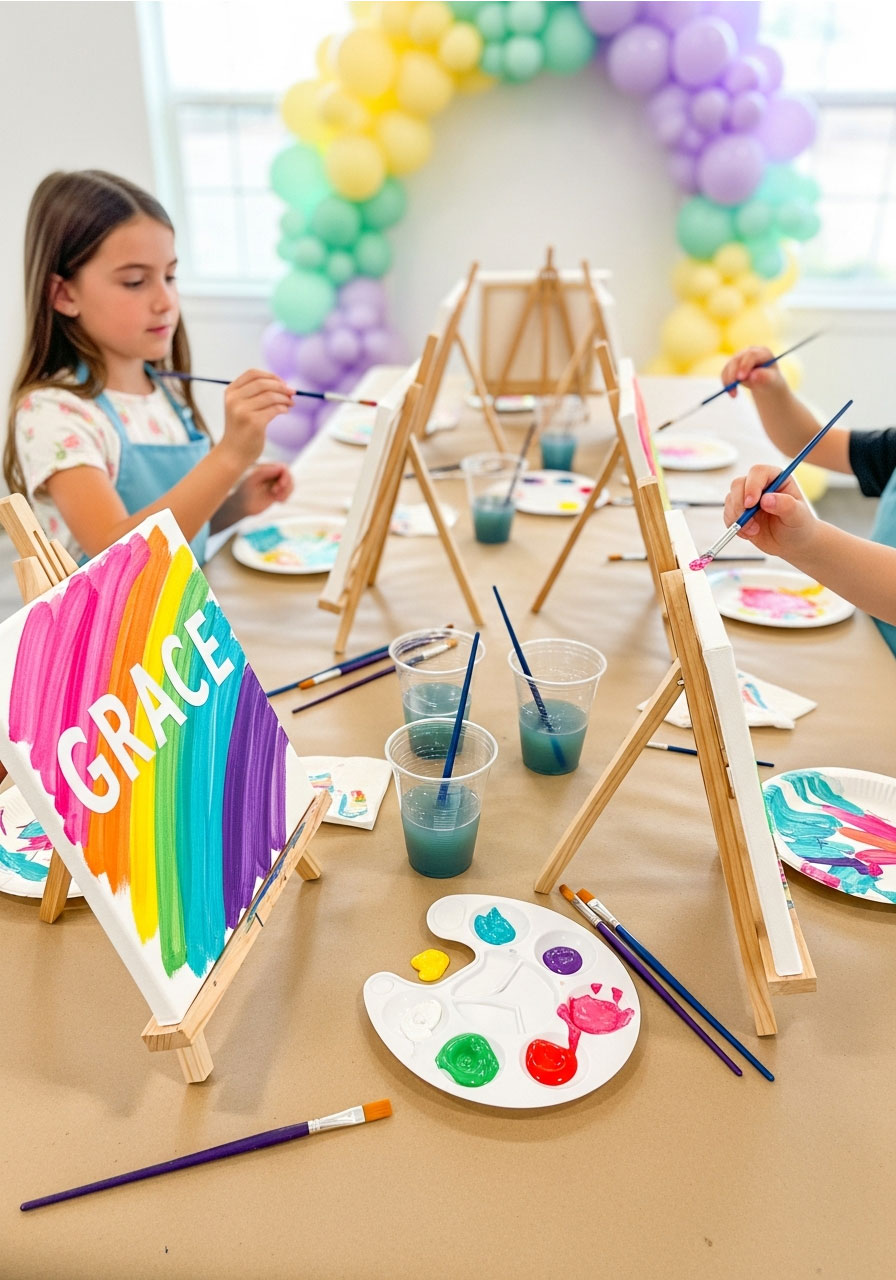
This is where the real magic happens. Every child creates a stunning personalized canvas painting that reveals their name in the unpainted canvas underneath. It’s like a paint-resist project that makes every kid feel like a professional artist – and they’ll actually want to hang this in their room!
Best for: Kids ages 5-12, creating lasting keepsakes
Time to Play: 30-45 minutes
Guests: Best with 8-10 kids maximum (you’ll need helpers!)
What You’ll Need:
- Small canvases, 8×10 works perfectly
- Removable vinyl for name cutouts
- Acrylic paints in rainbow colors
- Disposable paint palettes (grab a 50-pack on Amazon for a few dollars)
- Paintbrushes in various sizes – thin detail brushes plus wider foam brushes
- Small wooden easels (borrow these if you can!)
- Clear disposable cups for rinse water
- Brown kraft paper or plastic tablecloth (wrap your table multiple times!)
- Drop cloth for outdoor drying area
- Roll of paper towels (you’ll go through more than you think)
- Hand wipes for quick face and arm cleanups
- Large trash bag for spills and opened paint bottle seals
How to Play:
1. Prep the canvases ahead of time by cutting each child’s name from removable vinyl and sticking it firmly to their canvas – do this the day before.
2. Set up your painting station with fully wrapped tables, easels at each spot, and all supplies organized within easy reach.
3. Explain the mission: Paint over your name! Cover the entire canvas with whatever colors and designs you want.
4. Fill rinse cups with fresh water as kids select their paint colors – acrylic paint muddies water fast, so plan to refill these constantly.
5. Let them create freely for 20-30 minutes, encouraging them to paint the edges of the canvas too (this is where those easels come in handy!).
6. Move finished masterpieces to your outdoor drop cloth to dry while you transition to the next activity.
7. Once completely dry (give it at least an hour), use a weeding tool to carefully peel away the vinyl letters, starting from the corners.
8. Watch their faces light up as their name magically appears in the unpainted canvas underneath!
Pro Tip: This activity absolutely requires parent help – station a few adults around the table to assist with paint selection, cup refills, and general guidance. Keep rinse water fresh by having someone on dedicated refill duty. And here’s a game-changer: use brown kraft paper to wrap your table multiple times instead of a single tablecloth – it contains spills way better and costs less!
4. Beaded Bracelet & Necklace Station (The Creative Wind-Down)
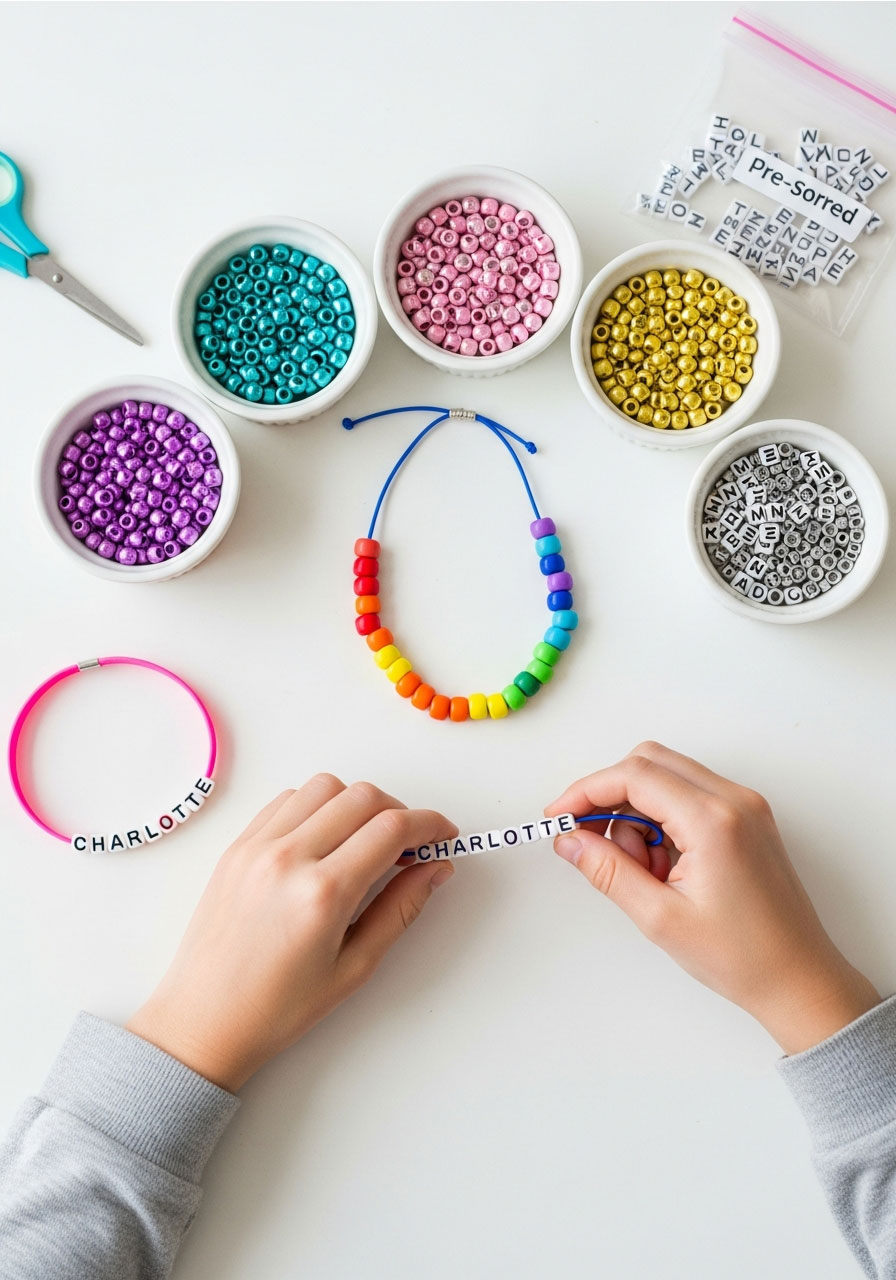
After all that painting excitement and a lunch break, transition to a calmer jewelry-making activity. This gives kids a chance to chat with friends, work at their own pace, and create even more personalized take-home treasures.
Best for: Kids ages 5+, winding down energy levels
Time to Play: 20-30 minutes
Guests: Works for groups of any size
What You’ll Need:
- Variety of colorful beads in coordinating colors (rainbow beads are always a hit!)
- Letter beads in both colored and black/white options
- Elastic cord for necklaces (the stretchy kind)
- Pre-made plastic bracelet bases
- Small bowls or containers for organizing beads
- Ziplock baggies for pre-prep
- Scissors
How to Play:
1. Before the party, pre-find each guest’s name in letter beads and place them in individual ziplock bags along with a plastic bracelet base.
2. Cut elastic cord into necklace-length pieces (about 20-24 inches) and tie a bead securely to one end so beads don’t slide off while kids work.
3. Set out bowls of coordinating beads in the center of your table, organized by color or style.
4. Hand each guest their pre-made bracelet kit and a prepared elastic cord.
5. Let them string beads to create matching jewelry sets – their name on the bracelet, whatever design they want on the necklace!
6. Help tie final knots on the necklaces – elastic cord needs 4-6 double knots looped around the last bead to stay secure.
Pro Tip: Do this activity toward the end of the party when energy naturally starts dipping. Some kids will enthusiastically dive in while others might lose interest – and that’s totally okay! Parents can step in to help finish any incomplete pieces. Pre-prepping those name beads and cord ties is the secret to keeping this activity from becoming chaotic.
5. Rainbow Fruit Platter (The Instagram-Worthy Snack)
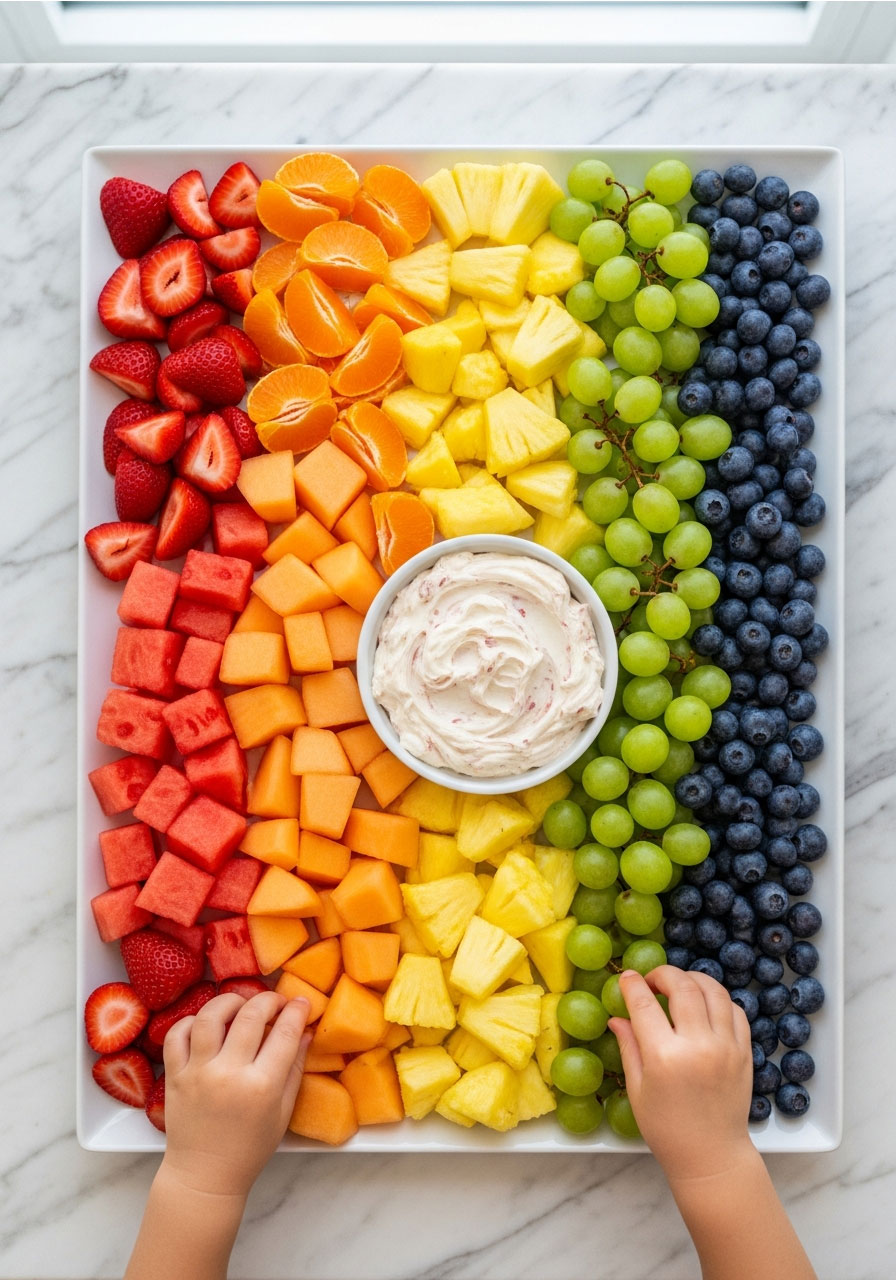
Who says party food can’t be both healthy and stunning? A rainbow fruit tray is the perfect way to feed hungry little artists while sticking with your colorful theme. Plus, it’s way easier to pull off than those elaborate themed treats you see on Pinterest.
Best for: Healthy snacking, impressive presentation
Time to Prep: 20-30 minutes
Guests: Feeds 15-20 people easily
What You’ll Need:
- Strawberries (red)
- Watermelon chunks (more red/pink)
- Oranges or cantaloupe (orange)
- Pineapple chunks (yellow)
- Green grapes (green)
- Blueberries (blue/purple)
- Large serving platter or tray
- Small bowl for fruit dip (optional but recommended!)
How to Arrange It:
1. Wash and prep all your fruit the morning of the party – cut larger fruits into bite-sized pieces.
2. Arrange in rainbow order on your platter: red strawberries and watermelon on one end, then oranges, pineapple, green grapes, and blueberries flowing to the other side.
3. Place a bowl of fruit dip in the center or on the side – a simple cream cheese and marshmallow fluff combo works great!
4. Serve with cinnamon pita chips for dipping if you want to get fancy.
Pro Tip: This tray looks way more impressive than the effort it requires! Don’t stress about making it perfect – even a casual rainbow arrangement will have parents commenting on how beautiful it looks. Skip the elaborate Rice Krispie treat paintbrushes or cake pop palettes you see online. Save your energy for the actual art activities – your guests will remember the painting way more than themed snacks.
6. DIY Cupcake Decorating Station (The Sweet Finale)
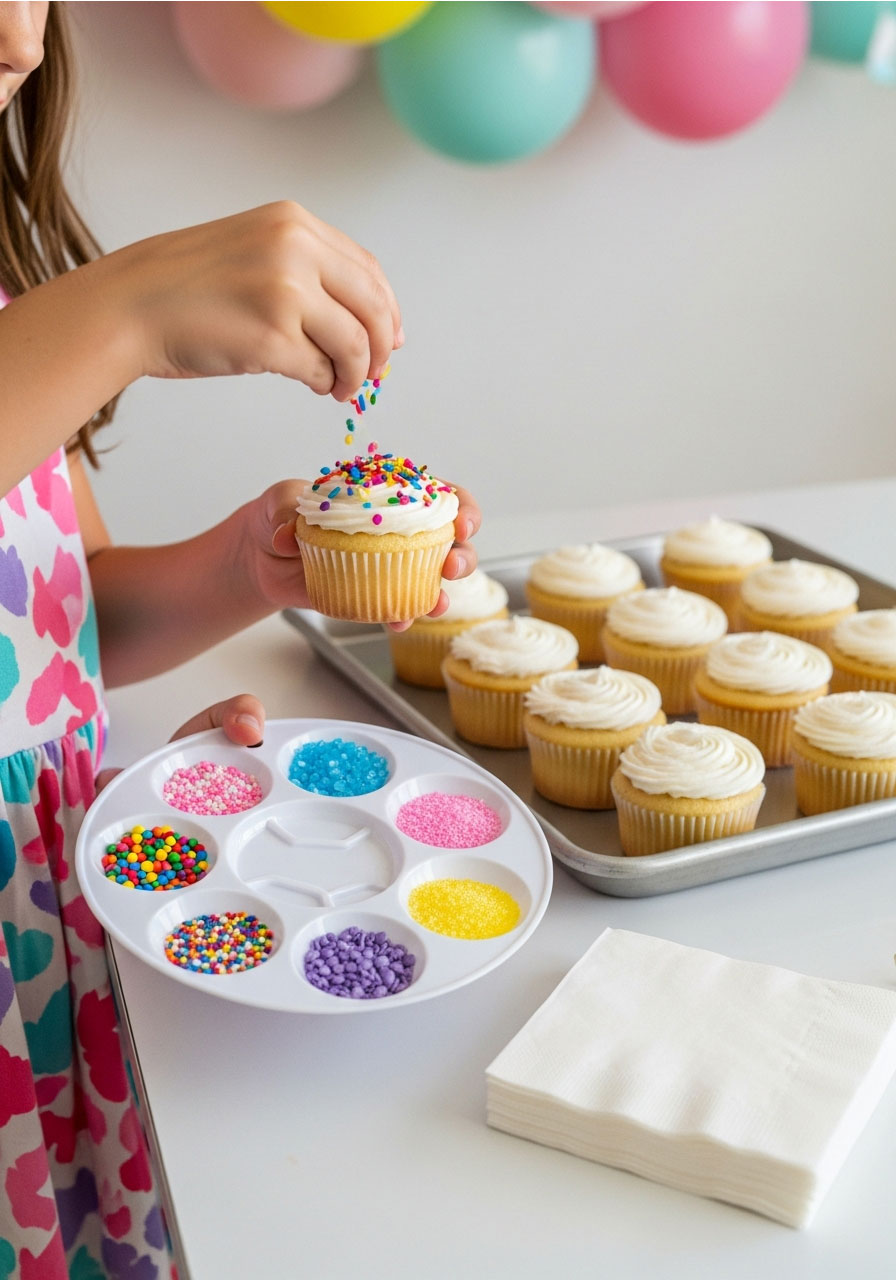
Instead of a traditional birthday cake that takes forever to cut and serve, give kids one last creative moment with a cupcake decorating station! Using paint palettes filled with sprinkles is an adorable touch that ties perfectly into your art theme.
Best for: All ages, satisfying that sugar craving
Time to Play: 10-15 minutes
Guests: One cupcake per child (plus extras for adults!)
What You’ll Need:
- Vanilla cupcakes with vanilla frosting (unfrosted cupcakes work too if kids want to spread their own)
- Plastic paint palettes – grab a 50-pack on Amazon for just a few dollars
- Variety of colorful sprinkles (jimmies, nonpareils, sugar crystals, etc.)
- Small spoons for sprinkling
- Baking trays or large platters for serving
- Napkins and plates
How to Play:
1. Fill each paint palette well with about a teaspoon of different colored sprinkles – do this a few hours before the party.
2. Rest the filled palettes on baking trays so you can easily carry and distribute them all at once.
3. When it’s cake time, hand out one frosted cupcake and one sprinkle palette to each guest.
4. Let them create their own sprinkle masterpiece by sprinkling whatever colors and combinations they want!
5. Sing “Happy Birthday” while everyone admires their custom-decorated cupcakes.
Pro Tip: What kid doesn’t dream of decorating their own cupcake with unlimited sprinkle options? This activity takes zero artistic skill but feels like a major treat. Plus, cleanup is a total breeze since everything’s contained in individual palettes. If you want to make it even easier, set up one big “sprinkle station” where kids come up to decorate rather than passing out individual palettes.
7. Scratch Art Bookmarks (The Quick & Easy Add-On)
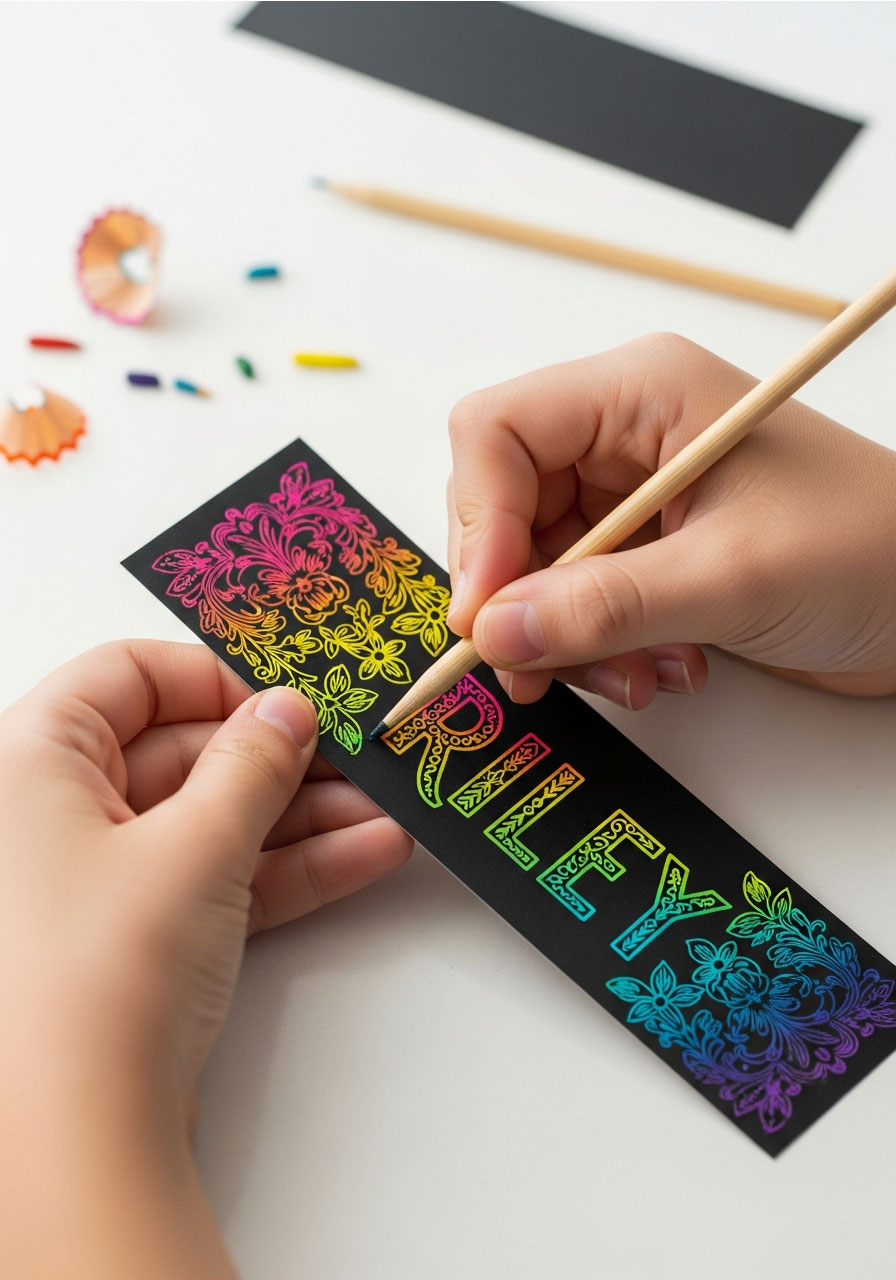
Need one more low-key activity to fill time between painting and lunch? Scratch art bookmarks are the perfect solution! They’re mess-free, satisfying, and create another take-home item that kids will actually use.
Best for: Ages 5+, filling gaps in your party schedule
Time to Play: 10-15 minutes
Guests: Any group size
What You’ll Need:
- Scratch art bookmark kits (available at craft stores or Amazon)
- Wooden stylus tools (usually included with scratch kits)
- Table space for working
How to Play:
1. Set out scratch art bookmarks and stylus tools on your table after kids finish their placemats.
2. Show them how to use the wooden tool to scratch away the black coating and reveal rainbow colors underneath.
3. Let them create their own designs – names, patterns, pictures, whatever they want!
4. Send bookmarks home in goody bags or let kids use them to mark pages in birthday cards.
Pro Tip: This is the ultimate “set it and forget it” activity. Kids can work independently while you’re setting up other stations or helping with painting prep. Stock up on a few extra bookmark packs – they’re cheap and some kids will want to make multiples!
8. Personalized Goody Bags They Color Themselves
Why buy pre-made goody bags when kids can decorate their own as part of the party? This brilliant idea keeps kids busy, adds another creative element, and ensures every child goes home with a bag they’re proud of.
Best for: Ages 4+, end-of-party activity
Time to Play: 10-15 minutes
Guests: One bag per child
What You’ll Need:
- Plain canvas or paper gift bags (one per guest)
- Fabric markers or regular markers (depending on bag material)
- Stickers, stamps, or stencils for extra decoration (optional)
- All the goodies you’re sending home: custom apron, painted canvas, beaded jewelry, scratch bookmark, leftover candy
How to Play:
1. Give each child a blank bag during one of your calmer activity periods (great to do alongside beaded bracelets!).
2. Set out markers and decoration supplies and let them color or write their name on their bag.
3. As the party winds down, help kids pack their creations into their personalized bags.
4. Send everyone home with a bag full of art they made themselves!
Pro Tip: Doing this early in the party (rather than at the very end when kids are tired and parents are waiting) means kids actually enjoy the process instead of rushing through it. Plus, you can use these bags as a landing spot throughout the party – kids can store their finished jewelry, bookmarks, and other small items in their bag as they complete each activity.
Quick Supply Checklist for Your Art Party Success
For Personalized Aprons:
Canvas aprons, iron-on vinyl, cutting machine, iron/EasyPress, transfer tape
For Coloring Placemats:
Large paper, glitter gel pens (extras!), markers/crayons, cutting machine with pen holder
For Canvas Painting:
Small canvases, removable vinyl, acrylic paints, paint palettes, brushes (variety of sizes), easels, rinse cups, table covering, drop cloth, paper towels, hand wipes, trash bags
For Beaded Jewelry:
Assorted beads, letter beads, elastic cord, plastic bracelet bases, ziplock bags, scissors
For Food & Snacks:
Rainbow fruit, veggie tray, ranch dip, chips, spinach dip, pizza, fruit dip, cinnamon pita chips
For Cupcake Station:
Vanilla cupcakes, frosting, plastic paint palettes, assorted sprinkles, baking trays
For Scratch Art:
Scratch bookmark kits, wooden stylus tools
For Goody Bags:
Plain bags, markers, optional stickers/stamps
Why These Art Party Ideas Are Absolute Winners
Here’s what makes this party theme knock it out of the park:
✨ Eight distinct activities keep kids engaged from arrival to departure
✨ Every project becomes a take-home favor – no separate goody bags needed
✨ Personalization everywhere makes each guest feel special
✨ Mix of messy and calm activities balances energy levels perfectly
✨ Budget-friendly compared to booking an art studio venue
✨ Kids create real keepsakes they’ll display and use for years
✨ Flexible timeline – pick and choose activities based on your party length
✨ Parents will be impressed by the thought and organization
The secret sauce? Strategic preparation. Yes, you’ll invest time creating personalized aprons and placemats before the big day. Yes, you’ll need to gather supplies and set up stations. But when party day arrives, you’ll have a rock-solid plan that keeps kids creatively engaged while you (mostly) maintain your sanity.
Final Pro Tips for Art Party Domination
Start prep a week early – don’t try to personalize 8-10 aprons the night before or you’ll be up until midnight cursing your iron!
Recruit parent helpers – assign specific adults to the painting station, jewelry station, and cupcake area. You can’t be everywhere at once.
Set realistic expectations – not every canvas will belong in a museum, and that’s perfectly okay. The joy is in the creating, not the perfection.
Create a flexible timeline – if kids are loving the painting, let them go longer! If beading isn’t clicking, move on. Read the room.
Take tons of photos – capture those paint-covered smiles, focused faces, and proud moments when they reveal their finished canvases.
Remember why you’re doing this – to celebrate your creative kiddo and give them a day filled with art, friends, and fun!
With these 8 art party ideas in your arsenal, you’re ready to host a celebration that’ll have kids (and parents!) raving for weeks. Because the best parties aren’t about perfection – they’re about colorful creativity, genuine laughter, and memories that stick around long after the paint dries.
Now grab those paintbrushes and let’s get this party started!
More Birthday Party Ideas to Keep the Fun Rolling:
40+ Magical Harry Potter Birthday Games That’ll Cast a Spell on Your Party
15 Creative Birthday Morning Surprises for Daughter That’ll Make Her Day Unforgettable
40 Easy DIY Birthday Party Decorations That’ll Make You Look Like a Pro
How to Make a Birthday Balloon Column (No Helium Needed!)
22 Creative DIY Craft Activity Ideas That’ll Make Your Kids’ Birthday Party Legendary
36 Dinosaur Birthday Party Ideas (Roaring Fun & Easy!)
40 Brilliant Ideas to Throw the Ultimate LEGO Birthday Party
30+ Sparkling Fun Unicorn Birthday Party Ideas That’ll Make Your Party Absolutely Magical
10 Adorable Hello Kitty Birthday Party Decor Ideas
7 Fun & Easy Party Craft Ideas for an Unforgettable Teen Girl Birthday
22 Creative DIY Craft Activity Ideas That’ll Make Your Kids’ Birthday Party Legendary
As an Amazon Associate, we may earn a commission from qualifying purchases at no additional cost to you.