Picture this: it’s a lazy summer afternoon, your kids are bored, and you’ve got colored cardstock, a glue stick, and about 45 minutes to spare. That’s all you need to make these jaw-droppingly cute fruit paper fans – and trust me, once you see a finished watermelon fan in your child’s hands, you’ll want to make every fruit in the produce aisle.
These DIY fruit paper fans are one of those rare crafts that look impressive but are genuinely simple to pull off. We’re talking scissors, paper, popsicle sticks, and a little patience. No fancy tools, no craft store haul required.
The best part? They’re not just adorable keepsakes. Skip the popsicle sticks, glue the fan ends together into a full circle, and boom – you’ve got show-stopping decorations for a fruit-themed birthday party, a summer luau, or a tropical-themed celebration.
Ready to squeeze every drop of fun out of this craft? Let’s dive in.

What You’ll Need (For Both Fans)
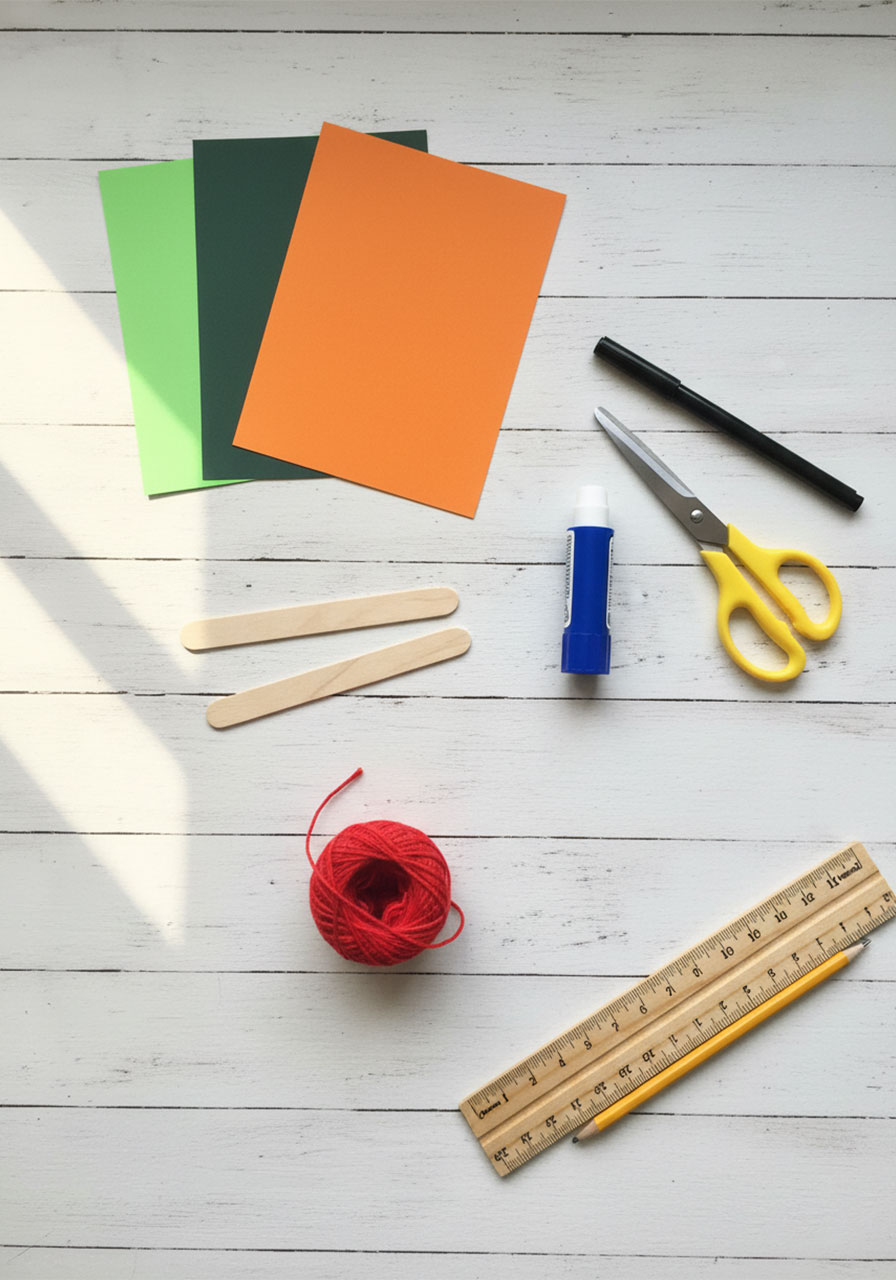
Gather these supplies before you start – it makes the whole process way smoother.
For the Watermelon Fan:
Red cardstock paper – 2 sheets, A4 size
Dark green cardstock paper – 1 sheet, A4 size
Light green cardstock paper – 1 sheet, A4 size
2 popsicle sticks, 7 inches long (if yours are shorter, glue two together to get the right length)
A small piece of red yarn or matching embroidery floss
Black coloring pen or marker
Scissors
Glue stick
For the Citrus Fan (Orange or Lemon):
2 large sheets of orange cardstock (for orange) or yellow cardstock (for lemon)
White cardstock paper for the citrus “pith” strips
2 popsicle sticks, 7 inches long
A small piece of matching yarn
Black coloring pen (optional, for lemon seeds)
Scissors
Glue stick
Pro Tip: Use cardstock rather than regular printer paper. It holds the accordion folds beautifully and gives the finished fan a much sturdier, polished look.

How to Make the Watermelon Paper Fan
This one is the star of the show – those red and green layers folded into a fan look exactly like a fresh watermelon slice. Here’s how to make it, step by step.
Step 1: Cut Your Red Base Pieces
From your red cardstock, cut two squares that are 8 inches x 8 inches each. These are the two halves of your fan, so make sure both squares are exactly the same size.
Step 2: Cut the Green Strips
From your dark green and light green cardstock, cut four strips each – all measuring 8 inches long and 0.5 inches wide. You’ll have 4 dark green strips and 4 light green strips total (two of each color per red square).
Step 3: Build the Watermelon Rind Look
Take one red square. Along one of the short edges, glue a dark green strip right at the very top edge. Then, right next to it (touching), glue a light green strip. This creates that classic two-tone watermelon rind effect.
Repeat on the opposite edge of the same red square – dark green first, then light green alongside it.
Do the exact same thing on your second red square.

Step 4: Draw the Watermelon Seeds
Using your black coloring pen, draw small teardrop-shaped seeds scattered along both the top and bottom edges of each red square (near the green strips). Leave the middle section of each square blank – that’s where the fold will pinch and it would look crowded.
Don’t stress about making the seeds perfect. Wonky little seeds look charming and completely real!

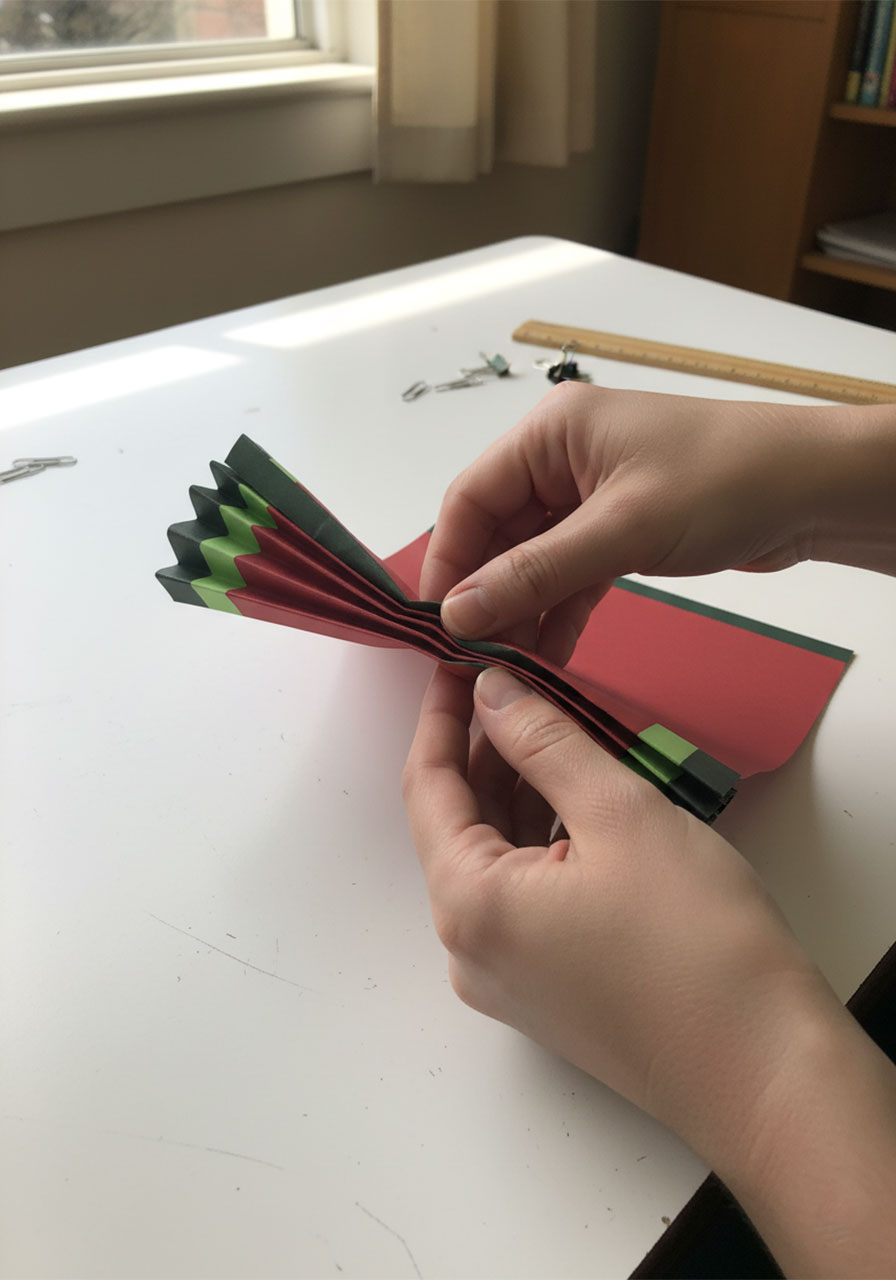
Step 5: Accordion-Fold Both Pieces
Here comes the satisfying part. Starting from the edge without the green strips (the plain center edge), begin folding the paper in accordion style – fold forward, fold back, fold forward, fold back – keeping each fold about 0.5 inches wide.
Work your way across the entire piece until the whole square is folded. Repeat with your second decorated square.
You should now have two accordion-folded rectangular fans, each with the pretty green-striped edges peeking out.
Step 6: Join the Two Pieces Together
Apply glue along one long edge of the first folded piece, then press the corresponding long edge of the second piece firmly against it. Hold for a moment until the glue sets. You’ve now created one long accordion-folded fan.
Step 7: Tie the Center
Pinch the center of your long folded fan tightly. Take your piece of red yarn and wrap it around that center point several times, pulling snugly. Tie it off and trim the excess yarn. This holds the fan shape together at the core.

Step 8: Fan Out and Glue the Edges
Gently spread both sides of the fan open into a full circle (or half circle, depending on your preference). Apply a thin line of glue along the outer edges on one side, then press them together to secure the open fan shape. Hold until set.
At this point, you have a beautiful round watermelon paper fan. Now let’s give it a handle!
Step 9: Attach the Popsicle Stick Handles
If your popsicle sticks are shorter than 7 inches, glue two together end-to-end first and let them dry fully before proceeding.
Apply glue along one popsicle stick and press it firmly against one of the two free inner edges of the fan (the flat bottom edge of the half-circle). Hold it in place for a minute. Repeat with the second popsicle stick on the other free inner edge.
The two sticks will spread apart slightly, forming a V-shape handle at the bottom – just like a real fruit pop!

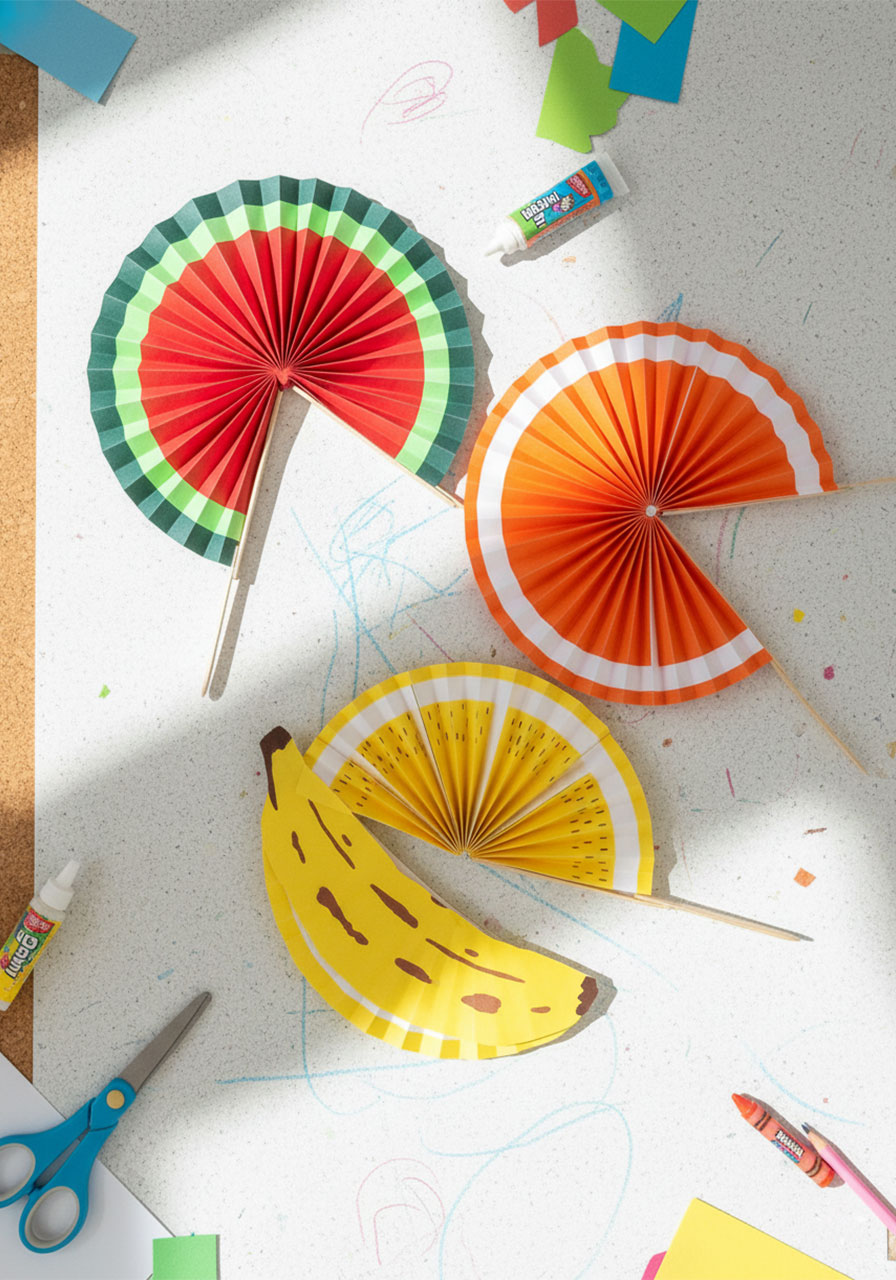
Your Watermelon Fan Is Ready!
Set it down and take a moment to admire it. Those layered greens, the red center, the little seeds – it genuinely looks like a slice of watermelon on a stick. Kids will absolutely flip for this.
How to Make the Citrus Paper Fan (Orange or Lemon)
Once you’ve nailed the watermelon fan, the citrus version is a breeze. The technique is identical – you’re just swapping out the color story to create that gorgeous striped citrus-slice look.
Step 1: Prep Your Citrus Base
Cut two large squares or rectangles from your orange or yellow cardstock – same as you did for the watermelon. These will be your two fan halves.
Step 2: Cut the White “Pith” Strips
From white cardstock, cut:
- 4 strips measuring 7.5 inches long x 0.5 inches wide
- 4 strips measuring 7 inches long x 0.5 inches wide
The slightly different lengths create that layered, segmented look of a real citrus slice when the fan is opened up.
Step 3: Glue the White Strips
On each orange or yellow piece, glue the 7.5-inch white strips along the top and bottom edges, leaving about 0.5 inches of colored paper visible on each side (don’t go edge-to-edge).
Then glue the 7-inch white strips just inside those, creating that double-strip citrus rind effect. Repeat on the opposite edge of each piece.
If you’re making a lemon fan, this is also the moment to add tiny black seed marks with your coloring pen in the orange/yellow areas between the white strips.

Step 4–9: Follow the Same Steps as the Watermelon Fan
From here, the process is identical to the watermelon fan:
- Accordion-fold both pieces
- Glue the two pieces together along the long edges
- Tie the center tightly with matching yarn
- Fan out and glue the edges to set the shape
- Attach the popsicle stick handles
The result is a bright, cheerful citrus fan that looks straight out of a lemonade stand dream.
Party Decoration Hack: Turn Fans Into Full Circles
If you want to use these as party decorations instead of handheld fans, here’s the easy twist: skip the popsicle sticks entirely. After you’ve tied the center with yarn and spread the fan open, simply apply glue along both free inner edges and press them together to form a complete circle.
You’ll end up with stunning round fruit medallions that look like they came from a party supply store – but you made them for almost nothing.
Hang them on a wall, string them on a garland, or use them as table centerpieces. They’re absolutely perfect for a fruit-themed birthday party, a tropical summer celebration, a Cinco de Mayo fiesta, or even a fun summer classroom display.

Tips to Make This Craft Even Better
Keep folds even. The more consistent your accordion folds, the more symmetrical and gorgeous the finished fan looks. Use a ruler to mark every 0.5 inches before folding if your child needs a guide.
Let glue dry fully before opening the fan. It’s tempting to spread it out immediately, but giving the center glue a full minute to set prevents tearing.
Make a whole fruit bowl. Once you’ve got the technique down, challenge your kids to make all three – watermelon, orange, and lemon – and display them together. The color combination is absolutely stunning.
Scale up for a bigger fan. Using 12 x 12-inch cardstock squares instead of 8 x 8 gives you a much larger, more dramatic fan that works beautifully as wall decor.
Try other fruits! Strawberry (red with white strips and small black seeds), kiwi (brown outer edge, bright green with a white center ring), or even pineapple (yellow with green zigzag edge) all translate beautifully into this fan format.
Why This Craft Is So Good for Kids
Beyond being genuinely fun, this project quietly builds a bunch of important skills. Measuring and cutting develops fine motor control. Accordion folding teaches pattern recognition and spatial thinking. Decorating with seeds and stripes sparks creativity and personal expression.
And finishing something this beautiful – something they can hold up, fan themselves with, or hang on the wall – gives kids a real sense of accomplishment. That “I made this!” glow on a child’s face? That’s the whole point.
It’s also a wonderful activity to do alongside them. There’s something meditative about accordion-folding paper together on a slow summer afternoon. Put on some music, set out the supplies, and just enjoy the process with your kids. Those are the moments they remember.

Frequently Asked Questions
What age is this craft suitable for?
Kids ages 6 and up can tackle most of this craft with adult help on the glue gun or careful scissors work. Younger children (3–5) can join in on drawing the seeds and helping decorate – they love that part! The accordion folding and assembly is best handled by ages 7 and up, or with a patient grown-up guiding the folds.
Can I use regular printer paper instead of cardstock?
You can, but cardstock is strongly recommended. Regular printer paper is thinner and more prone to tearing when you accordion-fold it repeatedly. It also won’t hold the fan shape as crisply. Cardstock from any craft store or dollar store works perfectly.
What can I use instead of popsicle sticks?
Wooden skewers (with the sharp ends snipped off), wide craft sticks, thick dowels, or even tightly rolled paper tubes all work great as handles. Just make sure whatever you use is sturdy enough to support the fan without bending.
How do I make the fan into a full circle for decoration?
Follow all the steps right up to the point where you’d attach the popsicle sticks. Instead of adding sticks, simply apply glue along both free inner edges and press them firmly together. Hold for a minute or two until the glue sets. You’ll have a perfect full-circle fruit medallion!
How long does this craft take?
One fan takes about 30–45 minutes, including drying time. If you’re making all three fruit varieties in one sitting, set aside about 2 hours – and maybe a fun playlist to keep the energy up.
More Summer Craft & Activity Ideas to Keep the Fun Rolling:
Plastic Spoon Bug Craft: The Cutest Ladybug and Bumblebee You’ll Make in Under 30 Minutes
Ice Cream Cone Name Craft (Printable Template!)
How to Make the Cutest Beaded Pipe Cleaner Dragonflies (Kids Will Absolutely Love This!)
Easy Paper Bowl Jellyfish Craft Kids Will Absolutely Love (No Paint Needed!)
Handprint Pineapple Craft – Printable Template for Kids
Summer Popsicle Tissue Paper Craft For Kids (So Easy, So Cute!)