Planning a princess-themed birthday party? You’re in the right place, and your future guest of honor is going to feel like an absolute queen.
There’s something magical about a princess party. The soft pinks, the gold sparkle, the tiny crowns on everything from cookies to sandwiches. It turns a regular birthday into a full-blown royal event, and your little one will remember it (or at least she’ll love the photos) for years to come.
The best part? You don’t need a castle or a professional event planner to pull this off. With a few clever DIY touches, some pretty printables, and a little bit of pink, you can host a princess party that looks like it belongs on a magazine cover.
Below, we’re breaking down 10 tried-and-true princess party ideas, covering everything from the showstopper cake to the tiny finishing touches that guests always remember. For each one, we’ll walk you through what it is, why it works, what you’ll need, and exactly how to make it happen.
Let’s get this royal celebration started.

1. The Princess Dress Pull-Apart Cupcake Cake
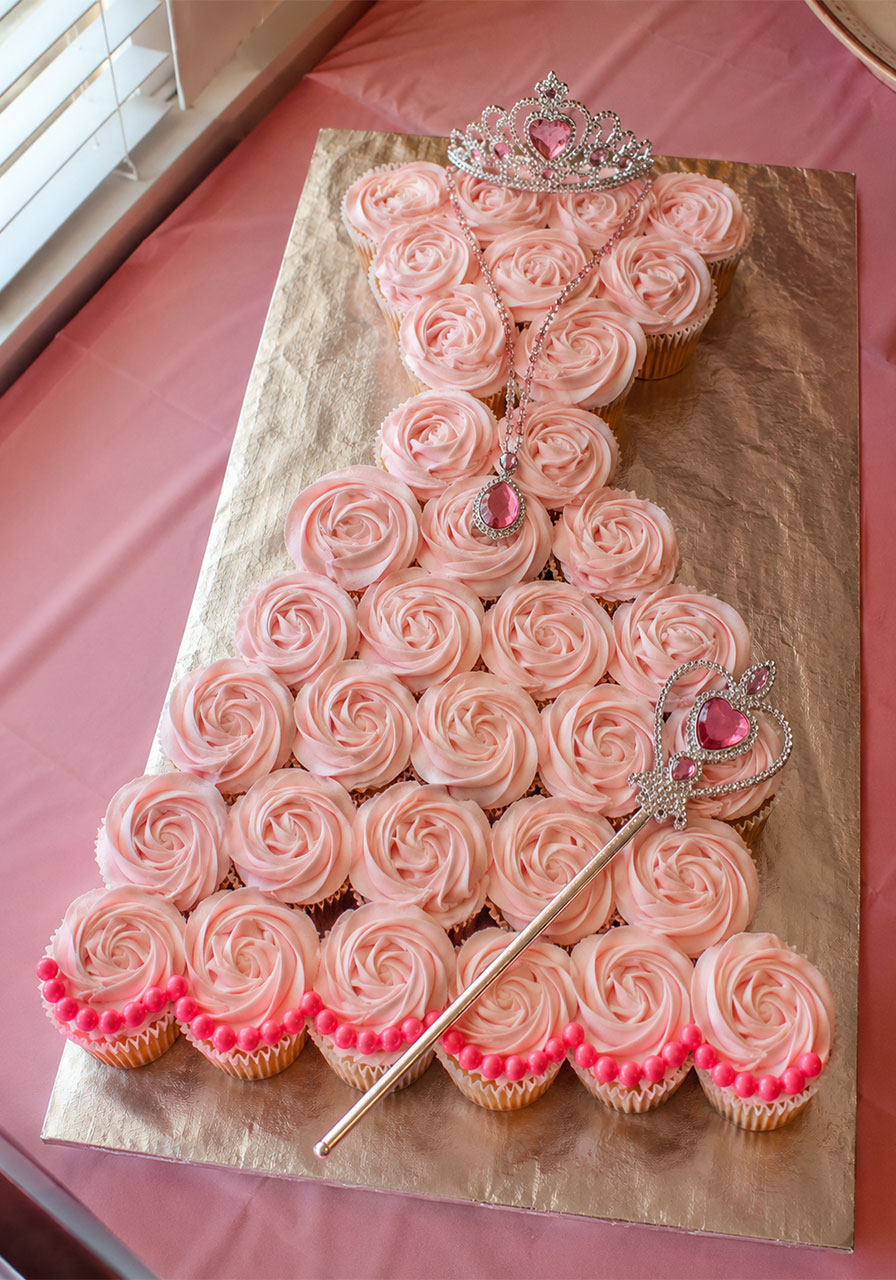
This is the idea that stops guests in their tracks. Instead of one giant cake, you arrange dozens of frosted cupcakes into the shape of a flowing princess gown, complete with a tiara and jeweled necklace on top.
Why it works: It’s stunning, but it’s actually easier to pull off than a traditional tiered cake. No advanced cake-decorating skills required. Plus, since it’s already portioned into cupcakes, serving is effortless. No cutting, no mess, just grab and go.
What you’ll need:
- 30-40 cupcakes (bakery-bought or homemade)
- A large foam board or cake board, cut into a dress silhouette
- Buttercream frosting in a soft blush or pink shade
- A piping bag fitted with a large closed-star tip
- Pink sugar pearls or edible pearl trim
- A toy tiara and jeweled necklace (or edible fondant versions)
How to make it:
1. Cut your foam board into a dress shape: narrow at the top for the bodice, flaring out wide at the bottom for the skirt.
2. Arrange your cupcakes on the board in the dress shape, placing them close together with no gaps.
3. Pipe a rosette swirl of frosting onto each cupcake, working from the top of the “dress” down to the bottom.
4. Add a row of pink sugar pearls along the bottom hem for a scalloped, jeweled effect.
5. Top the “bodice” area with a small tiara and a jeweled necklace to complete the royal gown look.
Pro Tip: Bake your cupcakes the day before and frost them the morning of the party. The rosette swirls hold their shape best when the buttercream is freshly piped.


2. Royal Crown Sugar Cookies
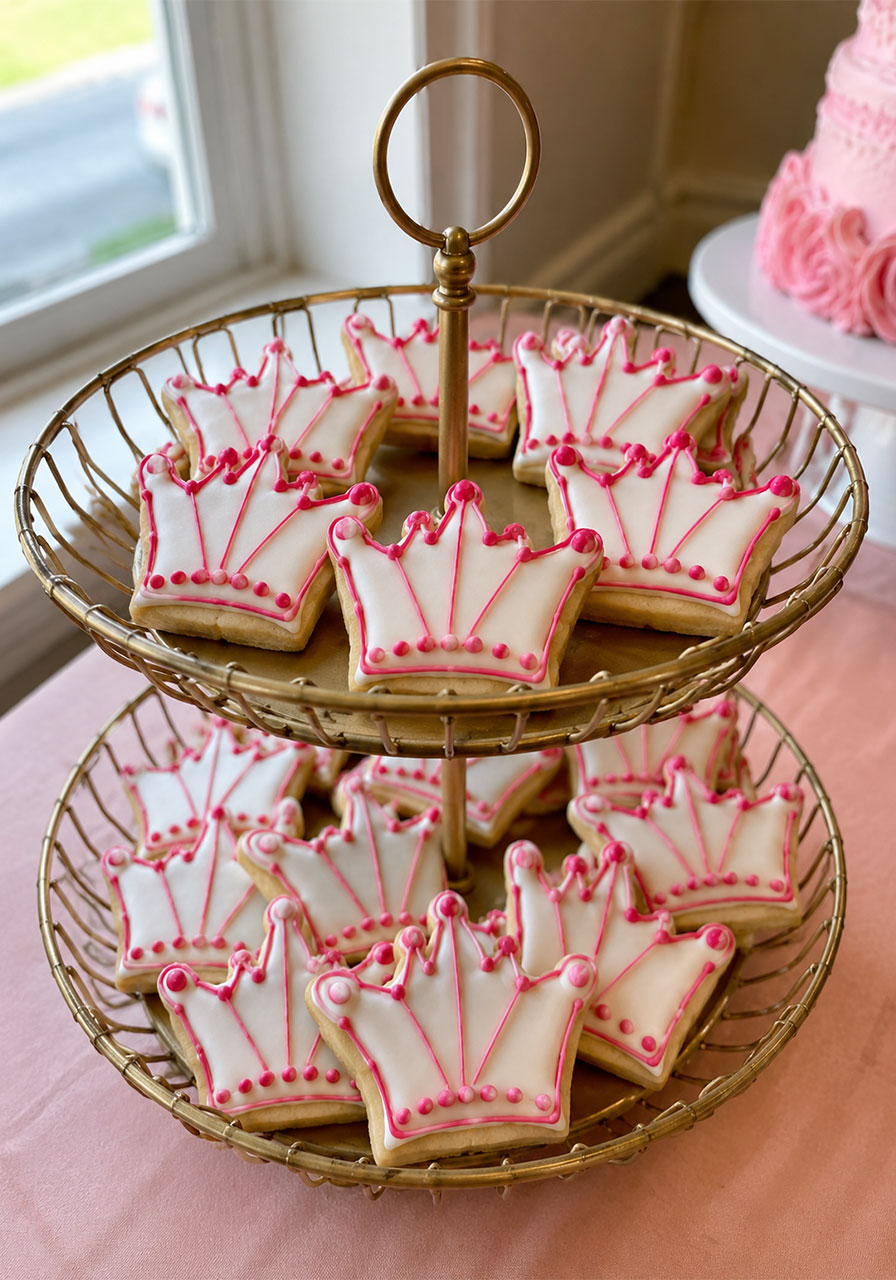
These crown-shaped sugar cookies, iced in white and hot pink, are the kind of treat guests can’t resist reaching for. Stack them high on a tiered stand and watch the plate empty fast.
Why it works: They double as decor and dessert. A tiered stand piled with pink and white crown cookies instantly makes any dessert table look party-ready, even before you add anything else.
What you’ll need:
- Sugar cookie dough (store-bought or homemade)
- A crown-shaped cookie cutter
- Royal icing in white and pink
- Piping bags with small round tips
- A tiered dessert stand
How to make it:
1. Roll out your dough and cut it into crown shapes, then bake according to your recipe and let cool completely.
2. Outline each cookie with white royal icing, then flood the center to create a smooth base.
3. Once the base layer is set, pipe pink icing along the crown’s points and add a border for contrast.
4. Add dots of icing for a jeweled effect, and let everything dry fully before stacking.
5. Arrange the cookies on a tiered stand for maximum visual impact.
Pro Tip: Let your iced cookies dry for at least 6-8 hours before stacking them. Rushing this step is the number-one reason cookies end up smudged.
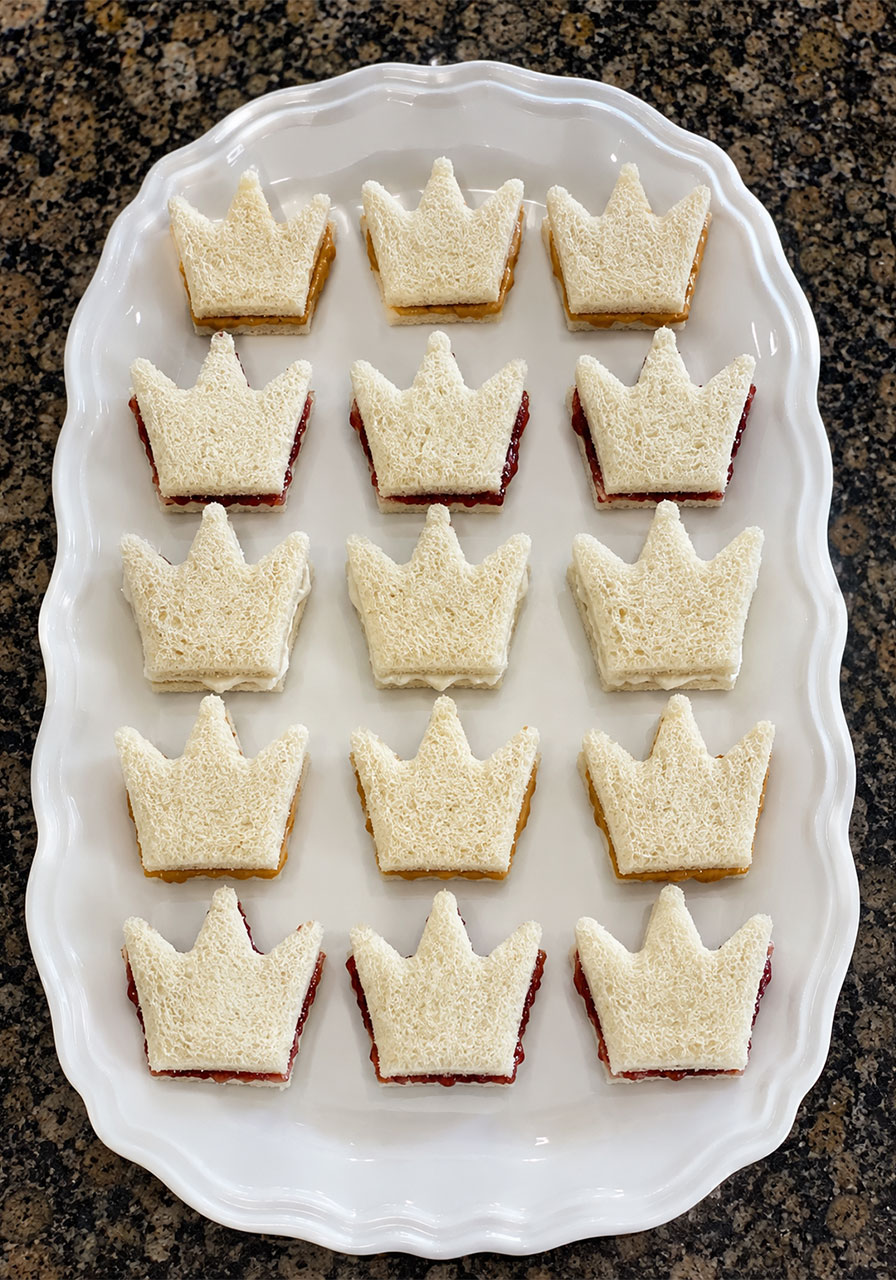
3. Crown-Shaped Finger Sandwiches
Simple peanut butter and jelly (or ham and cheese) sandwiches get a royal makeover with a crown-shaped cookie cutter. It’s a tiny detail that makes a huge difference.
Why it works: This is one of the easiest, most budget-friendly ways to theme your food table. You’re not changing the recipe at all, just the shape, which means zero extra cooking skill required.
What you’ll need:
- Sliced sandwich bread
- Your filling of choice (peanut butter and jelly, ham and cheese, or turkey)
- A crown-shaped cookie cutter
How to make it:
1. Assemble your sandwiches as usual, using two slices of bread with filling in between.
2. Press the crown-shaped cutter firmly through the center of each sandwich.
3. Remove the crust and scraps around the edges (save them for a snack later).
4. Arrange the crown sandwiches on a platter, slightly overlapping for a fuller look.
Pro Tip: Freeze your sandwiches for 10-15 minutes before cutting. Firm bread cuts much more cleanly and the crown points won’t tear.
4. Magic Wand Fruit Skewers
Watermelon stars, plump strawberries, and green grapes threaded onto skewers turn a basic fruit plate into a tray of edible magic wands.
Why it works: Parents will thank you. It’s a genuinely healthy option on a table full of sugar, and kids are far more likely to eat fruit when it’s on a stick shaped like something fun.

What you’ll need:
- A seedless watermelon, sliced thick
- A star-shaped cookie cutter
- Fresh strawberries, halved
- Green grapes
- Wooden skewers
How to make it:
1. Cut thick slabs of watermelon and press the star cutter through to create your “wand” tips.
2. Thread grapes onto each skewer first, filling about three-quarters of the stick.
3. Add a strawberry half or two near the top, followed by the watermelon star at the very tip.
4. Arrange the finished wands upright on a platter or in a tall glass for easy grabbing.
Pro Tip: Pat your fruit dry with a paper towel before skewering. This keeps the tray looking fresh and not watery by the time guests dig in.
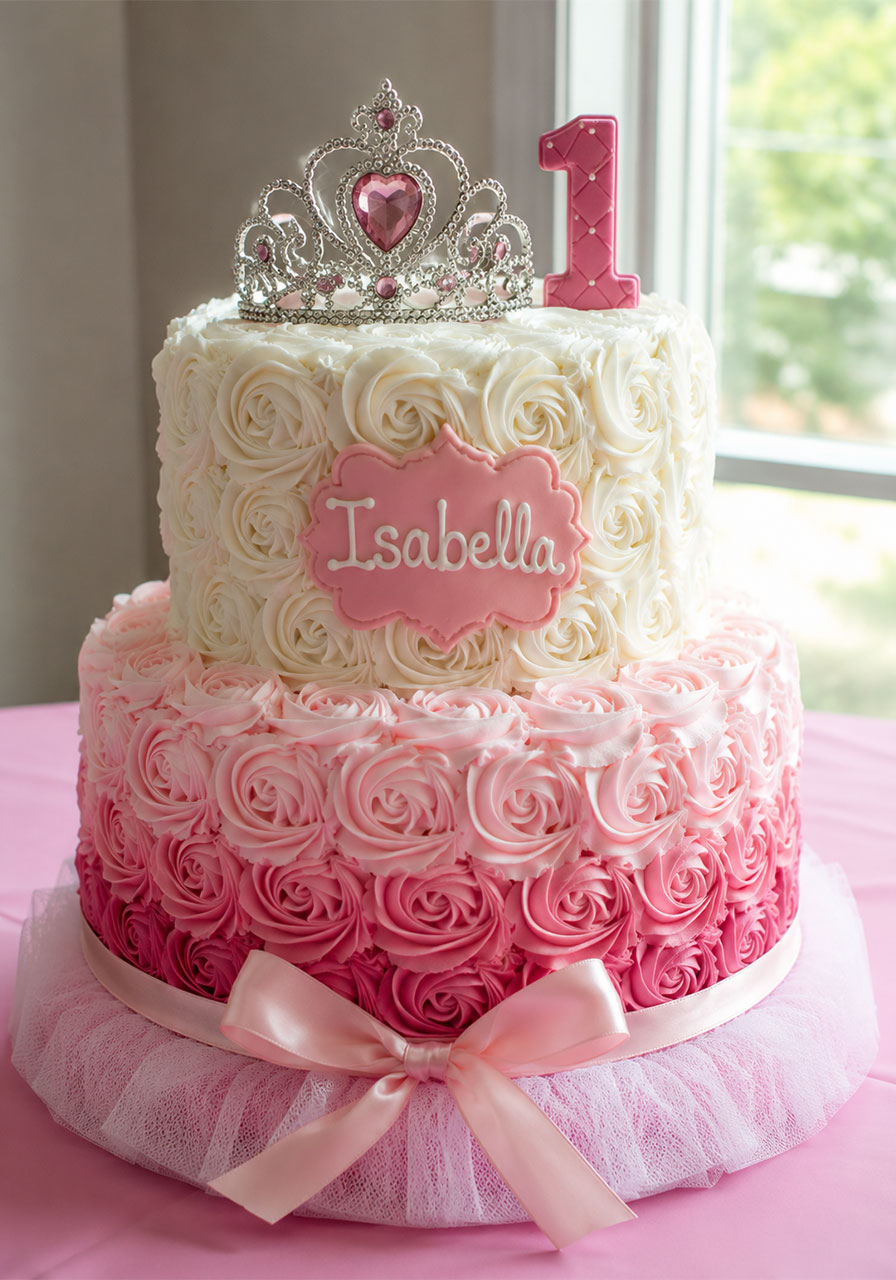
5. Ombré Rosette Birthday Cake with Her Name
For the smash cake or main cutting cake, a two-tier ombré rosette cake is the ultimate showstopper. White rosettes up top, deep pink rosettes below, and her name in a jeweled plaque right in the center.
Why it works: It looks like it came from a high-end bakery, but the technique is beginner-friendly. Rosette piping hides small imperfections far better than smooth fondant, so it’s forgiving even for first-time cake decorators.
What you’ll need:
- Two round cakes in different sizes (6-inch and 8-inch work well)
- Buttercream frosting, split into white and pink shades
- A piping bag with a large open-star tip
- A small fondant plaque with her name piped or printed on
- A cake-topper tiara
- Tulle for the base (optional, but stunning)
How to make it:
1. Stack and crumb-coat both cake tiers, then chill for 20 minutes so the frosting sets.
2. Pipe rosette swirls in white across the entire top tier, covering it completely.
3. Pipe rosette swirls in pink across the bottom tier, going slightly deeper in color near the base for that ombré fade.
4. Add the name plaque to the front of the top tier and press it gently into the frosting.
5. Top with a tiara cake topper, and wrap the base in tulle for extra drama.
Pro Tip: Work with slightly chilled buttercream. Warm frosting won’t hold its rosette shape as cleanly when piped.
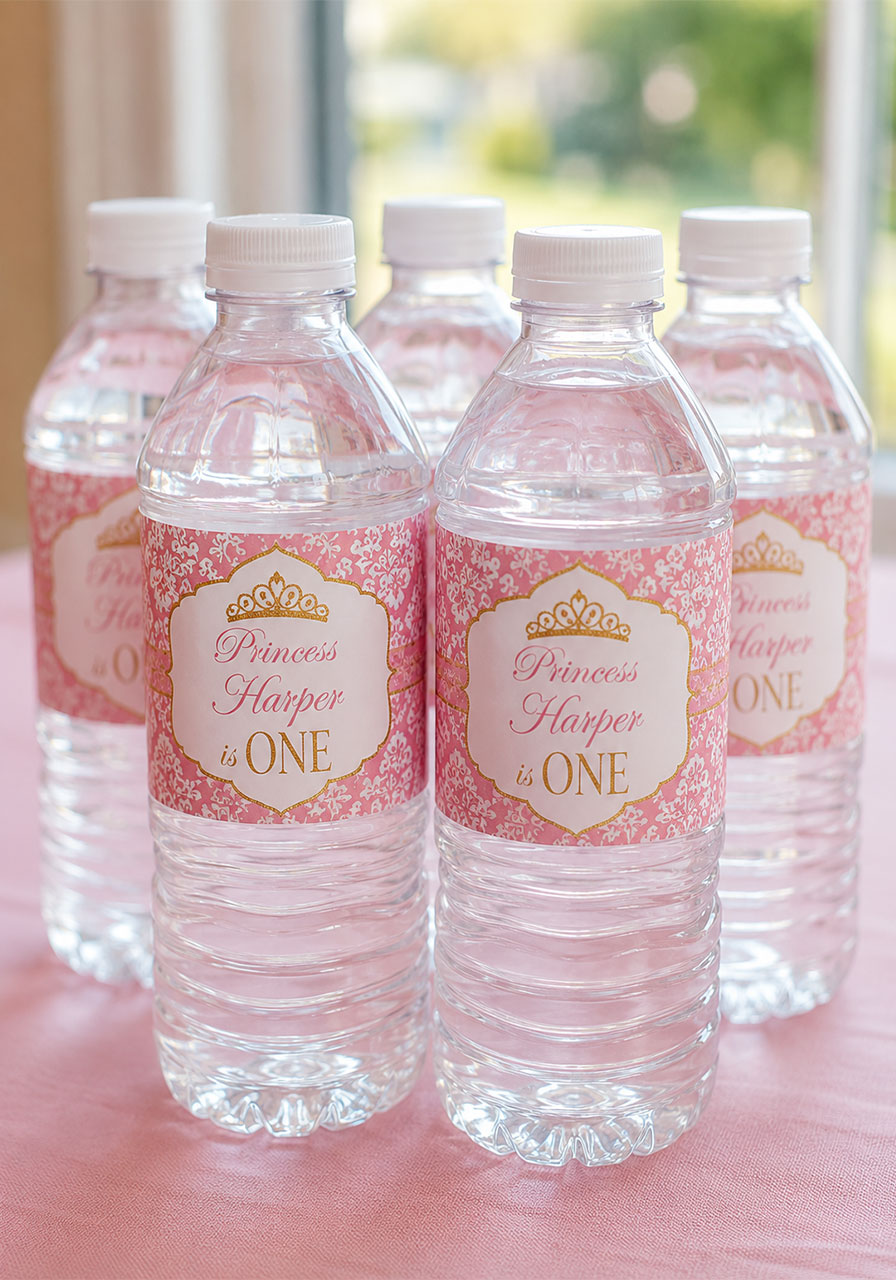
6. Personalized “Princess Is One” Water Bottles
Custom water bottle labels are a small touch that makes a massive impact for very little effort. Guests notice them, and they photograph beautifully on any drink table.
Why it works: It’s an easy way to theme something you’re already buying anyway. Water bottles are a party essential, so why not make them Instagram-worthy while you’re at it?
What you’ll need:
- A case of standard water bottles
- Printable water bottle label templates (pink and gold princess design)
- Clear tape or a glue stick
How to make it:
1. Design or download a princess-themed label template and personalize it with her name and age.
2. Print the labels on regular paper or sticker paper for an easier application.
3. Wrap each label around a bottle, trimming to fit, and secure with tape or the sticker’s built-in adhesive.
4. Chill the bottles before the party so they’re ready to grab straight from an ice bucket.
Pro Tip: Sticker paper is worth the small upgrade cost. It wraps smoothly around the curve of the bottle without wrinkling the way regular printer paper can.
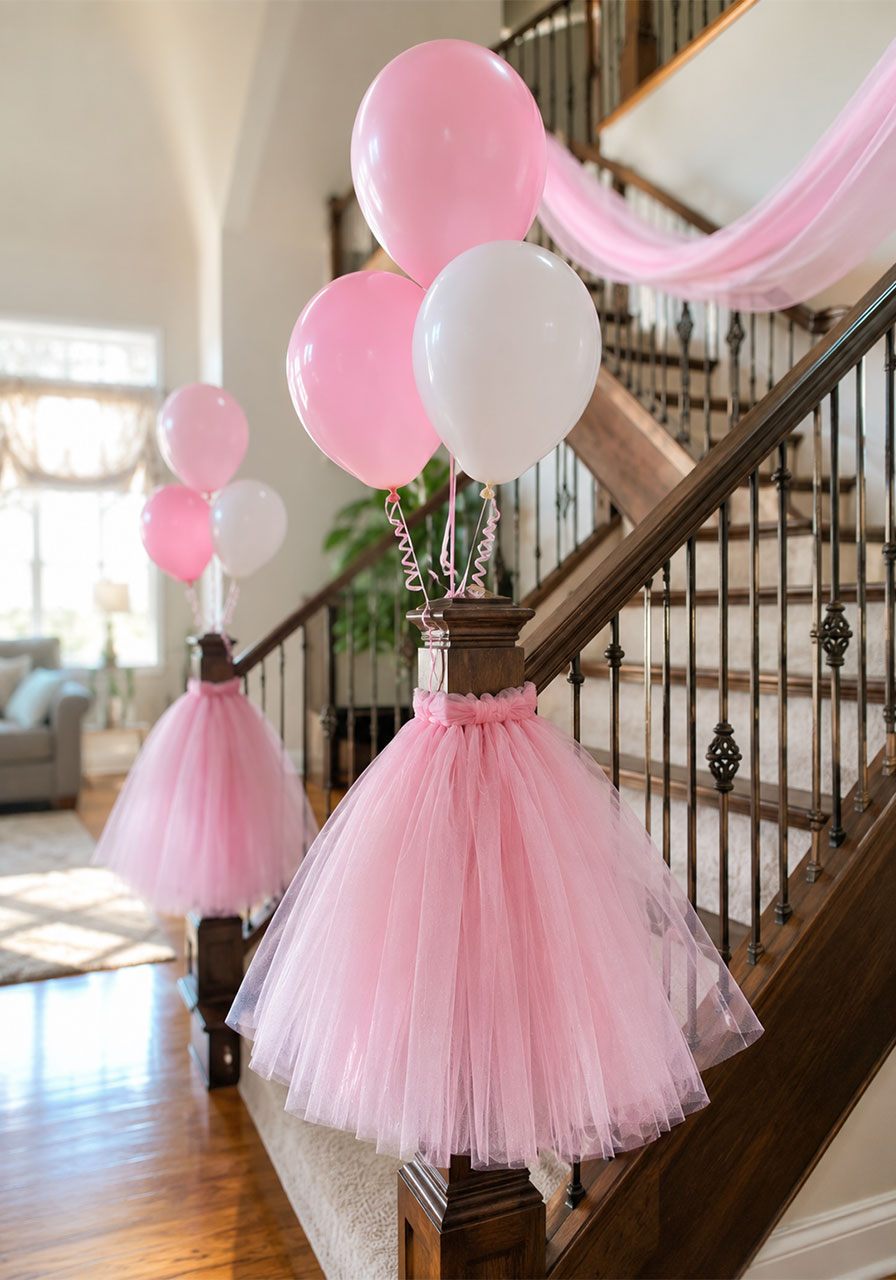
7. Tutu Balloon Garland on the Staircase
If you have a staircase or entryway, this is the decoration that makes the biggest first impression. Fluffy tulle “tutus” wrapped around the banister posts, paired with clusters of pink and white balloons.
Why it works: It transforms an ordinary hallway into an entrance worthy of a princess, and it sets the tone the second guests walk in the door.
What you’ll need:
- Rolls of tulle in pink and sparkly pink
- Scissors
- Pink and white latex balloons
- Curling ribbon
How to make it:
1. Cut long strips of tulle, roughly 12-18 inches each.
2. Tie the strips around the top of each banister post, layering multiple strips until you get a full, puffy tutu shape.
3. Trim the bottom edges so the tulle hangs evenly.
4. Inflate 3-4 balloons per cluster, tie them together with curling ribbon, and attach a bundle to each tutu post.
Pro Tip: Mix a sparkly tulle with a plain matte tulle on the same post. The combination catches the light and adds texture that a single tulle type can’t achieve on its own.
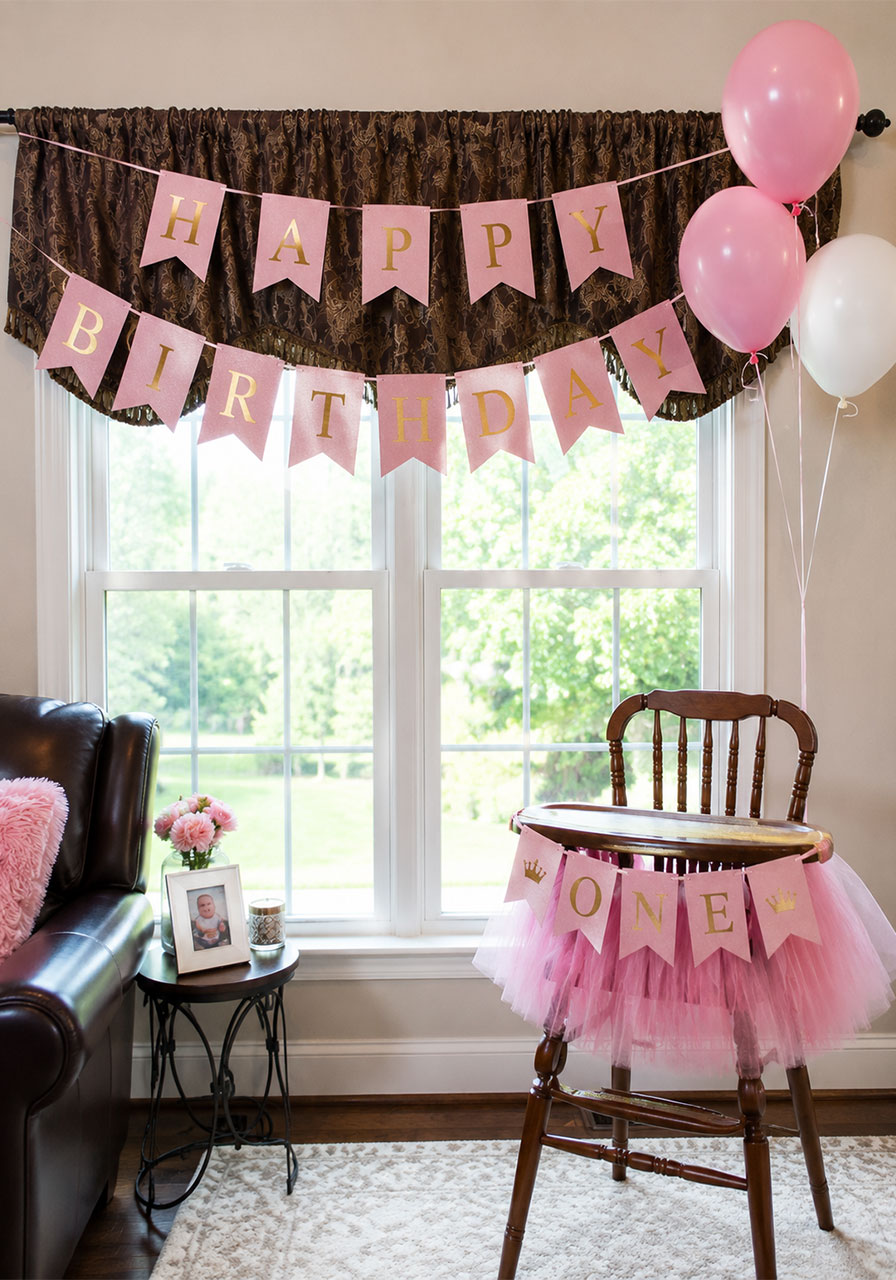
8. Pink and Gold “Happy Birthday” Banner Duo
A classic pennant “Happy Birthday” banner over the main dessert table, paired with a smaller “ONE” banner draped over the high chair, gives your party that polished, coordinated look in every photo.
Why it works: Banners are the fastest way to signal “this is a party” the moment someone walks into the room, and having a matching mini banner on the high chair makes for the cutest highchair-smash-cake photos.
What you’ll need:
- A pink and gold glitter pennant banner kit (“Happy Birthday”)
- A smaller matching “ONE” banner
- Twine or ribbon
- Removable adhesive hooks
How to make it:
1. Hang your main banner across a window, curtain valance, or wall using removable adhesive hooks so it doesn’t damage the wall.
2. String the smaller “ONE” banner across the front of the high chair, securing it with twine tied to each side.
3. Add a tutu skirt around the high chair legs for a coordinated finishing touch (see Idea 7 for the tulle technique).
Pro Tip: Hang your banners the night before the party. It’s one less thing on your to-do list the morning of, when you’ll want to focus on food and last-minute setup.
9. A Royal Invitation That Sets the Scene
Your invitation is the very first taste guests get of your party theme, so make it count. A pink and gold damask design with a tiara graphic and elegant script instantly tells guests exactly what kind of celebration to expect.
Why it works: A beautifully designed invite raises expectations in the best way; guests arrive already excited, and it gives you a chance to reinforce the color palette you’ll be using everywhere else.

What you’ll need:
- A digital invitation template (pink, white, and gold damask style)
- Her name and party details (date, time, location)
- An online design tool or printable template service
How to make it:
1. Choose a template featuring a tiara or crown graphic, since it visually announces “princess party” before guests even read the text.
2. Customize it with her name in an elegant script font, plus the date, time, and location.
3. Send digitally through text or email for convenience, or print physical copies for a more formal touch.
4. Send invites 3-4 weeks ahead of the party so guests have plenty of time to RSVP.
Pro Tip: Match your invitation’s color palette exactly to your decor. It creates a cohesive look across every photo, from the mailbox to the dessert table.
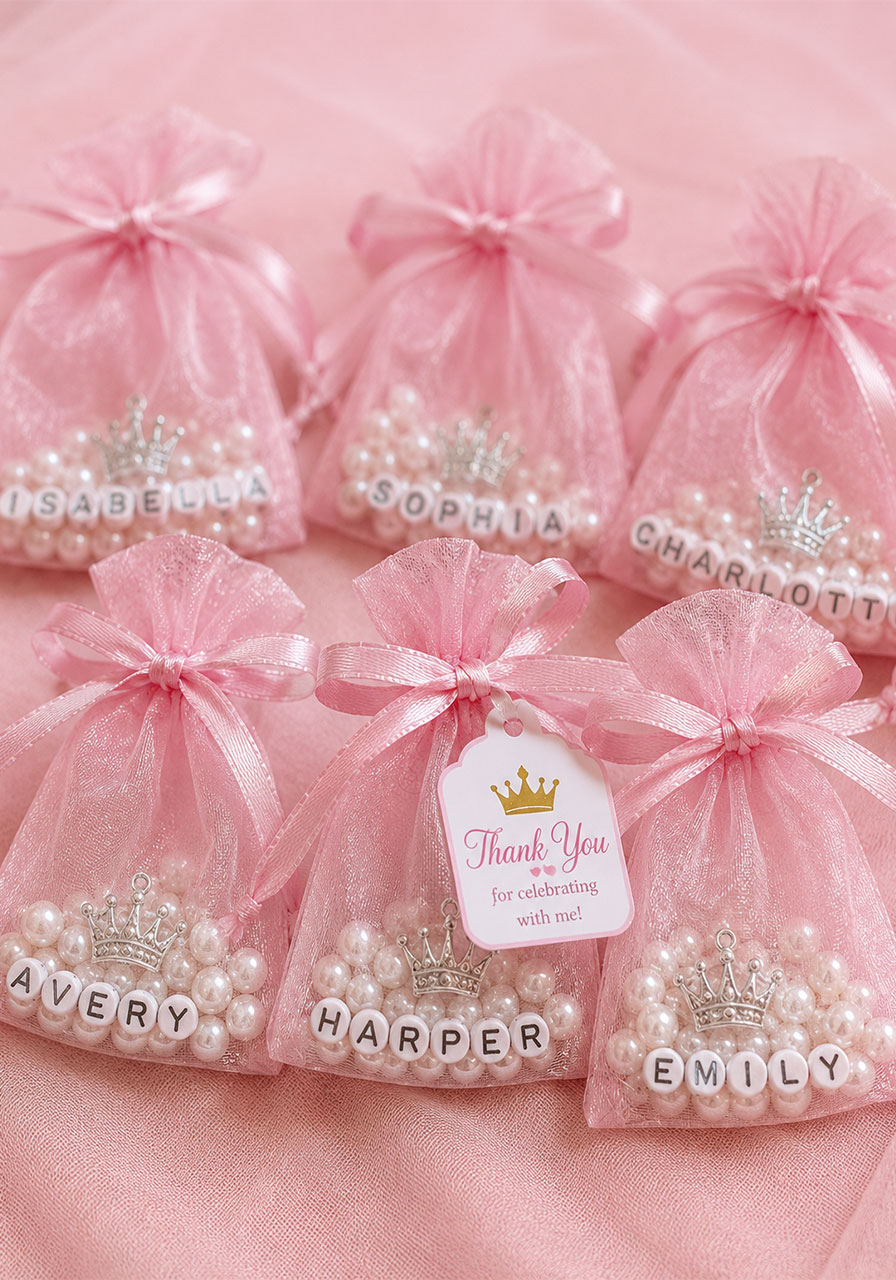
10. Sparkly Favor Bags for Little Princesses
Send guests home with tiny organza favor bags filled with sparkly trinkets and treats. It’s the small “thank you for coming” gesture that parents and kids both appreciate.
Why it works: Favor bags close out the party on a sweet note, and personalized touches (like each guest’s name) make kids feel like the celebration was made just for them too.
What you’ll need:
- Small organza drawstring bags (pink, white, or a mix)
- Alphabet beads to spell each guest’s name
- Small charms, pearl beads, or trinkets
- A printed thank-you tag
How to make it:
1. Fill each organza bag with a mix of beads, charms, and small treats.
2. Thread a few alphabet beads to spell out each guest’s name, and tuck the strand into the bag or tie it around the drawstring.
3. Attach a small printed thank-you tag to the ribbon for a finished, thoughtful touch.
4. Line the filled bags up in a basket near the exit so guests can grab one on their way out.
Pro Tip: Prep these a week in advance. Assembling 15-20 favor bags takes longer than most hosts expect, and it’s an easy task to knock out ahead of the busier party-week to-do list.
Ready to Host Your Royal Celebration
From the show-stopping dress cake to the tiniest crown-shaped sandwich, every detail on this list is designed to work together, so your princess party feels cohesive, polished, and genuinely magical from the moment guests walk in the door.
You don’t have to do all 10 ideas to pull off a memorable party. Pick your favorites, mix and match based on your time and budget, and build from there. Even just three or four of these touches will transform an ordinary birthday into a celebration she’ll be talking about all year.
Because at the end of the day, the best parties aren’t the most expensive ones. They’re the ones filled with thoughtful little details, good food, and a lot of love.
Happy planning, and happy birthday to your little princess!