
Best for: Kids’ birthdays (ages 3-10), Super Mario fans, DIY-loving party hosts
Prep Time: 1-3 months (sounds crazy, but trust us – it’s worth it!)
Budget Level: Dollar store friendly with a few splurges
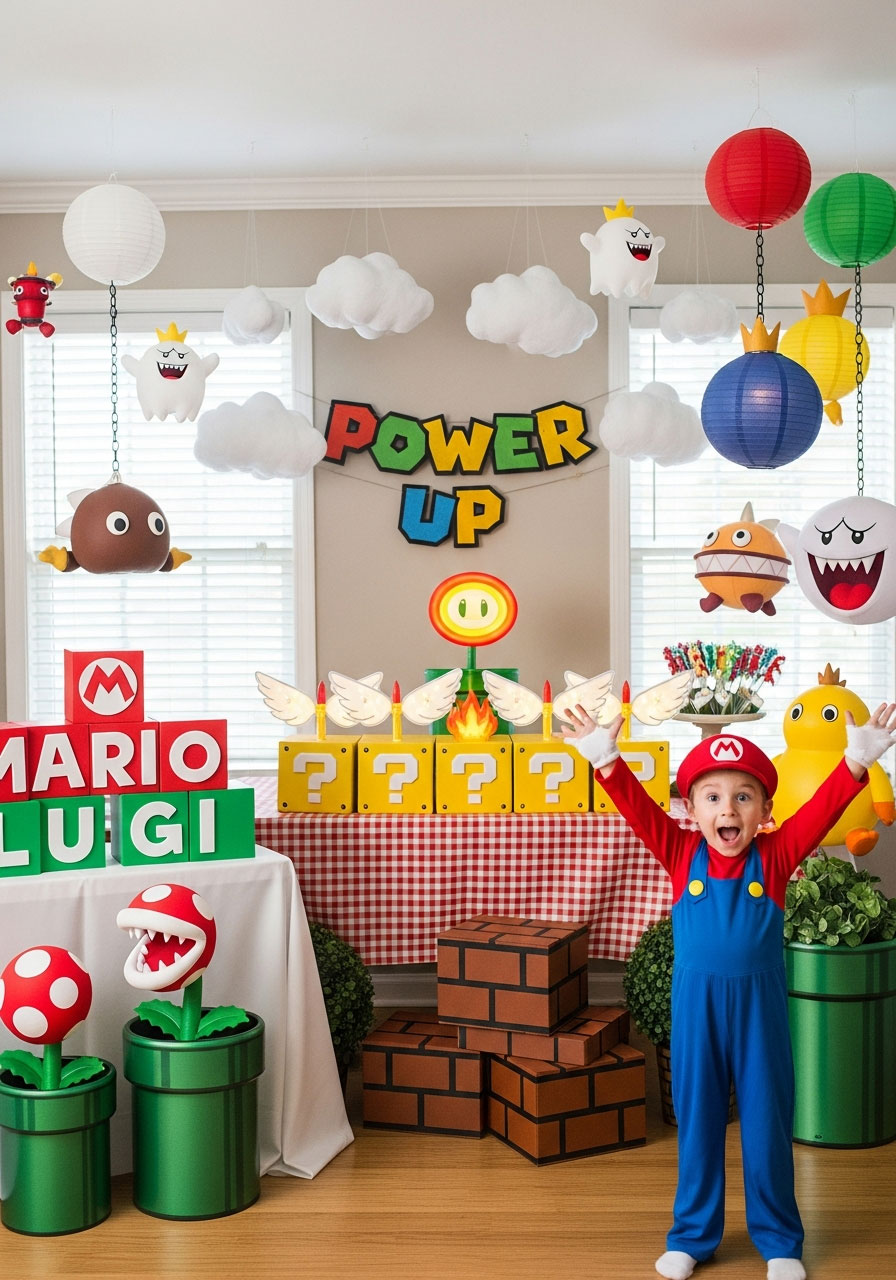
Let’s be real: your kiddo deserves a birthday party that’s as epic as beating Bowser on the final level. And here’s the best part – you don’t need to drop a fortune on pre-made decorations when you can createshow-stopping Super Mario crafts that’ll have every guest (and parent) asking, “Wait, you made that?!”
We’re about to walk you through 15 game-changing DIY projects that transform your party space into the Mushroom Kingdom. Some are quick weekend projects, others need a bit more love, but every single one is designed to make your party unforgettable. Grab your hot glue gun and let’s-a-go!
Pro Tip: Most supplies come from the dollar store, so don’t waste money on fancy craft stores unless you really need to!

1. Personalized Foam Letter Blocks (Character Edition!)
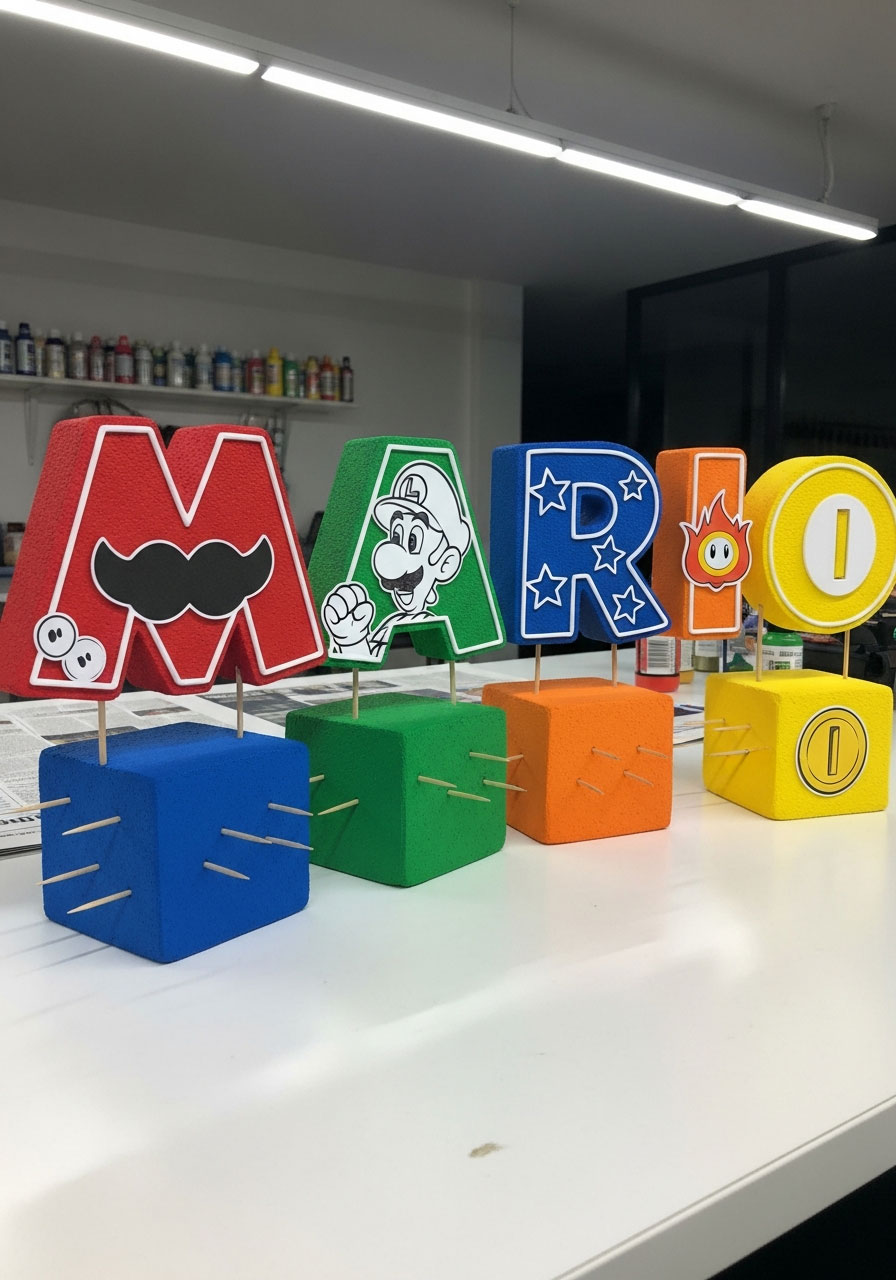
This is how you make your birthday kid feel like the main character – literally. Picture their name spelled out in chunky 3D letters, each one designed to look like Mario, Luigi, Princess Peach, or other iconic characters. These babies make killer photo ops and double as bedroom decor after the party.
What You’ll Need:
- Round floral foam circles (4-6, depending on name length)
- Floral foam blocks for bases
- Printed letters in Super Mario font
- X-acto knife
- Paper mache paste (1 part flour + 1 part water)
- Newspaper strips
- Acrylic paint (red, blue, green, black)
- White cardstock
- Colored markers or Sharpies
- Elmer’s glue
- Toothpicks
How to Make It:
1. Trace your letters onto the round foam circles using your printed templates as guides.
2. Carefully cut out each letter with your X-acto knife – take your time here!
3. Mix up your paper mache paste (equal parts flour and water until smooth).
4. Cover your foam letters with small newspaper strips dipped in paste, smoothing them flat. Let dry 24 hours.
5. Cover your foam blocks the same way with bigger newspaper pieces. Let dry 24 hours.
6. Paint each letter in character colors: red for Mario, green for Luigi, pink for Peach, etc. Paint front, back, and sides.
7. Sketch character details on white cardstock – think Mario’s mustache, Luigi’s “L”, Peach’s crown.
8. Color your character details with markers, cut them out neatly.
9. Glue character designs onto your painted foam letters using Elmer’s glue.
10. Pierce toothpicks into the bottom center of each letter and mount on painted foam blocks.
Fun Variation: Can’t draw? Print out small character images and glue those on instead!
Pirate Birthday Scavenger Hunt for Kids Printable
Instant Pirate Adventure: Download, print, and play in 15 minutes! No stress – just instant, unforgettable fun for kids ages 4-12
Indoor Party Lifesaver: Perfect for apartments & houses. Keep 1-10 kids wildly entertained for 45 minutes with clever rhyming clues
A Treasured Memory: Watch your birthday child become the hero of an epic story. Includes a thrilling intro and congratulatory treasure letter
Fun That Secretly Teaches: Kids race to solve riddles while building reading, problem-solving, and teamwork skills. Fun with a hidden purpose!

Indoor Birthday Scavenger Hunt Printable for Kids – 12 challenges
Your 15-Minute Party Hero: Instantly download, print, and hide. Get 1-2 hours of immersive, screen-free fun with 12 unique puzzles. Stress-free entertainment, guaranteed
More Than a Hunt – It’s a “”Cake Bandit”” Adventure! Kids don’t just find clues; they solve the mystery of the stolen cake! This engaging storyline creates a memorable birthday mission
Ultimate Indoor Party Lifesaver: Perfect for bad weather or small spaces. Keeps kids ages 4-10+ happily challenged with picture matching, mazes, and secret codes
Fun That Secretly Builds Genius: Laughter meets learning! These 12 clever challenges boost problem-solving, teamwork, and critical thinking skills without the kids even noticing

Difficult Birthday Scavenger Hunt Printable for Adults – The Oracle’s Birthday Prophecy
Forget Boring Parties. Unleash the Oracle: Transform a birthday into an epic mystery with 30 brain-teasing riddles, ciphers, and challenges. Customize the perfect adventure for your guests
Be the Host of the Most Memorable Party: Provide the clever, shared activity that gets everyone laughing and collaborating. It’s the highlight that guests will talk about for years
Sophisticated Fun, Zero Effort: Just download, pick your 10 favorite clues from 30 options, and hide them. Get a complete, themed adventure without the stress of planning from scratch
Challenge Adult Minds with “The Prophecy”: Move beyond simple games. This hunt features logic puzzles, cryptic ciphers, and hilarious dares designed specifically to engage and thrill adults

Happy Birthday Decorations
Everything in one box = party stress solved – Banner, honeycomb balls, swirls, and garland all coordinated. No last-minute runs to three different stores at 9 PM the night before.
Photo-ready in 15 minutes – Easy assembly means you spend less time wrestling with decorations and more time enjoying the birthday person’s reaction. Looks expensive, sets up fast.
Reusable = smart money – Quality materials hold up through the party AND pack away for next year. Stop buying flimsy decorations that rip before cake time.
Saves you $50+ vs. party store prices – Get the complete coordinated look without the markup. Guests think you hired a decorator; you paid a fraction of the cost.

2. Giant 3D Birthday Number (The Ultimate Centerpiece!)
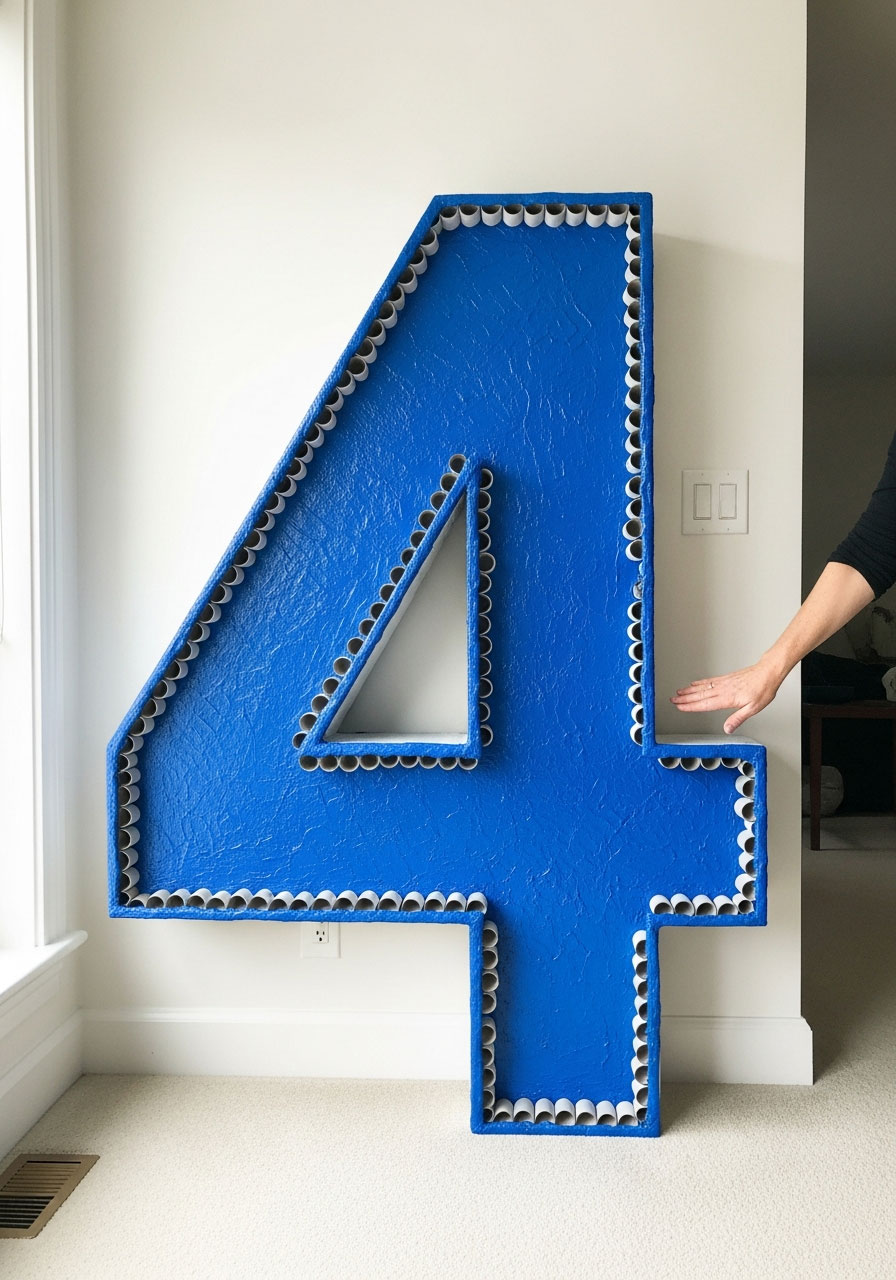
Nothing says “birthday royalty” like a massive number that’s almost as tall as the birthday kid. This showstopper becomes the focal point for photos and gift-opening moments.
What You’ll Need:
- 2 poster boards (any color)
- Pencil and scissors
- Empty toilet paper rolls (8-12, cut in half)
- Hot glue gun
- 2-inch masking tape
- Paper mache paste and newspaper
- Acrylic paint (we love bright blue for that Super Mario block vibe!)
How to Make It:
1. Sketch your number large on one poster board and cut it out.
2. Trace that number onto the second poster and cut it out – now you have matching front and back pieces.
3. Arrange halved toilet paper rolls across one number to create depth and support.
4. Hot glue the rolls in place, focusing on edges and the middle for stability.
5. Glue the second number on top of the toilet paper rolls to create your 3D structure.
6. Wrap the edges carefully with masking tape to seal everything together.
7. Cover the entire number with paper mache (newspaper strips + paste), laying them flat. Dry 24 hours.
8. Paint multiple coats in your chosen color until you get solid, vibrant coverage. Let each coat dry completely.
Pro Tip: Paint in sections rather than all at once to avoid smudges – your future self will thank you!
3. Terrifying (But Adorable) Piranha Plants
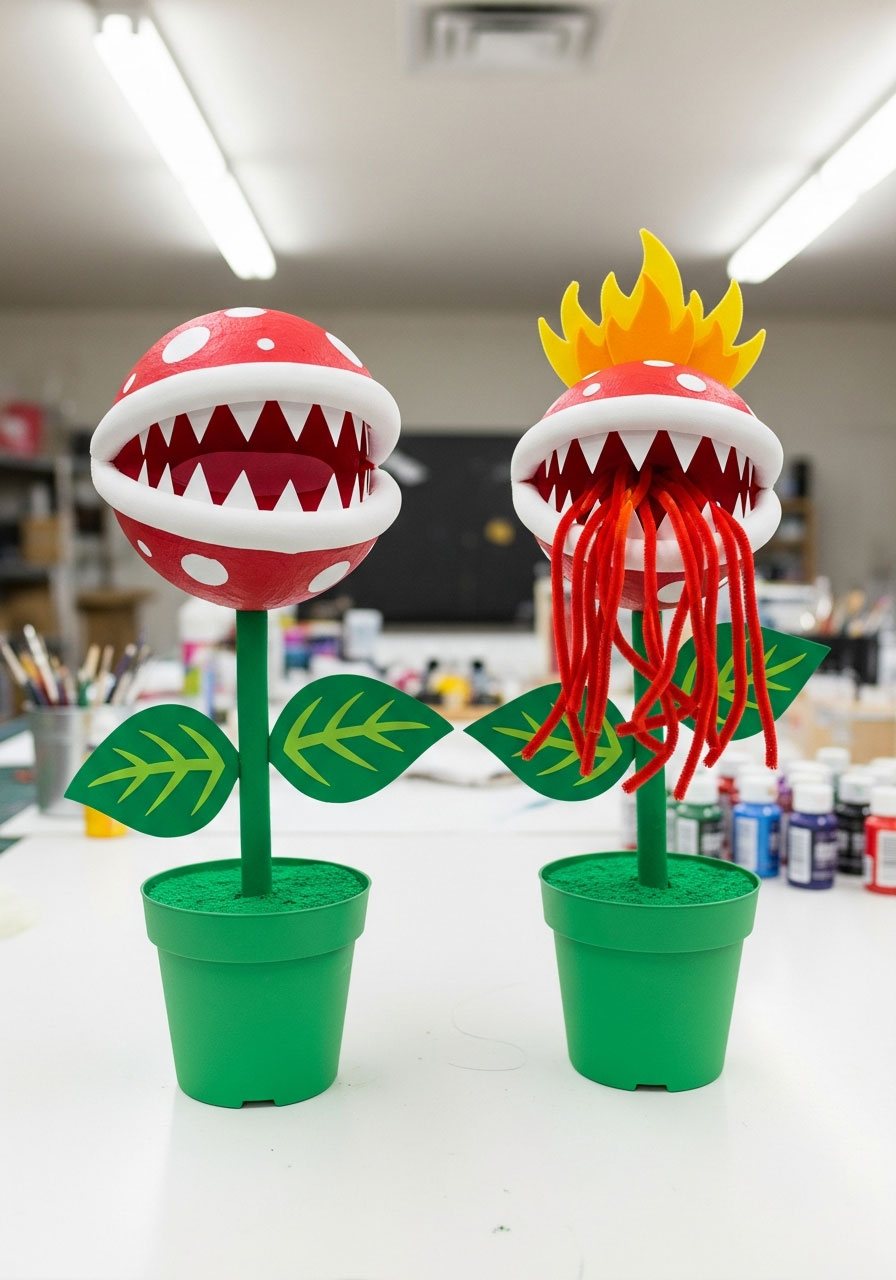
These classic Super Mario villains are surprisingly fun to make and look absolutely incredible coming out of those iconic green pipes. They’re perfect for flanking your snack table or guarding the entrance!
What You’ll Need:
- 2 styrofoam spheres (about 5 inches diameter)
- 2 plastic pots (spray-painted green – these are your pipes!)
- Green glossy spray paint
- Skinny wooden dowels
- Floral foam to fit inside pots
- X-acto knife
- Paper mache supplies
- Red and white acrylic paint
- Green, white, and black cardstock
- Red pipe cleaners (optional, for “fire”)
How to Make It:
1. Clean your plastic pots thoroughly and spray paint them glossy green (your pipes!).
2. Cut dowels to size and spray paint them green – these are your stems.
3. Sketch a Pac-Man mouth on each foam sphere, measuring from the middle outward.
4. Carve out the mouth with your X-acto knife for that signature piranha plant look.
5. Paper mache the spheres with newspaper strips, smoothing as you go. Dry 24 hours.
6. Paint the heads bright red with multiple coats until fully opaque.
7. Add white polka dots all over the dried red surface with white paint.
8. Cut out sharp teeth from white cardstock and outline them with black marker for drama.
9. Place floral foam inside your green pipe-pots for stability.
10. Pierce the dowel stem through the bottom of the piranha head, then into the floral foam.
11. Cut a black circle to cover the visible foam at the top of the pot.
12. Create and attach leaves from green cardstock to your dowel stem.
13. Optional: Add fire effects using red pipe cleaners coming out of the mouth!
Fun Variation: Make baby piranha plants using smaller spheres for scattered decoration!
4. Mystery Question Block Centerpieces (With Wings!)
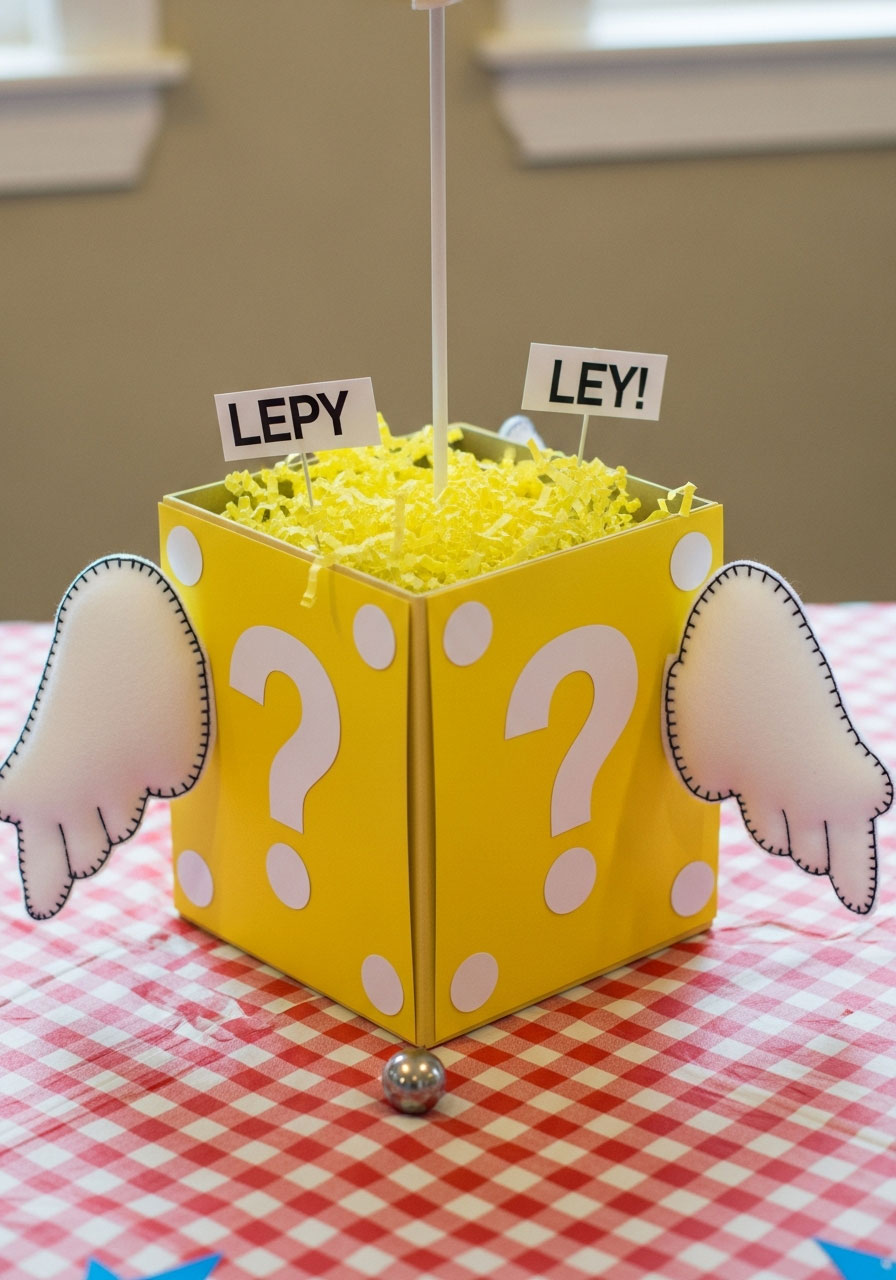
These iconic yellow blocks are perfect for centerpieces, and adding wings takes them from cool to absolutely next-level. Fill them with decorative shred and use balloon weights to keep them grounded.
What You’ll Need:
- Yellow poster boards
- Foam poster boards (for reinforcement)
- Ruler and pencil
- X-acto knife
- Hot glue gun or Elmer’s glue
- Yellow decorative shred
- Balloon weights
- White paper for question marks
- White felt (for wings)
- Poly-fil stuffing
- Sewing kit
How to Make It:
1. Measure and sketch a box template on yellow poster board (try 6″x6″x6″ with five faces plus flaps).
2. Cut five foam board pieces to fit snugly inside as reinforcement.
3. Hot glue foam pieces inside the box structure to add stability.
4. Fold and glue flaps to secure your box shape.
5. Cut out question marks from white paper, sized to fit centered on each face.
6. Glue question marks onto two opposite sides (save the other two for wings!).
7. Sketch wing shapes on paper as your template.
8. Trace and cut wings from white felt – you need two pieces per wing.
9. Sew wing pairs together leaving a small gap for stuffing.
10. Stuff wings with poly-fil until they’re plump and cloud-like.
11. Finish sewing to close the gap completely.
12. Attach wings to the sides without question marks using hot glue.
13. Fill with yellow shred and add a balloon weight at the bottom for stability.
Pro Tip: Add white felt circles in the corners of your box just like the real game blocks!
5. Glowing Fire Flower Power-Up
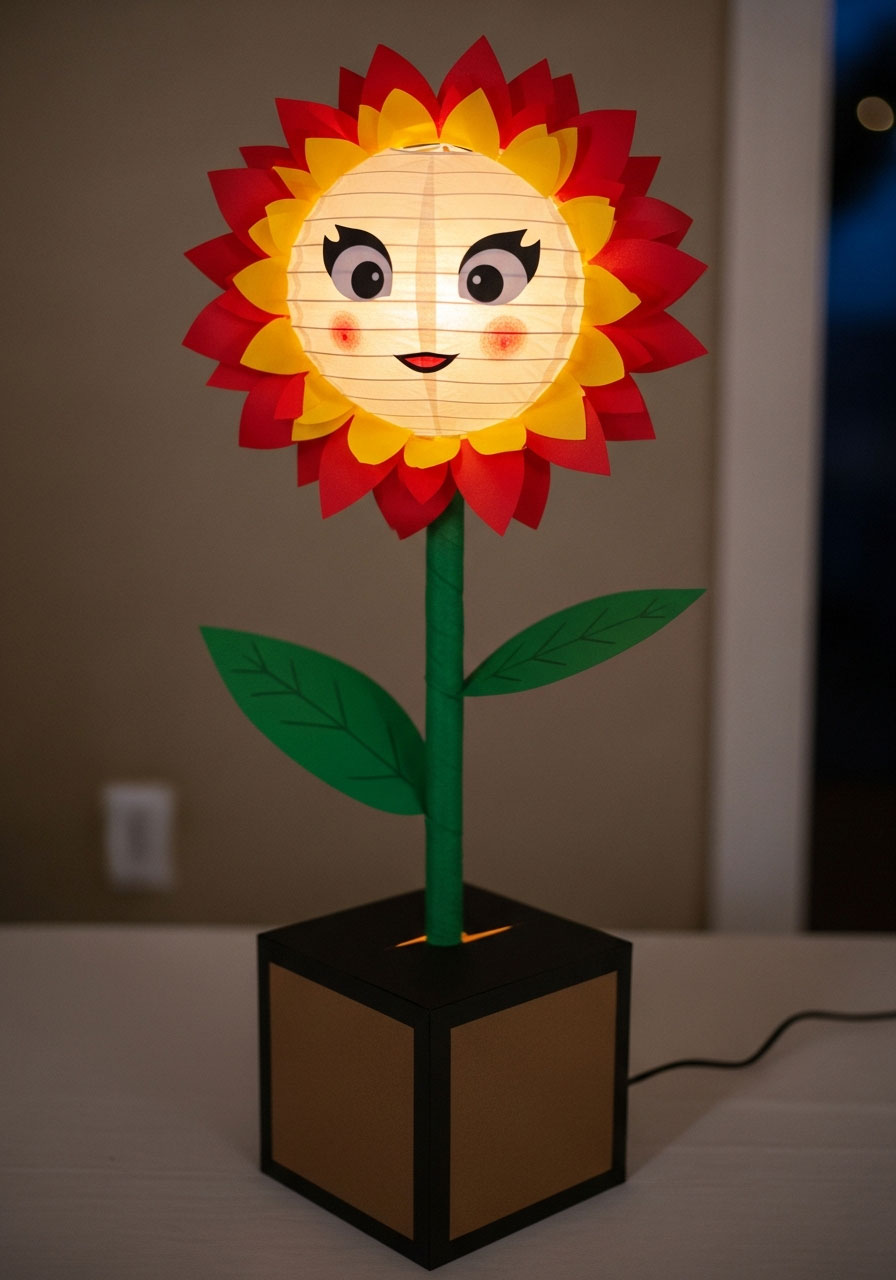
This adorable Fire Flower literally glows from within thanks to a paper lantern, making it perfect for dimmer party spaces or evening celebrations. It’s surprisingly easy but looks insanely impressive!
What You’ll Need:
- Small empty cardboard cube box
- Reddish-brown cardstock (for dirt block)
- Green cardstock (for stem and leaves)
- Yellow and red cardstock (for flower petals)
- Black cardstock (for face)
- Foam poster board scrap
- White paper lantern (6 inches)
- Elmer’s glue stick
- Hot glue gun
- Stapler
How to Make It:
1. Cover your cardboard box completely with brown cardstock to create a dirt block base.
2. Cut a large red circle with the center removed to fit around the paper lantern.
3. Cut a smaller yellow circle the same way, sized to layer on top of the red.
4. Glue yellow onto red creating the classic Fire Flower petal look.
5. Attach the flower ring around your assembled paper lantern using tape.
6. Cut foam board lengthwise for a sturdy stem.
7. Wrap the stem in green cardstock, securing with glue or staples.
8. Cut out leaf shapes from green cardstock and attach to the stem.
9. Cut a horizontal slit in the top of your dirt block box for the stem.
10. Cover the box top with black cardstock (including the slit).
11. Insert the stem through the slit and secure with hot glue.
12. Cut and glue eyes from black cardstock onto the paper lantern face.
Fun Variation: Make an Ice Flower version using blue and white instead!
6. Floating King Boo & Ghost Squad

These spooky-cute paper lantern ghosts create the most magical floating effect when hung at different heights. King Boo gets his royal treatment with a cardstock crown that actually stays put!
What You’ll Need:
- White paper lanterns (various sizes)
- Black and red Sharpies
- Pencil
- Fishing line
- Yellow cardstock (for King Boo’s crown)
- Stapler
- Scrap paper
How to Make It:
1. Assemble all paper lanterns according to package directions.
2. Lightly sketch Boo faces with pencil first – this is your safety net!
3. Trace over pencil with black Sharpie for eyes and that signature tongue.
4. Add pink blush with red Sharpie for extra personality.
5. Cut fishing line in varying lengths for a dynamic floating effect.
6. Tie fishing line securely to the wire frame of each lantern.
7. For King Boo: Sketch a crown on yellow cardstock sized to fit the lantern top.
8. Cut out and form the crown by stapling the ends together.
9. Create support flaps by stapling scrap paper to opposite sides of the crown interior.
10. Insert flaps through the top of the lantern to hold the crown in place without glue.
Pro Tip: Draw the faces AFTER the lanterns are fully assembled – trust us on this one!
7. Stackable Brick Blocks (The Detail That Makes It Real!)

These wrapped foam bricks scattered around your party space instantly transport guests into the Mushroom Kingdom. They’re shockingly easy but make a huge impact!
What You’ll Need:
- Red brick wrapping paper
- Foam cubes or small cardboard boxes (various sizes)
- Ruler and pencil
- Scissors
- Clear tape
How to Make It:
1. Measure each box face carefully and draw templates on the wrapping paper (five faces only).
2. Add 1-inch flaps to your measurements for clean folding.
3. Cut out your templates precisely.
4. Start with horizontal faces – tape these to the box first to maintain the brick pattern direction.
5. Fold and tape flaps from the horizontal pieces onto the box sides.
6. Lay vertical wrapping pieces flat on your work surface.
7. Fold extra flaps inward to hide them before attaching – this keeps your pattern seamless!
8. Wrap and tape vertical faces ensuring the brick pattern flows correctly around all sides.
Pro Tip: Test your pattern on one box first before cutting all your wrapping paper!
8. Bob-Omb Buddies (With Optional Stability Base!)

These round black characters with their iconic blue wind-up keys are guest favorites. The foam base trick keeps them standing proud without toppling over!
What You’ll Need:
- 2 black paper lanterns
- 2 round foam circles (same as letter project)
- 2 foam spheres (for feet)
- Paper mache supplies
- Baby blue and orange acrylic paint
- X-acto knife
- Yellow pipe cleaners
- Hot glue gun
- Foam poster board (for base)
- White cardstock (for eyes)
How to Make It:
1. Paper mache the foam circles completely and let dry 24 hours.
2. Paint circles baby blue with multiple coats for the wind-up key cap.
3. Cut foam spheres in half for feet and paint orange (many coats needed!).
4. Mark wire frame positions on the dried blue circle to create grooves.
5. Cut a groove in the circle foam using your X-acto knife so the wire frame sits snugly.
6. Cut a center hole for the pipe cleaner fuse to go through.
7. Insert half a pipe cleaner through the hole and secure with hot glue or by bending.
8. Attach the wire frame into the groove you cut in the blue cap.
9. Assemble the paper lantern with the blue cap/wire frame inserted.
10. Glue the cap edges lightly to the lantern for extra security.
11. Hot glue orange feet onto the bottom of the lantern.
12. Cut and glue white eyes onto the Bob-Omb face.
13. Optional: Cut foam board bases and glue both the feet and wire frame to it for rock-solid stability.
Fun Variation: Vary the fuse lengths – some long, some short – for visual interest!
9. Chain Chomp on a Leash

This might be the easiest project on the list, but it’s wildly effective. That paper chain attached to this grumpy character is pure genius and so fun to make!
What You’ll Need:
- 1 black paper lantern
- Black cardstock sheets
- White cardstock
- White cardstock scrap
- Black Sharpie
- Scissors
- Stapler
- Hot glue gun
How to Make It:
1. Cut black cardstock lengthwise into 2-inch wide strips (you’ll need about 7 strips).
2. Staple the first strip into a circle.
3. Loop the second strip through the first and staple it closed.
4. Continue interlocking all strips to create your chain.
5. Draw eye circles on white scrap and cut out the centers (the lantern shows through as pupils!).
6. Sketch the toothy mouth on a full sheet of white cardstock with black sharpie outline.
7. Test placement of eyes and mouth on the lantern BEFORE gluing – learn from our mistakes!
8. Hot glue eyes first once you’re absolutely sure of placement.
9. Hot glue the mouth carefully below the eyes.
10. Attach the chain to the side of the lantern with hot glue.
Pro Tip: Don’t glue anything until you’ve tested the placement – repositioning ruins paper lanterns fast!
10. Fluffy Clouds (Simple But Essential!)

Sometimes the simplest decorations tie everything together. These white clouds with their adorable faces can be hung or propped to add that classic Mario sky vibe!
What You’ll Need:
- 2 white poster boards
- Pencil
- Black Sharpie
- Scissors
- Fishing line (for hanging)
How to Make It:
1. Sketch cloud shapes in various sizes on your white poster boards.
2. Draw simple faces with black Sharpie – classic dot eyes and small smile work perfectly!
3. Cut out your clouds carefully following your outline.
4. Optional: Punch small holes at the top and thread fishing line through for hanging.
Fun Variation: Make some clouds with happy faces and some with sleepy faces for variety!
11. Custom Snack Bar Place Cards (Food Gets Character Names!)
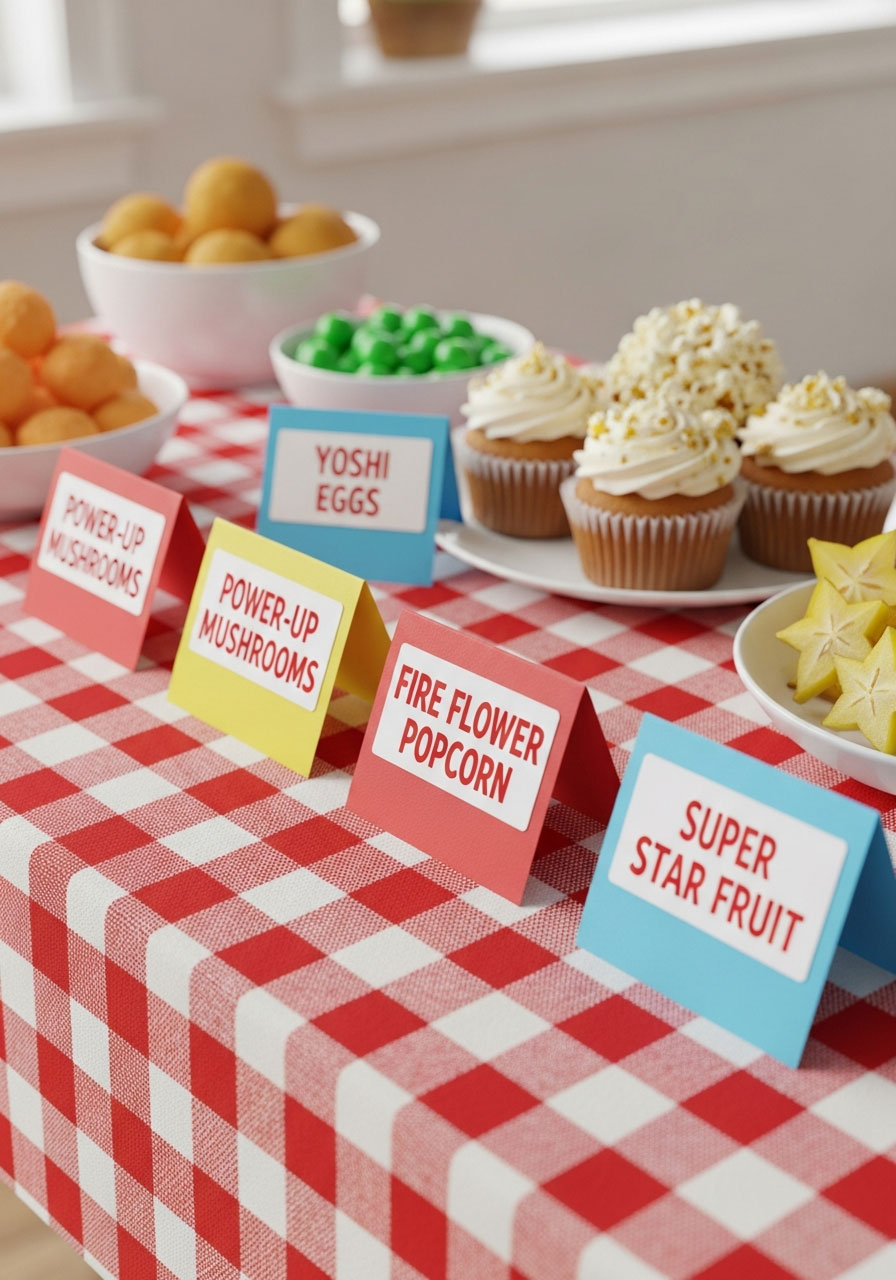
Give your party food the Mario treatment with themed place cards that turn regular snacks into “Power-Up Mushrooms” and “Yoshi Eggs”. Guests will absolutely love this detail!
What You’ll Need:
- White cardstock
- Super Mario font (download free online)
- Colored cardstock for stands
- Printer
- Elmer’s glue
- Scissors
How to Make It:
1. Download Super Mario font to your computer (free from various font sites).
2. Design place cards in your editing program with creative food names: “Super Star Fruit”, “Fire Flower Popcorn”, “1-Up Mushroom Cupcakes”.
3. Print on white cardstock for durability.
4. Cut out each place card neatly.
5. Create triangular stands from colored cardstock by folding it into a tent shape.
6. Glue place cards to the front of each stand.
7. Position next to each food item on your snack table!
Pro Tip: Laminate these if you have access to a laminator – they’ll last for multiple parties!
12. “POWER UP!” Banner for Your Snack Bar

This bold banner hung above your food table instantly transforms it into an official Power-Up station. Yellow plates + printed letters = instant party magic!
What You’ll Need:
- White paper plates from dollar store (one per letter)
- Yellow acrylic paint
- Printed letters (P-O-W-E-R U-P)
- Elmer’s glue
- Fishing line or ribbon
- Hole punch
How to Make It:
1. Paint all paper plates bright yellow and let dry completely.
2. Apply a second coat for solid coverage.
3. Print your letters large enough to fit centered on each plate.
4. Cut out each letter carefully.
5. Glue one letter to the center of each yellow plate.
6. Punch two holes at the top of each plate.
7. Thread fishing line or ribbon through holes to connect all plates.
8. Hang above your snack table for that authentic power-up station feel!
Fun Variation: Add star shapes between words for extra flair!
13. Character Goodie Bags (Mario, Luigi & Princess Peach!)

Skip the generic party bags and create these adorable character-themed ones. Kids will know exactly which one is theirs, and parents will be impressed by the personal touch!
What You’ll Need:
- Plain paper goodie bags (red, green, and pink)
- Super Mario font printouts (M, L, Crown)
- White cardstock
- Colored markers or paint
- Elmer’s glue
- Scissors
How to Make It:
1. Print the letter M for Mario bags in the correct size.
2. Print the letter L for Luigi bags in the correct size.
3. Print or draw crowns for Princess Peach bags.
4. Cut out all letters and crowns from white cardstock.
5. Color in details using markers – keep M red, L green, crown gold/pink.
6. Glue M’s onto red bags, L’s onto green bags, crowns onto pink bags.
7. Let dry completely before filling.
8. Fill with themed party favors, candy, and Super Mario toys!
Pro Tip: Add each guest’s name in small letters below the character symbol!
14. Coin Block Photo Booth Prop

Create an Instagram-worthy photo moment with a giant coin block that guests can “punch” for pictures. This interactive decoration doubles as entertainment!
What You’ll Need:
- Large cardboard box (cube-shaped)
- Yellow poster board or paint
- Brown/orange cardstock (for coin)
- Black marker
- Packing tape
- String or ribbon
How to Make It:
1. Tape your cardboard box closed on all sides to create a solid cube.
2. Cover entirely in yellow using either poster board or paint.
3. Cut large circles from brown/orange cardstock (these are your coins).
4. Draw question marks on two opposite sides of your yellow box.
5. Attach string to the top of each coin.
6. Tape strings inside the box so coins dangle below when held up.
7. Position for photos where guests can “punch” the block and coins “fall out!”
Fun Variation: Fill the box with chocolate coins that actually fall out when shaken!
15. Warp Pipe Entrance Sign

Welcome guests to your party through an official Warp Pipe! This entrance decoration sets the tone the second people arrive.
What You’ll Need:
- Large green poster board
- Black poster board
- Pencil and scissors
- Green paint or extra poster board
- Tape or mounting squares
How to Make It:
1. Cut two large circles from green poster board (these are your pipe openings).
2. Cut a rectangle from green poster board to connect both circles vertically.
3. Cut a black circle slightly smaller than your green circles.
4. Layer black onto one green circle to create depth effect.
5. Attach rectangle between circles to form a 3D pipe shape.
6. Add “WELCOME!” or “WARP ZONE” text in Mario font.
7. Mount on your front door or entrance wall!
Pro Tip: Add green streamers flowing from the bottom pipe opening for movement!
Ready, Set, Party Time!
There you have it – 15 DIY projects that transform your space into the ultimate Super Mario celebration without breaking the bank. Yes, some of these take time (hello, paper mache drying!), but the look on your kiddo’s face when they see their Mushroom Kingdom birthday party? Absolutely priceless.
Our Top Time-Saving Tip: Start early! Knock out one or two projects per week leading up to the party. The paper mache projects need drying time anyway, so you might as well work on something else while you wait.
Remember, you don’t have to make all 15. Pick your favorites based on your time, skill level, and party size. Even just 5-6 of these will create an epic celebration your guests will be talking about for months!
Which DIY are you most excited to tackle? Drop a comment and let us know!
More Birthday Party Ideas to Keep the Fun Rolling:
40+ Magical Harry Potter Birthday Games That’ll Cast a Spell on Your Party
35 Fun Pokemon Birthday Party Ideas for Kids
15 Creative Birthday Morning Surprises for Daughter That’ll Make Her Day Unforgettable
How to Make a DIY Balloon Garland in Under an Hour (No Pinterest Perfection Required!)
22 Birthday Party Crafts for Tweens
40 Easy DIY Birthday Party Decorations That’ll Make You Look Like a Pro
16 Tips and Ideas for Birthday Balloon Centerpieces That Wow
22 Creative DIY Craft Activity Ideas That’ll Make Your Kids’ Birthday Party Legendary
30+ Sparkling Fun Unicorn Birthday Party Ideas That’ll Make Your Party Absolutely Magical
10 Adorable Hello Kitty Birthday Party Decor Ideas
7 Fun & Easy Party Craft Ideas for an Unforgettable Teen Girl Birthday
22 Creative DIY Craft Activity Ideas That’ll Make Your Kids’ Birthday Party Legendary
As an Amazon Associate, we may earn a commission from qualifying purchases at no additional cost to you.
