Planning a bridal shower is one of the most fun jobs in the whole wedding world – and if you’ve got a Cricut, you’re already ahead of the game.
Seriously. A Cricut machine turns what could be a stressful, expensive crafting session into something genuinely enjoyable. Custom signs, personalized favors, adorable banners, blinged-out decorations – you can make them all at home, at a fraction of the boutique price tag.
Whether you’re going for glam gold vibes, rustic chic, pastel florals, or a fun co-ed BBQ party, these DIY bridal shower ideas with the Cricut will help you nail the look – and make the bride feel like the total star she is.
Let’s dive in.
What You Need Before You Start
Before we get into the ideas, here’s a quick checklist of Cricut supplies you’ll want to have on hand for most of these projects:
- Cricut Explore Air 2, Cricut Maker, or Cricut Joy (any of these work great)
- Iron-on vinyl (HTV) in various colors and finishes (glitter iron-on is a game-changer)
- Adhesive vinyl for signs and paper crafts
- Cardstock in your chosen color palette
- Standard grip cutting mat
- Weeding tool and scraper
- EasyPress or household iron
- Scoring wheel or scoring stylus (for 3D paper projects)
Got your supplies? Let’s get crafting.


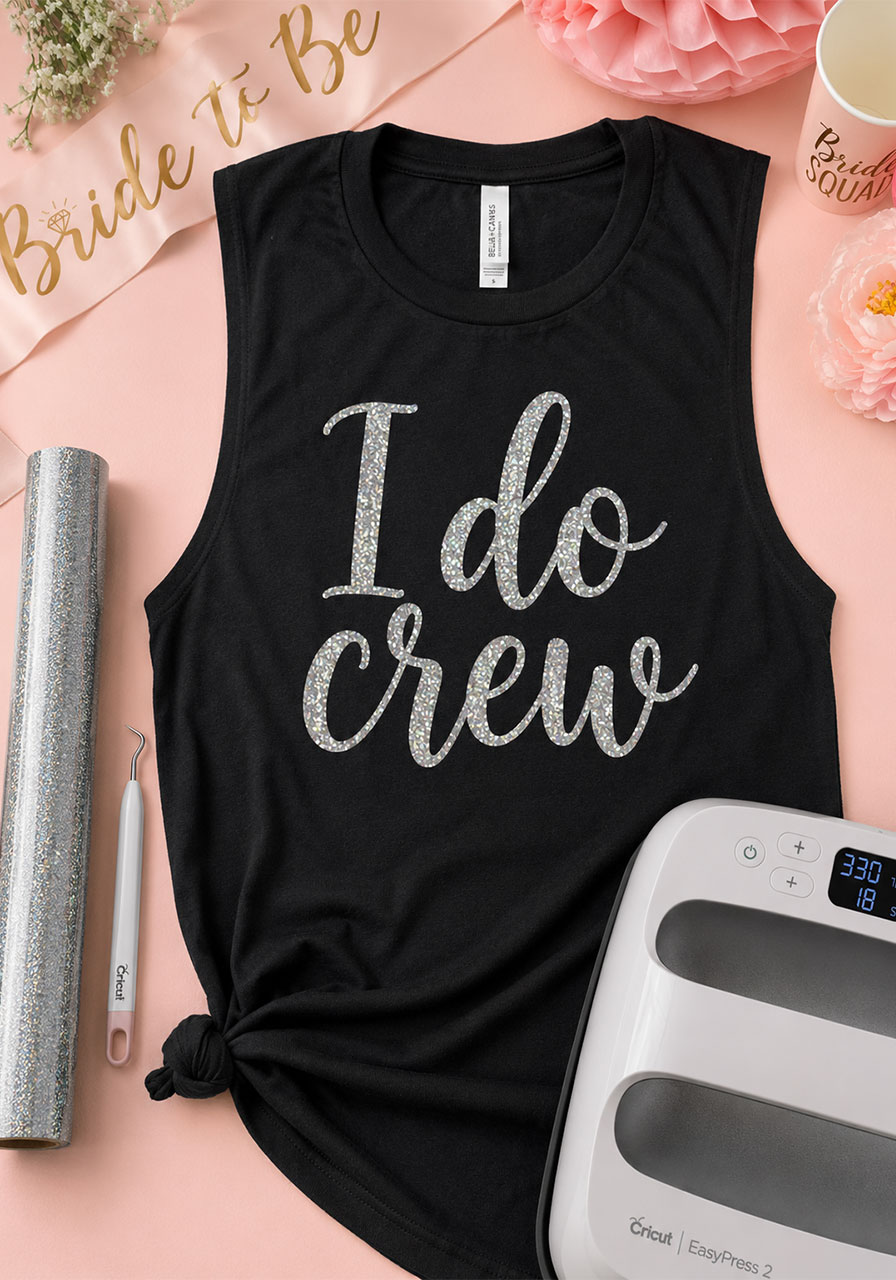
1. “I Do Crew” Bridesmaid Shirts
There’s nothing like matching shirts to kick off the bridal shower energy the second guests walk in – and this one is a crowd-pleaser every single time.
The “I Do Crew” tank top is cute, wearable, and doubles as a keepsake your bridesmaids will actually want to keep. Use glitter iron-on vinyl on black tanks for maximum drama, or go soft and sweet with white fabric and rose gold iron-on.
Why it’s a hit: The matching shirts make for the most Instagrammable group photos of the whole event. They also make the bridesmaids feel appreciated and celebrated, not just assigned to carry things.
What You’ll Need:
- Black or white tank tops (one per bridesmaid)
- Glitter or holographic iron-on vinyl
- Cricut machine + cutting mat
- EasyPress or iron
- “I Do Crew” SVG file
How to Make It:
- Download or create an “I Do Crew” SVG design in Cricut Design Space.
- Mirror your design before cutting (this is essential for iron-on vinyl).
- Cut your design on the glitter iron-on vinyl using the iron-on setting for your material.
- Weed away the excess vinyl, leaving only your design on the carrier sheet.
- Position the design on the shirt, shiny side down.
- Press with your EasyPress at the recommended temperature for about 30 seconds.
- Peel the carrier sheet while warm, and you’re done!
Pro Tip: Make a slightly different version for the bride – something like “I Do” or “Bride” in a fancier font – so she stands out from the crew.
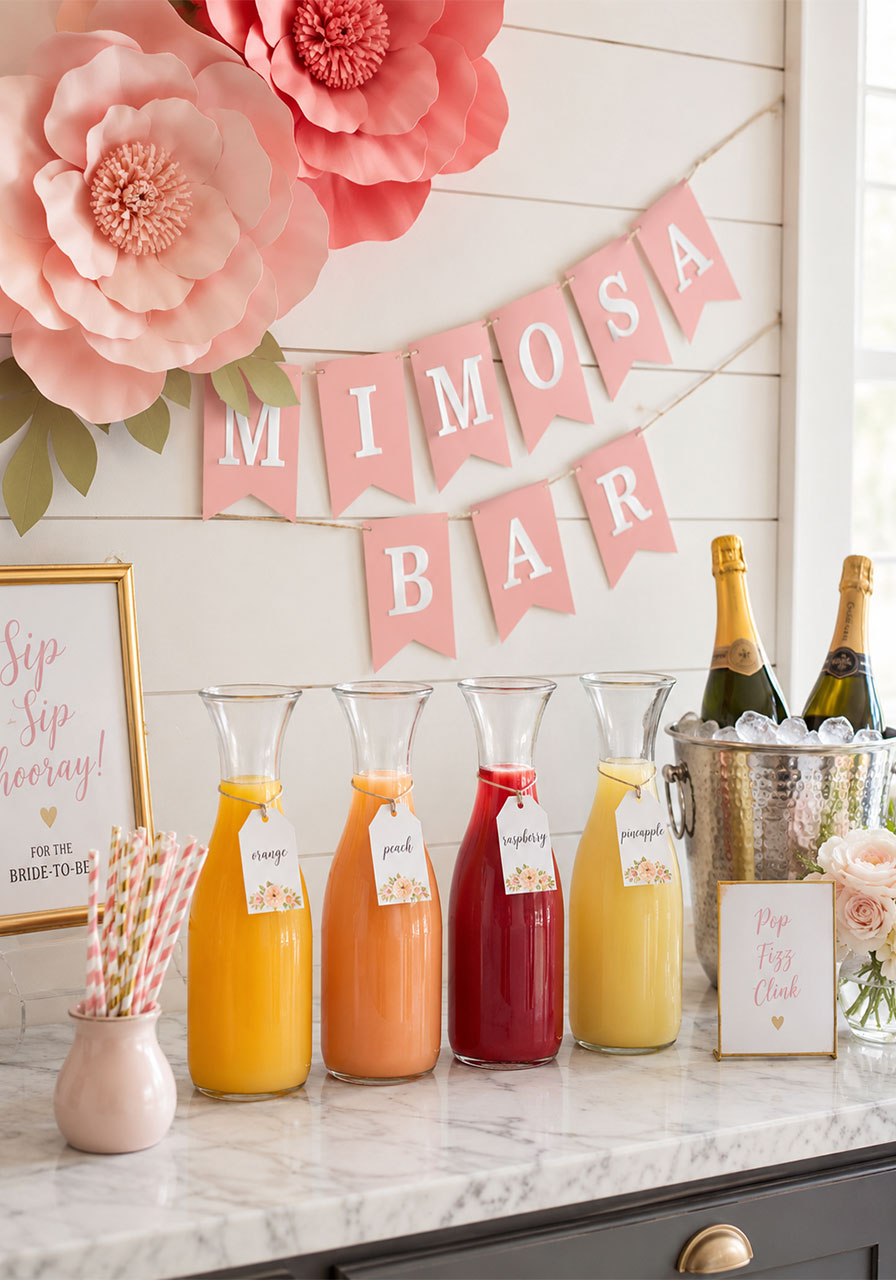
2. DIY Mimosa Bar Decorations
A mimosa bar is basically a bridal shower requirement at this point – and your Cricut can make it look like something straight out of a magazine spread.
Cut a gorgeous “Mimosa Bar” banner from cardstock, add labels for the juice bottles (peach, mango, raspberry), and even make little tags for the garnish options. The whole setup takes maybe an hour to put together but looks like you hired a professional event stylist.
Why it’s a hit: It’s interactive, it’s pretty, and everyone loves a good brunch drink station. Pair it with giant paper flower backdrops cut on your Cricut and you’ve got a photo moment that’ll live on Instagram forever.
What You’ll Need:
- Pink or blush cardstock
- White adhesive vinyl (for banner letters)
- Twine or ribbon for hanging the banner
- Printable labels or vinyl for juice bottles
- Mimosa Bar SVG or banner template
How to Make It:
- Cut banner pennant flags from cardstock using your Cricut.
- Cut your letter designs from white adhesive vinyl.
- Weed and apply the letters to each pennant flag.
- Hole-punch the top corners of each flag and thread through twine.
- Cut and apply custom labels to your juice bottles or decanters.
- Hang the banner behind your drinks station and arrange your bottles and glasses.
Pro Tip: Add a small “Mix Your Own” tag card listing popular mimosa flavor combos. It makes the bar feel even more special and takes guests about 30 seconds to read and love.
3. Paper Rosettes
Paper rosettes are one of those bridal shower decorations that look seriously impressive but are shockingly easy to make with a Cricut – especially if you use the Cricut Scoring Wheel to do the folding work for you.
Hang them as a backdrop, scatter them across tables, or cluster them together on a feature wall. They instantly elevate the vibe from “nice little party” to “wow, this is stunning.”
Why it’s a hit: Totally customizable to your color palette, budget-friendly, and they make the best backdrop for the bride’s gift-opening moment.

What You’ll Need:
- Cardstock in your chosen colors (double-sided looks gorgeous)
- Cricut Scoring Wheel attachment
- Adhesive or double-sided tape
- Brads or paper fasteners for the center
- Paper rosette SVG file
How to Make It:
- Load your rosette design into Cricut Design Space and attach the Scoring Wheel.
- Let the Cricut score and cut your rosette pieces in one pass.
- Fold along all the scored lines accordion-style.
- Connect the two ends of the strip to form a circle and secure with tape or a brad.
- Attach a backing circle to the center for a finished look.
- Make a bunch in varying sizes and pin or tape to your backdrop wall.
Pro Tip: Mix three different sizes for a layered, luxurious look. Go big with 12-inch rosettes as anchors, then fill in with 8-inch and 4-inch ones around them.
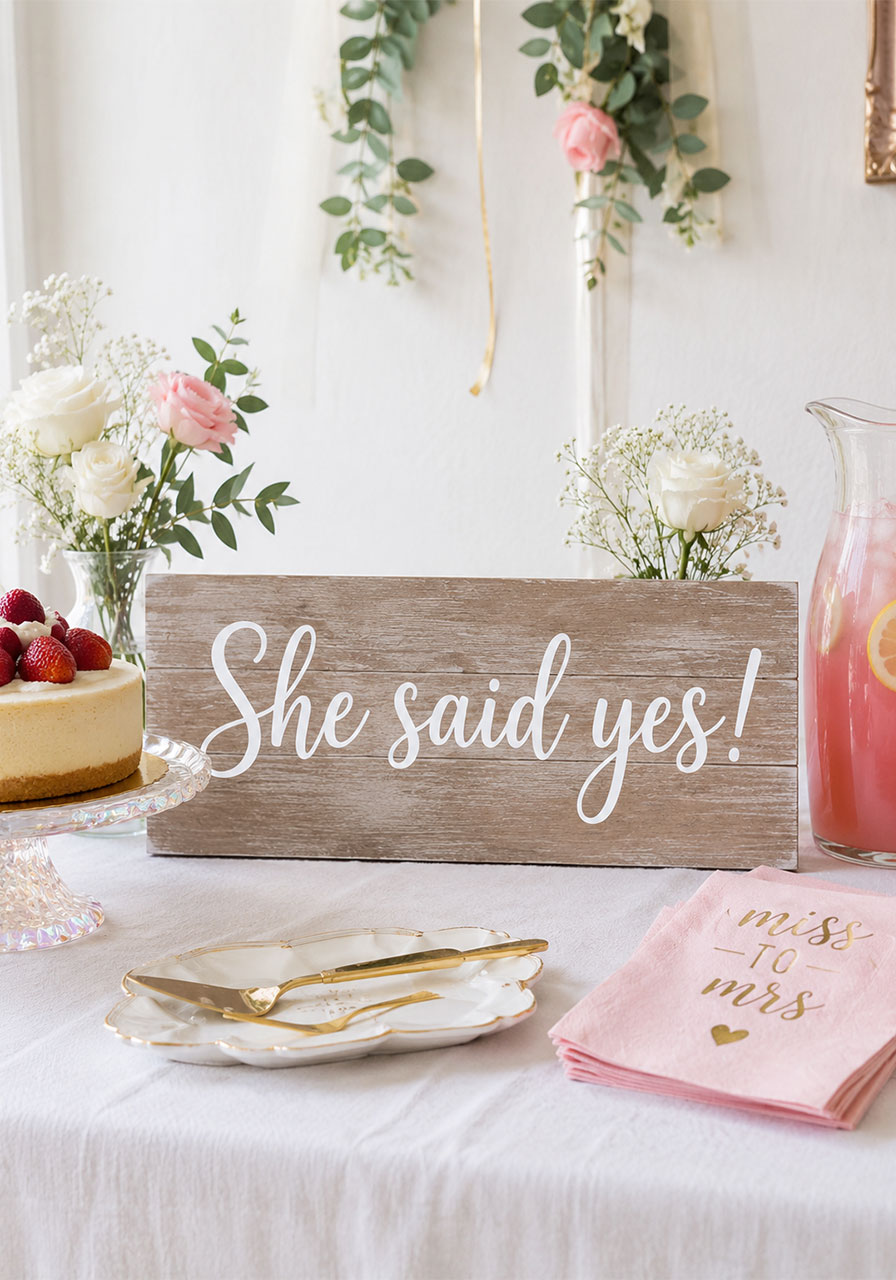
4. “She Said Yes!” Sign
You need a sign. Every bridal shower needs a sign. And this one is pure magic.
A “She Said Yes!” sign is the perfect focal point for your dessert table, gift table, or entry display. Cut the text from adhesive vinyl and apply to a wooden plank, frame, or foam board – and you’ve got something that looks like it came from a boutique decor shop.
Why it’s a hit: It’s one of those pieces that ties the whole room together and photographs beautifully in every single shot.
What You’ll Need:
- White or gold adhesive vinyl
- Wooden sign, picture frame, or foam board
- Transfer tape
- “She Said Yes” SVG file
- Scraper tool
How to Make It:
- Cut your “She Said Yes!” design from adhesive vinyl in Cricut Design Space.
- Weed away all the negative vinyl, leaving just your lettering.
- Apply transfer tape over the design and smooth it down firmly with a scraper.
- Peel the backing off the vinyl, then carefully position it on your sign surface.
- Smooth it down from the center outward to avoid bubbles.
- Slowly peel back the transfer tape, leaving the vinyl letters on the sign.
Pro Tip: Use a chalk marker to add a few hand-lettered flourishes or little hearts around the vinyl text for a mixed-media look that feels super personal.
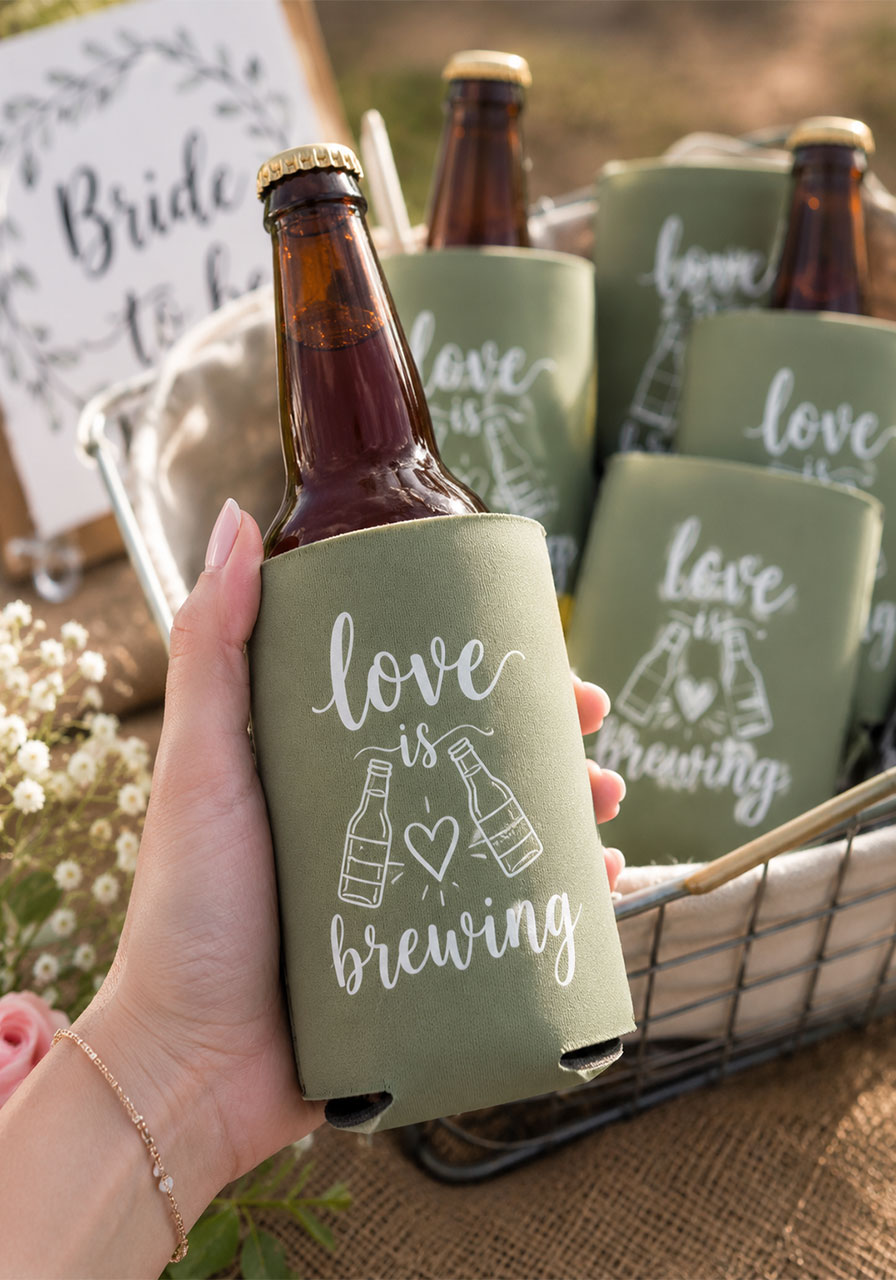
5. “Love Is Brewing” Can Koozies
If you’re hosting a co-ed bridal shower or a more casual backyard celebration, these “Love Is Brewing” can koozies are the favor everyone will actually use – not just stash in a drawer and forget about.
Cut the design from iron-on vinyl and press it onto blank neoprene koozies. Customize the initials of the happy couple and you’ve got a heartfelt, practical party favor that feels premium without costing a fortune.
Why it’s a hit: It’s functional, it’s cute, and it works for any vibe – craft beer fans, soda drinkers, sparkling water obsessives. Everyone can use a koozie.
What You’ll Need:
- Blank neoprene can koozies (sage green, black, or white look great)
- White iron-on vinyl
- EasyPress or iron
- “Love Is Brewing” SVG file
- Pressing pillow or small towel to stuff inside the koozie
How to Make It:
- Customize the SVG design in Design Space to include the couple’s initials.
- Mirror the design before cutting on iron-on vinyl.
- Cut, weed, and position the design on the koozie.
- Stuff the koozie with a small folded towel to create a firm pressing surface.
- Press with your EasyPress at the recommended temperature for iron-on on neoprene (typically 305°F for about 30 seconds).
- Let cool and peel the carrier sheet.
Pro Tip: Package each koozie with a mini bottle of craft beer, a can of sparkling water, or a small bottle of champagne for the sweetest little favor bundle.
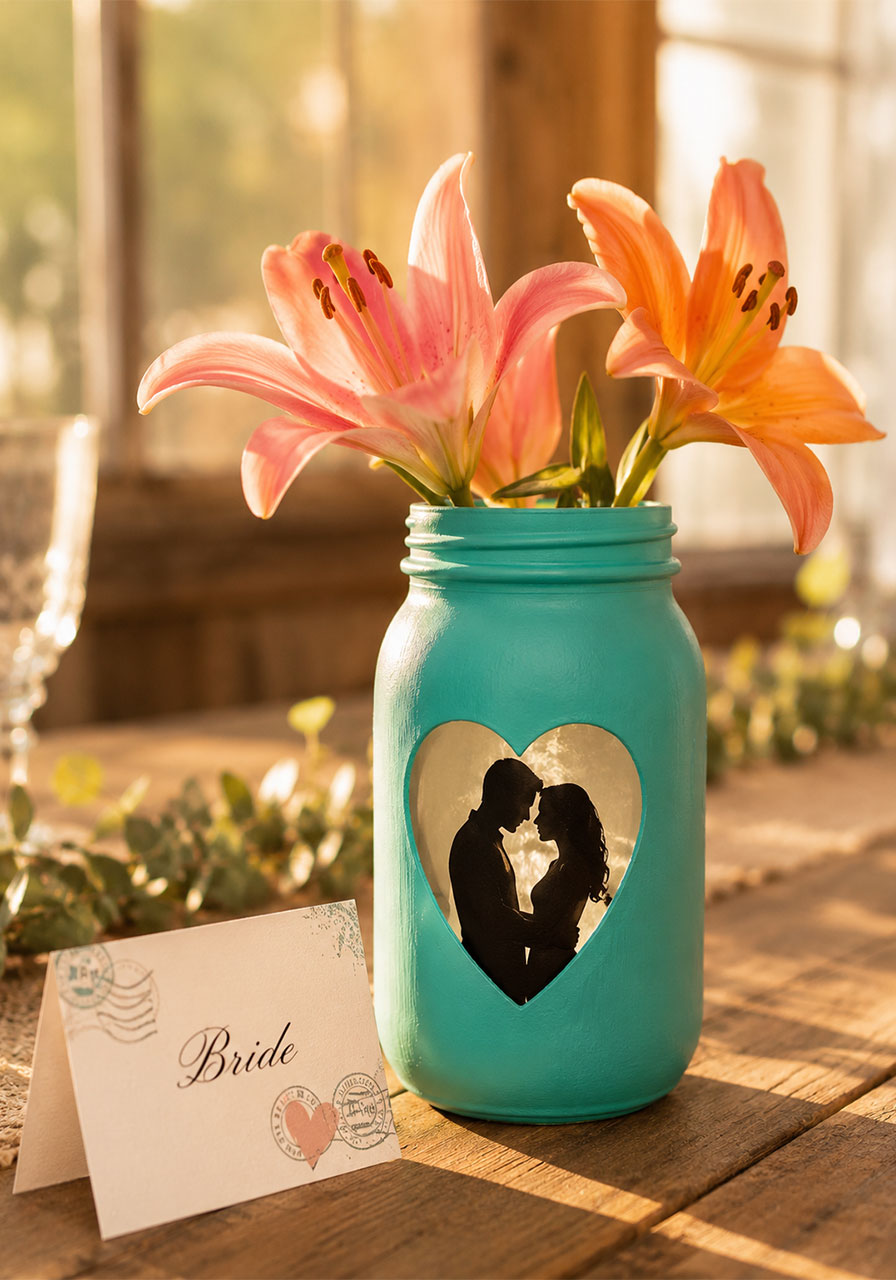
6. Silhouette Mason Jar Centerpieces
These are one of the most searched DIY bridal shower centerpiece ideas on Pinterest – and for good reason. A mason jar painted in your shower’s accent color, with a sweet couple silhouette cut from vinyl applied to the front, is genuinely beautiful.
Fill with fresh flowers, fairy lights, or greenery and you’ve got a table centerpiece that looks like it cost way more than it did.
Why it’s a hit: It’s personal, romantic, and works with virtually any color scheme or theme. You can also make these as gifts for the couple to keep after the shower.
What You’ll Need:
- Mason jars in your preferred size
- Chalk paint or spray paint in your accent color
- Black adhesive vinyl
- Couple silhouette SVG file
- Transfer tape
- Fresh flowers or faux greenery
How to Make It:
- Paint your mason jars in your chosen color and let them dry completely.
- Cut your couple silhouette design from black adhesive vinyl.
- Weed the design and apply transfer tape.
- Center and apply the silhouette to the front of the painted jar.
- Smooth down firmly and remove the transfer tape.
- Fill with flowers, greenery, or fairy lights and place on your tables.
Pro Tip: Cut small matching name cards on your Cricut using the same font as the silhouette jar design. Place one in front of each centerpiece for a fully cohesive table look.
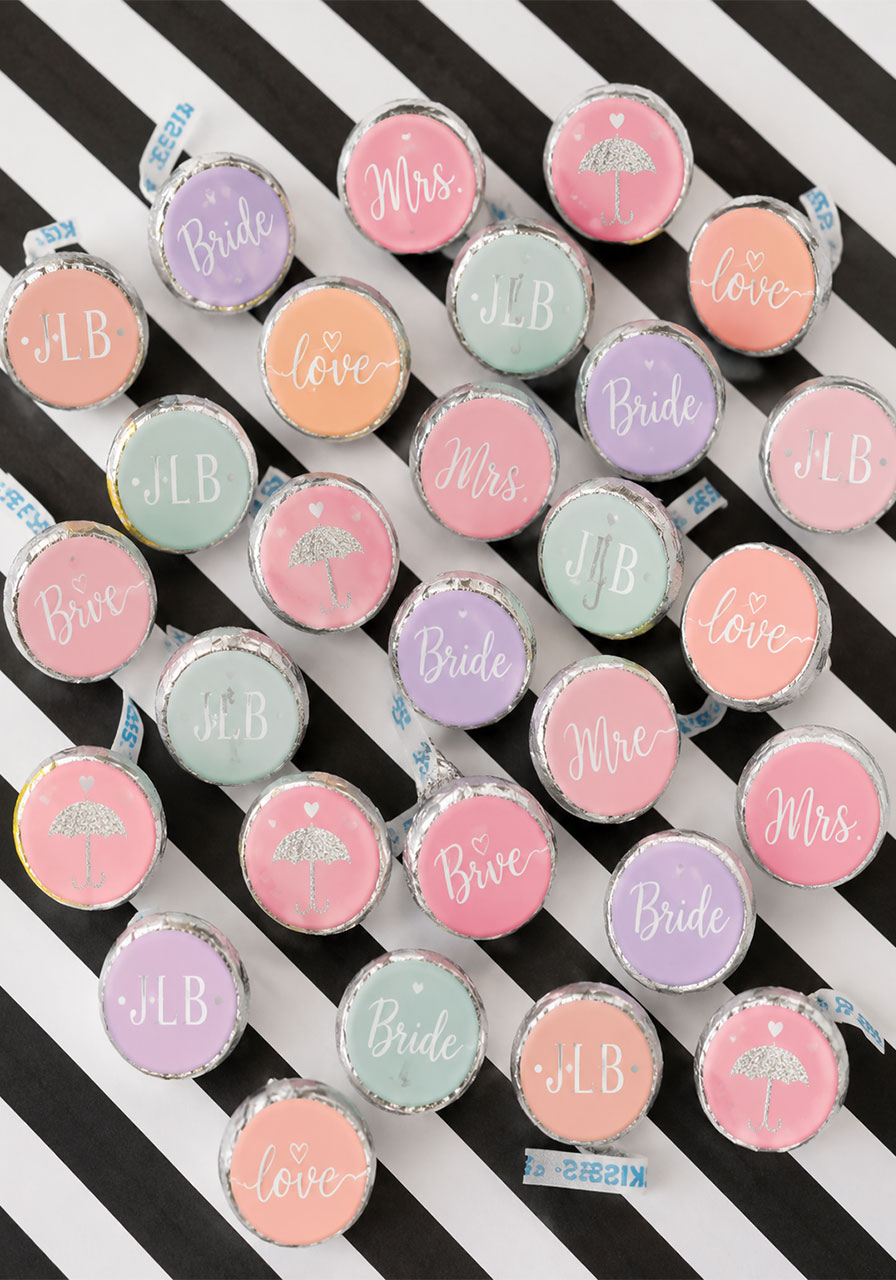
7. Custom Hershey Kiss Labels
This one is such a clever little detail – and guests absolutely love it.
Using Cricut’s Print Then Cut feature, you can design and print tiny circular labels that fit perfectly on the bottom of Hershey Kisses. Add the bride’s name, the wedding date, a little “Sealed with a Kiss” message, or the couple’s monogram. Then stack them in a pretty dish and watch them disappear.
Why it’s a hit: It’s one of those tiny touches that makes guests think you thought of absolutely everything. Minimal effort, maximum “awww” reaction.
What You’ll Need:
- Hershey Kisses (lots of them)
- Printable sticker paper or label paper
- Home printer
- Cricut machine (for Print Then Cut)
- Custom Kiss label SVG/template file
How to Make It:
- Design your labels in Cricut Design Space, sizing them to fit the base of a Hershey Kiss (about 1 inch circle).
- Add your custom text, monogram, or design.
- Use the Print Then Cut function – print your labels first on sticker paper, then let the Cricut cut the circles precisely.
- Peel and stick one label to the base of each Kiss.
- Arrange in a bowl, tiered tray, or small favor bags.
Pro Tip: Make a few different label designs for variety – monograms, little rings, heart designs, and a “She Said Yes!” version. Mix them all together for a fun assorted look.
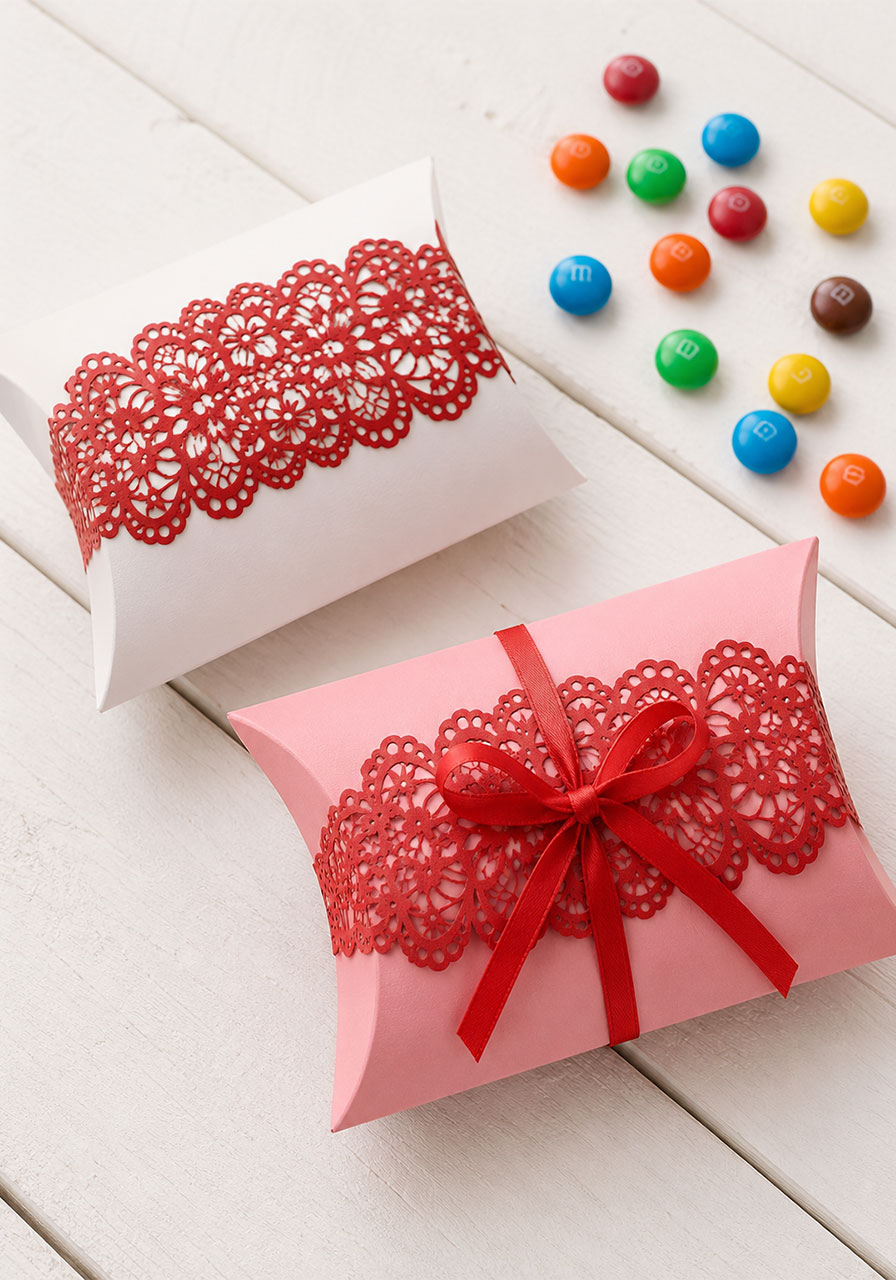
8. Lace-Accented Pillow Boxes
These elegant little pillow-shaped favor boxes look like they belong in a high-end bridal boutique – and you can make them in about 20 minutes with your Cricut.
The Cricut cuts the box shape and the intricate lace border design all in one go. Fold it up, fill it with candy, chocolates, bath salts, or a personalized note, and you’ve got a favor that’s almost too pretty to open. (Almost.)
Why it’s a hit: The lace detail makes these feel genuinely luxurious. They work beautifully for any elegant or feminine shower theme.
What You’ll Need:
- Cardstock in your color palette (ivory, blush, red, or white all look stunning)
- Scoring stylus or scoring wheel
- Bone folder (optional but helpful)
- Double-sided tape or glue
- Pillow box with lace SVG file
- Treats or small gifts to fill them with
How to Make It:
- Load your pillow box design into Design Space – make sure the lace overlay and scoring lines are set up correctly.
- Cut and score in one pass on your Cricut.
- Fold along all scored lines. Use a bone folder for crisp edges.
- Apply double-sided tape to the side tab and press together to form the box shape.
- Leave both curved ends open to add your filling.
- Fill with treats, then gently press the ends closed (they’re designed to stay closed without glue).
Pro Tip: Tie a thin satin ribbon around the center of each pillow box before closing the ends. It adds a polished final touch and makes them feel like tiny wrapped gifts.
9. Floral Monogram Letter
If you need a bridal shower gift that’s also a decorative masterpiece, this is it. A giant monogram letter decorated with felt flowers – all cut on the Cricut – is a stunning gift the bride can display in her new home long after the wedding.
Pick the first initial of the bride’s new last name, cover it in felt blooms in her favorite colors, and you’ve created something genuinely personal and beautiful.
Why it’s a hit: It doubles as a party decoration AND a gift. The bride gets to take it home and it means something.

What You’ll Need:
- Large cardstock or chipboard letter (cut on your Cricut or purchased)
- Felt sheets in 2-3 coordinating colors
- Green felt for leaves
- Hot glue gun and glue sticks
- Felt flower SVG file
- Patterned or solid cardstock for the letter base (optional)
How to Make It:
- Cut your monogram letter from thick cardstock or chipboard using your Cricut.
- Cut all your felt flower pieces and leaves from felt (the Cricut Maker handles felt beautifully).
- Layer the felt circles for each flower, pinching and gluing from the center out to create a bloom shape.
- Make a variety of sizes – 3 to 4 different flower sizes look the most natural.
- Arrange flowers and leaves along one side of the letter before gluing anything down.
- Once happy with the arrangement, hot glue each piece in place.
Pro Tip: Add a few small pearl or rhinestone centers to some of the flowers using hot glue. It takes the design from sweet to absolutely stunning.
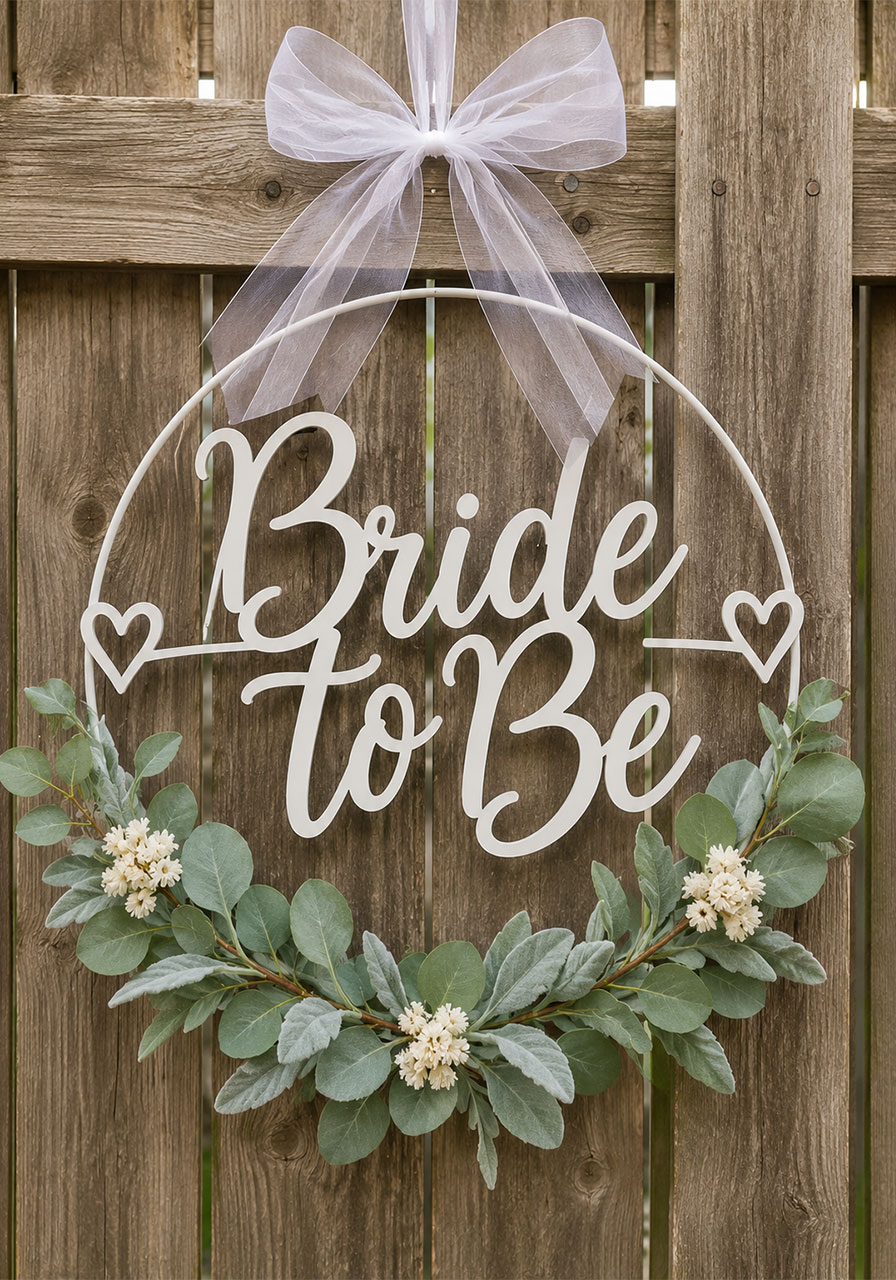
10. “Bride to Be” Hoop Wreath
This ethereal hoop wreath is one of the most gorgeous bridal shower decorations you can make – and it’s surprisingly easy.
Cut the “Bride to Be” lettering from white cardstock or acrylic-look vinyl on your Cricut, attach it to a metal hoop, and add a few sprigs of eucalyptus, a sheer ribbon bow, and some delicate dried flowers. The result is something that looks like it belongs on a wedding inspiration blog.
Why it’s a hit: It’s boho, it’s romantic, and it works as both a door decoration and a backdrop piece. Plus, the bride can use it as home decor after the shower – just remove the greenery and refresh it.
What You’ll Need:
- 12-14 inch metal embroidery hoop or macrame hoop
- White cardstock or white vinyl
- Sheer ribbon
- Faux or fresh eucalyptus sprigs
- Small dried flowers (optional)
- “Bride to Be” SVG file
- Hot glue gun
How to Make It:
- Cut your “Bride to Be” design from white cardstock – use a slightly thicker cardstock so the letters hold their shape.
- Attach the lettering to the center of the hoop using small drops of hot glue.
- Bundle a few eucalyptus sprigs and tuck them into the bottom of the hoop, securing with floral wire or hot glue.
- Add small dried flowers tucked into the greenery for extra texture.
- Tie a big sheer ribbon bow at the top of the hoop for hanging.
- Hang at the entry, above the gift table, or as a photo backdrop.
Pro Tip: Add two tiny laser-cut heart details from your Cricut on either side of the “Bride to Be” lettering for an extra romantic touch.
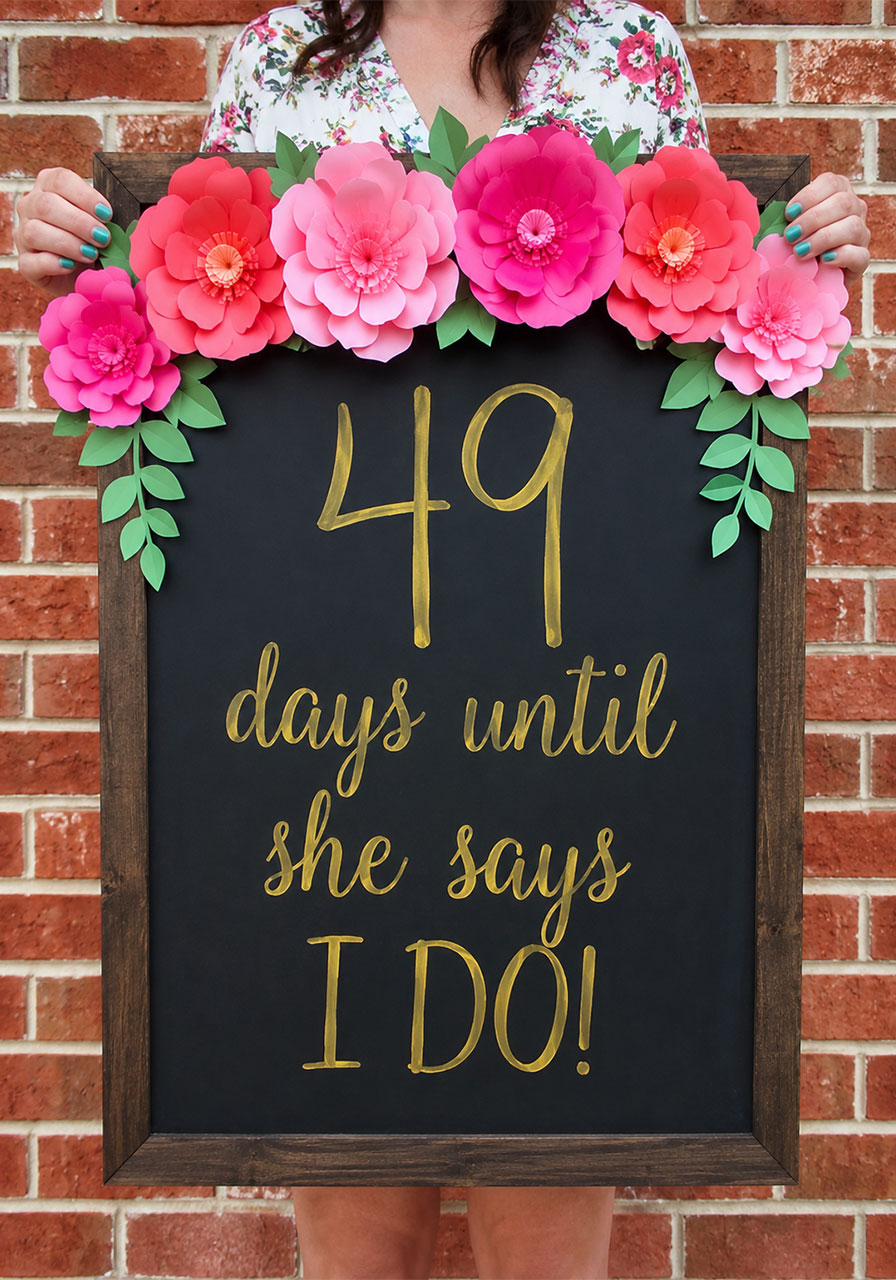
11. Wedding Day Countdown Chalkboard
Is there anything more fun than counting down to the big day? This DIY Countdown Chalkboard is equal parts decoration and entertainment – guests will love reading it and snapping photos with it.
Use your Cricut to cut gold adhesive vinyl lettering and 3D paper flowers for the border. Mount everything on a large chalkboard and write in the number of days. The bride can even take it home and update the countdown every day leading up to the wedding.
Why it’s a hit: It’s interactive, meaningful, and creates one of the best photo ops of the entire shower. Everyone will want a picture with it.
What You’ll Need:
- Large chalkboard or chalkboard-painted wood board
- Gold adhesive vinyl
- Cardstock in 3-4 colors for 3D flowers
- Green cardstock for leaves
- Hot glue gun
- Chalk or chalk markers
- Countdown sign SVG file
How to Make It:
- Cut your text (“days until she says I DO!”) from gold adhesive vinyl.
- Apply the vinyl lettering to the lower half of your chalkboard.
- Cut 3D flower pieces from cardstock using your Cricut – score and shape them into dimensional blooms.
- Arrange flowers in an arch across the top of the board before gluing.
- Hot glue flowers and leaves into place along the top arc.
- Write the current number of days in chalk in the open space in the center.
Pro Tip: Write the number in a chalk marker rather than regular chalk so it stays crisp and legible at the party. You can easily wipe it off and update it at home after the shower.
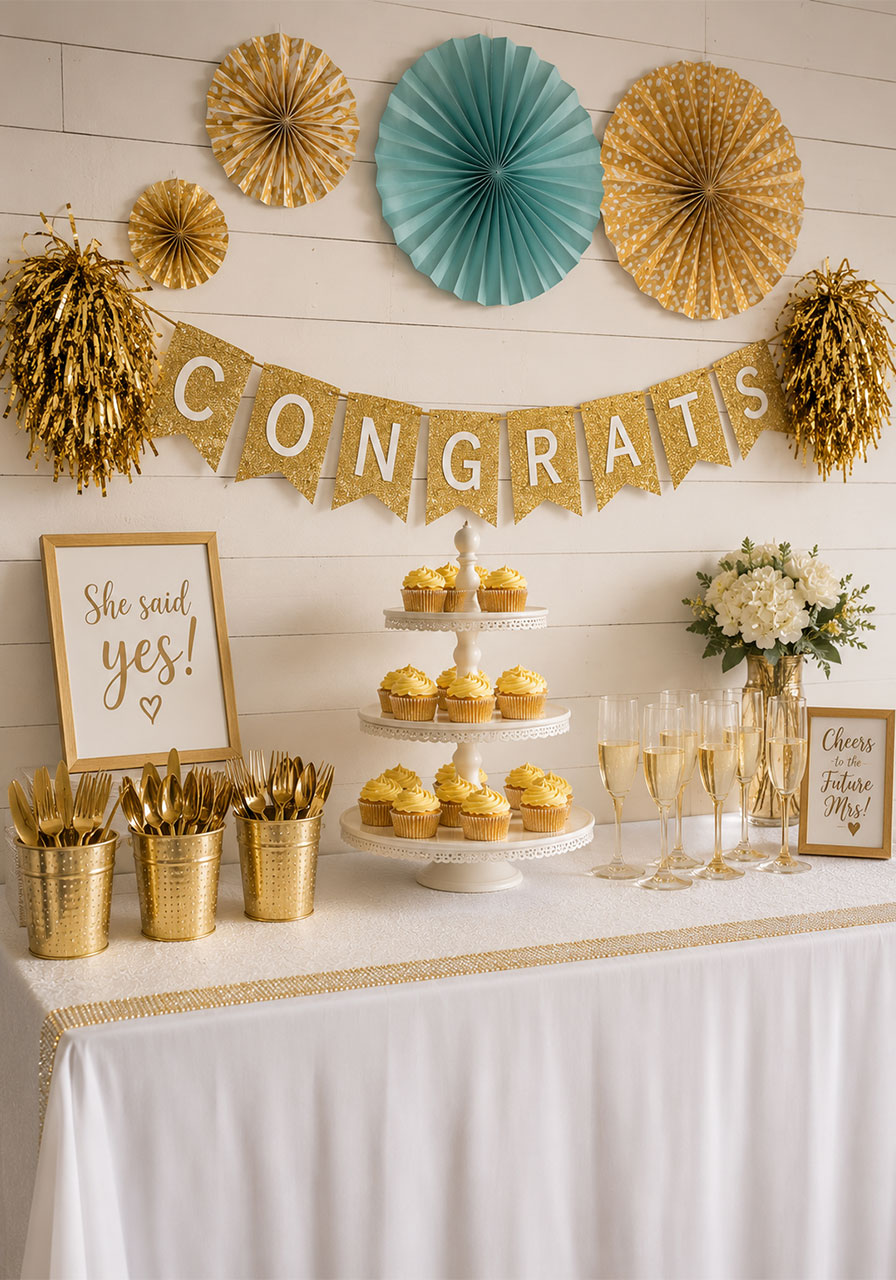
12. Glam Gold Engagement Party Decorations
If bling is the bride’s love language, then go all in on a gold glam theme – and your Cricut is the secret weapon to pulling it off without breaking the bank.
Cut gold glitter vinyl letters for signs, create gold foil pennant banners, and die-cut metallic confetti and table accents. Everything shimmers. Everything sparkles. It’s perfect.
Why it’s a hit: Gold and glam never go out of style, and it photographs absolutely beautifully – especially with champagne flutes and a well-styled dessert table in the background.
What You’ll Need:
- Gold glitter adhesive vinyl
- White or ivory cardstock for signs and pennants
- Gold foil cardstock
- Metallic gold ribbon
- Gold engagement party SVG files
- Transfer tape
How to Make It:
- Cut “Congrats,” “She Said Yes,” or the couple’s names from gold glitter vinyl.
- Apply to white boards or foam core signs using transfer tape.
- Cut pennant triangles from gold foil cardstock and string them on metallic ribbon for a banner.
- Cut confetti shapes (rings, hearts, champagne glasses) from gold and ivory cardstock and scatter on tables.
- Style everything together with gold candlesticks, champagne flutes, and macarons or cupcakes.
Pro Tip: Mix matte gold with glitter gold pieces for a more layered, sophisticated look. All-glitter can feel a little much – balance is everything.
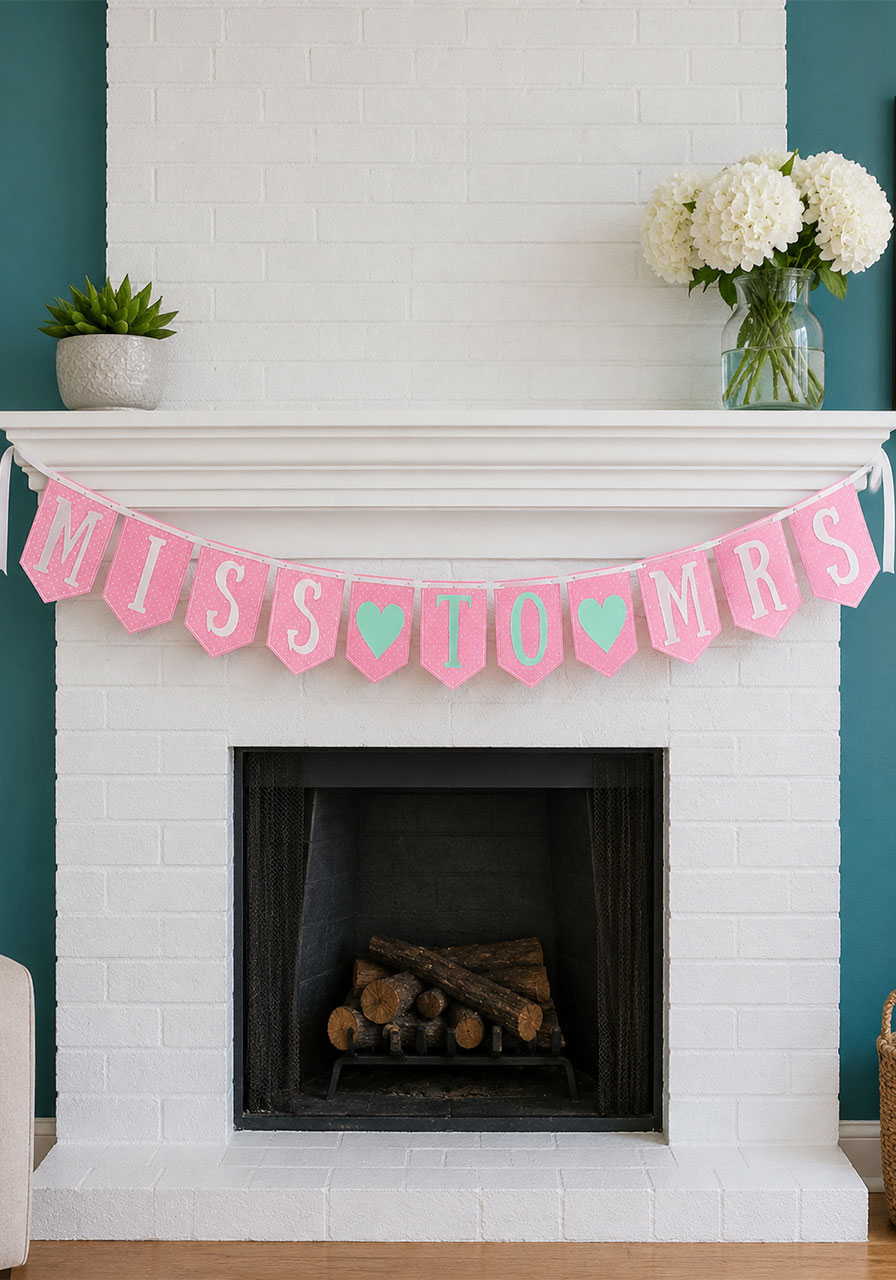
13. “Miss to Mrs.” Banner
Simple, sweet, and completely customizable – the “Miss to Mrs.” banner is a bridal shower classic for a reason.
With your Cricut, you can cut letter tiles from patterned cardstock, add coordinating vinyl accents, and string it all together in your chosen colors. Hang it on the mantle, above the dessert table, or as a photo backdrop.
Why it’s a hit: It clearly sets the scene the moment guests walk in. Instantly everyone knows what kind of party this is – and the excitement starts immediately.
What You’ll Need:
- Patterned or solid cardstock in your color palette
- Adhesive vinyl for letters (or use a contrasting cardstock)
- Ribbon or twine
- Hole punch
- “Miss to Mrs.” banner SVG file
How to Make It:
- Cut your banner flag shapes (squares, hexagons, or pennants) from patterned cardstock.
- Cut individual letters from a contrasting cardstock or vinyl.
- Adhere each letter to its banner flag.
- Hole-punch the top corners of each flag.
- Thread through ribbon or twine, spacing flags evenly.
- Hang and adjust until it’s perfectly level.
Pro Tip: Add a small heart or ring charm cut from vinyl between the “Miss” and “to” and “Mrs.” sections for an extra sweet detail.
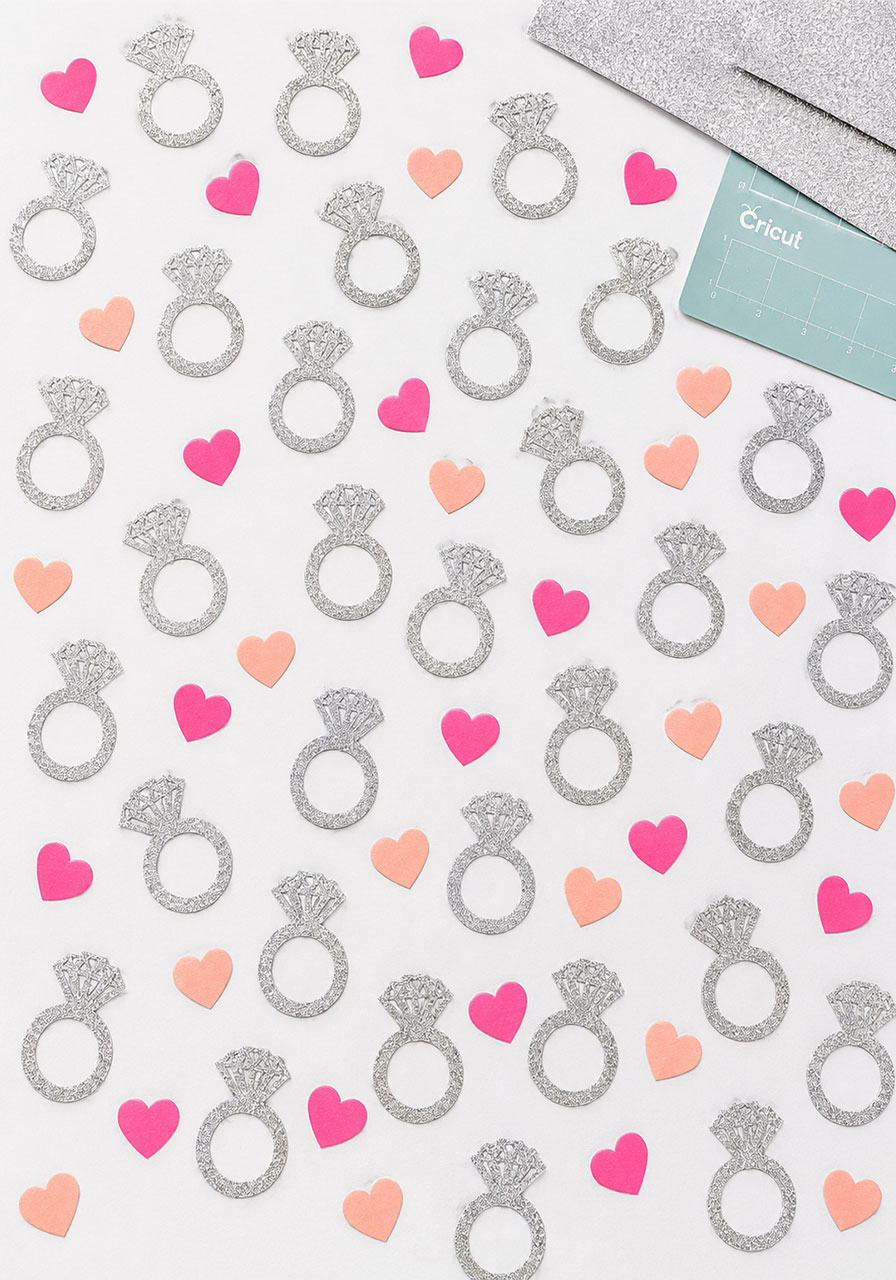
14. Engagement Ring Confetti
Confetti on tables is one of those little touches that makes everything feel festive – and when it’s shaped like diamond rings, it’s extra on-theme and adorable.
Cut engagement ring shapes from silver glitter cardstock and small hearts from hot pink and peach cardstock on your Cricut. Scatter liberally. Guests will love it.
Why it’s a hit: It’s an easy, inexpensive detail that makes the whole table look intentionally styled. Takes about 15 minutes to make and adds so much visual impact.
What You’ll Need:
- Silver glitter cardstock
- Hot pink and peach cardstock
- Engagement ring and heart SVG files
- Cricut cutting mat
How to Make It:
- Load your ring and heart SVGs into Design Space.
- Size them small – about 1-1.5 inches for confetti scale.
- Cut a large batch from glitter and colored cardstock.
- Collect all the little pieces and scatter across tablecloths, trays, and centerpieces.
Pro Tip: Put some confetti inside a clear balloon filled with air for a gorgeous confetti balloon centerpiece. The Cricut-cut pieces are light enough that they float around inside beautifully.
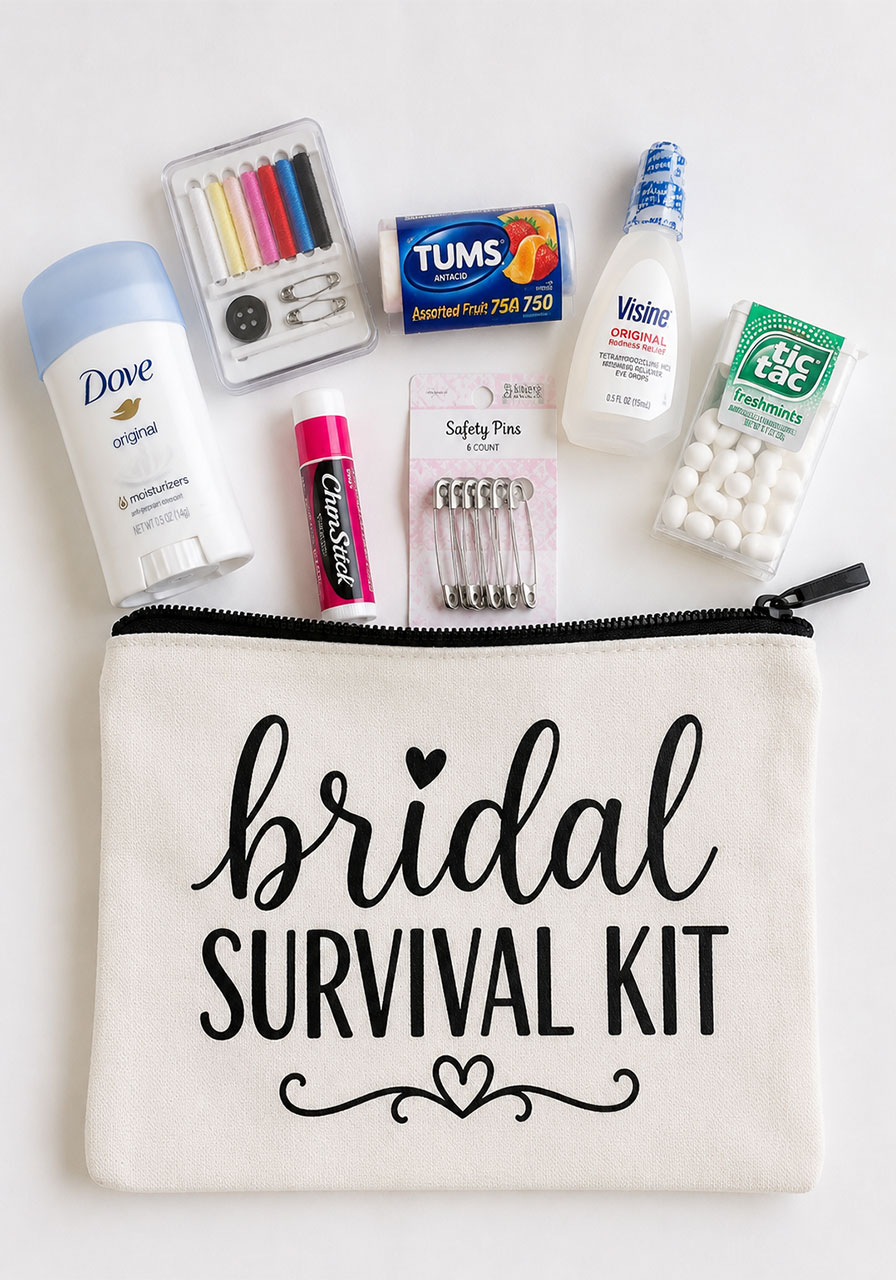
15. Bridal Survival Kit Bag
This is possibly the most thoughtful bridal shower gift you can give – and the Cricut makes the presentation absolutely perfect.
Use iron-on vinyl to label a small canvas cosmetic bag with “Bridal Survival Kit” in a beautiful script font, then fill it with wedding-day essentials: a travel deodorant, a mini sewing kit, stain remover pen, eye drops, safety pins, clear nail polish, blotting papers, and breath mints. Every single bride will use this on her wedding day.
Why it’s a hit: It’s practical, personal, and genuinely useful. The bag itself is adorable, and the contents show how thoughtfully the gift was put together.
What You’ll Need:
- Small canvas zip pouch or cosmetic bag (white or cream looks best)
- Black iron-on vinyl
- EasyPress or iron
- “Bridal Survival Kit” SVG file
- Small travel-sized essentials to fill the bag
How to Make It:
- Cut your “Bridal Survival Kit” design from black iron-on vinyl (remember to mirror first).
- Weed the design carefully – the script font may have tiny details to weed around.
- Press onto the canvas bag using your EasyPress at 315°F for about 30 seconds.
- Let cool and peel the carrier sheet.
- Fill with carefully chosen travel-sized bridal essentials.
- Tie with a ribbon for a polished gift presentation.
Pro Tip: Write a small handwritten note card listing each item in the bag and why it might save the day. Tuck it inside. It’s a sweet extra touch that makes the gift feel even more personal.
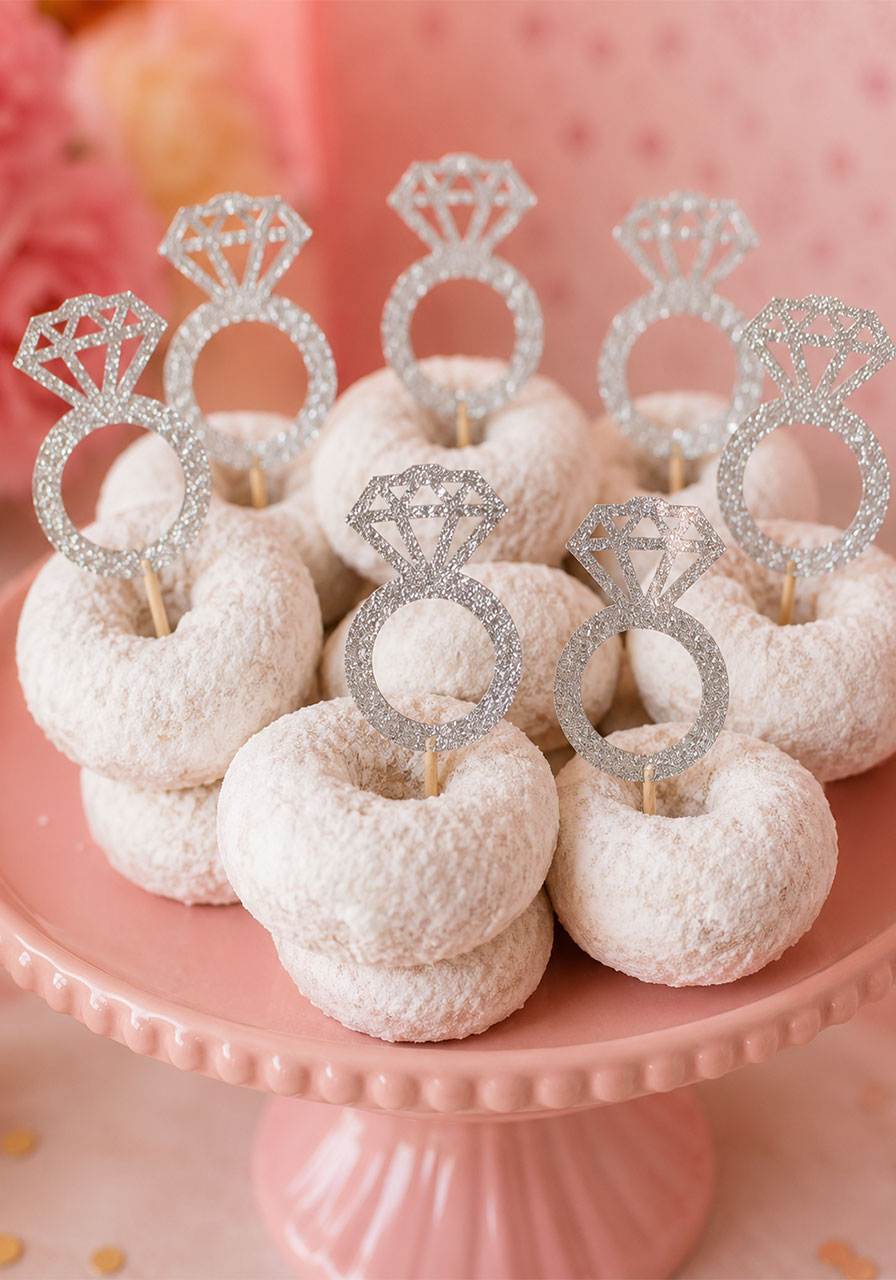
16. Diamond Donut Wedding Ring Toppers
This is the most genius bridal shower food idea – and it requires almost zero cooking skill.
Buy powdered sugar donuts from the grocery store. Cut diamond ring shapes from silver glitter cardstock on your Cricut. Stick them into the donuts. Done. You’ve just created the most adorable bridal shower treat display that will have everyone gasping and reaching for their phones.
Why it’s a hit: It’s simple, cheap, creative, and absolutely photo-worthy. Everyone will think you’re a party planning genius.
What You’ll Need:
- Powdered sugar donuts (mini or regular size)
- Silver glitter cardstock
- Diamond ring SVG file
- Toothpicks or small wooden skewers
- Hot glue gun (to attach toppers to picks)
How to Make It:
- Cut diamond ring shapes from glitter cardstock on your Cricut.
- Hot glue each ring shape to the top of a toothpick or mini skewer.
- Let dry completely.
- Press one topper into each powdered donut.
- Arrange on a tiered tray or pretty platter for display.
Pro Tip: Pair these with a little sign that reads “She Found Her Diamond” – cut it on your Cricut, of course – and place it in front of the donut display. Cue all the happy tears.
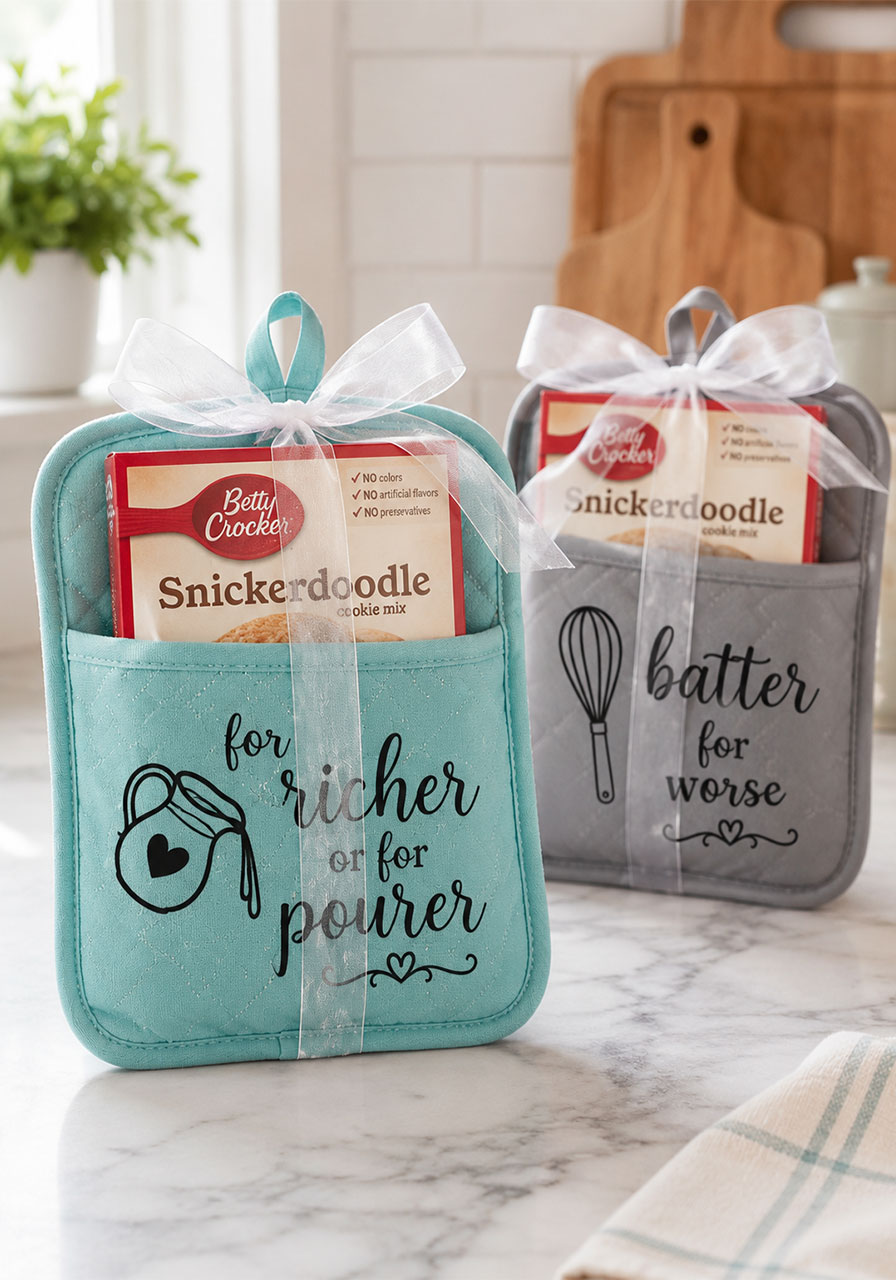
17. “For Richer or For Pourer” Pot Holder Cake Mix Favor
This creative favor idea combines two things every newlywed needs: something sweet and something practical.
Use your Cricut to cut and apply a cute “For Richer or For Pourer” iron-on design to a simple pot holder, then tuck a boxed cake mix into the pocket. It’s a bridal shower favor that’s both adorable and genuinely useful in the new kitchen.
Why it’s a hit: It’s clever, it’s funny in the best way, and it’s something guests will actually use at home. The punny phrase gets everyone smiling every time.
What You’ll Need:
- Plain pot holders with a pocket (light blue or gray look great)
- Black iron-on vinyl
- EasyPress or iron
- “For Richer or For Pourer” SVG file
- Small box of cake mix or cookie mix to tuck inside
- Ribbon for gift presentation
How to Make It:
- Cut your design from black iron-on vinyl (mirrored).
- Weed the design carefully.
- Press onto the front of the pot holder using your EasyPress.
- Let cool and peel the carrier sheet.
- Slide a box of cake mix into the pocket of the pot holder.
- Tie a ribbon around the whole bundle and add a small tag.
Pro Tip: Make a second pot holder for the same set with “Batter Together” and give them as a pair – it makes an even sweeter favor bundle that guests will love.
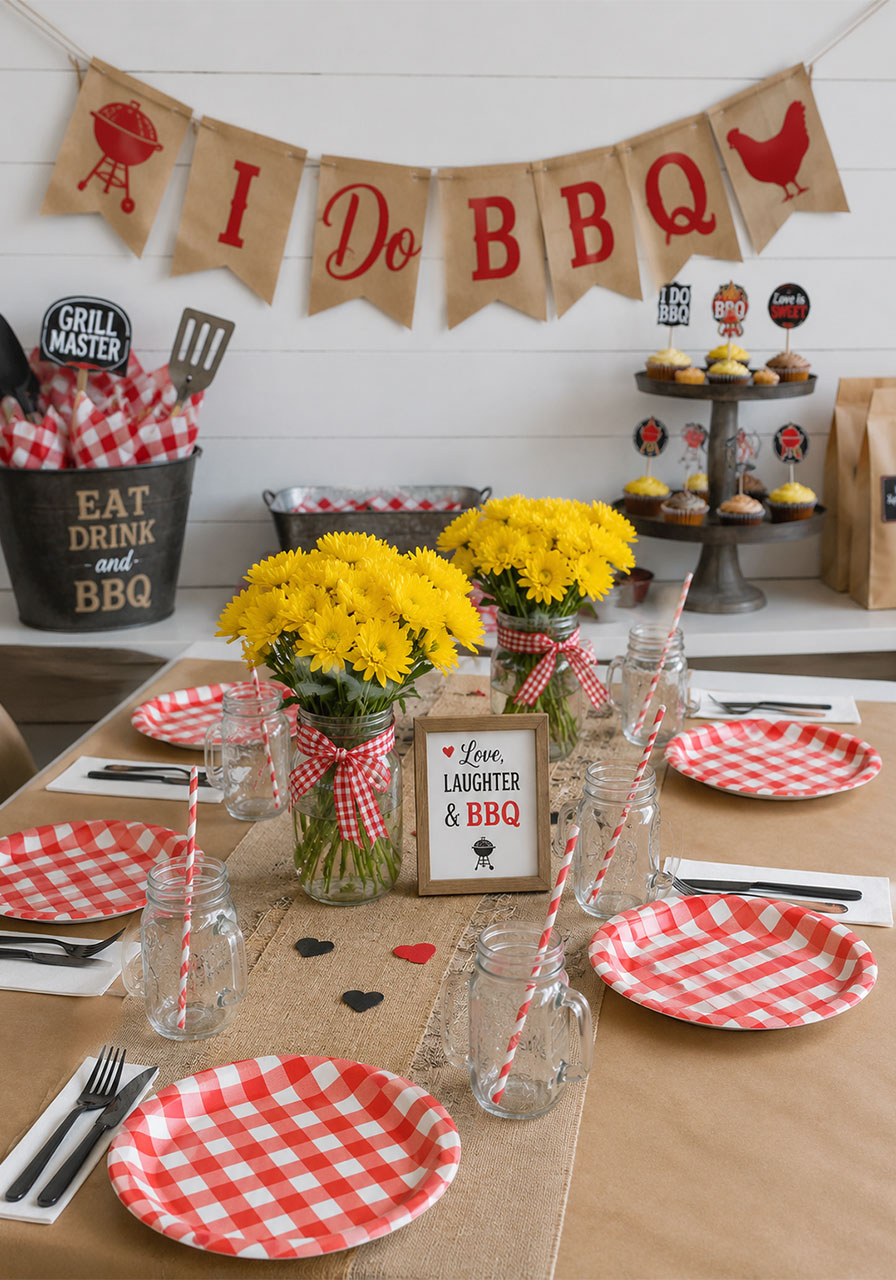
18. BBQ Co-Ed Shower Decorations
Not every bridal shower is a pastel pink tea party – and thank goodness for that. A co-ed BBQ couples shower is one of the most fun party formats out there, and your Cricut can handle the rustic, playful theme perfectly.
Cut kraft paper banners, BBQ-themed burlap flags, plaid table runner designs, and mason jar labels. Think red gingham, kraft paper, and wood tones – with a cheerful “I Do BBQ” vibe throughout.
Why it’s a hit: Co-ed showers are increasingly popular, and a BBQ theme keeps it relaxed and fun for everyone – not just the bridal party crowd.
What You’ll Need:
- Kraft paper or burlap for banners
- Red or black adhesive vinyl for lettering
- Mason jars for centerpieces
- Red gingham ribbon
- BBQ bridal shower SVG file pack
- Fresh yellow flowers (sunflowers or daisies look perfect)
How to Make It:
- Cut your BBQ-themed banners and signage from kraft paper using your Cricut.
- Cut lettering and icons (little BBQ grills, chickens, “I Do BBQ” text) from red or black vinyl.
- Apply vinyl designs to your kraft paper pieces and mason jars.
- Fill mason jars with bright yellow flowers and tie with gingham ribbon.
- Set a kraft paper table runner down the center of the table.
- Hang burlap flags and banner above the food and beverage stations.
Pro Tip: Create a DIY “Brisket Bar” or “Hot Dog Station” label sign on kraft paper with your Cricut. It ties the decor into the food display and makes everything feel intentional and cohesive.
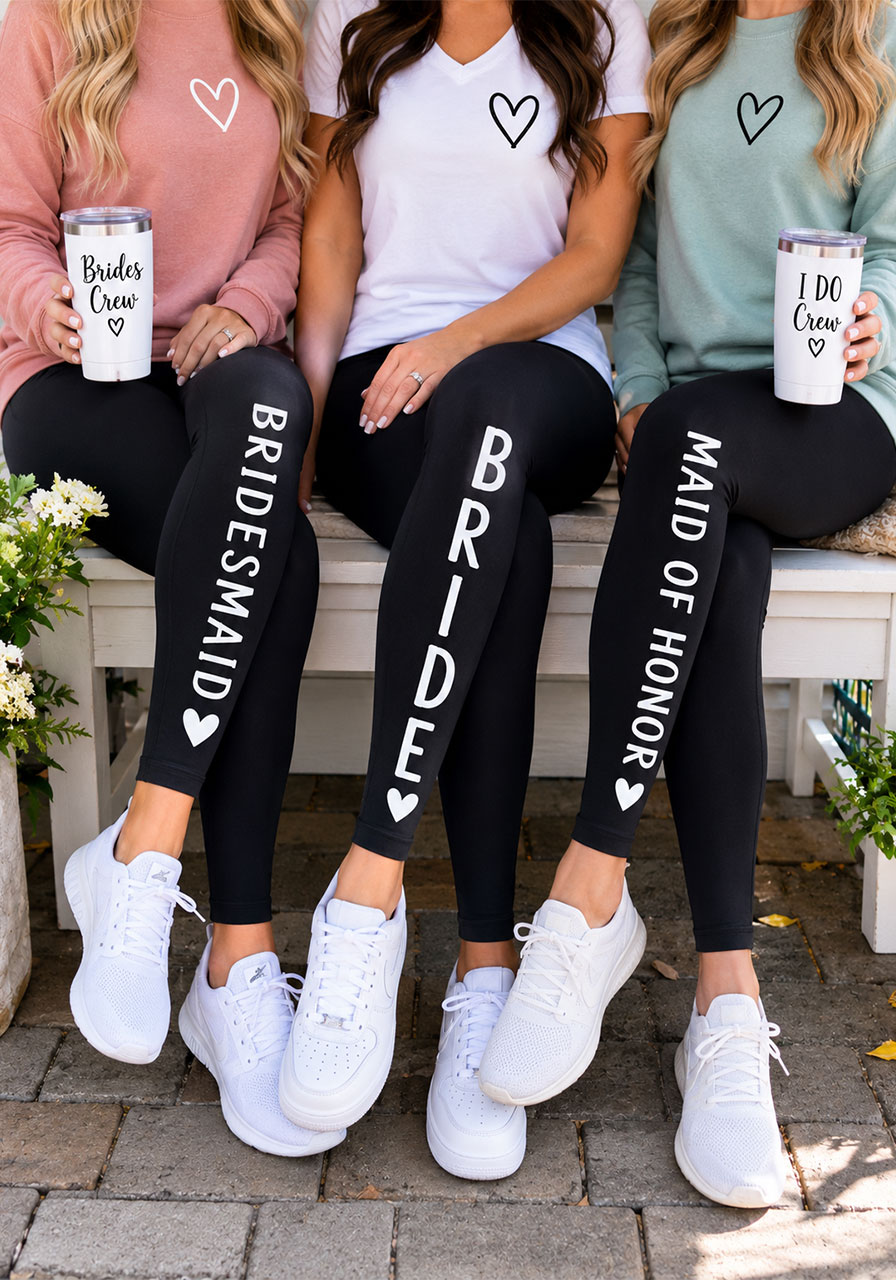
19. Bridal Party Iron-On Leggings
Matching shirts are great – but matching leggings? That’s next level. Iron-on “Bridesmaid,” “Maid of Honor,” and “Bride” designs down the leg of black leggings is an unexpected, hilarious, and genuinely adorable group gift idea.
Guests can wear them to a morning-of brunch, a bachelorette weekend, or just around the house – and every time they put them on, they’ll think of the wedding.
Why it’s a hit: Nobody expects leggings as a bridal party gift, which makes it instantly memorable. And the personalization means every single person gets something just for them.
What You’ll Need:
- Black leggings for each person (match sizing carefully)
- White or gold glitter iron-on vinyl
- EasyPress or iron
- Bridal party leggings SVG file
- Pressing pillow or firm towel
How to Make It:
- Create vertical text designs reading “Bridesmaid,” “Bride,” “Maid of Honor,” etc. in Design Space.
- Mirror and cut from iron-on vinyl.
- Weed the design and position down the outer seam of the legging leg.
- Slide a pressing pillow inside the legging leg to create a firm, flat pressing surface.
- Press at the correct temperature for iron-on on spandex/athletic fabric (typically 320°F, medium pressure).
- Let cool fully before peeling the carrier sheet.
Pro Tip: Use a lower temperature and test on a hidden area of the leggings first – synthetic fabrics can be heat-sensitive. Always do a test press before committing to the full design.
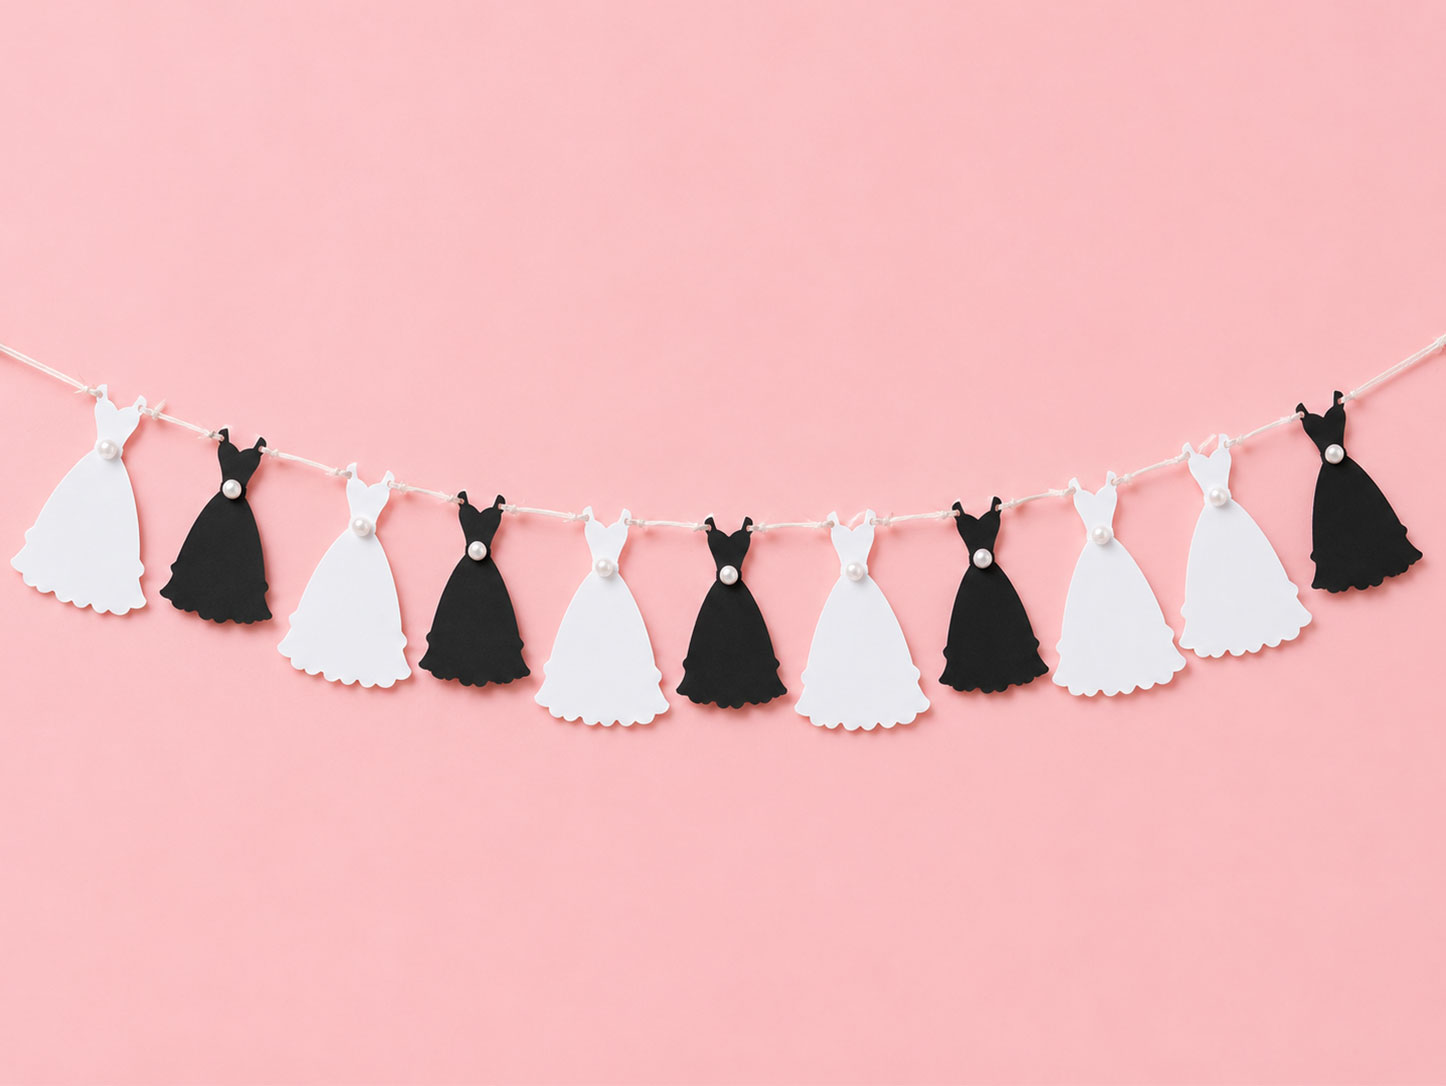
20. Mini Wedding Dress Bunting
Adorable doesn’t even begin to cover it. This mini wedding dress bunting – tiny little wedding gown silhouettes strung on twine – is one of the most charming bridal shower decorations you’ll ever make.
The Cricut cuts all the little dress shapes quickly and consistently, so you can make as much bunting as you need without any two pieces looking wonky. Hang above the gift table, across a window, or as part of a multi-layer backdrop display.
Why it’s a hit: It’s whimsical, it’s unique, and it screams “bridal shower” in the most elegant possible way. Guests will be charmed immediately.
What You’ll Need:
- White and ivory cardstock
- Thin twine or ribbon
- Mini hole punch
- Mini wedding dress SVG file
- Optional: tiny pearl or rhinestone embellishments
How to Make It:
- Load the mini wedding dress SVG into Design Space and size to about 3-4 inches tall.
- Cut a large batch from white and ivory cardstock (alternating looks beautiful).
- Punch small holes in the top corner of each dress shape.
- Thread onto twine, spacing evenly with small knots to keep them in place.
- Optional: add a tiny rhinestone to the “waist” of each dress with a dot of glue.
- Hang and style to your liking.
Pro Tip: String a second line of matching black bridesmaid dress silhouettes right below the white wedding dress line. The contrast between the wedding dress row and the bridesmaid dress row is stunning – and so meaningful.
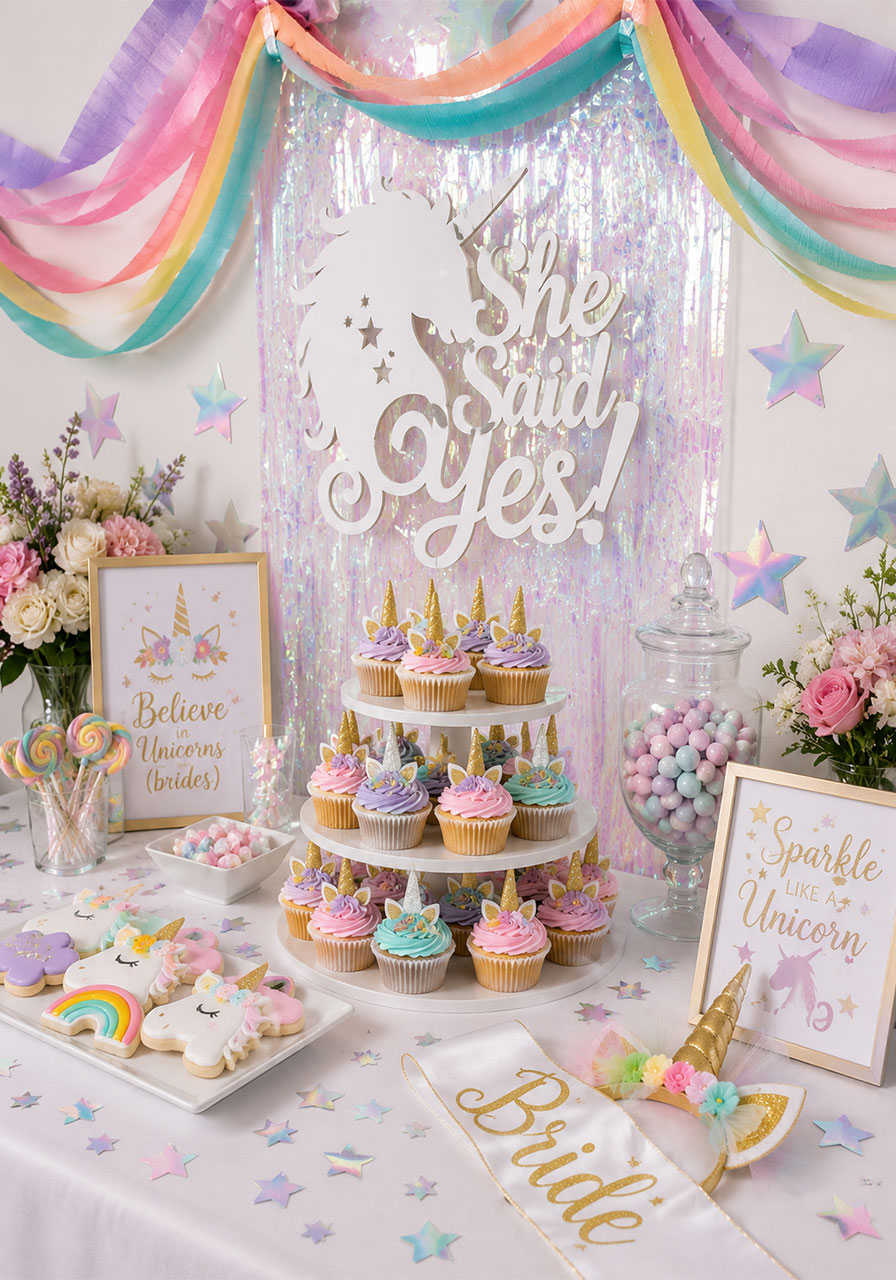
21. Unicorn Bridal Shower Decorations
Is it a little extra? Yes. Is it absolutely perfect for the right bride? Also yes.
A unicorn bridal shower theme is magical, playful, and gives you endless creative freedom. Use your Cricut to cut unicorn horns, iridescent star confetti, rainbow swag banners, and dreamy pastel table settings. Add a “She’s Getting Married” sign with a unicorn silhouette and you’ve created a shower that no one will ever forget.
Why it’s a hit: It’s unexpected, joyful, and gives guests full permission to be silly and playful. Perfect for the bride who doesn’t take herself too seriously.
What You’ll Need:
- Iridescent and pastel cardstock in rainbow colors
- Gold glitter vinyl for horns and stars
- Holographic adhesive vinyl
- Unicorn bridal shower SVG file pack
- Tulle or crepe paper streamers in pastel colors
How to Make It:
- Cut unicorn horn shapes from gold glitter cardstock for use as cupcake toppers, photo props, or headbands.
- Cut iridescent star confetti to scatter on tables.
- Make pastel rainbow pennant banners from holographic and pastel cardstock.
- Cut a large “She Said Yes!” sign with a unicorn silhouette from white cardstock and apply gold vinyl lettering.
- Style your dessert table with a pastel, rainbow, and gold color scheme throughout.
Pro Tip: Make gold glitter unicorn horn headbands for the bridal party as a party favor – cut the horn shape from cardstock, add glitter vinyl, and attach to a plain headband with hot glue. They’re ridiculous and everyone will wear them immediately.
3 Bonus Ideas to Make Your Shower Extra Special
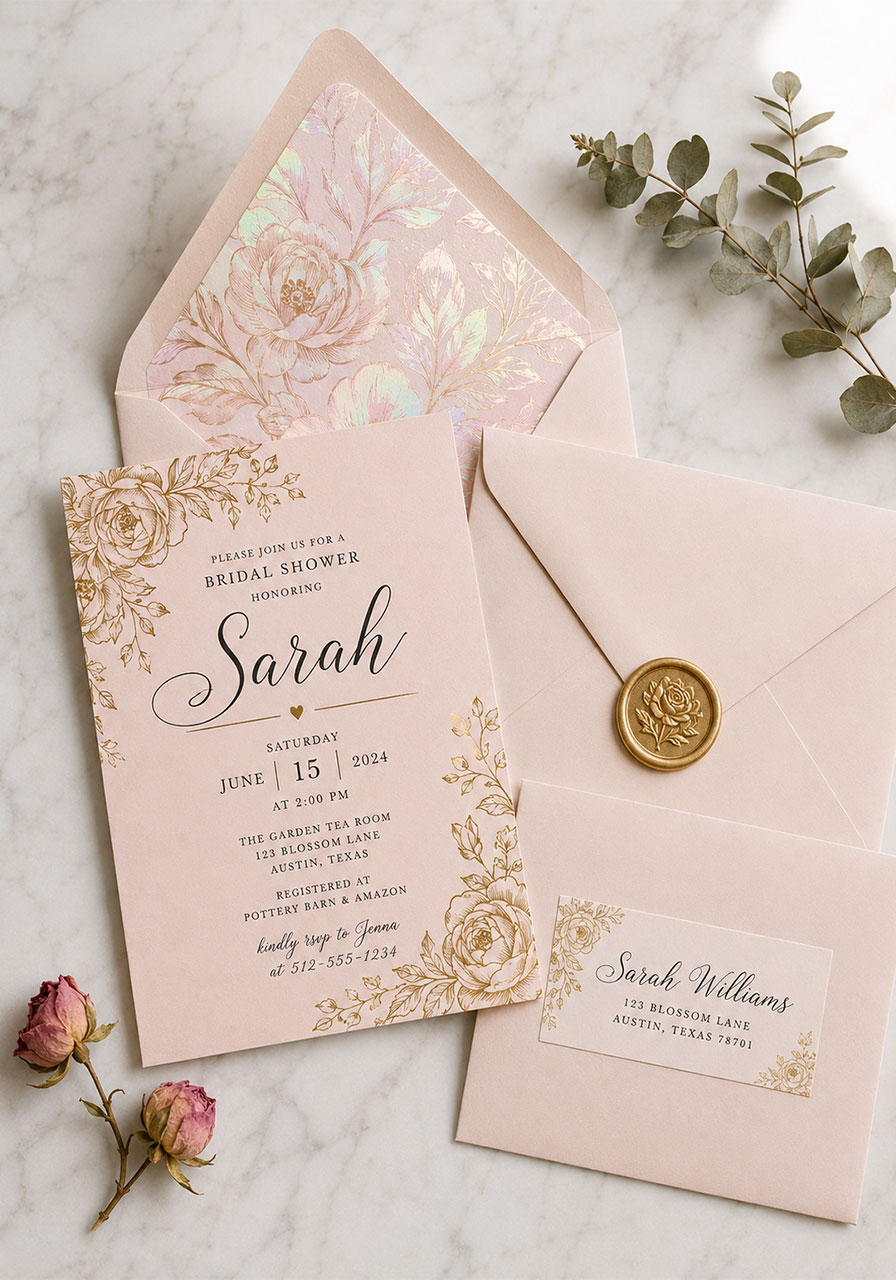
22. Custom Bridal Shower Invitations
Why stop at decorations when you can DIY the invitations too?
Use Cricut’s Print Then Cut feature to design and cut gorgeous custom bridal shower invitations at home. Add die-cut envelope liners, custom address labels, and envelope seals – all cut on your machine – for a full stationery suite that looks like it came from a professional print shop.
A complete DIY invitation suite can save you hundreds of dollars compared to ordering from a boutique stationer – and your guests will have no idea you made them yourself.
Pro Tip: Use vellum paper as an overlay on top of a cardstock invite for an extra luxurious, layered effect. The Cricut cuts vellum beautifully with the right settings.
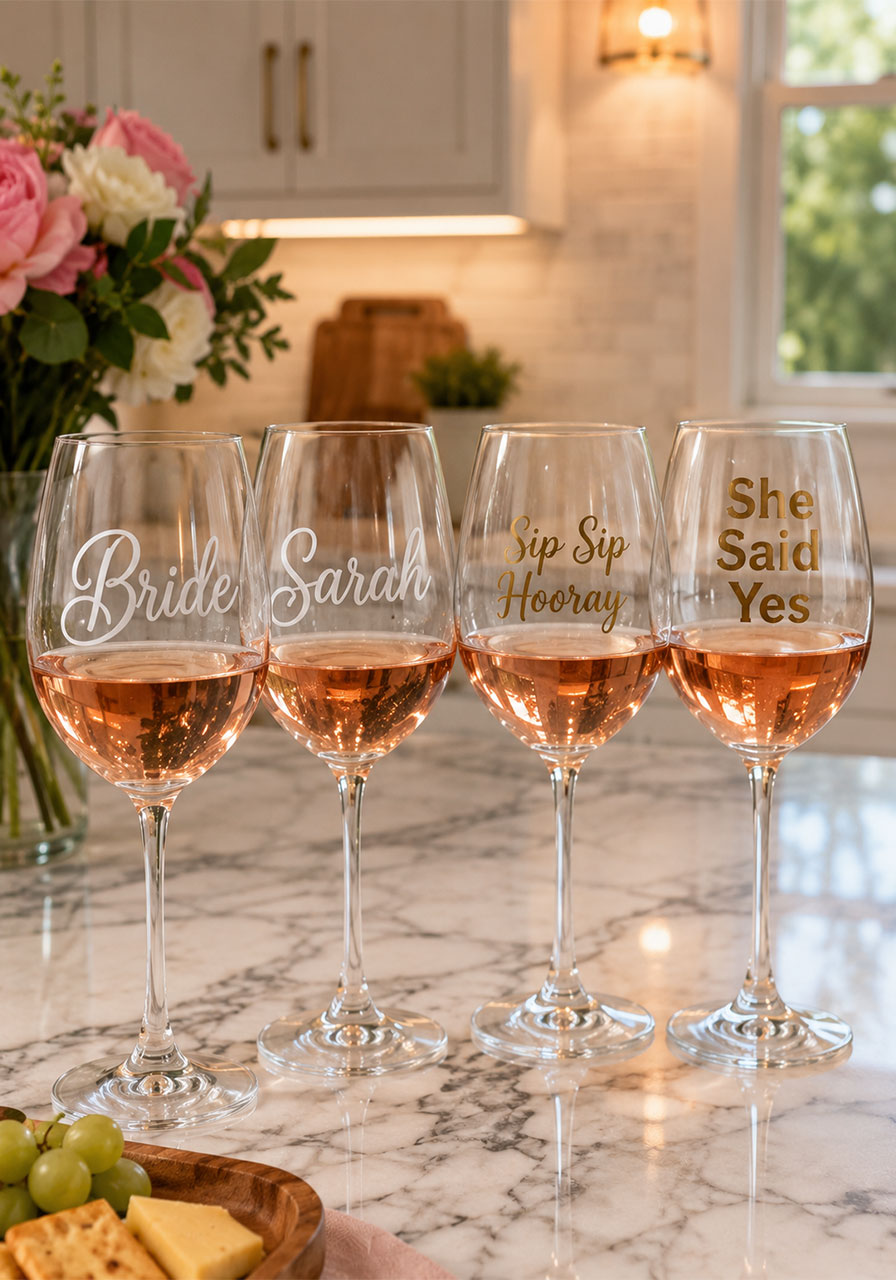
23. Personalized Wine Glasses
Personalized stemware is always a crowd-pleaser – and with your Cricut and a little adhesive vinyl, you can customize an entire set of wine glasses in under an hour.
Add each guest’s name to a glass, create a custom “Bride” glass for the guest of honor, or cut fun phrases like “Sip Sip Hooray” and “She Said Yes” for a coordinated set.
The glasses double as both decor and party favors – guests take their personalized glass home at the end of the night.
Pro Tip: Use Cricut’s Infusible Ink or permanent adhesive vinyl for wine glasses – it holds up much better than standard vinyl when the glasses are washed.
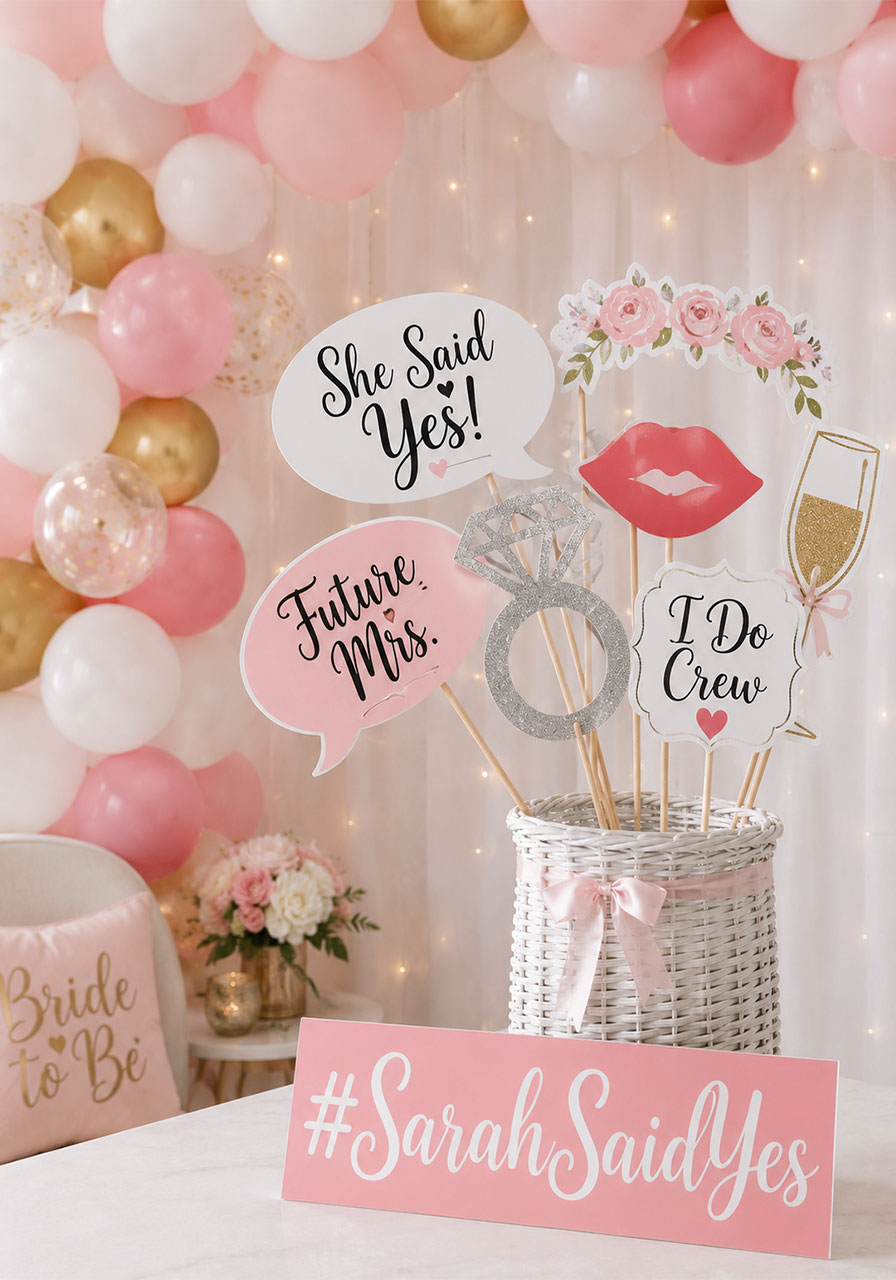
24. DIY Photo Booth Props
A photo booth is the most reliable party entertainment idea that exists – and your Cricut can cut an entire set of bridal shower props in one afternoon.
Cut speech bubbles (“She Said Yes!”, “Future Mrs.”, “I Do Crew”), rings, hearts, lips, flower crowns, and champagne glass shapes from cardstock and glitter vinyl. Glue them to wooden dowels and place them in a pretty vase or bucket near a designated photo corner.
Set up a simple backdrop (a balloon arch, a flower wall, or even just a pretty curtain) and let guests go wild. The photos will be some of the best memories from the whole celebration.
Pro Tip: Create a custom hashtag for the shower – something like #SarahSaidYes – and cut it as a prop sign so every guest’s photo gets tagged consistently. It’s a sweet way to create a shared digital album of the day.
Final Thoughts
Here’s the thing about DIY bridal shower decorations with your Cricut: the results look so polished and intentional that guests will assume you spent a fortune – when really, you spent an afternoon.
That’s the magic of it. A Cricut machine gives you the ability to create personalized, beautifully detailed decorations, favors, and gifts at a fraction of the boutique price. And more importantly, everything you make carries a little piece of your heart in it – because you made it yourself, for someone you love.
Pick a few ideas that match your theme and budget, get your supplies together, and get crafting. The bride is going to absolutely love it.
And hey – save a few of these ideas for the bachelorette party too. Just saying.