There’s something magical about a tea party. Maybe it’s the delicate teacups. Maybe it’s the tiny sandwiches that somehow taste better than regular-sized ones. Or maybe it’s just the excuse to put on your prettiest outfit and sip something warm while catching up with the people you love.
Whatever the reason, tea parties never go out of style. They’re perfect for birthdays, bridal showers, baby showers, girls’ days, or just a random Tuesday because life is short and you deserve cute snacks.
The secret to a tea party that gets talked about for weeks? It’s all in the little details. Pretty invitations, dainty food, and decor that feels like it belongs in a storybook.
Below, you’ll find 20 ideas to help you throw the kind of tea party your guests will be raving about long after the last crumpet is gone. We’ve broken down exactly what you need and how to pull off each one, so you can mix, match, and make it your own.
Let’s get into it.
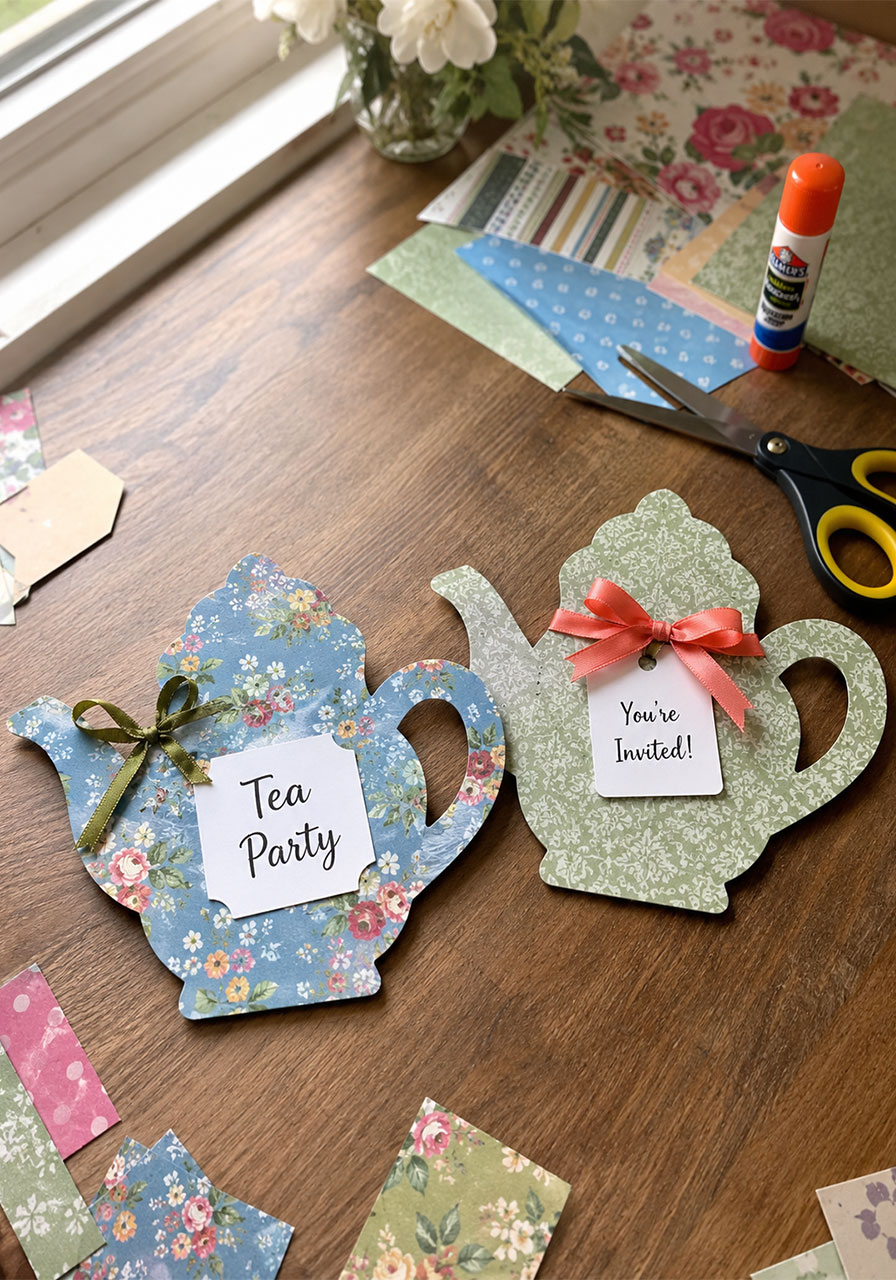
1. Flowery Tea Cup Invitations
First impressions matter, and a teapot-shaped invitation immediately tells your guests this party is going to be special. There’s nothing like opening your mailbox to find a little floral teapot waiting for you.
Best for: Setting the tone before the party even starts
Time to Prep: 1-2 hours for a small batch
Guests Reaction: “Wait, this is just the invitation?!”
What You’ll Need:
- Cardstock or scrapbook paper in floral or pastel prints
- A teapot template (search “teapot template printable” or trace one freehand)
- Scissors or a craft cutting machine like a Cricut
- Small white cards or labels for the party details
- Thin ribbon, twine, or a small bow embellishment
- Glue stick
How to Make It:
- Trace or cut out your teapot shape using the floral scrapbook paper as your base.
- Cut a smaller rectangle or label shape from white cardstock to write your party details on (date, time, location, RSVP info).
- Glue the white label onto the center of the teapot shape.
- Tie a small bow with ribbon and glue it near the spout for that extra dainty touch.
- Write or print your invitation details onto the label.
Pro Tip: If cutting out teapot shapes for a big guest list sounds like a lot, use a die-cutting machine. It’ll save you hours and every invite will look perfectly uniform.


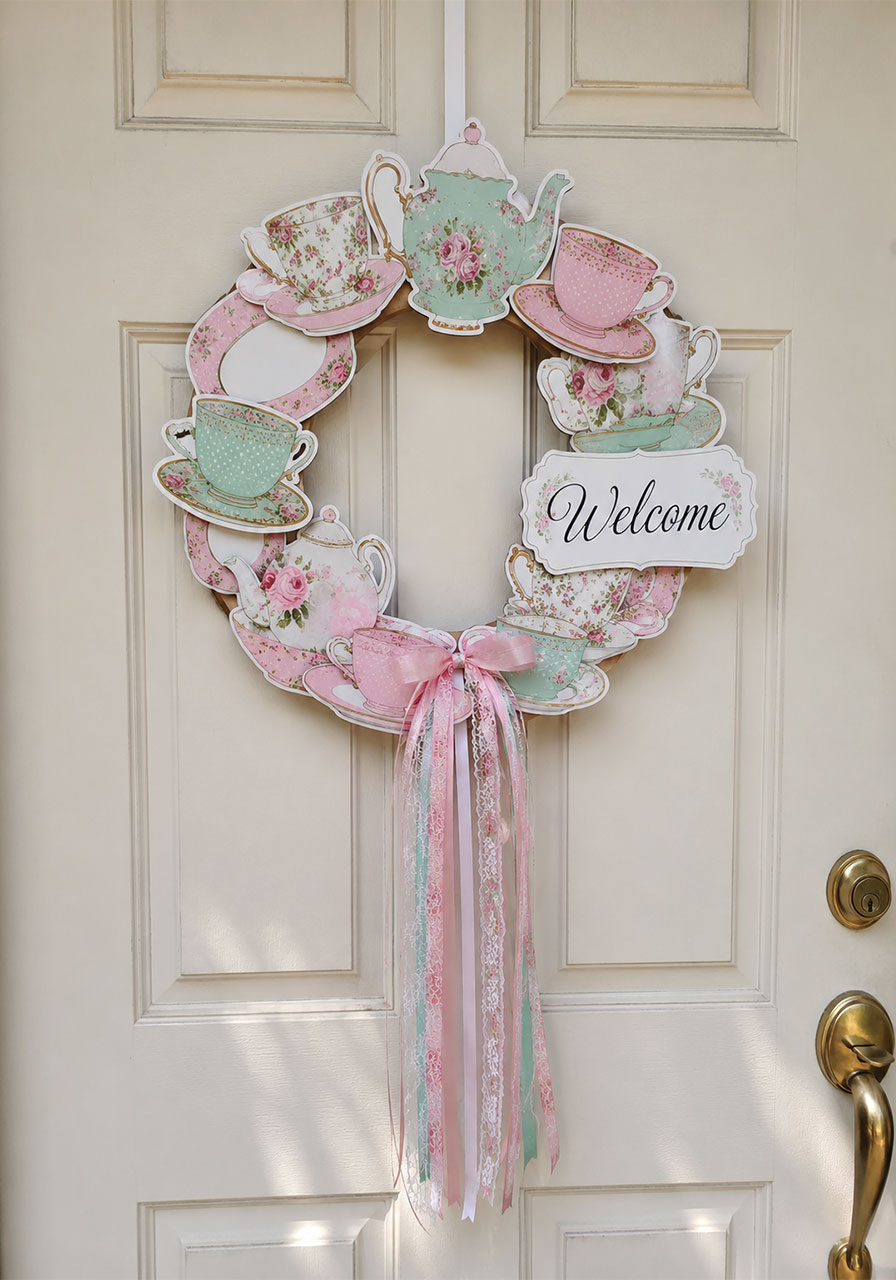
2. Tea Wreath to Welcome Guests
Hang this on your front door and your guests will know exactly what kind of fabulous afternoon they’re walking into. A tea wreath made of paper teacups, teapots, and pretty patterned shapes is a fun, low-cost way to make a big first impression.
Best for: Front door decor, baby showers, bridal teas
Time to Prep: 1-2 hours
Guests Reaction: “Okay, I’m already obsessed and I haven’t even walked in yet.”
What You’ll Need:
- A foam or wire wreath form (or even a circle cut from sturdy cardboard)
- Scrapbook paper or cardstock in coordinating colors and patterns
- Teacup and teapot templates (printable ones are widely available)
- Hot glue gun
- Ribbon for hanging and embellishing
- A small sign with your party name or “Welcome” message
How to Make It:
- Cut out a generous number of teacup, teapot, and saucer shapes from your patterned papers. Aim for a mix of sizes for visual interest.
- Starting from one side of the wreath form, glue the shapes down, slightly overlapping each one as you go.
- Continue working your way around the wreath, alternating patterns and sizes, until the entire form is covered.
- Attach your welcome sign to one side using glue or ribbon.
- Add a ribbon bow at the bottom or side, then attach a loop of ribbon to the back for hanging.
Pro Tip: Keep your color palette to 2-3 shades. It’ll look way more put-together than throwing in every pattern you own (tempting as that may be).
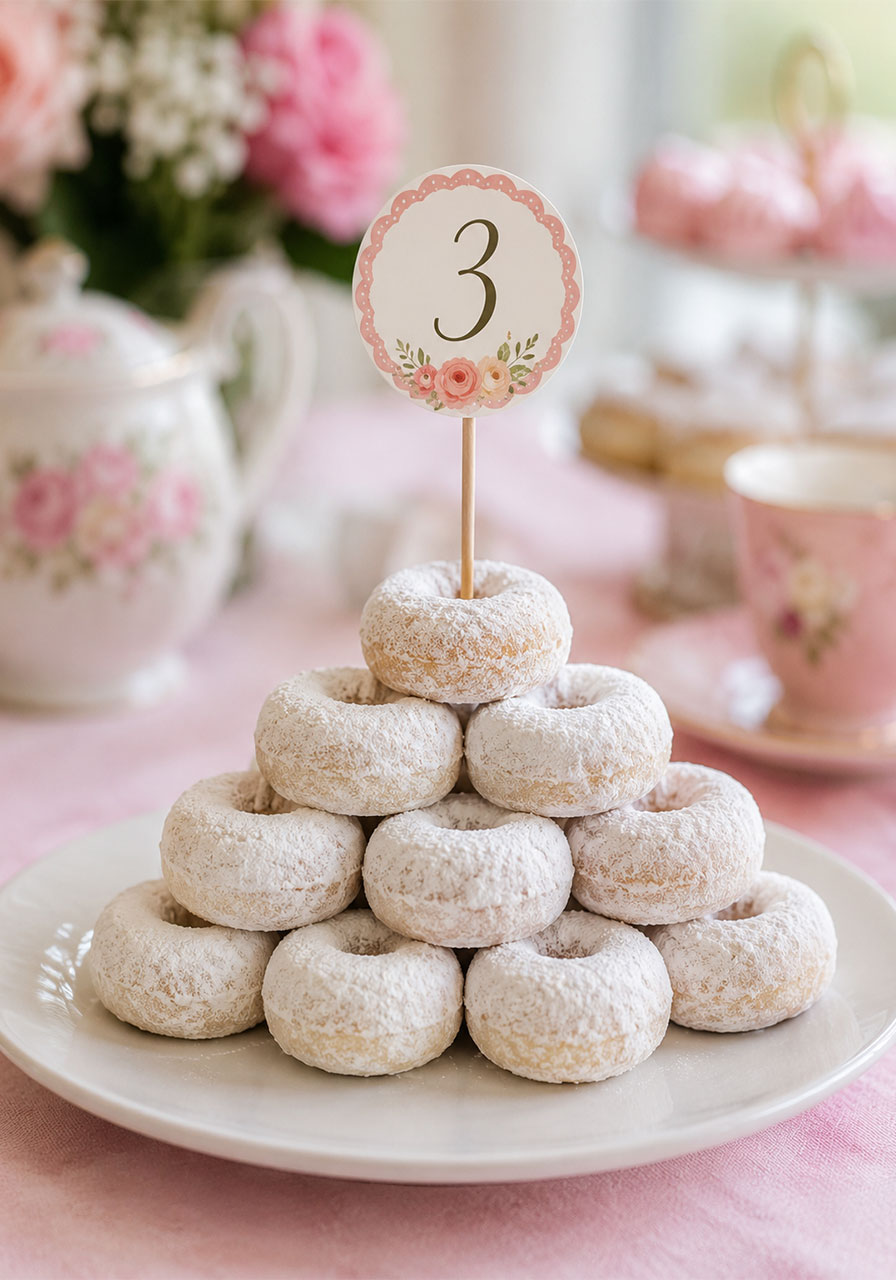
3. Sweet Table Number Holders
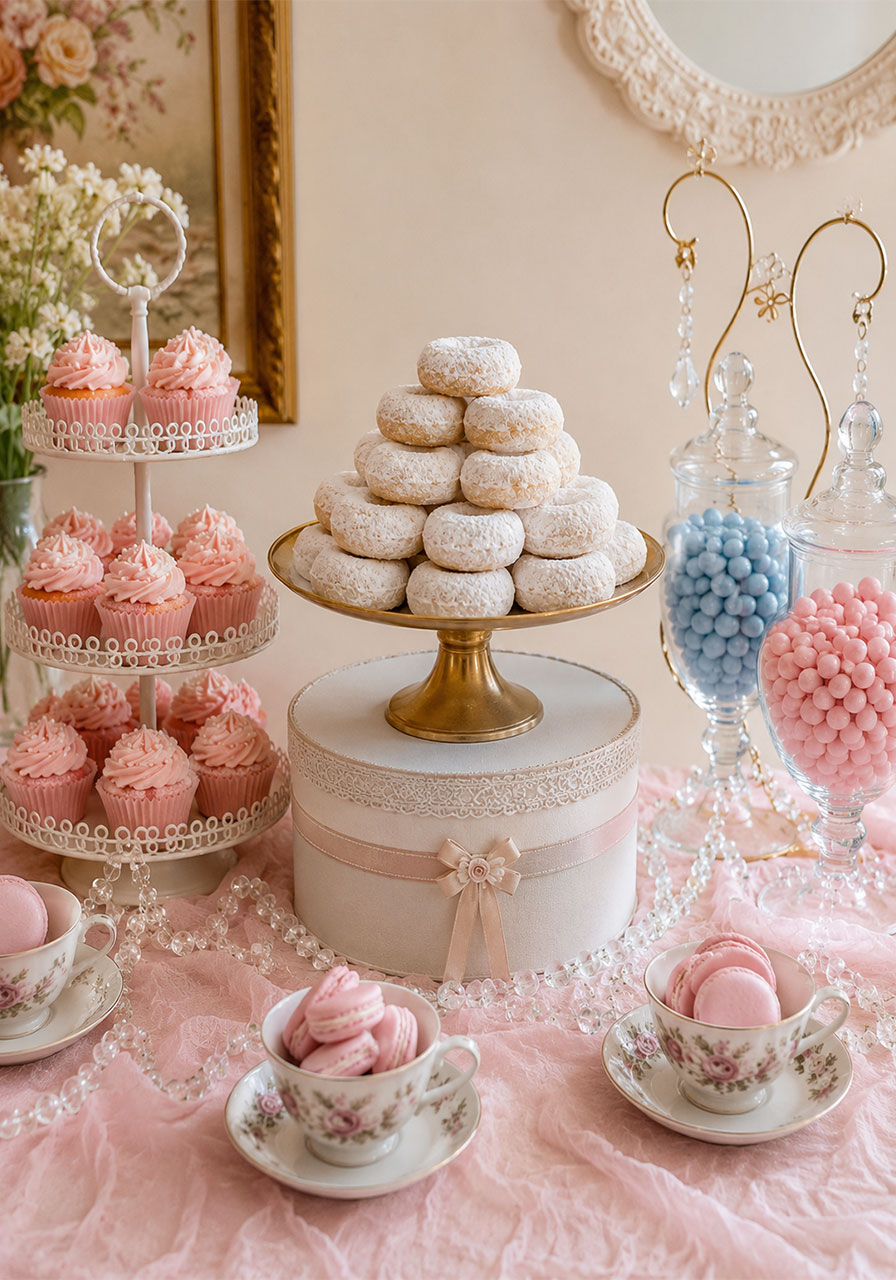
If you’re hosting a bigger tea party with multiple tables, ditch the boring printed table numbers. Stack a tower of powdered donuts or mini treats and top it with a cute numbered flag instead. It’s edible decor, which honestly should be a rule for all parties from now on.
Best for: Larger tea parties with multiple tables
Time to Prep: 10-15 minutes per table
Guests Reaction: “Wait, can I just eat the table number?”
What You’ll Need:
- Mini powdered donuts (or any small round treat like macarons or donut holes)
- A small plate or cake stand per table
- A lollipop stick or skewer for each table
- Cardstock circles printed with table numbers
- Glue or tape
How to Make It:
- Print and cut out small circle labels with each table number on them.
- Glue each label onto the top of a lollipop stick or skewer.
- Stack your mini donuts into a small pyramid on a plate, building from a wider base to a narrower top.
- Gently push the stick with the number into the center of the donut stack so it stands upright.
- Repeat for each table, then sit back and watch guests admire (and eventually devour) your table numbers.
Pro Tip: Stack the donuts right before guests arrive. Powdered sugar donuts tend to get a little sticky if they sit out too long in a warm room.
4. Colorful Shot Glass Salads
Salad doesn’t usually scream “party food,” but serve it in individual shot glasses or small cups and suddenly it’s the chicest thing on your buffet table. These mini salads are fresh, pretty, and surprisingly easy to throw together.
Best for: Adding a fresh, healthy option to your spread
Time to Prep: 20-30 minutes
Guests Reaction: “These are so cute I almost feel bad eating them.”

What You’ll Need:
- Small clear cups or shot glasses (about 10-12 for a medium party)
- Arugula or mixed greens
- Sliced strawberries
- Crumbled goat cheese or feta
- Sliced almonds
- A light vinaigrette (poppy seed or balsamic work beautifully)
- A small pitcher for serving the dressing on the side
How to Make It:
- Wash and dry your greens thoroughly so they stay crisp.
- Layer a small handful of greens into each cup.
- Top with a few strawberry slices, a sprinkle of cheese, and a few almond slivers.
- Arrange the cups on a tray or platter, with the dressing pitcher placed nearby.
- Drizzle a little dressing over each cup right before serving, or let guests add their own from the pitcher.
Pro Tip: Add the dressing at the very last minute. Nobody wants soggy greens, and these little cups look extra fresh when the leaves are still crisp and perky.
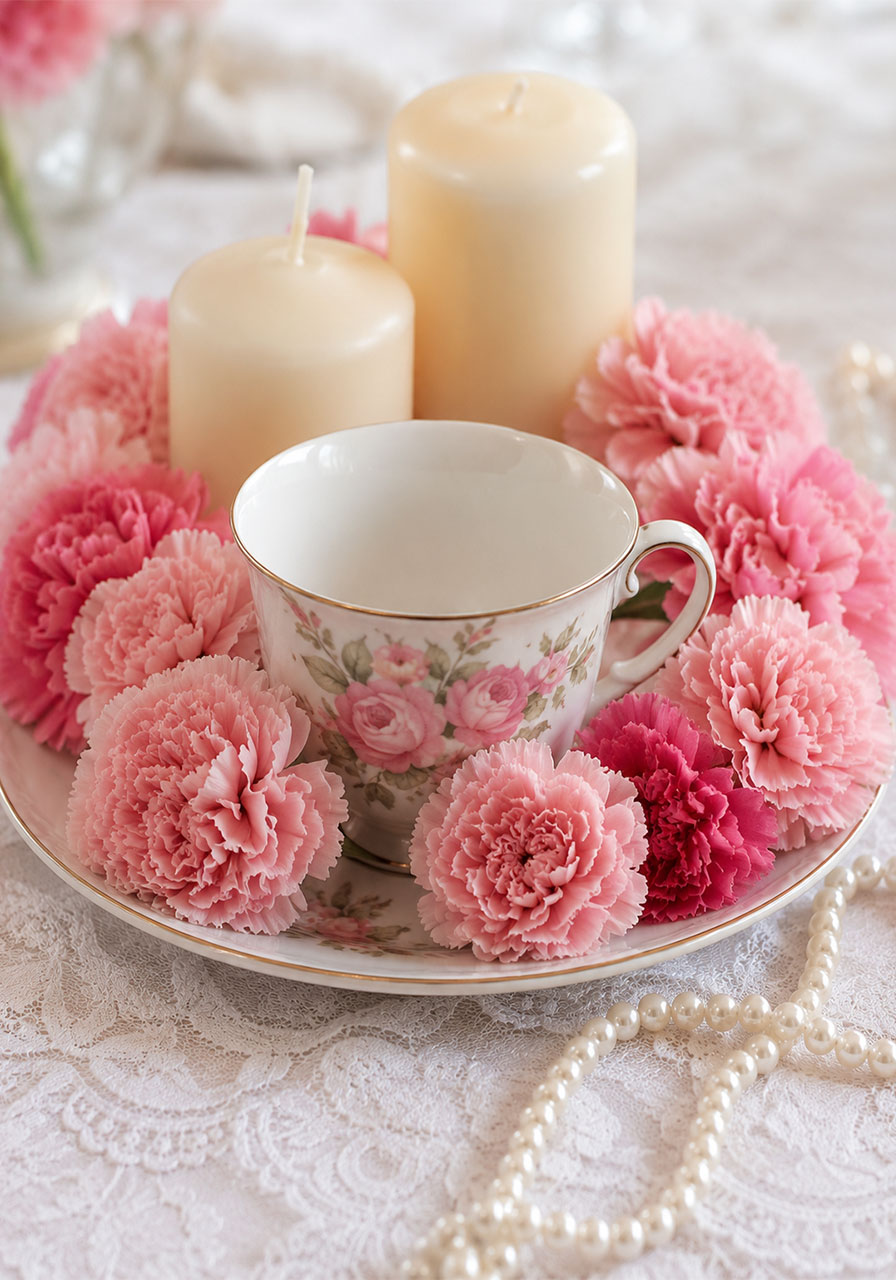
5. Dreamy Tea Cup Candle Holders
Got mismatched or chipped teacups sitting in the back of your cabinet? This is their moment to shine. Turn them into the prettiest little centerpiece using candles and fresh flowers.
Best for: Centerpieces, buffet table accents
Time to Prep: 15-20 minutes
Guests Reaction: “I need to know where you got this.”
What You’ll Need:
- A vintage teacup and saucer (or any pretty teacup you have)
- A pillar candle (choose one that’s roughly the same diameter as the teacup opening, or slightly smaller)
- Fresh flowers, such as carnations or roses
- A small dish or cake stand to display everything on
How to Make It:
- Place your teacup on its saucer, then set both on your cake stand or display dish.
- Set the pillar candle inside or beside the teacup, depending on the size.
- Arrange fresh flowers around the base of the candle and around the teacup, filling in any gaps.
- Continue layering flowers until the candle and teacup look like they’re sitting in a little garden.
Pro Tip: Trim your flower stems short so they sit snugly around the candle without flopping over. Carnations are a great budget-friendly choice because they hold up well and look full even in small clusters.
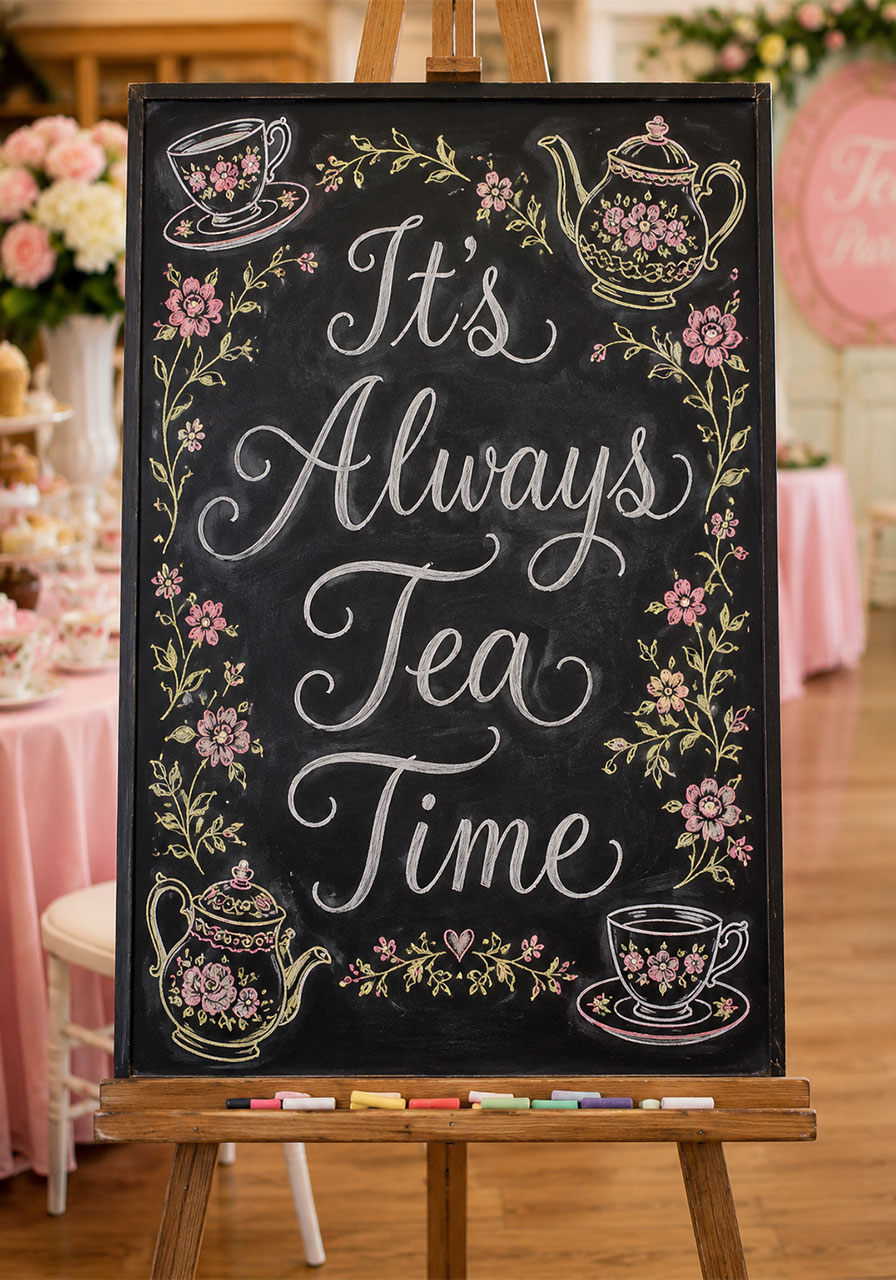
6. A Chalkboard for Guests to Scribble On
A pretty hand-lettered chalkboard sign adds instant charm to any tea party setup, and it doubles as a fun keepsake. Set one out and invite your guests to leave a little message, doodle, or signature they can take home with them.
Best for: Sentimental gatherings like bridal or baby showers
Time to Prep: 30 minutes to a few hours, depending on detail
Guests Reaction: “I’m definitely taking a picture of this before I leave.”
What You’ll Need:
- A chalkboard (any size, framed or unframed)
- Chalk markers or regular chalk in white and pastel colors
- A pencil for sketching your design first
- A small easel or stand to display it
How to Make It:
- Lightly sketch your design or wording with a pencil first. Something like “It’s Always Tea Time” works beautifully.
- Go over your sketch with chalk markers, starting with the main lettering.
- Add small decorative touches like teacups, flowers, or vines around the text.
- Display it on an easel near your entrance or guest book table.
- If you want guests to write messages, leave a smaller blank chalkboard nearby with chalk for them to use.
Pro Tip: Not confident in your lettering skills? Print out your wording in a pretty font, tape it to the back of the chalkboard, and trace the letters through the chalkboard by holding it up to a window with light behind it.
7. Tulle-Covered Balloons
Regular balloons are fine. Balloons wrapped in soft tulle with a little flower tucked at the base? Absolutely dreamy. This simple trick instantly elevates your decor from “kid’s birthday” to “Pinterest-worthy tea soirée.”
Best for: Corner accents, photo backdrops, table decor
Time to Prep: 5-10 minutes per balloon
Guests Reaction: “These don’t even look like balloons!”

What You’ll Need:
- Balloons in your party’s color scheme
- Tulle fabric (about a yard per balloon, cut into a large square)
- Small faux or fresh flowers
- Ribbon or string
How to Make It:
- Inflate your balloons and tie them off as usual.
- Lay a square of tulle on a flat surface and place the balloon, knot-side down, in the center.
- Gather the tulle up around the balloon and twist it together at the bottom, just below the knot.
- Secure the gathered tulle with a piece of ribbon or string, tying it tightly.
- Tuck a small flower into the knot of tulle to cover the tied spot, and add a longer ribbon for hanging or tying down.
Pro Tip: Use helium for ceiling-height drama, or skip the helium and tie a cluster of these to chair backs for an instant seat upgrade.
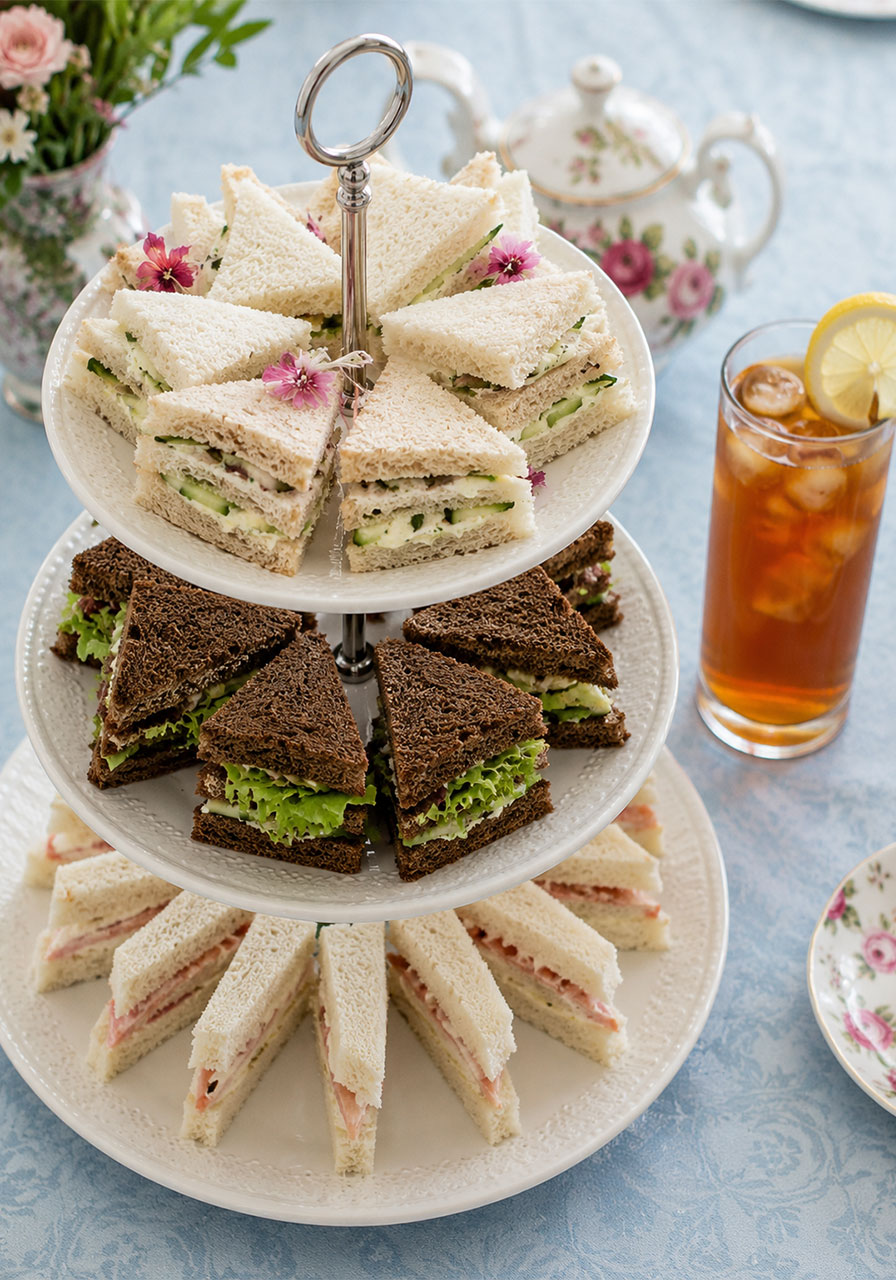
8. A Spread of Classic Tea Sandwiches
No tea party is complete without dainty little sandwiches stacked on a tiered stand. The good news? They’re easier to make than they look, and you can prep most of them ahead of time.
Best for: The centerpiece of your food table
Time to Prep: 45 minutes to 1 hour
Guests Reaction: “Okay I’ve had four of these and I’m not stopping.”
What You’ll Need:
- Soft sandwich bread (white, wheat, and pumpernickel for variety)
- Fillings: cucumber and cream cheese, egg salad, chicken salad, smoked salmon with herb cream cheese
- A sharp knife for trimming crusts and cutting into shapes
- Fresh herbs or edible flowers for garnish
- A tiered serving stand
How to Make It:
- Prepare your fillings the night before so flavors have time to develop.
- Spread fillings between two slices of bread, keeping the layer thin and even.
- Trim the crusts off using a sharp knife for a clean, polished look.
- Cut each sandwich into triangles, rectangles, or even rounds using a cookie cutter for variety.
- Arrange the sandwiches on your tiered stand, mixing up the bread types and shapes, and garnish with fresh herbs or edible flowers.
Pro Tip: Cover finished sandwiches with a slightly damp paper towel and plastic wrap, then refrigerate until serving time. This keeps the bread from drying out and curling at the edges.
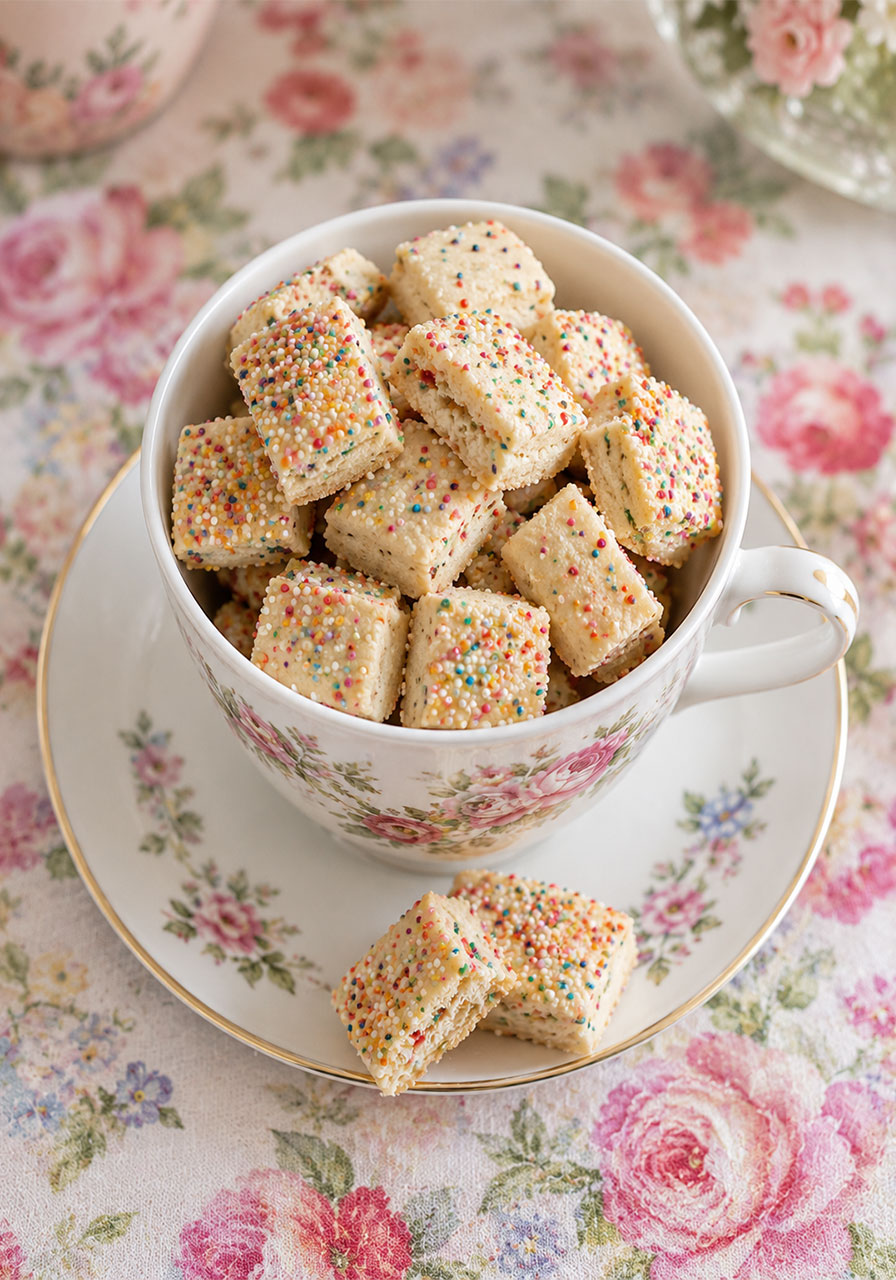
9. Colorful Bite-Sized Sprinkle Cookies
These funfetti-style shortbread squares are bursting with rainbow sprinkles, making them an instant favorite with both kids and adults. They’re buttery, crumbly, and look absolutely adorable piled up on a vintage teacup.
Best for: Dessert table, kid-friendly tea parties
Time to Prep: 20 minutes prep, plus baking and chilling time
Guests Reaction: “Okay these are basically tiny pieces of birthday cake and I love it.”
What You’ll Need:
- 2 cups all-purpose flour
- 1 cup unsalted butter, softened
- 1/2 cup powdered sugar
- 1/2 teaspoon vanilla extract
- 1/2 cup rainbow sprinkles (the small round kind, not the long jimmies)
- A pinch of salt
How to Make It:
- In a large bowl, cream the softened butter and powdered sugar together until light and fluffy.
- Mix in the vanilla extract, then gradually add the flour and salt until a soft dough forms.
- Fold in the sprinkles, being careful not to overmix (this keeps the colors from bleeding into the dough).
- Press the dough into a lined baking dish, smoothing the top into an even layer.
- Chill the dough for at least 30 minutes, then bake at 325°F (165°C) for about 20-25 minutes, or until the edges turn lightly golden.
- Let cool completely, then cut into small squares before serving.
Pro Tip: Use the small round nonpareil sprinkles instead of long jimmies. They hold their color much better during baking and won’t streak the dough.
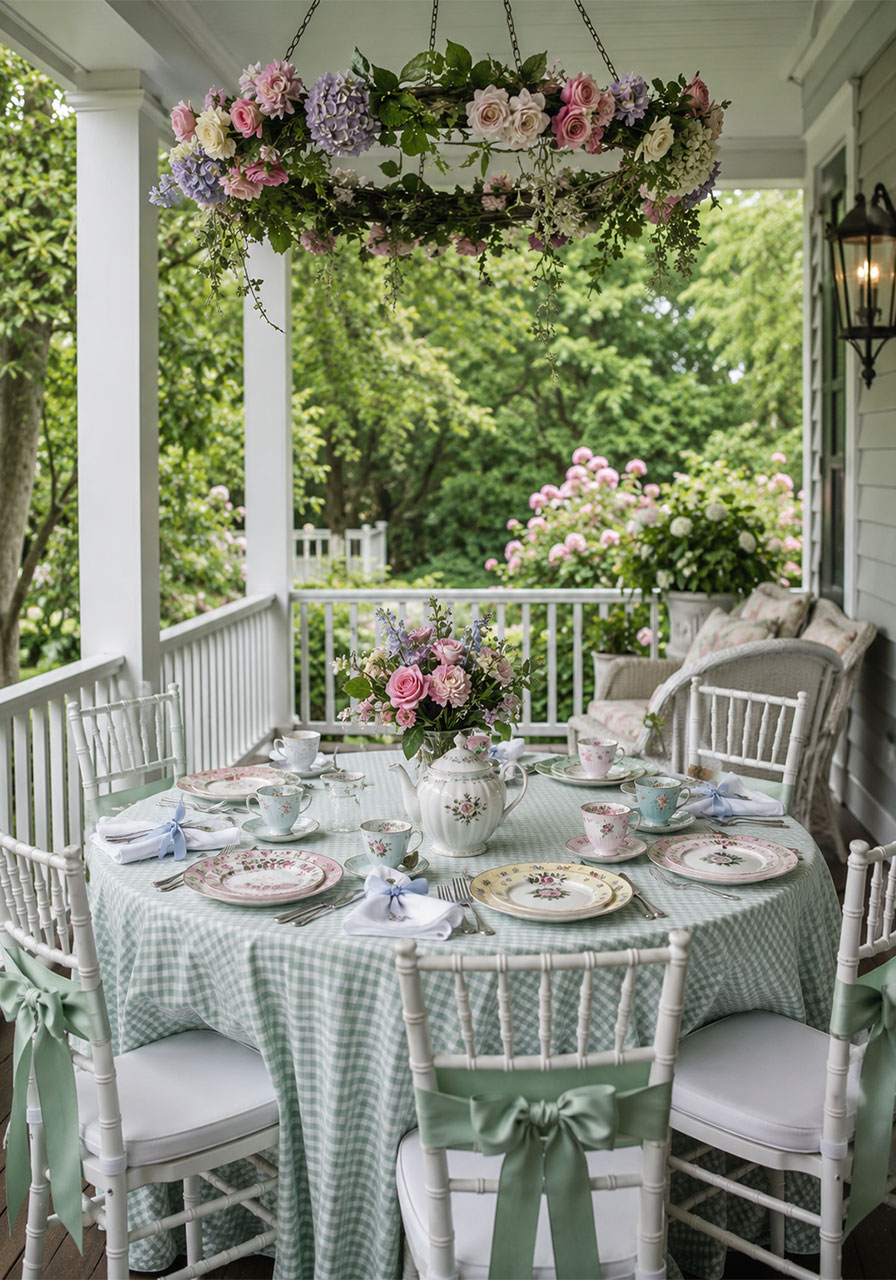
10. A Whimsical, Storybook-Style Table Setting
This is the kind of table setting that makes grown women squeal like they’re seven years old again. Think soft pastels, gingham linens, mismatched florals, and little personalized place settings that feel straight out of a fairytale picnic.
Best for: The “wow” factor when guests first walk in
Time to Prep: 1-2 hours
Guests Reaction: “I feel like I’m in a movie right now.”
What You’ll Need:
- A gingham or pastel tablecloth
- Mismatched vintage-style plates, teacups, and saucers
- Fresh flowers in small vases or teapots
- Cloth napkins, tied with ribbon
- Place cards or small favor bags for each seat
- Optional: a hanging floral arrangement or canopy above the table
How to Make It:
- Start with your tablecloth as the base, and choose a soft, cohesive color palette (mint, pink, and white work beautifully together).
- Set each place with a plate, teacup, and saucer. Mismatched patterns within the same color family actually look more charming than a perfectly matched set.
- Tie cloth napkins with coordinating ribbon and place them on each plate.
- Fill small vases or teapots with fresh flowers and space them down the center of the table.
- Add a small place card or favor at each seat with the guest’s name.
- If you want extra drama, hang a floral arrangement or fabric canopy above the table using ribbon or fishing line.
Pro Tip: Thrift stores and estate sales are goldmines for vintage teacups and saucers. You don’t need a matching set, just a similar color story.
11. A Tiered Sweets and Candy Display
Turn your dessert table into a candy land using glass canisters, apothecary jars, and pretty stands at different heights. Fill them with colorful candies, macarons, and mini treats for a display that looks like it belongs in a bakery window.
Best for: Showstopping dessert table centerpiece
Time to Prep: 30-45 minutes to set up
Guests Reaction: “Can I just stand here and stare at this for a while?”
What You’ll Need:
- A variety of glass jars, canisters, and cake stands in different heights
- Colorful candies (gumballs, jelly beans, rock candy)
- Macarons or mini cupcakes
- Powdered donuts or other small pastries
- A tablecloth in a coordinating color
How to Make It:
- Lay out your tablecloth and decide on a focal point, usually the tallest stand placed slightly off-center.
- Place your tallest items (cake stands, tiered trays) toward the back, and shorter jars and dishes toward the front.
- Fill the glass jars with different colored candies, grouping similar colors together for a more polished look.
- Arrange macarons, mini cupcakes, and pastries on stands and plates, filling in gaps as needed.
- Step back and adjust the heights and spacing until everything feels balanced rather than cluttered.
Pro Tip: Stick to 2-3 candy colors that match your party’s color scheme. A rainbow of every candy in the store can start to look chaotic instead of curated.
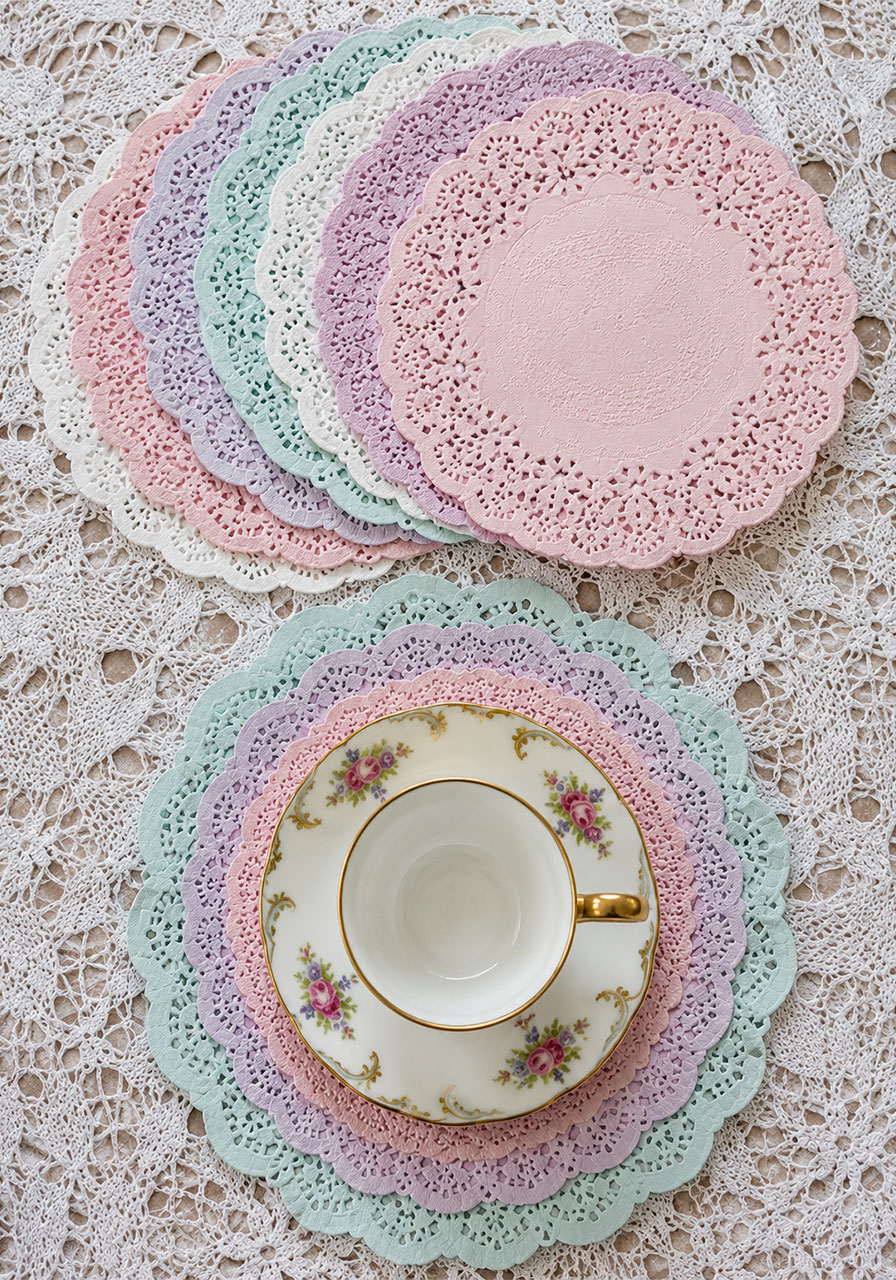
12. Lovely Doily Coasters and Place Mats
Paper doilies are inexpensive, instantly elegant, and surprisingly versatile. Dye them in soft pastel shades and use them as coasters, place mats, or even as a backdrop for displaying your prettiest teacups.
Best for: Adding texture and softness to your table
Time to Prep: 20-30 minutes, plus drying time
Guests Reaction: “Wait, these match everything perfectly. Did you have these custom made?”
What You’ll Need:
- White paper doilies in a few different sizes
- Liquid food coloring or fabric dye in your party’s color palette
- Shallow dishes or bowls for dipping
- Water
- A flat surface lined with paper towels for drying
How to Make It:
- Fill shallow dishes with water and add a few drops of food coloring to each, mixing until you get your desired shades.
- Dip each doily briefly into the colored water, just enough to lightly tint the paper without soaking it through.
- Lay the dyed doilies flat on paper towels to dry completely, which usually takes a couple of hours.
- Once dry, layer different colored doilies on top of each other at each place setting, then top with a teacup and saucer.
Pro Tip: Doilies are delicate when wet, so lift them out of the dye with a fork or slotted spoon rather than your fingers to avoid tearing.
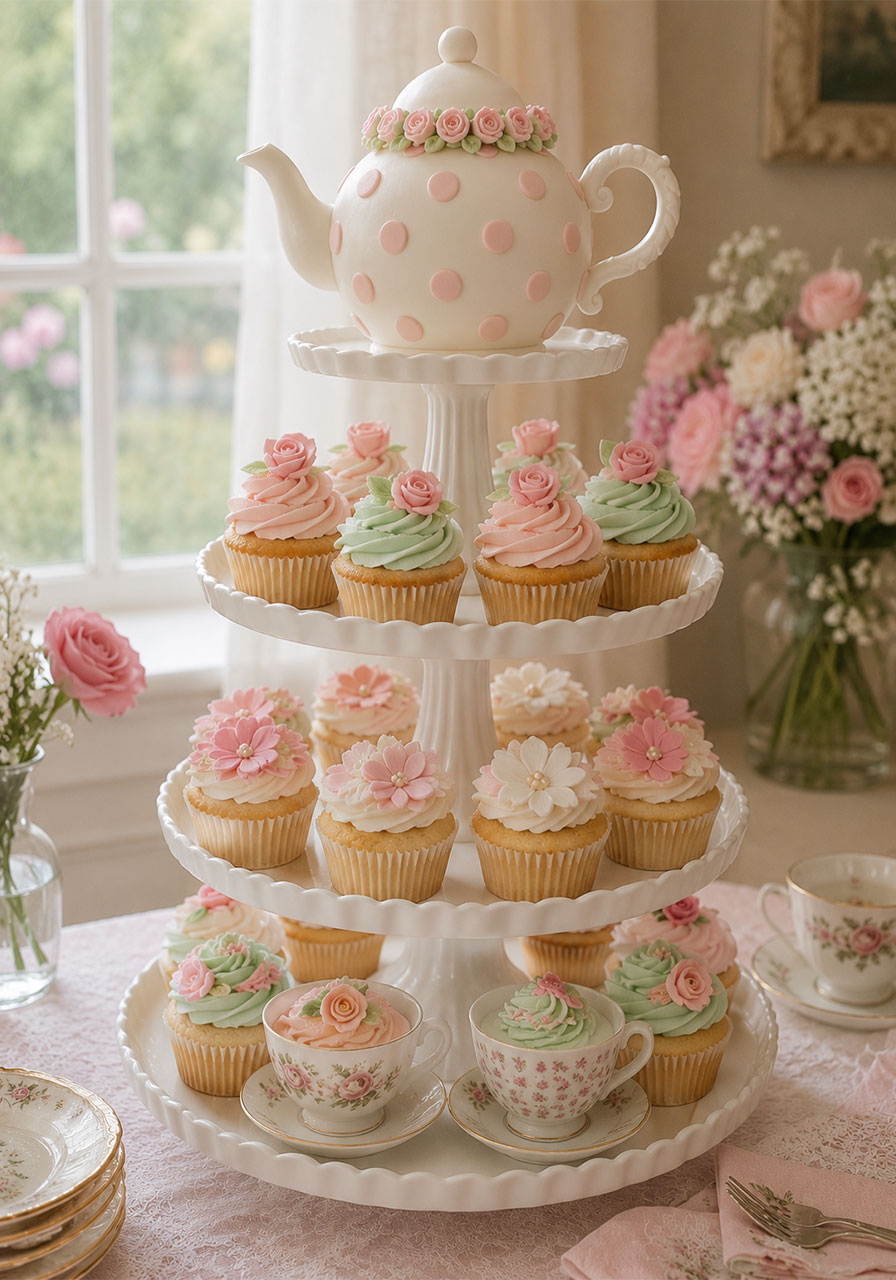
13. A Showstopping Teapot Cupcake Tower
This one is a serious centerpiece. A giant fondant teapot perched on top of a tower of decorated cupcakes makes a statement that doubles as dessert. It’s perfect for birthdays, bridal showers, or any tea party where you want the cake table to really shine.
Best for: The main event of your dessert table
Time to Prep: A few hours, or order the teapot topper from a local bakery
Guests Reaction: “I almost don’t want to cut into it, it’s too pretty.”
What You’ll Need:
- A tiered cupcake stand
- Cupcakes in your party’s color scheme (3-5 dozen depending on guest count)
- Buttercream frosting in pastel colors
- A fondant teapot topper (homemade or store-bought)
- Small fondant or sugar decorations like flowers and polka dots
How to Make It:
- Bake and cool your cupcakes the day before your party.
- Frost each cupcake using a piping bag, varying your piping styles (swirls, rosettes, smooth tops) for visual variety.
- Add small fondant decorations like flowers or dots to about half of the cupcakes.
- Arrange the cupcakes on your tiered stand, working from the bottom tier up and alternating colors and styles evenly.
- Place your fondant teapot topper on the very top tier as the grand finale.
Pro Tip: If decorating a fondant teapot feels intimidating, most local bakeries will make one for you as a standalone topper. It’s a great shortcut that still looks homemade.
14. Layered Macaron and Treat Towers Under Glass
There’s something so elegant about treats displayed under a glass cloche or dome. Pair that with a tiered stand of pastel macarons and you’ve got a dessert display that looks straight out of a French patisserie.
Best for: Adding a touch of elegance to your dessert table
Time to Prep: 15-20 minutes to assemble
Guests Reaction: “Where did you even find macarons this color?!”

What You’ll Need:
- Macarons in pastel colors (pink, mint, lavender)
- A tiered serving stand
- A glass cloche or dome
- A vintage teacup and saucer
- Fresh flowers
- Fresh strawberries or other small fruits for garnish
How to Make It:
- Arrange macarons by color on each tier of your serving stand, grouping like colors together for a clean, ombré effect.
- Place a vintage teacup filled with fresh flowers on the table beside the stand, and cover it with the glass cloche.
- Scatter a few fresh strawberries or other small fruits around the base of the display for a pop of color.
- Add any remaining pastries or cupcakes around the stand to fill out the table.
Pro Tip: Macarons are notoriously finicky to make at home, so don’t be afraid to buy them from a bakery or grocery store. Nobody will know, and your display will still look incredible.
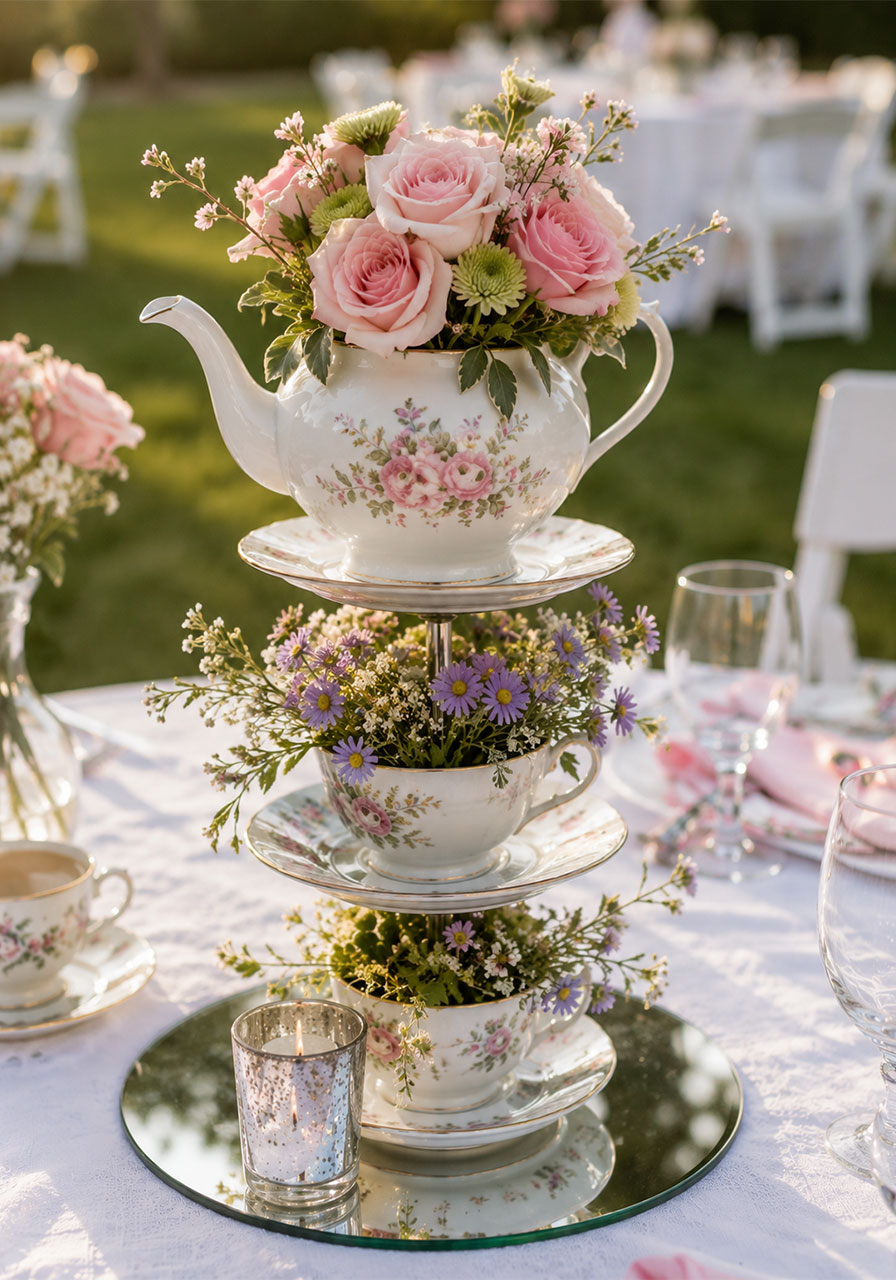
15. A Garden-Style Tiered Centerpiece
If you’re hosting your tea party outdoors, this centerpiece brings the garden right onto your table. Stack teacups, saucers, and a teapot with fresh flowers and greenery for a centerpiece that looks effortlessly elegant.
Best for: Outdoor or garden-themed tea parties
Time to Prep: 30-40 minutes
Guests Reaction: “This belongs in a magazine.”
What You’ll Need:
- A round mirror or tray as your base
- Vintage teacups, saucers, and a teapot in varying sizes
- Fresh flowers and greenery (roses, hydrangeas, wildflowers)
- Small floral foam blocks or water-filled cups to hold stems
How to Make It:
- Place your round mirror or tray in the center of the table as your base.
- Arrange your teacups, saucers, and teapot on top, stacking some pieces and laying others flat to create different heights.
- Tuck small pieces of floral foam or tiny cups of water into the teacups and teapot.
- Trim your flower stems and arrange them into each container, letting some greenery spill over the edges.
- Fill in any gaps with smaller blooms or greenery until the arrangement feels full and lush.
Pro Tip: Mix in a few unexpected greens like ferns or herbs (mint and rosemary smell amazing and add texture without costing much).
Bonus Ideas: A Few More Dainty Touches Worth Trying
You’ve made it through the original 15, but we couldn’t stop there. Here are five more ideas to make your tea party even more memorable.
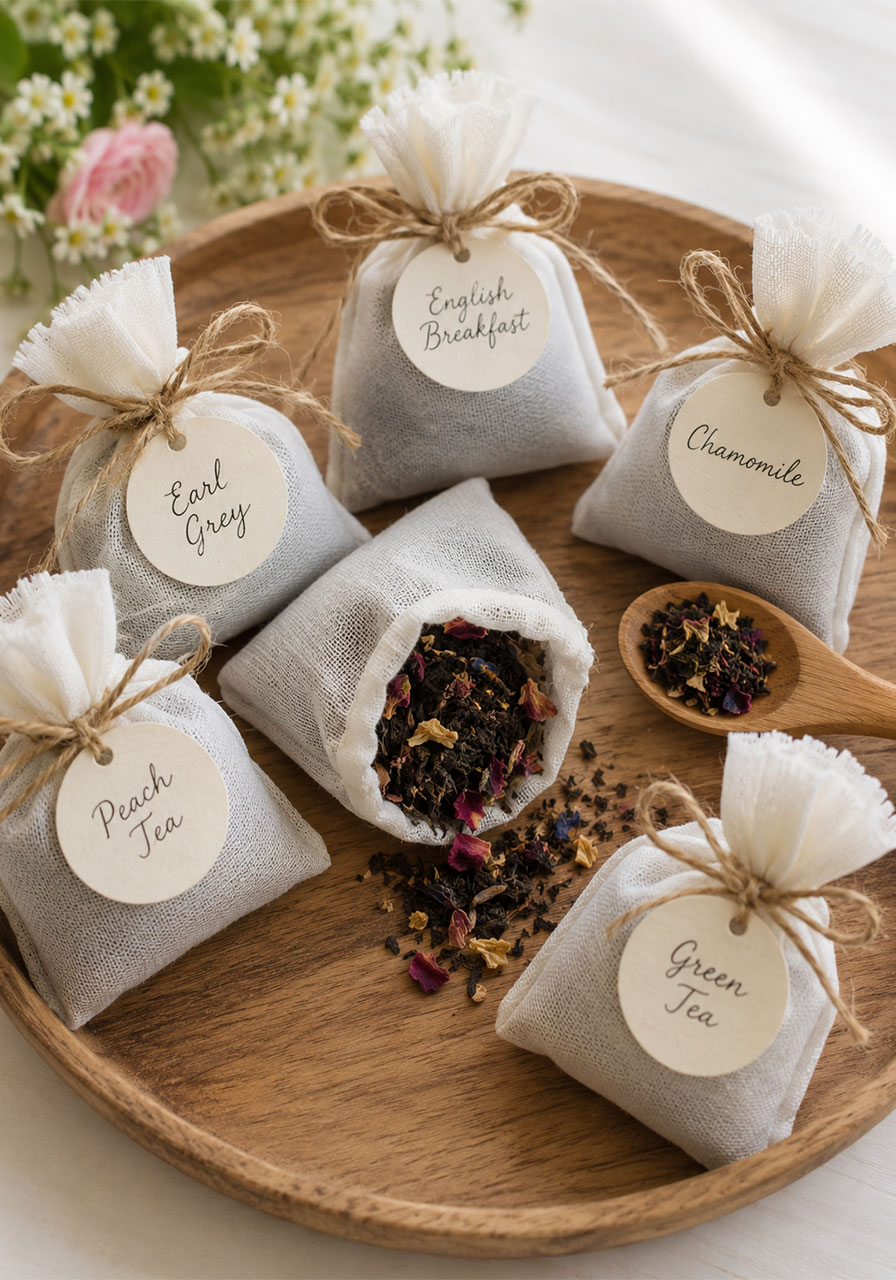
16. DIY Tea Bag Party Favors
Send your guests home with a little gift they’ll actually use. Custom tea bag favors are simple to make and feel incredibly thoughtful.
Best for: Party favors and thank-you gifts
Time to Prep: 30 minutes for a dozen favors
What You’ll Need:
- Loose leaf tea of your choice
- Empty tea bags or small squares of cheesecloth
- Twine or thread
- Small cardstock tags
How to Make It:
- Fill each empty tea bag (or cheesecloth square) with a spoonful of loose leaf tea.
- Tie the top closed with twine or thread, leaving a small loop to hang the tag from.
- Attach a small tag with a thank-you message and the tea flavor written on it.
- Place a few favors in a small bowl by the door, or set one at each place setting.
Pro Tip: Pair the tea bag with a small individually wrapped cookie for an even sweeter send-off.
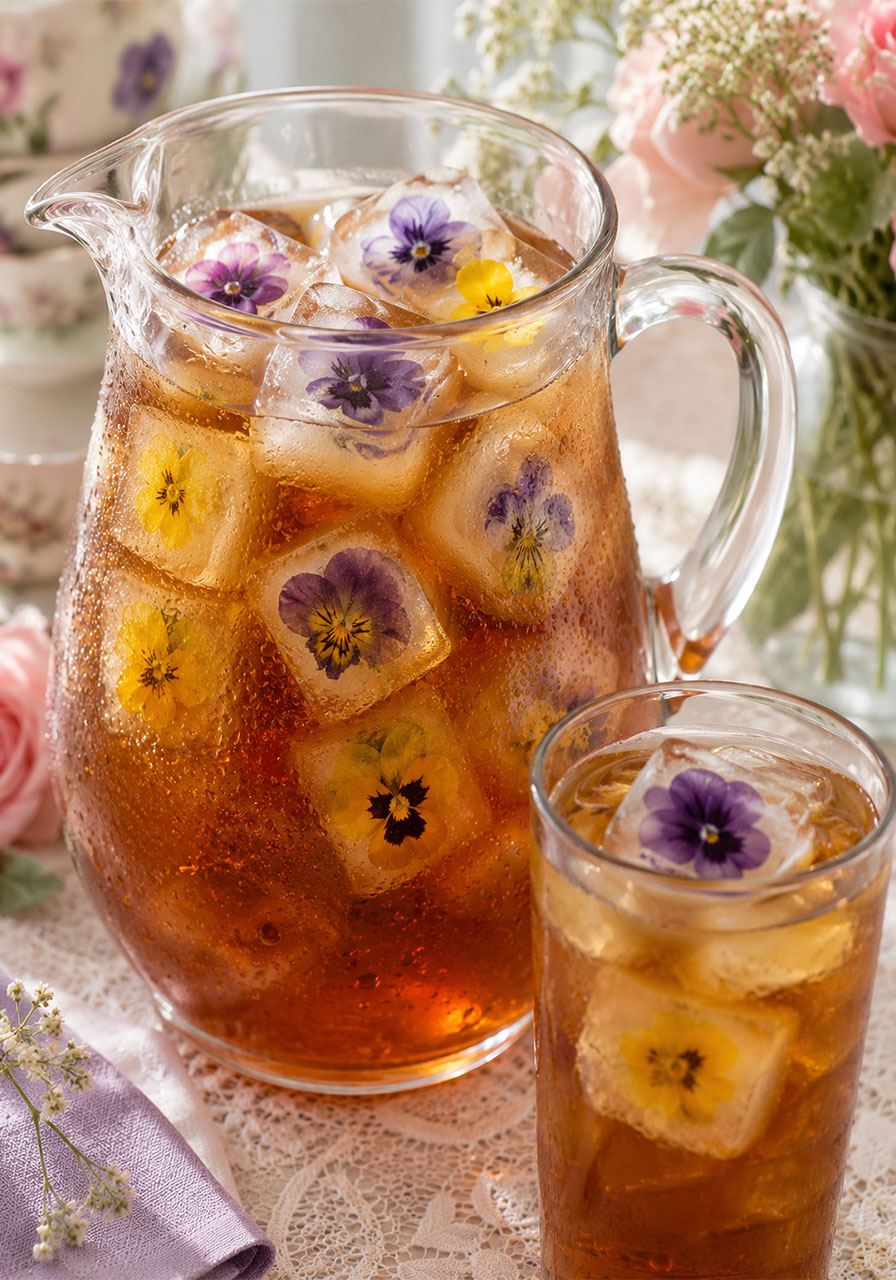
17. Edible Flower Ice Cubes for Iced Tea
If your tea party is happening on a warm day, iced tea is a must. Take it up a notch with ice cubes that have tiny edible flowers frozen right inside them. It’s a small touch that gets a big reaction.
Best for: Summer or outdoor tea parties
Time to Prep: 10 minutes, plus freezing time
What You’ll Need:
- An ice cube tray
- Edible flowers (pansies, violets, or chamomile blossoms)
- Filtered water
How to Make It:
- Place one small edible flower into each compartment of the ice cube tray.
- Fill each compartment partway with water and freeze for about an hour, just until the first layer is solid.
- Top off each compartment with more water and freeze again until completely solid.
- Pop the cubes into a pitcher of iced tea right before serving.
Pro Tip: Freezing in two layers keeps the flowers suspended in the center of the cube instead of floating to the top, which looks much prettier.
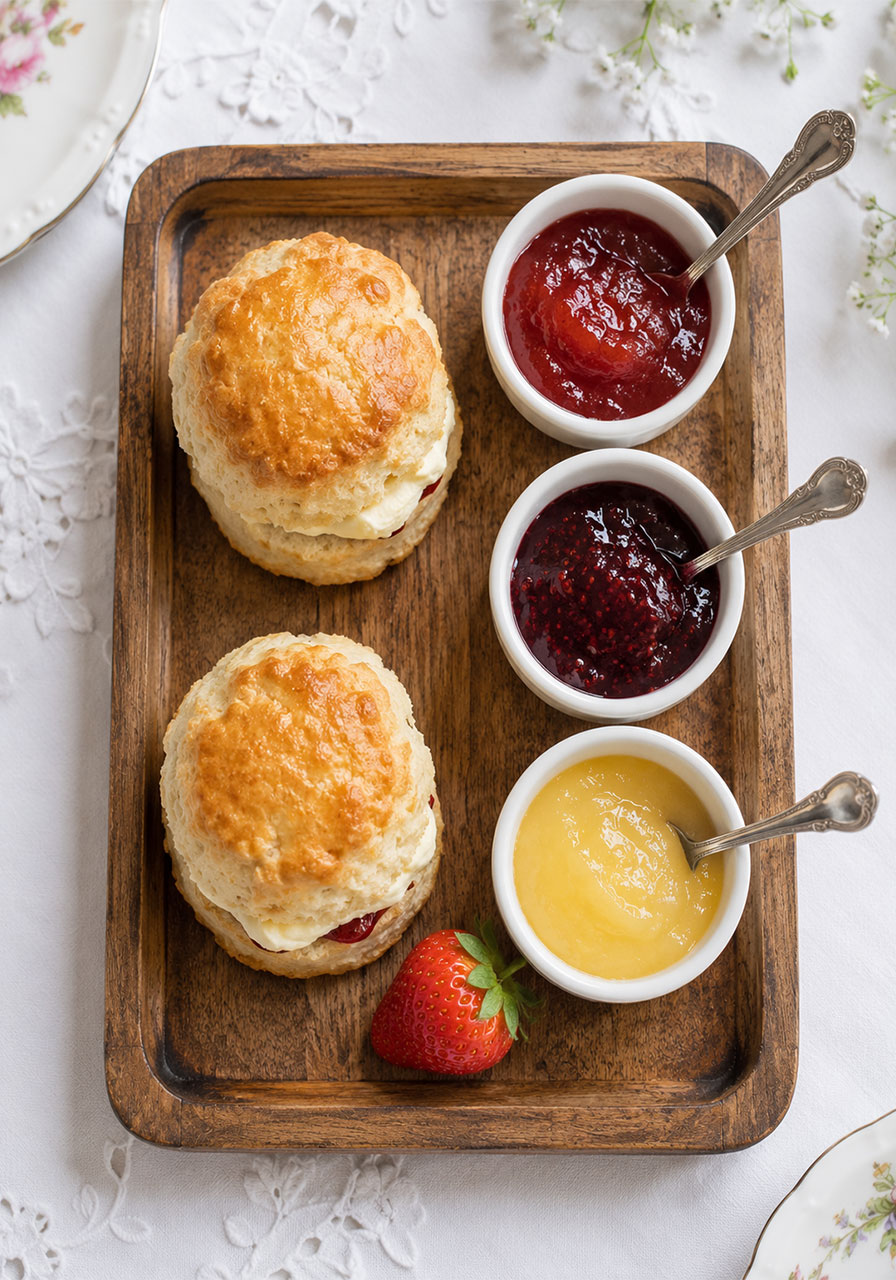
18. A Mini Scone and Jam Flight
Instead of one big jam jar that everyone has to pass around, set up individual jam flights. Each guest gets their own little sampler of jams and curds to pair with their scone.
Best for: Adding a personal touch to the food spread
Time to Prep: 20 minutes to assemble
What You’ll Need:
- Mini scones (homemade or store-bought)
- 2-3 varieties of jam (strawberry, raspberry, lemon curd)
- Small ramekins or sauce cups
- Small spoons
- A small tray per guest or shared platter
How to Make It:
- Spoon a small amount of each jam variety into separate mini ramekins.
- Arrange the ramekins on a small tray alongside a scone or two.
- Add a tiny spoon to each ramekin for easy serving.
- Set one tray at each place setting, or arrange several on a shared table for guests to help themselves.
Pro Tip: Warm the scones slightly before serving. A warm scone with cold jam and clotted cream is the kind of detail guests remember.
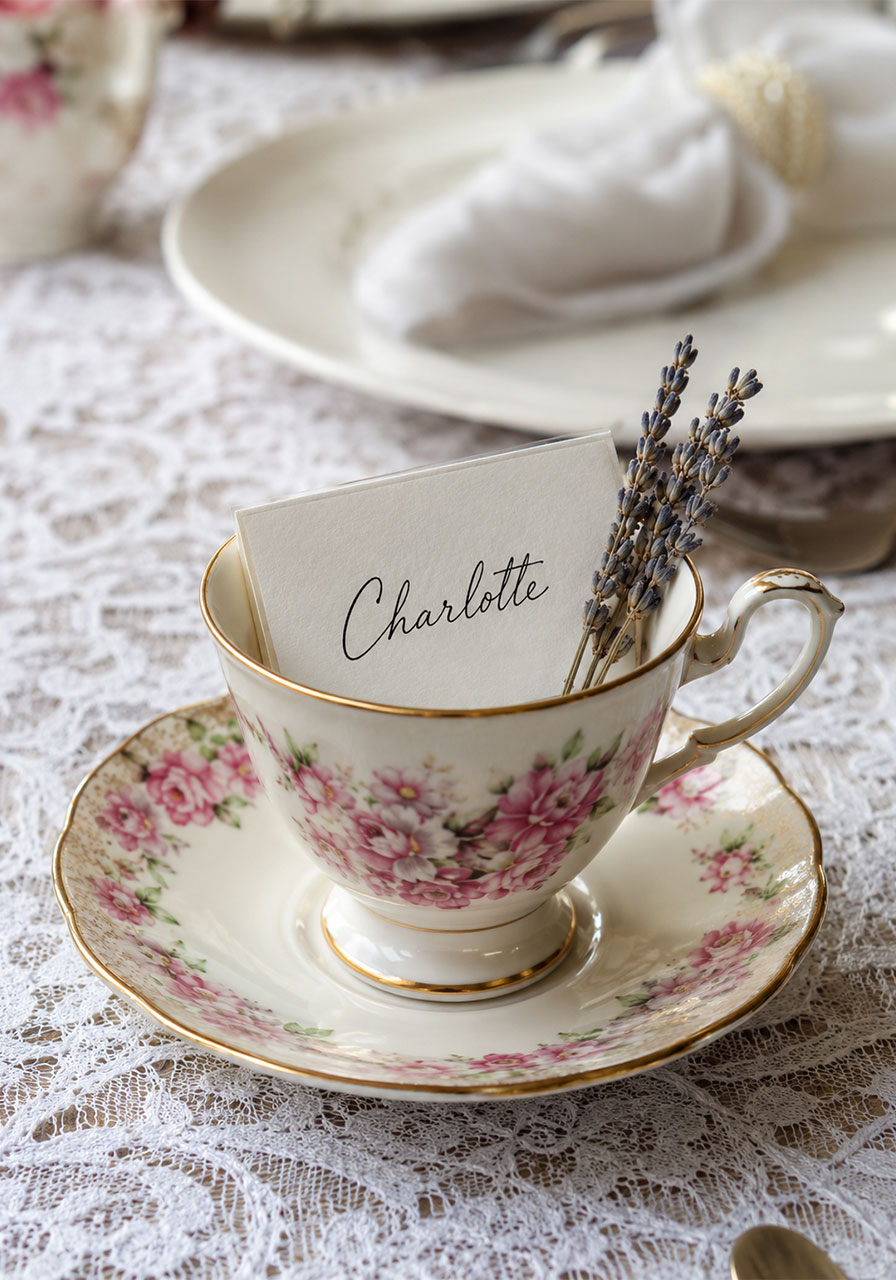
19. Vintage Teacup Place Cards
Turn place cards into part of the decor by tucking each guest’s name card right into a vintage teacup at their seat. It does double duty as decoration and seating chart, and it’s a sweet little memento guests can take home.
Best for: Assigned seating with a personal touch
Time to Prep: 20-30 minutes
What You’ll Need:
- One small teacup per guest (vintage, thrifted, or inexpensive new ones)
- Small cardstock cards
- A pen with nice handwriting, or a printer
- Optional: a small dried flower or sprig of greenery
How to Make It:
- Write or print each guest’s name on a small card.
- Fold the card slightly so it can stand upright, or attach it to a small skewer.
- Place the card inside the teacup so the name is visible.
- Tuck a small dried flower or sprig of greenery into the cup alongside the card for extra charm.
- Set one at each place setting.
Pro Tip: Let guests take their teacup home as a favor at the end of the party. It turns a decor item into a meaningful keepsake.
20. A Tea-Themed Photo Backdrop
Give your guests (and yourself) a reason to take photos all afternoon. A simple backdrop with hanging teacups, paper flowers, and a “Tea Time” sign creates an instant photo moment.
Best for: Capturing memories and social media-worthy moments
Time to Prep: 1-2 hours
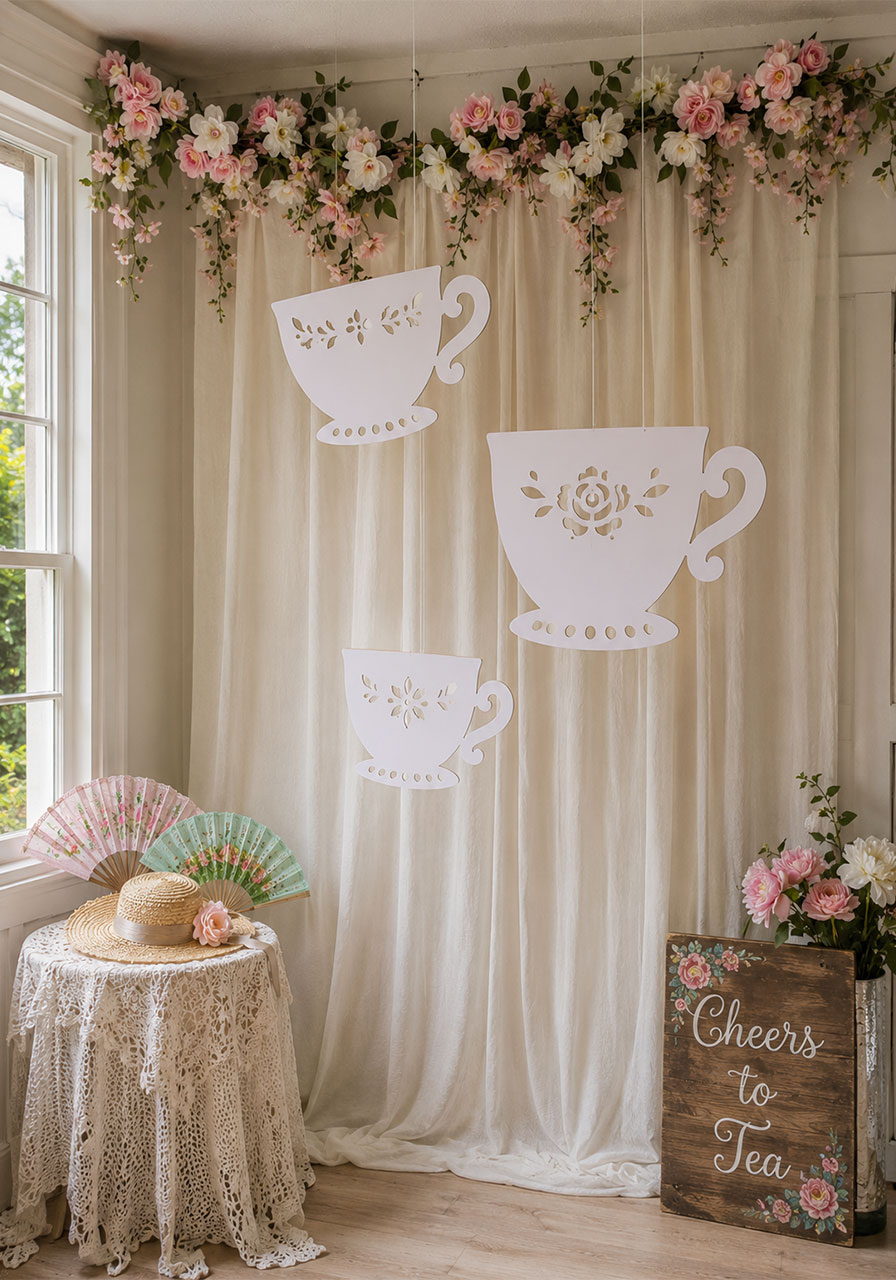
What You’ll Need:
- A plain backdrop (curtain, fabric, or a blank wall)
- Paper flowers or fresh garlands
- A few lightweight teacups or paper teacup cutouts
- Fishing line or clear thread
- A “Tea Time” or “Cheers to Tea” sign
How to Make It:
- Hang your fabric backdrop against a wall or use an existing blank wall as your base.
- Attach paper flowers or a floral garland along the top edge of the backdrop.
- Use fishing line to hang a few lightweight teacups or paper teacup cutouts at varying heights, so they appear to float.
- Place your “Tea Time” sign in the center or to one side.
- Set up a small table or stool nearby with props like fans, hats, or extra teacups for guests to use in photos.
Pro Tip: Set up the backdrop near a window or in a well-lit corner of the room. Natural light makes a huge difference in how photos turn out.
Wrapping It Up
And there you have it: 20 dainty tea party ideas to turn any gathering into something truly special. From flowery invitations to a teapot cupcake tower fit for royalty, every detail here is designed to make your guests feel like they stepped into something magical.
The best part? You don’t need to do all 20. Pick a handful that fit your space, your budget, and your guest list, and build from there. A few thoughtful touches go a long way.
Now go put the kettle on. Your dainty tea party awaits.
Have you ever thrown a tea party? We’d love to hear how you decorated and what ideas worked best for you. Drop a comment below and share your favorite tea party memories!