Let’s be honest: the food is half the reason we go camping in the first place. Sitting around the fire with a full belly, watching the sky turn pink, and not stressing about what’s for dinner? That’s the whole point.
But cooking a full meal on a two-burner camp stove while your kids are hangry and the mosquitoes are throwing a party is not it.
That’s where make-ahead camping meals come in. You do the heavy lifting in your own kitchen, days before you even pack the car. Then at the campsite, you’re just reheating, assembling, or straight-up unwrapping something delicious.
Below are 25 tried-and-true camping food ideas, organized by breakfast, lunch, and dinner, that you can prep ahead, pack in a cooler, and pull off without a hitch. Every recipe includes exactly what to do at home and exactly what to do once you’re at the campsite, so nothing gets lost in translation.
With this list in your back pocket, you’re officially the friend who “has camping figured out.” Let’s get into it.
Why Meal Prepping for Camping Is a Total Game-Changer
Prepping your camping meals ahead of time means less time cooking and more time actually enjoying the trip.
It also means fewer dishes at the campsite, less food waste, and way less chance of forgetting an ingredient three hours from the nearest grocery store.
And honestly? Pre-portioned, frozen camping food doubles as ice packs for your cooler. It’s basically meal prep and cooler management in one move.


Quick Camping Meal Prep Essentials
Before you dive into the recipes, here’s what makes camp cooking easy:
- A good cooler with a drain plug, plus a second smaller cooler just for drinks (so the food cooler doesn’t get opened fifty times a day)
- Heavy-duty aluminum foil, for packets and for reheating
- Gallon-size freezer bags and airtight containers
- A cast iron skillet, which works over a campfire, a grill grate, or a camp stove
- A camp stove as backup for when the fire isn’t cooperating
Now, let’s get to the food.
Make-Ahead Camping Breakfasts
Mornings at the campsite move slow, and that’s exactly how you want them. These breakfasts are all prepped before you leave home, so all that’s left to do is reheat, unwrap, or pour.
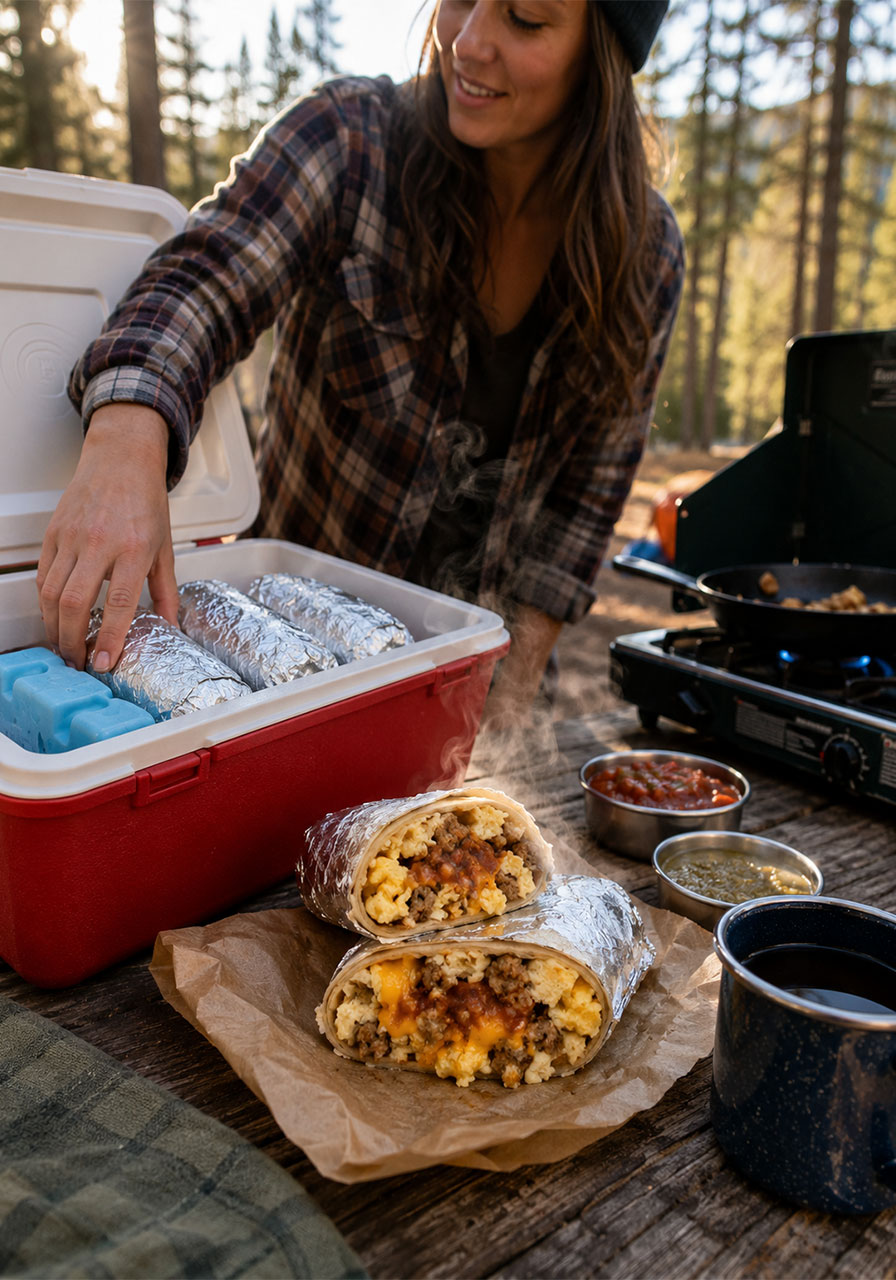
1. Easy Freezer Breakfast Burritos
These are the MVP of camping breakfasts. They travel frozen, double as an ice pack for your cooler, and reheat in minutes.
Best for: Busy camp mornings, big groups. Prep Ahead Time: 25 minutes. Serves: 6.
What You’ll Need:
- 6 eggs
- 6 flour tortillas (8-inch)
- ¼ pound sausage
- ¼ cup salsa
- ½ cup shredded cheddar cheese
Prep at Home:
1. Brown the sausage in a skillet over medium heat, then set it aside in a bowl.
2. Scramble the eggs in the same skillet until fully cooked.
3. Lay out the tortillas and layer eggs, sausage, salsa, and cheese evenly across each one. Roll them up burrito-style.
4. Place the wrapped burritos on a baking sheet and freeze for 1 hour, then transfer to a freezer-safe bag. They’ll keep for up to 3 months.
At the Campsite:
1. Pull a frozen burrito straight from the cooler.
2. Wrap it in a damp paper towel, then in foil, and warm it over the campfire coals or on a camp stove for a few minutes per side until heated through.
Pro Tip: Pack these flat and frozen at the very bottom of your cooler. They’ll help keep everything else cold for the first day or two of your trip.
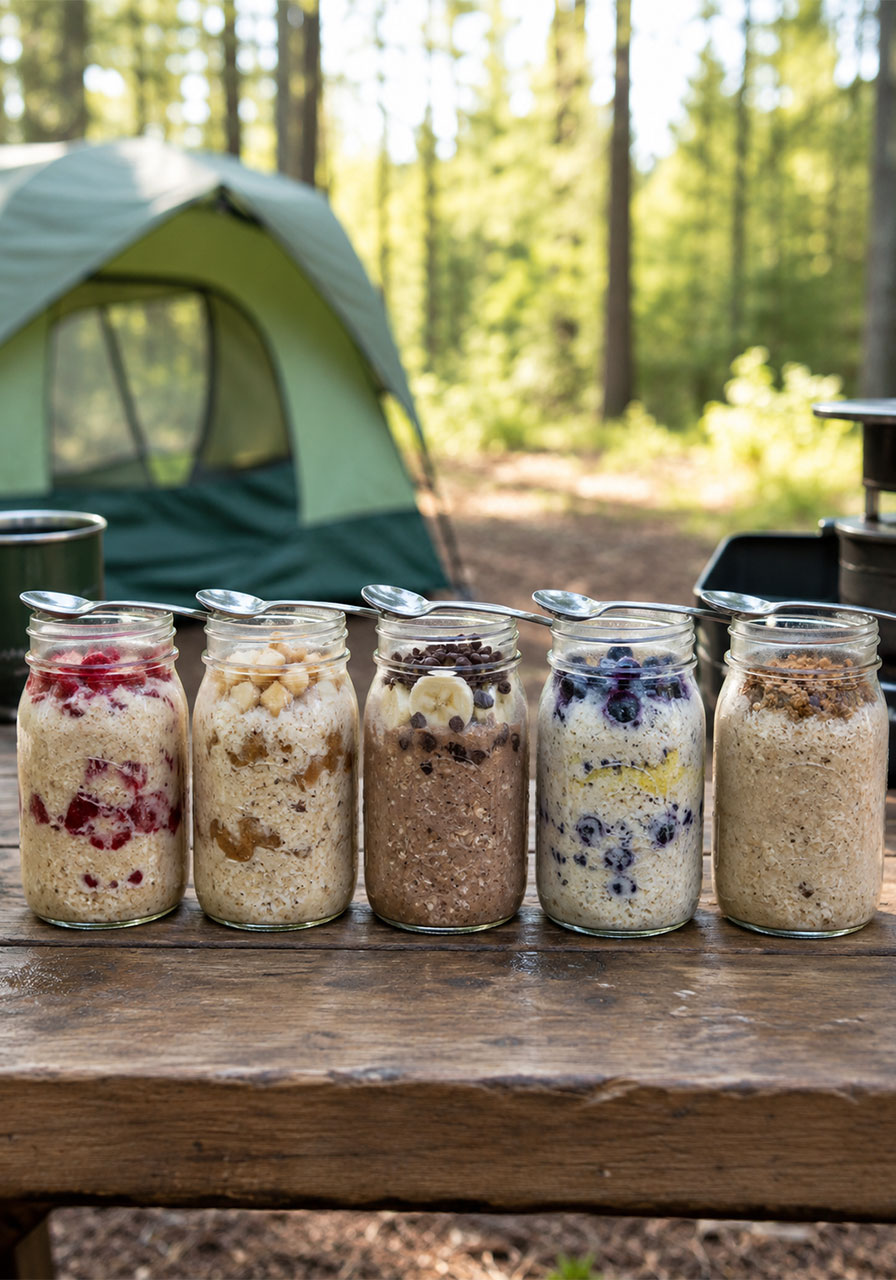
2. Overnight Oats Breakfast Jars
No cooking, no cleanup, no problem. Just grab a jar from the cooler and eat.
Best for: Grab-and-go mornings. Prep Ahead Time: 5 minutes plus overnight chill. Serves: 1 per jar.
What You’ll Need (Base):
- ½ cup rolled oats
- ½ cup milk of choice
- ¼ cup Greek yogurt
- 1 tablespoon chia seeds
- 1 tablespoon honey or maple syrup
- ¼ teaspoon vanilla extract
Pick a flavor and add these mix-ins to the base above:
- Peanut Butter & Jelly: 1 tablespoon strawberry jam, 1 tablespoon peanut butter, ¼ cup diced strawberries, 2 tablespoons crushed peanuts
- Apple Pie: ¼ cup diced apples, 1 tablespoon chopped pecans, 2 teaspoons maple syrup, ¼ teaspoon cinnamon
- Banana Nutella: ½ sliced banana, 1 tablespoon Nutella, 1 tablespoon crushed hazelnuts, 1 tablespoon chocolate chips
Prep at Home:
1. Add all ingredients to a mason jar with a tight lid and mix until combined.
2. Cover and refrigerate for at least 2 hours, or overnight.
At the Campsite: Grab a jar straight from the cooler and eat cold, straight from the jar. No prep needed.
Pro Tip: These keep for up to 5 days in the cooler, so make a jar for every morning of your trip before you even leave the driveway.
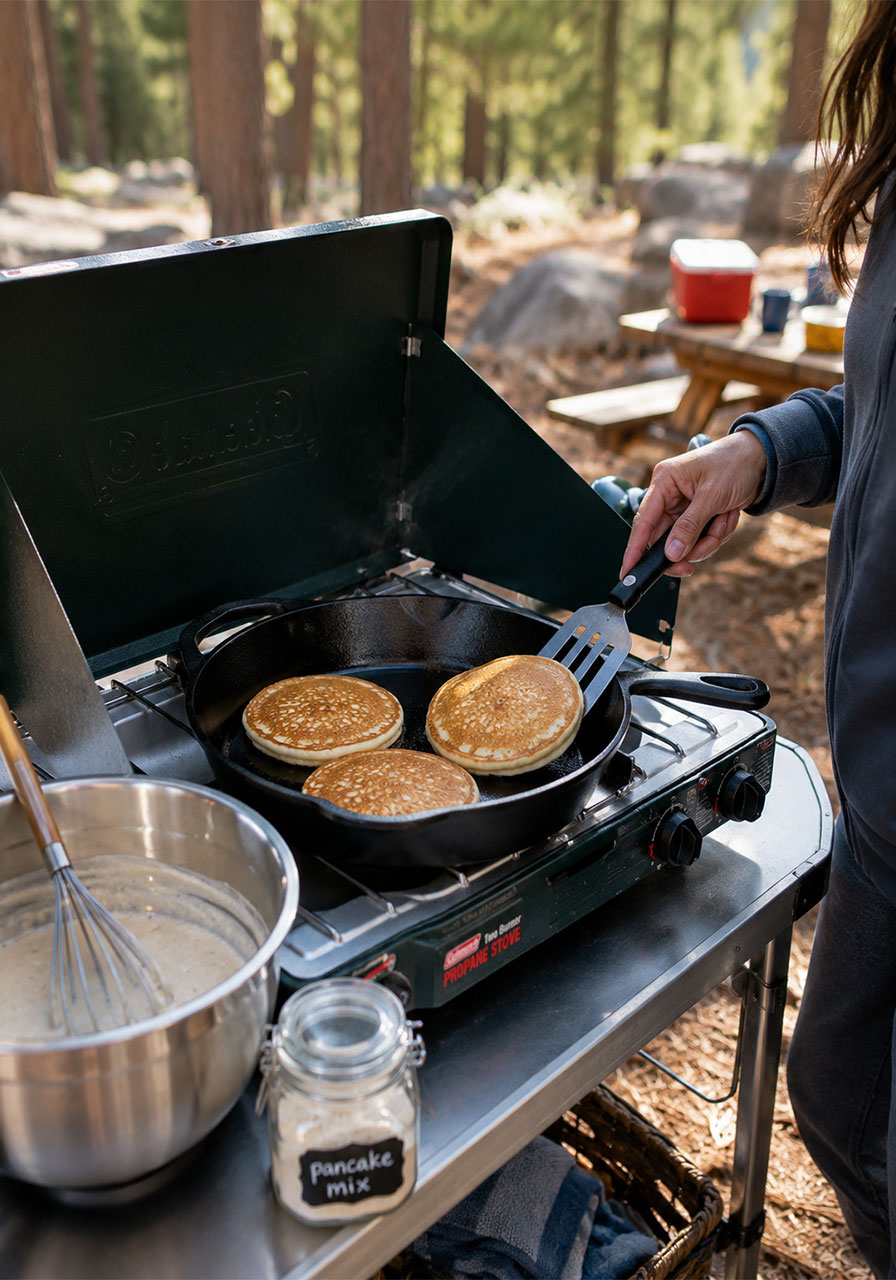
3. Fluffy Greek Yogurt Pancakes
Pack the dry mix at home, and all you need at camp is a bowl, a whisk, and a hot griddle.
Best for: A slower camp morning that deserves a hot breakfast. Prep Ahead Time: 10 minutes. Serves: 8 pancakes.
What You’ll Need:
- 1 cup all-purpose flour
- 2 teaspoons baking powder
- 1 tablespoon sugar
- ¼ teaspoon salt
- ¾ cup Greek yogurt
- 1 large egg
- ½ cup milk
- 1 teaspoon vanilla extract
- Butter or oil for cooking
Prep at Home:
1. Whisk together the flour, baking powder, sugar, and salt in a bag or container. This is your camp-ready dry mix.
2. Pack the egg, yogurt, milk, and vanilla in a small cooler-safe container, or bring them separately and mix at camp.
At the Campsite:
1. Combine the dry mix with the yogurt, egg, milk, and vanilla in a bowl. Stir until just combined; lumps are okay.
2. Heat a greased skillet over your camp stove or grill grate. Scoop ¼ cup batter per pancake and cook 2–3 minutes per side until golden.
Pro Tip: Don’t overmix the batter. A few lumps keep the pancakes light and fluffy instead of tough.
4. Cottage Cheese Egg Frittata Bites
These protein-packed egg bites are baked ahead at home, then reheated at the campsite for an easy, no-fuss breakfast.
Best for: Protein-focused mornings, picky eaters who like customizing. Prep Ahead Time: 30 minutes. Serves: 6.

What You’ll Need:
- Cooking oil spray
- ¾ to 1 cup finely chopped vegetables
- ¼ cup crumbled feta cheese
- 2 tablespoons chopped green onion
- 4 large eggs
- ½ teaspoon salt
- ⅛ to ¼ teaspoon black pepper
- 1 tablespoon chopped fresh herbs
Prep at Home:
1. Preheat the oven to 350°F and generously grease a 6-cup muffin pan.
2. Stir together the chopped veggies, green onion, and feta, then divide evenly among the muffin cups.
3. Whisk the eggs with salt, pepper, and herbs, then pour over the veggie mixture.
4. Bake 18 to 22 minutes, until puffed and set. Let cool, then refrigerate or freeze in an airtight container.
At the Campsite: Wrap the egg bites in foil and warm them on the edge of the campfire grate or in a skillet over low heat for a few minutes.
Pro Tip: These reheat much better than they refreeze twice, so only thaw what you’ll eat that morning.
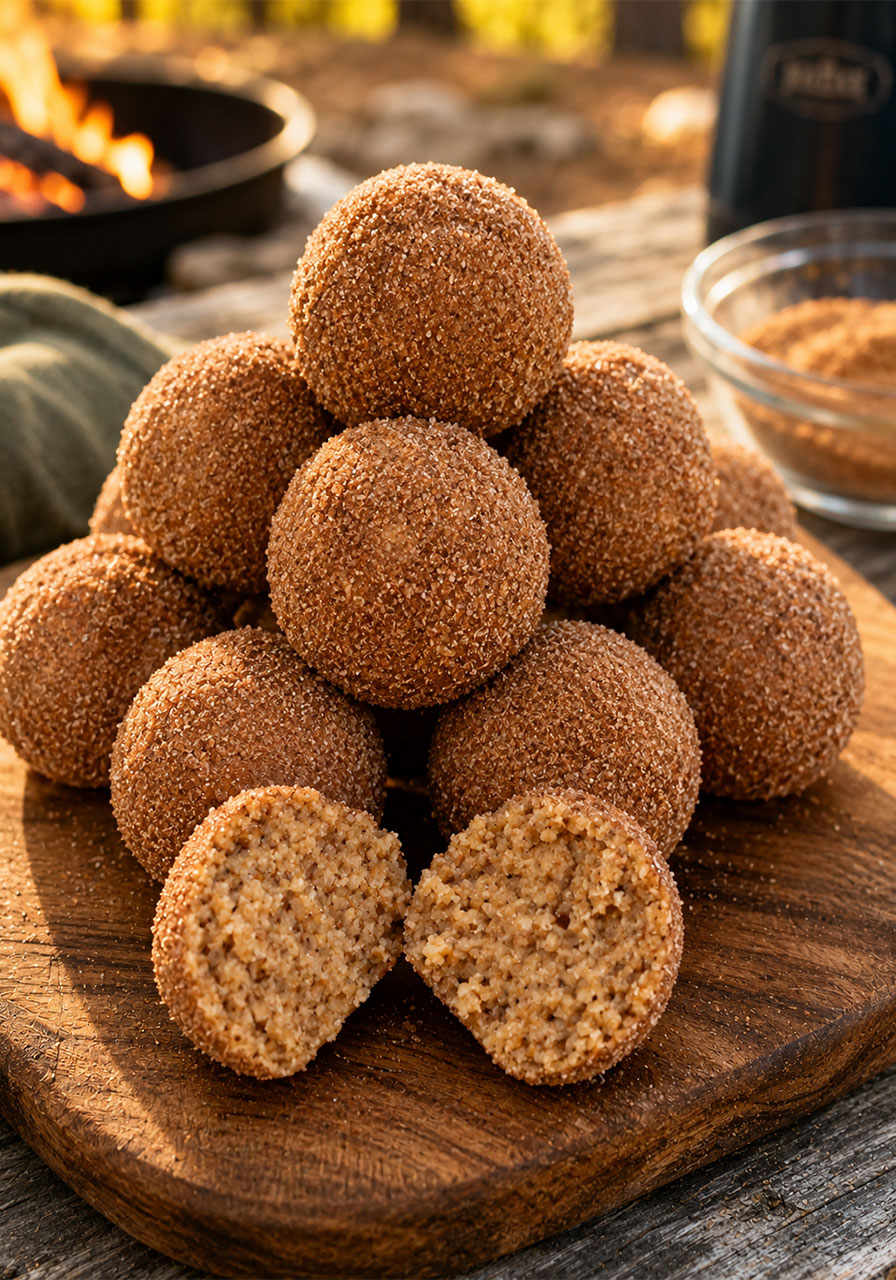
5. Snickerdoodle Protein Balls
Zero cooking required at the campsite. These little bites are basically dessert disguised as breakfast fuel.
Best for: Trail snacks, quick morning bites. Prep Ahead Time: 6 minutes. Serves: 18.
What You’ll Need:
- 1 ½ cups almond flour
- ¼ cup coconut flour
- 1 tablespoon cinnamon
- ¼ cup almond butter
- ¼ cup maple syrup
- 1 tablespoon milk
- 1 tablespoon cinnamon (for coating)
- 1 tablespoon sugar (for coating)
Prep at Home:
1. Combine the almond flour, coconut flour, and cinnamon in a bowl.
2. Melt the almond butter with the maple syrup, then stir into the dry mix, adding milk until the dough is thick and slightly sticky.
3. Roll into small balls, then coat each in the extra cinnamon and sugar mixture. Chill to firm up.
4. Store in an airtight container in the cooler.
At the Campsite: Eat straight from the container. No reheating needed.
Pro Tip: Double the batch. These disappear fast once your camp neighbors catch a whiff of the cinnamon sugar.
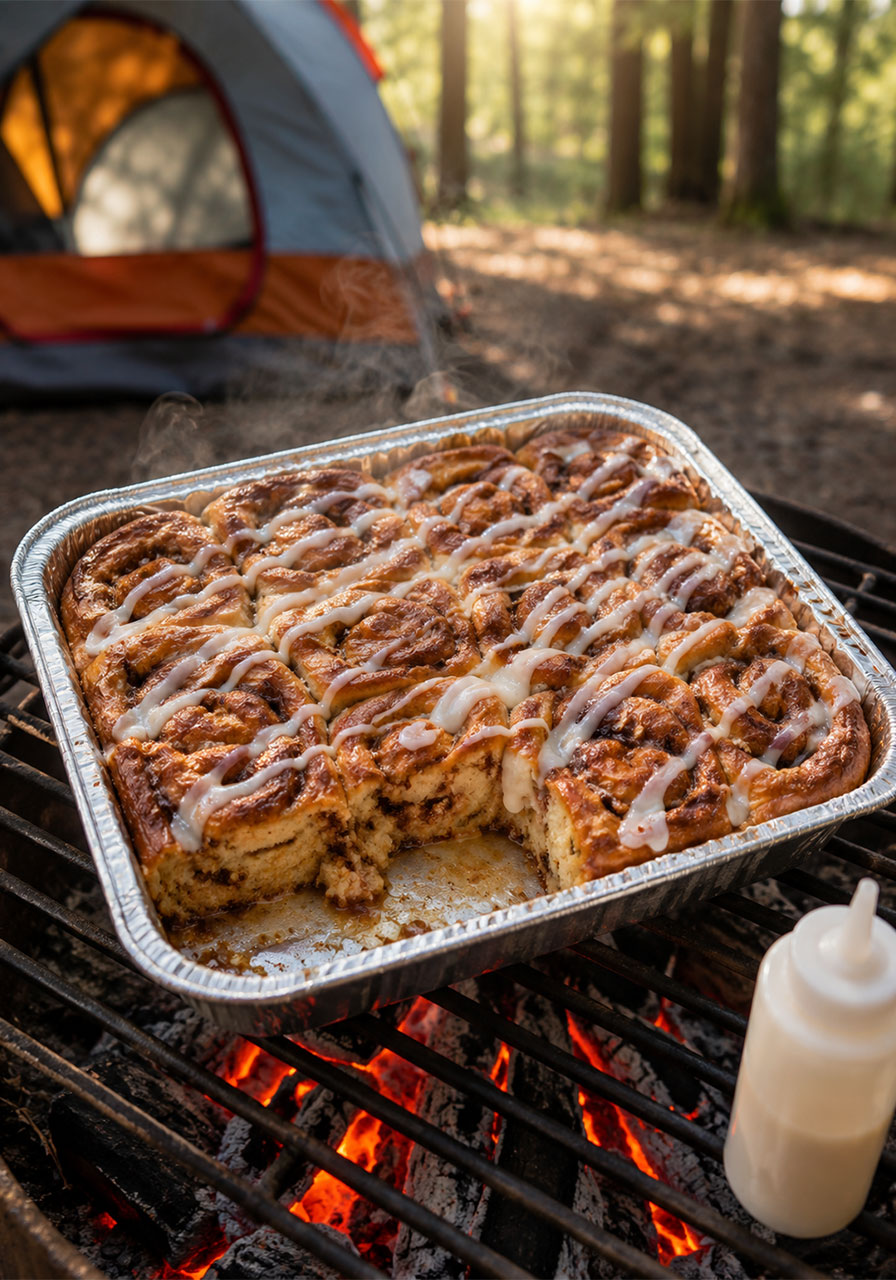
6. Easy Cinnamon Roll Casserole
Bake this the night before your trip, and you’ll have a warm, gooey, crowd-pleasing breakfast waiting at camp.
Best for: Special camp mornings, big groups. Prep Ahead Time: 55 minutes. Serves: 12.
What You’ll Need:
- 2 cans refrigerated cinnamon rolls, with icing packets
- 4 large eggs
- ½ cup milk
- 1 teaspoon vanilla extract
- 1 teaspoon ground cinnamon
- 2 tablespoons melted butter
- Optional: chopped pecans, raisins, apple slices, or chocolate chips
Prep at Home:
1. Preheat the oven to 350°F and grease a 9×13-inch baking dish.
2. Cut the cinnamon rolls into quarters and spread them evenly in the dish.
3. Whisk the eggs, milk, vanilla, cinnamon, and butter, then pour over the rolls.
4. Bake covered with foil for 25 minutes, then uncovered for another 10 to 15 minutes until golden and set.
5. Cool completely, cover tightly, and refrigerate. Bring the icing packets separately.
At the Campsite: Warm individual portions in foil over the campfire or on the camp stove, then drizzle with the warmed icing before serving.
Pro Tip: This one also tastes great served at room temperature, so don’t stress if you can’t fully reheat it.
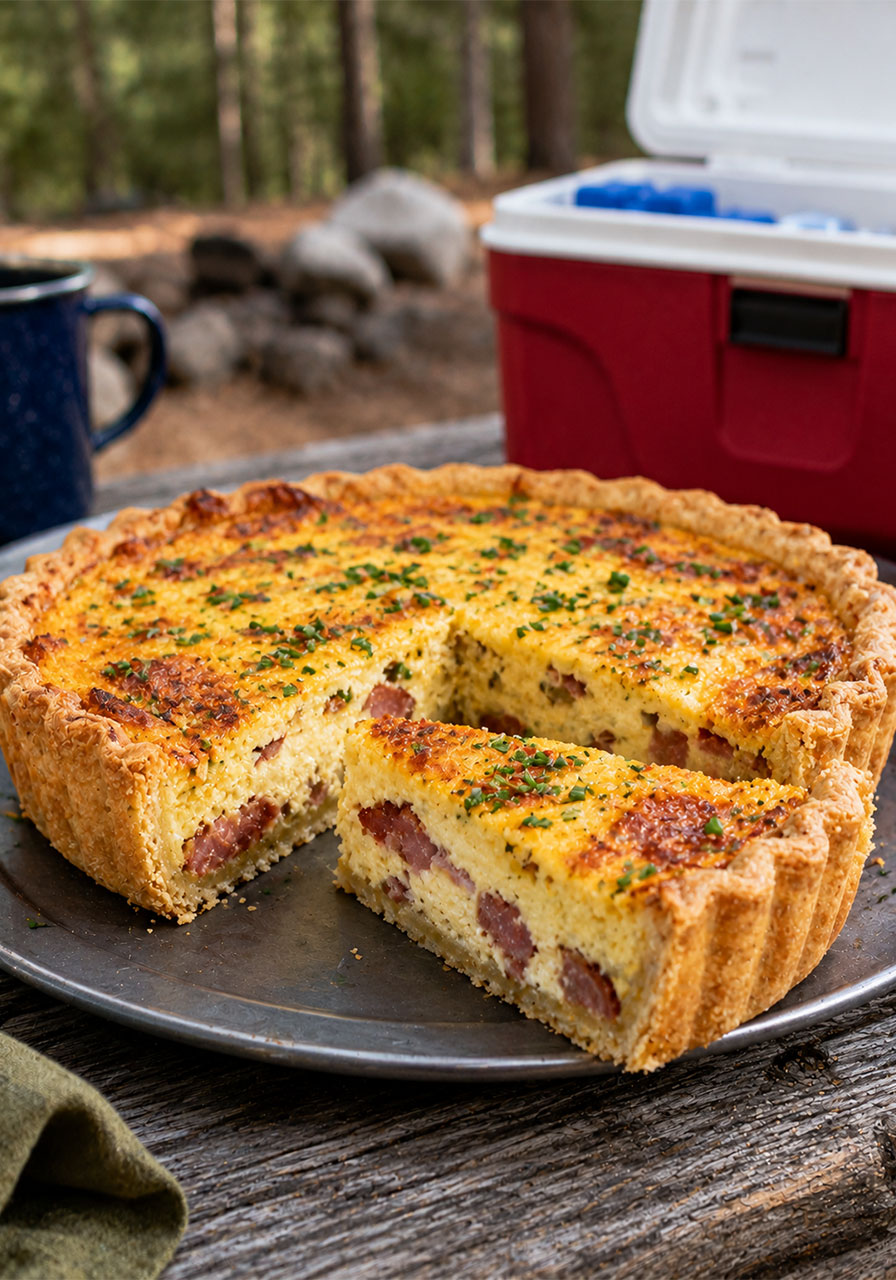
7. Classic Quiche Lorraine
Yes, you can absolutely bring a quiche camping. Bake it at home, slice it up, and serve it cold or gently warmed.
Best for: A hearty, make-ahead breakfast or brunch. Prep Ahead Time: 1 hour 25 minutes. Serves: 8.
What You’ll Need:
- 1 9-inch single pie crust
- 8 ounces bacon, cut into small pieces
- 1 large shallot, minced
- 4 large eggs
- 1 ½ cups half-and-half
- ¼ teaspoon salt, 1 teaspoon black pepper, ⅛ teaspoon nutmeg, pinch of cayenne
- 4 ounces grated Gruyère cheese
- ¾ ounce grated Parmesan
- 1 tablespoon chives
Prep at Home:
1. Blind bake the pie crust at 375°F until light brown, about 30 minutes total.
2. Fry the bacon until crisp, then sauté the shallot in the leftover bacon fat until soft.
3. Whisk the eggs, half-and-half, salt, pepper, nutmeg, and cayenne together.
4. Scatter the bacon, shallot, and Gruyère in the crust, pour the egg mixture over top, and sprinkle with Parmesan and chives.
5. Bake at 375°F for 40 to 50 minutes, until light golden and just set. Cool, cover, and refrigerate.
At the Campsite: Serve slices at room temperature, or wrap in foil and warm gently over low coals for a few minutes.
Pro Tip: Bake the quiche a full day ahead. The flavor actually improves once it’s had time to rest in the fridge overnight.
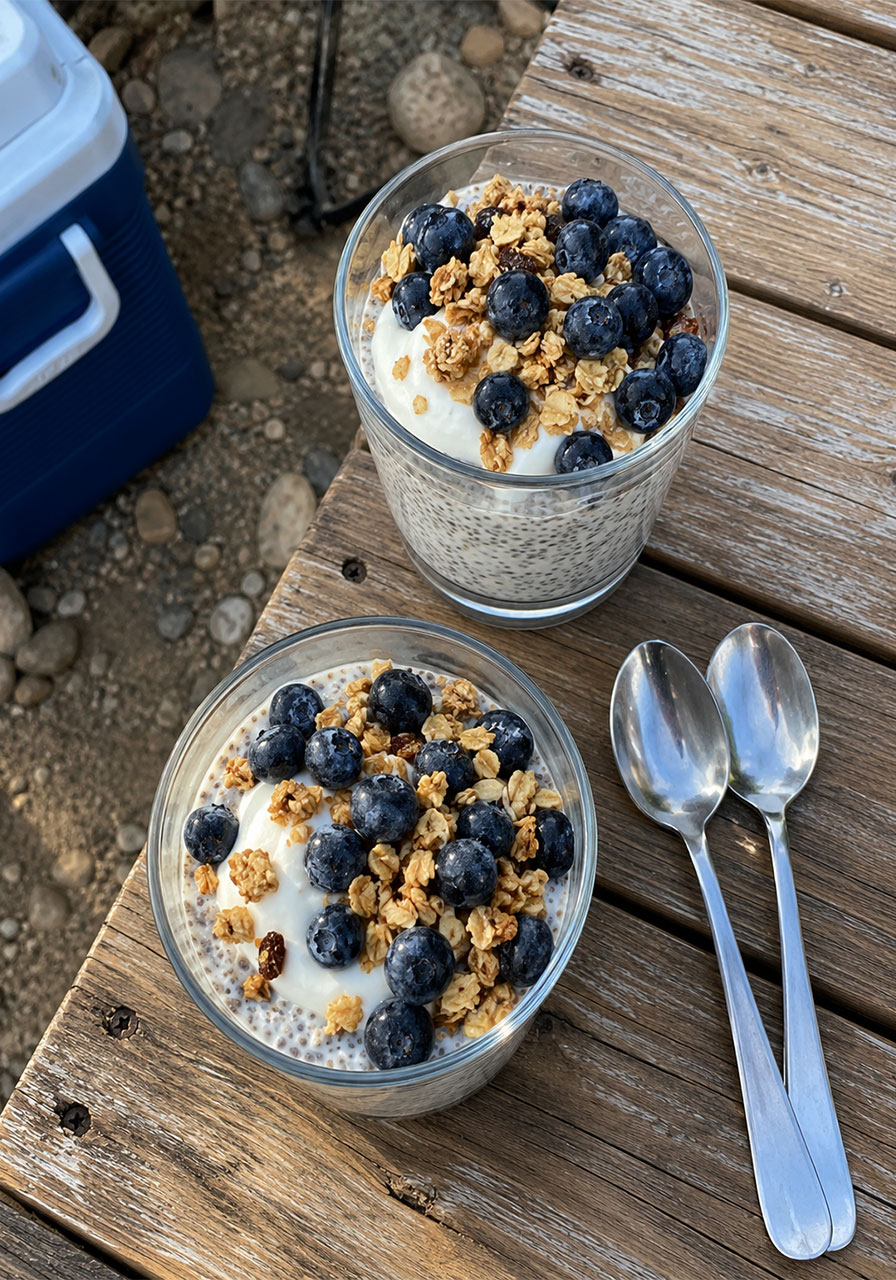
8. Protein Chia Pudding
Another no-cook camping breakfast that just needs a spoon and a cooler.
Best for: Light, protein-packed mornings. Prep Ahead Time: 2 hours (mostly hands-off). Serves: 2.
What You’ll Need:
- 1 scoop vanilla protein powder
- 1 ¼ to 1 ½ cups unsweetened vanilla almond milk
- 4 tablespoons chia seeds
- ½ tablespoon maple syrup or honey
- ¼ teaspoon vanilla, optional
- ½ cup Greek yogurt
- Granola and fresh berries for topping
Prep at Home:
1. Whisk the almond milk and protein powder together in a jar until dissolved.
2. Add the chia seeds, maple syrup, and vanilla, and stir well. Let sit 5 minutes, then stir again to break up clumps.
3. Refrigerate for 1 to 2 hours, or overnight, until thick.
At the Campsite: Spoon into cups and top with Greek yogurt, granola, and berries. No cooking required.
Pro Tip: Pack the toppings in a separate small container so the granola stays crunchy instead of turning soggy in the cooler.
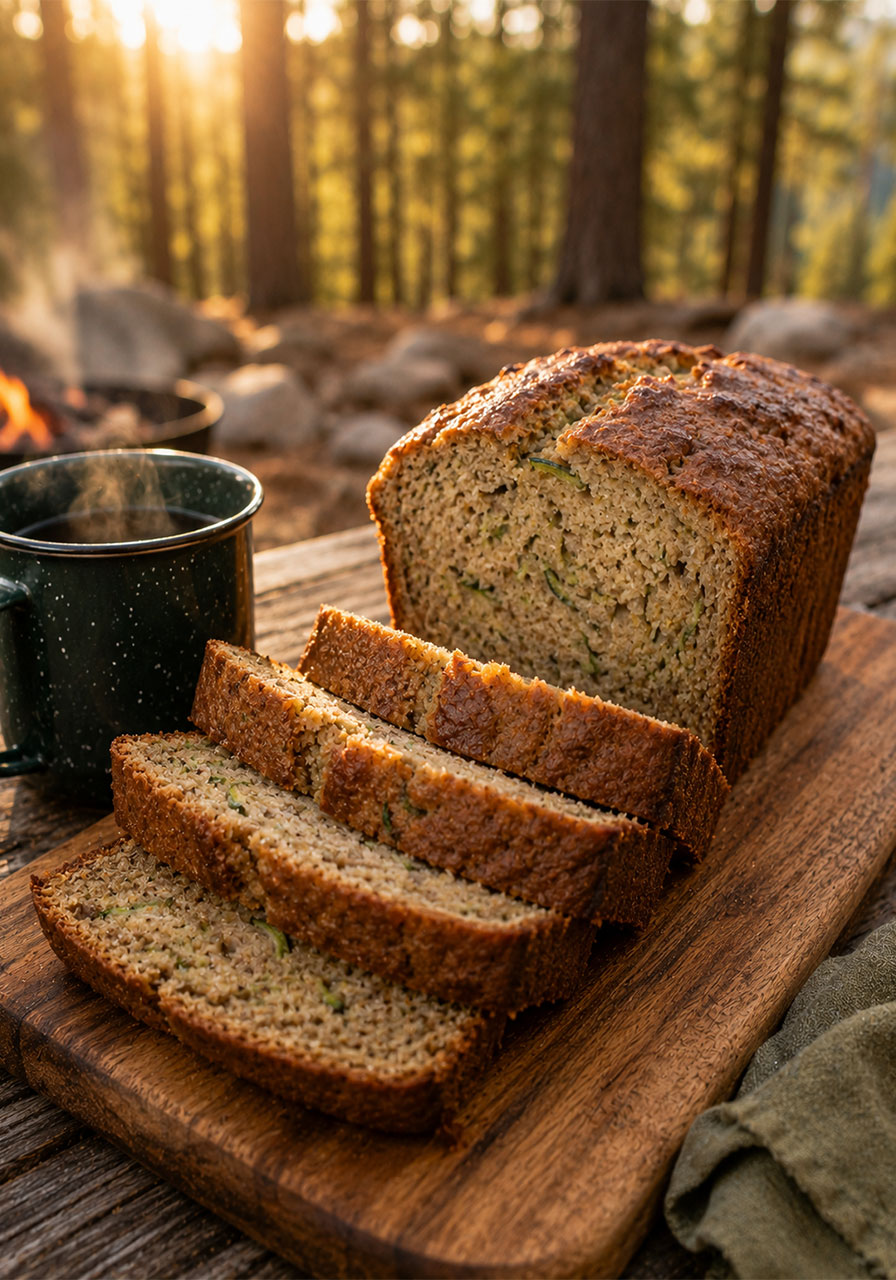
9. Zucchini Banana Bread
A moist, sliceable loaf that needs zero campsite prep. Just slice and hand it out.
Best for: Coffee-and-a-snack mornings. Prep Ahead Time: 1 hour 35 minutes. Serves: 1 loaf.
What You’ll Need:
- 2 cups finely shredded zucchini
- 2 cups all-purpose flour
- ½ teaspoon baking soda
- 1 teaspoon baking powder
- 2 teaspoons cinnamon
- ½ teaspoon salt
- 2 ripe bananas, mashed
- 1 cup granulated sugar
- 2 large eggs
- 1 cup canola oil
- 2 teaspoons vanilla extract
Prep at Home:
1. Preheat the oven to 350°F and grease a 9×5-inch loaf pan.
2. Squeeze excess water from the shredded zucchini and set aside.
3. Whisk together the flour, baking soda, baking powder, cinnamon, and salt.
4. In a separate bowl, mash the bananas and stir in the sugar, eggs, oil, and vanilla.
5. Combine the wet and dry ingredients, fold in the zucchini, and pour into the pan.
6. Bake 70 to 80 minutes, until a toothpick comes out clean. Cool completely before slicing.
At the Campsite: Slice and serve as is. No reheating necessary.
Pro Tip: Wrap the whole loaf in plastic wrap, then foil, before packing. It’ll stay moist for days at the campsite.
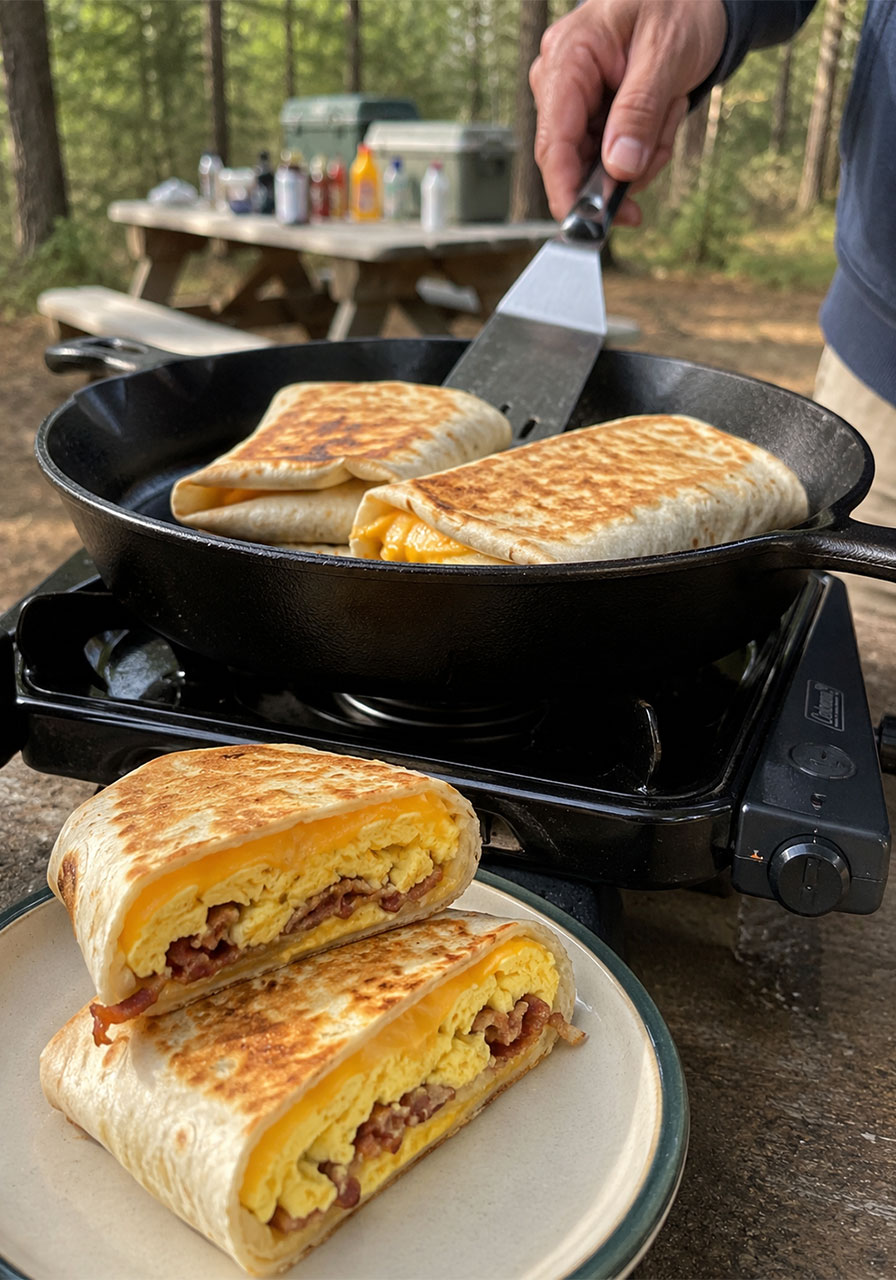
10. Dunkin-Style Wake Up Wraps
Bacon, egg, and cheese folded into a tortilla and toasted golden. This one’s a camp-morning classic for a reason.
Best for: Hot, savory breakfasts that eat like a treat. Prep Ahead Time: 20 minutes. Serves: 4.
What You’ll Need:
- 4 flour tortillas (5-inch)
- 4 eggs
- 4 pieces bacon
- 4 slices American cheese
- 2 tablespoons butter
Prep at Home:
1. Cook the bacon until crisp and set aside.
2. Scramble the eggs in a buttered skillet until just set.
3. Lay out the tortillas, and place one egg, one piece of bacon, and one slice of cheese on half of each.
4. Fold each tortilla in half like a quesadilla, wrap individually, and refrigerate or freeze.
At the Campsite: Toast the folded wraps in a hot, buttered skillet over the camp stove for 1 to 2 minutes per side, until the cheese melts and the outside is golden.
Pro Tip: Assemble these fully at home so all you’re doing at camp is toasting. That’s the whole trick to a fast morning.
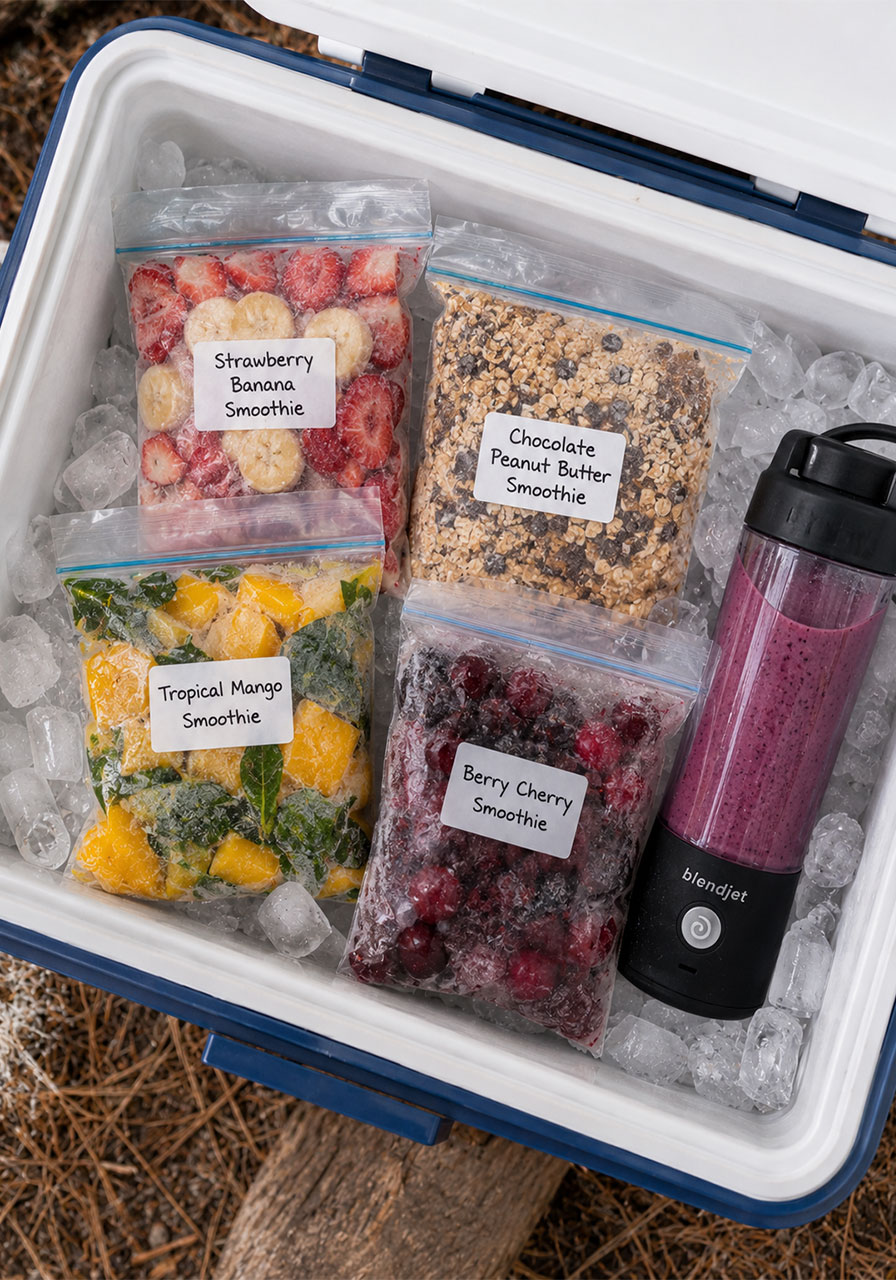
11. DIY Frozen Smoothie Packs
These do double duty: they’re a make-ahead breakfast and a genius cooler ice pack.
Best for: Hot-weather camping trips. Prep Ahead Time: 5 minutes. Serves: 2 per pack.
What You’ll Need (Strawberry Banana):
- 1 cup strawberries, halved
- 1 banana, sliced
- 1 tablespoon honey
- 1 tablespoon chia seeds
- 2 cups milk of choice, added when ready to blend
Prep at Home:
1. Divide the fruit and mix-ins (everything except the liquid) into a freezer-safe bag. Squeeze out excess air and seal.
2. Freeze the packs flat until ready to go.
At the Campsite: Add the pack contents to a portable blender or shaker bottle with the milk. Blend or shake until smooth.
Pro Tip: Line the bottom of your cooler with these frozen packs. They’ll thaw into your breakfast right as you need them.
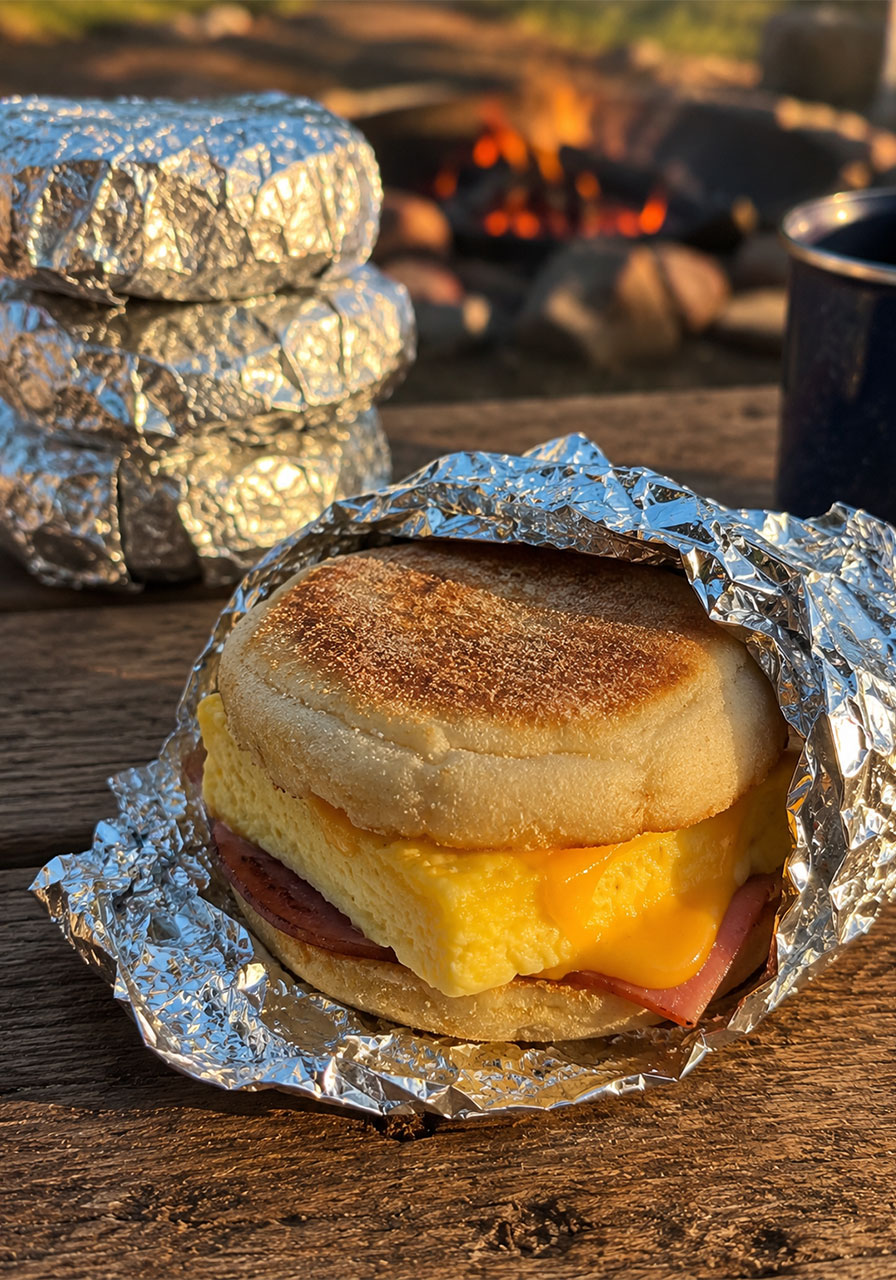
12. Freezer Breakfast Sandwiches
Baked eggs, melty cheese, and your choice of meat on an English muffin. These are the ultimate camp-morning grab-and-go.
Best for: Feeding a full campsite fast. Prep Ahead Time: 40 minutes. Serves: 12.
What You’ll Need:
- 12 eggs
- 2 tablespoons milk
- 1 teaspoon salt, ½ teaspoon black pepper
- 12 slices cooked bacon, sausage, or ham
- 12 English muffins
- 12 slices cheddar cheese
Prep at Home:
1. Preheat the oven to 325°F and grease a 9×13-inch pan.
2. Whisk the eggs, milk, salt, and pepper, then pour into the pan. Bake 18 to 22 minutes, just until set.
3. Cool and cut into 12 squares.
4. Assemble each muffin with egg, cheese, and meat, then wrap individually in foil and freeze.
At the Campsite: Warm the foil-wrapped sandwiches directly on the campfire grate or camp stove for a few minutes per side, until the cheese melts.
Pro Tip: Pack these in the middle of the cooler. They’ll thaw gradually and be ready to reheat by day two or three.
Make-Ahead Camping Lunches & Sides
Midday at camp calls for something cold, satisfying, and zero-effort. These three are all made entirely ahead of time.
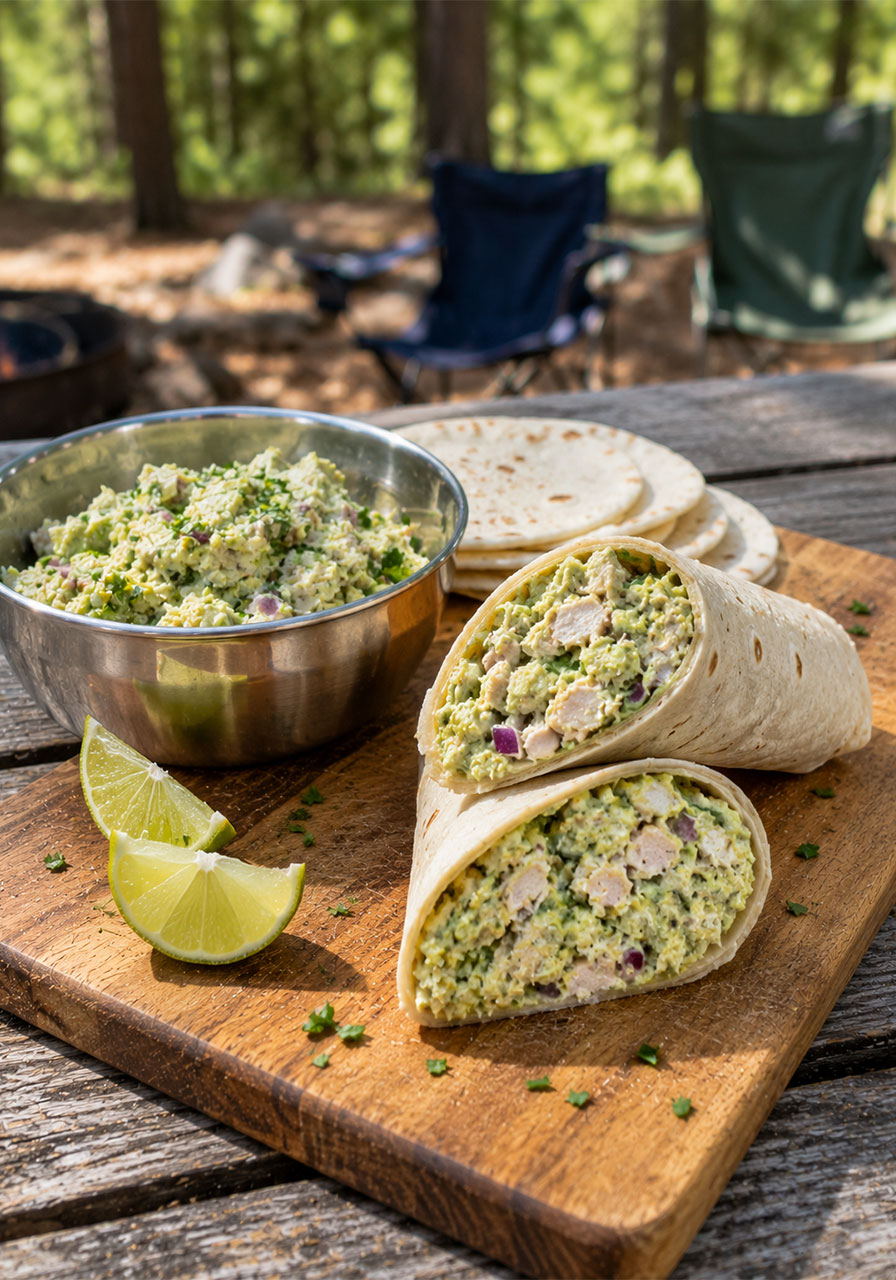
13. Healthy Avocado Chicken Salad Wraps
Creamy, protein-packed, and ready in minutes once you’re at the picnic table.
Best for: A fresh, filling camp lunch. Prep Ahead Time: 15 minutes. Serves: 4.
What You’ll Need:
- 2 cups shredded cooked chicken
- 2 ripe avocados, diced
- ¼ cup plain Greek yogurt
- 1 lime, juiced
- ½ teaspoon garlic powder, salt, and black pepper each
- ¼ cup finely chopped red onion
- ¼ cup chopped fresh parsley
- 4 large flour tortillas
Prep at Home:
1. Combine the shredded chicken, avocado, Greek yogurt, lime juice, garlic powder, salt, and pepper in a bowl, keeping some avocado chunks intact.
2. Stir in the red onion and parsley.
3. Store the mixture in an airtight container in the cooler, and pack the tortillas separately.
At the Campsite: Spoon the chicken mixture onto a tortilla, fold in the sides, and roll tightly. Slice and serve.
Pro Tip: Keep the mixture and tortillas separate until serving time, and eat this one within the first two days of your trip, since the avocado will start to brown.
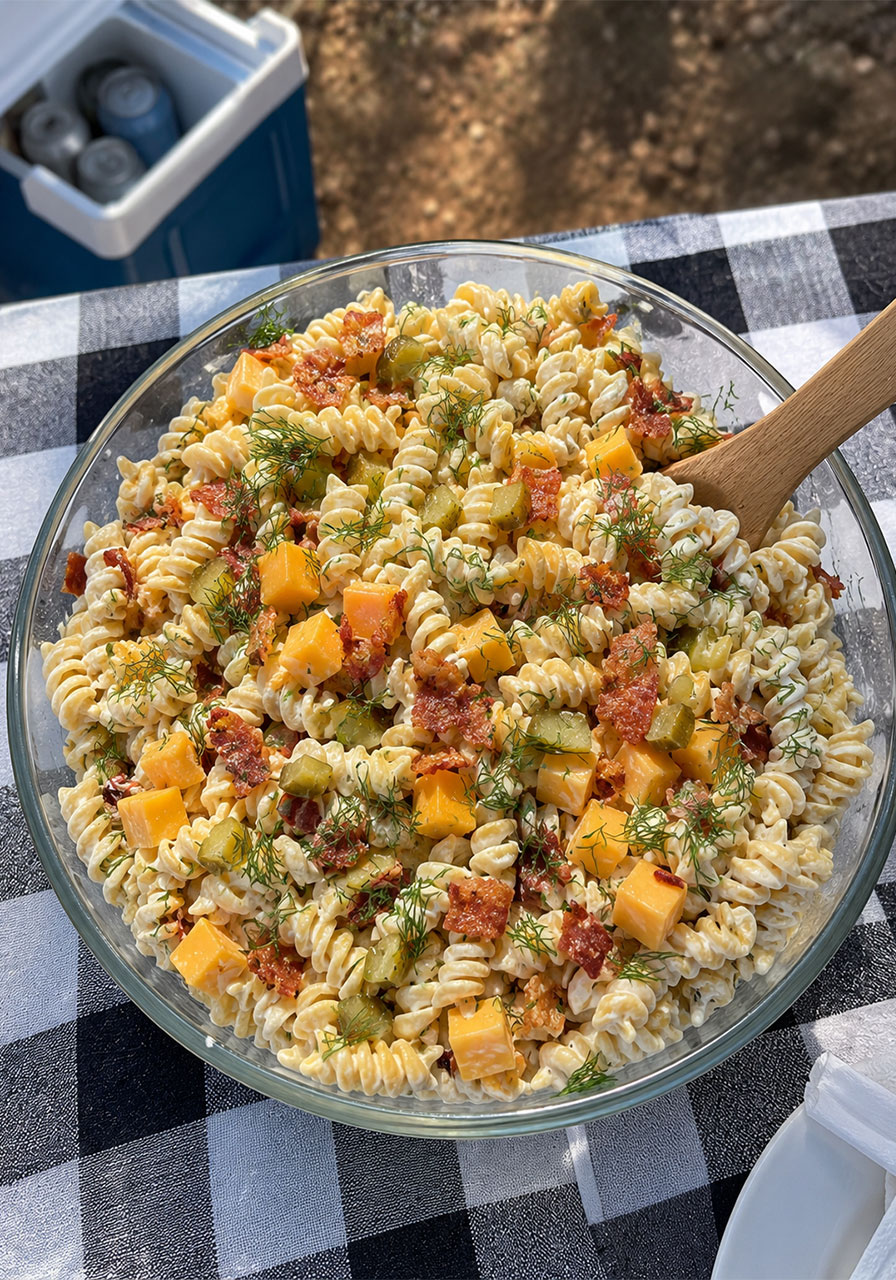
14. Dill Pickle Bacon Ranch Pasta Salad
Tangy, creamy, and loaded with bacon. This is the pasta salad people ask for the recipe on.
Best for: Feeding a crowd, potluck-style camp dinners. Prep Ahead Time: 50 minutes. Serves: 12.
What You’ll Need:
- 16 oz rotini pasta
- 16 oz bacon, cooked and crumbled
- 1 cup mayonnaise
- 1 cup sour cream
- ½ cup pickle juice
- 1 packet ranch dressing seasoning mix
- 2 tablespoons fresh dill, chopped
- 2 cups dill pickles, chopped
- 8 oz sharp cheddar cheese, cubed
Prep at Home:
1. Cook the pasta until al dente, drain, and rinse under cold water until cool.
2. Mix the mayonnaise, sour cream, pickle juice, ranch seasoning, and dill in a large bowl.
3. Add the pasta, bacon, pickles, and cheese, and mix well.
4. Refrigerate for at least an hour, then transfer to an airtight container for the cooler.
At the Campsite: Serve cold, straight from the cooler. No reheating needed.
Pro Tip: This actually tastes better the next day, so make it 24 hours before you leave. Bring a little extra mayo in case it needs to be rehydrated by day three.
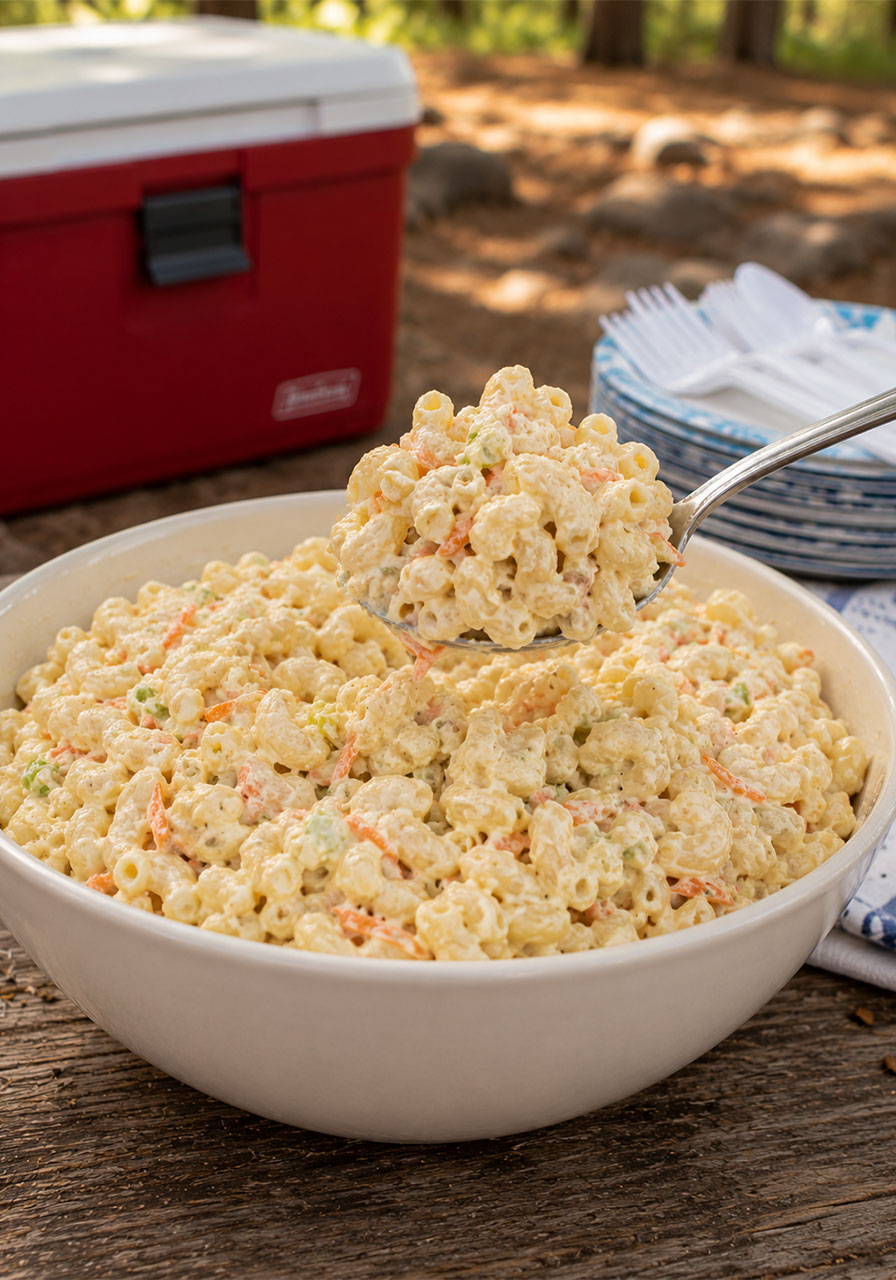
15. Authentic Hawaiian Macaroni Salad
Creamy, simple, and the perfect cold side for a hot afternoon at the campsite.
Best for: BBQ dinners, potlucks. Prep Ahead Time: 35 minutes plus 4 hours chilling. Serves: 18.
What You’ll Need:
- 1 pound macaroni
- 2 tablespoons apple cider vinegar
- 2 carrots, shredded
- ¼ cup shredded onion, optional
- 2 ½ cups mayonnaise
- ¼ cup milk
- 2 teaspoons sugar
- Salt and pepper to taste
Prep at Home:
1. Cook the macaroni per package directions, rinse under cold water until cool, and drain well.
2. Sprinkle with vinegar, add the carrot and onion, and toss. Refrigerate 15 minutes.
3. Whisk the mayo, milk, and sugar together, then fold into the macaroni. Season with salt and pepper.
4. Cover and refrigerate at least 4 hours, ideally overnight, before transferring to a cooler-safe container.
At the Campsite: Give it a gentle stir and serve cold. Add a splash more milk if it’s thickened up in the cooler.
Pro Tip: Pack this in a container with a tight lid directly in a cooler and it’ll hold up beautifully for several days of camping.
Make-Ahead Camping Dinners
Dinner at camp should feel like an event, not a chore. These recipes are prepped or fully cooked ahead, so the campfire only has to handle the final step.
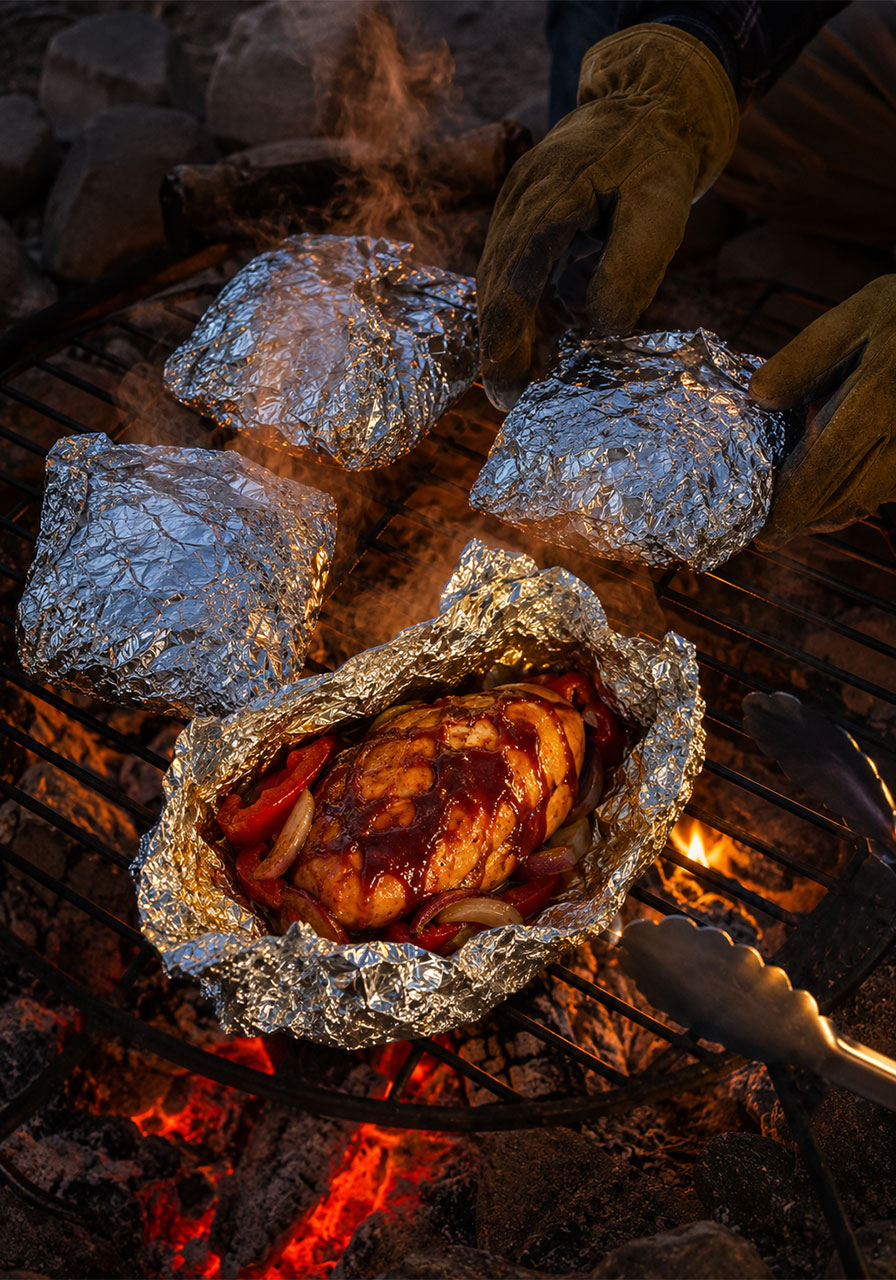
16. Grilled BBQ Chicken Foil Packets with Peppers and Onions
This is basically built for campfire cooking. Assemble the packets at home, then just toss them straight on the coals.
Best for: One-and-done campfire dinners. Prep Ahead Time: 15 minutes at home. Serves: 4.
What You’ll Need:
- 4 boneless, skinless chicken breasts (8 oz each)
- ½ cup barbecue sauce
- 4 medium bell peppers, sliced
- 1 medium red onion, sliced
- ¼ cup olive oil
- Kosher salt and black pepper, to taste
Prep at Home:
1. Cut four 16-inch pieces of heavy-duty foil.
2. Lay a chicken breast in the center of each, top with a portion of peppers and onions, and brush with BBQ sauce.
3. Drizzle with olive oil, season with salt and pepper, and seal each packet tightly.
4. Refrigerate or freeze the sealed packets until your trip.
At the Campsite:
1. Place the packets directly on the campfire grate or hot coals and cook about 25 minutes, turning once, until the chicken hits 165°F.
2. Unwrap carefully and brush with extra BBQ sauce before serving.
Pro Tip: Freeze the packets flat before your trip. They’ll thaw in the cooler and be ready to cook by dinner the first night.
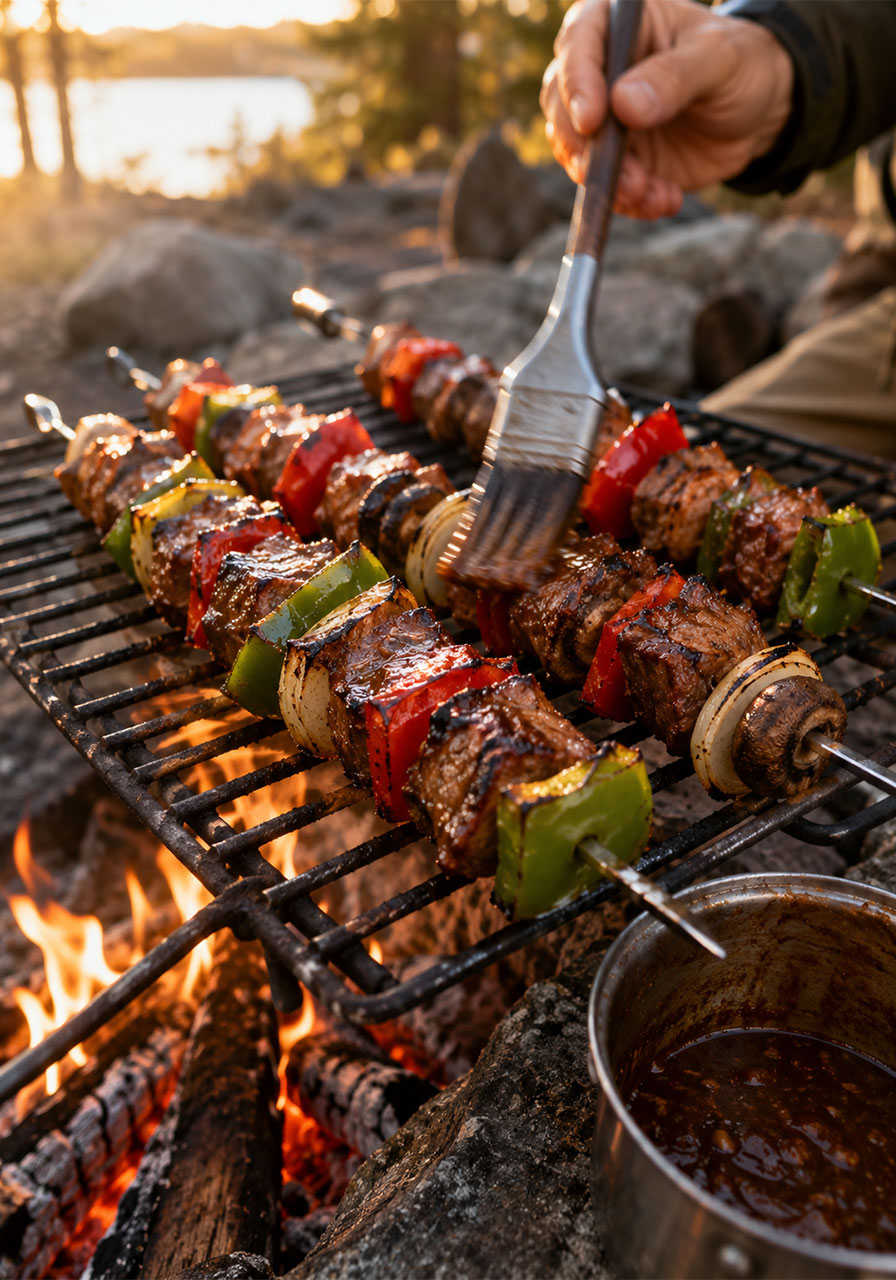
17. Shish Kabobs
Juicy, marinated beef skewers with peppers, onions, and mushrooms. This one turns any campsite into a backyard cookout.
Best for: A special campfire dinner night. Prep Ahead Time: 15 minutes plus 16 hours marinating. Serves: 4.
What You’ll Need:
- ½ cup soy sauce
- ⅓ cup vegetable oil
- ¼ cup lemon juice
- 1 clove garlic, minced
- 1 tablespoon prepared mustard
- 1 tablespoon Worcestershire sauce
- 1 ½ teaspoons salt, 1 teaspoon black pepper
- 1 ½ pounds lean beef, cubed
- 16 mushroom caps
- 2 green bell peppers and 1 red bell pepper, cut into chunks
- 1 large onion, cut into squares
- 8 metal skewers
Prep at Home:
1. Whisk the soy sauce, oil, lemon juice, garlic, mustard, Worcestershire, salt, and pepper together.
2. Add the beef to a resealable bag with the marinade and refrigerate 8 hours or overnight.
3. Add the mushrooms to the bag and marinate another 8 hours.
4. Pack the marinating bag directly in your cooler, along with the peppers and onion.
At the Campsite:
1. Remove the beef and mushrooms from the marinade and thread them onto skewers alternating with the peppers and onion.
2. Simmer the leftover marinade in a small pot over the camp stove for 10 minutes for basting.
3. Grill the skewers over the campfire, turning and basting frequently, until browned and the beef is cooked through, about 15 minutes.
Pro Tip: Pre-cube everything at home so all you’re doing at camp is threading the skewers. It cuts prep time in half.
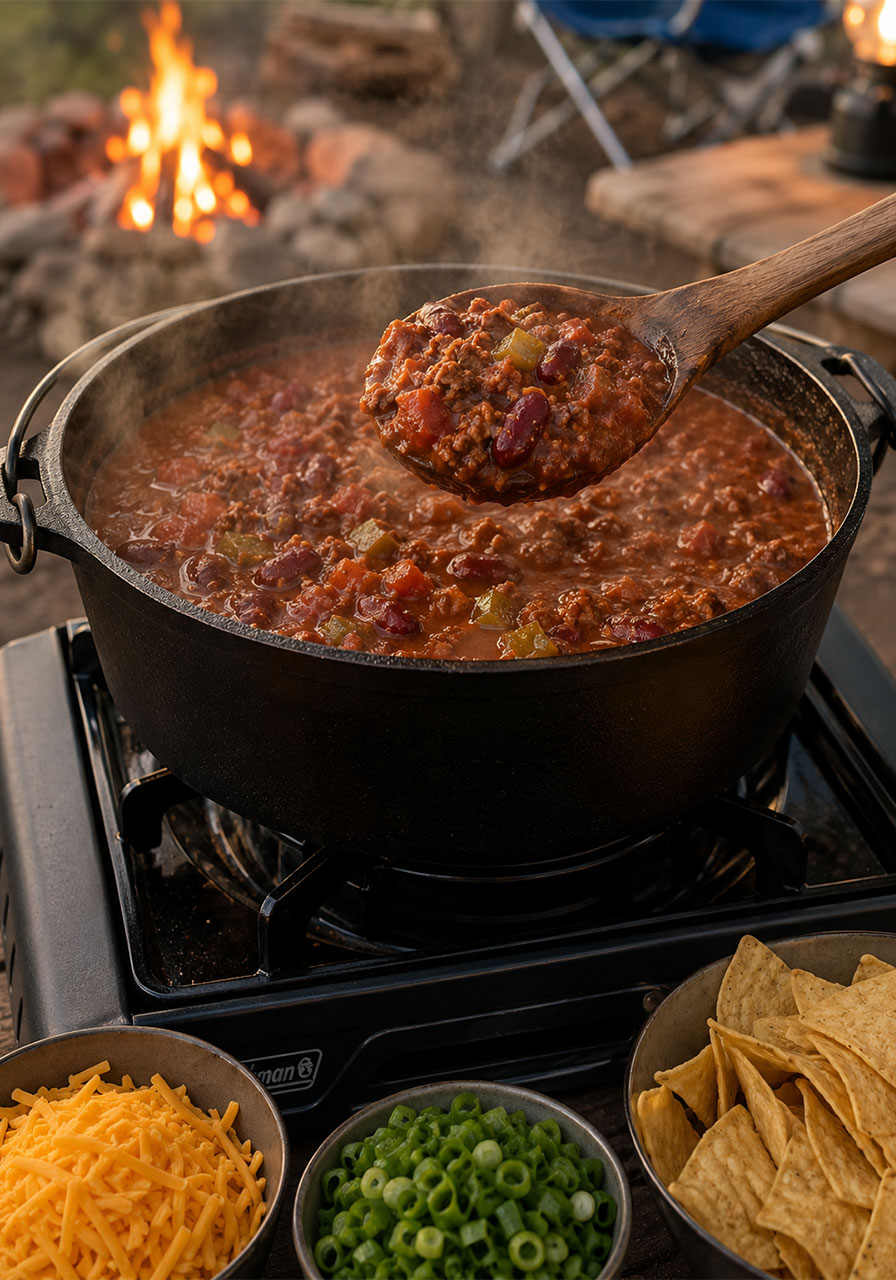
18. Best Homemade Chili
A big pot of chili is basically made for camping: it’s hearty, it feeds a crowd, and it tastes even better the second day.
Best for: Chilly camp nights. Prep Ahead Time: 1 hour 5 minutes. Serves: 8.
What You’ll Need:
- 2 pounds lean ground beef
- 1 onion, diced
- 1 jalapeño, seeded and diced
- 4 cloves garlic, minced
- 2 ½ tablespoons chili powder, 1 teaspoon cumin
- 1 green bell pepper, diced
- 14.5 oz crushed tomatoes
- 19 oz canned red kidney beans, drained and rinsed
- 14.5 oz canned diced tomatoes
- 1 ½ cups beef broth, 1 cup beer
- 1 tablespoon tomato paste, 1 tablespoon brown sugar (optional)
- Salt and black pepper to taste
Prep at Home:
1. Combine the ground beef with 1 ½ tablespoons of chili powder.
2. Brown the beef, onion, jalapeño, and garlic in a large pot. Drain any excess fat.
3. Add the remaining ingredients, bring to a boil, then reduce heat and simmer uncovered 45 to 60 minutes, until thickened.
4. Cool completely, then transfer to airtight containers for the cooler.
At the Campsite: Reheat in a pot over the camp stove or in a Dutch oven over the campfire, stirring occasionally, until warmed through.
Pro Tip: Bring shredded cheese, sliced green onion, and tortilla chips in a separate bag for a build-your-own chili bar at the campsite.
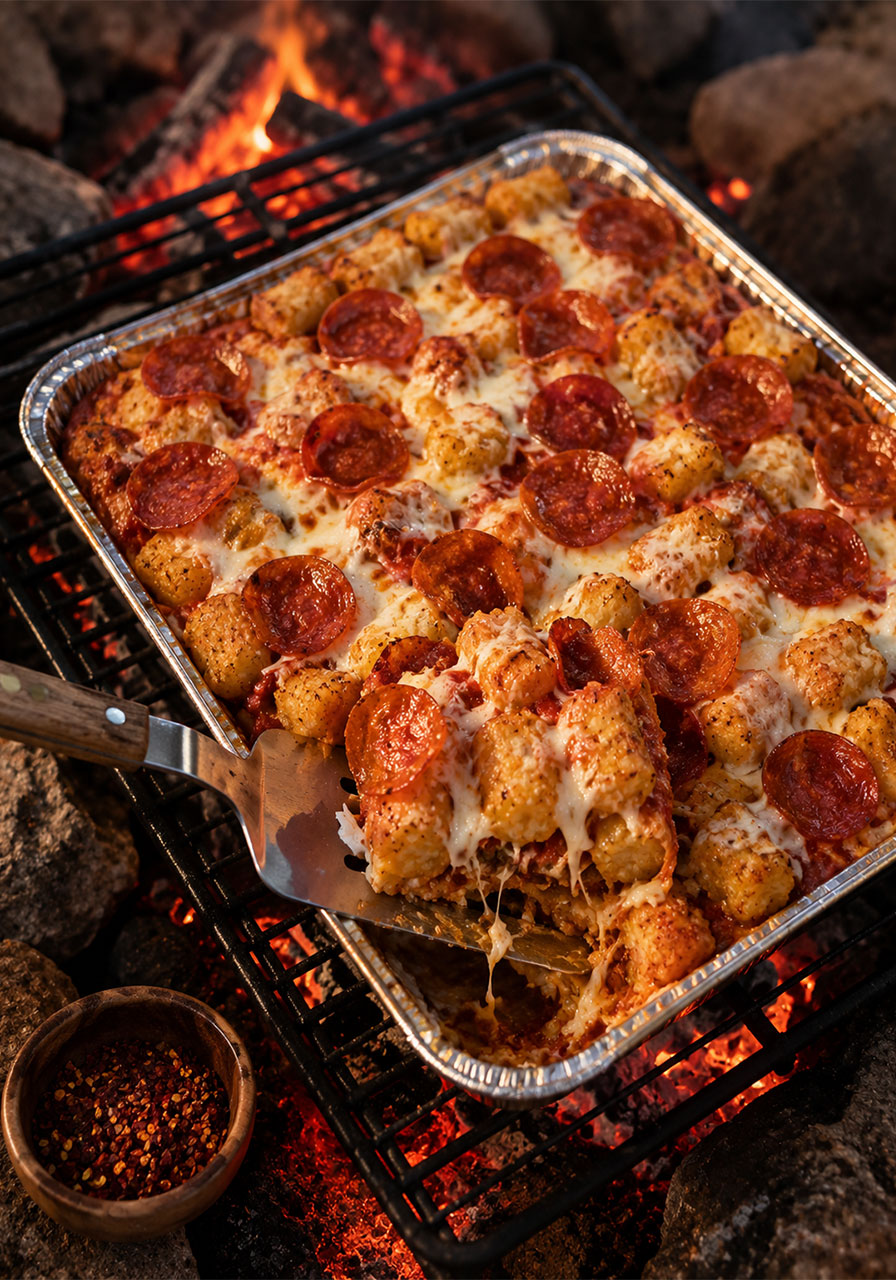
19. Dump & Bake Tater Tot Pizza Casserole
A five-minute-prep dinner that tastes like a treat. Great for feeding picky eaters at the campsite.
Best for: Kid-approved camp dinners. Prep Ahead Time: 40 minutes. Serves: 6.
What You’ll Need:
- 1 (32 oz) bag frozen tater tots
- 1 (24 oz) jar pasta sauce
- 2 cups shredded mozzarella cheese
- 1 small bag pepperoni
- ¼ cup grated Parmesan, optional
Prep at Home:
1. Preheat the oven to 400°F and grease a 9×13 baking dish.
2. Layer a thin coat of sauce, then a third of the pepperoni, then half the tater tots, half the remaining sauce, half the mozzarella, and another third of the pepperoni. Repeat, ending with pepperoni and Parmesan on top.
3. Cover with foil and bake 20 minutes, then uncover and bake 15 more minutes, until golden and crispy.
4. Cool completely, cover tightly, and refrigerate for transport.
At the Campsite: Reheat portions wrapped in foil over the campfire coals, or in a covered skillet on the camp stove, until warmed through.
Pro Tip: Pack extra red pepper flakes and ranch dressing to doctor it up campsite-style.
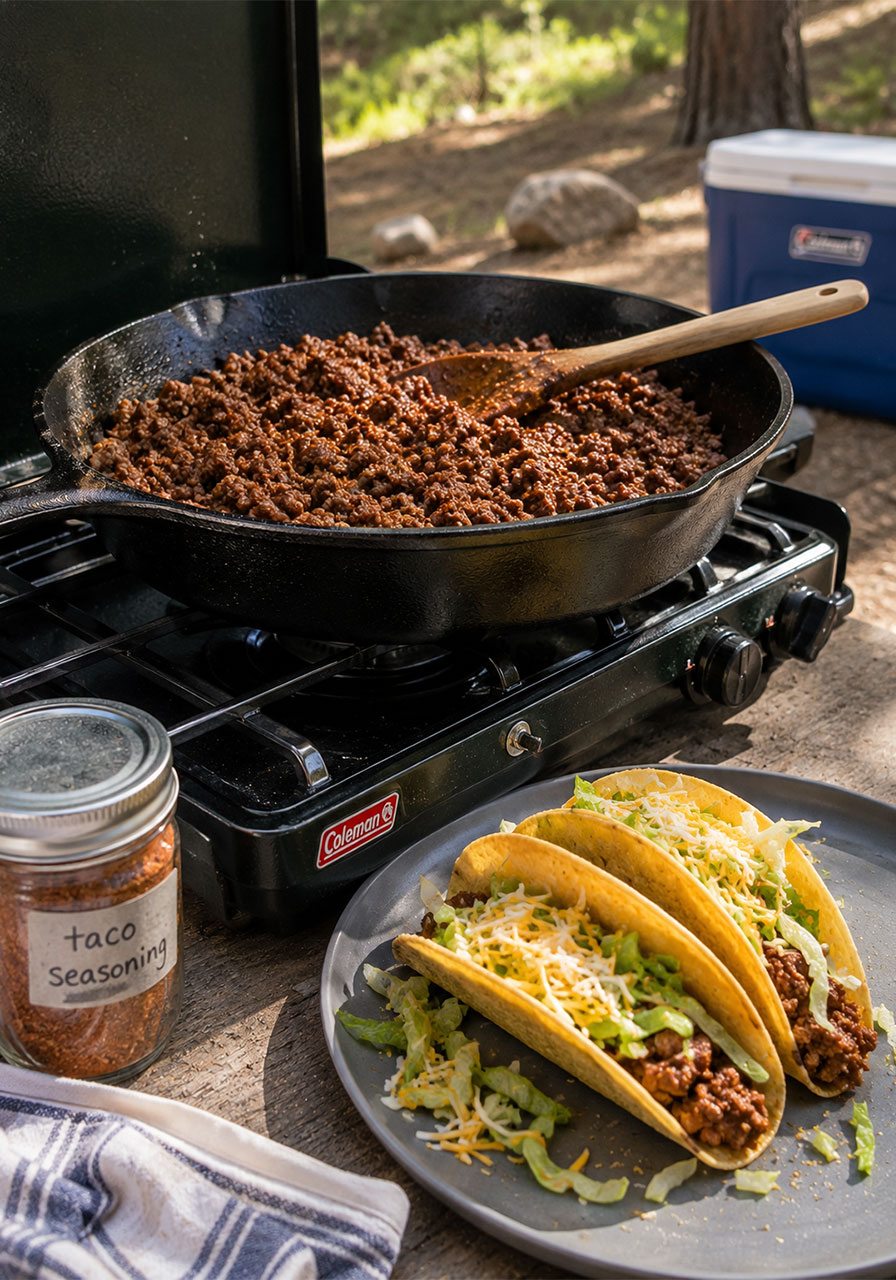
20. Ground Beef Tacos with Homemade Seasoning
Skip the packet. This seasoning mix comes together in five minutes and tastes way better than store-bought.
Best for: A fast, crowd-pleasing camp dinner. Prep Ahead Time: 25 minutes. Serves: 8.
What You’ll Need:
- 2 teaspoons dried minced onion
- 1 teaspoon salt, 1 teaspoon chili powder
- ½ teaspoon cornstarch, ½ teaspoon cumin
- ½ teaspoon red pepper flakes, optional
- ¼ teaspoon cayenne pepper, optional
- ¼ teaspoon dried minced garlic, ¼ teaspoon dried oregano
- 1 pound ground beef
- ½ cup water
Prep at Home: Mix all the dry seasoning ingredients together in a small container or bag. This is your camp-ready taco seasoning.
At the Campsite:
1. Brown the ground beef in a skillet over the camp stove until crumbly, about 7 to 10 minutes. Drain any excess grease.
2. Add the water and seasoning mix, stir, and simmer about 5 minutes until slightly thickened.
3. Serve in tortillas or taco shells with your favorite toppings.
Pro Tip: Pre-mix the seasoning at home in a labeled zip bag so it’s one less thing to think about at the campsite.
21. The Best Homemade Sloppy Joes
Cook the meat mixture at home and freeze it. All that’s left at camp is warming it up and piling it onto a bun.
Best for: A nostalgic, easy camp dinner. Prep Ahead Time: 25 minutes. Serves: 6.

What You’ll Need:
- 1 tablespoon butter, 1 teaspoon olive oil
- 1 pound ground beef
- ⅓ green bell pepper, minced
- ½ large yellow onion, minced
- 3 cloves garlic, minced
- 1 tablespoon tomato paste
- ⅔ cup ketchup, ⅓ cup water
- 1 tablespoon brown sugar, 1 teaspoon yellow mustard
- ¾ teaspoon chili powder, ½ teaspoon Worcestershire sauce
- ½ teaspoon salt, ¼ teaspoon black pepper
Prep at Home:
1. Heat butter and oil in a skillet, add the beef, and brown for about 5 minutes. Drain and set aside.
2. Cook the onion and bell pepper in the same skillet until soft, then add the garlic.
3. Return the beef to the skillet with tomato paste, ketchup, water, brown sugar, mustard, chili powder, Worcestershire, salt, and pepper. Simmer 10 to 15 minutes until thickened.
4. Cool completely, then freeze in an airtight container.
At the Campsite: Reheat in a pot over the camp stove until warmed through, then serve over toasted buns.
Pro Tip: This freezes well for up to 4 months, so it’s an easy one to prep weeks ahead of your trip, not just the night before.
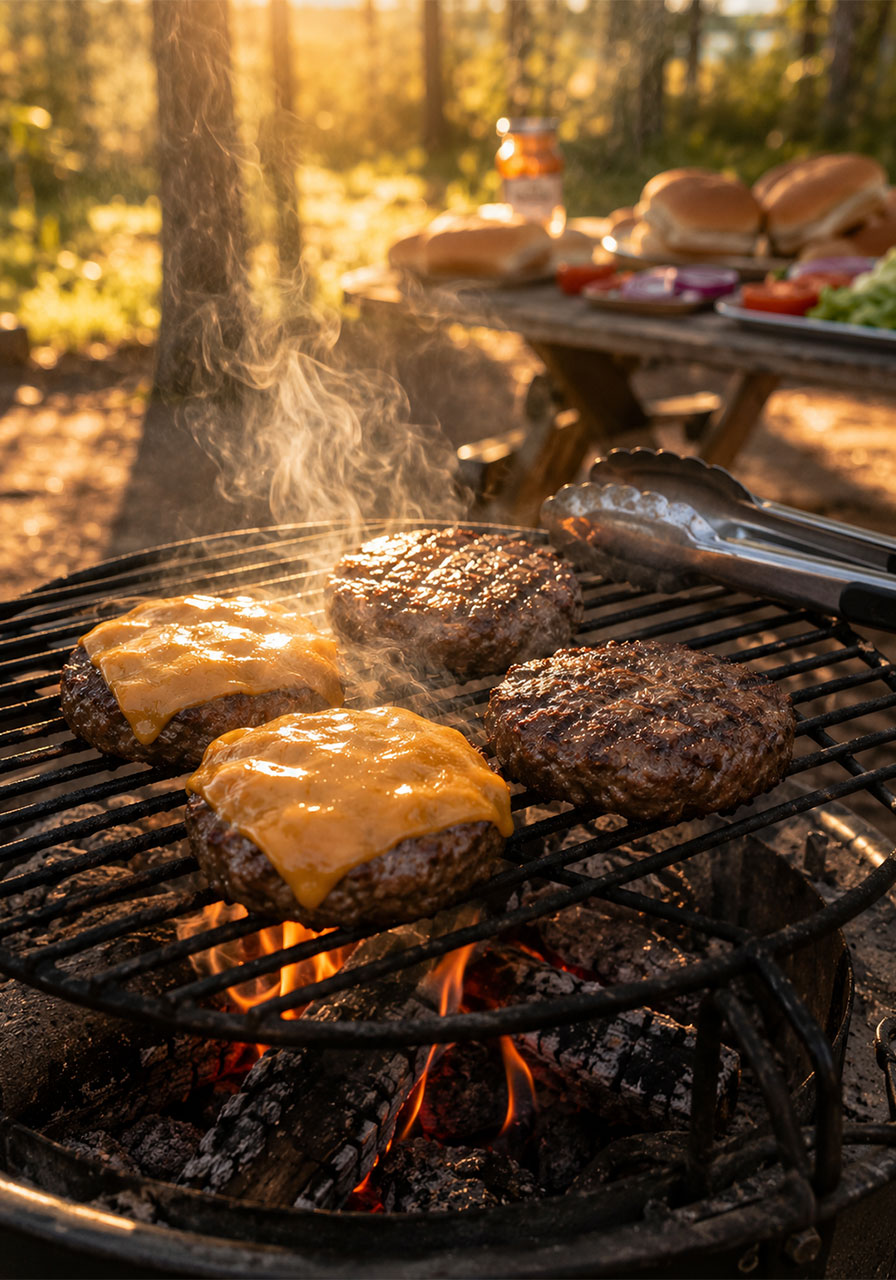
22. Juicy Grilled Hamburgers
Form the patties ahead, freeze them flat, and grill them straight over the campfire when you’re ready to eat.
Best for: A classic campfire cookout night. Prep Ahead Time: 13 minutes at home. Serves: 4.
What You’ll Need:
- 1 tablespoon olive oil
- 1 tablespoon Worcestershire sauce
- ½ teaspoon garlic powder
- 1 teaspoon sea salt, ½ teaspoon black pepper
- 1 pound ground beef
- 4 slices cheddar cheese, optional
Prep at Home:
1. Whisk together the olive oil, Worcestershire sauce, garlic powder, salt, and pepper.
2. Add the ground beef and mix gently until just combined; don’t overwork it.
3. Shape into ½-inch thick patties, pressing a thumbprint into the center of each to keep them from puffing up.
4. Wrap each patty individually and freeze or refrigerate.
At the Campsite: Grill over the campfire or a portable grill grate for 4 to 5 minutes per side, adding cheese in the last couple of minutes if desired, until cooked through.
Pro Tip: Freeze the patties before your trip so they act as extra ice packs and thaw out just in time for grilling.
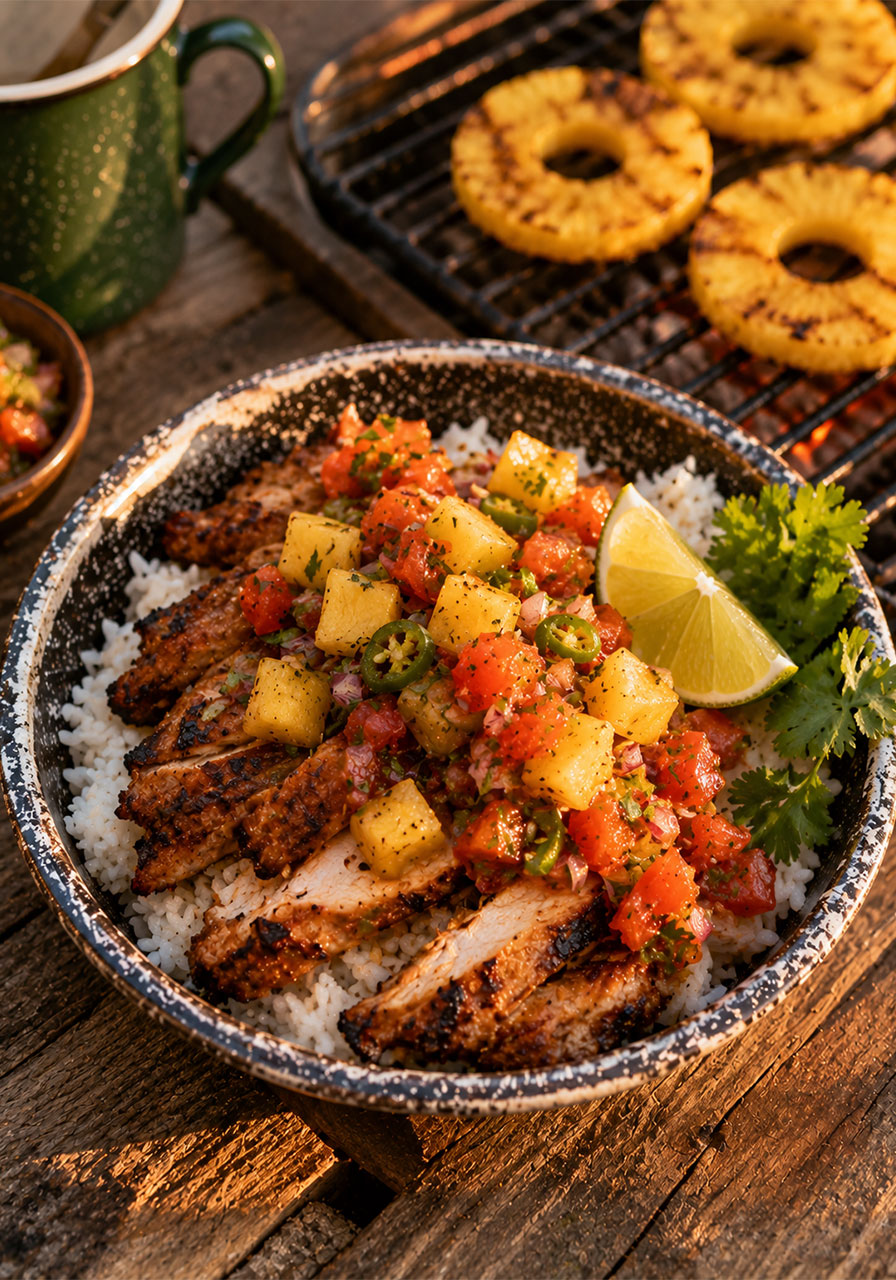
23. Grilled Pineapple Chicken and Rice
Sweet, smoky, and a little spicy. This bowl feels like a vacation on a plate, which, well, you’re already on one.
Best for: A slightly fancier camp dinner. Prep Ahead Time: 35 minutes active, plus marinating. Serves: 4.
What You’ll Need:
- ½ cup pineapple juice, 1 tablespoon lime juice
- 2 teaspoons grated fresh ginger, 2 cloves garlic, minced
- Soy sauce and honey, to taste
- 1 ½ pounds boneless, skinless chicken thighs
- ½ medium fresh pineapple, cut into planks
- 2 medium tomatoes, cubed
- 1 medium jalapeño, minced
- 3 tablespoons minced cilantro, 2 tablespoons lime juice
- 4 cups cooked rice
Prep at Home:
1. Whisk the pineapple juice, lime juice, soy sauce, ginger, garlic, and honey together.
2. Add the chicken to the marinade in a resealable bag and refrigerate 2 to 12 hours.
3. Cook a batch of rice and pack it in an airtight container for reheating.
At the Campsite:
1. Grill the chicken and pineapple over the campfire or camp stove until the chicken reaches 165°F and the pineapple is charred, then slice.
2. Chop the grilled pineapple and toss with tomato, jalapeño, cilantro, and lime juice for a quick salsa.
3. Warm the rice, then top with chicken and salsa to serve.
Pro Tip: Marinate the chicken in the bag it’ll travel in. One less container to wash at the campsite.
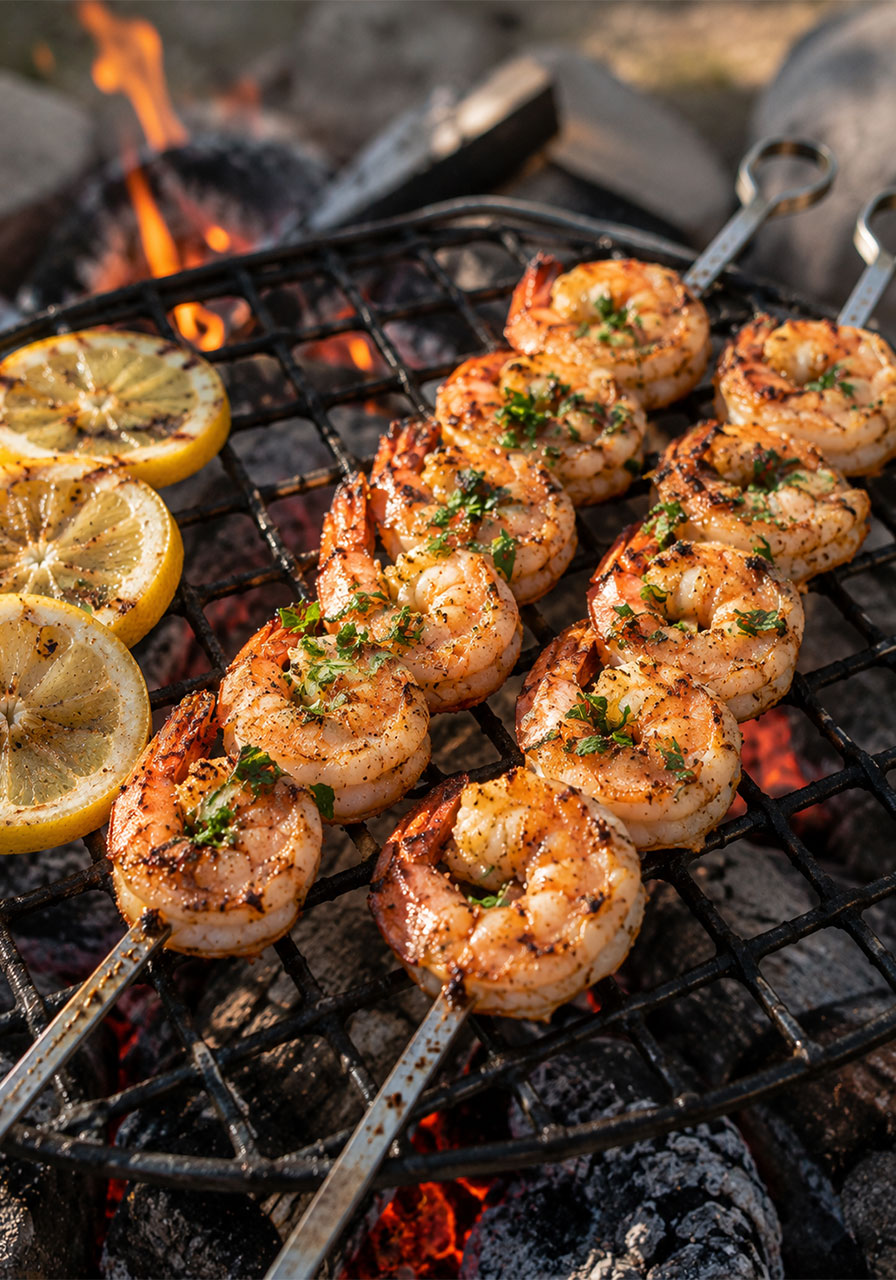
24. Easy Grilled Shrimp Skewers
Ready in under 10 minutes of actual cooking. This one’s perfect for a quick, lighter camp dinner.
Best for: A fast, fresh-tasting dinner. Prep Ahead Time: 10 minutes plus marinating. Serves: 4.
What You’ll Need:
- 1 pound large shrimp, peeled and deveined
- 3 tablespoons olive oil
- 2 tablespoons lemon juice
- ½ teaspoon salt, ¼ teaspoon black pepper
- 1 teaspoon oregano, ½ teaspoon paprika, ½ teaspoon garlic powder
Prep at Home:
1. Whisk the olive oil, lemon juice, salt, pepper, oregano, paprika, and garlic powder together.
2. Pack the marinade and shrimp separately in the cooler, since marinating for too long will start to cook the shrimp.
At the Campsite:
1. Toss the shrimp in the marinade and let sit for 15 minutes, no longer than 2 hours.
2. Skewer 4 to 6 shrimp per skewer and grill over the campfire or camp stove for 2 to 3 minutes per side, until pink and opaque.
Pro Tip: Soak wooden skewers in water at home before your trip so they’re ready to go and won’t burn over the fire.
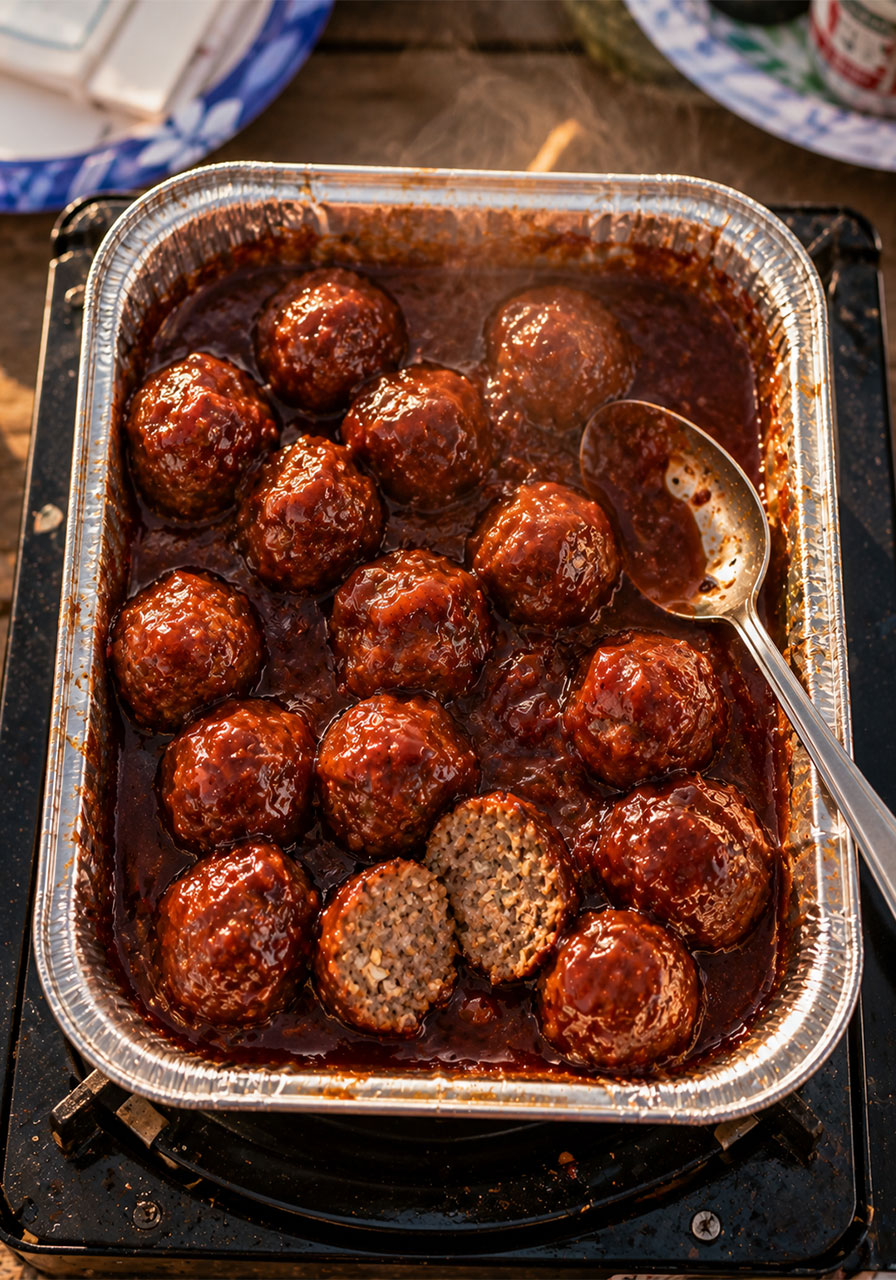
25. BBQ Meatballs
Sweet, smoky, and fall-apart tender. These freeze beautifully and taste like you spent way more effort than you actually did.
Best for: A hearty, hands-off camp dinner. Prep Ahead Time: 1 hour 20 minutes. Serves: 6.
What You’ll Need (Meatballs):
- 2 pounds ground beef
- 1 cup quick oats
- 1 (5 oz) can evaporated milk
- 1 egg, beaten
- 2 teaspoons onion powder, 1 teaspoon garlic powder, 1 teaspoon chili powder
- 2 teaspoons kosher salt
What You’ll Need (BBQ Sauce):
- 2 cups ketchup, ½ cup brown sugar
- ¼ cup apple cider vinegar
- 2 tablespoons liquid smoke, 2 tablespoons Worcestershire sauce
- ½ teaspoon each garlic powder and onion powder
- 1 teaspoon kosher salt
Prep at Home:
1. Preheat the oven to 350°F. Mix together all the meatball ingredients and roll into golf ball-sized balls.
2. Whisk the sauce ingredients together and pour over the meatballs in a baking dish.
3. Bake 1 hour, until bubbly. Stir in 2 to 3 tablespoons of water to loosen the sauce.
4. Cool completely, then freeze in a foil pan or airtight container.
At the Campsite: Reheat in a covered skillet over the camp stove, or in a Dutch oven over the campfire, adding a splash of water to loosen the sauce as needed.
Pro Tip: Freeze these directly in a disposable foil pan. You can reheat and serve straight from it, with zero extra dishes to wash at camp.
Frequently Asked Questions About Camping Meal Prep
How far in advance can I prep camping meals? Most of these recipes hold up well when made 1 to 3 days before your trip. Frozen items like burgers, burritos, and meatballs can be prepped weeks ahead and pulled straight from your home freezer into the cooler.
How do I keep food cold without power at the campsite? Pack frozen items like burritos, patties, and smoothie packs at the bottom of the cooler. As they thaw, they act as ice packs and help keep everything else cold longer.
What’s the safest way to reheat food at a campsite? Wrap items in foil and reheat over hot coals, on a grill grate, or on a camp stove, and use a food thermometer when reheating meat to be sure it reaches a safe internal temperature.
And there you have it: 25 make-ahead camping meals to keep your whole crew fed, happy, and asking when the next trip is.
With this list packed alongside your tent and sleeping bags, you’re all set to spend less time cooking and more time actually enjoying the campfire.