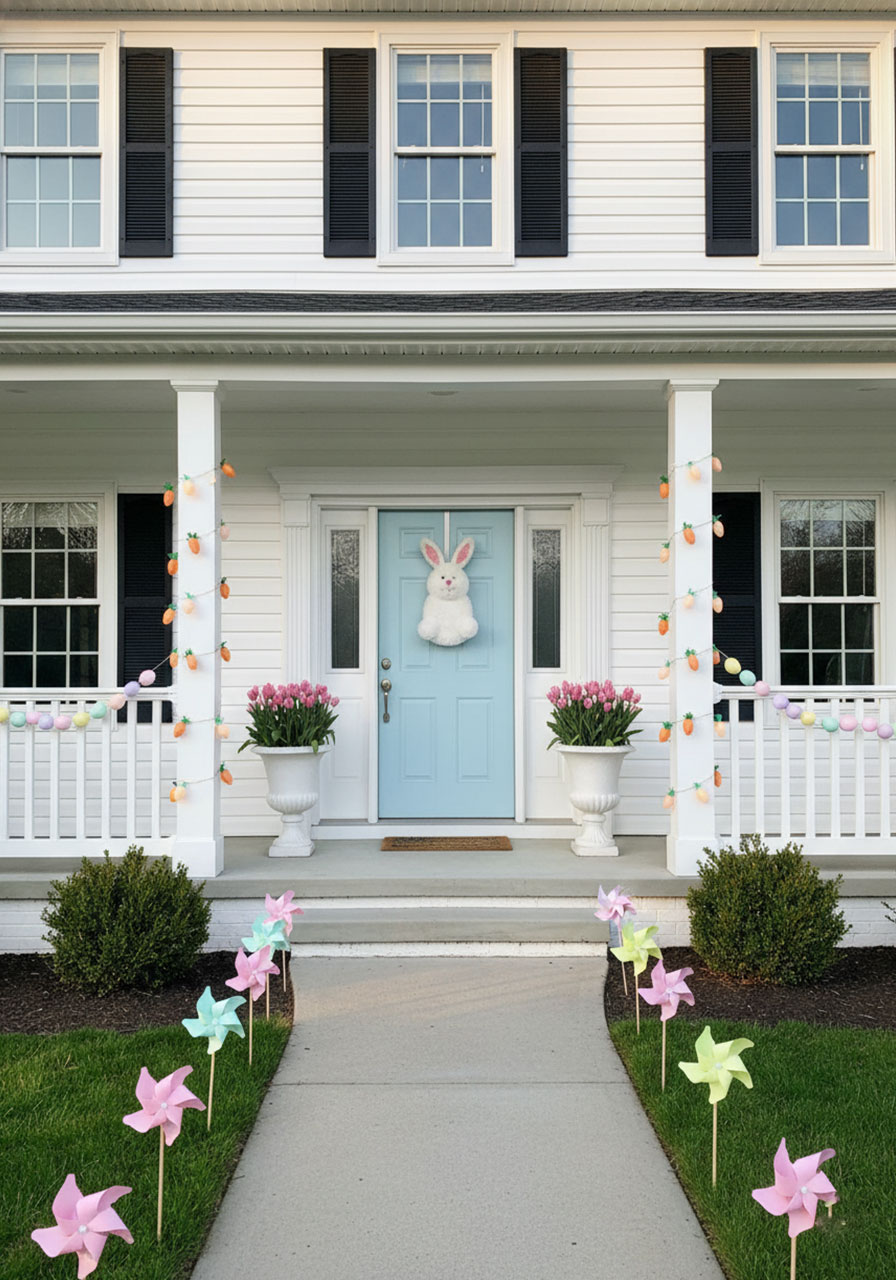
Easter is officially the best excuse to go all-out on your front porch – and your kids (and their friends) will absolutely love you for it. Whether you’re a DIY-loving parent who already has a hot glue gun on standby, or a teacher looking for fun spring inspiration to share with families, these Easter porch decor ideas are easy, budget-friendly, and guaranteed to put a smile on every face that walks up to your door.
We’ve rounded up 38 unique, creative ideas that cover everything from fluffy bunnies and painted eggs to cheerful chicks and cute carrots. Some take just 10 minutes. Some are weekend projects the whole family can tackle together. All of them will transform your outdoor space into a springtime showstopper.
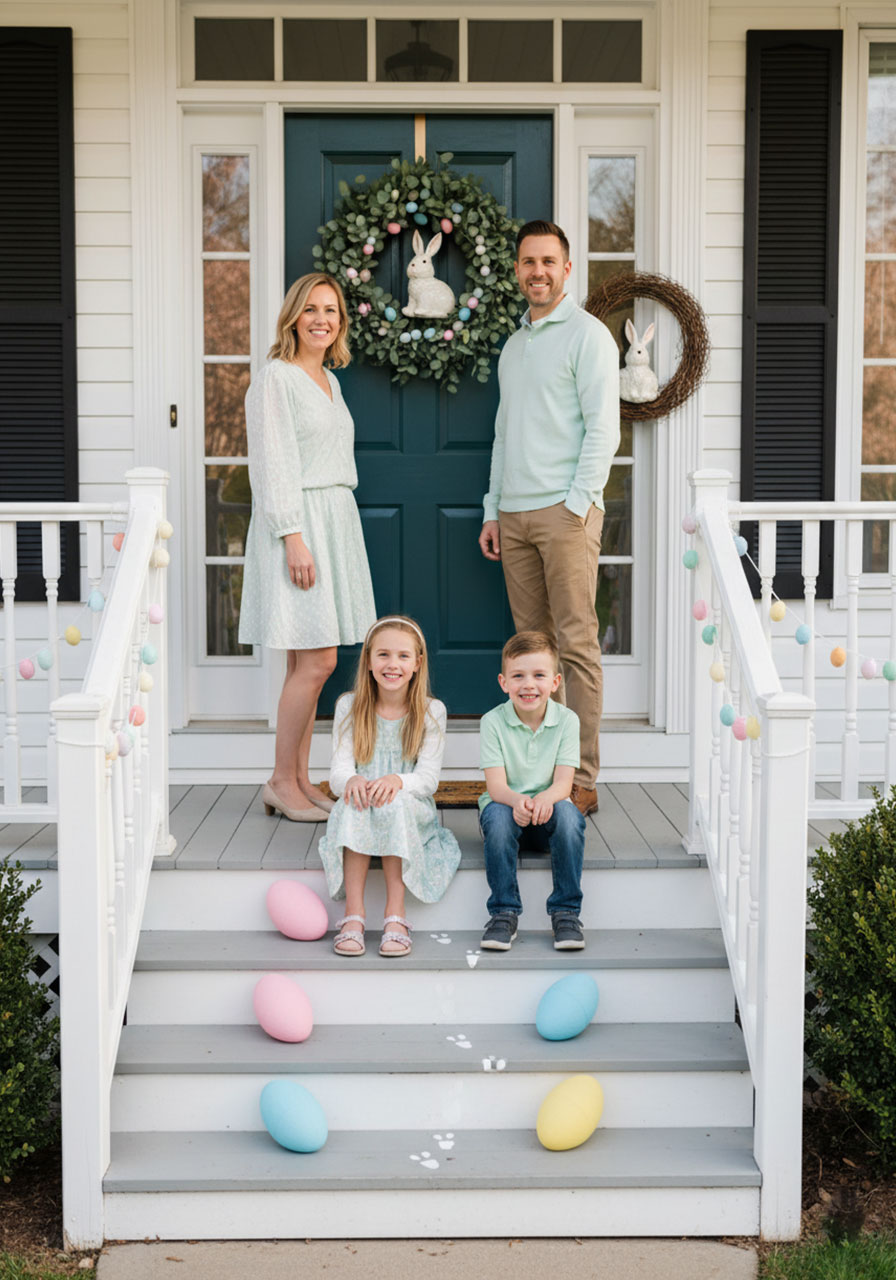
Ready to hop into it? Let’s go!
Bunny-Themed Easter Porch Decor (Ideas 1–4)
The Easter bunny is the star of the season – so why not give him top billing on your porch? These bunny-themed ideas are sweet, charming, and totally easy to pull off, even on a busy week.
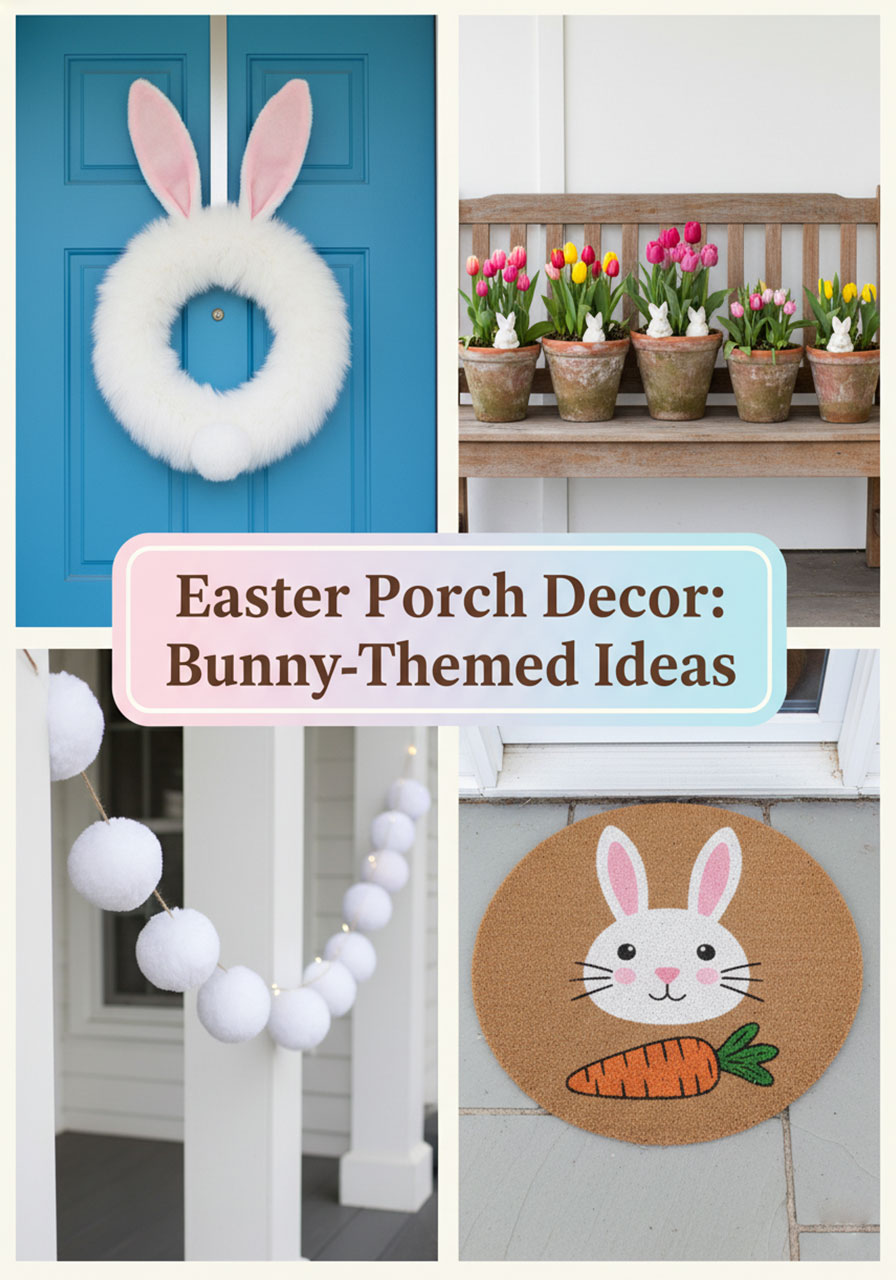
1. Bunny Wreath Welcome
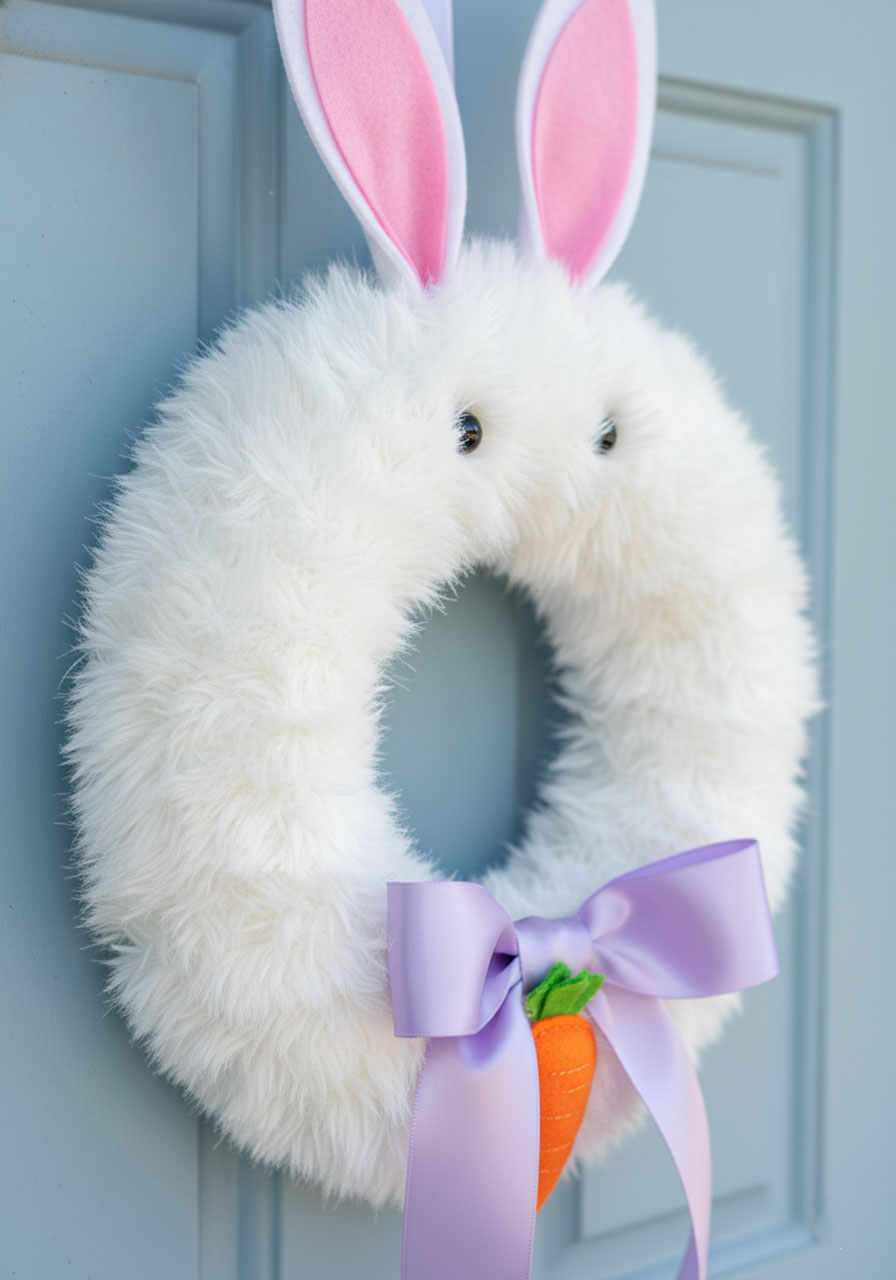
This fluffy, faux-fur wreath is the kind of front door decor that makes neighbors slow down and smile. It looks like something out of a boutique shop, but you can make it yourself in under an hour. The little carrot accent at the bottom? Chef’s kiss.
What You’ll Need:
Foam wreath form
White faux fur fabric or a bag of cotton balls
Pink felt (for the inner ears)
2 small black beads (for eyes)
1 small faux carrot decoration
Pastel ribbon
Hot glue gun + glue sticks
Command hook (for your door)
How to Make It:
1. Cut your faux fur into small sections and hot-glue them all over the foam wreath form until it’s fully covered and fluffy. If using cotton balls, simply glue them on in layers for a bumpy, cloud-like texture.
2. Cut two tall oval shapes from white felt for the ears, then cut a slightly smaller oval from pink felt for the inner ear. Glue the pink piece centered onto the white piece, then fold and pinch the base of each ear slightly before gluing them to the top of the wreath.
3. Hot-glue the two black bead eyes just below the ears on the front of the wreath.
4. Glue the small faux carrot at the very bottom of the wreath for a fun finishing touch.
5. Tie a pastel ribbon into a bow and glue it just above the carrot, or at the base of the ears.
6. Hang on your door with a Command hook and step back to admire your masterpiece!
Pro Tip: Let kids help glue on the cotton balls – it’s a mess-free activity (mostly!) that makes them feel proud every time a visitor compliments the wreath.

Easter Story 3D Egg Craft Template Printable | Resurrection Craft for Kids
🐴 Palm Sunday – Kids clearly understand Jesus entering Jerusalem as they color the donkey – turning a complex Bible moment into something simple and memorable.
🍞 Last Supper – The bread and wine panel helps you naturally introduce Jesus’ sacrifice and connect it to real-life church practices like communion.
✝️ The Cross – The crucifixion scene gives you a gentle, age-appropriate way to explain Jesus’ love and why His sacrifice matters.
⛰️ Empty Tomb – This panel captures kids’ attention with the biggest turning point – helping them grasp that Jesus defeated death.
🙏 Resurrection – Seeing Jesus alive again reinforces the full Easter message, giving kids a clear, lasting understanding of why we celebrate.
2. Peeping Bunny Planters

This one is adorably simple and looks like the Easter bunny himself stopped by to peek at your tulips. Small ceramic bunny figurines nestled into pots of bright spring blooms create an irresistible, whimsical display. Line them along the porch edge and watch everyone do a double take.
What You’ll Need:
Terracotta pots (any size)
Fresh tulips, hyacinths, or faux spring flowers
Small ceramic or resin bunny figurines (find these at craft stores or dollar stores)
Potting soil (if using real flowers)
How to Make It:
1. Fill each terracotta pot with potting soil and plant your tulip bulbs, or simply press faux flowers into floral foam or soil.
2. Once your flowers are in place, gently press a small bunny figurine into the soil near the front edge of the pot so it looks like it’s peeking out from behind the stems.
3. Arrange your pots in a row along the porch railing, steps, or edge for maximum effect.
Pro Tip: Mix pot sizes for a more dynamic display – one big pot flanked by two smaller ones looks especially polished. If you’re doing this as a classroom project or family craft, kids can paint the pots before planting for an extra-personalized touch.
3. Bunny Tail Bunting

Fluffy pom-pom “bunny tails” strung across your porch is one of those ideas that’s almost embarrassingly easy – but it looks like you put in serious effort. The soft white pom-poms swaying in the breeze alongside pastel pennant flags are pure springtime magic.
What You’ll Need:
Large white pom-poms (craft store or make your own with yarn)
Pastel fabric scraps or pastel cardstock
Twine or white string
Scissors and hot glue (or a needle and thread)
Small adhesive hooks or clips
How to Make It:
1. Cut your fabric or cardstock into triangles (about 5–6 inches tall) for the pennant flags.
2. Fold the flat edge of each triangle over the twine and glue or sew it in place, spacing them about 8 inches apart.
3. Between each flag, tie or glue a large white pom-pom directly onto the twine so it hangs down slightly.
4. Alternate flags and pom-poms along the full length of twine until you have enough to span your porch.
5. Hang between two porch columns or along the railing using adhesive hooks.
Pro Tip: This is a fantastic classroom or family craft project. Cut all the triangles ahead of time and let kids decorate each one with Easter doodles before you assemble the bunting.
4. Bunny Face Doormat
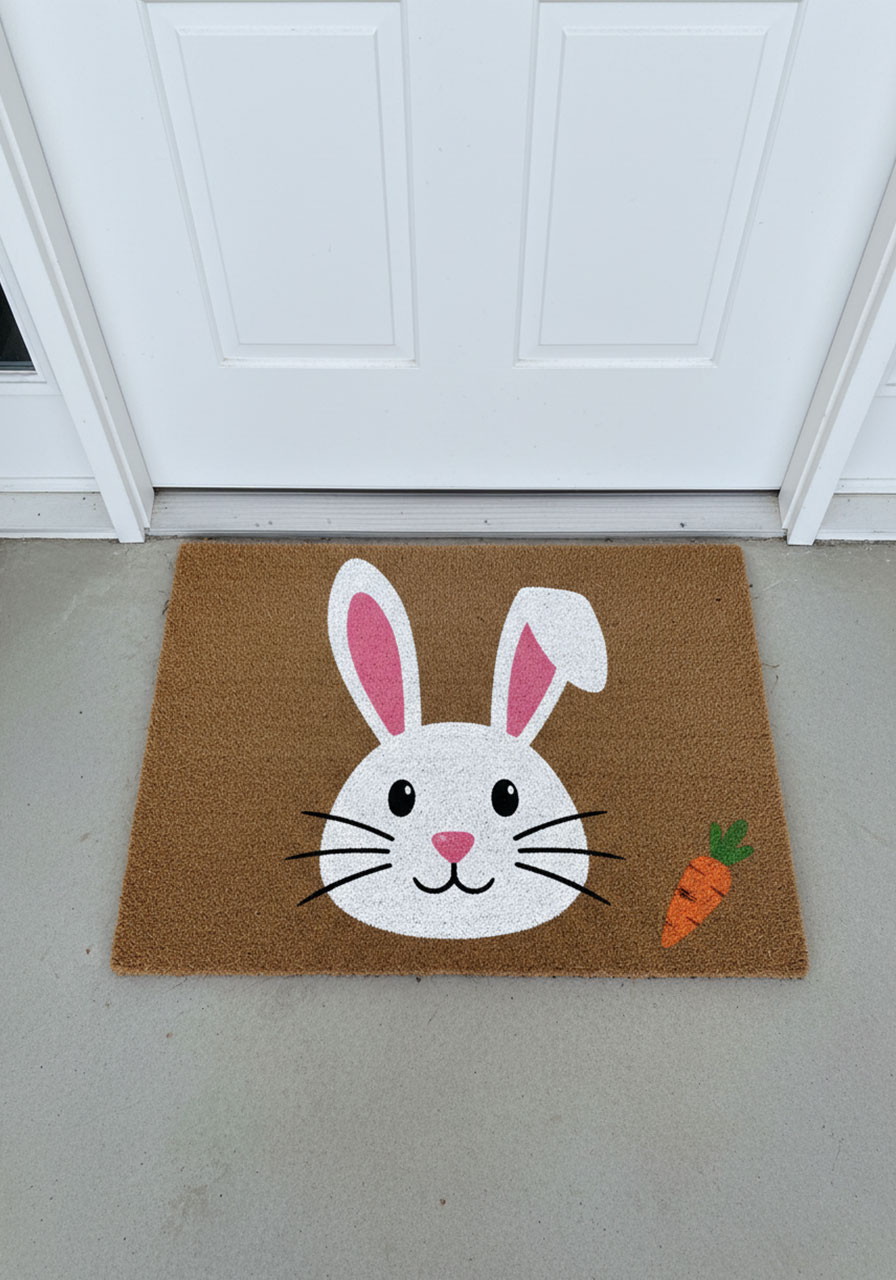
Your doormat is basically a blank canvas waiting for a bunny makeover. This painted coir mat with a grinning bunny face and floppy ears is the first thing guests see – and trust us, it sets the most delightful tone for the whole visit. Bonus: carrot detail at the corner for extra flair.
What You’ll Need:
Plain coir doormat (brown or natural color)
White, pink, and black acrylic paint (outdoor-grade if possible)
Paintbrushes (a wide one for filling in, a thin one for details)
Bunny face stencil (print one from a search or freehand it)
Optional: orange paint for a small carrot detail
How to Make It:
1. Lightly sketch or stencil a large bunny face in the center of the mat using a pencil or chalk – two rounded ears at the top, a wide oval face below.
2. Paint the face and ears white. You’ll likely need 2–3 coats since coir absorbs a lot of paint. Let each coat dry fully before adding the next.
3. Once white is fully dry, use pink paint to fill in the inner ear ovals.
4. Use black paint (with a thin brush) to add the eyes, a small nose, and whisker lines.
5. If you’d like, paint a small carrot in one corner using orange and green paint.
6. Let dry completely (at least a few hours) before placing at your front door.
Pro Tip: Spray the finished mat with a clear outdoor sealant to protect the paint from rain and foot traffic. It’ll last through the whole Easter season!


Egg-Themed Easter Porch Decor (Ideas 5–8)
No Easter porch is complete without eggs – and these ideas go way beyond just hiding them in the grass. From glowing trees to pastel garlands, these egg-inspired displays are colorful, creative, and seriously impressive.
5. Pastel Egg Garland
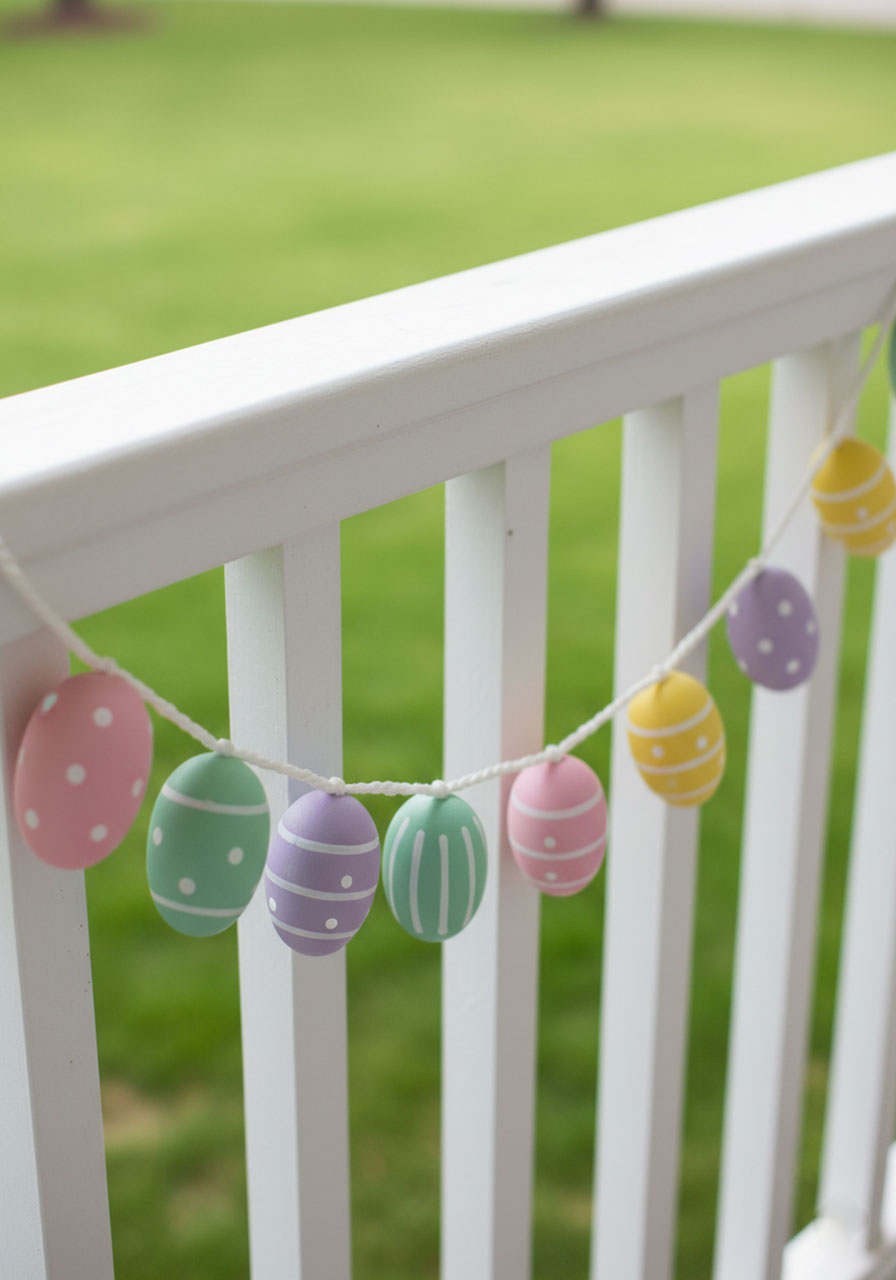
Strung along your porch railing, this garland of painted wooden eggs in soft pinks, lilacs, yellows, and blues is a simple detail that makes a huge visual impact. It takes an afternoon to make and looks absolutely gorgeous in photos – your Instagram will thank you.
What You’ll Need:
Wooden craft eggs (available at any craft store)
Pastel acrylic paints (pink, mint, yellow, lavender, baby blue)
Small paintbrushes
A drill with a small bit (or a thick needle/skewer for pre-made holes)
White twine or thick white thread
How to Make It:
1. Paint each wooden egg a different pastel color. Add polka dots, stripes, or simple floral patterns once the base color is dry for extra charm. Let everything dry fully.
2. Drill or carefully poke a small hole through the top and bottom of each egg.
3. Thread your twine through each egg, spacing them about 4–5 inches apart. Tie a small knot on both sides of each egg to hold it in place.
4. Tie the finished garland to your porch railing at both ends, making sure it hangs at a pleasing height.
Pro Tip: Make this a family painting session! Set up a craft station, give everyone a few eggs, and let kids go wild with whatever designs they love. It makes the garland even more special because every single egg is unique.
6. Easter Egg Tree
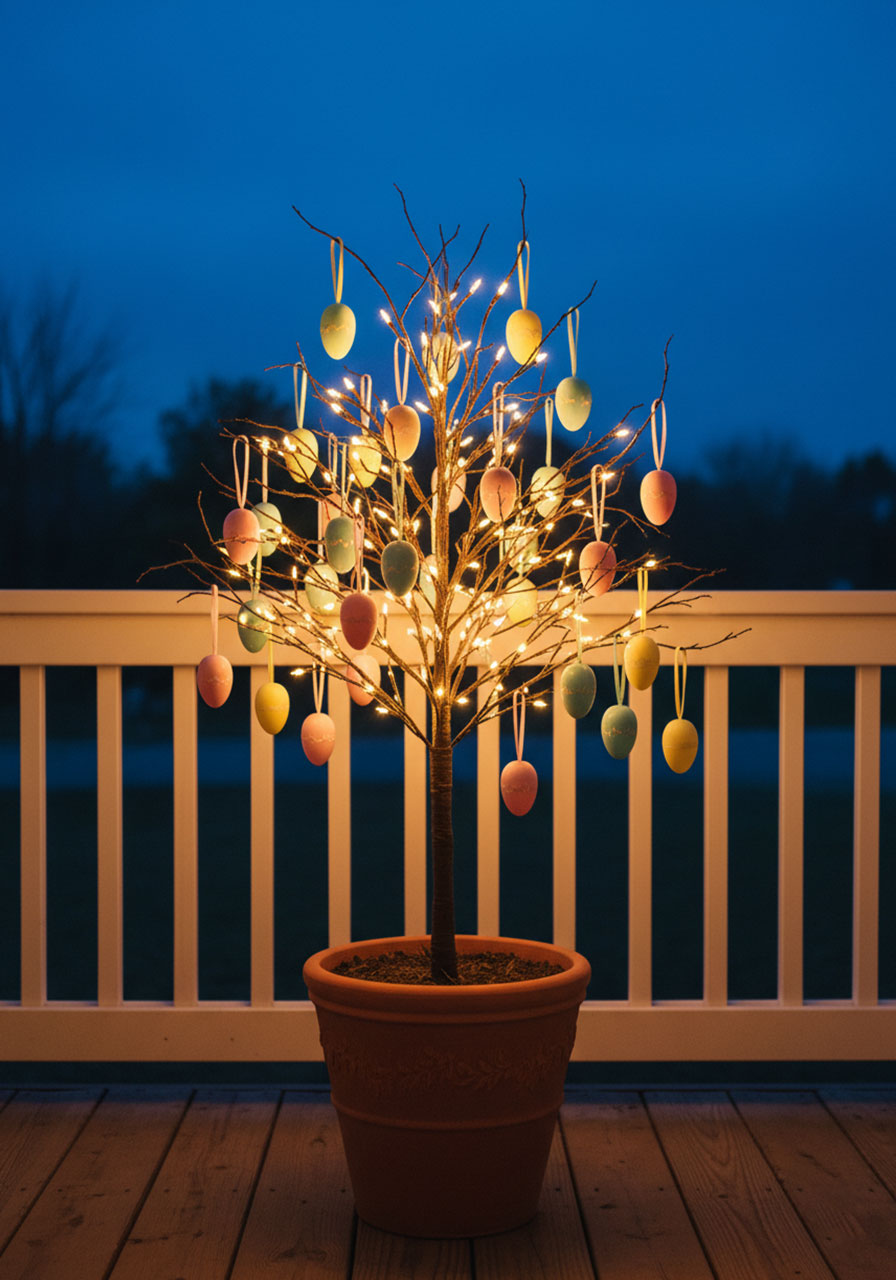
Picture this: a bare-branch tree glowing with warm fairy lights and colorful Easter eggs swaying gently in the spring breeze. At night, it looks absolutely magical. This is one of those decor pieces that becomes a neighborhood talking point every single year.
What You’ll Need:
A small potted tree, shrub, or tall vase with bare branches
Plastic Easter eggs with a small hole drilled or tied at the top
Thin ribbon or string (in coordinating colors)
Fairy lights or warm white string lights
How to Make It:
1. Set your potted tree or branch arrangement on your porch in a spot where it’s visible but sheltered enough that eggs won’t blow off in high wind.
2. Cut ribbon into 6–8 inch lengths and loop each piece through the hole at the top of a plastic egg, tying a small knot so it won’t slip through.
3. Hang the eggs from branches, distributing them evenly so no single branch is overloaded.
4. Weave fairy lights through the branches, starting from the trunk and working outward. Secure loosely with small twist ties if needed.
5. Plug in the lights at dusk and enjoy the glow!
Pro Tip: Use eggs in a mix of solid pastels and patterned designs for the most visually interesting display. If you have young kids, let them “decorate” the eggs with stickers before hanging – it makes them feel like part of the setup and they’ll love pointing out their eggs to visitors.
7. Painted Egg Stepping Stones
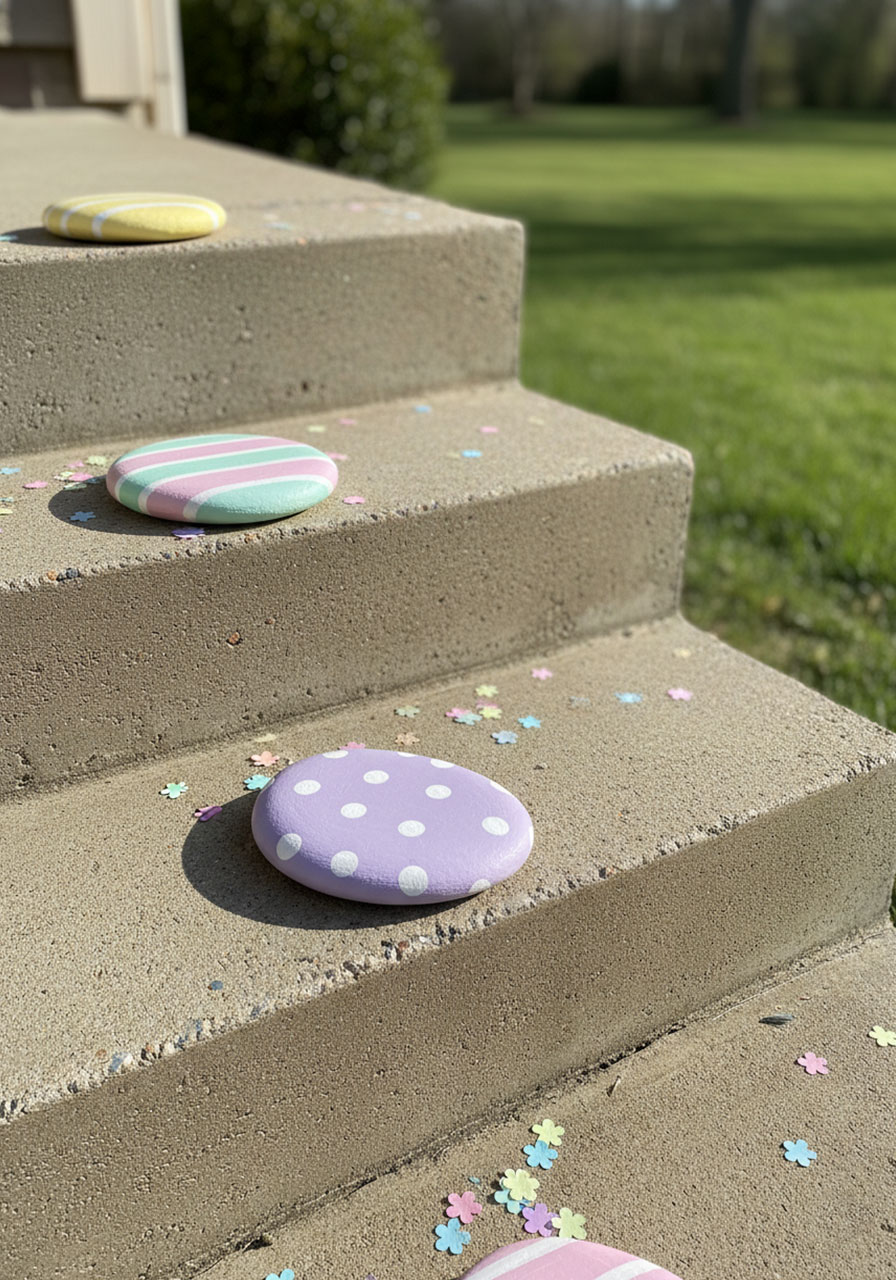
These painted stepping stones double as decor AND as a cheerful path that guides guests right up your porch steps. Flat stones painted like oversized Easter eggs in pastel hues with polka dots and stripes are both festive and functional – and they’re a project kids absolutely love doing.
What You’ll Need:
Flat garden stones or concrete stepping stones
Outdoor acrylic craft paint in pastel colors
Round and fine-tip paintbrushes
Clear outdoor spray sealant
How to Make It:
1. Clean your stones and let them dry completely.
2. Paint the entire top surface of each stone in a single pastel base color – think lavender, mint, soft pink, or yellow. Apply 2 coats for full coverage, letting each coat dry in between.
3. Once the base is dry, use contrasting pastel colors to add polka dots (use the eraser end of a pencil for perfect circles!), stripes, zigzags, or simple floral designs.
4. Let the painted stones dry overnight, then spray with a clear outdoor sealant to protect the paint from weather and foot traffic.
5. Arrange along your porch steps or front walkway.
Pro Tip: This is one of the best Easter crafts to do with kids – there’s no wrong way to decorate a stone! Make extras to give as Easter gifts to grandparents or neighbors. They make the sweetest little presents.
8. Egg Balloon Bouquet
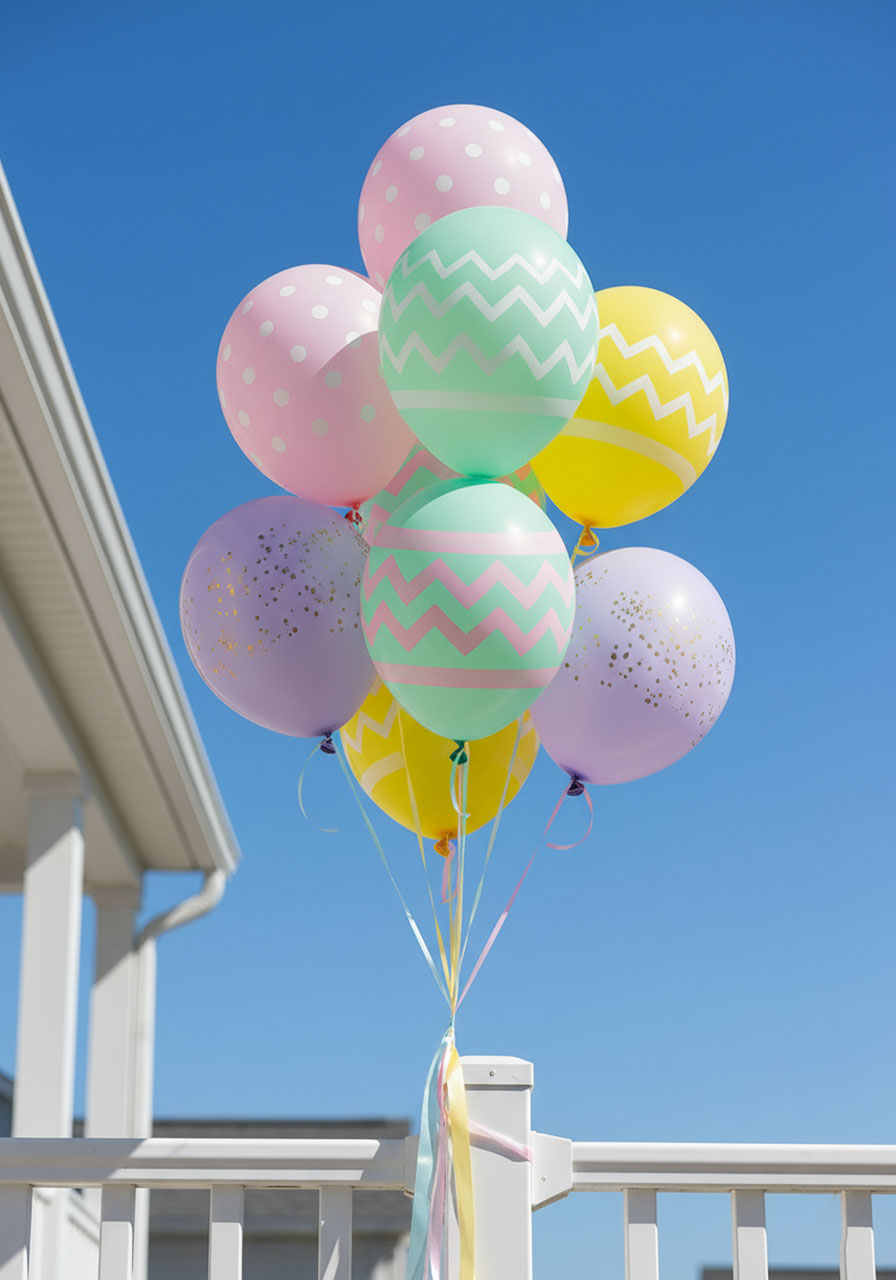
Balloons painted like Easter eggs, tied to your porch railing in a cheerful cluster, are an instant festive upgrade that takes almost zero effort. They bob in the spring breeze like little eggs in flight, and kids absolutely go wild for them. This is your last-minute Easter decor lifesaver.
What You’ll Need:
White or pastel latex balloons
Acrylic paint in pastel shades (slightly watered down works well on latex)
Thin paintbrushes
A helium tank (available for rent or purchase at party stores) OR air pump for a different look
Ribbon in coordinating colors
How to Make It:
1. Inflate your balloons with helium (or air – they’ll just need to be attached differently). Tie off securely.
2. Use slightly-thinned acrylic paint to add Easter egg patterns to each balloon – polka dots, stripes, chevron, and simple zigzags all look great. Let paint dry fully (about 30–60 minutes).
3. Tie each balloon to a long ribbon, then tie the ribbons to your porch railing in a cluster of 5–7 balloons at varying heights.
4. If using air-filled balloons, you can tape them to a porch wall or doorframe instead for a fun balloon backdrop effect.
Pro Tip: Set up a balloon-painting station for kids! Give each child 1–2 uninflated balloons to paint, then inflate them afterward for the big reveal. It’s a fantastic Easter morning activity that ends with instant porch decor.
Carrot-Themed Easter Porch Decor (Ideas 9–12)
Carrots don’t get nearly enough love as Easter decor – but these ideas are here to change that! Bold, bright, and totally fun, carrot-themed porch decor is unexpected in the best way possible. The Easter bunny would definitely approve.
9. Carrot Patch Sign
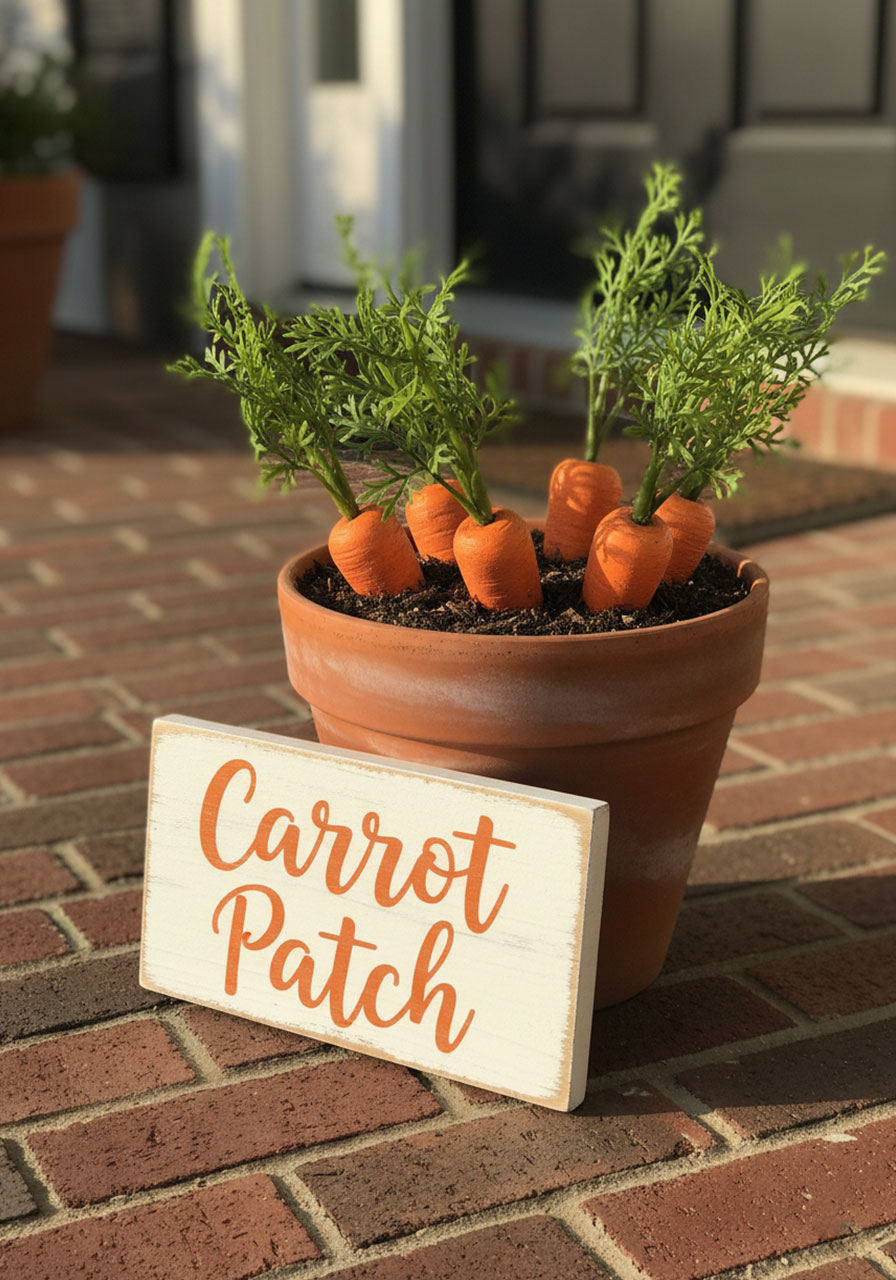
This charming rustic sign propped in front of a pot of faux carrots is guaranteed to get a laugh from every adult and a delighted gasp from every kid who sees it. It’s simple, inexpensive, and has that perfect “farmhouse Easter” vibe that’s everywhere right now.
What You’ll Need:
A small wooden plank or piece of scrap wood
White chalk paint or white acrylic paint
Orange paint or an orange paint marker
A medium paintbrush and a fine-tip brush or paint pen
Faux carrot picks or small plastic carrots (from the dollar store or craft store)
A terracotta pot filled with potting soil or floral foam
How to Make It:
1. Paint the wooden plank with white chalk paint and let it dry completely. Sand the edges lightly for a worn, rustic look.
2. Use an orange paint marker or fine brush to write “Carrot Patch” in a playful, slightly uneven script across the center of the plank.
3. Once the paint is dry, press several faux carrot picks into a terracotta pot filled with soil or floral foam so the carrot “tops” poke up like they’re growing.
4. Prop your sign against the front of the pot.
Pro Tip: Add a small note that says “Do Not Disturb – Easter Bunny Delivery Zone!” to make it extra fun for little ones. You can also paint the pot a fun color or add a bunny face to pull the whole look together.
10. Carrot Topiary
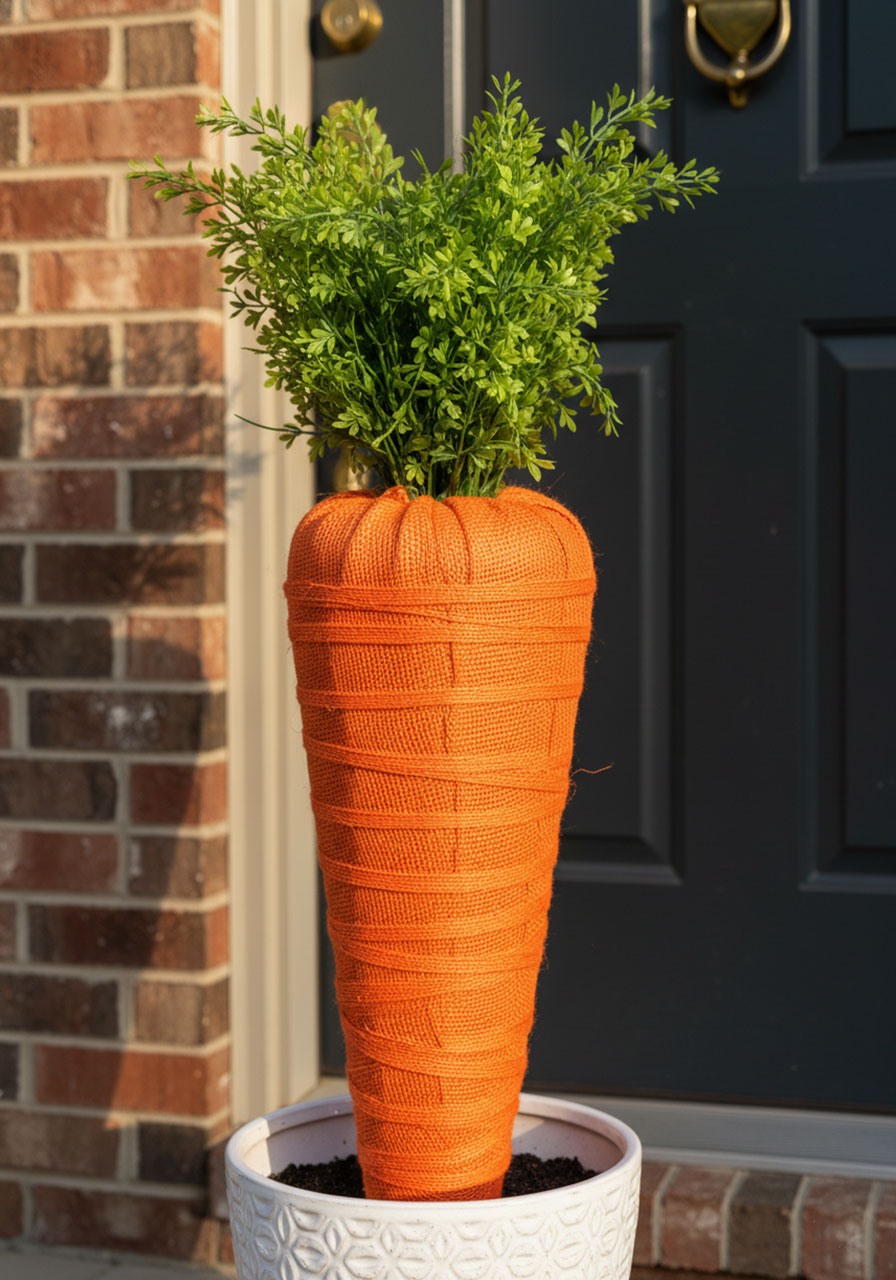
This one is a bold statement piece – a large, carrot-shaped topiary standing beside your front door. It’s unexpected, eye-catching, and will absolutely make your home the most memorable one on the block this Easter. Easier to make than it looks, promise.
What You’ll Need:
A large foam cone (the bigger the better for maximum impact)
Orange ribbon, twine, or strips of orange fabric
Hot glue gun + glue sticks
Faux green leafy stems or bushy green artificial plants
A tall white planter or pot
Floral foam or rocks to anchor it inside the pot
How to Make It:
1. Starting at the bottom point of the foam cone, begin wrapping orange ribbon or fabric strips diagonally around the cone in tight, overlapping layers. Hot-glue each layer as you go.
2. Continue wrapping all the way to the top, leaving the very top open to insert the green “carrot tops.”
3. Bundle several faux green leafy stems together and push/glue them firmly into the top opening of the cone so they fan out naturally.
4. Insert a wooden dowel or skewer into the flat bottom of the cone for stability, then press the other end into floral foam inside your planter.
5. Place your finished carrot topiary beside your front door.
Pro Tip: Make two! A matching pair of carrot topiaries flanking your front door is one of the most impactful (and Instagrammable!) Easter porch setups you can create.
11. Carrot String Lights
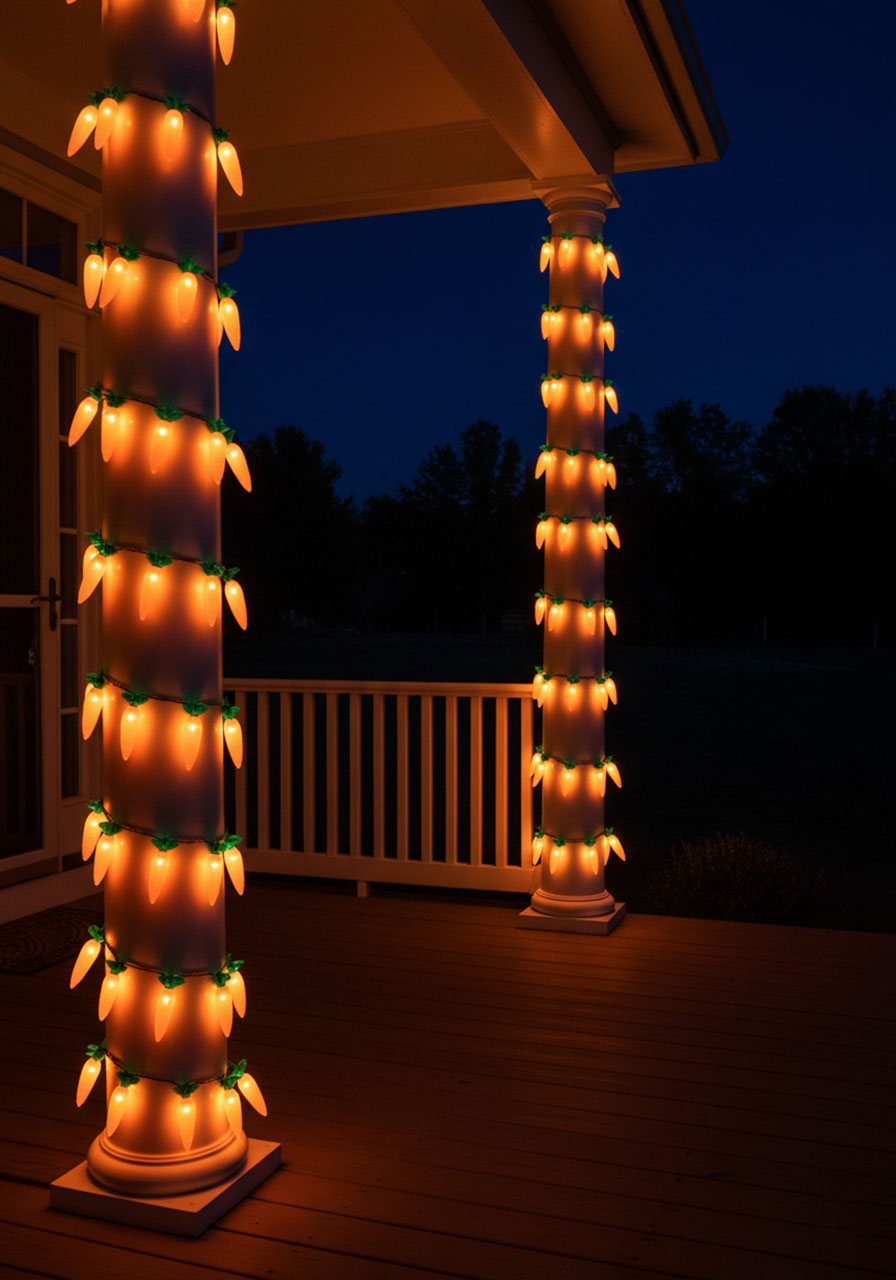
String lights shaped like tiny glowing carrots wrapped around your porch columns are a festive touch that looks cheerful in the daytime and absolutely magical at night. If you love putting out Halloween string lights in October, this is your Easter equivalent – and just as fun.
What You’ll Need:
Carrot-shaped novelty string lights (search online or check holiday/party stores)
Adhesive clips or small command hooks for outdoor use
An outdoor extension cord if needed
How to Make It:
1. Plan your light path before you start – columns, railings, along the roofline, or all three!
2. Attach adhesive clips to your porch columns or railing at 6–8 inch intervals.
3. Thread the carrot string lights through the clips, working your way from the power source outward.
4. Plug in and enjoy your glowing carrot porch!
Pro Tip: Let the kids help decide where the lights should go – it gives them ownership over the Easter decor and makes them extra excited to turn them on each evening. These lights also look wonderful wound around a small Easter Egg Tree (Idea #6) for a double display.
12. Carrot Crate Stack
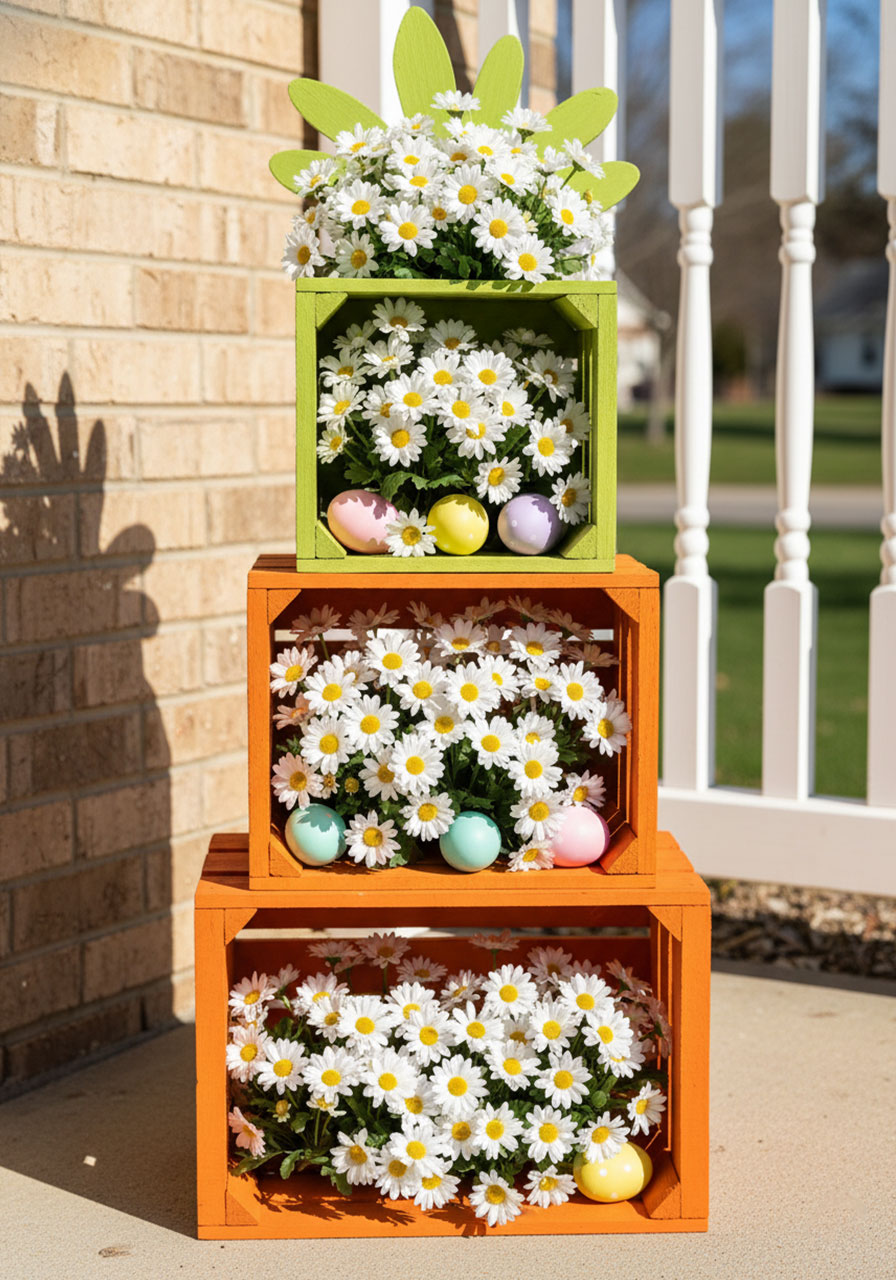
Stack wooden crates painted in orange and green – the colors of a giant carrot – and fill them with daisies, eggs, or spring greenery for a show-stopping vertical display. This is the kind of porch centerpiece that looks like it came from a professional decorator, but costs next to nothing if you already have old crates lying around.
What You’ll Need:
2–3 wooden crates (same or graduated sizes)
Orange and green outdoor-safe paint
Paintbrushes
White or cream daisies, faux flowers, or real potted blooms
Pastel Easter eggs for layering in
Strong glue or L-brackets (optional, for securing the stack)
How to Make It:
1. Paint the largest crate (bottom) orange. Paint the middle crate orange as well. Paint the top crate green to represent the leafy carrot tops. Let all crates dry fully.
2. Stack the crates from largest to smallest. For safety, especially if you have young kids running around, secure them together with a dab of strong outdoor-safe glue or small L-brackets on the back.
3. Fill each crate with flowers, greenery, Easter eggs, or a mix of all three. The green top crate looks especially great stuffed full of bushy green faux plants or real flowers.
4. Place the finished stack in a corner of your porch where it can be seen from the street.
Pro Tip: Use this crate stack as a “photo prop” for Easter morning pictures of the kids – it makes the most adorable backdrop! Encourage families to snap a photo in front of it before the egg hunt begins.
Floral and Plant-Based Easter Porch Decor (Ideas 13–16)
Spring is nature’s own party decoration – and these floral-inspired ideas are all about leaning into that glorious seasonal bloom. Fresh, vibrant, and full of life, these displays bring the garden right to your front door.
13. Floral Bunny Ears Arch
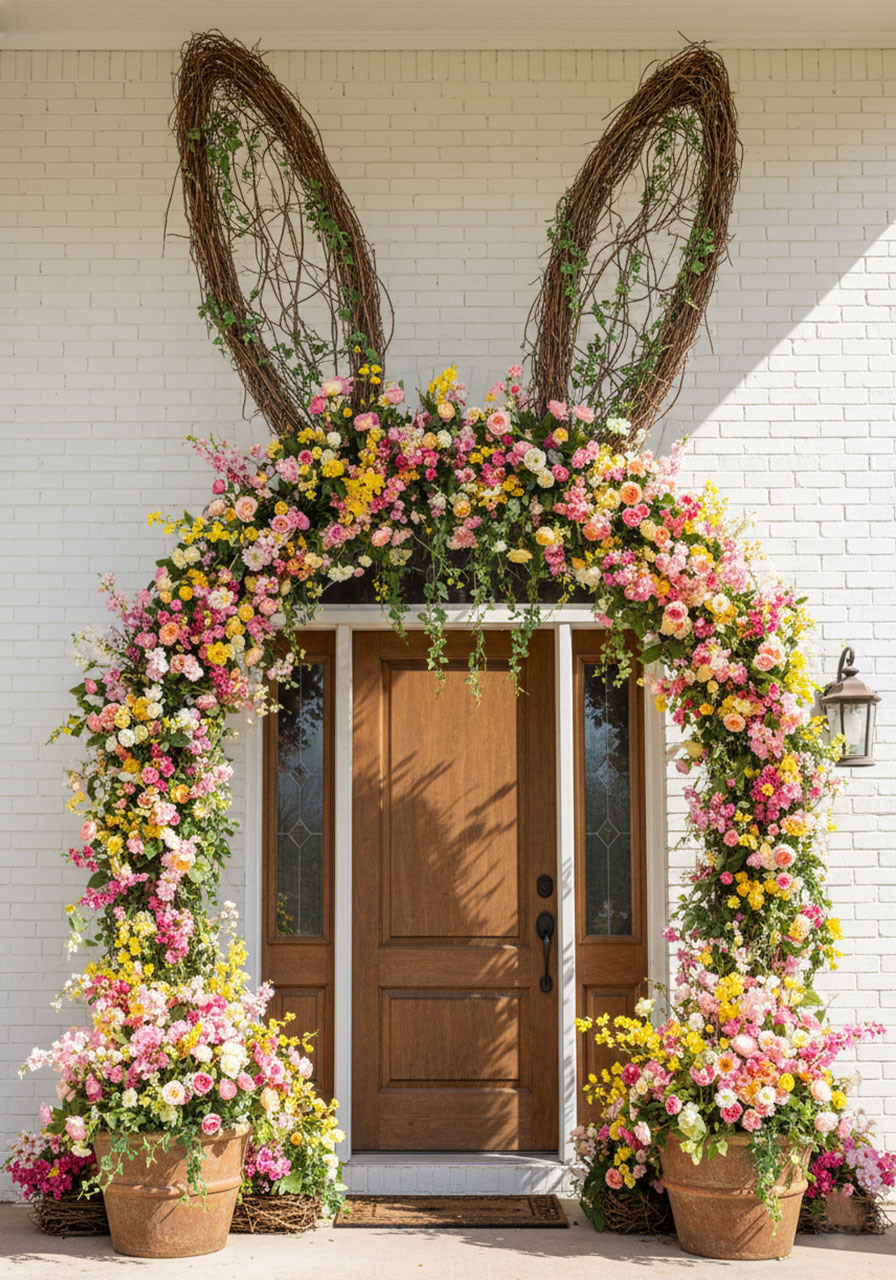
This is the crown jewel of Easter porch decor – a gorgeous arched entrance framed with grapevine shaped into giant bunny ears, woven with pastel flowers. It transforms your front door into an Easter wonderland, and guests will quite literally stop in their tracks. It’s a weekend project, but every single minute is worth it.
What You’ll Need:
Two large rolls of grapevine or flexible willow branches
Floral wire
Faux pastel flowers (pink, yellow, white, and lavender work beautifully)
Hot glue gun + glue sticks
Zip ties (for attaching to your porch frame)
2 large heavy planters (to anchor the bottom of each “ear”)
How to Make It:
1. Soak your grapevine briefly in water to make it more pliable. Shape each bundle into a long oval “bunny ear” shape and secure with floral wire at several points to hold the shape. Make two ears.
2. Stand the base of each ear in a heavy planter filled with rocks or floral foam to anchor it upright – one planter on each side of your front door.
3. Use zip ties to attach the tops of the ears to your porch frame or overhang so they stay upright and in position.
4. Weave faux pastel flowers throughout the grapevine, using hot glue to secure them. Concentrate more blooms near the tops and along the arch base for a lush, full look.
5. Add a small wreath to your door (like Idea #1!) to complete the full “Easter wonderland entrance” effect.
Pro Tip: This arch is absolutely the most Instagrammable Easter decor you’ll ever make. Set it up a day or two before Easter and use it as a photo backdrop for pictures of the kids – you’ll treasure those photos forever.
14. Egg Carton Flower Boxes
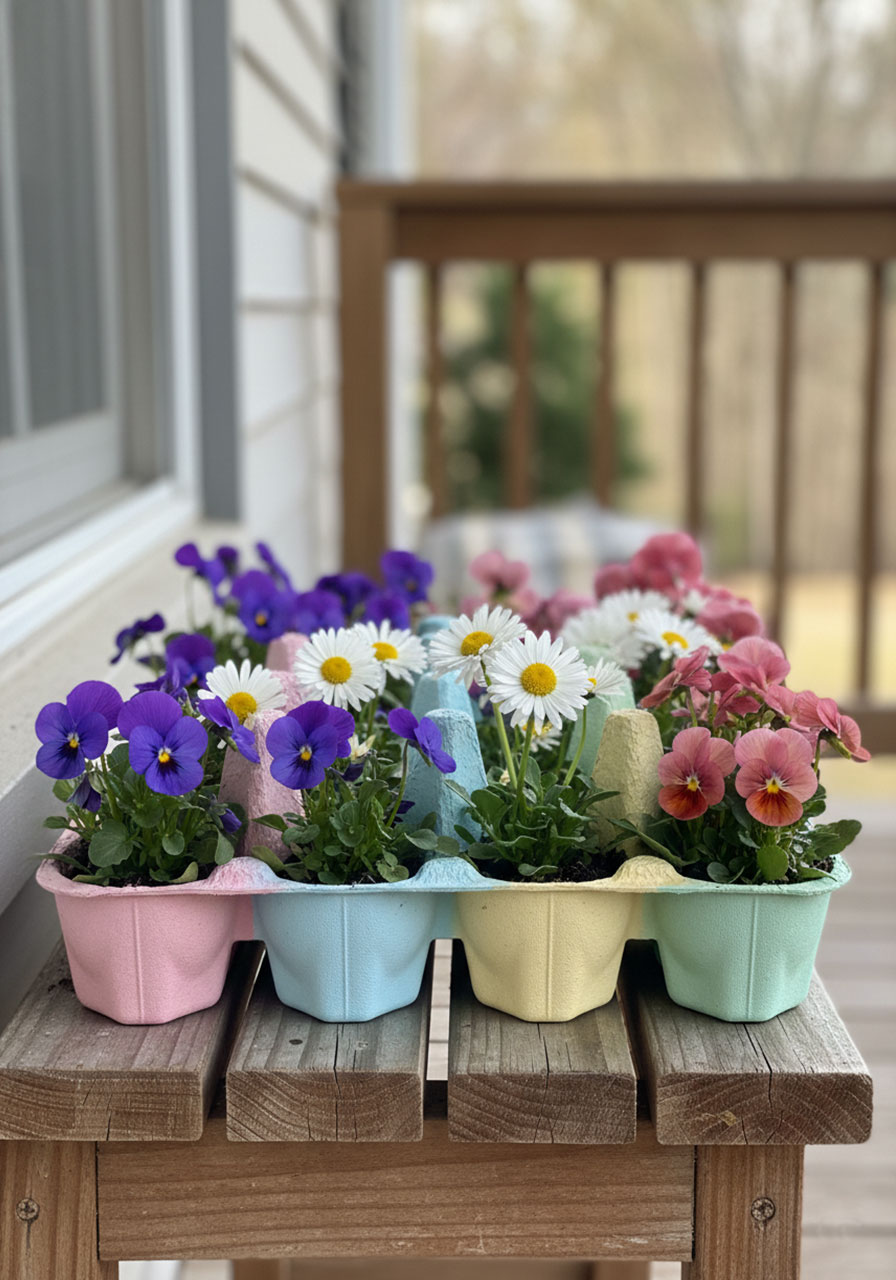
Before you toss another egg carton, stop right there – because those everyday kitchen staples are about to become the most charming little flower boxes on your porch. Painted in coordinating pastel shades and filled with cheerful pansies or daisies, they’re a clever, eco-friendly Easter display that costs practically nothing.
What You’ll Need:
Cardboard egg cartons (paper pulp style works best for painting)
Pastel spray paint or acrylic paint
Small flowers – pansies, violas, or daisies work perfectly
Potting soil
Adhesive strips or small nails for mounting
How to Make It:
1. Spray paint or brush-paint the outside of each egg carton in a pastel color – use a different shade for each one to create a rainbow row.
2. Let the paint dry completely. If using real flowers, line each cup with a small piece of plastic wrap to prevent the cardboard from getting soggy too quickly.
3. Fill each cup of the carton with a small amount of potting soil and press a small flower into each one.
4. Mount your finished flower box along your porch railing or windowsill using adhesive strips, or simply rest them on a ledge.
Pro Tip: This is a wonderful classroom project! Have students each decorate their own egg carton, then take them home to display on their family’s porch as an Easter gift for their parents. It’s budget-friendly, creative, and deeply meaningful.
15. Tulip Bunny Buckets
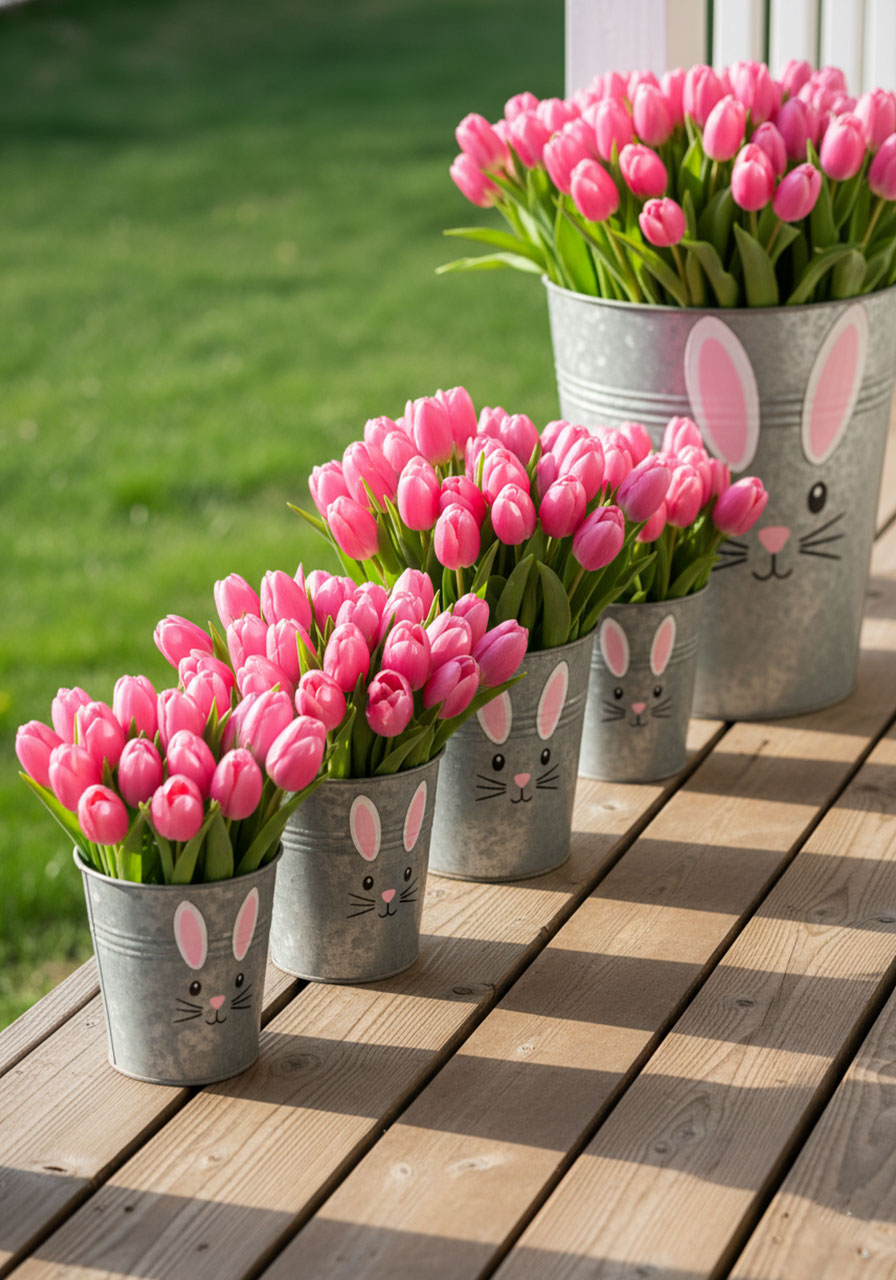
Galvanized metal buckets with sweet bunny faces painted on the front, overflowing with pink tulips – it doesn’t get more irresistibly springtime than this. These are adorable lined up in a row along your porch edge, and they’re sturdy enough to use year after year.
What You’ll Need:
Galvanized metal buckets (various sizes look great together)
White, black, and pink acrylic paint
Fine-tip paintbrush
Fresh pink tulips or faux tulips
Potting soil or floral foam
How to Make It:
1. Clean and dry your buckets thoroughly.
2. On the front of each bucket, paint a simple bunny face: two small black oval eyes, a tiny pink nose, and a few curved lines for whiskers. Add small pink bunny ears peeking up from the top edge.
3. Let the paint dry fully (a few hours), then seal with a clear spray sealant if using outdoors.
4. Fill buckets with potting soil or floral foam and arrange your tulips inside so they stand tall and full.
5. Line the buckets along your porch edge, steps, or grouped in a corner display.
Pro Tip: Galvanized buckets are incredibly durable, so you can reuse these every Easter! After the holiday, swap the tulips for summer flowers and your bunny buckets become a year-round porch fixture. The bunny faces will make you smile every time.
16. Pastel Polka Dot Pots
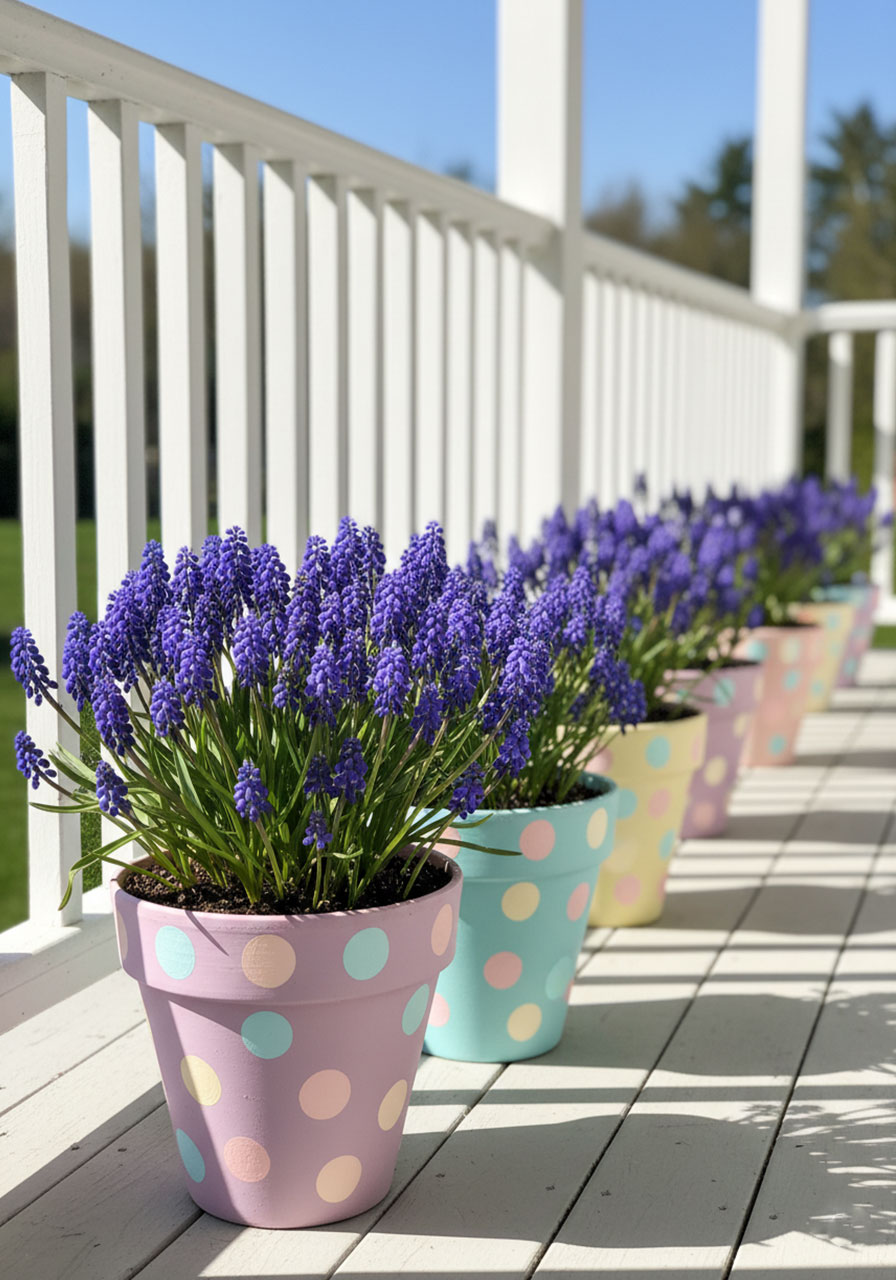
Sometimes the simplest ideas are the most charming. Plain terracotta pots get a complete Easter glow-up with a coat of pastel paint and cheerful polka dots, then get filled with gorgeous hyacinths or spring blooms. Lined up in a row, they look like they belong in a French flower market.
What You’ll Need:
Terracotta pots (any size)
Pastel acrylic paints in assorted colors
A medium paintbrush for the base coat
The eraser end of a pencil (for perfect polka dots!)
Hyacinths, muscari, or other spring-blooming bulbs or faux flowers
Potting soil
How to Make It:
1. Paint each terracotta pot a solid pastel base color. Apply 2 coats for full, even coverage and let dry completely between coats.
2. Dip the eraser end of a pencil into a contrasting pastel paint and press it firmly onto the pot surface to create perfect, evenly-sized polka dots. Cover the entire pot in a random polka dot pattern.
3. Let dry completely.
4. Plant your hyacinths or spring flowers in the pots using fresh potting soil.
5. Arrange in a row along your porch railing or steps – alternate colors for a rainbow effect!
Pro Tip: This is a perfect Saturday morning activity to do with kids. Set up a “pot painting station” with all the supplies and let them go wild with dots, stripes, and patterns. Their personalized pots displayed proudly on the porch will be the highlight of their Easter.
Chick-Themed Easter Porch Decor (Ideas 17–20)
Fluffy yellow chicks are Easter royalty – right up there with bunnies and eggs. These chick-themed decor ideas are absolutely bursting with personality, and they have a special ability to make even the most tired grown-up break into a grin.
17. Chick-Filled Wheelbarrow
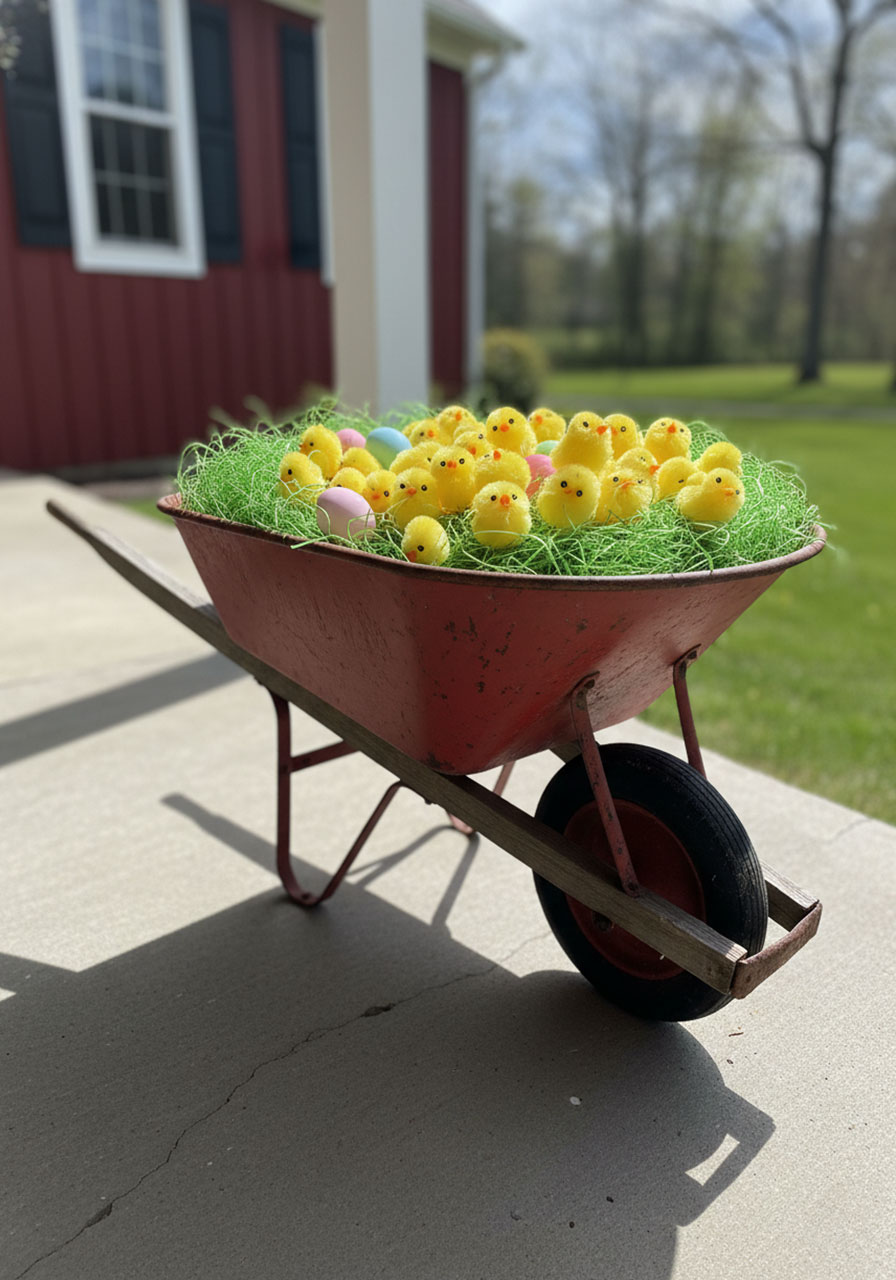
A vintage wheelbarrow overflowing with dozens of plush yellow chicks nestled in a bed of faux grass is one of those decor pieces that practically leaps off the porch and demands attention. It’s farmhouse-charming, it’s playful, and it is genuinely delightful for kids of every age – including the “kids at heart” adults in your life.
What You’ll Need:
A wheelbarrow (a vintage metal one is ideal, but a mini decorative one works perfectly too)
Faux Easter grass (the classic pastel shredded stuff or a sheet of artificial turf)
A large collection of plush yellow chick decorations (load up at craft stores, dollar stores, or Easter seasonal sections)
Optional: a few pastel Easter eggs nestled in between the chicks
How to Make It:
1. Position your wheelbarrow on the porch in a spot where it’ll be easily seen – near the steps or at the side of the door works well.
2. Fill the basin with a thick layer of faux grass so the base is completely covered.
3. Pile in your plush chicks! The more the merrier – they should look like they’re spilling over the edges. Nestle a few colorful Easter eggs in between for extra color.
4. Step back, admire, and wait for the “awwws.”
Pro Tip: This display is irresistible to little hands, and that’s actually a feature, not a bug! Let visiting kids rearrange the chicks and make it “their own” – it becomes an interactive Easter activity right on your porch. Just make sure the plush chicks are washable so they can be reused next year.
18. Chick-Topped Mason Jars
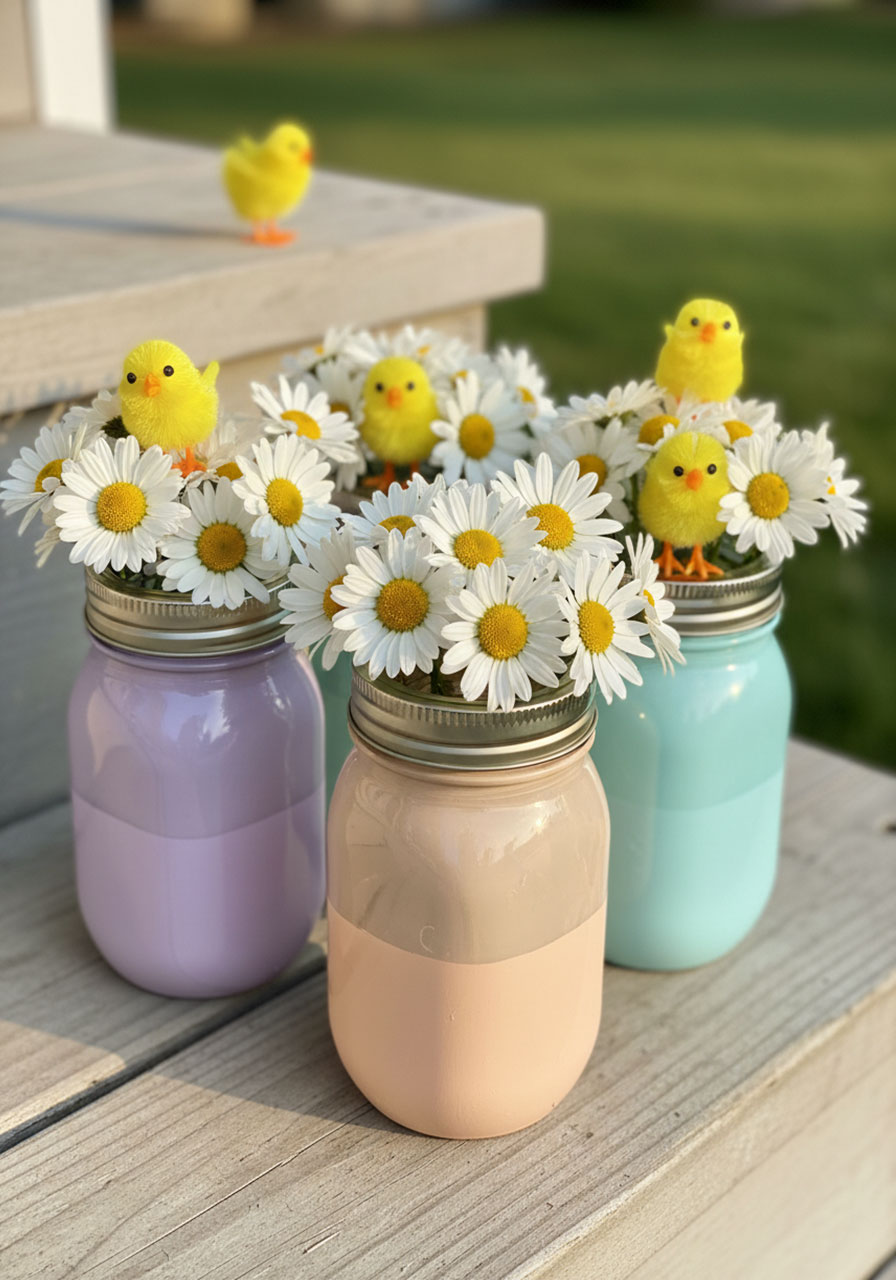
These pastel-painted mason jars filled with spring daisies – and topped with tiny yellow chick figurines perched on the lids – are so cute they’re almost ridiculous. They’re also wonderfully reusable, easy to make, and look lovely grouped together on a porch table or step.
What You’ll Need:
Mason jars (any size)
Pastel chalk or acrylic paint
Mason jar lids
Small plastic or resin chick figurines
Hot glue gun + glue sticks
Fresh or faux daisies, chamomile, or other small spring flowers
How to Make It:
1. Paint the lower half or entire exterior of each mason jar with a pastel color – lilac, mint, peach, and sky blue all look gorgeous. Let dry completely.
2. Hot-glue a small chick figurine to the center of each lid. Make sure it’s firmly attached and let the glue set fully.
3. Fill jars with water (for fresh flowers) or pack with faux flowers.
4. Screw the chick-topped lids on (they’ll hold the flower stems in loosely, which is a cute effect for silk flowers).
5. Arrange in a cluster of 3–5 jars of varying heights for the best display.
Pro Tip: These make the sweetest Easter gifts! Make a set of 3, tie a pastel ribbon around them, and give them to a teacher, neighbor, or grandparent. They can reuse the jars long after Easter as fun planters or storage.
19. Chick Parade Banner
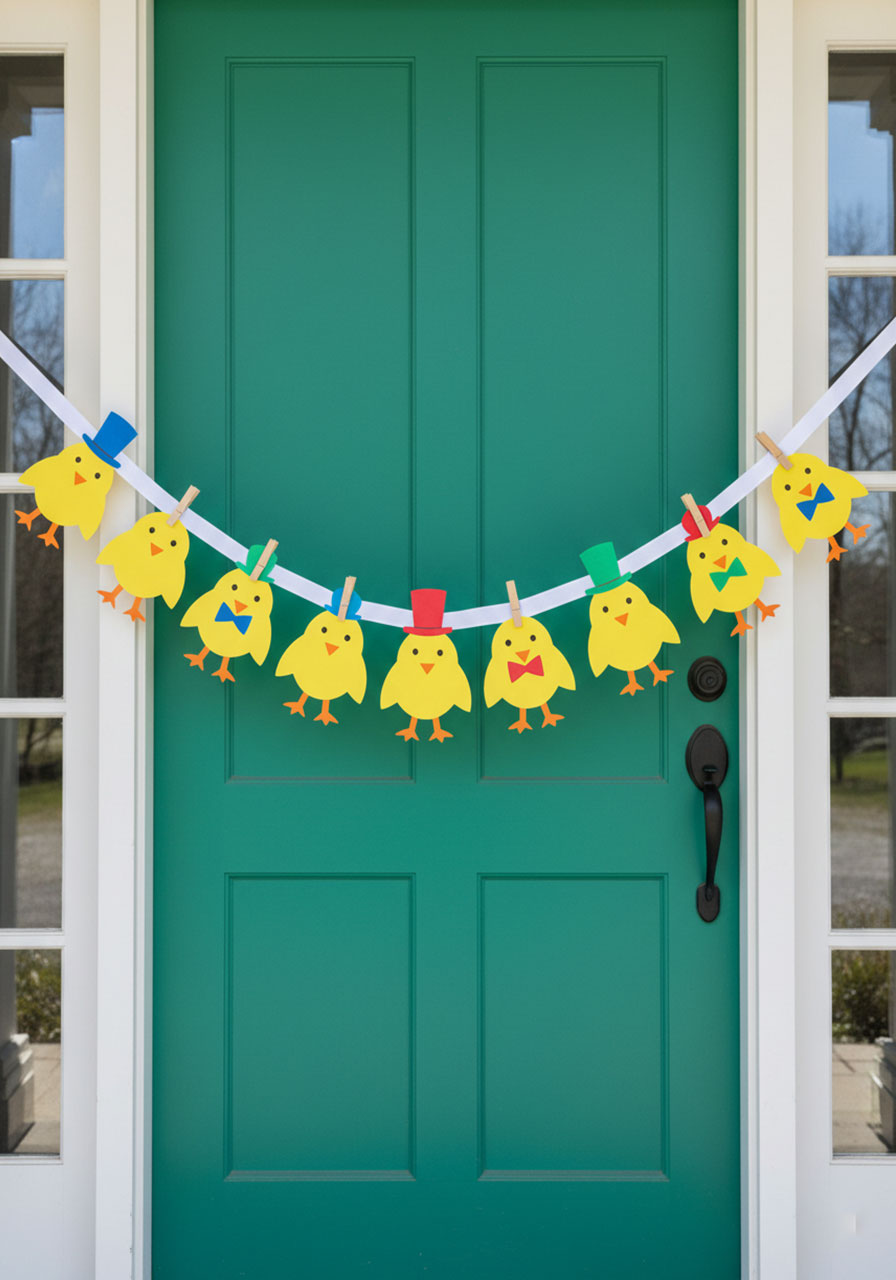
A row of cheerful paper chicks in top hats and bowties marching across a banner strung above your porch – it’s as joyful as it sounds. This is one of those decorations that makes adults stop, smile, and say “that is the cutest thing I’ve ever seen.” And it takes about 20 minutes to make.
What You’ll Need:
Yellow cardstock or heavyweight yellow paper
Scrap paper in various colors (for hats, bowties, wings)
Scissors and a black marker or fine-tip pen
Glue stick or craft glue
White ribbon or twine
Small binder clips or clothespins
How to Make It:
1. Cut out chick bodies from yellow cardstock – simple rounded oval shapes with a slightly pointed beak, about 4–5 inches tall.
2. Cut small bow ties from red or blue paper and top hats from black or colorful paper. Add small wing shapes from orange paper.
3. Glue the accessories onto each chick and draw on eyes, feet, and details with a black marker.
4. Once dry, clip each chick to a length of ribbon or twine using small binder clips or clothespins, spacing them evenly.
5. Hang the banner across your porch, above the door, or along the railing.
Pro Tip: This is a perfect classroom art project! Have each student make their own chick (let them come up with their own hat and bowtie designs), then string all the chicks together into one giant class parade banner. It’s a wonderful way to build community and create something truly unique.
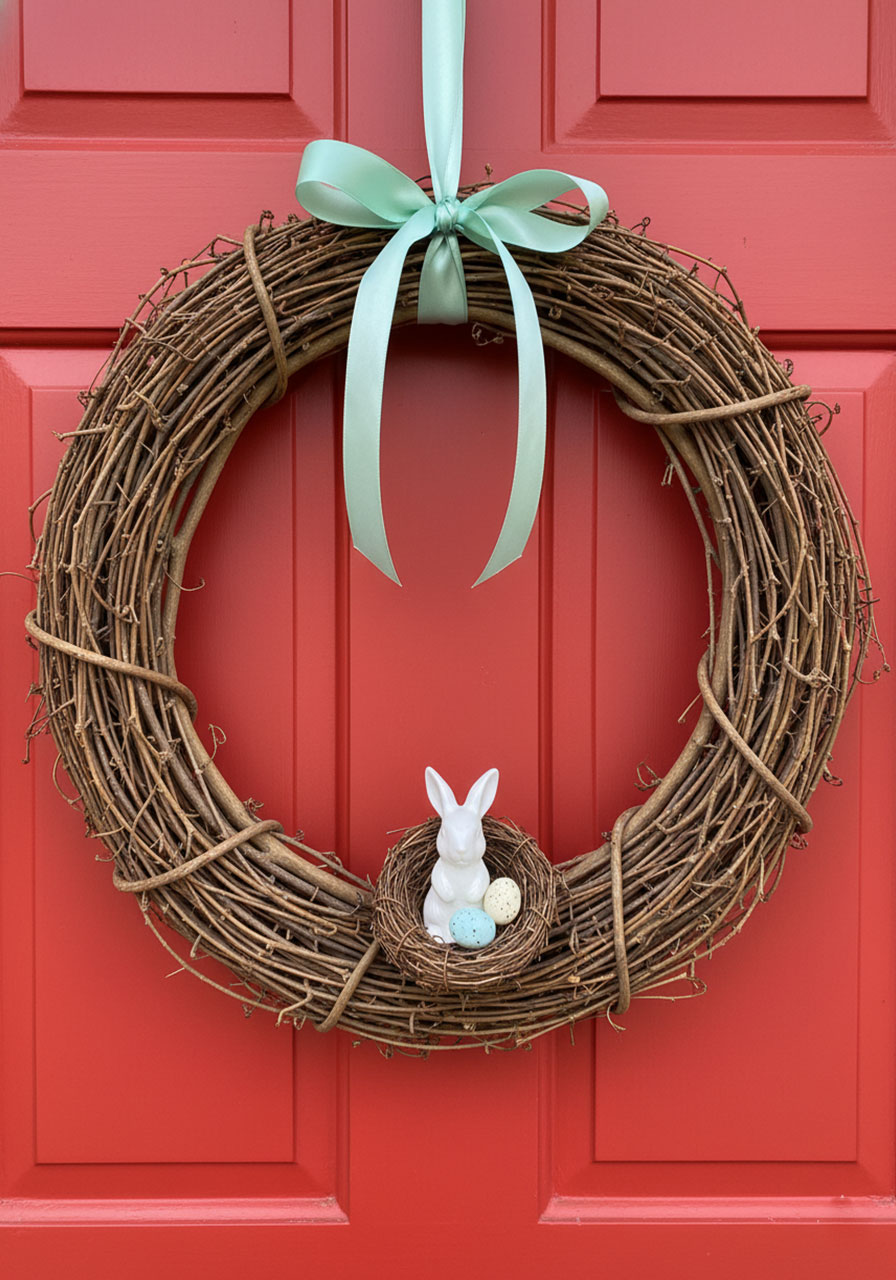
20. Chick Nest Wreath
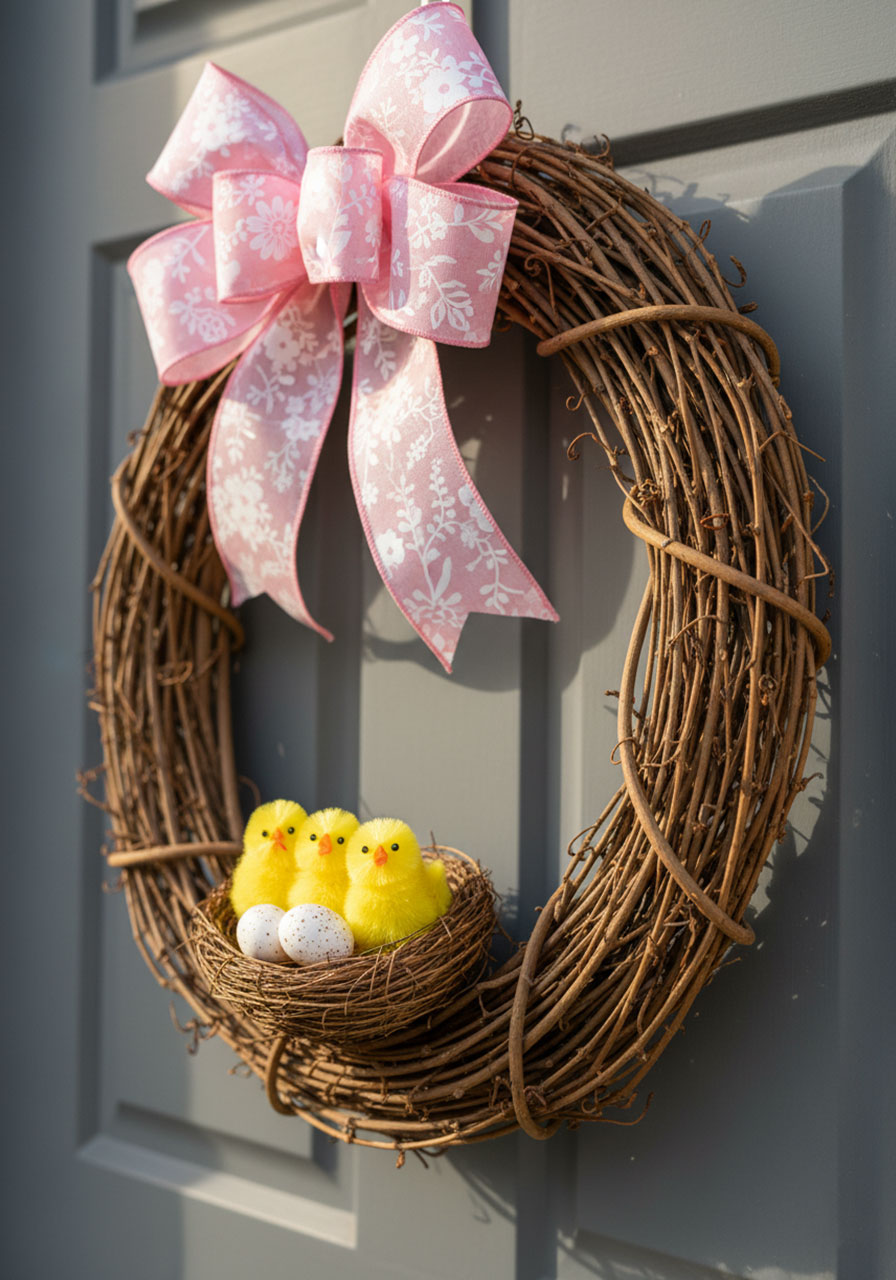
A grapevine wreath with a cluster of fluffy yellow chicks nestled in a cozy faux nest right in the center is a sweet, nature-inspired Easter welcome that looks lovely on any door or porch wall. It’s elegant enough for the front door but whimsical enough to delight every child who sees it.
What You’ll Need:
A grapevine wreath (12–16 inches works well)
A small faux bird’s nest (from a craft store)
3–5 small plush yellow chick figurines
Hot glue gun + glue sticks
Pastel ribbon (wired ribbon holds its bow shape beautifully)
Optional: a few speckled faux eggs to nestle alongside the chicks
How to Make It:
1. Position the small faux nest at the bottom center of your grapevine wreath and hot-glue it firmly in place.
2. Arrange your plush chicks inside the nest, pressing them snugly together so they look like a happy little family. Hot-glue each one lightly to keep them in place.
3. Add a few speckled eggs alongside the chicks in the nest if desired.
4. Tie a generous length of pastel ribbon into a big, full bow and hot-glue it to the top of the wreath.
5. Hang on your porch door or wall with a wreath hook.
Pro Tip: Wired pastel ribbon holds its bow shape beautifully even in light wind and rain, so it’s worth the small extra investment over regular ribbon for an outdoor wreath. This wreath also works beautifully inside above a mantel or on a classroom bulletin board!
Playful and Interactive Easter Porch Decor (Ideas 21–24)
Want your porch to do more than just look pretty? These interactive ideas turn your outdoor space into part of the Easter fun itself – think trails, signs, and games that get kids moving, laughing, and completely enchanted from the moment they arrive.
21. Hopping Bunny Trail
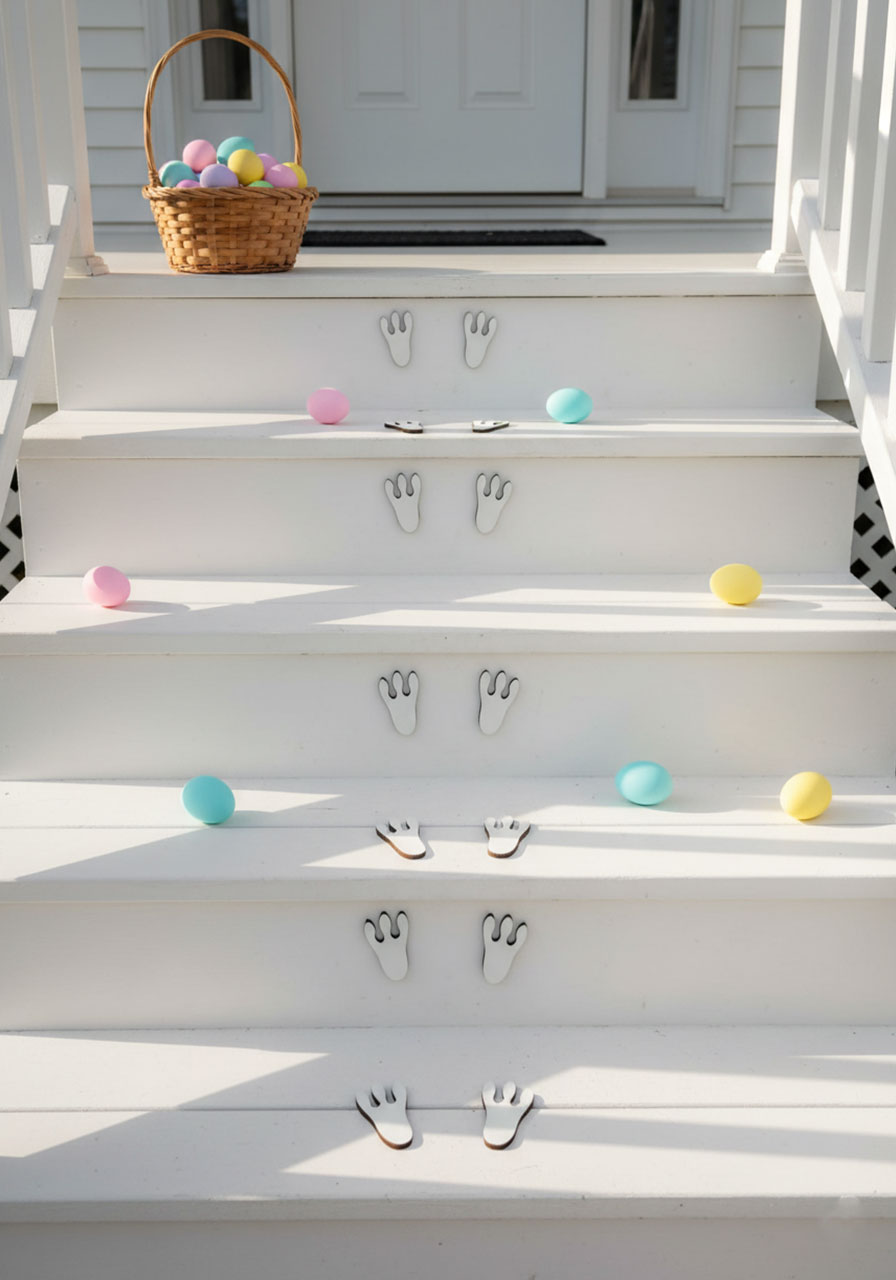
Imagine your kids (or their visiting friends) stepping onto the porch and discovering a trail of bunny footprints leading right up to the front door – as if the Easter bunny himself just hopped by. This is pure childhood magic, and it takes about 20 minutes to pull off.
What You’ll Need:
Thin plywood or thick cardboard
A jigsaw or craft knife (for plywood) or scissors (for cardboard)
White outdoor paint or white chalk
A pencil and a bunny footprint template (draw your own or trace a simple shape: one large oval “foot” with three small toe ovals above it)
How to Make It:
1. Draw or trace bunny footprints onto your plywood or cardboard and cut them out. You’ll want about 8–12 prints to create a convincing trail up your steps.
2. Paint them white and let dry completely.
3. Arrange them in pairs going up your porch steps, slightly offset (like a real animal walking), leading toward your front door.
4. For a temporary version, simply draw the prints directly onto your steps using white sidewalk chalk – it washes away with rain or a hose after Easter.
Pro Tip: Place the trail the night before Easter so kids discover it on Easter morning. For extra enchantment, scatter a few pastel Easter eggs along the trail as if the bunny dropped them on his way through. The reaction on kids’ faces is absolutely priceless.
22. Egg Hunt Arrow Sign
Whether you’re hosting a backyard egg hunt or just want to add some festive whimsy to your porch, this painted wooden arrow sign pointing to “Egg Hunt This Way” is the perfect playful addition. It sets the scene, builds anticipation, and looks adorable in photos.
What You’ll Need:
A wooden arrow-shaped plank (cut it yourself or purchase a pre-cut wood arrow from a craft store)
White chalk paint or white acrylic paint
Green paint or a green paint marker
Small colorful Easter egg stickers or painted egg details
Sandpaper (for a distressed, rustic finish)
A small stake or stand to prop it up
How to Make It:
1. Paint the wooden arrow white. Sand the edges lightly once dry for a charming, weathered look.
2. Use a green paint marker or brush to write “Egg Hunt This Way” in bold, friendly lettering. Keep the letters slightly uneven for a handmade, fun feel.
3. Add small Easter egg illustrations or stickers in the corners of the sign in bright, cheerful colors.
4. Prop the sign against your porch post, lean it in a planter, or mount it on a small stake in your front garden.
Pro Tip: This sign is reusable year after year – just store it with your other Easter decorations! If you have older kids or teens, let them letter the sign themselves for a genuinely handcrafted touch that the whole family will love.
23. Pastel Pinwheel Path
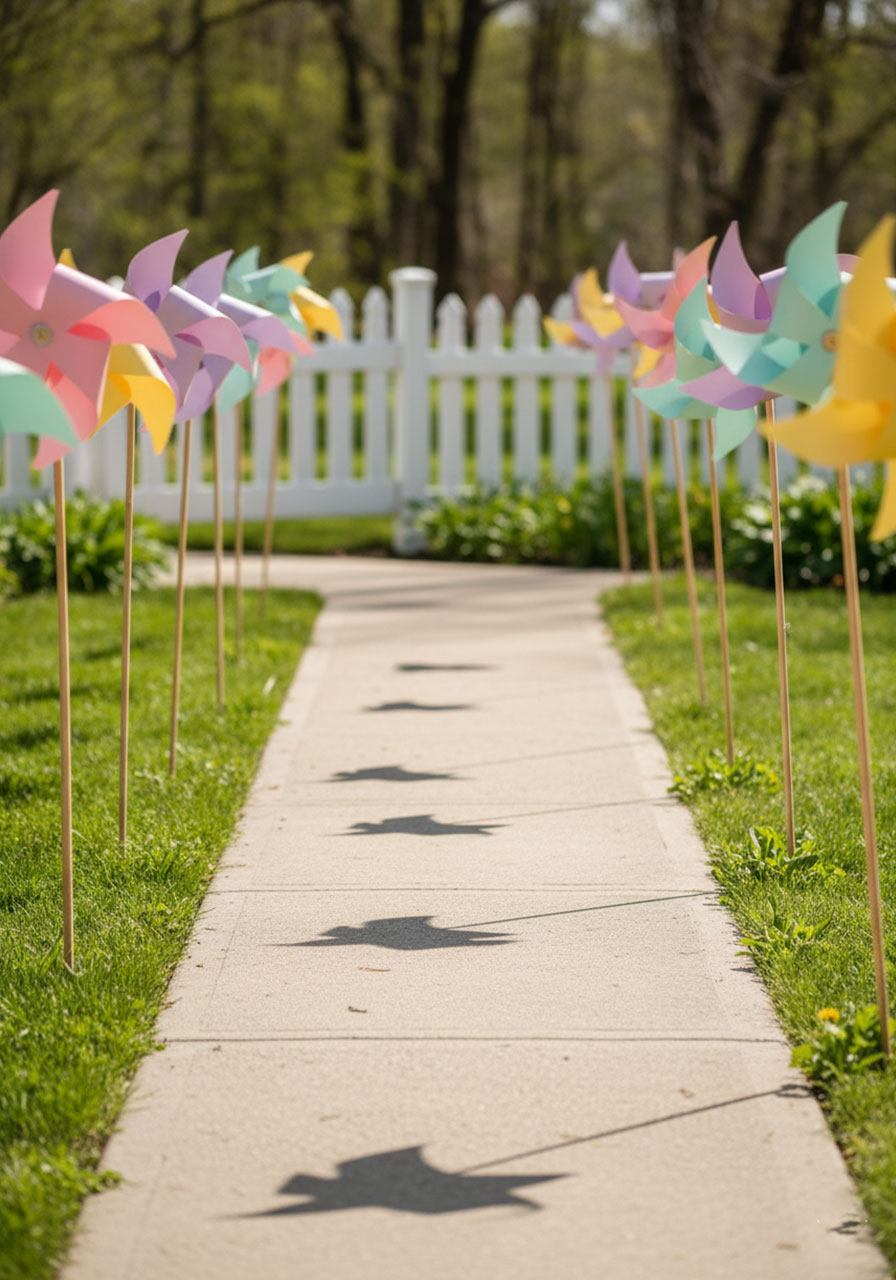
A row of oversized pastel pinwheels spinning in the spring breeze along your walkway is one of those ideas that’s almost impossibly cheerful. The movement makes them feel alive and festive, and they catch the eye from the street in the most delightful way. Spring wind does all the work for you.
What You’ll Need:
Pastel cardstock in pink, yellow, mint, lavender, and sky blue
Scissors and a ruler
Push pins or small brads
Wooden dowels or garden stakes (about 12–18 inches long)
A small bead (to act as a spacer between the pinwheel and the stake)
How to Make It:
1. Cut a square from your cardstock (about 8×8 inches for a good-sized pinwheel). Draw diagonal lines from each corner toward the center, stopping about 1.5 inches before the middle. Cut along these lines.
2. Fold every other point into the center (not crease – just bend), overlapping them all in the center. Push a brad or push pin through all the overlapping points and the center of the square.
3. Thread a small bead onto the brad/pin before attaching it to the top of your dowel – the bead keeps the pinwheel spinning freely.
4. Press the dowels into the ground along your front walkway, spacing them evenly about 12–18 inches apart.
Pro Tip: This is one of the easiest classroom crafts in this entire list – kids can make their own pinwheels in minutes and take them home to line their family’s walkway for Easter. It’s a wonderful take-home project that parents absolutely love receiving.
24. Bunny Hopscotch Board
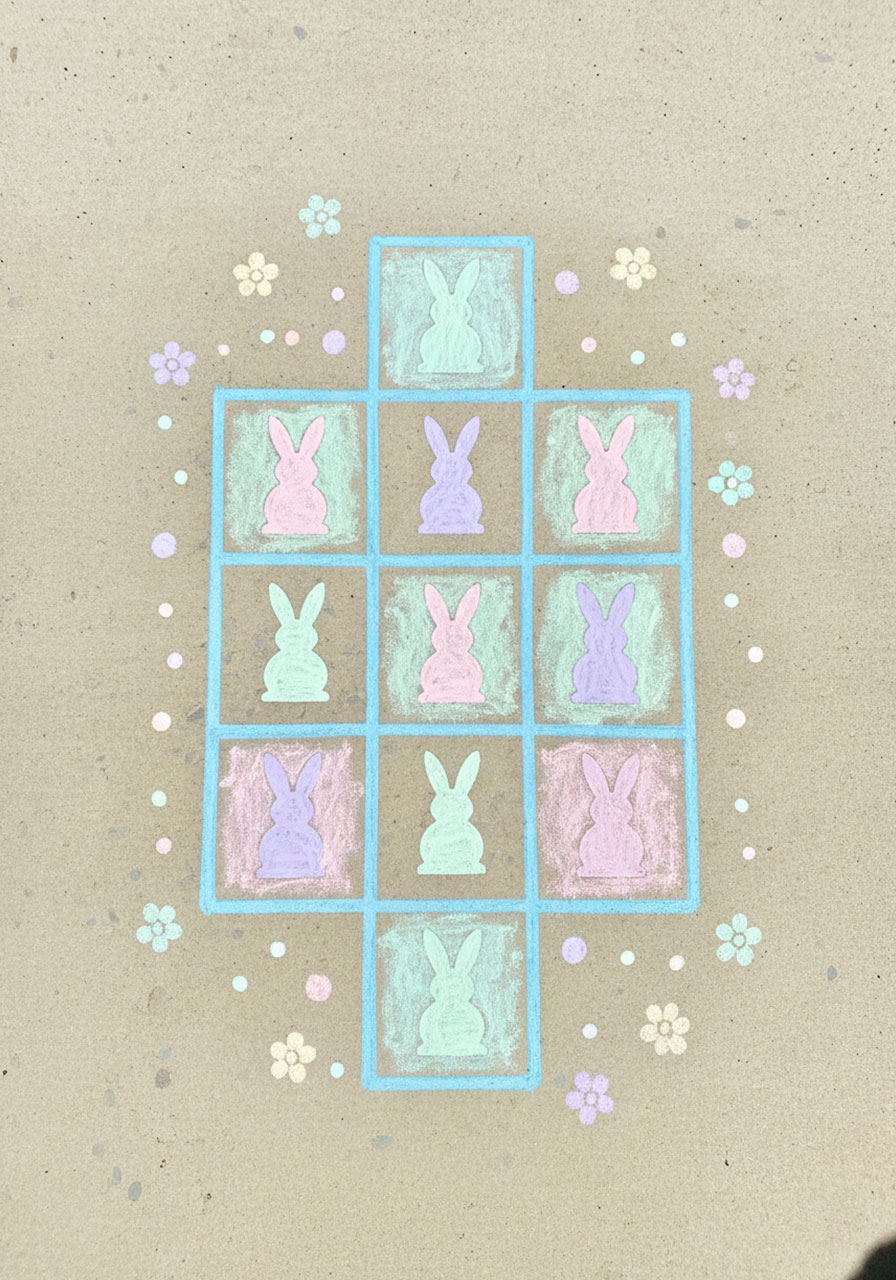
Replace the numbers on a classic hopscotch grid with painted bunny silhouettes, add some pastel flowers around the edges, and you’ve turned your porch floor into the most fun Easter activity station imaginable. Kids will play on it for hours – and it looks genuinely gorgeous as a decor piece too.
What You’ll Need:
Outdoor chalk paint in pastel shades (or regular sidewalk chalk for a temporary version)
A bunny silhouette stencil (cut one from a piece of cardboard – a simple sitting bunny shape works perfectly)
A wide paintbrush or foam roller
A ruler or chalk line to keep your grid straight
How to Make It:
1. Map out your hopscotch grid in chalk first – the classic layout is 1 square, then 2 side by side, then 1, then 2, then 1, for about 9 spaces total.
2. Paint the grid lines with outdoor chalk paint in a light pastel color.
3. Instead of numbers in each square, use your bunny stencil to paint a bunny silhouette in a different pastel color in each space. Alternate colors as you go.
4. Once the grid is dry, add small floral doodles and dots around the borders of the hopscotch board for an extra-pretty touch.
Pro Tip: If you want a temporary version that washes away after Easter, use regular sidewalk chalk instead of paint. It’s just as beautiful and the kids can help draw it – making it even more special because they helped create the game they’re playing on.
Rustic Easter Porch Decor (Ideas 25–28)
There’s something so warm and timeless about rustic Easter decor – the kind that feels like it belongs on a farmhouse porch or in a cottage garden. These ideas use natural materials, soft candlelight, and weathered textures to create an Easter atmosphere that’s cozy, elegant, and full of character.
25. Springtime Lantern Nests
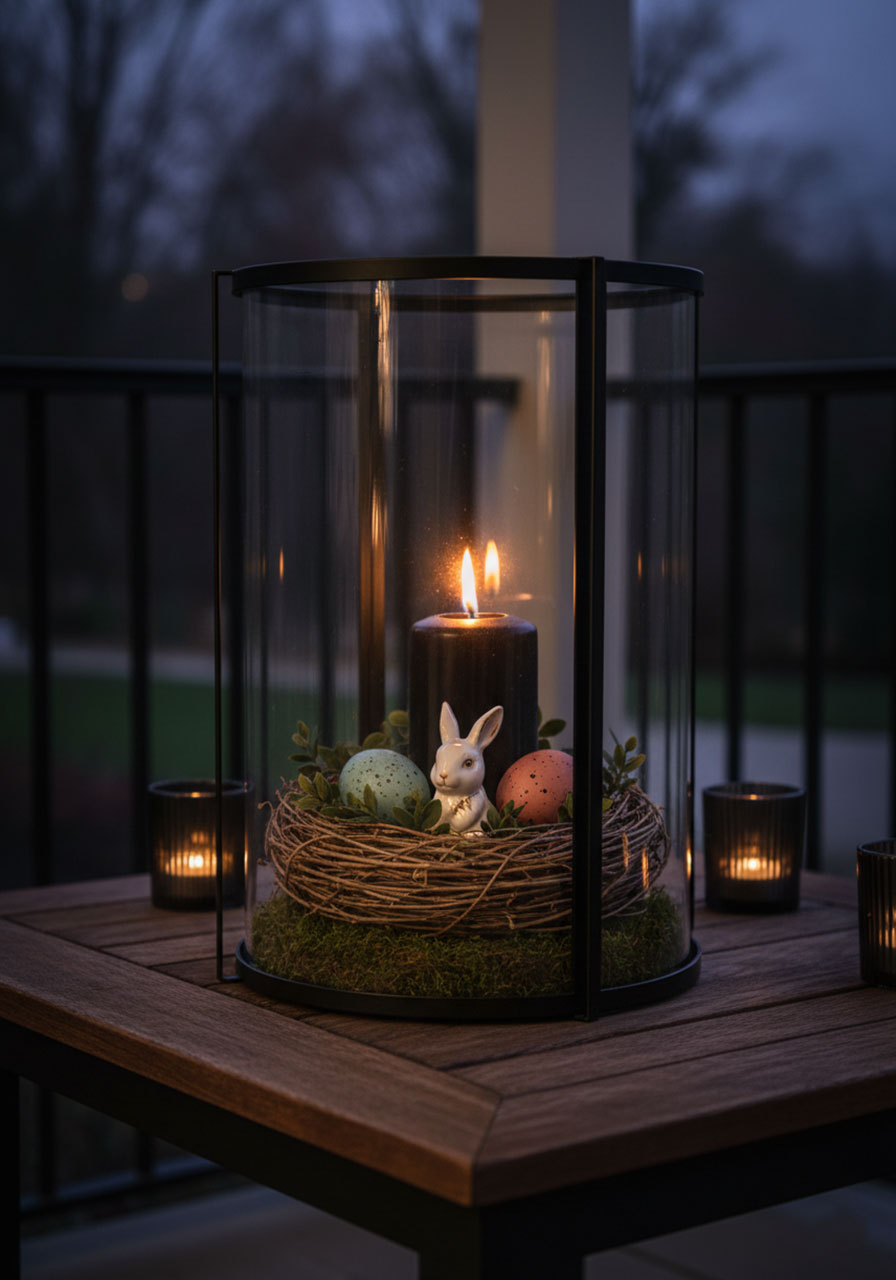
A glass lantern holding a twig nest with speckled pastel eggs and a tiny bunny figurine, glowing from a candle within – this is the kind of decor that makes your porch feel like a scene from a storybook. It’s serene, beautiful, and absolutely magical at dusk.
What You’ll Need:
A large glass lantern (the taller the better for the most dramatic effect)
A small twig or raffia bird’s nest
3–5 small speckled faux eggs or pastel mini eggs
A small ceramic or resin bunny figurine
A pillar candle or battery-operated LED candle (safer for outdoors with kids around)
Optional: a few tiny dried or faux flowers to tuck around the nest
How to Make It:
1. Place your pillar candle (or LED candle) in the center base of the lantern.
2. Nestle the twig nest around the base of the candle so the nest frames it naturally.
3. Arrange 3–5 small speckled eggs inside the nest, and tuck your bunny figurine alongside them as if it’s guarding the eggs.
4. Add a few tiny flowers around the nest for a final touch of spring color.
5. Close the lantern and place it on a porch table, step, or ledge where the glow can be appreciated in the evening.
Pro Tip: Always use an LED battery candle when decorating with kids around – it gives the same gorgeous warm glow with zero fire risk. Look for ones with a timer function so your lantern automatically glows each evening without you having to remember to turn it on.
26. Egg Crate Shelf Display
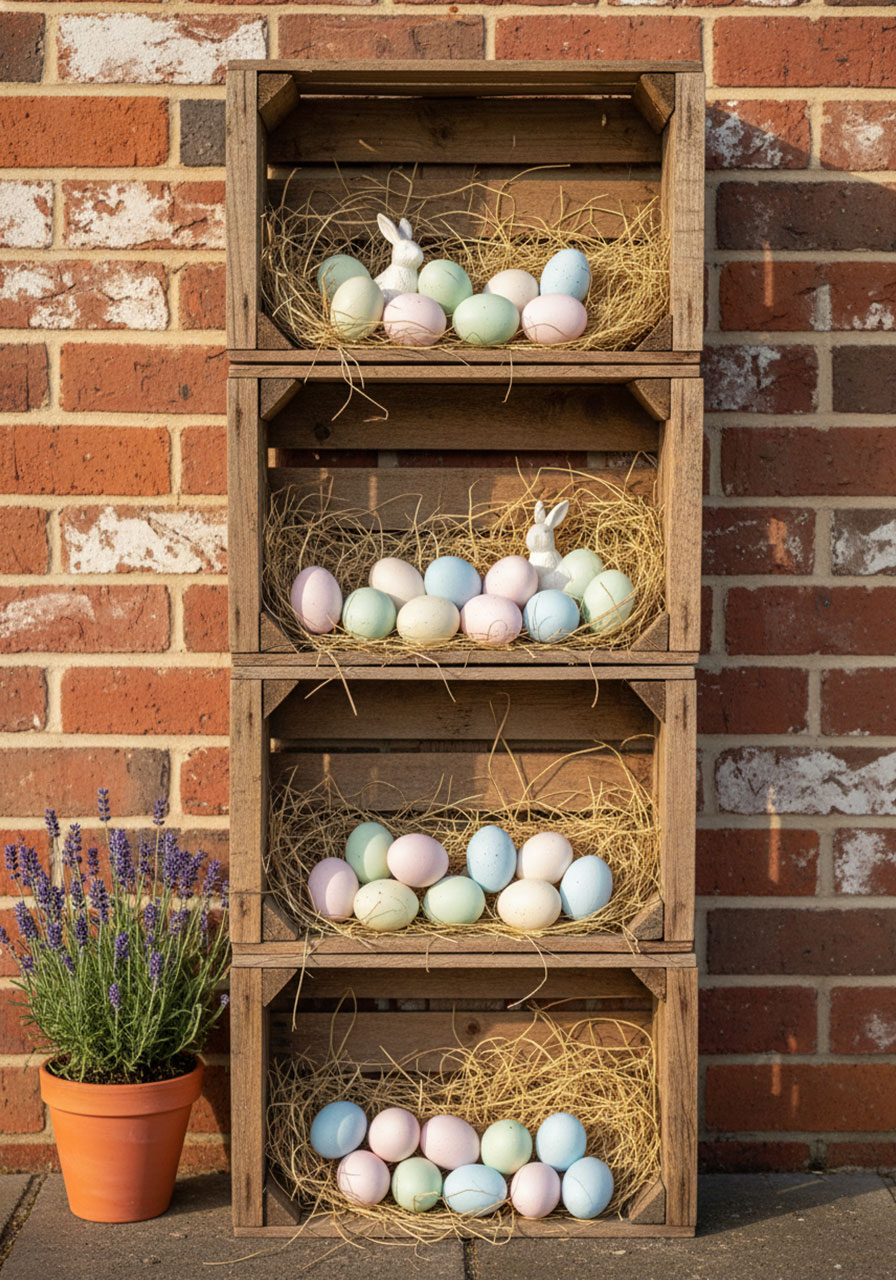
Stack three or four natural wooden egg crates into a rustic shelving tower and fill each one to the brim with pastel eggs, mini bunny figurines, and sprigs of lavender. This statement piece looks like it belongs in a high-end Easter boutique – but it costs almost nothing if you repurpose old crates.
What You’ll Need:
3–4 wooden crates in similar sizes (thrift stores, hardware stores, or craft stores are great sources)
Sandpaper and optional wood stain or clear sealant
Straw or natural raffia to line the crate bottoms
Pastel Easter eggs (real, wooden, or plastic)
Small bunny figurines
Faux or real lavender sprigs, or other spring flowers
Strong wood glue or L-brackets for securing the stack
How to Make It:
1. Sand the crates lightly for a smooth, clean finish. Apply a light coat of wood stain or clear sealant if you’d like them to weather-resistant outdoors.
2. Stack the crates – alternate the direction of each one (front-facing, then side-facing) for a more interesting visual display. Secure each crate to the one below using wood glue or L-brackets on the back for safety.
3. Line the bottom of each crate with a thin layer of straw or raffia for a natural, farmhouse look.
4. Fill each crate with a generous arrangement of pastel eggs, tuck in a bunny or two, and add lavender sprigs or small flower bunches for color and fragrance.
5. Place against your porch wall, beside the door, or in a corner where it can be fully admired.
Pro Tip: Add a small chalkboard sign inside one of the crates that reads “Happy Easter” or “Spring Has Arrived” for an extra rustic-charming detail. It ties the whole display together beautifully.
27. Egg Nest Wreath
A simple grapevine wreath gets a beautiful rustic Easter upgrade with one small but powerful addition: a faux bird’s nest at the bottom, cradling a tiny white bunny among a handful of speckled eggs. It’s nature-inspired, unpretentious, and genuinely stunning on any front door.
What You’ll Need:
A grapevine wreath (12–18 inches)
A small faux bird’s nest
3–5 small speckled faux eggs
1 small ceramic or resin bunny figurine
Hot glue gun + glue sticks
A length of mint, sage, or pastel ribbon (wired ribbon is best)
How to Make It:
1. Position the faux nest at the bottom center of the wreath and hot-glue it firmly in place. Press it into the grapevine slightly so it sits nestled within the wreath rather than just on top of it.
2. Arrange the speckled eggs inside the nest, then glue each one in place so they won’t fall out in the breeze.
3. Tuck the small bunny figurine into the nest beside the eggs and hot-glue securely.
4. Tie a beautiful full bow from your ribbon and hot-glue it to the top of the wreath.
5. Hang on your front door with a wreath hook.
Pro Tip: This wreath is incredibly versatile – it works equally well for a classroom door, a school hallway display, or hung above a fireplace inside. It’s understated enough to stay up through late April without feeling overdone.
28. Rustic Twig Easter Sign
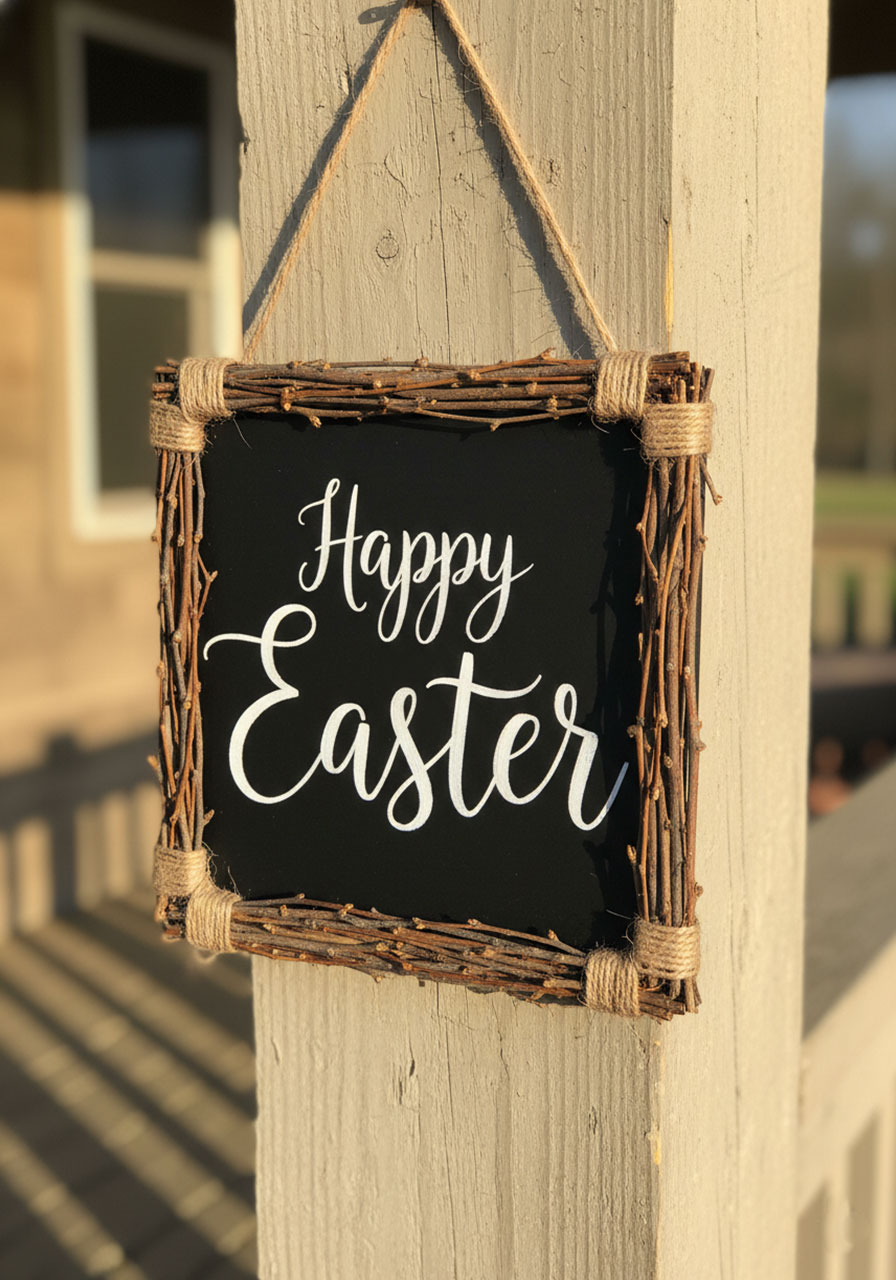
A chalkboard sign framed with natural twigs and twine, reading “Happy Easter” in soft white lettering – leaning casually against a porch post or hanging from a hook – is the kind of detail that makes your whole porch feel thoughtfully curated. It’s farmhouse-meets-Easter-whimsy at its very best.
What You’ll Need:
A small wooden plank or framed chalkboard
Black chalk paint (if using plain wood) or a ready-made mini chalkboard
White chalk or a white paint pen
Thin natural twigs, dried sticks, or bamboo skewers
Natural jute twine
Hot glue gun + glue sticks
How to Make It:
1. Paint your wooden plank with black chalk paint and let it dry completely. (Skip this step if using a ready-made chalkboard.)
2. Write “Happy Easter” in your best handwriting using a white chalk marker or chalk. For extra charm, write “Happy” in a smaller size above “Easter” in larger, bolder letters.
3. Cut thin twigs to the length of each side of your sign and hot-glue them along the edges to create a natural twig frame.
4. Wrap twine around the corners of the frame and tie a small bow at the top for a loop to hang it from.
5. Hang from a porch hook or lean it against a post.
Pro Tip: A chalkboard sign can be updated year after year – just wipe it down after Easter and store it. Next spring, re-chalk your message. It’s one of the most sustainable (and budget-friendly!) Easter decor investments you can make.
Cozy and Functional Easter Porch Decor (Ideas 29–32)
Who says Easter decor has to stay at eye level? These ideas bring festive spring charm to the most functional parts of your porch – your chairs, your table, your lanterns – so every single corner feels like part of the celebration.
29. Bunny Bench Cushion
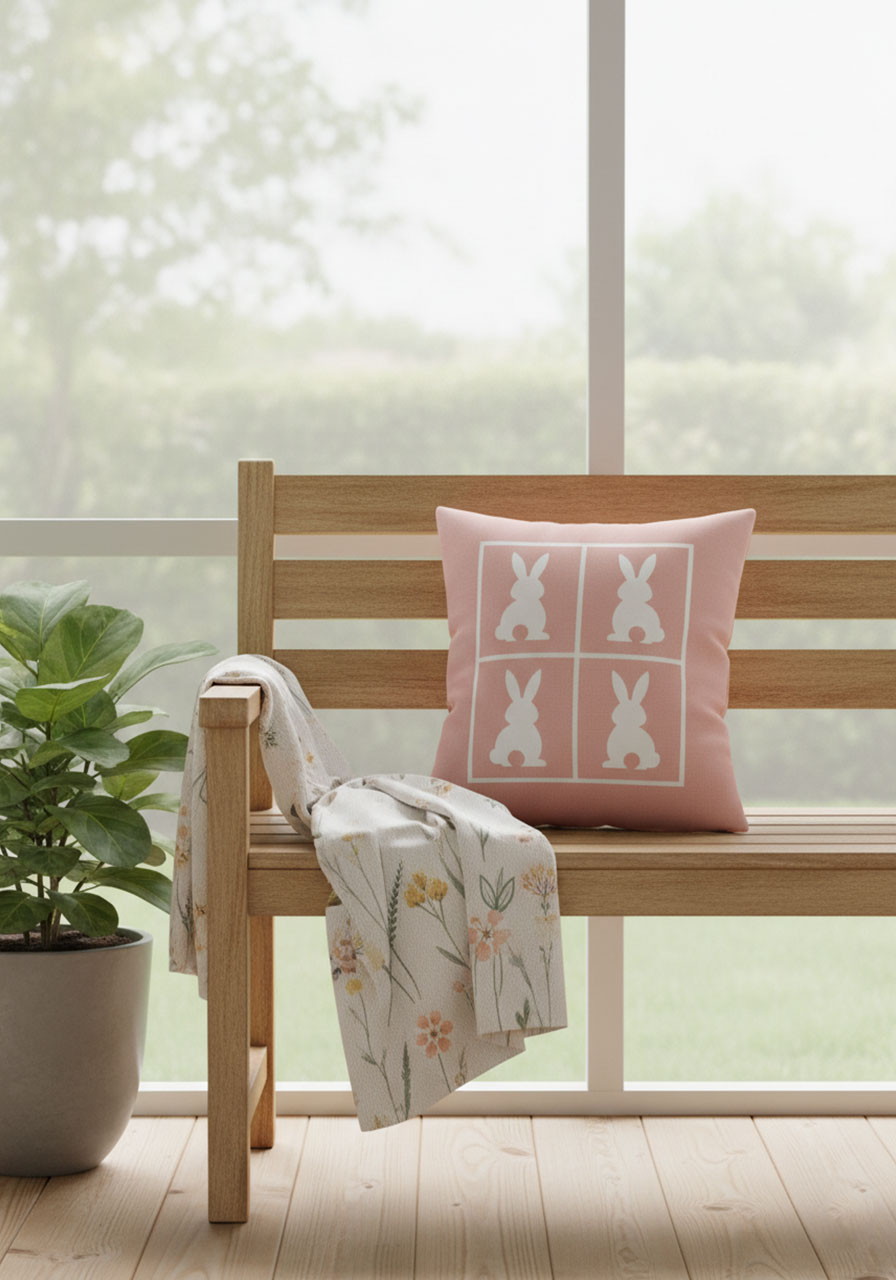
A porch bench draped with a cushion featuring soft white bunny silhouettes on a blush pink background, paired with a floral throw blanket casually tossed over the arm – it’s cozy, it’s springtime-perfect, and it turns your bench into the prettiest little Easter nook imaginable.
What You’ll Need:
A plain pastel pink or cream outdoor bench cushion cover
White fabric paint
A bunny silhouette stencil (cut one from cardboard – a simple side-profile bunny shape)
A foam stencil brush
A floral throw blanket in soft spring colors
How to Make It:
1. Lay your cushion cover flat on a work surface. Position your bunny stencil on the fabric and hold it firmly in place.
2. Dab white fabric paint over the stencil using a foam brush, using a straight up-and-down dabbing motion (never drag the brush or paint will bleed under the stencil).
3. Carefully lift the stencil and reposition it to create a repeating bunny pattern across the cushion. Let each print dry before repositioning the stencil over a completed one.
4. Heat-set the paint by ironing over the design once fully dry (place a thin cloth between the iron and the fabric).
5. Dress the bench with the finished cushion and drape the floral throw loosely over one end.
Pro Tip: This stenciling technique works on any plain fabric item – throw pillow covers, tote bags, tea towels. Consider making a matching set of stenciled pillow covers to complete your Easter porch seating area. The whole effect is incredibly polished and pulled-together.
30. Bunny Ear Chair Backs
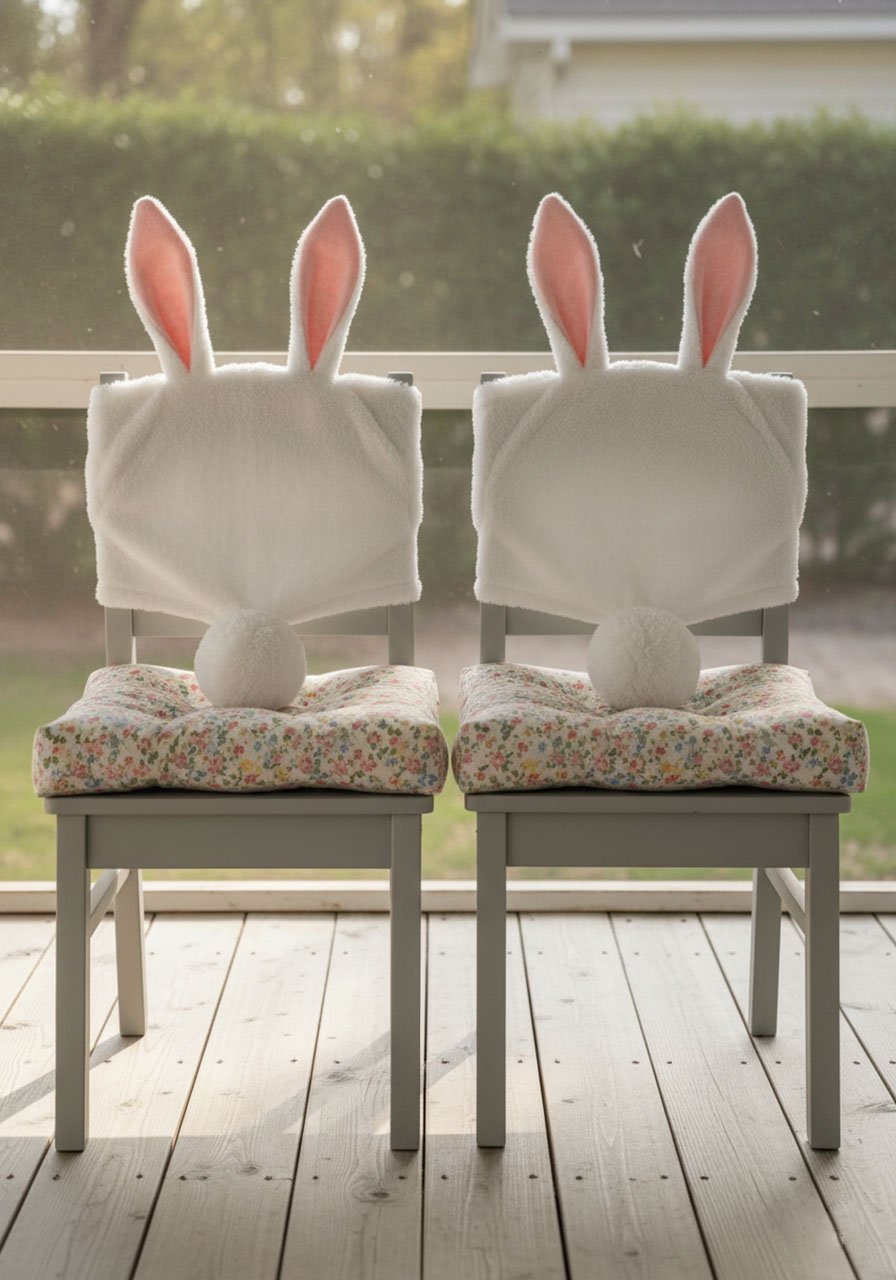
This idea is wildly charming and takes about 30 minutes from start to finish. Slipping fabric bunny ear “hoods” over your porch chair backs instantly transforms ordinary outdoor seating into Easter thrones – complete with a fluffy pom-pom tail at the back. Kids will insist on sitting in the “bunny chairs” all day.
What You’ll Need:
White fleece or felt fabric
Pink felt (for inner ears)
Scissors and a sewing needle + thread (or hot glue for a no-sew version)
A large white pom-pom for the tail
Measuring tape
How to Make It:
1. Measure the width and height of your chair back. Cut two rectangles of white fleece slightly wider than the chair back and about 10–12 inches tall – these will be the front and back of the cover that slips over the chair.
2. Cut two large bunny ear shapes from white fleece and two slightly smaller ovals from pink felt for the inner ears. Glue or sew the pink onto the white, then attach the completed ears to the top edge of the front rectangle.
3. Sew or glue the front and back rectangles together along the sides, leaving the top and bottom open so it slides over the chair back.
4. Hot-glue a large white pom-pom to the back panel near the bottom as the bunny’s tail.
5. Slip one cover over each chair back.
Pro Tip: Make a set of four for a truly cohesive Easter porch table setup. These also double as the most adorable Easter morning photo prop – pop a kid in the chair, ears up, and snap away. Those photos are keepers.
31. Pastel Egg Table Runner
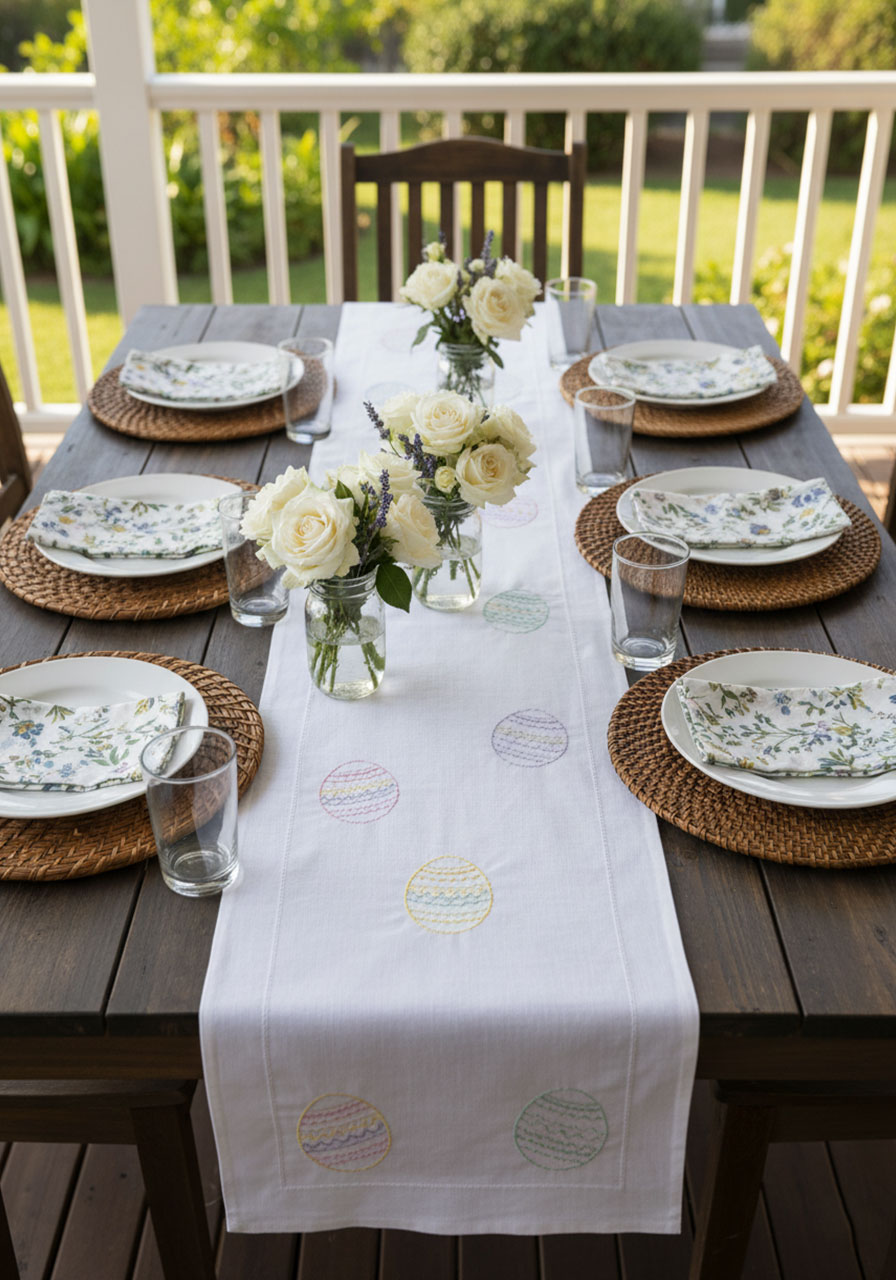
A crisp white table runner adorned with delicate embroidered pastel Easter eggs transforms your porch dining table into a proper Easter feast setting. Pair it with mismatched floral napkins, mason jar flower vases, and wicker placemats and you’ve got a table worthy of an Easter magazine spread.
What You’ll Need:
A plain white or cream linen or cotton table runner
Pastel embroidery floss in pink, mint, yellow, and lavender
An embroidery needle
A water-soluble fabric marker for sketching the egg shapes
Embroidery hoop (optional but helpful)
How to Make It:
1. Use your fabric marker to lightly sketch simple egg shapes along the runner – space them evenly, alternating sizes for a natural look. The marker will wash out with water once you’re done.
2. Thread your embroidery needle with a single strand of pastel floss and use a basic backstitch or outline stitch to embroider the egg outlines. Switch colors for each egg.
3. Add simple interior details – a few cross-stitched dots, stripes, or small flowers inside each egg for extra charm.
4. Once complete, lightly spritz the fabric marker lines with water to remove the sketch marks and let the runner dry flat.
5. Press with an iron and place on your porch table.
Pro Tip: Not a confident embroiderer? No problem. Use fabric paint and a fine-tip brush to draw the egg designs instead – you’ll achieve a very similar look in a fraction of the time. This runner will last for years and gets more beautiful every time you use it.
32. Bunny Lantern Covers
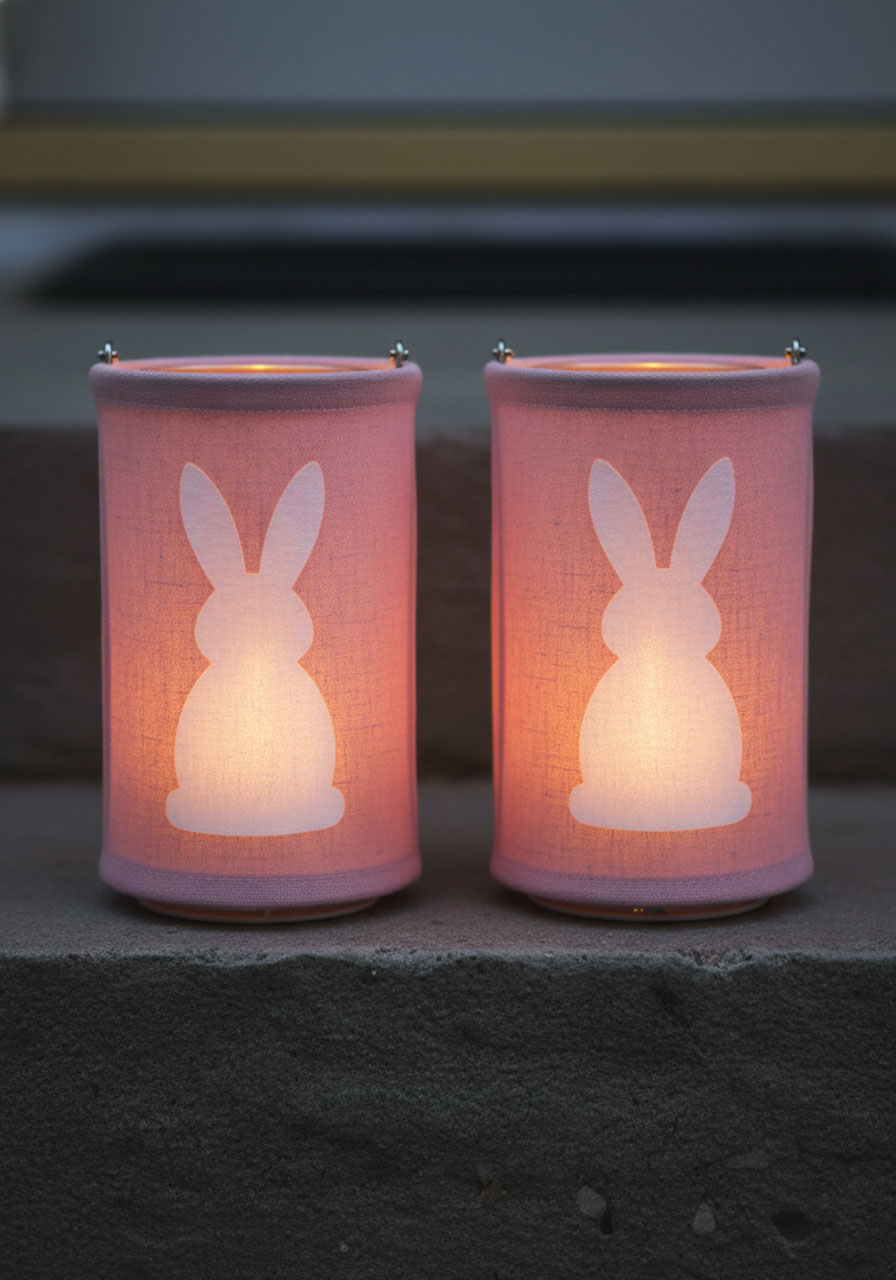
Plain metal or glass porch lanterns get a full Easter transformation with simple fabric covers featuring cut-out bunny silhouettes that cast a warm, glowing shape when the light shines through. They’re soft, romantic, and completely magical once the sun goes down.
What You’ll Need:
Battery-operated porch lanterns or existing outdoor lanterns
Soft pink or cream fabric (muslin or minky fabric work beautifully)
A bunny silhouette cut from contrasting fabric or cardstock
Craft glue or hot glue
Scissors and measuring tape
Battery-operated LED candles or fairy lights inside the lanterns
How to Make It:
1. Measure the circumference and height of your lantern. Cut your fabric into a rectangle that wraps around the lantern with a small overlap.
2. Cut a large bunny silhouette shape from a contrasting color of fabric or from white cardstock. (If using cardstock, the light will cast a shadow silhouette through the fabric – a gorgeous effect!)
3. Center the bunny silhouette on the fabric panel and glue it in place.
4. Wrap the fabric cover around your lantern and secure the overlapping edges with a dab of glue or a small piece of velcro for easy removal.
5. Place battery-operated LED candles or fairy lights inside the lanterns. Turn them on at dusk and enjoy the glow.
Pro Tip: Make two matching lantern covers for a symmetrical porch display – one on each side of your front door. The effect is incredibly welcoming and warm, especially as guests arrive for an Easter dinner.
Hanging and Window Easter Porch Decor (Ideas 33–36)
Don’t forget to look up – and out! Your porch ceiling, hanging hooks, and windows are all prime Easter decorating real estate. These hanging and window ideas add dimension, movement, and a sense of wonder to your outdoor space that ground-level decor simply can’t achieve on its own.
33. Egg Basket Swing
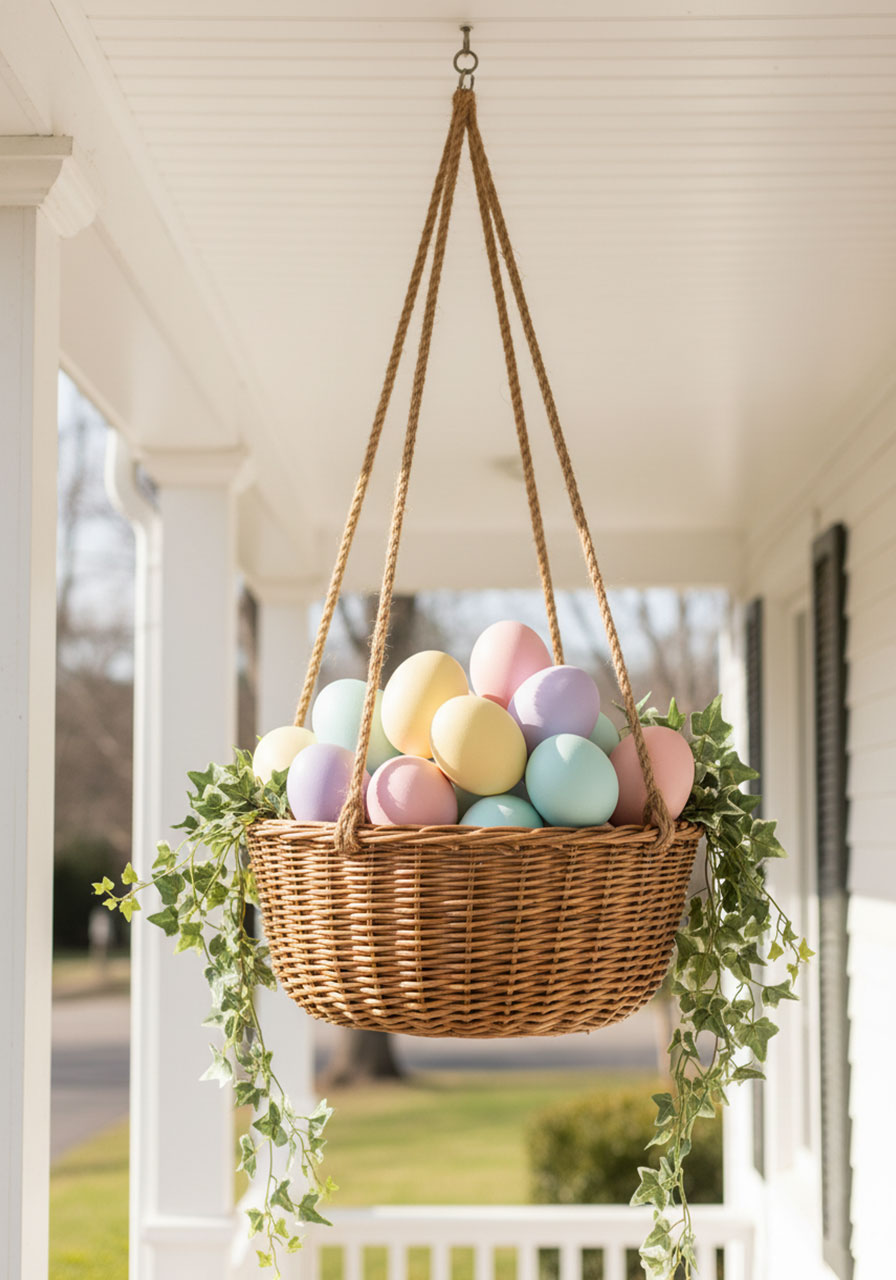
A wicker basket overflowing with pastel Easter eggs and cascading ivy, hanging from your porch ceiling like a swaying Easter gift from above – this is the kind of decor detail that makes the whole street stop and stare. It’s unexpected, gorgeous, and impossibly springtime-perfect.
What You’ll Need:
A round or oval wicker basket with sturdy handles
Thick natural rope or jute twine (at least 4–6 feet)
Oversized plastic Easter eggs in assorted pastel shades
Faux trailing ivy garland
A sturdy ceiling hook rated for outdoor use
Optional: a few spring flowers tucked between the eggs
How to Make It:
1. Thread your rope through both handles of the basket, tying secure, tight knots on each side so the basket hangs level.
2. Gather all the rope ends above the basket and tie them together in a large overhand knot, leaving a loop at the very top for the ceiling hook.
3. Fill the basket generously with oversized pastel Easter eggs – pile them high so they look like they might spill over the edges.
4. Drape faux ivy garland over the sides of the basket so it cascades down naturally. Tuck in a few spring flowers for added color.
5. Hang from a sturdy ceiling hook on your porch.
Pro Tip: Test the weight capacity of your ceiling hook before hanging – a full basket can be heavier than it looks! A hook rated for 15–20 lbs gives you plenty of safe margin. This basket display also looks stunning hung from a large tree branch near the porch entrance.
34. Bunny Silhouette Window Clings
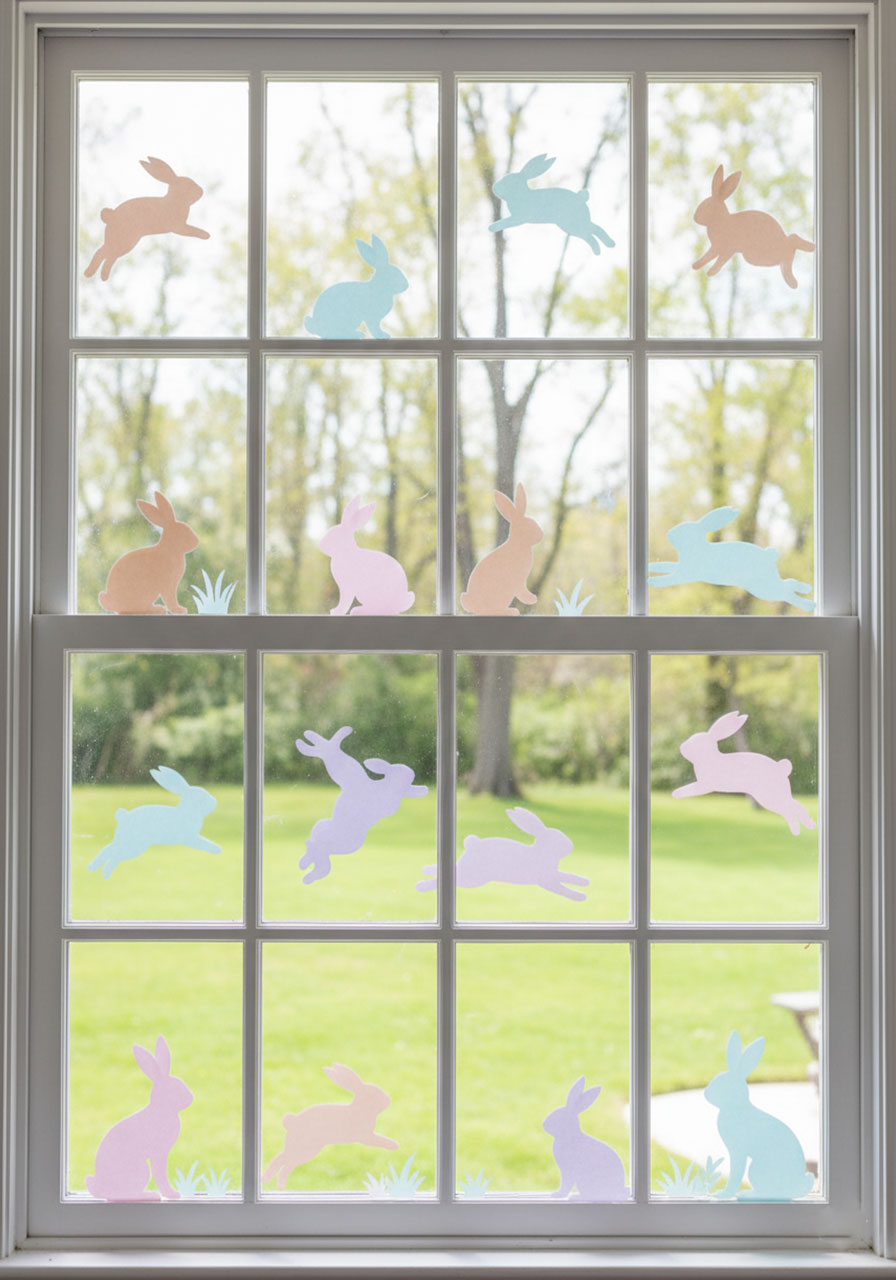
A whole family of bunny silhouettes in different sizes and pastel colors hopping across your porch windows – some sitting, some running, some looking back over their shoulders – creates a playful, storybook scene that kids absolutely adore. It’s also one of the easiest and most budget-friendly ideas on this entire list.
What You’ll Need:
Pastel contact paper or self-adhesive vinyl in pink, blue, brown, and lavender
A craft knife or sharp scissors
A bunny template in several sizes and poses (draw your own or print a simple outline to trace)
A pencil for tracing
How to Make It:
1. Draw or trace bunny shapes in various sizes onto the back of your contact paper – a mix of sitting bunnies, running bunnies, and jumping bunnies looks the most dynamic and fun.
2. Carefully cut out each bunny shape with scissors or a craft knife.
3. Peel the backing and press each bunny directly onto your clean, dry window glass. They stick and peel cleanly without leaving any residue.
4. Arrange them in a scattered, playful pattern – some near the bottom as if hopping on the ground, some higher up as if jumping – for the most lively effect.
Pro Tip: Let the kids design the bunny layout themselves – give them the cut-out bunnies and let them decide where each one goes. It becomes their Easter porch contribution, and they’ll proudly tell every visitor “I put those up!” for the whole season.
35. Pastel Egg Mobile
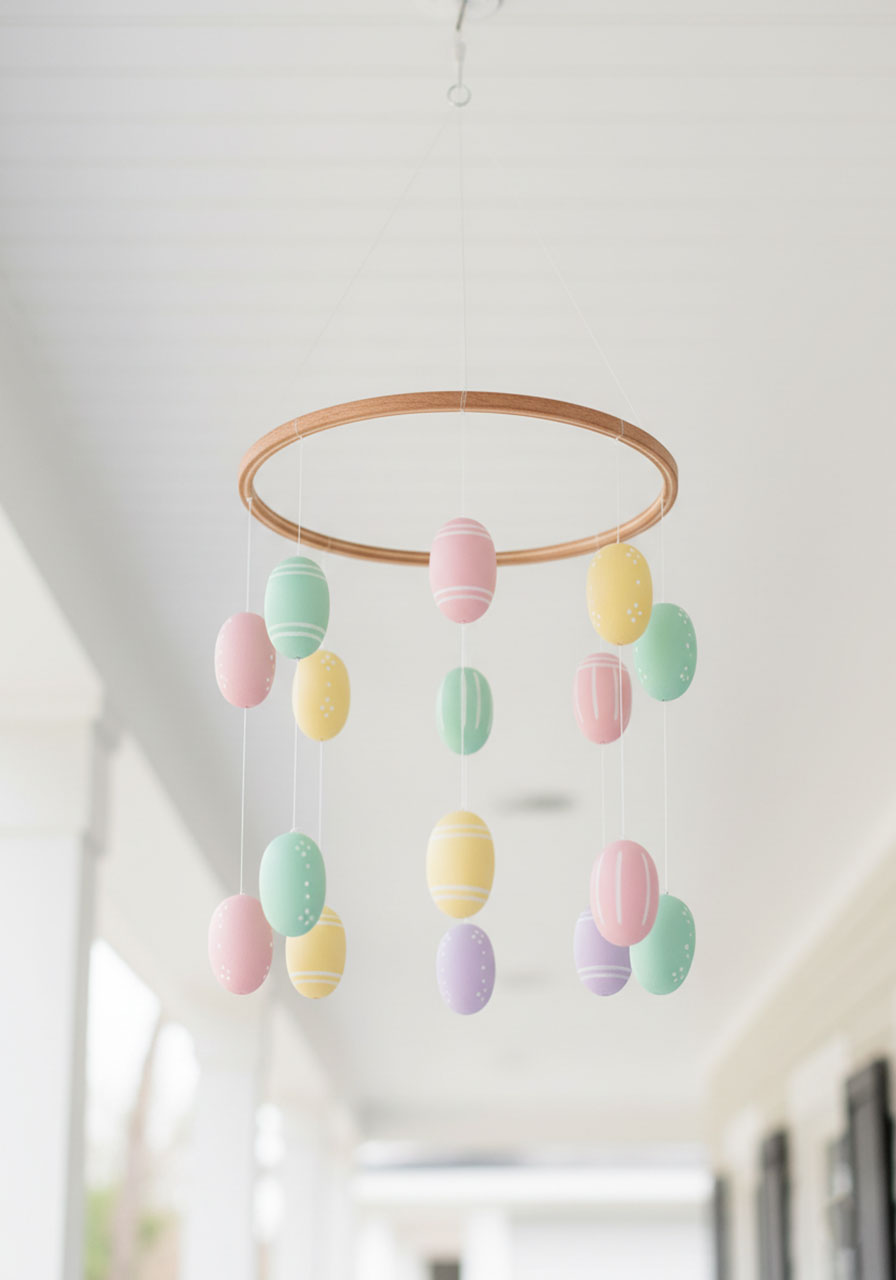
Pastel-painted wooden eggs suspended at varying lengths from a wooden embroidery hoop, swaying gently in the spring breeze from your porch ceiling – this hanging mobile is the kind of decor that makes people tilt their head back and say “oh, that’s beautiful.” It’s elegant, simple, and utterly charming.
What You’ll Need:
Wooden craft eggs (8–12 of them)
Pastel acrylic paint and small paintbrushes
A wooden embroidery hoop or a thin wooden dowel
Clear fishing line or thin white thread
A small drill or thick needle to make holes in the eggs
A ceiling hook for hanging
How to Make It:
1. Paint each wooden egg a different pastel shade. Add simple details like stripes, dots, or small floral designs once the base coat is dry. Let everything dry fully.
2. Drill or carefully poke a small hole through the narrow top of each egg.
3. Cut fishing line into varying lengths (ranging from about 6 inches to 18 inches) and thread one piece through the hole in each egg, tying a knot at the bottom so it won’t pull through.
4. Tie the other end of each line to the embroidery hoop, spacing the eggs evenly around the circumference and varying the drop lengths for a beautiful, layered effect.
5. Tie three equal-length pieces of line to the hoop at evenly-spaced points, gather them above the hoop, and knot together to create the hanging point.
6. Hang from a ceiling hook on your porch.
Pro Tip: This mobile makes a wonderful Easter craft project for older kids and teens. The painting, the threading, the arranging – it’s a multi-step creative process that results in something genuinely beautiful that they’ll be proud to display. Consider making smaller versions as Easter gifts for teachers or grandparents.
36. Carrot Window Stickers
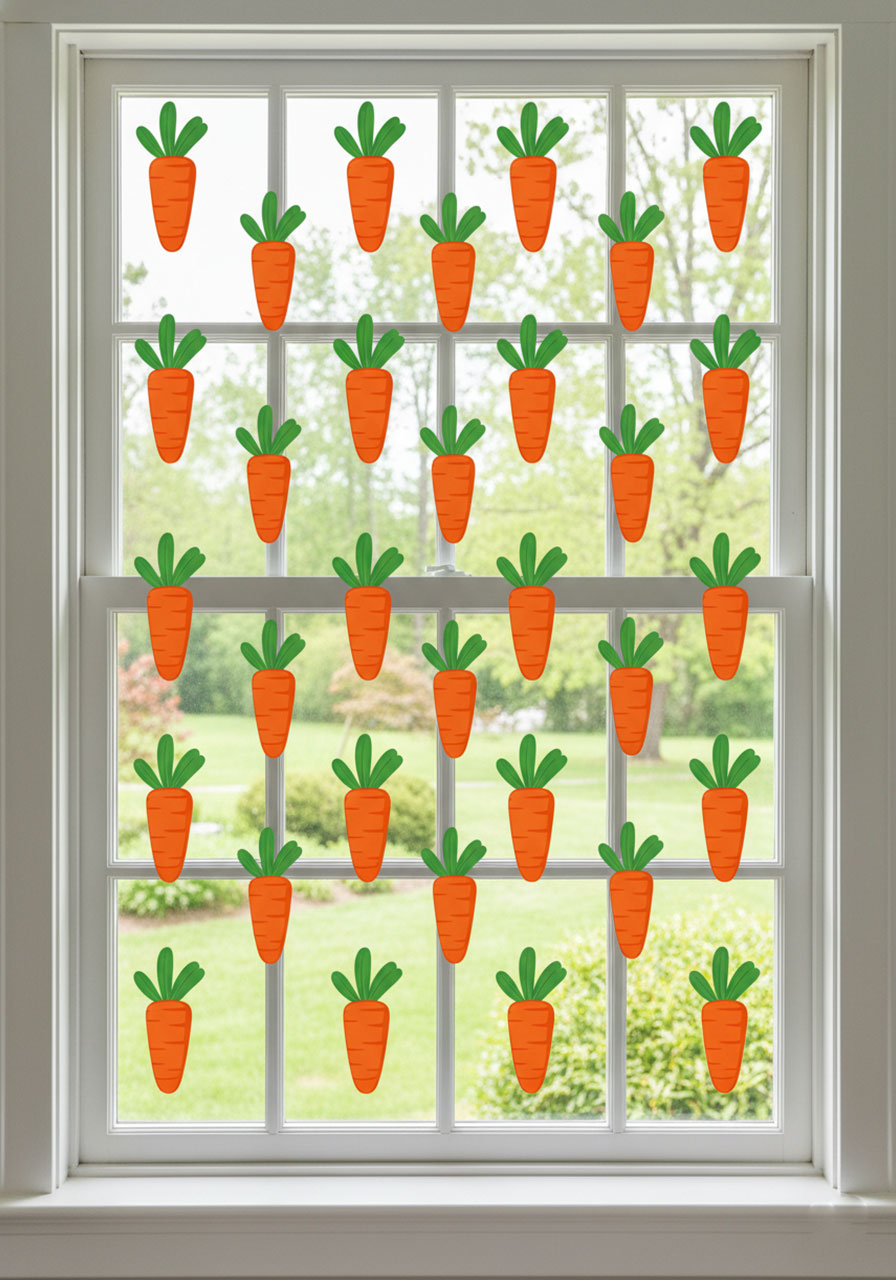
A grid of bright orange carrot stickers marching across your porch window in cheerful, repeating rows is bold, colorful, and absolutely unmistakably Easter. It’s also the fastest decor idea on this list – you can have your windows fully decorated in under 10 minutes.
What You’ll Need:
Orange and green self-adhesive vinyl or contact paper
A craft knife or sharp scissors
A simple carrot template (draw your own – a rounded triangle body in orange with a few green leaf tops)
How to Make It:
1. Draw carrot body shapes onto the back of your orange vinyl and leaf tops onto the green vinyl. Cut out all the pieces.
2. For each carrot, attach the green leaf tops to the wide top edge of the orange body piece.
3. Clean your windows thoroughly – this ensures the vinyl adheres well and peels cleanly when you’re done.
4. Stick the carrots onto your windows in a playful repeating pattern. Try alternating directions (some facing right, some left) for a lively, animated feel.
Pro Tip: Vinyl window clings peel off cleanly when it’s time to take them down – just start at a corner and pull slowly. Store them on their original backing paper and you can reuse them next Easter. This is one of the most mess-free, fuss-free Easter decor ideas for families with young kids.
Two More to Complete Your Easter Porch Dream (Ideas 37–38)
37. Easter Basket Planter Display
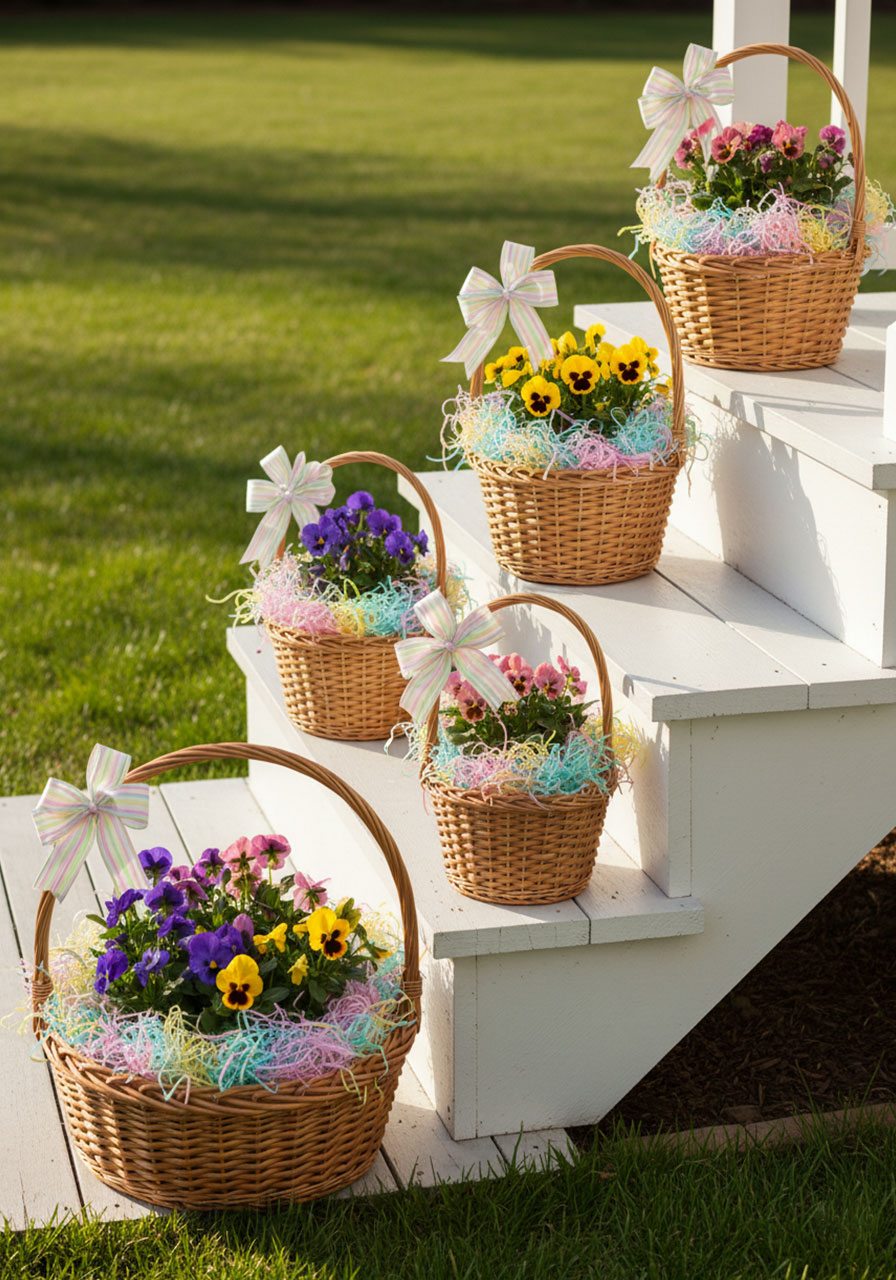
Real wicker Easter baskets – the kind that might otherwise just hold candy – become a beautiful repeating porch display when you fill them with potting soil and spring flowers and line them along your steps or railing. It’s functional, festive, and gorgeously in the spirit of Easter.
What You’ll Need:
3–5 wicker Easter baskets in varying sizes
Plastic liner bags or small plastic pots (to protect the basket from moisture)
Potting soil
Cheerful spring flowers – pansies, violas, or primroses in pastel shades work beautifully
A ribbon or pastel bow for the basket handle
How to Make It:
1. Line the inside of each basket with a plastic bag or drop a plastic pot inside to protect the wicker from wet soil.
2. Fill with potting soil and plant 3–4 small flowers per basket, patting the soil firmly around the roots.
3. Tie a pastel ribbon bow around each basket handle for a finishing touch.
4. Arrange the baskets along your porch steps, staggering sizes from largest to smallest for a beautifully graduated display.
Pro Tip: After Easter, simply remove the flowers and repot them in the garden – the baskets can be cleaned out and used for next year’s Easter candy or egg hunts. It’s a fully multi-purpose Easter investment!
38. Spring Welcome Chalkboard Sign

A large chalkboard sign at your porch entrance with a hand-lettered seasonal message – “Welcome, Spring!” or “The Bunny Has Been Here” surrounded by chalk-drawn flowers and eggs – is a personal, warm greeting that tells every visitor this is a home that celebrates the season with joy and intention. And you can update it week by week throughout spring.
What You’ll Need:
A large chalkboard (freestanding, framed, or mounted – any style)
White chalk and colored chalk in pastel shades
A chalk marker for cleaner, bolder lettering (optional)
A damp cloth for erasing and correcting
How to Make It:
1. Start with a freshly wiped, dry chalkboard. Lightly sketch your layout in pencil chalk first so you can adjust spacing before committing.
2. Write your main message in large, confident lettering in the center. “Welcome to Our Easter Porch!” or “Happy Easter from Our Family to Yours” are lovely options.
3. Use colored chalks to draw a border of spring flowers, Easter eggs, and small bunny faces around the edges of the board.
4. Add your family name or a smaller message at the bottom for a personal touch.
5. Prop the finished board at your porch entrance where arriving guests will see it first.
Pro Tip: Spray your finished chalkboard design with a light mist of hairspray to “set” the chalk so it doesn’t smudge in the breeze. This is a life-changing tip for outdoor chalkboard displays! The design will stay crisp and beautiful through the whole Easter season.
You’re Ready to Create the Most Magical Easter Porch on the Block!
There you have it – 38 creative, colorful, and totally doable Easter porch decor ideas to transform your outdoor space into a springtime showstopper. Whether you go all-in on a floral bunny ear arch and a carrot topiary flanking your front door, or simply line your steps with a few painted polka dot pots and a cheerful welcome sign, every single one of these ideas brings that same wonderful result: a home that feels alive with Easter spirit.
The best part? You don’t have to do it alone. These projects are designed to be done with your kids, your family, your students – turning the decorating itself into one of the most memorable parts of the Easter season. Because the joy isn’t just in the beautiful porch you end up with. It’s in the Saturday morning you spent painting rocks together, the cotton balls that definitely got stuck to the wrong things, the proud look on a child’s face when they see their chick parade banner hanging up for the whole neighborhood to see.
Pick your favorites, grab your hot glue gun, and go make something wonderful. Your Easter porch is waiting.
Which idea are you most excited to try? We’d love to hear in the comments below – and don’t forget to share photos of your finished Easter porch!
More Easter Party Ideas to Keep the Fun Rolling:
33 Creative DIY Easter Crafts for Kids of All Ages (That Parents & Teachers Will Love Too!)
Bunny Mask, Easter Party Games & Holy Week Activities Your Kids Will Actually Love
14 A-Door-able DIY Easter Wreaths to Kick Off Easter in Style
How to Make an Easter Peeps House – The Cutest Easter Craft for Kids!
The Most Gorgeous Cross Easter Craft for Kids (No Printable Needed!)
Peek-a-Boo Clothespin Eggs: The Cutest 5-Minute Easter Craft for Kids (and Classrooms!)
9 Simple But Beautiful Easter Decorating Ideas for Your Home
15 Beautiful Easter Tablescape Ideas to Wow Your Guests This Spring