
Let’s be real – empty toilet paper rolls usually go straight into the recycling bin without a second thought. But what if we told you those cardboard tubes are actually tiny craft goldmines just waiting to be transformed? Whether you’re looking for a rainy-day activity with the kids or want to flex your creative muscles with some surprisingly elegant DIY projects, we’ve got you covered.
Get ready to see toilet paper rolls in a whole new light. These 15 crafts range from adorable to downright impressive, and the best part? They’re all budget-friendly and easy to pull off. Let’s dive in!
1. Cozy Yarn-Wrapped Pumpkins

Nothing says fall quite like a cluster of handmade pumpkins, and these yarn-wrapped beauties are about to become your new seasonal obsession. They’re soft, colorful, and so satisfying to make that you might just wrap a dozen.
Best for: Fall decor, Thanksgiving centerpieces, crafting with tweens and teens
Time to Complete: 15-20 minutes per pumpkin
What You’ll Need:
- Empty toilet paper rolls
- Chunky yarn (orange, white, cream, or green)
- Scissors
- Small wooden dowels or twigs for stems
- Hot glue gun (optional, for extra security)
How to Make It:
- Cut your roll to size. Trim the toilet paper roll down to create a shorter tube – this gives you that perfect plump pumpkin shape.
- Start threading. Push one end of your yarn through the center of the roll, leaving a small tail hanging out.
- Wrap, wrap, wrap! Loop the yarn around the outside of the roll and back through the center hole repeatedly. Keep going until the entire cardboard is covered and no tube is peeking through.
- Secure the end. Tuck the loose yarn tail into the wrapped layers or add a tiny dab of hot glue to keep everything in place.
- Add your stem. Poke a wooden dowel or twig into the center top of your pumpkin. A little hot glue here helps it stay put.
- Fluff and shape. Gently adjust the yarn to create a fuller, rounder pumpkin look.
Pro Tip: Mix different yarn colors – try white for ghost pumpkins or add green accents for a more realistic look. These also make adorable handmade gifts!

Fall Autumn Outdoor Scavenger Hunt Printable for Kids & Adults
🎁Buy Now and get instant access to your download!
✉After your purchase, you can download your files directly from the website or find them in the email receipt we send you.
📧Should you encounter any issues, please contact us at [email protected] and we'll assist you within 24-48 hours.

2. Stunning Paper Roses

Who needs expensive silk flowers when you can craft elegant roses from toilet paper rolls? These gorgeous blooms look way more impressive than their humble origins suggest, and they’re perfect for everything from home decor to gift toppers.
Best for: Home decor, party decorations, wedding DIY projects
Time to Complete: 10-15 minutes per rose
What You’ll Need:
- Empty toilet paper rolls
- Scissors
- Paint or markers (optional)
- Hot glue gun
- Wooden skewers or floral wire (for stems)
How to Make It:
- Flatten and cut. Press your toilet paper roll flat and cut it into thin strips about ½ inch wide.
- Shape your petals. Take each strip and gently curl one edge using your fingers or a pencil to create that classic rose petal curve.
- Start building. Begin with one petal strip and roll it tightly to form the center of your rose. Secure with hot glue.
- Add layers. Continue wrapping and gluing petal strips around the center, slightly overlapping each one and positioning them at different angles for a natural look.
- Attach a stem. Once your rose reaches your desired size, glue it onto a wooden skewer or floral wire.
- Paint if desired. You can leave them natural for a rustic look or paint them in your favorite colors.
Fun Variation: Create an entire bouquet and display them in a vase – no one will guess they started as toilet paper rolls!
3. Whimsical Paper Butterflies

These colorful butterflies are the perfect quick craft that delivers maximum wow factor with minimum effort. They’re ideal for brightening up kids’ rooms, classrooms, or even creating a magical party backdrop.
Best for: Kids’ crafts, room decorations, spring or garden-themed parties
Time to Complete: 10 minutes per butterfly
What You’ll Need:
- Empty toilet paper rolls
- Colorful paper or cardstock
- Scissors
- Glue or tape
- Markers, stickers, or paint for decorating
- Pipe cleaners (for antennae)
How to Make It:
- Decorate the body. Paint or wrap your toilet paper roll in colorful paper – this becomes the butterfly’s body.
- Create the wings. Cut wing shapes from colorful paper or cardstock. You can make them symmetrical or wonderfully wonky – butterflies come in all styles!
- Attach the wings. Glue or tape the wings to the sides of your decorated roll.
- Add personality. Draw or glue on eyes, add patterns to the wings with markers or stickers, and get creative!
- Make antennae. Poke two small holes in the top of the roll and thread pipe cleaner pieces through, bending them into cute curly antennae.
Pro Tip: Make a whole swarm in different colors and sizes, then hang them from the ceiling with fishing line for a floating butterfly effect that’s absolutely magical.
4. Adorable Tree-Dwelling Owls

These charming owls perched on branches are almost too cute to handle. They’re a hit with kids and make fantastic classroom decorations or woodland-themed party decor.
Best for: Kids’ room decor, classroom projects, nature-themed parties
Time to Complete: 20 minutes per owl (plus drying time)
What You’ll Need:
- Empty toilet paper rolls
- Construction paper or cardstock (various colors)
- Googly eyes
- Scissors and glue
- Markers or crayons
- Branch or construction paper tree (for display)
How to Make It:
- Create the owl shape. Gently press in the top edges of the toilet paper roll to create two pointed “ear” sections.
- Wrap the body. Cover the roll with colored paper – browns, grays, or even fun colors like purple or turquoise work great.
- Cut the features. Create circles for eyes, a triangle for the beak, and wing shapes from construction paper.
- Assemble your owl. Glue on the googly eyes (bigger is better!), add the beak, and attach the wings to the sides.
- Add details. Use markers to draw feather patterns or a belly pattern on your owl.
- Display on a branch. Attach your finished owls to a real branch or create a paper tree backdrop for a complete woodland scene.
Fun Variation: Make a whole owl family with different sizes and colors – mama, papa, and baby owls all roosting together!

Rescue The Runaway Turkeys – Easy Thanksgiving Scavenger Hunt Printable for Kids
🎁Buy Now and get instant access to your download!
✉After your purchase, you can download your files directly from the website or find them in the email receipt we send you.
📧Should you encounter any issues, please contact us at [email protected] and we'll assist you within 24-48 hours.
5. Magical Fairy-Tale Houses
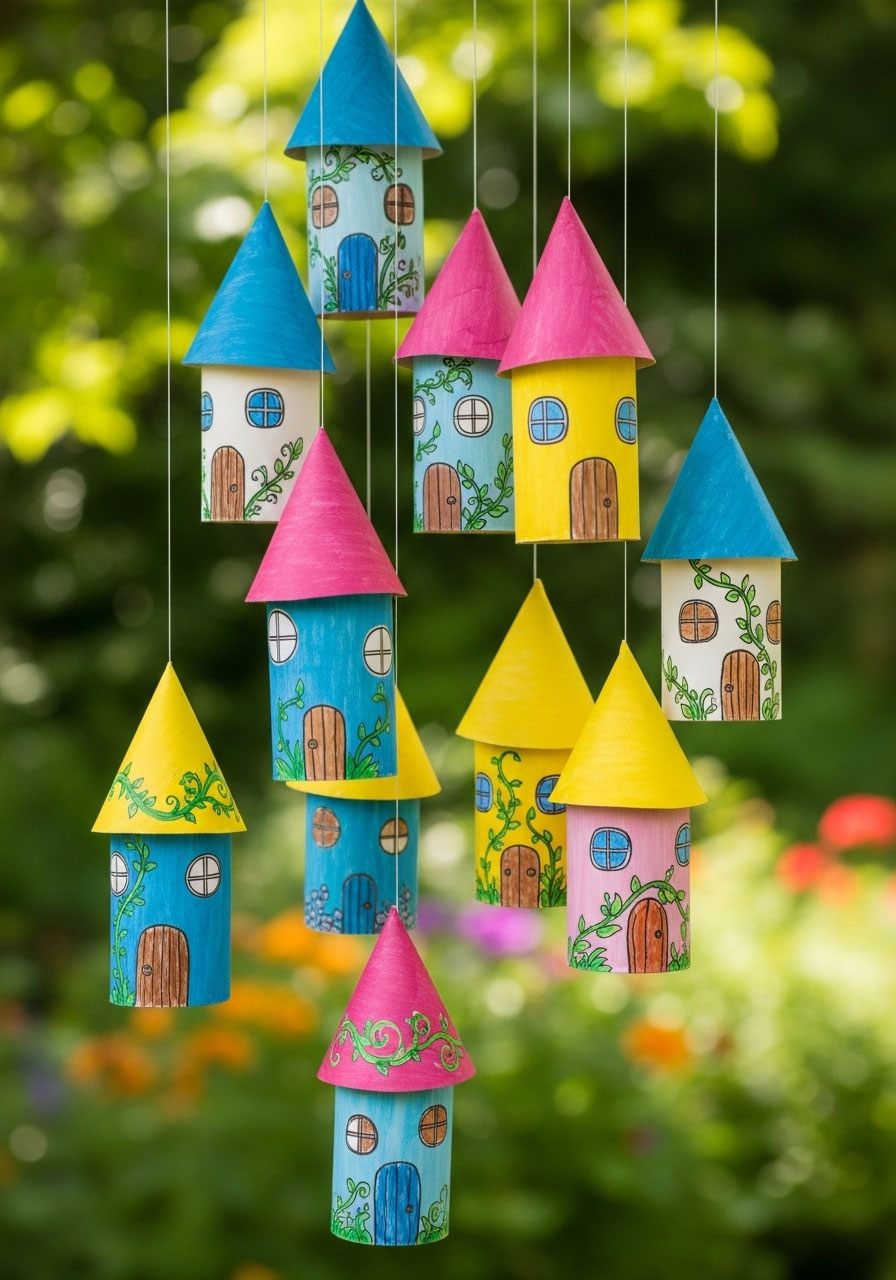
Transform ordinary tubes into an enchanted village that looks straight out of a storybook. These tiny houses are perfect for imaginative play or as a charming garden display that’ll make your neighbors do a double-take.
Best for: Imaginative play, garden decorations, fairy garden accessories
Time to Complete: 30 minutes per house
What You’ll Need:
- Empty toilet paper rolls
- Acrylic paint (bright, fun colors)
- Paintbrushes
- Construction paper or cardstock (for roofs)
- Markers or paint pens
- Small toy figures or decorations (optional)
- String for hanging (if desired)
How to Make It:
- Paint your house. Cover the toilet paper roll in vibrant acrylic paint – think bright blues, cheerful yellows, or pretty pinks. Let it dry completely.
- Add details. Use markers or paint pens to draw windows, doors, bricks, or any architectural details your fairy-tale heart desires.
- Create a roof. Cut a half-circle from construction paper, decorate it, then roll it into a cone shape and glue it to the top of your tube.
- Add inhabitants. Draw or glue small figures peeking out of windows, or position tiny toys nearby for extra charm.
- Display or hang. Place your houses in a garden, on a windowsill, or thread string through them to create hanging fairy-tale dwellings.
Pro Tip: Make an entire village with different colored houses and create little pathways between them using stones or craft sticks for maximum enchantment!
6. Elegant Winter Snowflakes

These intricate snowflakes prove that toilet paper rolls can create seriously sophisticated decor. They’re perfect for transforming your space into a winter wonderland without spending a fortune on decorations.
Best for: Christmas ornaments, winter decor, holiday craft parties
Time to Complete: 20-25 minutes per snowflake
What You’ll Need:
- Empty toilet paper rolls
- Scissors
- Hot glue gun
- White paint or spray paint
- Glitter (optional, but highly encouraged!)
- String or ribbon for hanging
How to Make It:
- Cut thin rings. Slice your toilet paper rolls into rings about ¼ to ½ inch wide. You’ll need 5-6 rings per snowflake.
- Shape the petals. Gently pinch each ring into a pointed oval or teardrop shape.
- Create the pattern. Arrange your shaped pieces into a snowflake design – one center piece with others radiating outward. Get creative with your pattern!
- Glue it together. Use hot glue to secure all the pieces where they touch, creating a sturdy snowflake structure.
- Paint it white. Once the glue is dry, paint your snowflake white. Spray paint gives the smoothest finish.
- Add sparkle. While the paint is still tacky, sprinkle glitter over your snowflake for that magical winter shimmer.
- Attach hanging string. Thread ribbon or string through the top to hang your creation.
Fun Variation: Make snowflakes in different sizes and hang them at varying heights for a stunning dimensional display!
7. DIY Bird Feeder

Turn your craft project into a gift for your feathered friends! This simple bird feeder is a win-win: you get to craft, and the birds get a tasty snack. Plus, you’ll love watching them visit your creation.
Best for: Nature lovers, backyard activities, teaching kids about wildlife
Time to Complete: 10 minutes (plus bird-watching time!)
What You’ll Need:
- Empty toilet paper roll
- Peanut butter (or vegetable shortening for peanut allergies)
- Birdseed
- Butter knife or popsicle stick
- String or twine
- Plate or shallow dish
How to Make It:
- Prep your roll. Thread a piece of string through the toilet paper roll for hanging later.
- Spread the “glue”. Use your butter knife to spread a generous layer of peanut butter all over the outside of the roll. Make sure it’s nice and thick!
- Roll in birdseed. Pour birdseed onto a plate, then roll your peanut-butter-covered tube through the seeds until it’s completely coated.
- Hang it up. Tie your feeder to a tree branch in your yard and wait for the birds to discover their new favorite snack spot.
Pro Tip: Make several at once and place them in different areas of your yard. Different bird species prefer different locations, so you’ll attract more variety!
8. Beautiful Eco-Friendly Wreath

This showstopping wreath looks like it came from a high-end craft store, but it’s made entirely from toilet paper rolls! It’s the perfect way to create elegant home decor while being kind to the planet.
Best for: Front door decor, seasonal decorations, impressive DIY gifts
Time to Complete: 1-2 hours (worth every minute!)
What You’ll Need:
- 6-8 empty toilet paper rolls
- Scissors
- Hot glue gun
- Cardboard circle (for wreath base)
- Paint or spray paint
- Optional: silk flowers, ribbon, embellishments
How to Make It:
- Create your base. Cut a large circle from cardboard with a smaller circle cut from the center to form a wreath shape.
- Make the flowers. Cut toilet paper rolls into thin rings, then pinch each ring to create petal shapes (just like the snowflakes!).
- Form flowers. Arrange 5-6 petals in a circle to create flower shapes, gluing them together at the center.
- Attach to base. Glue your flowers all around the cardboard wreath base, overlapping them to create a full, lush look.
- Paint your masterpiece. Spray paint the entire wreath in your chosen color – white is classic and elegant, but any color works!
- Add extras. Glue silk flowers in the center of some toilet paper roll flowers, or add ribbon for extra flair.
Fun Variation: Create seasonal wreaths by changing colors and add-ons: pastels with silk flowers for spring, oranges and browns for fall, or go all-white with glitter for winter!
9. Valentine’s Day Party Crackers

These adorable party crackers bring the fun British tradition to your Valentine’s celebration! Fill them with candy, love notes, or tiny treasures for a festive surprise that’ll make everyone smile.
Best for: Valentine’s parties, classroom treats, romantic surprises
Time to Complete: 10 minutes per cracker
What You’ll Need:
- Empty toilet paper rolls
- Decorative paper (Valentine’s patterns, red, pink, or white)
- Twine, ribbon, or string
- Scissors and tape
- Small treats or notes to fill inside
How to Make It:
- Fill your roll. Before wrapping, stuff your toilet paper roll with small candies, conversation hearts, tiny toys, or handwritten love notes.
- Wrap it up. Cut a piece of decorative paper large enough to wrap around the roll with extra on both ends. Roll the paper around the tube and secure with tape.
- Tie the ends. Gather the excess paper on one end and tie it closed with ribbon or twine. Repeat on the other end to create that classic cracker shape.
- Add decorations. Draw hearts, add stickers, or attach small decorative elements to personalize each cracker.
- Display or distribute. Arrange them in a basket or place one at each person’s seat for a sweet surprise!
Pro Tip: Write each person’s name on their cracker for personalized party favors, or add a riddle or joke inside for extra fun!
10. Miniature Gift Boxes

These tiny gift boxes are almost too cute for words! They’re perfect for small jewelry pieces, a few candies, or any little treasure that deserves special presentation.
Best for: Small gifts, party favors, jewelry packaging
Time to Complete: 5-10 minutes per box
What You’ll Need:
- Empty toilet paper roll
- Acrylic paint or decorative paper
- Paintbrush (if painting)
- Ribbon or twine
- Scissors
- Glue or tape
How to Make It:
- Decorate your tube. Paint the toilet paper roll in your chosen color (metallic gold or silver looks especially fancy!) or wrap it in pretty paper. Let paint dry completely.
- Create the box shape. Gently press in the top edge of the roll, folding it toward the center to create a rounded flap.
- Seal one end. Press in the bottom edge the same way, but perpendicular to the top, so the flaps cross each other. This creates the box bottom.
- Fill your box. Open the top flap and tuck your small gift inside.
- Close and tie. Press the top closed and wrap ribbon or twine around the box to secure it and add that finishing touch.
Fun Variation: Stack several boxes in graduating sizes for a tower of tiny gifts, or make a bunch in different colors for a rainbow of surprises!
11. Colorful Napkin Rings

Elevate your table setting with custom napkin rings that look professionally crafted but cost next to nothing. Your dinner guests will be impressed by your attention to detail!
Best for: Dinner parties, holiday table settings, wedding receptions
Time to Complete: 5 minutes per ring
What You’ll Need:
- Empty toilet paper rolls
- Scissors
- Decorative paper, fabric, or washi tape
- Glue or hot glue gun
- Optional: ribbons, buttons, gems, or other embellishments
How to Make It:
- Cut to size. Slice your toilet paper roll into sections about 1-2 inches wide to create individual rings.
- Wrap and decorate. Cover each ring with decorative paper, pretty fabric, or washi tape. Secure with glue.
- Add personality. Glue on buttons, ribbon bows, sparkly gems, or whatever matches your table theme.
- Let dry completely. Make sure all glue is dry before using.
- Slide on napkins. Roll your napkins and slide them through the rings for an instant upgrade to your table!
Pro Tip: Make themed sets for different occasions – rustic twine and burlap for fall, glittery gold for New Year’s, or pastels with ribbon for spring brunches!
12. Desktop Organizer Station
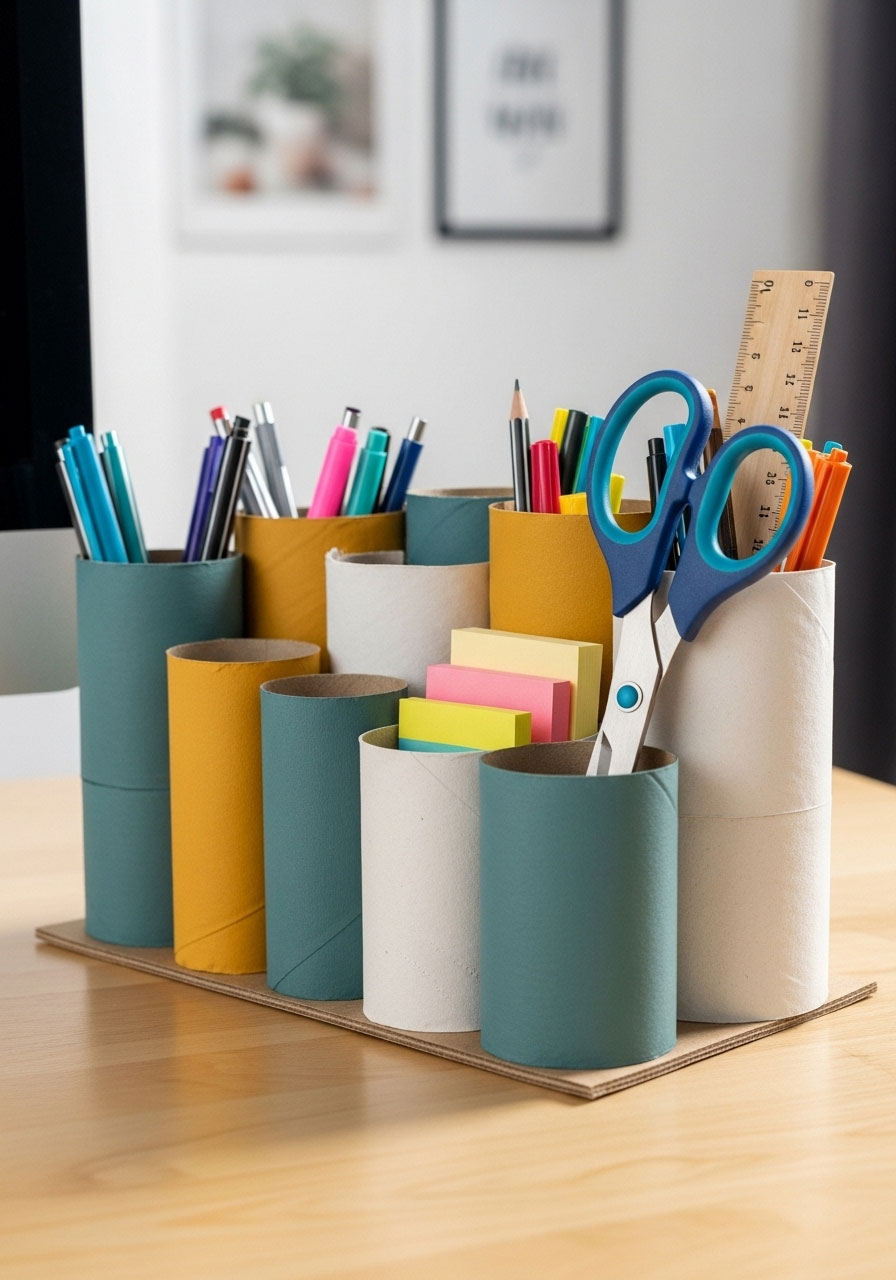
Stop letting pens, scissors, and desk supplies take over your workspace! This genius organizer keeps everything in its place while looking surprisingly sleek.
Best for: Home office, kids’ homework areas, craft room storage
Time to Complete: 30 minutes
What You’ll Need:
- 5-7 empty toilet paper rolls
- Cardboard base (cereal box or shipping box works great)
- Hot glue gun
- Paint, decorative paper, or contact paper
- Scissors
How to Make It:
- Create your base. Cut a piece of sturdy cardboard to your desired size for the organizer base.
- Decorate everything. Paint or wrap both the toilet paper rolls and the base in coordinating colors or patterns. Let dry completely.
- Arrange your layout. Play with different arrangements of the rolls on the base until you find a configuration you like.
- Glue it together. Hot glue the bottom of each roll to the base, holding firmly until secure. You can also glue rolls to each other for added stability.
- Fill and organize. Sort your supplies into the different compartments – pens in one, scissors in another, markers in a third!
Fun Variation: Cut rolls to different heights to create a tiered organizer that’s both functional and visually interesting!
13. Kid-Friendly Binoculars

These pretend binoculars will have kids exploring every corner of your house and yard. They’re perfect for safari adventures, nature walks, or backyard explorations!
Best for: Imaginative play, outdoor adventures, party favors
Time to Complete: 15 minutes
What You’ll Need:
- 2 empty toilet paper rolls
- Tape or hot glue gun
- Paint or decorative paper
- String or yarn (for the neck strap)
- Hole punch
- Optional: stickers for decorating
How to Make It:
- Decorate your rolls. Paint both toilet paper rolls or wrap them in fun paper. Let dry if using paint.
- Connect them. Place the rolls side by side and tape or glue them together securely.
- Add a neck strap. Punch a hole on the outer edge of each roll, then thread string or yarn through both holes and tie the ends together.
- Personalize. Let kids add stickers or draw designs on their binoculars.
- Start exploring! Hang the binoculars around their neck and watch the adventures begin!
Pro Tip: Create different colored sets for multiple kids so everyone has their own pair for group adventures!
14. Wall Art Letter Display
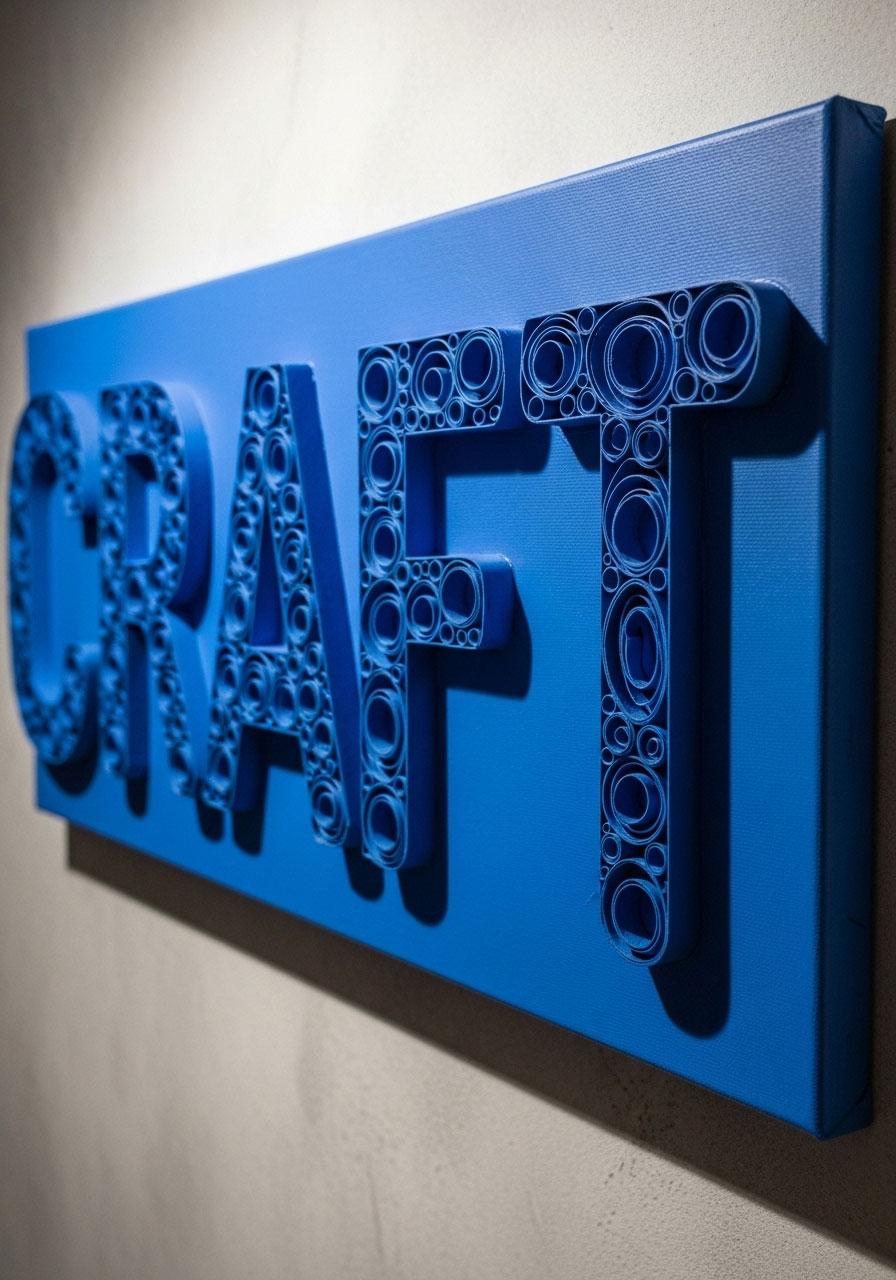
Spell out names, inspiring words, or seasonal messages with these dimensional letters that add texture and personality to any wall.
Best for: Kids’ rooms, craft room decor, seasonal displays
Time to Complete: 45 minutes – 1 hour
What You’ll Need:
- Multiple empty toilet paper rolls
- Scissors
- Hot glue gun
- Canvas or sturdy cardboard backing
- Paint
- Pencil (for sketching)
How to Make It:
- Sketch your letter. Lightly draw your chosen letter on the canvas or cardboard backing.
- Cut rings. Slice toilet paper rolls into thin rings (about ¼ inch wide).
- Shape as needed. Gently pinch or bend rings to follow curves in your letter design.
- Glue down. Following your sketched outline, hot glue the rings onto the backing, placing them edge-on to create a dimensional outline effect.
- Fill it in. Continue gluing rings to fill in the entire letter shape.
- Paint your creation. Once glue is dry, paint the entire piece in your chosen color for a cohesive look.
Fun Variation: Create an entire name or phrase for a child’s room, or make seasonal words like “JOY” for the holidays or “LOVE” for Valentine’s Day!
15. Toy Car Garage and Ramps

Little ones with a collection of toy cars will absolutely love this DIY garage complete with parking spots and ramps. It’s functional play equipment that costs almost nothing to make!
Best for: Toddlers and preschoolers, toy organization, creative play
Time to Complete: 30-45 minutes
What You’ll Need:
- 6-10 empty toilet paper rolls
- Large cardboard box or sturdy cardboard pieces
- Hot glue gun
- Paint or markers
- Scissors
- Optional: toy road tape or markers to draw roads
How to Make It:
- Create the structure. Use a cardboard box as your garage base, or construct walls from cardboard pieces.
- Make parking spots. Glue toilet paper rolls horizontally inside the garage to create individual parking spaces for cars. Space them so cars can roll in and out easily.
- Build a ramp. Cut and fold cardboard to create a ramp leading up to a second level of parking, using toilet paper rolls as support pillars.
- Decorate. Paint the structure, add windows, draw parking lines, or use markers to create road markings.
- Add details. Use extra rolls cut in half as barriers or decorative elements.
- Start playing! Let kids park, race, and organize their cars in their new custom garage.
Pro Tip: Add number or color labels to each parking spot to sneak in learning while kids play!
Ready to Start Crafting?
Who knew toilet paper rolls had this much potential, right? Whether you’re creating cozy fall pumpkins, elegant winter wreaths, or a toy garage that’ll keep the kids entertained for hours, these 15 crafts prove that the best DIY projects don’t need fancy supplies – just a little creativity and imagination.
The beauty of these crafts is that they’re flexible. Feel free to mix up colors, add your own personal touches, or combine ideas to create something totally unique. And here’s the best part: every time you finish a roll, you’ve got another craft opportunity waiting in the wings!
So save those tubes, grab your glue gun, and get ready to transform trash into treasure. Your next craft masterpiece is just one empty toilet paper roll away!
