

Looking for a craft project that’s actually fun to make and looks amazing when you’re done? This paper heart wreath is about to become your new favorite go-to decoration. Whether you’re gearing up for Valentine’s Day, planning a Galentine’s party, or just want to add some love to your space, this 3D heart wreath is equal parts adorable and impressive – and way easier to make than it looks.
Trust me, once you see how that flat paper transforms into a gorgeous dimensional wreath with a dangling heart in the center, you’ll want to make a dozen in every color. Let’s dive in!
What Makes This Heart Wreath So Special?
Here’s the thing: most paper crafts either look too kiddie or require a PhD in origami. This one hits the sweet spot. The finished wreath has a beautiful 3D ripple effect that makes it look store-bought, but the actual construction? Surprisingly simple. Plus, you can customize it with any color scheme you want – classic red and pink, trendy pastels, or even bold rainbow hearts for a fun twist.
Best for: Valentine’s Day decor, Galentine’s parties, classroom crafts, rainy day activities
Time to Make: 30-45 minutes
Skill Level: Beginner-friendly (seriously, if you can cut and glue, you’ve got this)

What You’ll Need
Here’s your shopping list – it’s refreshingly short:
Paper with a heart wreath template (the template shows a circle divided into 8 segments with hearts, plus separate heart cutouts – you can find free templates on craft sites like krokotak.com)
Scissors (sharp ones make this easier)
Glue stick (way less messy than liquid glue)
String or thread (for hanging the center heart)
Clear tape
Markers, crayons, or colored pencils (for decorating)
Pro Tip: Print your template on cardstock instead of regular printer paper if you want a sturdier wreath that’ll last through multiple Valentine’s seasons.

Cute Valentine Day Treasure Hunt Printable for Kids and Preschoolers
Instant download = Valentine’s Day saved at the last minute – Forgot to plan something special? Buy now, print in 5 minutes, become the hero parent.
30-60 minutes of pure entertainment – Kids stay happily busy solving clues while you finish dinner, wrap up work, or just enjoy your coffee hot.
No craft store runs, no supplies needed – Everything’s done for you. Just print on regular paper and hide around spots you already have (fridge, couch, bed).
Cupid storyline they’ll talk about for months – Way more memorable than another box of chocolates. Grandparents: this is the visit they’ll never forget.
Under $10 beats a babysitter – Keeps multiple kids engaged together with zero screen time. Siblings actually cooperate for once.

Romantic Valentine Scavenger Hunt Printable for Couples and Adults – Cupid’s Mischievous Adventure
Way better than dinner reservations – Skip the overpriced restaurant crowds. Create an intimate, playful experience at home that actually feels personal and memorable.
24 flirty clues = built-in foreplay – Romantic riddles leading around your home build anticipation and laughter. Way more fun than another box of chocolates gathering dust.
No awkward “”what do we do now?”” moments – Everything’s scripted but feels spontaneous. Perfect for couples who want romance without the pressure of planning it themselves.
Under $15 beats flowers that die in 3 days – Create a memory you’ll both laugh about for years. Add your own surprise at the end (jewelry, getaway reveal, or just champagne and you).

Conversation Heart Bulletin Board Classroom Decoration Set
130+ pieces = complete Valentine’s display in ONE box – No extra shopping trips or piecing together mismatched decorations.
Reusable for years – Sturdy cardboard that teachers confirm holds up, unlike flimsy paper that tears after one use.
Instant student engagement – Familiar conversation heart design captures attention and creates classroom buzz.
5-minute setup – Adhesive included. Transform your space faster than your morning coffee break.
Blank hearts = bonus teaching tool – Use for student names, vocabulary, or kind messages beyond just decoration.

Valentines Day Gifts for Kids – 24 Pack
24 pre-packaged valentines = ZERO prep work – Already assembled with cards attached. Just sign names and you’re done in minutes.
Candy-free option parents actually thank you for – No sugar rush, no red dye, no allergy worries. Kids still get excited, classrooms stay calm.
Keychains kids actually USE after February – Clip to backpacks and they’ll play tic-tac-toe for months. Way better than crushed candy hearts in the trash.
Under $1 per student – 24 complete valentines for less than a box of store-bought cards, but looks like you spent way more effort.
Four designs included – No awkward “”why did they get that one?”” moments. Every kid gets a fun variation with matching pun cards.

Valentines Day Gifts for Your Loved One
Custom photo + personalized text = looks way more expensive than it is – Recipients think you spent hours designing something unique. You just uploaded a photo and typed their name.
Doubles as functional night light – Not just décor gathering dust. Customers rave it’s the perfect bedroom glow without being too bright.
Clear, vibrant photo quality that lasts – Shatterproof acrylic with UV printing means colors stay vivid for years, unlike cheap frames that fade by next Valentine’s.
USB-powered, zero hassle setup – Plug in, flip switch, done. No batteries to replace, no complicated assembly that sits in the box for months.
Perfect last-minute gift that feels thoughtful – Arrives ready to give. Looks like you planned ahead even if you’re ordering the week before Valentine’s Day.
Step-by-Step: Let’s Build This Beauty
Step 1: Cut Out Your Pieces
Start by cutting out the main circle from your template – this is the wreath base. You’ll also want to cut out at least one of the separate heart shapes (this becomes your adorable dangling centerpiece). Set these aside for now.

Step 2: Create the Slits (The Smart Way)
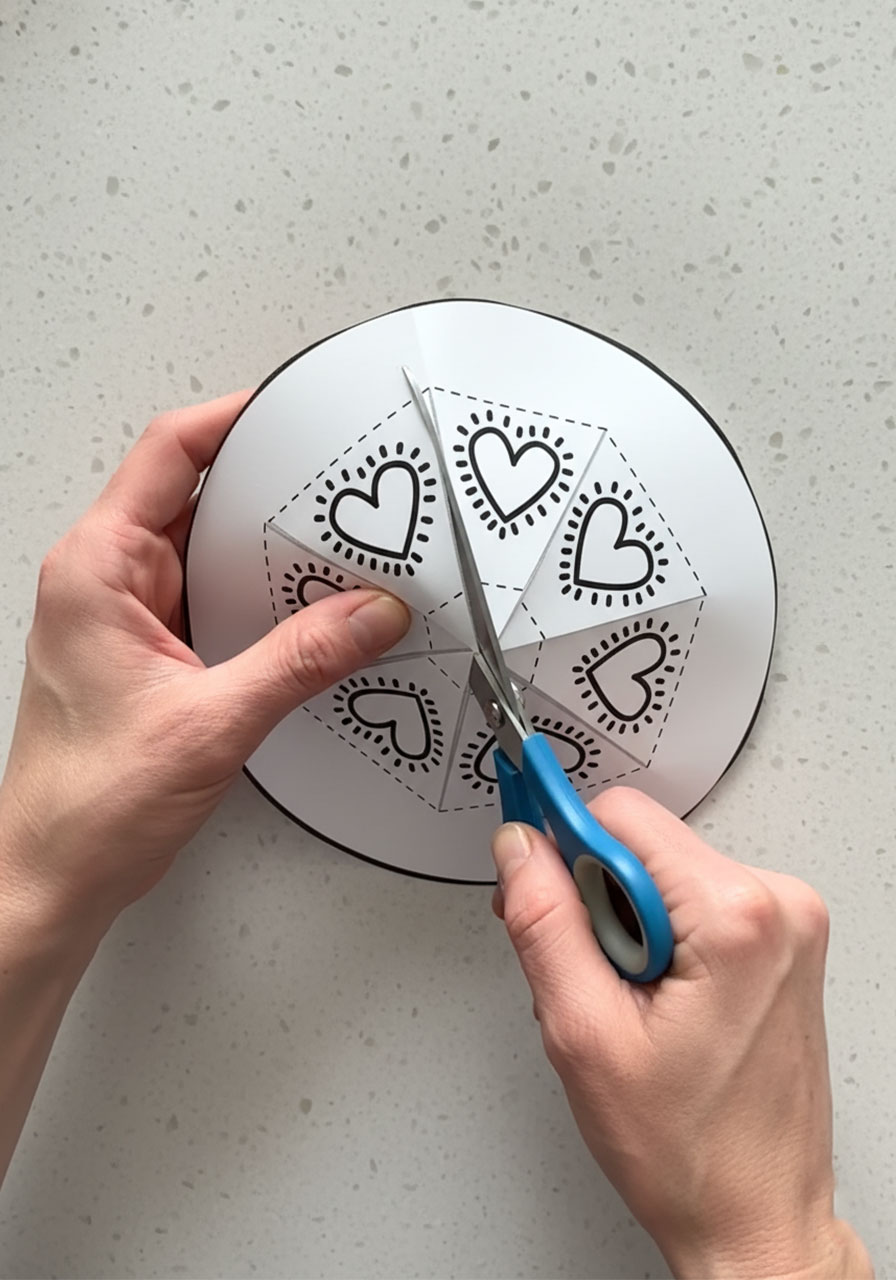
Here’s where the magic starts. You need to cut slits between each heart segment, starting from the outer edge and stopping before you reach the center circle. But here’s the genius shortcut that’ll save you tons of time:
1. Fold the circle in half.
2. Fold it in half again.
3. Fold one more time until you’ve got a narrow wedge shape (think: pizza slice).
4. Cut along the line that separates the hearts – just one snip through all those layers.
5. Unfold and voilà! All your slits are perfectly cut at once.
This folding trick is a total game-changer. You just saved yourself from making 8 separate cuts, and everything’s evenly spaced.

Step 3: Shape Your Wreath (This Is Where It Gets 3D)
Now for the fun transformation. You’ve got 8 flat segments radiating from the center – time to give them dimension:
1. Pick one segment and apply a small dab of glue to one of the outer corners (the wide part of the wedge).
2. Bring the two outer corners together, overlapping them slightly, and press to seal. You’re basically curling that flat wedge into a little cone or loop.
3. Repeat for all 8 segments around the circle.
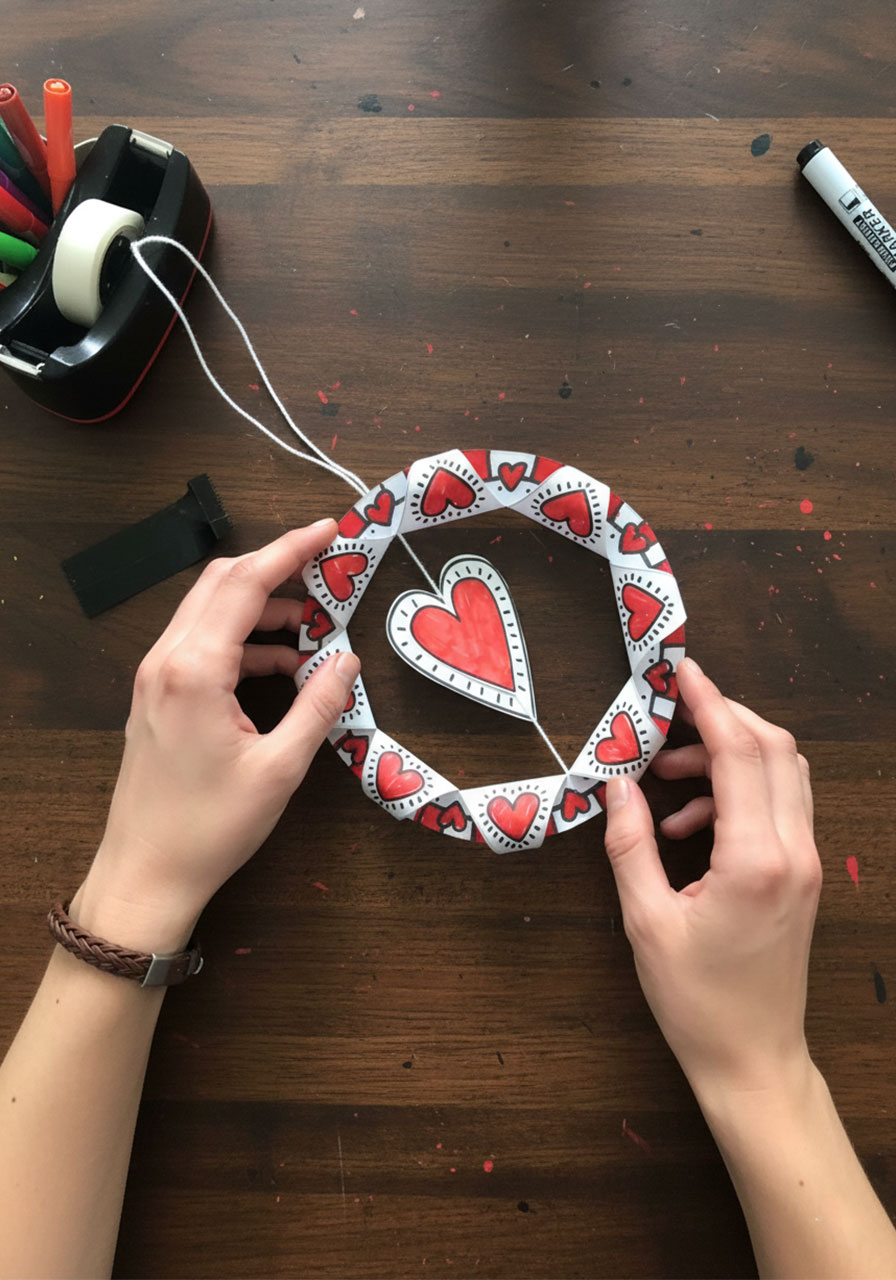
Watch as your flat paper suddenly becomes a gorgeous 3D wreath with hearts that pop! Each segment should create a gentle curve – don’t worry about making them perfect. The slight variations actually add to the handmade charm.


Step 4: Prep Your Dangling Heart
Grab that separate heart cutout you set aside earlier. Cut a piece of string (about 6-8 inches works well), and use a small piece of clear tape to attach one end to the back of the heart. Make sure it’s secure – you don’t want your centerpiece taking a dive mid-display!

Step 5: Attach the Heart to Your Wreath
Flip your 3D wreath over to the back side. Position the string so the heart hangs right in the middle of the wreath opening (adjust the length until it looks centered). Once you’re happy with the placement, tape the loose end of the string to the back of the wreath to secure it in place.

Step 6: Add Color and Personality
Time to make this wreath yours! Grab your markers, crayons, or colored pencils and go to town decorating the hearts and adding patterns around the edges. You can color it before assembly if you prefer working on a flat surface, but there’s something satisfying about coloring the 3D shape and watching the colors wrap around those curves.

Design Ideas:
Classic red hearts with pink accents
Ombré effect with graduated shades
Rainbow hearts for a cheerful vibe
Patterns like polka dots, stripes, or doodles around the borders
Metallic markers for some sparkle
Step 7: Create Your Hanger
Almost there! Cut another piece of string (about 8-10 inches), form it into a loop, and tape both ends to the top back of your wreath. Now you’re ready to hang this masterpiece on your door, wall, or anywhere that needs a dose of handmade love.

Why This Craft Is a Winner
It looks impressive but isn’t intimidating. The 3D effect makes people think you’re some kind of paper-crafting wizard, but the actual steps are totally manageable – even for craft newbies.
You can batch-make them. Once you’ve made one, you’ve got the process down. Make a whole collection in different colors for a stunning gallery wall, or get the kids involved and let everyone create their own version for their bedroom doors.
It’s budget-friendly. All you really need is paper, glue, and markers you probably already have lying around.
The customization options are endless. This template works for way more than just Valentine’s Day. Switch up the colors for Christmas wreaths, spring pastels for Easter, or school colors for a kid’s room.
Troubleshooting Tips
Hearts not curving evenly? Make sure you’re overlapping the corners consistently on each segment. A little more or less overlap will change how pronounced the curve is – experiment to find what looks best to you.
String keeps slipping? Use a bigger piece of tape, or add a dab of glue over the tape for extra security.
Template hearts too small or too big? When you print your template, adjust the print size to make the wreath smaller for a delicate look or larger for a bold statement piece.
Make It Your Own

This basic technique opens up so many creative possibilities. Once you master the heart wreath, try these variations:
Themed wreaths: Use star templates for patriotic holidays, flowers for spring, or snowflakes for winter
Mixed media: Add glitter, sequins, or small pompoms to the decorated hearts
Multiple hearts: Instead of one dangling heart in the center, create a mobile effect with hearts hanging at different lengths
Paper choices: Try patterned scrapbook paper, metallic cardstock, or even pages from old books for a vintage vibe
The Bottom Line
There you have it – your complete guide to creating an absolutely adorable paper heart wreath that’ll have everyone asking, “Where did you buy that?!” The best part? You can smugly tell them you made it yourself, and it only took about 30 minutes.
This craft hits all the marks: it’s easy enough for beginners, impressive enough to gift, and customizable enough to make multiple versions without getting bored. Plus, there’s something genuinely satisfying about turning a flat piece of paper into a dimensional decoration with just some strategic cutting and folding.
So grab your supplies, put on your favorite playlist, and get ready to create something beautiful. Your walls (and your Instagram feed) are going to thank you.
More Valentine’s Day Party Ideas to Keep the Fun Rolling:
Magnetic Hearts Activity: The Easiest (and Most Adorable) Valentine’s Day Game Ever
DIY Beaded Heart Decorations: A Sweet Craft Kids Will Love
36 Epic Valentine Games That’ll Make Your Party Unforgettable
Musical Hearts: The Wildly Fun Movement Game That’ll Save Your Next Party
36 Easy DIY Valentine’s Party Ideas for Kids That’ll Make You the Hero Host
12 Stunning Valentine’s Day Fireplace Decor Ideas (Classic & Easy!)
Cupid’s Arrow Toss: The Sweetest Valentine’s Day Game for Kids
As an Amazon Associate, we may earn a commission from qualifying purchases at no additional cost to you.
