
Your go-to guide for transforming any space into a Galentine’s paradise using streamers – because your gal pals deserve the ultimate celebration!
Look, we all know that Galentine’s Day is the perfect excuse to gather your favorite people and celebrate the friendships that make life amazing. But here’s the thing: you don’t need a massive budget or professional decorator skills to create a party space that’ll have everyone reaching for their phones to snap photos. All you need? Streamers. Yes, those humble rolls of colorful paper are about to become your secret weapon for party decor success.
Whether you’re hosting in a tiny apartment or have a whole house to work with, streamers are your best friend when it comes to creating that Instagram-worthy atmosphere without breaking the bank. They’re lightweight, versatile, and ridiculously easy to work with – which means more time celebrating and less time stressing about decorations.
Ready to transform your space into a Galentine’s dream? Let’s dive into 17 creative streamer ideas that’ll make your party the talk of the town!
1. Classic Cascading Ceiling Streamers

Best for: Creating instant wow-factor when guests walk in | Setup time: 15-20 minutes
There’s something magical about walking into a room where colorful streamers cascade down from the ceiling like a vibrant waterfall. This is your entry-level streamer decoration that delivers maximum impact with minimal effort.
What You’ll Need:
4-6 rolls of streamers in pink, red, white, and rose gold
Clear tape or removable adhesive hooks
A step ladder or sturdy chair
How to Create It:
1. Start at the center of your ceiling (or where your light fixture is) and secure one end of each streamer with tape.
2. Pull each streamer toward different points along the walls, creating a tent-like effect that radiates outward.
3. Twist some streamers as you go for added texture and visual interest – the twisting catches light beautifully!
4. Secure the ends to the walls at varying heights to create natural movement and flow.
5. Step back and adjust any streamers that look too tight or too loose.
Pro Tip: Mix matte and metallic streamers together for a sophisticated look that catches the light. And here’s a game-changer: slightly curl the ends of streamers by running them against a scissor blade (like you would with ribbon) to create elegant spirals that bounce and move when people walk by!

Cute Valentine Day Treasure Hunt Printable for Kids and Preschoolers
Instant download = Valentine’s Day saved at the last minute – Forgot to plan something special? Buy now, print in 5 minutes, become the hero parent.
30-60 minutes of pure entertainment – Kids stay happily busy solving clues while you finish dinner, wrap up work, or just enjoy your coffee hot.
No craft store runs, no supplies needed – Everything’s done for you. Just print on regular paper and hide around spots you already have (fridge, couch, bed).
Cupid storyline they’ll talk about for months – Way more memorable than another box of chocolates. Grandparents: this is the visit they’ll never forget.
Under $10 beats a babysitter – Keeps multiple kids engaged together with zero screen time. Siblings actually cooperate for once.

Romantic Valentine Scavenger Hunt Printable for Couples and Adults – Cupid’s Mischievous Adventure
Way better than dinner reservations – Skip the overpriced restaurant crowds. Create an intimate, playful experience at home that actually feels personal and memorable.
24 flirty clues = built-in foreplay – Romantic riddles leading around your home build anticipation and laughter. Way more fun than another box of chocolates gathering dust.
No awkward “”what do we do now?”” moments – Everything’s scripted but feels spontaneous. Perfect for couples who want romance without the pressure of planning it themselves.
Under $15 beats flowers that die in 3 days – Create a memory you’ll both laugh about for years. Add your own surprise at the end (jewelry, getaway reveal, or just champagne and you).

Conversation Heart Bulletin Board Classroom Decoration Set
130+ pieces = complete Valentine’s display in ONE box – No extra shopping trips or piecing together mismatched decorations.
Reusable for years – Sturdy cardboard that teachers confirm holds up, unlike flimsy paper that tears after one use.
Instant student engagement – Familiar conversation heart design captures attention and creates classroom buzz.
5-minute setup – Adhesive included. Transform your space faster than your morning coffee break.
Blank hearts = bonus teaching tool – Use for student names, vocabulary, or kind messages beyond just decoration.

Valentines Day Gifts for Kids – 24 Pack
24 pre-packaged valentines = ZERO prep work – Already assembled with cards attached. Just sign names and you’re done in minutes.
Candy-free option parents actually thank you for – No sugar rush, no red dye, no allergy worries. Kids still get excited, classrooms stay calm.
Keychains kids actually USE after February – Clip to backpacks and they’ll play tic-tac-toe for months. Way better than crushed candy hearts in the trash.
Under $1 per student – 24 complete valentines for less than a box of store-bought cards, but looks like you spent way more effort.
Four designs included – No awkward “”why did they get that one?”” moments. Every kid gets a fun variation with matching pun cards.

Valentines Day Gifts for Your Loved One
Custom photo + personalized text = looks way more expensive than it is – Recipients think you spent hours designing something unique. You just uploaded a photo and typed their name.
Doubles as functional night light – Not just décor gathering dust. Customers rave it’s the perfect bedroom glow without being too bright.
Clear, vibrant photo quality that lasts – Shatterproof acrylic with UV printing means colors stay vivid for years, unlike cheap frames that fade by next Valentine’s.
USB-powered, zero hassle setup – Plug in, flip switch, done. No batteries to replace, no complicated assembly that sits in the box for months.
Perfect last-minute gift that feels thoughtful – Arrives ready to give. Looks like you planned ahead even if you’re ordering the week before Valentine’s Day.

2. Heart-Shaped Streamer Backdrop

Best for: Photo ops and creating a stunning focal point | Setup time: 25-30 minutes
Your friends are going to want photos, so give them a backdrop that screams “Galentine’s perfection!” This heart-shaped streamer wall is easier to create than you’d think and makes every selfie instantly share-worthy.
What You’ll Need:
8-10 rolls of streamers (stick to 2-3 coordinating colors)
Painter’s tape or removable wall strips
Pencil (optional, for sketching)
How to Create It:
1. Lightly sketch a large heart outline on your wall with pencil, or eyeball it if you’re feeling confident.
2. Start at the top center of the heart and tape your first streamer, following the outline.
3. Layer streamers closely together, working your way around the entire heart shape.
4. Fill in the center with vertical streamers in alternating colors for a striped effect.
5. Add dimension by creating small loops or ruffles with some streamers as you attach them.
Fun Variation: Create an ombre effect by transitioning from deep red at the top to light pink at the bottom. Trust me, your Instagram followers will lose it over this gradient masterpiece!
3. Twisted Garland Perfection

Best for: Doorways, mantels, and table edges | Setup time: 20 minutes
A twisted streamer garland is like the little black dress of party decor – it works everywhere and always looks polished. The twisting technique gives streamers that expensive, store-bought look without the price tag.
What You’ll Need:
2-3 rolls of streamers in complementary colors
Clear tape
Your hands (seriously, that’s it!)
How to Create It:
1. Unroll two streamers of different colors side by side.
2. Tape the ends together at one point.
3. Start twisting the two streamers around each other, keeping tension consistent as you go.
4. Secure every 2-3 feet with a small piece of tape to maintain the twist.
5. Hang your garland along doorways, drape it on tables, or wind it around stair railings.
Pro Tip: Make your garlands ahead of time and store them loosely coiled in a box – they’ll stay twisted and ready to hang when party day arrives. This is the ultimate time-saver for busy hosts!
4. Fringe Wall of Fun
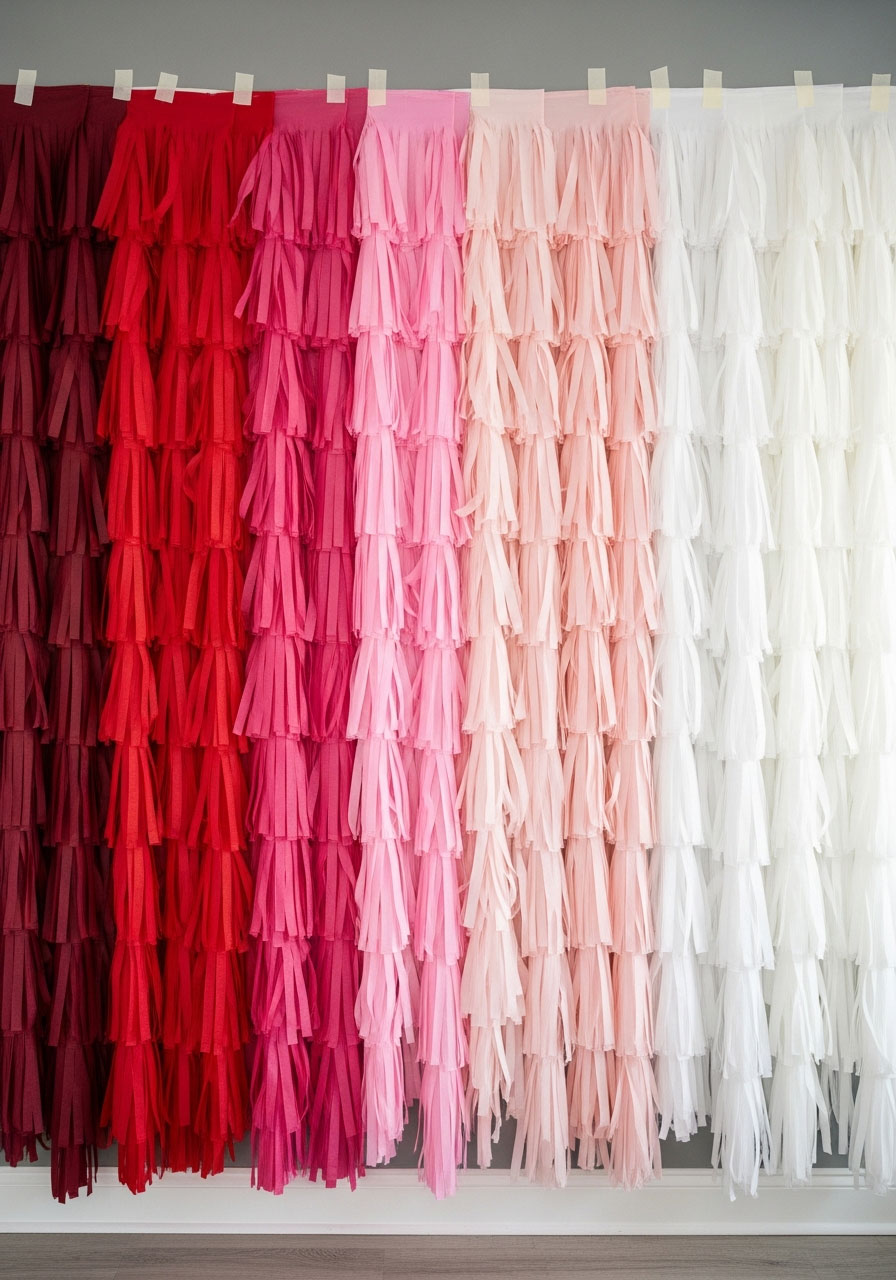
Best for: Adding texture and movement to blank walls | Setup time: 30 minutes
Want to create a backdrop that moves and shimmers with every breeze? A fringe wall made from cut streamers is playful, dynamic, and gives your party space that festival-vibe energy everyone loves.
What You’ll Need:
6-8 rolls of streamers in your color scheme
Scissors
Strong tape or a tension rod
How to Create It:
1. Cut streamers into equal lengths (about 6-8 feet works well for standard ceilings).
2. Make vertical cuts up each streamer, stopping about 2 inches from the top to create fringe – don’t cut all the way through!
3. Attach the uncut portion to your wall or tension rod using tape, spacing streamers close together.
4. Layer different colors to create depth and visual interest.
5. Gently separate the fringe with your fingers to fluff it out.
Fun Variation: Create an ombre fringe wall by arranging colors from dark to light as you go across. The gradient effect is absolutely stunning and makes your photo backdrop look professionally designed!
5. Balloon and Streamer Combos

Best for: Maximum festive impact with minimal supplies | Setup time: 15 minutes
Why choose between balloons and streamers when you can have both? This combo decoration multiplies the party vibes while keeping your setup simple and stress-free.
What You’ll Need:
10-15 balloons (helium or air-filled)
3-4 rolls of streamers
String or balloon ribbon
Tape
How to Create It:
1. Inflate your balloons and tie them with long ribbons if using helium, or attach them to walls if air-filled.
2. Attach streamers to the bottom of helium balloons, letting them trail down for a whimsical effect.
3. Create clusters of balloons with streamers radiating outward from the center.
4. Mix in twisted streamer garlands around balloon bouquets for added texture.
5. Scatter these combos throughout your party space – near the drinks table, by the entrance, in conversation corners.
Pro Tip: Use double-sided tape to attach the ends of streamers to the floor in swirling patterns around balloon clusters. This anchors the whole look and prevents streamers from flying everywhere when doors open!
6. Streamer Chandelier Statement Piece
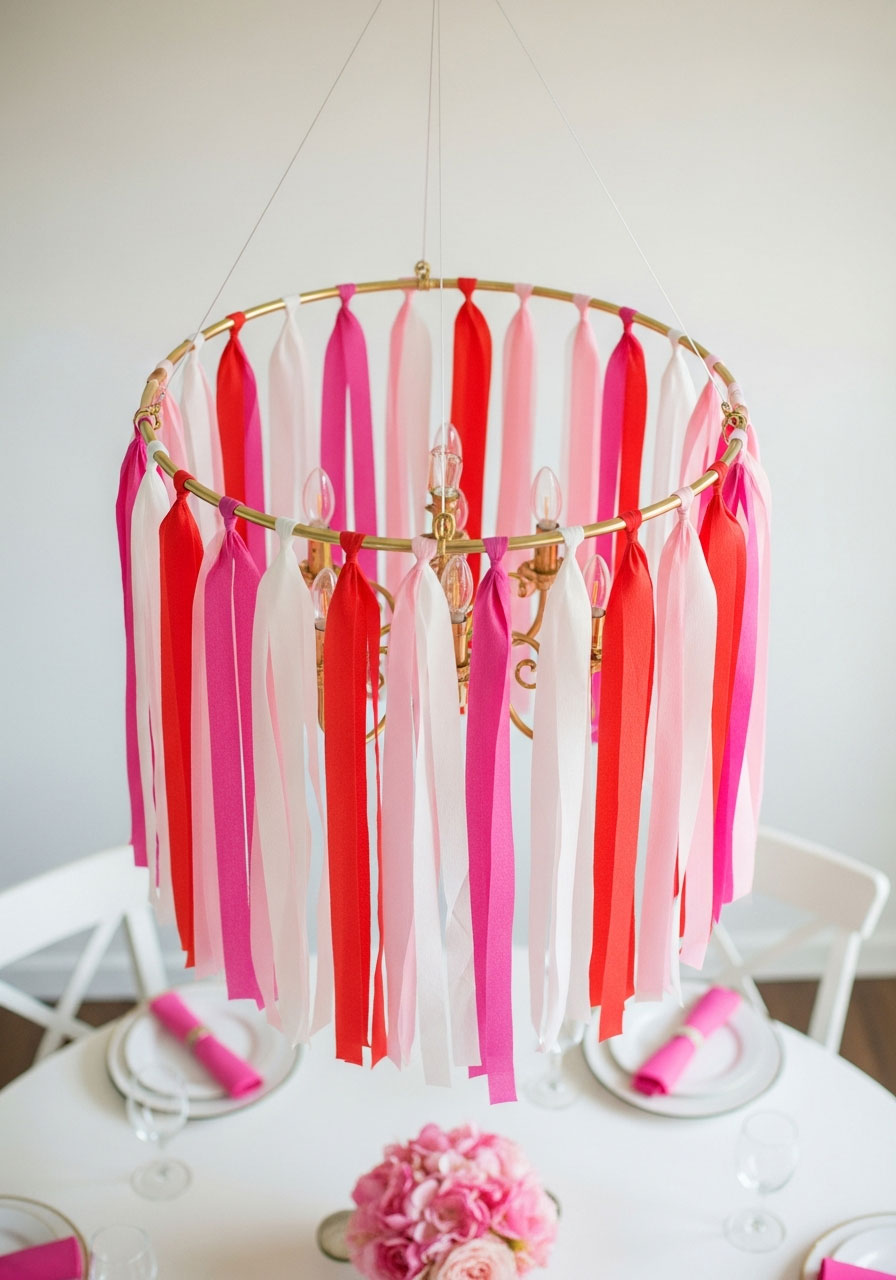
Best for: Dining tables or central gathering spots | Setup time: 25 minutes
Transform a basic light fixture into a show-stopping centerpiece with this streamer chandelier technique. It’s elegant, it’s fun, and it creates the perfect focal point above your party table.
What You’ll Need:
5-6 rolls of streamers in coordinating colors
Clear fishing line or string
Tape
A hoop or embroidery ring (optional, for structure)
How to Create It:
1. Secure streamers around your existing light fixture, or attach them to a hoop you’ll hang from the ceiling.
2. Let streamers cascade down at varying lengths to create layers – think of it like a colorful waterfall.
3. Twist some streamers while keeping others flat for textural variety.
4. Add curls to the ends by running scissors along the streamers.
5. Adjust the lengths so the lowest streamers hang about 12-18 inches above your table.
Fun Variation: Weave in some fairy lights through the streamers for a magical glow that’ll make evening celebrations absolutely enchanting. The combination of light and movement is pure party magic!
7. Doorway Curtain Entrance
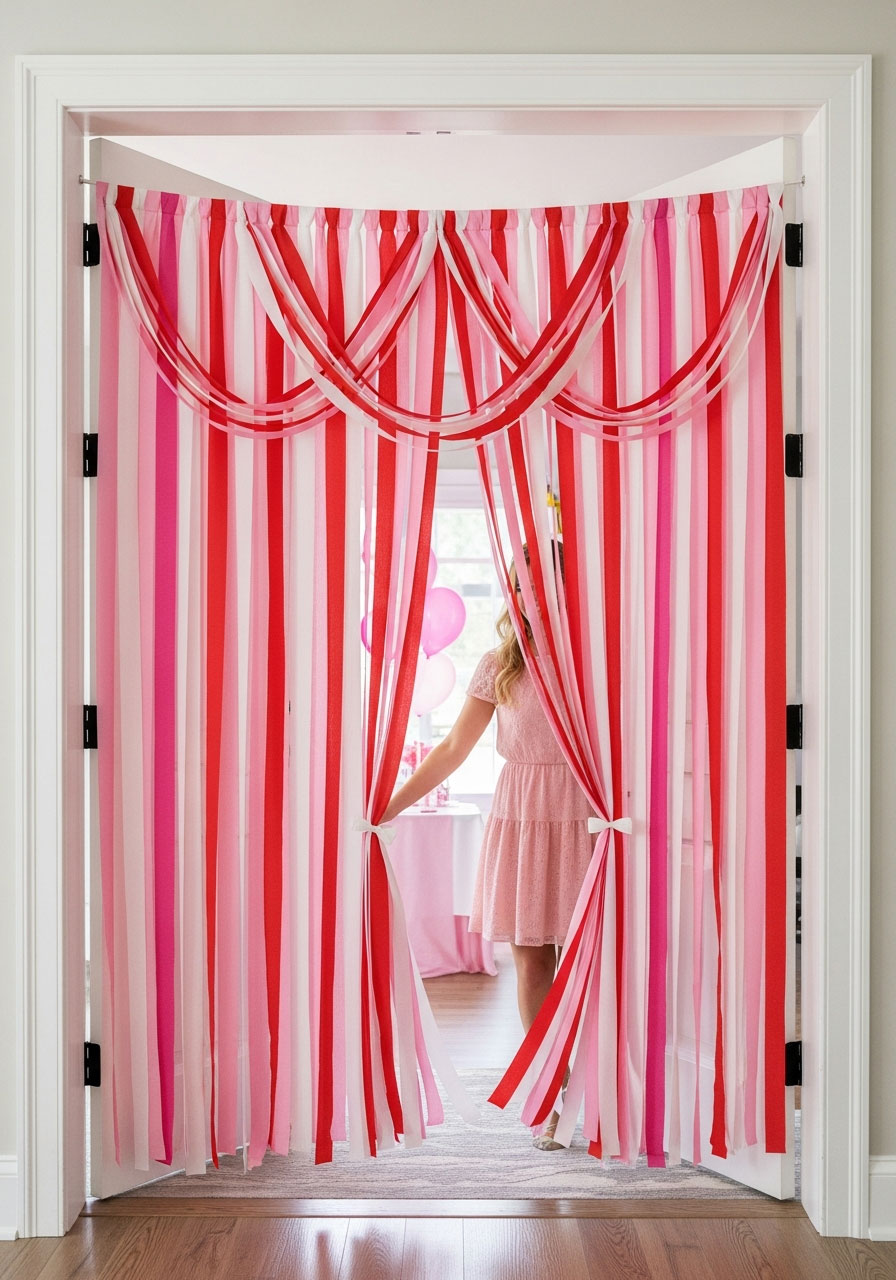
Best for: Creating a grand entrance moment | Setup time: 20 minutes
Give your guests that red-carpet feeling the moment they arrive with a floor-to-ceiling streamer curtain. It’s dramatic, it’s fun to walk through, and it immediately sets the party mood.
What You’ll Need:
4-5 rolls of streamers
Tension rod or strong tape
Scissors
How to Create It:
1. Measure your doorway and cut streamers to length (floor to ceiling, plus a few extra inches).
2. Attach a tension rod across the top of your doorway, or create a tape line if you don’t have a rod.
3. Hang streamers closely together along the rod or tape, slightly overlapping them.
4. Alternate colors in a pattern, or go random for a more playful vibe.
5. Trim any uneven ends at the bottom for a polished look.
Pro Tip: Tie every 3-4 streamers together about two-thirds of the way down to create gentle swags. This adds movement without making the curtain too heavy to walk through!
8. Geometric Wall Design
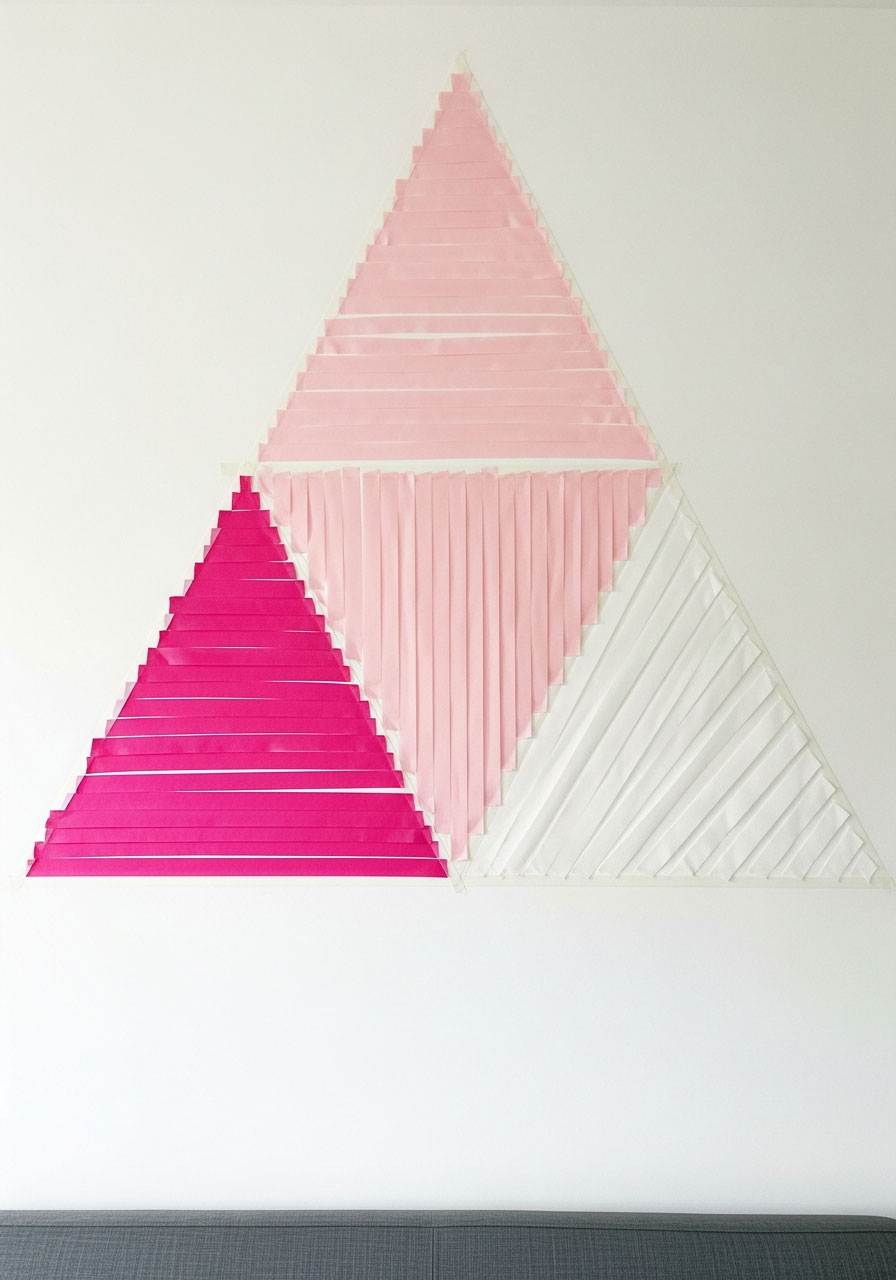
Best for: Modern, minimalist party aesthetics | Setup time: 35 minutes
If your style leans more contemporary than traditional, this geometric streamer design is calling your name. Clean lines meet festive fun in this Instagram-ready creation.
What You’ll Need:
3-4 rolls of streamers (stick to one or two colors for maximum impact)
Painter’s tape
Ruler or measuring tape
Level (optional but helpful)
How to Create It:
1. Plan your design on paper first – think triangles, diamonds, or hexagons.
2. Use painter’s tape to mark out your geometric shapes on the wall.
3. Fill each shape with streamers going in the same direction within that shape.
4. Change directions for adjacent shapes to create contrast and visual interest.
5. Remove the painter’s tape carefully to reveal crisp, clean lines.
Fun Variation: Create a large geometric heart or the word “GALS” using this technique. The sharp, modern lines make it feel custom-designed while still being totally DIY!
9. Table Runner Streamers

Best for: Adding color to your dining setup without blocking conversation | Setup time: 10 minutes
Forget expensive table runners – streamers laid across your table create a vibrant base for your Galentine’s feast while keeping things casual and fun.
What You’ll Need:
2-3 rolls of streamers
Clear tape (optional)
Your party table
How to Create It:
1. Unroll streamers lengthwise down the center of your table.
2. Layer 3-5 streamers in different colors side by side for width and visual interest.
3. Let ends drape slightly over the table edges for a relaxed, flowing look.
4. Secure with tiny pieces of tape if needed, or let them flow free.
5. Place your centerpieces and dishes directly on top – the streamers peek out beautifully around the edges.
Pro Tip: Weave the streamers in an over-under pattern like a simple braid before laying them on the table. This creates a gorgeous textured runner that looks way more complicated than it actually is!
10. Streamer Pom-Poms

Best for: Adding 3D dimension to walls or ceilings | Setup time: 15 minutes each (make several!)
These fluffy streamer pom-poms add instant charm and a handmade touch that shows you put thought into your decor. Plus, making them is oddly therapeutic!
What You’ll Need:
1-2 rolls of streamers per pom-pom
Scissors
String or fishing line
Floral wire or pipe cleaners
How to Create It:
1. Accordion-fold a long piece of streamer back and forth until you have about 20 layers.
2. Secure the center tightly with wire or a pipe cleaner.
3. Round the ends by cutting them into a curved shape.
4. Gently separate each layer and fluff outward from the center, alternating sides.
5. Hang from the ceiling or attach to walls using the wire/pipe cleaner as a hanger.
Fun Variation: Make pom-poms in graduating sizes and cluster them together in odd numbers (3 or 5 works great) for a professional, gallery-wall effect!
11. Woven Backdrop Magic

Best for: Creating texture and a boho-chic vibe | Setup time: 40 minutes
If you want to go the extra mile, a woven streamer backdrop is your masterpiece moment. It looks incredibly intricate but follows a simple over-under pattern that’s actually quite meditative to create.
What You’ll Need:
8-10 rolls of streamers in 3-4 colors
Tape
A large blank wall
Patience (it’s worth it!)
How to Create It:
1. Create your base by taping vertical streamers across your wall space, about 2 inches apart.
2. Start at the top with a horizontal streamer and weave it over-under through the vertical pieces.
3. Continue weaving horizontal streamers, alternating your over-under pattern with each row.
4. Push rows together as you go to create a tight, woven appearance.
5. Trim excess at the edges for clean lines.
Pro Tip: Use this as your photo backdrop and watch your friends marvel at your “incredible skills.” They don’t need to know it only took you 40 minutes and some Netflix in the background!
12. Spiral Columns of Color

Best for: Framing entryways or creating room dividers | Setup time: 20 minutes per column
These twisting columns of streamers add vertical drama to your space and can help define different areas at your party – perfect for creating a drinks zone or photo corner.
What You’ll Need:
3-4 rolls of streamers per column
Tall tension rods, PVC pipes, or cardboard tubes
Tape
Floor weights (books, decorative boxes)
How to Create It:
1. Secure your pole vertically using tension or a weighted base at the bottom.
2. Tape one streamer to the top of the pole.
3. Wrap it around the pole in a spiral, moving downward.
4. Secure at the bottom and repeat with different colored streamers.
5. Create multiple columns and place them strategically around your space.
Fun Variation: Wind fairy lights around the pole first, then add your streamers. When you plug in the lights, you’ve got glowing columns of celebration!
13. Streamer Swags and Draping

Best for: Adding elegance to windows and archways | Setup time: 15 minutes
Channel your inner event planner with these graceful draped swags that make any space look polished and party-ready. The gentle curves add softness to your decor.
What You’ll Need:
4-6 rolls of streamers
Clear tape or removable hooks
Optional: Command hooks for damage-free hanging
How to Create It:
1. Attach one end of your streamer to the top corner of a window or archway.
2. Let it drape down in a gentle curve to the opposite side.
3. Secure the other end, leaving some slack for that classic swag shape.
4. Layer multiple streamers in the same swag pattern for fullness.
5. Add a cluster of balloons or a bow at each attachment point for extra flair.
Pro Tip: Twist two different colored streamers together before draping for a candy-cane effect that’s unexpectedly sophisticated!
14. Rainbow Arch of Friendship
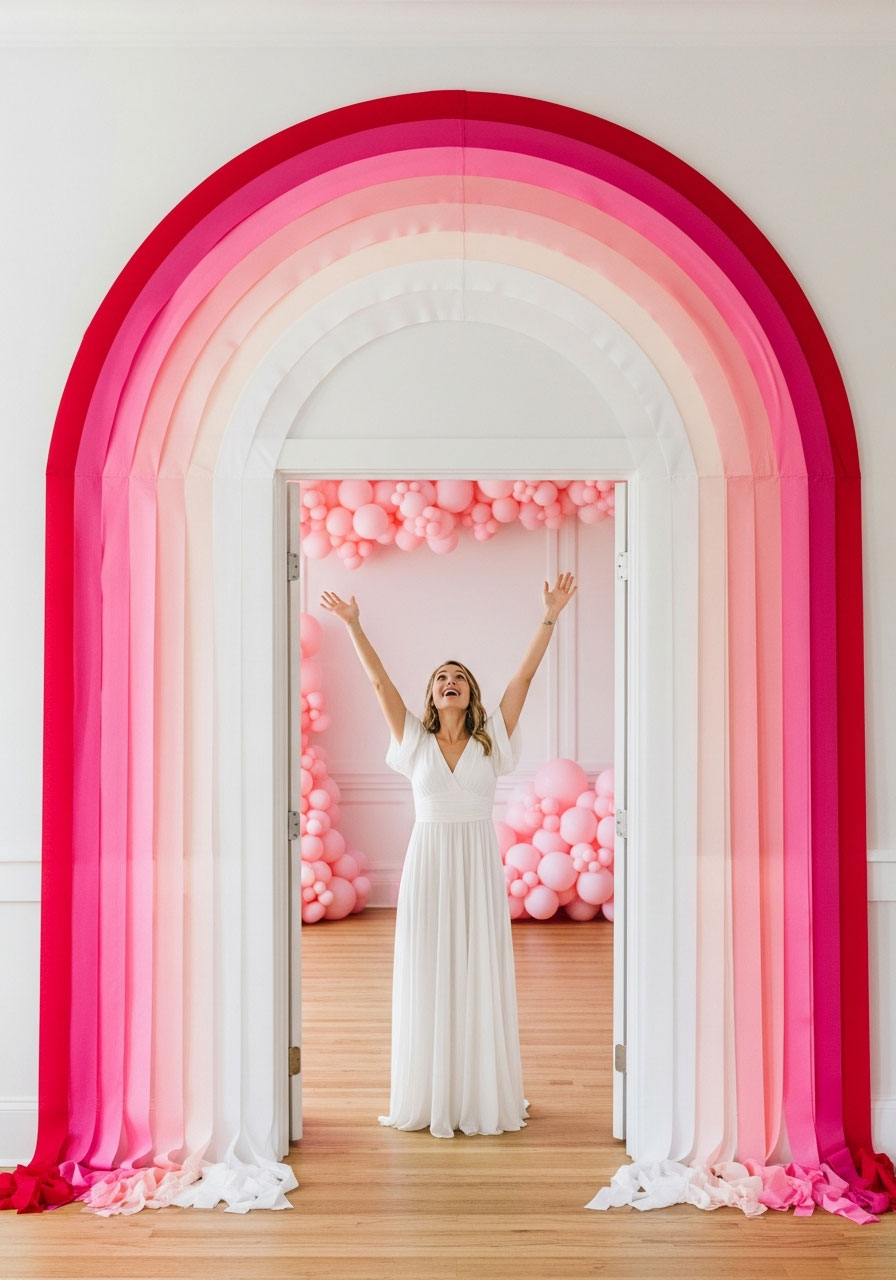
Best for: Creating a photo-worthy entrance or backdrop | Setup time: 30 minutes
Celebrate the spectrum of friendship with a vibrant rainbow arch made entirely from streamers. This cheerful addition works as an entrance decoration or a stunning photo backdrop.
What You’ll Need:
6-7 rolls of streamers in rainbow colors (or Galentine’s pinks and reds)
Tape
Optional: PVC pipe or pool noodle for structure
How to Create It:
1. Create the arch shape by taping streamers to the ceiling in a curved pattern, or bend a pool noodle/PVC pipe into an arch shape.
2. Start with your darkest color on the outside of the arch.
3. Layer each color moving inward, creating concentric arcs.
4. Secure all streamers at the base points on both sides.
5. Fluff and adjust to ensure smooth, even curves.
Fun Variation: Make a “tunnel” arch that guests walk through by creating two parallel arches facing each other. It’s like walking through a celebration portal!
15. Confetti Streamer Explosion

Best for: Creating organized chaos that looks amazing | Setup time: 25 minutes
This technique makes it look like confetti exploded across your walls in the most artfully designed way possible. Random yet intentional – that’s the vibe we’re going for!
What You’ll Need:
5-6 rolls of streamers
Scissors
Tape
An eye for creative chaos
How to Create It:
1. Cut streamers into varying lengths (2-5 feet).
2. Tape one end of each piece to your wall at random heights and positions.
3. Let them hang at different angles – some straight, some diagonal, some curled.
4. Create denser clusters in some areas and leave other spots more sparse.
5. Add curls and twists to some streamers for extra movement.
Pro Tip: Use this technique on the wall behind your dessert table – the explosion of color makes everything look extra celebratory and frames your treats beautifully!
16. Layered Ceiling Cloud Effect

Best for: Creating dreamy, floating atmosphere | Setup time: 35 minutes
Transform your ceiling into a whimsical cloud-like installation that makes your party space feel like you’re celebrating in the sky. This technique adds major wow-factor overhead!
What You’ll Need:
8-10 rolls of streamers in whites, pinks, and blush tones
Clear tape
Step ladder
Helper friend (this one’s easier with two people!)
How to Create It:
1. Map out cloud shapes mentally on your ceiling – organic, billowy forms work best.
2. Tape streamers in loose, gathered bunches across your mapped areas.
3. Layer different shades to create depth and dimension.
4. Let some streamers hang down at varying lengths to create a floating effect.
5. Fluff and separate layers to maximize the cloud-like appearance.
Fun Variation: Mix in some silver or iridescent streamers to create “rain” that drips down from your clouds. It’s whimsical and totally unexpected!
17. Letters and Words Display

Best for: Spelling out your party message loud and proud | Setup time: 45 minutes
Go big and bold by spelling out “GALS,” “BFFs,” or “LOVE” using streamers shaped into letters. This custom touch makes your party feel designed just for your crew.
What You’ll Need:
6-8 rolls of streamers (use one consistent color for clearest letters)
Pencil
Painter’s tape
Lots of regular tape
Patience and maybe some wine
How to Create It:
1. Sketch your letters lightly on the wall with pencil (or use painter’s tape to outline them).
2. Fill in each letter by taping streamers closely together, following the letter shape.
3. Keep streamers taut as you work for crisp, readable letters.
4. Outline each letter with a contrasting color streamer for definition.
5. Step back frequently to check proportions and readability.
Pro Tip: Block letters work WAY better than cursive for this technique – trust me on this one. And if you mess up? Just call it “abstract art” and keep going. Your friends will love it either way!
Making It All Come Together
Here’s the beautiful secret about streamers: you can’t really mess them up. If something doesn’t look quite right, just adjust, re-tape, or try a different angle. The whole point is to create a space that feels joyful and festive, not to achieve Pinterest perfection.
Mix and match these ideas based on your space, your time, and your energy level. Maybe you go all-in with a woven backdrop and ceiling clouds, or maybe you keep it simple with some cascading ceiling streamers and a twisted garland. Either way, your Galentine’s party will be the celebration your friendships deserve!
Quick Tips for Streamer Success:
- Always buy more streamers than you think you need – they’re cheap and you’ll be glad for the extras
- Use removable tape for walls to avoid damage
- Prep what you can the night before
- Don’t stress about perfection – lived-in and fun beats pristine and stiff every time
- Take photos of your setup before guests arrive so you can recreate favorites!
Now get out there and create a Galentine’s celebration that’ll have everyone asking, “How did you do all this?!” (And you can just smile and know it was all about those magical rolls of paper and a little creativity.)
Your gals are going to love it – we guarantee it!
More Valentine’s Day Party Ideas to Keep the Fun Rolling:
16 Galentine’s Day Party Ideas That’ll Make Your Squad Say “Yasss!”
How to Make a Paper Heart Wreath: Your Step-by-Step Guide to This Adorable Valentine’s Craft
DIY Beaded Heart Decorations: A Sweet Craft Kids Will Love
36 Epic Valentine Games That’ll Make Your Party Unforgettable
Musical Hearts: The Wildly Fun Movement Game That’ll Save Your Next Party
36 Easy DIY Valentine’s Party Ideas for Kids That’ll Make You the Hero Host
12 Stunning Valentine’s Day Fireplace Decor Ideas (Classic & Easy!)
Cupid’s Arrow Toss: The Sweetest Valentine’s Day Game for Kids
As an Amazon Associate, we may earn a commission from qualifying purchases at no additional cost to you.
