
Valentine’s Day is basically a love letter to crafting, isn’t it? With hearts, sparkles, and all those glorious shades of red and pink floating around, it’s the perfect excuse to break out the glue sticks and construction paper. Whether you’re looking to create adorable gifts, deck out your space with festive decorations, or just spend quality time getting crafty with your crew, we’ve rounded up 28 amazing Valentine craft ideas that’ll have you falling head over heels. Get ready to transform simple supplies into something absolutely swoon-worthy!
1. Adorable Love Bugs Valentine Craft

Get ready for the cutest infestation ever! These pom-pom love bugs are ridiculously charming and surprisingly simple to make – even the most devoted insect-hater won’t be able to resist their fuzzy charm.
Best for: Kids of all ages, classroom activities, Valentine’s Day party crafts
Time to Craft: 20-30 minutes per bug
What You’ll Need:
- Pom poms in various sizes and colors (fuzzy ones are adorable but take longer to dry; stick with regular pom poms for impatient crafters)
- Googly eyes (or tiny black pom poms for bug eyes)
- Craft glue (Elmer’s Craft Bond works like a dream)
- Foam heart shapes
- Pipe cleaners
- Scissors
- Construction paper
How to Make Your Love Bugs:
1. Choose your bug body. Pick a pom pom to serve as the main body – bigger pom poms make chunkier bugs, while tiny ones create delicate little critters.
2. Add the hearts. Foam hearts become wings when glued to the top of the pom pom, or feet when attached to the bottom. Get creative! You can also fold construction paper hearts in half for a different wing style (think bumble bees and butterflies).
3. Snip a tiny hole in the center of each foam heart and construction paper piece you’re using.
4. Create the spider legs (if making a spider): Cut 2 pipe cleaners in half, bend each piece into an “M” shape, and poke the ends through heart-shaped feet. Twist the “M’s” together in the middle and adjust so all feet face the right direction.
5. Assemble your bug. Hold each piece against the pom pom body for a few minutes as the glue sets before adding the next piece. For spiders, glue the large pom pom to the center of the twisted legs, then add googly eyes on top.
6. Bring it to life with googly eyes or tiny pom pom eyes glued to the body.
Pro Tip: Let kids go wild making tiny bugs! Simply glue a tiny pom pom to a small heart and call it done – kids love the simplicity, and you’ll end up with an entire love bug family in no time.

Cute Valentine Day Treasure Hunt Printable for Kids and Preschoolers
Instant download = Valentine’s Day saved at the last minute – Forgot to plan something special? Buy now, print in 5 minutes, become the hero parent.
30-60 minutes of pure entertainment – Kids stay happily busy solving clues while you finish dinner, wrap up work, or just enjoy your coffee hot.
No craft store runs, no supplies needed – Everything’s done for you. Just print on regular paper and hide around spots you already have (fridge, couch, bed).
Cupid storyline they’ll talk about for months – Way more memorable than another box of chocolates. Grandparents: this is the visit they’ll never forget.
Under $10 beats a babysitter – Keeps multiple kids engaged together with zero screen time. Siblings actually cooperate for once.

Romantic Valentine Scavenger Hunt Printable for Couples and Adults – Cupid’s Mischievous Adventure
Way better than dinner reservations – Skip the overpriced restaurant crowds. Create an intimate, playful experience at home that actually feels personal and memorable.
24 flirty clues = built-in foreplay – Romantic riddles leading around your home build anticipation and laughter. Way more fun than another box of chocolates gathering dust.
No awkward “”what do we do now?”” moments – Everything’s scripted but feels spontaneous. Perfect for couples who want romance without the pressure of planning it themselves.
Under $15 beats flowers that die in 3 days – Create a memory you’ll both laugh about for years. Add your own surprise at the end (jewelry, getaway reveal, or just champagne and you).

Conversation Heart Bulletin Board Classroom Decoration Set
130+ pieces = complete Valentine’s display in ONE box – No extra shopping trips or piecing together mismatched decorations.
Reusable for years – Sturdy cardboard that teachers confirm holds up, unlike flimsy paper that tears after one use.
Instant student engagement – Familiar conversation heart design captures attention and creates classroom buzz.
5-minute setup – Adhesive included. Transform your space faster than your morning coffee break.
Blank hearts = bonus teaching tool – Use for student names, vocabulary, or kind messages beyond just decoration.

Valentines Day Gifts for Kids – 24 Pack
24 pre-packaged valentines = ZERO prep work – Already assembled with cards attached. Just sign names and you’re done in minutes.
Candy-free option parents actually thank you for – No sugar rush, no red dye, no allergy worries. Kids still get excited, classrooms stay calm.
Keychains kids actually USE after February – Clip to backpacks and they’ll play tic-tac-toe for months. Way better than crushed candy hearts in the trash.
Under $1 per student – 24 complete valentines for less than a box of store-bought cards, but looks like you spent way more effort.
Four designs included – No awkward “”why did they get that one?”” moments. Every kid gets a fun variation with matching pun cards.

Valentines Day Gifts for Your Loved One
Custom photo + personalized text = looks way more expensive than it is – Recipients think you spent hours designing something unique. You just uploaded a photo and typed their name.
Doubles as functional night light – Not just décor gathering dust. Customers rave it’s the perfect bedroom glow without being too bright.
Clear, vibrant photo quality that lasts – Shatterproof acrylic with UV printing means colors stay vivid for years, unlike cheap frames that fade by next Valentine’s.
USB-powered, zero hassle setup – Plug in, flip switch, done. No batteries to replace, no complicated assembly that sits in the box for months.
Perfect last-minute gift that feels thoughtful – Arrives ready to give. Looks like you planned ahead even if you’re ordering the week before Valentine’s Day.

2. Easy Paper Plate Heart Sewing Craft for Kids

This isn’t just a pretty Valentine decoration – it’s also a sneaky way to develop fine motor skills! Kids can “sew” however they want with colorful yarn, making this craft nearly foolproof.
Best for: Preschoolers and up, fine motor skills practice
Time to Craft: 25-35 minutes
What You’ll Need:
- Paper plates (red, pink, or white – paint white ones first for extra fun!)
- Scissors
- Pencil
- Hole punch
- Yarn needle
- Yarn in Valentine colors
- Tape
- Optional decorations: stickers, sequins, gems, feathers, pom poms, glitter
How to Create Your Sewing Heart:
1. Make your heart template. Fold a paper plate in half and cut a heart shape out of the middle. Open it up – boom, you’ve got a heart-shaped stencil!
2. Trace and cut. Use your template to trace hearts onto the center of other paper plates with a pencil, then carefully cut them out.
3. Punch holes around the perimeter of the heart cutout using your hole punch. Space them fairly close together (about half an inch apart works great).
4. Thread your yarn needle with a long piece of yarn. Pull the needle through one hole and tape the yarn end to the back of the plate to secure it.
5. Start sewing! Let kids thread the yarn through different holes around the heart however they’d like. Younger kids will create wild, random patterns – older kids might prefer a more methodical approach. Either way looks fantastic!
6. Finish it off. When you’ve run out of yarn or filled all the holes, snip off the needle and tape the yarn end to the back of the plate.
7. Display your masterpiece using blu tack, ribbon, or string them together to create a gorgeous paper plate heart garland!
Pro Tip: Younger preschoolers will have a “wild” sewing pattern, while older kids can create more organized designs. Both are beautiful – embrace the creative chaos!
3. Yarn Wrapped Hearts

These colorful heart ornaments are absolutely mesmerizing to make! There’s something seriously satisfying about wrapping yarn around and around a wire frame until a beautiful design emerges.
Best for: Kids and adults, calm crafting sessions, Valentine’s Day decorations
Time to Craft: 30-45 minutes per heart
What You’ll Need:
- Wire or metal coat hangers
- Wire cutters/pliers
- Yarn in multiple colors
- Scissors
How to Wrap Your Hearts:
1. Cut a length of wire from the coat hanger using wire cutters (adults should handle this step).
2. Bend the wire into a heart shape. Take your time getting the curves just right – this is the foundation of your ornament.
3. Twist the ends together securely at the top of the heart.
4. Tie on your first piece of yarn at the twisted section, leaving a small tail.
5. Start wrapping! Wind the yarn around and around the heart frame, keeping it snug but not too tight. This is where the magic happens – watch the colors build up!
6. Continue wrapping until you’ve used up your length of yarn, then tie off the end.
7. Switch colors and repeat until your heart is wrapped exactly how you want it. You can create stripes, gradients, or random color patterns.
8. Add a hanging loop with extra yarn if you’d like to display it as an ornament.
Pro Tip: This craft is incredibly calming and perfect for kids who need a more focused, meditative activity. Plus, the repetitive wrapping motion is excellent for building concentration skills!
4. Threaded Heart Paper Plate Craft for Valentines Day

Here’s another fantastic threading craft that’s perfect for little hands! This version creates a beautiful woven effect that looks way more complicated than it actually is.
Best for: Toddlers and preschoolers, fine motor skills development
Time to Craft: 20-30 minutes
What You’ll Need:
- Paper plate
- Sheet of scrap paper (8×8 inches)
- Hole punch
- Pencil
- Thread or twine (red and white twine looks especially festive!)
- Scissors
How to Thread Your Heart:
1. Create your heart template. Cut an 8×8 inch piece of paper, fold it in half, and cut a large heart shape along the folded line. (For younger kids, you’ll want to handle the cutting.)
2. Trace the heart onto your paper plate using a pencil, then cut about 1/4 inch larger than your traced line. This creates a nice border around your design.
3. Punch holes all along the traced line with your hole puncher, spacing them about 1/2 inch apart.
4. Start weaving! Thread your twine in and out of the holes around the perimeter until you reach where you started, then tie the two ends in a knot.
5. Create the crisscross pattern. Take a new piece of twine, weave it through the back of any bottom hole and out through the front of any top hole across from it. Go through the back of the neighboring hole and repeat this pattern until your heart is as filled as you’d like.
6. Tie off your thread when you’re happy with the design.
Pro Tip: The concentration on young crafters’ faces as they carefully thread each hole is absolutely priceless. This is a wonderfully calming activity that really helps develop hand-eye coordination!
5. Paper Plate Valentine Bag Craft for Kids
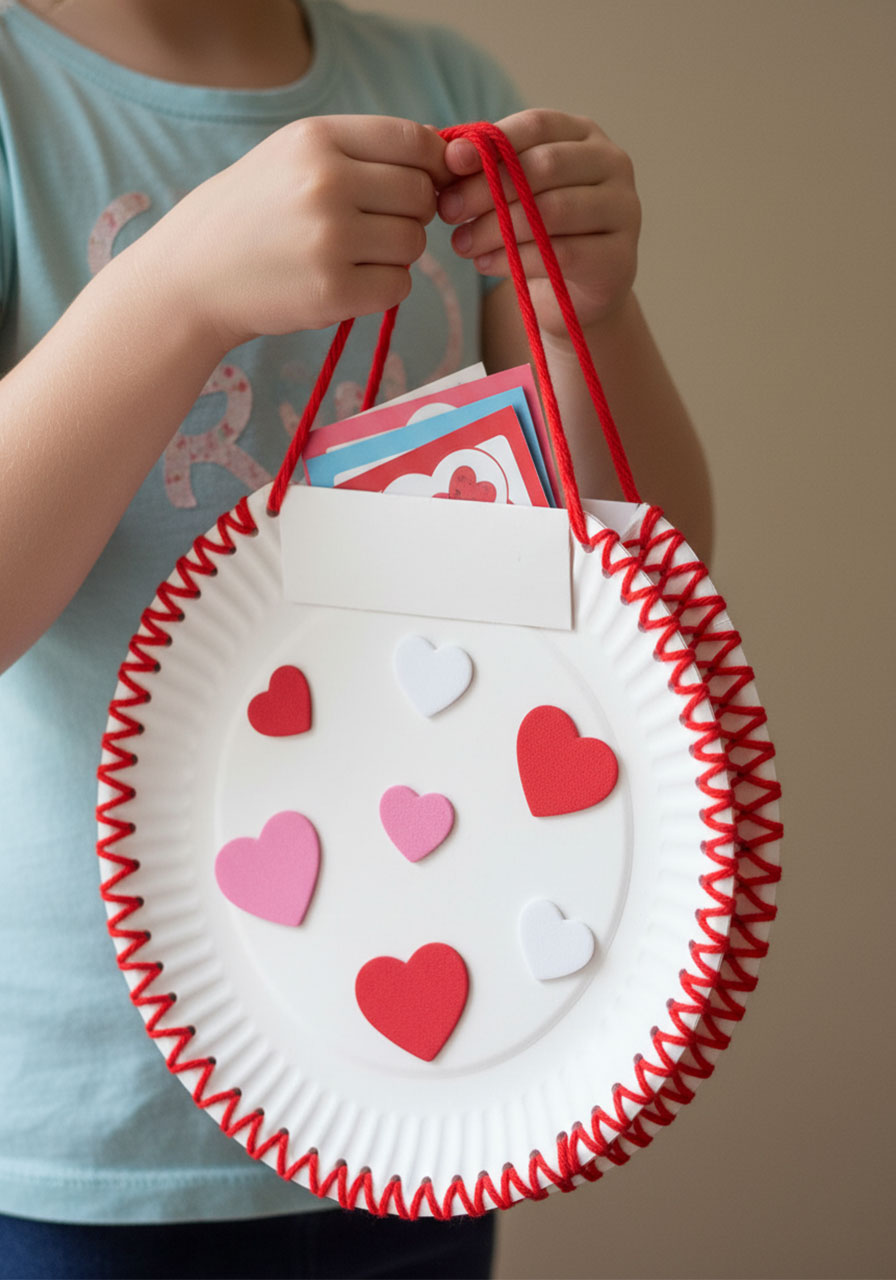
Forget store-bought Valentine’s Day bags – this DIY version is way more fun to make AND use! Plus, threading yarn through punched holes is an awesome fine motor workout.
Best for: School Valentine exchanges, holding Valentine cards and treats
Time to Craft: 35-45 minutes
What You’ll Need:
- 2 paper plates
- Red yarn (or any color you love)
- Hole punch
- Foam heart stickers
- Scissors
How to Make Your Valentine Bag:
1. Cut off the tops of both paper plates – just remove enough to create a straight edge across the top rather than a rounded one.
2. Line up your plates with the eating surfaces facing each other (this hides any food marks or decorations).
3. Punch holes around the edge. Hold the plates together and use your hole punch to make holes around the entire perimeter, leaving the straight top edges open. Space the holes fairly close together, though they don’t need to be perfectly measured.
4. Thread the yarn. Starting at one top corner, weave the yarn up through one hole and down through the next, working your way around to the other top corner. (Pro tip: Singe the end of the yarn with a lighter to prevent unraveling and make threading easier!)
5. Keep the threading tight as you work your way around, and make sure to go up through one hole, down through the next.
6. Create a handle. Cut a long piece of yarn, thread it through the top holes on both sides, and tie it securely.
7. Decorate the front with foam heart stickers to make your bag extra special!
Pro Tip: If your hole punch isn’t cooperating with two plates at once, punch one plate first, then use it as a template to mark where holes should go on the second plate. This ensures perfect alignment!
6. Heart Penguin Craft for Kids
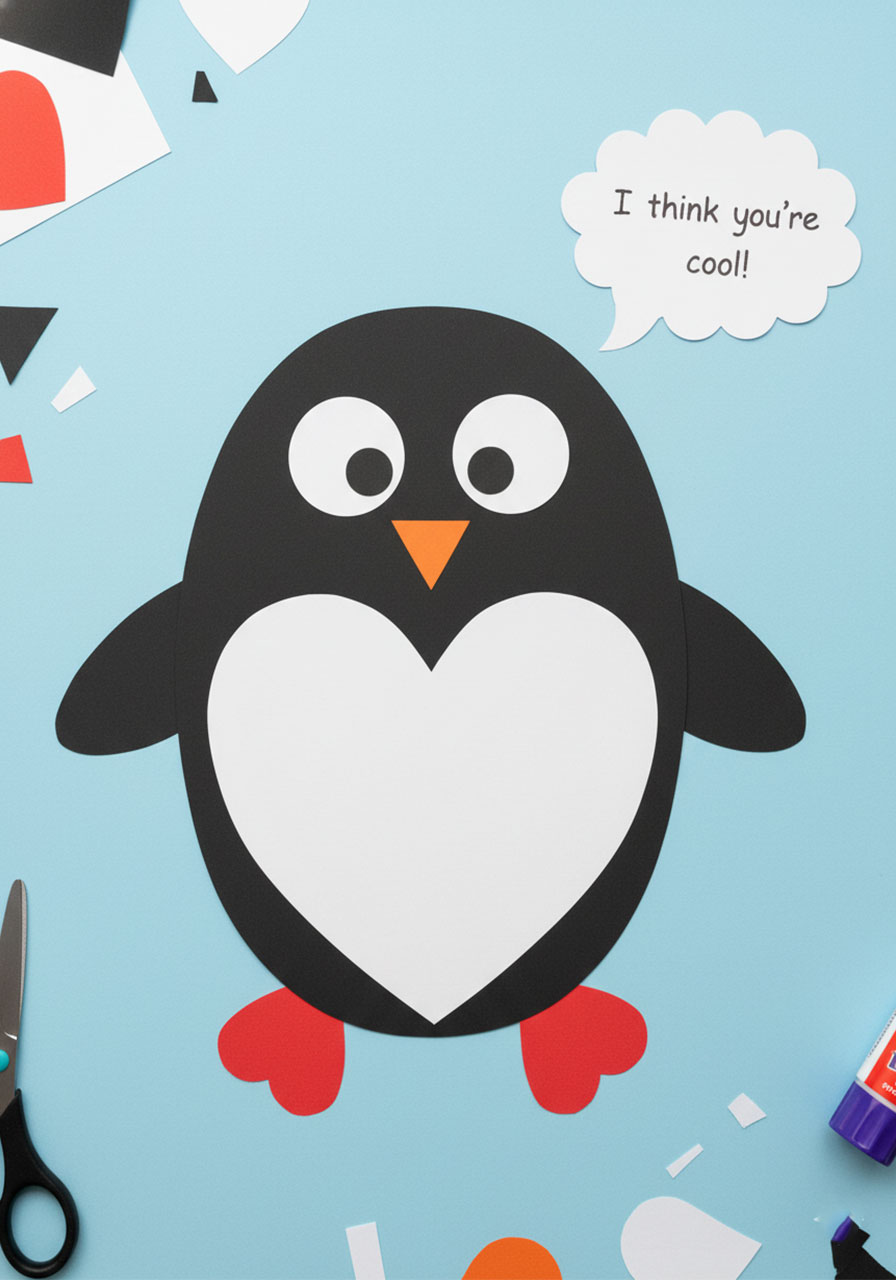
Who says penguins are just for winter? These heart-shaped penguin pals are perfect for Valentine’s Day, especially since their little tummies, feet, and wings are all made from hearts!
Best for: Kids ages 4 and up, classroom crafts, “I think you’re cool” Valentine cards
Time to Craft: 15-25 minutes
What You’ll Need:
- Black construction paper
- White construction paper
- Red construction paper
- Orange construction paper
- Scissors
- Glue stick
How to Craft Your Heart Penguin:
1. Cut out your shapes. You’ll need: one large black oval (the body), a few hearts in various sizes (for the tummy, wings, and feet), two white circles (for the eyes), and one orange triangle (for the beak).
2. Assemble the body. Glue the large black oval onto your background paper – this is your penguin’s body.
3. Add the white heart tummy to the center of the black oval.
4. Attach the heart wings on either side of the body – position them wherever looks cutest to you!
5. Glue on the heart-shaped feet at the bottom of the penguin, pointing slightly outward.
6. Create the face. Add the white circle eyes near the top of the body, draw or glue on black pupils, and attach the orange triangle beak in the center.
7. Optional: Write “I think you’re cool!” on the heart tummy or on the background paper around your penguin.
Pro Tip: These little guys are perfect for celebrating both Valentine’s Day AND Penguin Awareness Day on January 20th! Make a whole waddle of them in different sizes and colors for maximum cuteness.
7. Craft Foam Heart Valentine Fish

Turn hearts upside down and suddenly you’ve got fish! This clever craft proves that sometimes the best creations come from looking at supplies from a totally different angle.
Best for: Kids of all ages, completely customizable decorations
Time to Craft: 20-30 minutes
What You’ll Need:
- Large craft foam hearts
- Small craft foam hearts (for fins, lips, and scales)
- Kid-friendly craft scissors
- School glue
- Large wiggle eyes
- Embellishments: glitter, rhinestones, markers, whatever you’ve got!
How to Create Your Valentine Fish:
1. Turn a large heart upside down – the pointed end becomes the fish’s face, and the rounded curves form the tail!
2. Decorate your fish body however you’d like. Use markers to add patterns, glue on small hearts as scales, or go wild with glitter.
3. Add small heart fins on the sides – glue them wherever they look best to you.
4. Create the lips with a tiny heart at the pointed end (the fish’s “mouth”).
5. Glue on the scales using more small hearts scattered across the body.
6. Attach large wiggle eyes near the pointed end to bring your fish to life.
7. Add extra embellishments like rhinestones, feathers, or random buttons – remember, every fish in the ocean is different, so there’s no wrong way to decorate yours!
Pro Tip: This craft is fantastic because you don’t need to rush out for new supplies – just raid your craft stash and use whatever embellishments you already have on hand. The more random and creative, the better!
8. Easy Valentine Craft for the Non-Crafty!

If you’ve ever thought “I’m just not a crafty person,” this project is about to change your mind! It’s so simple that literally anyone can make it, making it perfect for classroom Valentine’s parties.
Best for: Preschool through 3rd grade, classroom parties, self-proclaimed “non-crafty” people
Time to Craft: 15-20 minutes
What You’ll Need:
- Heart-shaped paper pad, giant foam hearts, or colored paper cut into heart shapes
- Foam heart shapes in many sizes and colors
- Googly eyes
- Colored paper strips (red, pink, white, or any Valentine colors)
- Glue (or use sticky-backed foam hearts and googly eyes to skip the glue entirely!)
What Each Crafter Needs:
- 1 large heart-shaped piece of paper or foam
- 2 googly eyes
- 9 small foam hearts (2 for eyes, 2 for hands, 2 for feet, 2 for the mouth, 1 for the nose)
- 4 paper strips for arms and legs
How to Make Your Heart Person:
1. Create the face on your large heart using foam hearts and googly eyes. Position two hearts as rosy cheeks, add the googly eyes, place a heart for the nose, and arrange two hearts to form a smile.
2. Make accordion arms and legs. Fold each paper strip back and forth (accordion-style) to create bendy limbs.
3. Attach hearts to the ends of each accordion strip – these become hands and feet.
4. Glue the limbs onto your large heart – two on the sides for arms, two at the bottom for legs.
5. Let your personality shine by arranging the facial features however makes you happiest!
Pro Tip: Older kids might enjoy using more foam hearts to add extra details like patterns on the body, eyelashes, or decorative elements. Adults at care centers or nursing homes also really enjoy this surprisingly fun activity!
9. Red Solo Cup Valentine’s Day Craft For Kids (Heart Man)

Who knew a red plastic cup could become the star of Valentine’s Day? This goofy heart man is ridiculously fun to make and even more fun to play with – especially when you perch him on the edge of a table!
Best for: Kids ages 5 and up, silly Valentine decorations
Time to Craft: 20-30 minutes
What You’ll Need:
- Red plastic cup
- Pink, red, and white construction paper
- Googly eyes
- Scissors
- Glue or tape
- Black Sharpie
How to Build Your Cup Heart Man:
1. Create bendy arms and legs. Cut a sheet of pink construction paper into 4 long strips. Fold each strip back and forth accordion-style to make flexible limbs.
2. Attach the limbs to your cup using tape or glue – add two strips on the sides for arms and two at the bottom for legs.
3. Cut out hearts from your colored paper for hands, feet, and eyes.
4. Glue hearts onto the ends of each accordion limb to create hands and feet.
5. Design the face. Attach heart-shaped eyes (add googly eyes on top for extra silliness), then draw a big smile with your black Sharpie.
6. Give him personality! Position the limbs in funny poses and place your heart man sitting on the edge of a table, shelf, or counter.
Pro Tip: These guys look hilarious dangling their legs off edges! Make a whole crew of them and set up a Valentine’s Day party scene on your shelves.
10. Paper Plate Valentine’s Day Heart Wreath Craft

Paper plate wreaths are basically the Swiss Army knife of holiday crafts – they work for everything! This Valentine’s version is festive, colorful, and perfect for adding some heart-filled cheer to your door.
Best for: Kids ages 4 and up, Valentine’s Day decorations
Time to Craft: 35-45 minutes
What You’ll Need:
- Colored construction paper or cardstock (pinks, purples, reds, whites)
- Paper plate
- Ribbon
- Scissors
- Glue stick
- Heart template (or draw your own!)
How to Make Your Heart Wreath:
1. Print or draw hearts in three different sizes on your colored paper. Mix up the colors – different shades of pink, purple, red, and white look gorgeous together!
2. Cut out all your hearts. This is a great opportunity for younger kids to practice scissor skills! For extra learning, have them sort the hearts from smallest to biggest.
3. Cut out the center of your paper plate, leaving just the outer rim intact. This becomes your wreath base. (Younger kids may need help with this step.)
4. Start gluing hearts onto the rim. Randomly attach hearts all around the plate until it’s nicely covered – overlap them, angle them differently, and mix up the sizes for visual interest.
5. Add a ribbon hanger to the back of the plate so you can display your beautiful creation.
Pro Tip: There’s no such thing as “too many hearts” on this wreath – keep adding until you’re happy with how full and festive it looks!
11. Paper Plate Love Birds
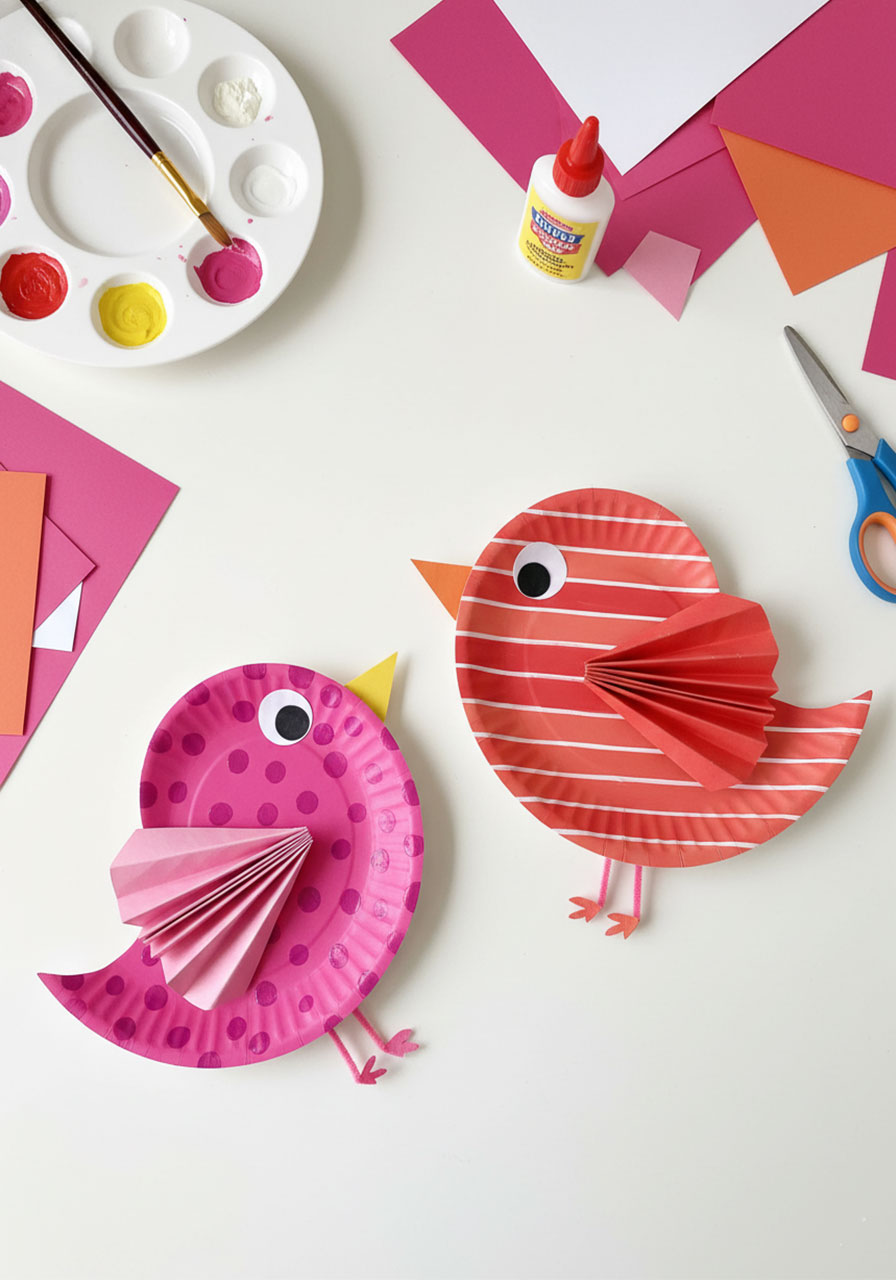
These adorable lovebirds prove that big personality can come in simple packages! With just a paper plate and some creative thinking, you’ll have the cutest Valentine’s Day decorations perched around your home.
Best for: Kids ages 5 and up, group crafting sessions
Time to Craft: 25-35 minutes
What You’ll Need:
- Paper plate
- Paint (get creative with colors and patterns!)
- PVA glue or glue stick
- Pipe cleaners
- Scissors
- Colored construction paper
- Love bird template (optional – you can freehand it!)
How to Create Your Love Birds:
1. Cut the paper plate in half creating a yin-yang shape – each half becomes one bird.
2. Paint both halves in opposite colors (like pink and red, or any colors you love). Add patterns, stripes, or polka dots to make each bird unique!
3. While paint dries, cut out heart-shaped wings from construction paper. Fold them back and forth accordion-style to create a textured, dimensional effect.
4. Once paint is dry, attach the wings to the sides of each bird half using glue.
5. Cut additional hearts from the leftover paper plate for extra decorative wings or tail feathers if desired.
6. Add a beak cut from construction paper and glue it to the pointed end of the bird.
7. Create the eyes by gluing on small circles with black pupils drawn in the center.
8. Make legs (optional but adorable!): Cut a pipe cleaner in two, bend one piece into a V shape, and keep the other piece straight. Place the straight piece in the center of the V and twist them together. Attach to the back of your bird with tape.
Pro Tip: Since lovebirds always come in pairs, make two! They look absolutely adorable displayed together, and it’s the perfect opportunity to practice color mixing and pattern creation.
12. DIY Rainbow Paper Heart Pom Pom Wreath
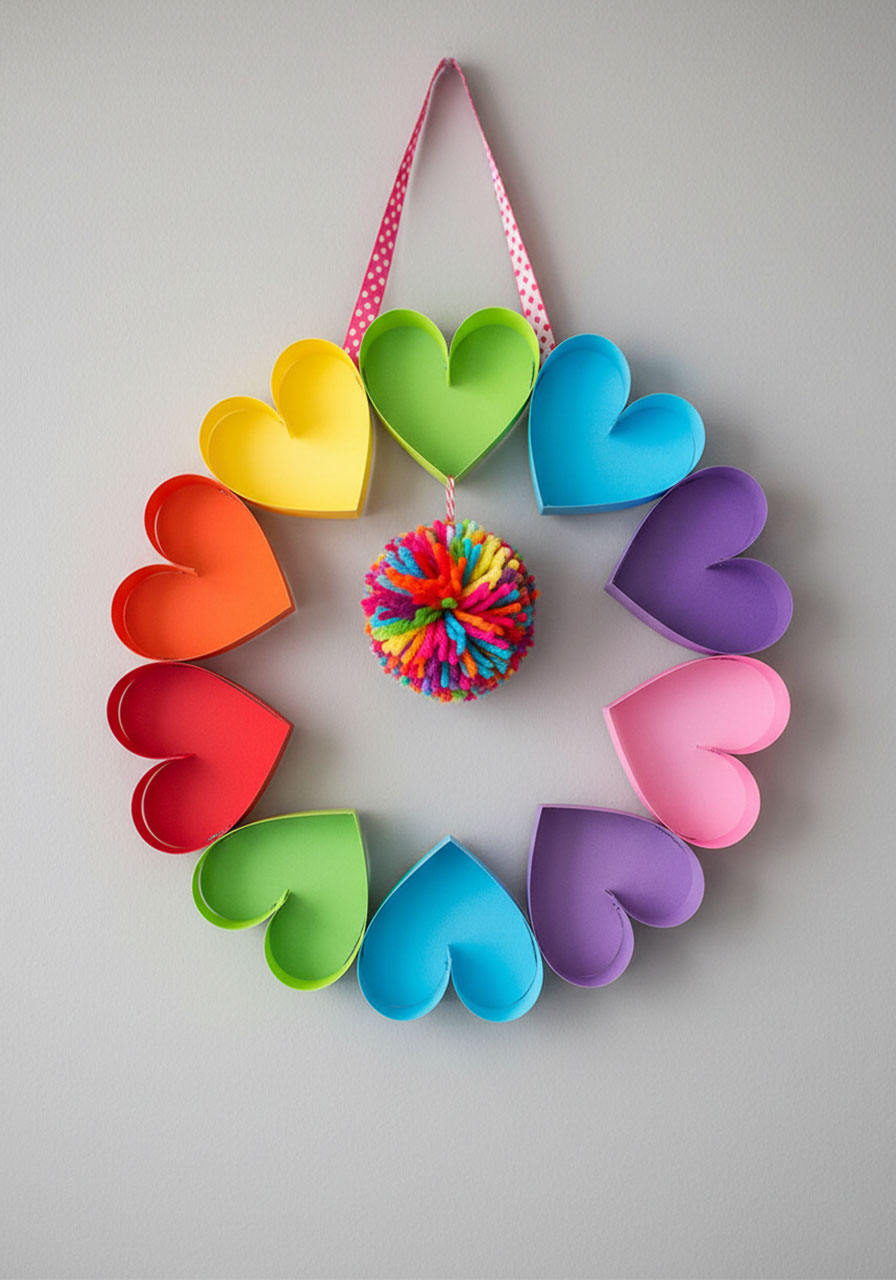
Rainbows and hearts together? Yes, please! This cheerful wreath combines the best of both worlds and looks absolutely stunning hanging on a door or wall.
Best for: Kids ages 6 and up, colorful Valentine decorations
Time to Craft: 45-60 minutes
What You’ll Need:
- Colored cardstock in rainbow colors
- Mini stapler
- Ribbon
- Paper cutter or scissors
- Yarn and pom pom making tool (optional but adorable!)
How to Make Your Rainbow Heart Wreath:
1. Fold your cardstock in half and cut it into 1-inch strips using your paper cutter. Make strips in all the colors of the rainbow!
2. Create hearts. Take each strip and fold the two open ends inward to form a heart shape, then use your mini stapler to staple it closed at the bottom.
3. Make LOTS of hearts in various colors – you’ll need enough to form a complete circle.
4. Arrange your hearts in a circle, organizing them by color to create a rainbow effect.
5. Start stapling hearts together on the back side (so the staples don’t show). Work your way around until you’ve connected all the hearts into a wreath shape.
6. Attach ribbon to two hearts across from each other on the back of the wreath for hanging.
7. Optional: Make a pom pom and attach it to the center of your wreath using the pom pom’s string. This adds an extra burst of color and texture!
Pro Tip: The pom pom in the center adds an adorable touch, but it will make the top hearts sag a bit when hung. You can easily fix this by taping the top hearts to the wall to keep them in place!
13. Heart Pillow (No-Sew)

A cuddly heart pillow that requires ZERO sewing skills? Sign us up! This no-sew project uses felt or polar fleece to create an adorable pillow that’s perfect for gifting (or keeping for yourself!).
Best for: Kids ages 7 and up (with supervision), Valentine gifts
Time to Craft: 45-60 minutes
What You’ll Need:
- Felt fabric or polar fleece in two different colors (must be threadless fabric)
- Scissors
- Wadding or cotton stuffing
- Pencil or marker
How to Make Your No-Sew Heart Pillow:
1. Layer your two pieces of fabric one on top of the other.
2. Cut a large heart shape through both layers – make it as big as you can!
3. Draw a smaller heart inside the larger one, leaving 2-3 cm (about 1 inch) between the two borders. This spacing is crucial because you’ll be cutting strips here that need to be long enough to tie.
4. Cut strips all around the border from the outer edge to the inner heart line. Make them about 1 inch apart all the way around.
5. Start tying! Take one strip from the top layer and one from the bottom layer and tie them together in a simple knot. Work your way around the heart, tying each pair of strips.
6. Leave a gap of about 3-4 inches untied – this is where you’ll stuff the pillow.
7. Stuff the pillow with wadding or cotton through the opening. Don’t overstuff – you want it to be cuddly but still able to tie closed.
8. Tie the remaining strips to seal up your pillow completely.
9. Optional: Trim the strip ends shorter to give your heart pillow a bushier, more polished look.
Pro Tip: This is a fantastic beginner sewing alternative project! Kids feel so accomplished making something they can actually use, and it’s a wonderful gift for someone special.
14. DIY Emoji Valentines

Emojis + Valentine’s Day = the perfect combo for kids who are emoji-obsessed (so, basically all kids)! These heart-shaped emoji Valentines are easy to customize and guaranteed to get smiles.
Best for: Classroom Valentines, kids ages 5 and up
Time to Craft: 30-40 minutes (depending on how many you make)
What You’ll Need:
- Yellow, black, red, blue, and white construction paper
- Scissors
- Glue stick
- Printable emoji templates (optional – you can draw your own!)
How to Create Your Emoji Valentines:
1. Cut out yellow hearts using half a sheet of paper for each heart. Make as many as you need for your Valentine exchange!
2. Decide which emoji faces you want to create. Popular options: heart eyes, tears of joy, kissing face, blushing face, neutral face, grinning face.
3. Cut out the facial features from your colored paper: eyes, mouths, tears, hearts, teeth – whatever each emoji needs!
4. Assemble each emoji by gluing the features onto the yellow hearts. Get creative with the expressions!
5. Write classmates’ names on the back of each Valentine.
6. Optional: Add a fun message like “You make me smile!” or “You’re emoji-zing!”
Pro Tip: Let kids pick their favorite emojis to recreate! This makes the craft more personal and way more fun. Plus, checking your “recently used” emojis on your phone can give you great ideas for which faces to make!
15. Flowering Tree from a Kid’s Hand

This adorable handprint tree literally grows hearts and flowers right from your child’s hand! It’s a sweet keepsake that captures how little their hands are right now.
Best for: Preschool and elementary ages, keepsake crafts
Time to Craft: 25-35 minutes
What You’ll Need:
- Brown cardboard
- Colored paper in various colors
- Scissors
- Glue
- Pencil
How to Make Your Hand Tree:
1. Trace your child’s hand and forearm onto brown cardboard – the arm becomes the trunk and the fingers become branches!
2. Cut out the hand shape. Draw two vertical lines on the sides of the wrist area and make two opposite cuts (mark them A and B).
3. Fold small pieces of colored paper in half and cut out hearts and leaves from them. Make lots in different colors!
4. Glue the hearts and leaves onto the cardboard hand, covering the palm and fingers so it looks like a flowering tree.
5. Make the tree stand. Slide the two cuts (A and B) into each other at the base to create a stand, so your tree stands up straight on its own!
Pro Tip: This makes an incredibly sweet gift for grandparents or a lovely Mother’s Day craft too! Add names or a special message on the trunk for extra personalization.
16. Handprint Valentine Heart Tree

Another fantastic handprint tree variation – this one focuses entirely on hearts blooming from the branches! It’s perfect for capturing a snapshot of your child’s tiny hands while creating gorgeous artwork.
Best for: Kids ages 4-8, Valentine’s Day cards or gifts
Time to Craft: 30-40 minutes
What You’ll Need:
- White card stock
- Kid-friendly acrylic paint (brown and red)
- Watercolor paints
- Old book pages or newspaper
- Pencil
- Glue stick
- Scissors
How to Create Your Handprint Heart Tree:
1. Trace around your child’s arm on white card stock – gently is key! For older kids, let them try tracing their own hand.
2. Paint the arm brown. This is a perfect opportunity for color mixing! Give kids red, yellow, and blue paint and watch them discover how to make brown.
3. While the tree dries, prepare the hearts. Tear out pages from an old book or grab some newspaper.
4. Paint the printed pages with watercolors. Use a saturated brush (lots of water mixed with paint) and glide it quickly over the paper in one continuous stroke to avoid sogginess.
5. Smooth out the painted pages while they’re still damp to eliminate creases and bumps that form while drying.
6. Cut thick strips from the dried watercolor pages, fold them in half, and cut half a heart shape along the fold. When you open it – ta-da! – you have a symmetrical heart.
7. Cut out hearts in varying sizes and different watercolor patterns.
8. Glue the hearts between the fingers of your tree and scatter more around to create the appearance of leaves or blossoms.
9. Optional: Create a 3D effect by applying glue only to the center of each heart, allowing the edges to naturally lift away from the paper.
Pro Tip: Kids find the watercolor painting process incredibly calming! Many will happily paint sheet after sheet, giving you plenty of colorful paper for multiple craft projects.
17. Family Night Valentine Crafts (Love Trees)

This heartwarming activity is SO much more than just a craft – it’s a chance for your family to share what they love about each other! These Love Trees become treasured keepsakes that remind everyone why they’re special.
Best for: Family bonding, all ages working together
Time to Craft: 45-60 minutes for the whole family
What You’ll Need:
- Construction paper, butcher paper, or wallpaper scraps
- Colored paper for hearts
- Scissors
- Glue or stapler
- Markers or pens
How to Make Your Family Love Trees:
1. Trace each family member’s hand and arm on paper and cut them out. Use different colored backgrounds or wallpaper for each person to make them unique.
2. Cut large hearts from colored paper – each person needs at least one heart per family member (not including themselves).
3. Time to get mushy! Give everyone a stack of blank hearts and ask them to write something they love about each family member. Complete sentences like “I love [name] because…” work great. Little kids can draw pictures or dictate their thoughts to someone else.
4. Sort the finished hearts by person – each family member should have a pile of hearts written about them.
5. Glue or staple the hearts onto each person’s hand tree so the branches are full of loving messages.
6. Display the trees somewhere everyone will see them all month – inside the front door, on bedroom walls, on the bathroom mirror, or on the fridge.
Pro Tip: This often becomes a surprisingly emotional activity in the best way! Hearing what your family loves about you is powerful, and these trees serve as daily reminders throughout the month. Many families make this an annual tradition!
18. Valentine’s Day Heart Fingerprint Tree Craft

Fingerprint art never gets old! This simple yet stunning craft turns thumbprints and fingertips into a tree bursting with colorful heart-shaped leaves.
Best for: Kids ages 3 and up, Valentine’s Day cards
Time to Craft: 20-30 minutes
What You’ll Need:
- 2 sheets of white paper
- Ink pads in reds and pinks (or finger paints)
- Black marker
- Scissors
- Pencil (optional)
- Tape (optional)
How to Create Your Fingerprint Heart Tree:
1. Make a heart stencil. Fold a sheet of paper in half and draw half a heart shape along the fold. Cut it out – when you open it, you’ll have a perfect symmetrical heart outline!
2. Place the heart stencil on top of a fresh sheet of white paper. Tape it down if you’re working with younger kids to keep it from sliding around.
3. Draw a tree trunk inside the heart shape using your black marker. Add branches reaching up toward the top!
4. Time to get messy! Dab fingers and thumbs into ink pads (use different fingers for different sized “leaves”) and stamp them all over the heart shape to create colorful foliage on your tree.
5. Keep stamping until you’re happy with how thick and colorful your tree’s “leaves” are.
6. Remove the stencil paper to reveal your beautiful heart-shaped tree!
7. Finish the trunk by drawing the rest of it below the heart if needed.
Pro Tip: This makes an absolutely adorable Valentine’s Day card! Write a sweet message on the back and give it to someone special. The fingerprints make it extra personal and meaningful.
19. Heart Corner Bookmarks

Bookworms, rejoice! These adorable origami-style corner bookmarks are functional AND festive. Plus, you can add a sweet note inside to make them extra special.
Best for: Kids ages 6 and up (with origami experience), Valentine gifts for book lovers
Time to Craft: 15-20 minutes per bookmark
What You’ll Need:
- Origami paper in red or pink
- Scissors
- Optional: markers for adding messages or decorations
How to Make Your Heart Corner Bookmarks:
1. Start with square origami paper. Fold it diagonally across both diagonals to create crease lines, then unfold.
2. Fold into a triangle using one of the diagonal creases.
3. Fold the top point of the triangle down toward the bottom point.
4. Fold the left and right corners up toward the top center point, then unfold them back down.
5. Fold those same corners up again, but this time tuck them into the pocket created by the folded-down top.
6. Cut a heart shape into the top of your bookmark using scissors. Get creative – you can make it more dramatic or subtle depending on how much you cut!
7. Optional: Personalize it! Write a sweet note, add decorations, or even create an arrow or wings from paper to make it extra special.
Pro Tip: These make fantastic additions to Valentine’s Day book gifts! Slip one into a favorite book along with a note about why you chose that particular story for them.
20. Heart Pencil Toppers Craft

Turn ordinary pencils into Valentine’s Day superstars with these adorable pipe cleaner heart toppers! They’re ridiculously easy to make and perfect for pairing with pencil Valentines as a non-candy classroom treat.
Best for: Kids ages 5 and up, classroom Valentines, party favors
Time to Craft: 10-15 minutes per pencil topper
What You’ll Need:
- Pipe cleaners in Valentine colors (red, white, pink – or go wild with any colors you love!)
- Valentine’s Day themed pencils (or regular pencils)
- Scissors (optional, for trimming)
How to Make Your Heart Pencil Toppers:
1. Grab two pipe cleaners in coordinating or contrasting colors for a fun look.
2. Wrap the ends around the top of your pencil about 2 times to secure them firmly in place.
3. Take one loose end and loop it around the pencil once, then wrap it 2 more times around the pencil to lock it down.
4. Repeat with the other loose end on the opposite side – now you should have two pipe cleaner loops sticking up from your pencil.
5. Form the heart shape by gently pressing down in the top center where the two loops meet. Adjust the curves until you’ve got that perfect heart silhouette!
6. Optional: Mix colors! Try wrapping one color first, then adding a second color on top for a striped or layered effect.
Pro Tip: These make fantastic party favors or Valentine exchange gifts! Pair them with a cute tag that says “You’re write for me!” or “You’re so sharp!” for extra smiles. You could also experiment with other shapes – stars, circles, or even initials!
21. Paper Towel Roses

Who would’ve thought paper towels could look this stunning? These gorgeous roses are so pretty that kids become absolutely addicted to making them – fair warning, you might need multiple rolls of paper towels once they get started!
Best for: Kids ages 7 and up, Valentine decorations, Mother’s Day, Teacher Appreciation gifts
Time to Craft: 25-35 minutes per rose
What You’ll Need:
- Colored paper towels (or dye your own – see our scrunch-dye technique!)
- Long thin craft stick or dowel rod
- Craft glue (or sticky tape for kids who prefer it)
- Yarn
- Scissors
How to Create Your Paper Towel Roses:
1. Cut your paper towel in half. You’ll use both halves to create one rose with beautiful layered petals.
2. Take the first half and fold it in half lengthwise, then fold that folded edge in again halfway. This creates your inner rose petals.
3. Apply a small amount of glue to the top edge of your craft stick.
4. Begin wrapping the first strip of paper towel around and around the top of the stick, creating the tight center of your rose. Glue down the end.
5. Grab your second half of paper towel and fold it in half lengthwise just once (this piece will be slightly longer and fuller).
6. Glue one edge to the rose center you’ve already created.
7. Wrap this second piece around and around, gradually moving the folded edge slightly lower than where you started. This creates the outer petals that open up like a real rose!
8. Glue the outer edge down to secure your rose. If you’d like, gently fold the outside edges of your “petals” down a bit to make them look more realistic.
9. Cover the base where the rose meets the stick by tying yarn tightly around it and wrapping until the join looks neat and finished.
Pro Tip: Once kids start making these, they seriously won’t want to stop! Set up a little “rose shop” station with different colored paper towels and let them create entire bouquets. These make absolutely beautiful gifts for Valentine’s Day, Mother’s Day, or Teacher Appreciation Day!
22. Gorgeous Coffee Filter Flowers Tutorial

Spring is in the air with these absolutely stunning coffee filter flowers! They look like they came from a fancy flower shop, but they’re surprisingly simple to create. Perfect for photo shoots, Mother’s Day gifts, or just brightening up your home!
Best for: Kids ages 6 and up, Spring decorations, Mother’s Day gifts, photo props
Time to Craft: 30-40 minutes per flower
What You’ll Need:
- Coffee filters (2 per flower)
- Tissue paper cut to the same size as coffee filters (1 per flower – designs with multiple shades look gorgeous!)
- Green chenille stems (pipe cleaners)
- Scissors
- Glue
- Watercolor paints
- Large watercolor brush
- For vase display: lime green drinking straws, small glass vase, narrow plastic cup, salt
How to Make Your Coffee Filter Flowers:
1. Fold each coffee filter into 8 sections by folding it in half three times.
2. Cut a single petal shape from your folded filter – just cut an arch shape off the top without cutting the sides. Think of it like cutting the top off a paper doll chain!
3. Unfold your filter to reveal your flower shape.
4. Time to paint! Mix very concentrated watercolors (minimal water, maximum color) and paint your coffee filters. We mixed red, dark pink, and purplish pink right on the filters for a gorgeous ombré effect. Let them dry completely.
5. Prepare your tissue paper by folding and cutting it into flower shapes the same way you cut the coffee filters.
6. Snip a tiny hole in the center of each coffee filter and tissue paper piece.
7. Roll down about ½ inch of one end of a pipe cleaner to create the flower center.
8. Slide the rolled end into the hole of your first coffee filter.
9. Grasp the filter in your hand and fold it up away from the stem, then squish it to create texture and dimension.
10. Add the tissue paper layer, folding up and squishing it the same way.
11. Add your second coffee filter, folding and squishing again.
12. Optional: Add glue where the base meets the pipe cleaner to secure everything if the flowers won’t be in a vase.
For Vase Display:
1. Cut holes large enough for a drinking straw in your flower petals.
2. Slide the pipe cleaner inside a straw before adding flowers.
3. Create the flowers using the same method, then glue around the straw at the base and inside the petals so they don’t slide.
4. Place an upside-down plastic cup inside your vase and arrange flowers.
5. Pour salt around and over the cup to fill the vase and hold flowers in place.
Pro Tip: These flowers practically scream SPRING and make incredible photo props! They’re also perfect for practicing color mixing and experimenting with different color combinations.
23. Valentine Craft: Tic Tac Toe Hearts

Classic tic tac toe gets a Valentine’s Day makeover! This adorable game board uses heart-shaped bean bags as playing pieces, making it way more fun than regular X’s and O’s.
Best for: Kids ages 5 and up, Valentine’s Day games and gifts
Time to Craft: 45-60 minutes
What You’ll Need:
- Poster board (white, red, or pink)
- Black marker
- Red and pink felt (3 squares of each color)
- Dry beans (any kind or size)
- Sewing machine or hot glue gun
- Scissors
- Pencil
How to Make Your Valentine Tic Tac Toe:
1. Fold your poster board in half and cut out the biggest heart shape you possibly can. Get creative with the size!
2. Open up the heart and use a pencil to draw your tic tac toe grid – you’ll need 2 vertical lines and 2 horizontal lines creating 9 squares.
3. Trace over your pencil lines with black marker. Use the extra poster board scraps as a straight edge to make nice clean lines.
4. Create your heart bean bags. Cut 4 flat hearts from each felt square – you should get about 4 hearts per square.
5. Place two felt hearts together and either sew around the edges with a zigzag stitch or hot glue around them, leaving about an inch open for stuffing. (Pinking shears make a pretty decorative edge if you’re sewing!)
6. Fill each heart halfway with dry beans – you want enough to give them weight, but not so much that you can’t seal them closed.
7. Sew or glue the opening shut to finish each bean bag.
8. Make 5 bean bags in one color (say, pink) and 4 in another color (like red) – or however you want to divide your playing pieces!
9. Find an opponent and let the games begin! The player with 5 pieces goes first.
Pro Tip: This makes a fantastic handmade gift! Package the game board and bean bags together in a cute bag with a note that says “You’re tic-tac-totally awesome!” Kids absolutely love games they can play over and over again.
24. Tiny Folded Heart Surprise

Want to absolutely melt someone’s heart? These tiny folded heart envelopes hide secret love notes inside! They’re small enough to tuck into lunch boxes, favorite books, or anywhere someone special will find them.
Best for: All ages, secret kindness notes, Valentine surprises
Time to Craft: 5-10 minutes per heart
What You’ll Need:
- Printable heart templates in various designs (we’re providing guidance, not printables!)
- Scissors
- Pencil or pen for your message
- Small heart stickers (for sealing)
- Optional: colored paper or cardstock to draw/trace your own hearts
How to Make Your Secret Love Notes:
1. Create or draw heart shapes on paper – make them large enough to write a message inside but small enough to be a cute surprise.
2. Write your secret message on the blank side of the heart before folding. Keep it sweet and simple!
3. Fold the sides of the heart inward toward the center.
4. Fold the top of the heart down toward the bottom.
5. Fold the bottom of the heart up to meet the top, creating a little sealed package.
6. Secure with a small heart sticker on the outside to keep your note closed.
7. Get creative with hiding spots! Tuck them in lunch boxes, slip them between book pages, leave them on pillows, hide them in coat pockets, or even leave kindness notes for strangers to find!
Pro Tip: Write a whole bunch at once and hide them throughout the week leading up to Valentine’s Day! Kids absolutely love the treasure hunt aspect of finding these surprise notes. You could even start a kindness chain by encouraging people to pass them forward after reading them.
25. Watercolour and Glue Resist Heart Painting

This mesmerizing art technique creates paintings that look like the designs are literally lifted off the page! The glue creates a 3D barrier that “resists” the watercolor paint, resulting in absolutely stunning artwork.
Best for: Kids ages 5 and up, Valentine’s Day art projects
Time to Craft: 40-50 minutes (including drying time)
What You’ll Need:
- White stock card or thick paper
- Hot glue gun (or PVA glue in a squeeze bottle, or white crayon as an alternative)
- Watercolour paints
- Pencil
- Paintbrush
- Water container
How to Create Your Glue Resist Heart Painting:
1. Lightly draw your design onto white card using a soft pencil. Draw hearts, flowers, stars, swirls – whatever inspires you! Get creative with patterns inside the hearts too.
2. Trace over your pencil lines with hot glue. Carefully follow each line, dispensing glue as you go. (If using a hot glue gun, adults should supervise closely!)
3. Let the glue dry completely – hot glue only takes a few minutes, but PVA glue needs much longer (even overnight).
4. Mix your watercolors. Start with water, then add color to create vibrant paint.
5. Begin painting over your entire design, including right over the dried glue lines. Watch the magic happen as the paint fills in around the glue but doesn’t stick to it!
6. Take your time coloring each section. Kids often get completely absorbed in this calming process – the concentration on their faces is adorable!
7. Let your painting dry to reveal the beautiful raised glue designs with colorful backgrounds.
Pro Tip: If you don’t have a hot glue gun, PVA glue from a squeeze bottle works great (just requires more patience for drying), or simply use a white crayon for a flatter resist effect. This technique also works beautifully for spider webs, snowflakes, and other intricate designs!
26. DIY Pony Bead Heart Snake

Time to get colorful and creative with this wiggly, bendy heart snake! Using pipe cleaners and pony beads, kids can create a flexible snake with a heart-shaped head that’s perfect for Valentine’s Day fun.
Best for: Kids ages 4 and up, fine motor skills practice, Valentine’s Day toys
Time to Craft: 25-35 minutes
What You’ll Need:
- 2-3 pipe cleaners (red, pink, white, or any Valentine colors)
- Pony beads in multiple colors
- Red or pink craft foam or felt
- Googly eyes
- Glue
- Scissors
How to Make Your Heart Snake:
1. Twist 2-3 pipe cleaners together end to end to create one long pipe cleaner “snake body.” Make it as long as you’d like!
2. Bend one end into a loop to prevent beads from sliding off.
3. Start threading beads onto your pipe cleaner! This is where the fun begins – create patterns, alternate colors, go random, or make rainbow stripes. Let your creativity run wild!
4. Keep threading until you’ve filled almost the entire length, leaving about 2 inches unbeaded at the top.
5. Cut a heart shape from craft foam or felt – this becomes your snake’s head!
6. Poke the unbeaded end of your pipe cleaner through the center bottom of the heart.
7. Bend the pipe cleaner end on the back of the heart and secure it with glue or tape so it doesn’t poke through.
8. Glue on googly eyes and draw a smile to give your snake personality!
9. Shape your snake into curvy, wiggly positions – the beaded body is flexible and fun to pose!
Pro Tip: Threading beads is incredibly calming and excellent for developing fine motor skills and hand-eye coordination. Plus, you can use this same technique to practice color patterns, counting, and color recognition with younger kids. Make a whole family of heart snakes in different lengths and colors!
27. Felt Heart Garland Banner

String up some love with this adorable felt heart garland! It’s perfect for decorating doorways, mantels, or bedroom walls, and the best part? It’s completely customizable to match any color scheme.
Best for: Kids ages 6 and up (with adult help for sewing), Valentine’s Day decorations
Time to Craft: 45-60 minutes
What You’ll Need:
- Felt sheets in various Valentine colors (reds, pinks, whites, purples)
- Scissors
- Ribbon, twine, or string (at least 6 feet long)
- Sewing machine or hot glue gun
- Heart template (draw your own or trace cookie cutters!)
- Optional: stuffing, buttons, embroidery thread for extra details
How to Make Your Felt Heart Garland:
1. Cut out heart shapes from felt in various sizes – mix it up with big, medium, and small hearts!
2. Decide if you want flat or puffy hearts. For flat hearts, you’ll use one layer. For puffy hearts, cut two identical hearts per garland piece.
3. For puffy hearts: Place two hearts together and sew or hot glue around the edges, leaving a small opening. Stuff lightly with cotton or felt scraps, then seal the opening.
4. Lay out your ribbon or twine where you want to hang it and arrange your hearts along it, spacing them however looks best to you.
5. Attach hearts to the string either by sewing through the top of each heart, hot gluing them on, or folding the tops over the string and gluing them down.
6. Alternate colors and sizes as you work your way across the garland for visual interest.
7. Optional decorations: Add buttons to the center of hearts, use embroidery thread to create stitched details, or layer smaller hearts on top of bigger ones for dimension.
8. Hang your garland and enjoy your festive Valentine’s Day decoration!
Pro Tip: This garland is sturdy enough to be used year after year! Store it carefully in a box or bag, and you’ll have an instant Valentine’s decoration ready to go. You can also make it for other occasions by simply changing the colors – pastel hearts for Easter, orange and black for Halloween, or red and green for Christmas!
28. Melted Crayon Heart Canvas Art
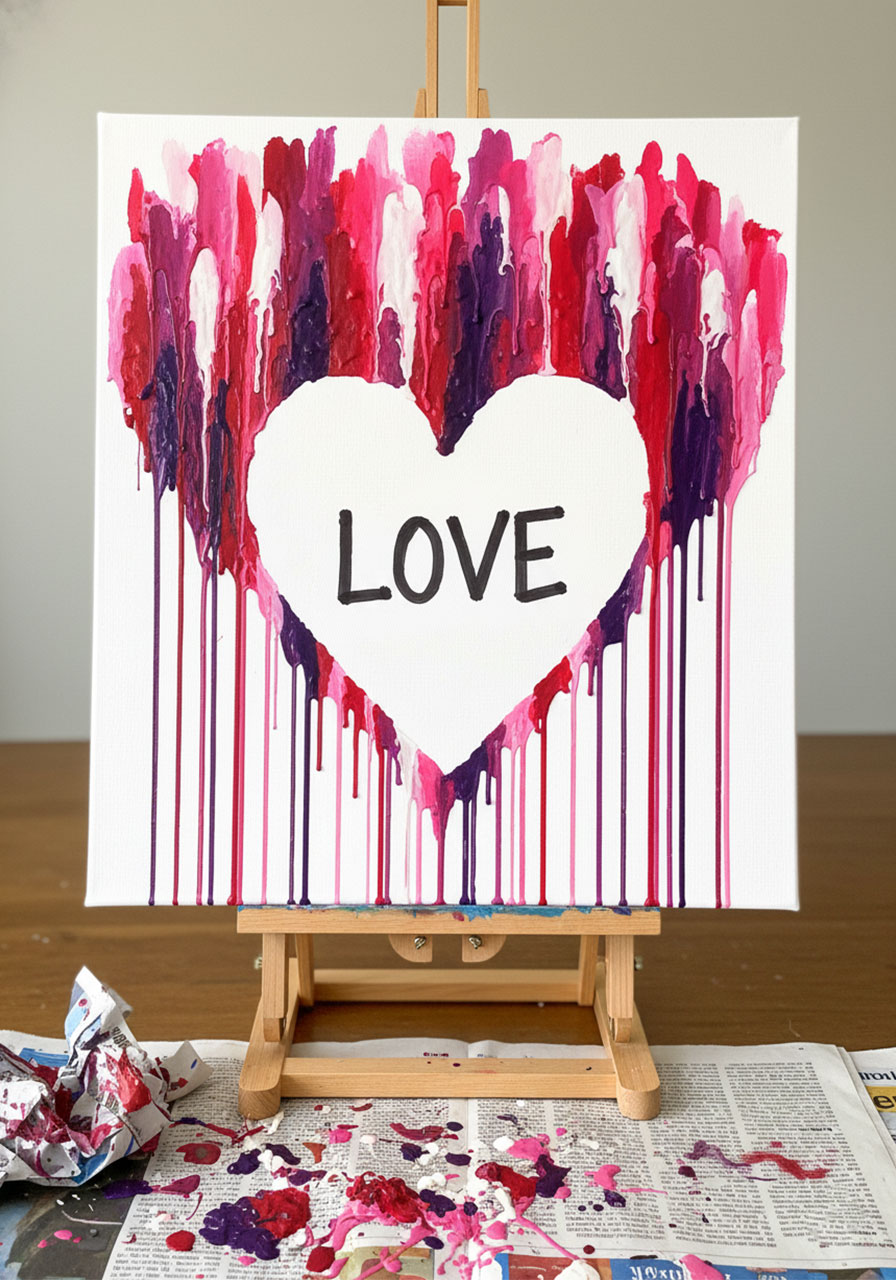
Ready to make some seriously cool abstract art? This melted crayon technique creates gorgeous, drippy rainbow hearts that look like they belong in an art gallery. Fair warning: this one’s a bit messy, but totally worth it!
Best for: Kids ages 8 and up (with adult supervision), unique Valentine’s Day art
Time to Craft: 45-60 minutes (plus cooling time)
What You’ll Need:
- Canvas (any size – 8×10 or larger works great)
- Crayons in Valentine colors (reds, pinks, purples, white)
- Hair dryer or heat gun
- Hot glue gun
- Scissors or craft knife for removing crayon wrappers
- Newspaper or drop cloth (this gets messy!)
- Painter’s tape
- Pencil
How to Create Your Melted Crayon Heart:
1. Set up your workspace with newspaper or a drop cloth – melted crayon can drip everywhere!
2. Draw a large heart outline on your canvas using painter’s tape. This creates a “mask” that will stay white while you melt crayons around it.
3. Remove wrappers from your crayons and break them into smaller pieces (about 2-3 inches each).
4. Arrange crayon pieces around the top edge of your canvas. You can glue them in place with hot glue or just prop up your canvas at an angle and let gravity help!
5. Aim your hair dryer at the crayons and turn it on high heat. Watch the magic as the crayons start to melt and drip down the canvas!
6. Move the dryer around to control where the wax drips. You can create dramatic drips, blend colors together, or aim for specific areas.
7. Keep melting and blending until you’re happy with your colorful creation. Layer different colors for depth and interest.
8. Let everything cool and harden completely – this might take 30 minutes to an hour.
9. Carefully remove the painter’s tape from the heart outline to reveal a clean, white heart shape surrounded by your melted crayon rainbow!
10. Optional: Fill in the white heart with a special message, more melted crayon in a different direction, or leave it white for contrast.
Pro Tip: This project is MESSY but incredibly fun! Do it outside if weather permits, or make sure your indoor space is well-protected. The abstract, drippy results are always unique – no two pieces ever look the same. This makes an absolutely stunning gift or a showpiece for your own room!
There you have it – 28 absolutely amazing Valentine crafts that’ll fill your February with creativity, color, and tons of heartfelt fun! Whether you’re crafting with toddlers or tweens, making gifts or decorations, there’s something here for everyone. So grab your supplies, gather your crew, and get ready to create Valentine’s Day magic. Which craft is calling your name first?
Happy crafting, and may your Valentine’s Day be filled with glitter, glue, and endless creativity!
More Valentine’s Day Party Ideas to Keep the Fun Rolling:
25 Valentine’s Day Crochet Patterns to Put a Little Love on Your Hook
DIY Valentine’s Wreath: Create This Stunning Ombre Heart Design in Under an Hour
Thumbprint Heart Magnet Ideas That’ll Make Everyone Say “I’m Keeping This Forever”
16 Galentine’s Day Party Ideas That’ll Make Your Squad Say “Yasss!”
3 Easy Heart Painting Ideas That’ll Make You Look Like a Creative Genius
46 Easy Valentine’s Day Crafts for Kids That’ll Make Their Hearts Skip a Beat
11 Valentine’s Party Hacks for Preschool That’ll Make You the Hero Teacher
As an Amazon Associate, we may earn a commission from qualifying purchases at no additional cost to you.
