No paintbrushes? No problem! These foolproof techniques work for kids, teens, and adults.
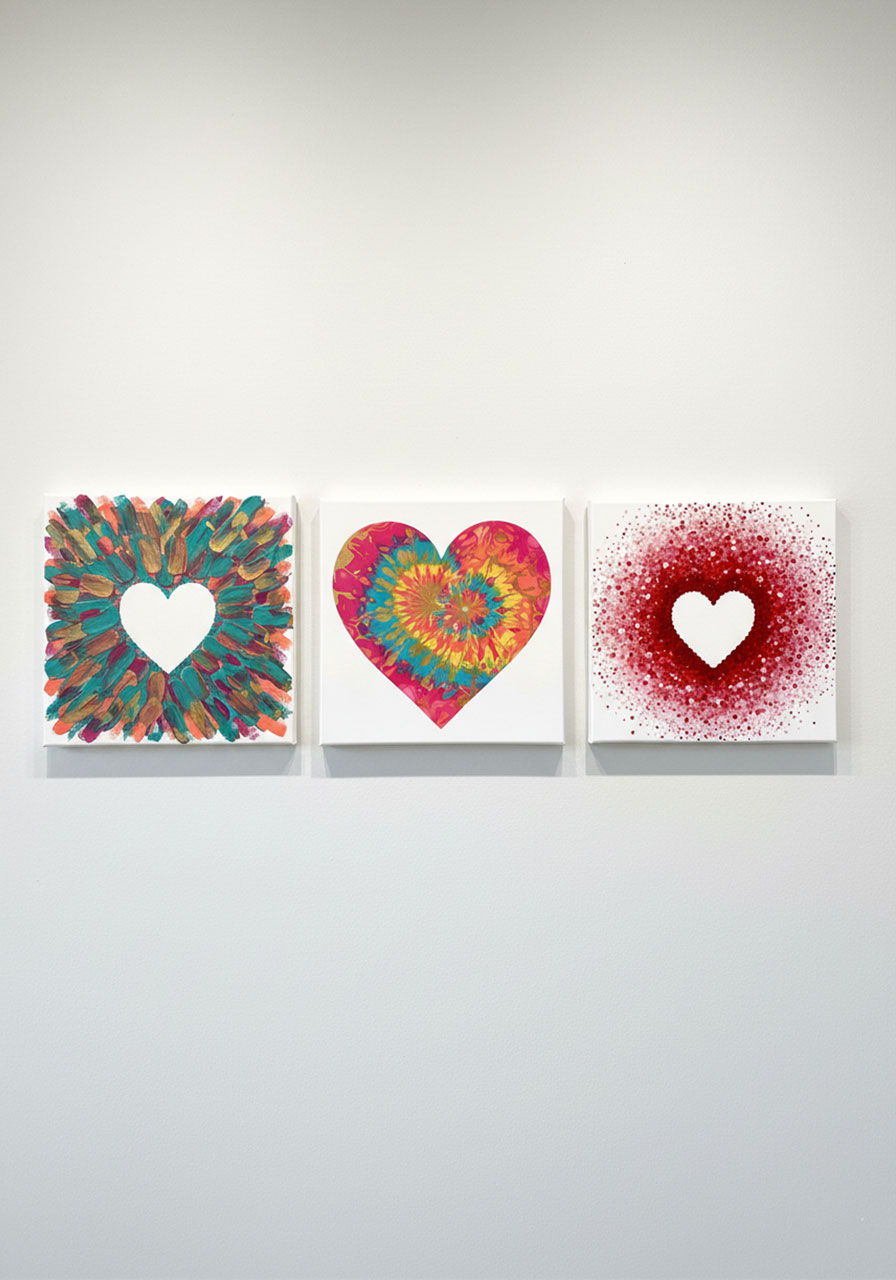
Looking for a fun art project that’s equal parts adorable and impressive? Get ready to fall in love with these three heart painting techniques that are so easy, you’ll wonder why you haven’t been making heart art all along.
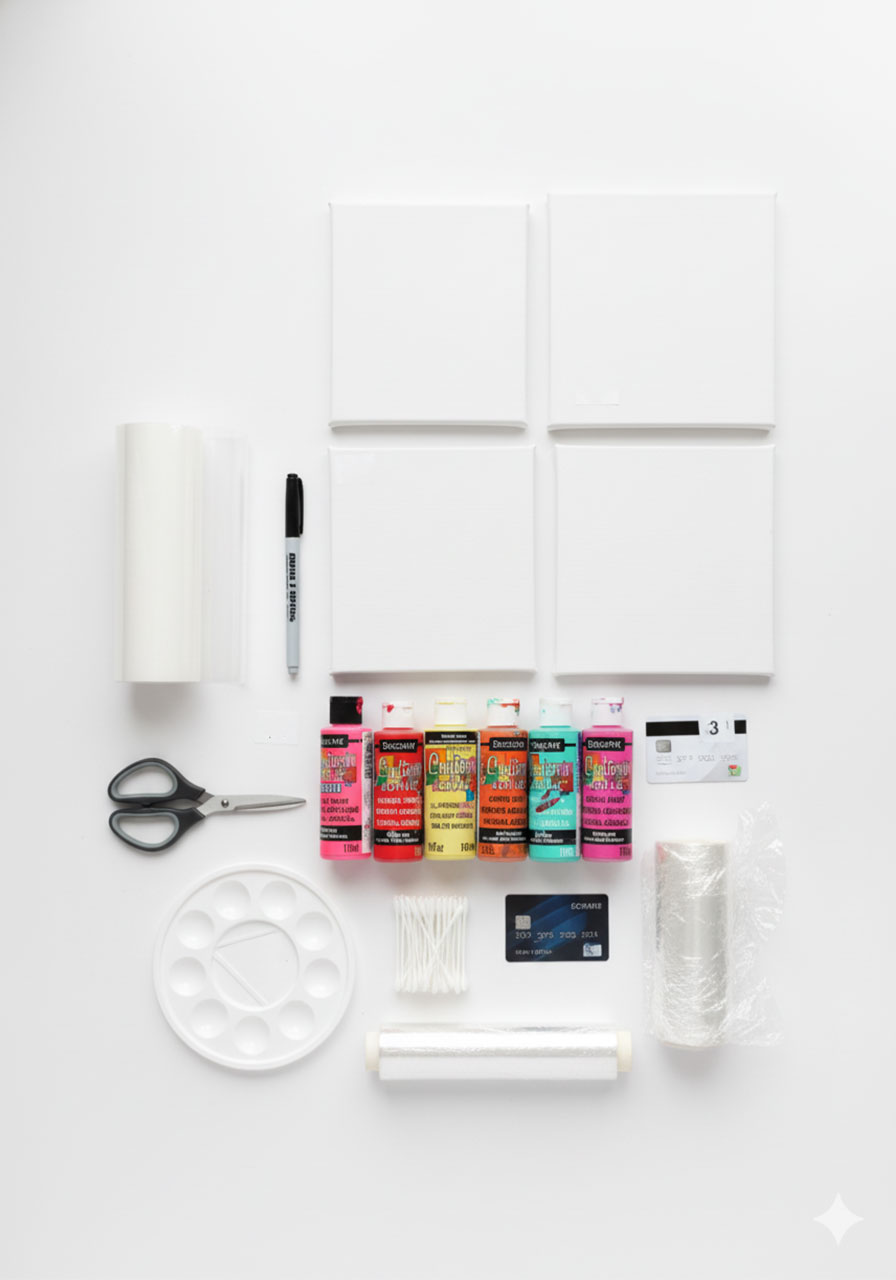
Here’s the best part: you don’t need fancy art supplies or paintbrushes. We’re talking Dollar Store canvases, basic acrylic paints, and everyday household items you probably already have lying around. Each project costs about $5 or less, making them perfect for Valentine’s Day crafts, paint party activities, or just a creative afternoon when you want to make something beautiful.
Whether you’re hosting a kids’ art party, looking for a fun date night activity, or just want to create some colorful wall art for your space, these techniques deliver big results with minimal effort. Plus, they’re incredibly satisfying to make – there’s something magical about peeling back that stencil to reveal your masterpiece!
Let’s dive into three different ways to create stunning heart paintings using unexpected tools. (Spoiler: one involves cling wrap, and it’s absolutely genius.)
First Things First: Your Secret Weapon for Perfect Heart Stencils
Before we jump into the painting techniques, let me share a game-changing hack that’ll save you money and give you professional-looking results.
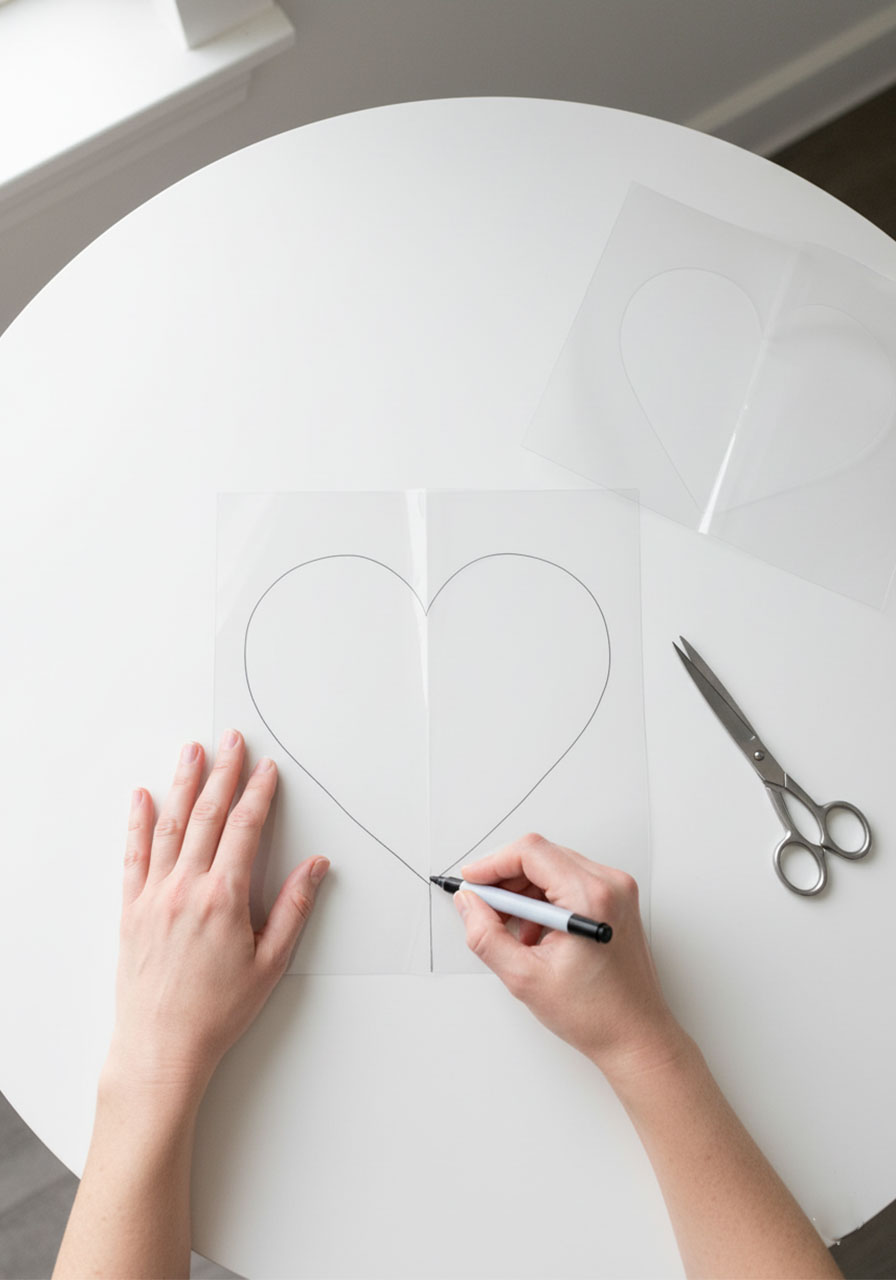
The Magic Item? Contact paper!
You know, that sticky shelf liner stuff you use in kitchen drawers? It doubles as the perfect DIY stencil material. No Cricut machine required!
What You’ll Need:
- Contact paper (grab it at Dollar Tree or any dollar store)
- Scissors
- Pencil
How to Make Your Heart Stencil:
1. Cut a piece of contact paper to match your canvas size
2. Fold the contact paper in half
3. Draw half a heart shape along the folded edge with your pencil
4. Cut along the line while the paper is still folded
5. Unfold to reveal your perfect symmetrical heart
6. Peel and stick it directly onto your canvas
Pro Tip: You’ll end up with TWO stencils – one with the heart cut out (for painting inside the heart) and one solid heart shape (for painting around the heart). We’ll use both in the techniques below, so don’t toss either piece!
Now that you’ve got your stencil ready, let’s get to the fun part!

Cute Valentine Day Treasure Hunt Printable for Kids and Preschoolers
Instant download = Valentine’s Day saved at the last minute – Forgot to plan something special? Buy now, print in 5 minutes, become the hero parent.
30-60 minutes of pure entertainment – Kids stay happily busy solving clues while you finish dinner, wrap up work, or just enjoy your coffee hot.
No craft store runs, no supplies needed – Everything’s done for you. Just print on regular paper and hide around spots you already have (fridge, couch, bed).
Cupid storyline they’ll talk about for months – Way more memorable than another box of chocolates. Grandparents: this is the visit they’ll never forget.
Under $10 beats a babysitter – Keeps multiple kids engaged together with zero screen time. Siblings actually cooperate for once.

Romantic Valentine Scavenger Hunt Printable for Couples and Adults – Cupid’s Mischievous Adventure
Way better than dinner reservations – Skip the overpriced restaurant crowds. Create an intimate, playful experience at home that actually feels personal and memorable.
24 flirty clues = built-in foreplay – Romantic riddles leading around your home build anticipation and laughter. Way more fun than another box of chocolates gathering dust.
No awkward “”what do we do now?”” moments – Everything’s scripted but feels spontaneous. Perfect for couples who want romance without the pressure of planning it themselves.
Under $15 beats flowers that die in 3 days – Create a memory you’ll both laugh about for years. Add your own surprise at the end (jewelry, getaway reveal, or just champagne and you).

Conversation Heart Bulletin Board Classroom Decoration Set
130+ pieces = complete Valentine’s display in ONE box – No extra shopping trips or piecing together mismatched decorations.
Reusable for years – Sturdy cardboard that teachers confirm holds up, unlike flimsy paper that tears after one use.
Instant student engagement – Familiar conversation heart design captures attention and creates classroom buzz.
5-minute setup – Adhesive included. Transform your space faster than your morning coffee break.
Blank hearts = bonus teaching tool – Use for student names, vocabulary, or kind messages beyond just decoration.

Valentines Day Gifts for Kids – 24 Pack
24 pre-packaged valentines = ZERO prep work – Already assembled with cards attached. Just sign names and you’re done in minutes.
Candy-free option parents actually thank you for – No sugar rush, no red dye, no allergy worries. Kids still get excited, classrooms stay calm.
Keychains kids actually USE after February – Clip to backpacks and they’ll play tic-tac-toe for months. Way better than crushed candy hearts in the trash.
Under $1 per student – 24 complete valentines for less than a box of store-bought cards, but looks like you spent way more effort.
Four designs included – No awkward “”why did they get that one?”” moments. Every kid gets a fun variation with matching pun cards.

Valentines Day Gifts for Your Loved One
Custom photo + personalized text = looks way more expensive than it is – Recipients think you spent hours designing something unique. You just uploaded a photo and typed their name.
Doubles as functional night light – Not just décor gathering dust. Customers rave it’s the perfect bedroom glow without being too bright.
Clear, vibrant photo quality that lasts – Shatterproof acrylic with UV printing means colors stay vivid for years, unlike cheap frames that fade by next Valentine’s.
USB-powered, zero hassle setup – Plug in, flip switch, done. No batteries to replace, no complicated assembly that sits in the box for months.
Perfect last-minute gift that feels thoughtful – Arrives ready to give. Looks like you planned ahead even if you’re ordering the week before Valentine’s Day.


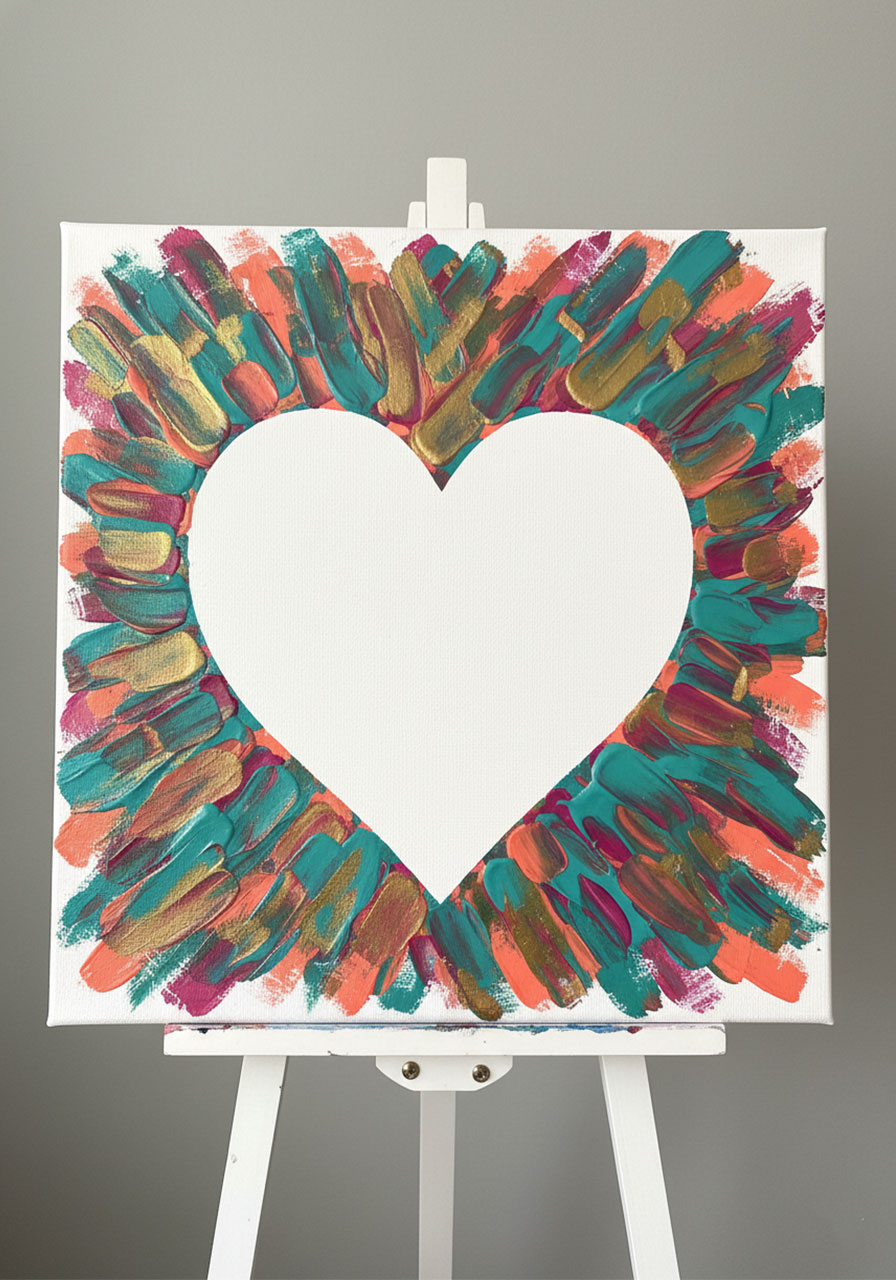
1. The Credit Card Swipe Heart (Our Personal Favorite!)
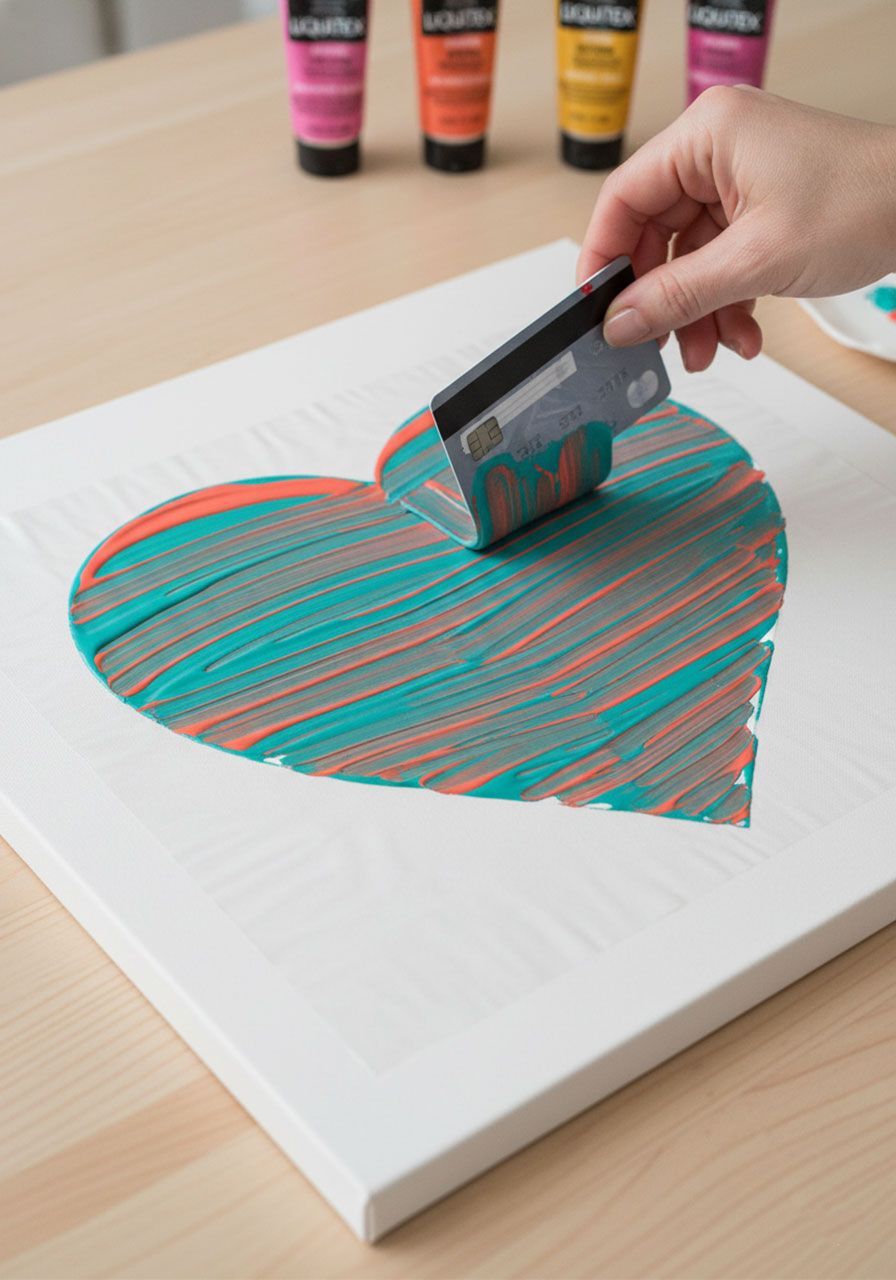
This technique creates the coolest rustic, wood-grain effect that looks way more complicated than it actually is. All you need is an old card from your wallet and some paint – that’s it!
Best for: Anyone who wants an artistic, sophisticated look with zero painting skills required
Time to Create: 10-15 minutes (plus drying time)
What You’ll Need:
- Canvas (any size works!)
- Acrylic paints in your favorite colors
- An old credit card, gift card, or hotel key card
- Your positive space heart stencil (the one with the heart cut out)
How to Create Your Masterpiece:
1. Stick your stencil on the canvas. Use the stencil with the heart opening. Press down the edges firmly so paint doesn’t sneak underneath.
2. Add your paint. Squeeze your chosen paint colors along the top edge of the heart opening, right where the contact paper meets the canvas. Don’t be shy – use generous amounts!
3. Work your magic with the card. Hold your credit card at a 45-degree angle and gently drag the paint downward across the canvas. Here’s the key: use light, smooth pressure – you’re gliding, not scraping. The paint should create beautiful streaky lines as you drag.
4. Build up your design. You can go over the same area multiple times with different colors to create layers and depth. Experiment with different angles and color combinations!
5. Clean up the edges. Before removing the stencil, gently wipe away any excess paint that got on the contact paper.
6. The big reveal! Carefully peel away the stencil to reveal your heart. If some paint bled under the edges (it happens!), let everything dry completely, then use white paint or a light color to clean up the border and make your heart pop.
Pro Tip: Don’t use a card you still need for shopping! While you can probably wash it off, it’s easier to sacrifice an expired card or old gift card. Your wallet will thank you.
Why This One’s Amazing: The end result looks like painted wood planks or an abstract expressionist piece. People will seriously think you spent hours on it!
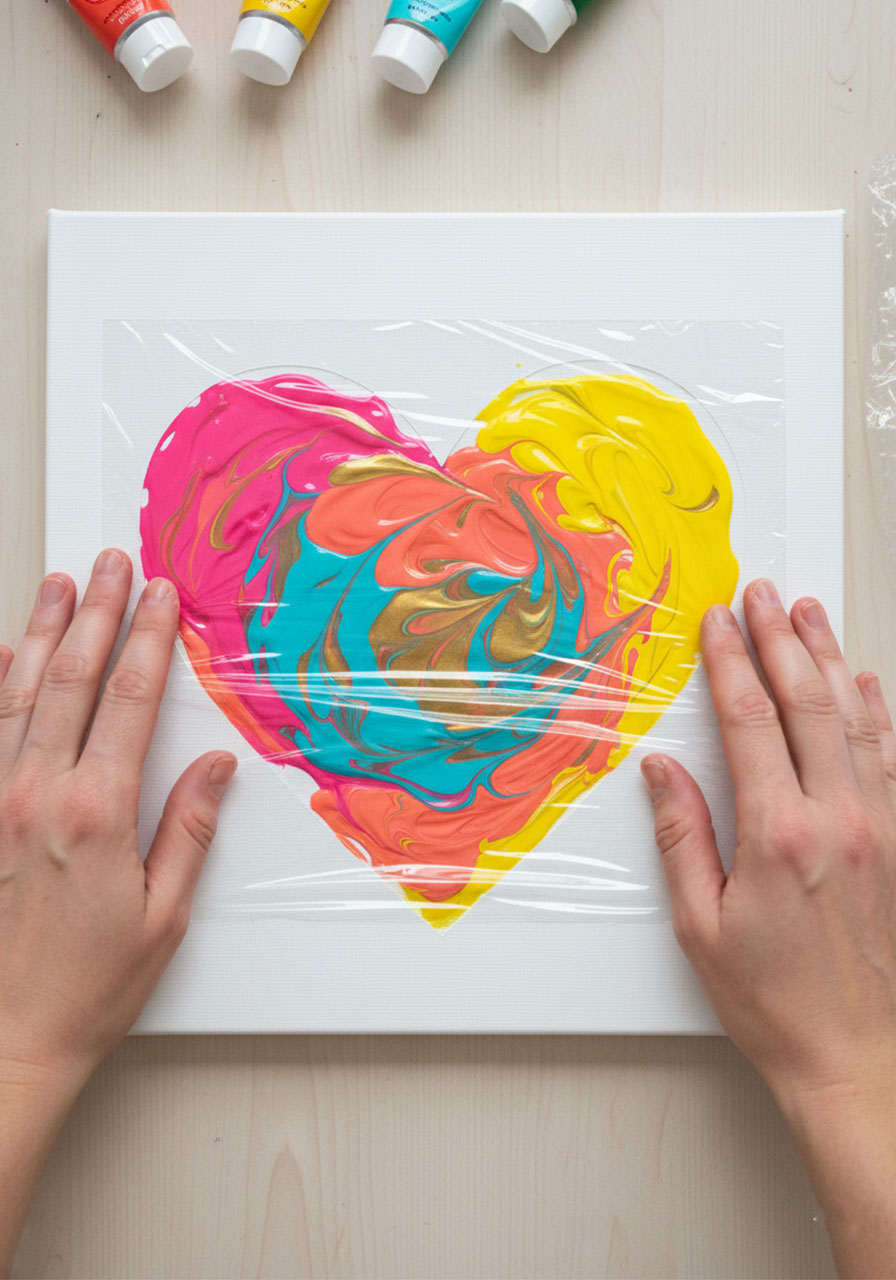
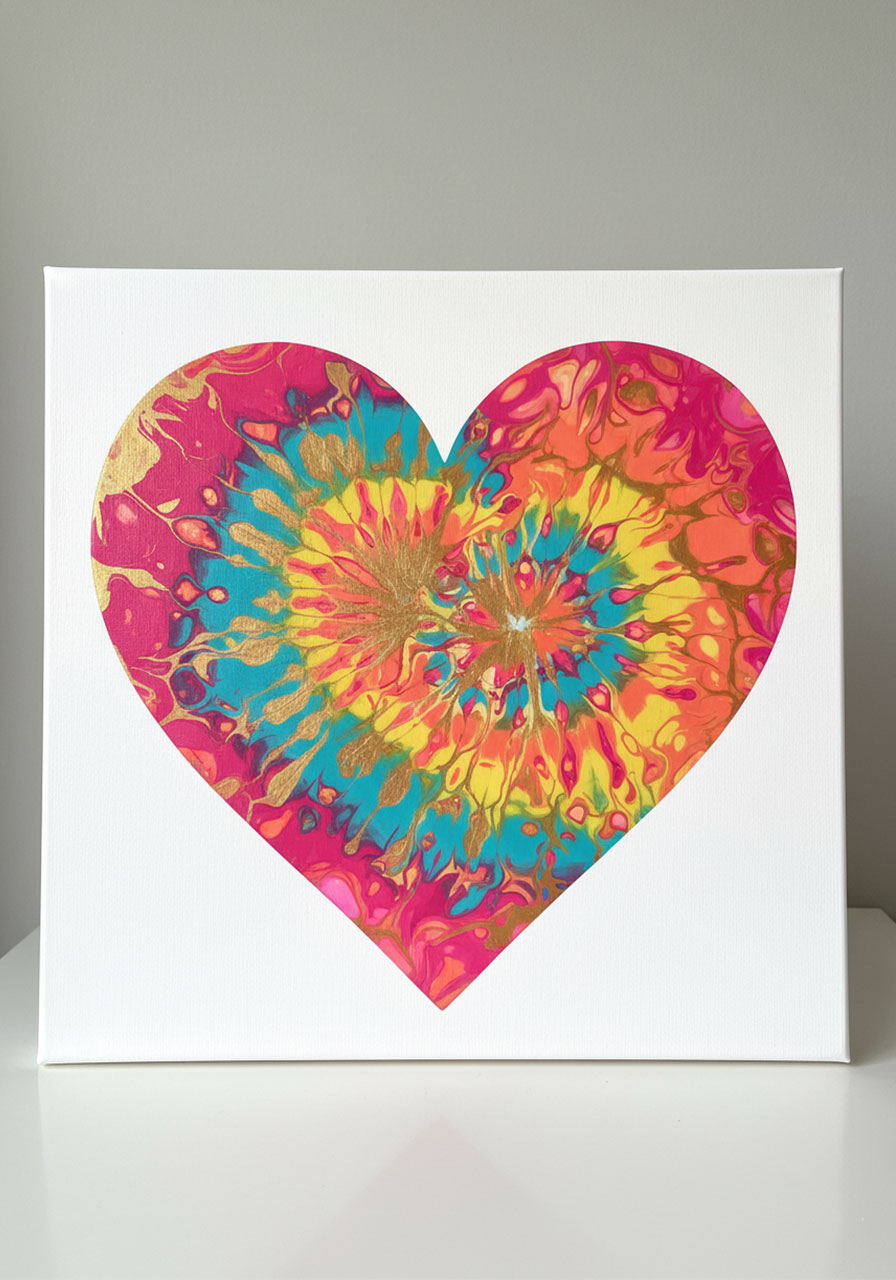
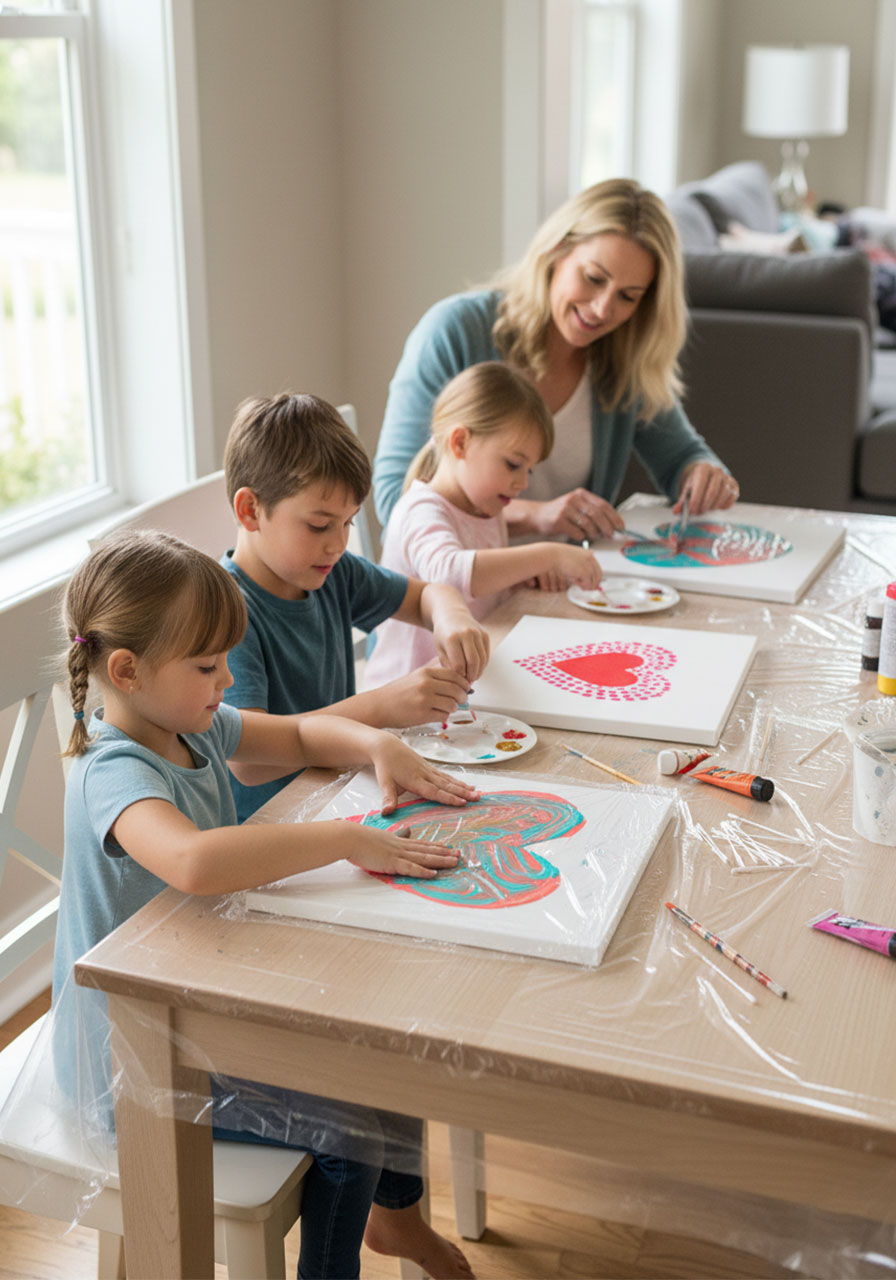
2. The Cling Wrap Surprise (Kids Go Crazy for This One!)
If you’ve ever wanted to try pour painting but thought it looked too messy or complicated, this is your new best friend. The cling wrap technique gives you that trendy tie-dye meets paint-pour effect with absolutely zero mess and total control.
Best for: Kids’ art parties, anyone who hates cleanup, or people who want vibrant, colorful results
Time to Create: 15 minutes (plus drying time)
What You’ll Need:
- Canvas
- Acrylic paints in multiple colors (3-5 colors work great!)
- Cling wrap (aka plastic wrap or saran wrap)
- Your positive space heart stencil
How to Create Your Masterpiece:
1. Stick your stencil on the canvas. Use the stencil with the heart opening, pressing down those edges nice and firm.
2. Squeeze on the fun! Add generous squeezes and dollops of different paint colors onto the white canvas inside the heart. Don’t worry about being neat – random placement actually looks best!
3. Cover it up. Cut a piece of cling wrap large enough to cover your entire canvas (go bigger than you think you need). Lay it over the paint-covered area.
4. Get squishy with it! Here’s where the magic happens. Use your hands to smoosh, swirl, and spread the paint around underneath the cling wrap. Kids absolutely love this part! Watch the colors blend and mix right before your eyes. Keep going until you’re happy with how it looks.
5. The grand unveiling. Grip one edge of the cling wrap and peel it away from the canvas at a 90-degree angle, pulling away from you in one smooth motion. Prepare to say “Whoa!”
6. Remove the stencil. Carefully peel off the contact paper. If paint snuck under the edges, let it dry and paint over those spots with white or your background color.
Pro Tip: Want a metallic twist? Add a few squeezes of gold or silver acrylic paint along with your regular colors. The shimmer effect is absolutely gorgeous!
Why This One’s Amazing: Zero mess (your hands stay totally clean!), maximum wow factor, and it’s so fun that kids will beg to make more.
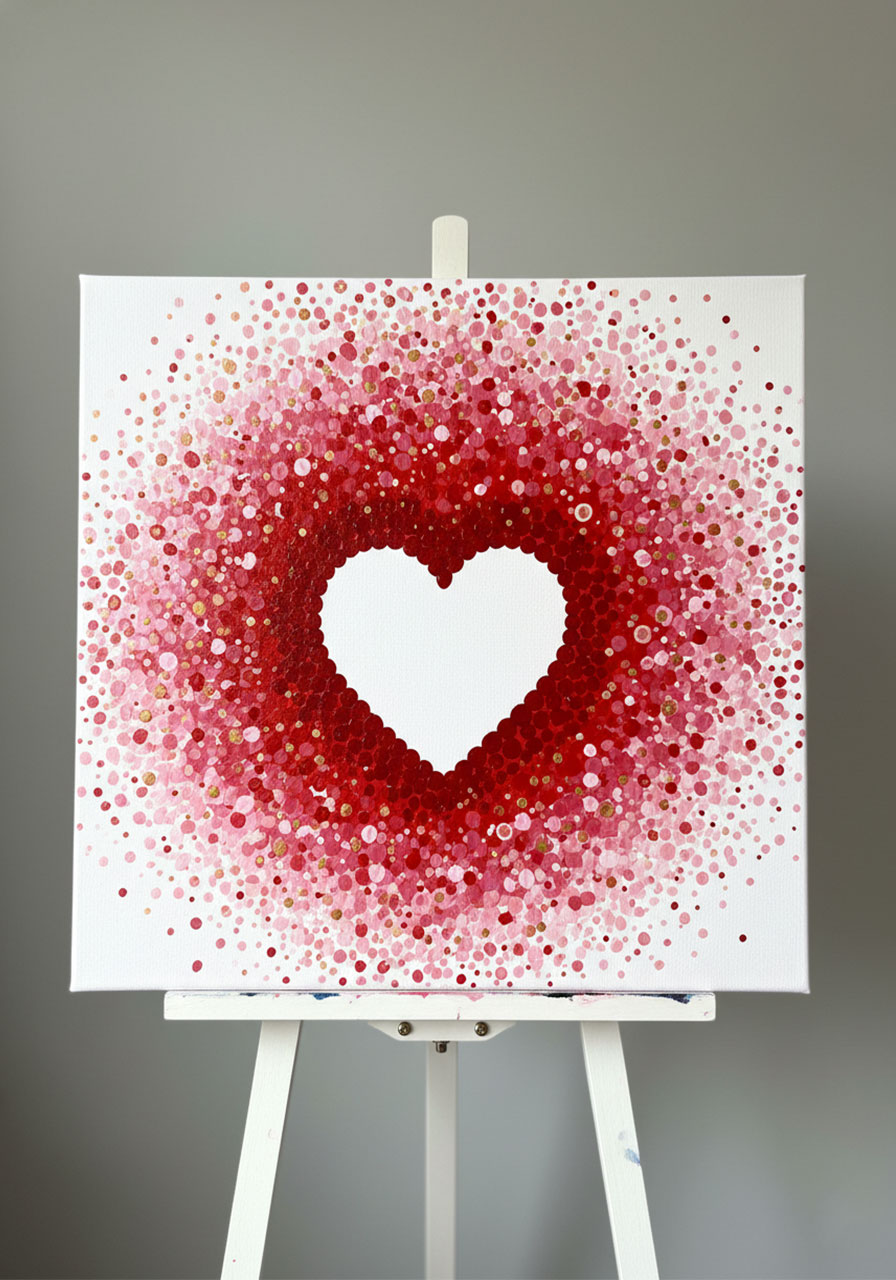
3. The Cotton Swab Starburst (Stunning Negative Space Design!)
This technique flips the script by painting around the heart instead of inside it, creating a gorgeous ombré starburst effect that looks professionally designed. Plus, you probably have everything you need in your bathroom right now!

Best for: Anyone who loves detailed, meditative art projects and stunning gradient effects
Time to Create: 20-30 minutes (plus drying time)
What You’ll Need:
- Canvas
- Acrylic paints in red, pink, white (and gold if you’re feeling fancy!)
- A handful of Q-tips or cotton swabs
- Your negative space heart stencil (the solid heart shape)
How to Create Your Masterpiece:
1. Apply your stencil. This time, use the solid heart cutout – you’re covering the heart and painting around it.
2. Start with the darkest color. Dip a cotton swab into bright red paint. Create a border of red dots all around the heart shape, staying about an inch away from the canvas edges. Concentrate more dots near the heart and fewer as you move outward.
3. Add your medium tone. Mix red and white to create a medium pink (or use store-bought pink). Using a fresh cotton swab, dot pink paint into and around the red dots, extending the border slightly outward. The dots should start to overlap with the red, creating a gradient effect.
4. Go lighter. Mix more white into your pink to create a very light pink shade. With another clean cotton swab, add these lighter dots around your medium pink, extending all the way to the edges of the canvas. Keep concentrating dots near the heart center with fewer dots as you reach the canvas edges – this creates that cool starburst effect!
5. Optional sparkle factor. Want to take it up a notch? Add some gold or metallic dots scattered throughout. Trust me, it’s gorgeous!
6. Reveal your heart. Once you’re satisfied with your dotted design, carefully peel away the contact paper heart. The crisp white heart against the colorful background is absolutely stunning!
Pro Tip: Use a fresh cotton swab for each color to keep your colors clean and vibrant. And don’t stress about making perfect dots – the organic, random placement is what makes it look so beautiful!
Why This One’s Amazing: The negative space technique creates such a striking, professional-looking design. It’s also surprisingly relaxing and meditative to make – perfect for unwinding after a long day.
Which Technique Will You Try First?
The best part about these three heart painting methods? There’s no wrong way to do them! Each technique delivers impressive results, and they’re all forgiving enough that even first-timers will feel like artistic rockstars.
Our recommendation? Try all three! Make it a creative afternoon or weekend project. They’re different enough that you won’t get bored, and you’ll end up with three unique pieces of heart art to display, gift, or keep as your new favorite décor.
These paintings make fantastic:
- Valentine’s Day crafts for kids’ classrooms or family activities
- Galentine’s Day party activities
- Mother’s Day or birthday gifts (homemade with love!)
- Colorful wall art for bedrooms, craft rooms, or offices
- Fun date night or girls’ night activities
Budget Breakdown: Each project costs about $5 or less if you shop at dollar stores, making them perfect for group activities, classroom projects, or when you want to get creative without breaking the bank.
So grab your canvases, raid your kitchen drawers for supplies, and get ready to create some h-art! (Yes, we went there.) Your inner artist is about to shine, and you might just surprise yourself with how talented you are with a credit card and some cling wrap.
More Kid’s Party Ideas to Keep the Fun Rolling:
How to Play Help Your Neighbor: The Card Game That’ll Have Your Family Actually Wanting Game Night
28 Super Fun Dollar Store Crafts for Kids That Won’t Break the Bank
25+ Hands-On Human Body STEM Activities Kids Will Love
The Soap and Pepper Experiment: A Mind-Blowing Way to Get Your Kids to Actually Use Soap
How to Make a DIY Kaleidoscope: A Mind-Blowing Science Craft for Kids
15 Minions Party Ideas For The Ultimate Despicable Me Birthday Bash
How to Make Magic Unpoppable Bubbles That’ll Blow Your Kids’ Minds
As an Amazon Associate, we may earn a commission from qualifying purchases at no additional cost to you.