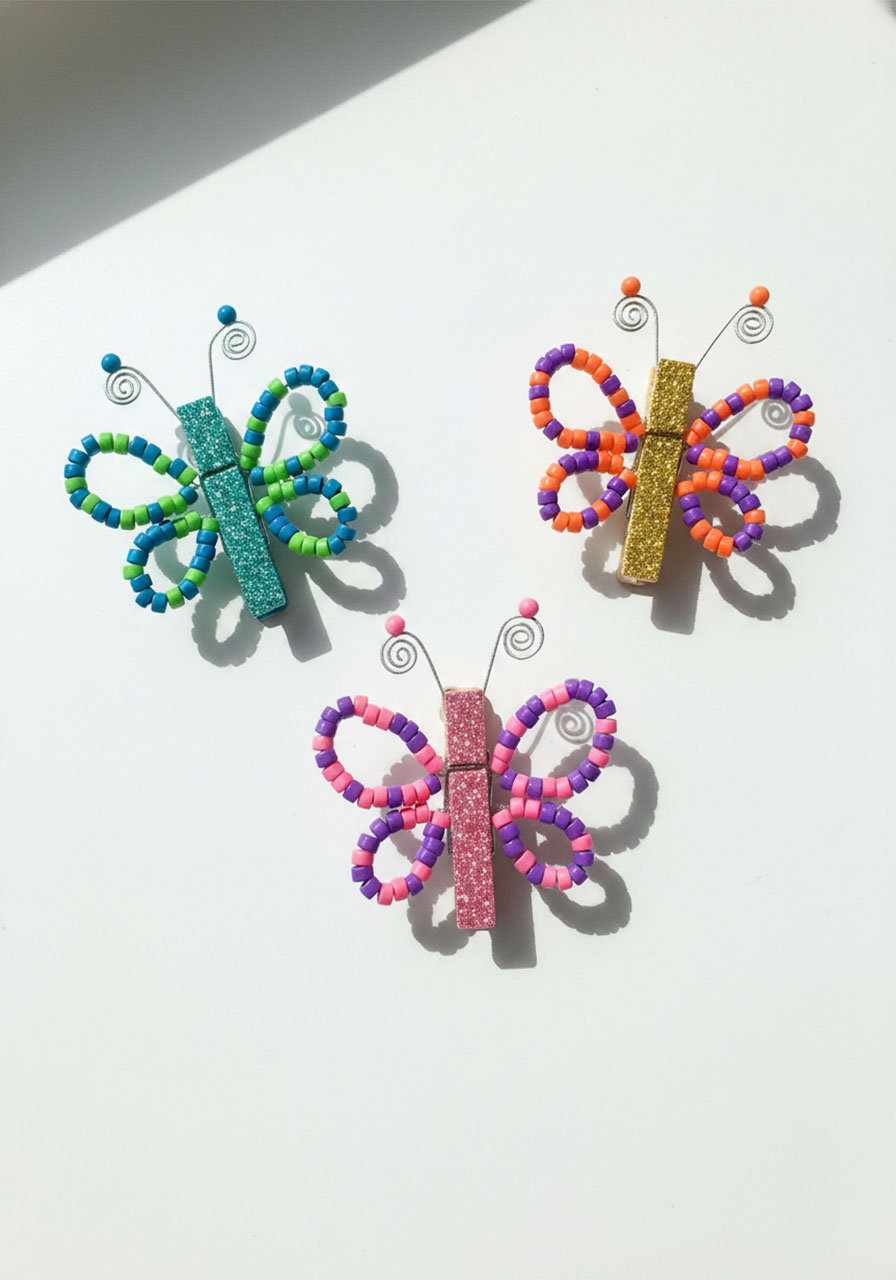
If you’re looking for a kids’ craft that’s sparkly, colorful, AND actually easy to pull off – you just found it.
These beaded pipe cleaner butterflies are absolutely gorgeous, and the best part? Kids can make them almost entirely on their own. Whether you’re a parent looking for a rainy-day activity or a teacher planning a spring craft station, this one is a total winner.
All you need are a few simple supplies – pipe cleaners, pony beads, and a clothespin – and you’re ready to create something that looks way more impressive than the effort it takes.
I’ve made these with kids as young as 5, and every single time they hold up their finished butterfly, their faces just light up. That never gets old!
Let’s dive in!
Why You’ll Love This Craft
This isn’t just a cute craft – it’s actually a fantastic learning activity in disguise.
Threading beads onto pipe cleaners is incredible for fine motor skill development. Kids are pinching, threading, and twisting – all movements that strengthen the small muscles in their hands and fingers.
Want to sneak in some math skills too? Have the kids count out exactly 40 beads before they start threading. Or challenge them to create a repeating color pattern. My daughter spent triple the normal time on this because she was so determined to make a perfect pattern – and I wasn’t about to stop her!
These butterflies also make wonderful spring or summer decorations, birthday party favors, or classroom display pieces. Once they’re done, kids love to play with them too – the clothespin body makes them really easy to hold and “fly” around the room.


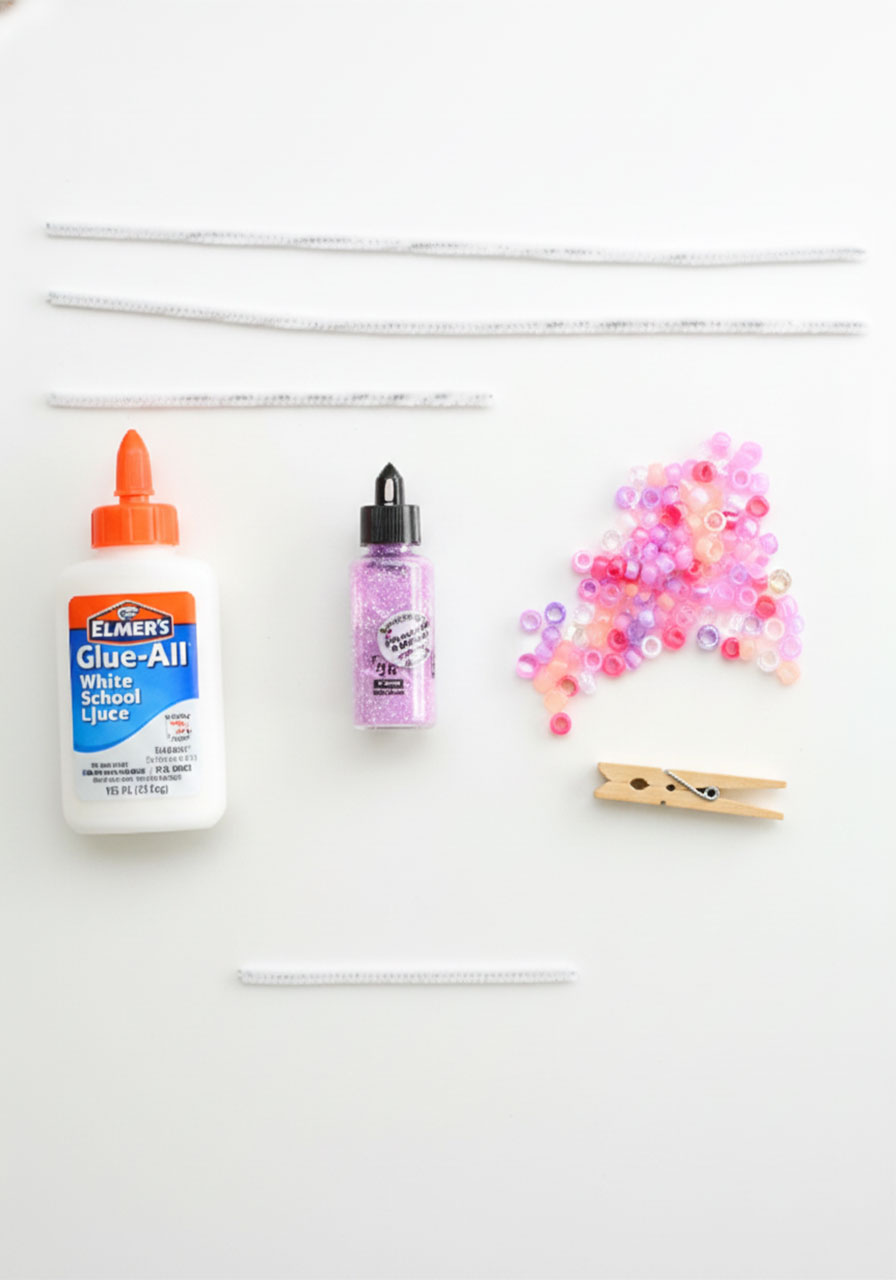
What You’ll Need
Here’s the great news: the supply list is short, simple, and very budget-friendly. You can find almost everything at a dollar store!
2 pipe cleaners, 12 inches long – these will become the wings
1 pipe cleaner, 6 inches long – this becomes the antennae (just cut a full-size one in half!)
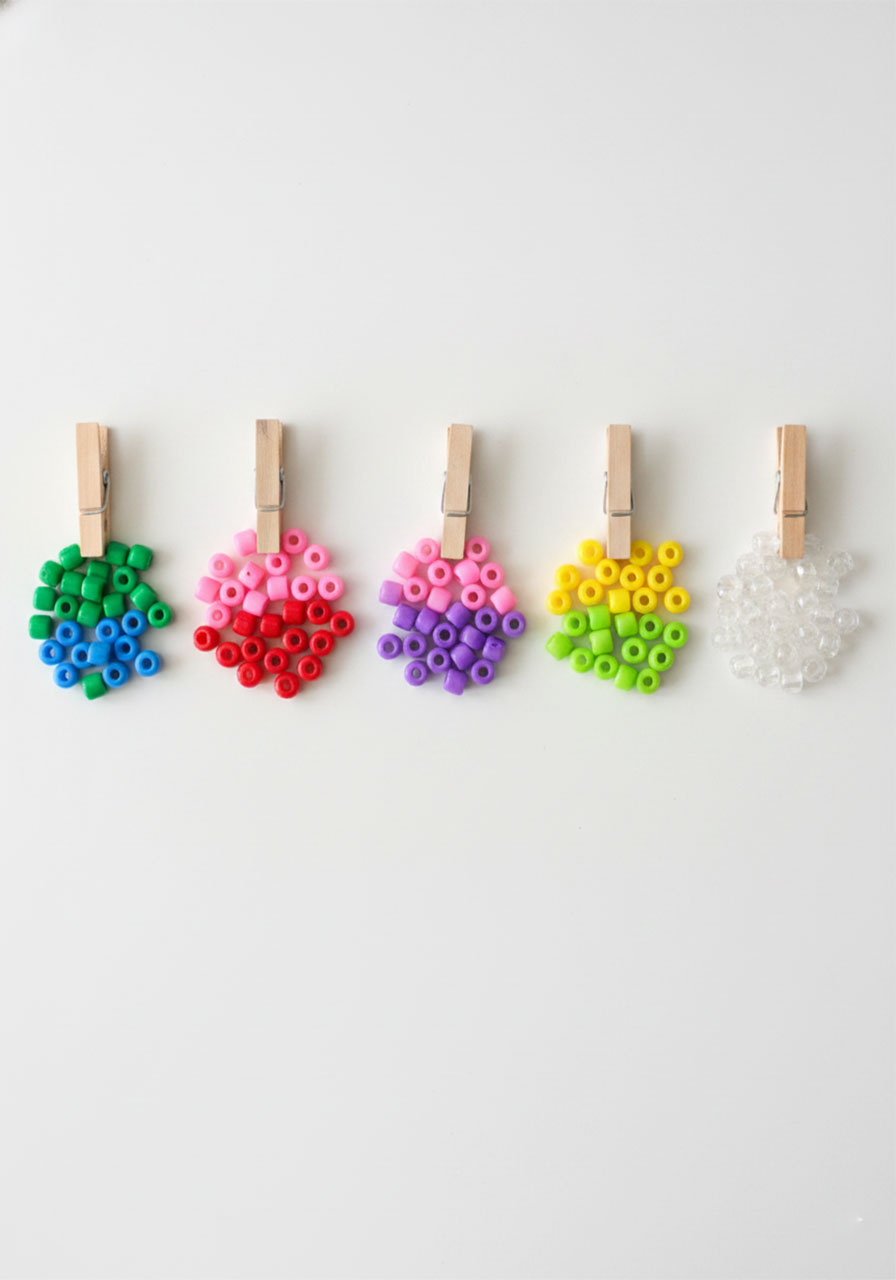
Plastic pony beads – about 80–90 total; mix colors from the same color family for a beautiful effect, or go rainbow!
1 wooden clothespin – the spring-loaded type works best
White glue (like Elmer’s Glue-All)
Glitter – totally optional, but absolutely worth it
Pro Tip: Do this craft on a sheet of construction paper or inside a cardboard box lid. It keeps glitter contained and cleanup is a breeze – just fold up the paper and toss it when you’re done!
Fun Color Combinations to Try
One of the most exciting parts of this craft is choosing your colors! Here are a few combos that always look stunning:
🌸 Pink + Purple + White – sweet and dreamy
💙 Blue + Green + Clear – cool and icy
🌈 Rainbow mix – bright and playful, perfect for younger kids
🌿 All one color – sophisticated and striking
✨ Clear/translucent beads – magical when they catch the light!
There’s really no wrong answer here. Let the kids pick their own combo – it makes the butterfly feel extra special and “theirs.”
How to Make Beaded Pipe Cleaner Butterflies – Step by Step
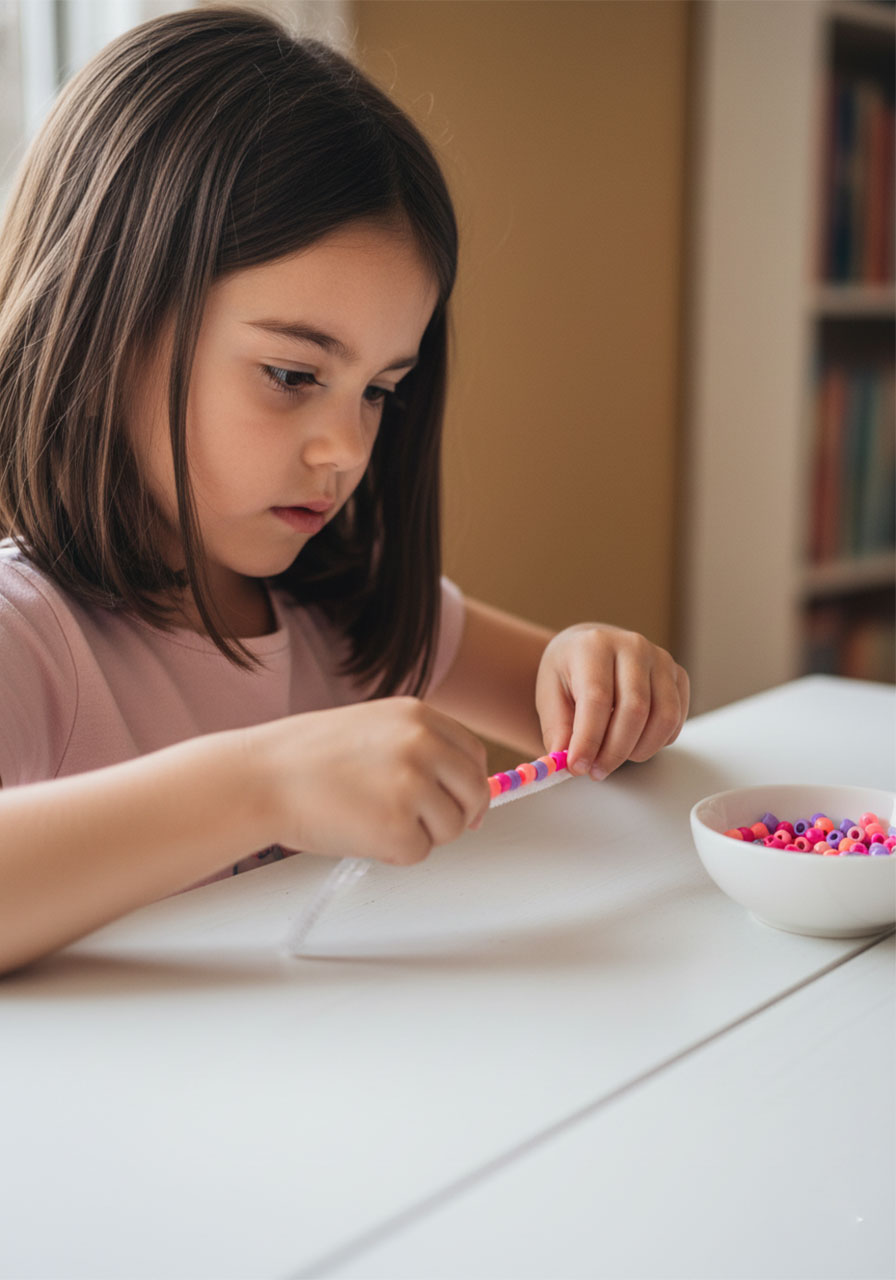
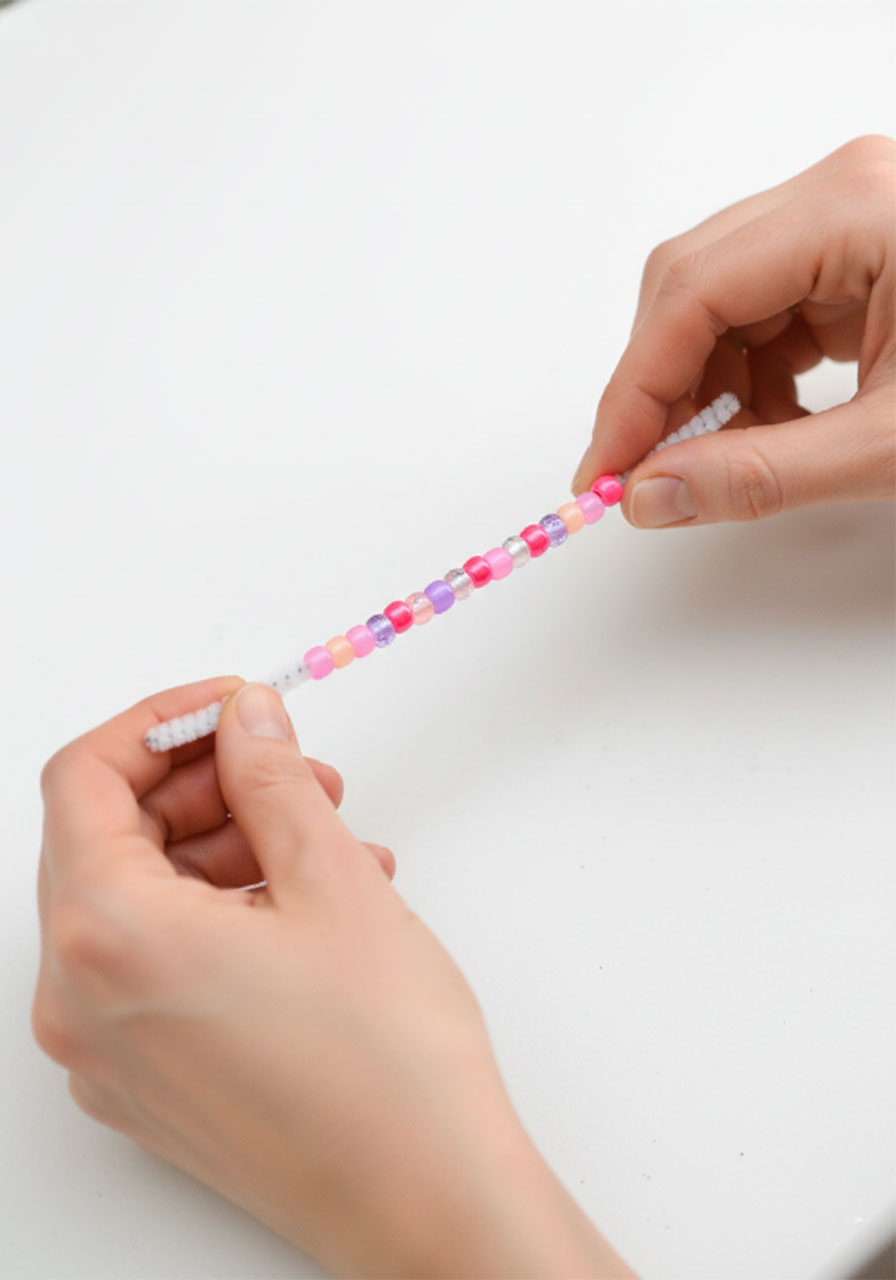
Step 1: Thread Your Beads onto the Pipe Cleaners
Take your two 12-inch pipe cleaners and start threading on the pony beads.
You want to add about 40 beads to each pipe cleaner, leaving roughly 1 inch of bare pipe cleaner on both ends. That bare section at each end is really important – you’ll need it to twist and secure the wings later.
Don’t skip that part! If you bead all the way to the ends, you won’t have enough wire to work with and the wings won’t hold their shape.
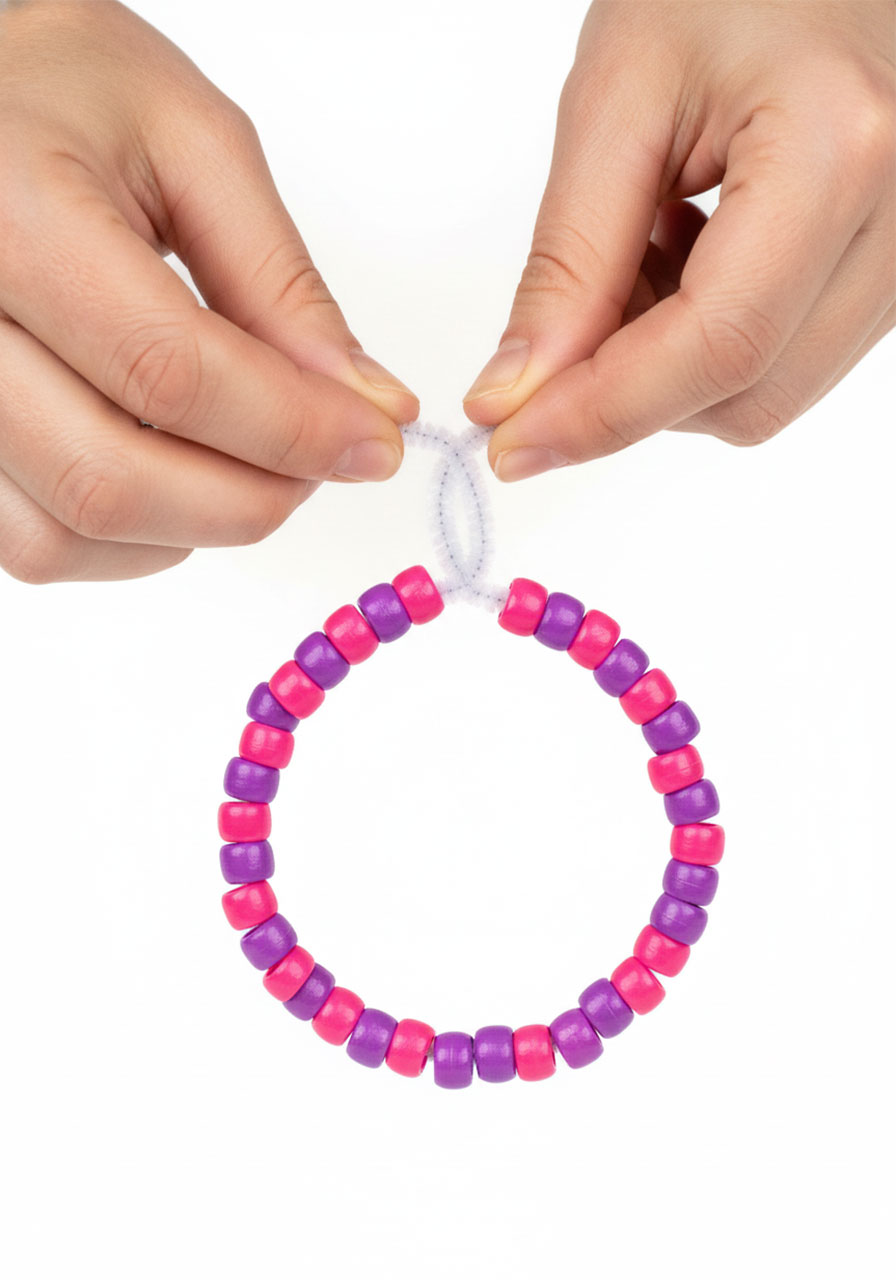
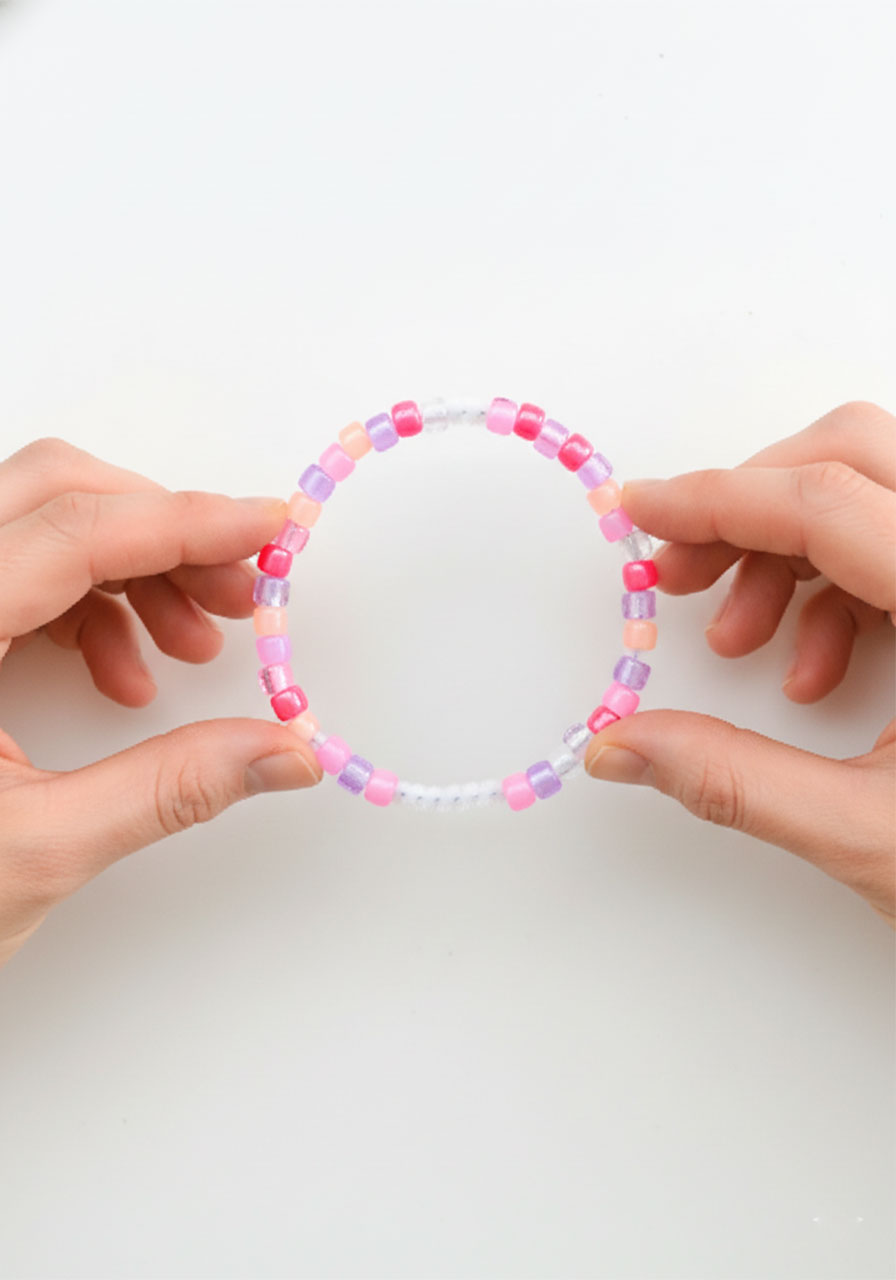
Step 2: Form Each Pipe Cleaner into a Circle
Take one of the beaded pipe cleaners and bring both ends together so it forms a circle.
Cross the two bare ends slightly and twist them together 2–3 times to lock the circle in place. Wrap any extra wire around the circle to tighten it up and make a neat join.
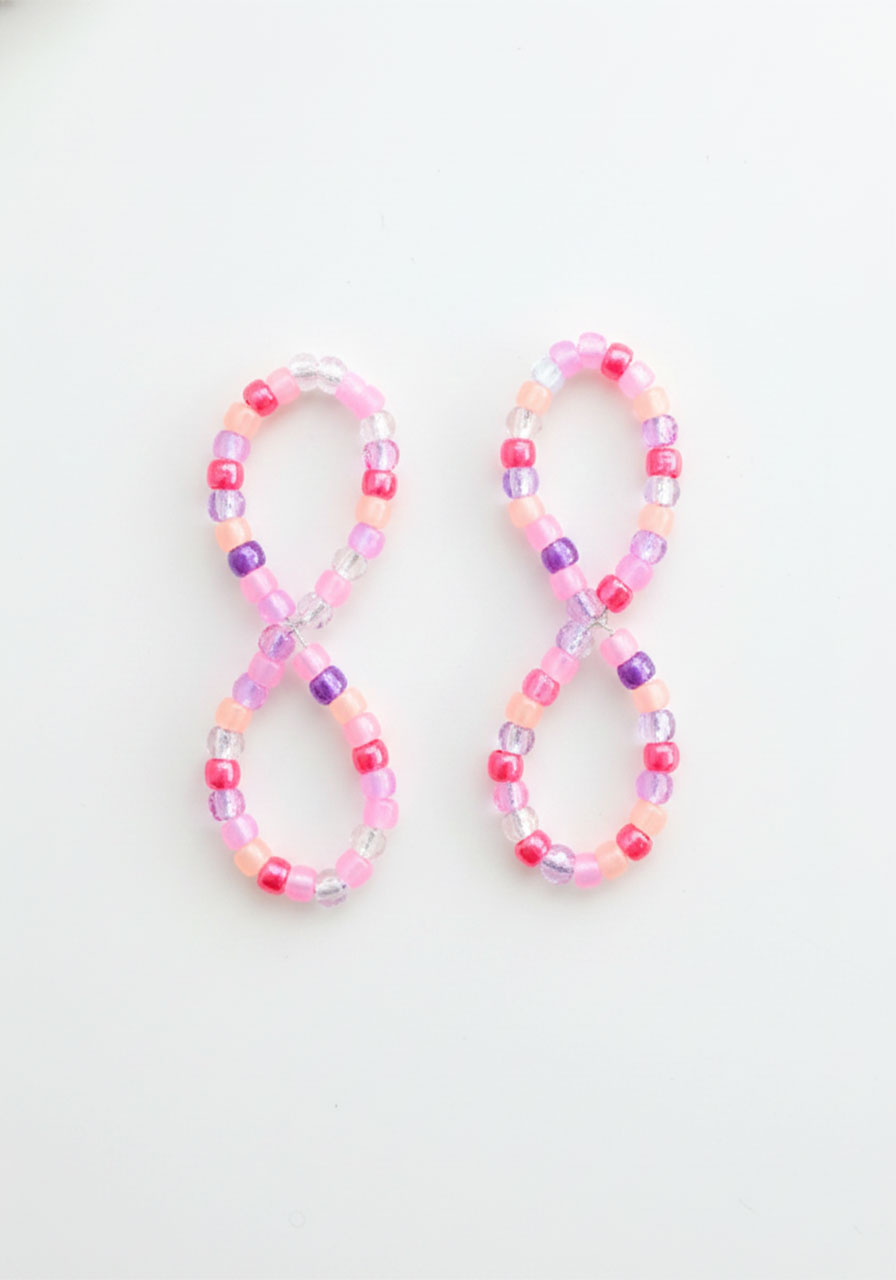
Step 3: Shape the Circle into Wings (the “Figure 8” Step!)
This is the magic step – get ready!
Look at your beaded circle and find the very top and very bottom. Gently spread the beads apart at those two points to reveal a small gap of bare wire (about ½ inch).
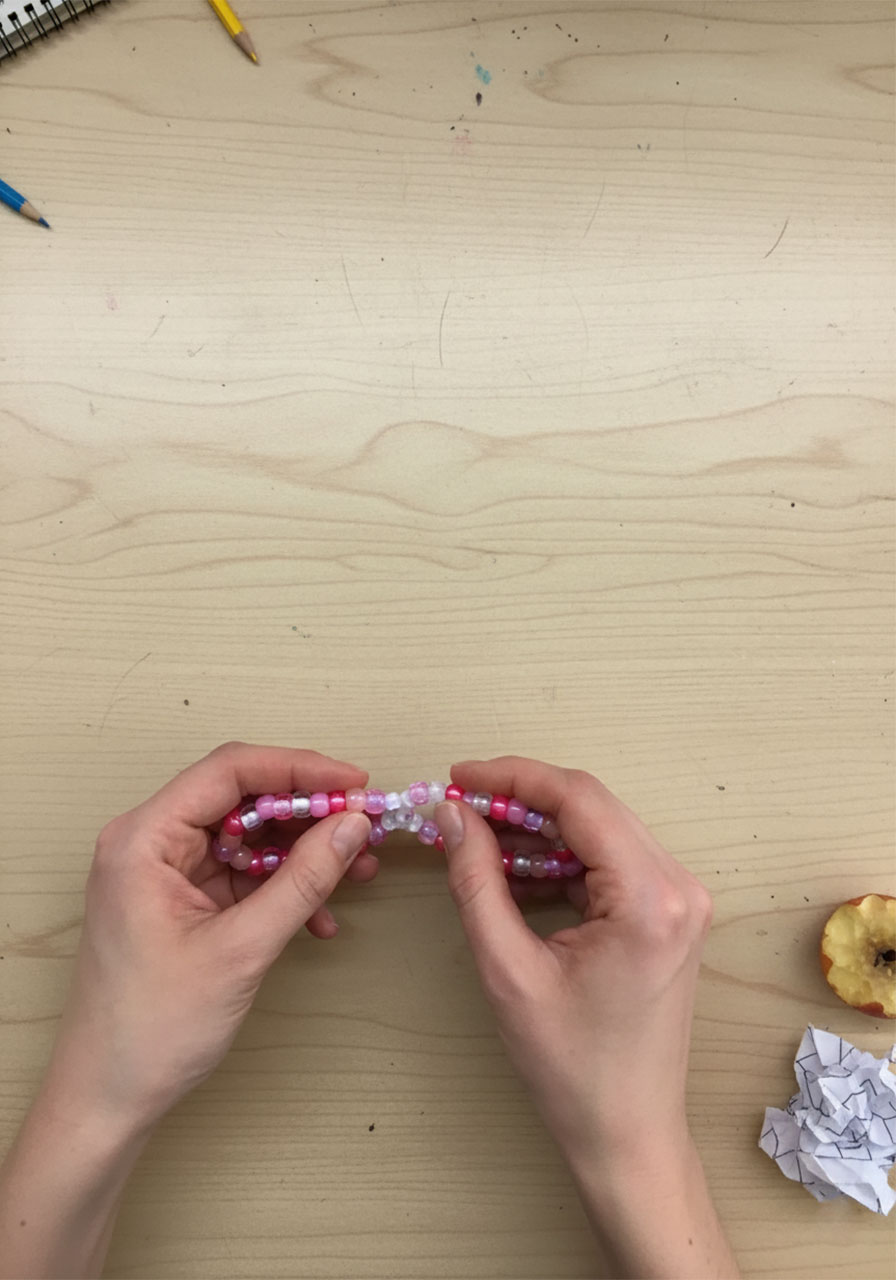
Now pinch those two points together – top and bottom – and twist them together 2–3 times. This pinches the circle into a beautiful figure-8 shape, which is exactly the shape of two butterfly wings!
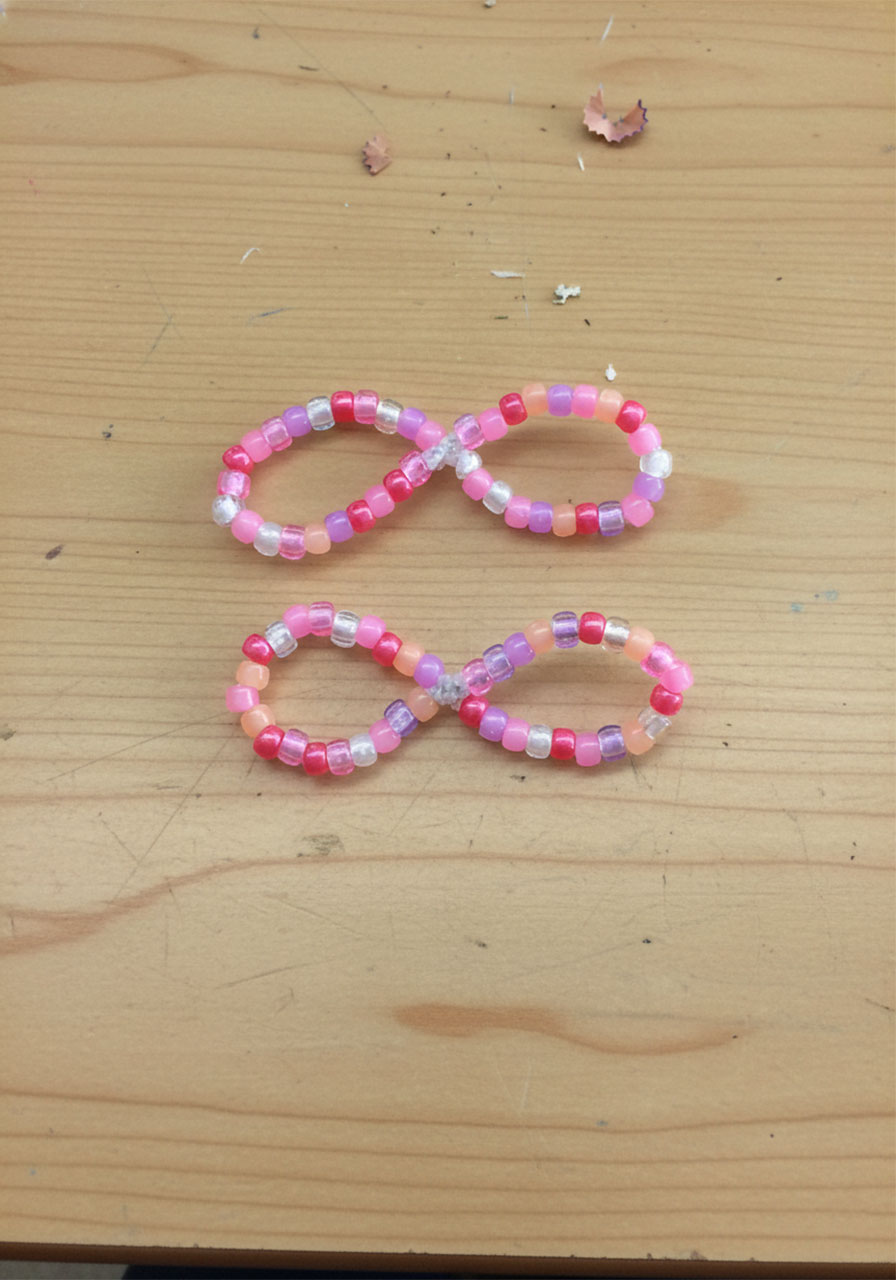
Step 4: Repeat to Make the Second Set of Wings
Do the exact same thing with your second 12-inch beaded pipe cleaner.
When you’re done, you’ll have two figure-8 wing pieces – one for the top wings and one for the bottom wings of your butterfly.
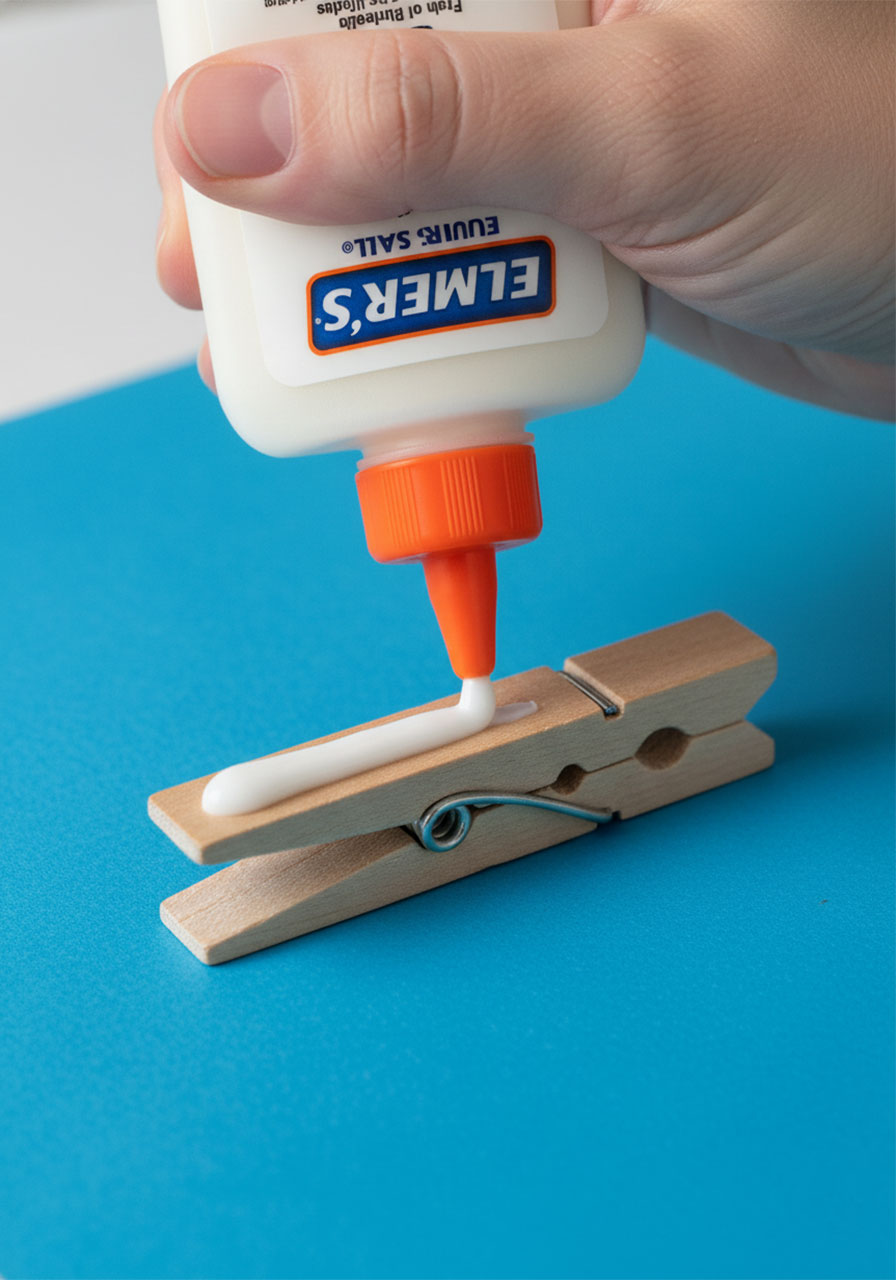
Step 5: Glitter the Clothespin (Optional but Magical!)
Okay, technically this step is optional. But honestly? The glitter is what takes these butterflies from “cute” to “WOW.”
Squeeze a generous line of white glue along the top flat surface of the clothespin. You can also add glue into the groove and over the little metal spring area – just try to keep it off the sides to avoid a big mess.
While the glue is still wet, generously sprinkle glitter all over the glued surface. Don’t be shy – pile it on!
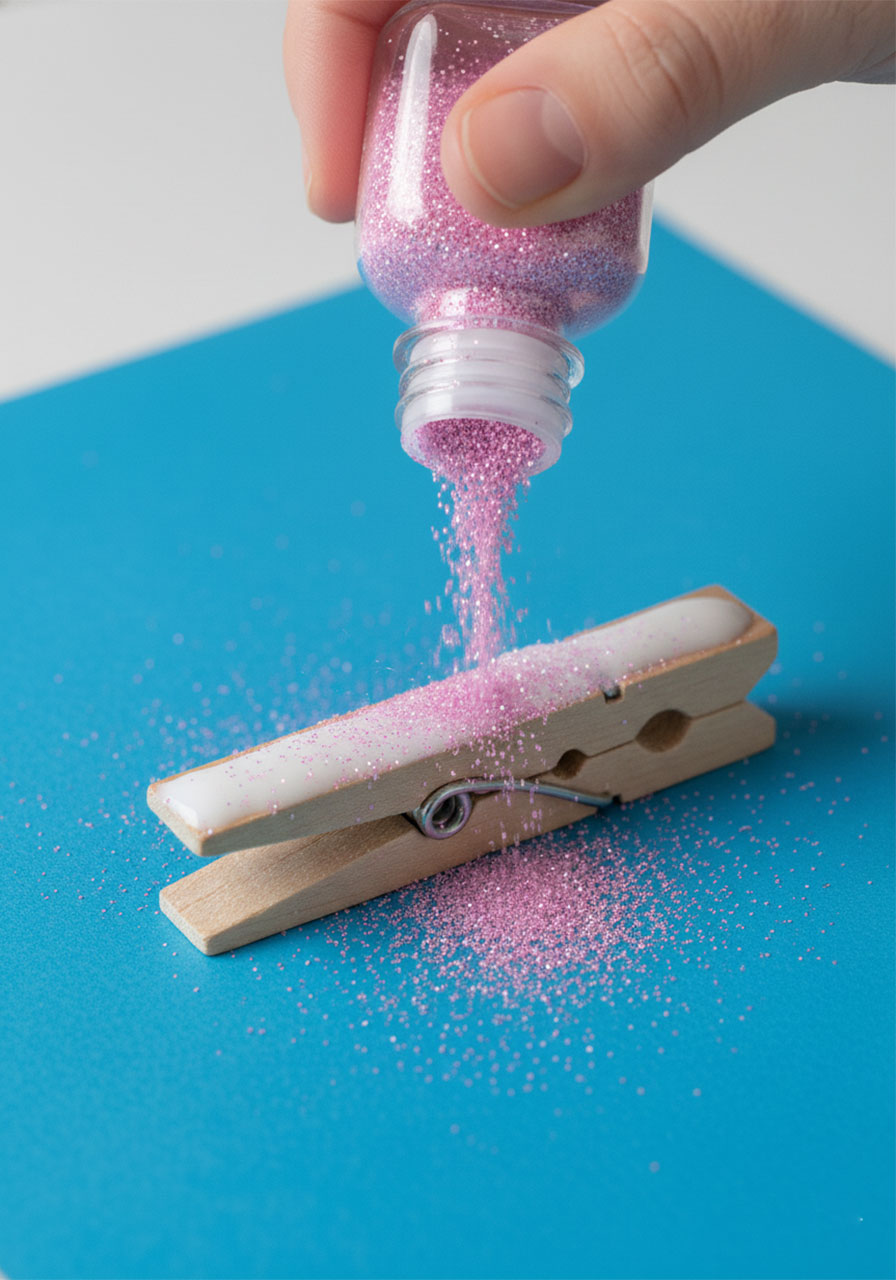
Then set it aside and let it dry completely. This usually takes about 2 hours. (Perfect time to do another craft or have a snack!)
Pro Tip: Let the clothespin dry overnight if you can. A fully dry, set glitter looks SO much more sparkly than a freshly glittered one!
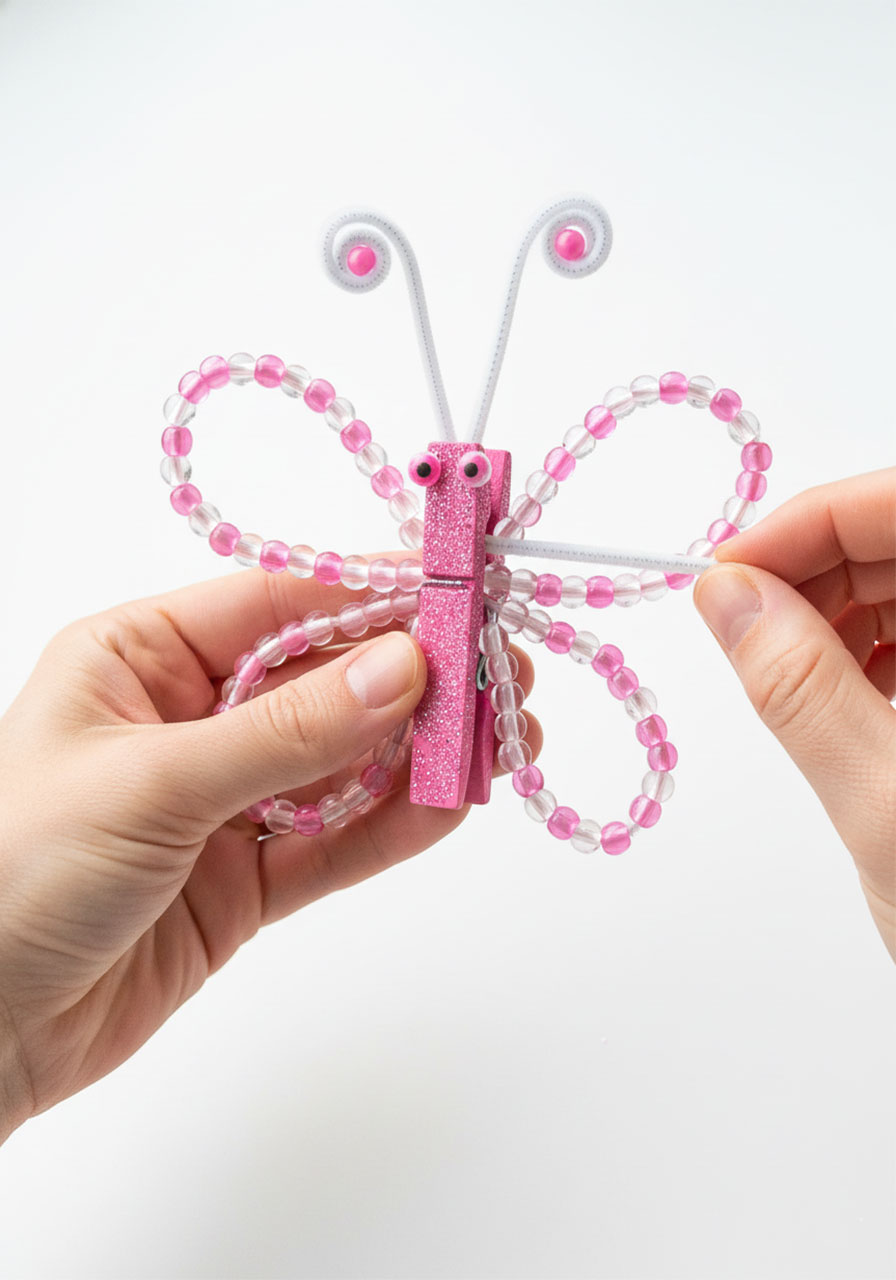
Step 6: Attach the Wings to the Clothespin
Once your clothespin is fully dry (no more tacky glue – pinch it to check!), it’s time to assemble.
Pinch the clothespin open and slide both figure-8 wing pieces in between the two wooden sides – one figure-8 for the top wings, one for the bottom wings. Adjust them so the wings fan out evenly on both sides.
The clothespin spring will grip the pipe cleaners firmly enough that you don’t need any glue. But if this butterfly is going to get a lot of playtime, add a tiny dab of hot glue inside the clothespin for extra security.
Now gently reshape the wings into a natural butterfly shape – upper wings slightly rounded at the top, lower wings a bit rounder and fuller at the bottom.

Step 7: Make the Antennae
Time to give your butterfly some personality!
Take your 6-inch pipe cleaner and fold it in half so you have two equal 3-inch sides.
On one end, thread on a single pony bead and then curl the very tip into a small spiral – like a tiny snail shell. This is the little bead at the top of each antenna. Repeat on the other end of the pipe cleaner.
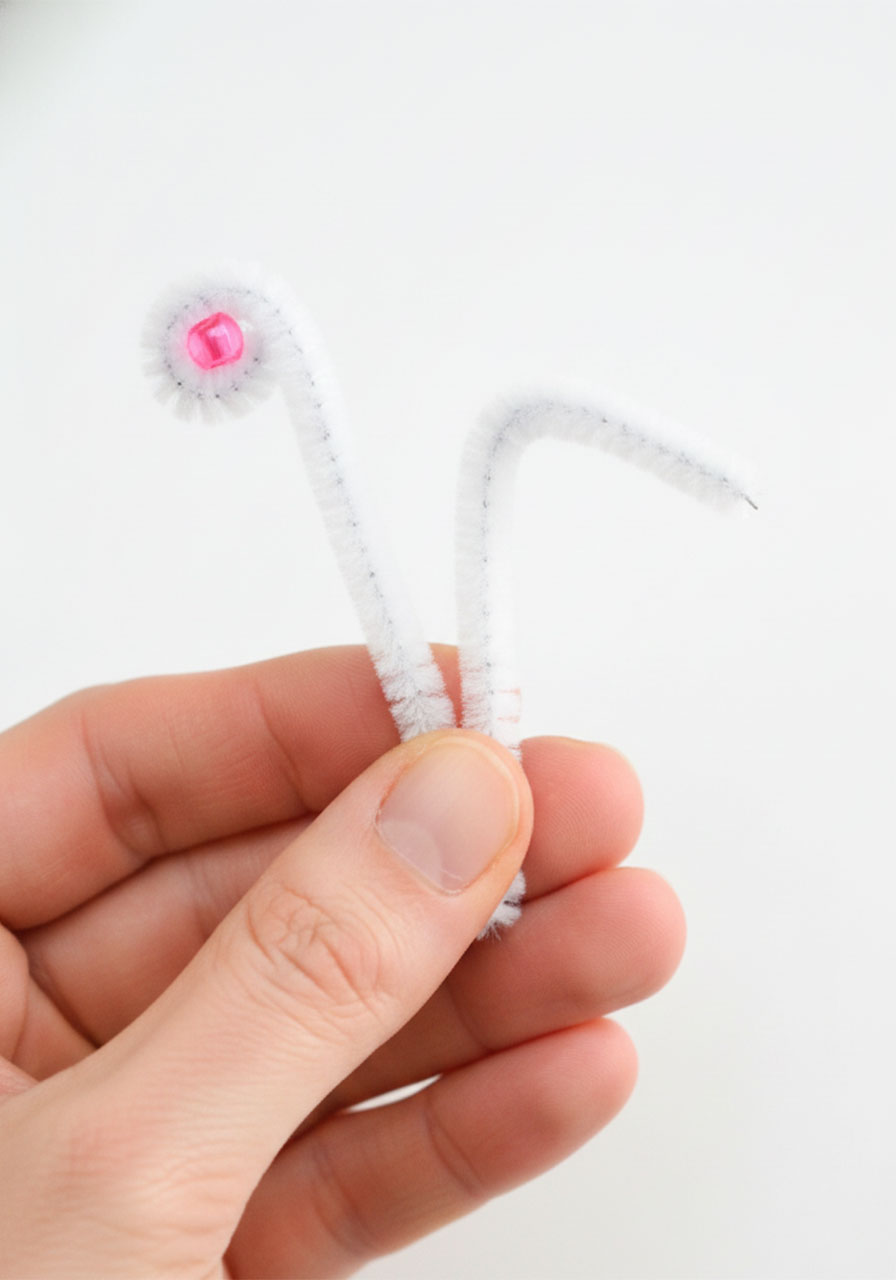
Now slide the folded center of the antenna pipe cleaner into the back end of the clothespin (the open end, opposite the pinching end). The clothespin will grip it in place.
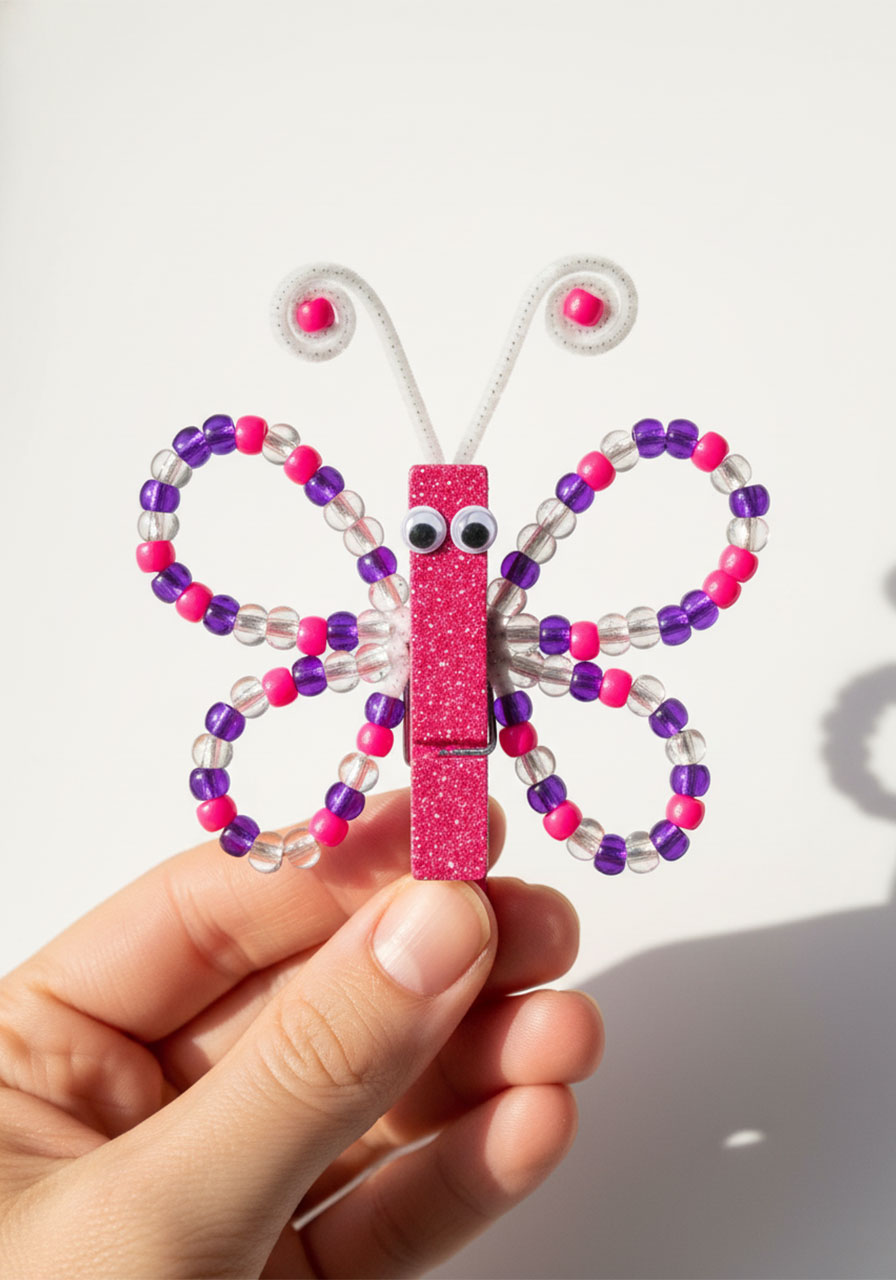
Your Beaded Pipe Cleaner Butterfly Is Ready to Fly!
And just like that – you’ve made something absolutely beautiful.
Hold it up to the light and watch how the beads shimmer and sparkle. It’s genuinely stunning, and kids are always so proud of what they’ve made.
Tips for Making This Craft Even Better
After making these butterflies with lots of kids (and adults who got just as excited!), here are the insider tips that make a real difference:
Don’t rush the glitter step. Letting the glue fully dry makes the glitter WAY more sparkly and prevents it from flaking off during play.
Use a bead tray or muffin tin to sort colors before starting. This makes it much easier for kids to grab and thread without knocking everything over.
Bigger beads = easier for little hands. Standard plastic pony beads are the perfect size. Avoid anything smaller for kids under 6.
One color family looks more polished than totally random colors – try sticking to pinks and purples, or blues and greens, for a beautiful result.
For extra durability, a small dab of hot glue (adult-only step!) at the end of the clothespin keeps the wings and antennae from wiggling loose over time.
Make a bunch at once! Once you have the beads sorted, assembly goes really fast. These make adorable party favors or gift toppers.
Fun Variations to Try
Once you’ve got the basic butterfly down, it’s time to get creative! Here are some fun ways to mix things up:
Monochrome Butterflies: Use all beads in one single color for a super elegant, sophisticated look. An all-white or all-clear butterfly looks like it’s made of ice!
Pattern Butterflies: Challenge older kids (or perfectionists like my daughter!) to add beads in a specific repeating pattern – like pink, purple, white, pink, purple, white. It’s great pattern recognition practice, and the result is stunning.
Mini Butterflies: Use 6-inch pipe cleaners for the wings with fewer beads to create tiny, delicate butterflies. These look adorable clustered together as a decoration.
No-Glitter Version: Skip the glitter clothespin and try painting it with acrylic paint in a solid color instead. Metallic paints look especially amazing.
Butterfly Mobile: Make 5–6 butterflies and hang them with fishing line from a wooden dowel for a gorgeous spring mobile. Perfect for a nursery or classroom!
Great for Classrooms and Parties Too!
If you’re a teacher, this craft is a dream for a spring unit. It ties in fine motor skills, pattern recognition, counting, and color sorting – all disguised as something just plain fun.
For birthday parties, these make the most adorable take-home favors. Set up a craft station with sorted bead colors and let each child make their own butterfly to take home. It’s a hands-on activity AND a party favor all in one – parents will love that!
You can also theme the colors to the party: pink and gold for a princess party, blue and silver for a frozen theme, or rainbow for a general celebration. The possibilities are endless.
Frequently Asked Questions
What age is this craft suitable for?
This craft works great for kids ages 5 and up. Younger kids (ages 3–4) can thread the beads with help from an adult, but twisting the pipe cleaners into wings is best handled by a grown-up for that age group. Kids 7 and older can usually do the whole thing independently!
How long does it take to make one butterfly?
Once you’ve got your beads sorted and ready, the actual assembly takes about 20–30 minutes. If you’re doing the glitter step, add a couple of hours of drying time – but that’s just waiting, not working!
Can I skip the clothespin and use something else for the body?
The clothespin is really perfect for this because it clips the wings in place without needing glue. You could technically use a thick piece of cardboard tube or a craft stick, but you’d need to glue the wings on – which adds complication. Stick with the clothespin; it works like a charm!
What kind of beads work best?
Standard plastic pony beads are ideal – they’re the right size, easy to thread, and come in tons of gorgeous colors. Translucent or pearlescent beads look especially beautiful because they catch the light. Avoid tiny seed beads for this project; they’re way too small and fiddly for little fingers.
Will the glitter make a huge mess?
Work on a sheet of paper or inside a cardboard box lid, and you’ll contain about 95% of the glitter. When you’re done, just fold up the paper and tip any loose glitter back into the bottle. Easy cleanup, promise!
Ready to Make Your Butterfly?
There you have it – everything you need to make the most gorgeous, sparkly, beaded pipe cleaner butterfly with your kids.
It’s one of those crafts that looks truly impressive but is absolutely achievable, even with young helpers. Whether you’re making one on a quiet afternoon or twenty for a classroom craft day, I promise this project delivers.
The looks on kids’ faces when they hold up their finished butterfly? That’s the best part. Every single time.
Happy crafting! 🦋
More Summer Craft & Activity Ideas to Keep the Fun Rolling:
How to Make Moon Sand With Only 2 Ingredients (Kids Go Absolutely Wild for This!)
Easy Jellyfish Suncatcher Craft for Kids (That Looks Stunning in a Window!)
Paper Loop Pufferfish Craft: The Cutest 3D Summer Activity for Kids
Egg Carton Ladybug Craft Ideas Kids (and Teachers!) Will Absolutely Love
Pool Noodle Boats: The Easiest DIY Water Toy Kids Will Absolutely Love