Dad deserves more than a generic card off the shelf. This Father’s Day, give him something that literally jumps out and says, “You are the best” – because that’s exactly what this pop-up card does.
This handmade 3D pop-up card is one of those rare crafts that looks like it took hours of skill but actually comes together in a single afternoon. Kids can make it. Adults will love making it. And Dad? He’s going to keep it on his desk for years.
Let’s get into exactly how to make it – step by step, no guesswork, no craft-store overwhelm.

Why This Card Is Worth Making
Store-bought cards are fine. Handmade cards are remembered.
There’s something about a card your kid actually sat down and made – cut, folded, colored, and glued – that hits differently. It’s a keepsake. Something Dad might tuck away in a drawer and rediscover years later when the kids are grown.
The 3D pop-up mechanism sounds fancy, but it’s really just a few clever scissor cuts. Once you see how it works, you’ll want to use the technique for every card you make from here on out.
This project is also a beautiful way to slow down and be intentional. In a world of two-day shipping and digital everything, a handmade card is a love language all its own.

What You’ll Need
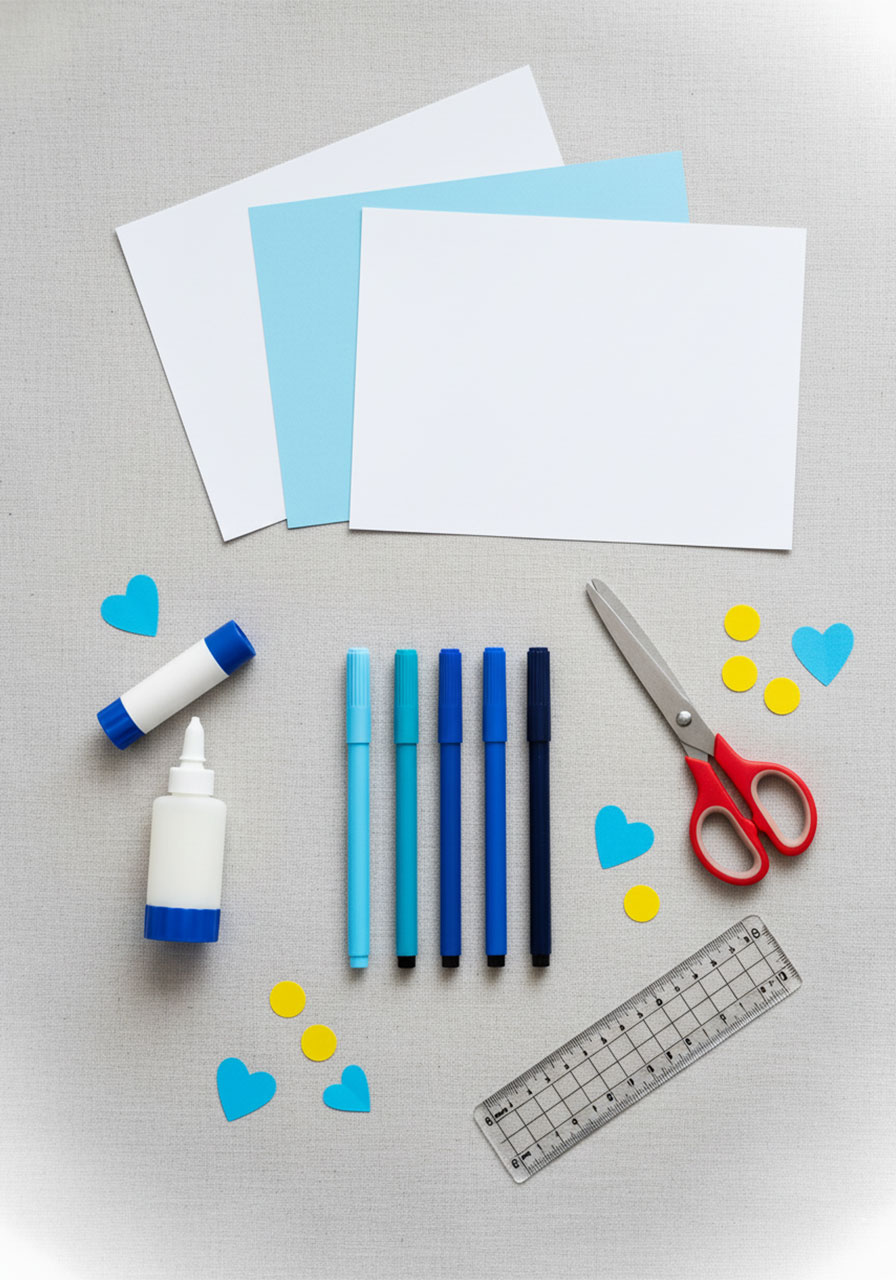
2 sheets of white cardstock – one for the inner card base, one for cutting decorations
1 sheet of blue cardstock (or Dad’s favorite color) – for the outer cover
Blue markers in at least 2 shades – light blue for filling, dark blue for outlining
Scissors
Glue stick or craft glue
Optional: a ruler – makes your folds crisp and your cuts cleaner
That’s genuinely it. No fancy Cricut machine, no specialty supplies. Just the basics, and a little bit of heart.
Step 1: Make the Pop-Up Mechanism
This is the magic behind the whole card, and it’s easier than it looks.
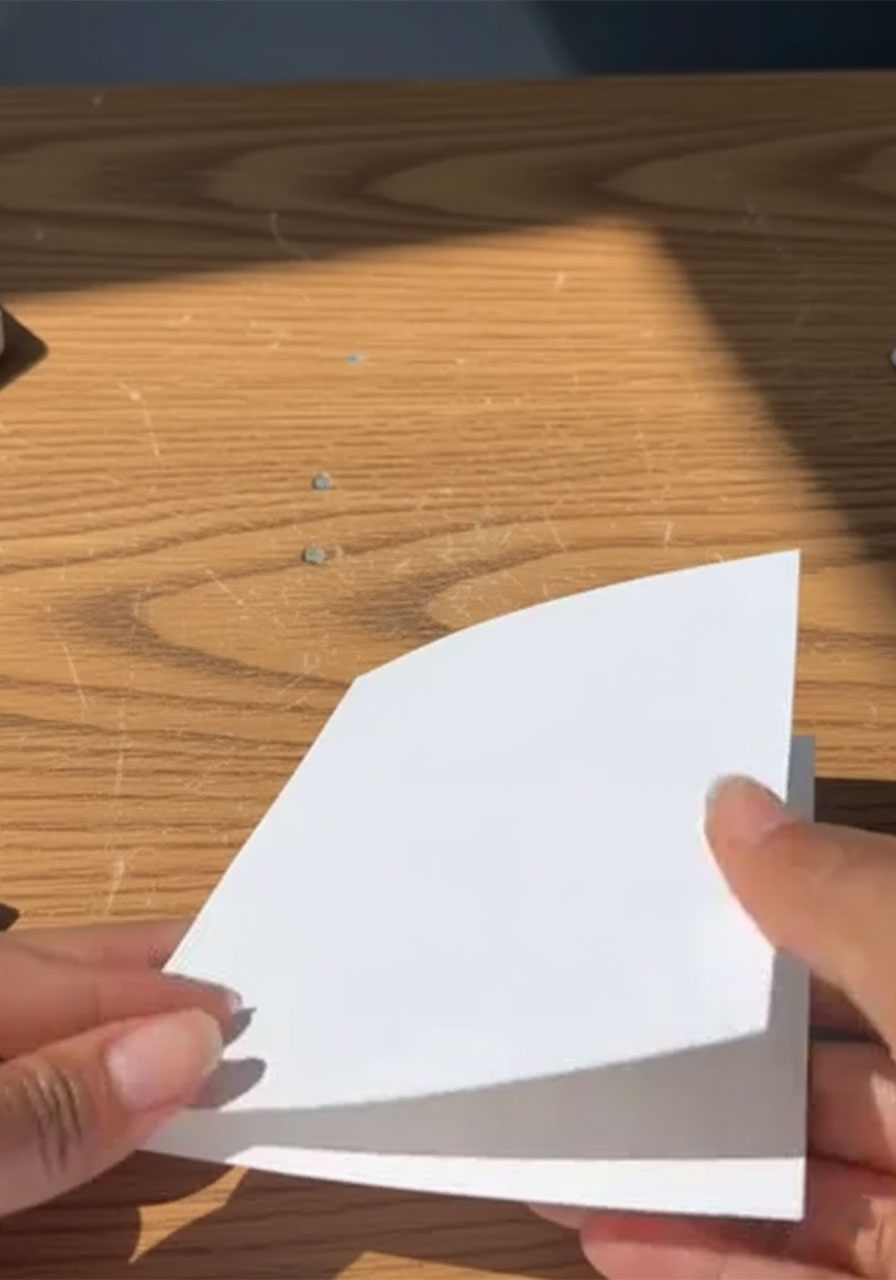
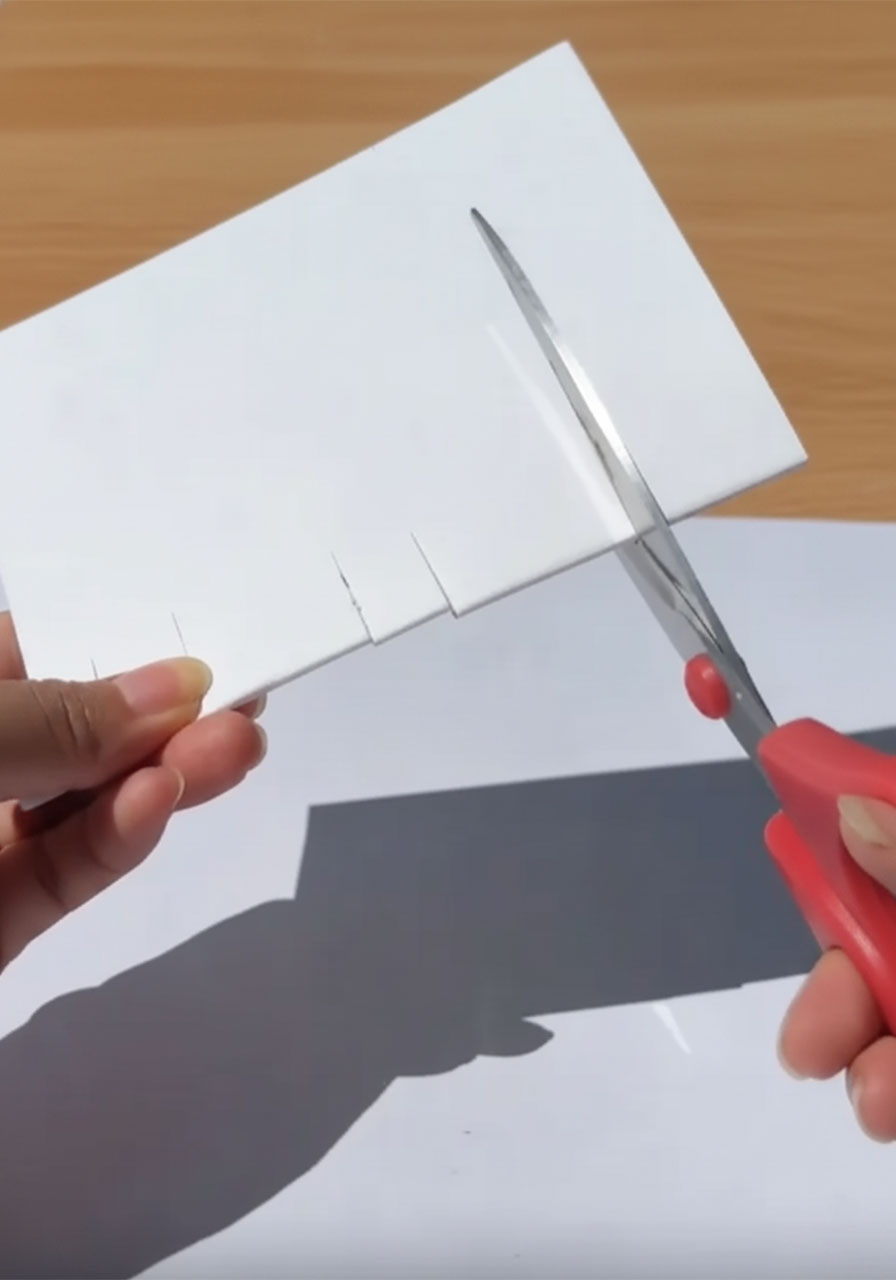
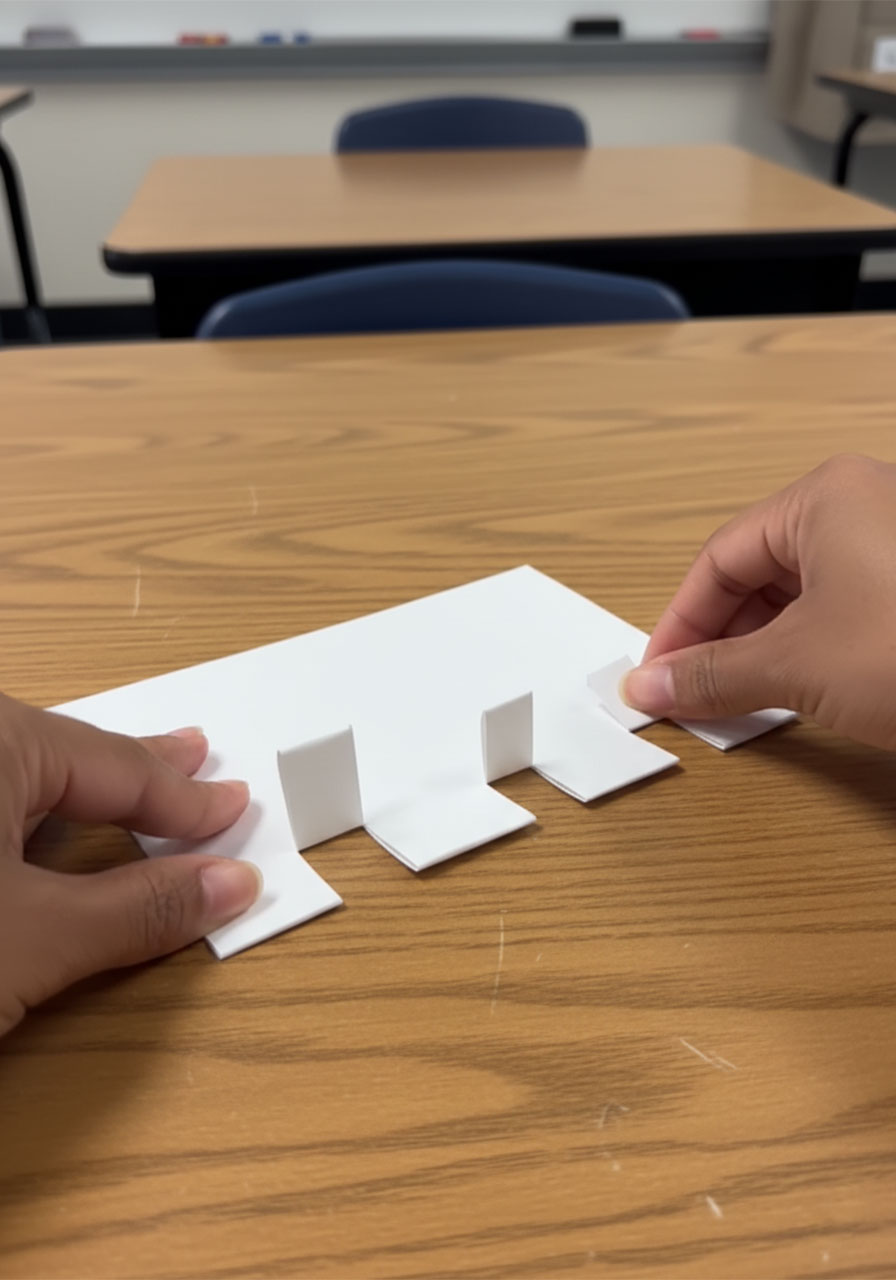
Take one sheet of white cardstock and fold it in half horizontally. This folded piece becomes your card base – the inside of the finished card.
Now, along the folded edge (the bottom of the fold), use your scissors to cut three sets of parallel slits:
1. One set of two cuts in the very center of the folded edge
2. One set of two cuts slightly to the left of center
3. One set of two cuts slightly to the right of center
Each pair of cuts should go about 1 to 2 inches deep into the paper. The two cuts in each set should be about half an inch apart from each other, creating a little rectangular tab between them.
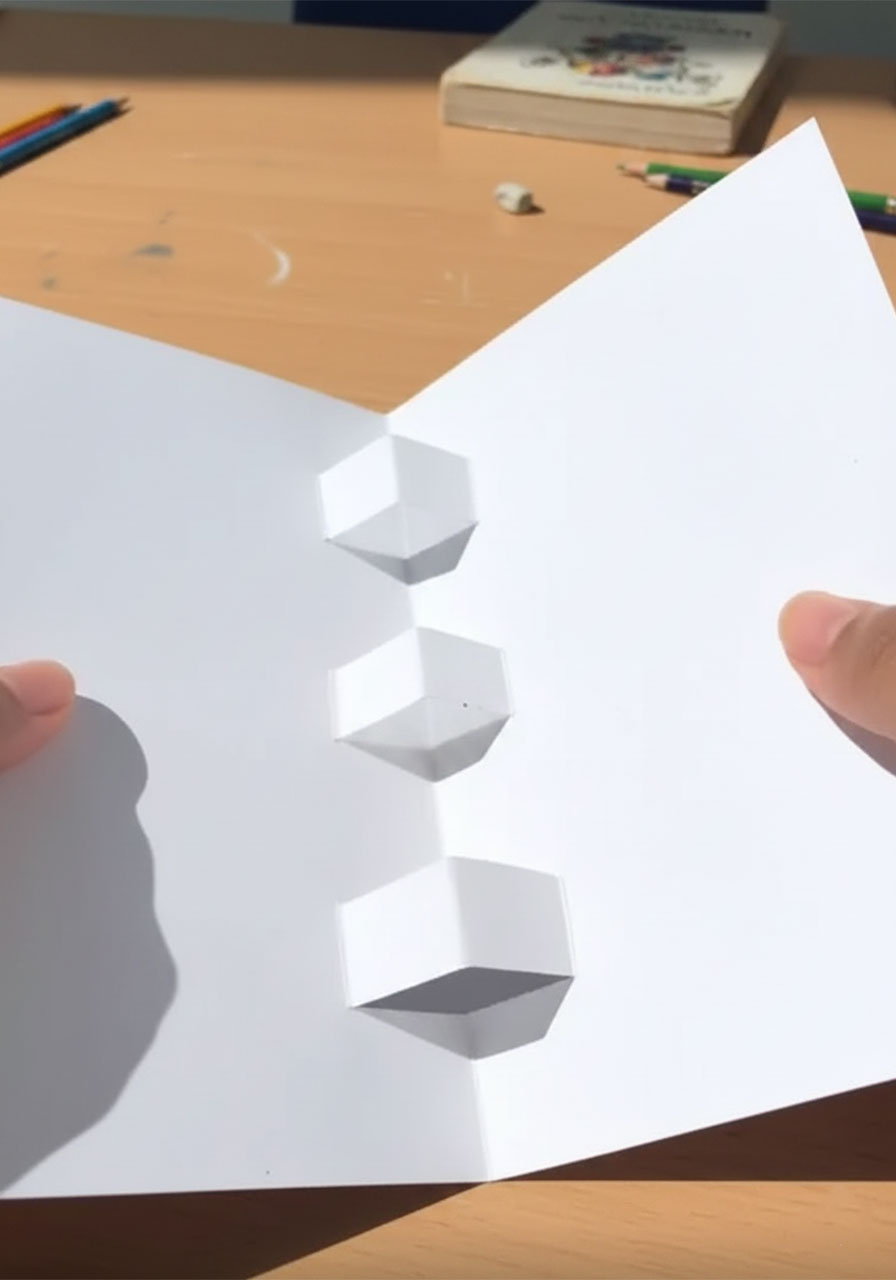
Once your cuts are done, open the card flat. Gently push each tab inward – away from you – so it folds toward the inside of the card. Run your fingernail along the new fold to crease it sharply.
Now fold the card closed again, and slowly reopen it. Watch what happens: those little tabs pop forward, creating three small 3D “shelves” that stand up inside the card.
That right there is your pop-up mechanism. Everything else builds on top of it.
Pro Tip: The cleaner and more even your cuts, the crisper your pop-up will look. If you have a ruler, use it to draw your cut lines in pencil before cutting.
Step 2: Draw and Cut Out the “DAD” Letters
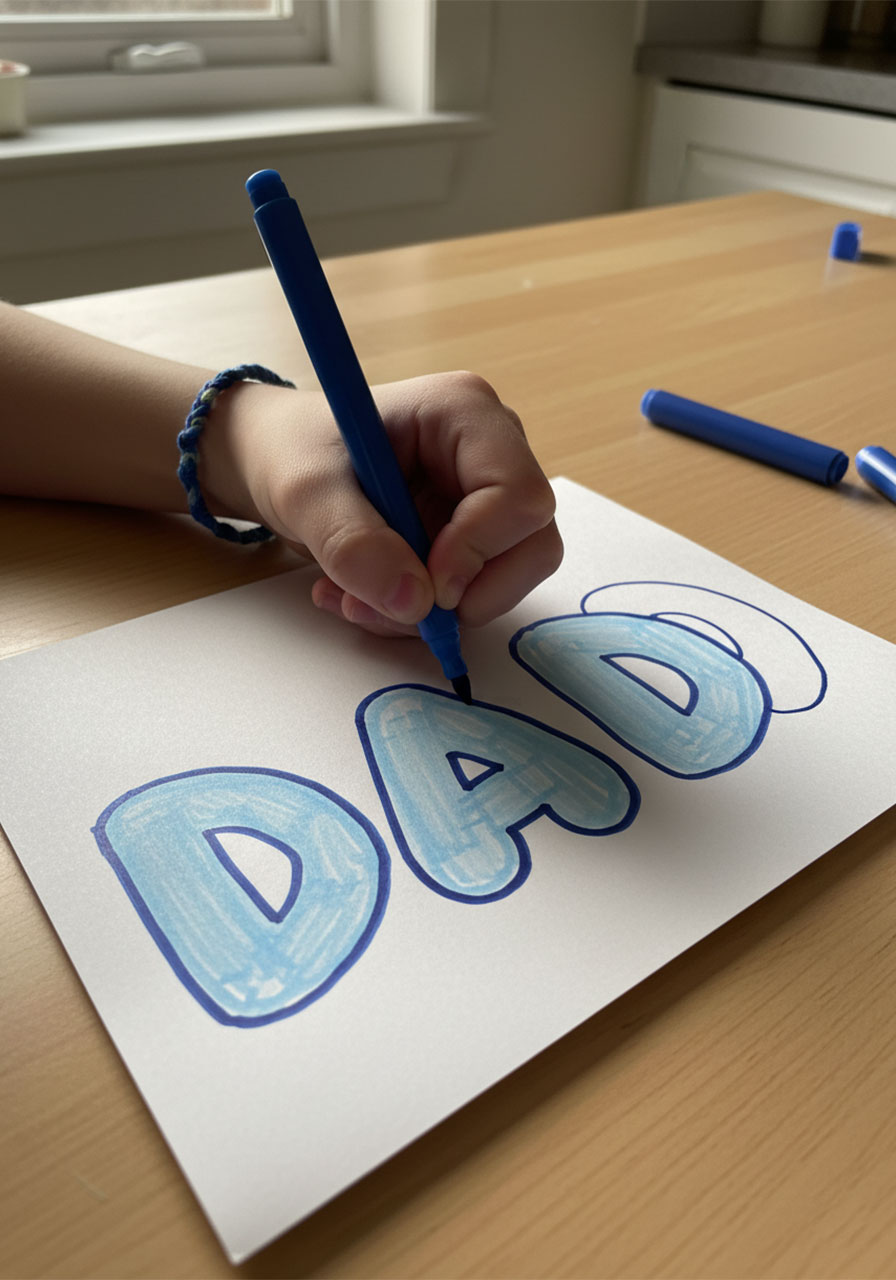
On your second sheet of white cardstock, use your blue markers to draw the word “DAD” in big, thick bubble letters.
Make them chunky. Make them bold. The bigger and more playful the letters, the more impressive the final card looks.
Here’s the trick for that cool 3D effect you can see in the photos:
- Fill the inside of each letter with a lighter shade of blue
- Outline each letter with a darker shade of blue
- Add a thin white highlight stroke inside the dark outline for a little extra dimension
Once you’re happy with how they look, carefully cut out the letters. You can cut them out as one connected piece or as three separate letters – either way works beautifully.
Set your “DAD” cutout aside for now. You’ll glue it on in the final assembly step.
Step 3: Make the Accent Decorations
This is where you can really make the card your own. The decorations around the “DAD” centerpiece are what turn a simple pop-up card into something that looks genuinely crafted with love.
Here’s what to draw and cut out:
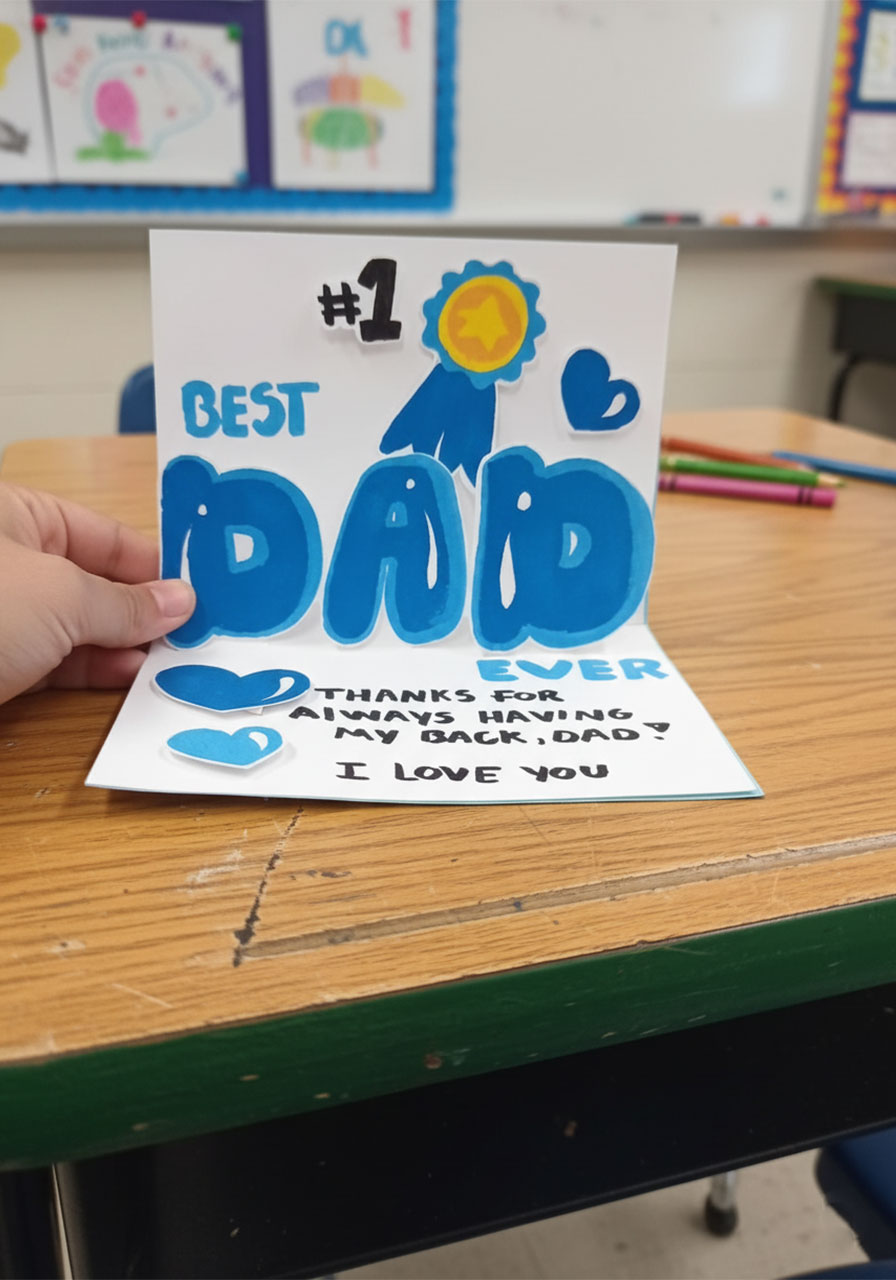
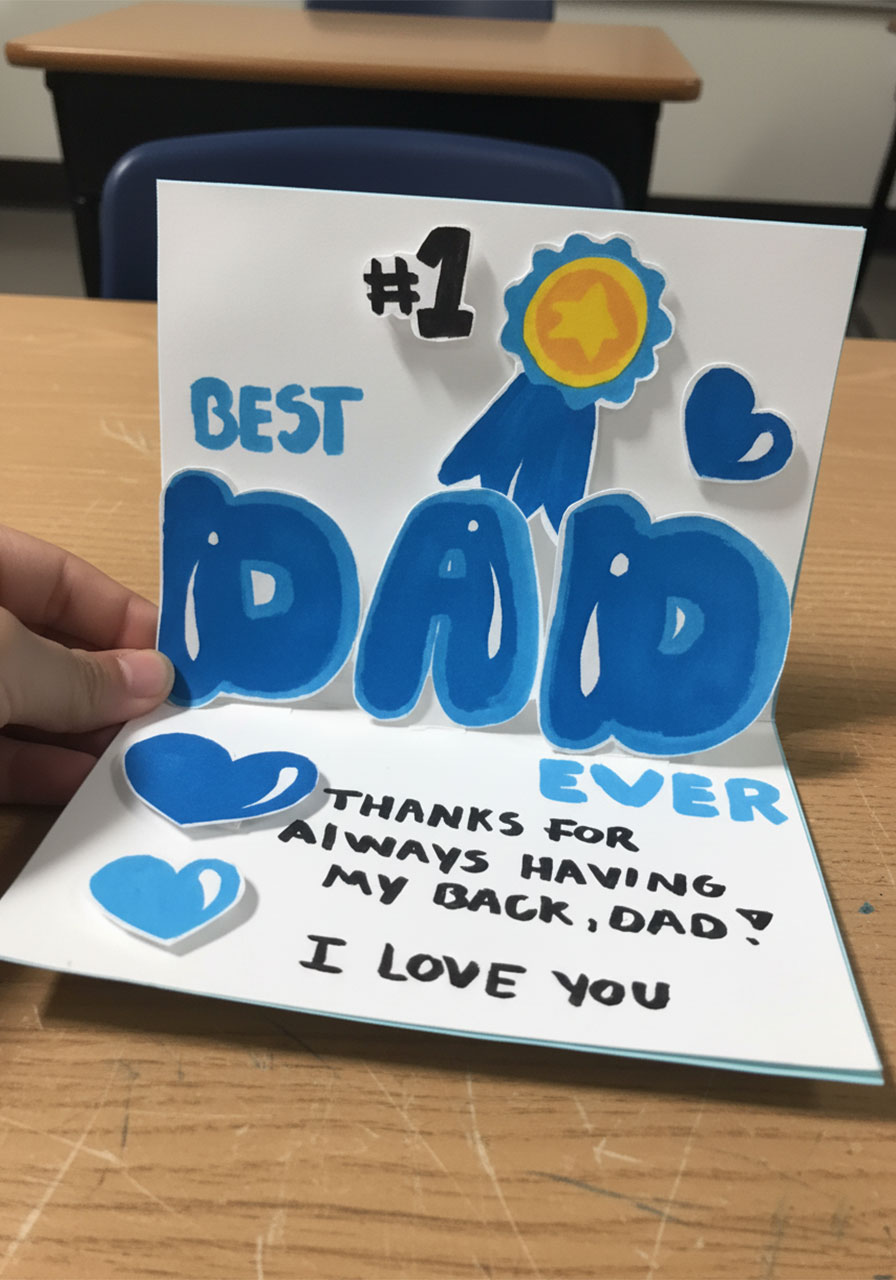
A #1 Ribbon Award: Draw a classic ribbon shape – a circle on top with two ribbon tails hanging down. Write “#1” in the center of the circle. Color it in with blue and yellow (yellow for the medal circle, blue for the ribbons). This little detail is such a fun nod to how much Dad means.
Blue Hearts: Cut out three or four small hearts in varying sizes. These are quick to make and add so much warmth when scattered around the finished card.
Optional – Small Stars or Dots: If you want to add even more flair, a few small stars or confetti-style dots in the background can make the design feel more festive and full.
Don’t overthink this step. Imperfect, hand-drawn shapes have their own charm – and Dad will love them even more knowing little hands made them.

Step 4: Write the Words Inside the Card
Open your card base flat so the pop-up tabs are pointing toward you.
Using your dark blue marker, write the word “BEST” above the tabs, toward the top of the card’s inside.
Then write the word “EVER” below the tabs, toward the bottom of the card’s inside.
When the card is opened, those three pop-up tabs will hold your “DAD” cutout – so the full message reads: BEST DAD EVER. Left to right, top to bottom, it all comes together perfectly.
Now, in the lower section of the inside card (below “EVER”), write your personal message. You can keep it simple and sweet. Here’s the one used in the original video – it’s a keeper:
“Thanks for always having my back, Dad. I love you.”
Write it in your own handwriting, or let your kid write it in theirs. Either way, it means everything.
Pro Tip: If you’re worried about spacing, lightly pencil in the words first before going over them in marker. Erase the pencil lines once the marker is dry.
Step 5: Assemble the Card
This is the moment it all comes together – and it’s so satisfying to watch it take shape.
Glue the “DAD” letters to the tabs. Apply glue to the front-facing surface of each pop-up tab. Press your “DAD” cutout firmly onto the tabs, centering it as best you can. Hold it in place for about 30 seconds while the glue sets. Let it dry completely before moving on.
Add your accent decorations. Glue the #1 ribbon above the “DAD” letters – right at the top of the card, where it’ll be the first thing Dad notices when he opens it. Glue a heart or two on the left side. Scatter the remaining hearts wherever they feel right. Step back and look at the overall layout before committing to each piece – you can always adjust before the glue sets.
Create the outer cover. Here’s something important: because you made cuts along the fold of your inner card, the back of it isn’t perfectly clean. The solution is simple and it also makes the card sturdier and more polished.
Take your sheet of blue cardstock and fold it in half to create an outer cover. Apply glue to the outside back of your inner white card, then press it firmly onto the inside of the blue cover. Smooth out any bubbles and let it dry. The blue cardstock hides the cuts, reinforces the card, and gives it a beautiful, finished look.
Decorate the front cover. Add a heart, a small “Happy Father’s Day” message, or even your child’s handprint to the front of the blue cover. Keep it simple – the real magic is inside, waiting for Dad to open it.
Tips to Make Your Card Even More Special
A few small touches can take this card from great to genuinely unforgettable.
Let your kids write the inside message themselves. Even if the letters wobble and the spelling isn’t perfect, that handwriting is irreplaceable. Dad will treasure it more than anything perfectly printed.
Match Dad’s favorite color. The photos show blue, but this card works beautifully in any color – green, red, orange, even black and gold for a more dramatic look. Use colors that feel like him.
Add a photo. Print out a small family photo and glue it inside the card alongside the message. It adds a deeply personal touch that makes the card a true keepsake.
Don’t stress about perfection. Handmade means handmade. The small imperfections are what make it real, personal, and irreplaceable.
How Long Does This Take to Make?
From start to finish, plan on about 45 minutes to an hour for a first-timer. Once you’ve done it once, you could easily make it in 30 minutes.
It’s a perfect Saturday morning project – put on some music, grab the kids, lay out the supplies, and make it a memory in itself.
If you’re making this with young children, the pop-up mechanism and cutting are best handled by an adult or older kid. But coloring the letters, drawing hearts, and writing the message? Those are the most meaningful parts, and little ones can absolutely take the lead.
Why Handmade Cards Matter More Than You Think
We live in a world where it takes two clicks to send a Father’s Day card. Which is exactly why a handmade one lands so differently.
When Dad opens this card and sees that pop-up “DAD” moment for the first time, he’s not just reading a card. He’s seeing the Saturday morning you spent together making it. He’s seeing the thought that went into it. He’s seeing that to someone in his life, he’s worth the time and effort.
That’s not something you can buy in a store.
And honestly? Making this card together can be just as meaningful as giving it. It’s a moment to slow down, create something with your hands, and pour a little love into a piece of paper. Those moments matter – for the kids making it, and for the dad receiving it.
More Father’s Day Ideas You’ll Love
If you’re building out a whole Father’s Day celebration, pair this card with a fun activity or game to make the day even more memorable. Dad deserves the full treatment!
Looking for games to play after brunch? We’ve got you covered with easy, no-prep ideas the whole family can enjoy together. Because the best Father’s Days are the ones where everyone’s laughing.
Happy crafting – and Happy Father’s Day to all the incredible dads out there!
More Father’s Day Ideas to Keep the Fun Rolling:
Father’s Day Handy Dad Heart Card (The Cutest Craft for Your Handy Dad or Grandpa!)
Father’s Day Pop Up Card – I Whaley Love You Dad! (The Cutest Card He’ll Ever Get)
How to Make a Suit-and-Tie Father’s Day Card (He’ll Actually Want to Keep)
The Cutest Father’s Day Craft: Printable Toolbox Cards Kids Can Color & Gift
Dad, You Rock! How to Make a Handprint Guitar Father’s Day Card (Printable Included)
How to Make a Magic Flip Card for Father’s Day (That Looks Way Harder Than It Is)