
Father’s Day is sneaking up fast – and if you want to skip the generic store-bought card this year, we have something so much better waiting for you.
This Interactive Magic Flip Card is one of those gifts that stops Dad in his tracks the moment he opens it.
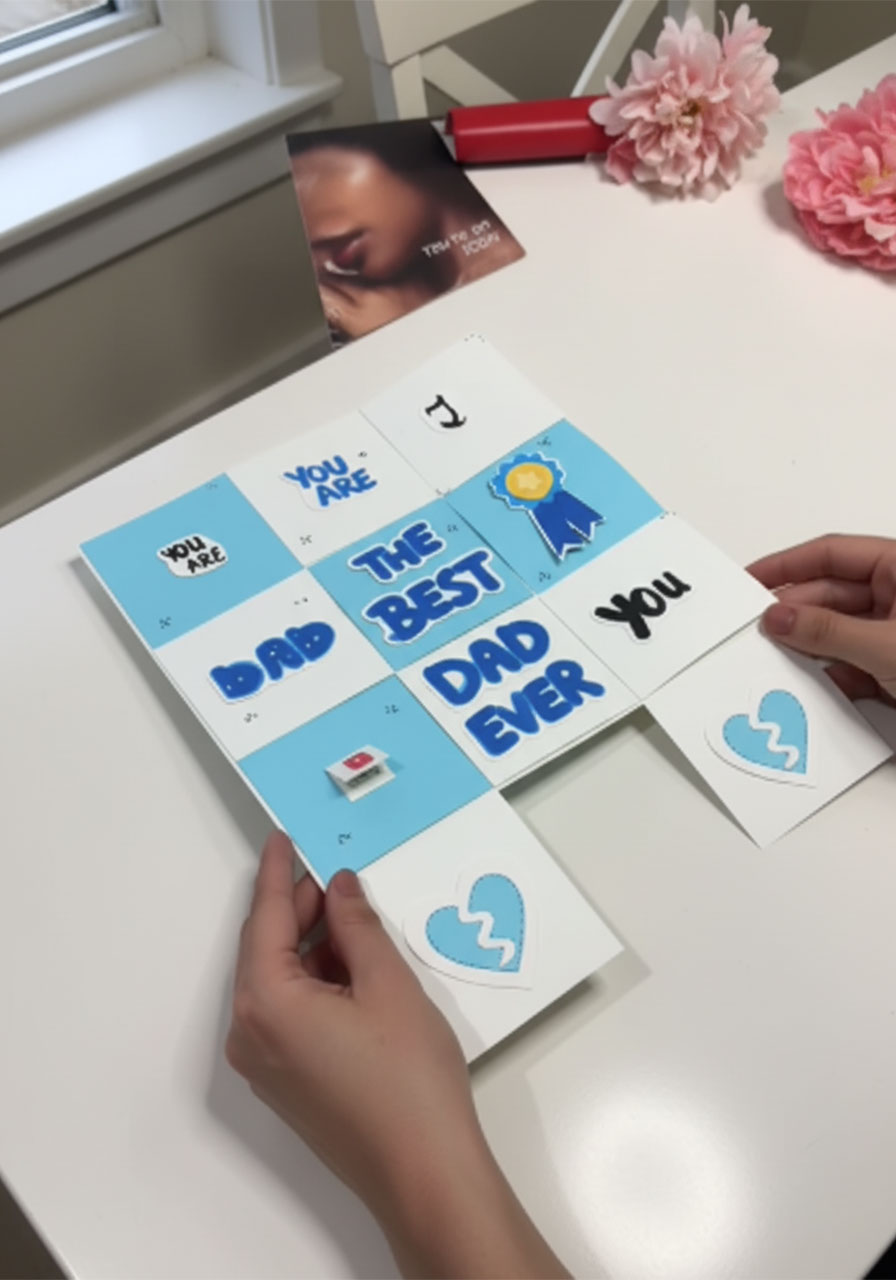
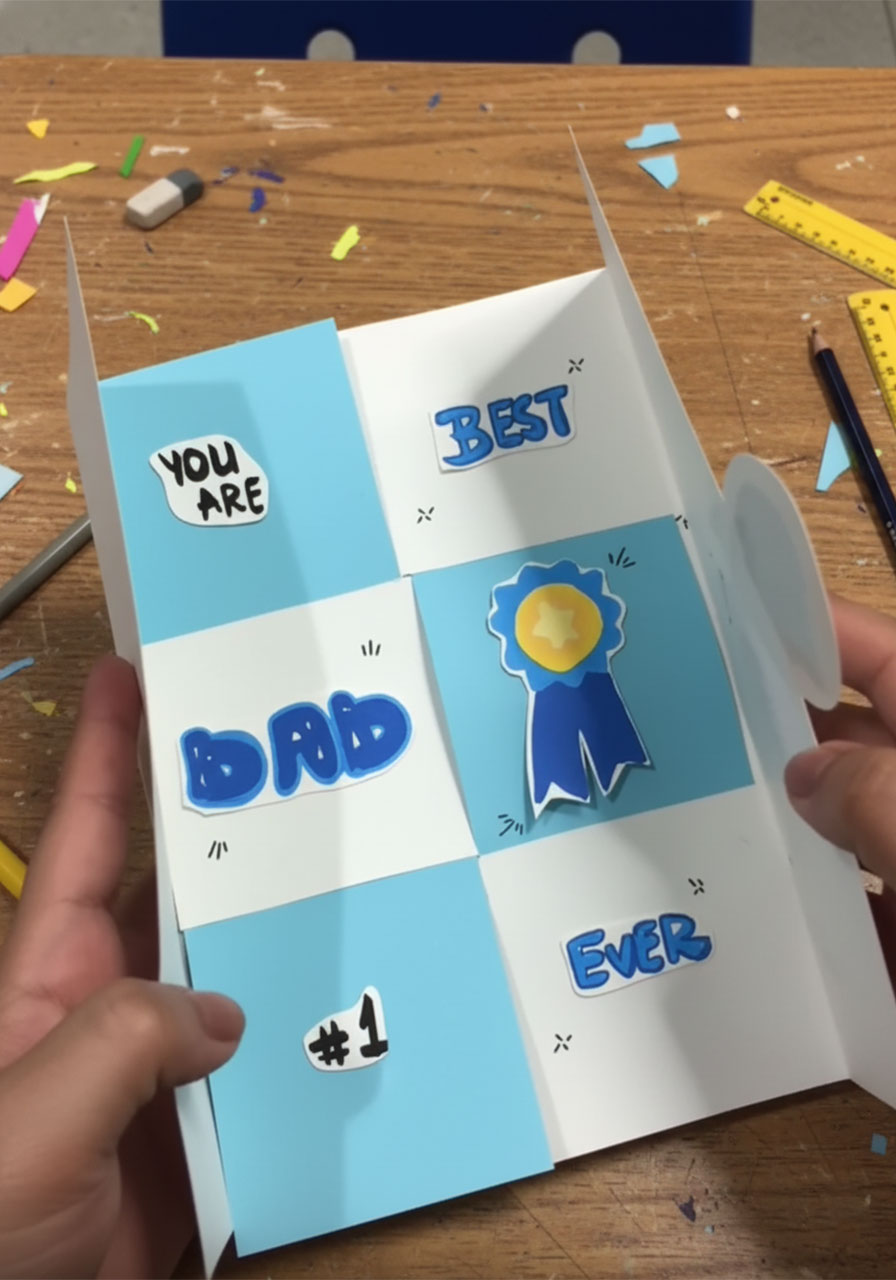
It unfolds like a puzzle. Messages appear. Little hidden flaps pop out. A trophy pops up. And the whole thing reads “Best Dad Ever” in the most satisfying, reveal-after-reveal way.
The best part? It takes under 15 minutes and costs almost nothing.
All you need is paper, scissors, a couple of markers, and a little bit of love. That’s it.
Whether you’re making this yourself or doing it alongside the kids, it’s going to be something Dad genuinely cherishes – and probably shows off at work.
What Makes This Card So Special
Most handmade cards are sweet, but simple. This one is different.
The magic is in the weave. You cut slits into a folded base, then thread colored paper strips through in a checkerboard pattern. When Dad opens and closes the card, the colors shift – and different messages reveal themselves like a tiny, personal storybook.
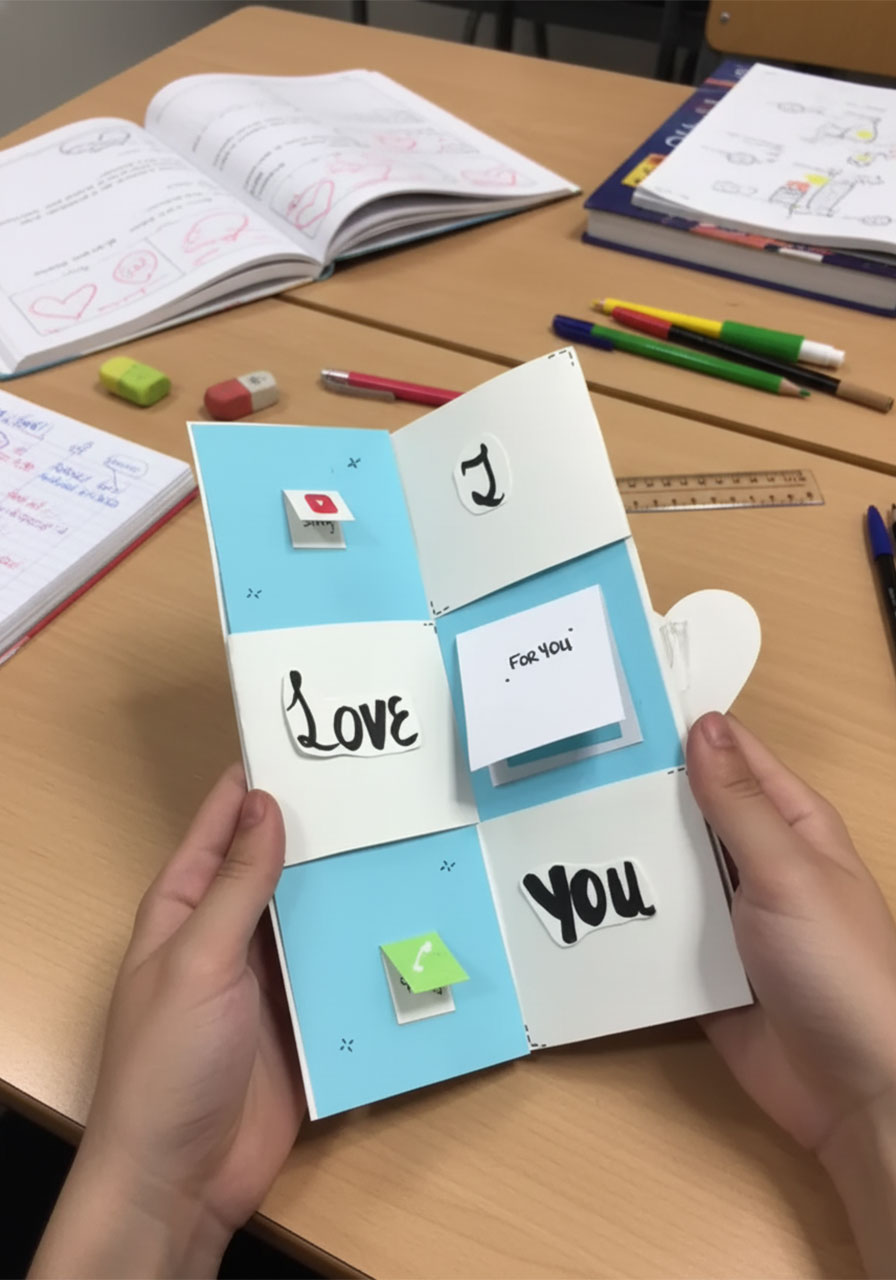
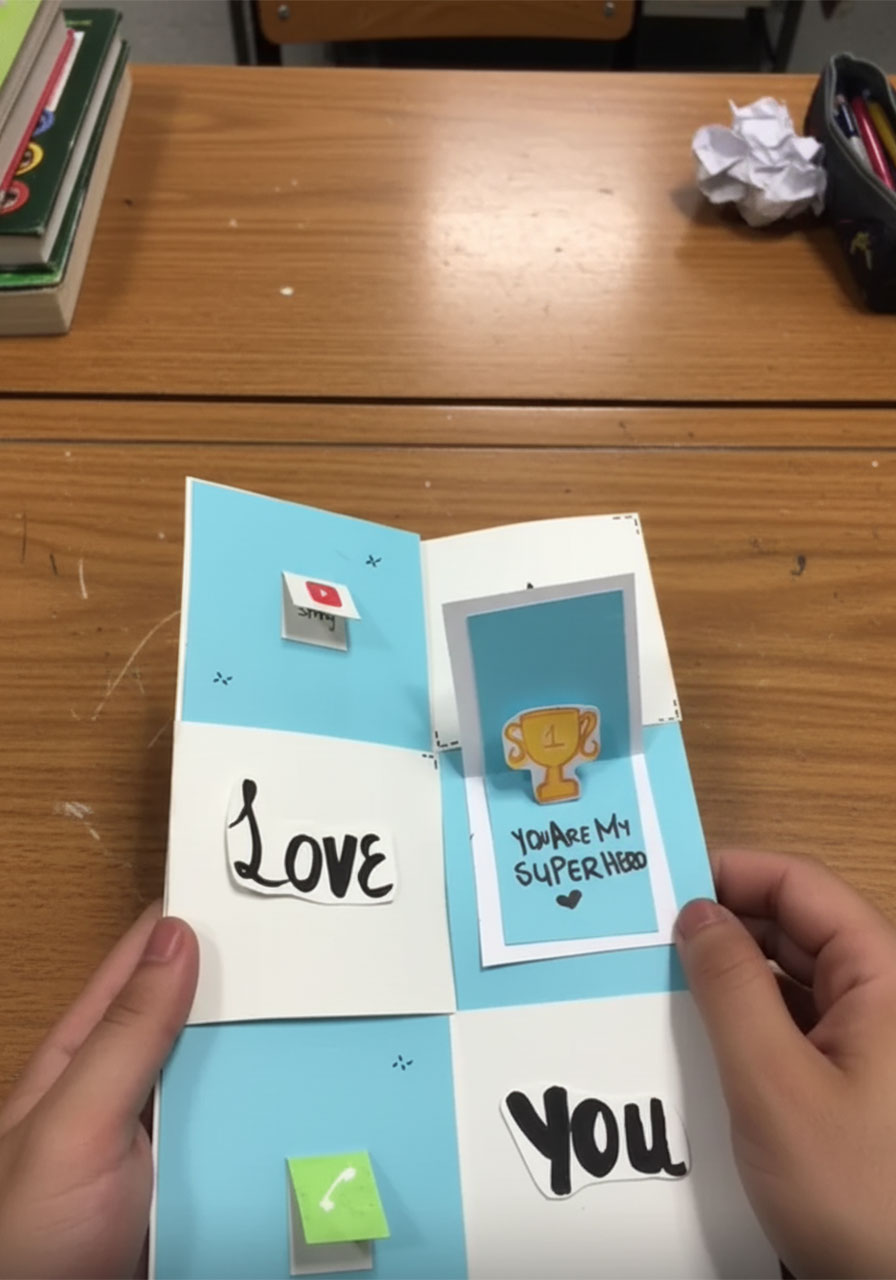
There’s a sealed heart on the front. A “Best Dad Ever” panel. Hidden flaps that open to say things like “You Are My Superhero” and “I Love You.” It’s layered and interactive in the best way possible.
It feels like it came from a boutique stationery shop. But it came from your kitchen table. And Dad will absolutely know the difference – in the best way.

What You’ll Need
Gather these before you start so everything flows smoothly:
1 sheet of A4 white paper – this is your base card
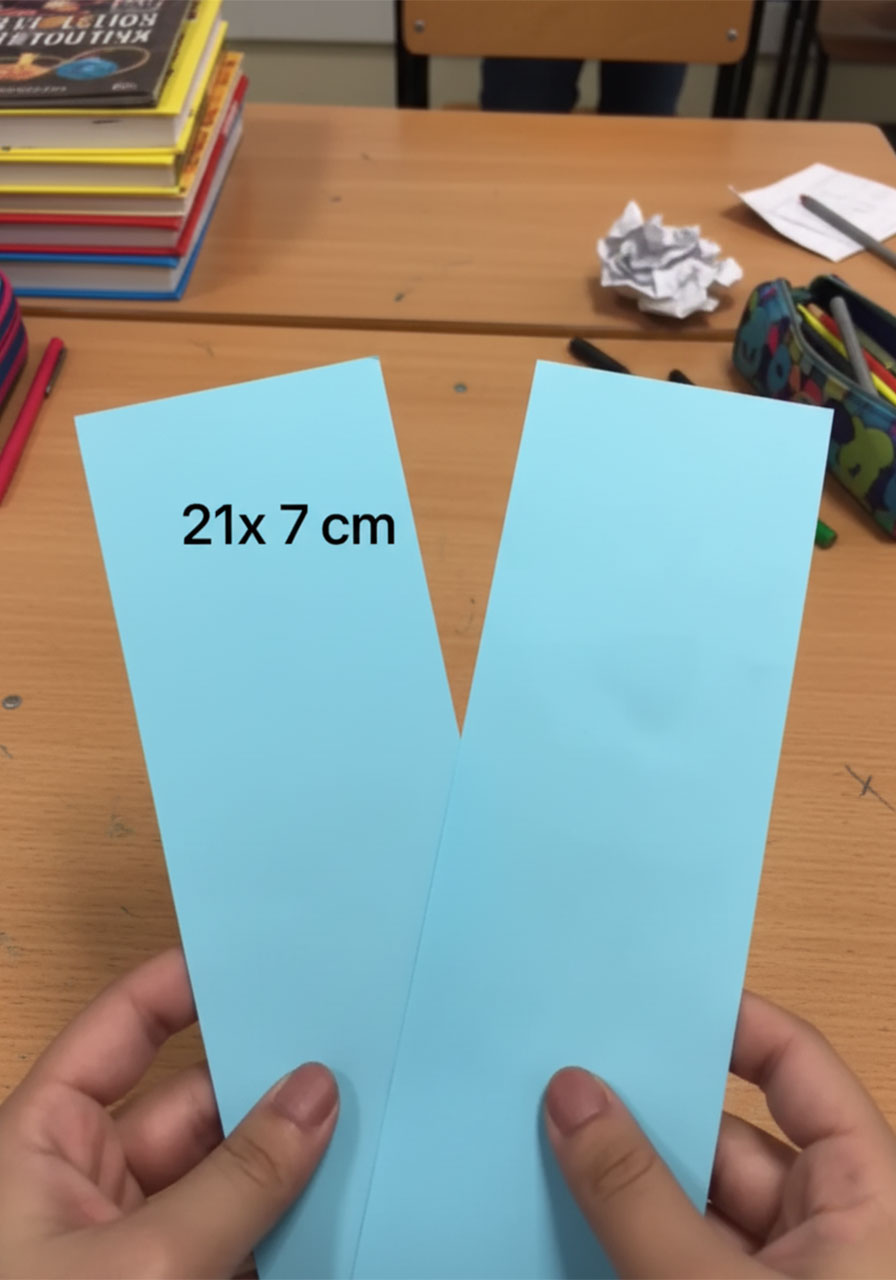
2 strips of blue (or Dad’s favorite color) paper, each cut to 21 x 7 cm – these are the magic weave strips
Small paper scraps for hidden flaps – roughly 8 x 4 cm (blue) and 10 x 5 cm (white)
A fine-tip black marker for writing messages
A bold blue or colored marker for lettering and decorations
Scissors
Glue stick or tape
A heart cut-out – white base, blue center – for the front seal
Optional stickers or printed icons like a trophy, blue ribbon, or YouTube play button for extra flair
No fancy tools. No craft store haul. Just things you probably already have at home.
Step-by-Step: How to Make the Magic Flip Card
Step 1: Fold the Base Paper
Lay your A4 paper flat in landscape orientation (wider than it is tall).
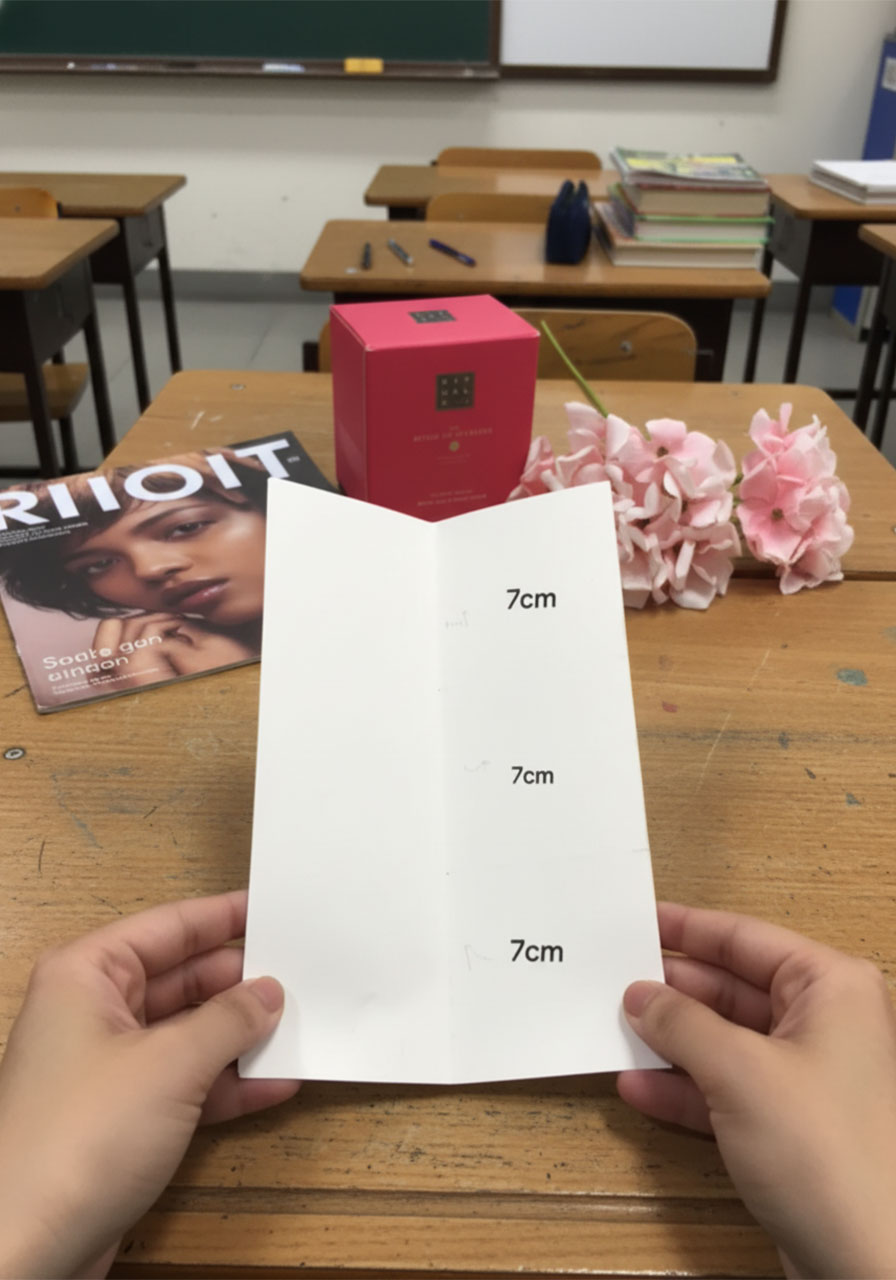
Fold it in half lengthwise to find the center crease. Then fold each outer edge inward to meet that center line.
This is called a gatefold – it’s the same style you see on fancy event invitations. When you unfold it, you’ll have two flaps that open from the center like double doors.
Set it aside for now.

Step 2: Mark Your 7 cm Sections
Unfold the paper and lay it flat.
Along the two vertical center fold lines, use a pencil to lightly mark three equal sections of 7 cm each going down the height of the paper.
You should end up with three rows of 7 cm, giving you a total of 21 cm of marked space on each fold line.
These marks are your cutting guides – so take a moment to double-check they’re evenly spaced before moving on.
Step 3: Cut the Magic Slits
This is the step that makes the whole card come alive.
Using your scissors (or a craft knife if you have one), carefully cut horizontal slits along those fold lines within the marked 7 cm sections.
You’ll end up with a series of neat openings on each fold – almost like mini windows cut into the paper.
Don’t cut outside the marked sections. The slits need to stay within those boundaries so the weaving works correctly.


Step 4: Weave the Color Strips Through
Now for the most satisfying part.
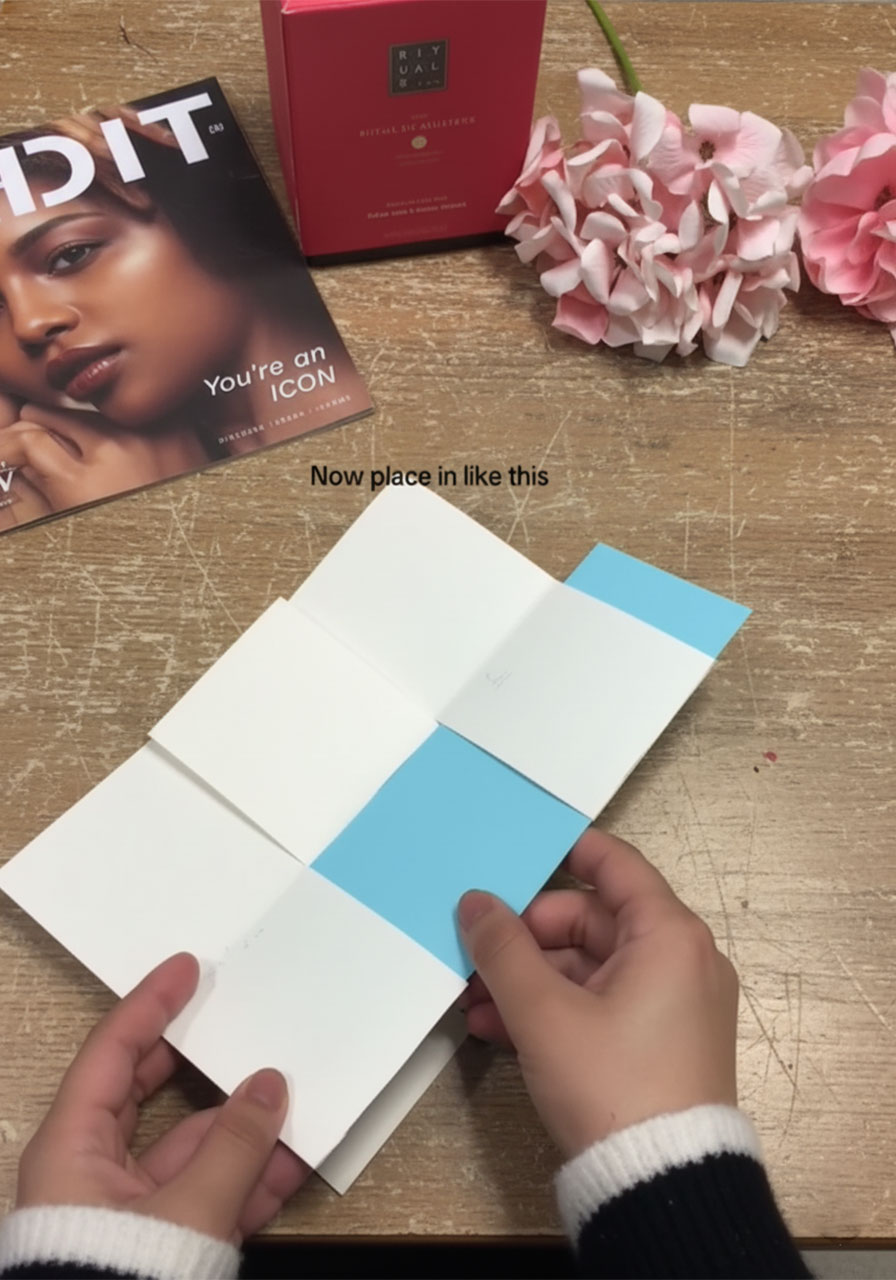
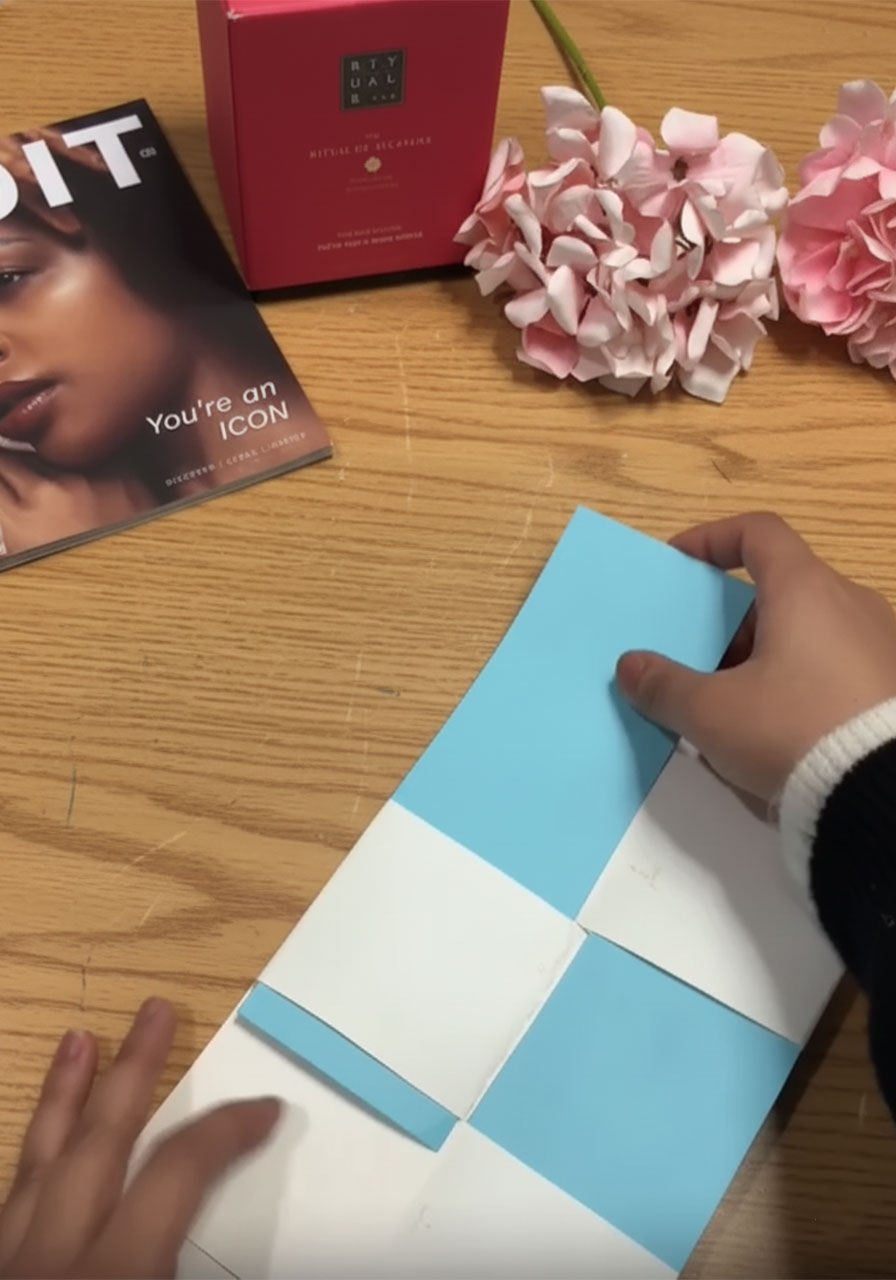
Take your two 21 x 7 cm colored strips. Thread them through the slits you just cut, weaving in and out in a checkerboard pattern.
The first strip goes: over, under, over. The second strip goes: under, over, under.
When done correctly, the blue and white sections alternate like a checkerboard across the card’s face. And when you open and close the card, the colors shift – revealing a different “face” of the card each time.
It feels like magic the first time you see it move. Trust us.

Step 5: Write the First Reveal Message
The first thing Dad sees when he opens the card should be the big, bold headline.
On the visible white and blue panels of the woven card face, write:
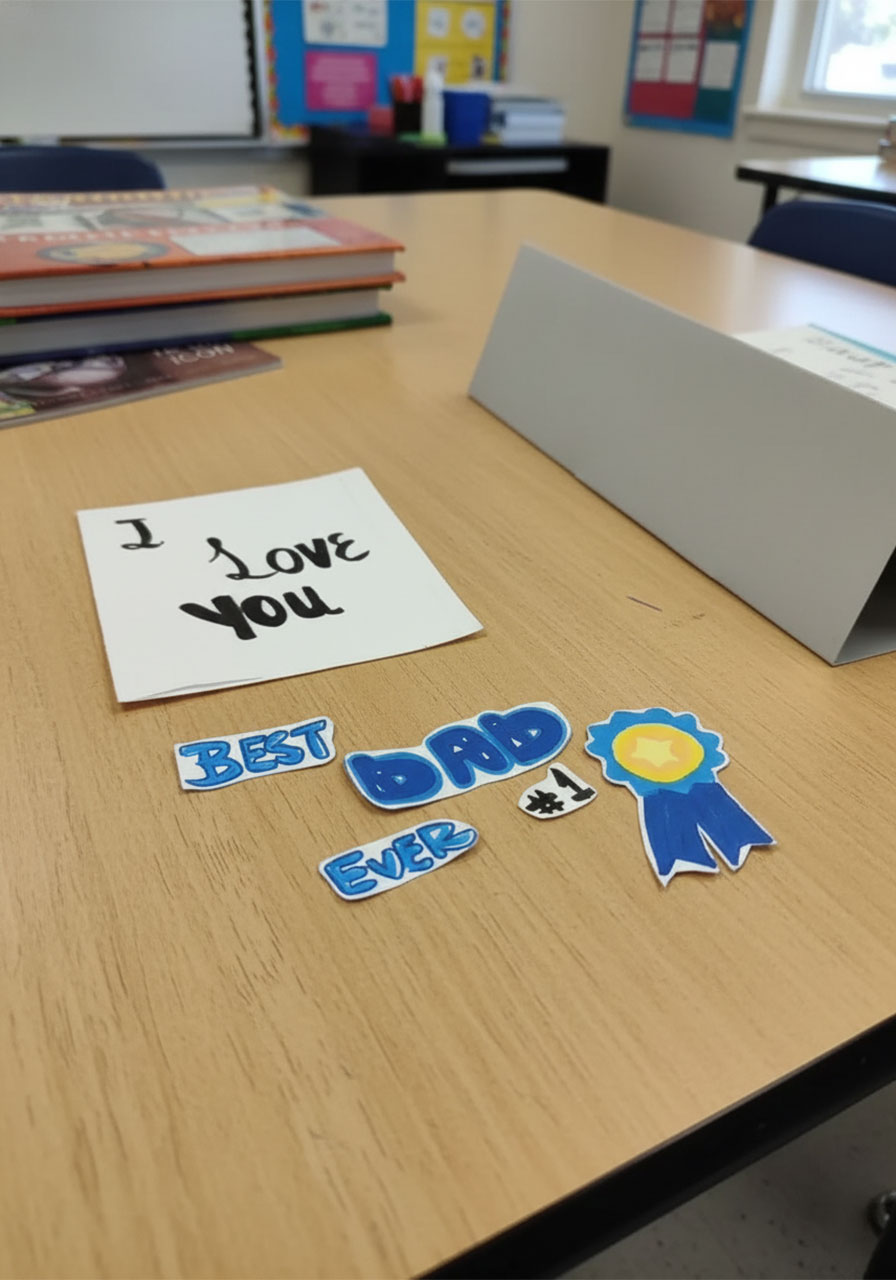
“YOU ARE THE BEST DAD EVER #1”
Spread the words across the panels so each section holds a piece of the message. Use your bold marker for impact. You can also cut out or print the letters and glue them on for an extra polished look.
Draw or stick on a blue ribbon award icon or a #1 trophy to anchor the design. These little details make such a big difference.
Step 6: Build the Hidden Surprise Flaps
This is where the card goes from “cute” to “completely unforgettable.”
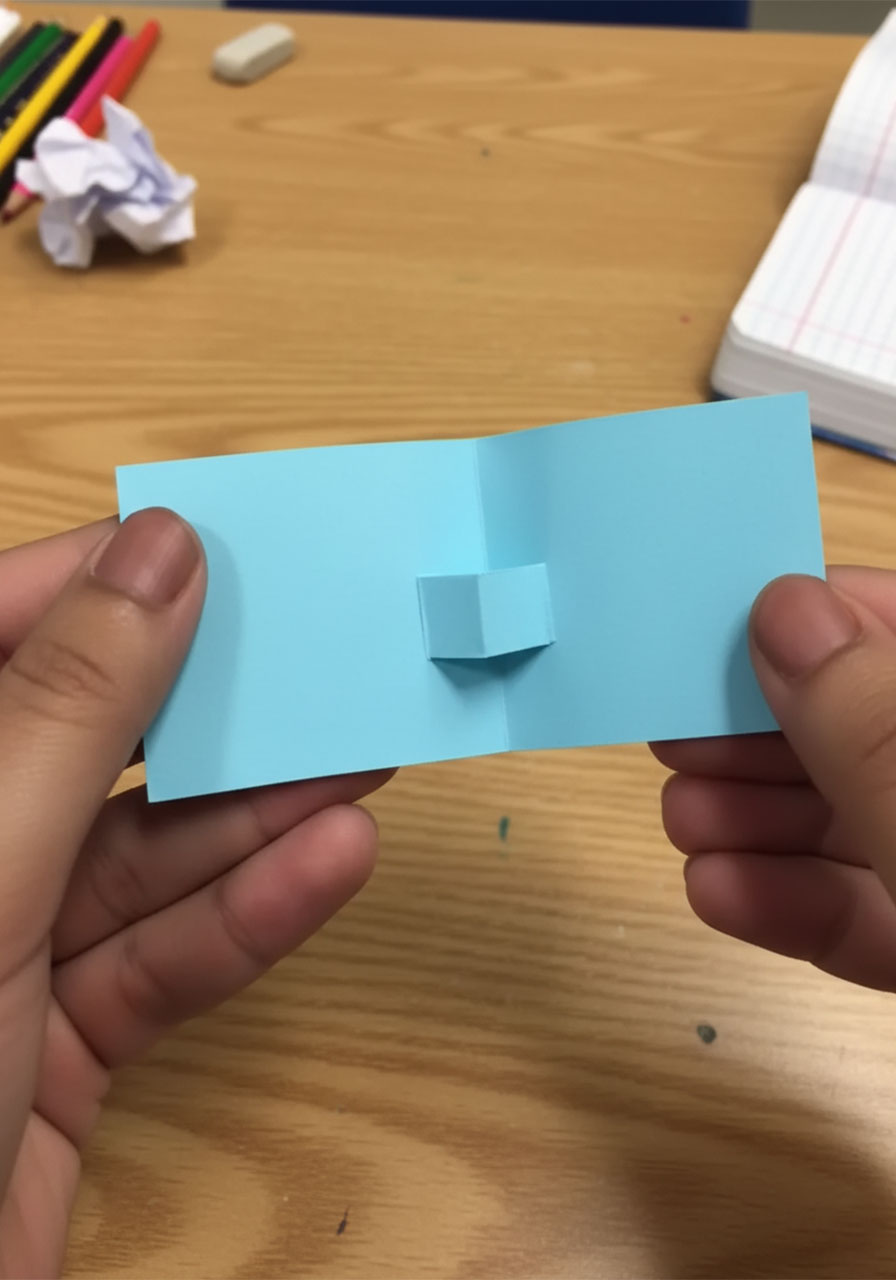
On the inside of the card – the side Dad sees as he keeps unfolding – create tiny little flaps that open to reveal secret messages.
Here’s how to make each flap:
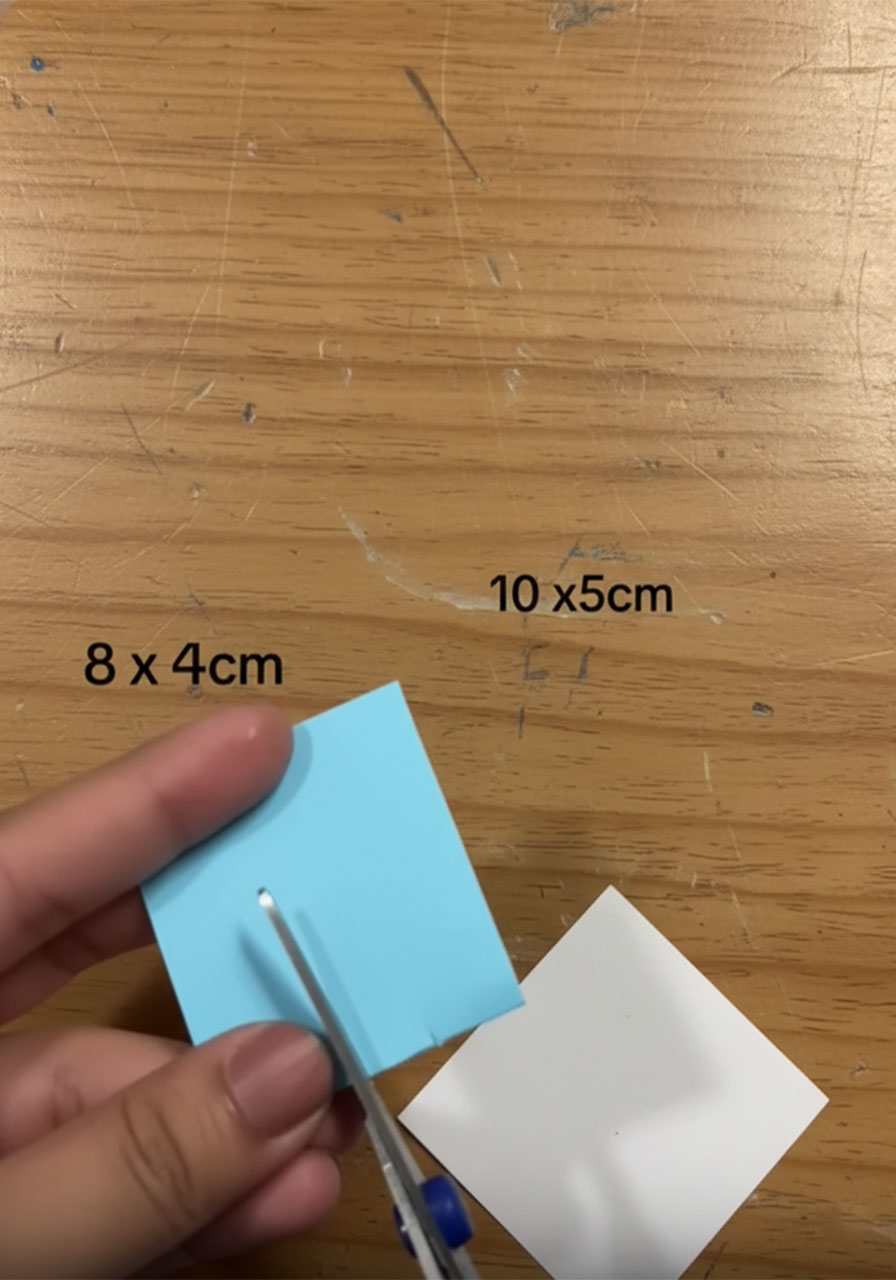
Cut a piece of blue paper to 8 x 4 cm
Score and fold a small tab at the bottom (about 1 cm)
Glue just the tab to the card – the rest should lift freely
Cut a white paper piece at 10 x 5 cm to tuck behind or alongside it
Write your hidden message on the part that’s hidden when the flap is closed
Message ideas that hit differently:
“You Are My Superhero” – with a small gold trophy sticker on the pop-up
“I Love You” – written in big, confident brushstroke letters
“You Are Strong” – tucked behind a flap with a small note that says “For You”
“You Are Rocking It” – a little affirmation he didn’t know he needed
You can also add tiny icons – a phone, a YouTube play button, whatever feels personal to your dad’s life – to give each flap its own little personality.
Don’t overthink the icons. Even a hand-drawn version looks charming.

Step 7: Seal It With a Heart
Now that your card is fully assembled, it’s time to close it and add the front.
Close both flaps of the gatefold card.
Take your heart cut-out – a white paper heart with a blue paper heart layered on top – and glue one half of it onto the left flap.
The other half of the heart will naturally rest on the right flap when closed, acting as a seal.
On the heart, write: “Happy Father’s Day”
When Dad picks up this card, that little heart is the first thing he sees. And the moment he pulls the card open, the heart splits in two – which is genuinely such a beautiful detail. It’s simple, but it hits right in the feelings.

Tips to Make It Even Better
Customize the Color
Blue is classic and works beautifully, but feel free to swap it out. If your dad loves green, use green. If he’s a Navy fan, go navy and gold. The checkerboard effect works with any two contrasting colors.
Let the Kids Help With the Messages
If little ones are making this card, have them write the hidden messages themselves – in their own handwriting, typos and all. That’s the version Dad will keep forever. Their wobbly “I Love You” inside a flap is worth a thousand perfectly typeset words.
Swap “Dad” for “Grandpa”
Making this for Grandpa instead? Just swap the messaging. Inside the flaps, add little “coupons” – things like “One Free Phone Call,” “One Giant Hug,” or “Help in the Garden Whenever You Need It.” Grandpas melt for that stuff.
Add a Personal Photo
Print out a small photo of you and Dad (or the kids and Grandpa) and tuck it inside one of the flaps. Nothing beats a surprise photo reveal in the middle of all those sweet messages.
Laminate the Front (Optional)
If you want this to last – and it’s the kind of card that deserves to last – print the final version at a copy shop and have the front laminated. Dad might actually put it on his desk.
A Note on Timing
We said under 15 minutes, and we mean it – once you’ve made the base fold and cut the slits, the rest flows quickly.
That said, don’t rush the weaving step. Take an extra minute to make sure the strips are even and the checkerboard effect is clean. That’s the part everyone notices first, and it’s worth doing right.
If you’re doing this with kids, budget around 30 minutes and enjoy it. Put on a playlist. Make it a little Father’s Day Eve ritual. The making is part of the magic, too.
Why This Card Works So Well
There’s something deeply intentional about a handmade card like this.
It’s not just paper and markers. It’s proof that you thought about it. That you took time out of a busy week to create something specifically for him. That you know what messages he needs to hear.
Dad isn’t expecting a card that unfolds into a surprise-filled journey with his favorite colors, hidden love notes, and a little trophy that says he’s #1. That’s exactly why it works.
Because the best gifts are the ones nobody saw coming.
And the ones that come from the heart – literally, in this case – are the ones that get kept in a drawer for years.
You’ve Got This
With these steps in your back pocket, you’re all set to make Dad’s day genuinely unforgettable.
No expensive supplies. No last-minute store run. Just a little creativity, some paper, and all the love you’ve got – folded into something he’ll absolutely treasure.
Happy crafting, and happy Father’s Day! 🎉
More Father’s Day Ideas to Keep the Fun Rolling:
How to Make a DIY Tuxedo Father’s Day Card (Step-by-Step)
Super Dad Father’s Day Gift: The Sweetest Superhero Craft Kids Can Make in Minutes
“You Mean the World to Me”: How to Make the Cutest 3D Father’s Day Card for Dad or Grandpa
Going the Extra Mile: A Sweet DIY Handprint Semi-Truck Craft for Father’s Day
Unmask the Hero: DIY “Secret Superhero” Dress Shirt Card for Father’s Day
“Best Dad in the Universe”: The Cutest DIY Father’s Day Card Kids Can Make in an Afternoon
Hands Down the Best! 4 Easy DIY Handprint Crafts for Father’s Day
