
If your porch could use a little “wow” this October, an outdoor Halloween arch is the easiest way to get it. It’s the first thing trick-or-treaters see, the backdrop for every family photo, and honestly, it’s a fun weekend project you can do with the kids helping along the way.
The best part? You don’t need a big budget or power tools. Pumpkins, hay bales, dollar-store spiderwebs, and a little creativity go a long way. We rounded up 14 fan-favorite arch styles, then added several brand-new ideas built specifically around pumpkins and hay, since those two materials are cheap, easy to find at any farm stand or grocery store, and they photograph beautifully.
For every idea below, you’ll get a quick explanation of the look, why it’s worth doing, exactly what to buy or gather, and step-by-step instructions so there’s no guesswork. Let’s get your porch ready for its close-up.
What Makes a Great Outdoor Halloween Arch?
Before we dive in, here’s what separates a “nice try” arch from a “neighbors are stopping to take pictures” arch: a sturdy frame, secure attachments, and layering. A single row of pumpkins looks flat. Pumpkins stacked with leaves, lights, or hay peeking through look full and professional.
You also want to think about weather. Most of these arches live outside for weeks, so anything that can get soggy (real pumpkins, hay, paper) needs either a covered porch, a plan to swap it out closer to Halloween, or a weatherproof faux version.
With that in mind, here are the ideas, starting with the classics and ending with our own pumpkin-and-hay originals.

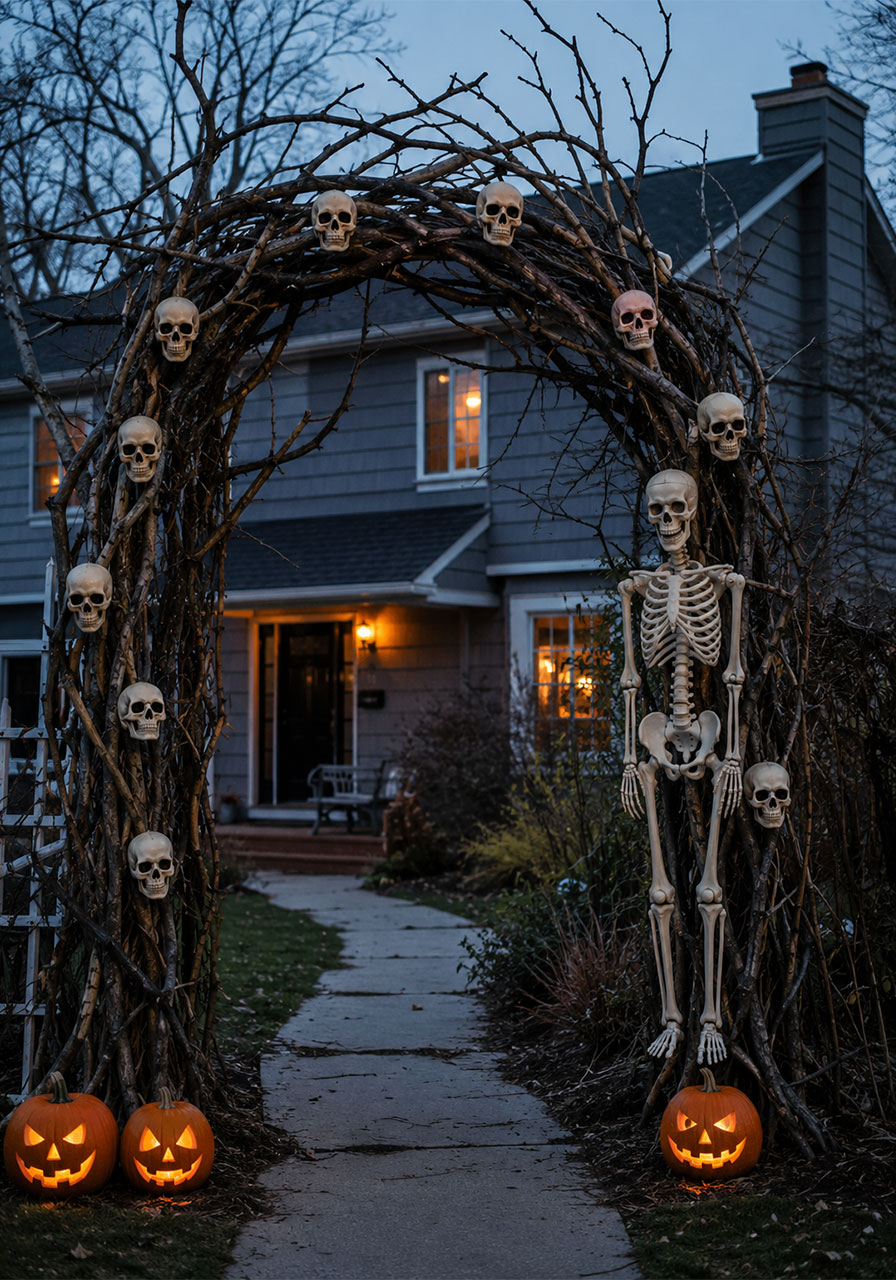
1. Spooky Skeleton Branch Arch
What it is: A twisted archway made from bare tree branches, hung with plastic skulls and topped off with a full-size skeleton guarding the path.
Why it’s appealing: This one has serious “haunted forest” energy. It costs almost nothing if you have branches in your yard, and it looks completely different from every store-bought inflatable on the block.
What you’ll need:
- Large fallen branches or a trimmed tree (ask a neighbor with yard waste!)
- Zip ties or floral wire
- Plastic skulls (10 to 15)
- 1 to 2 full-size plastic skeletons
- Black or brown spray paint (optional, for a weathered look)
How to make it:
1. Sink two sturdy branches or fence posts into the ground on either side of your walkway, about 4 to 5 feet apart.
2. Bend and zip-tie smaller branches across the top to form an arch shape, layering them until it looks full.
3. Wire skulls onto the branches at different heights, angling a few outward so they’re visible from the street.
4. Secure a skeleton to one post using zip ties around the spine and wrists so it stands upright.
Pro tip: Spray paint the skulls with a thin coat of black paint, then wipe most of it off. This “dry brush” trick makes them look ancient instead of dollar-store fresh.
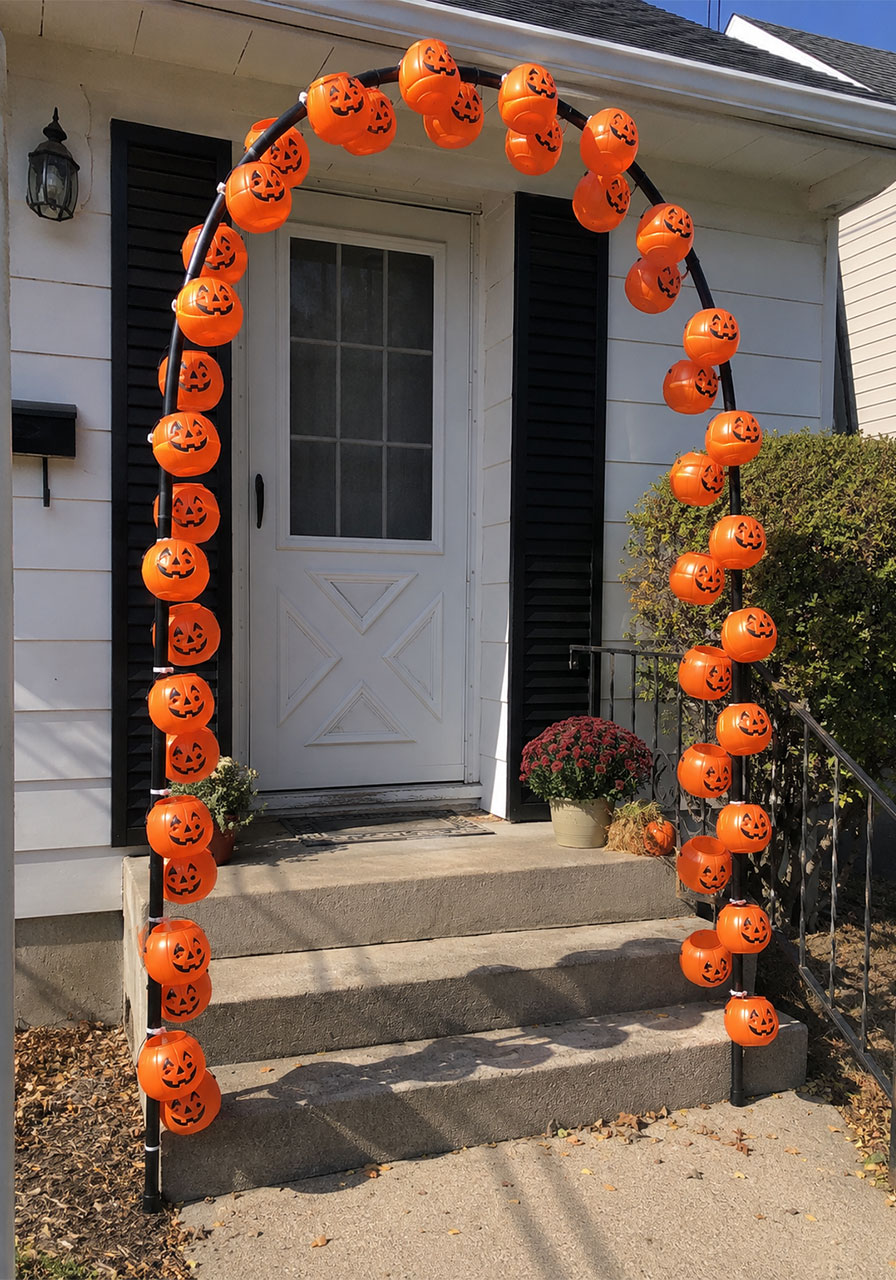
2. Pumpkin Pail Archway
What it is: Small plastic jack-o’-lantern trick-or-treat pails, strung together to form a bright, cheerful archway.
Why it’s appealing: This is one of the easiest and cheapest ideas on the list. It’s also very kid-friendly since there’s nothing fragile or heavy involved, so kids can help hang pails without much supervision.
What you’ll need:
- 2 sturdy garden arch frames or PVC pipe bent into arches
- 20 to 30 small plastic pumpkin pails (dollar store or party stores)
- Zip ties or twine
How to make it:
1. Set up your arch frame, or build one from PVC pipe secured into buckets of concrete or sand.
2. Punch a small hole through the handle area of each pail if it doesn’t already have one.
3. Zip-tie the pails to the frame, alternating angles so they don’t all face the same direction.
4. Fill in any gaps near the top and base so the frame is fully covered.
Pro tip: Mix in a few pails with battery tea lights inside. Once it’s dark, the whole arch glows.
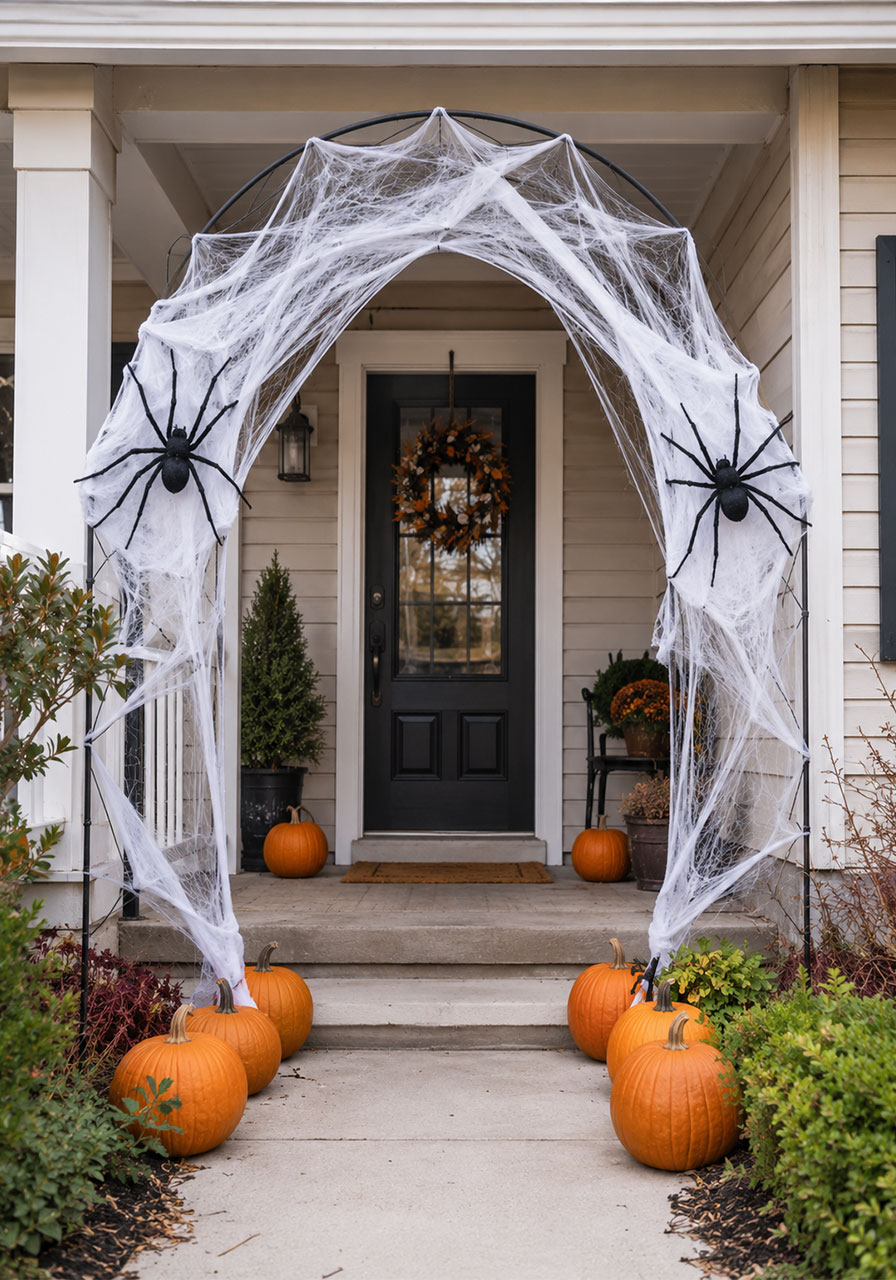
3. Spiderweb Wrapped Arch
What it is: A simple frame draped in stretchy fake spiderweb material, then accented with a giant spider or two.
Why it’s appealing: This is the fastest project on the list. You can go from bare porch to full-blown spookiness in under 30 minutes, which is perfect if Halloween snuck up on you.
What you’ll need:
- 3 to 4 bags of stretch spiderweb
- 2 to 3 oversized plastic spiders
- An existing porch overhang, pergola, or simple arch frame
How to make it:
1. Stretch the spiderweb material between your fingers to loosen the fibers before hanging.
2. Drape it over your frame or porch beams, pulling sections down to create sagging, web-like layers.
3. Tuck spiders into the thickest sections of web, near the top and along the sides at eye level.
4. Add a few strands trailing down toward the walkway so guests brush past them on the way in.
Pro tip: A light mist of hairspray on the web keeps it from blowing apart in windy weather.
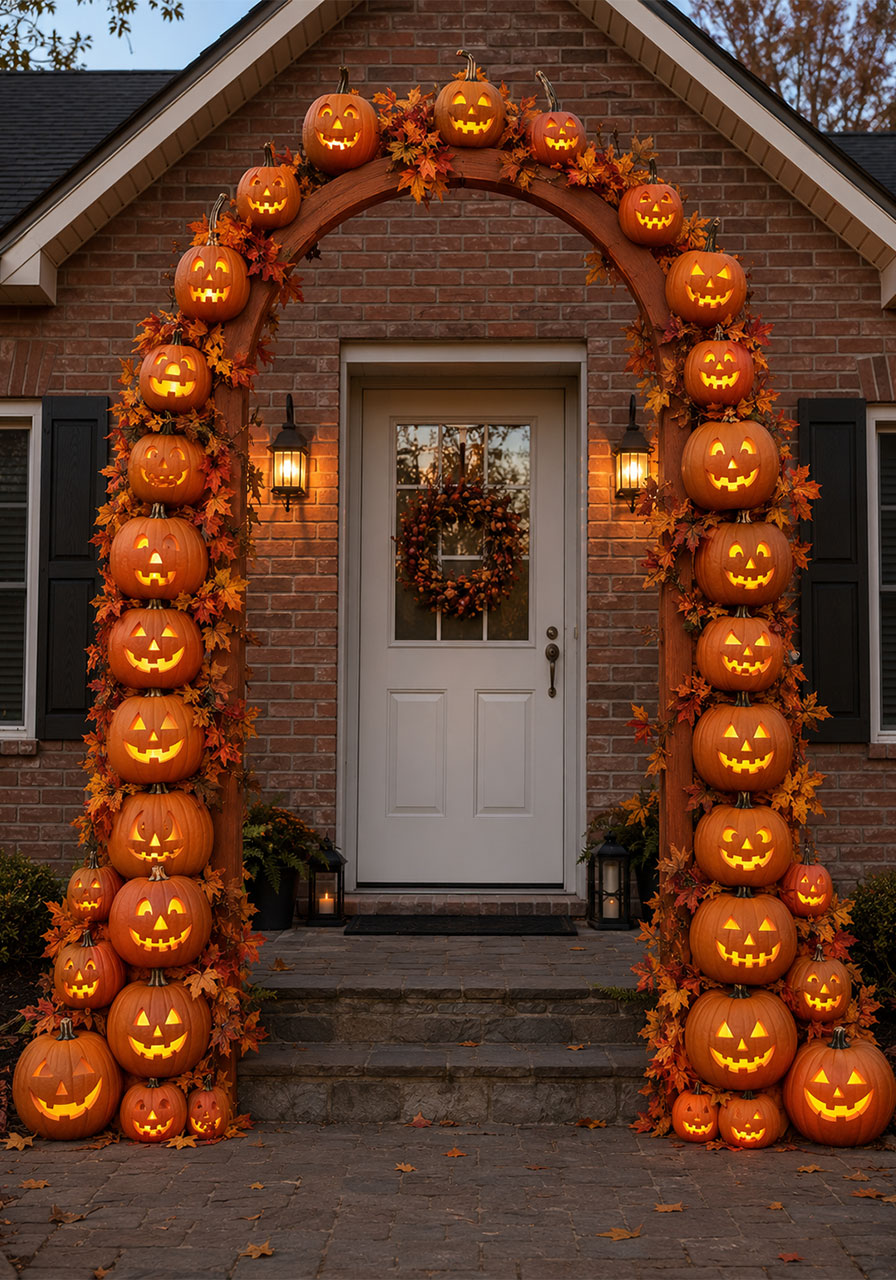
4. Classic Jack-o’-Lantern Arch
What it is: Real or faux pumpkins, carved with different funny and scary faces, stacked and secured to form a full archway.
Why it’s appealing: This is the single most popular arch style for a reason. It’s warm, welcoming, and unmistakably Halloween, and it works for every age group from toddlers to teens.
What you’ll need:
- 15 to 25 pumpkins (mix of real and craft foam pumpkins to save money)
- A curved arch frame, or a wooden ladder-style frame you build yourself
- Battery tea lights
- Wood screws or heavy-duty zip ties
How to make it:
1. Carve your pumpkins ahead of time with a mix of expressions: scary, silly, and classic triangle-eyed.
2. Build or rent a curved frame sized to your doorway.
3. Starting at the base, stack pumpkins largest to smallest, screwing through the frame into each pumpkin or nesting them on small platforms.
4. Add tea lights inside each carved pumpkin once it’s dark out.
Pro tip: If you’re using real pumpkins, wait until 5 to 7 days before Halloween to carve and stack them so they don’t collapse early.
5. Carnival-Style Pumpkin Entrance
What it is: A giant, illuminated jack-o’-lantern cutout entrance, styled like a spooky carnival midway with a ticket booth off to the side.
Why it’s appealing: This is the showstopper of the list. It takes more effort, but it turns your yard into a full experience instead of just a decorated door.
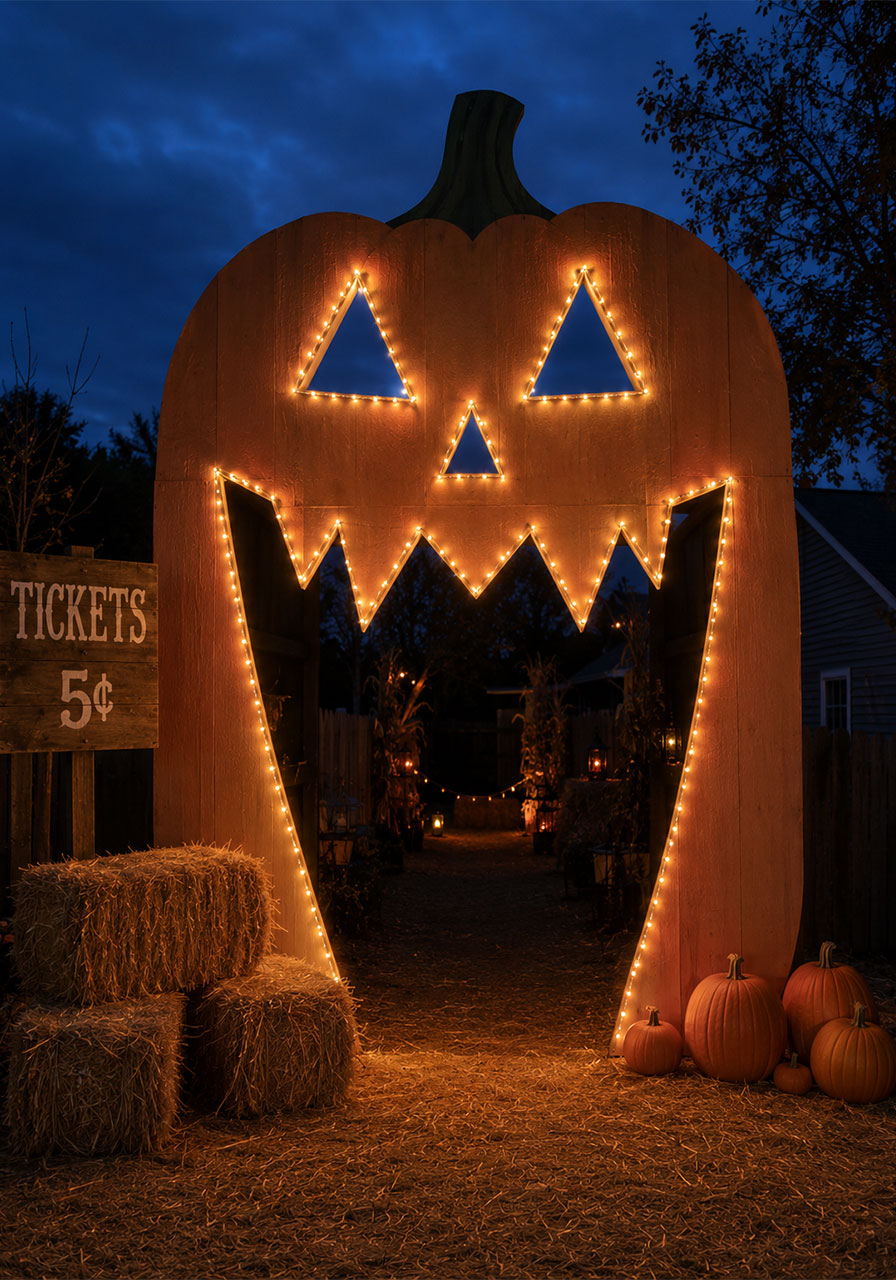
What you’ll need:
- Plywood sheet, jigsaw, orange and black exterior paint
- String lights (100+ count)
- Hay bales for the base
- Small pumpkins for accenting
How to make it:
1. Sketch a giant pumpkin face onto plywood, then cut it out with a jigsaw, leaving the mouth and eyes open as the “doorway.”
2. Paint the face orange with black features and a green stem.
3. Outline the eyes and mouth with string lights, stapling them into place along the wood.
4. Prop the cutout upright using a wooden brace on the back, then surround the base with hay bales and small pumpkins.
Pro tip: This project is worth spreading over a weekend. Cut and paint on day one, add lighting and staging on day two.
6. Cemetery Gates Archway
What it is: Two faux stone pillars connected by an arched sign reading “Cemetery,” wrapped in cobweb material.
Why it’s appealing: This idea instantly sets a spooky, storytelling tone for the rest of your yard display, especially if you’re also doing a small graveyard scene with tombstones.
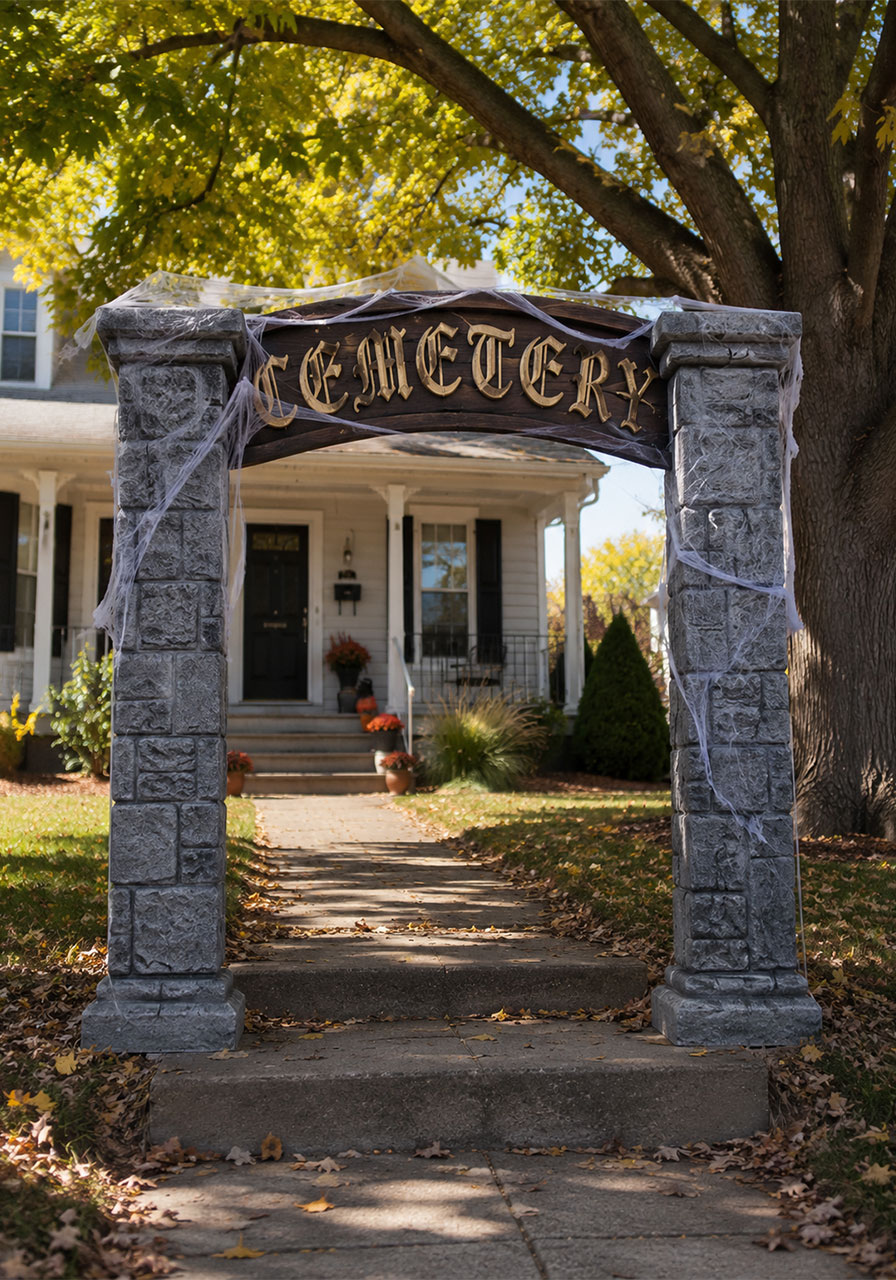
What you’ll need:
- Cardboard boxes or foam board for pillars
- Gray spray paint and a fine black paint pen for “stone” texture
- A curved sign, cut from foam board, with cemetery-style lettering
- Cobweb material
How to make it:
1. Stack and tape sturdy boxes into two pillar shapes, then wrap in gray paper or paint directly.
2. Add cracks and shadow lines with the black paint pen for a stone texture.
3. Cut your sign, paint it, and letter it with a stencil or freehand paint pen.
4. Attach the sign between the two pillars and drape cobwebs across the top and sides.
Pro tip: Weigh down the base of each pillar with a sandbag or brick so it doesn’t tip in the wind.
7. Cobweb Metal Arch
What it is: A black metal garden arch, strung with light cobweb material for a subtle, elegant spooky look.
Why it’s appealing: If you want something spooky without going full haunted-house, this is your idea. It’s understated, reusable year after year, and works even if you have very little time.
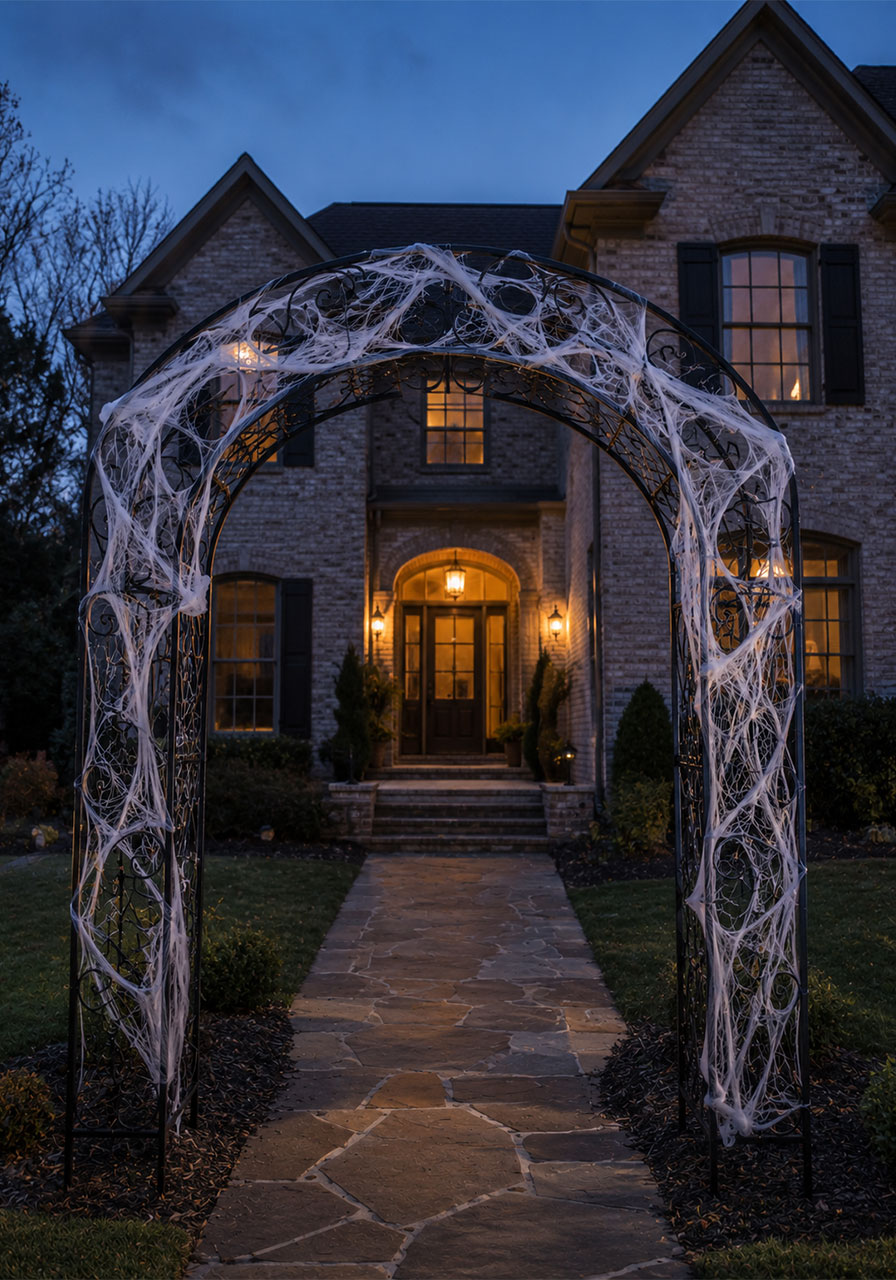
What you’ll need:
- 1 black metal garden arch
- 2 to 3 bags of cobweb material
- A few small plastic spiders
How to make it:
1. Install the metal arch along your front walkway, securing the feet into the ground.
2. Loosely weave cobweb material through the top and sides, leaving gaps so the black metal still shows through.
3. Tuck spiders into a few of the web pockets.
Pro tip: This arch also works beautifully for fall in general, so you can leave it up through Thanksgiving with the webs removed.
8. White and Orange Pumpkin Arch
What it is: A softer, more elegant take on the pumpkin arch, alternating white and orange pumpkins with fall leaf garland woven through.
Why it’s appealing: This style photographs beautifully and fits homes that want festive without looking scary, which makes it a favorite for family photo ops.
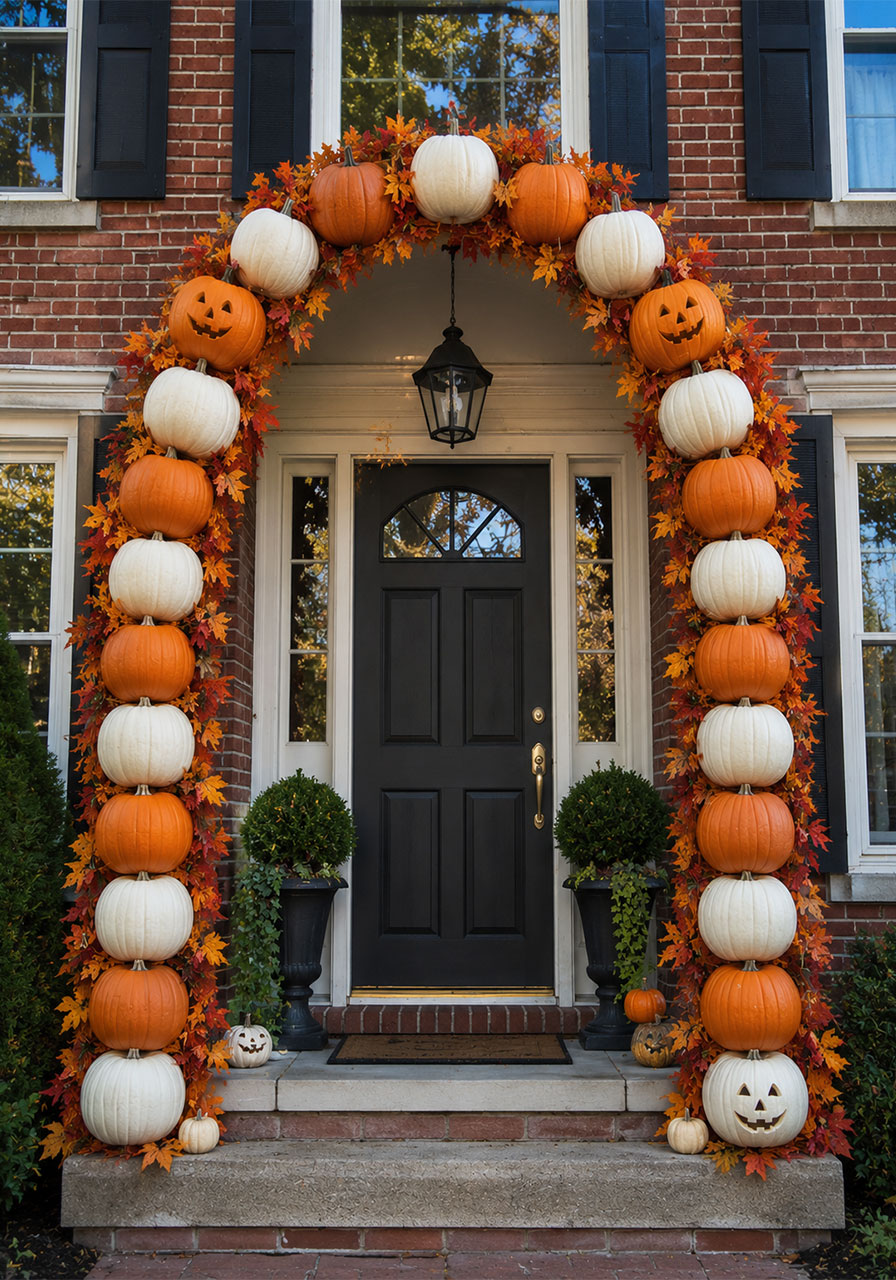
What you’ll need:
- 12 to 18 pumpkins in a mix of white and orange (real or foam)
- Faux fall leaf garland
- Arch frame
- Hot glue gun and floral wire
How to make it:
1. Attach your arch frame to your porch posts or door frame.
2. Wire or hot-glue pumpkins to the frame, alternating white and orange as you go.
3. Weave the leaf garland between and around the pumpkins to fill in gaps.
4. Add a few carved faces to select pumpkins for a hint of spookiness without overdoing it.
Pro tip: Group family costumes (like matching skeleton pajamas) in front of this arch. The neutral palette makes any costume color pop in photos.
9. Gothic Iron Gate Arch
What it is: A dramatic wrought-iron-style arch with bat silhouettes on top, flanked by tall faux stone pedestal columns.
Why it’s appealing: This is the most architectural option on the list, great if your home already has a classic or gothic exterior style you want to lean into.
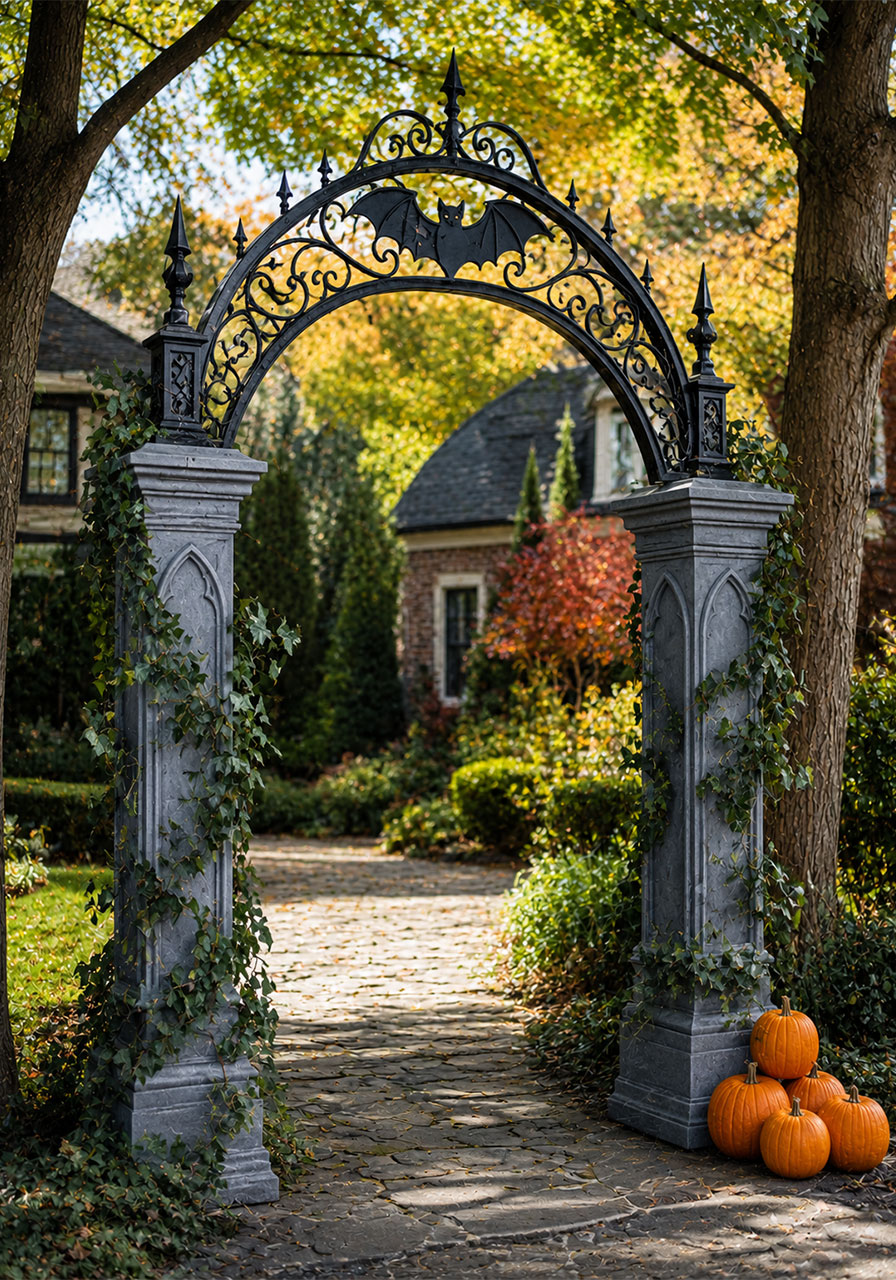
What you’ll need:
- A decorative metal arch (garden centers carry these) or PVC painted black
- Bat silhouette cutouts (craft foam or thin plywood)
- Foam pedestal columns or wrapped boxes
- Faux vine or ivy garland
How to make it:
1. Build or place your pedestal columns on either side of the entry.
2. Attach the metal arch across the top, securing it into the columns.
3. Glue bat silhouettes along the top edge of the arch.
4. Wrap faux vine around the columns for an aged, overgrown look.
Pro tip: A can of textured stone spray paint on the pedestals makes them look far more expensive than they are.
10. Halloween Balloon Arch
What it is: A colorful arch built entirely from balloons, either in a spooky orange, purple, and black palette or covered in jack-o’-lantern faced balloons.
Why it’s appealing: This is the most party-friendly option on the list. It’s ideal if you’re hosting a Halloween party or class event rather than just decorating for trick-or-treaters, and kids love helping blow up balloons.
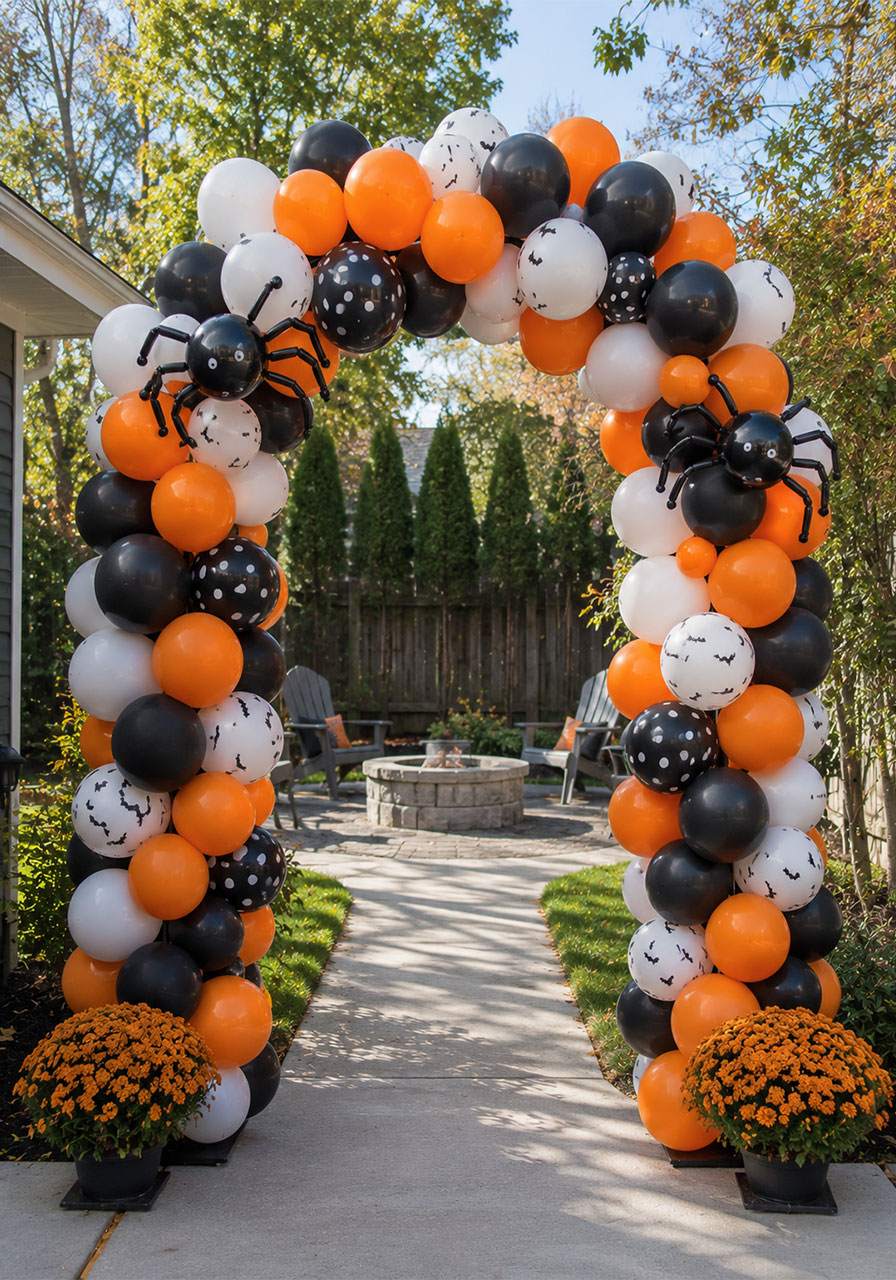
What you’ll need:
- An arch stand kit (base and pole)
- 60 to 100 balloons in orange, purple, and black
- A hand pump
- Balloon decorating strip or fishing line
How to make it:
1. Set up your arch stand base and pole according to the kit instructions.
2. Inflate balloons to similar sizes, mixing your colors as you go.
3. Twist pairs of balloons together and attach them to the decorating strip or tie directly to the frame.
4. Keep layering until the entire frame is covered with no visible gaps.
Pro tip: Balloons deflate faster in direct sun and cold nights, so plan to build this the same day as your event, not a week ahead.
11. Black, White & Orange Statement Arch
What it is: A bold, photo-ready pumpkin arch mixing black, white, and orange carved pumpkins with dramatic faces and autumn leaves.
Why it’s appealing: This color combo reads as modern and Instagram-worthy rather than traditional, which makes it a great option if you want your porch to stand out on social media.
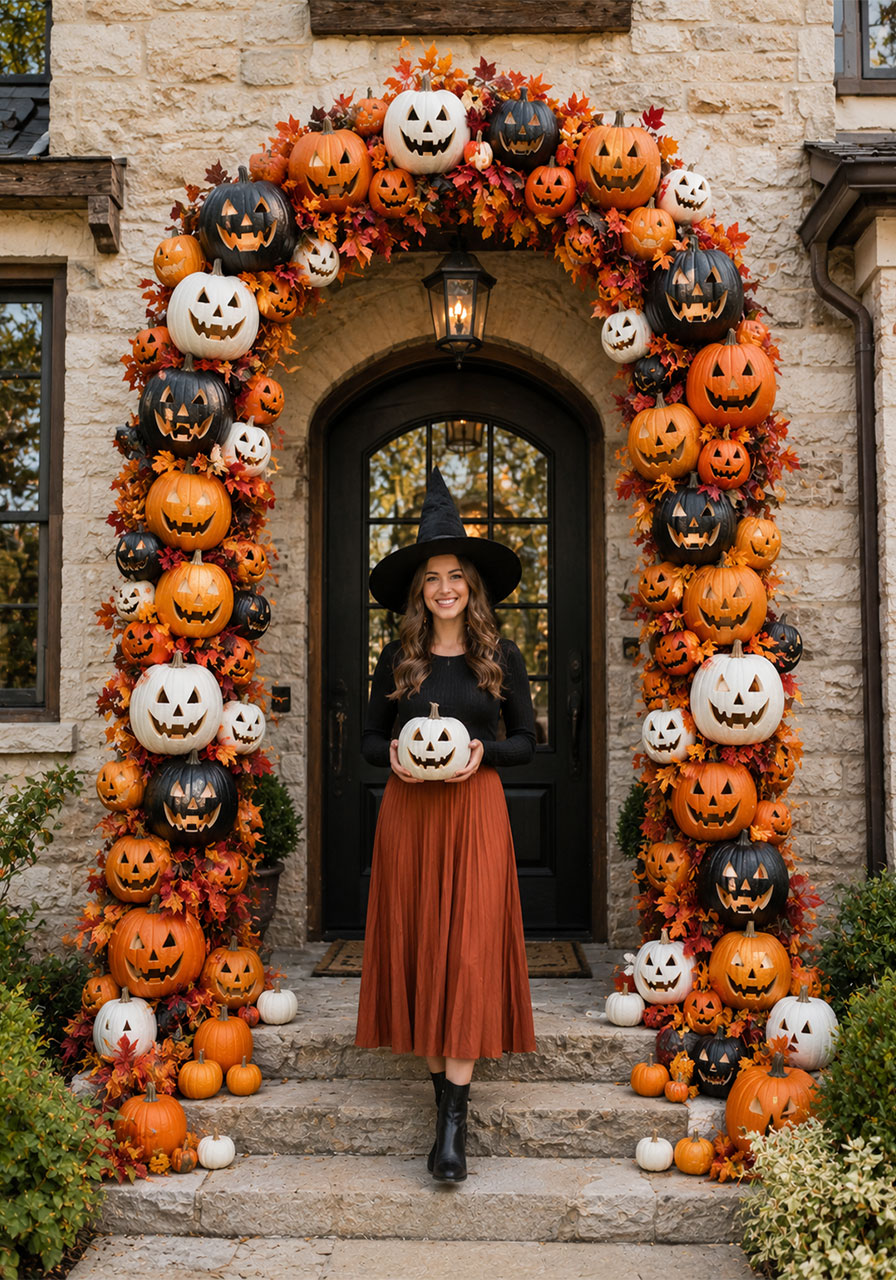
What you’ll need:
- 20+ pumpkins in black, white, and orange
- Faux fall leaf garland
- Arch frame
- Small wooden platforms or shelf brackets for stacking
How to make it:
1. Carve your pumpkins with a variety of expressions, and paint the black pumpkins ahead of time if using real ones.
2. Mount your arch frame securely to your porch structure.
3. Stack pumpkins in a random color pattern rather than a strict repeat, which looks more natural.
4. Fill any visible gaps with leaf garland.
Pro tip: Black pumpkins are usually painted, not grown, so use exterior spray paint made for plastic or a matte black craft paint on real pumpkins for the cleanest finish.
12. Spider Attack Entryway
What it is: A dramatic, oversized spider descending from the entry with a full web draped across the doorway and smaller spiders scattered throughout.
Why it’s appealing: This is the go-to idea for anyone who wants their house to be “the scary one” on the block. It works especially well on homes with a covered entry or porch overhang.
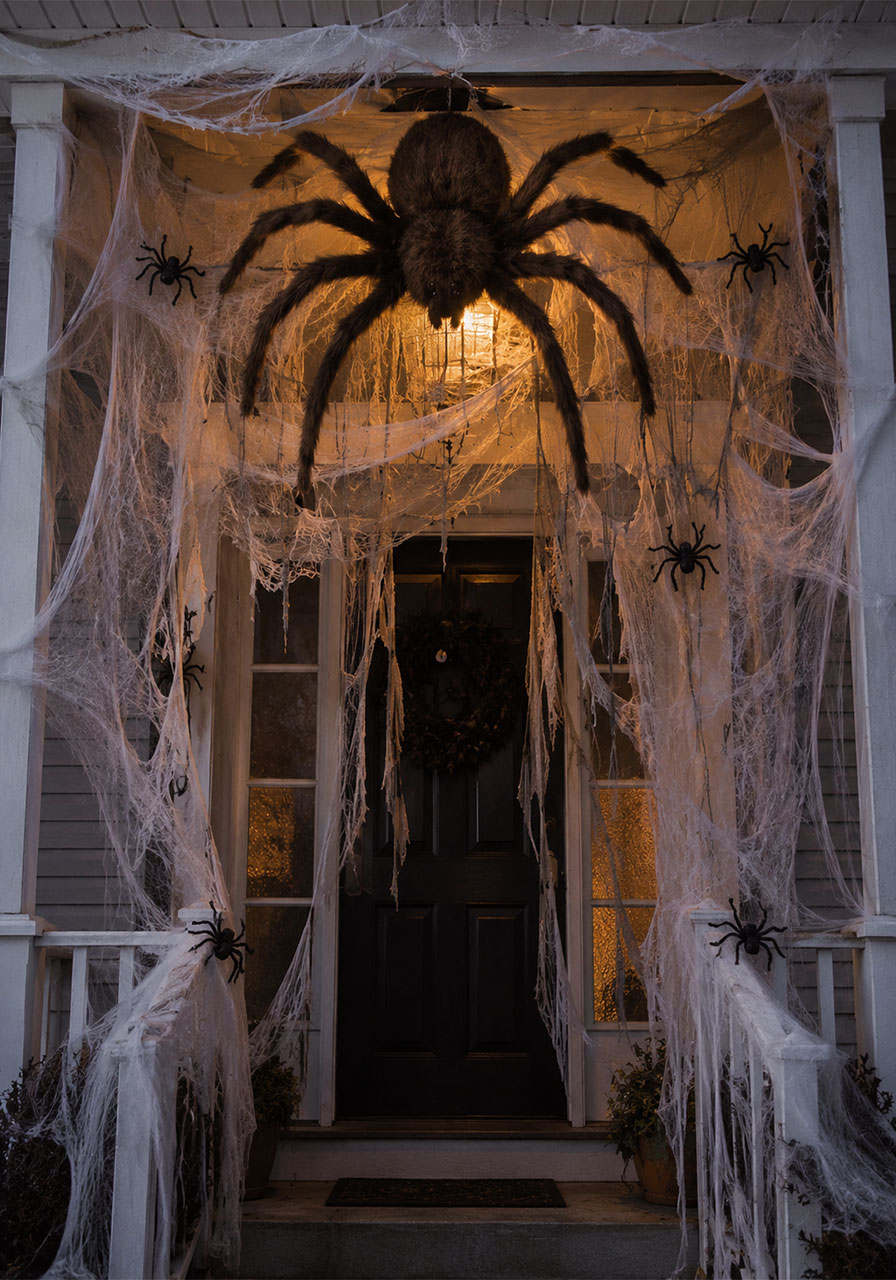
What you’ll need:
- 1 large hanging spider decoration
- Cheesecloth or gauze fabric (for ghostly draping)
- 4 to 6 medium spiders
- Cobweb material
How to make it:
1. Hang the large spider from your porch overhang directly above the walkway.
2. Drape cheesecloth across the doorway and down the sides, tearing edges for a tattered look.
3. Layer cobweb material over the cheesecloth for texture.
4. Tuck the medium spiders into corners, on railings, and near the ground.
Pro tip: Spray the gauze lightly with black or gray fabric dye before hanging for an aged, dusty look.
13. Ribbon & Deco Mesh Halloween Tree Arch
What it is: A colorful, textured arch built from wide ribbon, deco mesh, and small figural ornaments like witches and pumpkins.
Why it’s appealing: This is the most decor-forward, “professionally designed” looking arch on the list. It uses techniques straight from wreath-making, so if you enjoy crafting, this is the most satisfying build.
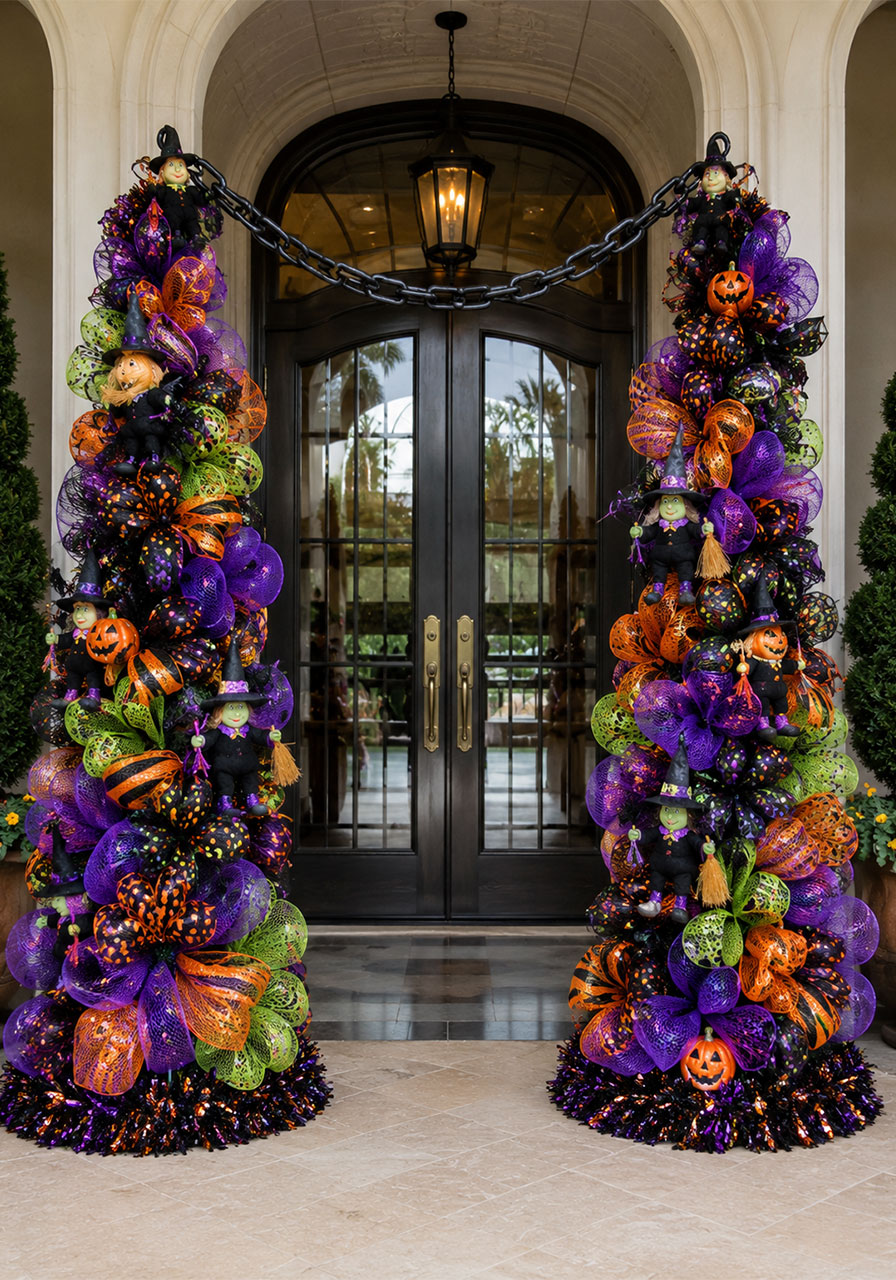
What you’ll need:
- 2 tomato cages or tree-shaped foam forms as a base
- Assorted wide ribbon and deco mesh in purple, orange, green, and black
- Small Halloween picks and ornaments
- Zip ties
How to make it:
1. Set up your two base forms on either side of the entry.
2. Zip-tie ribbon and mesh in loops around each form, working from bottom to top.
3. Tuck in Halloween picks and ornaments as you go for pops of color.
4. Arch the tops toward each other, or connect them with an additional ribbon-wrapped garland.
Pro tip: Buy ribbon in odd numbers of colors (3 or 5) rather than even numbers. It looks more intentional and less matchy.
14. Witches Balloon Arch Sign
What it is: A flat photo backdrop shaped like an archway, topped with balloon letters spelling “Witches,” perfect for a Halloween party entrance or photo booth.
Why it’s appealing: This one doubles as both decor and a photo backdrop, which makes it perfect for classroom parties, playdates, or a neighborhood Halloween gathering.
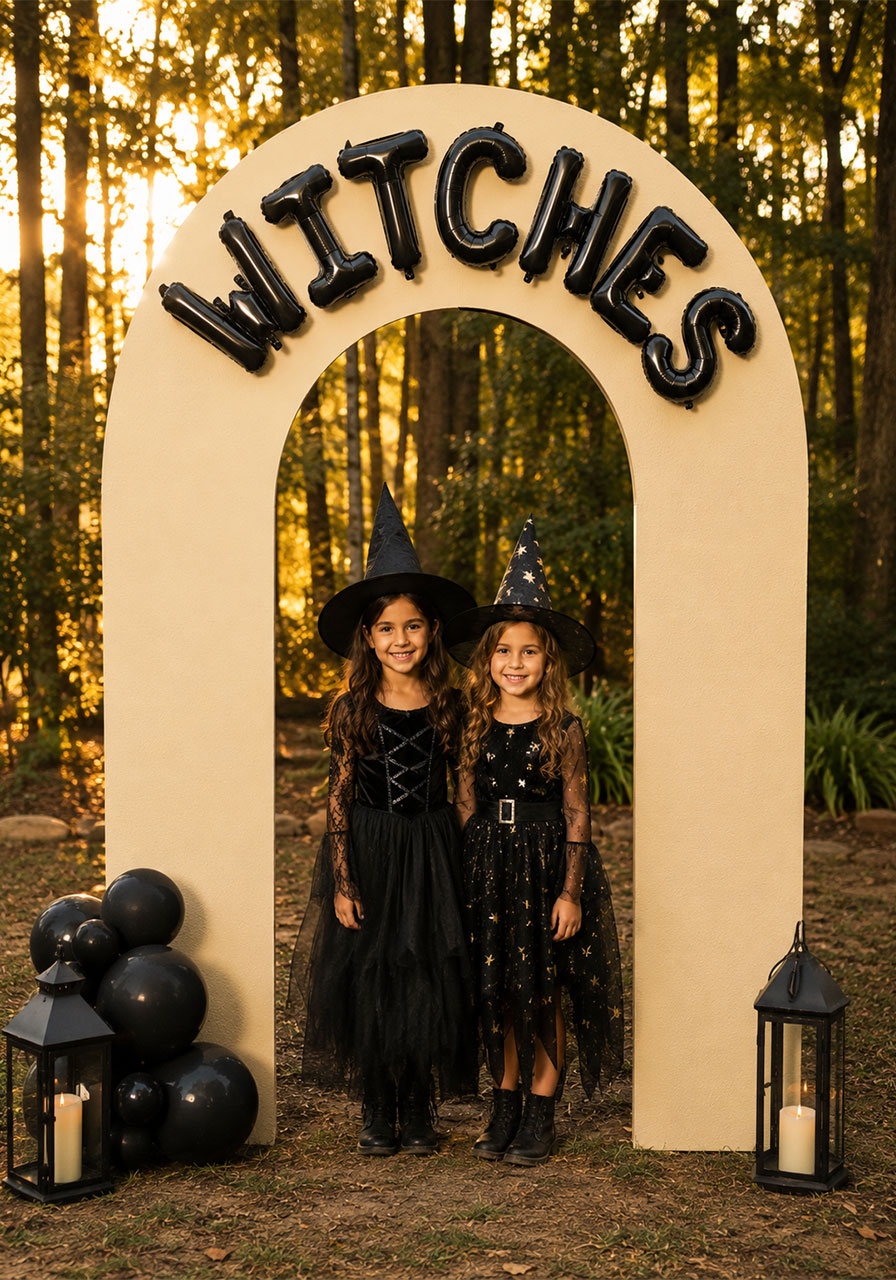
What you’ll need:
- Foam board or plywood cut into an arch shape
- Balloon letter kit
- Black balloons for an accent cluster
- Two lanterns or props for the base
How to make it:
1. Cut your foam board or plywood into a simple arch shape and paint it a solid neutral color.
2. Inflate your balloon letters and attach them across the top edge.
3. Cluster a few black balloons at the base on one side for balance.
4. Prop the backdrop upright with a wooden easel brace on the back.
Pro tip: Keep this backdrop light enough for one person to carry so you can reposition it for the best afternoon light when taking photos.
15. Hay Bale Tunnel Entrance
What it is: A short tunnel-style walkway formed by stacking hay bales along both sides of your path, topped with an arched frame of cornstalks.
Why it’s appealing: This creates an immersive, farm-style entrance that feels like walking into a mini pumpkin patch, and it’s incredibly sturdy since hay bales don’t blow over or need much anchoring.
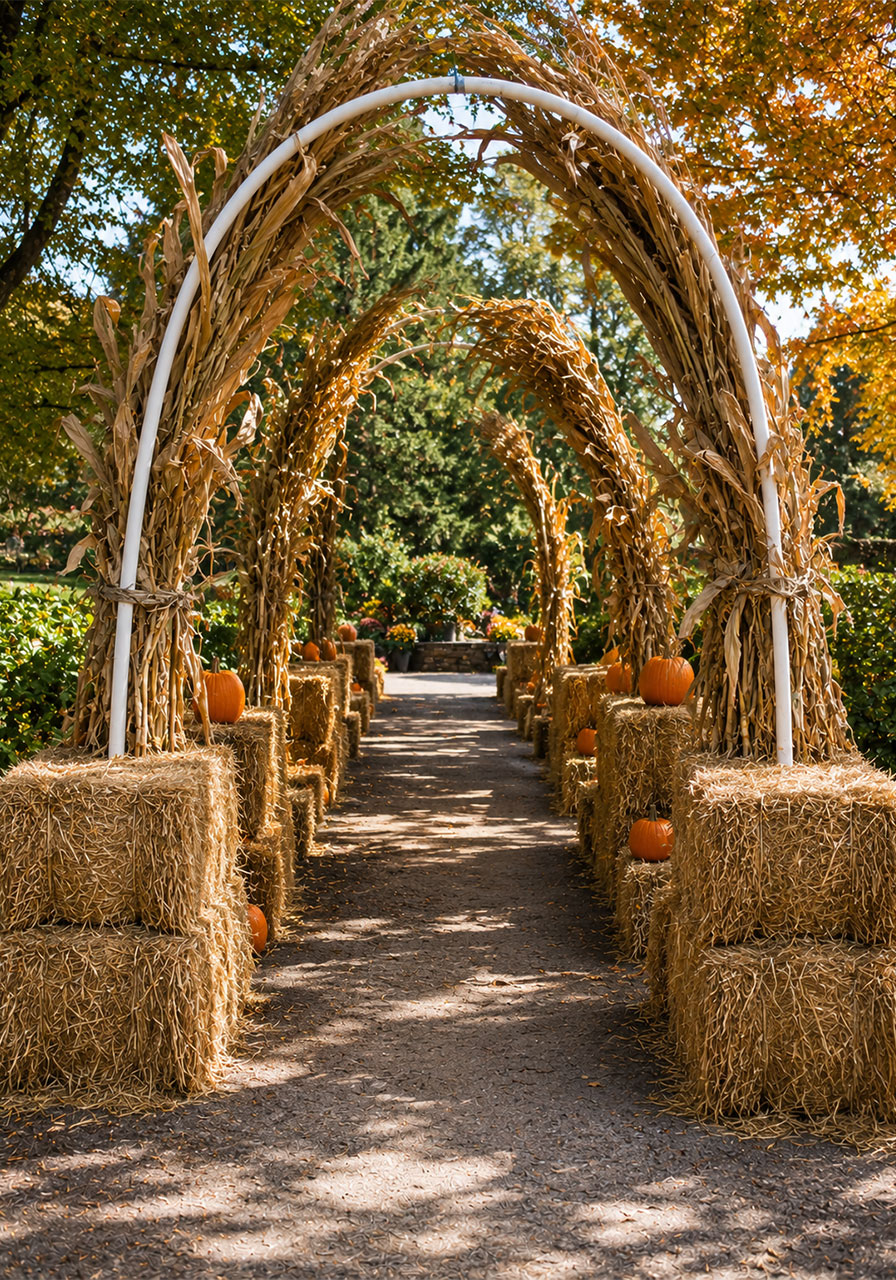
What you’ll need:
- 8 to 10 small hay bales
- 4 to 6 cornstalk bundles
- Twine
- A curved PVC frame
How to make it:
1. Stack hay bales two to three high along both sides of your walkway.
2. Install the curved PVC frame at the entrance, anchoring the base into the hay bales themselves.
3. Tie cornstalk bundles to the frame with twine, arching them up and over.
4. Tuck small pumpkins into the gaps between hay bales along the path.
Pro tip: Place hay bales on a tarp or pallet if your ground gets wet, so they don’t get moldy underneath before Halloween arrives.
16. Pumpkin & Hay Photo Booth Arch
What it is: A rustic, farmhouse-style arch built from a wooden ladder frame, hay bale base, and a cascade of pumpkins in graduating sizes.
Why it’s appealing: This is a beautiful, natural-looking backdrop that works for both Halloween and general fall photos, so it earns its keep well past October 31st.
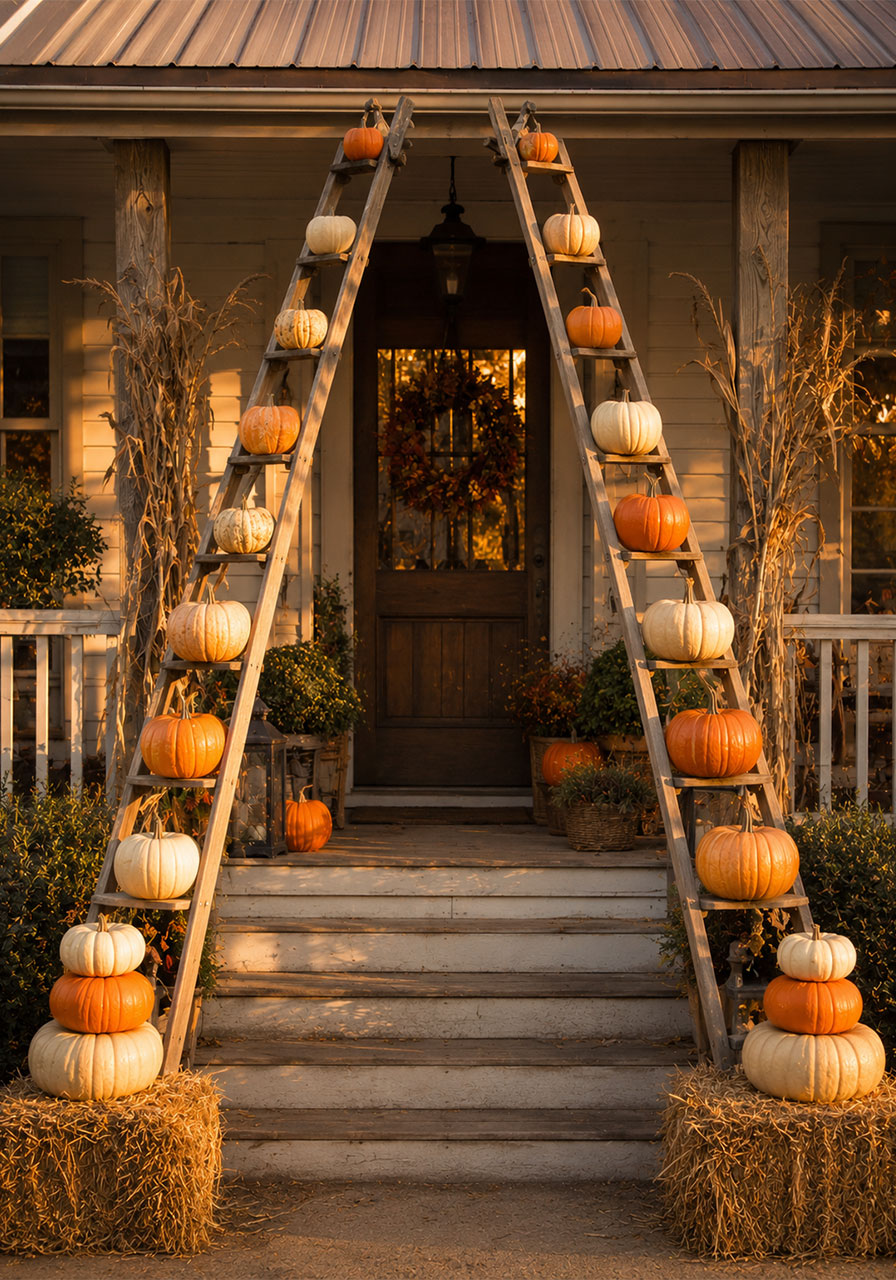
What you’ll need:
- 2 wooden ladders or an A-frame arch
- 2 small hay bales
- 15 to 20 pumpkins in mixed sizes and colors
- Twine and floral wire
How to make it:
1. Set the ladders or A-frame in place at your entry, angled slightly inward at the top to form an arch shape.
2. Position a hay bale at the base of each side.
3. Wire or nestle pumpkins onto the ladder rungs, largest at the bottom and smallest toward the top.
4. Stack a few extra pumpkins on top of the hay bales to finish the base.
Pro tip: This setup doubles as a fall market display before Halloween. Swap the carved pumpkins for uncarved ones through most of October, then carve closer to the big day.
17. Scarecrow Family Welcome Arch
What it is: Two friendly scarecrows perched on hay bales, connected by a simple wooden arch draped with a mix of pumpkins and fall foliage.
Why it’s appealing: This is the most family-friendly, non-scary option on the bonus list, which makes it a great choice for homes with younger trick-or-treaters or for a school event.
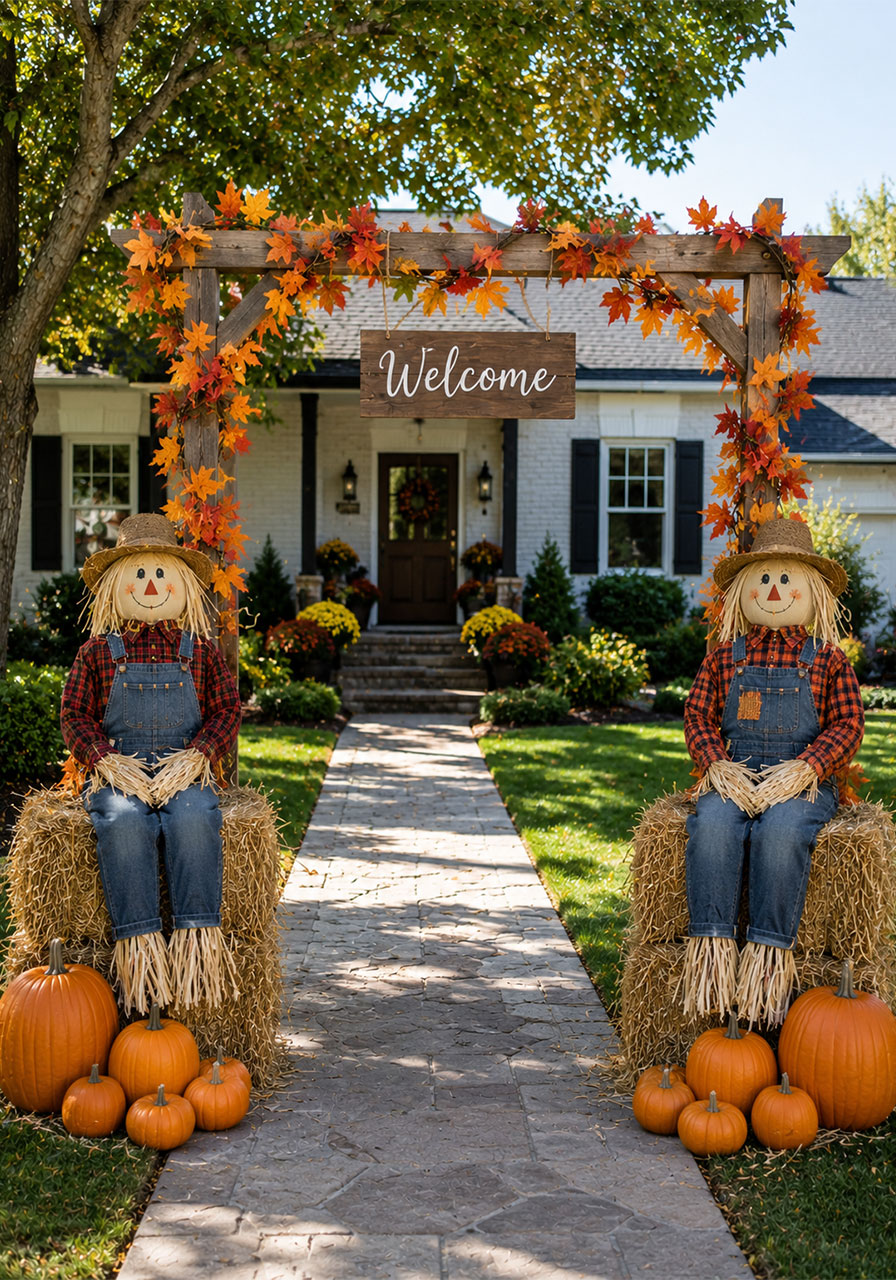
What you’ll need:
- 2 scarecrow figures (store-bought or DIY from old clothes and straw)
- 2 hay bales
- A simple wooden or PVC arch frame
- Pumpkins and faux autumn leaves
How to make it:
1. Seat or stand a scarecrow on each hay bale, securing them with a stake through the base if needed.
2. Install the arch frame between the two hay bales.
3. Drape leaf garland along the arch and tuck pumpkins into the base of each hay bale.
4. Add a small sign or banner across the top reading “Welcome” or “Happy Fall.”
Pro tip: Stuff extra straw into the scarecrows’ sleeves and pant legs so they hold their shape better in wind.
18. Illuminated Pumpkin Stack Topiary Arch
What it is: Two tall, cone-shaped “pumpkin topiaries” made by stacking mini pumpkins on a wire form, connected by a lighted garland arch.
Why it’s appealing: This gives you serious height and drama on either side of your door without needing a massive amount of pumpkins, since the wire form does most of the visual heavy lifting.
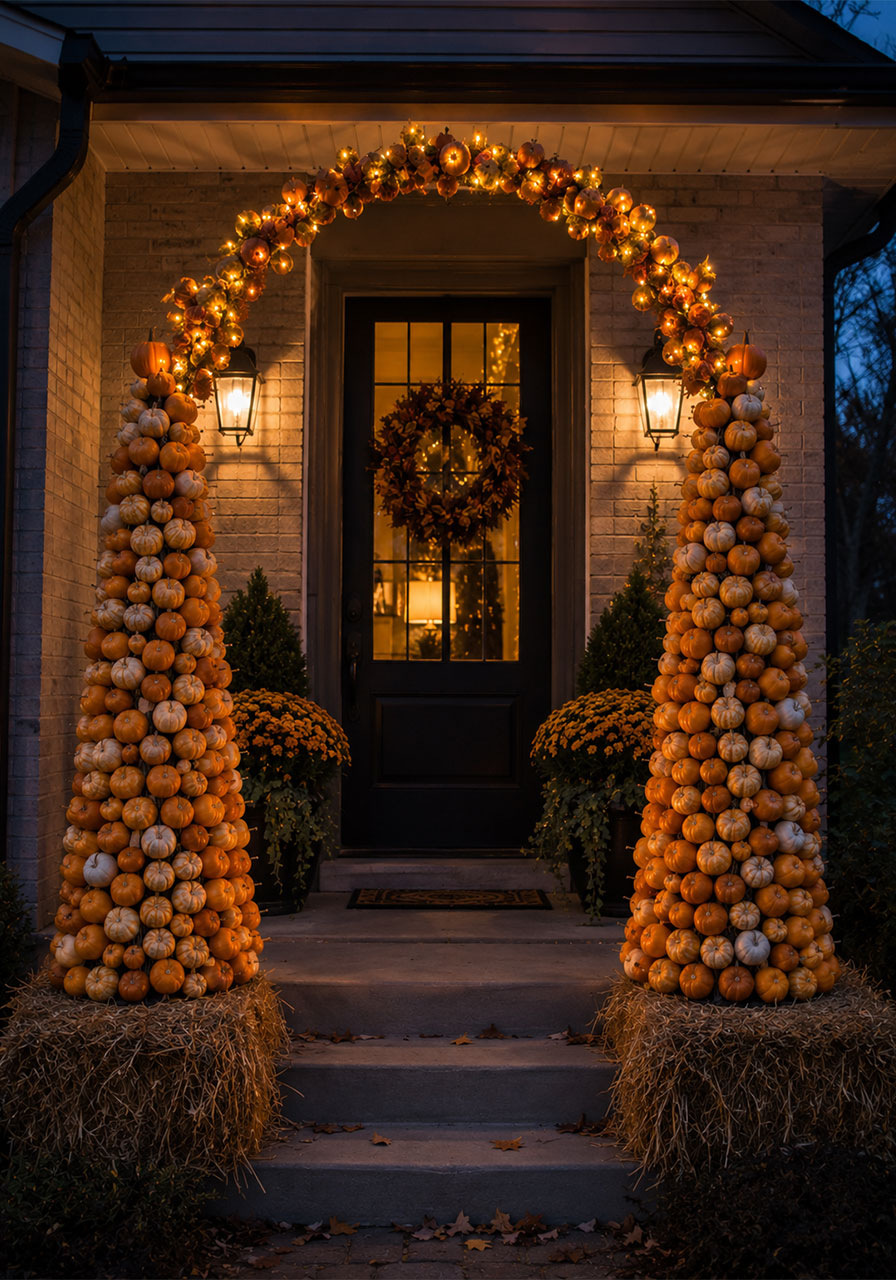
What you’ll need:
- 2 cone-shaped wire topiary forms
- 30 to 40 mini pumpkins per side
- String lights
- Floral wire or wood skewers
How to make it:
1. Skewer mini pumpkins onto wood dowels or wire and insert them into the topiary form, working bottom to top.
2. Fill in any gaps until the cone shape is fully covered.
3. Weave string lights between the connecting garland that arches over your doorway.
4. Add a hay bale at the base of each topiary for a finished, grounded look.
Pro tip: Mini pumpkins last longer than full-size ones once cut or skewered, but check them weekly and swap out any that soften.
Frequently Asked Questions
How far in advance can I build a real pumpkin arch?
Uncarved pumpkins can go up 3 to 4 weeks ahead in cool weather. Once carved, plan on 5 to 7 days before they start to shrink and cave in.
Will hay bales attract pests?
Occasionally, yes, especially in warm climates. Keeping bales off direct soil on a pallet or tarp and choosing a dry spot helps a lot.
What’s the cheapest arch idea on this list?
The cobweb metal arch and pumpkin pail archway are both budget winners, since they mostly rely on dollar-store materials and a frame you likely already have.
Final Thoughts
You really don’t need a huge budget or a ton of building experience to pull off a showstopping outdoor Halloween arch. Start with what you already have on hand, whether that’s leftover branches, extra hay bales from a fall craft, or a simple metal garden arch, then layer in pumpkins, lights, and a little imagination.
Pick one idea from this list, or mix a couple together, and you’ll have a porch that trick-or-treaters remember long after October ends.
Happy decorating!
