
Fall break is coming, the pumpkin spice is flowing, and your students (or your own kids) are already asking one question: “Are we doing Halloween stuff yet?”
Good news – you don’t need a professional prop budget or a garage full of fog machines to turn your front porch into the neighborhood’s favorite spooky stop. You just need a few dollar-store supplies, an afternoon, and this list.
We’ve rounded up 23 easy, budget-friendly Halloween porch decorations that look like they took hours (they didn’t) and feel like they cost a fortune (they really, really didn’t). Many double as fantastic family or classroom craft projects, so we’ve flagged the ones that are perfect for little hands and the ones best left to the grown-ups.
Grab your hot glue gun, and let’s get this porch party started.
1. Frightful Flying Bats
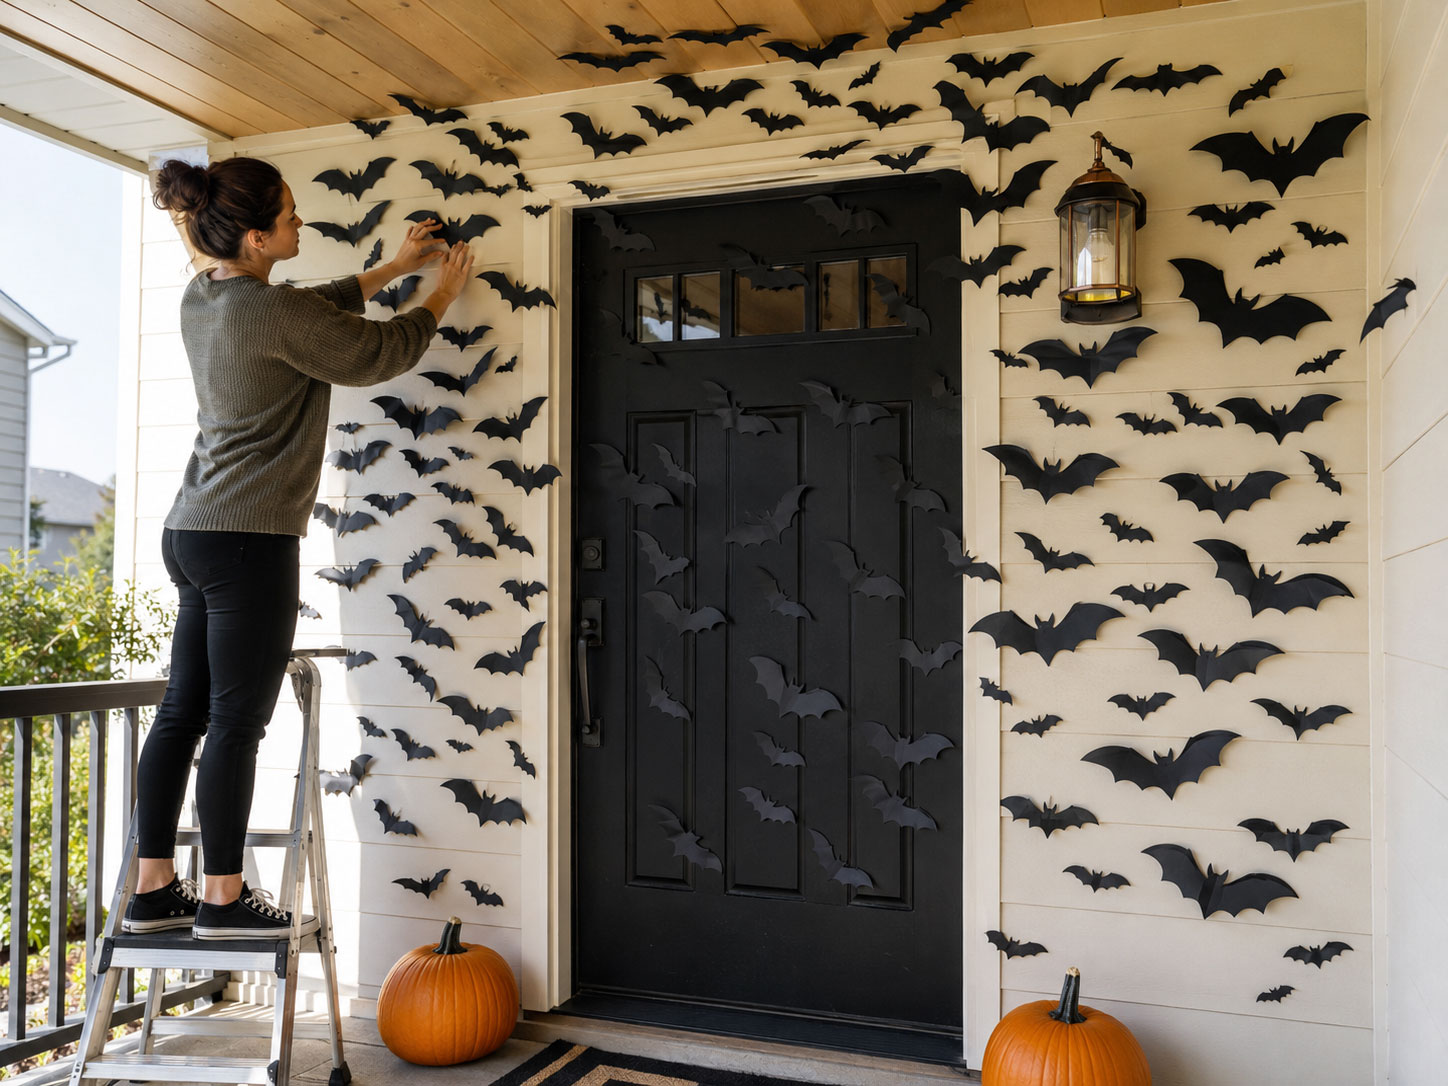
Nothing says “Halloween has officially arrived” like a swarm of bats taking over your entryway. This project uses simple black paper cutouts, and the effect is genuinely jaw-dropping once you see them clustered together.
Best For: Front doors, porch ceilings, entryway arches. Prep Time: 1–2 hours. Difficulty: Easy, kid-friendly.
What You’ll Need:
- Black cardstock or construction paper
- Bat template (free printable or hand-drawn)
- Scissors
- Removable double-sided tape or mounting putty
How to Make It:
1. Print or trace a bat template onto black cardstock.
2. Cut out as many bats as you want – the more, the spookier. Aim for at least 30–40 for a full “swarm” effect.
3. Fold each bat gently down the center to give the wings a slight 3D lift.
4. Stick them to your door, walls, and ceiling using removable tape, clustering them tightly near the door and spreading them thinner as they “fly” outward.
Pro Tip: Vary the bat sizes. Mixing small, medium, and large bats makes the swarm look like it’s actually moving toward your door instead of just sitting flat on the wall.
Teacher & Parent Bonus: This is a wonderful hands-on symmetry lesson. Have kids fold their paper in half before cutting so both wings match perfectly – an easy, sneaky geometry win.

2. Spider Webs of Fear
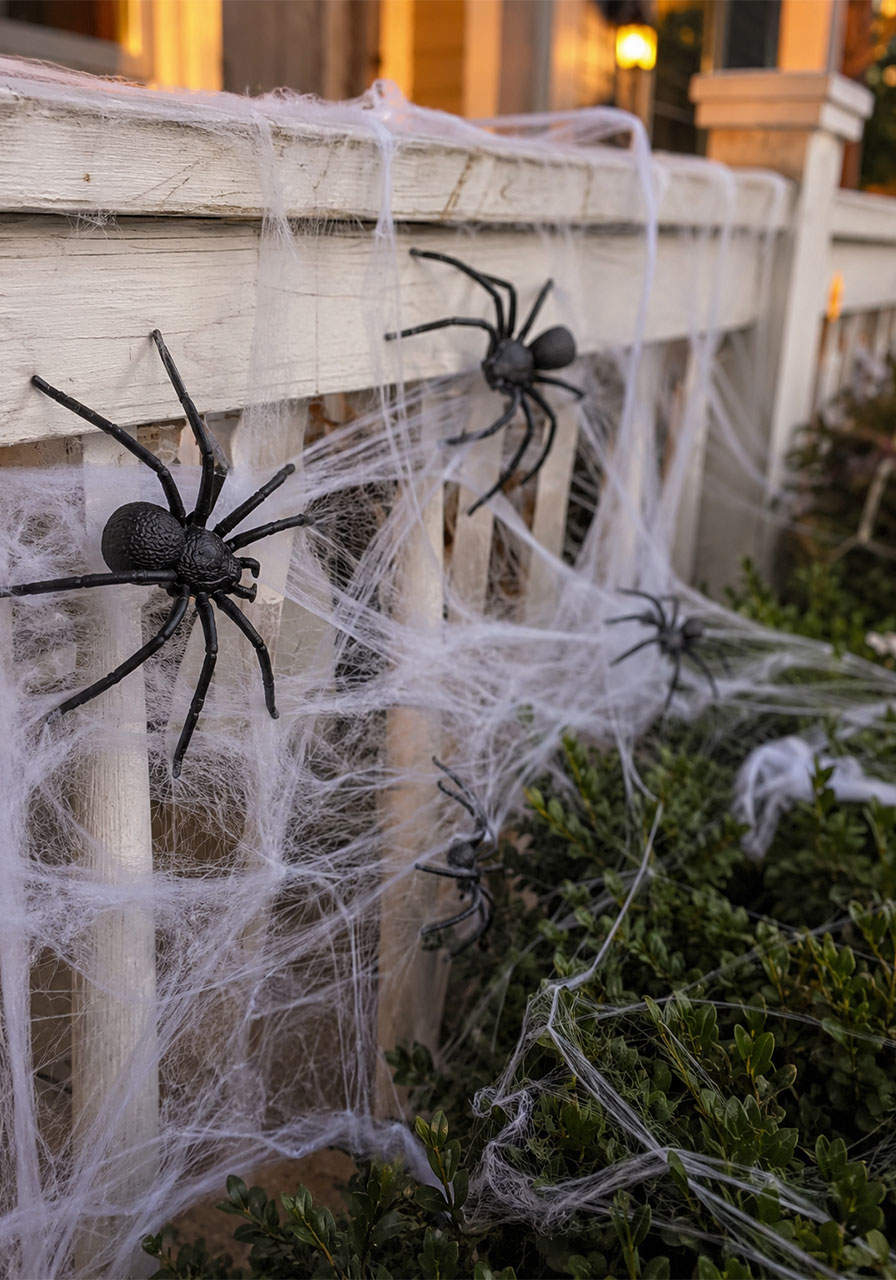
There’s nothing quite as creepy as walking through a porch draped in cobwebs. This is one of the fastest, cheapest transformations on this entire list.
Best For: Railings, doorways, bushes. Prep Time: 20–30 minutes. Difficulty: Very easy.
What You’ll Need:
- Bag of stretchy synthetic spider web
- Plastic spiders (oversized ones make the biggest impact)
- Removable hooks or command strips
How to Make It:
1. Pull the synthetic web apart gently to stretch it out – this is oddly satisfying, promise.
2. Drape it across railings, over doorframes, and through bushes.
3. Tuck plastic spiders into the webbing at different heights so they’re not all in one clump.
4. Add a few extra loose strands trailing onto the ground for a “the spiders have taken over” effect.
Pro Tip: Messy is the goal here. The more tangled and uneven the web looks, the more realistic it reads from the street.
3. Eerie Floating Ghosts
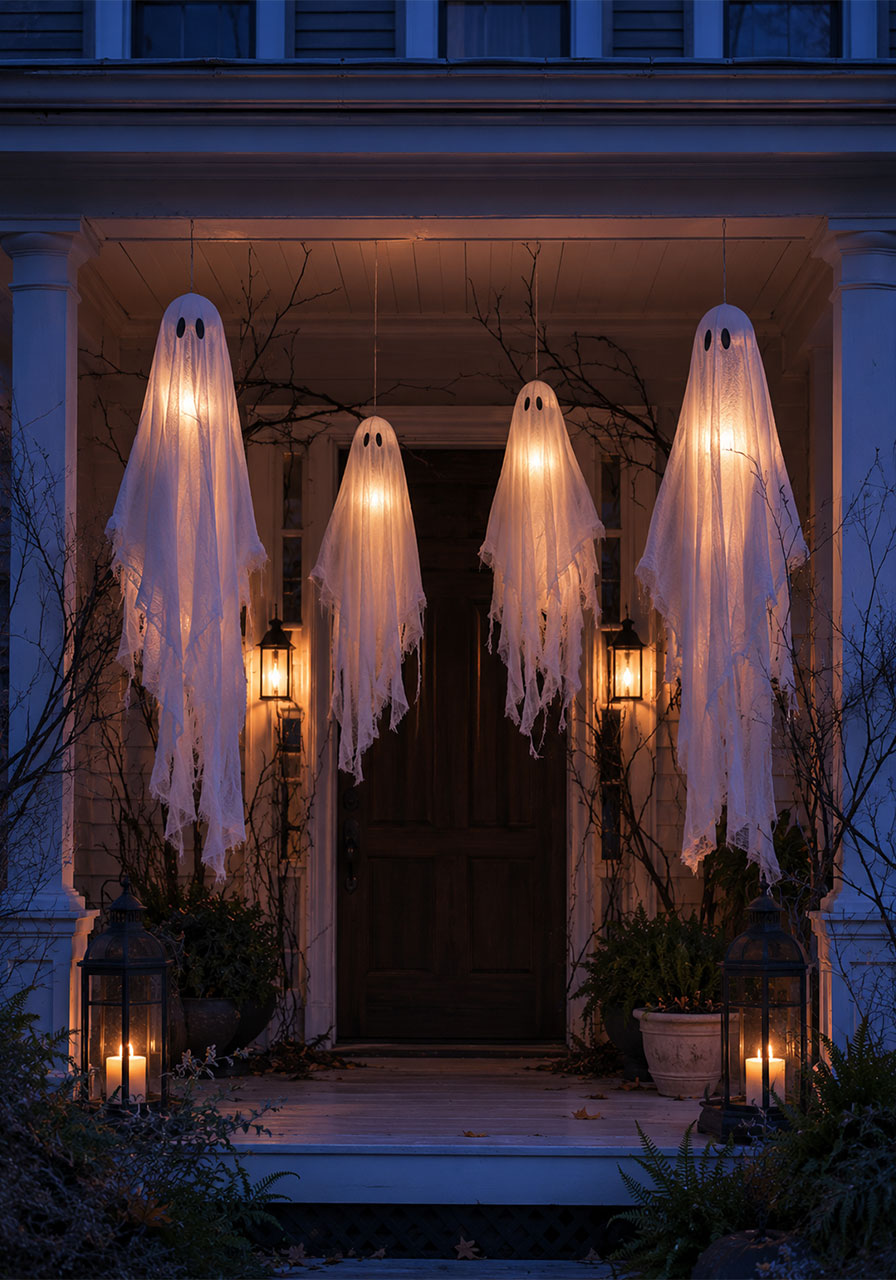
Ghosts are the ultimate Halloween classic, and homemade ones have a charm that store-bought versions just can’t match. Made from old sheets or cheesecloth, these ghosts seem to drift and float when the wind catches them just right.
Best For: Porch ceilings, tree branches, railings. Prep Time: 30–45 minutes. Difficulty: Easy, kid-friendly with adult help for hanging.
What You’ll Need:
- Old white sheets or cheesecloth
- Styrofoam balls or balloons (for the “head”)
- Fishing line or clear string
- Black marker or fabric paint for eyes
How to Make It:
1. Place a styrofoam ball or inflated balloon inside the center of your sheet to form the head shape.
2. Tie a piece of string around the “neck” to secure the sheet in place.
3. Draw or paint two simple black oval eyes on the head.
4. Hang your ghost from the porch ceiling or a tree branch using fishing line so it appears to float.
Pro Tip: Hang several ghosts at slightly different heights and add a small battery-operated light inside one or two of them for an eerie glow after dark.
Level It Up: Want the showstopper version? Build one oversized glowing ghost for a mini graveyard scene, then position smaller ghosts near windows and pathways so it feels like they’re watching from every angle.
4. Twisted Branch Archway
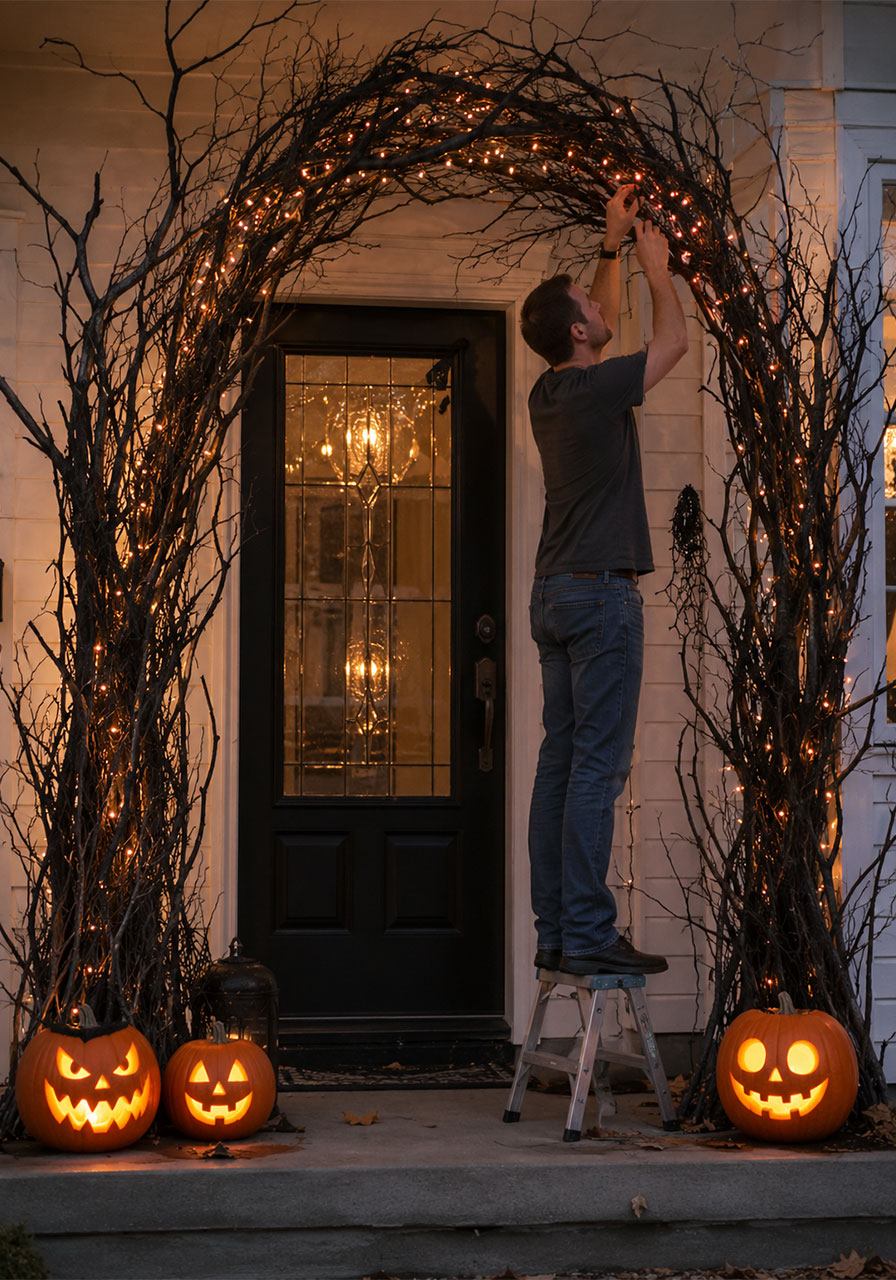
This one transforms your entire entryway into something straight out of a haunted forest, and it costs almost nothing if you have a yard full of fallen branches.
Best For: Front doors, walkways. Prep Time: 1 hour. Difficulty: Moderate – best with an adult handling the branches.
What You’ll Need:
- Twisted, gnarled branches (fallen ones work great)
- Zip ties or floral wire
- Warm white or orange fairy lights
- Optional: faux cobwebs
How to Make It:
1. Collect an assortment of curved or twisted branches from your yard.
2. Secure the branches to your doorframe or porch posts using zip ties, arching them up and over the entrance.
3. Weave fairy lights through the branches, tucking the wire out of sight.
4. Drape faux cobwebs across a few branches for extra texture.
Pro Tip: Spray-paint your branches black before assembling for an even more dramatic, gothic look.
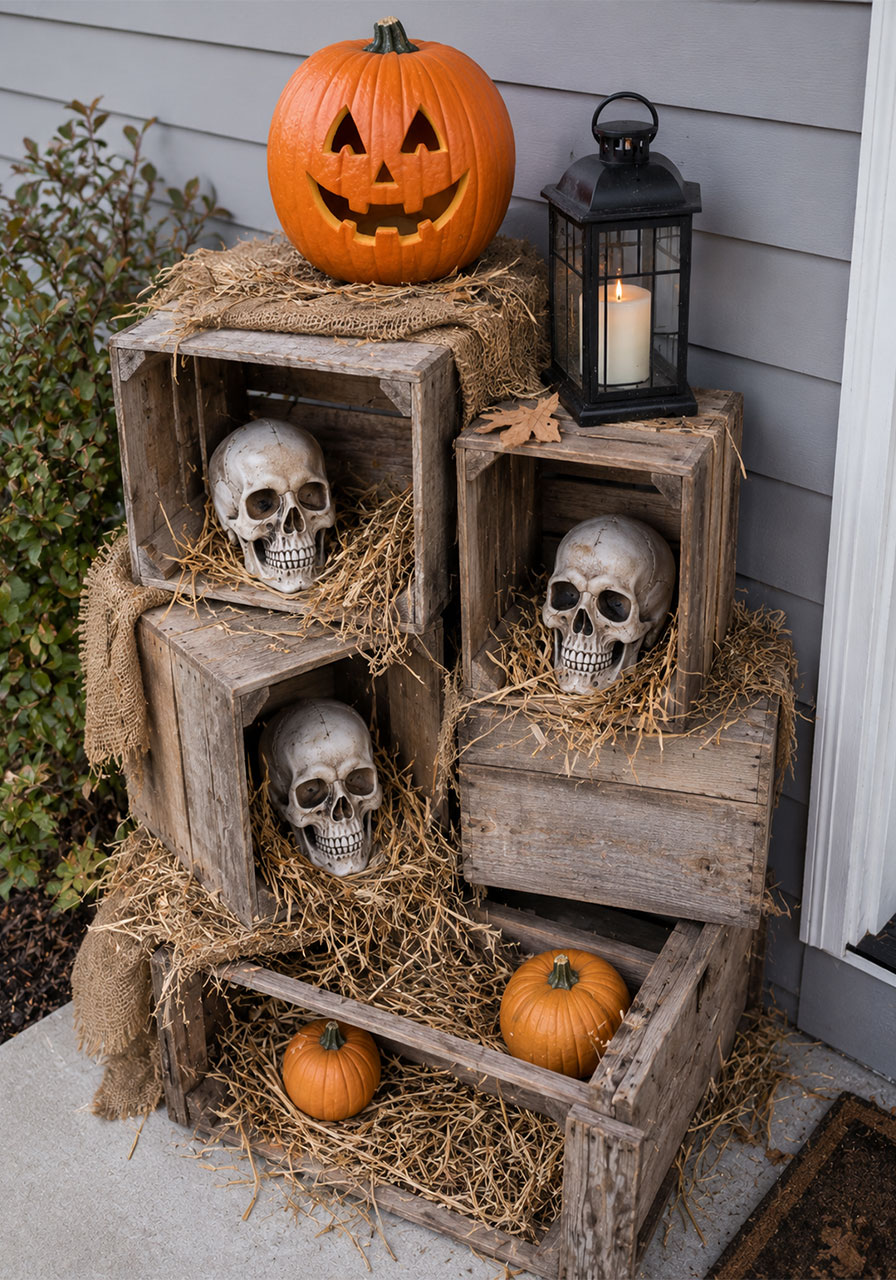
5. Rustic Wooden Crates
Wooden crates are a decorator’s best friend, and they turn any Halloween pile of props into an intentional, styled display.
Best For: Porch corners, entry steps. Prep Time: 30 minutes. Difficulty: Easy.
What You’ll Need:
- 2–4 wooden crates in varying sizes
- Pumpkins (real or faux)
- Plastic skulls or creepy critters
- Hay or burlap for texture
How to Make It:
1. Stack your crates in a staggered, uneven pattern for visual interest.
2. Tuck a layer of hay or burlap into and around the crates.
3. Fill and top each crate with pumpkins, skulls, or spooky critters.
4. Add one taller item, like a lantern, at the top of the stack to draw the eye upward.
Pro Tip: Odd numbers look more natural than even ones. Stick to three or five crates instead of two or four.
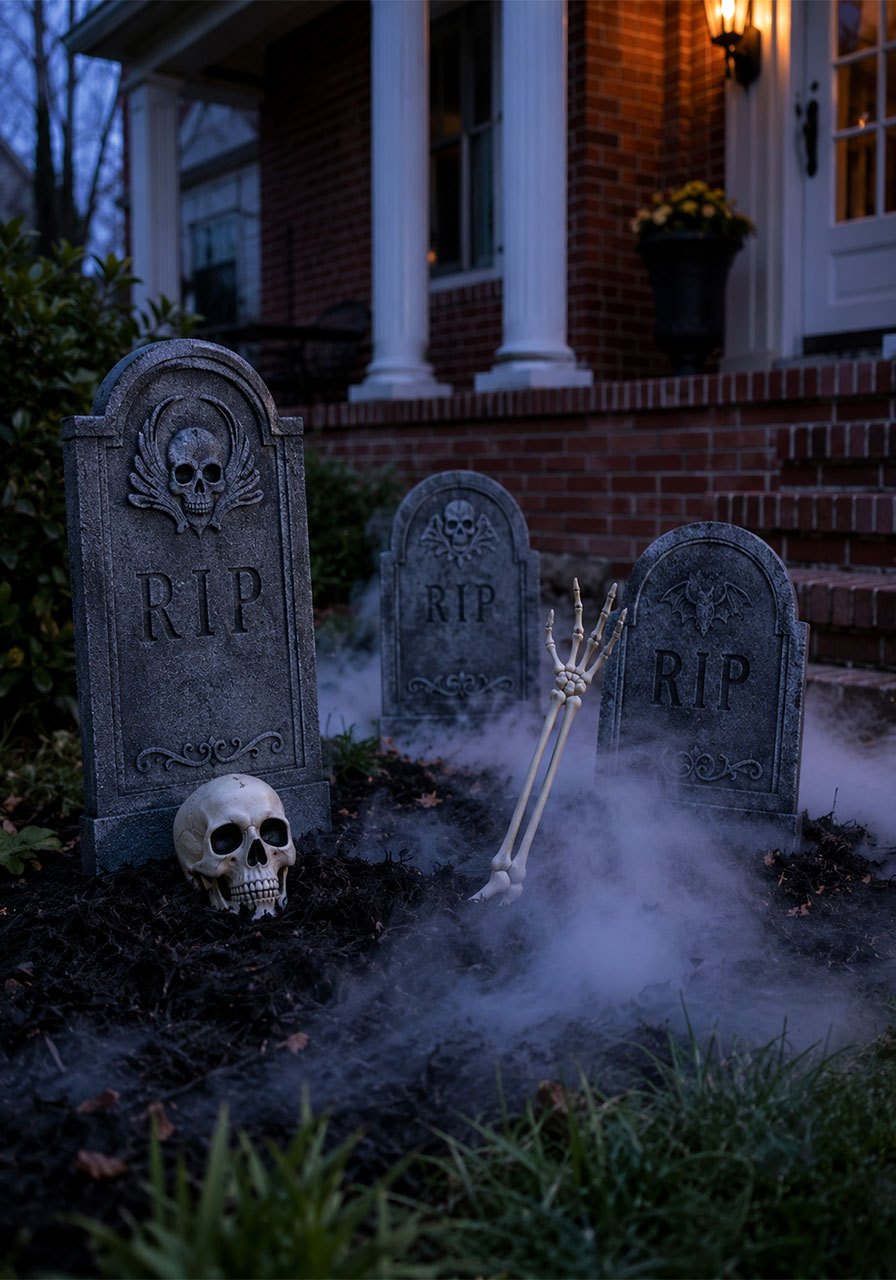
6. Bone-Chilling Mini Graveyard
A tiny cemetery scene on your porch steps is an instant showstopper, and it’s far easier to build than it looks.
Best For: Front lawns, porch steps. Prep Time: 1 hour. Difficulty: Easy, great family project.
What You’ll Need:
- Foam or cardboard tombstones (DIY or store-bought)
- Plastic skulls and skeleton bones
- Black mulch or dark mesh fabric
- Optional: fog machine
How to Make It:
1. Cut tombstone shapes from foam board or thick cardboard, then paint them gray with a “worn stone” texture using a dry brush.
2. Push wooden stakes into the back of each tombstone so they can stand upright in the ground.
3. Arrange tombstones at varying heights and angles – never in a perfectly straight line.
4. Scatter skulls and bones around the base, half-buried for realism, and add a fog machine for atmosphere.
Pro Tip: Write a punny epitaph on each tombstone. It’s a small touch that gets guests to actually stop and read.
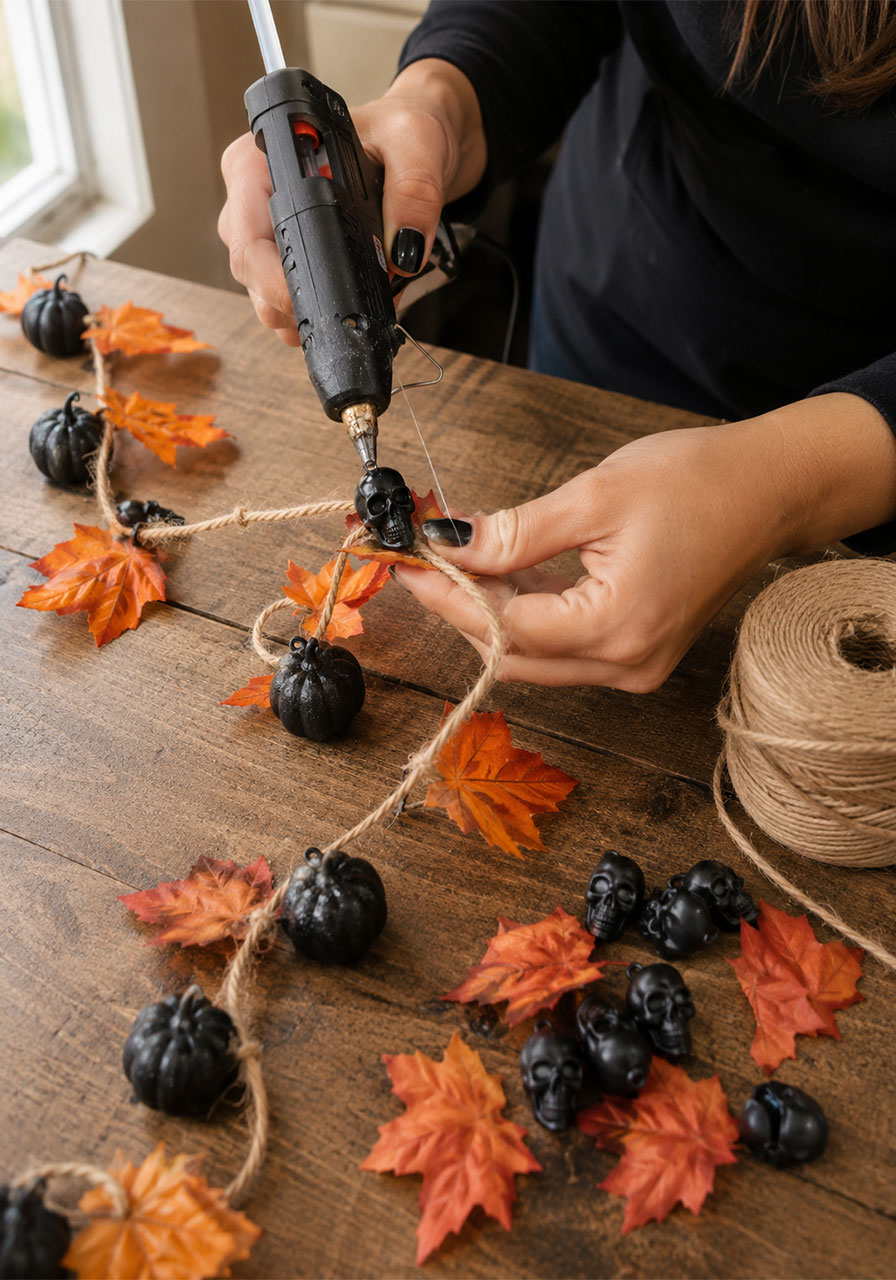
7. Gory Garlands
Garlands aren’t just a Christmas thing. A Halloween version made from faux leaves, mini pumpkins, or tiny skulls adds finished, festive texture anywhere you drape it.
Best For: Railings, doorframes, windows. Prep Time: 45 minutes. Difficulty: Easy.
What You’ll Need:
- Twine or ribbon
- Faux leaves, mini pumpkins, or small skull/bone accents
- Hot glue gun
How to Make It:
1. Cut a length of twine long enough to drape across your target area, plus a few extra feet for slack.
2. Hot glue leaves, pumpkins, or bone accents along the twine, alternating for a balanced pattern.
3. Drape and pin the finished garland across railings, doorframes, or window frames.
Pro Tip: Let the garland sag slightly between attachment points instead of pulling it taut – the gentle drape looks far more natural.
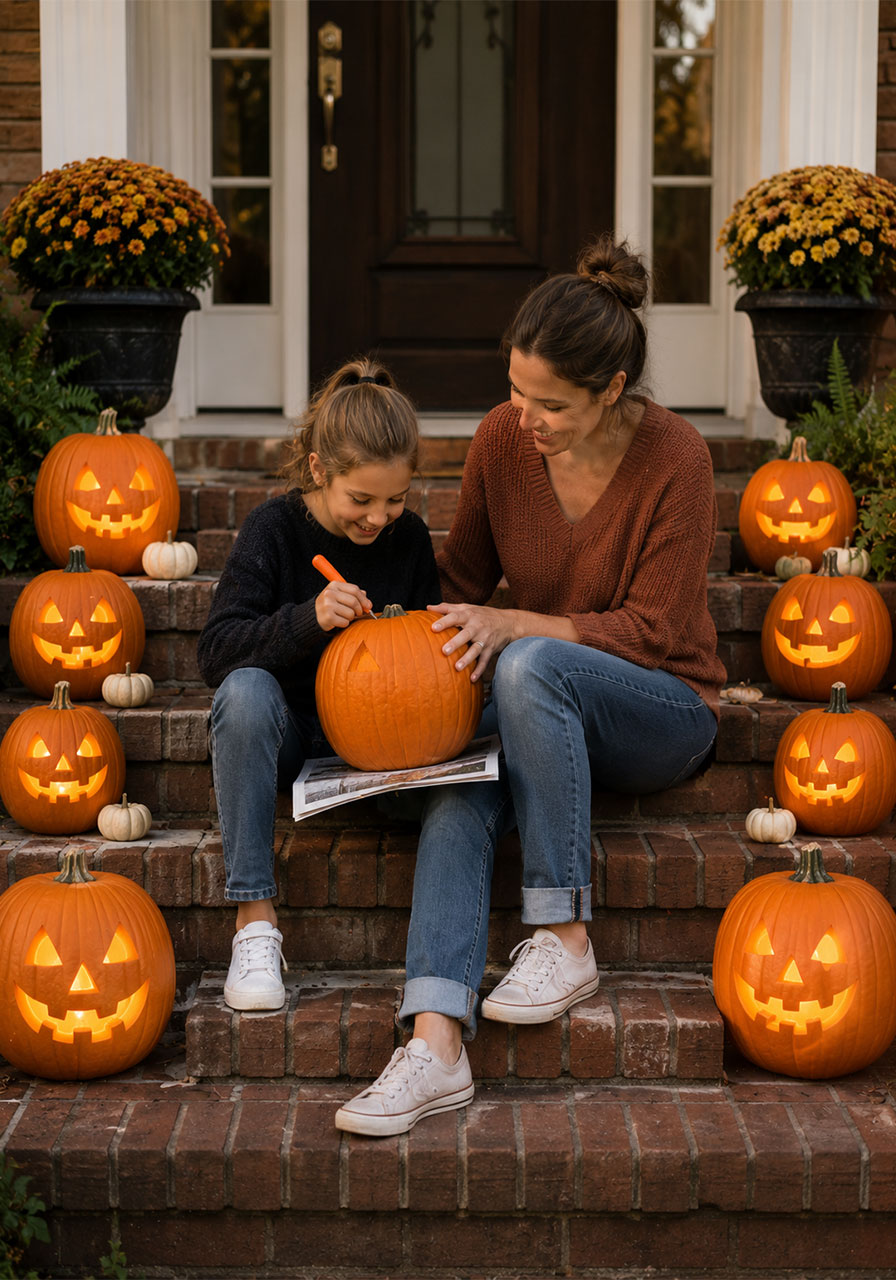
8. Pumpkin Piles
You can’t go wrong with the Halloween classic. Grouping pumpkins on your steps creates an eye-catching, glowing path right to your door.
Best For: Porch steps, entryways. Prep Time: 30 minutes (plus carving time). Difficulty: Easy, kid-friendly for design, adults for carving.
What You’ll Need:
- Pumpkins in assorted sizes and colors
- Carving tools
- Battery-operated tea lights
How to Make It:
1. Carve a variety of faces – classic grins, spooky scowls, or intricate designs – on your pumpkins.
2. Line your porch steps, alternating sizes so the display has rhythm instead of a flat row.
3. Add battery tea lights inside each one so they glow safely, even unattended.
Pro Tip: Mix in a few unpainted mini pumpkins and mums between your jack-o’-lanterns to soften the look and add fall color.
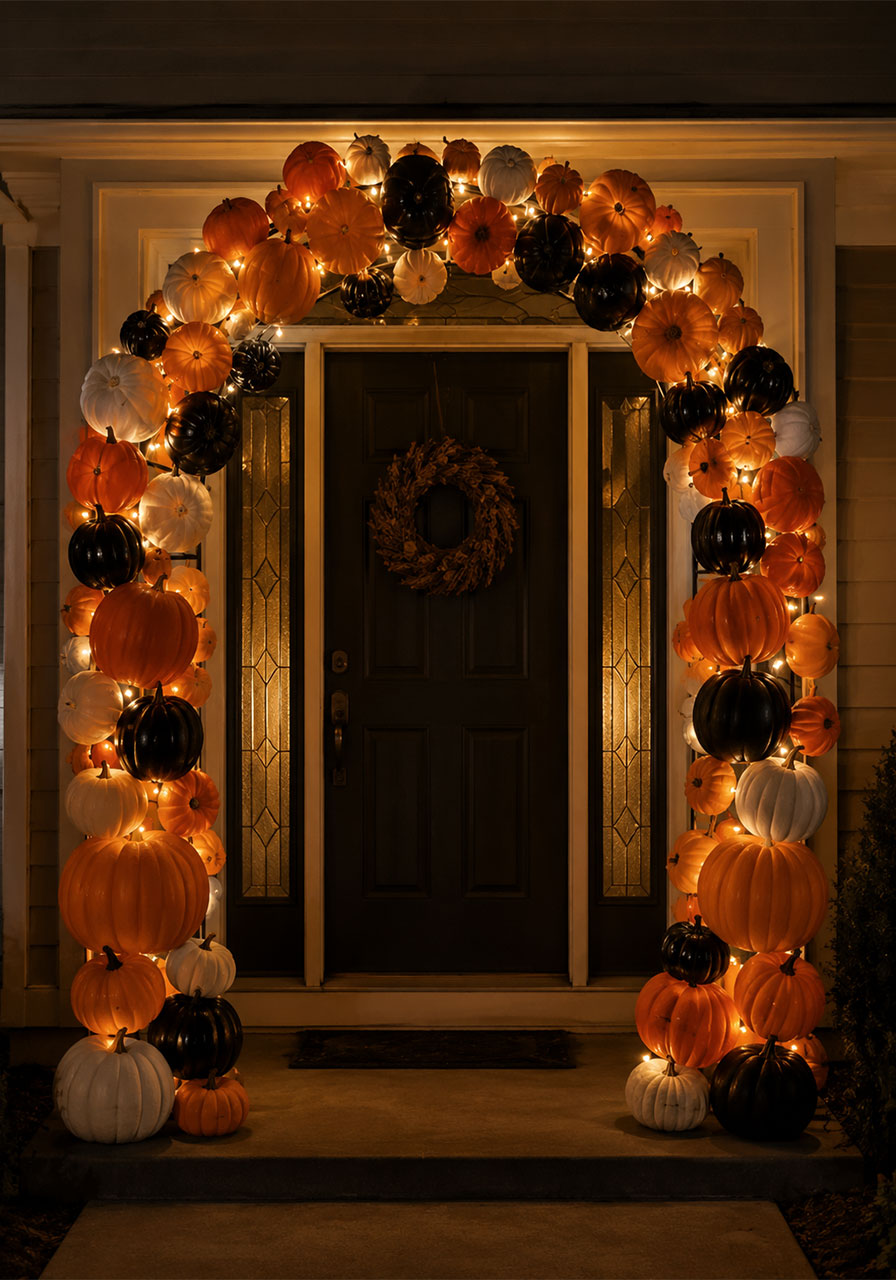
9. Pumpkin Arch Glow-Up
Want a true wow-factor entrance? A pumpkin arch turns your doorway into the neighborhood’s must-see photo spot.
Best For: Front doors, statement entryways. Prep Time: 2–3 hours. Difficulty: Moderate.
What You’ll Need:
- Lightweight arch frame (PVC or metal, or build one from wire)
- Faux pumpkins in orange, white, and black
- Battery-operated string lights
- Zip ties
How to Make It:
1. Assemble your arch frame over the doorway or walkway.
2. Zip-tie faux pumpkins along the frame, mixing colors and sizes for visual variety.
3. Weave string lights through the pumpkins so the glow peeks through the gaps.
4. Fill in any bare spots at the base with real or faux pumpkin stacks.
Pro Tip: No frame? No problem. Start small by stacking faux pumpkins into two tall columns flanking your door instead of a full arch.
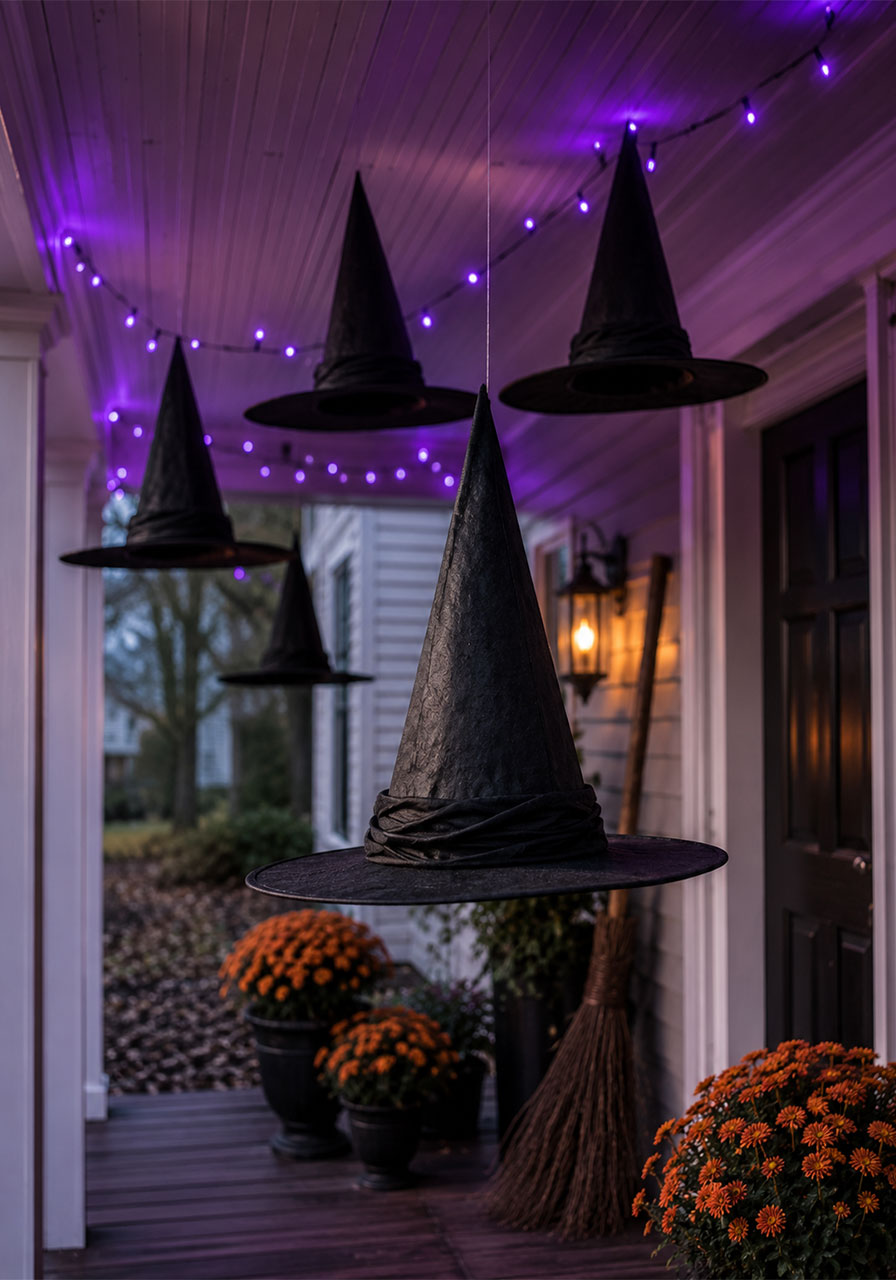
10. Bewitched Floating Hats
Add a little magic to your porch with witch hats that appear to float mid-air, like a coven just swept through.
Best For: Porch ceilings, entryways. Prep Time: 20 minutes. Difficulty: Easy.
What You’ll Need:
- Witch hats (dollar-store versions work great)
- Fishing line
- Purple string lights
- Broomsticks (optional)
How to Make It:
1. Poke a small hole through the top point of each witch hat.
2. Thread fishing line through the hole and hang the hats from your porch ceiling at varying heights.
3. Add purple string lights nearby to give the whole scene a spellbinding glow.
4. Lean a broomstick or two against the porch to complete the coven vibe.
Pro Tip: Balance the spooky purple glow with a few cozy touches, like mums or lanterns, so it still feels welcoming for trick-or-treaters.
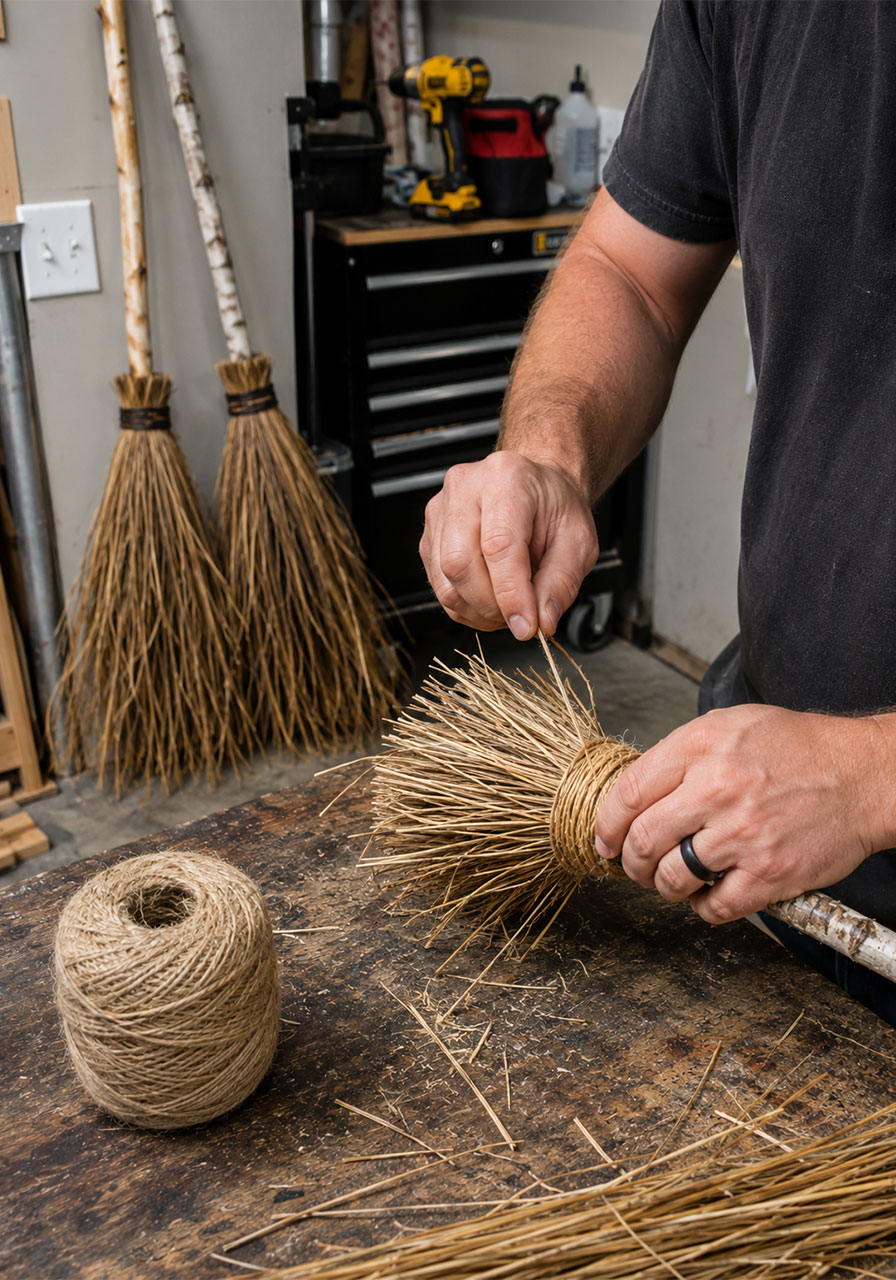
11. Witches’ Broom Parking Lot
This playful idea uses broomsticks as decor on their own, and it’s a guaranteed conversation starter.
Best For: Porch walls, entryway corners. Prep Time: 30 minutes. Difficulty: Easy, kid-friendly.
What You’ll Need:
- Sturdy sticks or birch branches
- Dried straw or twine
- Chalkboard or wood sign
How to Make It:
1. Gather a bundle of dried straw or thin twigs for each broom’s “bristles.”
2. Tie the bristles tightly to the bottom of a sturdy stick using twine.
3. Lean the finished brooms against your porch wall in a row.
4. Paint or chalk a sign that reads “Witches’ Parking Lot” and prop it beside the brooms.
Pro Tip: Line the base with pumpkins to hide the broom ends and finish the look.
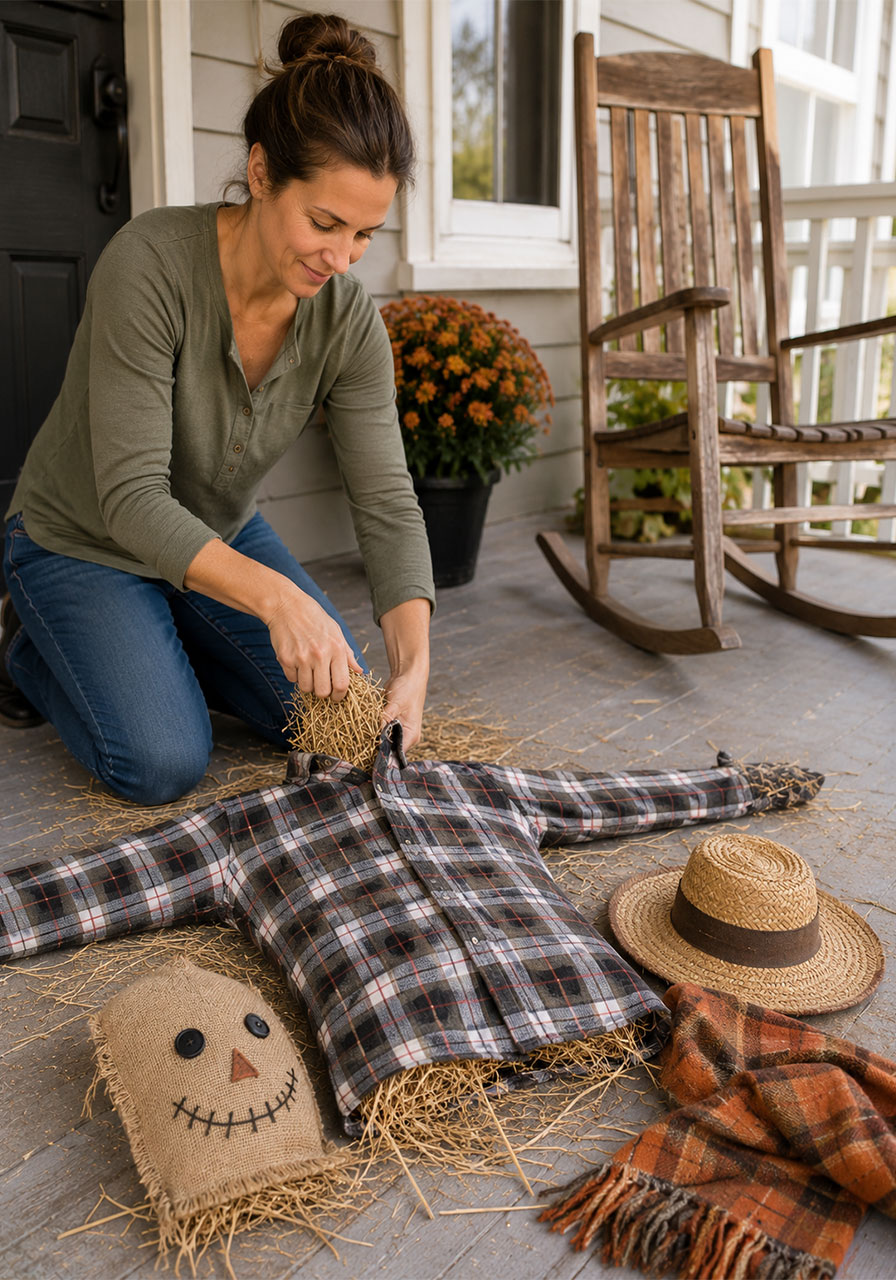
12. Sinister Scarecrow
A scarecrow with a spooky twist brings a little country charm and a lot of startle-factor to your porch.
Best For: Rocking chairs, doorways. Prep Time: 1 hour. Difficulty: Moderate, best with adult supervision.
What You’ll Need:
- Old clothes and gloves
- Stuffing (straw, newspaper, or pillow filling)
- Creepy mask or DIY painted mask
- Hat and scarf
How to Make It:
1. Stuff old clothing with straw or newspaper to build the body shape.
2. Attach a creepy mask to the top and secure a hat over it.
3. Tatter the edges of the clothing with scissors for a worn, unsettling look.
4. Seat or prop your scarecrow somewhere visitors will spot it up close – a rocking chair works perfectly.
Pro Tip: Position the scarecrow slightly turned away from the walkway so it seems to “notice” guests as they approach – much creepier than facing forward.
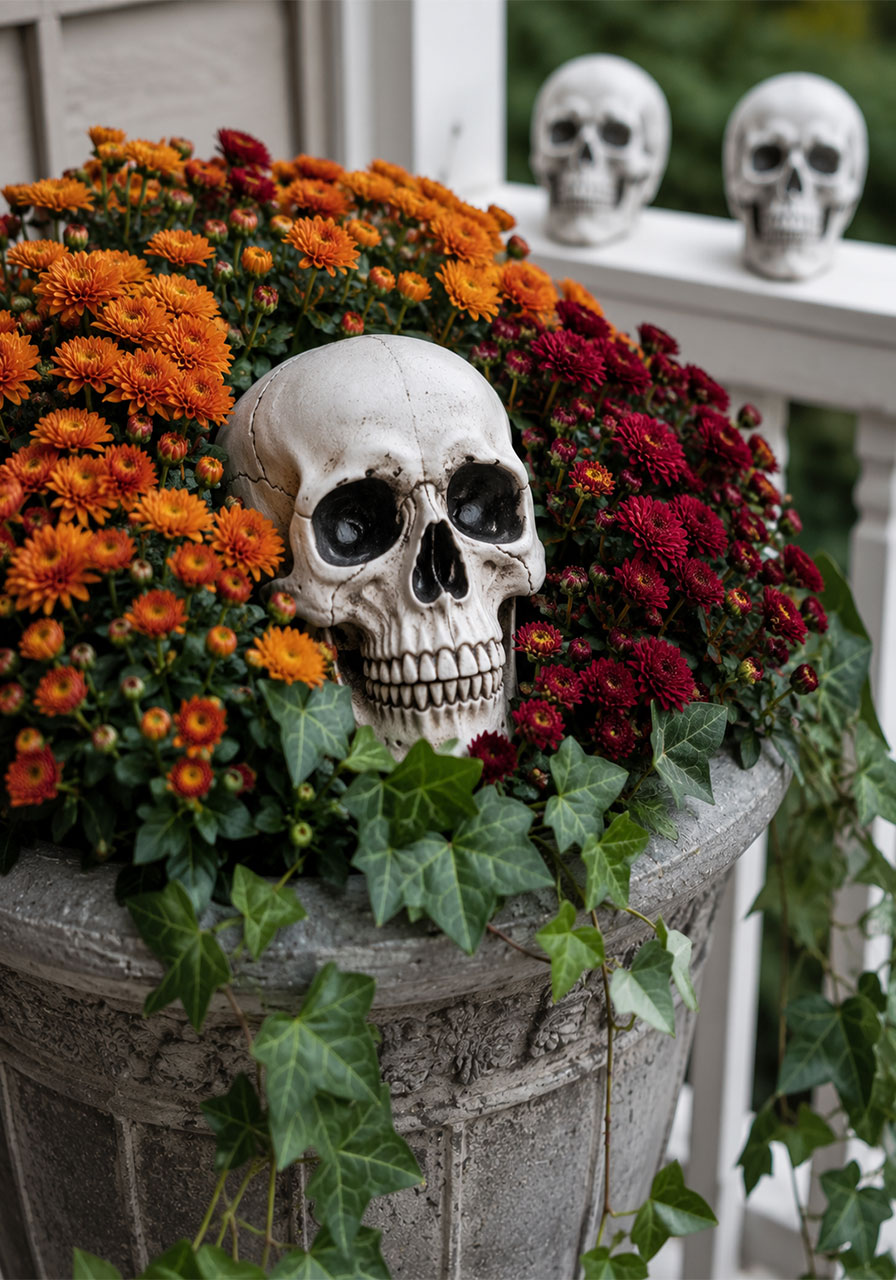
13. Scary Skull Accents
Skulls are a Halloween staple that never gets old, especially when tucked into unexpected spots.
Best For: Planters, railings, steps. Prep Time: 15 minutes. Difficulty: Very easy.
What You’ll Need:
- Plastic skulls in assorted sizes
- Optional: gray or black craft paint
How to Make It:
1. Nestle skulls into planters, flower pots, or gaps between pumpkins.
2. Line a few along your porch railing or steps.
3. For a custom look, paint a few skulls to match your overall color scheme.
Pro Tip: Half-bury a few skulls in mulch or dirt so they look like they’re emerging from the ground.
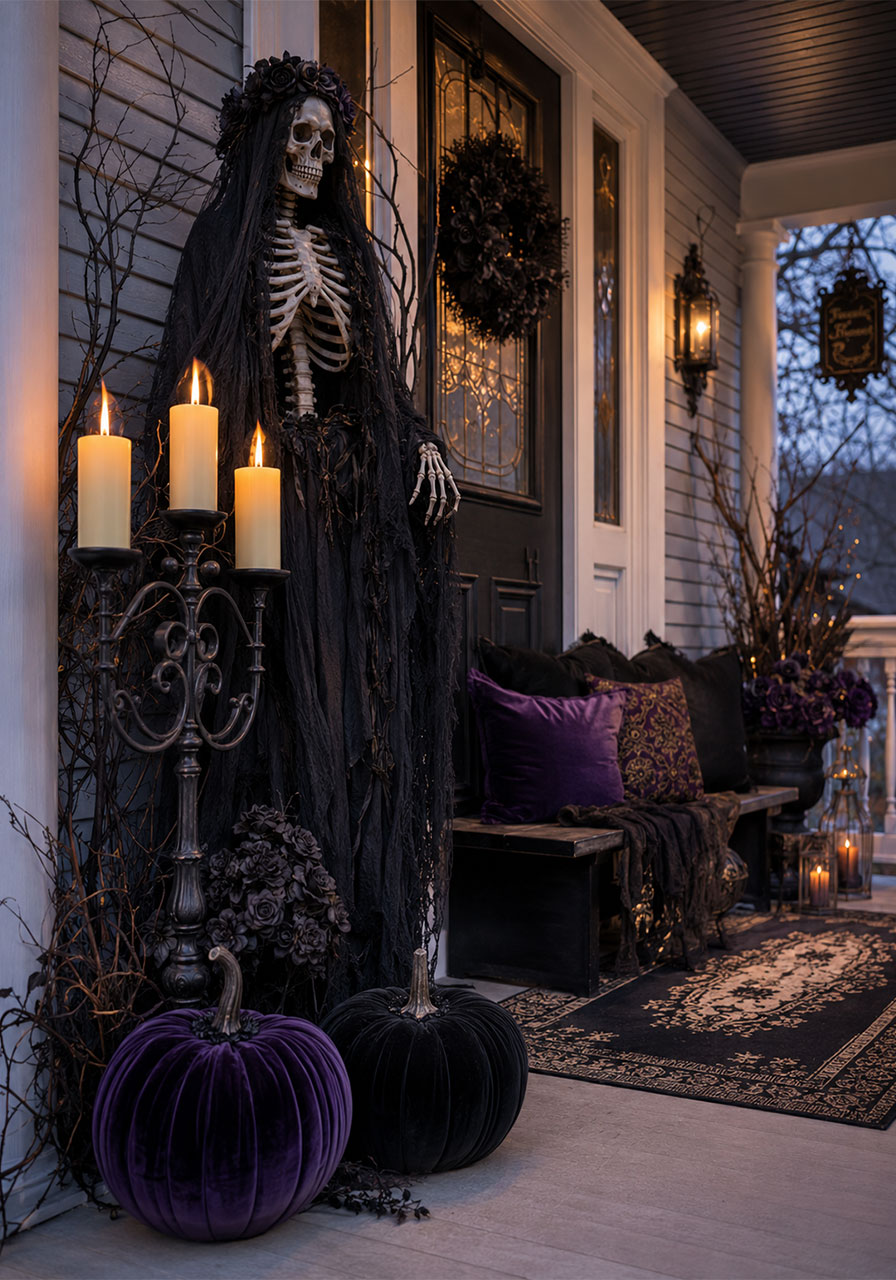
14. Grandin Road–Inspired Luxe Look
Want a more upscale, magazine-worthy porch? Borrow ideas from high-end Halloween decor and DIY your own budget-friendly versions.
Best For: Statement entryways. Prep Time: 2 hours. Difficulty: Moderate.
What You’ll Need:
- Velvet fabric (for DIY velvet pumpkins)
- Black candelabra or candlestick holders
- Elaborate skeleton figures
- Deep jewel-toned accents (plum, black, deep orange)
How to Make It:
1. Cover foam pumpkins in velvet fabric, securing the seams with hot glue for a plush, high-end texture.
2. Set up a black candelabra as a focal point near your door.
3. Position an elaborate skeleton figure as a dramatic centerpiece.
4. Layer in jewel-toned accents throughout to tie the elegant look together.
Pro Tip: Stick to a tight, cohesive color palette – this is what makes a “luxe” display look intentional instead of cluttered.
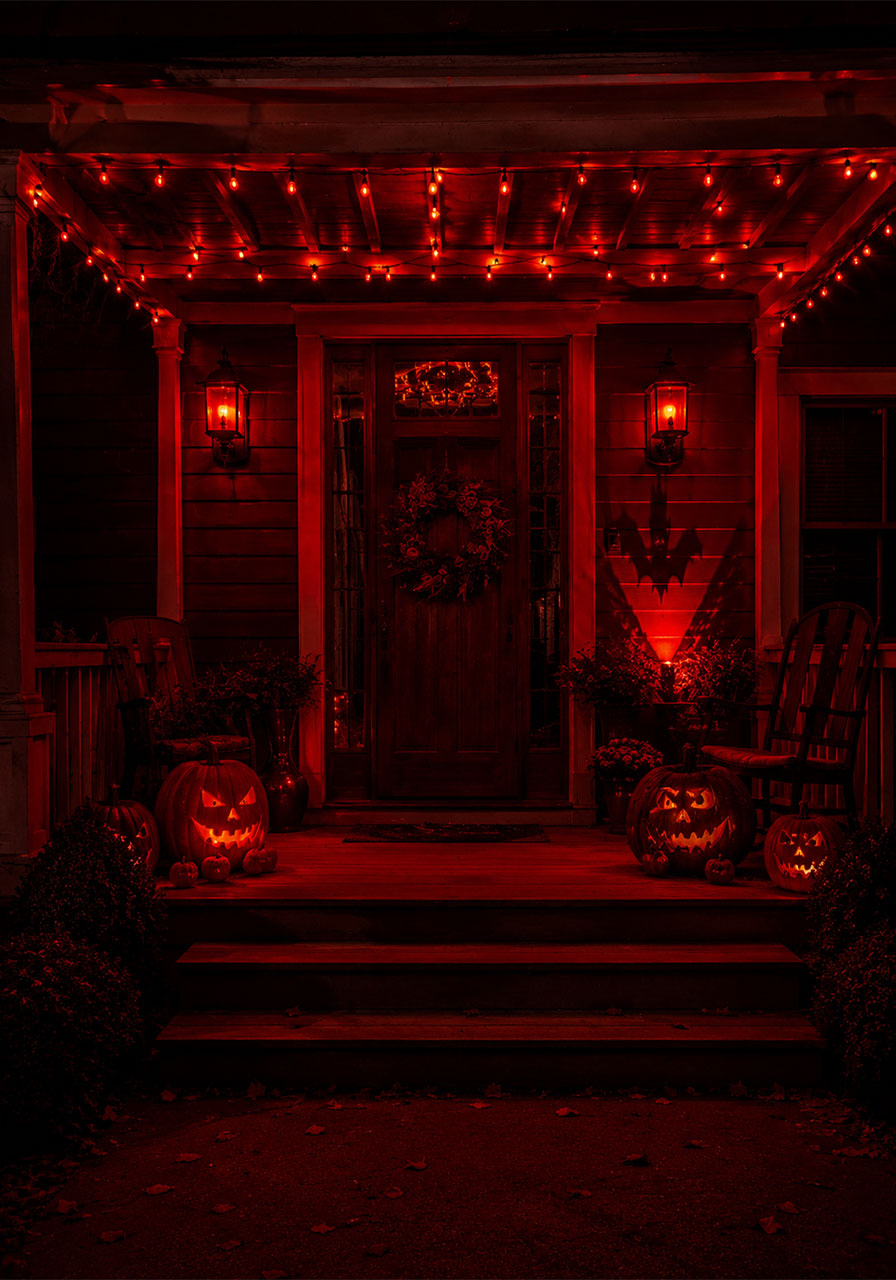
15. Red Lights Mood Lighting
Swapping your regular porch bulbs for red ones is one of the fastest, cheapest ways to instantly set a spooky mood after dark.
Best For: Porch lamps, string lights. Prep Time: 10 minutes. Difficulty: Very easy.
What You’ll Need:
- Red light bulbs or red string lights
- Small red spotlights (optional)
How to Make It:
1. Replace your existing porch bulbs with red ones.
2. String red fairy lights along railings or door frames.
3. Tuck small red spotlights behind pumpkins or props to cast dramatic shadows.
Pro Tip: Red lighting makes white ghosts and cheesecloth decor look like they’re drifting through a haunted haze – pair this idea with Idea #3 for maximum effect.
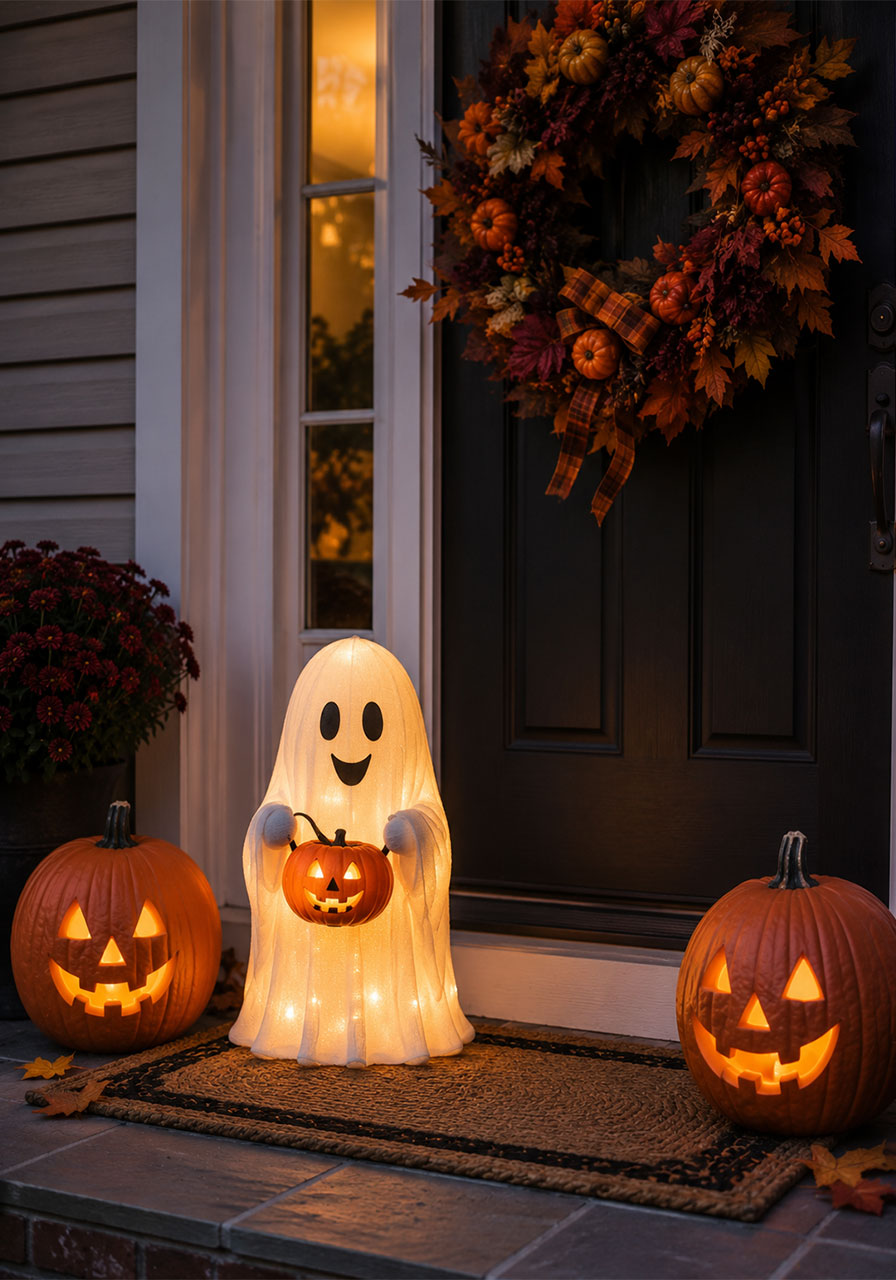
16. A Welcoming Glowing Ghost
Not every porch ghost needs to be terrifying. A cute, glowing ghost figure holding a jack-o’-lantern strikes the perfect playful-but-spooky balance for trick-or-treaters of all ages.
Best For: Front door greeters. Prep Time: 15 minutes (if using a pre-made figure). Difficulty: Very easy.
What You’ll Need:
- Light-up ghost figure or DIY illuminated ghost
- Pumpkins and a fall wreath
- Doormat
How to Make It:
1. Place your glowing ghost figure right beside the front door where it will greet every visitor.
2. Surround it with pumpkins and a doormat for a finished, welcoming feel.
3. Hang a bold autumn wreath on the door above it to tie the whole entrance together.
Pro Tip: This one is eye-catching in daylight and even better after dark, so it earns its spot even if the rest of your porch stays simple.
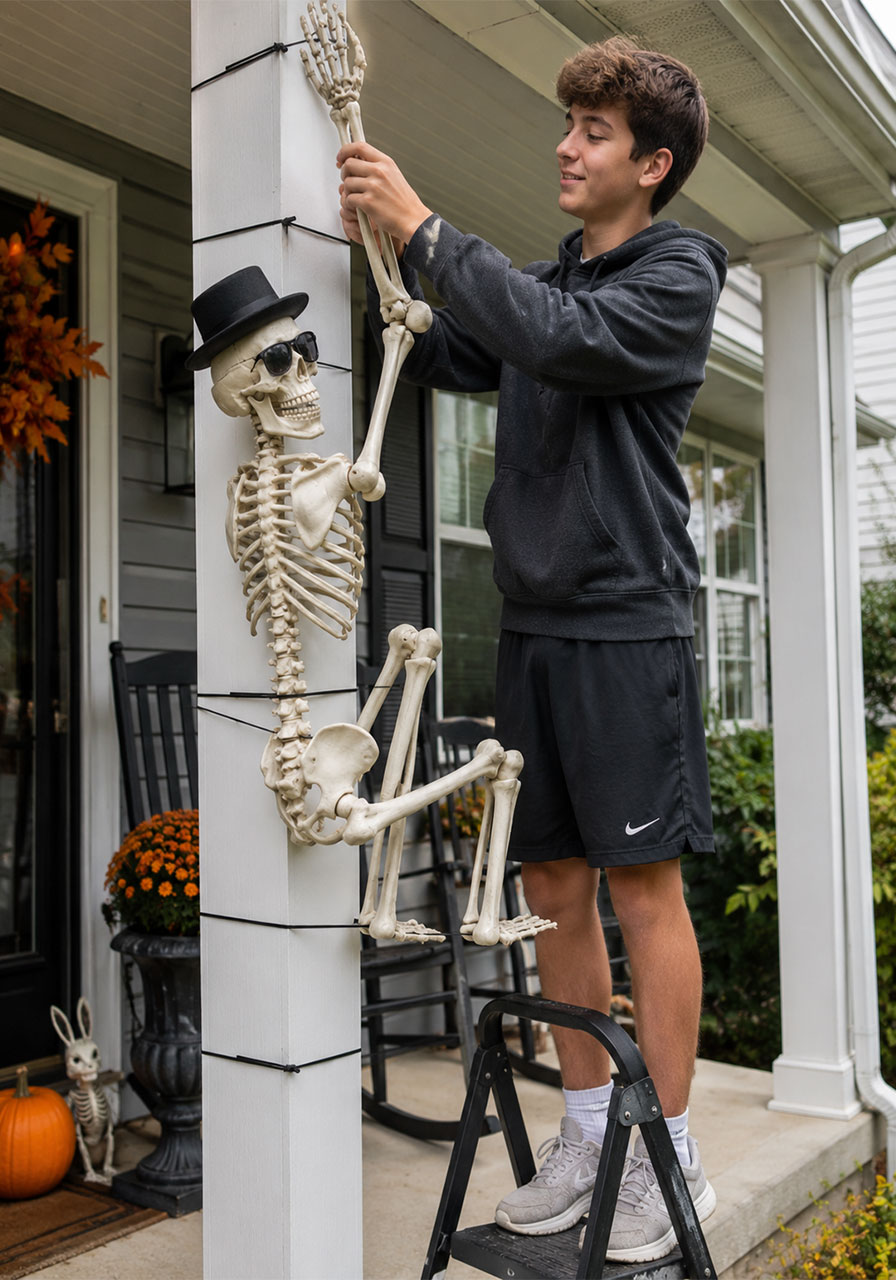
17. Playful Posed Skeleton
Skeletons are a Halloween classic, but posing them in fun, unexpected ways takes them to a whole new level.
Best For: Porch posts, doorways. Prep Time: 20 minutes. Difficulty: Easy.
What You’ll Need:
- Posable plastic skeleton
- Zip ties or wire (for posing joints)
- Optional accessories: hats, scarves, sunglasses
How to Make It:
1. Use the skeleton’s bendable joints to set a dramatic pose – climbing a post, swinging from a light fixture, or mid-air mid-jump.
2. Secure the pose with zip ties or thin wire so it holds through wind and weather.
3. Dress it up with a hat, scarf, or sunglasses to match your porch’s overall theme.
Pro Tip: Change the pose and accessories every few days leading up to Halloween – it keeps neighbors and trick-or-treaters coming back to see “what the skeleton is doing now.”
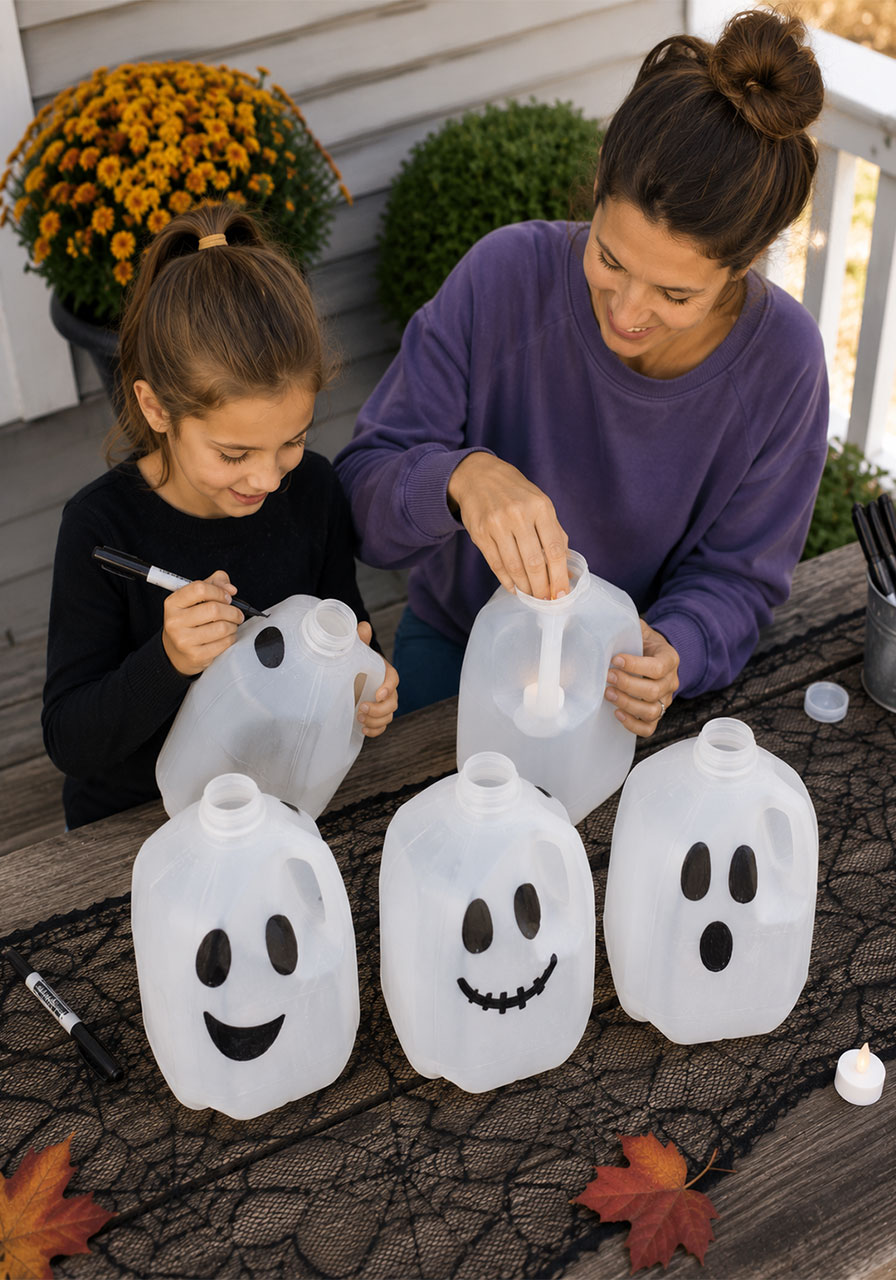
18. Milk Jug Ghost Lanterns
This is one of our favorite budget upcycling projects, and it’s a genuinely great classroom or family craft. Empty milk jugs become glowing ghosts that light your whole walkway.
Best For: Walkways, porch steps. Prep Time: 30 minutes (plus drying time if painting). Difficulty: Very easy, kid-friendly.
What You’ll Need:
- Clean, empty milk jugs
- Black permanent marker
- Battery-operated tea lights
How to Make It:
1. Rinse and dry your milk jugs thoroughly, removing labels.
2. Draw simple ghost faces (two eyes and an “oooh” mouth) directly onto the jug with permanent marker.
3. Drop a battery tea light inside each jug through the handle opening.
4. Line your walkway or steps with your glowing jug ghosts at dusk.
Pro Tip: Space the jugs evenly along both sides of your walkway for a runway effect that guides trick-or-treaters straight to your door.
Teacher & Parent Bonus: This is a fantastic recycling lesson. Talk with kids about how one plastic jug can get a second life instead of heading to the landfill – a simple, meaningful sustainability conversation.
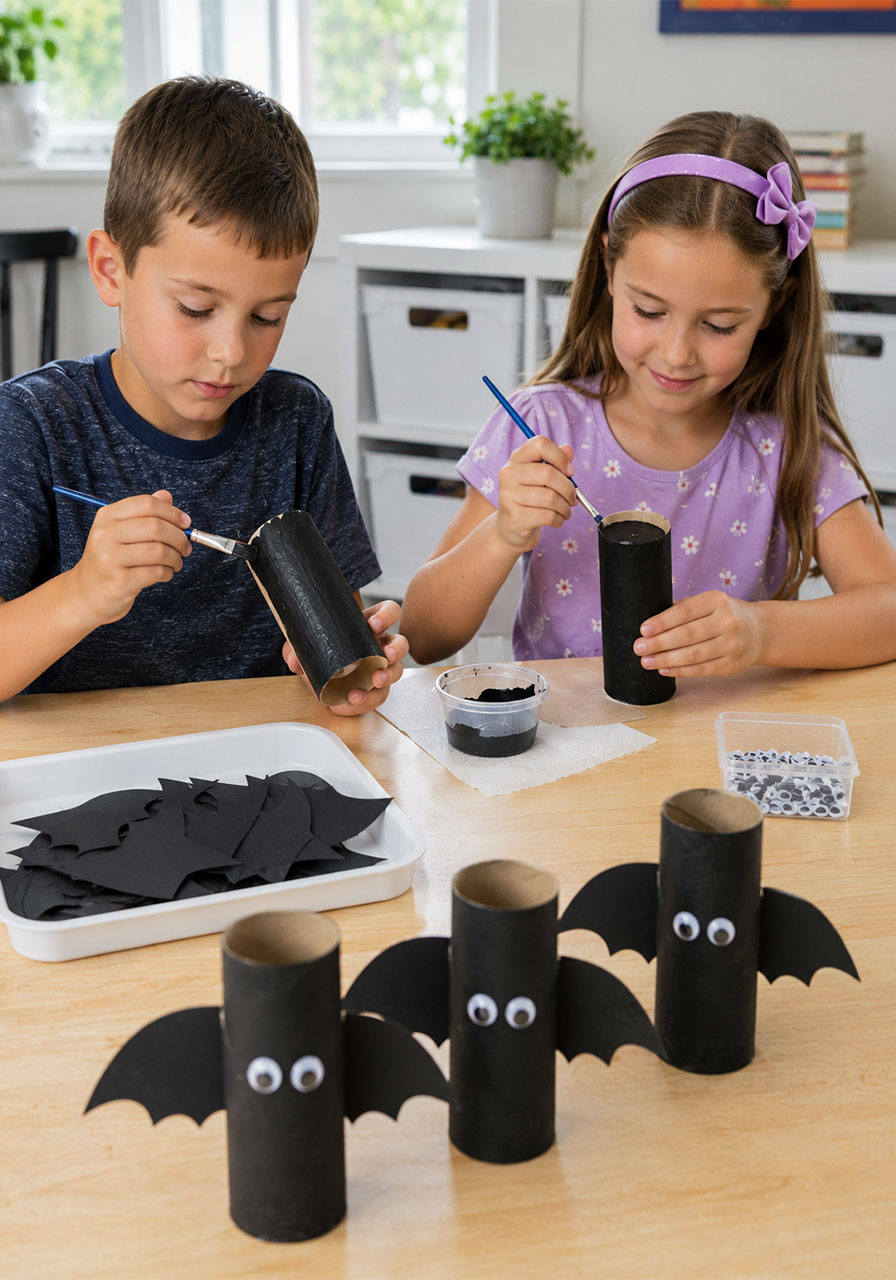
19. Toilet-Paper-Roll Bat Swarm
Another great upcycled classroom craft: empty toilet paper rolls turn into a cute (and slightly creepy) bat family in about ten minutes.
Best For: Windows, small porch accents. Prep Time: 15–20 minutes. Difficulty: Very easy, ideal for young kids.
What You’ll Need:
- Empty toilet paper rolls
- Black paint
- Black cardstock (for wings)
- Googly eyes
How to Make It:
1. Paint each toilet paper roll black and let it dry completely.
2. Cut simple wing shapes from black cardstock – two per bat.
3. Glue the wings to the sides of the roll and add googly eyes near the top.
4. Group several bats together on a windowsill or small shelf.
Teacher & Parent Bonus: Bats are real nocturnal pollinators and pest-control experts. This craft pairs perfectly with a two-minute chat about why bats are actually helpful (not scary) neighbors.
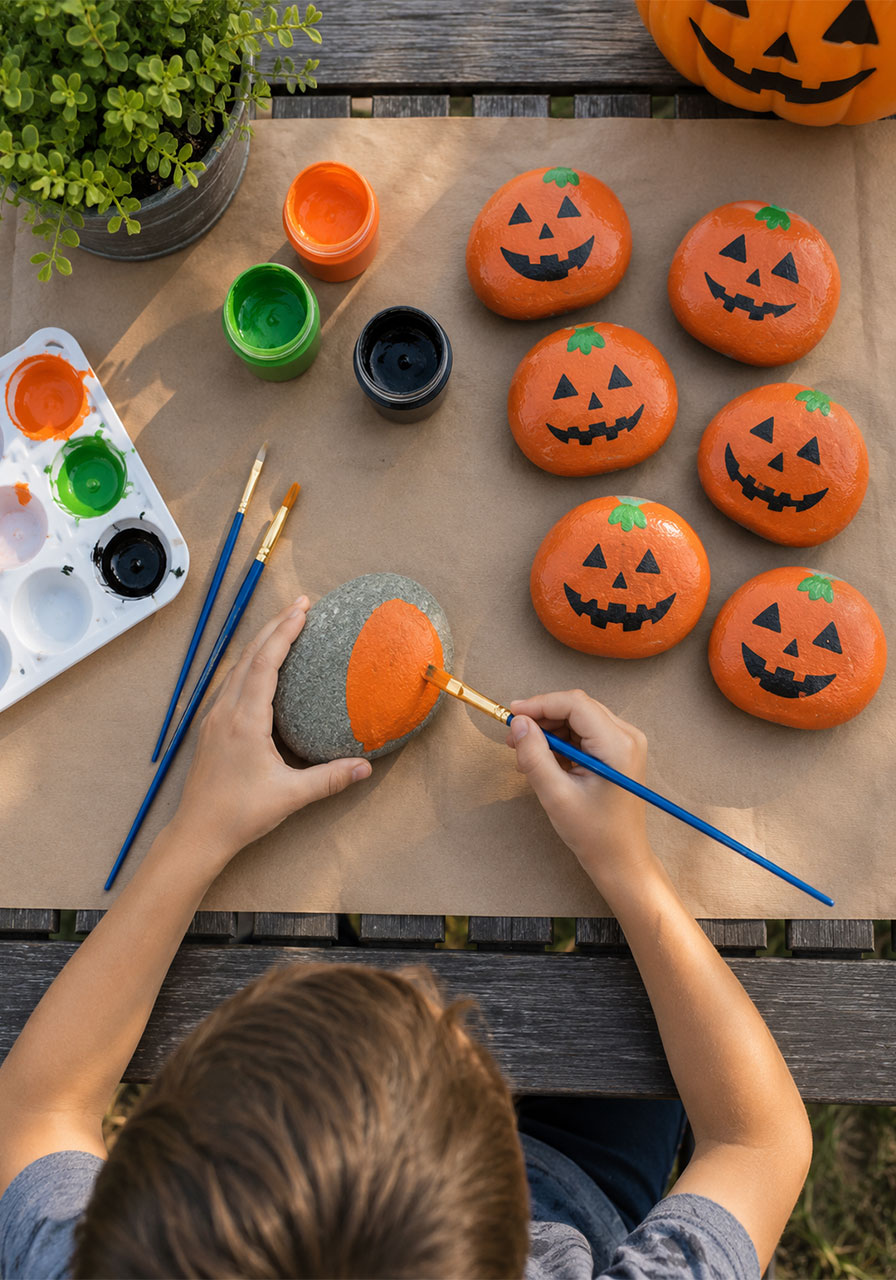
20. Painted Rock Pumpkin Patch
If you’ve got a rock painting kit gathering dust, put it to work. Painted rocks become an adorable, weatherproof mini pumpkin patch that lasts the whole season.
Best For: Porch steps, planters, garden beds. Prep Time: 30 minutes (plus drying). Difficulty: Very easy, ideal for young kids.
What You’ll Need:
- Smooth, rounded rocks
- Orange, green, and black acrylic paint
- Paintbrushes
- Clear sealant spray (optional, for durability)
How to Make It:
1. Wash and dry your rocks thoroughly before painting.
2. Paint each rock orange and let it dry fully.
3. Add black jack-o’-lantern faces and a small green “stem” mark on top.
4. Once dry, seal with clear spray if displaying outdoors long-term.
Teacher & Parent Bonus: While you paint, ask kids where they think the rocks came from – it’s an easy, natural lead-in to a beginner conversation about rocks, erosion, and how nature shapes them.
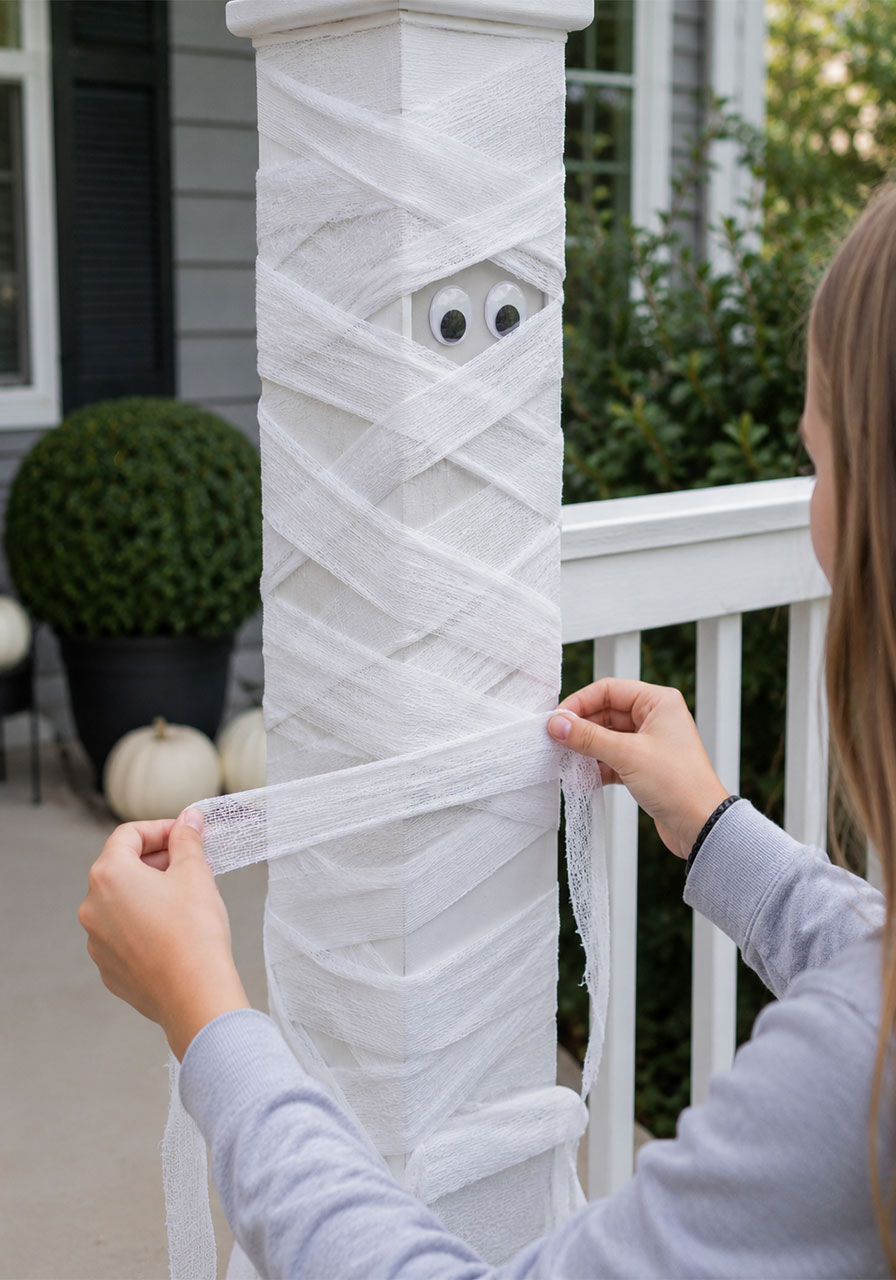
21. Mummy-Wrapped Porch Railings
This one is oddly therapeutic to make and instantly transforms plain railings or posts into something straight out of a haunted tomb.
Best For: Railings, porch posts, lamp posts. Prep Time: 30–45 minutes. Difficulty: Easy, great group project.
What You’ll Need:
- White gauze fabric or cheesecloth strips
- Hot glue gun or fabric tape
- Googly eyes (optional)
How to Make It:
1. Tear or cut your gauze into long strips.
2. Starting at the base, wrap each strip around the railing or post in a criss-cross pattern.
3. Secure loose ends with hot glue or fabric tape as you go.
4. Add a couple of googly eyes peeking out from the wrapped layers for a playful surprise.
Pro Tip: Leave a few strips intentionally loose and dangling – it reads as far more unsettling than a perfectly neat wrap job.
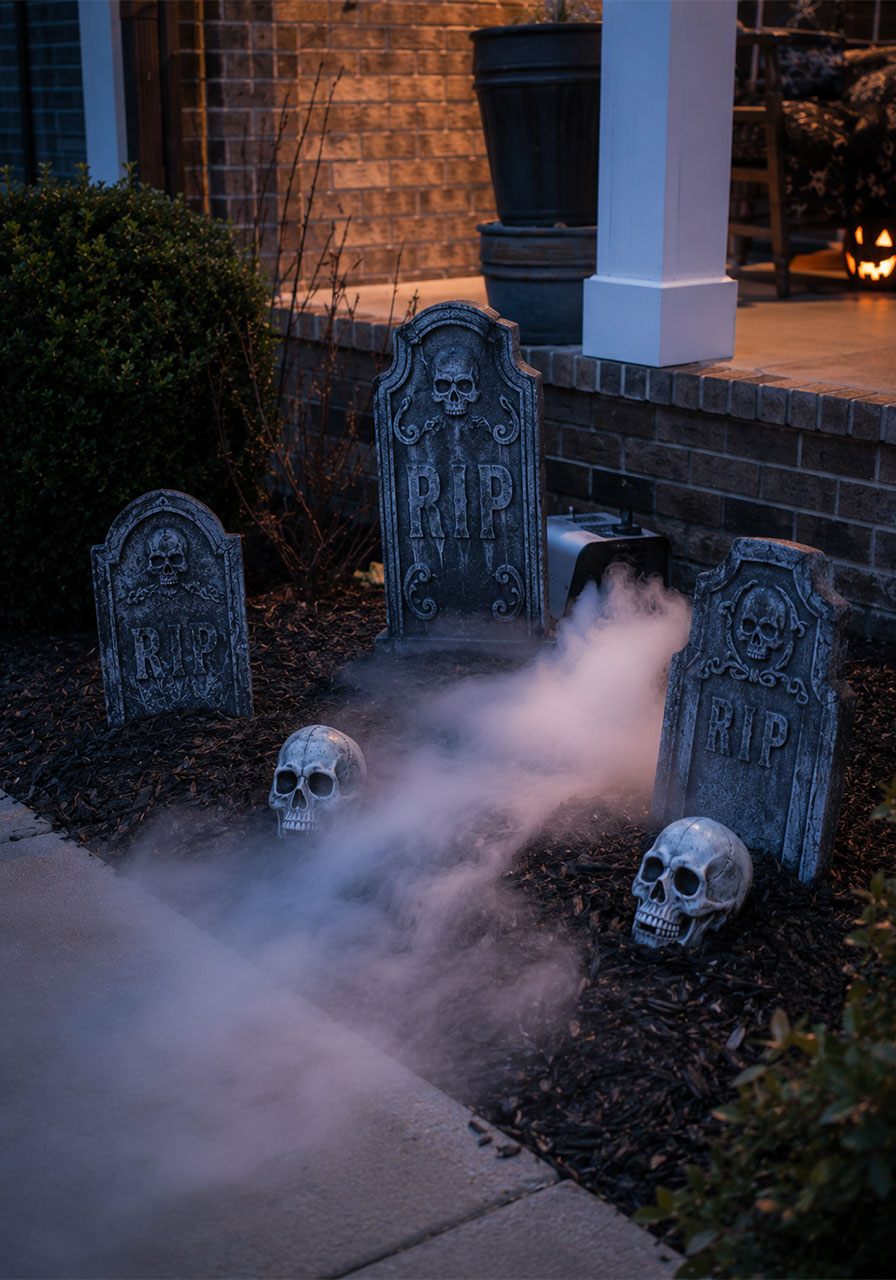
22. Bone-Chilling Fog Garden
Building on the mini graveyard idea, this version adds a low-lying fog effect that makes tombstones and skulls look like they’re rising from mist.
Best For: Front lawns, garden beds near the porch. Prep Time: 20 minutes to set up. Difficulty: Easy.
What You’ll Need:
- Small fog machine or dry ice (adult handling required for dry ice)
- Tombstones and skulls
- Black mulch
How to Make It:
1. Arrange your tombstones and half-buried skulls in a small garden bed or grouping.
2. Cover the base with black mulch to hide any equipment.
3. Place your fog machine low to the ground, tucked behind a tombstone, so the fog rolls out naturally.
4. Run the fog machine for short bursts in the evening for the best visual effect.
Safety Note: If using dry ice, always handle it with gloves and keep it well out of reach of children and pets – it can cause burns on contact.
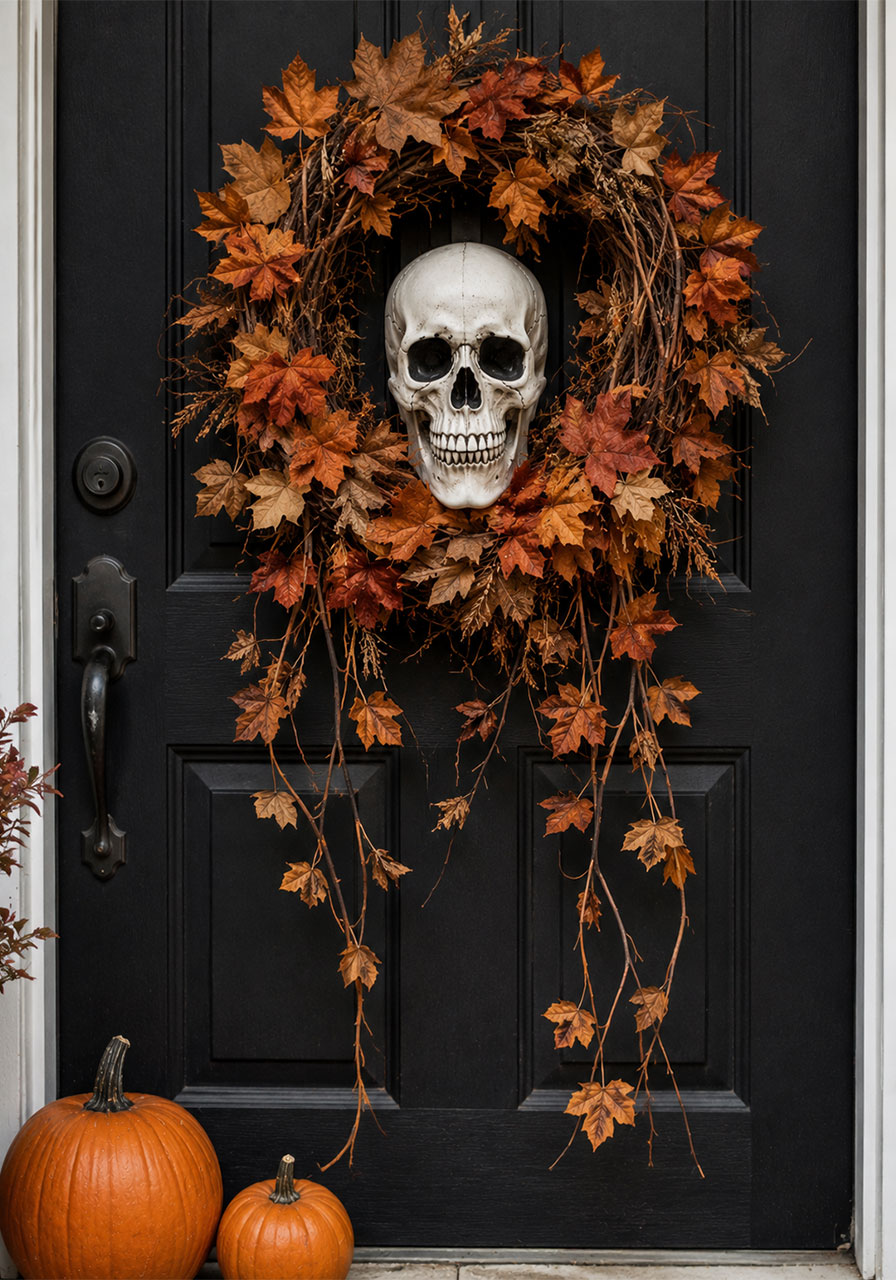
23. Skull Wreath with Falling Leaves
Swap your usual fall wreath for this dramatic twist: a skull nestled into a wreath of dried vines and autumn leaves.
Best For: Front doors. Prep Time: 45 minutes. Difficulty: Easy.
What You’ll Need:
- Grapevine wreath base
- Dried or faux fall leaves
- One plastic skull
- Hot glue gun
How to Make It:
1. Weave dried leaves and vines through the wreath base, letting some strands trail down for length.
2. Hot glue the skull into the top center of the wreath, nestled among the leaves.
3. Hang on your front door and add a few loose skulls or pumpkins at the base of the door for continuity.
Pro Tip: Let some vines hang well below the wreath itself – the longer, trailing look reads far more dramatic than a compact, tidy circle.
Frequently Asked Questions
What are the cheapest Halloween porch decorations to make?
Paper bat cutouts, painted rocks, and toilet-paper-roll bats cost almost nothing since they use materials you likely already have at home. Stretchy synthetic spider web and a few plastic spiders are also extremely budget-friendly and go a long way.
What Halloween decorations are safe for young kids to help make?
Painted rock pumpkins, milk jug ghost lanterns, toilet-paper-roll bats, and paper bat cutouts are all great low-mess, low-risk options for younger children. Save fog machines, dry ice, and anything involving a hot glue gun for adult hands or close supervision.
How do I make my porch decorations last the whole season?
Stick to weatherproof materials where possible – faux pumpkins, sealed painted rocks, and outdoor-rated string lights hold up far better than paper decor if you’re expecting rain. Bring paper-based decorations inside overnight if wet weather is in the forecast.
Can these ideas work for a classroom Halloween party too?
Absolutely. Milk jug ghosts, painted rocks, and toilet-paper-roll bats are all easy to scale down for a classroom table or bulletin board, and they double as simple sustainability or nature-science conversation starters for students.
Ready to Get Spooky?
You don’t need a scary-movie budget to build a porch that stops the whole block in its tracks. Pick two or three ideas from this list, grab your kids or your students, and turn an ordinary afternoon into a memory-making Halloween craft session.
Because the best Halloween porches – like the best parties – are the ones filled with a little creativity, a little chaos, and a lot of laughter.
