

Ready to turn a boring afternoon into a colorful craft adventure?
This DIY glue suncatcher project is about to become your go-to activity when the kids need something fun to do.
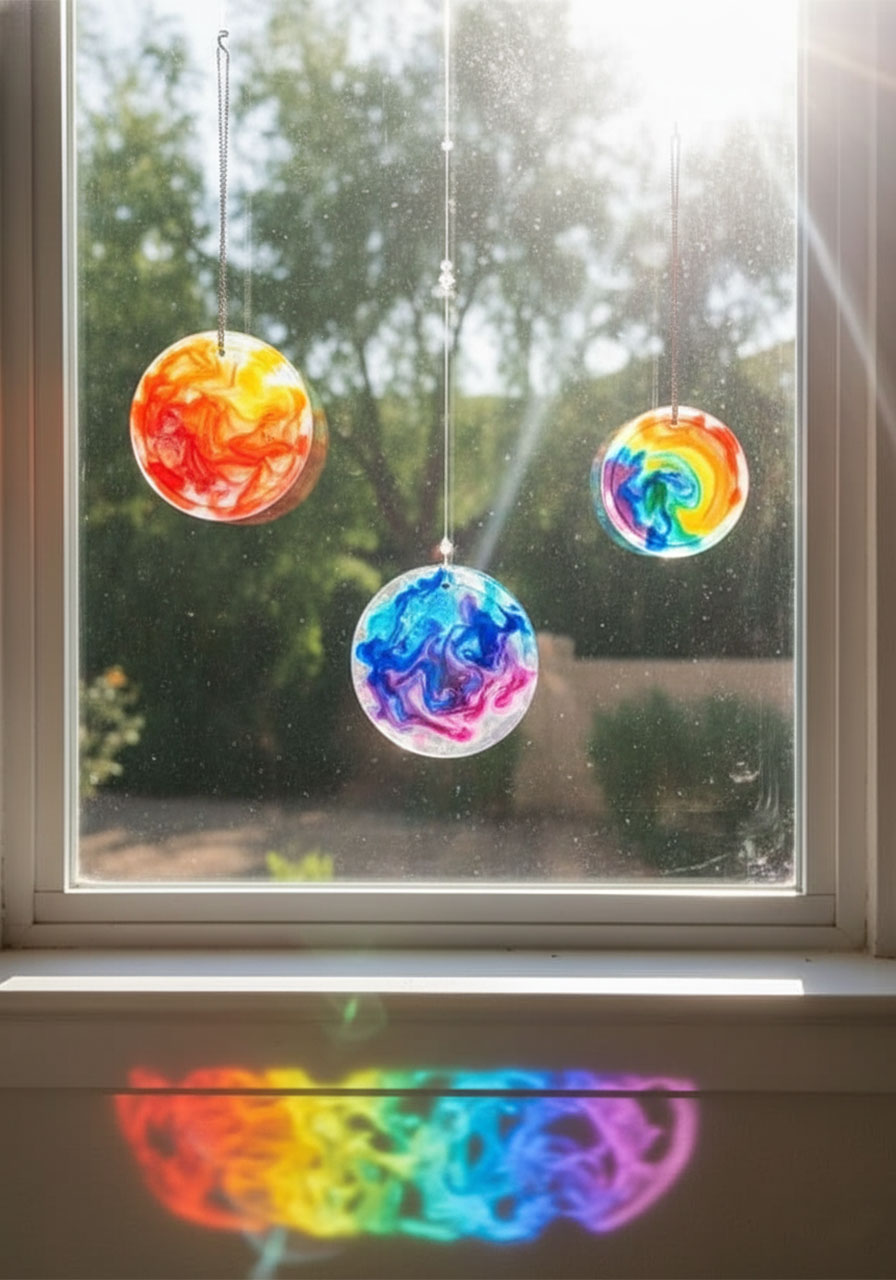
Trust me – there’s something magical about watching white glue transform into a translucent rainbow that catches the sunlight just right.
I’ll never forget the first time we tried this craft. My daughter checked on her drying glue approximately 47 times in one day, absolutely convinced it was ready each time. (Spoiler: It wasn’t.)
But when that suncatcher finally peeled off and we hung it outside? The squeals of delight were 100% worth the wait.
The best part? This craft takes about 5 minutes of active time, uses supplies you probably already have, and creates stunning window decorations that’ll make your neighbors ask, “Where did you buy those?”
Get ready to smile and say, “Oh, we made them!”
Why You’ll Love This Suncatcher Craft
Perfect for: Kids ages 4+, rainy day activities, party crafts, gifts for grandparents
Active Time: 5 minutes per suncatcher
Drying Time: 2-3 days (patience required!)
Mess Level: Low (finally, a craft that won’t ruin your carpet!)
Here’s why this beats other kids’ crafts: Unlike slime (which somehow always ends up in someone’s hair), painting (hello, stained clothing), or glitter projects (we’re still finding sparkles from 2019), this activity is refreshingly contained.
Pour, swirl, wait, done. The only challenge is keeping little fingers from poking the drying glue every five minutes.

What You’ll Need

Grab these simple supplies and you’re ready to roll:
Elmer’s white glue (the classic stuff – trust me on this one)
Food coloring or liquid watercolor paint (3-4 colors work best)
Toothpicks (for creating those gorgeous swirls)
Flexible plastic lids (yogurt, sour cream, or hummus containers are perfect)
Hole punch
String or ribbon (for hanging your masterpiece)
Pro Tip: Don’t use glass or rigid plastic lids – you’ll never get your suncatcher out in one piece! The lid needs to flex so you can pop that dried glue disc out without breaking it.
How to Make Your Glue Suncatchers
Step 1: Pour the glue
Pour enough white glue into your plastic lid to completely cover the bottom surface.
You want it thick enough to create a solid disc, but not so much that it takes forever to dry. About ¼ inch thick is your sweet spot.
Step 2: Add your colors
Drop 2-3 drops of food coloring onto the glue surface. Here’s where you can get creative!
Try red, yellow, and blue for a primary color explosion, or go with pinks and purples for something dreamy.
Just remember: less is more. About 3 drops per color is plenty – any more and the colors might get muddy.

Step 3: Create your design
Hand your kiddo a toothpick and let them gently swirl the colors around.
This is the fun part! Drag the toothpick through the drops to create marbled patterns, spirals, or abstract designs.
Parent Alert: You’ll want to supervise this step. If you leave kids alone with that toothpick for too long, they’ll keep mixing until everything turns brown. Set a timer for 2-3 minutes of swirling, then call it done!

Step 4: The waiting game
Place your lid somewhere safe and high up (seriously, put it on top of the fridge).
Now comes the hardest part of this entire craft: waiting for it to dry completely. Depending on how thick your glue is, this takes 2-3 days.
Your kids will absolutely insist it’s dry after 6 hours. It’s not. They’ll check again at bedtime. Still not ready.
By day two, they’ll swear it’s solid. Probably not quite yet. You’ll know it’s truly ready when you see the edges starting to peel away from the lid naturally.

Step 5: The big reveal
Once it’s completely solid, gently flex the lid to pop out your suncatcher.
This is the moment of truth – and it’s so satisfying! The glue should release easily if your lid is flexible enough.
Step 6: Punch and hang
Use a hole punch to make a hole near the edge (not too close or it might tear).
Thread your string through, tie it off, and find the perfect sunny spot to hang your creation.

Step 7: Watch the magic happen
Hang your suncatcher in a window or outside on tree branches where the sunlight can shine through.
When that light hits the translucent colors, you’ll see why this craft is worth every minute of waiting!
Pro Tips for Perfect Suncatchers Every Time
Size matters
Smaller suncatchers (yogurt lid size) dry faster and are less likely to curl or bend than larger ones. Start small and work your way up once you’ve mastered the technique.

Temperature check
If you’re crafting in the summer, keep your suncatchers indoors. Heat above 90°F can cause the glue to soften, warp, or even melt. (Ask me how I know this. Actually, don’t – it was tragic.)
Color mixing tip
Stick to 2-4 colors max. More than that and you risk everything blending into one muddy color. Some winning combos: blue + yellow + green, red + orange + yellow, or pink + purple + blue.
Food coloring type
Regular liquid food coloring works best for keeping those gorgeous swirl patterns visible. Natural food coloring tends to fade or blend too much as it dries.
The finger-poke problem
Kids will be tempted to touch the drying glue. Oh, they’ll be SO tempted. Place it somewhere out of reach, or you’ll end up with fingerprint art instead of pretty swirls.
Fun Variations to Try
Once you’ve mastered the basic technique, experiment with these creative twists:
Glitter bomb: Add a pinch of fine glitter before the glue dries for extra sparkle
Shape it up: Use silicone molds (like soap molds) in fun shapes – flowers, stars, hearts, or bees
Clear glue version: Try it with clear glue instead of white for a more translucent look (though the colors won’t pop quite as much)
Layered effect: Let one color dry slightly, then add another layer on top for a dimensional look
Holiday themes: Use red and green for Christmas, orange and black for Halloween, or pastels for Easter
Troubleshooting Common Suncatcher Problems
My suncatcher curled up!
This happens when it’s too thin, too big, or exposed to heat. Make your next batch smaller and thicker (at least ¼ inch of glue), and keep them in a cool spot while drying.

The colors all mixed into brown!
Too much swirling! Next time, limit the mixing to just 2-3 minutes and use fewer toothpick strokes. Sometimes less really is more.

It’s been 5 days and it’s still not dry!
If you used a lot of glue or the lid is large, it can take up to a week. Make sure it’s in a well-ventilated area and not in a humid room (bathrooms are the worst for drying time).
The suncatcher broke when I tried to remove it!
The lid wasn’t flexible enough. Next time, use a softer plastic lid (yogurt or hummus containers work perfectly) and make sure the glue is 100% dry before attempting removal.
Why Kids (and Parents!) Love This Craft
There’s something almost hypnotic about watching those drops of color swirl through the white glue. It’s like tie-dye meets stained glass, with a dash of science experiment thrown in.
Kids are amazed when the opaque white glue magically becomes clear and translucent as it dries.
This craft also checks all the boxes busy parents are looking for: it’s inexpensive, uses common household items, doesn’t create a huge mess, and produces something genuinely beautiful that you’ll actually want to display. (No more “artwork” cluttering the fridge that you secretly want to toss!)
Plus, these suncatchers make fantastic gifts. Grandparents absolutely love receiving handmade suncatchers, and you can make them for teacher appreciation gifts, birthday party favors, or holiday presents that feel personal and special.
Final Thoughts: Let the Sunshine In!
With a bottle of glue, a few drops of food coloring, and a plastic lid, you’ve got everything you need to create colorful magic with your kids. Yes, the 2-3 day wait time will test everyone’s patience (mostly yours, as you field the “Is it ready yet?” questions). But when you finally hang those vibrant suncatchers in a sunny window and watch the light dance through the colors, you’ll agree it was worth every minute.
So grab those yogurt lids you were about to toss, raid your craft supplies, and get ready to turn a regular afternoon into something special. Your kids will love the creative freedom, you’ll love the low mess factor, and everyone will love the stunning results catching the sunlight in your windows.
Now go make something beautiful! And maybe hide that glue bottle when you’re done – just in case anyone gets ideas about “experimenting” when you’re not looking.
More Kid’s Party Ideas to Keep the Fun Rolling:
How to Make Bouncy Balls: A 5-Minute DIY That’ll Have Kids Begging for More
Easy Baking Soda & Vinegar Fireworks: A Science Experiment That’ll Make You the Coolest Parent Ever
How to Make Puffy Paint: The 3-Ingredient Recipe That’ll Blow Your Mind
DIY Bottle Rockets: The Backyard Science Experiment That’ll Launch Your Summer Into the Stratosphere
27 Circle Time Ideas for Toddlers and Preschoolers That Actually Work
27 Epic Camping Activities That’ll Make Your Kids Forget About Their Screens
