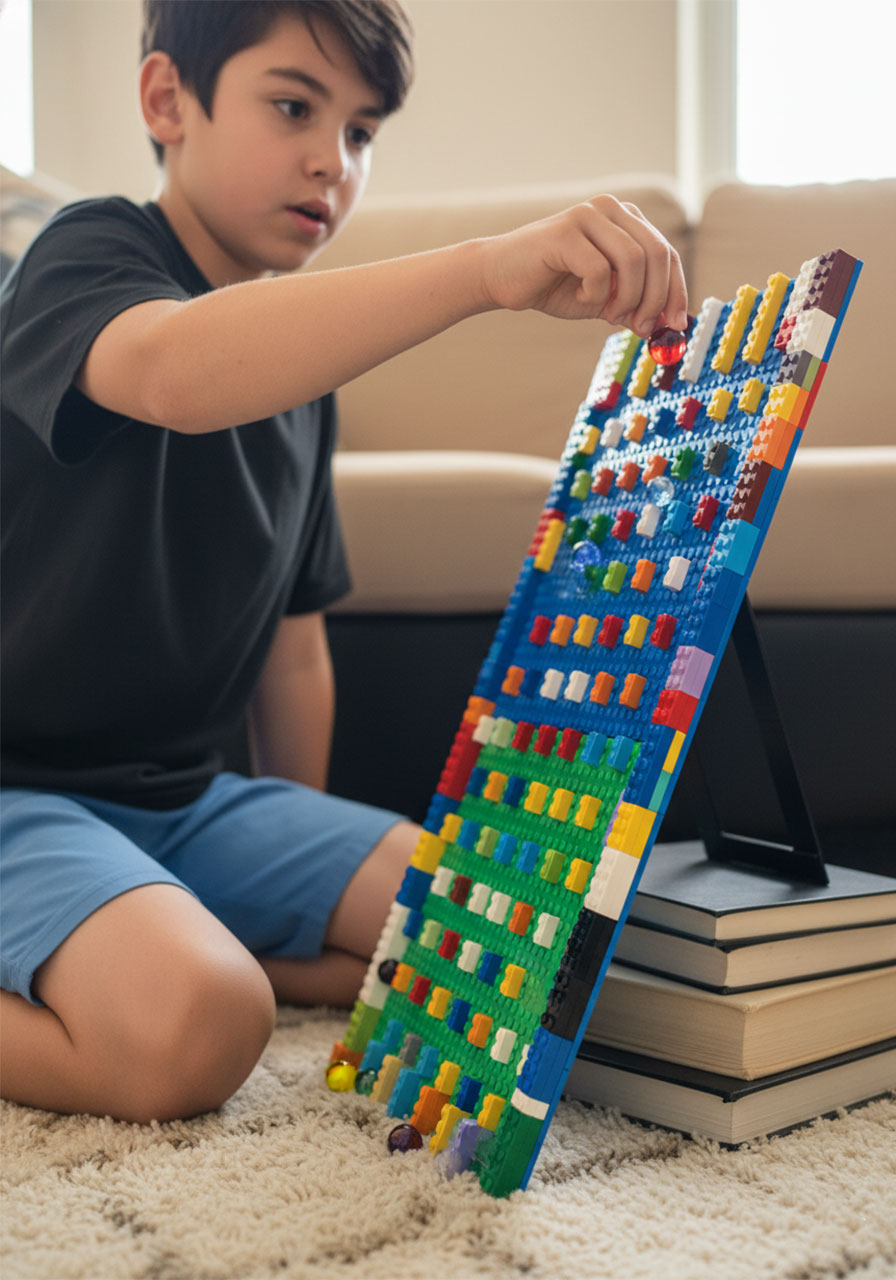
Remember those mesmerizing Plinko boards from game shows and carnival nights? The ones where you’d hold your breath as the disc bounced its way down, praying it would land in the jackpot slot? Well, guess what – you can build your own at home using LEGO bricks and marbles, and it’s about to become your new favorite rainy-day project.
This DIY LEGO Plinko board is part engineering challenge, part hypnotic entertainment, and 100% awesome. Whether you’re building it solo or turning it into a fun family activity, you’ll love watching those marbles zigzag their way down through the maze of colorful pegs. Plus, there’s some sneaky math magic happening behind the scenes (but don’t worry – we’ll keep that part fun).
Ready to build? Let’s dive in!
Why You’ll Love This LEGO Plinko Board
Best for: Family game nights, rainy day activities, STEM learning, kids ages 6+
Time to Build: 30-60 minutes (depending on your design)
Why It’s Awesome: This project combines creativity, problem-solving, and pure entertainment. You’ll get to design your own board, troubleshoot when marbles get stuck (it’s all part of the fun!), and then enjoy the satisfying clink-clink-clink as marbles bounce their way to the bottom. It’s like building your own miniature carnival attraction!


What You’ll Need:
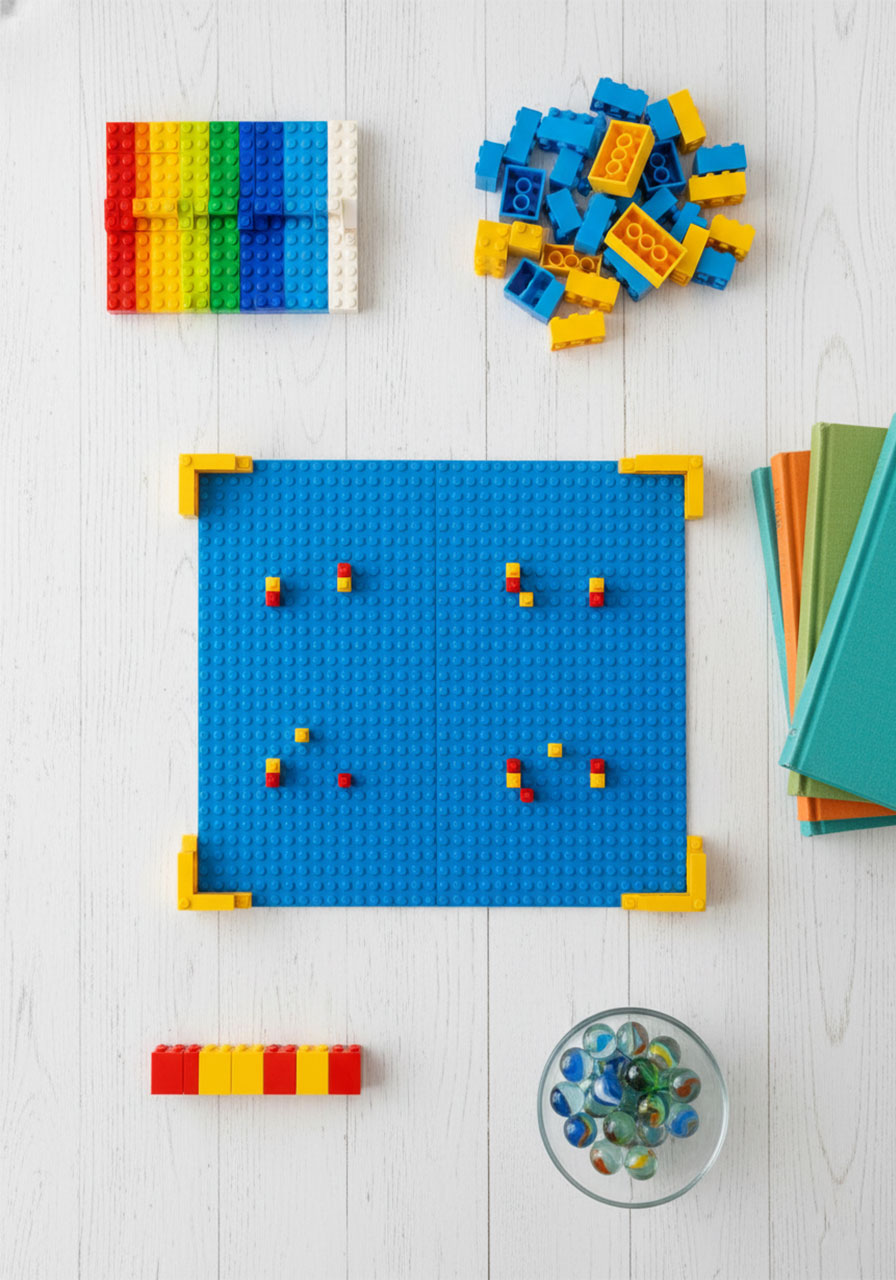
LEGO bricks (various sizes: 2×6, 2×4, 2×2, 1×6, 1×4, 1×2 bricks work great)
1 or 2 LEGO baseplates (use two side-by-side for a bigger board)
Marbles (standard size – make sure they fit between your pegs!)
Thick books or a baking sheet (to prop up your board at an angle)
Optional: A whiteboard backing if your baseplate bends
Pro Tip: Raid your LEGO collection for colorful bricks – a rainbow Plinko board is way more fun to watch than a boring one-color version!
How to Build Your LEGO Plinko Board:
Step 1: Set Up Your Base
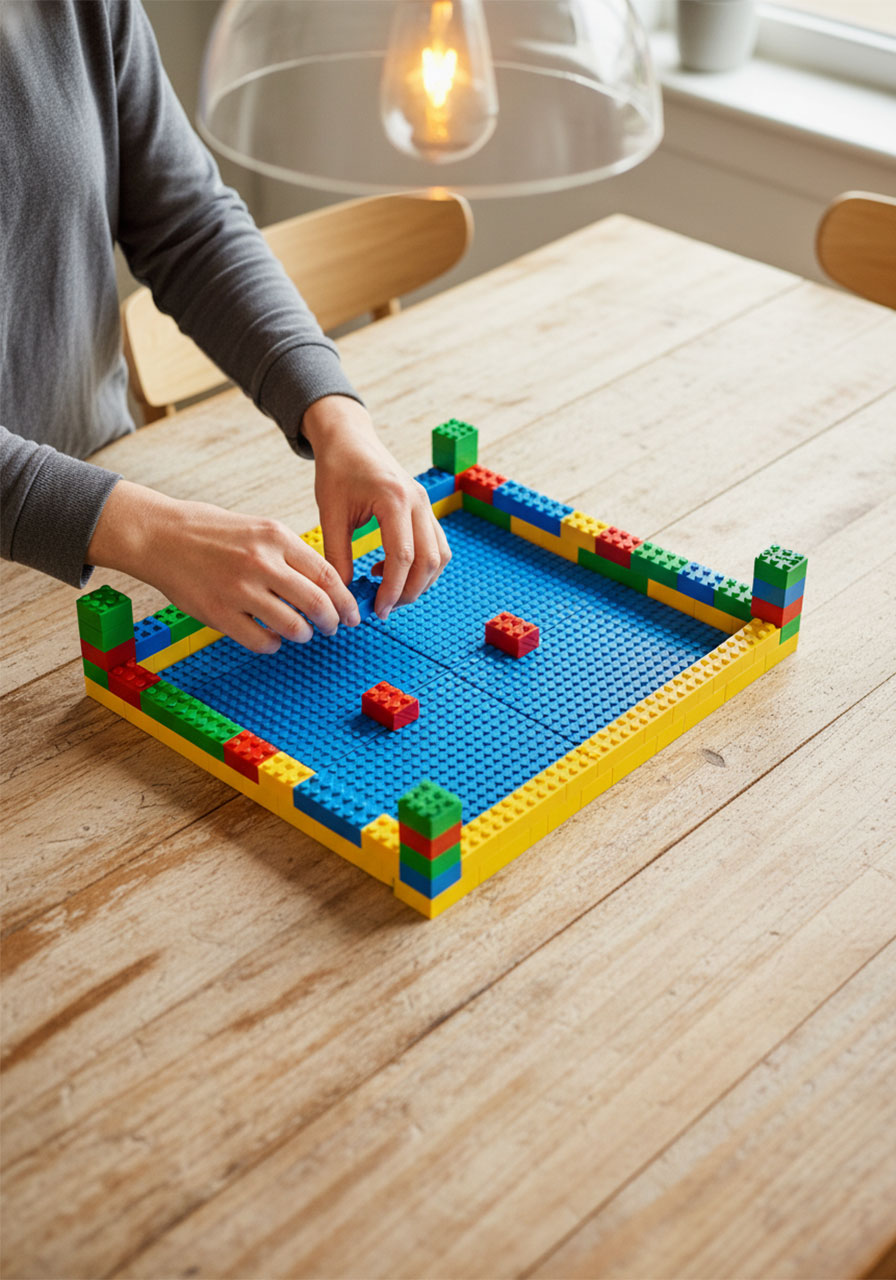
If you’re using two baseplates for a bigger board, place them side by side and connect them using two 2×4 LEGO bricks on each side. This keeps everything stable during gameplay.
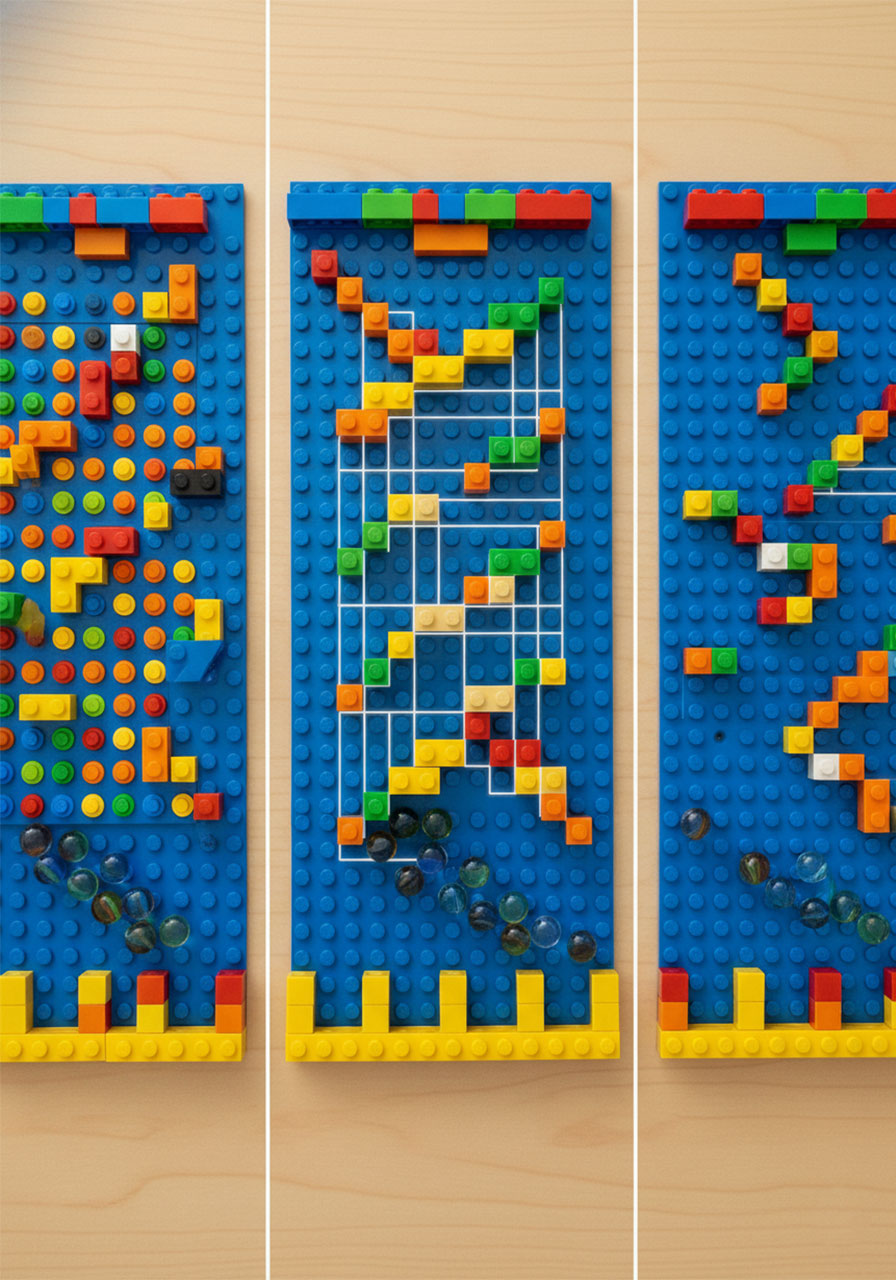
Step 2: Build Your Border
Create the bottom and side borders of your Plinko board using 2×6, 2×4, 2×2, or 2×1 bricks. Stack them at least 2-3 bricks high so your marbles don’t escape mid-game. (Trust us – chasing runaway marbles gets old fast.)
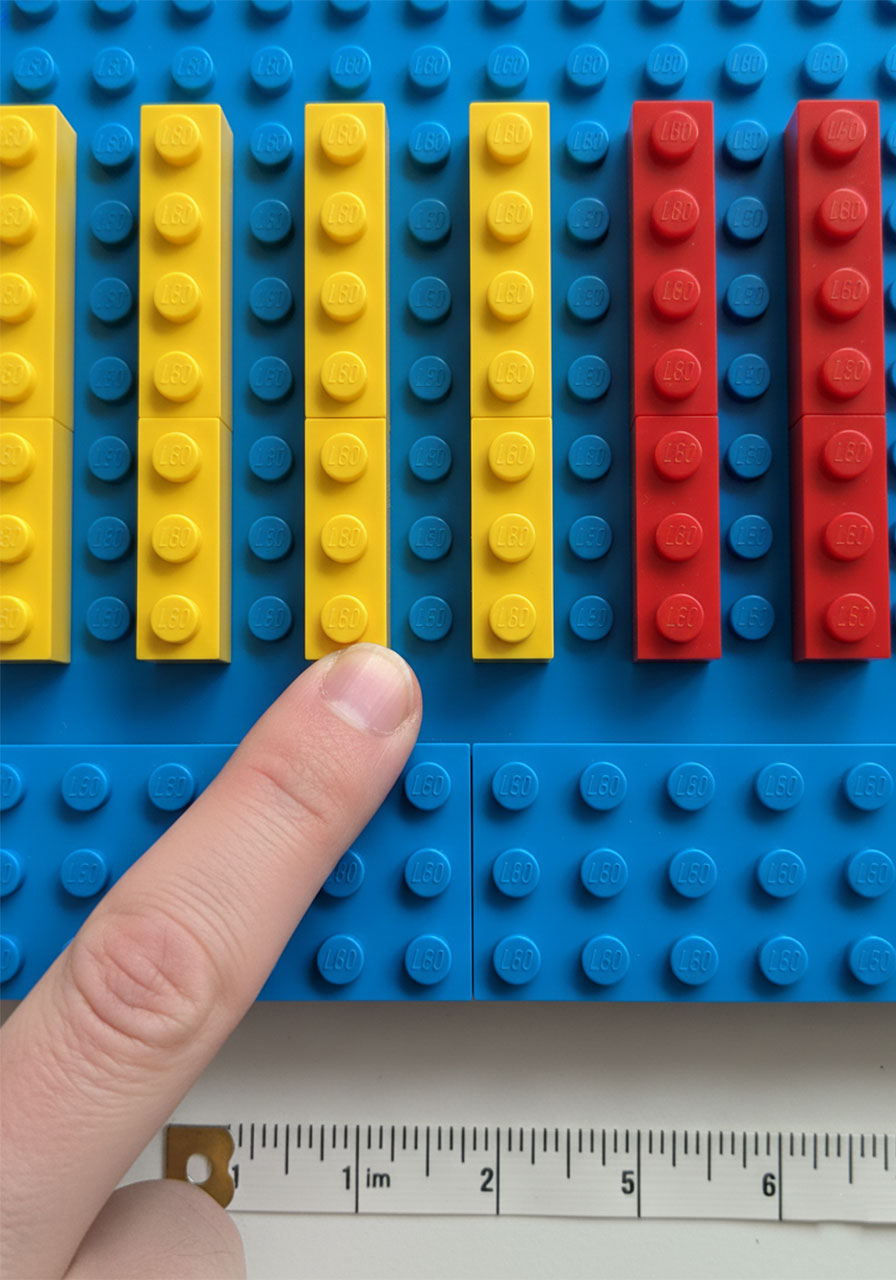
Step 3: Create Your Prize Slots
Here’s where things get interesting! Place 1×6 LEGO bricks every 4 studs along the bottom to create your prize slots. Each slot should be 3 studs wide – that’s the perfect size for marbles to drop into.
Important: You’ll end up with one slot that’s 4 studs wide. That’s totally fine – just make sure all your slots are wide enough for the marbles to actually fit!
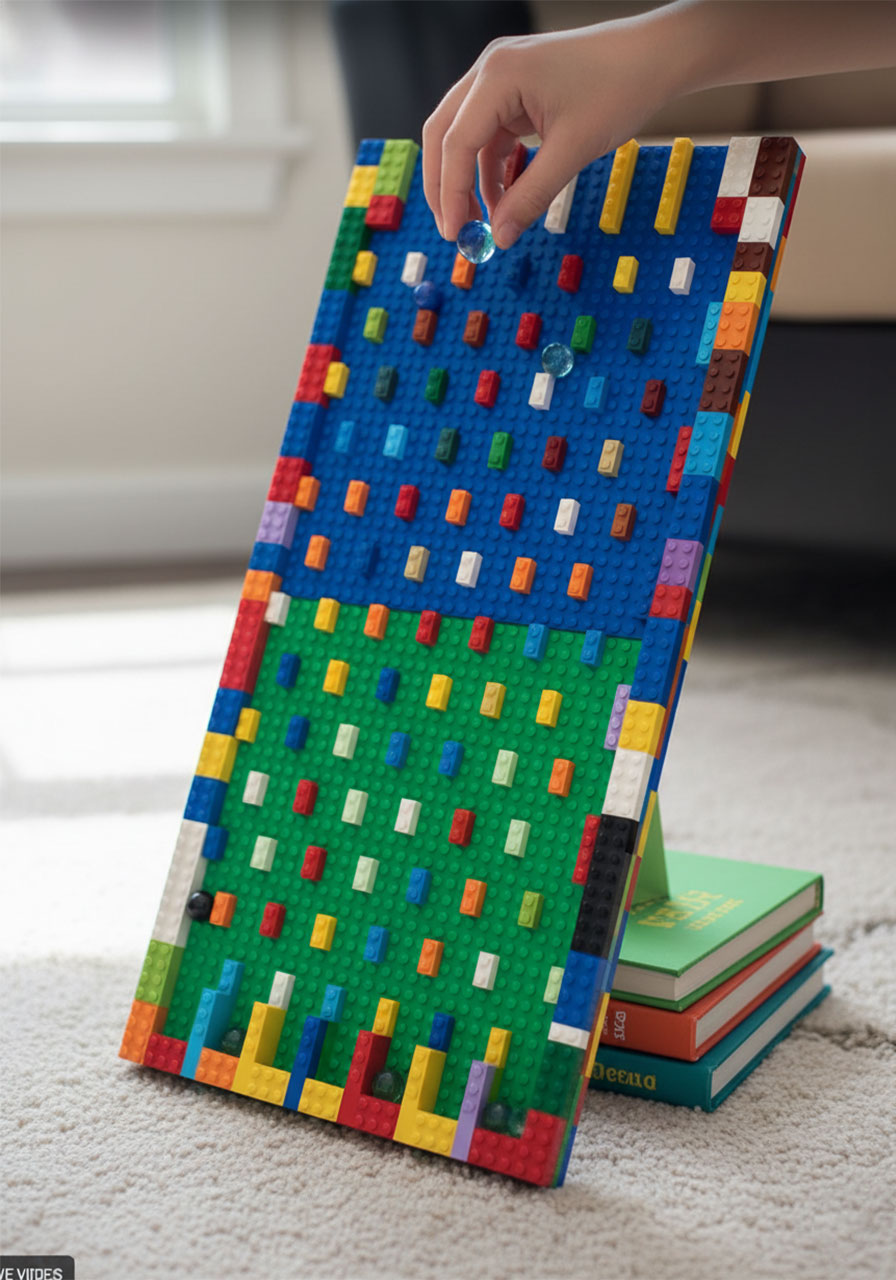
Step 4: Add Your Pegs (The Fun Part!)
Now it’s time to create the zigzag maze! Place 1×2 LEGO bricks as your “pegs” with 3 studs between them horizontally and 2 studs vertically.
Critical detail: Stagger your columns! Don’t create straight vertical lines of bricks, or your marbles will just slide straight down without any of that satisfying bouncing action.
Step 5: Fix the Tricky Spots
Here’s where you’ll need to do some problem-solving:
Every other row, you’ll notice some 1×2 pegs leave only 1 stud of space next to the border. Remove those pegs – they’ll trap your marbles!
Replace them with 1×4 bricks placed next to the border, leaving 4 studs of space. This keeps marbles moving and prevents those annoying traffic jams.
For the row right above your slots, use 1×2 bricks instead of 1×4 bricks near the borders, or your marble won’t be able to drop into the corner slots.

Step 6: Leave Drop Space at the Top
Make sure you’ve got some open space at the top where you can drop your marbles. This is your “launch zone!”
Step 7: Reinforce Everything
Add extra bricks to your bottom border and sides. Build them up nice and high – at least 3-4 bricks tall – so marbles stay on the board instead of flying off dramatically (though that is kind of hilarious).
Step 8: Prop It Up
Here comes the magic moment! Prop your LEGO Plinko board up at a slant using thick books, a baking sheet, or anything sturdy. You’ll need to experiment with the angle – too vertical and marbles fly off; too horizontal and they get stuck on the pegs.
Pro Tip: If your baseplate bends under the weight (classic LEGO problem), slide a whiteboard or cookie sheet behind it for support.
Step 9: Drop and Watch the Magic!
Drop a marble from the top and watch it ping-pong its way down through the pegs. Pure. Satisfaction.
Take Your Plinko Board to the Next Level
Once you’ve got the basic board working, try these fun variations:
1. Switch Up Your Pegs: Use 1×1 bricks instead of 1×2 bricks for tighter, trickier gameplay.
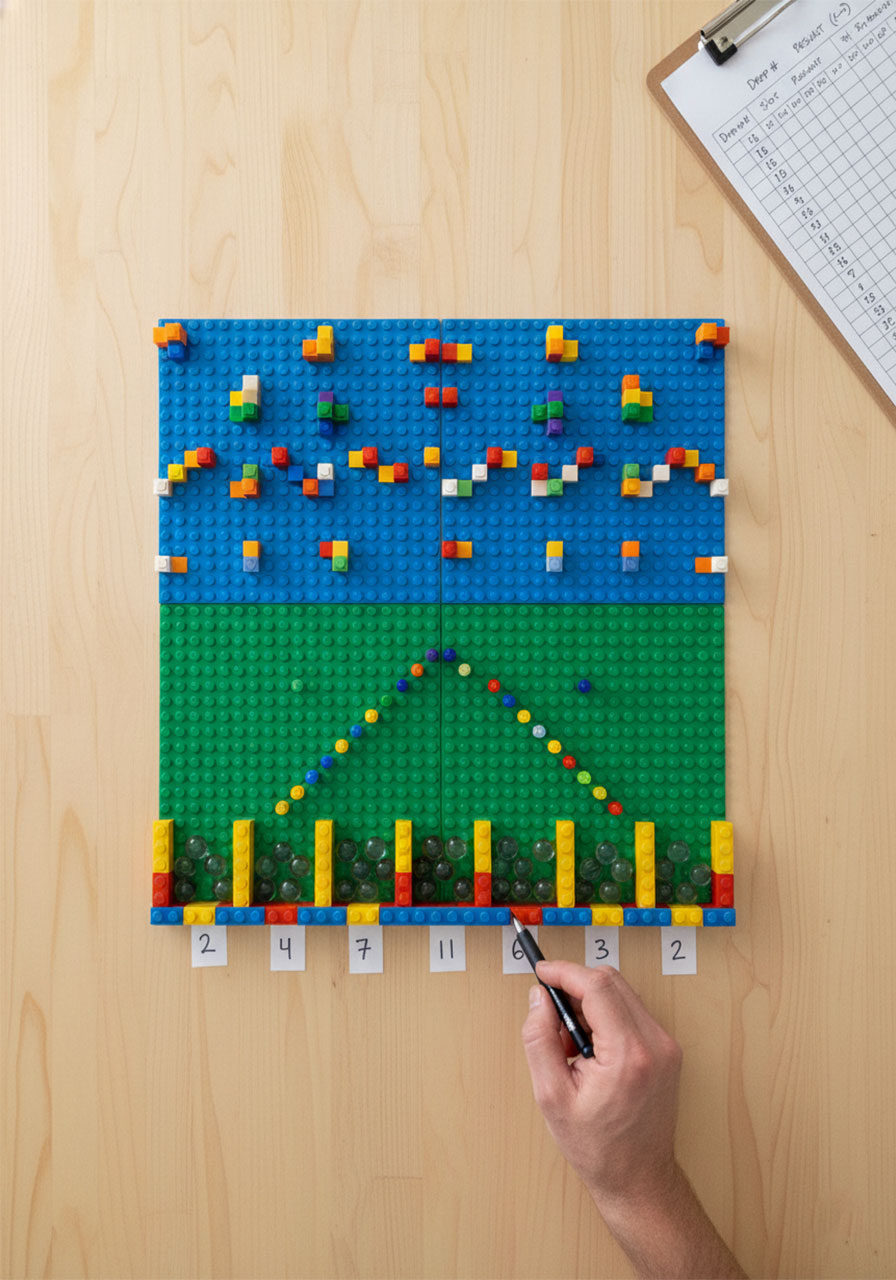
2. Run a Marble-Drop Experiment: Drop 20+ marbles and count how many land in each slot. Which slot collects the most? (Spoiler: It’ll probably be the middle ones – there’s actual science behind this!)
3. Play Marble Rescue: When marbles inevitably get stuck on the pegs, challenge yourself to knock them loose by dropping another marble. It’s like pool, but vertical!
4. Assign Point Values: Write numbers on small pieces of paper and place them in each slot. Turn your Plinko board into a competitive game – highest score wins!
5. Create Obstacle Courses: Get creative and add ramps, tunnels, or extra barriers to make your marble’s journey even more unpredictable.
The Cool Math Behind Your Plinko Board (Optional Reading!)
Your Plinko board isn’t just fun – it’s also a mini probability lesson in disguise! If you drop enough marbles, you’ll notice the middle slots always collect the most, while the side slots stay pretty empty.
Why? When marbles drop from the center, they have to travel farther to reach the edges. Marbles dropped near the sides often bounce off the borders and ricochet back toward the middle. The result? A bell-shaped curve of marbles, with most clustering in the center.
It’s called a normal distribution, and it’s the same math that shows up everywhere from test scores to heights of people. Pretty cool, right?
Final Thoughts: Just Drop and Enjoy!
You don’t need to turn this into a competition or a lesson – sometimes the best part is just watching marbles take their chaotic journey down the board. There’s something oddly mesmerizing about it, and kids (and let’s be honest, adults too) can watch it for surprisingly long stretches.
And here’s the best part: there’s no single “correct” way to build your Plinko board. Let your creativity run wild! Try different peg patterns, experiment with board angles, and see what happens when you change up the spacing. Every design teaches you something new about physics, probability, and problem-solving.
So grab your LEGO bricks, round up some marbles, and get building. Your homemade Plinko board is waiting – and trust us, that first satisfying marble drop is going to be chef’s kiss.
More Kid’s Party Ideas to Keep the Fun Rolling:
25 All-Time Best Documentaries for Kids (and Parents Who Don’t Want to Fall Asleep)
11 Epic Card Games for Kids (with One Simple Card Deck) That’ll Keep Them Entertained for Hours
Turn a Simple Egg Carton into the Ultimate Nature Color Hunt Adventure
5 Epic Newton’s Laws Projects That’ll Make Physics Click (Finally!)
DIY Bubble Wand Making Station: The Ultimate Summer Activity Kids Will Beg to Do Again
Pom Pom Tube Drop: The 5-Minute Activity That’ll Keep Your Toddler Entertained (And Learning!)
How to Make Fluffy Pet Rocks: The Cutest DIY Craft That’ll Have Kids Obsessed