Looking for a quick, budget-friendly craft that gets the kids excited about the 4th of July or Memorial Day? This paper plate flag craft checks every box – it’s easy to set up, uses supplies you probably already have at home, and ends with an adorable patriotic decoration you can hang right on the wall.
I made this with my kids using leftover Christmas tissue paper and a paper plate that already had color on the back. Trust me – it still turned out adorable. That’s the beauty of this craft: it’s perfectly imperfect, and that’s totally okay.
Whether you’re planning a 4th of July party, a Memorial Day gathering, or just want a fun Tuesday afternoon activity, this one’s a guaranteed hit with preschoolers and school-age kids alike.

Why You’ll Love This Craft
This isn’t just a cute craft – it’s also a sneaky little lesson in patriotism, creativity, and fine motor skills. Kids get to paint, cut, and arrange strips of red and white tissue paper that flutter like real flag stripes. The result looks so good hanging on a window that guests will do a double-take.
Here’s what makes it a go-to for busy moms:
Minimal prep. You don’t need to measure perfectly or cut in perfectly straight lines. Once it’s hanging up, you honestly can’t tell the difference.
Budget-friendly. Most of the supplies are things you likely already have on hand – a paper plate, tissue paper scraps, glue, and paint.
Works for a wide age range. Preschoolers can do the painting and sticker-placing while older kids tackle the cutting and gluing.
Display-ready. Add a loop of yarn and it’s ready to hang on a wall, window, or front door for all the patriotic vibes.

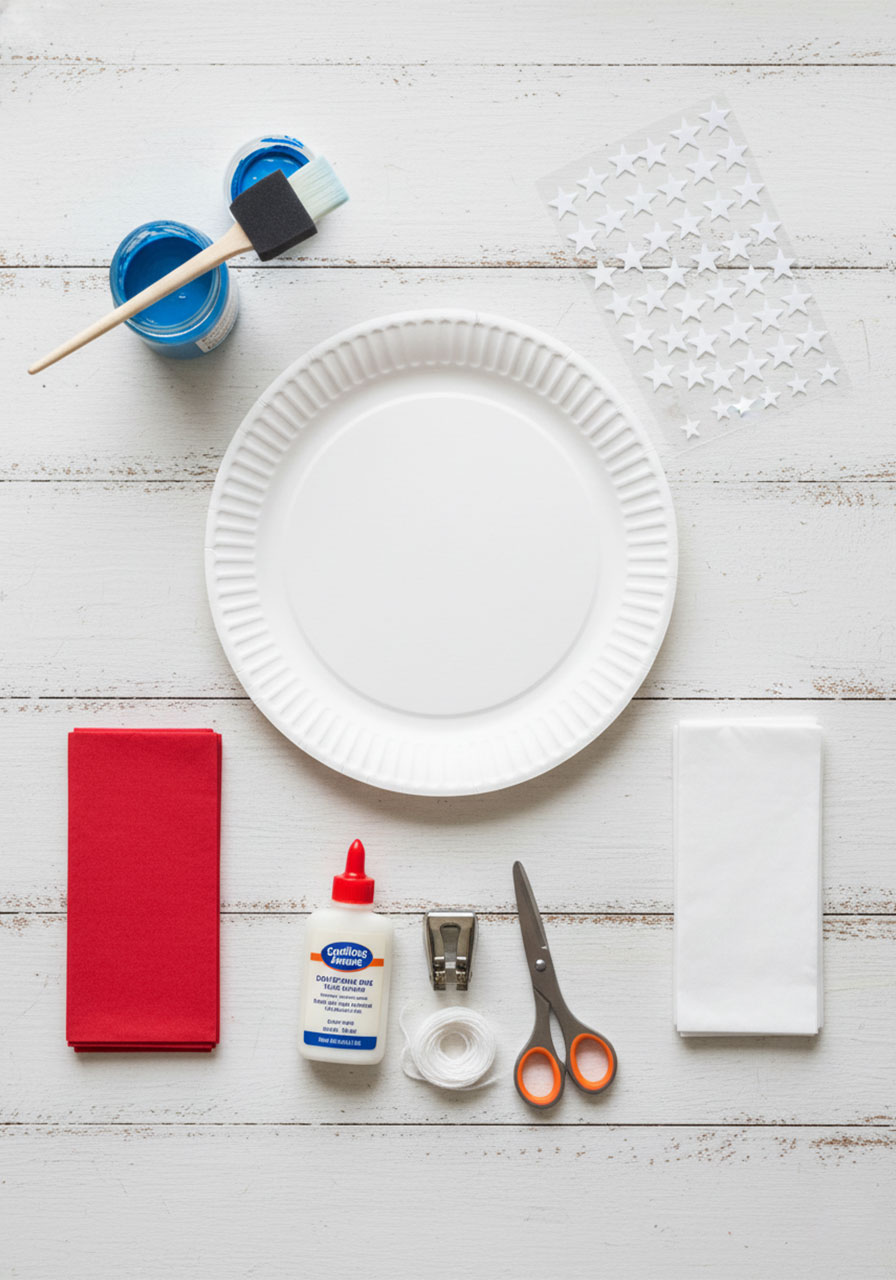
What You’ll Need
Paper plate
White star stickers (or white paper to cut your own)
Blue paint
Red and white tissue paper
Glue
Hole punch
Small piece of yarn or string
Scissors
Pro Tip: Don’t have white star stickers? Just cut small stars out of white paper or use a star-shaped hole punch if you have one. I actually did this myself and they looked just as charming!
How to Make a Paper Plate Flag: Step-by-Step
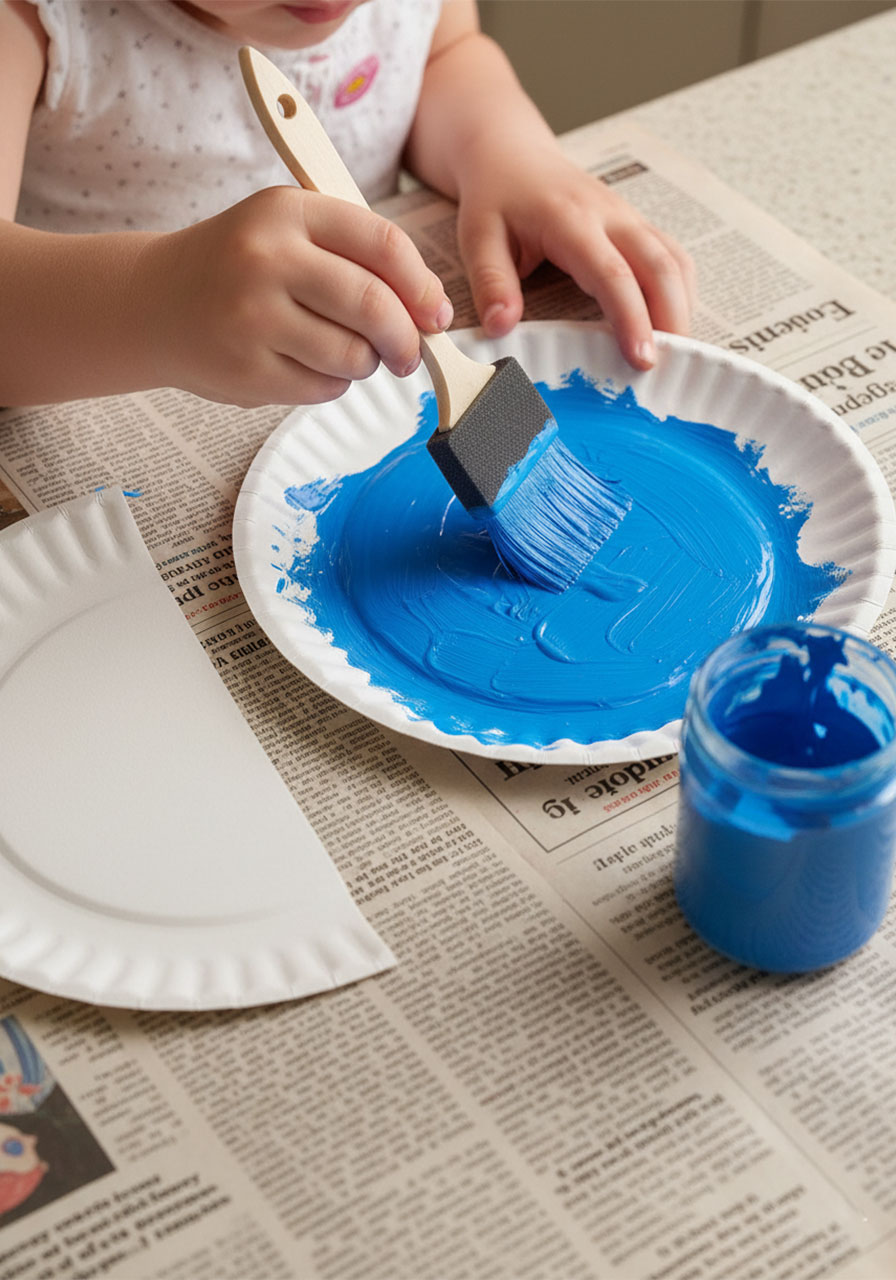
Step 1: Cut and Paint the Paper Plate
Cut your paper plate in half. This half-circle shape becomes the blue canton (the star section) of your flag – and it also doubles as the base to attach your tissue paper stripes. Once it’s cut, paint the entire top side blue. Cover it well, right to the edges. Set it aside and let it dry completely before moving on.
Tip: Tempera paint works great and dries fast, which is a lifesaver when you have impatient little crafters waiting!
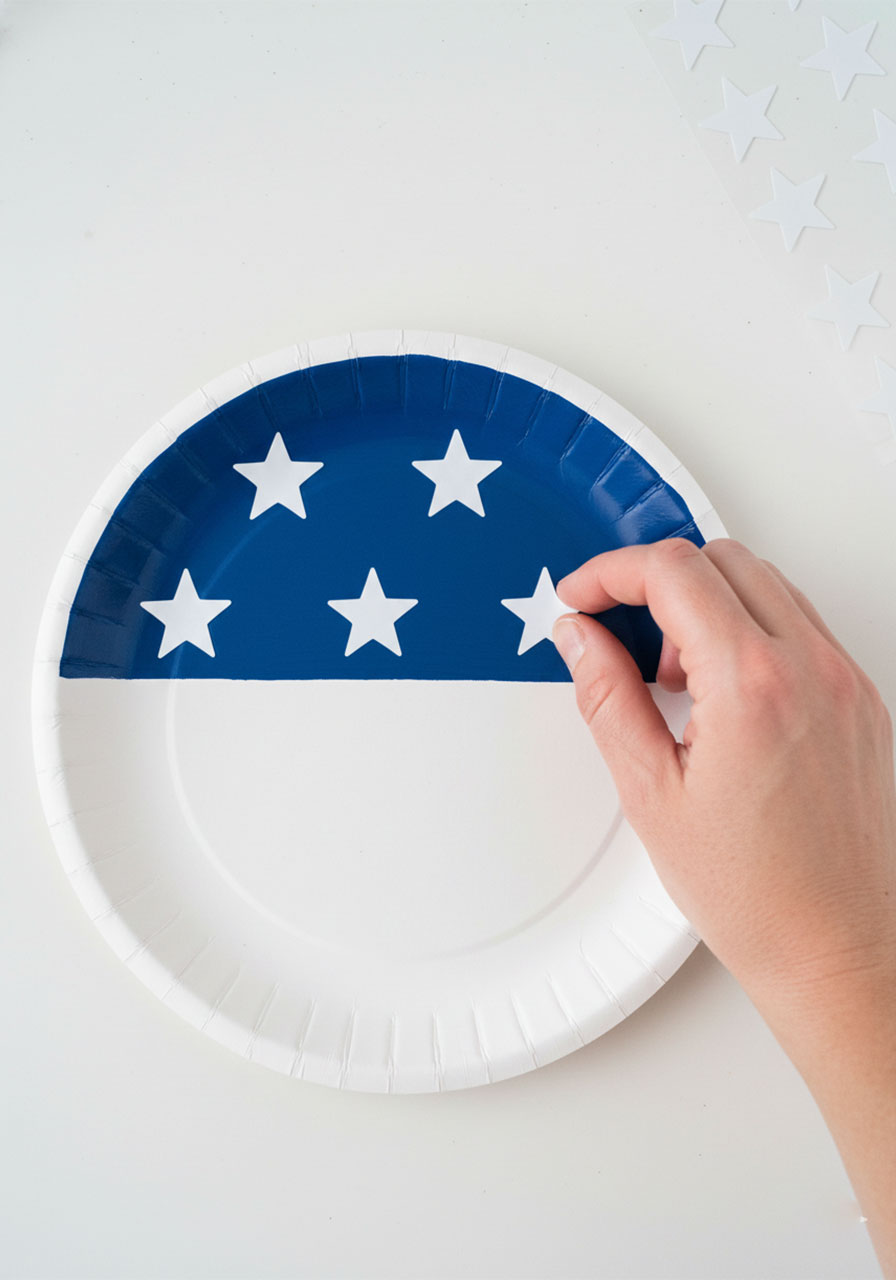
Step 2: Add the Stars
Once the paint is fully dry, add your white stars to the blue surface. Peel-and-stick star stickers make this step super easy and mess-free for little hands. Arrange them in a pattern across the blue section – two rows works beautifully and fills the space nicely.
No stickers? No problem. Cut small five-pointed stars out of white paper and glue them on. They don’t need to be perfect – a little handmade charm is part of the magic.
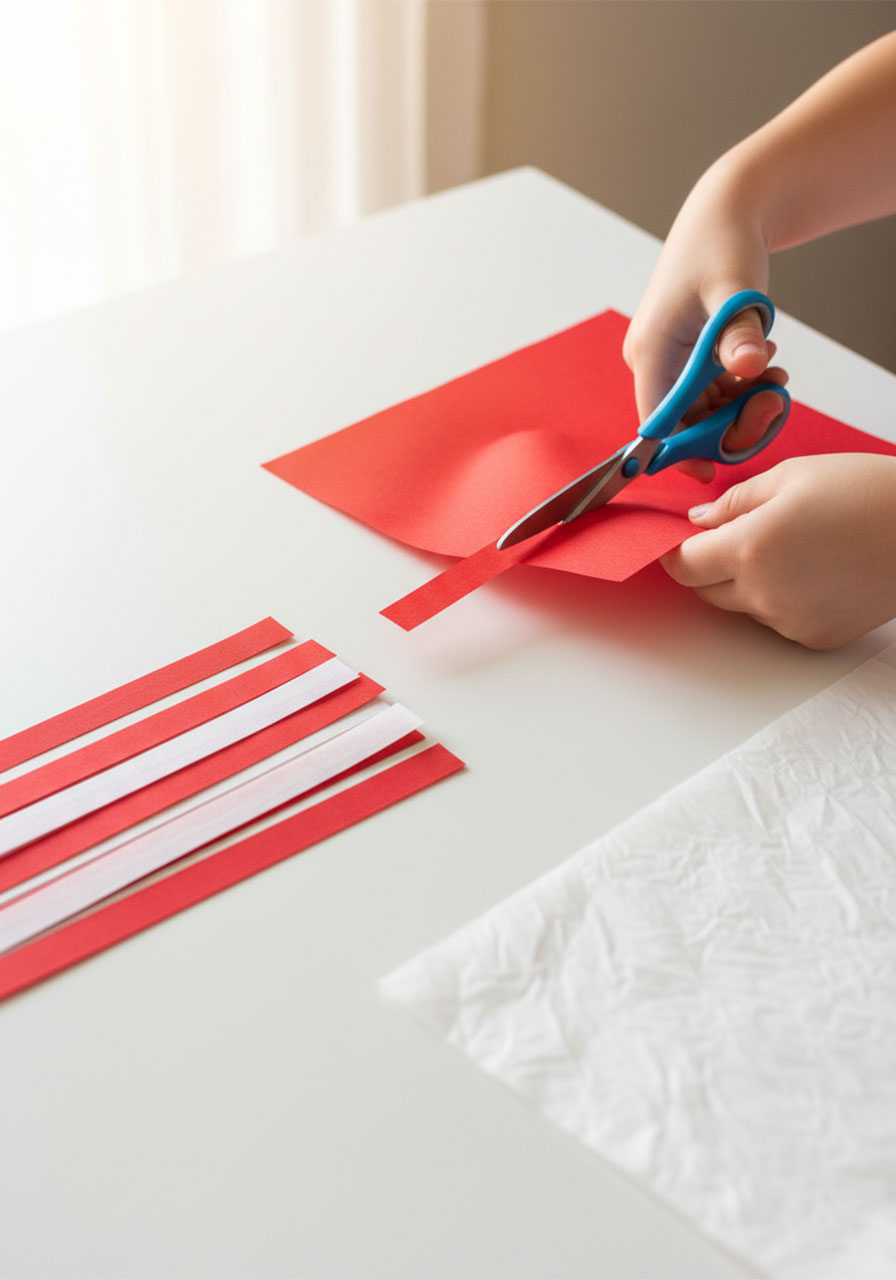
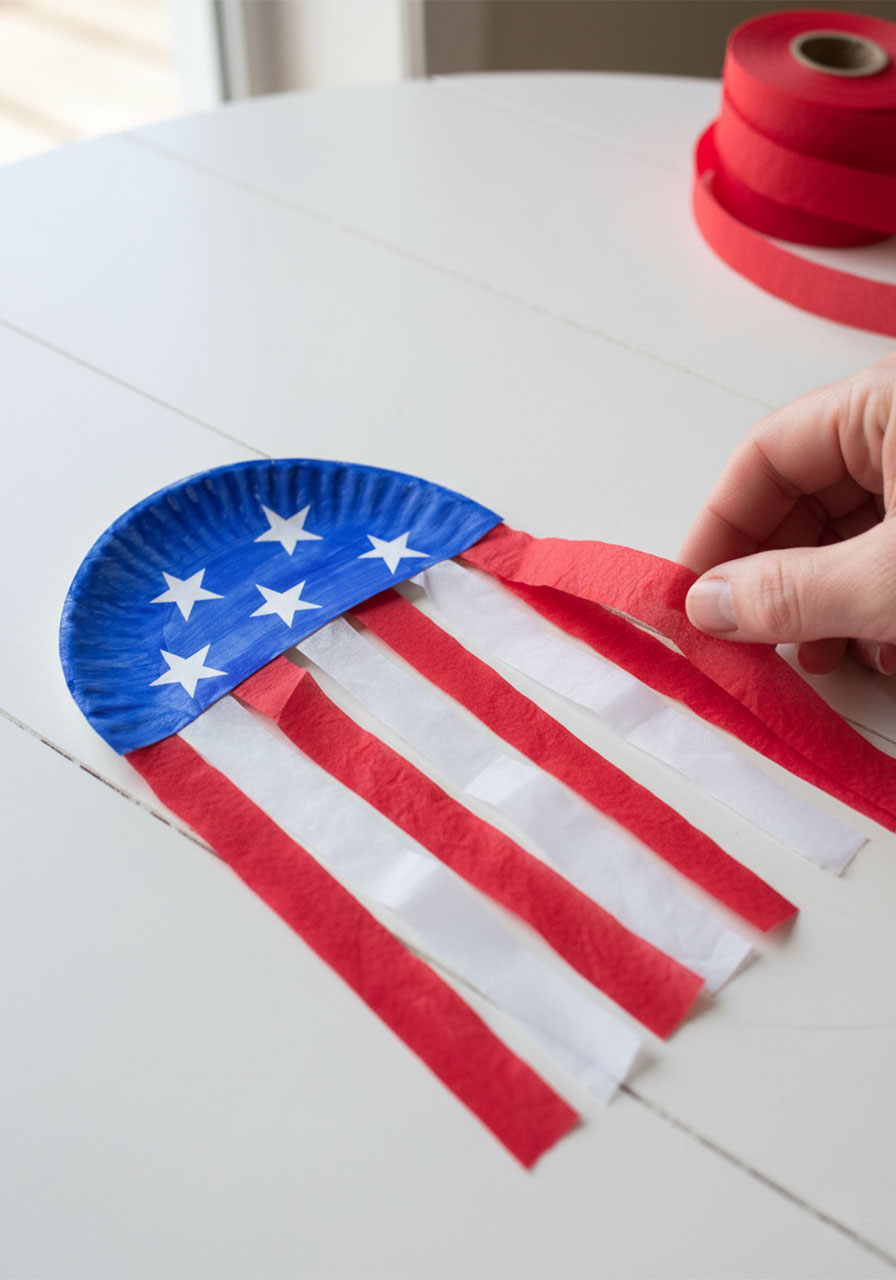
Step 3: Cut the Tissue Paper Stripes
Now for the stripes! Cut your red and white tissue paper into long strips. Aim for about 4 red strips and 3 white strips to get that classic flag look. The strips don’t need to be exactly the same width or perfectly straight – once they’re hanging, any little variations just add to the handmade charm.
Tip: Fold your tissue paper in half a couple of times before cutting to get multiple strips in one go. Major time-saver!
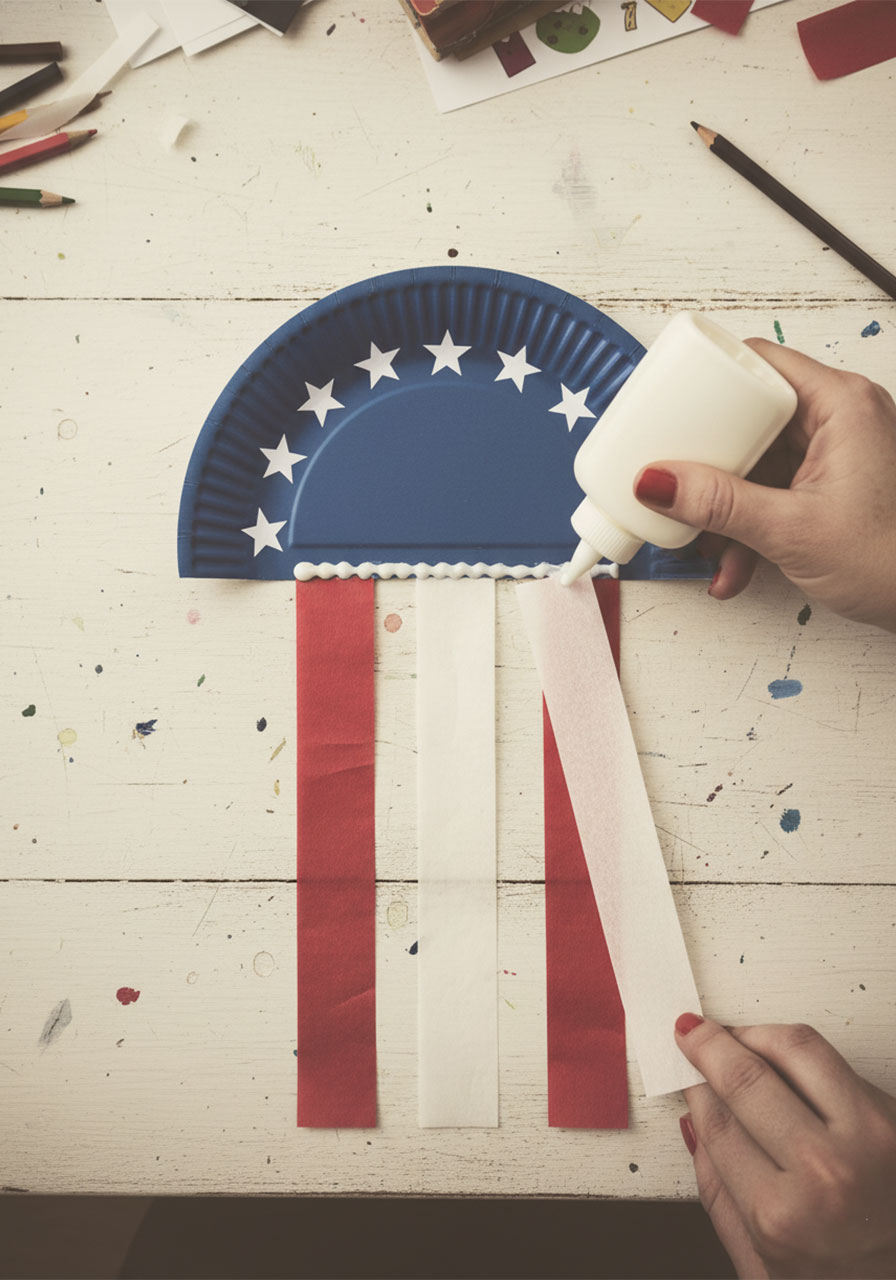
Step 4: Glue the Stripes to the Plate
Flip the blue paper plate so the flat (bottom) edge is facing you. Starting from one end, alternate gluing a red strip, then a white strip, all the way across the bottom edge. Press each strip firmly and let the glue set for a moment before adding the next one.
The stripes should hang down freely below the plate, creating that gorgeous flag-in-the-breeze effect.
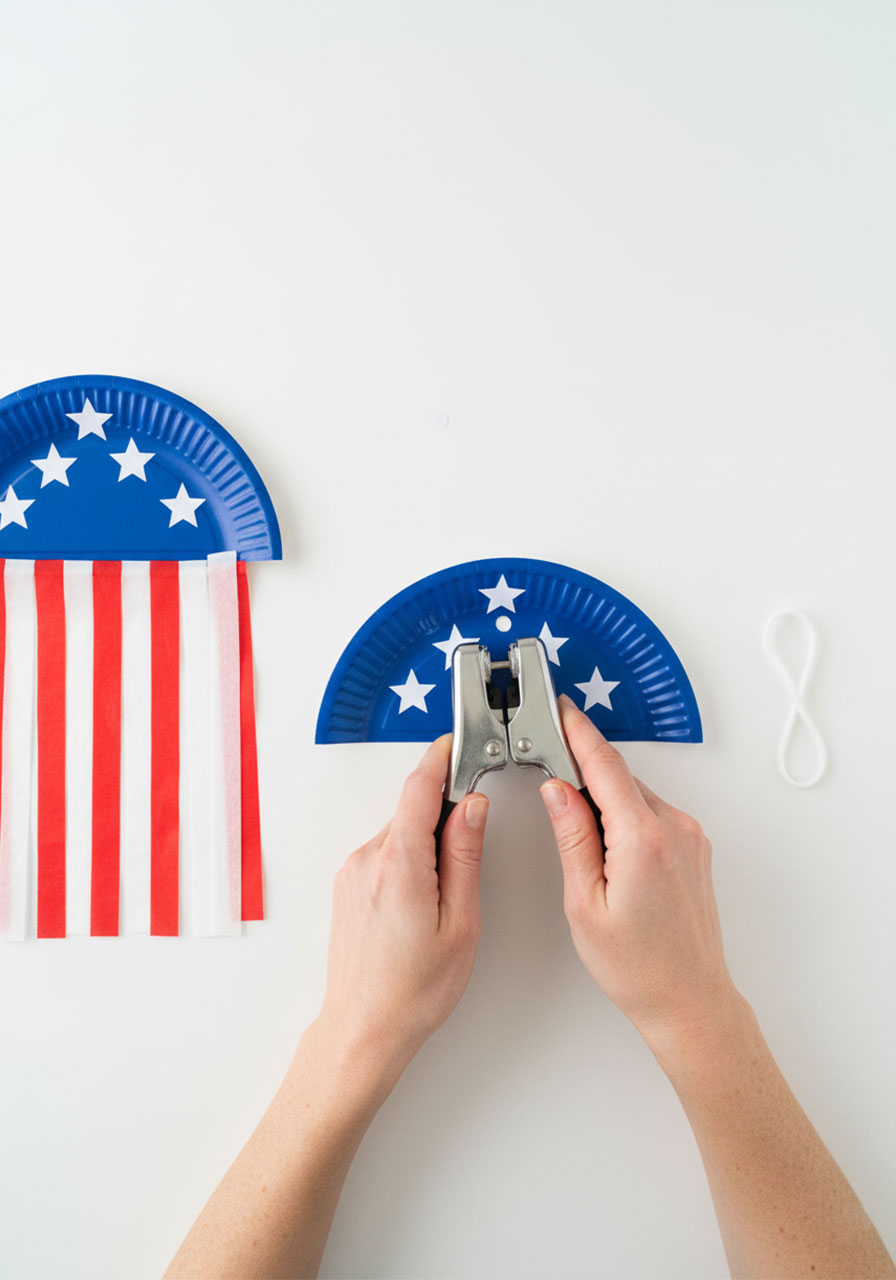
Step 5: Add the Hanging Loop
Use a hole punch to make a small hole in the center top of the paper plate (the very top of the curved edge). Thread a piece of yarn or string through the hole and tie it into a loop. That’s it – your flag is ready to hang!
I used white yarn and it blended in perfectly. You could also use red, blue, or even a thin ribbon to match your patriotic décor.
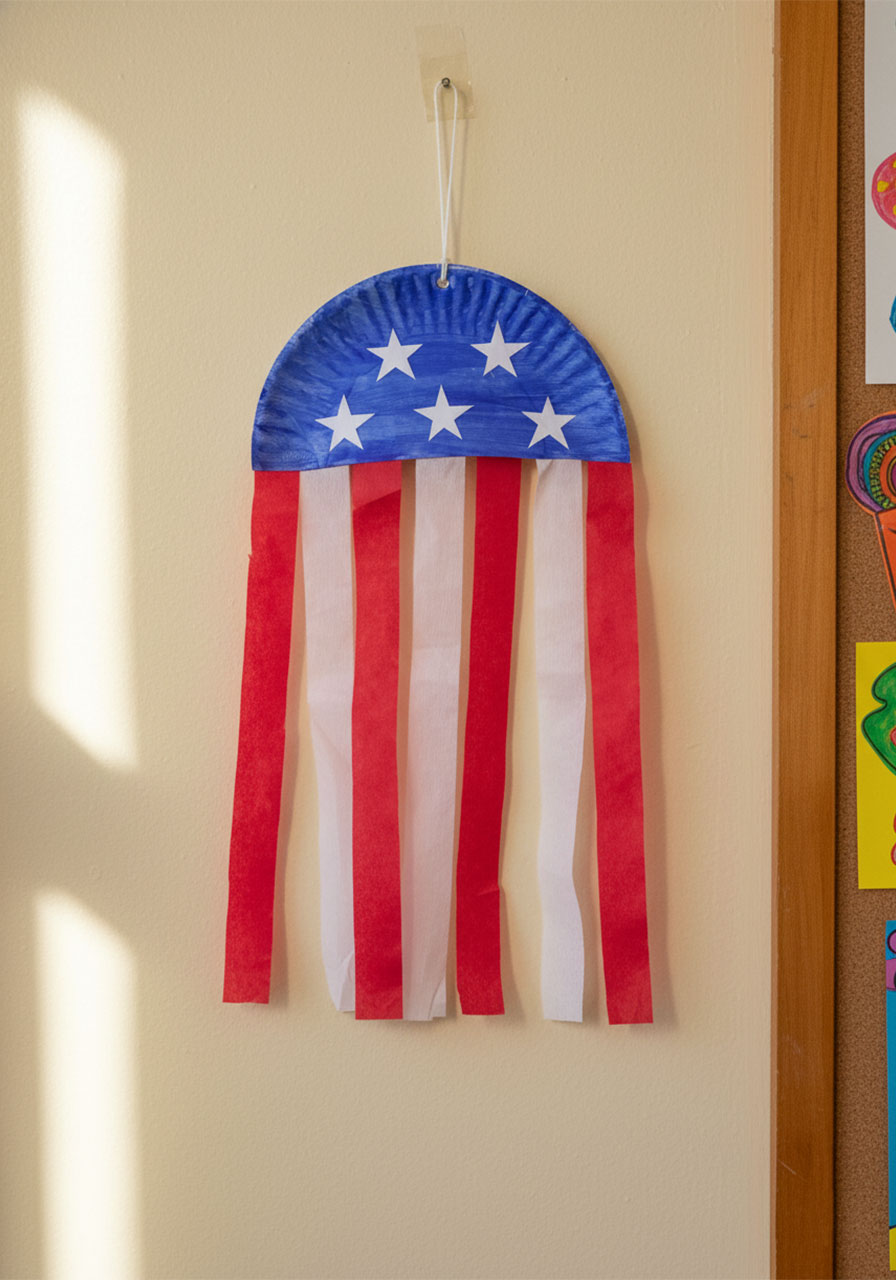
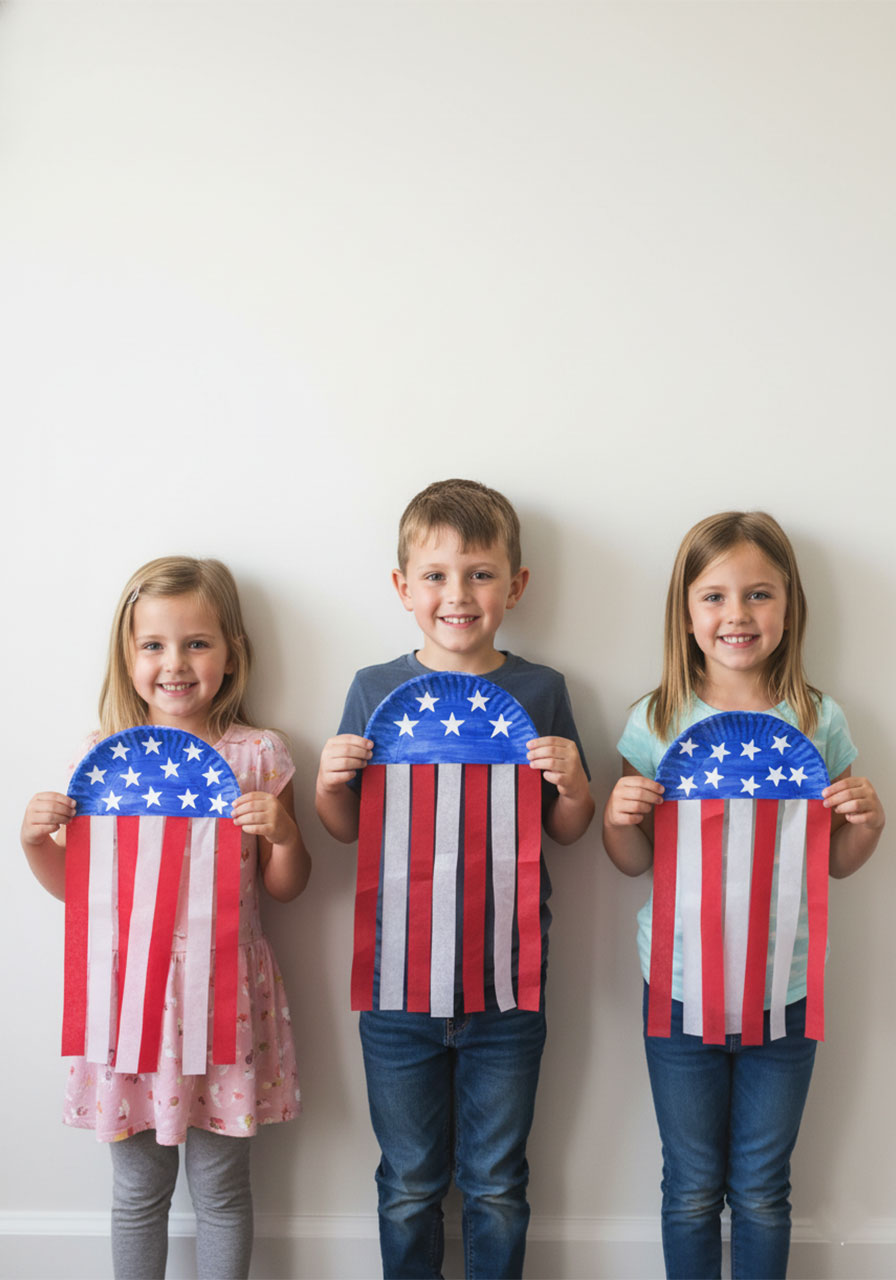
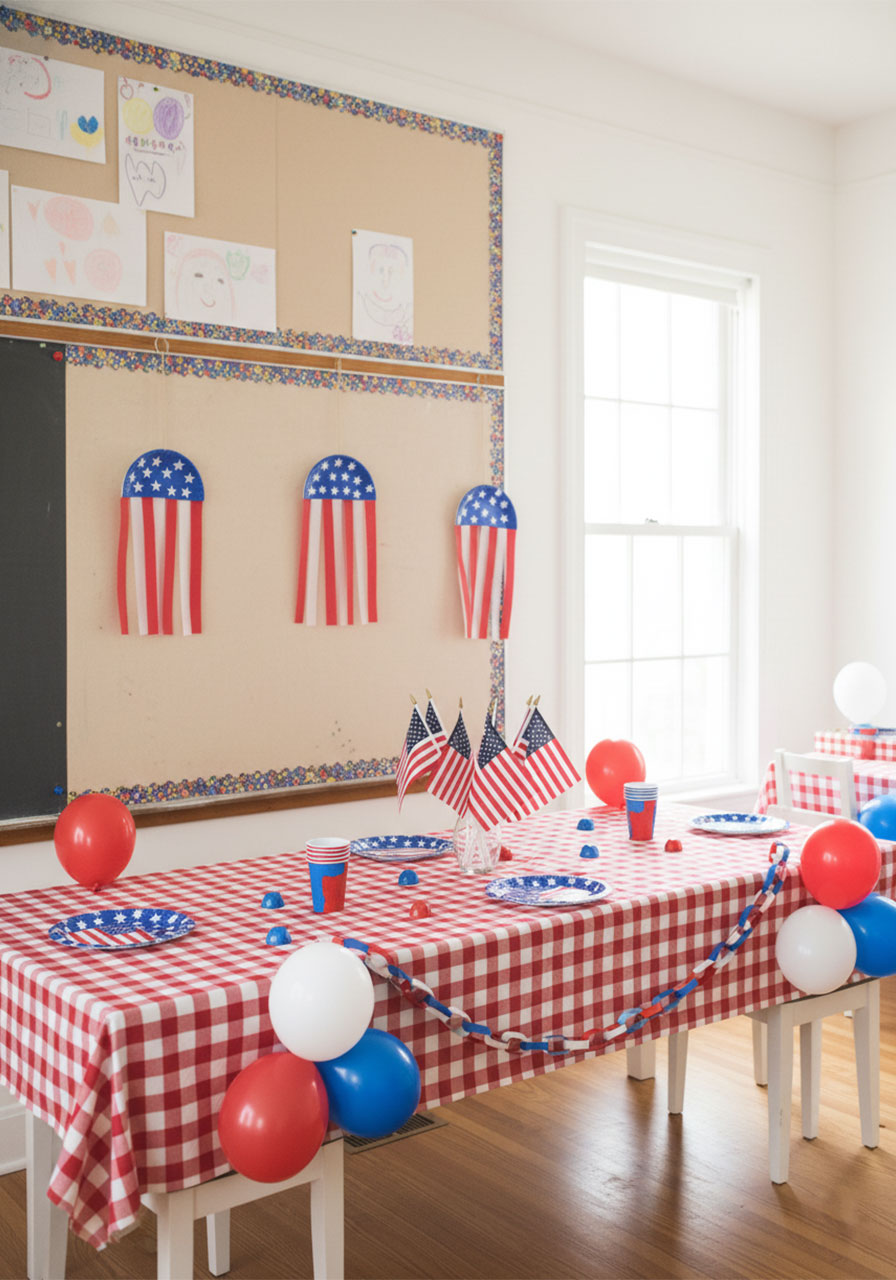
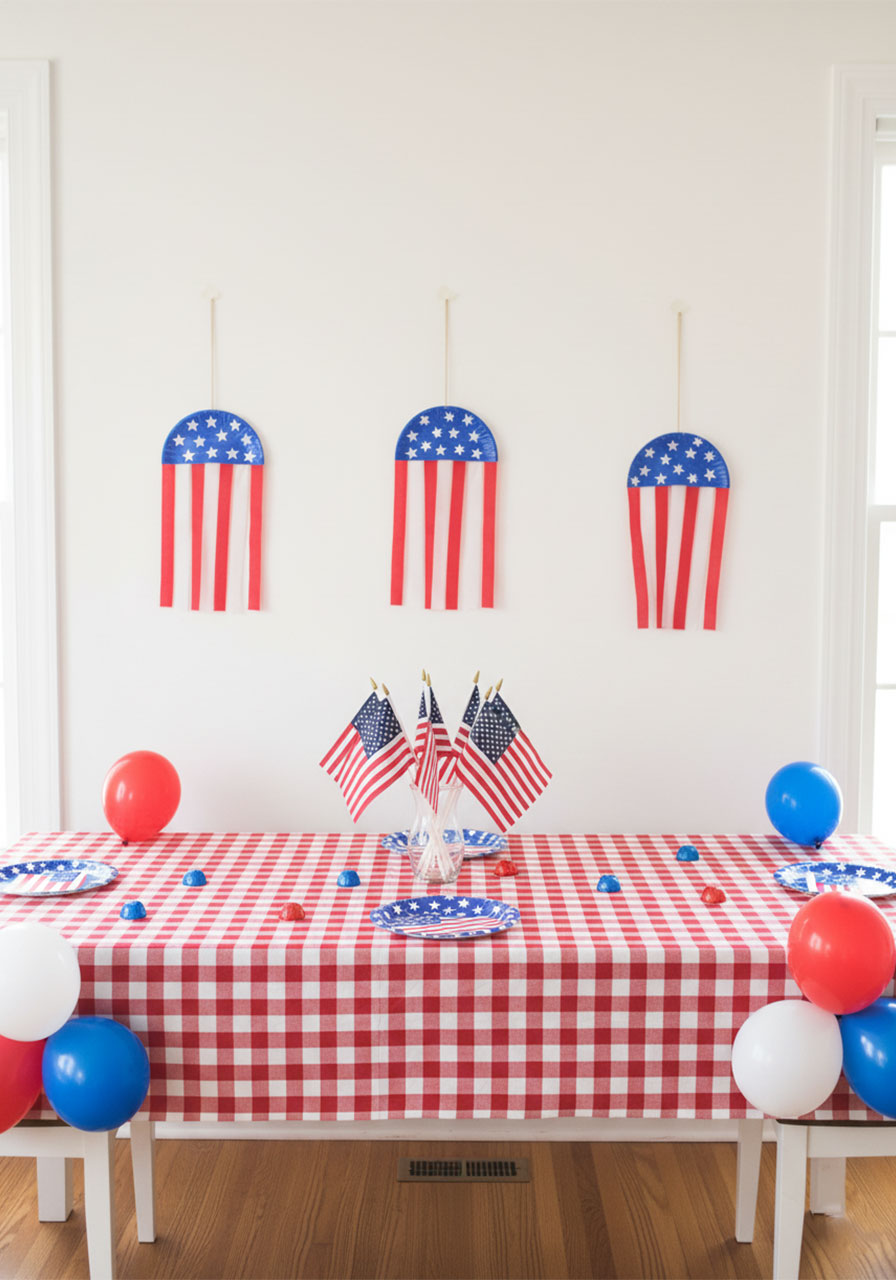
What the Finished Craft Looks Like
Once it’s hanging up, this paper plate flag is seriously impressive for such a simple craft. The blue half-circle sits at the top with the white stars arranged across it, and the red and white tissue paper strips flutter below like real flag stripes. It looks beautiful on a window where light shines through the tissue paper, or hung on a wall as part of your patriotic party décor.
My kids were so proud of theirs – and honestly, so was I. It’s one of those crafts that looks way harder than it actually is.
Fun Variations to Try
Once you’ve mastered the basic version, here are a few ways to switch it up:
Swap tissue paper for crepe paper. Crepe paper streamers have a beautiful crinkled texture and come in perfect patriotic red and white. They’re also a little sturdier than tissue paper if you’re crafting with very young kids.
Use cardboard instead of a paper plate. Cut a half-circle from a cereal box or any sturdy cardboard if you’re out of paper plates. It holds up just as well and is a great way to recycle.
Make a mini version. Use a small dessert-sized plate to create a miniature flag garland. Make several and string them together for a party banner that’s 100% handmade.
Let older kids paint the stars. Instead of stickers, have school-age kids use white paint and a star-shaped sponge to stamp the stars on. It’s a little messier but so much fun.
Tips for Crafting with Little Ones
Crafting with kids is always a little unpredictable (that’s the fun of it!), but a few simple prep steps make everything go smoother:
Lay down newspaper or a plastic tablecloth before you start painting. Blue paint has a way of ending up everywhere.
Pre-cut the tissue paper strips if you’re working with toddlers or preschoolers. That way they can focus on the gluing and arranging without the frustration of cutting.
Use a foam brush for painting. It covers the paper plate quickly and evenly, even in little hands.
Make it a group activity. If you’re hosting a 4th of July party or playdate, set up a crafting station and let each kid make their own flag to take home as a party favor.
When to Make This Craft
This paper plate flag is perfect for so many occasions:
4th of July parties and celebrations
Memorial Day activities
Flag Day (June 14th!)
Patriotic school or classroom projects
Veterans Day crafts for kids
Rainy day activities when you need something fun and festive
It also makes a sweet gift for grandparents around the holidays – kids love giving something they made with their own hands.
More 4th of July Ideas to Keep the Fun Rolling:
Coffee Filter Watercolor Fireworks Craft: The Most Magical 4th of July Activity for Kids
12 Fun & Creative Memorial Day Crafts for Kids (Patriotic Activities the Whole Family Will Love)
Bald Eagle Craft for Kids: Template + Step-by-Step Guide for Groups of 20!
Patriotic Star Suncatcher Craft: The Easiest 4th of July Activity That Kids AND Adults Will Love
How to Make a Tin Can Fireworks Centerpiece (Easy Patriotic Craft for 4th of July)
The Easiest 4th of July Firework Craft for Kids (Using Toilet Paper Rolls!)
Straw Stamped Paper Plate 4th of July Craft (Easy & So Festive!)