You’re going to want to make a whole swarm of these.
This plastic spoon bug craft is one of those rare projects that looks seriously impressive – but takes almost no time, no special skills, and barely any supplies. We’re talking recycled plastic spoons, a few dabs of paint, and a hot glue gun. That’s it.
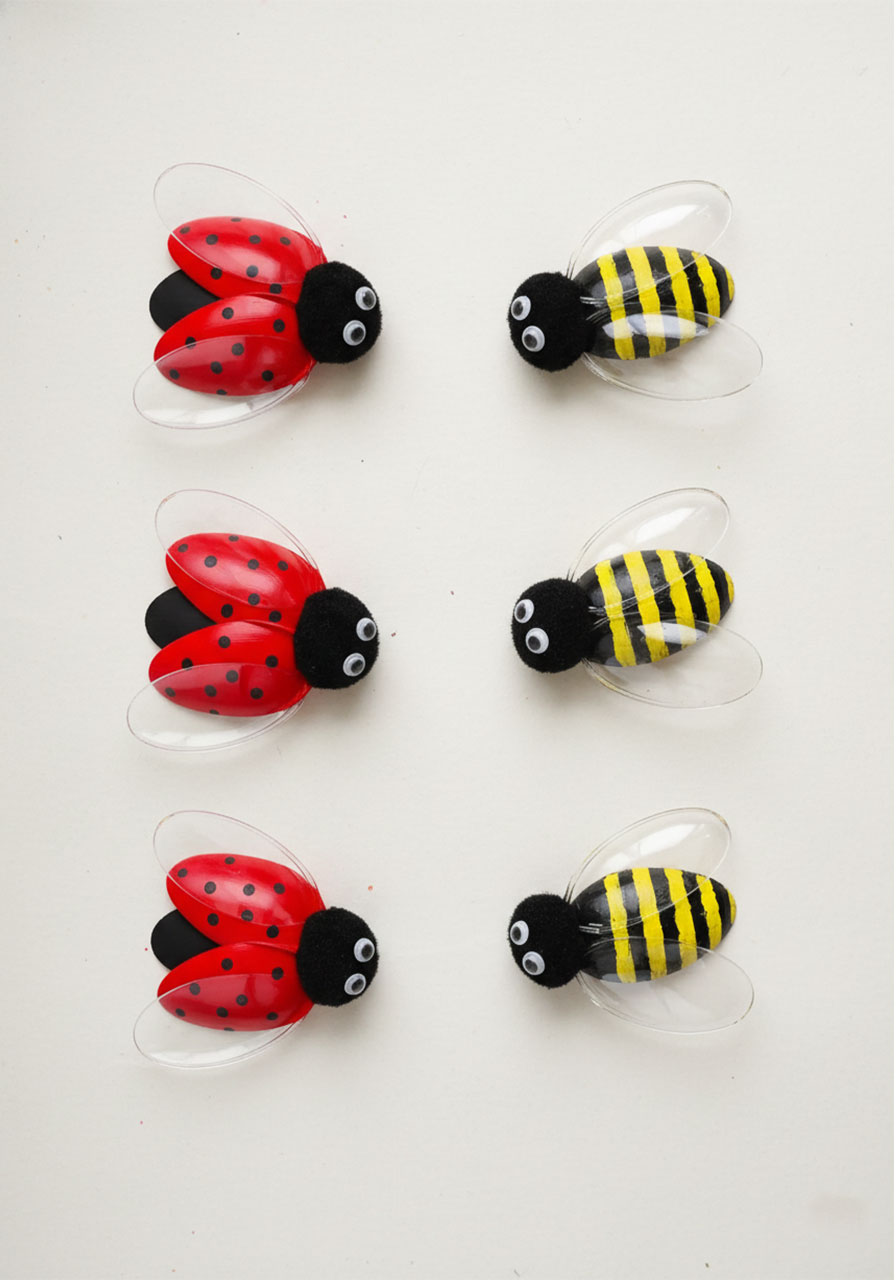
The result? Adorable little ladybugs and bumblebees that look like they came straight from a boutique craft store. They’re that cute.
Whether you’re looking for a fun kids’ activity, a creative nature-themed party craft, a sweet handmade gift, or just something satisfying to make on a slow afternoon – this bug craft checks every single box.
Let’s get into it.
Why You’ll Love This Plastic Spoon Bug Craft
Before we dive into the how-to, here’s why this project has become such a fan favorite:
It’s genuinely easy. No crafting experience required. If you can hold a paintbrush and squeeze a glue gun, you’re already qualified.
It uses recycled materials. Those plastic spoons sitting in your junk drawer? Give them a second life. This craft is a wonderful way to reduce waste while making something beautiful.
It’s endlessly versatile. Set them in a plant pot as decor. Use them as props for a bug-themed birthday party. Let the kids use them for imaginative play. Stick them in a gift bag as a handmade surprise. There is truly no wrong way to enjoy these little guys.
It’s a wonderful activity to do with kids. From painting to gluing on googly eyes, little hands can take part in almost every step. It’s the kind of craft that makes a mess in the best possible way.
It’s quick. From setup to finished bug, you’re looking at under 30 minutes. The only wait is for the paint to dry – which gives you a perfect excuse to take a little break and sip your coffee.


What You’ll Need to Make Plastic Spoon Bugs
The beauty of this craft is how minimal the supply list is. Here’s everything you need:
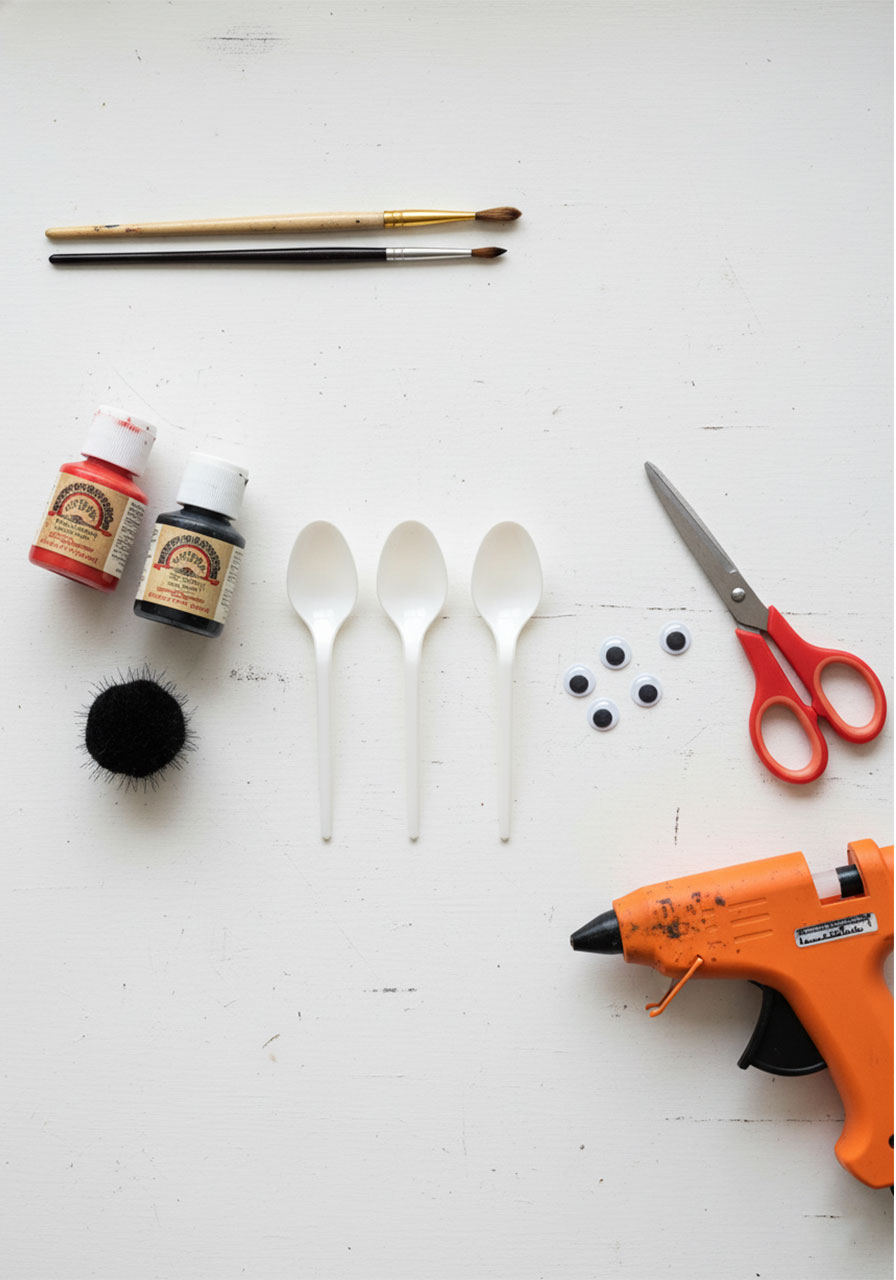
Materials:
Plastic spoons (3 per bug)
Multi-surface acrylic paint (black and red for the ladybug; black, yellow, and clear/white for the bee)
1-inch black pom pom (1 per bug)
6mm googly eyes (2 per bug)
Tools:
Sharp scissors
Paintbrush (flat for base coats, thin for dots and details)
Hot glue gun and glue sticks
A note on paint: Multi-surface acrylic paint gives the best coverage on plastic – you’ll likely only need one coat. Regular acrylic or tempera paint works too, but expect to do two or three coats for full coverage. Either way, let each coat dry fully before adding the next.
A note on spoons: Thin white plastic spoons are the easiest to cut with regular scissors. Thicker or clear plastic spoons are sturdier but harder to cut – you may need a handsaw, or you can soften the plastic with a heat gun or blow dryer (hold it a few inches away for 10–20 seconds at a time, then try cutting). Keep a few extra spoons on hand just in case.
How to Make a Plastic Spoon Ladybug: Step-by-Step
Ready? Let’s make the cutest little ladybug of your life.
Step 1: Cut the Handles Off Your Spoons
Grab three plastic spoons and cut the handle off each one. You only need the rounded bowl part. Set the handles aside for recycling.
You should now have three oval-shaped spoon bowls. These will become the ladybug’s body and two wings.
Step 2: Paint the Body Black
Flip one of your spoon bowls over so the back (curved side) faces up. Paint it entirely in black. This will be the ladybug’s abdomen – the small black section that peeks out from beneath the wings.
Set it aside to dry completely.

Step 3: Paint the Wings Red
Take your remaining two spoon bowls and paint the back of each one in red. These will be the ladybug’s wings.
Give them at least one full coat and let them dry completely before moving on. If the coverage looks patchy, add a second coat.
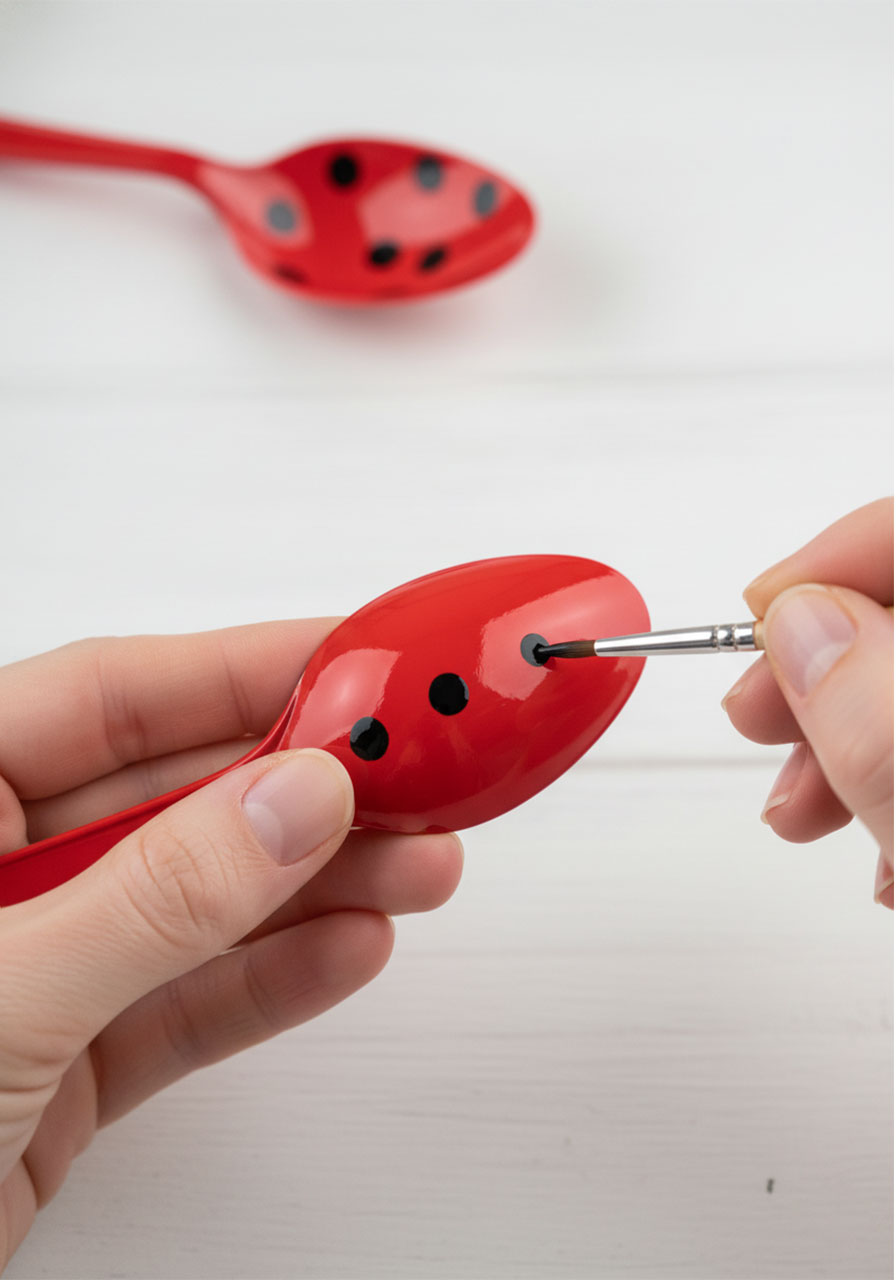
Step 4: Add the Polka Dots
Once the red paint is fully dry, it’s time for the spots! Use a small thin paintbrush – or the blunt end of a paintbrush handle dipped in black paint – to dot on the signature ladybug spots.
There’s no exact right number of dots. Just scatter them across both wings in a way that looks balanced and cute to you. Around 5–7 dots per wing is a sweet spot.
Let the dots dry completely before moving on.
Step 5: Glue the Wings to the Body
Now it’s time to assemble your ladybug! Lay your black body spoon face-down on your work surface with the cut end pointing up (that’s where the head will go).
Add a generous amount of hot glue to the cut end of the black spoon on one side. Press one red wing into the glue, angling it outward slightly away from the body. Hold it in place for a few seconds while the glue sets.
Add more hot glue right next to the first wing – partially overlapping it. Press the second red wing in place, angling it out in the opposite direction. It should slightly overlap the first wing in the center.
The two red wings should fan out like a heart shape or butterfly wings from the body. That’s exactly what you’re going for.
Make sure all three spoons are facing the same direction – cut ends all pointing the same way.

Step 6: Make and Attach the Head
Grab your 1-inch black pom pom and cut it in half with your scissors. You’ll use one half as the ladybug’s head.
Pro tip: Cut pom poms can fall apart quickly once snipped. Cover the entire flat (cut) surface generously with hot glue the moment you cut it, and press it firmly into place before it unravels.
Place the pom pom half at the top of the ladybug – right where the cut ends of all three spoons meet. The flat glued side faces down onto the bug. Press firmly and hold for several seconds.

Step 7: Add the Googly Eyes
This is everyone’s favorite step. Add a tiny dot of hot glue to the back of each googly eye and press them onto the front of the pom pom head.
Place them side by side, close together, toward the center of the pom pom for that sweet, wide-eyed look.
And that’s it – your plastic spoon ladybug is complete!
How to Make a Plastic Spoon Bumblebee
Obsessed with the ladybug? Wait until you see the bumblebee version. It’s made almost exactly the same way, with just a few tweaks.
Spoons to use: Swap the white spoons for one white spoon (for the body) and two clear plastic spoons (for the wings). The clear spoons give the bee those gorgeous see-through wings.
How to paint the body: Paint the white spoon yellow first. Once fully dry, paint black stripes across it to create that classic bumblebee pattern.
How to arrange the wings: Unlike the ladybug where the wings overlap in the center, place the two clear wings side-by-side without overlapping. This creates the look of open, outstretched bee wings.
Head and eyes: Use the same pom pom and googly eye technique as the ladybug. The big fluffy black pom pom head looks even more adorably oversized on the bee!
Everything else – the gluing, the pom pom technique, the eye placement – is identical to the ladybug steps above.

Creative Ways to Display and Use Your Plastic Spoon Bugs
Once you’ve made one, you’ll want to make ten. And then you’ll need fun ways to use them all! Here are some of our favorite ideas:
Tuck them into a plant pot. Nestle a few ladybugs or bees among the leaves of a houseplant or potted herb garden. They look absolutely magical peeking out from the greenery – like they just landed there.

Use them as party decor. Planning a garden party, spring birthday, or bug-themed celebration? These make the most charming table decorations. Scatter them across the tablecloth, use them to mark place settings, or perch them on cupcakes.

Make them for a school lesson. Teachers – this one’s for you. A bug unit just got a whole lot more engaging. Kids can make their own bugs and label the parts as a hands-on science activity.
Create a nature-themed gift. Pop a few bugs into a small gift bag with some tissue paper. They make a sweet, handmade gift for a nature-loving friend, a teacher, or a child who loves bugs.
Use them for imaginative play and storytime. Kids absolutely love using these as props for pretend play. They can fly them around, build little habitats for them, or use them as characters in their stories.
Make a leaf home for your bugs. Trace a leaf template onto green construction paper or felt and cut it out. Your spoon bugs can “live” on the leaf – it makes a darling display piece.
Tips for Making Your Plastic Spoon Bugs Even Better
A few little tricks that make a big difference:
Be generous with your hot glue. Plastic surfaces can be slippery, and you want those pieces to hold. Don’t be shy – a good glob of glue is your friend here.
Work fast when gluing the pom pom. Hot glue sets quickly, so have your pom pom ready to press into place the moment you apply the glue. Have a helper hold pieces steady if you need an extra hand.
Let the paint fully dry between steps. This is the step most people want to skip – and it’s the one that matters most. Wet red paint under a black dot just smears. Give each layer a full dry before moving on.
Use multi-surface acrylic paint if possible. It’s specifically designed to adhere to non-porous surfaces like plastic. One coat is usually all you need. Regular acrylic works too – just budget extra time for multiple coats.
Keep extra spoons on hand. Especially if you’re cutting thicker or clear spoons. The occasional uneven cut happens to everyone, and it’s nice to have a backup.
Make it a batch crafting session. Once you have your supplies out and your paint mixed, it’s just as easy to make six bugs as it is to make one. Crank up some music and make a whole little bug family!
Frequently Asked Questions About Plastic Spoon Bug Crafts
Can kids make this craft?
Absolutely – with a little adult supervision for the hot glue gun. Kids can do the painting, the dot-spotting, and the googly eye placement all on their own. The hot glue steps are best handled by an adult or done with close supervision for older kids.
For very young children (toddlers and preschoolers), swap the hot glue for craft glue or a glue stick. The bond won’t be as strong, but it’s completely safe for little hands.
What’s the best way to cut plastic spoons?
Thin white plastic spoons cut easily with a sharp pair of scissors. Thicker or clear plastic spoons need a bit more effort.
For stubborn spoons, try using a handsaw – it cuts through cleanly. Or, soften the plastic first using a heat gun or blow dryer. Hold it several inches away and apply heat in 10–20 second bursts, then try cutting. Test on a spare spoon first to get the feel for it.
Can I use regular acrylic paint instead of multi-surface paint?
Yes! Regular acrylic paint or even tempera paint will work on plastic spoons. The only difference is coverage – you may need two or three coats instead of one. Just make sure each coat is completely dry before applying the next. The wait is worth it.
How long does this craft take?
Active crafting time is about 15–20 minutes per bug. The main time variable is drying time between paint coats – factor in an extra 20–30 minutes for that. Make a few at once and let them all dry together to maximize your time.
Where do I display the finished bugs?
The possibilities are truly endless. Plant pots, bookshelves, party tablescapes, windowsills, children’s bedroom shelves – anywhere a tiny adorable bug would look at home. Which is basically everywhere.
Let’s Recap: Your Plastic Spoon Bug Craft Supply List
Before you start, make sure you have everything ready to go:
- 3 plastic spoons per bug
- Multi-surface acrylic paint in red and black (for ladybugs) or yellow, black, and clear (for bees)
- 1-inch black pom pom per bug
- Two 6mm googly eyes per bug
- Sharp scissors
- Flat and thin paintbrushes
- Hot glue gun and glue sticks
That’s truly it. Simple supplies, extraordinary results.
Ready to Get Crafting?
There is something so satisfying about turning something as ordinary as a plastic spoon into something this charming. That’s the magic of crafting – and this project delivers that feeling every single time.
Whether you make one sweet ladybug or a whole garden full of bees and bugs, we hope this craft brings you a little joy, a little creativity, and maybe a whole lot of googly-eyed smiles.
Happy crafting!
More Summer Craft & Activity Ideas to Keep the Fun Rolling:
Ice Cream Cone Name Craft (Printable Template!)
How to Make the Cutest Beaded Pipe Cleaner Dragonflies (Kids Will Absolutely Love This!)
Easy Paper Bowl Jellyfish Craft Kids Will Absolutely Love (No Paint Needed!)
Handprint Pineapple Craft – Printable Template for Kids
Summer Popsicle Tissue Paper Craft For Kids (So Easy, So Cute!)
Sandcastle Texture Summer Art Project for Kids (Easy & So Much Fun!)