
Planning a My Little Pony birthday party? You’ve come to the right place! Whether you’re getting ready for a movie premiere viewing party or celebrating your little one’s special day, these craft ideas will transform your gathering into a rainbow-filled extravaganza that’ll have every guest galloping with excitement.
The best part? These crafts work double-duty as both fun party activities and amazing take-home favors. Let’s dive into 28 magical My Little Pony craft ideas that’ll make you the ultimate party-planning hero!

Wearable Pony Magic (Crafts 1-8)
1. DIY My Little Pony Necklaces

Turn your party guests into jewelry designers with this adorable craft! These necklaces are surprisingly easy to make and every kid will treasure their custom creation.
Best for: Party activities, take-home favors, all ages
Time to Make: 10-15 minutes per necklace
What You’ll Need:
- Small My Little Pony figurines or charms
- Colorful beads (rainbow colors work perfectly!)
- Jewelry cord or elastic string
- Jump rings and clasps
How to Make It:
1. Cut your jewelry cord to the desired necklace length (typically 16-18 inches for kids).
2. Thread colorful beads onto the cord in a rainbow pattern – let the kids choose their favorite color combinations!
3. Attach the My Little Pony charm to the center using a jump ring.
4. Tie or clasp the ends securely, and voila – instant pony perfection!
Pro Tip: Set up a “necklace station” at your party where kids can design their own. Pre-cut the cords and organize beads in muffin tins for easy access!
Pirate Birthday Scavenger Hunt for Kids Printable
Instant Pirate Adventure: Download, print, and play in 15 minutes! No stress – just instant, unforgettable fun for kids ages 4-12
Indoor Party Lifesaver: Perfect for apartments & houses. Keep 1-10 kids wildly entertained for 45 minutes with clever rhyming clues
A Treasured Memory: Watch your birthday child become the hero of an epic story. Includes a thrilling intro and congratulatory treasure letter
Fun That Secretly Teaches: Kids race to solve riddles while building reading, problem-solving, and teamwork skills. Fun with a hidden purpose!

Indoor Birthday Scavenger Hunt Printable for Kids – 12 challenges
Your 15-Minute Party Hero: Instantly download, print, and hide. Get 1-2 hours of immersive, screen-free fun with 12 unique puzzles. Stress-free entertainment, guaranteed
More Than a Hunt – It’s a “”Cake Bandit”” Adventure! Kids don’t just find clues; they solve the mystery of the stolen cake! This engaging storyline creates a memorable birthday mission
Ultimate Indoor Party Lifesaver: Perfect for bad weather or small spaces. Keeps kids ages 4-10+ happily challenged with picture matching, mazes, and secret codes
Fun That Secretly Builds Genius: Laughter meets learning! These 12 clever challenges boost problem-solving, teamwork, and critical thinking skills without the kids even noticing

Difficult Birthday Scavenger Hunt Printable for Adults – The Oracle’s Birthday Prophecy
Forget Boring Parties. Unleash the Oracle: Transform a birthday into an epic mystery with 30 brain-teasing riddles, ciphers, and challenges. Customize the perfect adventure for your guests
Be the Host of the Most Memorable Party: Provide the clever, shared activity that gets everyone laughing and collaborating. It’s the highlight that guests will talk about for years
Sophisticated Fun, Zero Effort: Just download, pick your 10 favorite clues from 30 options, and hide them. Get a complete, themed adventure without the stress of planning from scratch
Challenge Adult Minds with “The Prophecy”: Move beyond simple games. This hunt features logic puzzles, cryptic ciphers, and hilarious dares designed specifically to engage and thrill adults

Happy Birthday Decorations
Everything in one box = party stress solved – Banner, honeycomb balls, swirls, and garland all coordinated. No last-minute runs to three different stores at 9 PM the night before.
Photo-ready in 15 minutes – Easy assembly means you spend less time wrestling with decorations and more time enjoying the birthday person’s reaction. Looks expensive, sets up fast.
Reusable = smart money – Quality materials hold up through the party AND pack away for next year. Stop buying flimsy decorations that rip before cake time.
Saves you $50+ vs. party store prices – Get the complete coordinated look without the markup. Guests think you hired a decorator; you paid a fraction of the cost.
2. My Little Pony Straw Toppers

Make every sip magical with these adorable straw decorations! They’re perfect for juice boxes, party drinks, or even as cupcake toppers in a pinch.
Best for: Party decor, drink stations, all ages
Time to Make: 5 minutes per topper
What You’ll Need:
- Printable My Little Pony character images (easily found online)
- Cardstock paper
- Scissors
- Tape or glue
- Colorful straws
How to Make It:
1. Print your favorite My Little Pony characters on cardstock and cut them out carefully.
2. Cut a small slit in the bottom of each character cutout.
3. Slide the straw through the slit, or tape/glue the character onto the straw.
4. Place them in party cups before guests arrive for an instant “wow” moment!
Fun Variation: Create double-sided toppers by gluing two identical cutouts back-to-back around the straw – they’ll look amazing from every angle!
3. Pony Ears Headbands
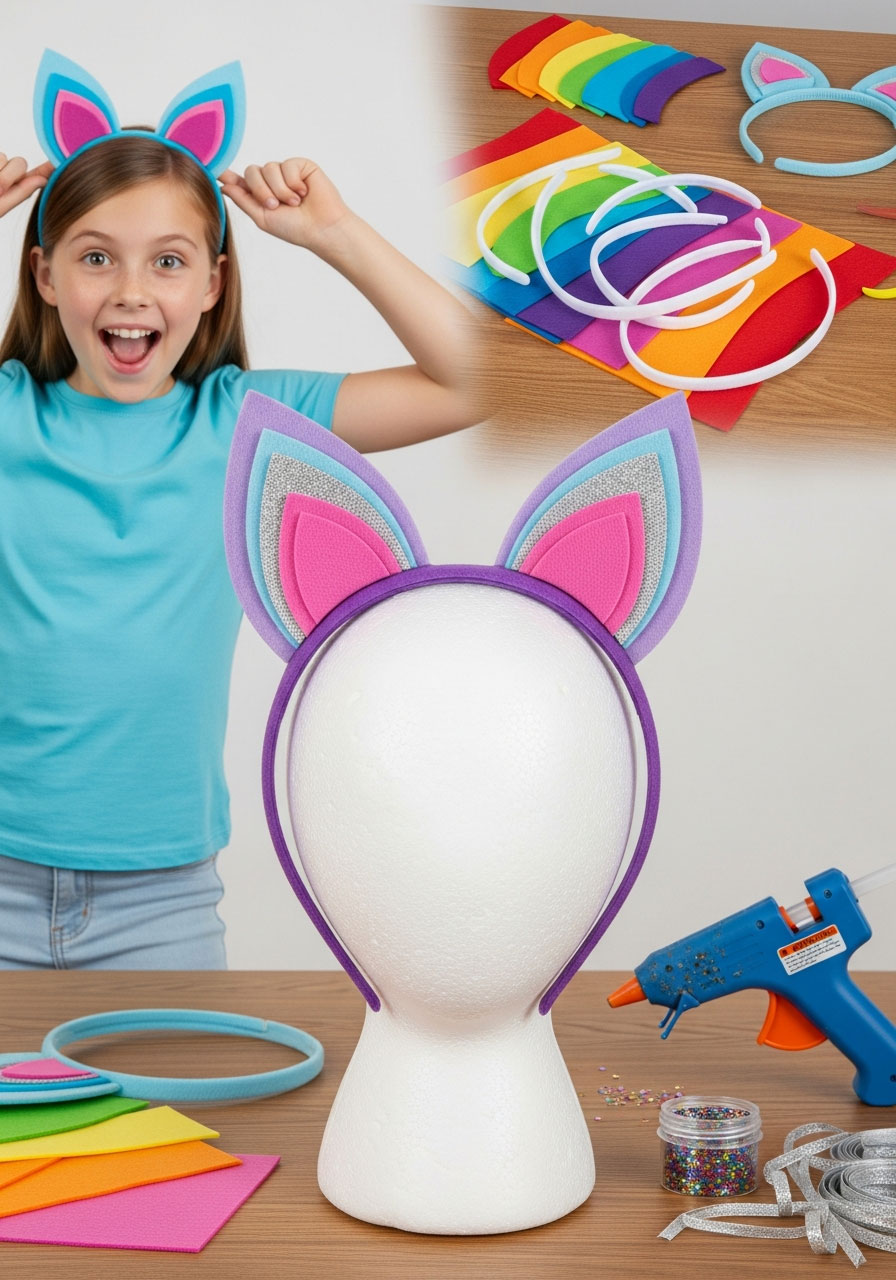
Get ready for the cutest photo ops ever! These felt pony ears transform party guests into their favorite characters and make for picture-perfect memories.
Best for: Party activities, dress-up fun, ages 4+
Time to Make: 15-20 minutes per headband
What You’ll Need:
- Plain plastic headbands
- Felt in various pony colors (pink, purple, blue, yellow)
- Hot glue gun (adult supervision required)
- Scissors
- Optional: glitter, sequins, or ribbons for extra sparkle
How to Make It:
1. Cut two ear shapes from felt (about 3-4 inches tall) – think triangles with slightly rounded tops.
2. Cut slightly smaller inner ear shapes in a contrasting color for dimension.
3. Glue the smaller piece onto the larger ear piece.
4. Attach both ears to the headband using hot glue, spacing them evenly.
5. Add glitter or ribbons for that signature My Little Pony sparkle!
Pro Tip: Make these ahead of time in different character colors so kids can choose which pony they want to be!
4. DIY My Little Pony Keychains

These mini masterpieces are perfect for attaching to backpacks, lunchboxes, or room keys. Kids absolutely love having something special to take home!
Best for: Party favors, ages 5+
Time to Make: 10 minutes per keychain
What You’ll Need:
- Small plastic pony figurines
- Keychain rings with clasps
- Strong adhesive or hot glue
- Optional: small charms or beads for extra flair
How to Make It:
1. Choose your pony figurine (dollar stores are goldmines for these!).
2. Carefully drill or poke a small hole in a non-visible spot on the figurine (adult job!).
3. Attach the keychain ring using a jump ring through the hole.
4. Add colorful beads or charms to the chain for extra personality.
Fun Variation: Let kids decorate plain wooden or plastic shapes with pony stickers and paint before attaching to keychains!
5. My Little Pony Hair Clips

These adorable hair accessories are perfect for everyday wear long after the party ends. Every little pony fan needs a collection!
Best for: Party crafts, gifts, ages 3+
Time to Make: 5-10 minutes per clip
What You’ll Need:
- Plain hair clips or barrettes
- Small My Little Pony character charms or buttons
- Ribbon (1 inch wide, in rainbow colors)
- Hot glue gun
- Optional: rhinestones or glitter
How to Make It:
1. Cut a 4-inch piece of ribbon and fold it accordion-style to create a bow.
2. Secure the center with a small dot of hot glue.
3. Glue the bow onto the hair clip base.
4. Attach your pony charm to the center of the bow.
5. Add rhinestones around the edges for extra sparkle!
Pro Tip: Make a set of three in different colors for each party guest – they’ll love mixing and matching!
6. Pony-riffic Rainbow Hair Extensions

Your little guests will flip for these temporary, colorful hair pieces! They’re perfect for dress-up and safe for kids of all hair types.
Best for: Party dress-up, ages 4+
Time to Make: 15 minutes per extension
What You’ll Need:
- Colorful yarn in rainbow shades
- Hair clips or small elastic bands
- Scissors
- Optional: beads or bells for the ends
How to Make It:
1. Cut 10-12 strands of yarn (each about 18-24 inches long) in your chosen color.
2. Gather all strands together and fold them in half.
3. Tie a knot near the fold, leaving a small loop.
4. Braid the yarn strands or leave them loose for a flowing mane effect.
5. Attach a hair clip to the loop so it can easily clip into hair.
Fun Variation: Mix multiple rainbow colors in one extension for a true Rainbow Dash vibe!
7. My Little Pony Eye Masks

Perfect for sleepovers or quiet time after all that party excitement! These soft sleep masks are both functional and adorable.
Best for: Sleepover parties, ages 5+
Time to Make: 20 minutes per mask
What You’ll Need:
- Felt in pony colors
- Elastic cord
- Eye mask template (easily found online)
- Fabric glue or needle and thread
- Markers or fabric paint for details
How to Make It:
1. Cut out the eye mask shape from felt using your template.
2. Decorate with fabric paint or markers to create your favorite pony face – don’t forget the cutie mark!
3. Cut two small slits on each side of the mask.
4. Thread elastic cord through the slits and tie to fit comfortably.
5. Add any final embellishments like glitter or sequins.
Pro Tip: Cut out felt eyelashes and glue them on top for an extra-cute touch!
8. DIY Pony Tails
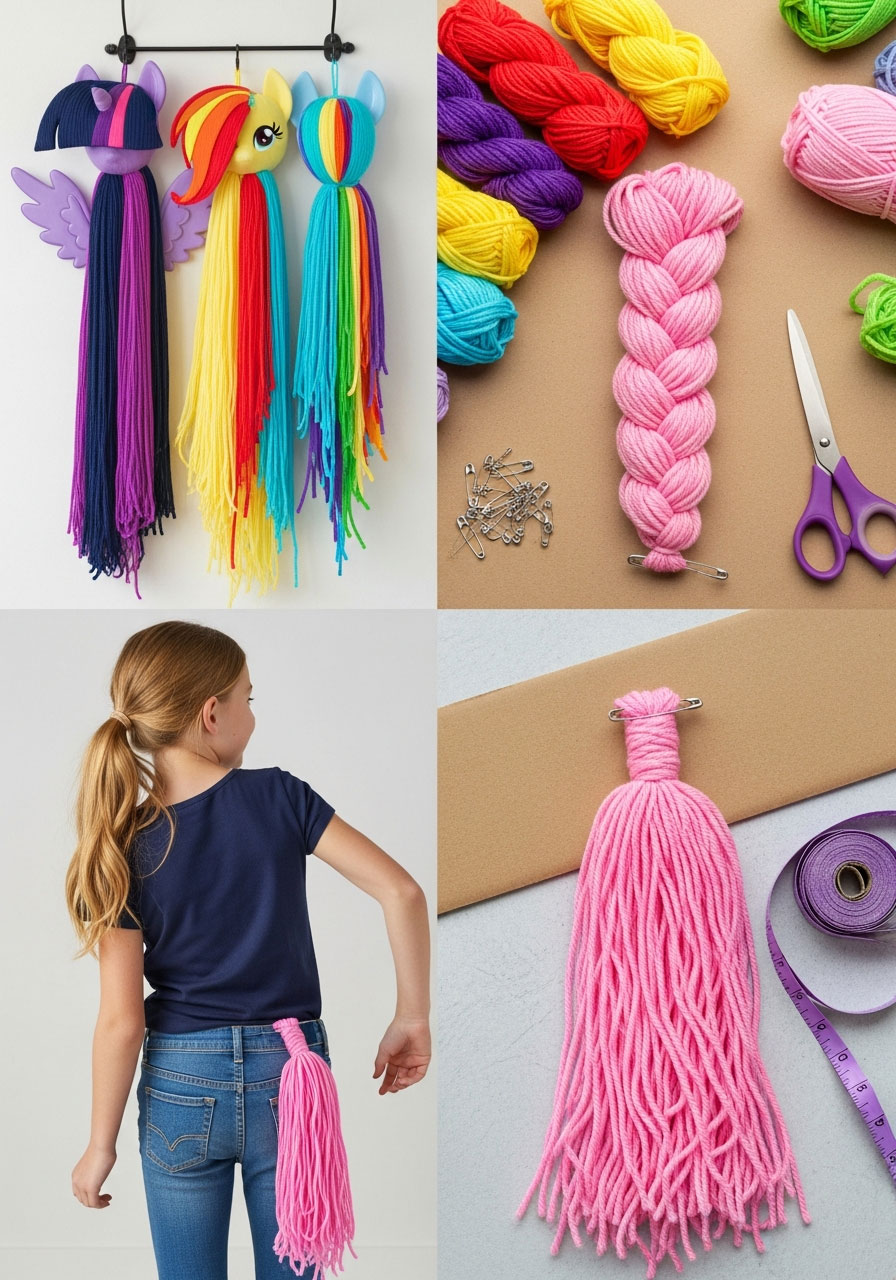
Let the kids live out their pony dreams with these attachable tails! They’re hilarious, adorable, and perfect for party photos.
Best for: Dress-up, party games, ages 4+
Time to Make: 20-25 minutes per tail
What You’ll Need:
- Colorful yarn (lots of it!)
- Safety pins or belt clips
- Cardboard (for wrapping)
- Scissors
- Ribbon
How to Make It:
1. Wrap yarn around a piece of cardboard (about 12 inches long) approximately 100 times.
2. Carefully slide the yarn off and tie one end tightly with a strong piece of yarn.
3. Cut the loops at the opposite end to create flowing strands.
4. Braid the top portion (about 3 inches) to create an attachment point.
5. Attach a safety pin or clip to the braided section so kids can attach it to their waistband.
Pro Tip: Make tails in each of the Mane Six colors so kids can match their favorite character!

Party Decor & Centerpiece Magic (Crafts 9-15)
9. My Little Pony Mason Jar Centerpieces

These gorgeous jars add instant sparkle to your party tables and they’re shockingly easy to make!
Best for: Table centerpieces, all skill levels
Time to Make: 30 minutes (plus drying time)
What You’ll Need:
- Mason jars (various sizes)
- Acrylic paint in pony colors
- Glitter
- Mod Podge or clear sealant
- Ribbon
- Battery-operated tea lights or flowers
How to Make It:
1. Pour acrylic paint inside the mason jar and swirl it around to coat the entire inside.
2. Pour out excess paint and let the jar dry upside down on wax paper.
3. Once dry, brush Mod Podge on the outside and sprinkle generously with glitter.
4. Seal with another coat of Mod Podge when dry.
5. Tie a ribbon around the neck and fill with tea lights or colorful flowers!
Fun Variation: Create an ombre rainbow effect by using different colored jars in various heights!
10. Rainbow Paper Lanterns

These floating beauties will transform your party space into Equestria itself! Hang them at varying heights for maximum impact.
Best for: Ceiling decor, photo backdrops
Time to Make: 10 minutes per lantern
What You’ll Need:
- White paper lanterns (various sizes)
- Tissue paper in rainbow colors
- Mod Podge
- Foam brushes
- String for hanging
How to Make It:
1. Tear tissue paper into small pieces (roughly 2-inch squares).
2. Brush Mod Podge onto a section of the lantern.
3. Press tissue paper pieces onto the glue, overlapping colors to create a rainbow effect.
4. Continue until the entire lantern is covered.
5. Apply a final coat of Mod Podge as a sealant and let dry completely.
Pro Tip: Hang these at different heights above your food table for a floating rainbow cloud effect!
11. Felt Rainbow Trees

These whimsical trees look straight out of Ponyville and make adorable table decorations or photo props!
Best for: Table decor, photo props
Time to Make: 45 minutes per tree
What You’ll Need:
- Styrofoam cones (various sizes)
- Felt in rainbow colors
- Hot glue gun
- Small flower pot (optional for base)
- Foam or clay for securing
How to Make It:
1. Cut felt into circles of various sizes (2-4 inches in diameter).
2. Fold each circle in half, then in half again to create a petal shape.
3. Starting at the bottom of the cone, hot glue the felt petals around in rows.
4. Work your way up the cone, overlapping rows and alternating colors.
5. Place the cone in a flower pot filled with foam if you want a free-standing tree.
Fun Variation: Add small pony figurines around the base for an instant Ponyville scene!
12. DIY Rainbow Ruffle Party Hats

Every birthday girl deserves a crown! These festive hats make everyone feel special and look amazing in photos.
Best for: Birthday celebrations, ages 3+
Time to Make: 20 minutes per hat
What You’ll Need:
- Cardstock or thin cardboard
- Crepe paper streamers in rainbow colors
- Glue or double-sided tape
- Elastic string
- Glitter, pom-poms, or stickers for decoration
How to Make It:
1. Cut cardstock into a cone shape and secure with glue or tape.
2. Cut crepe paper into 2-inch wide strips.
3. Scrunch the crepe paper and glue it in horizontal rows around the hat, starting from the bottom.
4. Layer rainbow colors as you work your way to the top.
5. Add a pom-pom or star to the tip, then attach elastic string to keep the hat in place.
Pro Tip: Make the birthday child’s hat extra special with additional glitter and a unicorn horn on top!
13. Pony Cone Party Favors
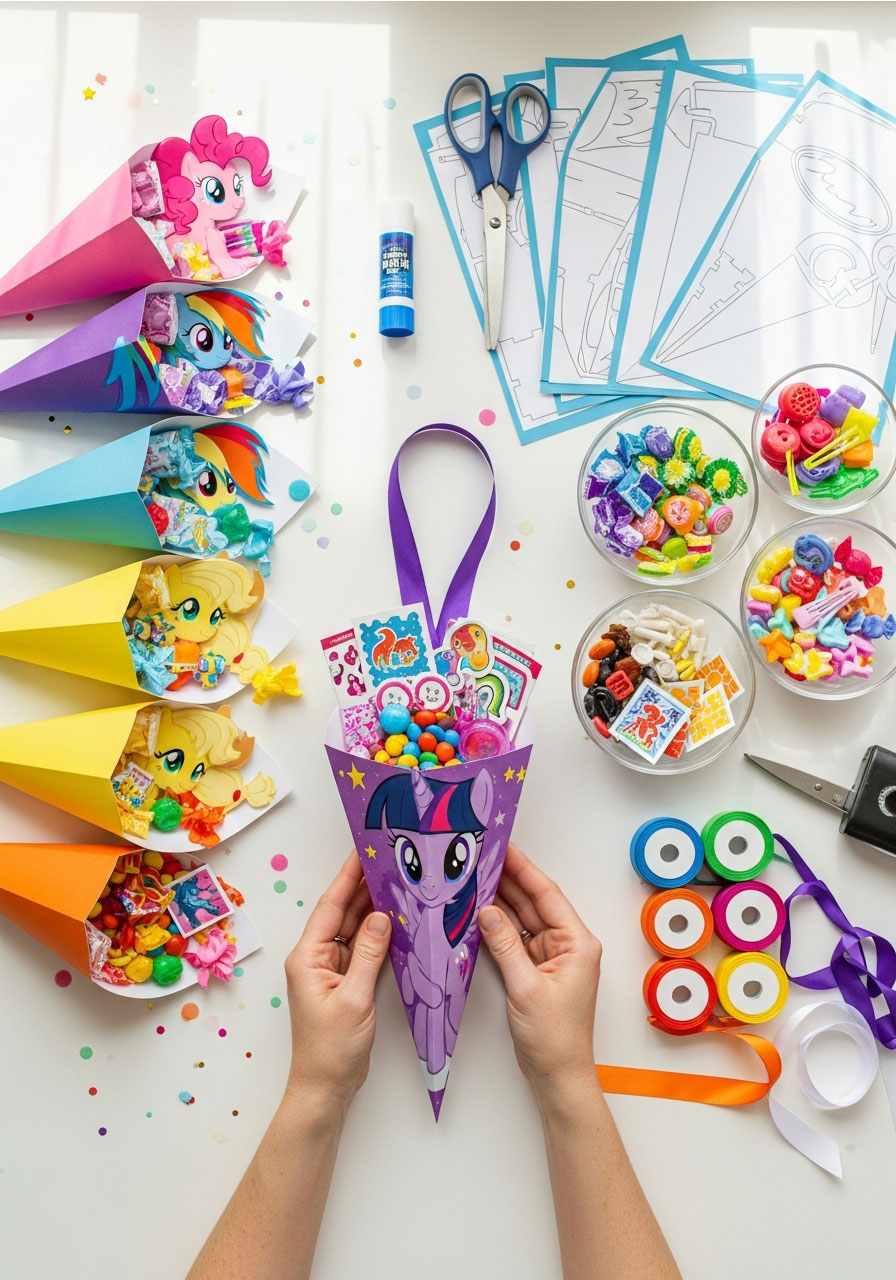
These adorable cones are perfect for filling with treats, small toys, or craft supplies as take-home gifts!
Best for: Party favors, treat holders
Time to Make: 5 minutes per cone (with printables)
What You’ll Need:
- Cardstock paper
- Printable pony cone templates
- Scissors
- Glue or tape
- Treats, toys, or candy to fill
How to Make It:
1. Print the pony cone template on colorful cardstock.
2. Cut out the template carefully following the lines.
3. Roll the flat design into a cone shape and secure with glue or tape.
4. Fill the cone with goodies – think rainbow candies, small toys, or stickers!
5. Add a ribbon handle if desired for easy carrying.
Fun Variation: Let kids decorate blank cones with markers and stickers before filling them!
14. My Little Pony Snow Globes

These magical keepsakes will be treasured long after the party ends. They’re easier to make than you’d think!
Best for: Craft activities, special favors, ages 6+
Time to Make: 30 minutes (plus drying time)
What You’ll Need:
- Small glass jars with lids
- Small pony figurines (waterproof)
- Glycerin
- Distilled water
- Glitter
- Hot glue gun
- Optional: small plastic decorations
How to Make It:
1. Hot glue your pony figurine to the inside of the jar lid and let dry completely.
2. Fill the jar almost to the top with distilled water.
3. Add 2-3 tablespoons of glycerin (this makes the glitter float slower).
4. Add a generous pinch of glitter – go for rainbow colors!
5. Screw the lid on tightly, shake, and watch the magic!
Pro Tip: Test the seal by turning the globe upside down over a sink before giving it to kids!
15. Sparkling Memory Boxes

Give party guests a special place to store their party treasures, photos, and memories!
Best for: Party favors, ages 5+
Time to Make: 25 minutes per box
What You’ll Need:
- Small wooden or cardboard boxes
- Acrylic paint in pony colors
- Mod Podge
- Glitter, rhinestones, or sequins
- My Little Pony stickers
- Small foam brushes
How to Make It:
1. Paint the outside of the box in your chosen pony color and let dry.
2. Brush a layer of Mod Podge over the painted surface.
3. Sprinkle glitter generously while the glue is still wet.
4. Once dry, add pony stickers and rhinestone decorations.
5. Seal everything with a final coat of Mod Podge.
Fun Variation: Pre-fill the boxes with party photos, small trinkets, or a special note from the birthday child!
Jewelry & Accessories (Crafts 16-20)
16. Bottle Cap Necklaces
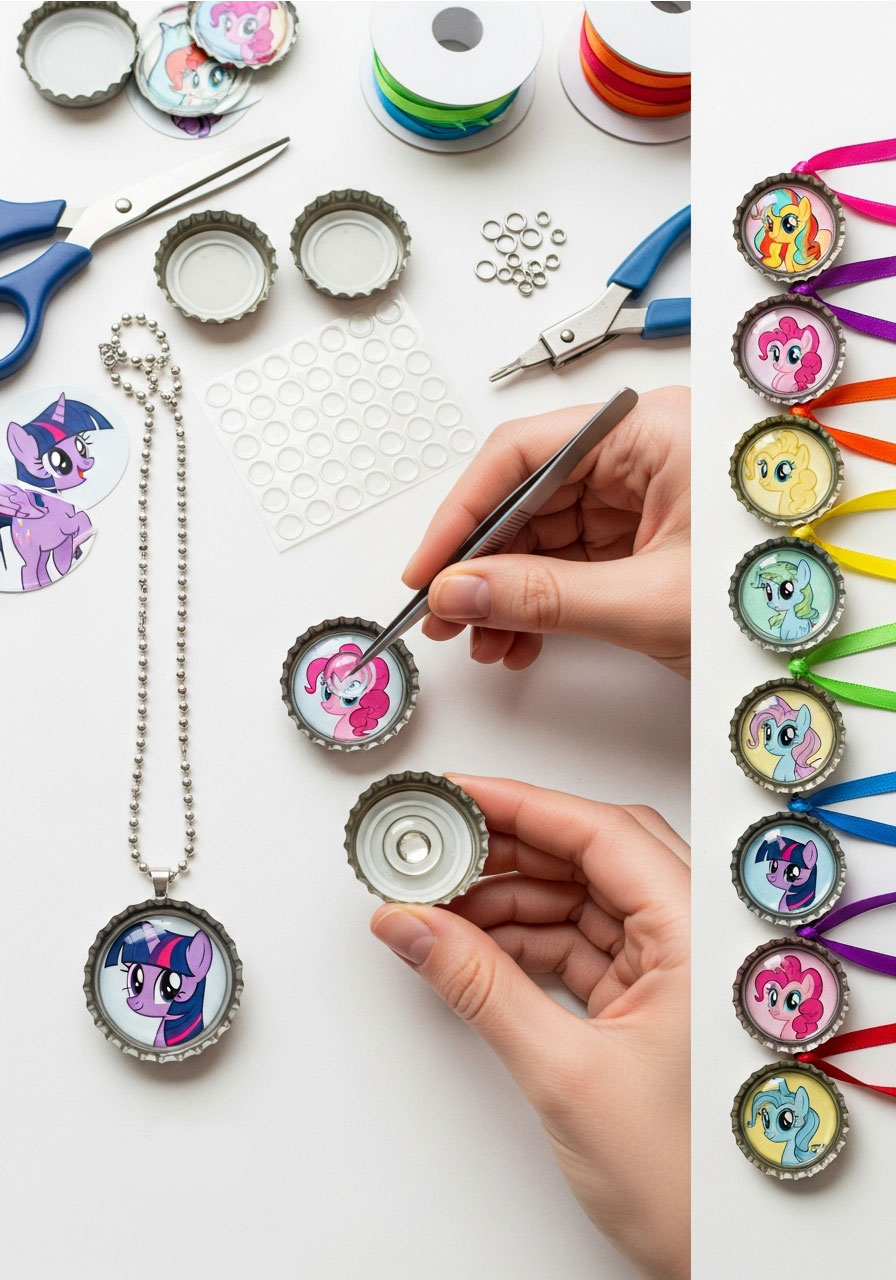
These trendy upcycled accessories are perfect for pony fans and eco-conscious crafters alike!
Best for: Party activities, ages 5+
Time to Make: 10 minutes per necklace
What You’ll Need:
- Clean bottle caps
- Printable My Little Pony images sized for bottle caps
- Clear epoxy stickers or resin
- Ball chain or ribbon
- Hole punch or drill
How to Make It:
1. Print tiny pony images sized to fit inside bottle caps and cut them out.
2. Glue the image inside the bottle cap.
3. Cover with a clear epoxy sticker for a glossy, professional finish.
4. Punch or drill a hole near the edge of the cap (adult supervision!).
5. Thread chain or ribbon through the hole and tie.
Pro Tip: Make these ahead of time and let kids choose their favorite character at the party!
17. My Little Pony Charm Bracelets

These customizable bracelets let kids show off their favorite ponies everywhere they go!
Best for: Craft stations, ages 6+
Time to Make: 15 minutes per bracelet
What You’ll Need:
- Elastic bracelet cord
- Colorful beads
- My Little Pony charms
- Jump rings
- Scissors
How to Make It:
1. Cut elastic cord to fit comfortably around the child’s wrist (add 2 extra inches).
2. Thread beads onto the cord in rainbow patterns.
3. Attach pony charms using jump rings at intervals.
4. Tie the ends securely with a double knot and trim excess.
5. Add a dab of clear nail polish to the knot for extra security.
Fun Variation: Create matching friendship bracelets for best friends featuring their favorite pony pairs!
18. Shrinky Dink Pony Charms
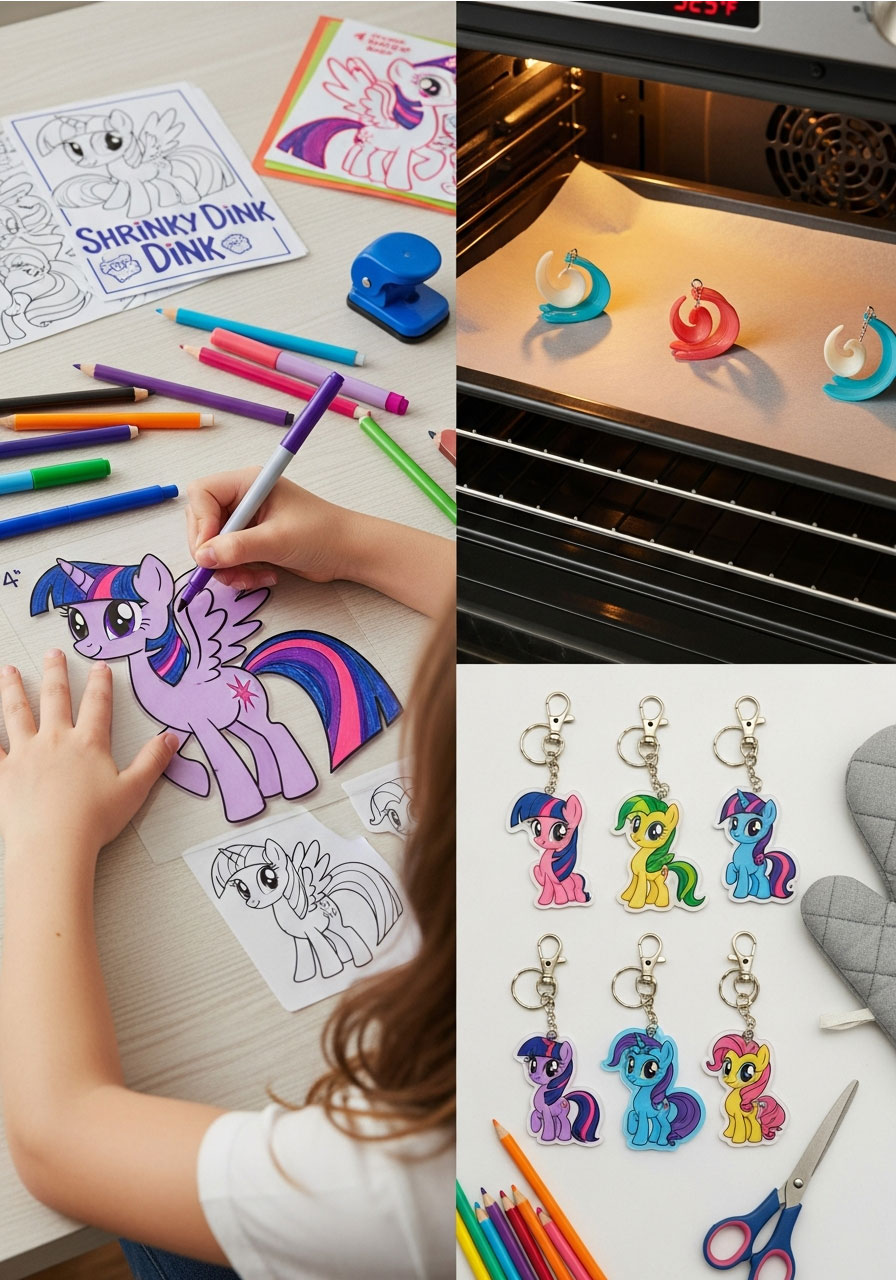
Kids go absolutely crazy for these – watching them shrink in the oven is pure magic!
Best for: Craft activities, ages 5+ (with adult oven supervision)
Time to Make: 20 minutes per batch (plus baking time)
What You’ll Need:
- Shrinky Dink plastic sheets
- Permanent markers or colored pencils
- My Little Pony templates
- Hole punch
- Baking sheet and parchment paper
- Jump rings and chains
How to Make It:
1. Trace or draw your favorite pony characters onto the Shrinky Dink sheet.
2. Color them in with bright markers or colored pencils.
3. Cut out the designs carefully and punch a hole for hanging.
4. Bake according to package directions (usually 325°F for 2-3 minutes) – watch them shrink!
5. Once cooled, attach to chains, keychains, or bracelets with jump rings.
Pro Tip: Make extras because everyone will want at least three of these adorable charms!
19. Temporary Tattoos

These washable tattoos are always a massive hit and perfect for kids who aren’t ready for jewelry yet!
Best for: Party favors, quick activities, all ages
Time to Make: 5 minutes application time
What You’ll Need:
- Temporary tattoo paper (printable)
- My Little Pony designs
- Scissors
- Damp cloth or sponge
How to Make It:
1. Print your chosen pony designs onto temporary tattoo paper.
2. Cut out individual designs carefully.
3. Remove the protective film from the tattoo.
4. Place the tattoo face-down on clean skin.
5. Press a damp cloth over it for 30 seconds, then peel away the backing paper.
Fun Variation: Create a “tattoo parlor” station at your party where kids can choose and apply their favorites!
20. Jewel-Filled Treasure Jars
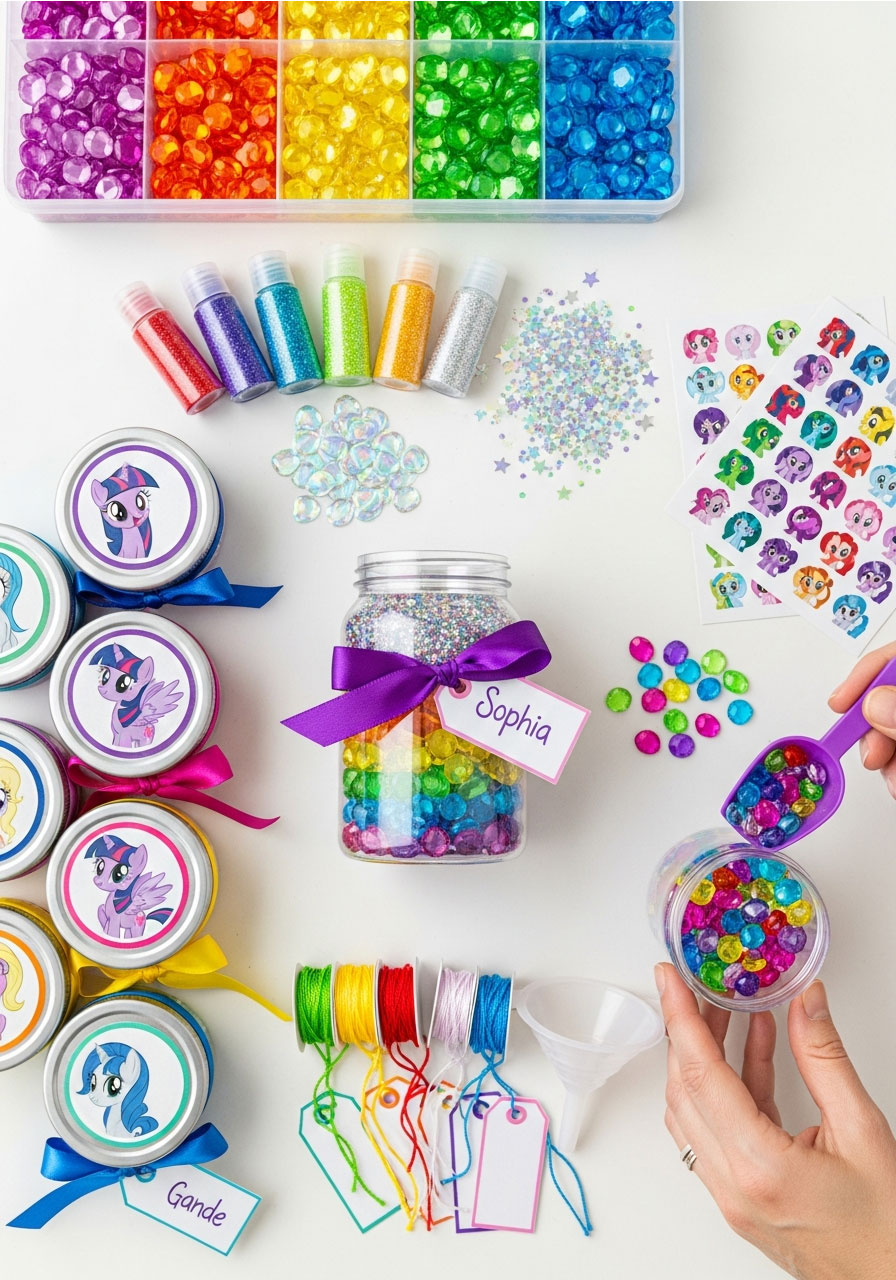
These glittery jars are perfect for storing small treasures, hair ties, or party memories!
Best for: Party favors, ages 4+
Time to Make: 15 minutes per jar
What You’ll Need:
- Small clear plastic jars with lids
- Plastic gems and jewels in rainbow colors
- Ribbon
- My Little Pony stickers
- Optional: confetti or glitter
How to Make It:
1. Fill the jar about two-thirds full with colorful plastic gems.
2. Add a sprinkle of glitter or confetti for extra sparkle.
3. Decorate the lid with pony stickers.
4. Tie a ribbon around the neck of the jar.
5. Attach a tag with the child’s name!
Pro Tip: Use these as place settings at your party table – they double as decor and take-home gifts!
Interactive Fun (Crafts 21-25)
21. My Little Pony Stick Ponies

These ride-on ponies are absolutely perfect for party games, races, and imaginative play!
Best for: Party games, ages 3-8
Time to Make: 30 minutes per pony
What You’ll Need:
- Foam or fabric for the pony head
- Googly eyes
- Yarn for mane and tail
- Wooden dowel or broomstick
- Hot glue gun
- Ribbon for reins
How to Make It:
1. Cut two identical pony head shapes from foam (about 10 inches tall).
2. Glue googly eyes and draw on a nose and mouth.
3. Cut long strands of yarn and glue them along the top for the mane.
4. Sandwich the dowel between the two head pieces and glue them together.
5. Attach ribbon reins to the sides of the head.
Fun Variation: Host a “pony race” game where kids gallop around an obstacle course!
22. Pony Sun Catchers

These colorful window decorations will brighten any room and they’re mesmerizing to create!
Best for: Craft activities, ages 5+
Time to Make: 20 minutes per sun catcher (plus drying time)
What You’ll Need:
- Clear contact paper
- Tissue paper in rainbow colors
- Pony-shaped templates
- Scissors
- String for hanging
How to Make It:
1. Cut two identical pony shapes from clear contact paper.
2. Peel the backing off one piece and lay it sticky-side up.
3. Let kids tear and place small pieces of tissue paper onto the sticky surface.
4. Peel the backing off the second piece and press it over the first, sealing the tissue inside.
5. Trim any excess and punch a hole to add hanging string.
Pro Tip: Hang these in sunny windows for gorgeous rainbow light effects throughout the party space!
23. DIY Pony Bubble Wands

Turn ordinary bubbles into magical fun with these character-topped wands!
Best for: Outdoor party activities, all ages
Time to Make: 10 minutes per wand
What You’ll Need:
- Bubble wands (dollar store variety works great)
- Printable pony character cutouts
- Cardstock
- Laminating sheets or clear packing tape
- Glue or tape
How to Make It:
1. Print pony characters on cardstock and cut them out.
2. Laminate the cutouts or cover both sides with clear packing tape for waterproofing.
3. Cut around the laminated image, leaving a small border.
4. Tape or glue the character to the top of the bubble wand handle.
5. Fill cups with bubble solution and let the fun begin!
Fun Variation: Set up a “bubble station” with multiple character wands and have a contest for the biggest bubble!
24. My Little Pony Masks

Perfect for party games, photo booths, or imaginative play – these masks transform kids into their favorite characters!
Best for: Photo booth props, party games, ages 3+
Time to Make: 15 minutes per mask
What You’ll Need:
- Cardstock or craft foam
- Printable pony mask templates
- Elastic string or popsicle sticks
- Markers or crayons
- Glue and scissors
- Optional: glitter, sequins, feathers
How to Make It:
1. Print pony mask templates on cardstock or trace onto craft foam.
2. Cut out the mask shape and eye holes carefully.
3. Let kids color and decorate their masks with markers, glitter, or sequins.
4. Attach elastic string to the sides for wearing, or glue to a popsicle stick for holding.
5. Add yarn mane pieces along the top for extra flair!
Pro Tip: Make a complete set of the Mane Six characters for an epic photo booth station!
25. Unicorn Horn Headbands

Every party needs unicorn magic! These sparkly horns are surprisingly easy to make and look absolutely magical.
Best for: Dress-up, party photos, ages 3+
Time to Make: 20 minutes per headband
What You’ll Need:
- Plain headbands
- Foam sheets or cardstock in white, gold, or rainbow colors
- Glitter
- Hot glue gun
- Elastic or ribbon
- Optional: flowers or ribbons for decoration
How to Make It:
1. Roll a piece of foam or cardstock into a cone shape (about 5-6 inches tall) and secure with hot glue.
2. Trim the bottom to create a flat base for attaching to the headband.
3. Cover the cone with glue and roll it in glitter – don’t be shy!
4. Once dry, hot glue the horn to the center of the headband.
5. Add silk flowers, ribbons, or additional glitter around the base.
Fun Variation: Make alicorn headbands by adding felt wings on either side of the horn!
Unique & Extra-Special Crafts (Crafts 26-28)
26. DIY Pony Shoe Wings

These are hands-down one of the coolest crafts ever – kids can literally fly like Rainbow Dash!
Best for: Costume pieces, party activities, ages 5+
Time to Make: 45 minutes per pair
What You’ll Need:
- Craft foam in rainbow colors
- Elastic straps or shoelaces
- Hot glue gun
- Feather shapes template
- Scissors
- Glitter or metallic markers
How to Make It:
1. Cut wing shapes from craft foam (about 6 inches wide, 8 inches tall).
2. Cut feather details into the edges for a realistic wing look.
3. Decorate with glitter or metallic markers in rainbow patterns.
4. Attach elastic straps to the back of each wing using hot glue.
5. Slip the straps over shoes and watch kids soar!
Pro Tip: Make these in character-specific colors so each child gets their favorite pony’s wings!
27. Cutie Mark Stickers or Patches

These personalized symbols are perfect for decorating everything from backpacks to notebooks!
Best for: Party favors, personalization station, ages 5+
Time to Make: 10 minutes per set
What You’ll Need:
- Sticker paper or fabric for patches
- Printable cutie mark designs
- Scissors
- Iron-on adhesive (for fabric patches)
- Markers for customization
How to Make It:
1. Print various cutie mark designs on sticker paper or regular paper.
2. Cut out each design carefully.
3. For stickers: Simply peel and stick! For patches: attach iron-on adhesive to fabric backing.
4. Let kids choose their favorite designs or create custom cutie marks.
5. Apply to party bags, shirts, or notebooks!
Fun Variation: Set up a “design your own cutie mark” station where kids draw their unique symbols!
28. My Little Pony Friendship Bookmarks

End your party on a sweet note with these bookmarks that celebrate friendship – the true magic of the show!
Best for: Party favors, reading incentives, ages 4+
Time to Make: 10 minutes per bookmark
What You’ll Need:
- Cardstock in rainbow colors
- Printable pony character images
- Ribbon or yarn for tassels
- Laminating sheets or clear contact paper
- Hole punch
- Inspirational friendship quotes
How to Make It:
1. Cut cardstock into bookmark shapes (2 inches wide, 6-7 inches tall).
2. Glue a pony character image at the top of the bookmark.
3. Add a friendship quote or the child’s name below the image.
4. Laminate the bookmark or cover with clear contact paper for durability.
5. Punch a hole at the top and thread colorful ribbons through for a tassel.
Pro Tip: Write personalized messages on the back about what makes each party guest a great friend!
Ready to Throw the Ultimate Pony Party?
There you have it – 28 absolutely magical My Little Pony craft ideas that’ll make your party the talk of the town! Whether you choose just a few favorites or go all-out with a full crafting extravaganza, these ideas will fill your celebration with creativity, laughter, and friendship.
The beauty of these crafts is their flexibility – you can set them up as party activities where kids create together, pre-make them as personalized favors, or mix and match based on your party’s theme and the age of your guests. Most require minimal supplies and can be adapted to any skill level!
Planning Your Craft Party? Here’s Our Top Tip: Choose 2-3 quick crafts (like straw toppers, tattoos, or stickers) for instant gratification, and 1-2 longer projects (like necklaces or stick ponies) as your main activities. Set up dedicated craft stations with all materials organized in advance, and you’ll be the ultimate party-planning hero!
Which of these My Little Pony craft ideas is your favorite? Drop a comment below and share your party planning wins – we’d love to see your creations! And remember, the real magic of any party isn’t just in the crafts or decorations, but in the memories you create together. Happy crafting, and may your party be filled with friendship and fun!
More Birthday Party Ideas to Keep the Fun Rolling:
40+ Magical Harry Potter Birthday Games That’ll Cast a Spell on Your Party
25 Best Mermaid Birthday Party Ideas That’ll Make a Splash
Some Bunny Is One: The Ultimate 1st Birthday Party Theme
DIY Woodland Fairy Crowns: Make Magical Party Crowns Kids Love
24 Construction Birthday Party Ideas That’ll Have Kids Ready to Build Some Fun
15 Epic Super Mario Birthday Party DIY Crafts
DIY Fringed Tissue Paper Garland That’ll Make Your Party Pop
20 Rainbow Garland DIYs for Stunning Birthday Parties
DIY Birthday Backdrop: Tablecloth Trick Under $5! (Easy Tutorial)
How to Make a DIY Birthday Candle Garland That’ll Light Up Your Party
20+ Donut Birthday Party Ideas (Games, Decor & Recipes!)
As an Amazon Associate, we may earn a commission from qualifying purchases at no additional cost to you.
