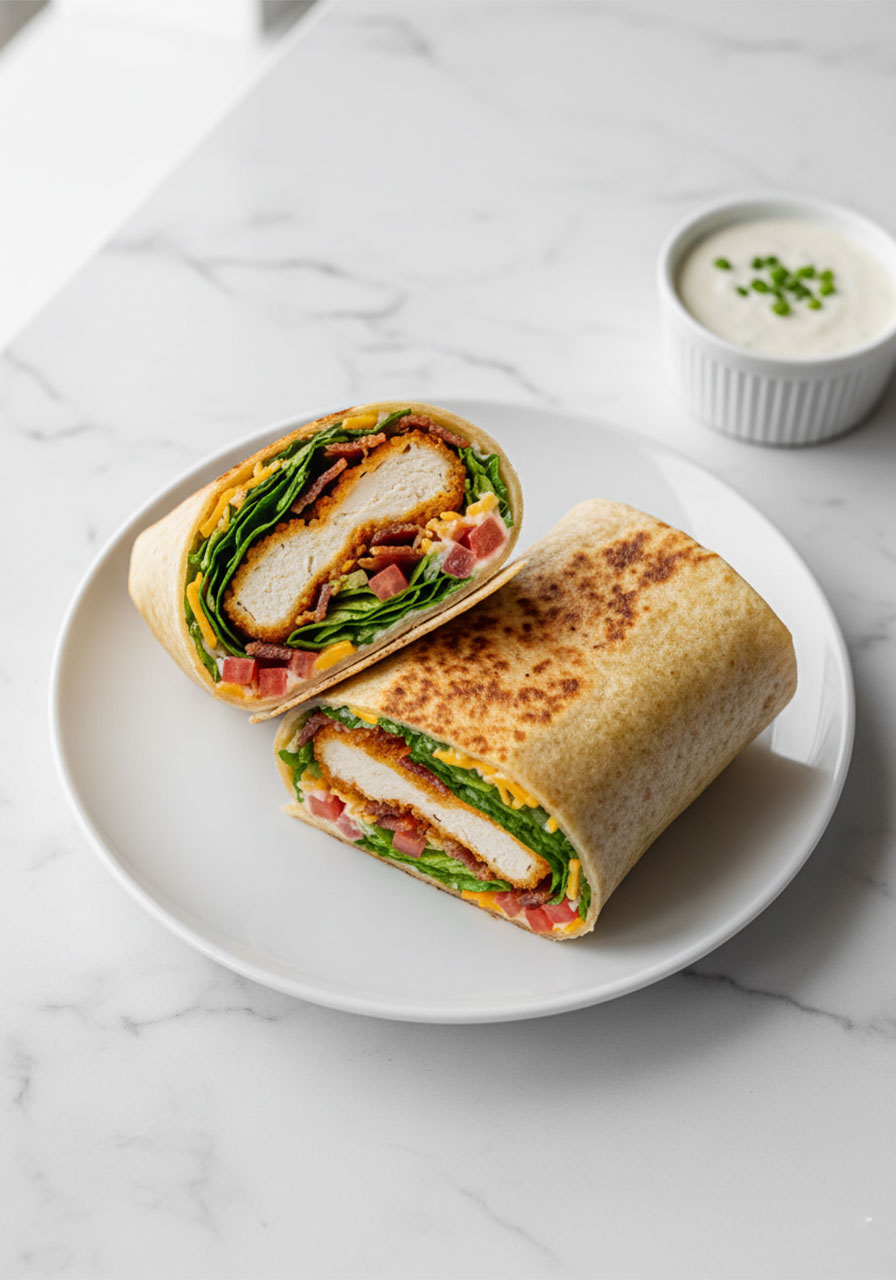
Picture this: golden, crunchy chicken strips. Smoky, crispy bacon. Cool, creamy ranch dressing. All tucked inside a warm, pillowy flour tortilla with crisp lettuce and juicy tomatoes.
Yeah. It’s exactly as good as it sounds.
This Crispy Chicken Bacon Ranch Wrap is the kind of recipe that earns you legendary status at the lunch table – or the party spread. Parents love it because it comes together in under an hour. Teachers love it because it feeds a crowd without any drama. And kids? They just love it because it’s absolutely delicious.
Whether you’re planning a birthday party spread, a casual playdate lunch, or just need a weeknight dinner that everyone will actually eat – this wrap has got you covered. Let’s dive in.
Why You’ll Love This Recipe
This isn’t just another wrap. This is a flavor-packed, crowd-pleasing, foolproof wrap.
Here’s why it’s a guaranteed winner:
Beginner-friendly: If you can slice chicken and fry it in a pan, you can absolutely nail this recipe.
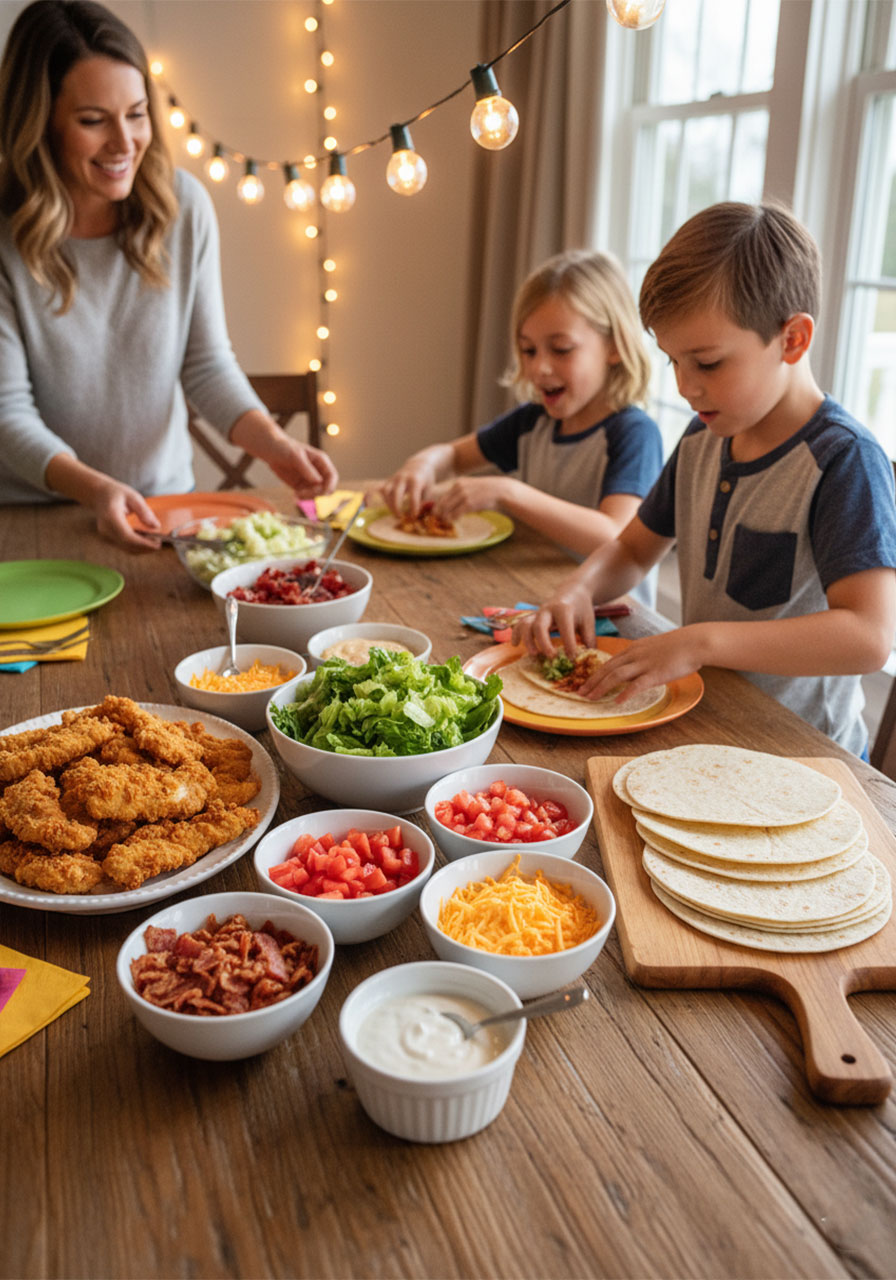
Perfect for parties: Set up a wrap station and let everyone build their own – kids go absolutely wild for it.
Endlessly customizable: Swap the fried chicken for grilled, add avocado, drizzle on hot sauce – make it yours.
Ready in 55 minutes: That’s 20 minutes of prep, 30 minutes of cooking, and 5 minutes of resting (and resisting the urge to eat one before everyone else gets theirs).


What You’ll Need (Ingredients)
Before you start cooking, get everything prepped and ready to go. This recipe moves fast once you’re at the stove, and having your ingredients lined up makes it a breeze.
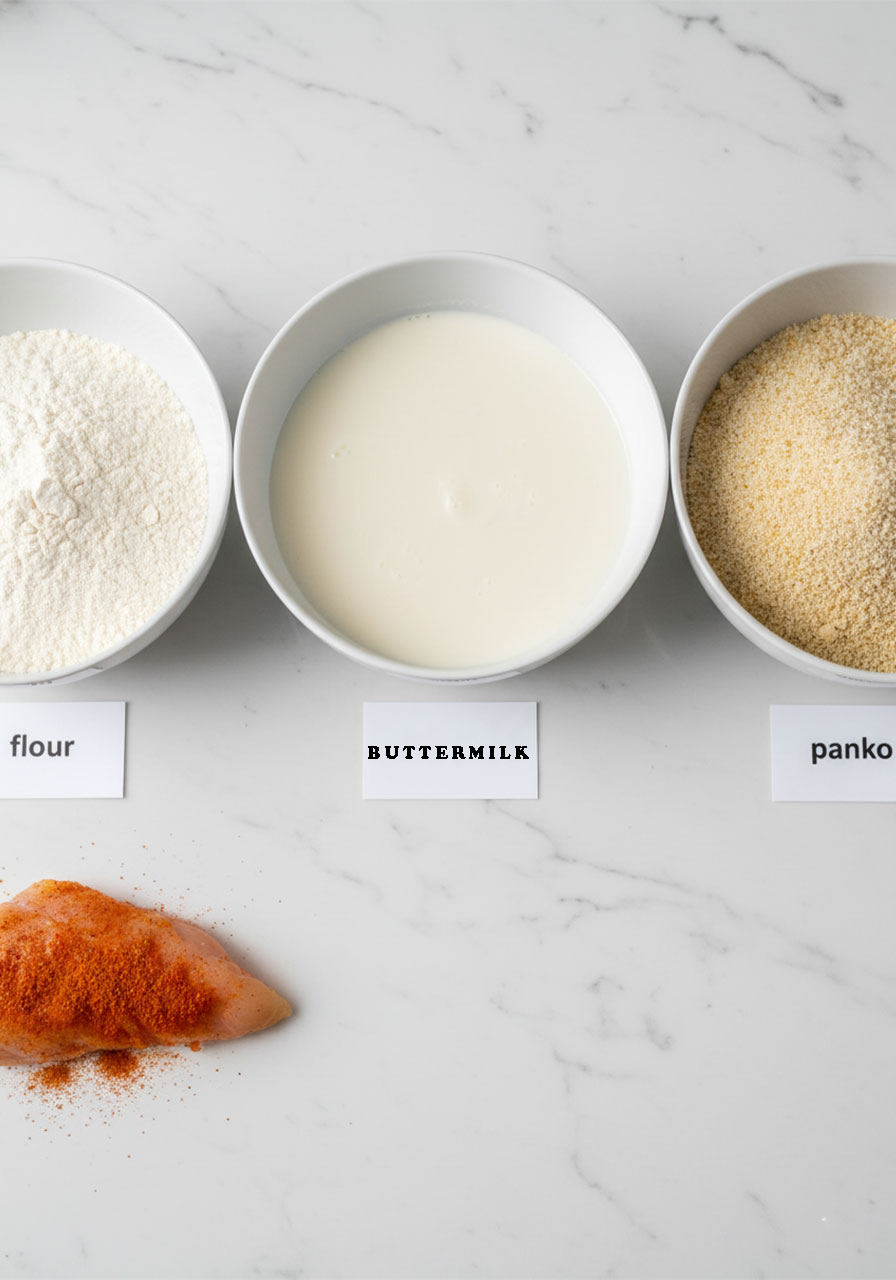
For the Crispy Chicken:
2 boneless, skinless chicken breasts
1 cup all-purpose flour
1 cup buttermilk
1 cup panko breadcrumbs
1 teaspoon garlic powder
1 teaspoon onion powder
1 teaspoon paprika
1 teaspoon salt
½ teaspoon black pepper
Vegetable oil, for frying
For the Wraps:
4 large flour tortillas
6 strips of bacon
1 cup shredded lettuce
1 cup diced tomatoes
1 cup shredded cheddar cheese
¼ cup ranch dressing
Pro Tip: No buttermilk? No problem! Mix 1 cup of regular milk with 1 tablespoon of white vinegar or lemon juice. Let it sit for 5 minutes – instant buttermilk substitute, ready to go.
A Quick Look at the Key Ingredients
Each ingredient in this wrap earns its spot. Here’s why they all matter:
Chicken Breasts – Sliced into strips, they cook up juicy on the inside and golden on the outside. The hearty, protein-packed foundation of the whole wrap.
Bacon – Smoky, crispy, salty perfection. It adds a satisfying crunch that plays beautifully against the creamy ranch.
Buttermilk – This is the secret weapon. It tenderizes the chicken AND helps the panko crust stick like a dream.
Panko Breadcrumbs – Regular breadcrumbs will work, but panko gives you that extra-light, extra-crispy coating that makes every bite crackle.
Garlic Powder + Onion Powder + Paprika – This trio is the flavor backbone of the chicken seasoning. Don’t skip any of them.
Ranch Dressing – The creamy, herby glue that ties every single component together. It’s doing a lot of heavy lifting here, and it earns every bite.
Flour Tortillas – Soft, pliable, and sturdy enough to hold all those glorious fillings. Use large ones so you have enough room to roll everything up nice and tight.
How to Make Crispy Chicken Bacon Ranch Wraps (Step-by-Step)
Here’s the foolproof game plan. Follow these steps and you’ll have restaurant-quality wraps on the table in no time.
Step 1: Season the Chicken
Slice your chicken breasts into thin, even strips. This is important – thin strips cook faster and more evenly, giving you that perfect crispy exterior without any raw spots in the middle.
Toss the strips with garlic powder, onion powder, paprika, salt, and black pepper. Make sure every piece is well coated in that spice blend. This is where the flavor begins.
Step 2: Set Up Your Dredging Station
This is the step that makes the magic happen. Line up three shallow dishes side by side:
- Dish 1: All-purpose flour
- Dish 2: Buttermilk
- Dish 3: Panko breadcrumbs
Having everything laid out before you start means no scrambling, no mess, and no missed coatings.
Step 3: Dredge the Chicken
Working one strip at a time, dip each piece first into the flour (shake off the excess), then into the buttermilk (let it cling on), and finally press it firmly into the panko so it’s fully coated all around.
Don’t rush this part. A thorough coating is what gives you that satisfying crunch when you bite in.
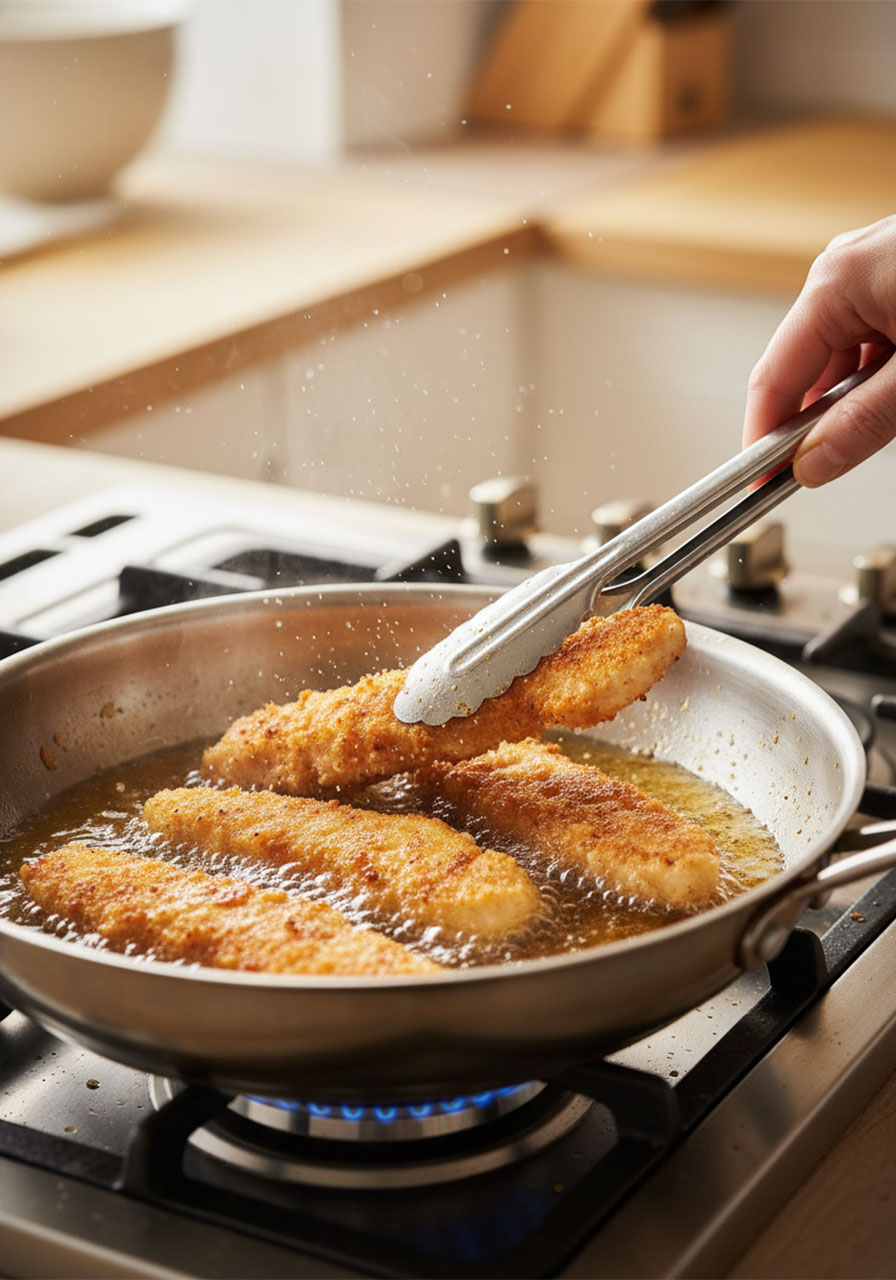
Step 4: Fry Until Golden and Crispy
Heat about a half-inch of vegetable oil in a large skillet over medium heat. You’ll know it’s ready when you drop in a pinch of breadcrumb and it sizzles immediately.
Carefully add the breaded chicken strips and fry for about 5–7 minutes total, turning as needed, until they’re a deep, gorgeous golden-brown. Transfer to a paper towel-lined plate to drain.
Pro Tip: Don’t overcrowd the pan! Fry in batches if needed. Overcrowding drops the oil temperature, which leads to soggy chicken instead of crispy – and nobody wants that.
Step 5: Crisp Up the Bacon
While the chicken drains, cook your bacon strips in a separate pan over medium heat until they’re perfectly crispy. Transfer to paper towels, let them cool for a minute, then crumble them into bite-size pieces.
Try not to eat all the bacon before assembly. (We know it’s hard. We believe in you.)
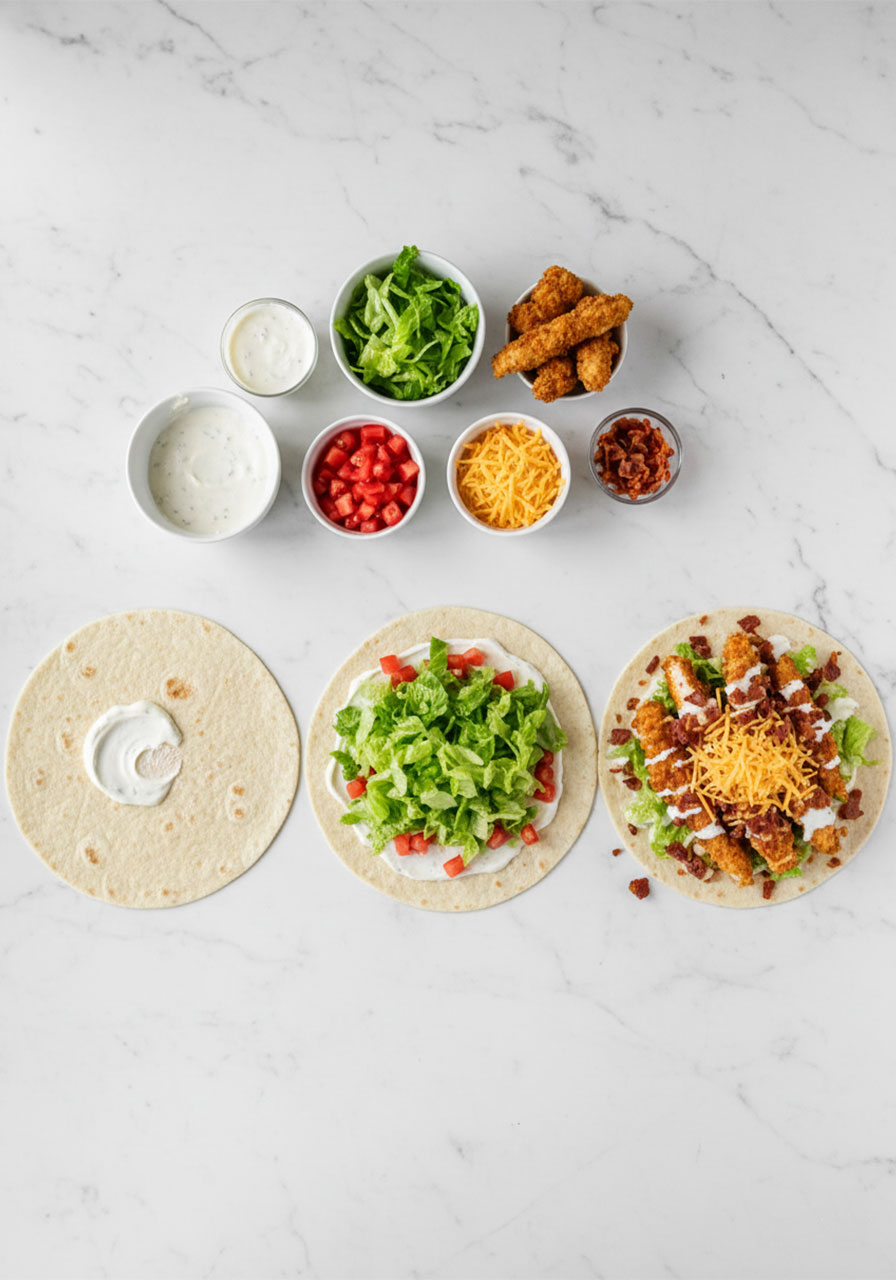
Step 6: Spread the Ranch
Lay your flour tortillas flat on a clean surface. Spread about a tablespoon of ranch dressing across the center of each one, leaving a small border around the edges so nothing overflows when you roll.
Step 7: Layer Up the Fillings
Now for the fun part! Layer your fillings in the center of each tortilla in this order:
1. Shredded lettuce
2. Diced tomatoes
3. Shredded cheddar cheese
4. Hot, crispy chicken strips
5. Crumbled bacon
The warm chicken will slightly melt the cheddar, and the cool lettuce and tomatoes add a refreshing contrast. It’s all about those layers.
Step 8: Roll It Up
Fold in the sides of the tortilla first, then roll from one end to the other, pulling it nice and tight as you go. Think burrito, not loose taco.
The tighter the roll, the better every bite will be.
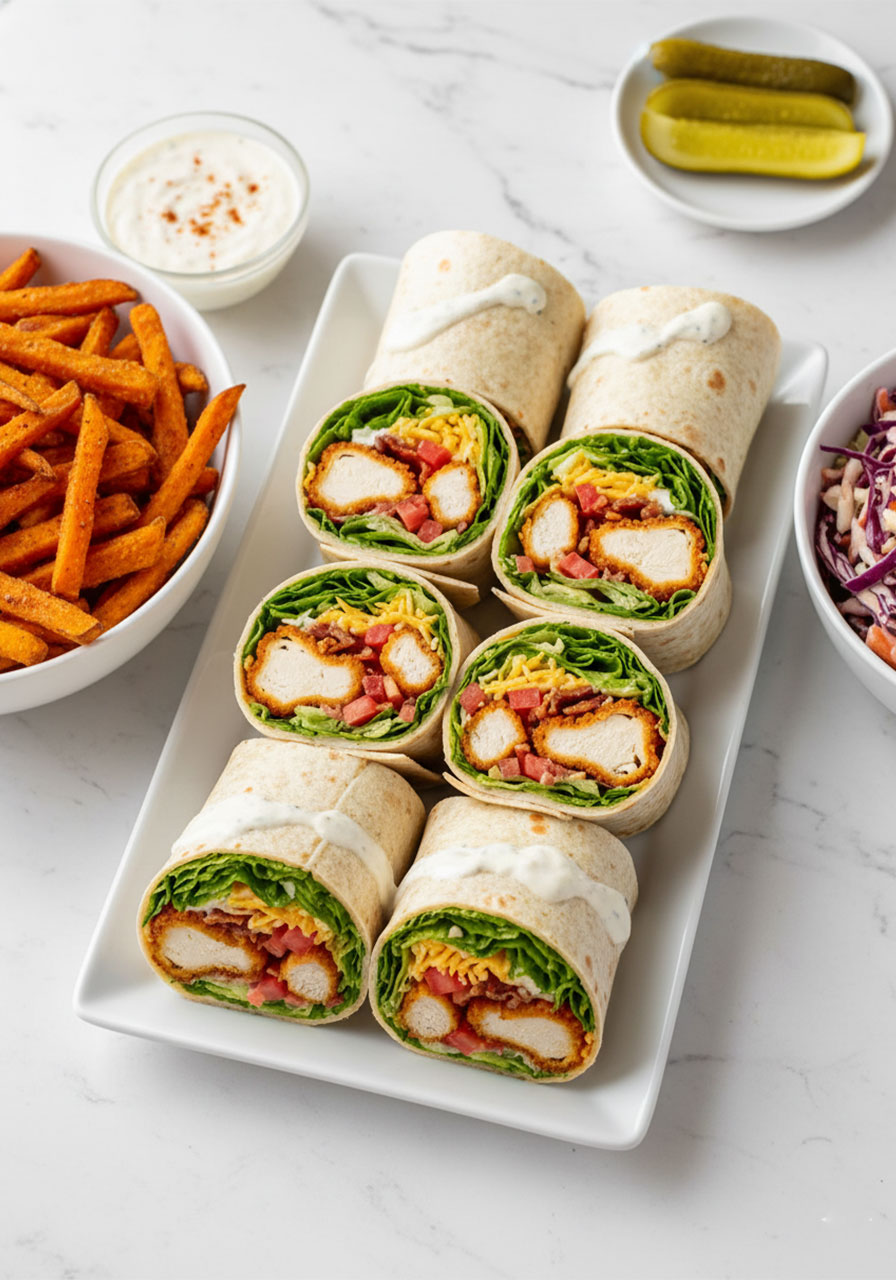
Step 9: Slice and Serve
Using a sharp knife, slice each wrap in half at a slight diagonal angle. This reveals that beautiful cross-section of colorful layers – and trust us, it makes the whole thing look even more irresistible.
Serve immediately while the chicken is still warm and crispy.
Fun Ways to Serve These Wraps at a Party
These wraps shine at any gathering – from birthday lunches to casual weekend hangouts. Here are some ideas to take the spread to the next level.
Build-Your-Own Wrap Station
Set out all the fillings in separate bowls and let guests (especially kids!) assemble their own wraps. It’s interactive, fun, and means everyone gets exactly what they want. Parents love this because it’s practically hands-off once everything is prepped.
Mini Party Wraps
Use smaller tortillas to make mini wraps – perfect bite-size portions for parties, potlucks, or school events. Slice them into rounds and pin with a toothpick for an easy, crowd-pleasing finger food.
Wrap Platter with Dipping Sauces
Arrange the sliced wraps on a big platter and set out small ramekins of ranch, honey mustard, and barbecue sauce for dipping. It looks impressive and takes zero extra effort.
What to Serve on the Side
This wrap is absolutely a meal on its own, but the right sides take it from great to legendary.
Crispy Sweet Potato Fries – Bake or air-fry until golden and caramelized. Season with smoked paprika for a sweet-and-smoky sidekick to the savory wrap.
Tangy Coleslaw – Shredded cabbage and carrots tossed in a light vinaigrette or yogurt dressing. The cool crunch cuts right through the richness of the fried chicken and bacon.
Pickle Spears or Pickled Veggies – Dill pickles, pickled red onions, or quick-pickled cucumbers add a bright, acidic pop that cleanses the palate between bites.
Extra Ranch Dipping Sauce – Serve a small bowl of ranch on the side, garnished with chopped chives or a sprinkle of paprika. Because you can never have too much ranch.
A Simple Side Salad or Fruit Salad – For a lighter, refreshing balance, a fresh green salad or colorful fruit salad is always a hit – especially with kids.
How to Store and Reheat Leftovers
If you somehow end up with leftovers (no promises), here’s how to keep everything tasting fresh.
Refrigerating Assembled Wraps
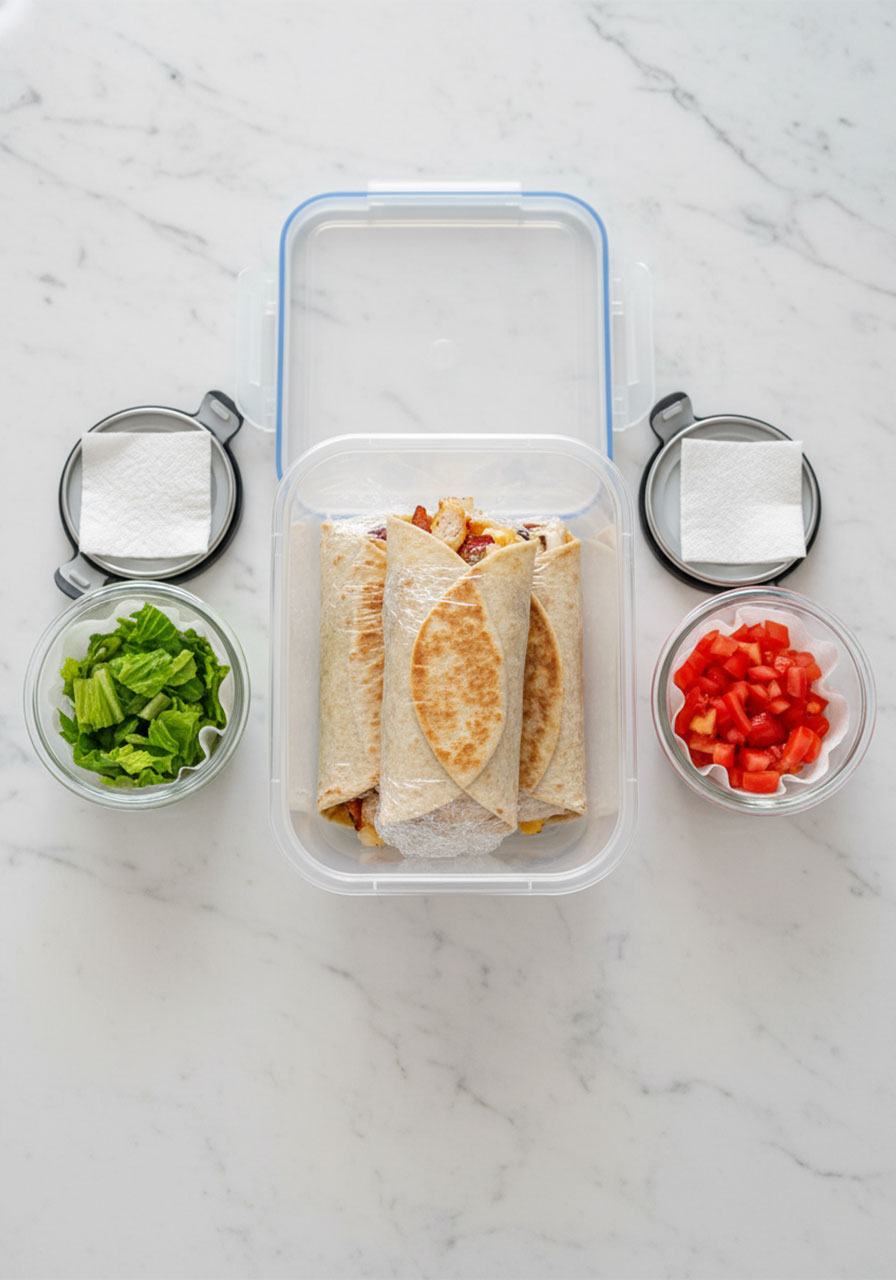
Wrap each leftover wrap tightly in plastic wrap or foil, making sure no air gets trapped inside. Store in an airtight container or resealable bag in the fridge for up to 2 days.
After 48 hours, the lettuce may start to wilt – so the sooner you eat them, the better.
Storing Components Separately (Best Method)
For the freshest results, store the chicken strips and bacon pieces separately from the fresh veggies and tortillas. Keep the lettuce and diced tomatoes in an airtight container lined with a paper towel to absorb excess moisture.
When you’re ready to eat, just reheat the chicken and assemble a fresh wrap. It tastes just as good as day one.
Freezing the Chicken and Bacon
The fried chicken strips and crumbled bacon freeze beautifully. Store them in separate freezer-safe bags for up to 1 month. Defrost overnight in the fridge before reheating.
Reheating Tips
Reheat chicken strips in a preheated oven at 350°F for about 8 minutes to bring the crispiness back. Skip the microwave if you can – it makes the breading soggy and sad.
Easy Customizations and Variations
One of the best things about this recipe is how easy it is to make it your own. Here are some crowd-pleasing twists to try:
Lighten it up: Swap the fried chicken for grilled chicken strips. Same great flavor, fewer calories – and still totally delicious.
Make it extra creamy: Add a few slices of ripe avocado before rolling. Game-changer.
Spice it up: Stir a dash of hot sauce or sriracha into the ranch dressing. Adults especially love this one.
Go vegetarian: Replace the chicken and bacon with crispy fried tofu or tempeh, and use a plant-based ranch dressing. Add sliced bell peppers or cucumbers for extra crunch.
Use chicken thighs: Prefer dark meat? Chicken thighs are juicier and even more flavorful than breasts. Just slice them thin for even cooking.
Make it a meal-prep star: Prep the chicken and bacon ahead of time, then assemble wraps fresh throughout the week. Wrap tightly in plastic wrap for a grab-and-go lunch.
Frequently Asked Questions
Can I use chicken thighs instead of chicken breasts?
Absolutely! Chicken thighs are actually juicier and more flavorful than breasts, which makes for an even tastier wrap. Just slice them into thin, even strips so they cook at the same rate and stay crispy all around.
What can I use instead of buttermilk?
Super easy fix. Mix 1 cup of regular milk (whole or 2% works best) with 1 tablespoon of white vinegar or fresh lemon juice. Stir and let it sit for about 5 minutes until it thickens slightly. Use it exactly as you would the buttermilk in the recipe – it works perfectly.
How do I store leftover wraps?
Wrap leftovers tightly in plastic wrap or foil and refrigerate in an airtight container for up to 2 days. For the best results, store the chicken, bacon, and veggies separately and assemble fresh wraps when you’re ready to eat. Reheat the chicken in the oven at 350°F for about 8 minutes to restore the crispiness – avoid the microwave, which will make the coating soggy.
Can I make this wrap vegetarian?
Yes! Swap the chicken and bacon for crispy pan-fried tofu or tempeh, and use a plant-based ranch dressing. Add sliced bell peppers, cucumbers, or even roasted chickpeas for extra texture and flavor. It’s a satisfying meatless option that everyone at the table will enjoy.
What are the best sides to serve with this wrap?
You can’t go wrong with sweet potato fries, a simple side salad, or a fresh fruit salad. For a crunchier pairing, potato chips or pickle spears on the side work great. If you’re serving this at a party, set out a few dipping sauces (extra ranch, honey mustard, or BBQ) alongside the wraps for a fun, interactive spread.
Can I make these wraps ahead of time for a party?
Yes – with a little planning! Prep the fried chicken and crumbled bacon ahead of time and store them separately. When it’s party time, warm the chicken in the oven, set out your fillings, and let guests assemble their own wraps at a build-your-own station. It’s the easiest party food setup you’ll ever pull off.
Final Thoughts
There’s a reason this Crispy Chicken Bacon Ranch Wrap has become a go-to for busy parents and anyone who needs a meal that’s fast, filling, and universally loved.
It’s got everything: the crunch, the smokiness, the creaminess, the freshness. It works as a party food, a weekday lunch, a dinner everyone actually gets excited about, or a meal-prep hero for the whole week.
Once you master the dredging station and nail that golden crust on the chicken, you’ll be making these on repeat. And when you slice that wrap in half and see all those gorgeous layers stacked up – trust us, you’ll feel like a total kitchen rockstar.
Give it a try, customize it to your crowd, and don’t forget to save this recipe for your next gathering. You’re going to need it.
Happy wrapping! 🌯
CRISPY CHICKEN BACON RANCH WRAP
Ingredients
For the crispy chicken:
- 2 boneless, skinless chicken breasts
- 1 cup all-purpose flour
- 1 cup buttermilk
- 1 cup panko breadcrumbs
- 1 teaspoon garlic powder
- 1 teaspoon onion powder
- 1 teaspoon paprika
- 1 teaspoon salt
- ½ teaspoon black pepper
- Vegetable oil, for frying
For the wraps:
- 4 large flour tortillas
- 6 strips of bacon
- 1 cup shredded lettuce
- 1 cup diced tomatoes
- 1 cup shredded cheddar cheese
- ¼ cup ranch dressing
Instructions
- Slice chicken breasts into thin, even strips. Season with garlic powder, onion powder, paprika, salt, and black pepper. Toss until every piece is well coated.
- Set up your dredging station: flour in the first shallow dish, buttermilk in the second, panko breadcrumbs in the third.
- Dip each chicken strip into the flour (shake off the excess), then the buttermilk, then press firmly into the panko until fully coated.
- Heat about ½ inch of vegetable oil in a large skillet over medium heat. Fry chicken strips for 5–7 minutes, turning as needed, until deep golden brown and crispy. Transfer to a paper towel-lined plate to drain.
- In a separate pan, cook bacon strips over medium heat until crispy. Transfer to paper towels, let cool slightly, then crumble into bite-size pieces.
- Lay tortillas flat. Spread 1 tablespoon of ranch dressing across the center of each one, leaving a small border around the edges.
- Layer fillings in the center of each tortilla in this order: shredded lettuce, diced tomatoes, shredded cheddar cheese, crispy chicken strips, crumbled bacon.
- Fold in the sides of the tortilla, then roll tightly from one end to the other.
- Slice each wrap in half at a diagonal angle. Serve immediately.
Notes
- No buttermilk? Mix 1 cup of milk with 1 tablespoon of white vinegar or lemon juice. Let it sit for 5 minutes and use as a substitute.
- Don’t overcrowd the pan when frying – cook in batches if needed to keep the oil hot and the chicken crispy.
- For a lighter version, swap the fried chicken for grilled chicken strips.
- Add avocado slices before rolling for extra creaminess.
- Stir a dash of hot sauce into the ranch for a spicy kick adults will love.
- To make vegetarian, use crispy pan-fried tofu or tempeh and a plant-based ranch dressing.
- Reheat leftover chicken strips in the oven at 350°F for 8 minutes to restore crispiness. Avoid the microwave – it makes the coating soggy.
- Store assembled wraps tightly wrapped in plastic wrap in the fridge for up to 2 days. For best results, store components separately and assemble fresh.
More Easy Party Food Ideas to Keep the Fun Rolling:
Taco Ranch Bites (Easy Party Finger Food for a Crowd!)
No-Bake Oreo Cheesecake Cups (Easy Dessert for Parties!)
Strawberry Brownie Kabobs (Fun Party Dessert Skewers Kids Will Go Crazy For!)
Easy Unicorn Cookies (The Most Magical Birthday Party Treat for Kids!)
Easy Pinwheel Sandwiches (Make-Ahead Party Finger Food!)
Sheet Pan Burger Sliders on Hawaiian Rolls (Easy Crowd Meal!)