
Forget the store-bought ties and “World’s Best Dad” mugs that collect dust in the back of the cabinet.
This Father’s Day, the gift that’s going to make Dad (or Grandpa!) tear up a little? A handprint craft made by your kid.
No, seriously. There is nothing more heart-melting than a tiny handprint frozen in time on a piece of paper. It’s the kind of gift that goes straight to the fridge – and stays there for years.
The best part? These four crafts are genuinely easy. We’re talking about projects you can pull off with a preschooler, a pack of washable paint, and about 30 minutes on a Sunday afternoon. Whether you’re a parent planning a weekend activity or a teacher looking for the perfect classroom project, we’ve got you covered.
Let’s get a little messy and make something Dad will love forever.

What You’ll Need (Stock Up Before You Start!)
Before you gather the kids around the table, make sure your craft station is ready to go. Nothing kills the crafting vibe like running out of paint mid-handprint!
Paper: Heavy cardstock or thick construction paper – regular printer paper will warp from the paint.
Paint: Washable tempera or acrylic paint in a variety of colors. Washable is your best friend here.
Markers: A black permanent marker for outlines and details, plus colored felt-tip markers.
Brushes: A few different sizes for painting hands and adding details.
Scissors: For cutting out sponge shapes (more on that in a minute!).
A kitchen sponge: The secret weapon for the rocket craft.
Pom-poms: Multi-colored, assorted sizes – the fluffier the better.
White craft glue or a glue gun: For the 3D turtle shell.
Googly eyes: Because every creature needs a little personality.
Star stickers: Gold and silver for the finishing touches on the space scene.
Baby wipes: Keep an entire pack within arm’s reach. Trust us.
Pro tip for teachers: Set up paint stations ahead of time with each color in a shallow tray or plate. It makes the handprinting step SO much smoother with a group of kids.


Craft #1: “To the Moon and Back” Rocket Ship
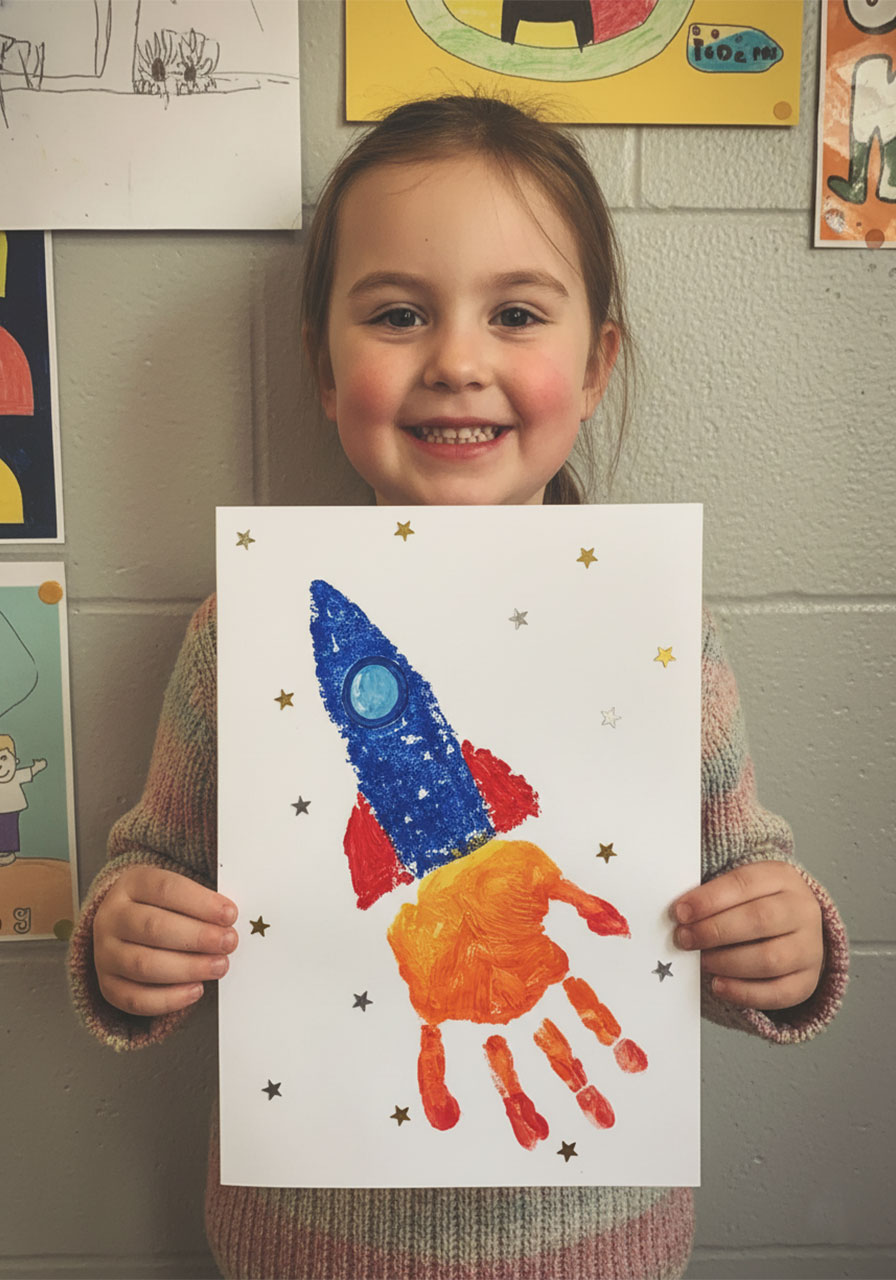
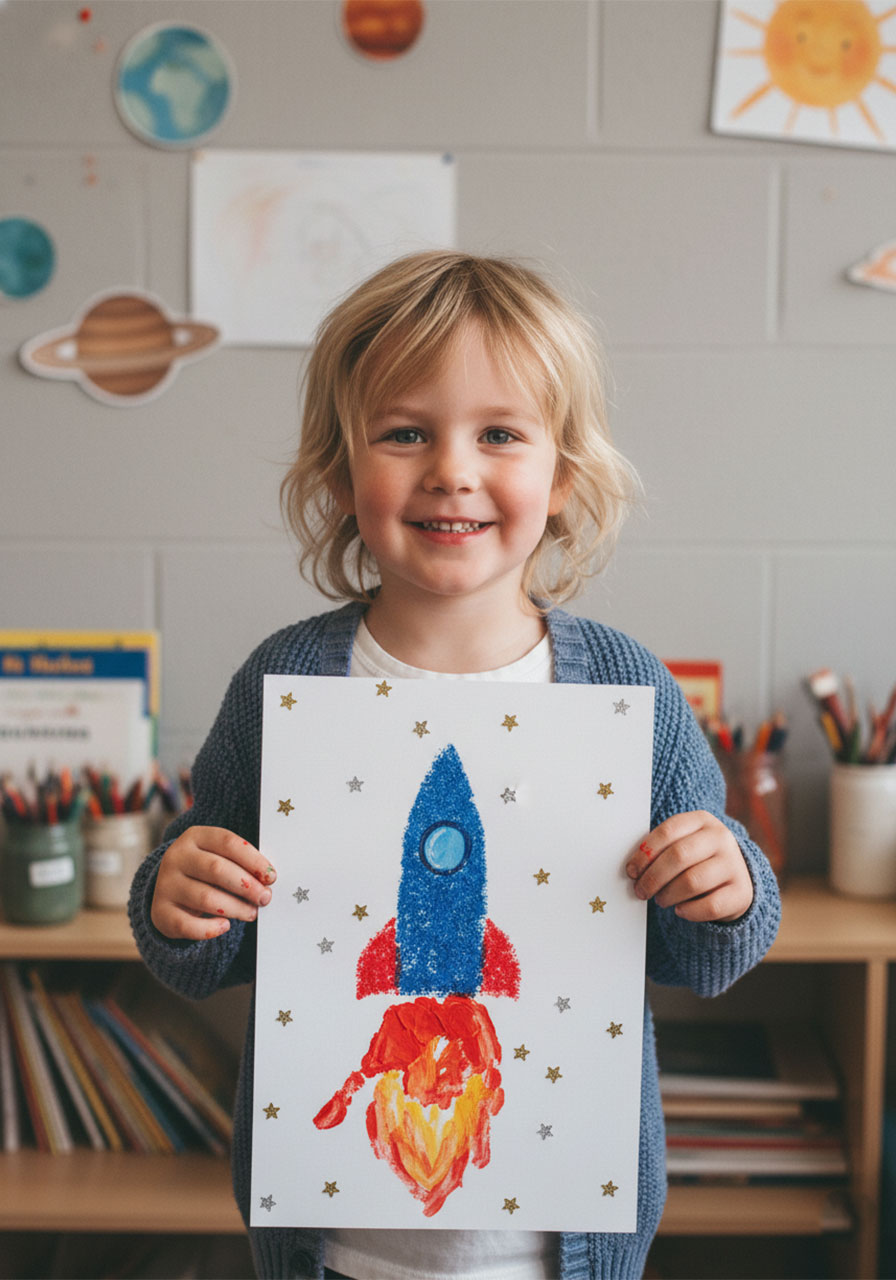
This one is a showstopper. The secret is a simple sponge-painting technique that gives the rocket a cool, textured “outer space” look – way more impressive than it sounds, and totally doable with little ones.
The finished result? A glittery rocket blasting through the stars, powered by a tiny handprint of fire. It’s the kind of thing Dad is going to frame.
Best for: Ages 3 and up | Kids and parents together
Time to Make: 20–30 minutes (plus drying time)
What You’ll Need:
White cardstock or thick paper
1 kitchen sponge
Scissors
Blue and red paint
Red, orange, and yellow paint (for the handprint flames)
A black marker
Gold or silver star stickers
A small circle sticker or blue paint for the window
How to Make It:
1. Cut your sponge shapes.
Cut one large triangle from the sponge for the rocket body, and two smaller triangles for the side fins. Don’t stress about making them perfect – a little irregular just adds to the handmade charm.
2. Stamp the rocket body.
Dip the large sponge triangle in blue paint and press it firmly in the upper-center of your paper. Lift straight up to reveal the textured print. You can add a second coat if you want it darker.
3. Add the fins.
Dip the small triangles in red paint and stamp one on each lower side of the rocket body. These are the side fins!

4. Paint the hand for the flames.
This is the fun (and messy!) part. Using a brush, paint your child’s palm yellow at the base, orange through the middle, and red at the fingers. You want it blended and fiery-looking.
5. Stamp the handprint.
Press the painted hand directly below the rocket, fingers pointing downward, to create the blast of fire launching the rocket into space. Press firmly and peel up slowly.

6. Let it dry completely.
This is important – fully dry paint before adding details, otherwise your marker lines will smear.
7. Draw the window.
Use a black marker to draw a round porthole on the rocket body. Color it in with blue paint or a blue marker to make it look like a real spacecraft window.
8. Add the stars.
Stick gold and silver star stickers all around the rocket for that “outer space” feel. Done!
What to Write: “Daddy, I love you to the moon and back!”
Teacher Tip: Have kids do their handprint flames on a separate piece of paper first to practice – then do the “real” one on the rocket picture. This prevents the heartbreak of a smudged final project!
Craft #2: “Best Dad Hands Down” Portrait
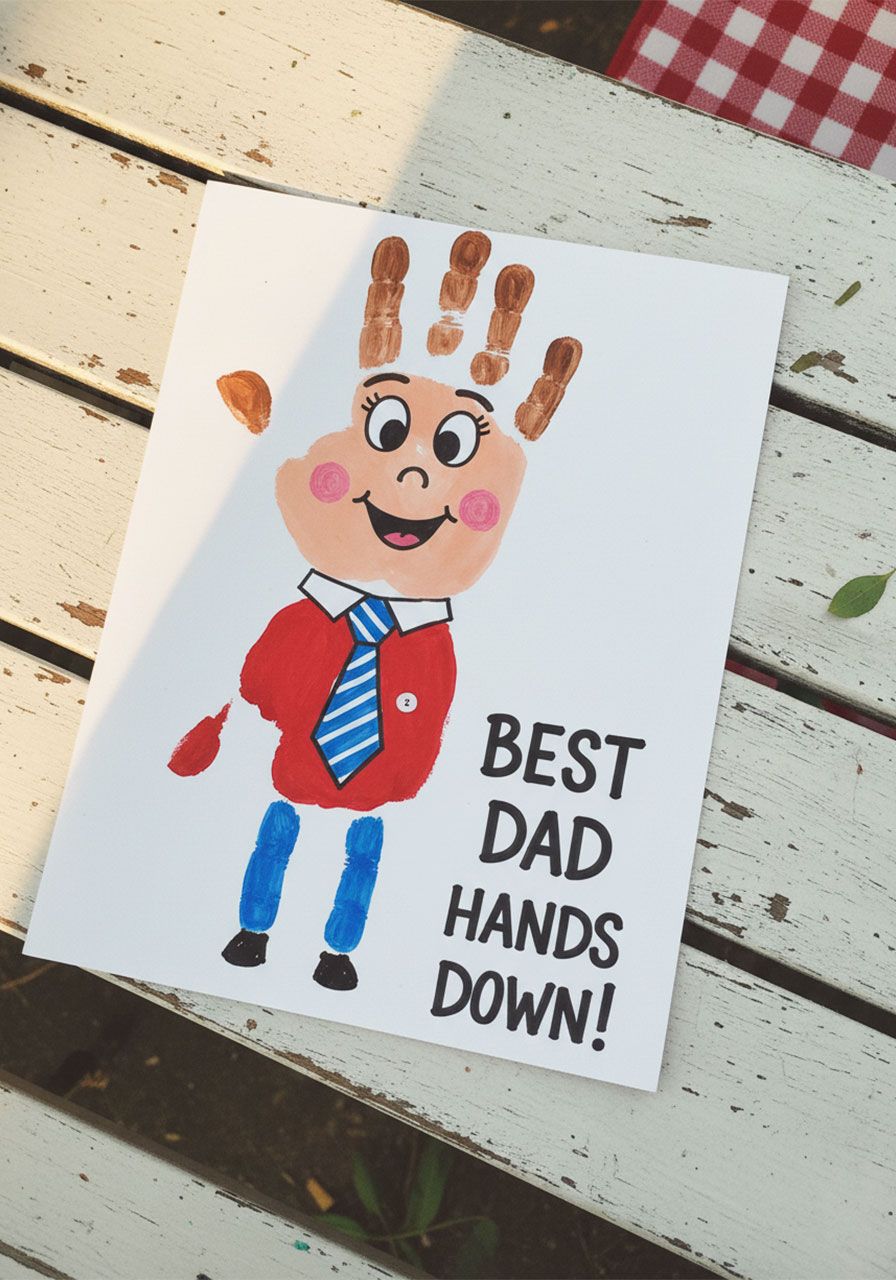
This craft is pure joy. You use the same hand twice – once for the head and hair, once for the body – to create an adorable “mini-me” caricature of Dad.
The fingers become the wild, spiky hair. The palm becomes the face. It’s goofy, it’s sweet, and it looks exactly like something a kid made – which is exactly why Dad is going to love it.
Best for: Ages 4 and up | Perfect for classroom Father’s Day projects
Time to Make: 25–35 minutes (plus drying time)
What You’ll Need:
White cardstock or thick paper
Skin-tone (peach) paint and brown or black paint (for hair)
Red paint (for the shirt) and blue paint (for the pants)
A paintbrush
Black marker and blue marker
Pink marker or paint (for the rosy cheeks)
How to Make It:
1. Paint the “head” hand.
Brush the palm with a skin-tone or peach color and paint the fingers brown (or black, or blonde – match Dad’s actual hair color for extra points!). This will be Dad’s face and hair.
2. Stamp the head near the top of the page.
Press the painted hand firmly onto the upper portion of the paper with the fingers pointing upward. The palm = the face, and the fingers = the hair sticking up. Peel off slowly.

3. Wipe the hand clean.
This is where those baby wipes earn their keep! Get all the paint off before the next step.
4. Paint the “body” hand.
Brush the palm red (for the shirt) and paint the fingers blue (for the pants/legs). You can paint the very tips of the fingers black for shoes if you want extra detail.
5. Stamp the body directly below the face.
Line it up so it looks like the head and body connect. Fingers point downward to create the legs.
6. Let everything dry completely.
7. Add the details with markers.
Draw two little curved eyebrows and a big smile on the face. Add two small dots or circles for eyes. Use a pink marker to add rosy cheeks. Use a blue marker to draw a tie or plaid pattern on the shirt. Get creative!
8. Write the caption in large, bold letters in the corner.
What to Write: “Best Dad, Hands Down!”
Pro Tip: Let kids pick what color shirt and pants “Dad” is wearing – they love the creative ownership, and it makes each portrait totally unique. In a classroom setting, no two will look alike!
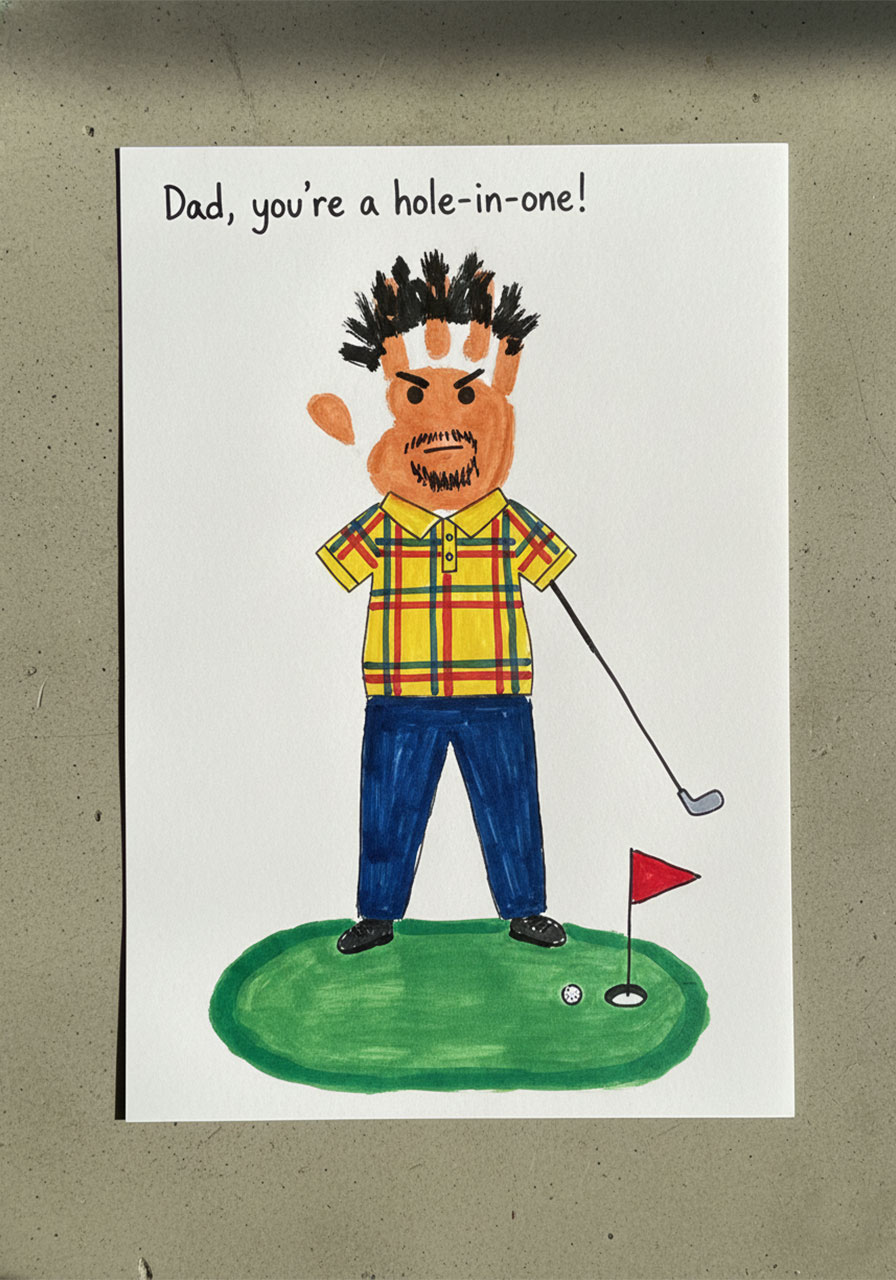
Craft #3: “Hole-in-One” Golf Dad
Got a Dad or Grandpa who lives for the golf course? This one was made for him.
It follows the same two-handprint portrait technique as the Mini-Me above, but we’re turning Dad into a golfer on the green. Complete with a red flag, a white golf ball, and a little club in his hand – this craft is a total hole-in-one.
Best for: Ages 5 and up | Great for Grandpa’s Day too!
Time to Make: 30–40 minutes (plus drying time)
What You’ll Need:
White cardstock or thick paper
Skin-tone paint and dark brown or black paint (for hair)
Bright yellow paint (for the polo shirt)
Dark blue or black paint (for pants)
Markers: black, green, red, and white (or white paint)
A fine-tipped marker for details like a plaid pattern on the shirt
How to Make It:
1. Create the head handprint.
Same as the portrait – paint the palm skin-tone and the fingers dark brown or black for hair. Stamp near the top of the page, fingers up.
2. Wipe the hand clean.
3. Create the body handprint.
Paint the palm bright yellow for a golf polo shirt and the fingers dark blue for pants. Stamp directly below the face.
4. Let it dry completely.
5. Draw the golf details.
Use a black marker to draw a thin golf club extending from one of his “hands” (the side fingers). Draw a small white circle near his feet for the golf ball.
6. Add the putting green.
In the lower portion of the paper, use a green marker to draw a rounded putting green. Add a small flag on a stick – red triangle on a thin black line – poking up from the hole.
7. Add face details.
Give him a confident smile, a little beard if Grandpa or Dad has one, and rosy cheeks. Use a fine marker to draw a plaid or checkered pattern on the yellow polo shirt – it’s a small touch that makes a huge difference!
8. Write the caption in the upper corner.
What to Write: “Dad, you’re a hole-in-one!” or “Grandpa, you’re our hole-in-one!”
Fun Variation: Swap out golf for whatever Dad’s hobby actually is! Fishing? Draw a little pond and a fishing rod. Basketball? Add a hoop. The same two-handprint formula works for any sport – just change the colors and the scenery.
Craft #4: “Turtley Awesome” 3D Turtle
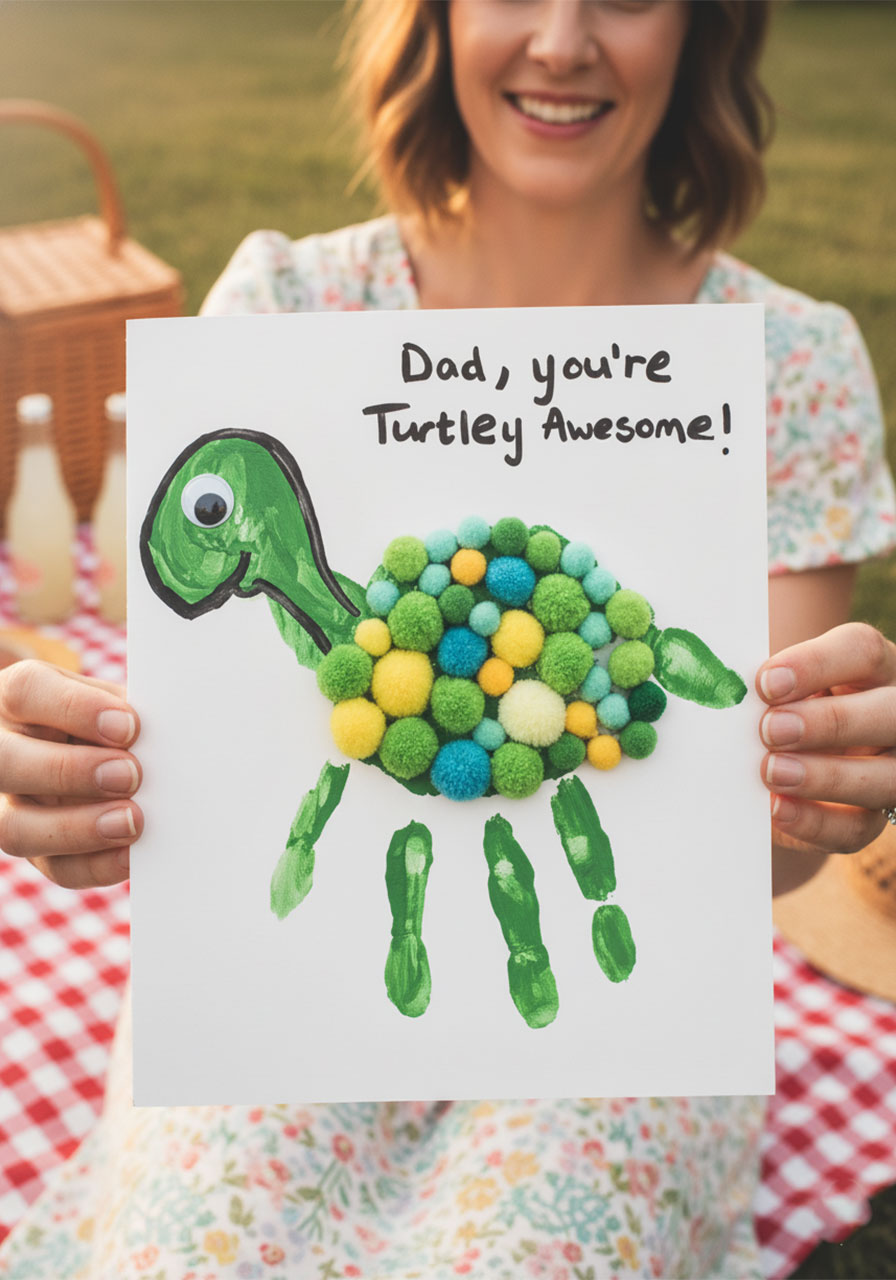
Okay, this one is our personal favorite. It’s tactile, it’s colorful, it’s covered in fluffy pom-poms – and it is absolutely adorable.
The handprint becomes the turtle’s body and legs, and then you glue a mountain of pom-poms on top to create the most satisfying 3D shell you’ve ever seen. Kids go absolutely wild for this one.
Best for: Ages 4 and up | Amazing sensory activity for kids
Time to Make: 30–45 minutes (plus drying time)
What You’ll Need:
White cardstock or thick paper
Green paint
Assorted pom-poms in green, yellow, blue, and teal (various sizes)
White craft glue or a low-temp glue gun (adult use only for the glue gun)
1 large googly eye
Black marker
Paintbrush
How to Make It:
1. Paint the hand green. Cover the entire hand – palm and all fingers – in green paint.
2. Stamp the hand sideways on the paper.
Turn the hand so the thumb points to one side (this becomes the tail) and the fingers spread out like legs. Press firmly and peel up slowly. The palm area will be the turtle’s main shell body.
3. Paint a rounded head shape.
Using a brush and green paint, add a round circle for the turtle’s head, connecting it to the side of the palm print. It should look like a little blobby circle attached to the body.
4. Let the paint dry completely.
This step is non-negotiable – if you glue onto wet paint, the pom-poms won’t stick properly.
5. Glue on the pom-poms.
This is the best part! Fill the palm area of the handprint with pom-poms in all different sizes and colors. Pack them in tightly – you want a full, overflowing, gloriously fluffy shell. Let kids arrange them however they like.

6. Add the googly eye.
Glue one large googly eye onto the head circle. Press and hold for a few seconds to let it set.
7. Draw the smile and outline.
Use a black marker to draw a little curved smile on the face and outline the head to help it stand out from the body.
8. Write the caption at the top of the paper.
What to Write: “Dad, you’re Turtley Awesome!”
Pro Tip: If you’re doing this in a classroom, pre-portion the pom-poms into small cups for each student – it speeds things up and prevents the classic pom-pom avalanche across the table. (It happens every time.)
Tips to Make Craft Day Go Smoothly
Whether you’re doing this at home with one kid or running it as a classroom project with 25 students, these tips will save your sanity.
1. Baby wipes are your best friend.
Keep a full pack on the table at all times. You’ll need them between handprint colors, and definitely before anyone touches their face. (They will touch their face.)
2. Set up a drying station.
Lay out a few extra sheets of paper or paper towels where finished crafts can dry flat without being touched, stacked, or sat on.

3. Always let the paint dry before adding marker details.
We know it’s tempting to jump straight to the fun part, but wet paint + marker = smeared mess. Give it at least 20–30 minutes, or use a hair dryer on the lowest setting to speed it up.
4. Use shallow plates or trays for the paint.
Pouring paint into a flat plate or foam tray makes it much easier to load a sponge or brush evenly. Plus, it contains the mess a lot better than squeezing straight from the bottle.
5. Do a practice handprint first.
Especially with younger kids or large classroom groups – do one handprint on scrap paper first so they know what to expect. It reduces the “oops, I moved my hand” ruined artwork situation significantly.
6. Write the child’s name and the date on the back.
Do this on every single craft. In five years, when Dad pulls these out of a box, he’s going to want to know exactly how old the little hands were. You’ll thank yourself later.
7. Don’t stress about perfection.
The wonky fingers, the slightly smeared paint, the googly eye that’s a little crooked – that’s what makes handprint crafts so special. They’re supposed to look like a kid made them. Because a kid made them!
What to Do With the Finished Crafts
Once the masterpieces are dry, here are a few ideas for presenting them in a way that really lands:
Frame it. A simple $5 frame from the dollar store transforms a piece of paper into wall art. Dad will actually display it – especially if it’s already framed and ready to hang.
Laminate it. If you have access to a laminator (most schools do!), laminating the finished craft preserves it beautifully and makes it feel more “official.” It also means spills won’t ruin it.
Turn it into a card. Fold a large piece of cardstock in half, glue the handprint art to the front, and let kids write their own message inside. Instant Father’s Day card – way better than anything from the store.
Make it into a gift tag. Smaller handprint crafts can be attached to a gift bag as a personalized tag. It’s a sweet little touch that makes any present feel more special.
Create a gallery wall. If you have multiple kids or you’re a teacher sending crafts home, encourage families to display them together as a little gallery. Multiple years of handprint art side by side? Pure magic.

Why Handprint Crafts Are the Best Gift Every Time
Here’s the thing about store-bought gifts: they get used, worn out, or forgotten.
Handprint crafts don’t.
There’s something about seeing a child’s tiny handprint frozen in paint that hits differently than any gift with a price tag. It’s a snapshot of a specific moment – how small those hands were, how much the child wanted to do something nice for the person they love most.
Dads and grandpas keep these things. They save them in boxes, they stick them to the fridge, they pull them out years later and get a little misty-eyed. That’s not something you can buy at a store.
So grab the paint, spread out some newspaper on the kitchen table, and get messy together. The craft is the activity, the gift is the memory, and the handprint is the proof that this moment happened.
Happy crafting – and Happy Father’s Day to all the incredible dads out there! 🚀🐢⛳
More Father’s Day Ideas to Keep the Fun Rolling:
“High-Five for Dad!” – The Cutest Father’s Day Handprint Card Kids Can Make
8 Heartfelt DIY Gifts for the New Dad That He’ll Actually Love (And Keep Forever)
The Cutest Handprint Father’s Day Grill Card (Template Inside!)
DIY “I Love You This Much” Handprint Card – The Sweetest Father’s Day Gift Your Kids Can Make
The Sweetest Father’s Day Gift You Can Make With Your Kids (And It Costs Almost Nothing)
Reel Him In: How to Make a DIY Fishing Bobber Gift Basket for Father’s Day
DIY Mini Grill Father’s Day Gift Basket: The Cutest Backyard BBQ Surprise Dad Will Love
