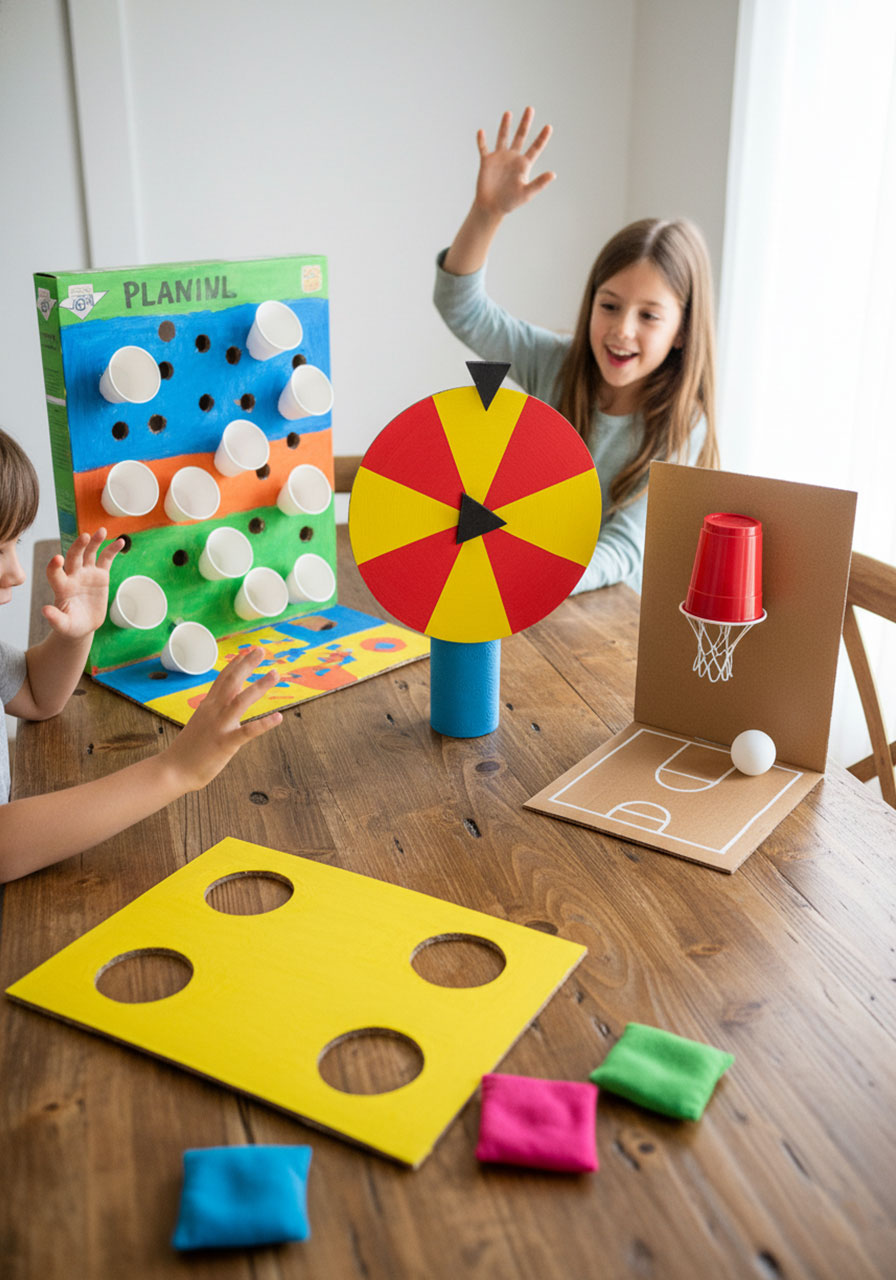
Looking for a party activity that keeps kids buzzing with excitement for hours? These DIY cardboard carnival games are your secret weapon! Not only will the kids have a blast building them, but they’ll be even more thrilled to play them. Get ready to turn your recycling bin into the ultimate party entertainment.
We’re talking real, working carnival games that cost next to nothing and deliver maximum fun. Whether you’re planning a birthday bash, organizing a classroom carnival, or just need a rainy-day activity that doesn’t involve screens, these games hit the bullseye every single time.
Why Your Kids Will Love This Challenge
Here’s the magic: kids get to be engineers AND party guests. They’ll design, build, decorate, and then compete with their creations. It’s the perfect blend of creativity, problem-solving, and pure fun. Plus, there’s something incredibly satisfying about playing a game you built with your own hands.
This works brilliantly as a solo rainy-day project, a family weekend activity, or a show-stopping group challenge for classrooms and birthday parties.


What You’ll Need to Get Started
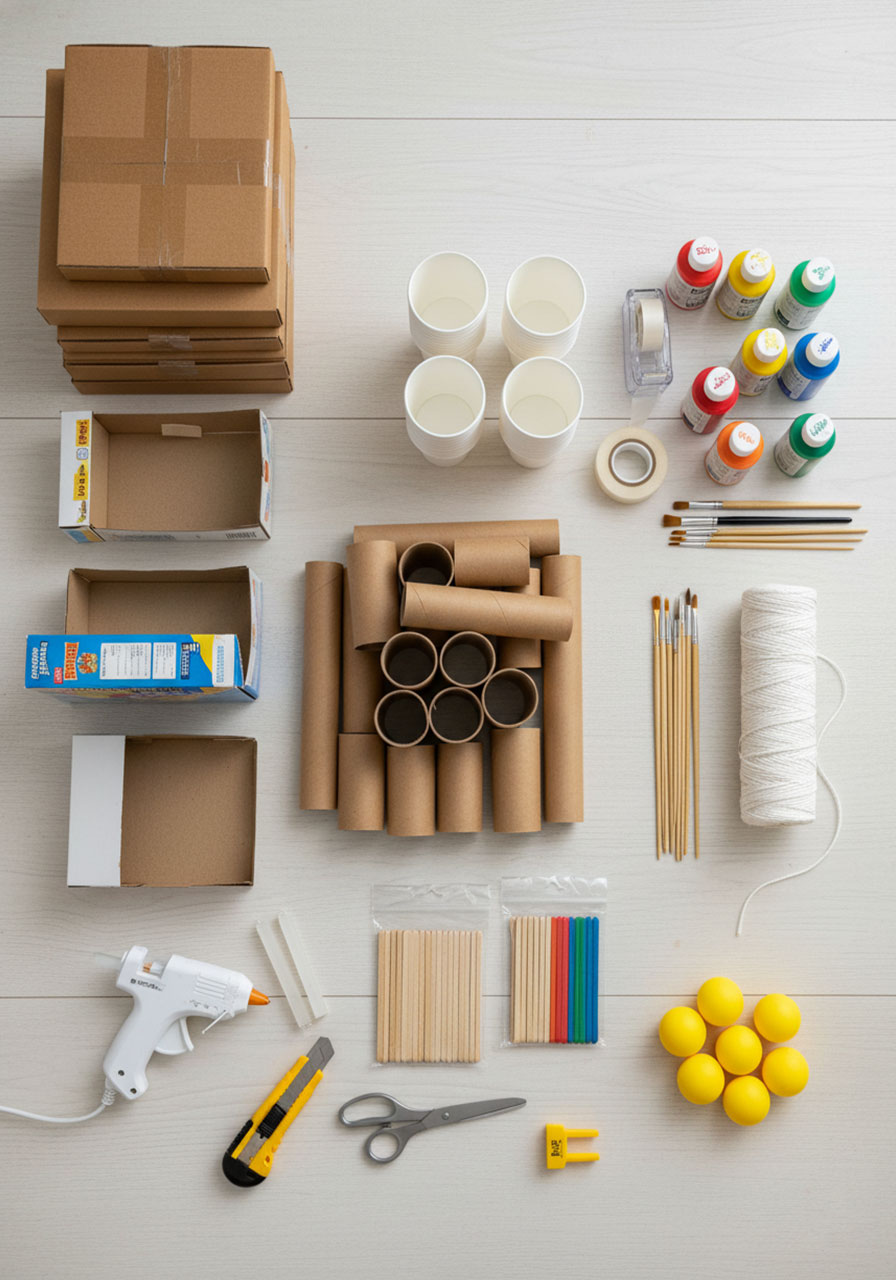
The beauty of this challenge? You probably have everything already! Here’s your supply checklist:
Essential Materials:
Cardboard boxes (shipping boxes, cereal boxes – raid that recycling bin!)
Paper towel and toilet paper rolls
Plastic or paper cups
Craft sticks or popsicle sticks
Bamboo skewers
String or twine
Hot glue gun (adult supervision required)
Clear tape and duct tape
Paint, markers, or construction paper for decorating
Game Supplies:
Ping pong balls
Small bean bags (or make your own!)
Felt (optional, for DIY bean bags)
Rice or beans (for filling bean bags)
Pro Tip: Set up a “maker station” with all supplies organized and ready to go. This keeps the creative energy flowing without constant interruptions to hunt for tape!
The Games Your Kids Can Build
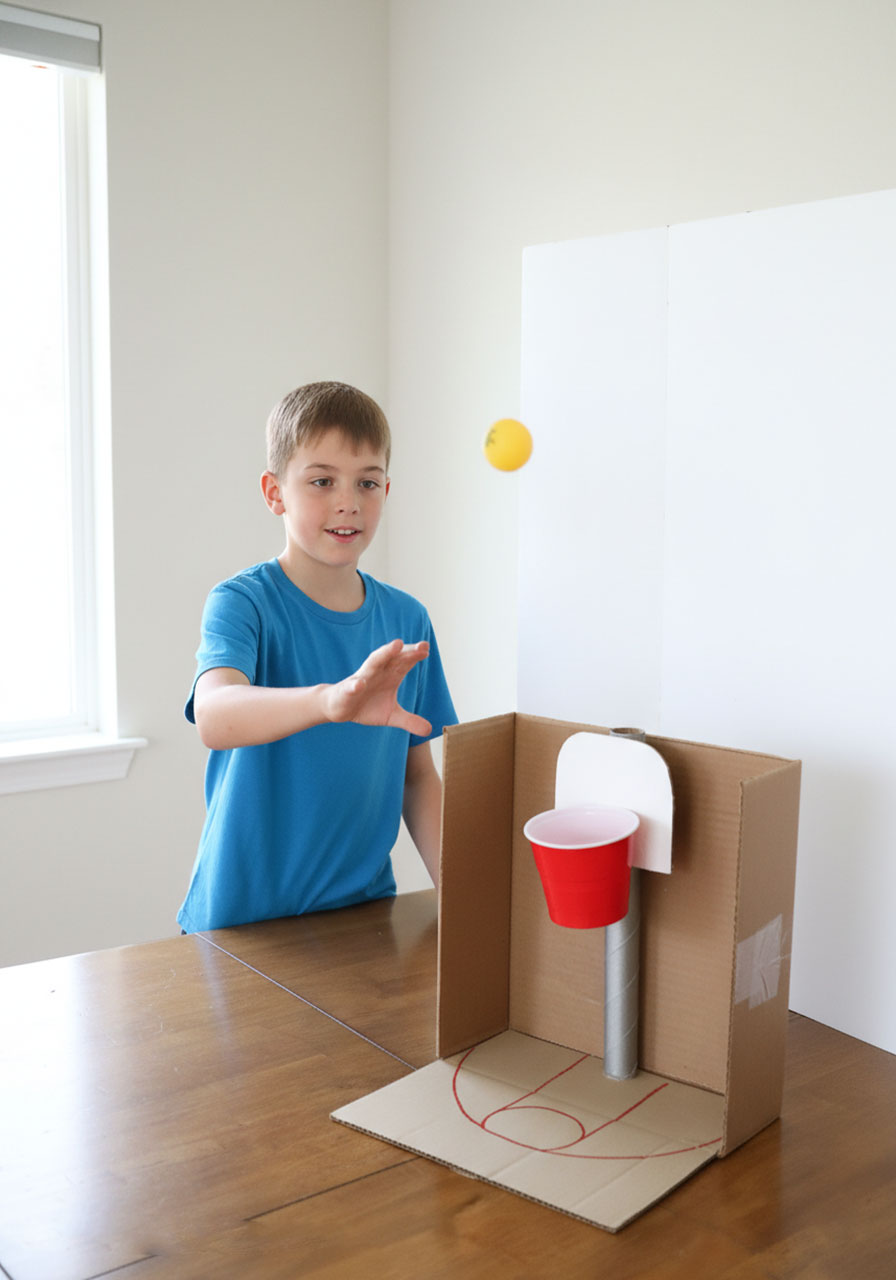
1. Ping Pong Basketball Challenge
Best for: Ages 6+, indoor or outdoor play
Build Time: 20-30 minutes
Difficulty: Easy
This miniature basketball court brings the arcade straight to your party! Kids can shoot hoops two ways – direct shots or epic table bounces.
How to Build It:
1. Create the basket: Cut the bottom off a plastic cup to make your hoop.
2. Build the post: Use a cardboard tube (like one from plastic wrap or paper towels) as your basketball post.
3. Make the backboard: Cut a rectangular piece from a cardboard box or food package.
4. Assemble: Hot glue the cup to the backboard, then attach the post behind it. Mount everything on a sturdy cardboard base so it stands upright.
5. Decorate: Paint it with team colors, add point values, or draw a basketball court design on the base.
How to Play:
- Stand 3-5 feet back and toss the ping pong ball into the basket
- Score bonus points for bouncing the ball off the table first
- Set a timer for 60 seconds and see how many baskets you can make
Game Variation: Create a three-point line farther back for older kids, or make multiple hoops at different heights for varying point values!
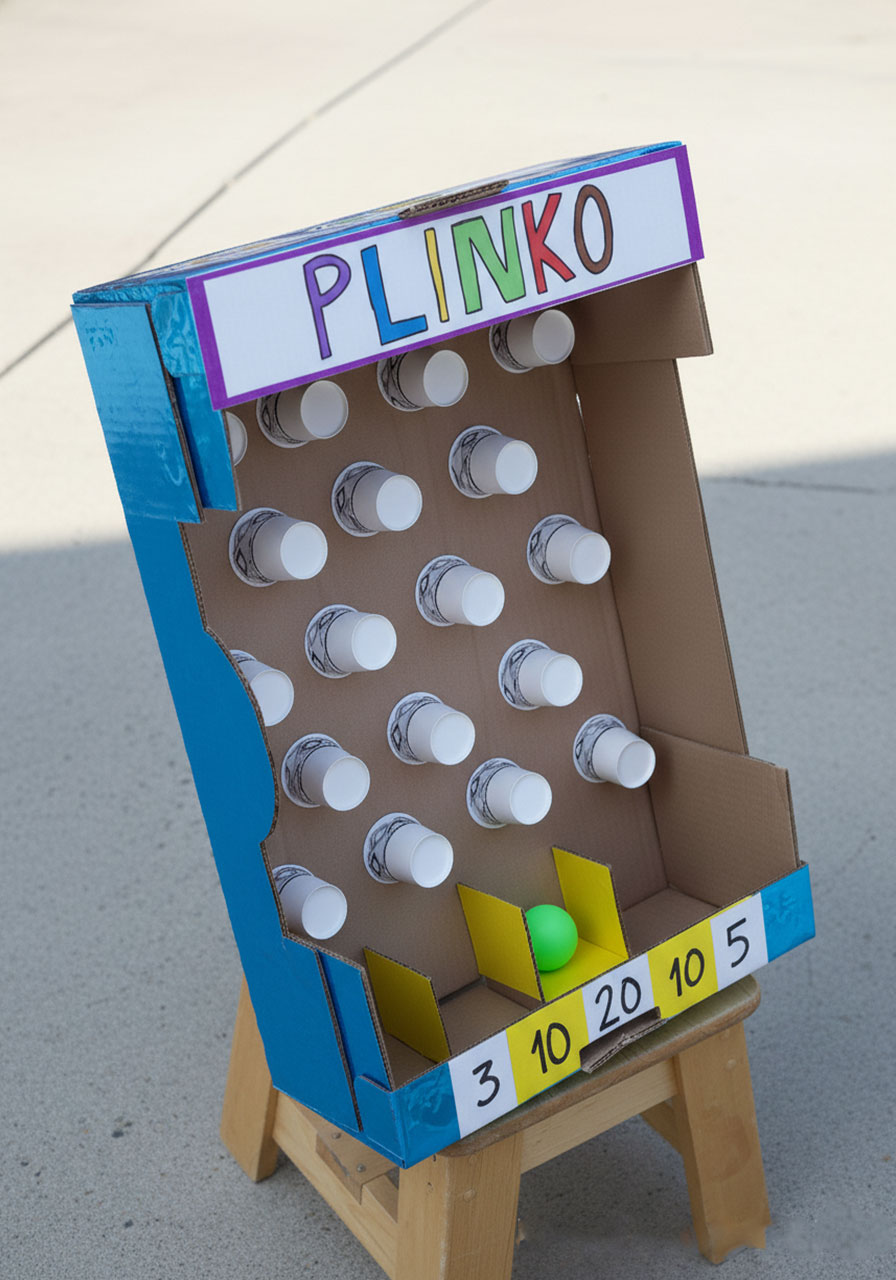
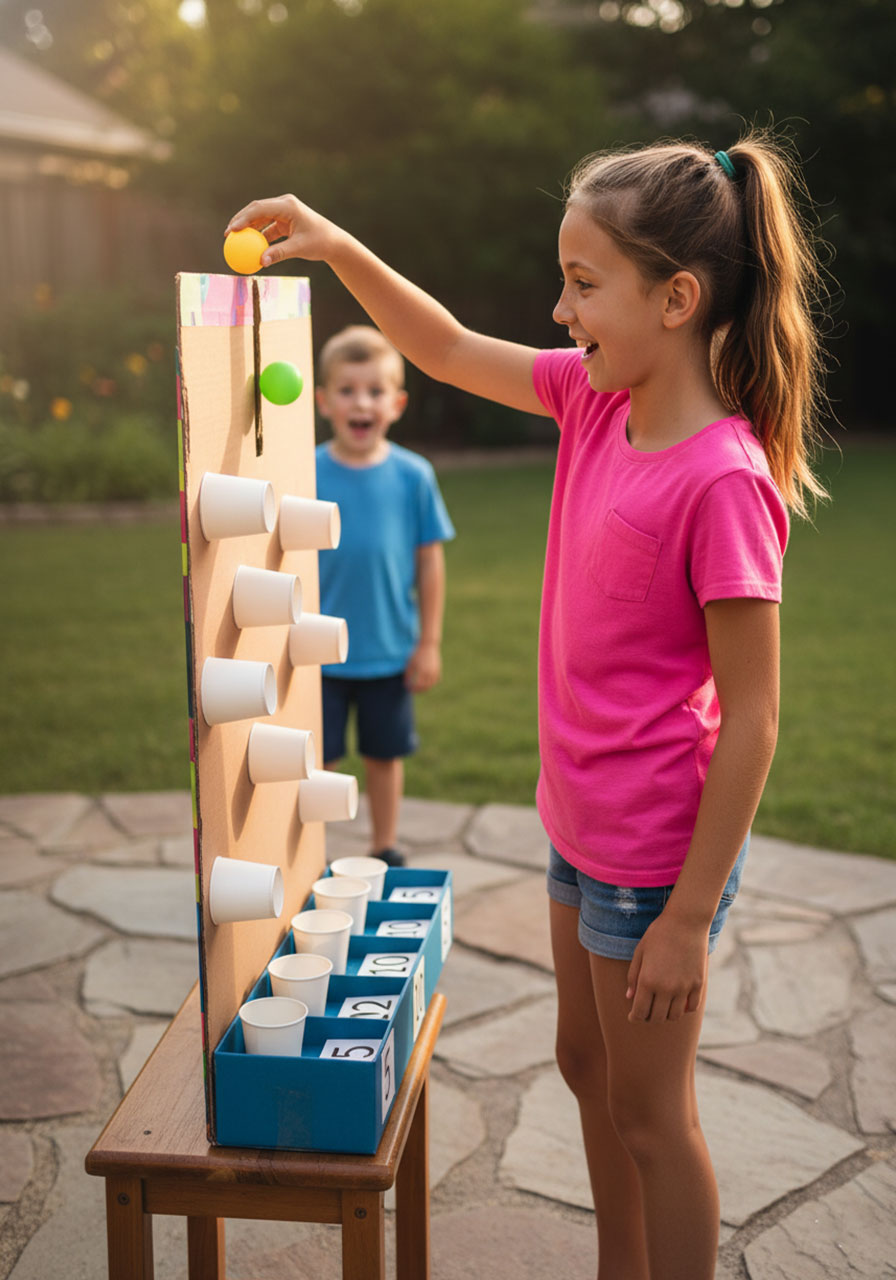
2. DIY Plinko Board
Best for: Ages 5+, all group sizes
Build Time: 30-45 minutes
Difficulty: Medium
Remember Plinko from The Price is Right? Now your kids can build their own! Watch that ping pong ball bounce its unpredictable path down to victory.
How to Build It:
1. Choose your box: Grab a large cardboard box (a Costco-sized box works perfectly).
2. Cut the drop zone: Remove a section from the top of the box to create an opening for dropping the ball.
3. Position the cups: Hot glue small paper cups to the inside front of the box in a staggered pattern. Space them about 2-3 inches apart so the ball can bounce between them but not get stuck.
4. Create prize compartments: Use the cardboard you cut from the top to make dividers at the bottom of the box. Label each compartment with different point values.
5. Decorate: Paint the box, add a colorful “PLINKO” sign, and number those bottom compartments (3, 10, 20, 5, etc.).
How to Play:
- Drop the ping pong ball through the top opening
- Watch it bounce off the cups on its way down
- Score points based on which compartment it lands in
- Play multiple rounds and keep a running total
Engineering Challenge: Have kids experiment with cup spacing. Too close together? The ball gets stuck. Too far apart? It drops straight down. Finding that sweet spot is part of the fun!
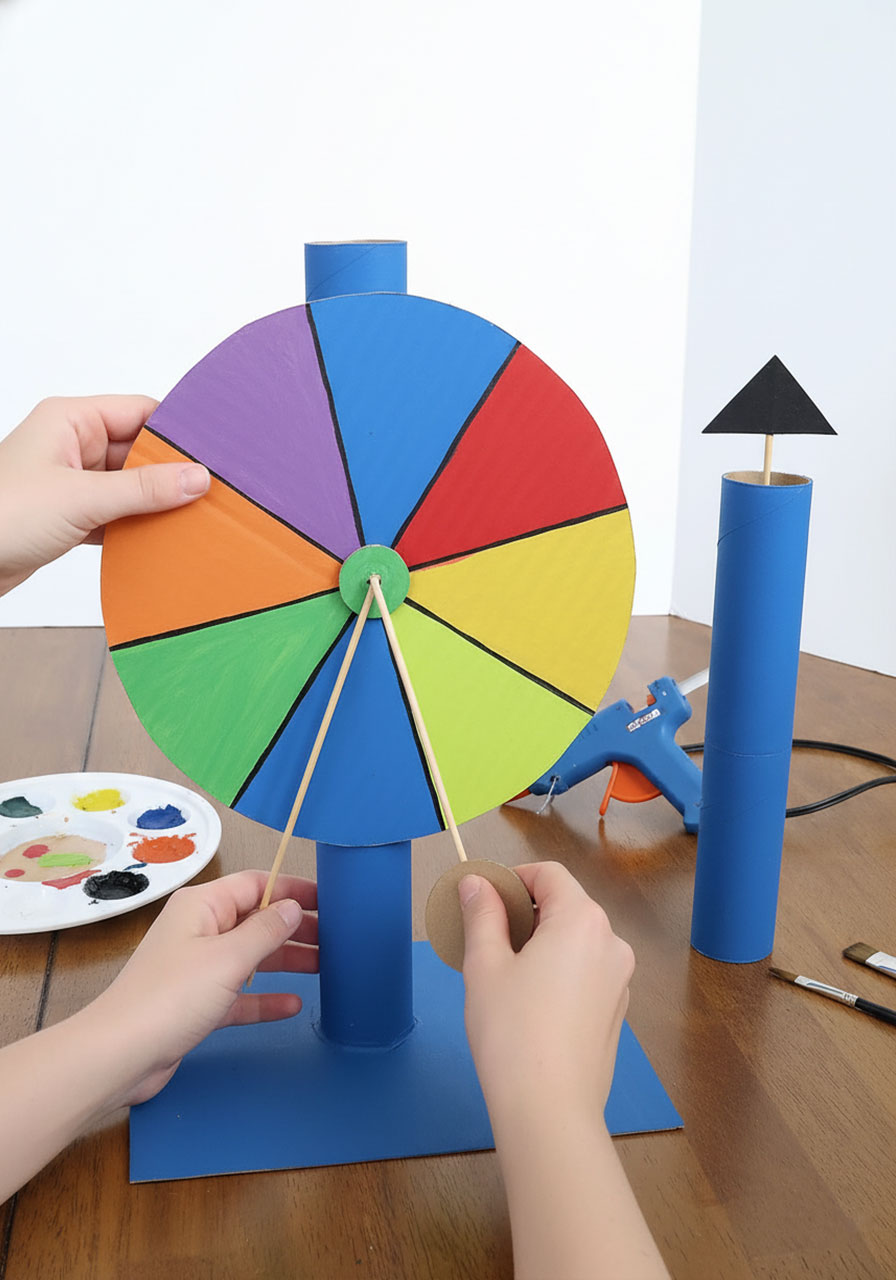
3. Spinning Prize Wheel
Best for: Ages 8+, great for parties
Build Time: 45-60 minutes
Difficulty: Advanced
This working spinner adds instant carnival vibes to any party! Kids love the satisfaction of seeing their engineering actually spin.
How to Build It:
1. Create the wheel: Cut a large circle from cardboard (trace a large plate or use a compass). Divide it into 8-10 equal wedges and paint each one a different color.
2. Build the base: Stack and glue two paper towel rolls together for height. Glue these to a sturdy cardboard base so everything stands stable.
3. Insert the axle: Push a bamboo skewer through the center of the wheel. This is your spinning axis.
4. Position the wheel: Insert the skewer through both paper towel rolls so the wheel can spin freely. Add a small circle of cardboard behind the wheel (glued to the skewer) to keep it from sliding off.
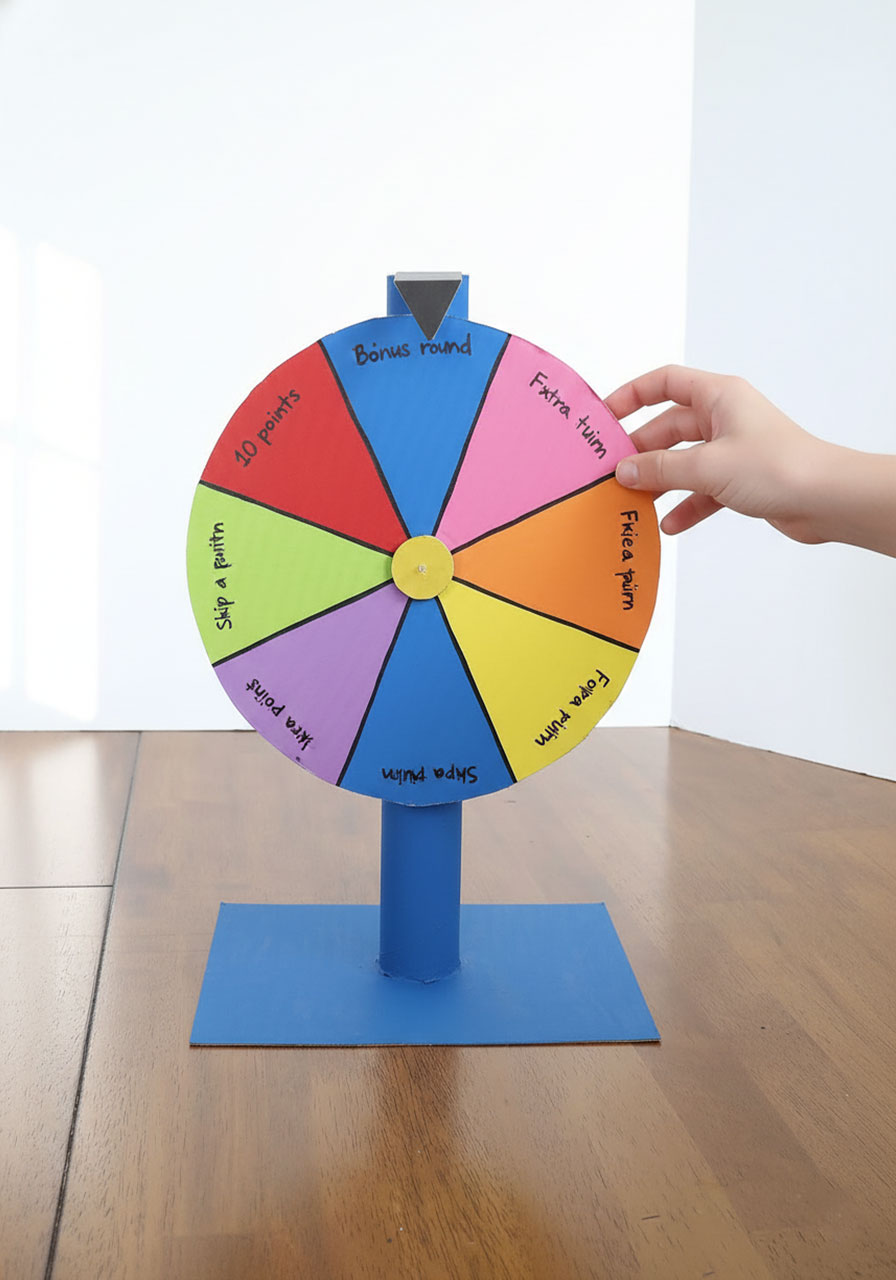
5. Add the pointer: Glue another paper towel roll vertically next to your spinner. Cut an arrow from cardboard and attach it to the top so it points at the wheel.
6. Secure it: Add a dab of hot glue on the skewer behind the upper paper towel roll to keep everything in place while still allowing the wheel to spin.
How to Play:
- Label each wedge with a prize, challenge, or point value
- Give it a spin and see where it lands
- Award prizes or assign challenges based on the result
Pro Tip: Test your wheel before decorating! Make sure it spins smoothly. If it’s too tight or wobbly, adjust the skewer position before committing to your design.
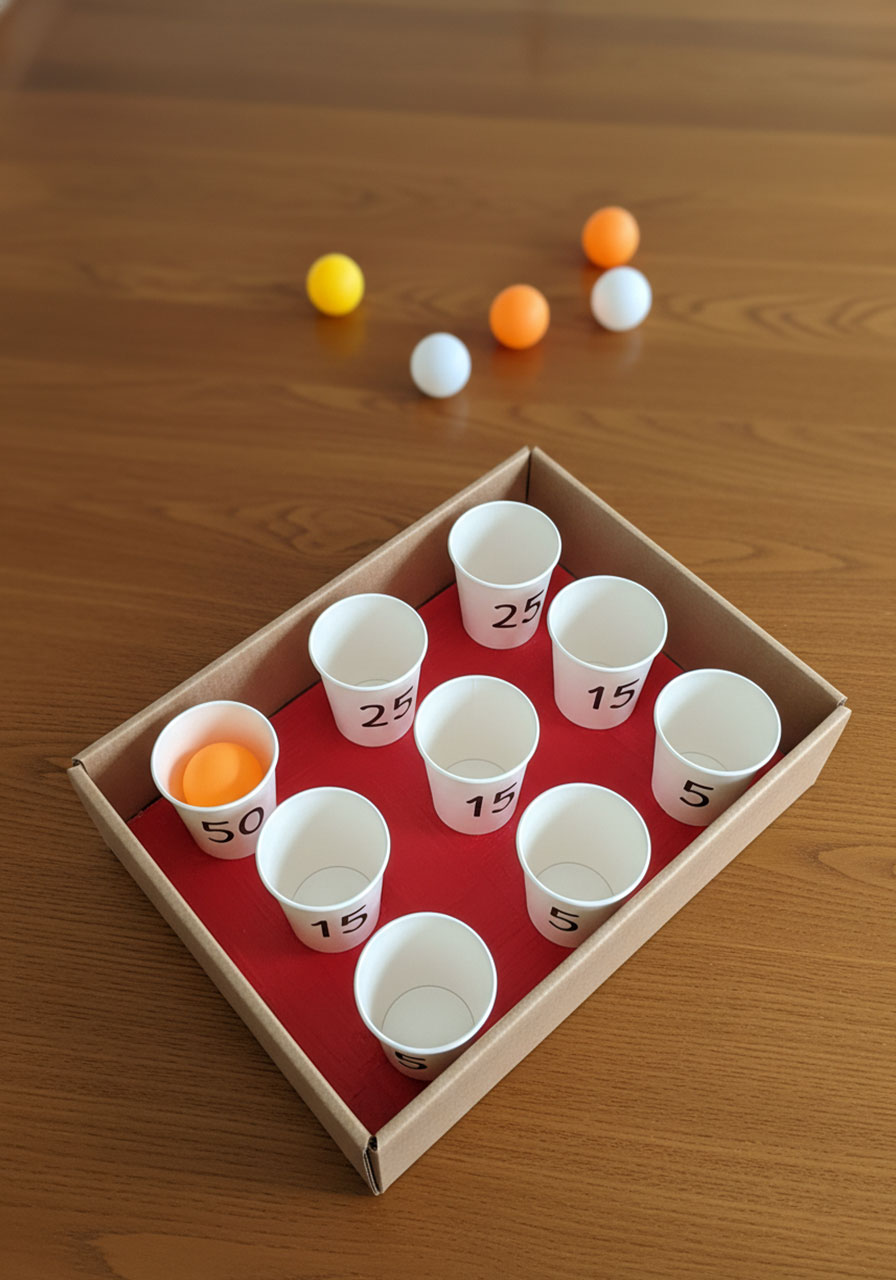
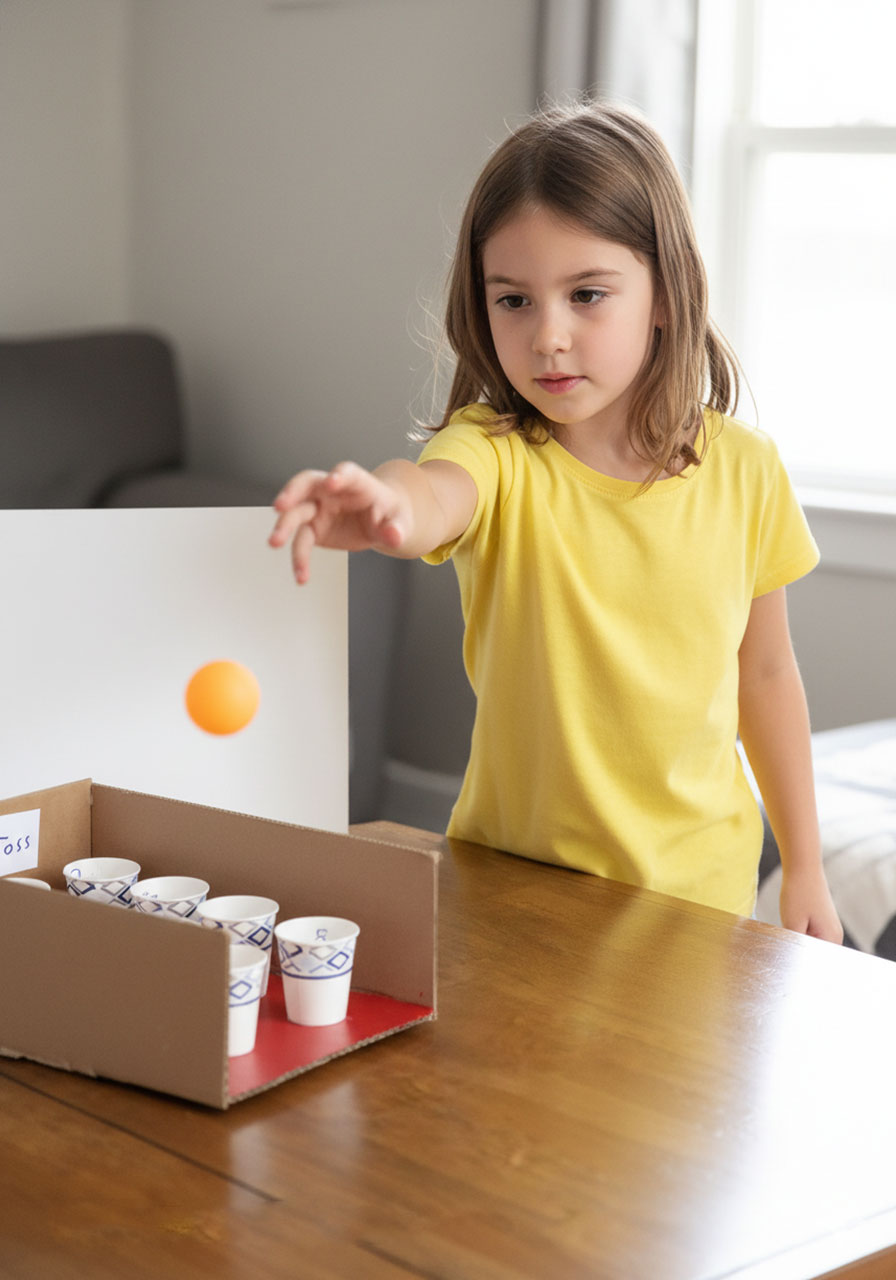
4. Cup Toss Carnival Game
Best for: Ages 5+, perfect for younger builders
Build Time: 15-20 minutes
Difficulty: Easy
This classic carnival game is super simple to build but endlessly fun to play. Kids can customize the point values and challenge levels however they want!
How to Build It:
1. Prep your box: Use a medium cardboard box and cut off any flaps so you have a clean, open rectangle.
2. Arrange the cups: Place paper or plastic cups inside the box in rows. Stagger them so they’re not too close together (leave about 1-2 inches between cups).
3. Secure them: Hot glue each cup in place so they won’t tip over during gameplay.
4. Add point values: Write different numbers on each cup with a marker. Make the cups in harder-to-reach spots worth more points!
5. Decorate: Paint the inside of the box a bright color to make your cups pop.
How to Play:
- Stand 4-6 feet away from the box
- Toss ping pong balls, trying to land them in the cups
- Option 1: Throw directly into the cups
- Option 2: Bounce the ball off the table first (way harder, worth more points!)
- Add up your points after 10 throws
Game Variation: For younger kids, move closer to the box. For an extra challenge, create a “speed round” where players have 30 seconds to land as many balls as possible!
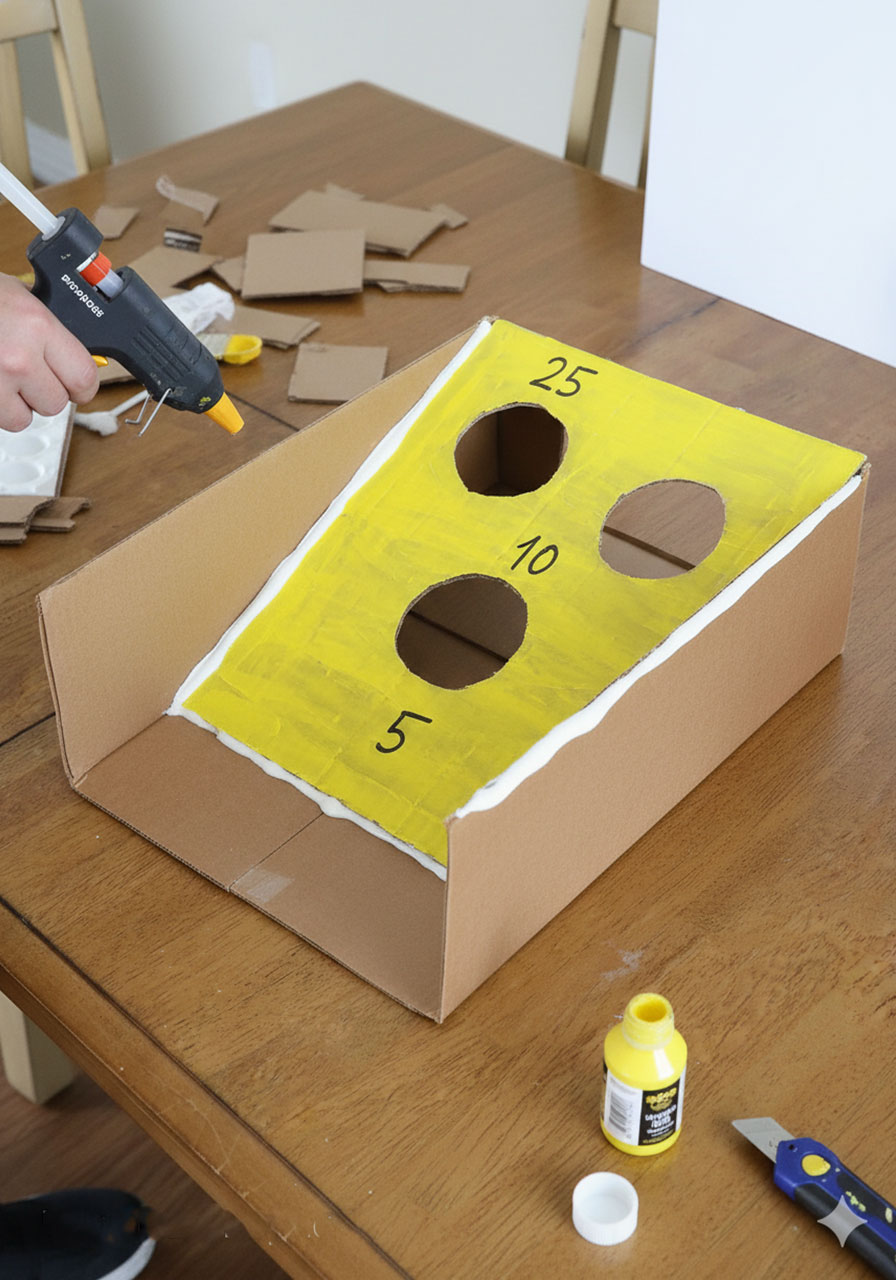
5. Bean Bag Toss (Mini Cornhole)
Best for: Ages 4+, ideal for younger kids
Build Time: 30 minutes (plus bean bag making)
Difficulty: Easy
This kid-friendly version of cornhole is perfect for little ones who want to build something awesome with a bit of help from a grown-up.
How to Build the Game Board:
1. Prepare the box: Remove the top flaps from a cardboard box.
2. Create the angle: Cut another piece of cardboard to fit inside the box at an angle, like a ramp. Hot glue it securely in place.
3. Cut the holes: Have an adult use an X-Acto knife or box cutter to cut 2-3 circular holes in the angled board. Vary the sizes for different difficulty levels.
4. Decorate: Let kids go wild with paint! Bright colors, fun patterns, whatever makes them happy.
5. Label the holes: Add point values around each hole.
How to Make No-Sew Bean Bags:
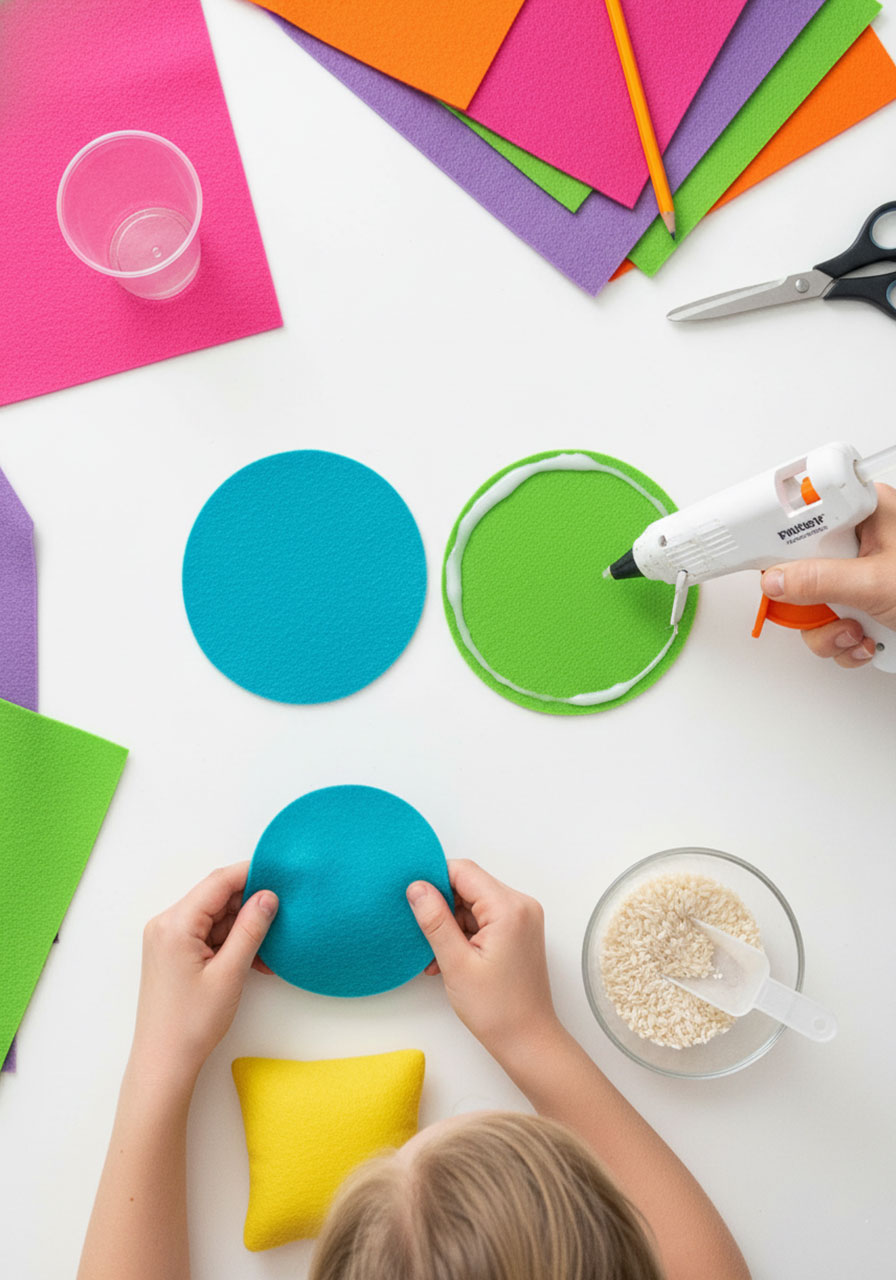
1. Cut felt circles: Use a small plastic cup to trace circles on felt. You’ll need two circles per bean bag.
2. Glue the edges: Place a line of hot glue around the edge of one circle, leaving a small opening.
3. Fill it up: Pour rice or dried beans through the opening.
4. Seal it: Add glue to close up that final gap.
5. Make several: Create 4-6 bean bags in different colors.
How to Play:
- Stand 5-8 feet from the board (adjust based on age)
- Toss bean bags, aiming for the holes
- Score points based on which hole you hit
- The smaller the hole, the more points it’s worth!

Pro Tip: Match your bean bag size to your hole size! Too-big bean bags won’t fit through, and too-small ones make it almost impossible to score.
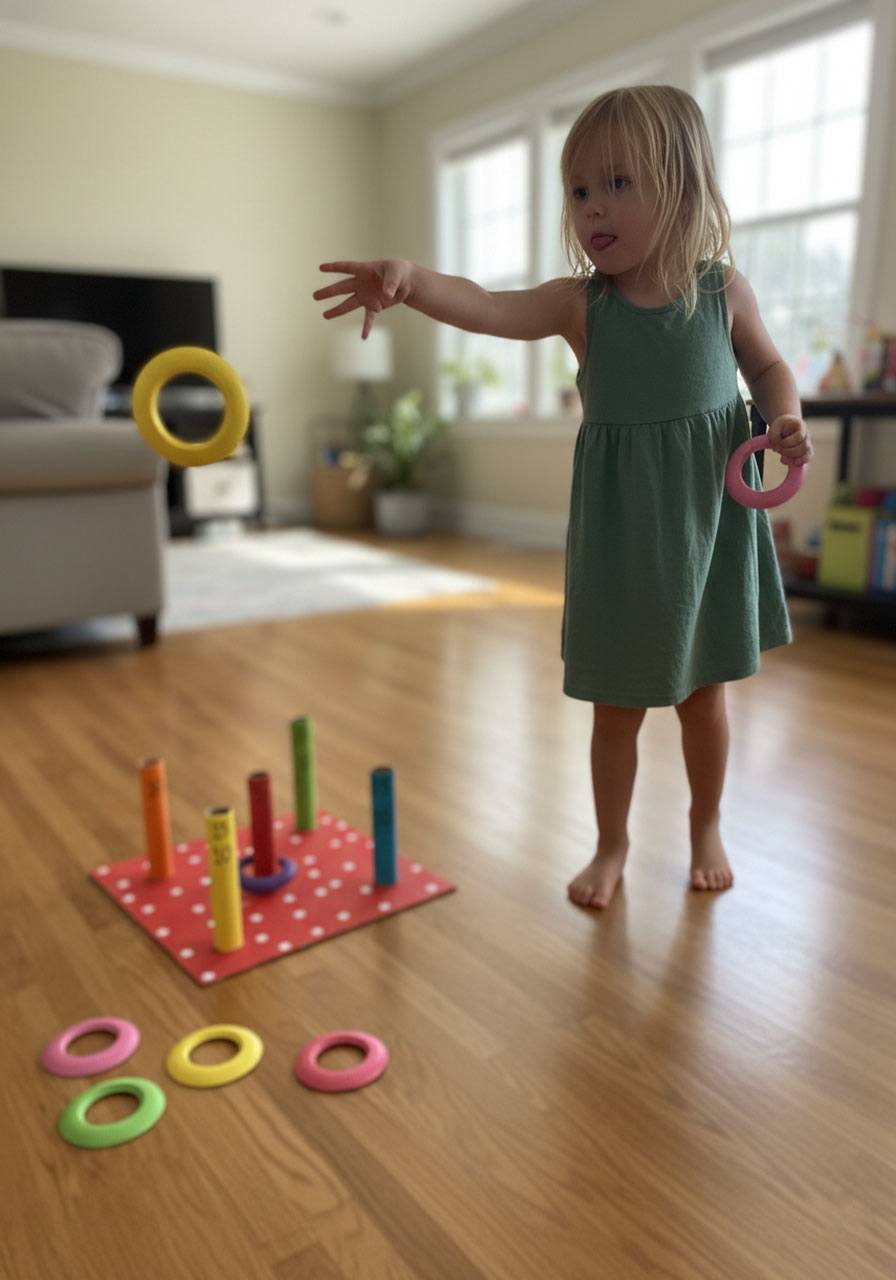
6. DIY Ring Toss Challenge
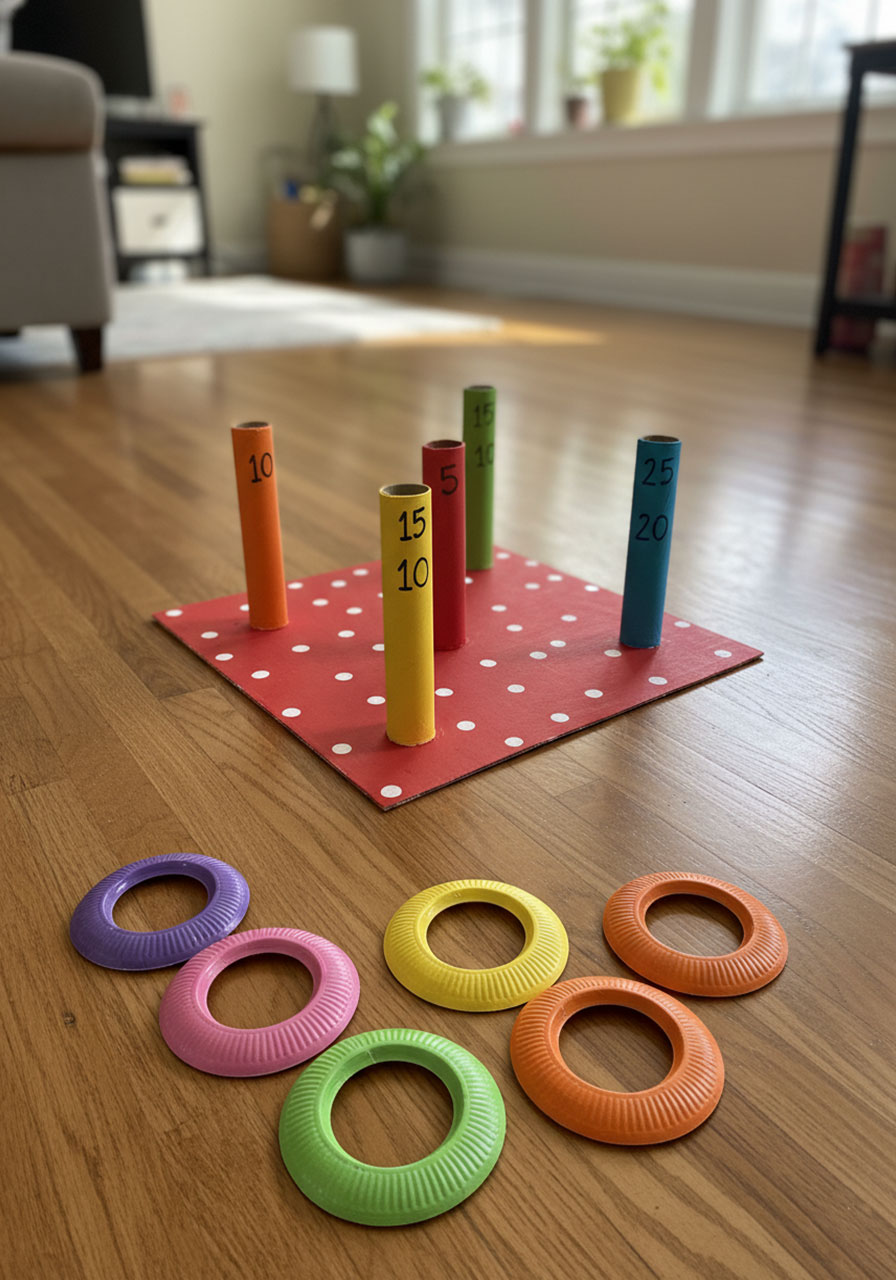
This classic carnival game is easier to make than you think! All you need are paper plates and paper towel rolls, and you’ve got hours of tossing fun.
Best for: Ages 4+, all group sizes
Build Time: 30-40 minutes
Difficulty: Easy
How to Build It:
Make the Posts:
1. Gather 5 paper towel rolls (or combine toilet paper rolls for shorter posts – glue two together for each post).
2. Paint each roll a different bright color (red, orange, yellow, green, blue work great).
3. Create the base: Cut a sturdy cardboard square 24×24 inches. Paint it a solid color or add fun designs like polka dots or stripes.
4. Position the posts: Arrange posts in an X pattern – one in the center, four in the corners about 8 inches from center. Hot glue each post securely to the base.
5. Add point values: Write numbers on each post (5, 10, 15, 20, 25) with permanent marker, with the center post worth the most points.
Make the Rings:
1. Start with paper plates (9-inch diameter standard dinner plates work perfectly).
2. Trace an inner circle: Use a smaller 7-inch plate or bowl to trace a circle in the center of each paper plate.
3. Cut out the center: Carefully cut along the traced line, leaving a 1-inch wide ring all around.
4. Paint your rings: Use bright acrylic paint or markers to decorate. Make 6-8 rings in different colors.
5. Let dry completely before playing.
How to Play:
- Stand 6-8 feet back from the game (adjust based on age and skill)
- Toss rings underhand, trying to land them around the posts
- Score points based on which post you ring
- Each player gets 5 tosses per round
- Highest score after 3 rounds wins!
Pro Tip: If your rings are too light and flutter in the air, glue two paper plate rings together to add weight and stability. This makes them fly straighter!
7. Nerf Target Shooting Gallery
Transform cardboard into an awesome target range! This game is perfect for kids who love Nerf battles and want to test their aim.
Best for: Ages 6+, outdoor or garage play
Build Time: 45-60 minutes
Difficulty: Medium
How to Build It:
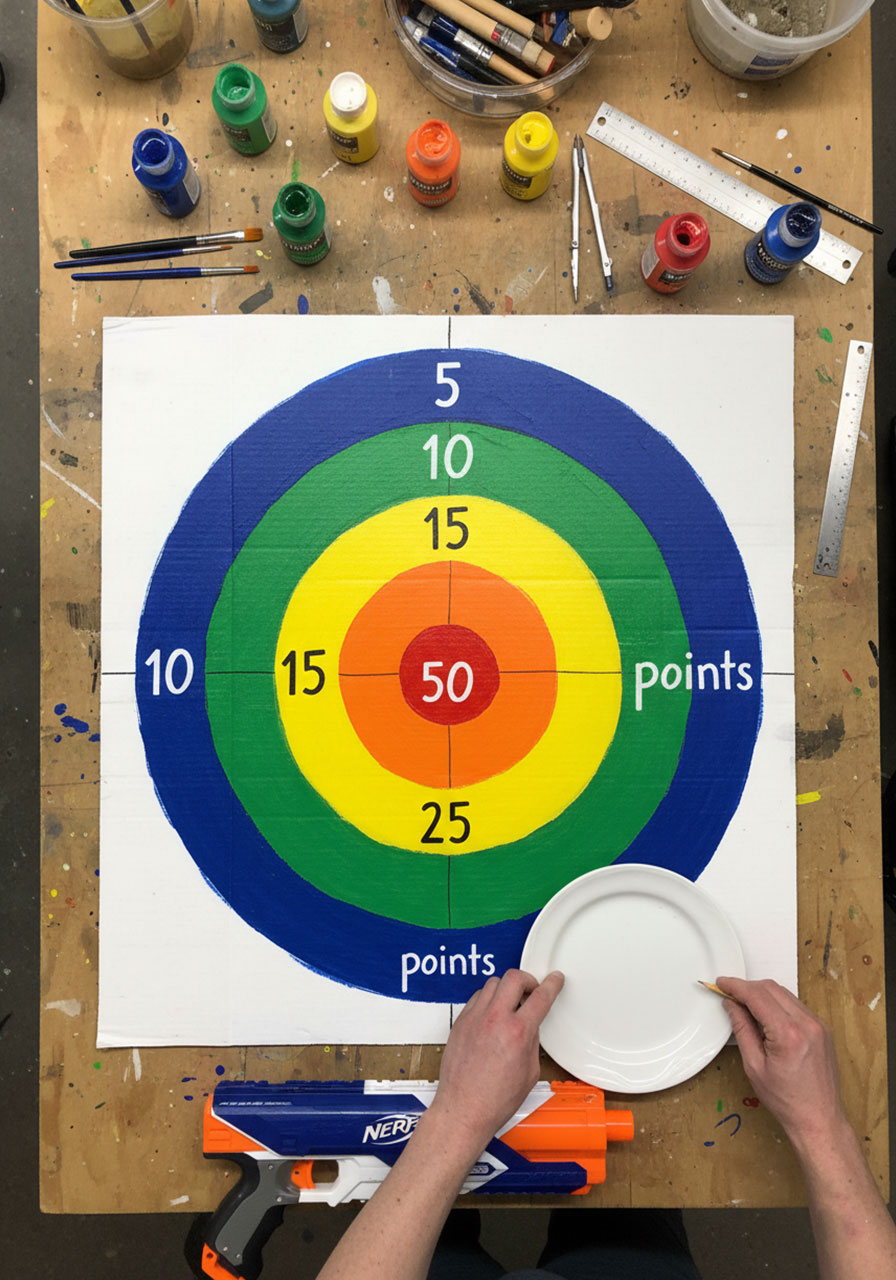
Create a Bulls-Eye Target:
1. Cut a large cardboard square 30×30 inches from a shipping box.
2. Paint the background white or light gray as your base.
3. Draw concentric circles using dinner plates, bowls, and cups as stencils:
- Outermost circle: 28-inch diameter (blue) = 5 points
- Second circle: 22-inch diameter (green) = 10 points
- Third circle: 16-inch diameter (yellow) = 15 points
- Fourth circle: 10-inch diameter (orange) = 25 points
- Center circle: 4-inch diameter (red) = 50 points
4. Label each ring clearly with point values in contrasting colors.
5. Create a stand: Cut two cardboard triangles and glue them as easel legs on the back, or prop against a fence.
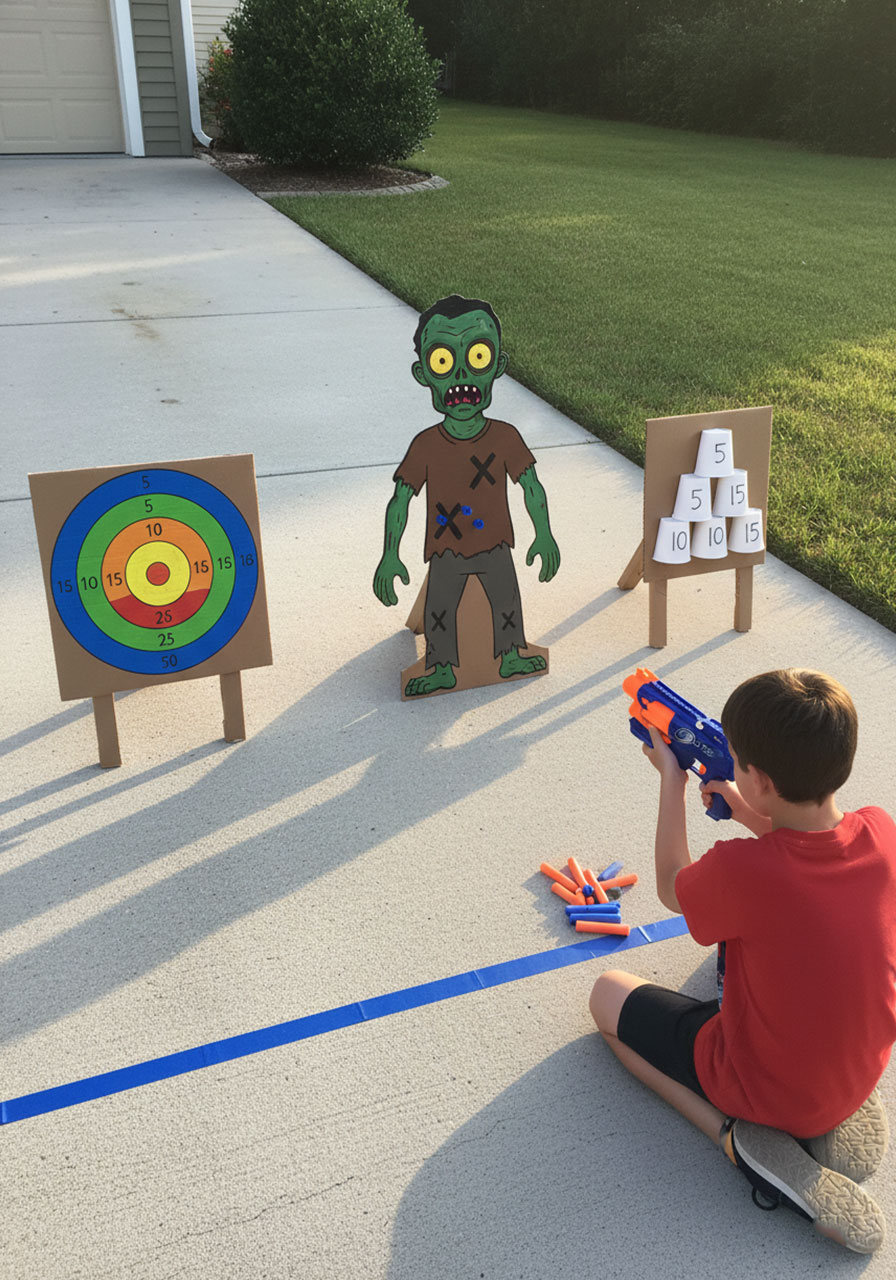
Build Bonus Target Variations:
- Cup Pyramid: Attach 6 paper cups in pyramid formation (3-2-1) to cardboard backing. Hit a cup to knock it down!
- Zombie Attack: Cut cardboard into zombie shape, mark hit zones on head and chest
- Moving Target: Hang small cardboard circles from string at varying heights
How to Play:
- Mark a throwing line 12-15 feet from targets with tape
- Each player gets 6 foam darts per round
- Hit targets to score points based on zones
- Bonus: Hit the 50-point bulls-eye three times in a row for a “sharpshooter” prize!
Safety First: Always use Nerf foam darts (never sharp objects), set up in an open area away from breakables, and make sure all players stand behind the throwing line when someone is shooting. Adult supervision required!
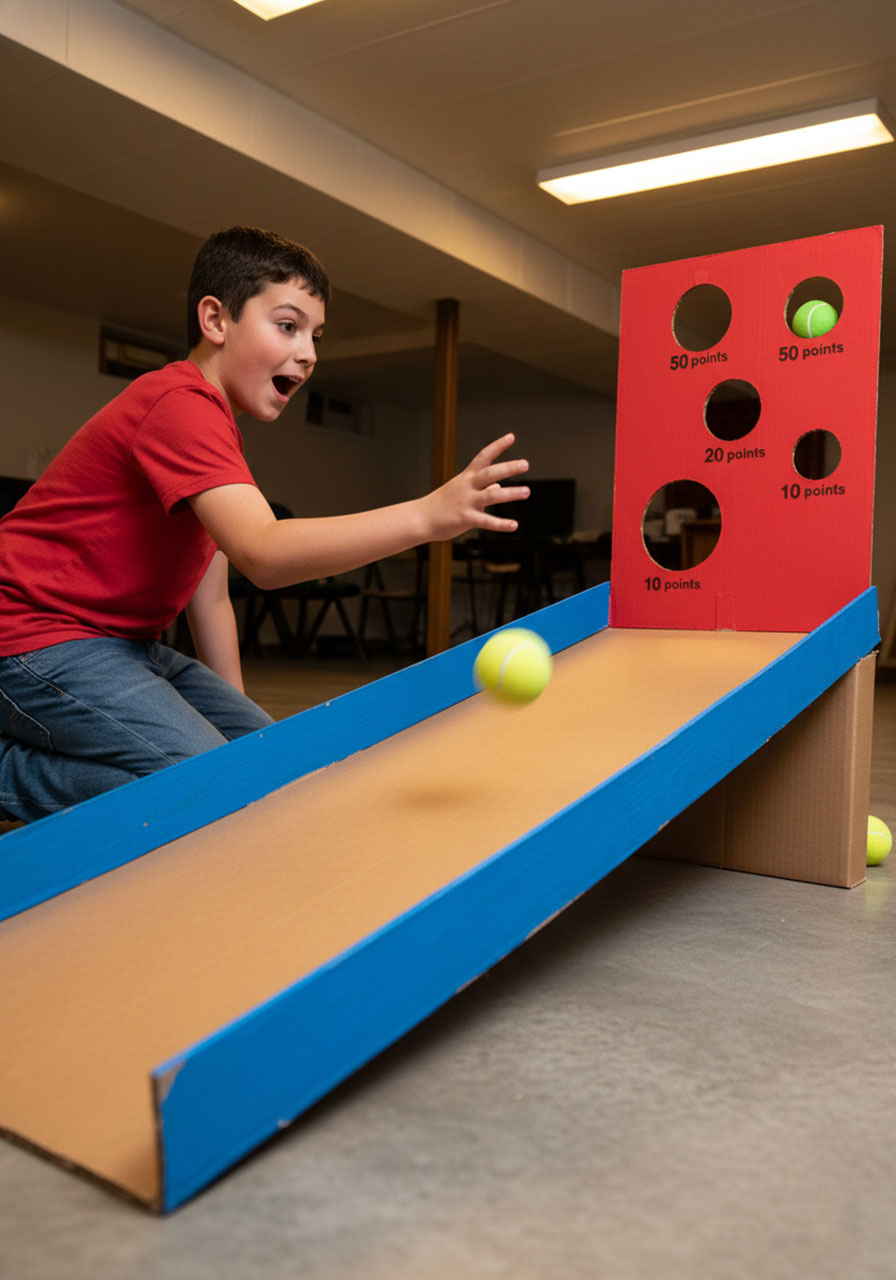
8. DIY Skee Ball Ramp
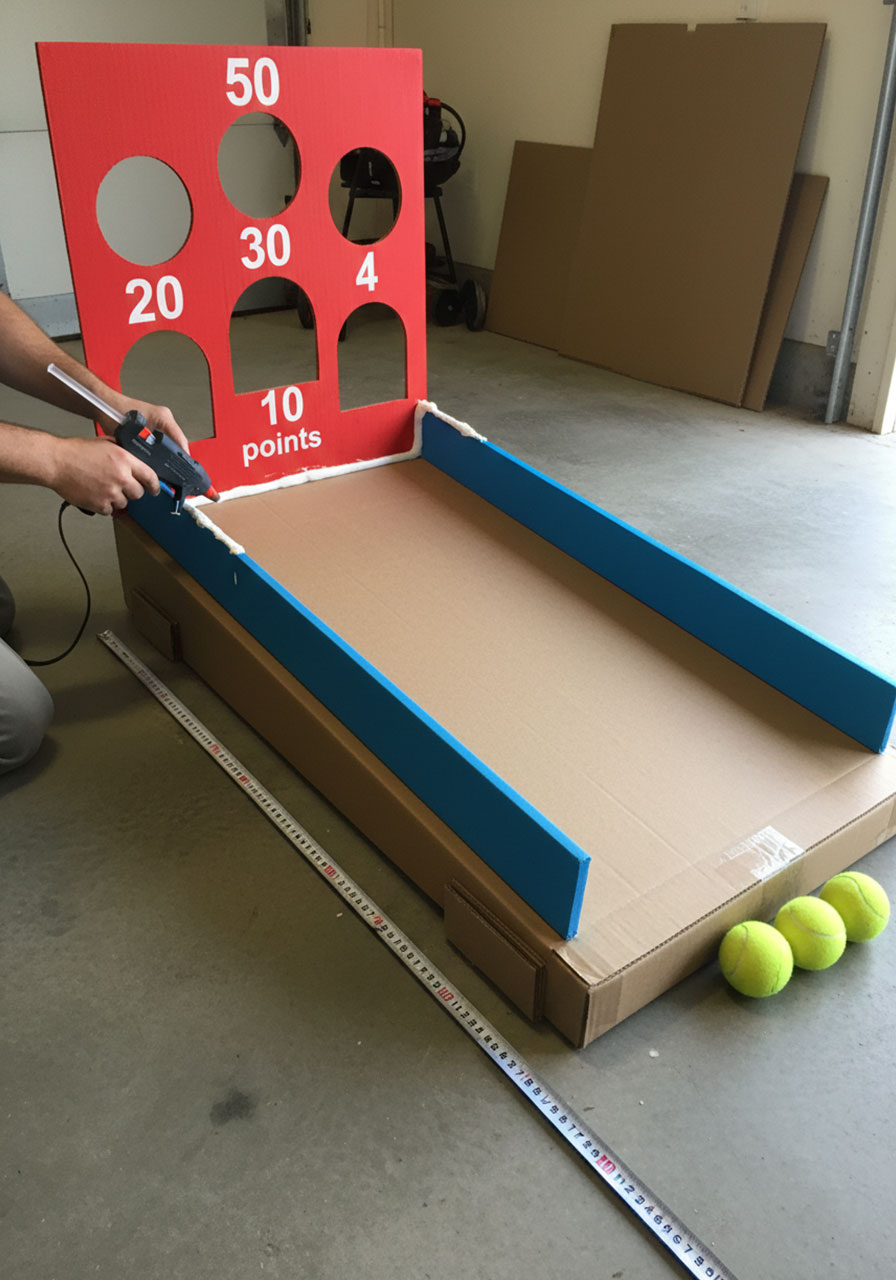
Bring the arcade home with this impressive cardboard skee ball game! It looks complicated but is actually straightforward to build.
Best for: Ages 7+, needs floor space
Build Time: 60-90 minutes
Difficulty: Advanced
How to Build It:
1. Create the ramp surface: Use a large flattened cardboard box (moving boxes work great) about 48 inches long and 30 inches wide.
2. Build the side walls: Cut two strips of cardboard 48 inches long x 6 inches tall. Hot glue these along both long edges of your ramp to create a channel for the ball.
3. Add the incline: Stack cardboard pieces or wooden blocks under the top end of the ramp to elevate it 8-10 inches, creating about a 15-degree angle.
4. Construct the scoring backdrop: Cut cardboard 30 inches wide x 24 inches tall. This goes at the top of your ramp.
5. Cut scoring holes: Create 4 arch-shaped openings in the backdrop, stacked vertically:
- Bottom (largest): 8 inches wide = 10 points
- Second: 6 inches wide = 20 points
- Third: 4 inches wide = 30 points
- Top (smallest): 2 inches wide = 50 points
6. Create catching pockets: Attach small cardboard boxes behind each hole to catch the balls.
7. Paint and decorate: Use bright colors like red, yellow, and blue. Add racing stripes or carnival designs!
8. Secure everything: Make sure the ramp angle is stable and won’t shift during play.
How to Play:
- Players stand at the bottom of the ramp
- Roll tennis balls or bouncy balls up the ramp
- Try to land the ball in the scoring holes at the top
- Smaller holes = harder to hit = more points!
- Each player gets 5 balls per round
Pro Tip: The ramp angle is critical! Too steep and balls roll back down. Too flat and they won’t reach the top. Test with a tennis ball and adjust the height until balls consistently reach the scoring area with a good roll.
9. Magnetic Fishing Pond
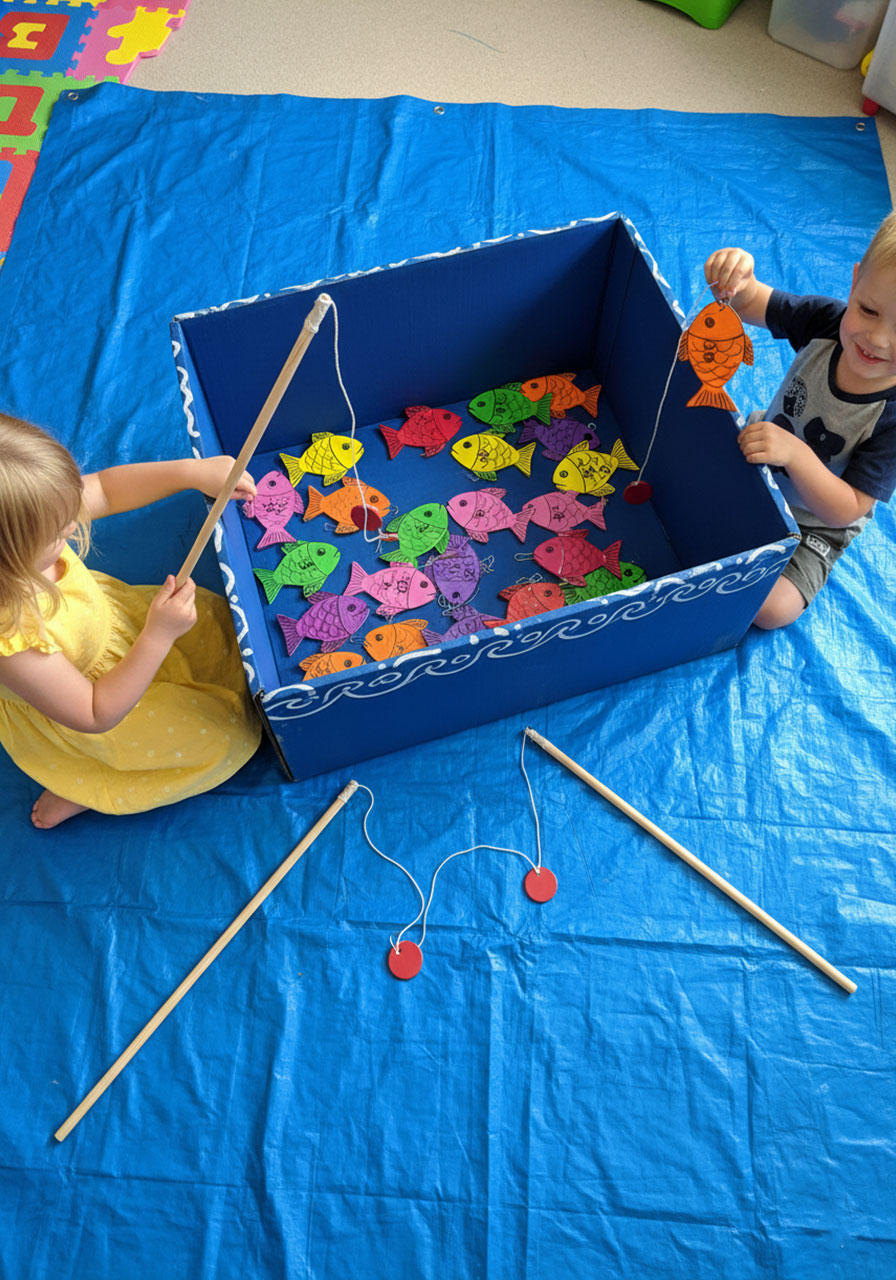
This adorable game is perfect for younger kids and creates that classic carnival fishing experience!
Best for: Ages 3+, quiet indoor play
Build Time: 45 minutes
Difficulty: Easy
How to Build the Pond:
1. Prepare the pond box: Use a large cardboard box (at least 24x18x10 inches). A moving box or appliance box works great.
2. Paint it ocean blue: Cover the inside and outside with blue paint. Add white wave designs around the rim for extra fun.
3. Optional decoration: Add painted seaweed, coral, or sea creatures to the sides.
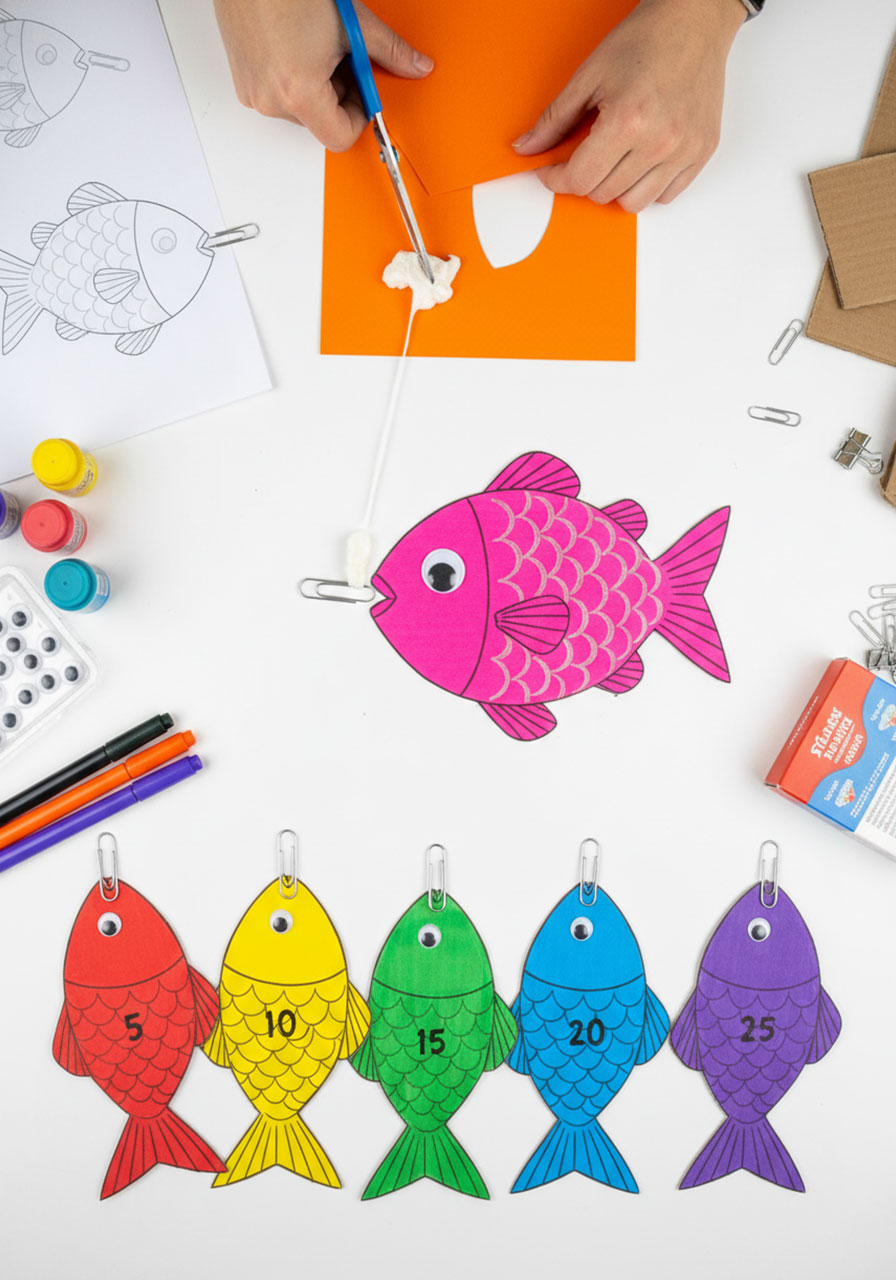
Make the Fish:
1. Create fish templates: Draw simple fish shapes 6-8 inches long on cardboard. Make them chubby so they’re easy for little hands to see.
2. Cut out 15-20 fish from colorful cardboard or construction paper glued to cardboard for sturdiness.
3. Decorate each fish: Paint bright colors, add scales with marker, glue on googly eyes (so fun!).
4. Add the “catch mechanism”: Hot glue a large paper clip (2 inches) to the nose/mouth area of each fish. The paper clip should stick out slightly.
5. Number the fish: Write point values 5-25 on the fish bodies. Make rarer colors worth more points!
Build the Fishing Poles:
1. Start with a wooden dowel 24-30 inches long (or use a sturdy stick from the yard).
2. Attach the fishing line: Tie kitchen twine or string to one end, about 3 feet long.
3. Add the magnet: Tie a circular magnet (1-inch diameter) to the end of the string. Secure with hot glue to prevent it from slipping off.
4. Test it: Make sure the magnet is strong enough to pick up a fish with the paper clip attached.
5. Paint the pole (optional) to match your color scheme.
How to Play:
- Place all fish in the “pond” scattered around
- Players sit or kneel around the box edge
- Lower your magnetic line into the pond
- When the magnet connects with a paper clip, slowly lift your catch!
- Score points based on the fish you caught
- Play until all fish are caught, or set a time limit of 3 minutes per player
Game Variation: Add special “prize fish” in gold or silver that earn bonus points or win a special prize. Or create a “trash” item (like a painted boot or tin can) that subtracts points if you catch it!
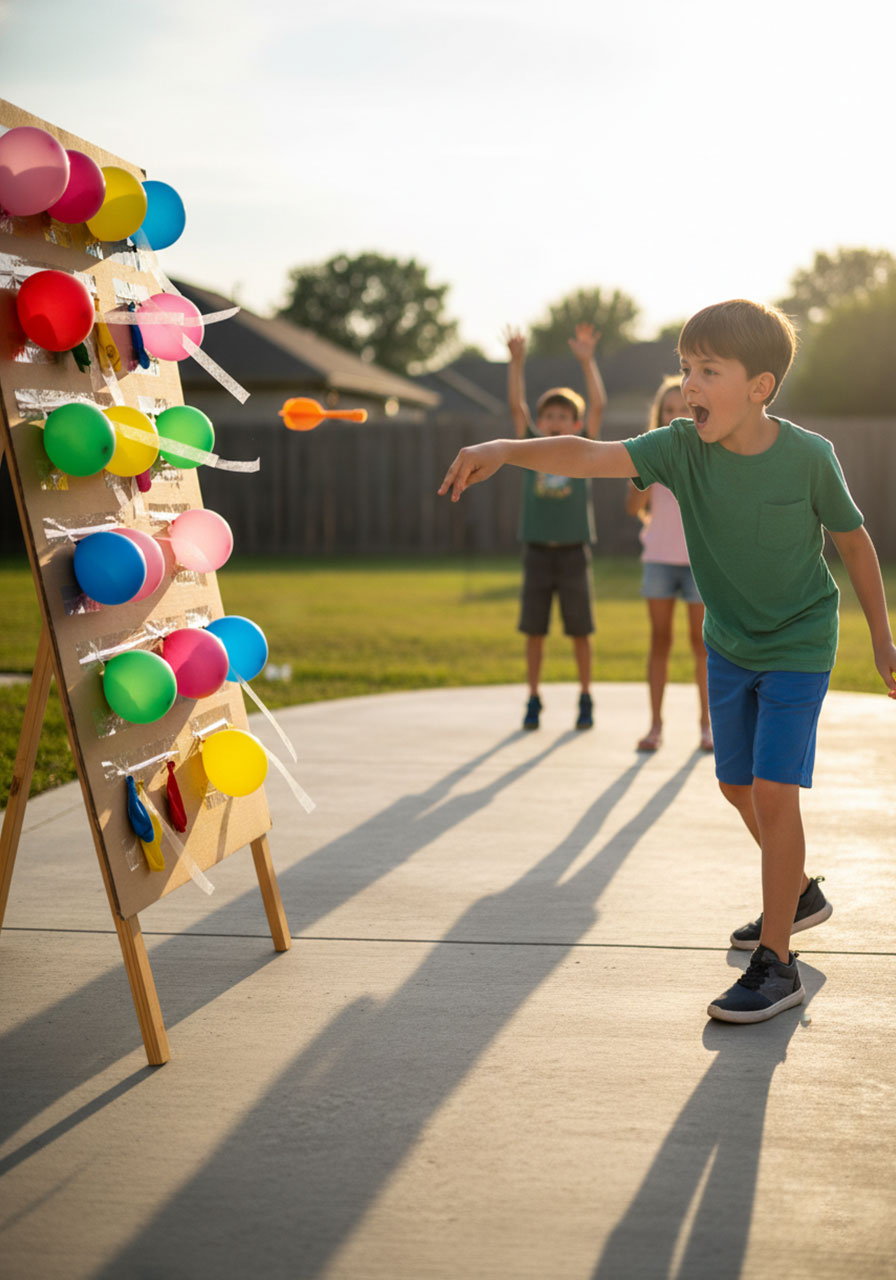
10. Balloon Pop Dart Toss (Safety Version)
This classic carnival game gets a kid-friendly makeover! We’re using safe foam darts instead of sharp ones to keep everyone happy and uninjured.

Best for: Ages 8+ with adult supervision
Build Time: 20 minutes
Difficulty: Easy (but requires safety precautions)
How to Build It:
1. Create the backing board: Use a large cardboard sheet 36×48 inches (appliance box sides work perfectly). You can also use foam board from a craft store for a sturdier base.
2. Mount it securely: Prop against a wooden easel, fence, or attach to a sturdy frame so it stands vertically. Make sure it won’t tip over!
3. Inflate balloons: Blow up 20-25 balloons to about 6-7 inches diameter (not fully inflated – this makes them easier to pop and less likely to fly off when hit).
4. Attach balloons safely: Use clear packing tape to secure each balloon. Place a strip of tape across the balloon’s widest part (like its “equator”) and press firmly to cardboard. The balloon should be held securely but still pop-able.
5. Arrange in rows: Create a grid pattern with 4-5 rows of 5 balloons each. Leave small gaps between balloons.
6. Add point values: Slip small index cards behind balloons showing different point values (5, 10, 15, 20, 25). Use different colors for different values!
7. Mark the throwing line: Use painter’s tape to mark a line on the ground 10-12 feet from the board.
How to Play:
- Each player gets 3 foam darts (use Velcro-tipped foam darts or soft magnetic tip darts – NOT sharp-tipped darts!)
- Stand behind the throwing line
- Throw darts at balloons trying to pop them
- When a balloon pops, you score the points hidden behind it
- After 3 throws, add up your score
- Replace popped balloons between players to keep the game going
Critical Safety Rules:
⚠️ Adult supervision required at all times
⚠️ Use ONLY foam-tipped, Velcro-tipped, or magnetic-tipped darts – never use sharp darts with kids
⚠️ Set up outdoors or in a garage – never in small indoor spaces
⚠️ All spectators must stand behind the thrower
⚠️ Players must wait until all darts have been thrown before approaching the board to collect them
⚠️ Check darts before use – discard any with damaged tips
Safer Alternative: Instead of darts, use small bean bags or velcro balls! Attach velcro strips to the balloons and use velcro balls. This makes it perfect for younger kids with zero safety concerns.
Pro Tip: Partially inflated balloons are actually easier to pop than fully inflated ones, plus they’re less likely to fly off dramatically when hit. This keeps the game moving faster and makes cleanup easier!
Tips for Making This Challenge a Smash Hit
For Parents Planning a Rainy Day Activity:
- Set up everything before announcing the project. Kids will dive in immediately when they see the supplies ready!
- Play upbeat music while building to keep energy high
- Take breaks to test games as you build them
- Plan for 2-3 hours of building time plus unlimited play time after
For Teachers & Group Leaders:
- Divide kids into teams of 2-4 to build different games
- Set a time limit (like 45-60 minutes) for the building phase
- Have kids rotate through stations to try all the games
- Award prizes for “Most Creative,” “Best Decorated,” “Most Challenging,” etc.
- Document the process with photos – kids love seeing their creations come to life!
For Birthday Parties:
- Make this the main party activity! Kids build for the first hour, then play for the second hour
- Set up multiple maker stations with different game templates
- Let party guests take their creations home as party favors
- Create a “carnival” atmosphere with colorful tablecloths and decorations
Safety Reminders:
- Hot glue guns should always be handled by adults or supervised closely
- X-Acto knives and sharp cutting tools are adult-only jobs
- Make sure games have sturdy bases so they won’t tip over during play
- Test all games before letting younger kids play unsupervised
Why This Activity Is Pure Gold
Beyond the obvious fun factor, this cardboard carnival challenge teaches kids valuable skills without them even realizing it. They’re learning:
Problem-solving: How do I make this ball bounce correctly? What spacing works best?
Engineering basics: Stability, angles, spacing, and balance all come into play
Creativity: From design to decoration, kids make it uniquely theirs
Fine motor skills: Cutting, gluing, and assembling strengthen hand coordination
Patience and persistence: Not every design works perfectly the first time – and that’s okay!
Plus, there’s something incredibly special about kids playing with toys they made themselves. The pride on their faces when their game actually works? Priceless.
Ready to Transform Your Next Party?
With just a recycling bin, some basic craft supplies, and a little imagination, you can create an entire carnival’s worth of entertainment. These DIY cardboard games prove that the best fun doesn’t come from expensive toys – it comes from creativity, teamwork, and the satisfaction of building something awesome.
So grab those cardboard boxes, fire up the hot glue gun, and get ready to become the coolest parent or teacher on the block. Your kids are about to have a blast, and you’ll love watching their faces light up when their handmade games actually work.
Because the best parties aren’t just about showing up – they’re about creating memories, and these cardboard carnival games deliver exactly that!
More Kid’s Party Ideas to Keep the Fun Rolling:
Build a Name STEM Activity: The Perfect First-Week Icebreaker That Combines Literacy and Creativity
Unwrap the Alphabet: A Sneaky-Smart Fine Motor Game for Little Learners
LEGO Bridge Building Challenge: The Ultimate STEM Party Game for Kids!
Post-It Math Party: Turn Addition Practice Into an Active Game Your Kids Will Actually Beg to Play
Paper Plate Roller Coaster Challenge: The Ultimate Physics Party for Elementary Kids
Teddy Bear Bridge STEM Challenge: The Ultimate Team-Building Activity for Little Engineers
How to Make a Walking Paper Horse: The Coolest STEM Project That Actually MOVES!
27 Best Minute to Win It Games for Family Fun Night: Quick, Easy, and Hilarious Ideas
DIY Wooden Building Blocks: Build Epic Lincoln Log-Style Blocks for Hours of Imaginative Play