
Let’s be real – keeping kids entertained at home can feel like a full-time job, and craft supplies from the big-box stores? They can drain your wallet faster than you can say “boredom buster.” But here’s the good news: your local dollar store is about to become your new best friend.
Whether you’re stuck indoors on a rainy Saturday or just need a creative activity to keep little hands busy, these 28 dollar store crafts are exactly what you need. They’re easy, they’re fun, and best of all – they’re incredibly budget-friendly. We’re talking crafts that cost pennies to make but deliver hours of entertainment.
Ready to transform a few dollars’ worth of supplies into an afternoon of creativity? Let’s dive in!
Your Dollar Store Craft Supply Shopping List
Before we jump into the fun stuff, let’s talk strategy. Here’s your master list of dollar store craft supplies that’ll cover every single project below. Stock up on these basics, and you’ll be ready for spontaneous craft sessions whenever inspiration (or desperation) strikes:
Your Essential Craft Supply List:
- Pom poms (various sizes)
- Elmer’s glue
- Pony beads
- Googly eyes
- Pool noodles
- Pipe cleaners
- Fun foam sheets
- Glitter glue
- Popsicle sticks (regular and jumbo)
- Glue gun and glue sticks
- Tissue paper
- Ribbon
- Construction paper
- Washable paint
- Buttons
- Yarn
- Balloons
- Paintbrushes
- Small jars
- Battery-operated candles
- Rubber bands
- Cotton swabs
- Plastic straws
- Tape
Pro Tip: Don’t live near a dollar store? No problem! I’ve got you covered – you can find all these supplies online too. Just search for “bulk craft supplies” and you’ll find everything you need delivered right to your door.

28 Dollar Store Crafts That Kids Will Actually Love
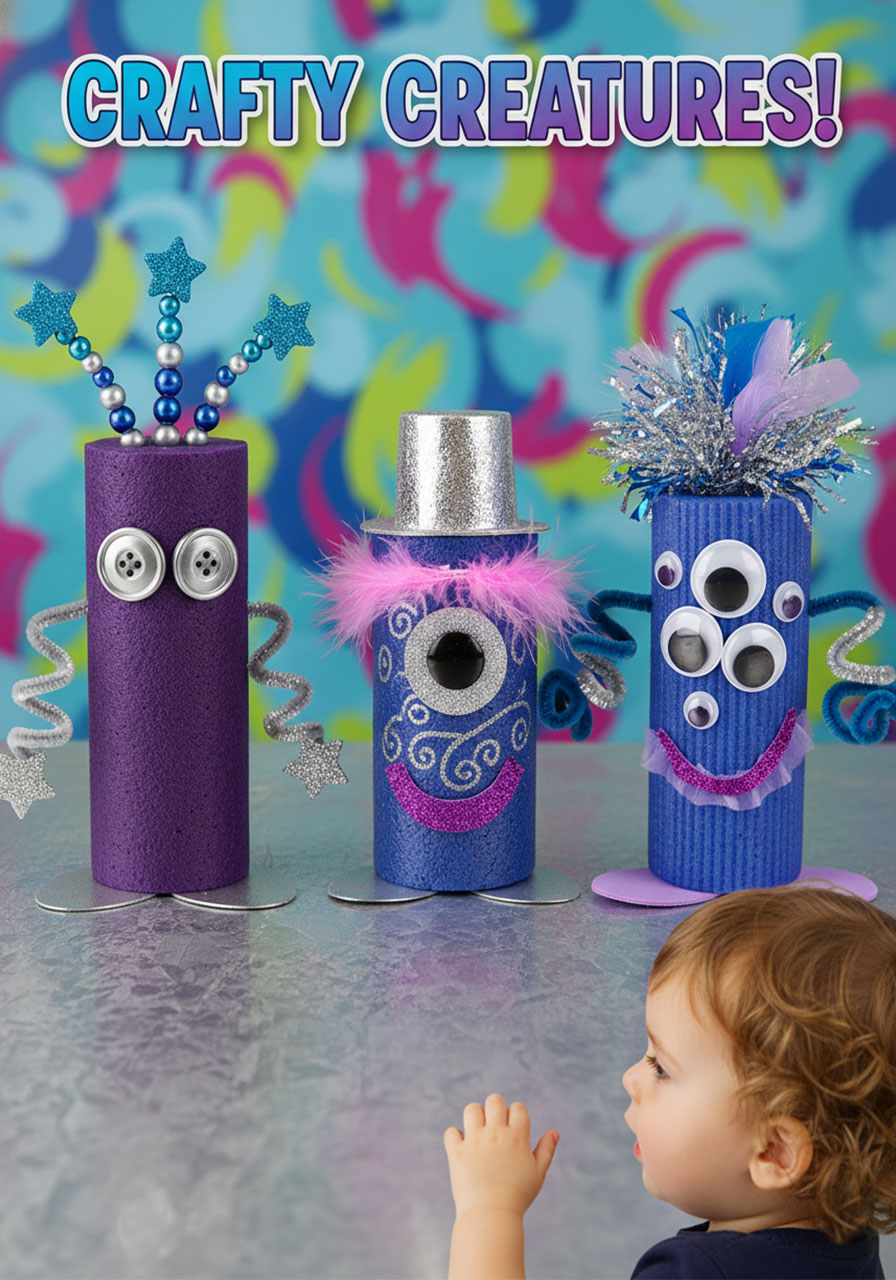
1. Pool Noodle Monsters
Best for: Kids ages 4-10, rainy day activities, summer fun
Time to Make: 20-30 minutes
Turn those leftover pool noodles into an army of adorable (or scary!) monsters! This craft is perfect because it lets kids’ imaginations run absolutely wild.
What You’ll Need:
- 1 pool noodle (you’ll get 7-8 monsters from one noodle)
- Pom poms
- Googly eyes
- Pipe cleaners
- Pony beads
- Glitter glue
- Tacky glue or hot glue gun
How to Make Pool Noodle Monsters:
1. Cut your pool noodle into 6-inch pieces. Important: Keep them around this length so they can stand up properly without toppling over.
2. Set up a craft station with all your supplies – buttons, pom poms, googly eyes, pipe cleaners, and anything else colorful you have on hand.
3. Let your kids go wild decorating! Want a monster with 10 eyes? Go for it. Prefer one with wild pipe cleaner hair? Absolutely.
4. Use tacky glue to attach pom poms and googly eyes. Pro tip: If pieces keep rolling around, place the pool noodle in a rolled-up washcloth to keep it steady while gluing.
5. Push pipe cleaners directly into the foam for instant arms, legs, or antennae – no glue needed!
Why Kids Love It: Every monster turns out completely different, and the pipe cleaners are super satisfying to poke into the foam. Plus, kids can create entire monster families or stage epic monster battles afterward!
2. Popsicle Stick Launchers

Best for: Kids ages 7+, outdoor play, STEM learning
Time to Make: 15-20 minutes
Get ready for some serious fun with these mini launchers that actually work! Kids will love the building process and then spend the next hour launching cotton swabs across the room.
What You’ll Need:
- 4 popsicle sticks
- 2 buttons
- 1 rubber band (a wider one works best)
- Craft paint
- 1 plastic straw
- Hot glue gun
- Scissors
- Cotton swabs (for launching)
How to Build Your Launcher:
1. Paint two popsicle sticks one color and two another color. Let them dry completely.
2. Glue two sticks together to make them stronger. Repeat with the other two sticks.
3. Choose which doubled stick will be the handle and which will be the crossbar. Glue the crossbar about ¼ of the way from the top of the handle.
4. Flip your launcher so the crossbar is on the bottom. Glue one button on each end of the crossbar, about 2 cm from the edges.
5. Cut your straw to 6-8 cm long and glue it on top of the handle, right above the crossbar.
6. Wrap your rubber band around one end of the crossbar, stretch it across to the other end, then loop the long end over the bottom of the handle.
How to Launch: Load a cotton swab into the straw, pull back the rubber band, and let it fly! The swabs can shoot surprisingly far – we’re talking across-the-room distances.
Pro Tip: Challenge kids to experiment with different straw lengths. Longer straws = more pull = greater distance, but they also require more finger strength!
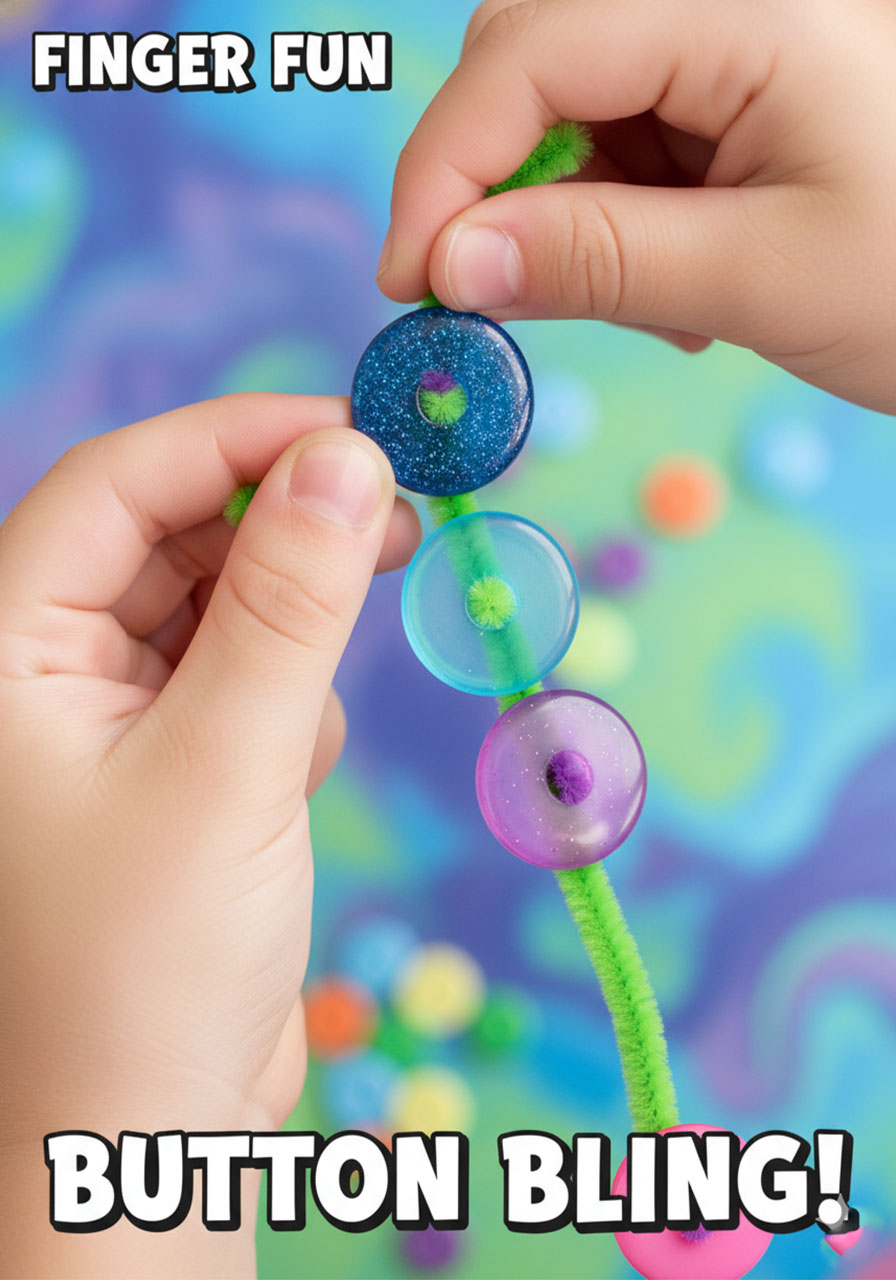
3. Button and Pipe Cleaner Bracelets
Best for: Kids ages 5+, jewelry lovers, quick crafts
Time to Make: 5-10 minutes per bracelet
This might be the easiest craft on our entire list, and kids absolutely love making jewelry they can actually wear!
What You’ll Need:
- Pipe cleaners
- Buttons (look for ones with two holes)
How to Make Your Bracelets:
1. Pick a pipe cleaner in your favorite color.
2. Thread a button through one hole and down through the other hole.
3. Keep adding buttons until your bracelet is long enough to fit around your wrist.
4. Twist the pipe cleaner ends together to secure, and trim any excess.
Why This Craft Rocks: It’s so simple that even young kids can make these independently, and they can create an entire jewelry collection in one sitting. Plus, these make fantastic handmade gifts for grandparents, teachers, or friends!
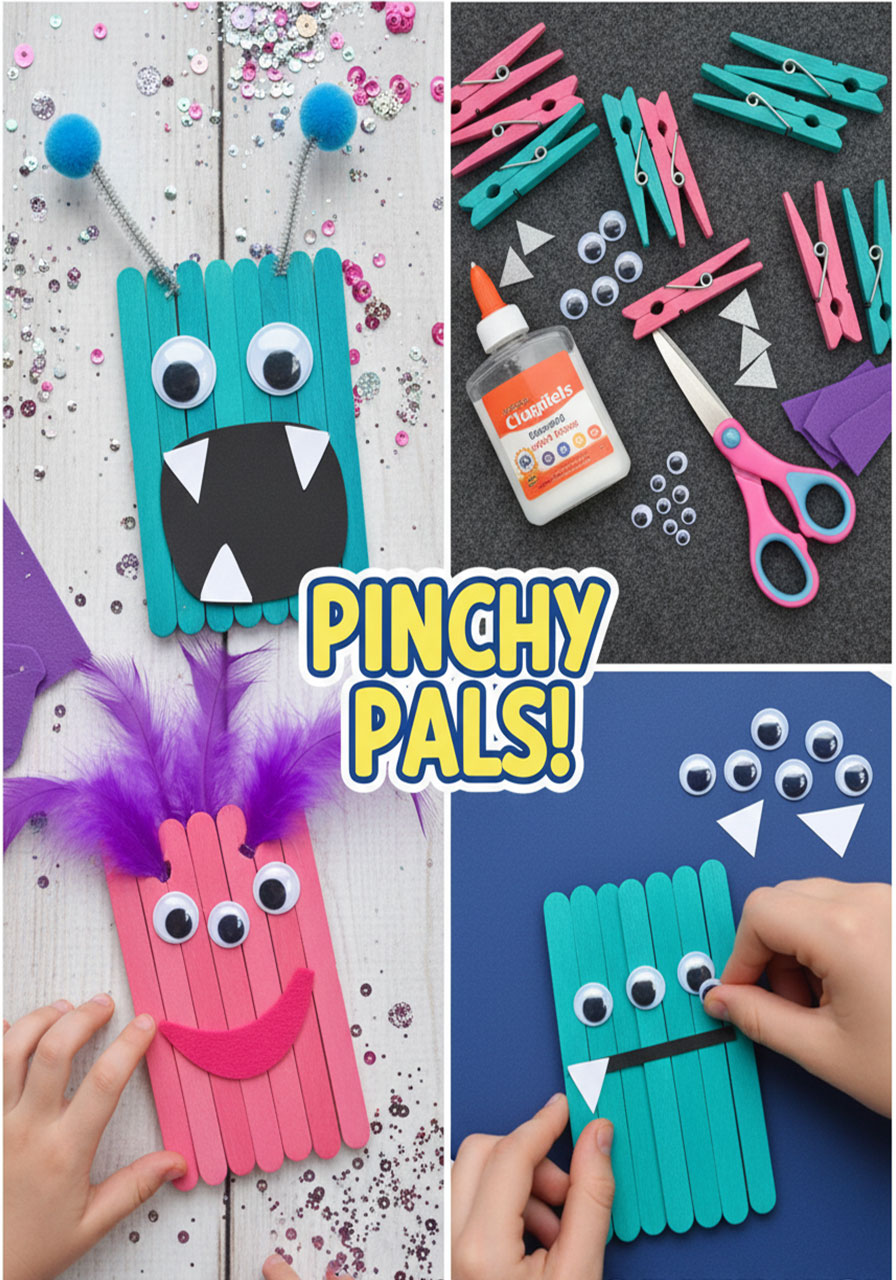
4. Popsicle Stick Monsters
Best for: Kids ages 4-8, Halloween crafts, preschool activities
Time to Make: 20-30 minutes
These colorful little monsters are perfect for kids who love anything silly and spooky. The best part? There’s no wrong way to make them!
What You’ll Need:
- Colored popsicle sticks (or paint plain ones)
- Glue
- Googly eyes (various sizes)
- Construction paper or fun foam
- Scissors
How to Create Your Monsters:
1. Lay 5-7 popsicle sticks side by side to create the monster’s body.
2. Glue a popsicle stick diagonally across the back to hold them all together.
3. While that dries, cut out fun shapes from construction paper – triangle ears, wavy hair, zigzag teeth, whatever your monster needs!
4. Flip your popsicle stick base over and start decorating! Add googly eyes (the more, the merrier), glue on your cut-out features, and get creative.
5. Let everything dry completely before displaying your monster masterpiece.
Fun Variation: Make different expressions – happy monsters, silly monsters, scared monsters, or even friendly monsters. Kids can create entire monster families!
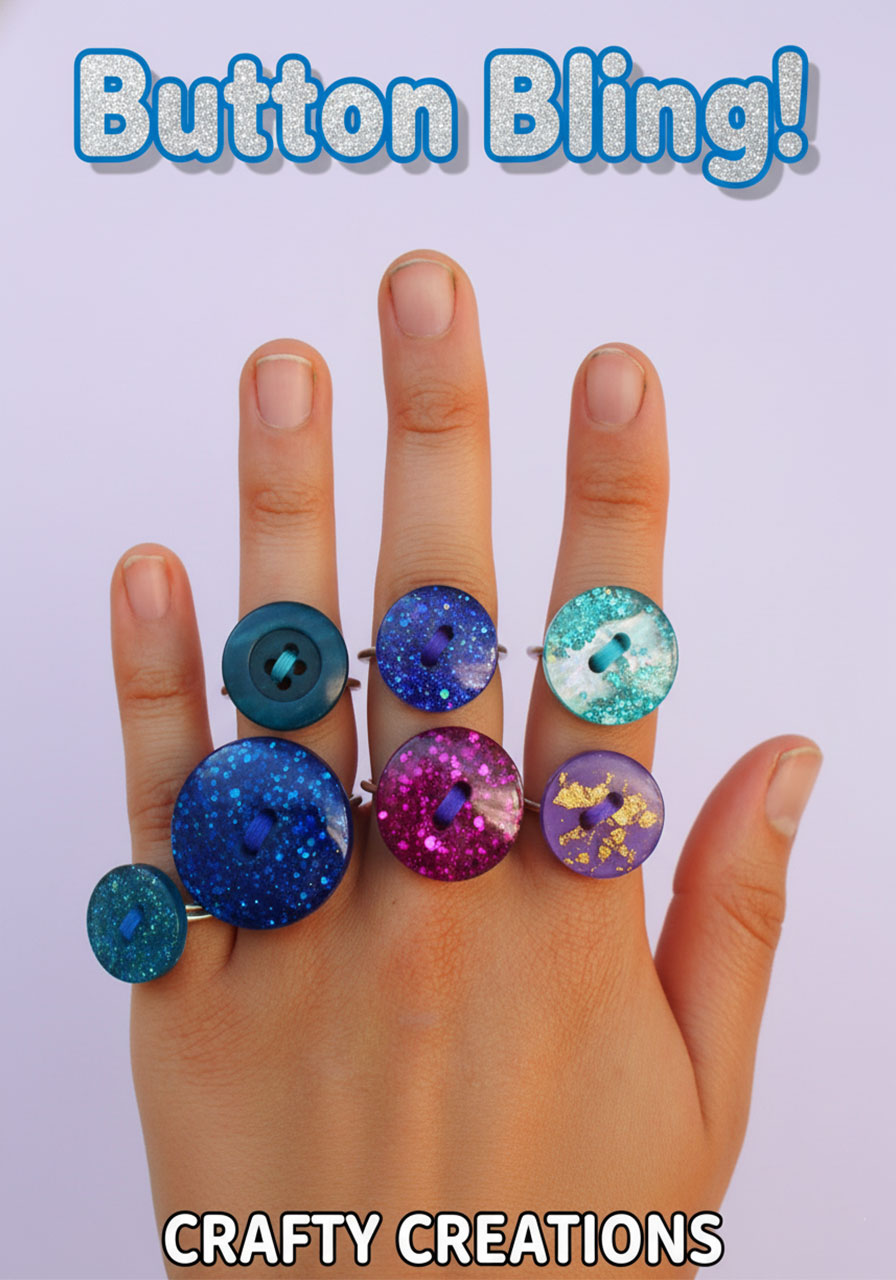
5. Button Rings
Best for: Kids ages 5+, dress-up enthusiasts, party favors
Time to Make: 5 minutes per ring
Turn pretty buttons into wearable jewelry with this super-quick craft that’s perfect for kids who love playing dress-up!
What You’ll Need:
- Pretty buttons (the more decorative, the better)
- Pipe cleaners
- Scissors
How to Make Button Rings:
1. Choose your prettiest button and find a matching or complementary pipe cleaner color.
2. Cut the pipe cleaner in half (one half makes one ring).
3. Thread your pipe cleaner through one hole in the button and back through the other hole.
4. Wrap the pipe cleaner around your finger to create the ring band, then twist both ends together to secure.
5. Trim off any excess pipe cleaner with scissors.
Pro Tip: Kids can make an entire jewelry box full of rings in different colors and styles. These also make fantastic party favors or gifts!
6. Popsicle Stick Flower Pots

Best for: Kids ages 6+, Mother’s Day gifts, spring crafts
Time to Make: 15-20 minutes (plus planting time)
Here’s the best part about this craft – no glue needed! These adorable flower pots are held together with just rubber bands and ribbon.
What You’ll Need:
- Colored popsicle sticks
- Clean tin cans (soup or vegetable cans work great)
- Rubber bands
- Ribbon
- Potting soil and small flowers or plants
How to Build Your Flower Pot:
1. Place a rubber band around your tin can, making sure it fits snugly.
2. Slide popsicle sticks under the rubber band, one at a time, all the way around the can until it’s completely covered.
3. Wrap a pretty ribbon around the can to hide the rubber band, tie it in a bow, and trim any excess.
4. Fill your new flower pot with soil and plant a small flower or succulent.
Why Kids Love It: It comes together so quickly, and there’s no waiting for glue to dry! Plus, the final product looks impressive enough to give as a gift.
7. Button Caterpillar
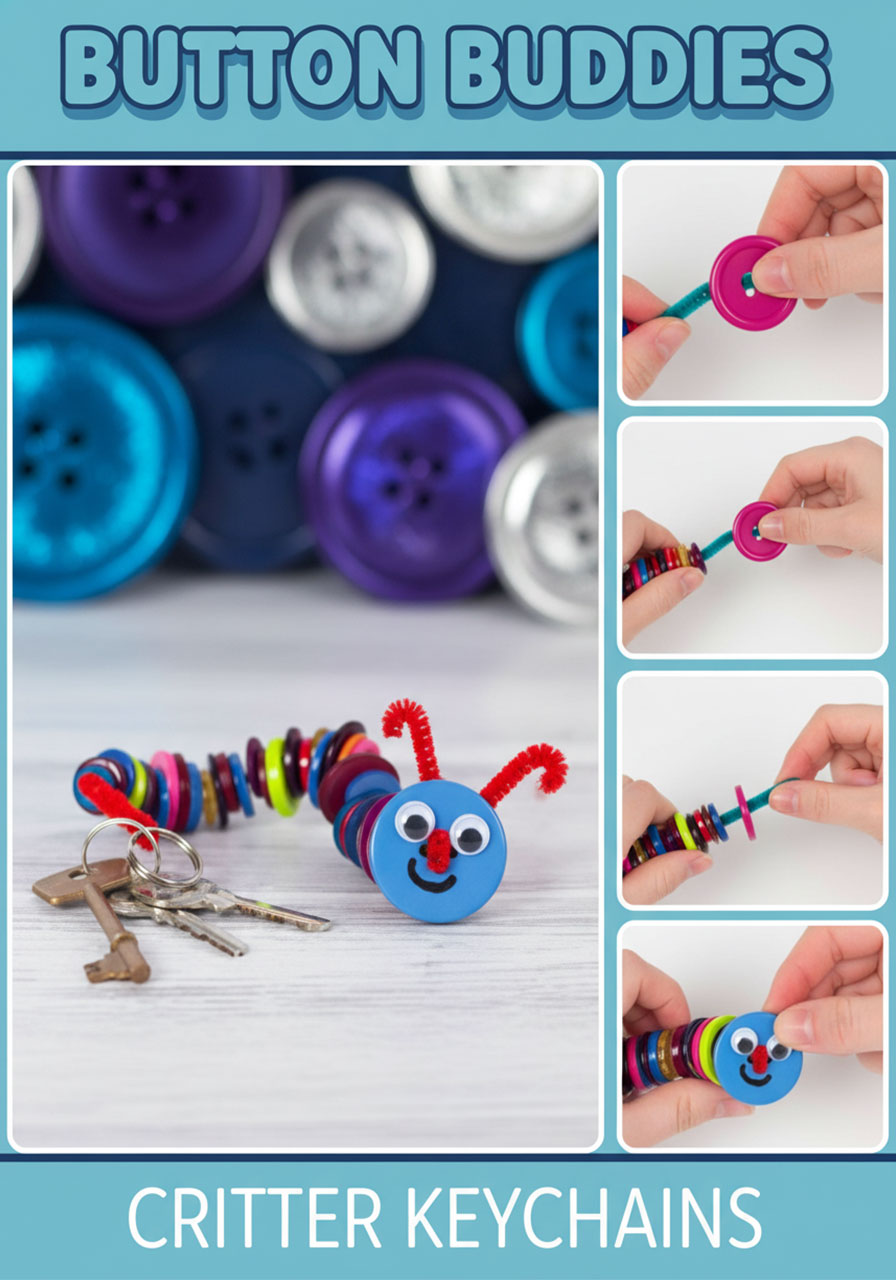
Best for: Kids ages 4-7, spring crafts, Eric Carle fans
Time to Make: 15-20 minutes
Create an adorable caterpillar using colorful buttons – it’s like bringing “The Very Hungry Caterpillar” to life!
What You’ll Need:
- Buttons in various sizes and colors
- Pipe cleaners
- Googly eyes
- Glue
How to Make Your Button Caterpillar:
1. Choose 5-8 buttons in graduating sizes or fun color combinations for your caterpillar’s body.
2. Thread the buttons onto a pipe cleaner, starting with the largest (the head) and working down to smaller sizes.
3. Bend the pipe cleaner into a gentle curve to create the caterpillar’s shape.
4. Cut a small piece of pipe cleaner for antennae, curl the ends, and attach to the head.
5. Glue googly eyes onto the largest button.
Fun Variation: Make an entire caterpillar family or create butterflies by adding pipe cleaner wings!
8. Beaded Pipe Cleaner People
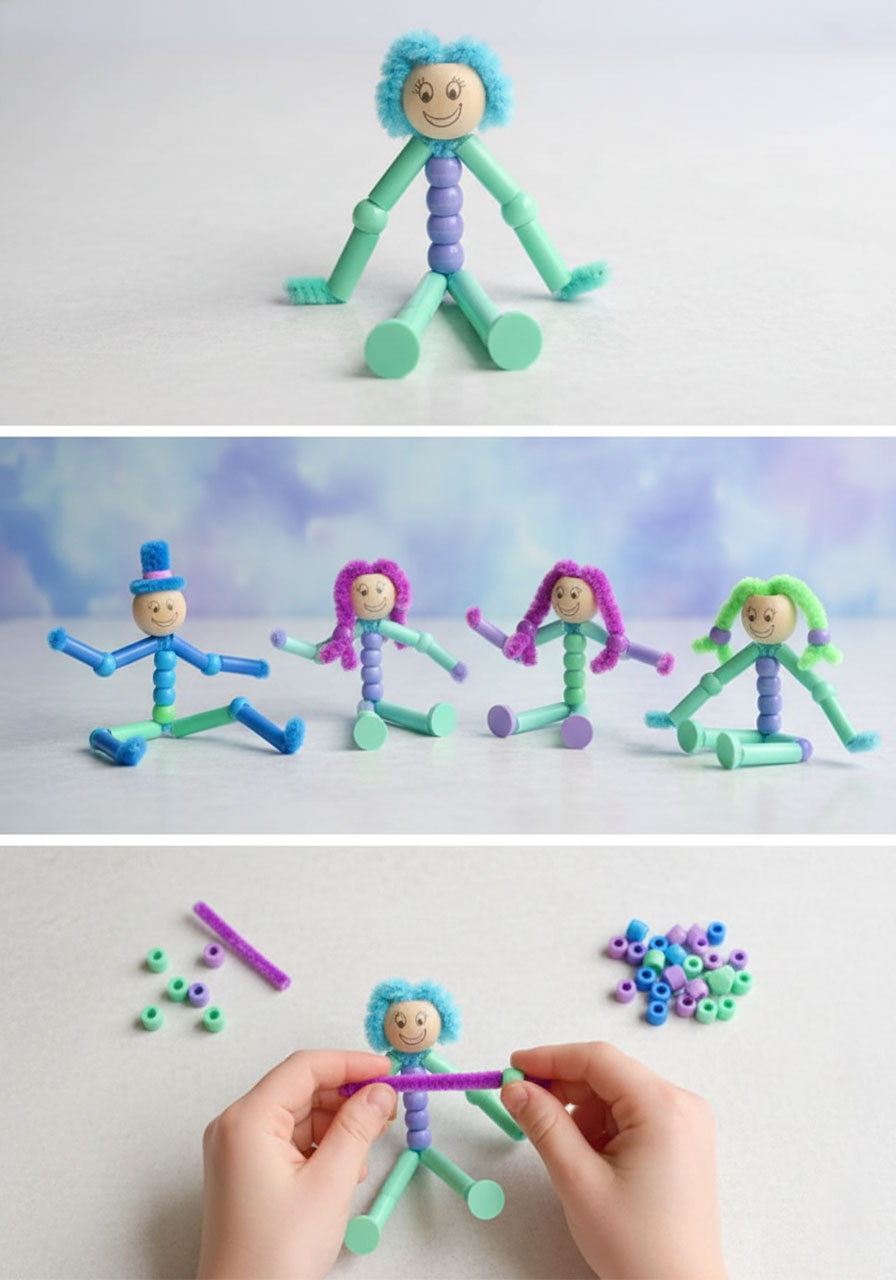
Best for: Kids ages 5+, imaginative play, fidget toys
Time to Make: 10-15 minutes per person
These bendy little people are perfect for imaginative play, and their arms and legs actually bend and pose!
What You’ll Need:
- Pipe cleaners (3 per person)
- Pony beads
- Plastic straws
- Scissors
How to Create Your Pipe Cleaner People:
1. Cut straws into small pieces for the body and limbs.
2. Thread one pipe cleaner with beads and straw pieces to create the body (about 3-4 inches long).
3. Create arms by threading beads onto another pipe cleaner, then twist it around the body.
4. Make legs by folding a third pipe cleaner in half, threading with beads, and attaching to the bottom of the body.
5. Bend into a sitting, standing, or action pose!
Pro Tip: Kids can create entire families, superheroes, or characters from their favorite stories. The poseable limbs make them perfect for imaginative play!
9. Rain Stick Craft
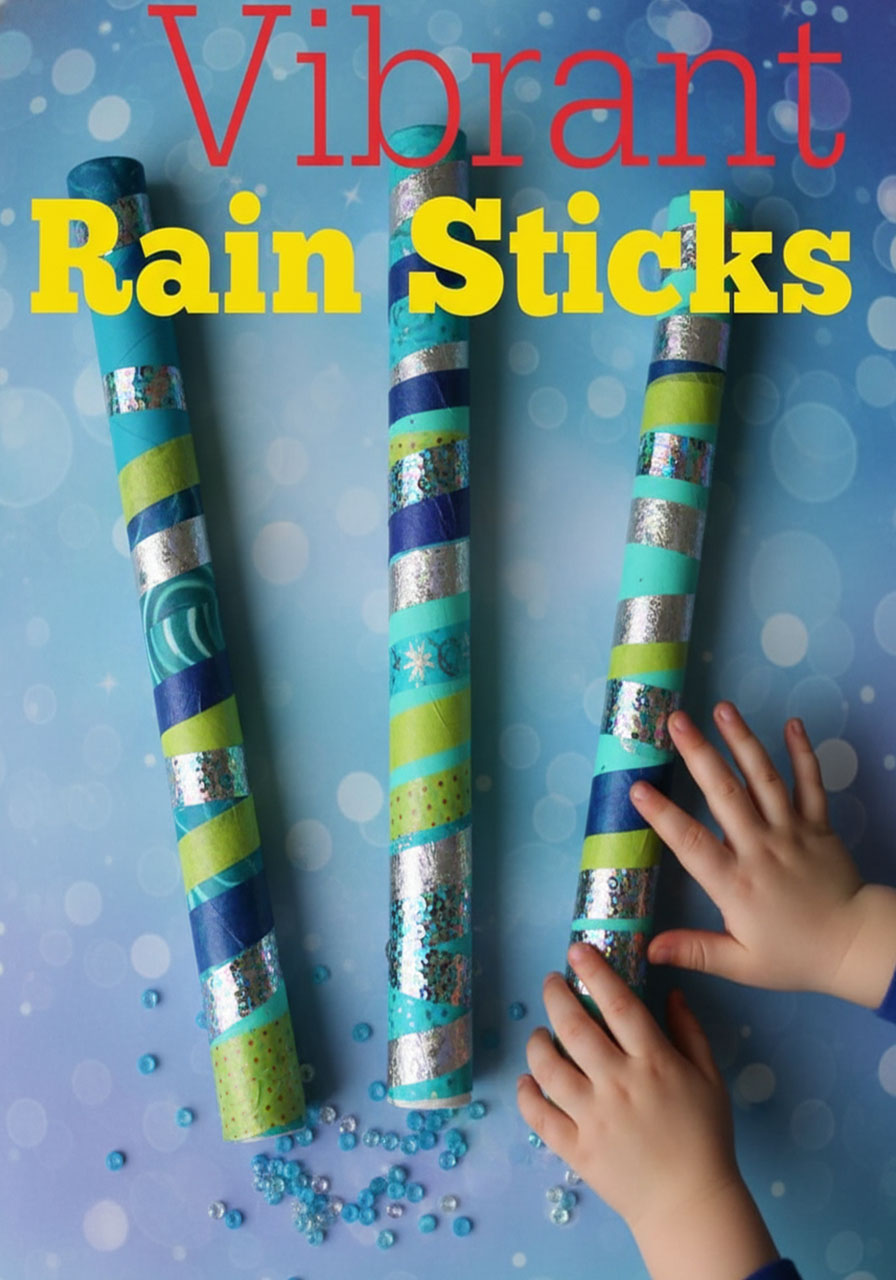
Best for: Kids ages 4+, sensory play, spring crafts
Time to Make: 30-45 minutes (including drying time)
The gentle rain sound these make is absolutely mesmerizing, and kids love decorating them with bright, vibrant colors!
What You’ll Need:
- Paper towel tube or wrapping paper tube
- Rice or dried beans
- Aluminum foil
- Tape
- Construction paper or paint
- Decorative supplies (stickers, markers, etc.)
How to Make Your Rain Stick:
1. Crumple a long piece of aluminum foil into a snake shape and twist it inside the tube. This creates obstacles for the rice to hit.
2. Seal one end of the tube with tape.
3. Pour in ½ to ¾ cup of rice or dried beans through the open end.
4. Seal the other end with tape.
5. Decorate the outside with colorful paper, paint, or whatever materials you have on hand!
Why It’s Magical: When you slowly tip the rain stick, you’ll hear the soothing sound of rain. Kids can experiment with different amounts of rice or beans to change the sound!
10. Baby Jar Heart Luminaries
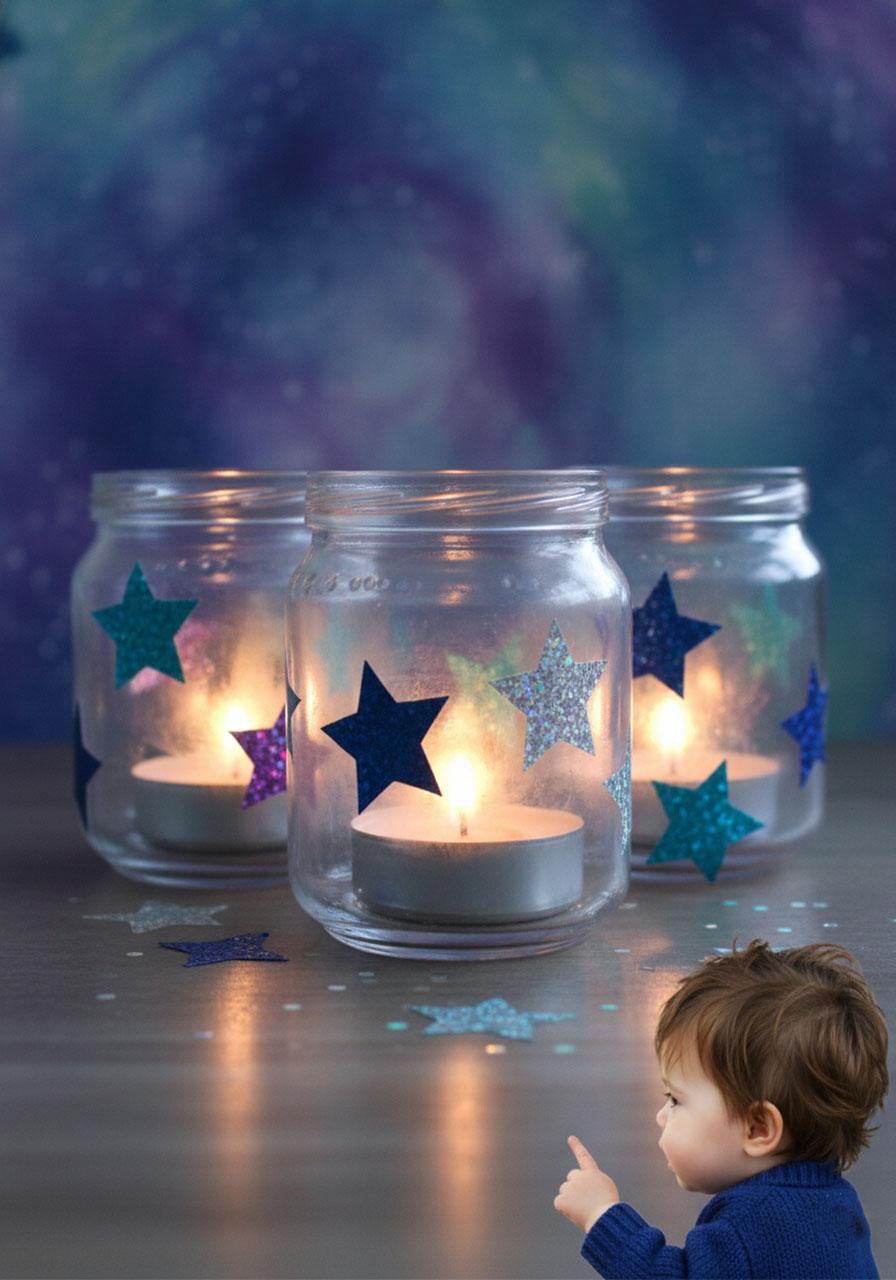
Best for: Kids ages 5+, Valentine’s Day, Mother’s Day gifts
Time to Make: 30-40 minutes (plus drying time)
Transform empty baby food jars into glowing heart luminaries that make the perfect handmade gift!
What You’ll Need:
- Clean baby food jars (or small mason jars)
- Tissue paper cut into heart shapes
- White glue (PVA glue)
- Paintbrush
- Battery-operated tea lights
How to Create Your Luminaries:
1. Make sure your jars are completely clean and dry.
2. Cut tissue paper into heart shapes in various colors.
3. Use a paintbrush to coat the outside of the jar with glue.
4. Stick tissue paper hearts onto the glue, overlapping them slightly. Press each one down firmly.
5. Brush another layer of glue over the top of the hearts to seal them. Pro tip: Don’t brush too much or the colors will smudge!
6. Let dry completely overnight.
7. Place a battery-operated tea light inside and watch it glow!
Safety Note: Always use battery-operated candles with paper crafts. Real flames are a fire hazard!
11. Popsicle Stick Harmonica
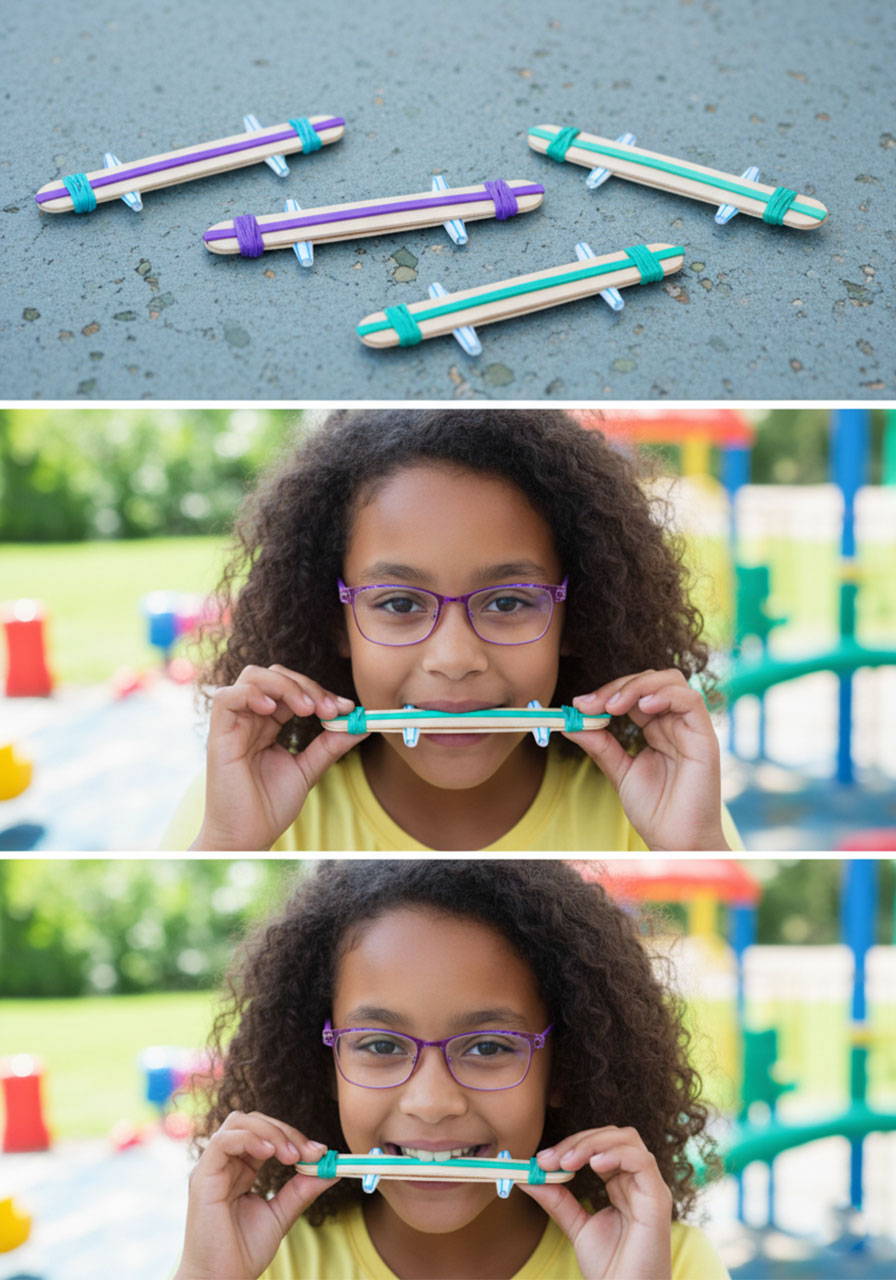
Best for: Kids ages 6+, music lovers, science experiments
Time to Make: 10-15 minutes
This actually works! Kids can make different pitches by adjusting the straws, and it’s a fun introduction to how sound and vibrations work.
What You’ll Need:
- 2 jumbo popsicle sticks
- 1 wide rubber band
- 2 small rubber bands
- 1 plastic straw
- Scissors
How to Build Your Harmonica:
1. Cut two pieces of straw, each about 1-1.5 inches long.
2. Stretch the wide rubber band lengthwise around one popsicle stick.
3. Place one straw piece under the rubber band at one end.
4. Put the second popsicle stick on top and secure that end with a small rubber band.
5. Place the second straw piece on top of the wide rubber band at the other end, and secure with the second small rubber band.
How to Play: Put your lips around the edge and blow! The rubber band vibrates to create sound. Slide the straws closer together for a higher pitch, or farther apart for a lower pitch.
Make It Educational: Talk about how the vibrating rubber band creates sound waves. The shorter the vibrating section, the higher the pitch!
12. Pipe Cleaner Flowers

Best for: Kids ages 5+, spring crafts, Mother’s Day gifts
Time to Make: 10-15 minutes per flower
These cheerful flowers never wilt, and kids can make an entire bouquet in just one crafting session!
What You’ll Need:
- Pipe cleaners (various colors, plus green for stems)
- Pony beads (optional for centers)
- Buttons (optional for centers)
How to Make Pipe Cleaner Flowers:
1. Choose a colored pipe cleaner for your flower petals.
2. Fold the pipe cleaner in half, then twist it once at the fold to create the center.
3. Make petals by creating loops with the pipe cleaner, twisting at the base each time. Continue until you have 5-6 petals.
4. Twist the ends together to secure the flower shape.
5. Add a green pipe cleaner as the stem by wrapping it around the base of the flower.
6. Optional: Thread a bead or glue a button in the center of the flower for extra detail.
Display Ideas: Create a bouquet, “plant” them in a small pot filled with dry beans, or make a flower crown!
13. Easy DIY Sun Catchers (Glue and Gem Version)
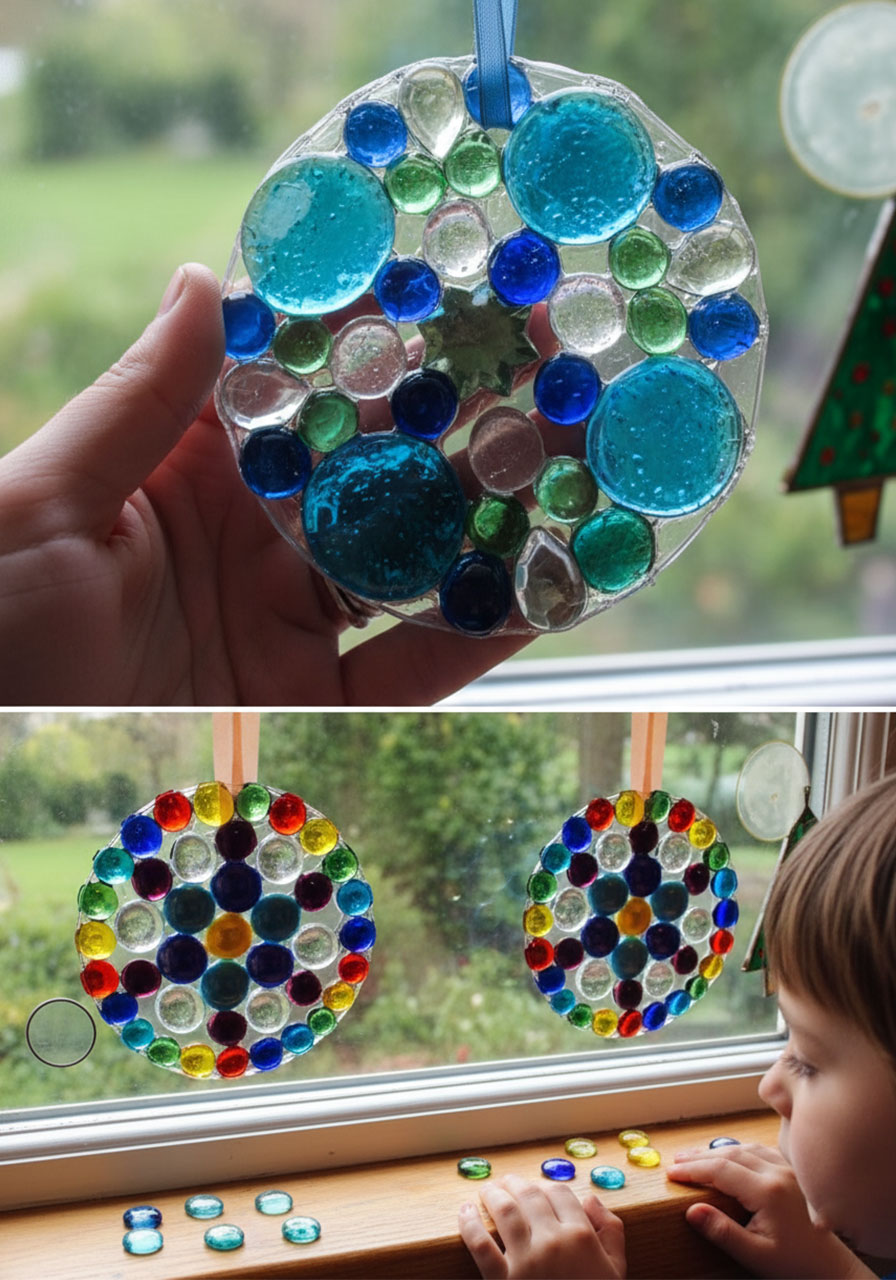
Best for: Kids ages 5+, window decorations, gift-making
Time to Make: 20 minutes (but needs 4-7 days to dry!)
These gorgeous sun catchers look like stained glass when the light shines through them. Fair warning: the hardest part is waiting for them to dry!
What You’ll Need:
- Colored glass gems or stones (from the floral section)
- Clean plastic lids (from butter, sour cream, or yogurt containers)
- Clear Elmer’s glue
- Ribbon or fishing line for hanging
How to Make Your Sun Catchers:
1. Plan your design first by arranging gems on the lid (this is optional but helpful for younger kids).
2. Remove the gems and squeeze glue all over the inside of the lid (with the rim facing up).
3. Place your gems in your chosen pattern, making sure they touch each other. This helps the finished piece stay together.
4. Squeeze more glue around and over the gems to fill in any gaps.
5. Let it dry for at least 4-7 days. Pro tip: I know it’s tempting, but don’t try to peel it out early! It needs to be completely dry.
6. When the edges start peeling away from the lid on their own, it’s ready! Gently pop it out.
7. Thread ribbon or fishing line through any gaps to hang, or use a dab of hot glue to attach a ribbon to the back.
Important Note: The glue peels right off the lid after it dries, so you can reuse the same lid for multiple sun catchers!
14. Straw Weaving Bracelets
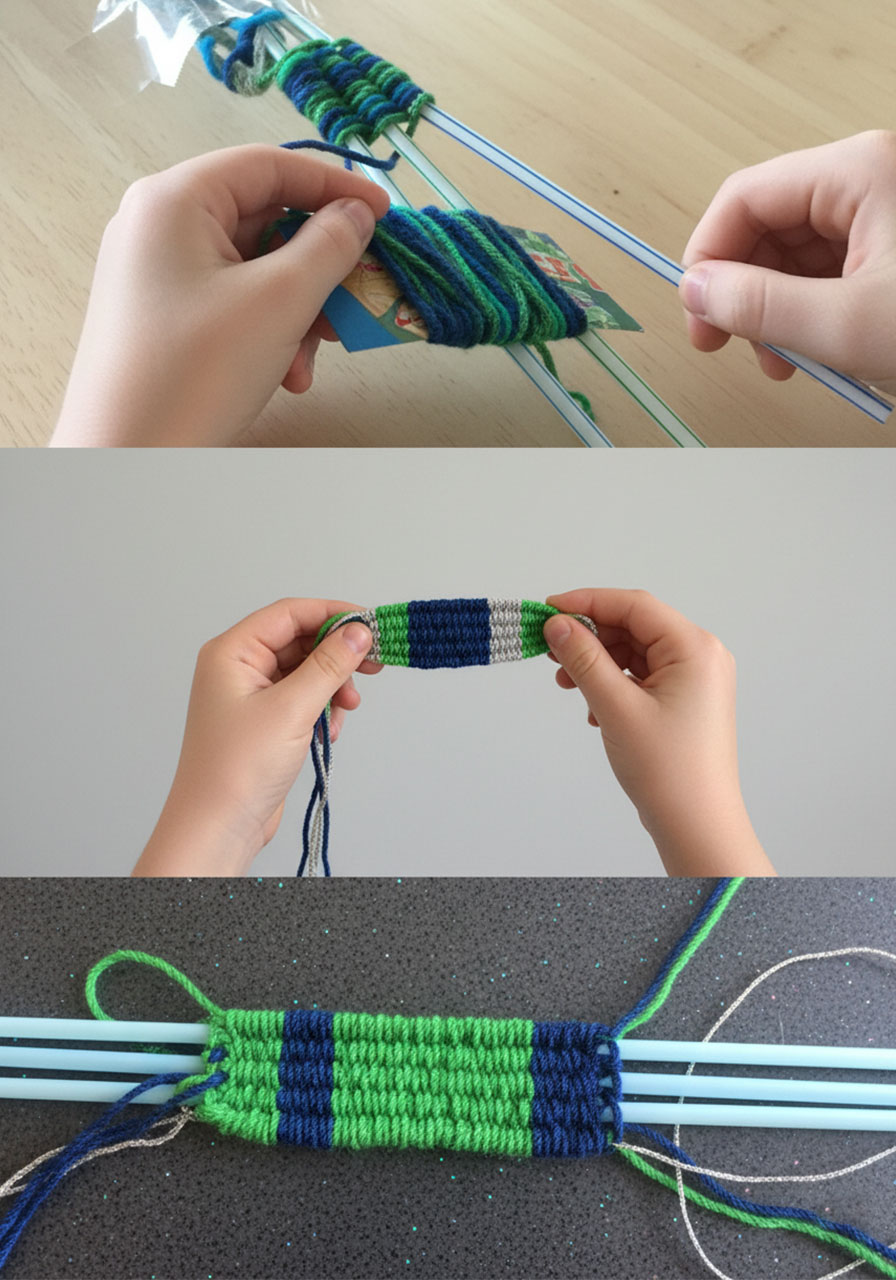
Best for: Kids ages 7+, tweens, camp crafts
Time to Make: 30-45 minutes per bracelet
This is an awesome craft for older kids who want something a bit more challenging. The finished bracelets look intricate and impressive!
What You’ll Need:
- 3-5 plastic drinking straws
- Yarn
- Scissors
- Tape
- Small piece of cardboard
- Wooden skewer (optional, for threading)
How to Weave Your Bracelet:
1. Cut yarn pieces 4-5 inches longer than your straws (one piece per straw).
2. Tie these yarn pieces together at one end.
3. Thread each piece of yarn through a straw. Pro tip: A wooden skewer helps guide the yarn through.
4. Tape the knotted end to your table to hold everything in place.
5. Wrap 5-8 feet of your weaving yarn around a small piece of cardboard (this becomes your “shuttle”).
6. Tie the loose end of your weaving yarn to the knotted yarn at the top.
7. Weave your yarn shuttle over the first straw, under the second, and over the third. Continue back and forth!
8. Push rows tightly together as you go for a neat finish.
9. When your weaving is long enough to fit around your wrist, carefully slide the straws out one at a time.
10. Tie the loose ends together to create your bracelet!
Pro Tip: Use 5 straws instead of 3 for a wider bracelet or even a headband!
15. Pom Pom Flower Magnets

Best for: Kids ages 4+, spring crafts, refrigerator decorations
Time to Make: 30-40 minutes
These fluffy flowers are adorable, and adding a photo in the center makes them extra special for grandparents!
What You’ll Need:
- Cardboard (cereal boxes work great)
- Pom poms (various sizes and colors)
- White glue
- Popsicle sticks
- Green paint
- Paintbrush
- Adhesive magnets
- Scissors
- Flower template (trace a simple flower shape)
How to Make Pom Pom Flowers:
1. Cut out a flower shape from your cardboard, including a circular hole in the center.
2. Glue pom poms around the center circle first, choosing one color for this ring.
3. Continue gluing pom poms onto the petals, using different shades of your chosen color.
4. Paint a popsicle stick green and let it dry.
5. Glue two small green pom poms onto the stick for leaves.
6. Glue the popsicle stick to the back of the flower as the stem.
7. Add a small photo to the center circle (perfect for gift-giving!).
8. Stick an adhesive magnet on the back.
Gift Idea: These make fantastic Mother’s Day or teacher appreciation gifts, especially with a child’s photo in the center!
16. Popsicle Stick Catapult
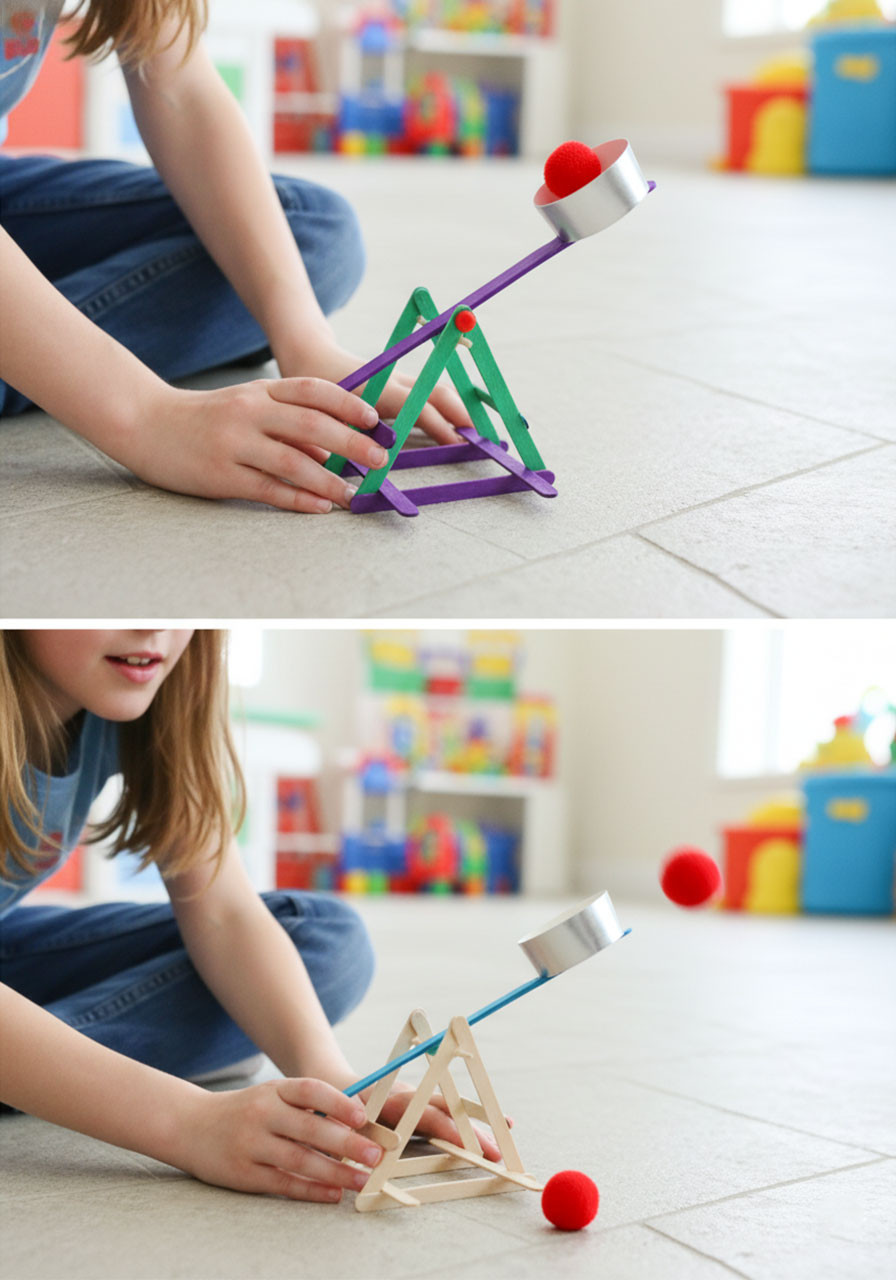
Best for: Kids ages 8+, outdoor play, STEM challenges
Time to Make: 20-30 minutes
This catapult design is one of the most effective we’ve ever built – it launches projectiles surprisingly far!
What You’ll Need:
- 8-9 popsicle sticks
- 2 wide craft sticks
- 1 bamboo skewer
- 1 plastic straw
- Small paper cup
- Hot glue gun
- Scissors
- Pom poms or small beads for launching
How to Build Your Catapult:
1. Make two triangles by gluing three popsicle sticks together for each triangle.
2. Cut a segment from your bamboo skewer (about the width of your triangle).
3. Cut a short piece from your straw (about 1 inch).
4. Hot glue the bamboo skewer across both triangles to connect them.
5. Glue a couple of popsicle sticks across the base for stability.
6. Thread the straw piece onto a wide craft stick – this becomes your launching arm.
7. Slide the launching arm onto the bamboo skewer so it can rotate.
8. Cut a paper cup so only 1-2 inches of the bottom remains, and glue it to the end of another wide craft stick.
9. Glue this second craft stick to the front of your catapult as a stop.
How to Launch: Load a pom pom into the cup, hold down the base, press down firmly on the launching arm, and release! Watch it fly!
17. Melted Bead Sun Catchers

Best for: Kids ages 6+ (with adult supervision), outdoor decorations, durable sun catchers
Time to Make: 20 minutes (plus melting time)
IMPORTANT: This craft involves melting plastic, which releases toxic fumes, so it must be done outside!
What You’ll Need:
- Translucent pony beads
- Metal baking dishes (old muffin tins work great)
- Outdoor grill or toaster oven
- Power drill (for hanging holes)
- String or twine
How to Make Melted Bead Sun Catchers:
1. Arrange pony beads in a single layer in your metal baking dishes. Fill muffin tin sections for small sun catchers, or use a cake pan for a large one.
2. Take your baking dish outside to your grill or outdoor toaster oven.
3. Heat at about 400°F for approximately 10 minutes, or until beads are completely melted and smooth. Critical safety note: Do this OUTSIDE only! The fumes are toxic.
4. Let cool completely – they’ll pop right out of the pan when cool.
5. Use a power drill to create a small hole for hanging.
6. Thread with string or twine and hang in a sunny spot!
Why They’re Worth It: Unlike paper sun catchers, these beauties are durable enough for outdoor use and last for years!
18. Button Gumball Machine Craft
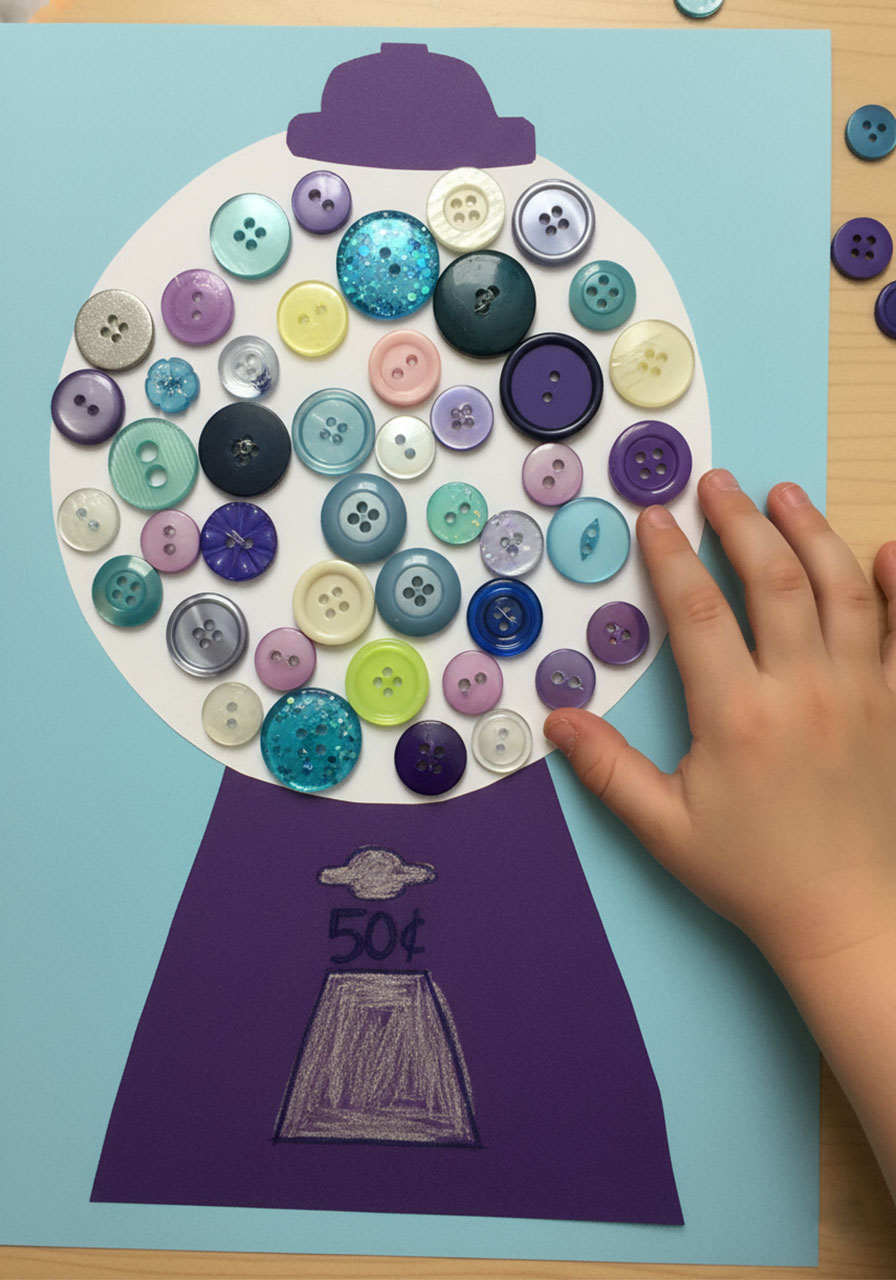
Best for: Kids ages 4-7, quick crafts, button sorting activities
Time to Make: 15-20 minutes
This sweet little craft is perfect for younger kids who love sorting buttons by color!
What You’ll Need:
- Construction paper (red and white)
- Buttons (various colors and sizes)
- Glue stick
- White glue or glue gun
- Crayons or markers
- Scissors
How to Create Your Gumball Machine:
1. Cut a large circle from white construction paper for the gumball globe.
2. Cut a small rectangle from red construction paper for the base.
3. Use a glue stick to attach both pieces to another sheet of paper.
4. Draw and color the dispenser chute and coin slot with crayons.
5. Let your child glue colorful buttons inside the white circle to create the “gumballs.”
6. Add a button at the bottom for the turn dial!
Why Kids Love It: The button-sorting and gluing process is satisfying, and every gumball machine turns out uniquely colorful!
19. Popsicle Stick Yarn Dolls

Best for: Kids ages 5+, imaginative play, handmade toys
Time to Make: 15-20 minutes per doll
These adorable little dolls are fun to make and even more fun to play with afterward!
What You’ll Need:
- Jumbo popsicle sticks
- Yarn scraps (various colors)
- Small buttons
- Permanent markers
- Low-heat glue gun
- Scissors
How to Make Your Dolls:
1. Choose a yarn color for the doll’s dress and cut a long piece.
2. Starting near the bottom of the popsicle stick, wrap the yarn around and around, working your way up. Stop about an inch from the top.
3. Secure the end with a small dab of glue.
4. Choose a “hair” color and wrap yarn around the top portion of the stick.
5. Use permanent markers to draw a face on the stick.
6. Glue small buttons down the front of the dress for decoration.
Pro Tip: Kids can make entire families or create dolls that look like their friends and family members!
20. Button Bowl
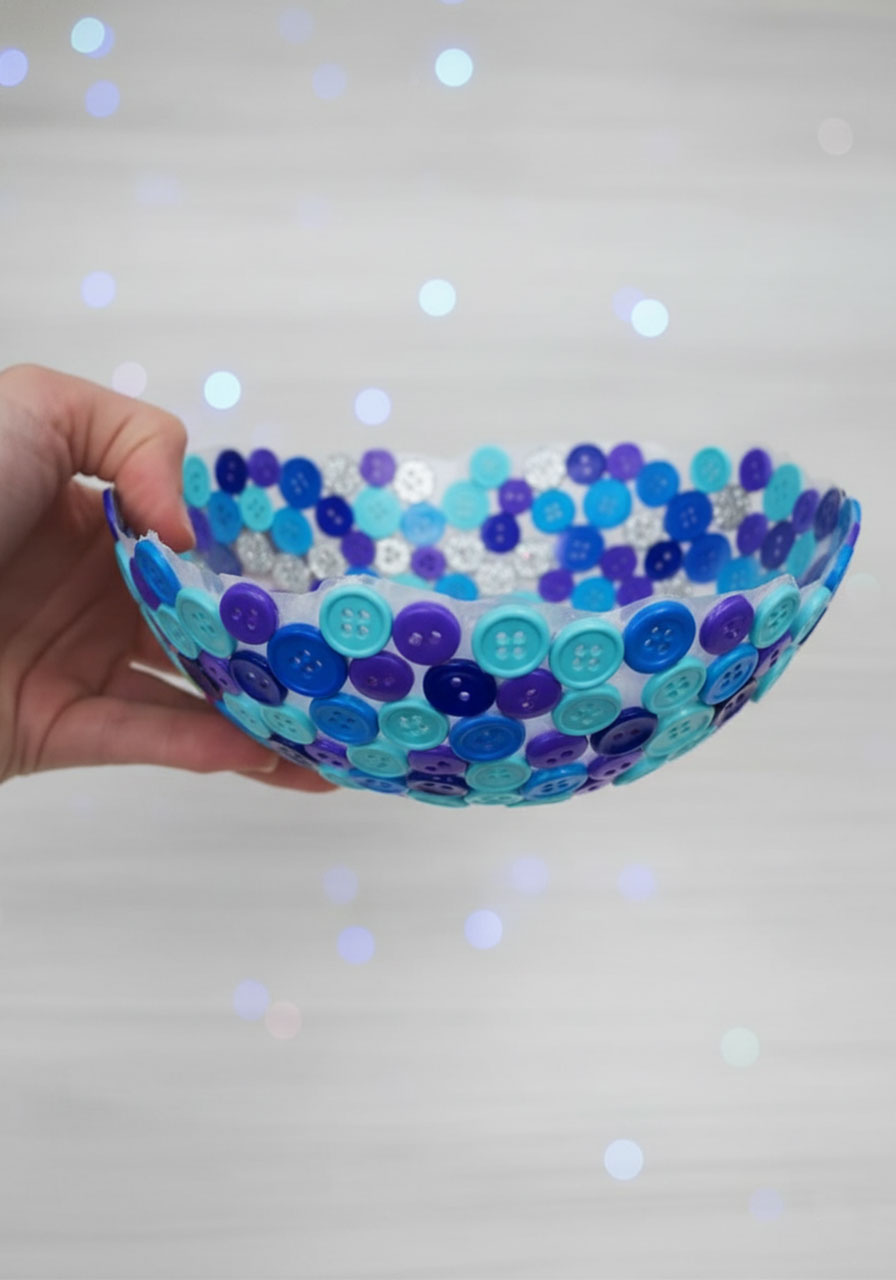
Best for: Kids ages 8+, decorative projects, functional crafts
Time to Make: 30 minutes (plus 24+ hours drying time)
This impressive project creates an actual functional bowl that can hold lightweight items!
What You’ll Need:
- Lots of buttons (various sizes and colors)
- Balloon
- White glue (lots of it!)
- Paintbrush
- Container to hold balloon
- Petroleum jelly or cooking oil
How to Create Your Button Bowl:
1. Inflate a balloon to your desired bowl size and tie it off.
2. Lightly coat half of the balloon with petroleum jelly or cooking oil. Important: This prevents the balloon from sticking to the glue!
3. Place the balloon on top of a container to hold it steady.
4. Brush a thick layer of glue over the oiled half of the balloon.
5. Press buttons into the glue, arranging them as close together as possible.
6. Apply more glue over and around the buttons.
7. Let dry for at least 5 hours.
8. Apply 2-3 more coats of glue, allowing each to dry completely between applications.
9. Once completely dry (give it 24+ hours), carefully deflate the balloon by cutting a small hole – don’t pop it!
10. Gently remove the balloon, and your button bowl is complete!
Display Ideas: Use it as a catch-all for small accessories, a decorative candy bowl, or a coffee table centerpiece!
21. Pipe Cleaner Finger Puppets

Best for: Kids ages 3+, quiet play, travel activities
Time to Make: 5-10 minutes per puppet
These quick little puppets are perfect for impromptu puppet shows, and they’re easy enough for even young kids to make!
What You’ll Need:
- Pipe cleaners (various colors)
- Small pom poms
- Googly eyes
- Low-heat glue gun
- Feathers (optional)
How to Make Finger Puppets:
1. Wrap a pipe cleaner tightly around your pinky finger (remember, kids’ fingers are smaller!).
2. With the remaining pipe cleaner, create the first ear by bending it into a loop.
3. Bend the other end to create the second ear.
4. Use a glue gun to attach a small pom pom to the front as the face.
5. Glue on googly eyes.
6. Optional: Add a feather or extra pom poms for hair!
Pro Tip: Make one for each finger and put on a complete puppet show! Kids can create different characters – animals, monsters, people, or anything they imagine.
22. Balloon Straw Rockets
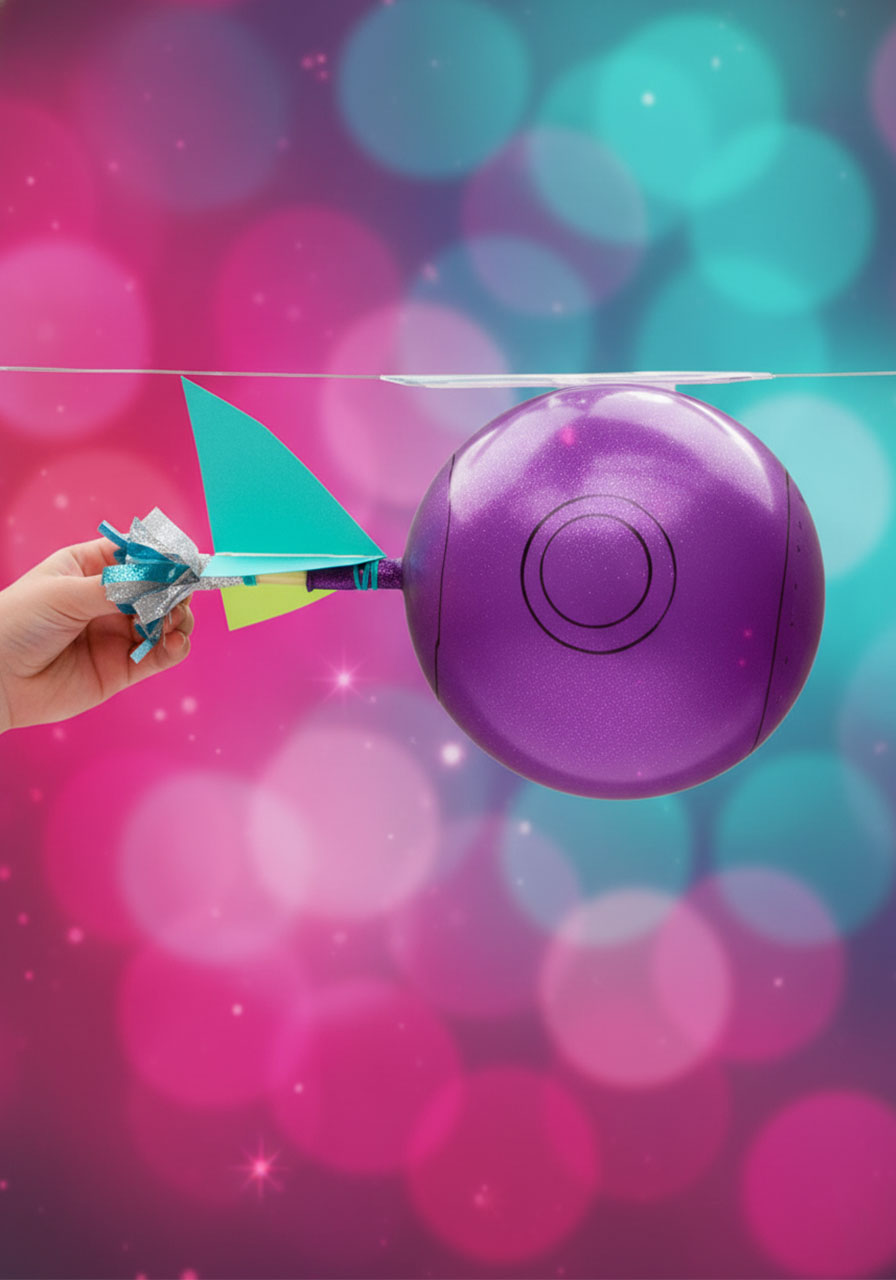
Best for: Kids ages 5+, science experiments, active indoor play
Time to Make: 10 minutes
This is a science experiment disguised as a super fun activity! Kids will be amazed at how far these balloon rockets can fly.
What You’ll Need:
- Balloons (long “airship” balloons work best)
- Kite string (10-15 feet)
- 1 plastic straw
- Tape
- Two supports (chairs, doorknobs, etc.)
How to Launch Your Rocket:
1. Tie one end of the string to a chair or doorknob.
2. Thread the other end of the string through the straw.
3. Pull the string tight and tie it to another support across the room.
4. Blow up the balloon but don’t tie it – pinch the end closed.
5. Tape the balloon to the straw (still pinching it closed!).
6. Count down from 10, then release the balloon and watch it zoom across the room!
The Science: As air rushes out of the balloon, it creates thrust – a forward pushing force. The same principle powers real rockets! Kids can experiment with different balloon shapes to see which creates the most thrust.
23. Popsicle Stick Treasure Boxes
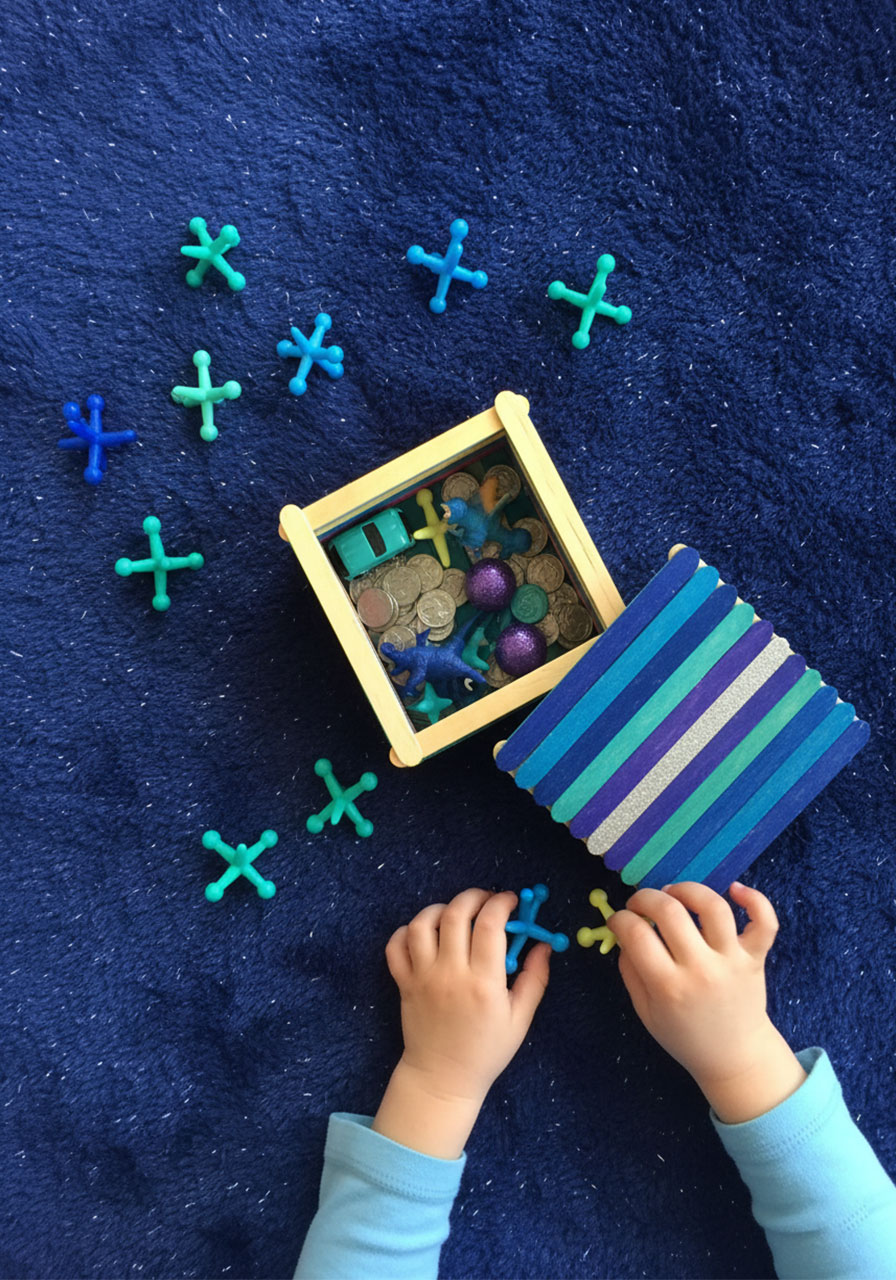
Best for: Kids ages 6+, collectors, organized storage
Time to Make: 45-60 minutes
Perfect for kids who love collecting small treasures, these boxes are functional and fun to build!
What You’ll Need:
- Popsicle sticks (plain or colored)
- Paint (if using plain sticks)
- Craft glue
- Cotton swabs (for applying glue)
- Stickers for decoration (optional)
How to Build Your Treasure Box:
1. If using plain sticks, paint them in your favorite colors and let dry.
2. Lay two sticks parallel to each other on your work surface.
3. Place two more sticks on top, perpendicular to the first two, forming a square.
4. Use small drops of glue at each corner to secure (cotton swabs help with precise glue placement).
5. Continue stacking and gluing until your box reaches the desired height.
6. Let the box dry completely before moving it.
7. For the bottom: Apply glue across the top edge and neatly line up sticks side by side.
8. For the lid: Lay sticks side by side and glue two rows of perpendicular sticks across the top to hold them together.
9. Decorate with stickers once everything is dry!
Why Kids Love It: They can store their special treasures, trading cards, or secret notes inside their handmade box!
24. Pom Pom Monster Pencil Toppers

Best for: Kids ages 5+, back-to-school crafts, party favors
Time to Make: 5 minutes per topper
Make school supplies fun again with these silly monster pencil toppers! They add personality to boring pencils.
What You’ll Need:
- Pencils
- 1-inch pom poms
- Googly eyes (various sizes)
- Pipe cleaners
- Hot glue gun
- Removable pencil erasers (optional)
How to Create Your Pencil Monsters:
1. Cut two pieces of pipe cleaner, each about 1.5 inches long.
2. Curl the ends of each piece to create antennae.
3. Hot glue the pipe cleaner antennae to the top of a pom pom.
4. Glue googly eyes to the front of the pom pom. Pro tip: Mix up eye sizes and quantities for different looks!
5. Hot glue the completed monster to the top of a pencil.
Optional: Attach a removable eraser to the pencil first so you can still use the eraser by removing the monster when needed.
Fun Variation: Try different colored pom poms and eye combinations to create unique monster personalities!
25. DIY Melted Pony Bead Bracelets

Best for: Kids ages 8+ (with adult supervision), jewelry making, unique accessories
Time to Make: 30 minutes (plus cooling time)
IMPORTANT: Like the melted bead sun catchers, this must be done outside due to toxic fumes!
What You’ll Need:
- Pony beads (various colors)
- Parchment paper
- Baking sheet
- Metal cookie cutter (for shaping)
- Oven or hair straightener
- Makeup brush handle or soda can (for shaping)
- Oven mitts
How to Make Your Bracelet:
1. Line a baking sheet with parchment paper.
2. Place a metal cookie cutter on the parchment and arrange beads inside in your desired pattern.
3. Take everything outside to your oven or grill.
4. Bake at 400°F for 5-20 minutes (watch closely!) until beads are melted but not bubbly.
5. Wearing oven mitts, quickly lift the parchment and drape the melted beads around a brush handle or can to form a ring shape.
6. Let cool completely before removing.
7. Trim any sharp edges carefully.
Safety Reminder: This MUST be done outside in a well-ventilated area. The fumes from melting plastic are harmful!
26. Straw Windpipe (Pan Flute)

Best for: Kids ages 6+, music lovers, quick crafts
Time to Make: 10-15 minutes
Create an actual working musical instrument from just straws and tape! Kids will love experimenting with different sounds.
What You’ll Need:
- 8+ plastic straws
- Tape
- Scissors
How to Make Your Windpipe:
1. Cut your straws to different lengths – start with one at full length, then cut each successive straw slightly shorter (about ½ inch shorter each time).
2. Lay out a long piece of tape, sticky side up.
3. Place your straws in order from longest to shortest along the tape, making sure the top edges are aligned.
4. Fold the tape over to secure all the straws together.
5. Cut the bottom of each straw at a diagonal angle. Important: This helps create better sound!
How to Play: Blow across the tops of the straws like you would blow across a bottle. Each straw creates a different pitch! Kids can experiment with cutting straws to different lengths to create their own musical scales.
Make It Educational: Talk about how shorter straws create higher pitches while longer straws create lower pitches!
27. Craft Stick Flower Pots (Glue-Free Version)
Best for: Kids ages 6+, spring crafts, Mother’s Day gifts
Time to Make: 15 minutes
We included this one earlier, but it deserves another mention because it’s truly one of the easiest and most impressive crafts on this list!
What You’ll Need:
- Colored craft sticks
- Clean tin cans
- Rubber bands
- Pretty ribbon
- Potting soil and small plants
Quick Assembly:
1. Snap a rubber band around the tin can.
2. Slide craft sticks under the rubber band all around the can.
3. Wrap ribbon around to hide the rubber band and tie in a bow.
4. Add soil and a plant!
Why This Works: It’s completely mess-free, requires zero drying time, and looks beautiful. Perfect for kids who want instant gratification!
28. Pool Noodle Rings (Toss Game)
Best for: Kids ages 5+, outdoor games, party activities
Time to Make: 10 minutes
Turn leftover pool noodles into a fun toss game that will keep kids entertained for hours!
What You’ll Need:
- Pool noodles (1-2 noodles)
- Duct tape or packing tape
- Scissors
- A stick or dowel rod (for the target)
How to Make Your Ring Toss Game:
1. Cut pool noodles into 12-inch sections.
2. Bend each section into a circle and secure the ends together with duct tape.
3. Decorate with colorful tape if desired.
4. Place a stick or dowel rod in the ground (or a bucket of sand) as your target.
5. Stand back and toss your rings to see who can get the most around the target!
Why Kids Love It: It’s active, competitive, and they can play it indoors or outdoors. Plus, making the rings is almost as fun as playing the actual game!
Your Turn to Create!
There you have it – 28 amazing dollar store crafts that prove you don’t need to spend a fortune to keep kids entertained and creative! Whether you’re tackling a rainy afternoon, planning a birthday party activity, or just looking for screen-free fun, these projects have you covered.
Quick Tips for Craft Success:
- Stock up on basic supplies during your next dollar store trip
- Set up a designated craft area for easy cleanup
- Let kids lead with their creativity – there’s no “wrong” way to craft
- Save completed projects to create a special memory box
Which craft are you making first? Grab your supplies, gather the kids, and get ready for some seriously fun (and budget-friendly) crafting adventures!
More Kid’s Party Ideas to Keep the Fun Rolling:
How to Play Help Your Neighbor: The Card Game That’ll Have Your Family Actually Wanting Game Night
Cornstarch & Dish Soap Bubble Dough: Easy DIY Sensory Fun!
25+ Hands-On Human Body STEM Activities Kids Will Love
The Soap and Pepper Experiment: A Mind-Blowing Way to Get Your Kids to Actually Use Soap
How to Make a DIY Kaleidoscope: A Mind-Blowing Science Craft for Kids
15 Minions Party Ideas For The Ultimate Despicable Me Birthday Bash
How to Make Magic Unpoppable Bubbles That’ll Blow Your Kids’ Minds
