
You know that feeling when you’re scrolling through Pinterest at 11 PM, telling yourself “just one more pin,” and suddenly an hour has gone by and your saved boards are overflowing with genius? Same. We’ve been there – and we did the deep dive so you don’t have to.
Whether you’re looking for a rainy-day craft, a crowd-pleasing snack for the class party, or a clever way to get your kids to actually clean up after themselves (yes, really), this list has something for every parent and teacher. These are the ideas that are genuinely worth your time – tested, practical, and totally doable without a craft degree or a professional kitchen.
Ready to fill up that “Must Try” board? Let’s go.
1. DIY Matchbox Car Parking Garage (From a Wooden Crate!)

If your living room floor is basically a Hot Wheels minefield, this one’s your new best friend. This clever parking garage uses a simple wooden crate packed with cardboard tubes – each one perfectly sized to hold a single toy car. The result? Every car has its own “spot,” cleanup is weirdly satisfying, and your feet will thank you.
Best for: Kids ages 3–10, playroom organization, gift idea for car-obsessed kids
Difficulty: Easy – no power tools required
Time to Make: About 30–45 minutes
What You’ll Need:
1 wooden crate (craft stores or dollar stores usually carry these)
Cardboard tubes (toilet paper rolls work great – start saving them now!)
Hot glue gun and glue sticks
A small sign or label for the front (optional, but adorable)
Paint or wood stain if you want to customize the crate
How to Make It:
1. Stand your wooden crate upright so the open side faces forward.
2. Cut your cardboard tubes to the same depth as the crate (so cars slide in and sit flush).
3. Hot glue the tubes together in a honeycomb-style staggered pattern – this gives you more spots and keeps everything stable.
4. Once the glue is dry, slide the entire tube structure into the crate. It should fit snugly.
5. Add a cute label or painted sign on the front that says “Parking Garage” and you’re done!
Pro Tip: Use a slightly smaller tube (like a paper towel roll cut down) for bigger trucks or monster cars so everything fits perfectly. Color-coding the tubes by car type? Even more fun for little ones learning to sort.

2. Monster Laundry Bags That Actually Make Kids Want to Tidy Up

Okay, we know what you’re thinking: “Nothing will make my kid pick up their dirty clothes.” But hear us out – these monster-faced laundry bags are so delightfully goofy that kids genuinely get excited about “feeding the monster.” The open mouth is a laundry opening, and the whole bag hangs on a door or hook. It’s part decoration, part organizational miracle.
Best for: Kids ages 3–8, bedroom organization, fun chore motivation
Difficulty: Moderate (basic sewing involved)
Time to Make: 1–2 hours
What You’ll Need:
Brightly colored, striped fabric (about 1 yard per bag)
Felt in white, black, and a contrasting color for the monster face details
Sewing machine (or fabric glue for a no-sew version)
Two curtain rings or loops for hanging at the top
Scissors, pins, and basic sewing supplies
How to Make It:
1. Cut your fabric into a large rectangle – approximately 18″ wide by 36″ tall gives you a good-sized bag.
2. Fold the fabric in half lengthwise with the right sides facing in, and sew up the sides to create a tube. Leave the top open.
3. From felt, cut out two big googly-eye shapes and a wide, toothy mouth shape. The mouth opening will be cut into the front of the bag – this is where laundry goes in.
4. Carefully cut a wide oval or half-moon opening in the center-front of the bag (this is the monster’s mouth). Finish the raw edges so they don’t fray.
5. Glue or sew the felt teeth around the inside of the mouth opening, and attach the eyes above it.
6. Add two small felt arms on the sides for extra monster personality.
7. Sew or attach two rings or loops at the top so the bag can hang from a curtain rod or hook.
Pro Tip: Make one monster per kid in their favorite color – now they have “their” monster and it doubles as a fun bedroom decoration. Bonus: it makes laundry day a lot less of a battle!
3. “Unicorn Droppings” Candy Jar – The Easiest Unicorn Party Idea Ever

If you’re throwing a unicorn-themed birthday party and need a decor idea that’s equal parts hilarious and adorable, this is it. Fill a clear glass jar with rainbow jelly beans, slap on a chalkboard label that says “Unicorn Droppings,” and watch the kids (and adults) absolutely lose it. It takes five minutes to set up and always gets a reaction.
Best for: Unicorn birthday parties, kids’ party dessert tables, classroom treats
Difficulty: Super easy – truly zero-effort
Time to Make: 5 minutes
What You’ll Need:
A clear glass jar or bottle (mason jars, apothecary jars, or even old spaghetti sauce jars work great)
Rainbow jelly beans, pastel M&Ms, or any colorful candy
A chalkboard label sticker (widely available at craft stores)
A chalk marker or chalk pen to write your label
How to Make It:
1. Clean and dry your jar completely.
2. Stick the chalkboard label onto the front of the jar.
3. Write “Unicorn Droppings” on the label using your chalk marker. Let it dry for a minute.
4. Fill the jar all the way to the top with your colorful candy.
5. Set it on your party table, dessert bar, or classroom treat station – and enjoy the giggles!
Pro Tip: Make a whole collection of whimsically labeled jars for a full candy buffet look – try “Fairy Dust” (rock candy), “Dragon Scales” (rainbow fish crackers), or “Mermaid Tears” (blue rock candy). It’s an incredibly easy way to make a dessert table look totally magical.
4. Fresh Fruit Salsa with Cinnamon Crisps

This one is going to become your go-to party appetizer, school snack, and “healthy dessert” all rolled into one. Sweet, chunky fruit salsa – think strawberries, raspberries, crisp apple, and melon – served alongside golden, crunchy cinnamon crisps made from tortillas. It looks stunning, it tastes incredible, and kids devour it like it’s candy. Parents feel great about serving it. Win-win.
Best for: Kids’ parties, classroom snacks, family gatherings, summer get-togethers
Difficulty: Easy
Time to Make: 20 minutes
What You’ll Need:
1 cup fresh strawberries, finely diced
1/2 cup fresh raspberries, lightly mashed
1 cup apple (any variety), peeled and finely diced
1/2 cup melon (honeydew or cantaloupe), finely diced
2 tablespoons sugar (or honey)
1 tablespoon fresh lemon juice
6 small flour tortillas
2 tablespoons melted butter
2 tablespoons cinnamon sugar (mix 2 tbsp sugar + 1/2 tsp cinnamon)
How to Make It:
1. Make the crisps first: Preheat your oven to 375°F. Brush both sides of each tortilla lightly with melted butter, then sprinkle generously with cinnamon sugar.
2. Cut each tortilla into 8 wedges (like a pizza) and lay them flat on a baking sheet.
3. Bake for 8–10 minutes until golden and crispy. Watch closely – they go from perfect to burnt quickly! Let them cool on the pan.
4. Make the salsa: Combine all your diced fruit in a bowl. Add sugar and lemon juice, then stir gently to combine.
5. Let the salsa sit for at least 10 minutes so the juices meld together – it gets even better as it rests.
6. Serve the fruit salsa in a bowl alongside a plate of cinnamon crisps. Done!
Pro Tip: Make the cinnamon crisps a day ahead – they stay perfectly crispy stored in an airtight container. The fruit salsa is best made the same day, but can sit refrigerated for a few hours before serving.
5. DIY Circus Animal Cookie Pillows for a Kid’s Room

Remember those pink-and-white frosted animal crackers with the rainbow sprinkles? These adorable stuffed pillows look exactly like them – in jumbo size. A bright pink elephant and a white rhino covered in colorful pom-pom “sprinkles” sitting on a couch? It’s the cutest thing you’ll ever sew, and kids absolutely go wild for them.
Best for: Kids’ bedroom or playroom decor, baby showers, unique handmade gifts
Difficulty: Moderate (basic sewing required)
Time to Make: 2–3 hours
What You’ll Need:
Fleece or felt fabric in hot pink and white (about half a yard of each)
Pillow stuffing / polyfill
Small colorful pom-poms (a mixed bag works perfectly)
Fabric glue or a hot glue gun
Scissors and sewing machine (or needle and thread)
An animal silhouette to trace – elephant and rhino shapes work great, but any chunky animal works
How to Make It:
1. Draw or print a large, simple animal silhouette (about 12–14 inches wide). An elephant or rhino with chunky, rounded shapes works best for stuffing.
2. Trace the silhouette twice onto your fabric and cut both pieces out – these are the front and back of your pillow.
3. Place the two pieces together with the right sides facing in, and sew around the outside edge leaving a 3-inch gap unsewn (you’ll stuff through here).
4. Clip around the curves, then turn the pillow right-side out through the gap. Use a pencil to gently push out the edges and curves.
5. Stuff firmly with polyfill until the pillow is plump and holds its shape. Hand-stitch the gap closed.
6. Now for the fun part: glue colorful pom-poms all over the pillow to create those iconic “sprinkles.” Let dry completely before giving to kids.
Pro Tip: Make a whole set of animals in different colors for a nursery or playroom shelf display – they look amazing grouped together. These also make genuinely impressive handmade baby shower gifts that nobody else will show up with!
6. DIY Homework Caddy from Empty Food Cartons

Before you toss that empty cereal box or juice carton, stop – you’re looking at the raw materials for the most satisfying craft project on this list. A few empty cartons + colorful duct tape = a surprisingly sturdy, totally customizable desk organizer that holds everything from pencils to scissors to flashcards. The best part? It costs basically nothing.
Best for: Back-to-school season, homework stations, desk organization for kids ages 5+
Difficulty: Easy – kids can help with this one!
Time to Make: About 1 hour (plus drying time)
What You’ll Need:
3–5 empty food cartons in varying sizes (cereal boxes, juice boxes, cracker boxes, oatmeal containers)
Colorful duct tape in 2–3 colors of your choice
Scissors
Hot glue gun
Toilet paper tubes (for holding pencils and pens inside a larger box)
How to Make It:
1. Open the tops of all your cartons and cut them down to different heights – this gives your caddy that stair-step look that’s both practical and stylish.
2. If using toilet paper rolls inside a box for a pencil holder, hot-glue them in a cluster inside one of the cartons now.
3. Arrange your cartons side by side in a configuration you like – group them by size and think about what you’ll store in each one.
4. Hot glue the cartons together so they hold their arrangement firmly.
5. Now wrap the entire caddy – both inside and outside – with strips of colorful duct tape in a striped pattern. Overlap the strips slightly for full coverage and no cardboard showing through.
6. Let everything dry and cool, then fill it up! Pencils, erasers, scissors, glue sticks, flashcards – everything gets a home.
Pro Tip: Let your kids pick the duct tape colors and help with the wrapping – this is a great age-appropriate craft for elementary schoolers, and they’ll take way more pride in keeping their desk tidy when they made the organizer themselves.
7. Creative DIY Growth Charts Your Kids Will Actually Love

Forget the pencil marks on the doorframe – these DIY growth charts are so good-looking you’ll want to frame them. From a sleek race track ruler to a personalized airplane design with your child’s name on the tail, these wall charts turn a simple height-tracking tradition into a genuine piece of bedroom decor. And the best part? You take it with you when you move.
Best for: Kids’ bedrooms, nurseries, playrooms, meaningful keepsake gifts
Difficulty: Moderate
Time to Make: 2–4 hours depending on the design
What You’ll Need (basic version):
A flat, smooth piece of wood (a 1″x6″ board cut to 6 feet works perfectly)
Sandpaper
Paint in your chosen colors
A ruler and pencil for marking measurements
A fine-tip paint pen or Sharpie for writing the numbers
Painter’s tape (for clean stripes or sections)
Clear sealant spray to protect the finished chart
How to Make It:
1. Sand your board smooth, then apply a base coat of paint in your primary color. Let dry completely.
2. Use painter’s tape to mask off alternating stripes (navy and white is a classic look, but go wild – match your kid’s room!). Paint, then carefully remove the tape before the paint fully dries for the crispest lines.
3. Once the base design is dry, use a ruler to carefully mark measurement increments along one edge of the board. Start from the floor – mark your first line at 12 inches from the bottom.
4. Use a paint pen to draw your measurement lines and write the numbers (1, 2, 3, 4, 5 feet). Make the foot markers slightly longer and bolder than the inch markers.
5. Add your personal touch – a child’s name, a themed cut-out (an airplane, rocket, or flower), or little decorative details that match their room.
6. Once fully dry, spray with a clear sealant to protect against fingerprints and little-kid hands. Mount on the wall with the bottom of the board exactly 12 inches from the floor.
Pro Tip: Use a paint pen rather than regular paint for writing numbers – it gives you much more control. Also, mounting the chart 12 inches from the floor (instead of starting at zero from the ground) accounts for the fact that most kids are measured in shoes! Just remember to note the offset.
8. Dirt Pudding Cups with Gummy Worms

These are the treat that every kid goes absolutely berserk for – and honestly, adults secretly love them too. Creamy chocolate pudding gets topped with crushed Oreos to look like “dirt,” then gummy worms are stuck in at all angles like they’re crawling through the soil. They’re dramatic, they’re delicious, and they take about 20 minutes to assemble. They’re perfect for birthday parties, classroom celebrations, Halloween, or just a Tuesday when everyone needs a win.
Best for: Birthday parties, Halloween, classroom treats, outdoor/nature themed parties
Difficulty: Super easy – kids can absolutely help make these
Time to Make: 20 minutes (plus 2 hours chill time)
What You’ll Need (makes about 8–10 cups):
2 boxes (3.4 oz each) instant chocolate pudding mix
3 cups cold milk
1 cup heavy whipping cream (or 1 tub of Cool Whip)
1 package Oreo cookies (about 30 cookies)
Gummy worms (at least 2 per cup)
Small clear plastic cups or bowls for serving
How to Make It:
1. Make the pudding base: Whisk the pudding mix and cold milk together for 2 minutes until thick. If using whipping cream, whip it separately to stiff peaks, then gently fold it into the pudding for an extra-creamy, mousse-like texture. If using Cool Whip, fold it right in.
2. Crush the Oreos: Place the Oreos in a zip-lock bag and crush them with a rolling pin until you get fine, crumbly “dirt.” You want a mix of fine crumbs and a few chunky bits – it looks more realistic!
3. Assemble the cups: Spoon the chocolate pudding mixture into each clear cup, filling it about three-quarters of the way up.
4. Spoon a generous layer of crushed Oreos on top of the pudding so it’s completely covered and looks like a cup of dirt.
5. Push 2–3 gummy worms into each cup so they’re peeking out at different angles – some crawling in, some wiggling out.
6. Refrigerate for at least 2 hours (or overnight) before serving. The pudding firms up beautifully and the “dirt” stays perfectly in place.
Pro Tip: Set these up assembly-line style at a birthday party and let the kids add their own gummy worms – it becomes a mini activity AND a treat. Just have extra gummy worms on hand because a few will mysteriously disappear before the cups are finished.
9. DIY Popsicle Stick Dollhouse
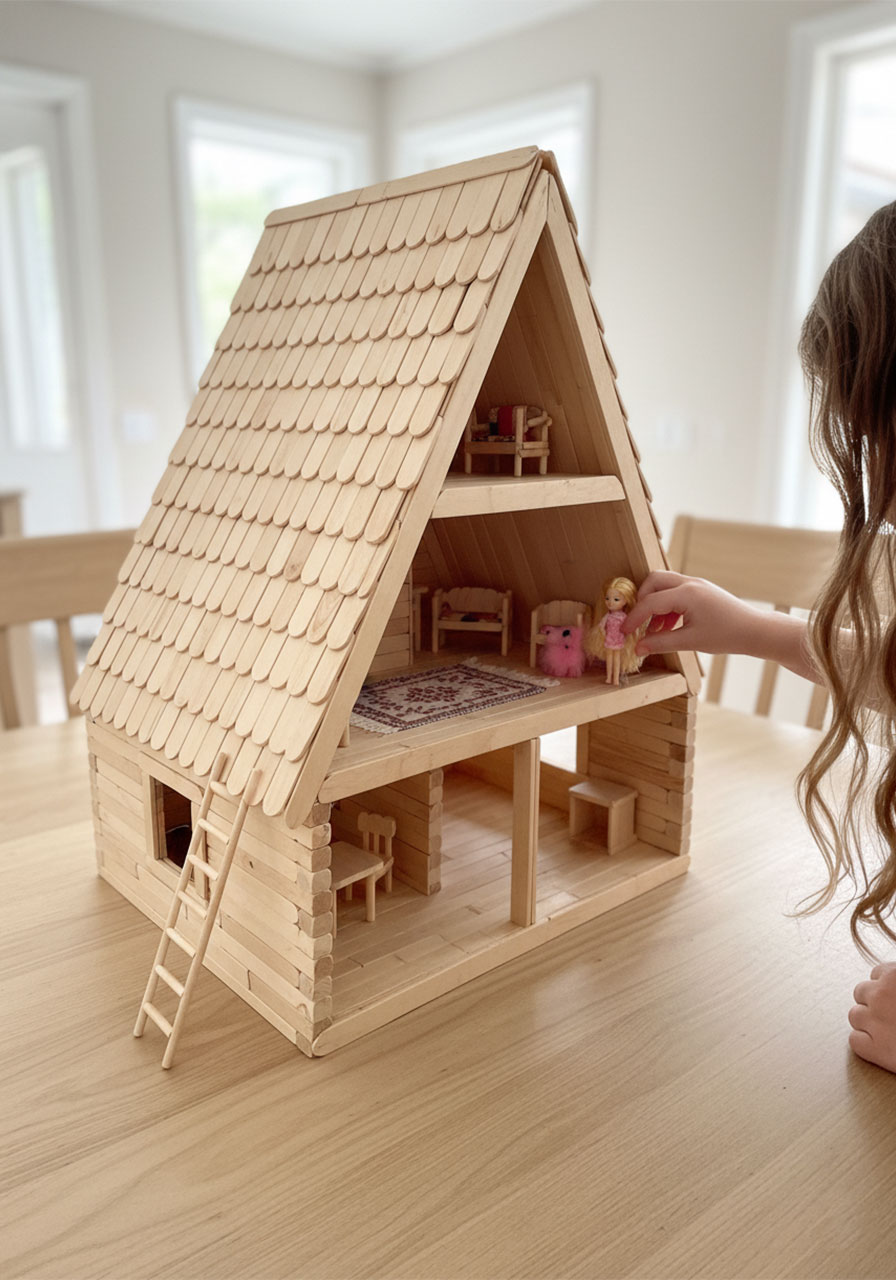
This is the kind of craft project that kids ask to work on every single day until it’s done – and then immediately want to start a second one. Built entirely from popsicle sticks (the jumbo craft variety), this A-frame dollhouse has real structural walls, a working ladder, and enough open space to furnish and play with. It’s a genuine building project that sneaks in creativity, fine motor skills, and patience – all while being genuinely fun.
Best for: Kids ages 6+, rainy-day project, STEM-friendly crafting, great for creative play
Difficulty: Moderate to challenging – this one’s a multi-session project
Time to Make: Several sessions over 2–3 days (glue needs drying time between steps)
What You’ll Need:
Jumbo popsicle/craft sticks (you’ll need several hundred – buy in bulk)
Regular-sized popsicle sticks for finer details like the ladder
Strong craft glue or a low-temp hot glue gun (adult supervision for the hot glue)
A sturdy flat base – a piece of cardboard or thin wood works great
Paint or wood stain (optional, for finishing)
Small decorations: fabric scraps for rugs, mini furniture, tiny accessories
How to Make It:
1. Build the floor: Lay popsicle sticks side by side on your flat base and glue them down in a grid pattern to form the ground floor. Let this dry completely before building up.
2. Build the walls: Stack popsicle sticks log-cabin style (alternating directions at each corner) to build up the four walls to your desired height. Glue each layer and let dry before adding the next.
3. Create the A-frame roof: This is the trickiest part! Form two triangular end pieces using sticks cut at angles (ask an adult to help). Then lay rows of sticks across the top from one triangle to the other, overlapping slightly like roof tiles. Glue in place.
4. Add the ladder: Glue two long sticks parallel to each other, then glue short sticks across as rungs. This can lean against the house or attach to an upper level if you build a second floor.
5. Once everything is fully dry, decorate! Paint the walls, add a tiny welcome mat made from felt, glue in fabric scraps as rugs, and move your dolls in.
Pro Tip: Work in stages and let the glue cure overnight between major structural steps – rushing this is the number one reason popsicle stick builds collapse. Patience pays off with a house that’s actually sturdy enough for active play.
10. Sand and Water Ocean Sensory Bin
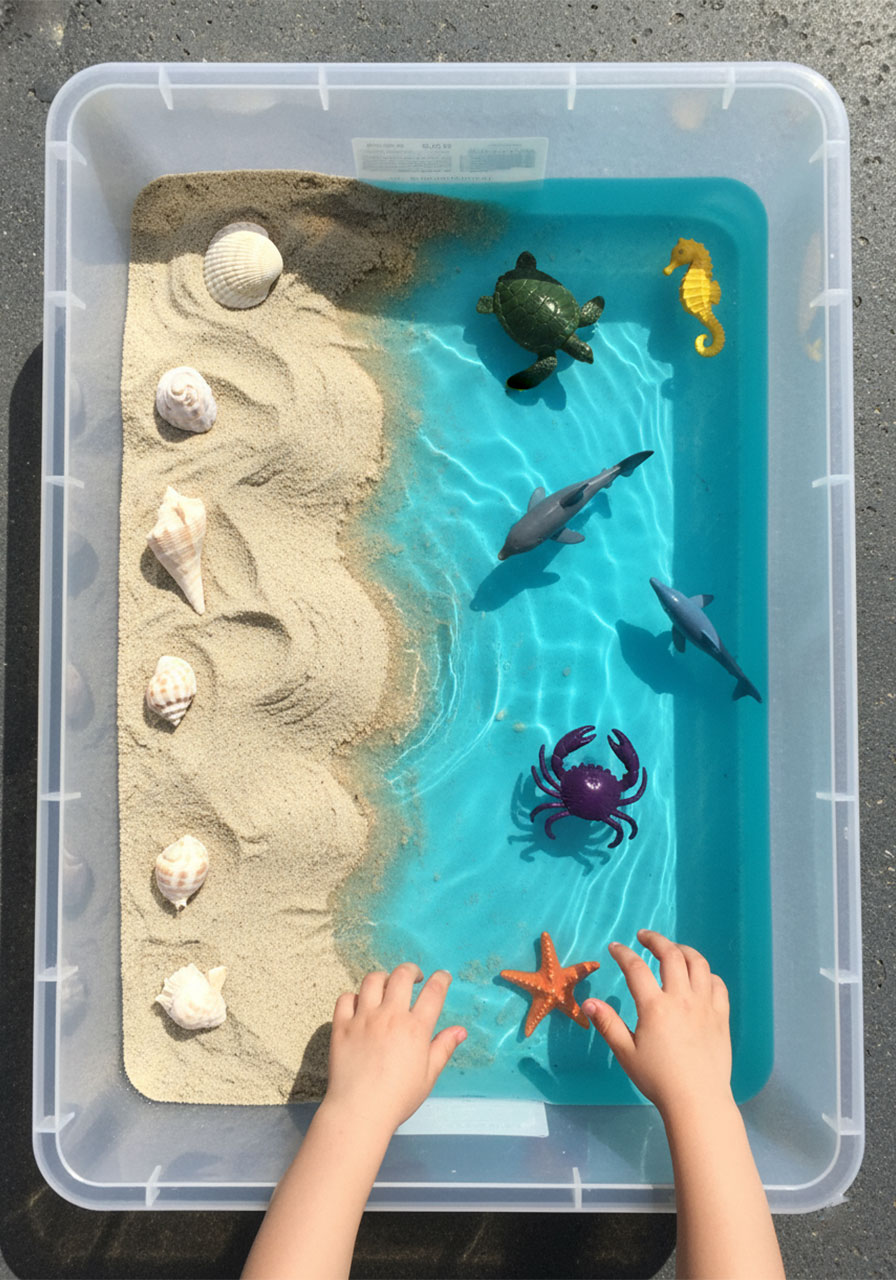
If you’ve never set up a sensory bin for your kids before, this is the one to start with – because it’s genuinely beautiful. Half real sand, half blue-tinted water, seashells lined up along the “shoreline,” and ocean animal figurines swimming through the depths. Kids can play in it for an hour straight, and it quietly teaches them about ocean habitats, textures, and imaginative storytelling all at once. Teachers, this one is an absolute classroom goldmine.
Best for: Toddlers and kids up to age 7, sensory play, classroom learning centers, ocean or beach themes
Difficulty: Super easy to set up
Time to Set Up: 10–15 minutes
What You’ll Need:
A large, clear plastic storage bin (the longer and wider, the better)
Real sand (play sand from a hardware or garden store – keep it dry)
Water
Blue food coloring (just a drop or two)
Seashells (grab a bag from a craft store, or collect real ones!)
Ocean animal figurines – sharks, turtles, dolphins, starfish, crabs
Optional: a few small rocks, a toy submarine, or a tiny plastic coral piece
How to Set It Up:
1. Pour dry sand into one half (or one-third) of the bin, packing it slightly so it holds a “beach” shape.
2. Line the border between the sand and water section with seashells – this looks stunning and creates a natural shoreline.
3. Carefully pour water into the other section of the bin. Add 1–2 drops of blue food coloring and stir gently until you get a pretty ocean-blue color.
4. Place your ocean animal figurines in the water section – partially submerged, peeking up, or “swimming” in different directions.
5. Add a starfish or two on top of the sand, and maybe a few shells in the water for kids to “discover.”
6. Set it on a low table or the floor (put a plastic sheet or towels underneath – splashing will happen). Now step back and watch the magic.
Pro Tip: For a classroom, laminate a simple ocean habitat reference card and lay it beside the bin – kids can match the figurines to the animals on the card. For home, this works brilliantly as a calm-down activity. The combination of cool water and soft sand is naturally soothing for little ones.
11. S’mores Cookie Bars

All the gooey, campfire magic of a s’more – no fire pit, no sticky fingers on lawn chairs, no bugs. These golden brown bars have a soft, chewy graham-cracker-flavored cookie base, a layer of melted chocolate chips, a layer of stretchy toasted marshmallow, and another cookie layer on top. They are outrageously good, they feed a crowd, and they stay fresh for up to a week (not that they’ll last that long).
Best for: Birthday parties, bake sales, classroom treats, family gatherings, campfire-themed parties
Difficulty: Easy – one bowl, one pan
Time to Make: About 40 minutes (including bake time)
What You’ll Need (makes one 9×13 pan, about 24 bars):
2 1/4 cups all-purpose flour
1 1/2 teaspoons baking powder
1/2 teaspoon salt
3/4 cup (1.5 sticks) unsalted butter, softened
1 cup packed brown sugar
1/4 cup granulated sugar
2 large eggs
1 teaspoon vanilla extract
1 1/2 cups semi-sweet chocolate chips
3 cups mini marshmallows (or about 20 large marshmallows, cut in half)
Optional: a few crushed graham crackers to press into the top layer for extra s’mores flavor
How to Make It:
1. Preheat your oven to 350°F. Grease a 9×13 inch baking pan well (or line it with parchment paper for the easiest cleanup).
2. In a large bowl, beat together the softened butter, brown sugar, and granulated sugar until light and fluffy – about 2 minutes.
3. Beat in the eggs and vanilla until fully combined.
4. Add the flour, baking powder, and salt, and stir until a soft dough forms.
5. Press half the dough into an even layer on the bottom of your prepared pan. It’ll be sticky – use lightly floured fingers or the bottom of a measuring cup to press it flat.
6. Sprinkle the chocolate chips evenly over the dough layer, then scatter the marshmallows on top of the chocolate in an even layer.
7. Drop the remaining dough in small pieces over the marshmallow layer and gently press it into a rough top layer. It doesn’t need to be perfectly smooth – the rustic look is part of the charm!
8. Bake for 25–30 minutes until the top is golden brown. The center may look slightly underdone – that’s perfect. It firms up as it cools.
9. Let cool in the pan for at least 20 minutes before cutting into bars. (We know – waiting is hard.)
Pro Tip: For the cleanest cuts, refrigerate the pan for 30 minutes after it comes to room temperature, then cut with a sharp knife. The cold firms up the marshmallow layer so it doesn’t stretch and drag when you slice. Worth the extra wait, we promise.
12. Pool Noodle Hot Wheels Drag Racing Track

This is the outdoor activity that will keep kids entertained for an entire afternoon – and all it takes is a couple of pool noodles and a kiddie pool. Slice two pool noodles in half lengthwise to create four perfectly car-sized lanes, prop them at a slight angle over the edge of a pool or storage bin, and you’ve got a legitimate drag racing setup. Kids race their Hot Wheels cars down the lanes, the cars splash into the water at the finish line, and everyone goes absolutely wild. It’s fast, it’s loud, and it’s the kind of fun that gets talked about for weeks.
Best for: Outdoor summer play, birthday parties, backyard gatherings, kids ages 3–10
Difficulty: Super easy – setup takes about 5 minutes
Time to Set Up: 5–10 minutes
What You’ll Need:
2–3 pool noodles (cut in half lengthwise to create the racing lanes)
A sharp kitchen knife or box cutter (adults only for this step)
A kiddie pool, large plastic storage bin, or any container to catch the cars at the bottom
Hot Wheels cars or any small toy cars
Something to prop up the top end of the noodles – a chair, a cooler, or stacked books work great
Optional: a homemade “START” and “FINISH” sign made from cardstock to make it feel official
How to Set It Up:
1. Have an adult carefully cut each pool noodle in half lengthwise using a sharp knife. The cut creates a natural groove/channel – this is your race lane.
2. Fill your kiddie pool or container with a few inches of water and place it at the bottom of where your track will end.
3. Rest the top end of the pool noodle halves on your elevated surface (a chair works perfectly). The noodles should slope downward toward the pool at a gentle angle – too steep and the cars fly off, too flat and they slow down. A 30–45 degree angle is the sweet spot.
4. Place two noodle lanes side by side so two cars can race simultaneously.
5. If you’re making signs, tape a “START” banner across the top of both lanes and a “FINISH” banner near the bottom. It instantly makes this look like a real event!
6. Drop two cars at the top at the same time – and let the racing begin. First car to splash into the water wins!
Pro Tip: Set up a bracket-style tournament if you have a group of kids – write all the kids’ names on a bracket (just like March Madness!) and have them race head-to-head in rounds. The kids will be completely obsessed, and it keeps everyone engaged even when it’s not their turn to race.
13. Rainbow Pretzel Wands

These are the treat that makes every party table look like a celebration exploded – in the best possible way. Pretzel rods dipped in smooth white chocolate and coated in rainbow sprinkles while the chocolate is still wet. That’s it. They look like something from a fancy bakery, they take about 20 minutes to make, and kids love them so much that people genuinely ask for the “recipe.” Spoiler: there isn’t one. They’re just that easy.
Best for: Birthday parties, unicorn or rainbow-themed parties, classroom treats, bake sales, end-of-year celebrations
Difficulty: Super easy – perfect for kids to help with
Time to Make: 20–25 minutes (plus 15 minutes to set)
What You’ll Need (makes about 20 wands):
1 bag of pretzel rods
2 cups white chocolate chips or white melting wafers (melting wafers give a smoother result)
Rainbow nonpareils or rainbow sprinkle mix
A tall glass or mug for dipping
Parchment paper or wax paper to lay the finished wands on
How to Make Them:
1. Melt your white chocolate in a tall, narrow mug or glass – a mug works better than a bowl because you can fully submerge the pretzel rod. Microwave in 30-second bursts, stirring between each, until completely smooth. Don’t overheat or the chocolate will seize.
2. Pour your rainbow sprinkles into a shallow dish or onto a plate.
3. Hold a pretzel rod by one end and dip it into the melted white chocolate, submerging about two-thirds of the rod. Let the excess drip off for a few seconds.
4. While the chocolate is still wet, roll or sprinkle the rainbow nonpareils generously over the coated section. Make sure to coat all sides.
5. Lay the finished wand on parchment paper. Repeat with remaining pretzel rods.
6. Let the wands set at room temperature for about 15 minutes, or pop them in the fridge for 5–10 minutes to speed things up. The chocolate will firm up and lock the sprinkles in place.
Pro Tip: Stand completed wands upright in a glass or mason jar filled with candy or rice for a stunning party centerpiece display – they look incredible AND they’re the dessert. Two birds, one stone. You can also swap white chocolate for pink, blue, or any colored melting wafers to match any party theme.
14. 2-Ingredient Aloe Vera Dough

Yes, really – two ingredients. Aloe vera gel and cornstarch are all it takes to make a smooth, stretchy, satisfying dough that kids can knead, shape, and play with for hours. It has a uniquely silky texture that’s completely different from regular playdough, it’s gentle on little hands, and because the main ingredient is aloe, parents feel pretty great about it. This is the rainy-day activity that’ll save you when you’ve run out of ideas.
Best for: Toddlers and kids ages 2–8, sensory play, classroom activity, rainy-day crafts
Difficulty: Literally can’t be easier
Time to Make: 5 minutes
What You’ll Need:
1 cup cornstarch
1/2 cup aloe vera gel (the clear, plain variety – not a lotion or scented gel)
Food coloring (optional, but highly recommended for extra fun)
A mixing bowl
A flat surface for kneading
How to Make It:
1. Pour the cornstarch into a mixing bowl.
2. Add the aloe vera gel. If you’re adding food coloring, mix a few drops into the aloe gel first before adding it to the cornstarch – this gives you the most even color distribution.
3. Stir the mixture together with a spoon until it starts to come together into a rough dough.
4. Turn it out onto a clean flat surface and knead with your hands for 1–2 minutes until it becomes smooth and pliable. If it feels too sticky, add a little more cornstarch one tablespoon at a time. If it’s too stiff, add a tiny bit more aloe gel.
5. That’s genuinely it. Hand it to your kids and watch them go!
Pro Tip: Make multiple small batches in different colors and give kids the whole rainbow to play with. Store leftover dough in a zip-lock bag or airtight container in the fridge – it’ll stay fresh and pliable for several days. Unlike regular playdough, this version won’t dry out and crack on the counter if kids forget to put it away.
15. Grilled Cheese Roll-Ups

Everything kids love about a grilled cheese sandwich – golden crispy outside, melty stretchy cheese inside – but in a fun roll-up shape that’s way more exciting to eat and way less messy to handle. These are perfect for lunchboxes, after-school snacks, or party food, and they come together in under 15 minutes. Serve them with a little cup of tomato soup for dipping and you have a lunch that kids will request on repeat.
Best for: Everyday lunches, after-school snacks, kids’ parties, picky eaters
Difficulty: Easy
Time to Make: 15 minutes
What You’ll Need (makes 8 roll-ups):
8 slices of white sandwich bread (the softer, the better – it rolls without cracking)
8 slices of American or cheddar cheese (or a mix)
2 tablespoons softened butter
A rolling pin
A non-stick skillet or griddle
Optional for dipping: tomato soup or marinara sauce
How to Make Them:
1. Use a rolling pin to flatten each slice of bread firmly – roll it out until it’s thin and compact. This is the key step that makes the bread flexible enough to roll without tearing.
2. Cut the crusts off each flattened slice (optional, but it gives a cleaner roll and most kids prefer it).
3. Lay one slice of cheese on each piece of flattened bread, covering it edge to edge.
4. Starting from one end, roll the bread up tightly around the cheese. Press the seam down gently to seal it – the bread will stick to itself.
5. Brush the outside of each roll-up lightly with softened butter on all sides.
6. Heat a non-stick skillet over medium heat. Place the roll-ups seam-side down and cook for about 2–3 minutes per side, turning to toast all sides until golden brown and the cheese is fully melted inside.
7. Let cool for a minute (the melted cheese is very hot inside!), then serve with soup or sauce for dipping.
Pro Tip: You can absolutely customize the filling – add a thin slice of ham, a little cream cheese, or even some scrambled egg for a breakfast version. Make a big batch and reheat in a toaster oven for a quick weeknight snack that still tastes freshly made.
16. Upcycled Soda Box Pencil Cases

Before recycling that empty 12-pack soda box, take a second look – because with about five minutes and some basic supplies, it becomes a surprisingly functional, totally unique pencil case. The cardboard is sturdy, the box is exactly the right size for pencils and markers, and kids get a kick out of carrying around a pencil case that looks like a can of Orange Fanta or Diet Coke. It’s the back-to-school craft that costs basically nothing.
Best for: Back-to-school crafts, classroom projects, kids ages 5+, zero-waste activities
Difficulty: Easy – great for kids to do independently
Time to Make: 10–15 minutes
What You’ll Need:
An empty soda can box (the rectangular 12-pack or variety pack boxes work best)
A ruler and pencil
Scissors or a craft knife (adult supervision for craft knives)
Clear packing tape or wide transparent tape
Velcro strip (the sticky-backed kind – found at any craft or hardware store)
Optional: washi tape or stickers to decorate
How to Make It:
1. Find the end of the soda box that opens (the perforated tab end) – this will become the opening of your pencil case. Make sure the box is completely empty and clean inside.
2. On the opposite end (the sealed bottom), measure and mark a line about 1.5 inches from the bottom edge all the way around two of the long sides and one short side – this creates a three-sided flap that opens like a lid.
3. Carefully cut along your marked line on those three sides to create the hinged opening flap. The fourth side stays uncut and acts as the hinge.
4. Fold the flap open and check that your pencils fit comfortably inside. Trim if needed.
5. Reinforce all the cut edges with clear packing tape so they don’t fray or tear with regular use.
6. Attach one strip of sticky Velcro to the inside of the flap and the corresponding strip to the box underneath so the case closes securely.
7. Decorate the outside with washi tape, stickers, or markers if desired – or leave the soda box graphic as-is for maximum cool factor.
Pro Tip: Make this a classroom craft at the start of the school year – ask parents to send in empty soda or cereal boxes a week beforehand, and turn pencil case making into a first-week activity. Every kid ends up with a one-of-a-kind case and zero supply cost for the classroom.
17. Iron-On Embroidered Patches for Kids’ Clothes

This one is so simple it barely counts as a project – but the result is genuinely adorable. Iron-on embroidered patches (think ice cream cones, rockets, dinosaurs, superheroes) can transform a plain t-shirt, backpack, jeans, or jacket into something that feels totally personalized and special. Kids love choosing their own patches, and the whole “makeover” takes about two minutes per patch. It’s also a brilliant way to cover up a stain or small hole and extend the life of a beloved item of clothing.
Best for: Kids of all ages, personalizing school supplies and clothes, birthday activity, upcycling worn items
Difficulty: Couldn’t be easier
Time: 2 minutes per patch
What You’ll Need:
Iron-on embroidered patches (widely available at craft stores, online marketplaces, and specialty shops – look for food, animal, space, or character themes)
A clothing iron
A thin cotton cloth or dish towel (to protect the patch while ironing)
The item of clothing, bag, or fabric you’re applying to
Optional: needle and thread to hand-stitch around the edges for extra durability
How to Apply a Patch:
1. Preheat your iron to the cotton/high heat setting. Make sure the steam function is turned OFF – you want dry heat only.
2. Place your garment on a firm, flat surface (an ironing board or a folded towel on a table works great). Smooth out any wrinkles in the area where you’ll apply the patch.
3. Position your patch exactly where you want it, adhesive side down.
4. Place your thin cotton cloth over the patch to protect it from direct iron contact.
5. Press the iron firmly down over the patch for 30–45 seconds. Apply firm pressure – don’t slide the iron, just press straight down.
6. Lift the iron and let the area cool for 60 seconds before touching the patch. Once cool, press down on the patch – if any edges lift, repeat the process on those spots.
7. For bags, backpacks, and high-stress areas, add a few hand stitches around the edge of the patch for extra security.
Pro Tip: Turn patch-decorating into a birthday party activity – set up a “patch station” where kids pick 2–3 patches to iron onto a plain canvas tote bag. They leave with a personalized party favor they actually made themselves. Parents love it, kids love it, and it’s one of the most low-stress party activities out there.
18. Zucchini Taco Shells (Gluten-Free & Dairy-Free!)

If you have a picky eater who “hates vegetables” – challenge accepted. These zucchini taco shells are golden, slightly crispy, and genuinely hold together for a full taco. Kids who have no idea they’re eating zucchini will happily devour them, and the parents who know what’s in them will feel like absolute champions. They’re gluten-free, dairy-free, and take about 30 minutes start to finish. Taco Tuesday just got a major upgrade.
Best for: Family weeknight dinners, picky eaters, gluten-free or dairy-free households, healthy school lunches
Difficulty: Easy
Time to Make: 30–35 minutes
What You’ll Need (makes about 8 shells):
3 medium zucchini
2 large eggs
1/3 cup almond flour (or regular flour if gluten isn’t a concern)
1/2 teaspoon garlic powder
1/2 teaspoon salt
1/4 teaspoon black pepper
A box grater or food processor
A clean kitchen towel or cheesecloth
Parchment-lined baking sheet
How to Make Them:
1. Preheat your oven to 400°F.
2. Grate the zucchini using the large holes of your box grater. You should have about 3 cups of grated zucchini.
3. This step is critical: Transfer the grated zucchini to a clean kitchen towel, wrap it up, and squeeze out as much liquid as possible over the sink. Squeeze hard and keep going – the drier the zucchini, the crispier your shells. This might take a full minute of squeezing.
4. Transfer the dry zucchini to a bowl. Add the eggs, almond flour, garlic powder, salt, and pepper. Mix until well combined – it should hold together when pressed.
5. Divide the mixture into 8 equal portions. On your parchment-lined baking sheet, press each portion into a flat, round circle about 5–6 inches across and as thin as you can make it.
6. Bake for 20–25 minutes until the edges are golden brown and the shells feel firm to the touch. They’ll crisp up more as they cool.
7. Fill with your favorite taco fillings – seasoned ground beef or chicken, shredded cheese, salsa, avocado, and lettuce. Fold gently and eat immediately.
Pro Tip: The squeezing step is non-negotiable – if the zucchini is too wet, the shells won’t hold together. Get the kids involved with the squeezing, though – it’s surprisingly fun and they’ll be invested in the final result. Kids who help make dinner are statistically much more likely to actually eat it!
19. Healthy Banana Split Cups
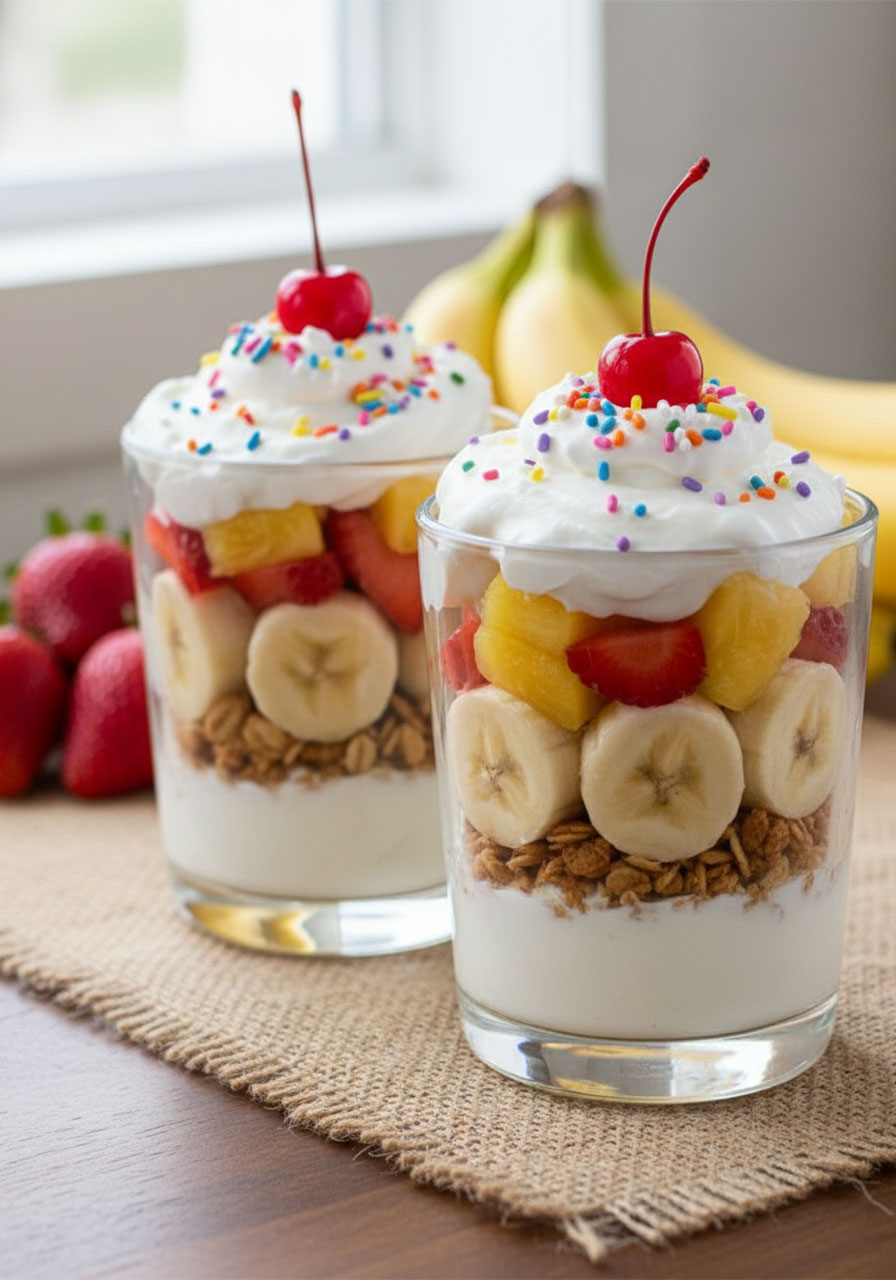
This is the dessert that feels like a total treat – and actually, secretly, kind of is good for you. Layers of creamy Greek yogurt, crunchy granola, sliced banana, fresh strawberries, and pineapple chunks, topped with a cloud of whipped cream, a shower of rainbow sprinkles, and a cherry on top. It looks exactly like a banana split sundae. It tastes exactly like a banana split sundae. It just happens to be packed with protein, fiber, and real fruit. Parents, this is your new secret weapon.
Best for: After-school snacks, healthy birthday party desserts, summer gatherings, breakfast-for-dessert nights
Difficulty: Zero cooking required
Time to Make: 10 minutes
What You’ll Need (per serving):
1/2 cup plain or vanilla Greek yogurt
1/4 cup granola
1/2 banana, sliced
4–5 fresh strawberries, hulled and halved
2–3 pineapple chunks (fresh or canned in juice, drained)
2 tablespoons whipped cream
A pinch of rainbow sprinkles
1 maraschino cherry for the top
A clear glass or cup for serving (the layers look stunning in a clear vessel)
How to Assemble:
1. Spoon the Greek yogurt into the bottom of your clear glass as the base layer.
2. Sprinkle the granola evenly over the yogurt layer – this gives you that satisfying crunch in every bite.
3. Add your fruit layer: arrange the banana slices, strawberry halves, and pineapple chunks on top of the granola. Layer them generously so the glass looks full and colorful.
4. Add a dollop of whipped cream right on top of the fruit.
5. Scatter a small pinch of rainbow sprinkles over the whipped cream.
6. Finish with a single maraschino cherry on top. Step back and admire your work – this looks genuinely beautiful.
7. Serve immediately, or refrigerate for up to an hour before serving (add the whipped cream and cherry right before serving so they stay fresh).
Pro Tip: Set this up as a “build your own banana split bar” at a kids’ party – lay out all the toppings in small bowls and let kids layer their own cup. It becomes an activity AND a dessert, it satisfies every preference, and cleanup is easier than you’d think. Kids are also way more excited to eat something they assembled themselves.
20. “I Love You to the Moon and Back” Space Wall Art
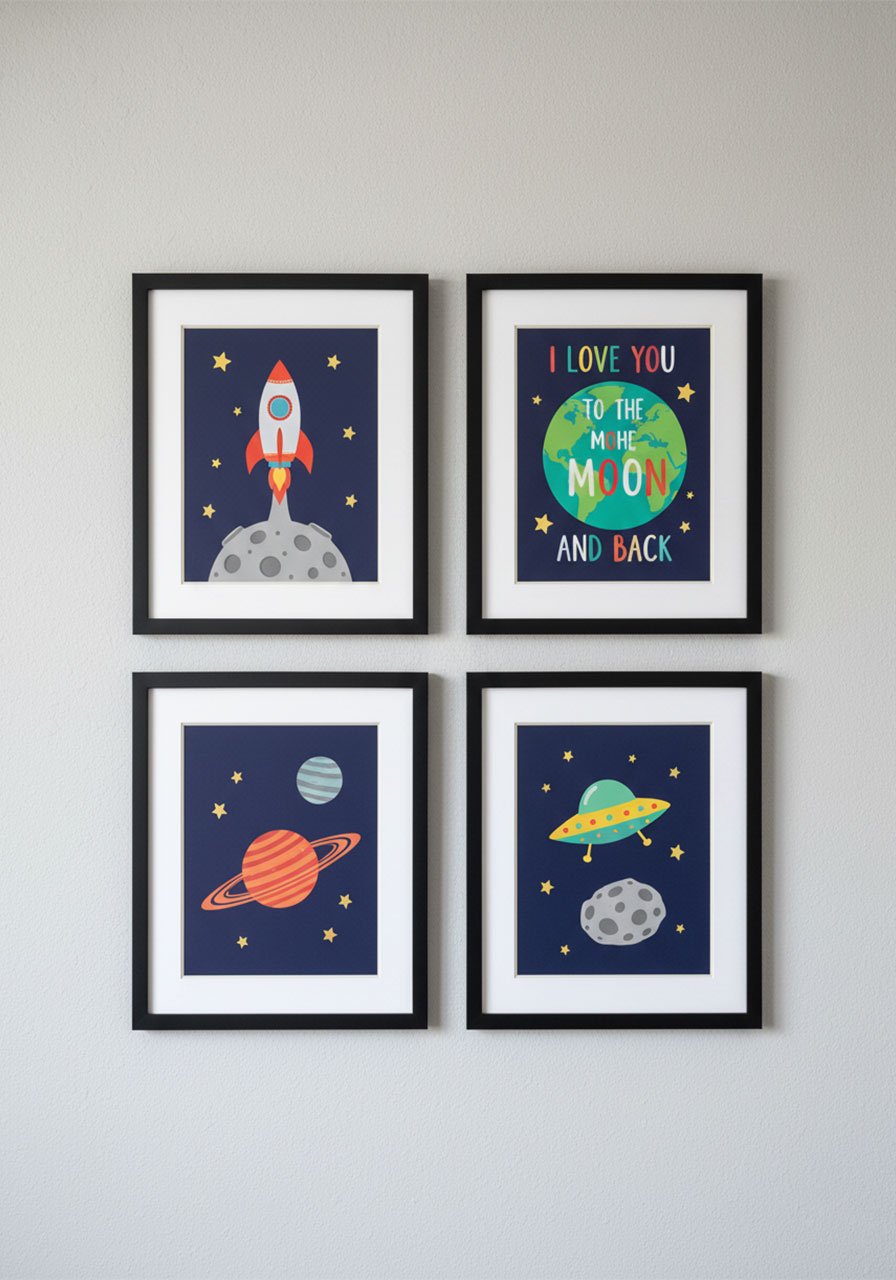
This is the finishing touch that takes a kid’s bedroom from a room to a sanctuary. A set of four coordinating space-themed art prints – a rocket ship, planets, a UFO, and the iconic “I Love You to the Moon and Back” quote – displayed together as a gallery wall. It’s the kind of thing that makes visitors stop and say “where did you get that?” and makes your kid feel like their room was designed just for them. And it’s a message that never gets old, no matter how old they get.
Best for: Nurseries, kids’ bedrooms, playrooms, meaningful gift for a new baby or birthday
Difficulty: Easy – it’s all about the arrangement
Time to Set Up: 30 minutes
What You’ll Need:
4 coordinating art prints in a space theme (look for sets on Etsy, at home goods stores, or create your own – see Pro Tip below)
4 matching frames (simple black or white frames let the art do the talking)
A level
A measuring tape
Pencil for marking the wall
Picture-hanging hardware (most frames come with this included)
Command strips (a damage-free option if you’re renting or want to avoid nails)
How to Hang a Gallery Wall:
1. Before touching the wall, lay all four frames out on the floor in the arrangement you want. Play with the layout – two on top, two on bottom is the classic grid look, but a slight offset arrangement feels more organic and modern.
2. Measure the total footprint of your arrangement on the floor, then find the corresponding spot on the wall, making sure it’s centered above the furniture it’ll hang over.
3. Start with the top-left frame. Use your level to make sure it’s perfectly straight, mark the wall, and hang it.
4. Use your measuring tape to maintain consistent spacing between frames – 2–3 inches between frames is the sweet spot for a cohesive look.
5. Hang each remaining frame, checking with the level as you go. Stand back every couple of frames to make sure the arrangement looks balanced from a distance.
6. Step back, take it in, and enjoy the fact that you just created a genuinely beautiful piece of your child’s room.
Pro Tip: Can’t find the exact prints you love? This is a wonderful opportunity to create something truly personal. Design your own art in Canva (free!) using the child’s favorite colors, their name, or inside family phrases. Print at a local print shop in the size you need, frame it, and you have completely custom wall art for a fraction of the cost – and a story to tell every time someone asks about it.
21. Rainbow Aloe Vera Play Dough Kit (Gift-Worthy Craft in a Jar)

You already know the magic of 2-ingredient aloe dough (idea 14!) – now imagine gifting the whole experience in a cute mason jar, ready to go. Layer cornstarch, a small bottle of aloe vera gel, and a few packets of food coloring neatly inside a clear jar, tie on a little tag with instructions, and you have one of the most thoughtful, low-cost, and genuinely useful party favors or teacher appreciation gifts out there. Parents love it because it’s non-toxic and mess-contained. Kids love it because it’s basically a science experiment they get to keep.
Best for: Birthday party favors, teacher appreciation gifts, classroom gift exchanges, holiday goodie bags
Difficulty: Incredibly easy – assembly takes about 3 minutes per jar
Time to Make: 10–15 minutes for a batch of 10 jars
What You’ll Need (per jar):
1 wide-mouth mason jar (8 oz or 16 oz both work great)
1 cup cornstarch, poured in first as the base layer
1 small travel-size bottle of plain aloe vera gel (or a pre-measured portion in a small zip-lock bag)
3–4 food coloring packets or small dropper bottles in different colors
A small wooden popsicle stick or craft stick for mixing (place inside the jar)
A square of fabric or decorative paper to cover the lid, secured with a rubber band or twine
A small gift tag with the two-step instructions written on it
How to Assemble It:
1. Start with a clean, dry mason jar. Pour 1 cup of cornstarch into the bottom – it creates a satisfying white powder base that looks beautiful through the glass.
2. Tuck the small aloe vera gel bottle or bag neatly on top of the cornstarch layer so it’s visible through the glass.
3. Add the food coloring packets or mini dropper bottles beside the aloe. Lay the popsicle mixing stick across the top.
4. Place a square of colorful fabric, burlap, or decorative paper over the lid, then screw the band down over it to hold it in place. Alternatively, use a regular lid and wrap the whole jar in clear cellophane tied with ribbon.
5. Write or print a small gift tag that says: “Mix the cornstarch + aloe gel together. Add a drop of color. Knead until smooth. Play!” Punch a hole and tie it to the jar with twine or ribbon.
6. That’s it – stack them in a basket or line them up in a row, and you have the most adorable batch of party favors you’ve ever made.
Pro Tip: For extra wow-factor, layer the cornstarch in two or three shades by mixing a tiny bit of food coloring directly into separate portions of cornstarch before layering – you get a rainbow ombre effect inside the jar before it’s even opened. It looks stunning and makes kids genuinely excited to dig in.
22. DIY Cardboard Box Play Kitchen

If you’ve ever watched a toddler ignore an expensive toy to play with the box it came in, you already know where this is going. A large cardboard box – the kind a washing machine or refrigerator comes in – transforms into a fully kitted-out play kitchen with a little paint, some creative cutting, and a handful of craft supplies. We’re talking a stove with burners, an oven door that opens, a sink cut-out, shelves, and even knobs made from bottle caps. Kids play with these for years. And the total cost? Pretty much zero.
Best for: Toddlers and kids ages 2–7, dramatic play, indoor rainy-day project, budget-friendly gift alternative
Difficulty: Moderate – a great weekend project for parents
Time to Make: 3–4 hours over one weekend
What You’ll Need:
1 large cardboard box (appliance boxes are ideal – ask appliance stores or check Facebook Marketplace/Nextdoor for free ones)
A craft knife or box cutter (adults only)
Acrylic paint in white, grey, or any color – pick a palette that suits your kitchen!
Wide foam paintbrush for base coating
4–6 metal bottle caps or large buttons for stove knobs
Hot glue gun and glue sticks
Black marker or black paint for detail lines
1 round wooden disc or black circle cut from cardboard for each burner (4 total)
A small plastic basin or foil pie dish for the sink cut-out
Brads or paper fasteners for door hinges
Optional: washi tape, contact paper, or decorative paper for backsplash details
How to Make It:
1. Plan your layout first. On the front face of the box (the side that will be the “kitchen front”), lightly sketch in pencil where you want the stove top, oven door, and any shelves or a sink. The stove top sits on the upper surface of the box; the oven door is on the front, roughly centered; a sink cut-out can go on one side of the stove front.
2. Paint the base coat. Paint the entire exterior of the box in your chosen color – white or light grey gives a clean, modern kitchen look; a bold color like teal or red makes it pop in a playroom. Apply two coats, letting each dry fully.
3. Cut the oven door. Have an adult use a craft knife to cut three sides of a rectangle on the front of the box, leaving the bottom edge uncut to act as a hinge. Fold the flap open – that’s your oven door! Reinforce the hinge with a strip of strong tape on the inside. Add a brad on each side to keep the door closed when not in use.
4. Add the burners. Cut four equal circles from black cardboard or use black-painted wooden discs. Hot-glue these flat onto the top surface of the box in a 2×2 arrangement. Draw a small spiral on each in white marker for a realistic coil burner look.
5. Install the sink. Cut a hole in the flat top surface, slightly smaller than your plastic basin or foil pie dish. Press the basin into the hole from the top – it should rest in place on its rim. Add a small strip of aluminum foil bent into a curve as a “faucet” above it.
6. Add the knobs. Hot-glue bottle caps or large buttons onto the front below the stove top area in a row. Mark a small line inside each one with a marker to look like a turn indicator.
7. Finish the details. Use washi tape or strips of decorative contact paper to add a “backsplash” behind the burners. Draw cabinet panel lines, drawer handles, and any other details with a black marker. Add a strip of washi tape around the edges to frame the stove top.
8. Let everything dry completely, then stock it with toy food, plastic utensils, and small pots – and hand the keys to your little chef!
Pro Tip: Search Facebook Marketplace or your local Buy Nothing group for large appliance boxes – they’re almost always listed for free pickup. Refrigerator boxes are particularly good because they’re tall enough to add a double-door refrigerator section on one side of the box while the other side becomes the full kitchen. Two play appliances from one box? Now that’s a Pinterest win.
You’re All Set to Be the Most Pinned Parent on the Block
There you have it 22 genuinely brilliant ideas that are fun to make, practical to use, and guaranteed to get a reaction. Whether you try one this weekend or work your way through the whole list over a season, every single one of these is worth the effort.
The best part? You don’t need to be a craft expert, a professional chef, or a Pinterest power user to pull any of these off. You just need a little time, a few supplies, and the knowledge that your kids are going to absolutely love you for it.
So go ahead – save this post, share it with a fellow parent or teacher who needs some fresh inspiration, and get ready to have some seriously fun memories ahead. Because the best gatherings, the best afternoons, and the best childhoods? They’re made of moments exactly like these.
Now go make something great.
More Kid’s Party Ideas to Keep the Fun Rolling:
The Easiest Math Activity for Preschoolers (All You Need Is a Cardboard Box!)
15 Cup Stacking STEM Challenges That Will Keep Preschoolers Busy for Hours
5 Domino Math Games Kids Actually Want to Play (No Worksheets Required!)
The Coolest Morse Code Activity for Kids (Using Lego!)
The Straw Maze Activity Kids Will Beg to Play Again and Again
7 Fun Hand-Clapping Games Kids and Adults Will Absolutely Love
