
Get ready to transform your space into a lucky wonderland! Whether you’re a teacher prepping your classroom or a parent looking to add some festive charm to your home, these five St. Patrick’s Day projects are ridiculously adorable and surprisingly easy to pull off. No advanced sewing skills required – just a little green fabric and a whole lot of Irish spirit!
1. Felt Four-Leaf Clover (The 3D Showstopper)
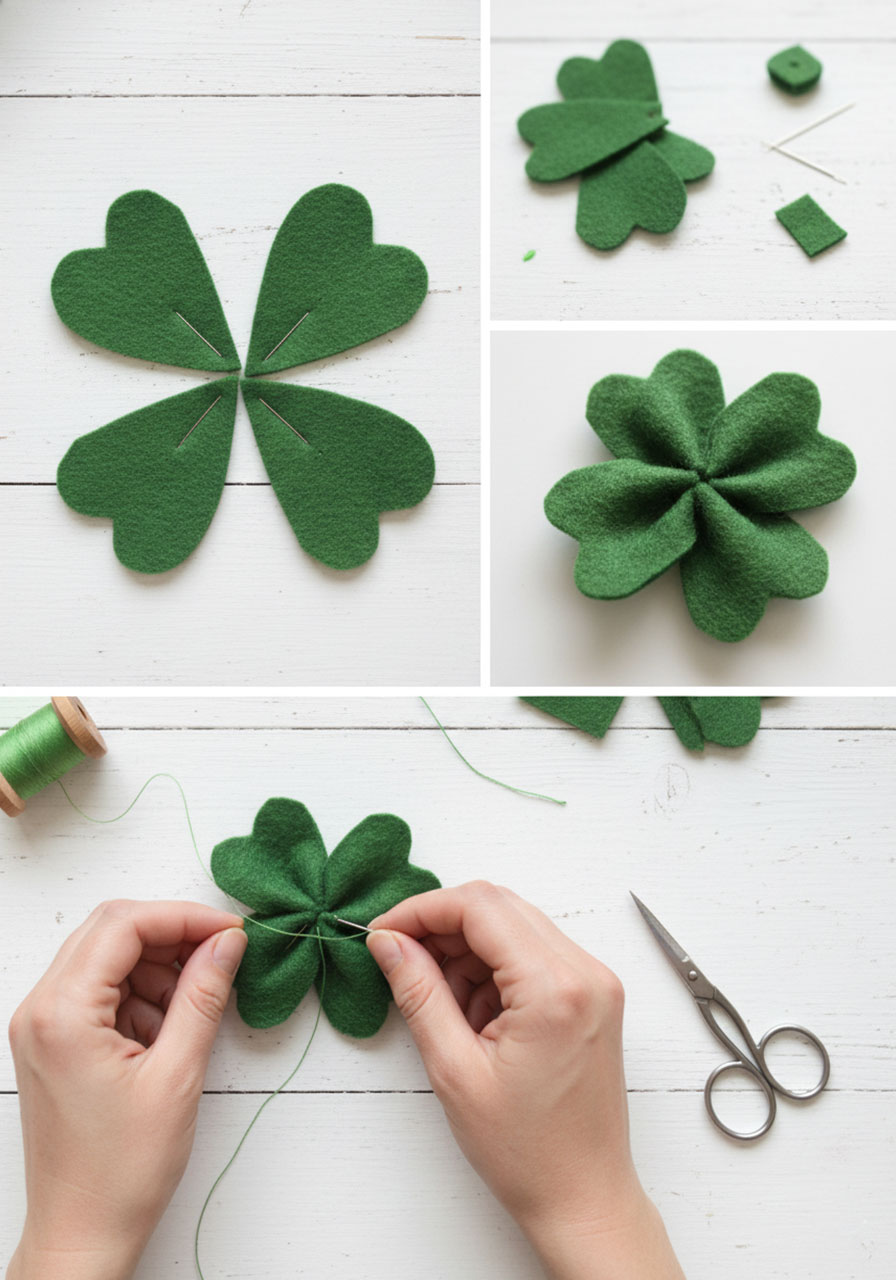
This plush felt clover is hands-down the cutest thing you’ll make this March. The secret? You’re creating four heart-shaped “leaves” and stitching them together at the center to create that perfect 3D pop. Trust me, everyone will ask where you bought it.
Best for: Table decorations, classroom displays, gift toppers
Time to Make: 30-40 minutes
What You’ll Need:
Green felt (the thicker craft felt works best)
Needle and green thread
Scissors
Pins
Optional: A little cotton stuffing for extra puffiness
How to Make It:
1. Cut out four identical heart shapes from your green felt. They should be roughly 3-4 inches tall – think “palm of your hand” size.
2. Fold each heart in half lengthwise (with the point of the heart at the bottom) and stitch along the curved edge, leaving the bottom open. This creates that beautiful curved leaf shape.
3. Arrange your four “leaves” in a cross pattern with all the points meeting in the center.
4. Stitch them together at the center point where they all meet. Use several tight stitches to make sure they’re secure.
5. Gently pull the leaves apart to create that full, 3D clover shape.
Pro Tip: Want to make it extra dimensional? Lightly stuff each heart with a tiny bit of cotton batting before you stitch them together at the center. The result is a clover that practically leaps off the table!

2. “Lucky” Shamrock Pillow (Instant Couch Charm)

Nothing says “festive and cozy” like a throw pillow that makes people smile. This project uses fabric scraps appliquéd onto a plain pillow cover – which means you can absolutely knock this out during naptime or after the kids go to bed.
Best for: Living room decor, classroom reading nooks, teacher gifts
Time to Make: 1-2 hours
What You’ll Need:
Plain cream or white pillow cover (or fabric to make one)
Green fabric scraps in different patterns (3-4 different prints look amazing)
Black fabric or fabric paint for the word “lucky”
Fabric glue or fusible webbing
Sewing machine (or needle and thread if you’re going old-school)
How to Make It:
1. Cut out shamrock shapes from your different green fabrics. Make them various sizes – three shamrocks in different patterns creates visual interest.
2. Arrange them on your pillow cover until you love the composition. Play around with it! There’s no wrong way to do this.
3. Attach the shamrocks using fabric glue or fusible webbing, then stitch around the edges with a zigzag stitch for a finished look. (If you don’t have a machine, a simple running stitch around each shape works perfectly.)
4. Add the word “lucky” in black cursive across the bottom. You can use fabric paint, cut letters from black fabric, or even use iron-on letters from the craft store.
5. Insert your pillow form and admire your handiwork!
Pro Tip: Can’t find a plain pillow cover? Grab a white or cream pillowcase from the dollar store and sew up the open end after you’ve added your shamrocks. Boom – instant pillow cover!
3. Embroidered Four-Leaf Clover (The Elegant Touch)
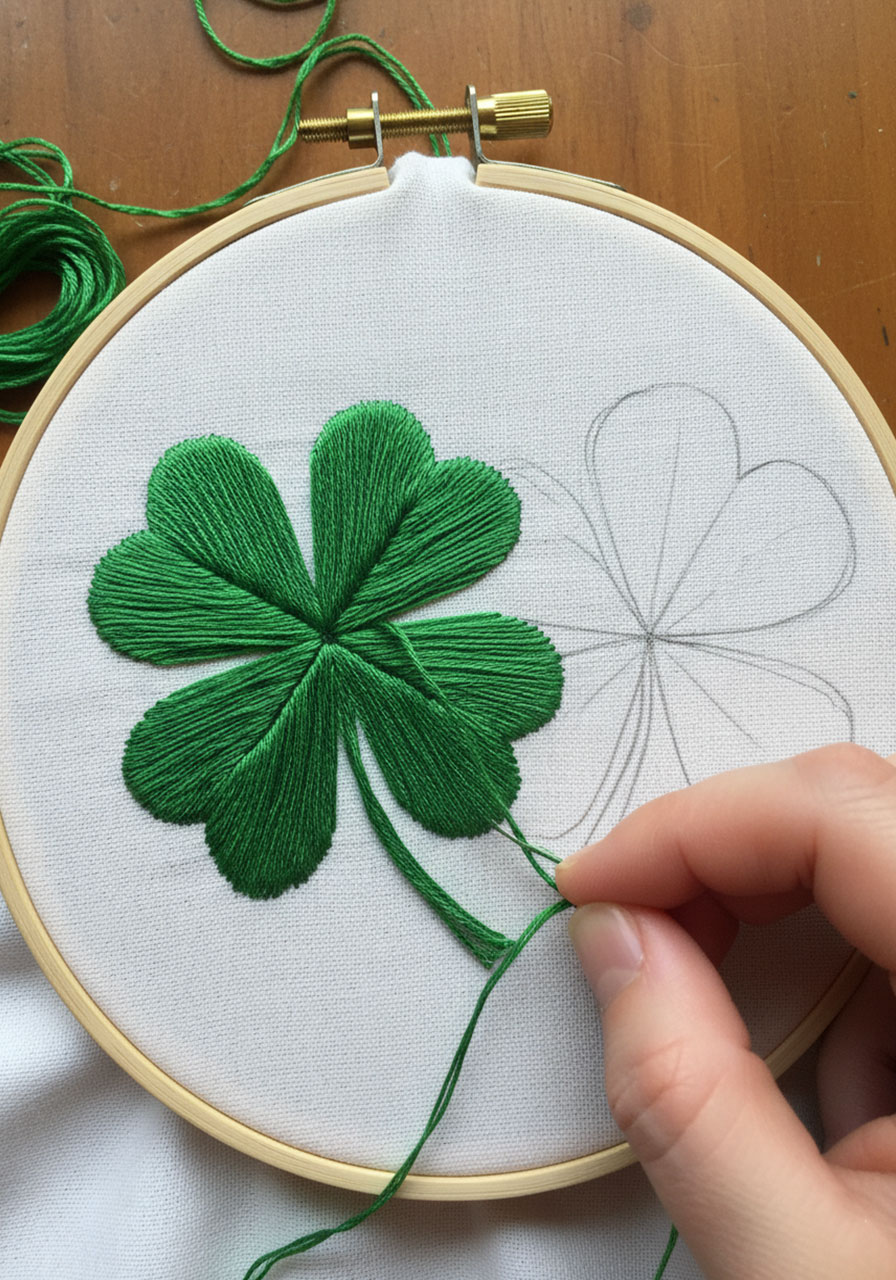
If you want something a little more sophisticated (but still super festive), this embroidered clover is your answer. The satin stitch creates a gorgeous, textured shamrock that looks way more complicated than it actually is. Promise.
Best for: Tea towels, tote bags, table runners, framed art
Time to Make: 45 minutes to 1 hour
What You’ll Need:
White or cream fabric (cotton or linen works beautifully)
Green embroidery floss
Embroidery needle
Embroidery hoop
Fabric pen or pencil
How to Make It:
1. Sketch your four-leaf clover design lightly onto your fabric with a fabric pen. Keep the lines simple – think rounded hearts for each leaf.
2. Secure your fabric in the embroidery hoop nice and tight. This keeps everything smooth while you work.
3. Thread your needle with 2-3 strands of embroidery floss (not all six – that’s too bulky for the satin stitch).
4. Fill in each leaf using the satin stitch. This means making parallel stitches right next to each other, working from one edge of the leaf to the other. Keep your stitches close together for that smooth, satiny finish.
5. Add a stem with a simple backstitch or stem stitch in a slightly darker green.
Pro Tip: New to embroidery? Start with the smallest leaf first. By the time you get to the larger leaves, you’ll have found your rhythm and they’ll look even better!
4. Shamrock-Stamped Banner (Instant Party Vibes)

This banner is basically magic: you’re using a store-bought shamrock stamp (or making your own from a potato – yes, really!) to create a giant clover design that’s made up of dozens of tiny shamrocks. The effect is absolutely stunning, and it’s so easy that your kids or students can help.
Best for: Classroom decorations, party backdrops, front door welcomes
Time to Make: 1 hour (including drying time)
What You’ll Need:
White canvas or heavy cotton fabric cut into a banner shape (think pennant/triangle)
Green fabric paint or acrylic paint
Small shamrock stamp (or a potato cut into a shamrock shape)
Green ribbon or bias tape for the edges
Hot glue or fabric glue
How to Make It:
1. Cut your fabric into a banner/pennant shape. A simple triangle or shield shape works perfectly.
2. Lightly sketch a large shamrock outline on your banner in pencil. This is your guide for where to stamp.
3. Load your stamp with green paint and start stamping tiny shamrocks inside your outline. Overlap them, layer them, fill in that shape completely!
4. Let it dry completely (this is the hardest part because you’ll want to hang it up immediately).
5. Finish the edges by gluing green ribbon or bias tape around the perimeter for a polished look.
6. Add a ribbon loop at the top for hanging.
Pro Tip: Don’t have a shamrock stamp? Cut a potato in half, carve a simple shamrock shape into the flat surface, and use that as your stamp. It works beautifully and the kids will think it’s the coolest thing ever!
5. Striped Tote Bag with Gold Shamrock (The Show-Off Piece)

This black-and-white striped tote with a glittery gold shamrock and fresh flower accents is chef’s kiss. It’s the project you make when you want people to say, “Wait, you MADE that?!” Perfect for teachers, gift-giving, or just treating yourself.
Best for: Teacher appreciation gifts, St. Patrick’s Day parades, everyday totes with festive flair
Time to Make: 1-2 hours
What You’ll Need:
Black-and-white striped fabric (or a plain tote bag you’ll add stripes to)
Gold glitter vinyl or gold fabric
White fabric for the tote base (if making from scratch)
Faux flowers (white hydrangeas look gorgeous)
Hot glue gun
Sewing machine
How to Make It:
1. Create your tote using black-and-white striped fabric for the main body and solid white fabric for the straps. (Or cheat like I do and buy a plain tote, then add fabric-glued stripes!)
2. Cut a shamrock shape from gold glitter vinyl or gold fabric. Make it big enough to be a statement – roughly 4-5 inches across.
3. Attach the shamrock to the center front of your tote using fabric glue or by ironing it on (if using heat-transfer vinyl).
4. Add the flower accents by hot-gluing small clusters of faux flowers near the top of the tote handles. This adds that “designer touch” that takes it from cute to absolutely gorgeous.
Pro Tip: Fresh flowers are beautiful but wilty. Faux flowers last forever and still photograph like a dream for those “look what I made!” social media posts. We see you!
Ready to Get Your Green On?
With these five projects in your crafting arsenal, you’re all set to make this St. Patrick’s Day the cutest one yet. The best part? Each of these projects is totally beginner-friendly, so grab your supplies and dive in. Your classroom, home, or party is about to get a whole lot luckier!
Which project are you making first? We’re betting on that 3D felt clover – it’s just too adorable to resist!
More St. Patrick’s Day Party Ideas to Keep the Fun Rolling:
5 Easy St. Patrick’s Day Crafts That’ll Make You Look Like a Creative Genius (Zero Luck Required!)
Easy Ideas to Host an Epic St. Patrick’s Day Breakfast for Kids
18 Easy and Fun St. Patrick’s Day Activities for Toddlers (No Prep Required!)
15 Easy St. Patrick’s Day Crafts for Kids That Are Actually Fun
Easy Shamrock Suncatcher Craft – A Magical St. Patrick’s Day Activity for Kids
How to Make a DIY St. Patrick’s Day Garland in 7 Easy Steps
Rainbow Pot of Gold Craft: The Ultimate 3D St. Patrick’s Day Project Kids Will Love
Leprechaun Hat Blowers: The Most Fun St. Patrick’s Day Craft Your Kids Will Actually Want to Make
